

Page 1

Model, Modelo, Modèle DF400
USA/Canada 1-800-231-9786
Mexico 01-800-714-2503
www.blackanddecker.com
Accessories/Parts
(USA/Canada) 1-800-738-0245
Accesorios/Partes
(EE.UU/Canadá)
Accessoires/Pièces
(É.-U./Canada)
PLEASE READ AND SAVE THIS USE AND CARE BOOK.
POR FAVOR LEA ESTE INSTRUCTIVO ANTES DE USAR EL PRODUCTO.
VEUILLEZ LIRE ET CONSERVER CE GUIDE D’ENTRETIEN ET D’UTILISATION.
FryMate™ Deep Fryer
Olla de freír FryMate™
Friteuse FryMate
mc
DF400Pub1000002346 10/5/05 2:29 PM Page 1
Page 2

2
1
When using electrical appliances, basic safety precautions should always
be followed, including the following:
❑
Read all instructions.
❑
Do not touch hot surfaces. Use handles and knobs.
❑
To protect against a risk of electric shock, do not immerse the unit,
the cord, or plug in water or other liquid.
❑
Close supervision is necessary when any appliance is used by or near
children.
❑
Unplug from outlet when not in use and before cleaning. Allow to cool
before putting on or taking off parts and before cleaning.
❑
Do not leave the appliance unattended when in use.
❑
Do not operate any appliance with a damaged cord or plug or after the
appliance malfunctions or is dropped or damaged in any manner.
Return the appliance to the nearest authorized service facility for
examination, repair, or electrical or mechanical adjustment. Or, call the
appropriate toll-free number listed on the cover of this manual.
❑
The use of attachments not recommended or sold by the appliance
manufacturer may cause injuries.
❑
Do not use outdoors.
❑
Do not let cord hang over the edge of table or counter or touch hot
surfaces.
❑
Do not place on or near a hot gas or electric burner or in a heated
oven.
❑
Extreme caution must be used when moving an appliance containing
hot oil or other hot liquid.
❑
Always attach plug to appliance first, then plug cord in the wall outlet.
To disconnect, turn any control to off, then remove plug from
wall outlet.
❑
Do not use appliance for other than intended use.
❑
Extreme caution must be used when moving fryer containing hot oil.
❑
Be sure that handles are properly assembled to basket and locked in
place. See detailed assembly instructions.
IMPORTANT SAFEGUARDS
SAVE THESE INSTRUCTIONS.
POLARIZED PLUG
This appliance has a polarized plug (one blade is wider than the other). To reduce
the risk of electric shock, this plug is intended to fit into a polarized outlet only one
way. If the plug does not fit fully into the outlet, reverse the plug. If it still does not
fit, contact a qualified electrician. Do not attempt to modify the plug in any way
ELECTRICAL CORD
a) A short power supply cord (or detachable power-supply cord) is provided to
reduce the risk resulting from becoming entangled in or tripping over a longer
cord.
b) An exension cord or longer detachable power-supply cord is not
recommended.
TAMPER-RESISTANT SCREW
Warning: This appliance is equipped with a tamper-resistant screw to prevent
removal of the outer cover. To reduce the risk of fire or electric shock, do not
attempt to remove the outer cover. There are no user-serviceable parts inside.
Repair should be done only by authorized service personnel.
DF400Pub1000002346 10/5/05 2:29 PM Page 2
Page 3

4
3
†1.Lid with viewing window (Part# DF400-01)
†2.Rubber gasket (Part# DF400-02)
3. Permanent dual filters (under vents)
†4.Nonstick cooking pot (Part# DF400-03)
†5.Frying basket (Part# DF400-04)
6. Temperature control
7. Power/temperature light
8. Lid release (OPEN) lever
9. 99-minute timer digital display
10. Timer button
11. Frying basket handle release switch
†12. Detachable cord (Part# DF400-06)
† Consumer replaceable/removable parts
Product may vary slightly from what is illustrated.
How to Use
This product is for household use only.
Important: For warranty verification, do not remove line cord sticker.
GETTING STARTED
1. Pull up the frying basket handle until it locks horizontally
(A).
2. Press the lid release (OPEN) lever to open the lid (B).
3. Grip the frying basket handle and lift the basket out of the
unit (C).
4. Remove any packing materials and stickers.
5. Grip side handles of the nonstick cooking pot and remove
from the unit (D).
6. Wash the cooking pot and frying basket in warm water and
liquid detergent. Rinse, and dry thoroughly.
7. Replace the cooking pot and frying basket in the unit.
8. Wipe the exterior of the unit including the lid with a damp
sponge or cloth. NEVER IMMERSE THE UNIT IN WATER.
A
B
C
D
DF400Pub1000002346 10/5/05 2:29 PM Page 4
Page 4
Important:
• Always use your fryer on a flat, heat resistant surface.
• Do not use the fryer under cabinets or curtains.
• Never leave it unattended during use.
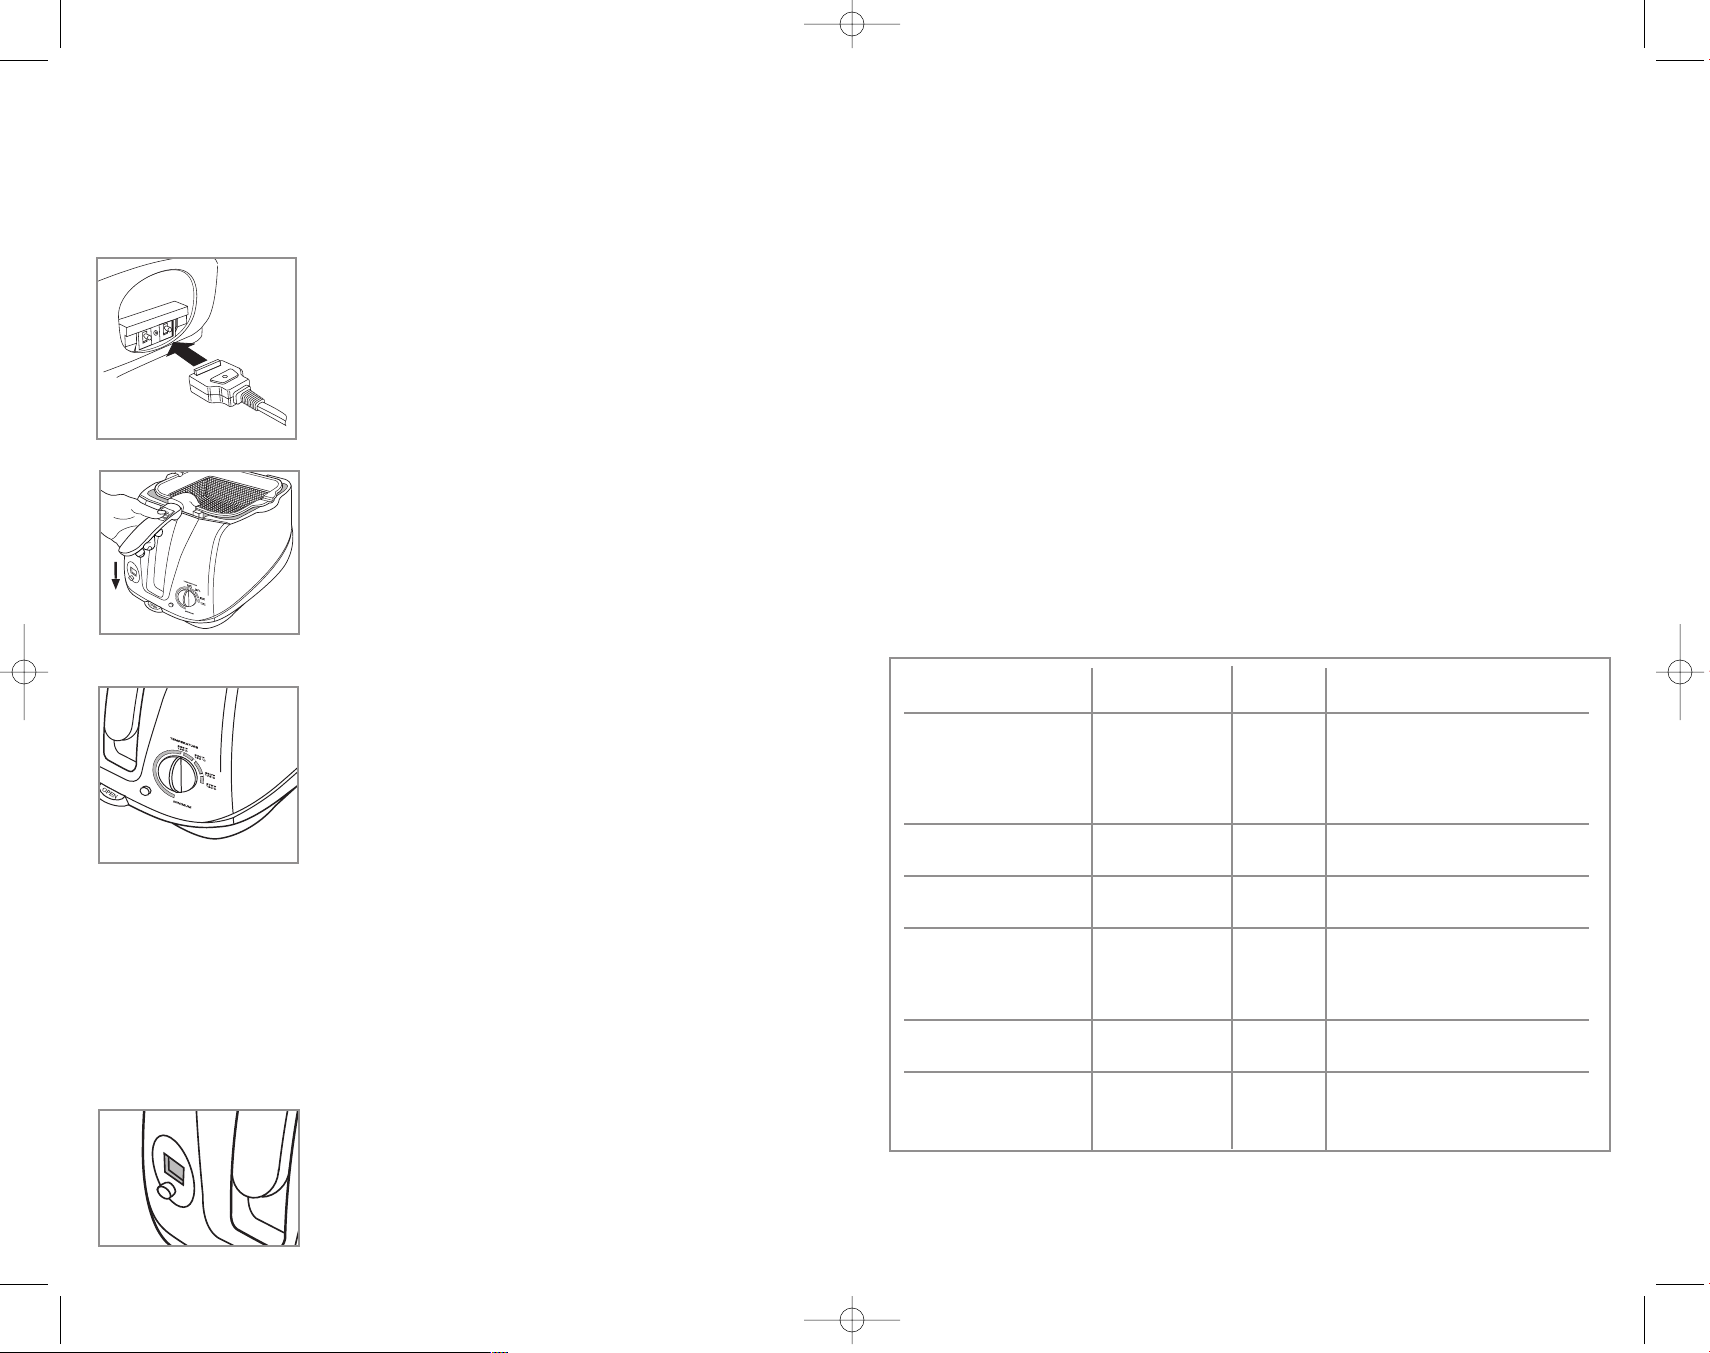
PREHEATING
Note: During first use, you may detect a slight odor. This is normal.
1. Attach the magnetic end of detachable cord into the socket
on the back of the unit (E).
2. Insert the cooking pot into the unit and fill with
approximately 8 cups (2.0 liters) of vegetable cooking oil.
Important:
• Do not use olive, sunflower or flavored oils.
• Do not go below the MIN MARK or exceed the MAX FILL
MARK inside the cooking pot.
3. Insert the empty frying basket into the unit and close the lid.
4. Slide the frying basket handle release switch down to fold
the handle as you lower the frying basket into the oil (F).
5. Plug unit into an electric outlet and turn the temperature
control to the appropriate temperature for your food (G).
The power temperature light will be red.
Important: Never turn on the unit without any oil in the
cooking pot.
• The power/temperature light turns green when the selected
temperature is reached. The light will cycle between green
and red to indicate the unit is operating.
6. To raise the basket pull up the frying basket handle until it locks into place (see A).
Let the frying basket drain a few seconds.
COOKING
1. Press the lid release (OPEN) lever down to open the lid.
2. Place the food to be cooked in the frying basket. DO NOT OVERFILL THE BASKET.
Note: Fry freshly battered foods without the frying basket.
3. Slide the frying basket handle release switch to fold the handle and lower the frying
basket.
4. Close the lid.
5. Cook your food according to Frying Chart or follow your
recipe.
6. Set the timer by pressing the timer button until the desired
time (up to 99 minutes) displays on the digital display (H).
• Once the button is released the timer counts down the minutes until it reaches the last
minute, then it counts down in seconds
• Once the time is up, a beep sounds. One minute later, another beep sounds.
Cooking Tips
• Avoid touching the exterior of the unit during cooking.
• Keep the lid closed while frying; you may peek into the viewing window to check
progress without opening the lid.
• It is normal for steam to appear in the window, but it will clear during cooking if you
keep the window clean after each use.
• Avoid the vent and the seam around the lid during cooking as steam may be hot.
7. When cooking is done, open the lid and pull up the frying basket handle (see B)
to lock in place horizontally.
8. Let the food drain 10-15 seconds.
9. Carefully lift the basket out (be sure not to press the handle release switch) and
empty the food onto a plate covered with paper towels to drain.
10. Replace the frying basket in the unit and close the lid.
11. Lower the frying basket back into the oil to reheat.
12. Let the oil regain the set temperature before frying additional batches of food.
13. When finished, turn the temperature control to the "Minimum" position, and unplug
the unit.
FRYING CHART
6
5
E
F
G
H
Food Temperature Time in Tips
Minutes
Mozzarella 350°F (175 °C) 2-4 Be careful not to stick
Sticks (frozen) with a fork when removing.
3/8" (0.95 cm)
Up to 8 sticks
at a time
Mushrooms, 350°F (175 °C) 2-4 Dip into an egg batter, then in
Single layer seasoned bread crumbs.
Onion Rings (frozen) 375°F (190 °C) 3-5 Fry about 6 oz. at a time.
About 1 cup at a time
Scallops, Fresh Bay, 350°F (175 °C) 2-4 Dip in an egg batter then roll
1/2 lb./227g in seasoned bread crumbs.
Drain on paper towels.
Serve with Tartar sauce.
Shrimp (frozen) 350°F (175 °C) 2-4 Drain well then fry. Serve with
your favorite cocktail sauce.
Zucchini Sticks, 350°F (175 °C) 3-5 Dip into an egg batter then in
single layer seasoned bread crumbs.
DF400Pub1000002346 10/5/05 2:29 PM Page 6
Page 5

8
7
Care and Cleaning
This appliance contains no user serviceable parts. Refer service to qualified service
personnel.
Important: Always unplug the unit and allow it to cool completely before discarding the
oil and cleaning.
STORING OIL
Note: You do not have to change the oil after each use. Oil can be re-used until it gets
dark or there is visible debris (such as batter or bits of food) in it.
1. Unplug unit from wall outlet.
2. Remove magnetic end of power cord from the unit socket.
3. Be sure the oil is completely cool before removing the cooking pot.
4. Store the cooled oil in its original container.
CLEANING
Lid
1. Open the lid and pull straight up to remove it (J).
2. Wash the lid in warm soapy water using a sponge or nylon
pad with liquid detergent.
3. Rinse, and dry thoroughly.
4. To reattach the lid, insert it straight down into the notches
in the unit.
Important: Be sure the lid is securely in place.
Cooking Pot and Frying Basket
1. Wash frying basket in the dishwasher, or wash by hand
with a non-abrasive liquid cleanser using a nylon pad to
remove any remaining oil.
2. Wash cooking pot by hand with a non-abrasive liquid cleanser using a sponge
or nylon pad to remove remaining oil.
• Do not use any abrasive cleaners, coarse cleansers, or metal pads as they may
damage the nonstick coated surface.
• Be careful not to bang the pot as any dents can affect future performance.
3. After washing, dry the cooking pot, frying basket and handle thoroughly.
Note: Over time and repeated use, there may be some fat buildup in the pot and on the
basket. This is normal.
EXTERIOR SURFACES
DO NOT IMMERSE THE UNIT. Wipe it with a damp sponge or cloth and liquid
detergent.
Cuando se utilizan aparatos eléctricos, se debe respetar ciertas medidas de
seguridad, incluyendo las siguientes:
❑
Por favor lea detenidamente todas las instrucciones antes de utilizar
el producto.
❑
No toque las superficies calientes. Utilice las asas o las perillas.
❑
A fin de protegerse contra un choque eléctrico, no sumerja el cable,
el enchufe ni la base del aparato en agua ni en ningún otro líquido.
❑
Se debe tomar mucha precaución cuando el producto se utilice por
o en la presencia de los menores de edad.
❑
Desconecte el aparato de la toma de corriente cuando no esté en uso
y antes de limpiarlo. Espere que el aparato se enfríe antes de instalar
o retirar los accesorios.
❑
No desatienda el aparato mientras éste se encuentre en funcionamiento.
❑
No utilice ningún aparato que tenga el cable o el enchufe estropeado,
que presente problema de funcionamiento o que esté dañado. Devuelva
el producto a un centro de servicio autorizado para que lo revisen,
reparen o ajusten debidamente o llame gratis al número que aparece en
la cubierta de este manual.
❑
El uso de accesorios no recomendados por el fabricante de este aparato
presenta el riesgo de lesiones personales.
❑
No utilice este producto a la intemperie.
❑
No permita que el cable cuelgue del borde de la mesa o del mostrador ni
que entre en contacto con las superficies calientes.
❑
No coloque el aparato sobre ni cerca de una hornilla de gas o eléctrica,
ni adentro de un horno caliente.
❑
Se debe tener mucho cuidado al pasar el aparato de un lugar a otro si
éste contiene alimentos, agua u otros líquidos calientes.
❑
Siempre se debe conectar primero el enchufe al aparato antes de
enchufar el cable a la toma de corriente. Para desconectar el aparato,
ajuste todo control a la posición de apagado (OFF) y luego, desconecte el
aparato de la toma de corriente.
❑
Este aparato se deberá utilizar únicamente con el fin provisto.
❑
Si la olla de freír contiene aceite caliente, ejerza mucha prudencia al
pasarla de un lugar a otro.
❑
Asegúrese de que las asas estén bien instaladas e el cesto de freír y fijas
en su lugar. Consulte detenidamente las instrucciones de montaje.
J
INSTRUCCIONES IMPORTANTES
DE SEGURIDAD
GUARDE ESTAS INSTRUCCIONES.
DF400Pub1000002346 10/5/05 2:29 PM Page 8
Page 6

10
9
Este producto puede variar ligeramente del que aparece ilustrado.
ENCHUFE POLARIZADO (Sólo en los modelos de Estados Unidos)
Este aparato cuenta con un enchufe polarizado (un contacto es más ancho que el
otro). A fin de reducir el riesgo de un choque eléctrico, este enchufe encaja en una
toma de corriente polarizada en un solo sentido. Si el enchufe no entra en la toma
de corriente, inviértalo y si aun así no encaja, consulte con un electricista. Por favor
no trate de alterar esta medida de seguridad.
EL CABLE DE ALIMENTACIÓN/ELÉCTRICO
a) El producto debe proporcionarse con un cable corto (o desmontable) para
reducir el riesgo de enredarse o de tropezar con un cable largo.
b) No es recomendado utilizar un cable de extensión o uno desmontable más
largo.
TORNILLO DE SEGURIDAD
Advertencia: Este aparato cuenta con un tornillo de seguridad para evitar la
remoción de la cubierta exterior del mismo. A fin de reducir el riesgo de incendio
o de choque eléctrico, por favor no trate de remover la cubierta exterior. Este
producto no contiene piezas reparables por el consumidor. Toda reparación se
debe llevar a cabo únicamente por personal de servicio autorizado.
†1.Tapa con ventanilla transparente (Pieza Nº DF400-01)
†2.Junta de goma (Pieza Nº DF400-02)
3. Dos filtros permanentes (debajo de los orificios)
†4.Olla antiadherente para cocinar (Pieza Nº DF400-03)
†5.Cesto de freír (Pieza Nº DF400-04)
6. Control de temperatura
7. Luz indicadora de funcionamiento/temperatura
8. Palanca de abrir (OPEN) para desprender la tapa
9. Cronómetro de 99 minutos
10. Botón de cronometraje
11. Desenganche del cesto de freír
†12. Cable separable (Pieza Nº DF400-06)
† Reemplazable/removible por el consumidor
DF400Pub1000002346 10/5/05 2:29 PM Page 10
Page 7

12
11
Importante:
•
Siempre coloque la olla de freír sobre una superficie plana, resistente al calor.
•
No utilice la olla de freír debajo de las cortinas ni de los gabinetes de la
cocina.
•
Jamás desatienda la olla de freír.
PRECALENTAMIENTO
Nota: Durante el primer uso del aparato se podría detectar un ligero olor.
Esto es normal.
1.
Conecte el extremo magnético del cable separable en
el enchufe de la parte trasera del aparato (E).
2.
Inserte la olla de cocinar en el aparato y vierta
aproximadamente 8 tazas (2.0 litros) de aceite vegetal
para cocinar.
Importante:
•
No utilice aceite de oliva, de girasol, ni aceites
condimentados.
•
Uno no debe de llenar la olla por debajo del nivel MIN ni exceder el nivel
MAX marcados adentro de la olla.
3.
Inserte el cesto de freír vacío en el aparato y cierre la tapa.
4.
Deslice el desenganche del mango para asimismo
doblar el mango a medida que introduce el cesto
de freír en el aceite (F).
5.
Enchufe el aparato a una toma de corriente y ajuste el
control de temperatura según los alimentos que desea
preparar (G). La luz de temperatura sera roja.
Importante: Jamás encienda el aparato si la olla no
contiene aceite.
•
La luz indicadora de funcionamiento/temperatura se
torna verde y brilla intermitentemente, cuando llega a la
temperatura selecta. Para indicar que funciona cambia
entre roja y verde.
6. Para elevar el cesto,
alce el mango del cesto de freír hasta encajar
horizontalmente (ver A). Permita escurrir unos segundos.
PREPARACIÓN DE ALIMENTOS
1.
Presione la palanca de desenganche de la tapa (OPEN) para abrir la misma.
2.
Coloque los alimentos que desea preparar adentro del cesto de freír. NO
LLENE EL CESTO DEMASIADO.
Nota: Se recomienda freír los alimentos acabados de rebozar sin el cesto de freír.
3.
Deslice el desenganche del mango para doblar el mango y poder bajar el cesto
de freír.
4.
Cierre la tapa.
5.
Prepare los alimentos según la guía de freír o según las recetas.
Como usar
Este producto es para uso doméstico solamente.
Importante: Para verificación de la garantía, por favor no retire la etiqueta del
cable eléctrico.
PASOS PRELIMINARES
1.
Hale hacia arriba el mango del cesto de freír hasta
encajar (A).
2.
Presione la palanca de abrir (OPEN), a fin de abrir la
tapa (B).
3.
Sujete el mango del cesto de freír y retire el cesto del
aparato (C).
4.
Retire toda calcomanía y material de empaque.
5.
Sujete la olla antiadherente de cocinar por las asas
laterales y retírela del aparato (D).
6.
Lave la olla y el cesto de freír con agua tibia y
detergente líquido. Enjuague y seque bien.
7.
Instale la olla de cocinar y el cesto de freír nuevamente
en el aparato.
8.
Limpie el exterior del aparato y la tapa con un paño o
esponja humedecida. JAMÁS SUMERJA EL APARATO
EN AGUA.
A
B
C
D
E
F
G
DF400Pub1000002346 10/5/05 2:29 PM Page 12
Page 8

14
13
6.
Para ajustar el tiempo, presione el botón del
cronómetro hasta aparecer el tiempo deseado (máximo
de 99 minutos) en la pantalla digital (H).
•
El cronómetro descuenta los minutos hasta alcanzar el
último minuto y después descuenta los segundos.
•
Al finalizar el ciclo programado, el aparato produce un
sonido y después de un minuto, produce otro.
Consejos al cocinar
•
Al cocinar. evite el contacto con el exterior de la olla.
•
Mantenga la tapa cerrada al freír los alimentos; uno puede supervisar los
alimentos a través de la ventana sin tener que alzar la tapa.
•
Al cocinar, la acumulación de vapor en la ventana es normal y desaparece
siempre que uno limpie la ventana después de cada uso.
•
Debido al vapor que emite la olla, evite el contacto con los bordes de la tapa.
7.
Al finalizar el ciclo de cocción, abra la tapa y eleve el mango del cesto
de freír (ver B) hasta encajar horizontalmente.
8.
Permita que los alimentos se escurran de 10 a15 segundos.
9.
Retire el cesto de freír con mucho cuidado (asegúrese de no presionar
el desenganche del mango) y vacie los alimentos en un plato cubierto
con papel de toalla.
10.
Coloque el cesto nuevamente en el aparato y cierre la tapa.
11.
Sumerja el cesto nuevamente en el aceite.
12.
Permita que el aceite alcance nuevamente la temperatura programada
antes de agregar los alimentos restantes.
13.
Al terminar, ajuste el control de temperatura a la posición mínima
y desenchufla.
GUÍA DE FREÍR
Cuidado y limpieza
El aparato no contiene piezas reemplazables por el consumidor. Para servicio, por favor
acuda a personal de asistencia calificado.
Importante: Siempre desconecte el aparato y permita que se enfríe bien antes de
desechar el aceite o antes de limpiar.
PARA CONSERVAR EL ACEITE
Nota: No es necesario cambiar el aceite después de cada uso. Uno puede utilizar el
mismo aceite repetidas veces hasta ponerse oscuro o acumular residuos de alimentos
fritos anteriormente.
1. Desconecte el aparato de la toma de corriente.
2. Desconecte el extremo magnético del cable enchufado al aparato.
3. Asegúrese de que el aceite se haya enfriado por completo antes de retirar la olla
de freír.
4. Una vez enfriado, uno puede conservar el aceite en el envase original.
LIMPIEZA
Tapa
1. Abra la tapa y levante derecho hacia arriba a fin de retirarla
(J).
2. Lave la tapa en agua tibia y detergente líquido con una
esponja o con una almohadilla de nailon.
3. Enjuague y seque bien.
4. Para enganchar la tapa nuevamente, insértela derecho hacia
abajo en las ranuras del aparato.
Importante: Asegúrese de que la tapa encaje bien en su lugar
Olla de cocinar y cesto de freír
1. Lave el cesto de freír en la máquina lavaplatos o a mano
con un detergente líquido no abrasivo. Utilice una
almohadilla de nailon para eliminar cualquier residuo
de aceite.
2. Lave la olla de cocinar a mano con un detergente líquido no abrasivo. Utilice una
esponja o una almohadilla de nailon para eliminar cualquier residuo de aceite.
•A fin de no dañar el acabado de las superficies con recubrimiento antiadherente,
no utilice limpiadores abrasivos ni almohadillas de fibras ásperas ni de metal.
• Tenga cuidado de no golpear la olla; las abolladuras podrían afectar el futuro
rendimiento del aparato.
3. Después de lavar, asegúrese de secar bien la olla de cocinar, el cesto de freír
y el mango.
Nota: Con el tiempo y después del uso repetido, es normal que se acumule grasa
en la olla y en el cesto de freír.
SUPERFICIES EXTERIORES
NO SUMERJA EL APARATO. Limpie con una esponja o con un paño y detergente
líquido.
H
Alimento Temperatura Tiempo en Consejos
minutos
Dedos de queso 350°F (175 °C) 2 a 4 Cuidado de no pinchar con un
Mozzarella (congelados) tenedor al retirarlos.
0,95 cm (3/8")
Hasta 8 a la vez
Champiñones, 350°F (175 °C) 2 a 4 Rebozar en mezcla de huevo
capa sencilla y después en migajas de pan
Aros de cebolla 375°F (190 °C) 3 a 5 Freír aprox. 6 oz. a la vez.
(congelados)
Aprox. 1 taza a la vez
Escalopes, frescos 350°F (175 °C) 2 a 4 Rebozar en mezcla de huevo
de bahía 227g/1/2 lb y después en migajas de pan.
Escurrir en papel de toalla
y servir con crema tártara.
Camarones 350°F (175 °C) 2 a 4 Escurrir bien y freír. Servir con
(congelados) su salsa de coctel predilecta.
Dedos de zucchini, 350°F (175 °C) 3 a 5 Rebozar en mezcla de huevo
capa sencilla y después en migajas de pan.
J
DF400Pub1000002346 10/5/05 2:29 PM Page 14
Page 9

16
15
Lorsqu’on utilise un appareil électrique, il faut toujours respecter certaines
règles de sécurité fondamentales, notamment les suivantes.
❑
Lire toutes les directives.
❑
Ne pas toucher aux surfaces chaudes. Utiliser les poignées et les
boutons.
❑
Afin d’éviter de secousses électriques, ne pas immerger le cordon, la
fiche ni l’appareil.
❑
Exercer une étroite surveillance lorsqu’on utilise l’appareil près d’un
enfant ou que ce dernier s’en sert.
❑
Débrancher l’appareil lorsqu’on ne s’en sert pas, avant de le nettoyer
et avant d’en enlever ou d’en installer des composantes.
❑
Ne pas laisser l’appareil sans surveillance lorsqu’il fonctionne.
❑
Ne pas utiliser un appareil dont la fiche ou le cordon est abîmé, qui
présente un problème de fonctionnement, qui est tombé ou qui est
endommagé. Confier l'examen, la réparation ou le réglage de l'appareil
au personnel du centre de service autorisé de la région. Ou composer
le numéro sans frais approprié indiqué sur la page couverture du présent
guide.
❑
L’utilisation d’accessoires non recommandés ni vendus par le fabricant
de l’appareil présente des risques de blessures.
❑
Ne pas utiliser à l’extérieur.
❑
Ne pas laisser pendre le cordon d’une table ou d’un comptoir, ni le
laisser entrer en contact avec une surface chaude.
❑
Ne pas placer près ou sur une cuisinière au gaz ou à l’électricité chaude,
ni dans un four réchauffé.
❑
Déplacer avec une extrême prudence un appareil renfermant de l'huile
chaude ou tout autre liquide chaud.
❑
Toujours brancher le cordon dans l’appareil d’abord, puis brancher
le cordon dans la prise murale. Pour débrancher, mettre toutes les
commandes à la position hors tension (OFF), puis retirer le cordon
de la prise murale.
❑
Utiliser l’appareil seulement aux fin auxquelles il est prévu.
❑
Faire preuve d’une extrême prudence lorsqu’on déplace l’appareil
renfermant de l’huile chaude.
❑
S’assurer que les poignées sont bien fixées au panier et verrouillées
en place. Consulter les directives d’assemblage détaillées.
IMPORTANTES MISES EN GARDE
FICHE POLARISÉE (Modèles des É.-U. seulement)
L'appareil est muni d'une fiche polarisée (une lame plus large que l'autre). Afin de
minimiser les risques de secousses électriques, ce genre de fiche n'entre que d'une
façon dans une prise polarisée. Lorsqu'on ne peut insérer la fiche à fond dans la prise,
il faut tenter de le faire après avoir inversé les lames de côté. Si la fiche n'entre toujours
pas dans la prise, il faut communiquer avec un électricien certifié. Il ne faut pas tenter
de modifier la fiche.
CORDON
a) Le cordon d’alimentation (ou le cordon d'alimentation amovible) de l’appareil
est court afin de minimiser les risques d’enchevêtrement ou de trébuchement.
b) Il est déconseillé d’utiliser un cordon de rallonge ou un cordon d’alimentation
amovible plus long.
VIS INDESSERRABLE
Avertissement : L’appareil est doté d’une vis indesserrable empêchant
l’enlèvement du couvercle extérieur. Pour réduire les risques d’incendie ou de
secousses électriques, ne pas tenter de retirer le couvercle extérieur.
L’utilisateur ne peut pas remplacer les pièces de l’appareil. En confier la
réparation seulement au personnel des centres de service autorisés.
CONSERVER CES INSTRUCTIONS.
DF400Pub1000002346 10/5/05 2:29 PM Page 16
Page 10

18
17
Utilisation
L'appareil est conçu pour une utilisation domestique seulement.
Important : Afin de pouvoir en vérifier la garantie, ne pas retirer l’étiquette du cordon
d’alimentation.
PRÉPARATIFS
1.
Soulever la poignée du panier de friture jusqu’à ce qu’elle
s’enclenche à l’horizontale (A).
2.
Appuyer sur le levier de dégagement (OPEN) pour ouvrir
le couvercle (B).
3.
Saisir la poignée et soulever le panier hors de l’appareil
(C).
4.
Retirer les matériaux d’emballage et les autocollants.
5.
Saisir les poignées latérales de la cuve à revêtement
antiadhésif et la sortir de l’appareil (D).
6.
Laver la cuve de cuisson et le panier de friture dans de
l’eau chaude savonneuse. Rincer et bien assécher.
7.
Remettre la cuve et le panier dans l’appareil.
8.
Essuyer l’extérieur de l’appareil, y compris le couvercle,
avec un chiffon ou une éponge humide. NE JAMAIS
PLONGER L’APPAREIL DANS L’EAU.
Le produit peut différer légèrement de celui illustré.
†1.Couvercle avec hublot d’observation (Pièce n° DF400-01)
†2.Joint d’étanchéité en caoutchouc (Pièce n° DF400-02)
3. Deux filtres permanents (sous les évents)
†4.Cuve de cuisson à revêtement antiadhésif (Pièce n° DF400-03)
†5.Panier de friture (Pièce n° DF400-04)
6. Sélecteur de température
7. Témoin de fonctionnement et de température
8. Levier de dégagement du couvercle (OPEN)
9. Affichage numérique de la minuterie de 99 minutes
10. Bouton de la minuterie
11. Bouton de dégagement de la poignée du panier de friture
†13. Cordon amovible (Pièce n° DF400-06)
† Pièce amovible e remplaçable par le consommateur
A
B
C
D
DF400Pub1000002346 10/5/05 2:29 PM Page 18
Page 11

20
19
Important :
• Toujours se servir de l’appareil sur une surface plane résistant à la chaleur.
• Ne pas utiliser la friteuse sous des armoires ni des rideaux.
• Ne jamais laisser l’appareil en service sans surveillance.
RÉCHAUFFAGE
Note : Lors de la première utilisation, l’appareil peut dégager une légère odeur; il s’agit
d’une situation normale.
1. Fixer l’extrémité magnétique du cordon d’alimentation dans
la douille à l’arrière de l’appareil (E).
2. Placer la cuve dans l’appareil et la remplir avec environ
2 l (8 t) d’huile végétale.
Important :
• Ne pas utiliser d’huile d’olive, d’huile de tournesol ni
d’huiles arômatisées.
• Verser de l’huile au-delà de la marque MIN et en deçà de la marque MAX (à
l’intérieur de la cuve).
3. Placer le panier dans l’appareil et fermer le couvercle.
4. Faire glisser le bouton de dégagement de la poignée vers le
bas afin de plier cette dernière alors qu’on abaisse le panier
dans l’huile (F).
5. Brancher l’appareil dans une prise électrique et placer le
sélecteur à la température appropriée à la cuisson de
l’aliment (G). Le témoin de fonctionnement et de
température devient rouge.
Important : Ne jamais mettre l’appareil en marche sans huile
dans la cuve.
• Le témoin de fonctionnement et de température devient vert lorsque la température
choisie est atteinte. Le témoin passe du vert au rouge indiquant que l’appareil est en
service.
6. Et soulever le panier soulever la poignée pour la verrouiller à l’horizontale (A). Laisser
le panier égoutter pendant quelques secondes.
CUISSON
1. Appuyer sur le levier de dégagement (OPEN) pour ouvrir le couvercle.
2. Déposer l’aliment à frire dans le panier. ÉVITER DE TROP REMPLIR LE PANIER.
Note : Faire frire des aliments fraîchement panés sans le panier.
3. Faire glisser le bouton de dégagement de la poignée afin de plier cette dernière et
abaisser le panier dans l’huile.
4. Fermer le couvercle.
5. Faire cuire l’aliment selon les directives du tableau de friture ou la recette choisie.
6. Régler la minuterie en appuyant sur le bouton jusqu’à
l’affichage de la durée voulue (jusqu’à 99 minutes) (H).
• Lorsqu’on relâche le bouton, le compte à rebours se fait en
minutes jusqu’à la dernière minute, où il se fait à la seconde.
• Lorsque la durée est écoulée, un timbre sonore se fait
entendre, puis un autre timbre est émis après environ une
minute.
Conseils relatifs à la cuisson
• Éviter de toucher à l’extérieur de l’appareil pendant la cuisson.
• Laisser le couvercle fermé pendant la friture. On peut surveiller les progrès de la
cuisson par le hublot d’observation sans avoir à ouvrir le couvercle.
• Il se peut que de la buée se forme à l’intérieur du hublot mais elle se dissipera
pendant la cuisson si on nettoie le hublot après chaque utilisation.
• Éviter l’évent et le joint autour du couvercle pendant la cuisson car la vapeur peut être
brûlante.
7. À la fin de la cuisson, ouvrir le couvercle et soulever la poignée du panier de friture
(B) pour la verrouiller à l’horizontale.
8. Laisser l’aliment égoutter de 10 à 15 secondes.
9. Soulever soigneusement le panier hors de l’appareil (s’assurer de ne pas toucher
au levier de dégagement de la poignée) et verser l’aliment dans une assiette garnie
d’essuie-tout pour le laisser égoutter.
10. Remettre le panier dans l’appareil et refermer le couvercle.
11. Abaisser le panier dans l’huile pour le réchauffer.
12. Attendre que la température déterminée de l’huile soit atteinte avant de frire
d’autres aliments.
13. À la fin de la cuisson, déplacer le sélecteur de température à la position « Minimum
» et débrancher l’appareil.
TABLEAU DE FRITURE
E
F
G
H
Aliment Température Durée en Conseils pratiques
minutes
Bâtonnets de 350°F (175 °C) De 2 à 4 Prendre soin de ne pas
mozzarella (surgelés) percer avec une fourchette
0,95 cm (3/8 po) lorsqu’on les retire.
Un maximum de
8 bâtonnets à la fois
Champignons, une 350°F (175 °C) De 2 à 4 Tremper dans un mélange
seule couche d’œufs, puis passer dans de la
chapelure assaisonnée
Rondelles d’oignons 375°F (190 °C) De 3 à 5 Faire frire environ 190 ml (6 oz)
(surgelées) Environ à la fois.
250 ml (1 t) à la fois
Pétoncles, petites et 350°F (175 °C) De 2 à 4 Tremper dans un mélange
fraîches, 227 g (1/2 lb) d’œufs, puis passer dans de la
chapelure assaisonnée. Égoutter
sur des essuie-tout. Servir avec
de la sauce tartare.
DF400Pub1000002346 10/5/05 2:29 PM Page 20
Page 12

22
21
Aliment Température Durée en Conseils pratiques
minutes
Crevettes 350°F (175 °C) De 2 à 4 Bien égoutter, puis faire frire.
(surgelées) Servir avec sa sauce préférée
Bâtonnets de zucchini, 350°F (175 °C) De 3 à 5 Tremper dans un mélange
une seule couche d’œufs, puis passer dans
de la chapelure assaisonnée.
Entretien et nettoyage
L’utilisateur ne peut entretenir aucune pièce de l’appareil. En confier l’entretien à du
personnel qualifié.
Important : Toujours débrancher l’appareil et le laisser refroidir complètement avant de
jeter l’huile et de nettoyer l’appareil.
RANGEMENT DE L’HUILE
Note : Il n’est pas nécessaire de remplacer l’huile après chaque utilisation. On peut la
réutiliser jusqu’à ce qu’elle devienne foncée ou qu’on y voit des débris (comme de la
panure ou des morceaux d’aliments).
1. Débrancher l’appareil de la prise murale.
2. Retirer l’extrémité magnétique du cordon d’alimentation de la douille de l’appareil.
3. S’assurer que l’huile est complètement refroidie avant de retirer la cuve de cuisson.
4. Ranger l’huile refroidie dans son contenant original.
NETTOYAGE
Couvercle
1. Ouvrir le couvercle et le tirer vers le haut pour le retirer (J).
2. Laver le couvercle dans de l’eau chaude savonneuse à
l’aide d’une éponge ou d’un tampon à récurer en nylon.
3. Rincer et bien assécher.
4. Pour remettre le couvercle en place, l’insérer tout droit vers
le bas dans les encoches à cet effet de l’appareil.
Important : S’assurer que le couvercle est bien en place.
Cuve de cuisson et panier de friture
1. Laver le panier dans le lave-vaisselle ou le laver à la main à
l’aide d’un détergent liquide non abrasif et d’un tampon à
récurer en nylon pour enlever toute trace d’huile
2. Laver la cuve de cuisson à la main à l’aide d’un détergent liquide non abrasif et d’une
éponge ou d’un tampon à récurer en nylon pour enlever toute trace d’huile
• Ne pas utiliser de produits nettoyants abrasifs ou puissants, ni de tampons à récurer
métalliques car ceux-ci pourraient endommager le revêtement antiadhésif.
• Prendre soin de ne pas donner de coup à la cuve car des bosselures pourraient nuire
à son rendement
J
3. Après le lavage, bien assécher la cuve de cuisson, le panier de friture et la poignée
du panier.
Note : À la longue, il peut y avoir accumulation de gras dans la cuve et sur le panier;
il s’agit d’une situation normale.
SURFACES EXTÉRIEURES
NE PAS IMMERGER L’APPAREIL. L’essuyer avec un chiffon ou une éponge humide
et du détergent liquide.
DF400Pub1000002346 10/5/05 2:29 PM Page 22
Page 13

¿Cómo se puede obtener servicio?
• Conserve el recibo original de compra.
• Por favor llame al número del centro de servicio autorizado.
Esta garantía no
cubre:
• Los productos que han sido utilizados en condiciones distintas a las normales
• Los daños ocasionados por el mal uso, el abuso o negligencia.
• Los productos que han sido alterados de alguna manera
• Los daños ocasionados por el uso comercial del producto
• Los productos utilizados o reparados fuera del país original de compra
• Las piezas de vidrio y demás accesorios empacados con el aparato
• Los gastos de tramitación y embarque asociados al reemplazo del producto
• Los daños y perjuicios indirectos o incidentales.
BESOIN D’AIDE?
Pour communiquer avec les services d’entretien ou de réparation, ou pour adresser
toute question relative au produit, composer le numéro sans frais approprié indiqué
sur la page couverture. Ne pas retourner le produit où il a été acheté. Ne pas poster
le produit au fabricant ni le porter dans un centre de service. On peut également
consulter le site web indiqué sur la page couverture.
Garantie limitée de un an
(Valable seulement aux États-Unis et au Canada)
Quelle est la couverture?
• Tout défaut de main-d’oeuvre ou de matériau; toutefois, la responsabilité de la
société Applica se limite au prix d’achat du produit.
Quelle est la durée?
• Un an après l’achat original.
Quelle aide offrons nous?
• Remplacement par un produit raisonnablement semblable nouveau ou réusiné.
Comment se prévaut-on du service?
• Conserver son reçu de caisse comme preuve de la date d’achat.
• Visiter notre site web au www.prodprotect.com/applica, ou composer sans frais
le 1 800 231-9786, pour obtenir des renseignements généraux relatifs à la garantie.
• On peut également communiquer avec le service des pièces et des accessoires
au 1 800 738-0245.
Qu’est-ce que la garantie ne couvre pas?
• Des dommages dus à une utilisation commerciale.
• Des dommages causés par une mauvaise utilisation ou de la négligence.
• Des produits qui ont été modifiés.
• Des produits utilisés ou entretenus hors du pays où ils ont été achetés.
• Des pièces en verre et tout autre accessoire emballés avec le produit.
• Les frais de transport et de manutention reliés au remplacement
du produit.
• Des dommages indirects (il faut toutefois prendre note que certains états ne
permettent pas l’exclusion ni la limitation des dommages indirects).
24
23
NEED HELP?
For service, repair or any questions regarding your appliance, call the appropriate
"800" number on the cover of this book. Do not return the product to the place of
purchase. Do not mail the product back to the manufacturer nor bring it to a service
center. You may also want to consult the website listed on the cover of this manual.
One-Year Limited Warranty
(Applies only in the United States and Canada)
What does it cover?
• Any defect in material or workmanship; provided; however, Applica’s liability will
not exceed the purchase price of the product.
For how long?
• One year after the date of original purchase.
What will we do to help you?
• Provide you with a reasonably similar replacement product that is either new or
factory refurbished.
How do you get service?
• Save your receipt as proof of the date of sale.
• Check our on-line service site at www.prodprotect.com/applica, or call our toll-free
number, 1-800-231-9786, for general warranty service.
• If you need parts or accessories, please call 1-800-738-0245.
What does your warranty not cover?
• Damage from commercial use
• Damage from misuse, abuse or neglect
• Products that have been modified in any way
• Products used or serviced outside the country of purchase
• Glass parts and other accessory items that are packed with the unit
• Shipping and handling costs associated with the replacement of the unit
• Consequential or incidental damages (Please note, however, that some states do not
allow the exclusion or limitation of consequential or incidental damages, so this
limitation may not apply to you.)
How does state law relate to this warranty?
• This warranty gives you specific legal rights, and you may also have other rights that
vary from state to state or province to province.
¿NECESITA AYUDA?
Para servicio, reparaciones o preguntas relacionadas al producto, por favor llame al
número del centro de servicio en el país donde usted compró su producto. NO
devuelva el producto al fabricante. Llame o lleve el producto a un centro de servicio
autorizado.
DOS AÑOS DE GARANTÍA LIMITADA
(No aplica en México, Estados Unidos o Canadá)
¿Qué cubre la garantía?
• La garantía cubre cualquier defecto de materiales o de mano de obra. Applica no se
responsabiliza por ningún costo que exceda el valor de compra del producto.
¿Por cuánto tiempo es válida la garantía?
• Por dos años a partir de la fecha original de compra.
DF400Pub1000002346 10/5/05 2:29 PM Page 24
Page 14

Argentina
Servicio Técnico Central
Service New S.R.L.
Atención al Cliente
Ruiz Huidobro 3860
Buenos Aires, Argentina
Tel.: (54-11) 4546-1212
Chile
Servicio Máquinas y
Herramientas Ltda.
Av. Apoquindo No. 4867 Las Condes
Santiago, Chile
Tel.: (562) 263-2490
Colombia
PLINARES
Avenida Ciudad de Quito
#88-09
Bogotá, Colombia
Tel.: (57-1) 610-1604/533-4680
Costa Rica
Aplicaciones Electromecanicas,
S.A.
Calle 26 Bis y Ave. 3
San Jose, Costa Rica
Tel.: (506) 257-5716/223-0136
Ecuador
Castelcorp
Km 2-1/2 Avenida Juan T.
Marengo junto Dicentro
Guayaquil, Ecuador
Tel.: (5934) 224-7878/2241767
El Salvador
Sedeblack Calle A San Antonio
Abad y Av. Lisboa, Edif. Lisboa
Local #21
San Salvador, El Salvador
Tel.: (503) 274-1179/274-0279
Guatemala
MacPartes, S.A.
34 Calle 4-14 Zona 9
Frente a Tecun
Guatemala City, Guatemala
Tel.: (502) 331-5020
360-0521
Honduras
Lady Lee
Centro Comercial Mega Plaza
Carretera a la Lima
San Pedro Sula, Honduras
Tel.: (504) 553-1612
México
Art. 123 y José Ma. Marroquí
#28-D
Centro.
Mexico D.F.
Tel.: 01 (800) 714-2499
(55) 1106-1400
Nicaragua
H & L Electronic
Zumen 3, C. Arriba
y 15 Varas al Sur
Managua, Nicaragua
Tel.: (505) 260-3262
Panamá
Authorized Service Center
Electrodomésticos, S.A.
Boulevard El Dorado, al lado
del Parque de las Mercedes
Panamá, Panamá
Tel.: (507) 236-5404
Perú
AV. REPUBLICA DE PANAMA
3535
Ofic 1303
San Isidro
Lima, Peru
Tel.: 2 22 44 14
Fax: 2 22 44 04
Puerto Rico
Buckeye Service
Jesús P. Piñero #1013
Puerto Nuevo, SJ PR 00920
Tel.: (787) 782-6175
Republica Dominicana
Plaza Lama, S.A.
Av, Duarte #94
Santo Domingo,
República Dominicana
Tel.: (809) 687-9171
Trinidad and Tobago
A.S. Bryden & Sons (Trinidad)
Limited
33 Independence Square,
Port of Spain
Trinidad, W.I.
Tel.: (868) 623-4696
Venezuela
Tecno Servicio TS2002
Av. Casanova
Centro Comercial del Este
Local 27
Caracas, Venezuela
Tel.: (58-212) 324-0969
Por favor llame al número correspondiente que aparece en la lista a continuación para
solicitar que se haga efectiva la garantía y donde Ud. puede solicitar servicio, reparaciones
o partes en el país donde el producto fué comprado.
Comercializado por:
Applica de México, S. de R. L. de C.V.
Manuel Avila Camacho No. 2900-902,
Torre el Dorado, Fracc. Los Pirules,
Tlalnepantla, Edo. de México, CP 54040.
R. F. C. AME-001026- PE3.
Servicio y Reparación
Art. 123 y José Ma. Marroquí # 28 D
Col. Centro, Mexico D. F., CP 06050
Servicio al Consumidor,
Venta de Refacciones y Accesorios
01 800 714 2503
Sello del Distribuidor:
Fecha de compra:
Modelo:
26
25
Quelles lois régissent la garantie?
• Les modalités de la présente garantie donnent des droits légaux spécifiques.
L’utilisateur peut également se prévaloir d’autres droits selon l’état ou la province
qu’il habite.
Póliza de Garantía
(Válida sólo para México)
Duración
Applica de México, S. de R. L. de C.V. garantiza este producto por 2 años a partir de
la fecha original de compra.
¿Qué cubre esta garantía?
Esta Garantía cubre cualquier defecto que presenten las piezas, componentes y la
mano de obra contenidas en este producto.
Requisitos para hacer válida la garantía
Para reclamar su Garantía deberá presentar al Centro de Servicio Autorizado la póliza
sellada por el establecimiento en donde adquirió el producto. Si no la tiene, podrá
presentar el comprobante de compra original.
¿Donde hago válida la garantía?
Llame sin costo al teléfono 01 800 714 2503, para ubicar el Centro de Servicio
Autorizado más cercano a su domicilio en donde usted podrá encontrar partes,
componentes, consumibles y accesorios.
Procedimiento para hacer válida la garantía
Acuda al Centro de Servicio Autorizado con el producto con la póliza de Garantía
sellada o el comprobante de compra original, ahí se reemplazará cualquier pieza o
componente defectuoso sin cargo alguno para el usuario final. Esta Garantía incluye
los gastos de transportación que se deriven de su cumplimiento.
Excepciones
Esta Garantía no será válida cuando el producto:
A) Se hubiese utilizado en condiciones distintas a las normales.
B) No hubiese sido operado de acuerdo con el instructivo de uso que le acompaña.
C) Cuando el producto hubiese sido alterado o reparado por personas no autorizadas
por Applica de México, S. de R. L. de C.V.
Nota:
Si el cordón de alimentación es dañado, este debe ser remplazado por el
fabricante o por un Centro de Servicio Autorizado para evitar el riesgo.
DF400Pub1000002346 10/5/05 2:29 PM Page 26
Page 15

is a trademark of The Black & Decker Corporation,
Towson, Maryland, USA
Marca registrada de The Black & Decker Corporation,
Towson, Maryland, E.U.
Marque de commerce déposée de la société The Black & Decker Corporation,
Towson, Maryland, É.-U.
2005/5-19-95 E/S/F
1500 W 120 V 60 Hz
Copyright © 2005 Applica Consumer Products, Inc.
Pub. No. 1000002346-00-RV00
Made in People’s Republic of China
Printed in People’s Republic of China
Importado por:
Applica de México S. de R.L. de C.V.
Blvd. Manuel Avila Camacho 2900 Int. 902
Los Pirules, Tlalnepantla,
Edo. Mex.
C.P. 54040
México
Teléfono: (55) 1106-1400
Del interior marque sin costo
01 (800) 714-2499
Fabricado en la República Popular de China
Impreso en la República Popular de China
Fabriqué en République populaire de Chine
Imprimé en République populaire de Chine
DF400Pub1000002346 10/5/05 2:29 PM Page 28
 Loading...