

Page 1
BRUSHED STAINLESS STEEL 4.5-LITER
DEEP FRYER
ACIER INOXYDABLE BROSSÉ FRITEUSE
DE 4,5 LITRES
Customer Care Line:
USA 1-800-231-9786
Accessories/Parts (USA)
1-800-738-0245
For online customer service
and to register your product, go to
www.prodprotect.com/applica
Service line à la clientèle :
Canada 1-800-231-9786
Accessoires/Pièces (Canada)
1-800-738-0245
Pour accéder au service à la clientèle en
ligne ou pour inscrire votre produit en
ligne, rendez-vous à
www.prodprotect.com/applica
MODEL/MODÈLE
❍ DF1405SKT
Page 2

Please Read and Save this Use and Care Book.
IMPORTANT SAFEGUARDS
When using electrical appliances, basic safety precautions should always
be followed, including the following:
❍ Read all instructions.
❍ Do not touch hot surfaces. Use handles or knobs.
❍ To protect against electric shock do not immerse cord, plugs or digital
control assembly in water or other liquid.
❍ Close supervision is necessary when any appliance is used by or near
children.
❍ Unplug from outlet when not in use and before cleaning. Allow to
cool before putting on or taking off parts, and before cleaning the
appliance.
❍ Do not operate any appliance with a damaged cord or plug, or after
the appliance malfunctions or has been damaged in any manner.
Return appliance to the nearest authorized service facility for
examination, repair or adjustment.
❍ The use of accessory attachments not recommended by the appliance
manufacturer may cause injuries.
❍ Do not use outdoors.
❍ Do not let cord hang over edge of table or counter, or touch hot
surfaces.
❍ Do not place on or near a hot gas or electric burner, or in a heated
oven.
❍ Extreme caution must be used when moving an appliance containing
hot oil or other hot liquids.
❍ Always attach plug to appliance first, then plug cord in the wall outlet.
To disconnect, turn any control to OFF (0), then remove plug from wall
outlet.
❍ Do not use appliance for other than intended use.
❍ Extreme caution must be used when moving fryer containing hot oil.
❍ Be sure handles are properly assembled to basket and locked in place.
See detailed assembly instructions.
SAVE THESE INSTRUCTIONS.
This product is for household use only.
2
Page 3

POLARIZED PLUG (120V Models Only)
This appliance has a polarized plug (one blade is wider than the
other). To reduce the risk of electric shock, this plug is intended to fit
into a polarized outlet only one way. If the plug does not fit fully into
the outlet, reverse the plug. If it still does not fit, contact a qualified
electrician. Do not attempt to modify the plug in any way.
TAMPER-RESISTANT SCREW
Warning: This appliance is equipped with a tamper-resistant screw
to prevent removal of the outer cover. To reduce the risk of fire or
electric shock, do not a ttempt to remove the outer cover. There are
no user-serviceable parts inside. Repair should be done only by
authorized service personnel.
ELECTRICAL CORD
a) A short power-supply cord (or detachable power-supply cord) is to
be provided to reduce the risk resulting from becoming entangled in
or tripping over a longer cord.
b) Longer detachable power-supply cords or extension cords are not to
be used with this product.
Note: If the power supply cord is damaged, it should be replaced by
qualified personnel.
ENGLISH
3
Page 4
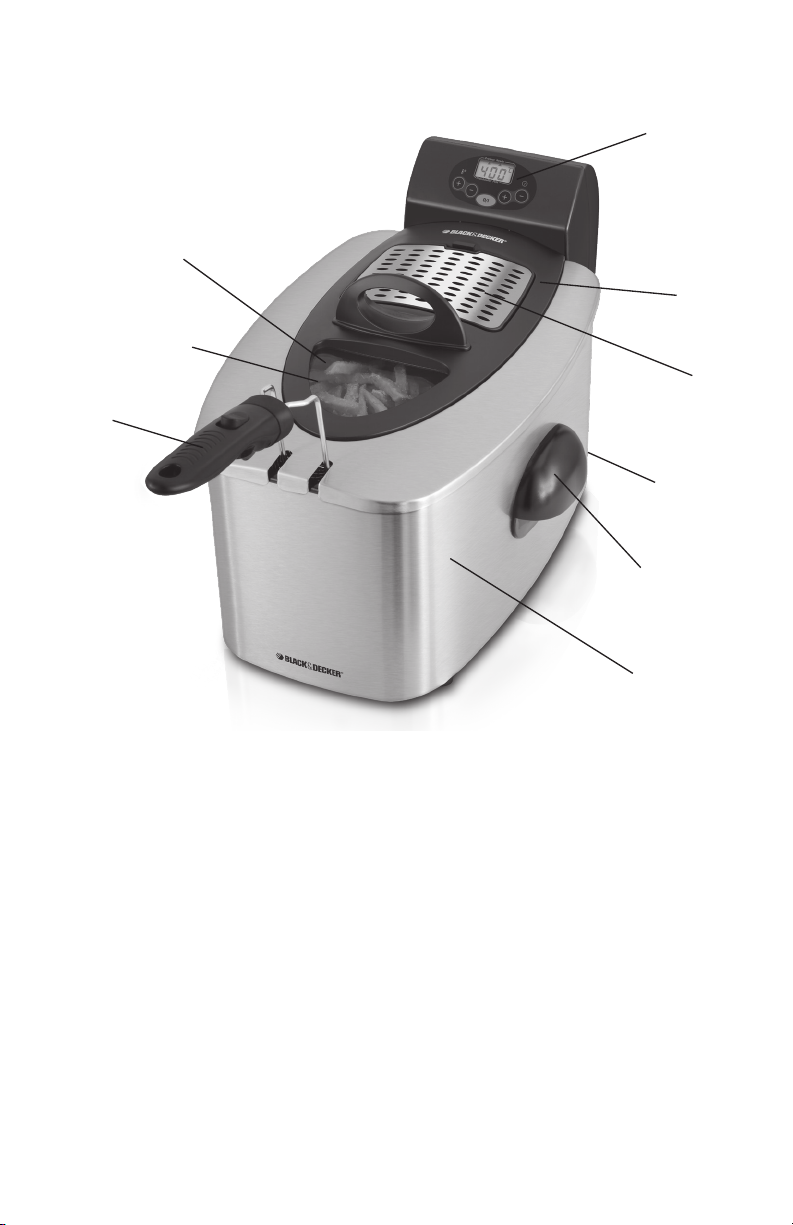
Product may vary slightly from what is illustrated.
1. Digital controls with LCD display
† 2. Detachable lid (Part # DF1405-01)
† 3. Removable filter cover (Part # DF1405-02)
† 4. Detachable magnetic power cord (not shown)
(Part # DF1405-06)
5. Base handles
6. Base
† 7. Removable basket handle (Part # DF1405-04)
† 8. Stainless steel fyring basket (not shown) (Part #DF1405-03)
† 9. Nonstick cooking pot (not shown) (Part # DF1405-05)
Note: † indicates consumer replaceable/removable parts
4
Page 5
How to Use
This product is for household use only.
GETTING STARTED
• Remove all packing material and any stickers. Remove and save Use and Care manual.
• Please go to www.prodprotect.com/applica to register your warranty.
• Wash all removable parts as instructed in CARE AND CLEANING section.
• Wipe outside of appliance with a damp cloth; dry thoroughly.
• Assemble product following directions as directed below.
• Select a stable, level, heat-resistant surface where this appliance is to be used, allowing
enough space from back of unit and the wall to allow heat to flow without damage to
cabinets and walls.
• Fill with oil to MIN (4 quarts) or MAX (5 quarts) line.
• This fryer has a detachable cord with a magnetic power attachment to be inserted to the
rear of the fryer. This must be inserted with the words THIS SIDE UP facing upward.
• Attached the cord to the appliance by matching the 2 electrical pins on the back of the
control assembly with the 2 indentations on the power cord.
• Plug unit into electrical outlet
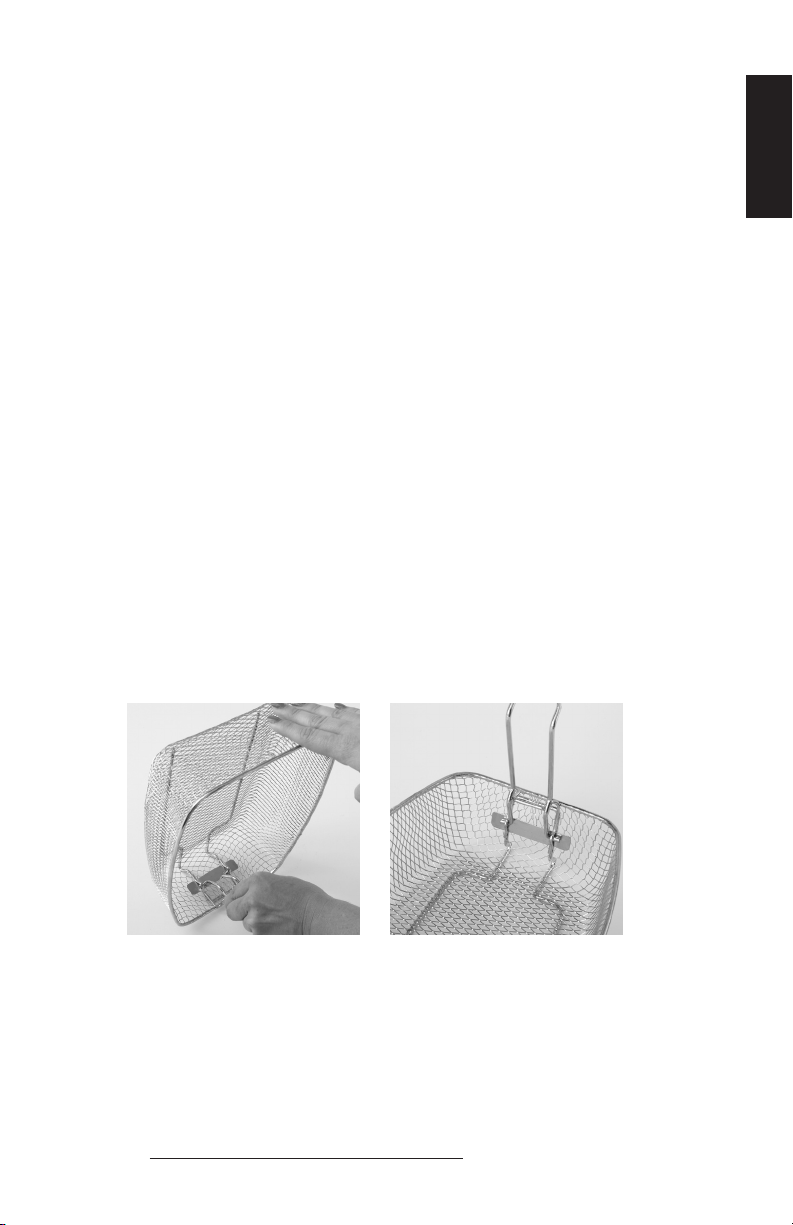
ASSEMBLING YOUR FRYER
Basket Handle Assembly
• The basket and handle are packed unassembled.
• Stand the basket on end on a flat surface or countertop with the narrow end down.
• Grasp handle by metal prongs and squeeze together.
• Insert prongs into loops half way down the side of the basket.
• Once they are inserted release the metal prongs.
• Lay the basket flat on the counter (A).
• Pull the handle forward until the metal prongs rest against the side of the basket and the
handle clicks into place (B).
ENGLISH
➞
➞
A
Fryer Assembly
• Place cooking pot into fryer matching the shape of the outer housing with narrow end
facing forward.
• Insert the control assembly aligning the 3 projections on the front of the control assembly
with the tracks on the back of the outer housing of the fryer.
• Slide the control assembly down as far as it will go making sure both outer guides are in
the tracks.
Note: The fryer will only function when both guides are properly positioned in the tracks.
• Fill the cooking pot with oil to the MIN (4 quarts) or MAX (5 quarts) line on the inside of the
cooking pot. Do not use olive, sunflower or flavored oils.
B
5
Page 6

Note: The amount of oil in the cooking pot must always be between the MIN and MAX line .
Never allow the oil to go below the MIN line or exceed the MAX line.
Note: When the fryer is functioning, the oil gets extremely hot. Use caution at all times.
Do not touch any of the metal parts, such as the basket or cooking pot once the appliance is
heating.
• Insert the basket into the cooking pot.
• Place the lid on the fryer.
• This fryer has a detachable cord with a magnetic power attachment to be inserted to the rear
of the fryer. This must be inserted with the words THIS SIDE UP facing upward.
• Attach the cord to the appliance by matching the 2 electrical pins on the back of the control
assembly with the 2 indentations on the power cord.
Important: This magnetic cord is designed to detach easily from the appliance; this will cause
the appliance to stop heating. Avoid moving the fryer or touching the cord in any way during
use.
Important: The appliance will only operate when both guides are properly positioned in the
tracks.
• Always use handles on the base when lifting or moving the appliance. Never lift or move
appliance using digital control assembly.
Caution: Never attempt to move the fryer when it contains hot oil.
TO START COOKING
1. Fill cooking pot with cooking oil up to the MIN (4 quarts) or MAX (5 quarts) level marking.
Do not exceed the MAX level mark.
2. Insert the cooking basket.
3. Close the lid.
4. Attach the cord to the appliance and plug into electrical outlet.
• When the fryer is plugged in there will be an audible signal.
• Digital display shows 130°C.
• Select the desired temperature (see FRYING CHART on page 7) by pressing the UP or
DOWN button on the left side of the control assembly and allow fryer to preheat.
The temperature range is (130°C, 150°C, 170°C, and 190°C).
5. The recommended setting for most frying is 190° F.
6. Press the On/Off button on the control assembly. There will be an arrow below the preheat
signage on the LCD.
7. Once the appliance has reached set temperature the numbers on the display will flash and
the arrow below the Ready signage will appear on the LCD display.
8. Lift the lid.
9. Raise the basket and rest it on the drain hook at the front of the cooking pot
10. Allow the basket to drain for several seconds.
11. Fill the basket no more than ¾ full with food to be cooked. Do not overfill.
12. Close the lid and lower the basket into the oil.
13. Press the switch on the handle to lower it into the rest position parallel to the front
of the fryer.
14. Press the + button to select the cooking time. The timer can be set from 1 to 30 minutes.
When the timer counts down below 1 minute the counter will count down in seconds.
Note: During cooking the temperature button can be pressed and the set oil temperature will
show on the LCD; however, the temperature cannot be changed.
15. When the timer reaches 0 there will be an audible signal. Raise the basket and allow it to
rest on the drain hook for several seconds to drain the excess oil.
6
Page 7

16. During cooking the time can be increased or decreased. If the ON/OFF button is pressed
the fryer will turn off and no changes can be made for 10 minutes. If this happens,
unplug the fryer and wait 10 minutes and then plug in the fryer, reselect the desired
cooking temperature and press the On/Off button and allow the fryer to reheat.
17. When frying is complete, press the ON/OFF button; after 10 minutes the fryer returns
to standby mode and will show the last selected cooking temperature.
18. If the fryer is not used for 30 minutes it will automatically turn of and begin to cool.
19. Unplug power cord from wall outlet and then from the base. Allow oil and appliance
to cool completely.
FRYING CHART
FOOD TEMPERATURE COOKING TIME COMMENTS
Fresh chicken wings 170° C
Approximately
350° F
4 – 5 minutes Dip in milk and
coat in seasoned
flour or bread
crumbs.
ENGLISH
Frozen coated
chicken tenders
Frozen coated fish
fillets
Fresh shrimp 170° C
Frozen coated
shrimp
Frozen snack foods 170° C
Frozen French fries
and other frozen
potatoes
Frozen onion rings 190 ° C
Dougnuts and funnel
cakes
170° C
Approximately
350° F
170° C
Approximately
350° F
Approximately
350° F
170° C
Approximately
350° F
Approximately
350° F
190 ° C
375° F
375° F
190 ° C
375° F
4 – 5 minutes Do not overfill
fryer; drain on
paper towels or
brown paper.
4 – 5 minutes Do not overfill fryer.
4 – 5 minutes Peel, leaving
tail intact; dip in
tempura batter.
4 – 5 minutes Do not overfill fryer.
4 – 5 minutes Do not overfill
fryer; season while
hot.
3 to 4 minutes Do not overfill fryer.
2 to 3 minutes Do not overfill fryer.
2 to 3 minutes Do not overfill fryer.
7
Page 8

Care and Cleaning
This product contains no user serviceable parts. Refer service to qualified service
personnel.
Important: Before cleaning any part, be sure the appliance is off, unplugged, and cool.
• All parts, except the digital control can be washed by hand in hot, soapy water or in the
dishwasher. Place the base and lid in the bottom rack.
• Never immerse digital control assembly in water or wash in a dishwasher. Wipe with a damp
cloth.
• If you choose to use a dishwasher there may be some discoloration of parts. This will not
affect the fryer’s performance.
• Do not use steel wool scouring pads or abrasive cleaners to clean any part.
• To clean the frying basket handle, remove it by squeezing the dring hooks and folding the
handle into the basket until the handle bars are out of the brackets. Continue squeezing to
remove both pegs from the bracket holes. After cleaning, reattach handle as instructed in
BASKET HANDLE ASSEMBLY.
STORAGE
• Press the release button on the handle into the vertical position and lower than handle until it
rests flush against the front of the fryer.
8
Page 9

NEED HELP?
For service, repair or any questions regarding your appliance, call the
appropriate 800 number on the cover of this book. Please DO NOT return the
product to the place of purchase. Also, please DO NOT mail product back to
manufacturer, nor bring it to a service center. You may also want to consult
the website listed on the cover of this manual.
TWO-YEAR LIMITED WARRANTY
(Applies only in the United States and Canada)
What does it cover?
• Any defect in material or workmanship provided; however, Applica’s liability
will not exceed the purchase price of product.
For how long?
• Two years from the date of original purchase with proof of such purchase.
What will we do to help you?
• Provide you with a reasonably similar replacement product that is either
new or factory refurbished.
How do you get service?
• Save your receipt as proof of date of sale.
• Visit the online service website at www.prodprotect.com/applica, or call
toll-free 1-800-231-9786, for general warranty service.
• If you need parts or accessories, please call 1-800-738-0245.
What does your warranty not cover?
• Damage from commercial use
• Damage from misuse, abuse or neglect
• Products that have been modified in any way
• Products used or serviced outside the country of purchase
• Glass parts and other accessory items that are packed with the unit
• Shipping and handling costs associated with the replacement of the unit
• Consequential or incidental damages (Please note, however, that some
states do not allow the exclusion or limitation of consequential or incidental
damages, so this limitation may not apply to you.)
How does state law relate to this warranty?
• This warranty gives you specific legal rights. You may also have other rights
that vary from state to state or province to province.
ENGLISH
is a registered trademark of The Black & Decker Corporation,
Towson, Maryland, USA
Made and Printed in People’s Republic of China
9
Page 10

Veuillez lire et conserver ce guide d’entretien et d’utilisation.
MISES EN GARDE IMPORTANTES
Lorsqu’on utilise des appareils électriques, il faut toujours respecter
certaines règles de sécurité fondamentales, notamment les suivantes :
❍ Lire toutes les directives.
❍ Ne pas toucher aux surfaces chaudes; utiliser les poignées et les
boutons.
❍ Afin d’éviter les risques d’incendie, de choc électrique ou de blessures,
ne pas immerger le cordon, la fiche ou le tableau de commande dans
l’eau ou tout autre liquide.
❍ Exercer une étroite surveillance lorsque l’appareil est utilisé par un
enfant ou près d’un enfant.
❍ débrancher l’appareil lorsqu’il ne sert pas ou avant de le nettoyer.
laisser l’appareil refroidir avant d’y placer ou d’en retirer des
composantes, et de le nettoyer.
❍ Ne pas utiliser un appareil dont la fiche ou le cordon est abîmé, qui
fonctionne mal ou qui a été endommagé de quelque façon que ce soit.
Pour un examen, une réparation ou un réglage, rapporter l’appareil
à un centre de service autorisé. Ou composer le numéro sans frais
inscrit sur la page couverture du présent guide.
❍ L’utilisation d’accessoires non recommandés par le fabricant de
l’appareil présente des risques d’incendie, de choc électrique ou de
blessures.
❍ Ne pas utiliser l’appareil à l’extérieur.
❍ Ne pas laisser pendre le cordon sur le bord d’une table ou d’un
comptoir ni le laisser entrer en contact avec une surface chaude.
❍ Ne pas placer l’appareil sur le dessus ou près d’un élément chauffant
électrique ou à gaz ni dans un four chaud.
❍ Toujours brancher la fiche de l’appareil d’abord, puis brancher le
cordon dans la prise murale. Pour débrancher l’appareil, placer toutes
les commandes à la position « 0 » (arrêt) et retirer la fiche de la prise.
❍ Utiliser l’appareil uniquement aux fins pour lesquelles il a été conçu.
❍ Ne pas déposer la carafe chaude sur une surface froide ou mouillée.
❍ Ne pas se servir de la carafe si le vere en est fêlé ou si la poignée est
lâche ou affaiblie.
❍ Ne pas nettoyer la carafe avec des produits nettoyants abrasifs, de la
laine d’acier ni tout autre produit abrasif.
CONSERVER CES INSTRUCTIONS.
L’appareil est conçu pour une utilisation domestique seulement.
10
Page 11

FICHE POLARISÉE (MODÈLES 120 V SEULEMENT
Cet appareil est doté d’une fiche polarisée (l’une des broches est plus
large que l’autre). Afin de réduire les risques de chocs électriques, la
fiche se branche dans une prise polarisée dans un sens seulement. Si
la fiche n’entre pas complètement dans la prise, tourner la fiche. Si la
fiche n’entre toujours pas, communiquer avec un électricien qualifié.
Ne pas tenter de modifier la fiche.
VIS INVIOLABLE
Avertissement : Cet appareil comporte une vis inviolable prévenant
le retrait du boîtier externe. Pour réduire les risques d'incendie ou
de choc électrique, ne pas tenter de retirer le boîtier externe. Il n'y a
aucune pièce réparable par l’utilisateur à l'intérieur. Les réparations
doivent être effectuées par un technicien autorisé seulement.
CORDON D'ALIMENTATION
a) Un cordon d'alimentation court (ou amovible) est fourni pour éviter
qu'un cordon long s'emmêle ou fasse trébucher.
b) Ne pas utilioser des cordons d'alimentation amovibles plus longs
ou des rallonges avec l'appareil.
Remarque : Si le cordon est endommagé, le faire remplacer par un
technicien qualifié.
FRANÇAIS
11
Page 12

Le produit peut différer légèrement de celui qui est illustré.
1. Commandes numériques avec afficheur ACL
† 2. Couvercle amovible (pièce n° DF1405-01)
† 3. Couvercle du filtre amovible (pièce n° DF1405-02)
† 4. Cordon d'alimentation aimanté détachable (non illustré)
(pièce n° DF1405-06)
5. Poignées de la base
6. Base
† 7. Poignée du panier amovible (pièce n° DF1405-04)
† 8. Panier à friture en acier inoxydable (non illustré)
(pièce n° DF1405-03)
† 9. Bol de cuisson antiadhésif (non illustré) (pièce n° DF1405-05)
Note: † indicates consumer replaceable/removable parts
12
Page 13

Utilisation
Cet appareil est conçu pour un usage domestique seulement.
POUR COMMENCER
• Retirer tous les matériaux d'emballage et les autocollants sur le produit. Retirer et
conserver le guide d'utilisation et d'entretien.
• Visiter le www.prodprotect.com/applica pour enregistrer la garantie.
• Laver toutes les pièces amovibles en suivant les directives de la section ENTRETIEN
ET NETTOYAGE du présent guide.
• Essuyer les surfaces extérieures de l'appareil à l'aide d'un linge humide; bien
assécher.
• Assembler l'appareil en suivant les indications ci-dessous.
• Choisir une surface stable, à niveau et résistante à la chaleur, en laissant
suffisamment d’espace entre l’arrière de l’appareil et le mur pour favoriser la
circulation de la chaleur, sans endommager les armoires et les murs.
• Remplir d'huile jusqu'au niveau MIN (4 litres) ou MAX (5 litres).
• La friteuse est équipée d'un cordon détachable aimanté pouvant être inséré à
l'arrière de l'appareil. La fiche doit être insérée avec les mots « THIS SIDE UP »
(CE CÔTÉ VERS LE HAUT) orientés vers le haut.
• Fixer le cordon à l'appareil en appliquant les 2 tiges électriques à l'arrière du
tableau de commande sur les 2 renfoncements pratiqués sur le cordon.
• Brancher l’appareil dans une prise de courant.
ASSEMBLAGE
Assemblage de la poignée du panier
• Le panier et la poignée sont emballés séparément.
• Déposer le panier sur une surface plane ou un comptoir, l'extrémité étroite
vers le bas.
• Saisir la poignée par les broches métalliques et les presser l'une contre l'autre.
• Insérer les broches dans les boucles sur le côté du panier.
• Une fois qu'elles sont insérées, relâcher les broches métalliques.
• Mettre le panier à plat sur le comptoir (A).
• Tirer la poignée vers l'avant jusqu'à les broches métalliques reposent contre le côté
du panier et que la poignée soit enclenchée (B).
FRANÇAIS
➞
➞
A
B
13
Page 14

Assemblage de la friteuse
• Placer le bol de cuisson dans la friteuse en fonction de la forme du boîtier, l'extrémité
étroite vers le bas.
• Insérer le tableau de commande en alignant les 3 saillies frontales sur les rainures
pratiquées au dos du boîtier de la friteuse.
• Faire glisser le tableau de commande jusqu'au bout en s'assurant que les deux guides
extérieurs sont dans les rainures.
Remarque : La friteuse ne fonctionnera que si les deux guides sont correctement
en place dans les rainures.
• Remplir le bol à cuisson d'huile jusqu'au niveau MIN (4 litres) ou MAX (5 litres) indiqué
sur le côté du bol à cuisson. Ne pas utiliser d'huile d'olive, d'huile de tournesol ou
d'huiles aromatisées.
Remarque : La quantité d'huile dans le bol de cuisson doit toujours se situer entre les
lignes MIN et MAX. Ne jamais permettre au niveau d'huile de baisser en-deçà de la ligne
MIN ou d'excéder la ligne MAX.
Remarque : Lorsque la friteuse est en marche, l’huile devient extrêmement chaude.
Faire preuve de prudence en tout temps. Ne pas toucher les pièces métalliques, comme
le panier ou le bol de cuisson, lorsque l’appareil fonctionne.
• Insérer le panier dans le bol de cuisson.
• Placer le couvercle sur la friteuse.
• La friteuse est équipée d'un cordon détachable aimanté pouvant être inséré à l'arrière
de l'appareil. La fiche doit être insérée avec les mots « THIS SIDE UP » (CE CÔTÉ VERS
LE HAUT) orientés vers le haut.
• Fixer le cordon à l'appareil en appliquant les 2 tiges électriques à l'arrière du tableau de
commande sur les 2 renfoncements pratiqués sur le cordon.
Important : Le cordon aimanté est conçu pour se détacher facilement de l'appareil; la
friteuse cessera de chauffer. Éviter de déplacer la friteuse ou de toucher le cordon de
quelque façon que se soit pendant l'utilisation.
Important : La friteuse ne fonctionnera que si les deux guides sont correctement en
place dans les rainures.
• Toujours utiliser les poignées à la base pour soulever ou déplacer l'appareil. Ne jamais
soulever ou déplacer l'appareil à l'aide du tableau de commande numérique.
Mise en garde : Ne jamais tenter de déplacer la friteuse lorsqu'elle contient de l'huile
chaude.
POUR COMMENCER LA CUISSON
1. Remplir le bol à cuisson d'huile jusqu'au niveau MIN (4 litres) ou MAX (5 litres). Ne pas
excéder la ligne MAX.
2. Insérer le panier à cuisson.
3. Fermer le couvercle.
4. Fixer le cordon à l'appareil et le brancher dans une prise électrique.
• Lorsque la friteuse est branchée, l'appareil émet un signal audible.
• L'afficheur indique 130 °C (265 °F).
• Sélectionner la température désirée (voir le TABLEAU DE FRITURE à la page 16) en
appuyant les touches vers la HAUT et vers le BAS sur le côté gauche du tableau de
commande, et permettre à la friteuse de chauffer. Les réglages de température sont
les suivants : 130 °C (265 °F), 150 °C (300 °F), 170 °C (340 °F) et 190 °C
(375 °F).
14
Page 15

5. Le réglage recommandé pour la plupart des fritures est 190 °C (375 °F).
6. Appuyer sur la touche marche/arrêt (insert graphic) du tableau de commande. Une
flèche apparaîtra sous l'indication PREHEAT du tableau de commande.
7. Une fois que l'appareil a atteint la température désirée, les chiffres à l'afficheur
clignoteront et la flèche sous l'indication READY apparaîtra à l'afficheur ACL.
8. Lever le couvercle.
9. Soulever le panier et le déposer sur le crochet d'égouttage à l'avant du bol de
cuisson
10. Permettre au panier de s'égoutter quelques secondes.
11. Ne pas remplir le panier d'aliments plus qu'au ¾. Ne pas trop remplir.
12. Fermer le couvercle et abaisser le panier dans l'huile.
13. Appuyer sur le bouton pour abaisser la poignée en parallèle avec l'avant de la
friteuse)
14. Appuyer sur la touche + pour sélectionner le temps de cuisson. La minuterie peut
être réglée de 1 à 30 minutes. La minuterie fait le décompte des minutes, jusqu’à
la dernière minute où elle fait le décompte des secondes.
Remarque : Pendant la cuisson, appuyer sur la touche de la température pour faire
apparaître le réglage sélectionné à l'afficheur ACL; toutefois, la température ne peut
pas être modifiée.
15. Lorsque la minuterie atteint 0, l'appareil émet un signal audible. Soulever le
panier et le déposer quelques secondes déposer sur le crochet d'égouttage pour
éliminer l'excès d'huile.
16. Pendant la cuisson, le temps de cuisson peut être augmenté ou réduit. Si la touche
marche/arrêt est pressée, la friteuse s'arrête et aucun changement ne pourra être
apporté avant 10 minutes. Si cette situation se produit, débrancher la friteuse,
attendre 10 minutes, la rebrancher, sélectionner de nouveau la température
désirée, appuyer sur la touche marche/arrêt et permettre à la friteuse de chauffer
de nouveau.
17. Lorsque la friture est terminée, appuyer sur la touche marche/arrêt (insert
signage); après 10 minutes, la friteuse retourne en mode veille et affiche la
dernière température de cuisson sélectionnée.
18. Si la friteuse n'est pas utilisée pendant 30 minutes, elle s'arrête automatiquement
et commence à refroidir.
19. Débrancher le cordon de la prise murale, puis de la base. Permettre à l'huile et à
l'appareil de refroidir complètement.
FRANÇAIS
15
Page 16

GUIDE DE FRITURE
ALIMENT TEMPÉRATURE TEMPS DE
Ailes de poulet
fraîches
Filets de poitrine
de poulet surgelés
Filets de poisson
surgelés
Crevettes fraîches 170 °C -
Crevettes
surgelées
Grignotines
surgelées
Frites et autres
pommes de terre
congelées
Rondelles
d’oignon
surgelées
Beignets et petits
gâteaux
170 °C -
approximativement
350 °F
170 °C -
approximativement
350 °F
170 °C -
approximativement
350 °F
approximativement
350 °F
170 °C -
approximativement
350 °F
170 °C -
approximativement
350 °F
190 °C -
375 °F
190 °C -
375 °F
190 °C -
375 °F
De 4 à 5 minutes Tremper dans le
De 4 à 5 minutes Ne pas trop remplir
De 4 à 5 minutes Ne pas trop remplir
De 4 à 5 minutes Peler (laisser la
De 4 à 5 minutes Ne pas trop remplir
De 4 à 5 minutes Ne pas trop
De 3 à 4 minutes Ne pas trop remplir
De 2 à 3 minutes Ne pas trop remplir
De 2 à 3 minutes Ne pas trop remplir
REMARQUES
CUISSON
lait et recouvrir
de farine ou de
chapelure.
la friteuse; égoutter
sur du papier
essuie-tout ou du
papier brun.
la friteuse.
queue intacte);
tremper dans la
pâte à tempura.
la friteuse.
remplir la friteuse;
assaisonner lorsque
chaud.
la friteuse.
la friteuse.
la friteuse.
16
Page 17

Entretien et nettoyage
Cet appareil ne contient aucune pièce réparable par l’utilisateur. Confier la réparation à un
technicien qualifié.
Important : Avant de nettoyer l'une des pièces, s’assurer que l'appareil est éteint,
débranché et refroidi.
• Toutes les pièces, à l'exception du tableau de commande numérique, peuvent être
nettoyées à la main dans de l'eau chaude savonneuse ou au lave-vaisselle. Placer la base
et le couvercle dans le panier inférieur.
• Ne jamais immerger le tableau de commande numérique dans l'eau ou le mettre
au lave-vaisselle. Essuyer à l'aide d'un linge humide.
• Si vous optez pour le lave-vaisselle, il pourrait se produire une décoloration des pièces.
Cela n'aura aucune incidence sur le rendement de la friteuse.
• Ne pas utiliser de tampons à récurer en laine d'acier ou de nettoyants abrasifs pour
nettoyer les pièces.
• Pour nettoyer la poignée du panier de friture, le retirer en pinçant les crochets et en
pliant la poignée dans le panier jusqu'à ce que les barres de la poignée soient sorties de
leurs supports. Continuer à pincer les crochets pour retirer les deux taquets des orifices
du support. Après le nettoyage, remettre la poignée en place comme indiqué à la section
Assemblage de la poignée du panier.
RANGEMENT
• Appuyer sur le bouton de dégagement sur la poignée en position verticale, et abaisser la
poignée jusqu'à ce qu'elle repose à plat contre l'avant de la friteuse.
FRANÇAIS
17
Page 18

BESOIN D’AIDE?
Pour communiquer avec les services d’entretien ou de réparation, ou pour adresser toute
question relative au produit, composer le numéro sans frais approprié indiqué sur la page
couverture. Ne pas retourner le produit où il a été acheté. Ne pas poster le produit au
fabricant ni le porter dans un centre de service. On peut également consulter le site web
indiqué sur la page couverture.
GARANTIE LIMITÉE DE DEUX ANS
(Valable seulement aux États-Unis et au Canada)
Quelle est la couverture?
• Tout défaut de main-d’oeuvre ou de matériau; toutefois, la responsabilité de la société
Applica se limite au prix d’achat du produit.
Quelle est la durée?
• Deux année(s) à compter de la date d’achat initiale, avec une preuve d’achat.
Quelle aide offrons nous?
• Remplacement par un produit raisonnablement semblable nouveau ou réusiné.
Comment se prévaut-on du service?
• Conserver son reçu de caisse comme preuve de la date d’achat.
• Visiter notre site web au www.prodprotect.com/applica, ou composer sans frais
le 1 800 231-9786, pour obtenir des renseignements généraux relatifs à la garantie.
• On peut également communiquer avec le service des pièces et des accessoires
au 1 800 738-0245.
Qu’est-ce que la garantie ne couvre pas?
• Des dommages dus à une utilisation commerciale.
• Des dommages causés par une mauvaise utilisation ou de la négligence.
• Des produits qui ont été modifiés.
• Des produits utilisés ou entretenus hors du pays où ils ont été achetés.
• Des pièces en verre et tout autre accessoire emballés avec le produit.
• Les frais de transport et de manutention reliés au remplacement du produit.
• Des dommages indirects (il faut toutefois prendre note que certains états ne permettent
pas l’exclusion ni la limitation des dommages indirects).
Quelles lois régissent la garantie?
• Les modalités de la présente garantie donnent des droits légaux spécifiques.
L’utilisateur peut également se prévaloir d’autres droits selon l’état ou la province qu’il
habite.
Marque de commerce déposée de la société The Black & Decker Corporation,
Towson, Maryland, É.-U.
Fabriqué e Imprimé en République populaire de Chine
18
Page 19

NOTES / NOTES
19
Page 20

© 2011 Applica Consumer Products, Inc.
2011/5-26-205E/S
 Loading...