

Black & Decker DCME10B, DCME10 User Manual
PLEASE READ AND SAVE THIS USE AND CARE BOOK.
POR FAVOR LEA ESTE INSTRUCTIVO ANTES DE USAR EL PRODUCTO.
VEUILLEZ LIRE ET CONSERVER CE GUIDE D’ENTRETIEN ET D’UTILISATION.
IMPORTANT / IMPORTANTE /
IMPORTANT
WASH CARAFE BEFORE FIRST USE!
LAVE LA JARRA ANTES
DEL PRIMER USO
LAVER LA CARAFE AVANT
LA PREMIÈRE UTILISATION!
Models/Modelos/Modèles
DCME10, DCME10B
Accessories/Parts (USA/Canada)
Accesorios/Partes (EE.UU/Canadá)
Accessoires/Pièces
(É.-U./Canada)
1-800-738-0245
USA/Canada 1-800-231-9786
Mexico 01-800-714-2503
www.blackanddecker.com
EuroBrew
™
10-Cup Coffeemaker
Cafetera de 10 tazas
Cafetière de 10 tasses
DCME10.Pub178918RV01 3/16/05 12:08 PM Page 1

2
1
IMPORTANT SAFEGUARDS
When using electrical appliances, basic safety precautions should always be
followed to reduce the risk of fire, electric shock, and/or injury to persons,
including the following:
❑
Read all instructions.
❑
Do not touch hot surfaces. Use handle or knobs.
❑
To protect against electric shock, do not place cord, plug or appliance in
water or other liquids.
❑
Close supervision is necessary when any appliance is used by or near
children.
❑
Unplug from outlet when not in use and before cleaning. Allow to cool
before putting on or taking off parts and before cleaning the appliance.
❑
Do not operate any appliance with a damaged cord or plug or after the
appliance malfunctions, or has been damaged in any manner. Return the
appliance to the nearest authorized service facility for examination, repair,
or adjustment. Or, call the appropriate toll-free number on the cover of
this manual.
❑
The use of an accessory not evaluated for use with this appliance may
cause injury.
❑
Do not use outdoors.
❑
Do not let cord hang over the edge of table or counter, or touch hot
surfaces.
❑
Do not place on or near a hot gas or electric burner or in a heated oven.
❑
Keep the lid on the carafe when in use.
❑
The carafe is designed for use with the appliance. It must never be used
on a range top.
❑
Do not clean the carafe with abrasive cleansers, steel wool, or other
abrasives material.
❑
Do not set a hot carafe down on a wet or cold surface.
❑
Do not use the carafe if the glass is cracked or has a loose or weakened
handle
❑
Do not use this appliance for other than intended use.
SAVE THESE INSTRUCTIONS.
POLARIZED PLUG (120V Models Only)
This appliance has a polarized plug (one blade is wider than the other). To reduce the risk of
electric shock, this plug is intended to fit into a polarized outlet only one way. If the plug does not
fit fully into the outlet, reverse the plug. If it still does not fit, contact a qualified electrician. Do not
attempt to modify the plug in any way.
TAMPER-RESISTANT SCREW
Warning : This appliance is equipped with a tamper-resistant screw to prevent removal of the
outer cover. To reduce the risk of fire or electric shock, do not attempt to remove the outer
cover. There are no user-serviceable parts inside. Repair should be done only
by authorized
service personnel.
ELECTRICAL CORD
The cord of this appliance was selected to reduce the possibility of tangling in or tripping
over a longer cord. If more length is needed, use an extension cord rated no less than 15
amperes. (For 220 volts rated products, use an extension cord rated no less than 6 amperes.)
When using an extension cord, do not let it drape over the working area or dangle where
someone could accidentally trip over it. Handle cord carefully for longer life; avoid jerking
or straining it at outlet and appliance connections.
NOTE: If the power supply cord is damaged, it must be replaced by the manufacturer
or its service agent or a similarly qualified person in order to avoid a hazard.
DCME10.Pub178918RV01 3/16/05 12:08 PM Page 2
4
How to Use
This product is for household use only.
GETTING STARTED
1. Remove all stickers, packing material, and literature.
2. Wash the carafe, filter basket and carafe lid in warm, sudsy water; rinse
thoroughly.
3. Pour cold water up to the 9-cup level mark into the water reservoir and brew it
through as instructed in “BREWING A POT OF COFFEE,” but do not add coffee
grounds to the paper filter.
4. When done, turn off the coffeemaker and discard paper filter and the water
from the carafe.
Important: For warranty verification, please do not remove line cord sticker.
BREWING A POT OF COFFEE
You don't have to set the clock or program the coffeemaker to
brew coffee.
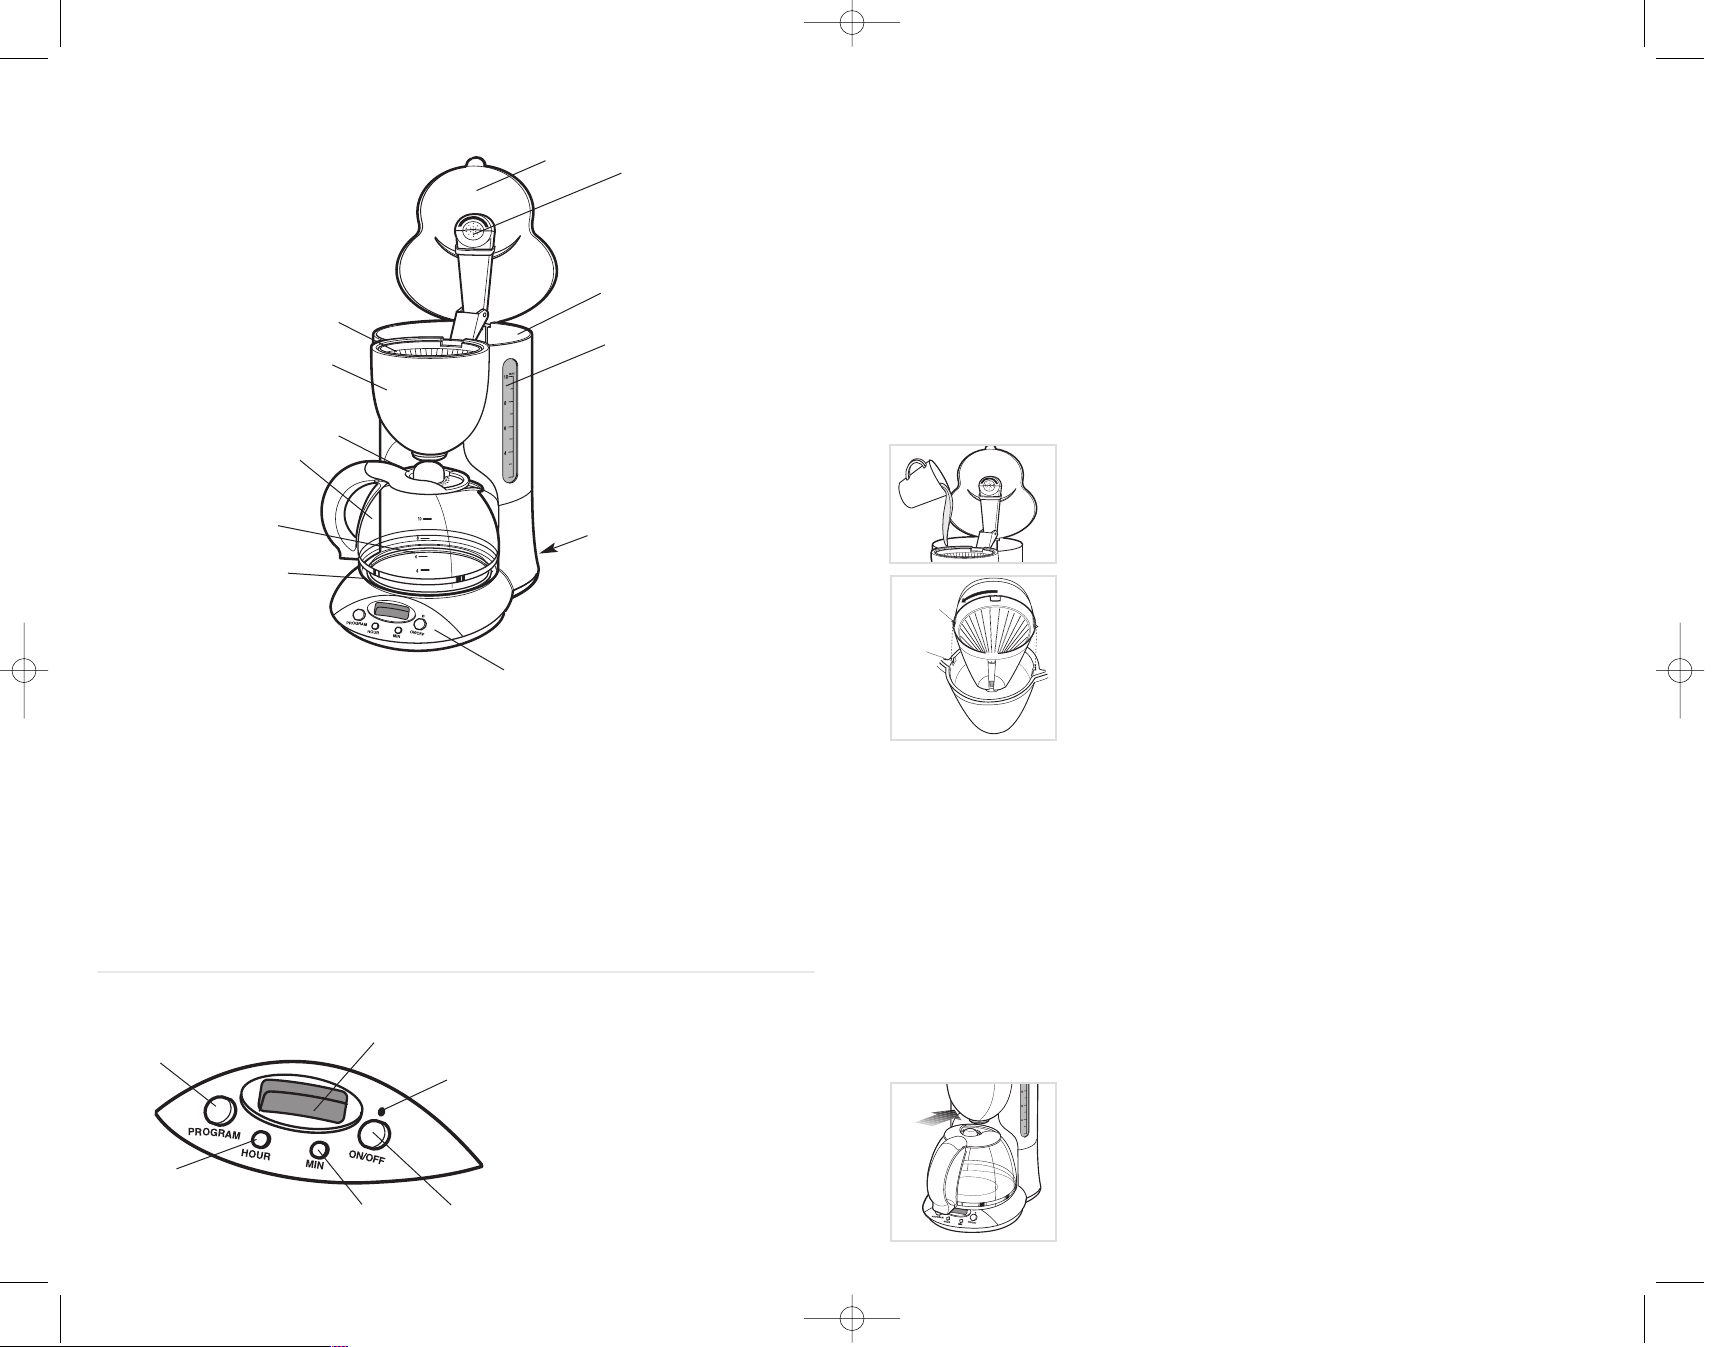
1. Lift the one-piece cover and use the water-fill markings on
the carafe to fill the water reservoir with cold water to your
desired level (A).
2. Place a No. 4 cone-shaped paper filter into the filter
basket. Be sure filter basket is secured. Align small posts on
both sides of the filter basket with grooves on the inside of
brew basket, press down on filter basket and turn
counterclockwise (B).
3. Add ground coffee to the desired level (we recommend
one heaping tablespoon for every 2 cups) and close the
cover.
Note: We recommend you use only a No. 4 cone-shaped paper filter with this
coffeemaker.
4. Place the carafe on the "Keep Warm" plate and plug in the unit.
5. Press On/Off button and the indicator light comes on indicating coffee is
brewing. The display momentarily shows the default time of 1:59 for the "Keep
Warm" Plate. When you release the On/Off button, the indicator light stays on
and clock flashes 12:00 a.m.
6. Press the On/Off button to turn off the coffeemaker. When brewing is complete
and/or all coffee has been served the indicator light goes out indicating the
coffeemaker has been turned off.
7. Replace the carafe on the "Keep Warm" plate when not serving to keep coffee
hot. The "Keep Warm" plate holds coffee at serving temperature for 2 hours and
then automatically shuts off.
Sneak-A-Cup®Interrupt Feature
You can pour a cup of coffee while coffee is brewing without
leaking from the brew basket.
When finished pouring coffee, place the carafe under brew
basket. The brewing process continues (C).
Important: To avoid possible overflow after removing the
carafe, be sure to replace the carafe under the brew basket
within one minute or less.
3
Product may vary slightly from what is illustrated.
1. One-piece cover
2. Water spreader
3. Water reservoir
4. Water window with cup level
markings
5. Cord storage (inside of unit)
6. Control panel
7. "Keep Warm" plate
8. Water-fill/brewed-coffee markings
†9.10-cup/50 oz. (1479 ml) carafe
(Part #9016002-W4116-3 (w)
9016002B10 (b))
†10. Carafe lid (Part # 12160-08(w)
12160-08 (b))
11. Brew basket
†12. Removable filter basket
(Part # 12160-07(w) / 12160-07 (b))
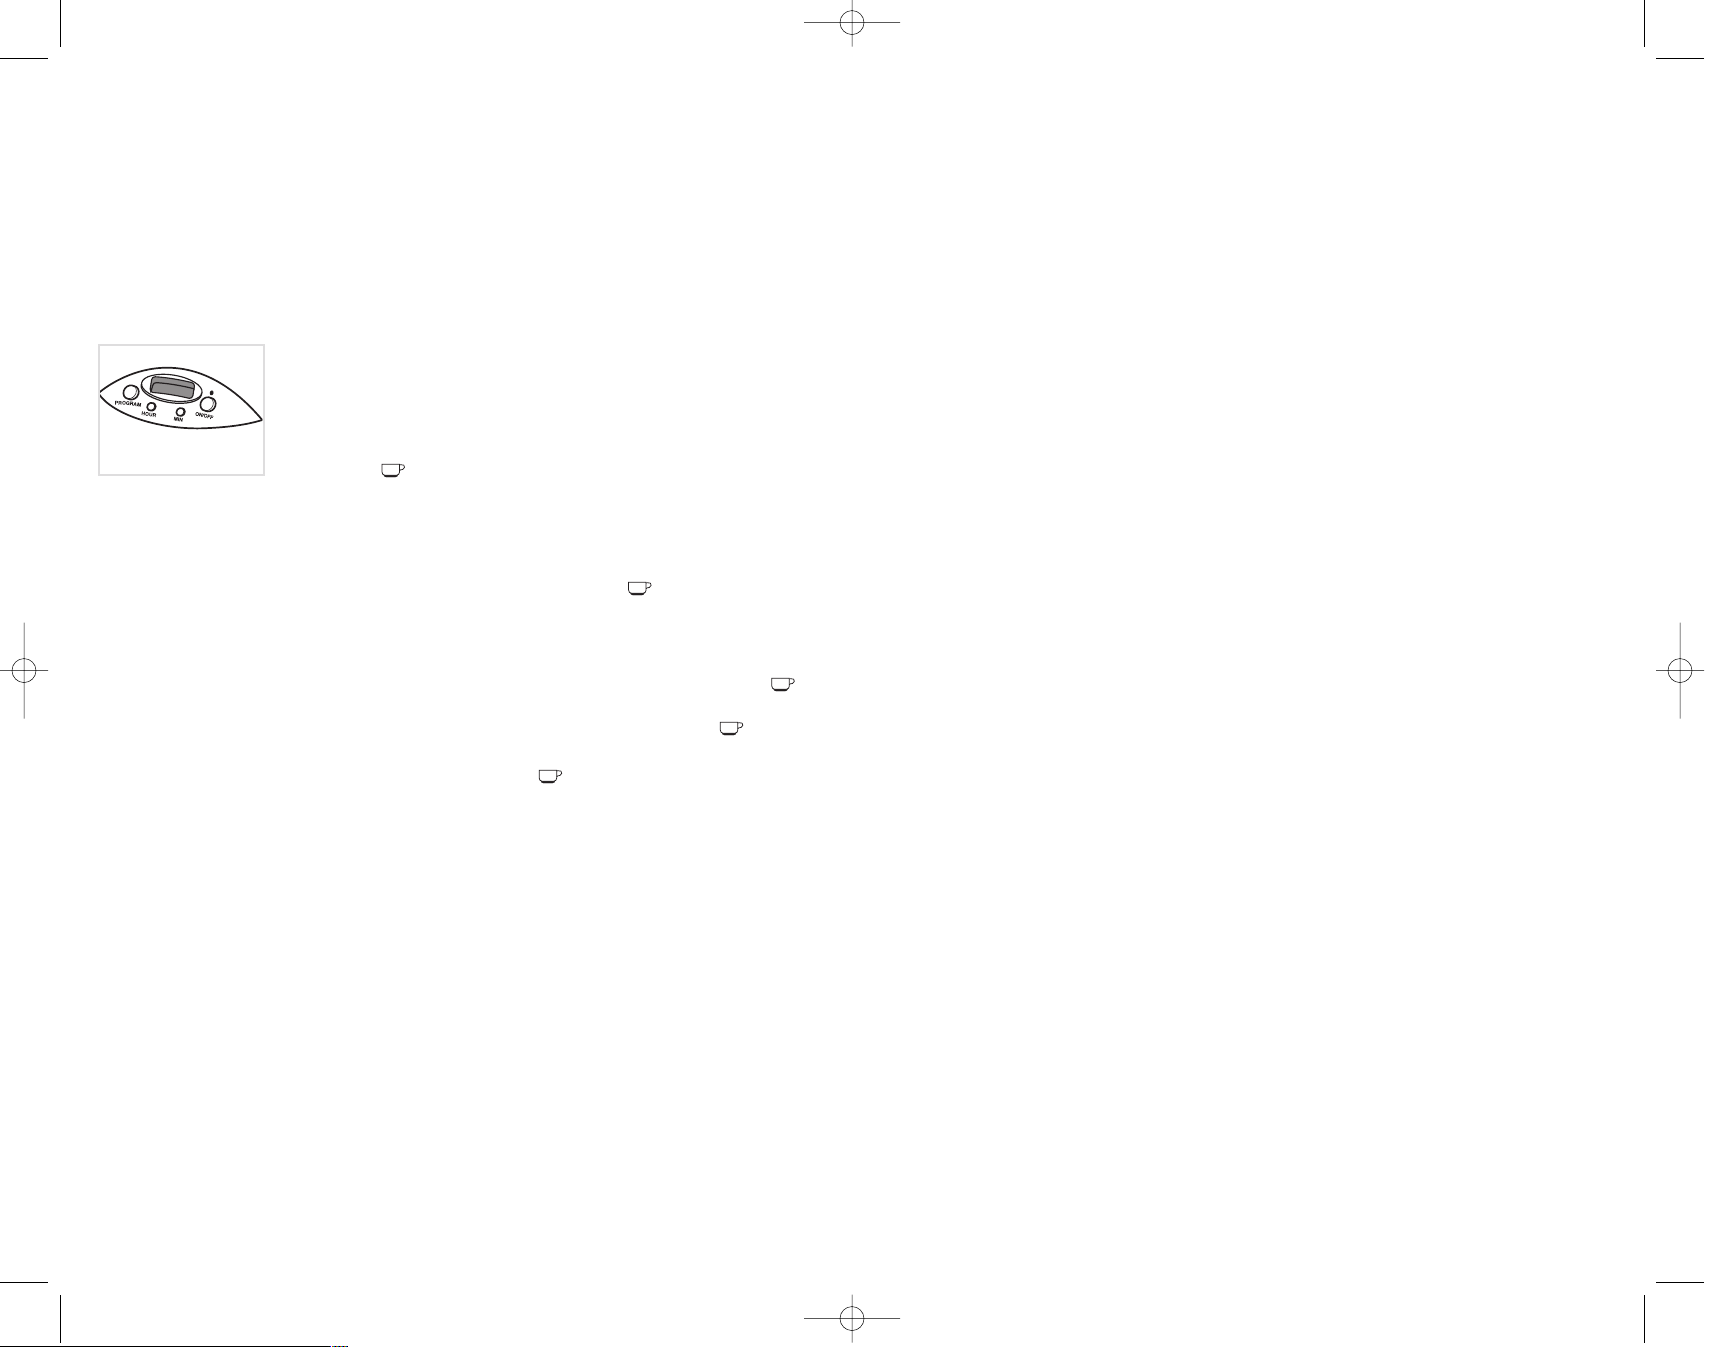
1. Digital display
2. ON indicator light
3. ON/OFF (1/0) button
4. MIN button
5. HOUR button
6. PROG button
A
B
C
CONTROL PANEL
Posts
Grooves
DCME10.Pub178918RV01 3/16/05 12:08 PM Page 4
6
5
SETTING THE CLOCK (D)
1. Plug in the unit. The digital display clock flashes 12:00 a.m. until the correct
time is set.
2. Press the Hour button until the correct a.m. or p.m. hour is reached. The letters
PM appear in the upper left corner of the display.
3. Press the Min button until the correct minutes are reached.
4. When the correct Hour and Min are set, the two dots between the hour and
minute flash indicating that the time is set.
Note: Unplugging the unit will reset the clock to 12:00.
PROGRAMMING THE COFFEEMAKER FOR AUTO-BREW (D)
1. If the clock is not set for the current time of day, see
"SETTING THE CLOCK" section.
2. Be sure the On/Off button is off and the indicator light
is out.
3. Press the Program button and hold until the coffee cup
symbol ( ) begins to flash. When programming the first
time, 6:00 will show on the display; otherwise time previously programmed is
displayed.
4. Using the Hour and Min buttons, program the time you want the coffee to start
brewing (for example 8:00 a.m.)
5. When programming is complete, the coffee cup symbol ( ) goes out after
5 seconds.
6. Prepare the Coffeemaker for brewing coffee (see "To Brew a Pot of Coffee"
section), but don’t turn the unit on.
7. To activate Auto-Brew, press the program button. The coffee cup symbol ( )
comes on and the preset brewing time is displayed momentarily. The digital
clock returns to the current time of day and the coffee cup symbol ( )
remains on the display indicating Auto-Brew has been activated.
8. When brewing begins, the coffee cup symbol ( ) turns off and the indicator
light goes on.
Note: The Auto-Brew function can be canceled at any time by pressing the Auto
On button a second time. On indicator light will go out.
PROGRAMMING THE AUTO-OFF KEEP WARM FEATURE
The "Keep Warm" Plate heats up as soon as the coffeemaker is on and keeps
brewed coffee hot until coffeemaker is turned off and the on indicator light goes
out. However, it can be programmed to keep coffee warm for up to 1 hour and 59
minutes and then automatically shuts off.
1. Press the On/Off button and keep it held down. The digital clock will display
1:59. To adjust the Keep Warm time, press the Hour and then the Min button.
Note: The numerals will run backward when the Keep Warm feature is being
programmed.
2. When desired Keep Warm time has been reached, release the On/Off button.
The indicator light goes out.
3. The Keep Warm time will now be in memory and the digital clock shows the
current time of day.
Care and Cleaning
This product contains no user serviceable parts. Refer service to qualified service
personnel.
CLEANING
1. Be sure the unit is unplugged and cooled.
2. Open the Cover Remove the filter basket, discard the paper filter/grounds.
3. Clean as follows: filter casket, carafe, carafe lid are all top rack dishwasher safe
or they may be hand washed in warm, sudsy water. See below for carafe care.
4. The Coffeemaker’s exterior, control panel area and "Keep Warm" plate may be
cleaned with a soft damp cloth. Do not use abrasive cleansers or scouring
pads. Never immerse the coffeemaker in water.
5. To clean the water reservoir and the water spreader wipe the surfaces with a
damp cloth.
CARING FOR YOUR CARAFE
A damaged carafe may result in possible burns from a hot liquid. To avoid
breaking:
• Do not allow all liquid to evaporate from the carafe while on the "Keep Warm"
Plate or heat the carafe when empty.
• Discard the carafe if chipped, cracked, or damaged in any manner.
• Never use abrasive scouring pads or cleansers, they will scratch and weaken
the glass.
• Do not place the carafe on or near a gas or electric burner, in a heated oven,
or in a microwave oven.
•Avoid rough handling and sharp blows.
MINERAL DEPOSITS AND CLOGGING
Mineral deposits left by hard water can clog your coffeemaker. Cleaning is
recommended every 3 months.
1. Pour white vinegar into the water reservoir up to the 5-cup level on the water
window. Add cold water up to the 8-cup line.
2. Insert a paper filter in the filter basket and close the cover. Set the empty carafe
on the "Keep Warm" plate.
3. Turn on the coffeemaker and let half the cleaning solution brew into the carafe
(till water level goes down to around "4"). Turn off the coffeemaker and let it
soak for at least 15 minutes to soften the deposits.
4. Turn on the coffeemaker and brew the remaining cleaning solution into the
carafe.
5. Turn off the coffeemaker; empty the carafe and discard the soiled filter.
6. Fill the reservoir with cold water to the 9-cup line, replace the empty carafe,
then turn on the coffeemaker for a complete brew cycle to flush out the
remaining cleaning solution. You may have to repeat this to eliminate the
vinegar smell/taste.
7. Wash the filter basket and carafe as instructed in "CLEANING."
D
DCME10.Pub178918RV01 3/16/05 12:08 PM Page 6

8
7
Cuando se utilizan aparatos eléctricos, siempre se debe respetar ciertas
medidas de seguridad a fin de reducir el riesgo de un incendio, un choque
eléctrico y (o) lesiones a las personas, incluyendo las siguientes:
❑
Por favor lea todas las instrucciones.
❑
No toque las superficies calientes Utilice las asas o las perillas.
❑
A fin de protegerse contra el riesgo de un choque eléctrico, no coloque
el aparato de manera que el cable, el enchufe o el mismo aparato entre
en contacto con agua o cualquier otro líquido.
❑
Todo aparato eléctrico utilizado en la presencia de menores de edad
o por ellos mismos requiere la supervisión de un adulto.
❑
Desconecte el aparato de la toma de corriente cuando no esté en
funcionamiento y antes de limpiarlo. Espere que el aparato se enfríe antes
de instalar o retirar las piezas y antes de limpiarlo.
❑
No se debe utilizar ningún aparato eléctrico que tenga el cable o el
enchufe averiado, que presente un problema de funcionamiento o que
esté dañado. Devuelva el aparato al centro de servicio autorizado más
cercano para que lo examinen, reparen o ajusten. También puede llamar
gratis al número apropiado que aparece en la cubierta de este manual.
❑
El uso de un accesorio no evaluado para ser utilizado con este aparato
podría ocasionar lesiones personales.
❑
Este aparato no se debe utilizar a la intemperie.
❑
No permita que el cable cuelgue del borde de la mesa o del mostrador
ni que entre en contacto con las superficies calientes.
❑
No coloque el aparato sobre ni cerca de las hornillas de gas o eléctricas
ni adentro de un horno caliente.
❑
La jarra debe permanecer tapada cuando está en uso.
❑
La jarra está diseñada para ser utilizada con este aparato. Jamás se deberá
utilizar sobre la estufa.
❑
No limpie la jarra con limpiadores abrasivos, con almohadillas de fibra
de metal ni demás limpiadores abrasivos.
❑
Nunca coloque una jarra caliente sobre una superficie fría ni húmeda.
❑
No utilice la jarra si el vidrio se encuentra rajado o si el asa está débil.
❑
El aparato se deberá utilizar únicamente con el fin previsto.
INSTRUCCIONES IMPORTANTES
DE SEGURIDAD
GUARDE ESTAS INSTRUCCIONES.
ENCHUFE POLARIZADO (Solamente para los modelos de 120V)
Este aparato cuenta con un enchufe polarizado (un contacto es más ancho que el otro).
A fin de reducir el riesgo de un choque eléctrico, este enchufe encaja en una toma de
corriente polarizada en un solo sentido. Si el enchufe no entra en la toma de corriente,
inviértalo y si aun así no encaja, consulte con un electricista. Por favor no trate de
alterar esta medida de seguridad.
TORNILLO DE SEGURIDAD
Advertencia: Este aparato cuenta con un tornillo de seguridad para evitar la
remoción de la cubierta exterior del mismo. A fin de reducir el riesgo de incendio o
de choque eléctrico, por favor no trate de remover la cubierta exterior. Este
producto no contiene piezas reparables por el consumidor. Toda reparación se debe
llevar a cabo únicamente
por personal de servicio autorizado.
CABLE ÉLECTRICO
El cable de este aparato fue escogido a fin de evitar el riesgo de enredarse o de
tropezar con un cable de mayor longitud. Cualquier cable de extensión que se deba
emplear, deberá estar calificado para nada menor de 15 amperios. (Para aquellos
productos de 220 voltios, se deberá utilizar un cable de extensión no menor de
6 amperios). Cuando utilice un cable de extensión, asegúrese que no interfiera con
la superficie de trabajo ni que cuelgue de manera que alguien se pueda tropezar.
A fin de aumentar la vida útil del cable, no tire de él ni maltrate las uniones del
cable con el enchufe ni con el aparato.
NOTA: Si el cordón de alimentación se encuentra dañado, debe ser reemplazado
por el fabricante, agente de servicio o persona igualmente calificada a fin de evitar
cualquier peligro.
DCME10.Pub178918RV01 3/16/05 12:08 PM Page 8
 Loading...