

Page 1
SAVE THIS USE AND CARE BOOK
10-Cup
Drip Coffeemaker
1-800-231-9786
QUESTIONS? Please call us TOLL FREE!
?
MODELS DCM200C, DCM703C,
DCM900WH, DCM900BK,
DCM902WH, DCM903WH,
DCM912BK, DCM913BK
IMPORTANT:
PLEASE WASH
CARAFE BEFORE
FIRST USE!
(DCM903WH Shown)
Page 2

IMPORTANT SAFEGUARDS
When using electrical appliances, in order to reduce the risk of fire,
electric shock, and/or injury to persons, basic safety precautions
should always be followed, including the following:
■ Please read all instructions.
■ Do not touch hot surfaces. Use handles or knobs.
■ To protect against fire, electric shock and injury to persons, do not
immerse cord, plug, or coffeemaker base in water or other liquid.
■ To prevent fire or electric shock, do not remove bottom cover from
coffeemaker base. There are no user-serviceable part inside. Repair
should be done by authorized service personnel only.
■ Close supervision is necessary when any appliance is used by or
near children.
■ Allow to cool before putting on or taking off parts and before
cleaning the coffeemaker.
■ Do not operate any appliance with a damaged cord or plug or after
the appliance malfunctions or has been damaged in any manner.
Return the appliance to the nearest Black & Decker (U.S.) Inc.,
Household Appliance Company-Owned or Authorized Service
Center for examination, repair, or adjustment.
■ The use of an accessory not evaluated for use with this coffeemaker
may result in fire, electric shock, or injury to persons.
■ Do not use outdoors.
■ Do not let cord hang over edge of table or counter or touch
hot surfaces.
■ Do not place on or near a hot gas or electric burner or in a hot oven.
■ Do not use coffeemaker for other than intended use.
■ Keep lid on carafe while serving coffee.
■ The carafe is designed for use with this coffeemaker. It must never
be used on a range top or in a microwave oven.
■ Do not set a hot carafe on a wet or cold surface.
■ Do not use a cracked carafe or a carafe with a loose or
weakened handle.
■ Do not clean carafe with cleansers, steel wool pads, or other
abrasive material.
■ Remember to place carafe on the “Keeps Hot” Plate before
brewing and when using the automatic timer on clock models.
■ Do not pour liquid other than water or the cleaning solution
specified in this manual into the water reservoir.
(See “Mineral Deposits and Cleaning,” page 11.)
■ Do not move entire unit when carafe contains hot liquid.
2
Page 3
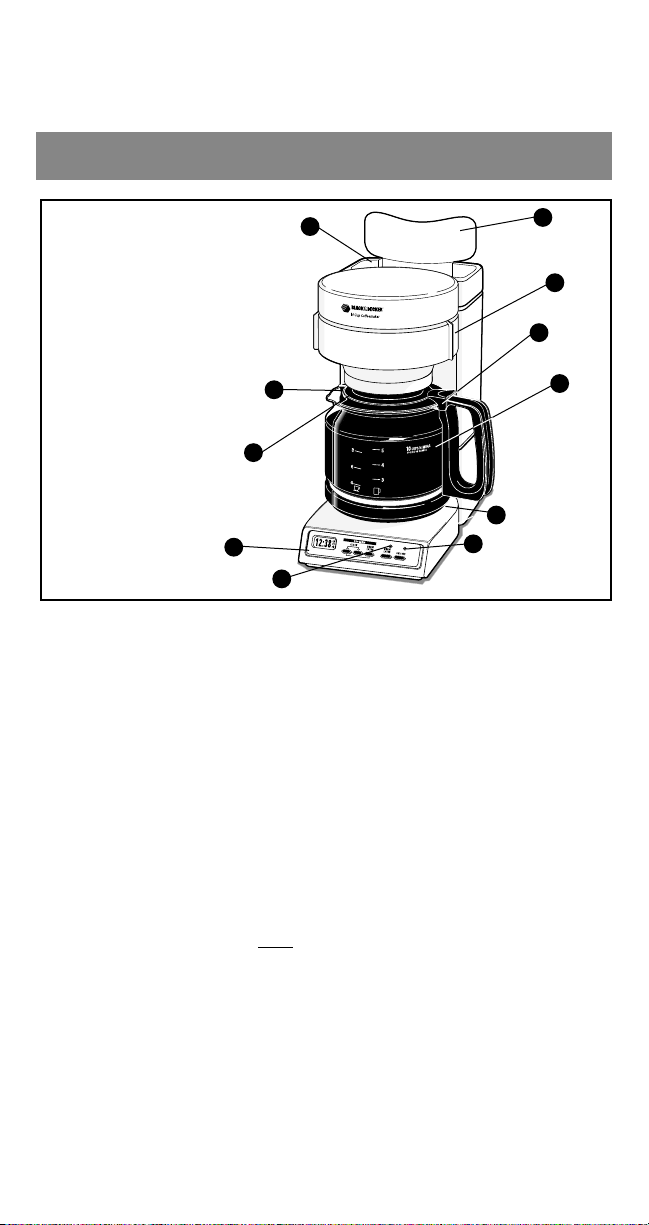
1 Water Reservoir Lid
2 Filter Basket
3 10-Cup Level Mark on Handle
4 Carafe
5 “Keeps Hot” Plate (Under Carafe)
6 Power “On” Light (Red)
7 Brew Later Light (Green)
8 Clock/Control Panel
9 Carafe Lid
10 Drip Stop (Under Basket)
11 Water Reservoir
3
1
2
3
4
5
6
7
8
9
10
11
DCM903WH Shown
POLARIZED This appliance has a polarized plug (one blade is
PLUG wider than the other). As a safety feature, this plug
will fit into a polarized outlet only one way. If the
plug does not fit fully into the outlet, reverse it. If it
still does not fit, contact a qualified electrician. Do
not attempt to defeat this safety feature.
TAMPER- This appliance is equipped with a tamper-resistant
RESISTANT screw to prevent removal of the outer cover. To
SCREW reduce the risk of fire or electric shock, do not
attempt to remove the outer cover. There are no
consumer serviceable parts inside. Repair should
be done only by authorized service personnel
(see pages 13-14 for a list of Black & Decker
Company-Owned Service Centers).
SAVE THES INSTRUCTIONS
■ Do not operate in the presence of explosive and/or flammable fumes.
■ This appliance is intended FOR HOUSHOLD USE ONLY and not for
commercial or industrial use.
Page 4
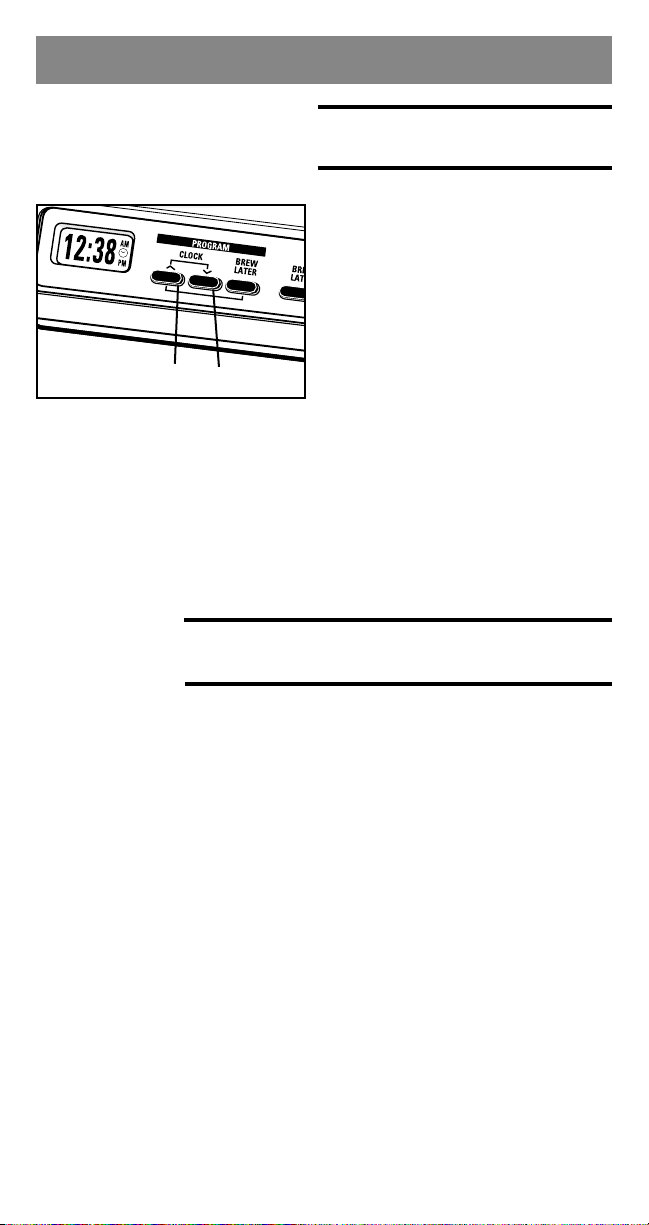
NOTE: It is not necessary to set
the clock before brewing.
1. Plug the Coffeemaker into a
standard electrical outlet. The
Clock will flash 12:00 a.m. It will
remain flashing until either the
Up or Down Buttons are
pressed (Figure A).
2. To move the clock quickly to the
correct time, push and hold
either the Up or Down Button
until the current time of day, a.m. or p.m., is
reached. (You must hold the Button for a few
seconds before the time shown begins to change.)
3. To move forward or backward one minute at a
time, push and release the Up or Down Button as
many times as necessary until the desired time
is reached.
NOTE: Before brewing coffee, the inside of your
Coffeemaker and carafe must be cleaned.
1. Brew 10 cups of fresh water only. Follow the
instructions under “Brewing Coffee - With or
Without Clocks” (pages 4 - 6 ), but do not add
coffee grounds to the paper filter.
2. When all the water has brewed into the Carafe,
turn the Coffeemaker off.
3. Wait 10 minutes, discard the water from the
Carafe, then repeat steps 1 and 2.
4. Wash and dry the Filter Basket, Carafe, and
Carafe Lid.
1. Flip up the Carafe Lid to fill the Carafe with cold
water to the level for the desired number of cups.
2. Open the Water Reservoir Lid and pour the
water from the Carafe into the Water Reservoir.
Close the Water Reservoir Lid.
4
BREWING
COFFEE MODELS
WITH CLOCK
(DCM703C/
DCM903WH/
DCM913BK)
BEFORE
BREWING
COFFEE
SETTING THE CLOCK
(MODEL DCM703C/
DCM903WH/ DCM913BK)
Figure A
●●
Up Down
How To Use
Page 5

3. Remove the Filter Basket and place a standard
cupcake-style paper coffee filter in it.
4. Put coffee grounds in the filter, using 1 level
tablespoon of drip grind coffee for each cup
(5 oz.) of brewed coffee.
NOTE: Use more or less grounds per cup to suit
your taste. When brewing 2-4 cups, use slightly
more grounds per cup (20 tablespoons maximum).
5. Shake the Filter Basket to spread the grounds,
and place the Filter Basket back in the Coffeemaker. Be sure the Filter Basket is pushed all the
way into the unit.
6. Place the Carafe on the “Keeps Hot” Plate,
making sure the Carafe Lid is on the Carafe.
7. Depress the ON/OFF Button. A red Power “On”
Light will glow showing the unit is brewing and
the “Keeps Hot” plate will automatically come on.
8. To serve coffee, remove the Carafe from the
“Keeps Hot” Plate. Always keep the Carafe Lid
on the Carafe when pouring.
9. To keep coffee hot, place the Carafe back on the
“Keeps Hot” Plate when not serving.
10. The “Keeps Hot” Plate will remain on for two
hours then will shut off automatically. If you wish
to turn the Coffeemaker off sooner, depress the
ON/OFF Button and the red Power “On” Light
will turn off.
11. If you’d like to extend the “Keeps Hot” after the
auto shut-off, press the ON/OFF Button to turn
the “Keeps Hot” Plate on for two more hours.
NOTE: The amount of coffee in the Carafe may
be slightly less than the amount of water placed
in the Water Reservoir, since some water is
absorbed by the coffee grounds during brewing.
5
Page 6

1. Remove the Carafe Lid to fill the Carafe with
cold water to the level for the desired number of
cups. Open the Water Reservoir Lid, and pour
the water from the Carafe into the Water
Reservoir. Close the Water Reservoir Lid.
2. Remove the Filter Basket and place a standard,
cupcake-style paper coffee filter in it.
3. Put coffee grounds in the filter, using 1 level
tablespoon of drip grind coffee for each cup
(5 oz.) of brewed coffee.
NOTE: Use more or less grounds per cup to suit
your taste. When brewing 2-4 cups, use slightly
more grounds per cup (20 tablespoons maximum).
4. Shake the Filter Basket to spread the grounds,
and place the Filter Basket back in the Coffeemaker. Be sure the Filter Basket is pushed all
the way into the unit.
5. Place the Carafe on the “Keeps Hot” Plate
making sure the Carafe Lid is on the Carafe.
6
BREWING
COFFEE MODELS
WITHOUT
CLOCKS (DCM200C,
DCM902WH,
DCM912BK)
The clock models have a
Sneak-A-CupTMInterrupt
Feature – an automatic drip
stop. During the brewing cycle,
the Carafe can be removed to
pour a cup of coffee from the
Carafe. (Figure B)
IMPORTANT: The Carafe must
be replaced under the Brew
Basket in less than a minute to
prevent the Brew Basket from
overflowing.
Figure B
SNEAK-A-CUP
TM
INTERRUPT FEATURE
Page 7

7
6. Models DCM902WH,
DCM912BK: Flip the OFF/ ON
Switch to the right to turn the
Coffeemaker on. (Figure C)
7. Models DCM200C,
DCM900WH, DCM900BK: Slide
the Switch to the right and a
red indicator will be visible
next to the Switch. (Figure D)
The “Keeps Hot” plate will
automatically come on when
the brewing begins.
8. Let all the brewed coffee drip
from the Filter Basket before
removing the Carafe.
NOTE: The amount of coffee in
the Carafe may be slightly less
than the amount of water
placed in the Water Reservoir,
since some water is absorbed
by the coffee grounds during
brewing.
9. To serve coffee, remove the Carafe from
the“Keeps Hot” Plate. Always keep the
Carafe Lid on the Carafe when pouring.
10. To keep coffee hot, place the Carafe back
on the“Keeps Hot” Plate when not serving.
11. Models DCM902WH, DCM912BK: To turn
the Coffeemaker off when the Carafe is
empty or you no longer want to keep the
coffee hot, flip the Switch to the left.
12. Models DCM200C, DCM900WH,
DCM900BK: Slide the Switch to OFF. The
“Keeps Hot” plate will go off when the unit
is turned off.
Figure D
Figure C
Page 8

8
1. Press and release the
Brew Later Button under the
Program heading on the
Coffeemaker. A clock symbol
( ) will appear on the
right side of the display
indicating you are in the
Brew Later Program mode.
(Figure E)
2. Press and hold either the
Up or Down Button until the
desired Brew Later start time a.m. or p.m. - is reached.
3. The clock will return to the
current time of day within a
few seconds.
Figure E
NOTE: If the Clock symbol disappears before
pressing the Up or Down Buttons, the display
will go back to the current time of day. Press the
Brew Later Button again to reactivate the
Program mode.
PROGRAMMING THE
COFFEEMAKER TO BREW
LATER (MODELS DCM703C/
DCM903WH/DCM913BK)
NOTE: The first time the
Program Brew Later Button is
pressed after the Coffeemaker
has been plugged in, the
display will show a colon,
3 broken lines, and the clock
symbol (
- : - - ). This
indicates the Timer has no
Brew Later time programmed
into its memory. Press the Up
or Down Buttons to program a
Brew Later time. This
condition will also occur if the
Coffeemaker is unplugged or
there is a power outage for
more than 30 seconds.
Page 9

9
BREWING LATER USING
THE AUTOMATIC TIMER
1. Be sure the Coffeemaker is
ready to brew coffee. (See
“Brewing Coffee - Models
with Clock," page 4.)
2. Press the Brew Later
Button next to the ON/OFF
Button. The green light above the Button will
glow indicating the Coffeemaker will brew when
the current time of day is the same time as the
Brew Later programmed time. (Figure F)
3. When the current time of day reaches the Brew
Later programmed time, the red Power “On”
Light will glow and the Coffeemaker will begin
brewing.
Brew Later can be canceled at any time by
pressing the Brew Later Button. This will turn off
the green Brew Later Light, but no change will
be made to the currently stored Brew Later set
time. To change the stored Brew Later time,
follow the procedures in ”Programming the
Coffeemaker to Brew Later” on pg. 8.
Models with clocks are equipped with an
automatic 30-second power out back-up
function. If you should lose power (or if you
unplug the unit to relocate it once it has been
programmed), the unit will automatically save
the pre-set brew time and the current time of day
as long as power is restored within 30 seconds.
If power is out longer than 30 seconds, you will
have to reset the time of day and re-program
your brew-later timer.
Figure F
NOTE: To view the currently stored Brew Later
time, push the Program Brew Later Button and
the stored time will display. After a few
seconds, the present time of day will be
displayed again.
CANCELING
OR RESETTING
BREW LATER
AUTOMATIC
POWER OUT
BACK-UP
Page 10

10
1. Pour the coffee into a saucepan and heat on a
range top using a low to medium setting. Heat
until the coffee is hot but not boiling; boiling will
affect the coffee’s flavor.
2. IMPORTANT: Never pour brewed coffee back
into the Water Reservoir. Do not place the Carafe
on a cooking surface or in a microwave oven.
NOTE: Do not place anything other than water or
the cleaning solution specified in this book into
the Water Reservoir.
Care Guide
To clean your Coffeemaker after brewing coffee,
be sure the Coffeemaker is turned OFF and is
cool. Discard the paper filter, and clean each
part as follows:
Filter Basket, Glass Carafe, and Carafe Lid
:
Dishwasher - top rack only; or hot, sudsy water.
Coffeemaker:
Wipe with soft, damp cloth and dry.
Do not use abrasive soaps or scouring pads.
Parts washed in a dishwasher may appear to fade.
The original color may be restored by polishing
with a soft, dry cloth.
CARING FOR A damaged Carafe may result in possible burns
YOUR CARAFE from hot liquid. To avoid breaking Carafe:
• Do not allow all liquid to evaporate from
Carafe while on the “Keeps Hot” Plate or heat
Carafe when empty. If this happens, discard
Carafe.
• Discard Carafe if damaged in any manner.
A chip or crack could result in breakage.
• Never use abrasive scouring pads or
cleansers as they will scratch and weaken
the glass.
• Do not place Carafe on or near a hot gas or
electric burner, in a heated oven, or in a
microwave oven.
• Avoid rough handling and sharp blows.
TO REHEAT
LEFTOVER
COFFEE
CLEANING
AFTER
BREWING
COFFEE
Page 11

11
MINERAL Mineral deposits left by water can clog your DEPOSITS Coffeemaker. It is necessary to regularly clean AND your Coffeemaker to flush out these deposits. CLEANING
Clean your Coffeemaker about every 1 - 3 months.
Frequency of cleaning will be affected by water
hardness. If you live in a hard water area, you may
have to clean the Coffeemaker more frequently.
Excessive steaming or a prolonged brewing cycle
are signs that cleaning is needed.
During cleaning, more steaming occurs than when
brewing coffee.
1. Pour white vinegar into the Carafe up to the
”6“ cup level mark and add cold water up to the
10-cup level.
2. Pour this cleaning solution into the Water
Reservoir. Place the Carafe on the “Keeps Hot”
Plate making sure the Carafe Lid is on the
Carafe.
3. Remove the Filter Basket and place a standard
cupcake-style paper coffee filter in it. Put the
Filter Basket back in the Coffeemaker.
4. Turn the Coffeemaker on.
5. Let 1/2 the cleaning solution brew into the
Carafe, then turn the Coffeemaker off.
6. Let the Coffeemaker cool for 15 minutes to
soften the deposits.
7. Pour the liquid that brewed into the Carafe back
into the Water Reservoir.
8. Turn the Coffeemaker on and let all the cleaning
solution brew into the Carafe.
9. Turn the Coffeemaker off and discard the
cleaning solution and soiled paper filter.
10.Fill the Coffeemaker with fresh water; follow
the steps in “Before Brewing Coffee” (page 4) to
flush out the remaining cleaning solution.
11.Wash the filter Basket, Carafe and Lid as
instructed in “Cleaning After Brewing” on pg. 10.
Page 12

12
SERVICE OR Service, if necessary, must be performed by a
REPAIR Black & Decker (U.S.) Inc., Household Appliance
Company-Owned or Authorized Service Center.
The Service Center nearest you can be found in
the yellow pages of your phone book under
“Appliances - Small - Repairing.”
If mailing or shipping your Coffeemaker, clean, dry,
and pack it carefully in its original carton or any
sturdy carton with enough packing material to
prevent damage. Include a note describing the
problem to our Service Center and be sure to give
your return address. We also suggest that you
insure the package for your protection.
Consumer-replaceable parts and accessories are
available at Black & Decker (U.S.) Inc., Household
Appliance Company-Owned or Authorized
Service Centers.
Need Help?
ELECTRICAL The cord length of this appliance was selected to
CORD reduce safety hazards that may occur with a
longer cord. If more cord length is needed,
an extension cord may be used. It should be rated
not less than 10 amperes, 120 volts, and should
have Underwriters Laboratories listing. A properly
rated extension cord may be purchased from a
Black & Decker (U.S.) Inc., Household
Appliance Company-Owned or Authorized Service
Center. When using a longer cord, be sure that it
does not drape over a working area or dangle
where it could be pulled on or tripped over.
Handle cord carefully for longer life; avoid jerking
or straining it at outlet and appliance connections.
Page 13

13
BLACK AND DECKER COMPANY-OWNED SERVICE CENTERS
ALABAMA
BIRMINGHAM — 2412 Green Springs, Hwy., 35209
205-942-0538
MOBILE — 3831 Airport Blvd., 36608 205-343-6624
ALASKA
ANCHORAGE — 910 West International Airport Rd.,
99518 907-563-4664
ARIZONA
MESA — 535 South Dobson Rd., Suite 7, 85202
602-461-1074
PHOENIX — 4501 N. 7th Ave., 85013 602-279-6414
TUCSON — 4845 E. Speedway Blvd., 85712
602-323-3388
ARKANSAS
LITTLE ROCK — 519 W. Seventh St., 72201 501-372-3040
CALIFORNIA
ANAHEIM — 540 South State College Blvd., 92806
714-772-4050
CHULA VISTA — 309 Broadway, 91911 619-420-6350
CONCORD — 1500 Monument Blvd., #C2, 94520
510-682-4880
FRESNO — 5412 North Blackstone Ave., 93710 209-435-
0810
LONG BEACH — 2011 South St., 90805 310-422-5825
LOS ANGELES — 4820 South Eastern Ave., Suite “L”
90040
213-720-1834
RIVERSIDE — 6215 Magnolia Ave., Suite B, 92506
714-787-9700
SACRAMENTO — 2033 Fulton Ave., 95825 916-972-9090
SAN DIEGO — 9270 Clairmont Mesa Blvd., 92123
619-279-2011
SAN JOSE — 1185 South Bascom Ave., 95128 408-293-
7350
SAN LEANDRO — 15206 East 14th St., 94578 510-276-
1610
VAN NUYS — 14920 Victory Blvd., 91411 818-787-5531
COLORADO
DENVER — 1171 South Federal Blvd., Box 19220, 80219
303-922-8325
CONNECTICUT
HARTFORD — 662 Silas Deane Hwy., 06109 203-5635800
ORANGE — 481 Boston Post Rd., 06477 203-795-3583
DISTRICT OF COLUMBIA
COLMAR MANOR, MD — 4153 Bladensburg Rd., 20710
301-779-3808
FALLS CHURCH, VA — 344 W. Broad St., 22046
703-533-7313
FLORIDA
FT. LAUDERDALE — 799 East Oakland Pk. Blvd., 33334
305-566-5102
FT. MYERS — 5224 Bank St., 33907 813-278-1188
JACKSONVILLE — 920 Cassat Ave., 32205 904-781-2253
MIAMI — 13345 North West Seventh Ave., 33168
305-681-6658
MIAMI — 12233 South Dixie Hwy., 33156 305-232-9497
ORLANDO — 3807 East Colonial Dr., 32803 407-894-7011
ST. PETERSBURG — 5635 49th St. North, 33709
813-525-0273
TAMPA — 3432 West Kennedy Blvd., 33609 813-872-
8317
WEST PALM BEACH — 310 South Military Trail, 33415
407-689-3247
GEORGIA
ATLANTA (South) — 5330 Old National Hwy., 30349 404762-8844
SMYRNA — 2550 Cobb Parkway South, 30080 404-9560869
STONE MOUNTAIN — 5723 Memorial Dr., 30083 404292-4714
HAWAII
HONOLULU — Unit No. 106, Sand Island Access Rd.,
96819 808-847-7447
ILLINOIS
CHICAGO (Lincolnwood) — 6710 North Crawford Ave.,
60646 708-673-0923
DES PLAINES — 1277 South Elmhurst Rd., 60018 708364-5220
LISLE — 2950 Ogden Ave., Unit H, 60532 708-717-1075
MOLINE — 4433 23rd Ave., 61265 309-762-3000
OAK LAWN — 6343 W. 95th St., 60453 708-423-7212
WAUKEGAN, — 39 S. Greenbay Rd., 60085 703-249-4390
INDIANA
EVANSVILLE — 307 First Ave., Crescent Ctr., 47710 812425-4269
HAMMOND — 7103 Kennedy Ave., 46323 219-845-5100
INDIANAPOLIS (Speedway) — 5999 Crawfordsville Rd.,
46224 317-243-8308
IOWA
DES MOINES — 3427 Merle Hay Rd., 50310 515-2701340
KANSAS
WICHITA — 155 South West St., 67213 316-943-1271
KENTUCKY
LOUISVILLE — 5211 Preston Hwy., 40213 502-968-7100
LOUISIANA
BATON ROUGE — 11859 Florida Blvd., 70815 504-2728111
HARVEY — 2500 Lapalco Blvd., 70058 504-366-8676
METAIRIE (New Orleans) — 3504 North Causeway
Blvd., 70002 504-837-2550
SHREVEPORT — 7710-7714 Jewella Rd., 71108 318-688-
1553
MARYLAND
BALTIMORE — 4712 Erdman Ave., 21205 410-485-5550
BALTIMORE — 29-31 Cranbrook Rd., Cockeysville, 21030
410-666-5966
COLMAR MANOR (Wash. D.C.) — 4153 Bladensburg
Rd., 20722 301-779-3808
PASADENA — 8220 Ritchie Hwy., 21122 410-647-8456
MASSACHUSETTS
BRIGHTON (Boston) — 12 Market St., 02135 617-7826264
SEEKONK — 120 Highland Ave., 02771 508-336-6510
MICHIGAN
GRAND RAPIDS — 3040 28th St.,SE, 49512 616-949-8331
LANSING — 3203 W. Saginaw Hwy., 48917 517-323-
4181
WARREN — 27035 Van Dyke Blvd., 48093 313-756-6711
WESTLAND — 8067 N. Wayne Rd., 48185 313-427-1520
MINNESOTA
BLOOMINGTON — 9517 Lyndale Ave., South, 55420
612-884-9191
Page 14

MISSOURI
KANSAS CITY — 4324 Main St., 64111 816-531-0629
ST. ANN — 3637 North Lindbergh Blvd., 63074
314-739-4661
ST. LOUIS — 12852 Manchester Rd., 63131 314-821-8740
NEBRASKA
OMAHA — 4225 South 84th St., 68127 402-592-5666
NEVADA
LAS VEGAS — 3411 East Charleston Blvd., 89104
702-641-6555
NEW JERSEY
CHERRY HILL — 1444 East Marlton Pike (Rt. 70), 08034
609-429-2822
LITTLE FALLS — 1189 U.S. Hwy. 46, 07424 201-256-9373
SCOTCH PLAINS — 2520 Route #22 East, 07076 908-233-
5665
NEW MEXICO
ALBUQUERQUE — 5617 Menaul Blvd., N.E., 87110
505-884-1002
NEW YORK
ALBANY (Latham) — 836 Troy-Schenectady Rd., 12110
518-785-1867
BUFFALO — 881 West Delavan Ave., 14209 716-8846220
CENTEREACH L.I. — 2061-63 Middle Country Rd., 11720
516-737-4706
NEW YORK (Elmhurst) — 77-20 Queens Blvd., 11373
718-335-1042
NEW YORK (Manhattan) — 50 West 23rd St., 10010
212-929-6450
NEW YORK (Westbury, L.I.) — 1061 Old Country Rd.,
11590 516-997-6140
ROCHESTER — 2969 W. Henrietta Rd., 14623 716-4241310
SYRACUSE — 3485 Erie Blvd., East, 13214 315-446-3086
NORTH CAROLINA
CHARLOTTE — 3007 East Independence Blvd., 28205
704-374-1779
GREENSBORO — 3716 High Point Rd., 27407 919-8521300
RALEIGH — 2930 Capital Blvd., 27604 919-878-0357
OHIO
CINCINNATI — 2310 East Sharon Rd., 45241 513-7723111
COLUMBUS — 3975 East Livingston Ave., 43227
614-237-0461
DAYTON — 2898 South Dixie Drive, 45409 513-298-1951
MAYFIELD HEIGHTS — 5881 Mayfield Rd., 44124
216-449-2770
PARMA HEIGHTS (Cleveland) — 6483 Pearl Rd., 44130
216-842-9100
TOLEDO — 3231 Dorr St., 43607 419-531-8921
OKLAHOMA
OKLAHOMA CITY — 1318 Linwood Blvd., 73106
405-232-7515
TULSA — 3120 S. Sheridan Rd, 74145 918-622-5666
OREGON
PORTLAND — 1640 NW Johnson St., 97209
503-228-8631
PENNSYLVANIA
ALLENTOWN (Whitehall) — 2242 MacArthur Rd., 18052
215-435-9544
EVANS CITY — Cranberry Town Center Plaza, 20808 Rt.
19 N., 16033 412-779-9600
HARRISBURG — 6080 Allentown Blvd., 17112 717-5450651
LANCASTER — 118 Keller Ave., 17601 717-393-5251
PHILADELPHIA — 9977-81 Bustleton Ave., 19115
215-464-7771
PHILADELPHIA — 333 North 20th St., 19103 215-564-
5520
PITTSBURGH — 5437 Baum Blvd., 15232 412-362-2700
WILKES-BARRE — 759 Kidder St., 18702 717-824-5704
PUERTO RICO
GUAYNABO — “C” Street # 14, Rexco Industrial Park,
00922-1924 809-783-3535
RHODE ISLAND
SEEKONK, MA — 120 Highland Ave., 02771 508-3366510
SOUTH CAROLINA
GREENVILLE — 1557 Laurens Rd., 29607 803-232-3038
TENNESSEE
CHATTANOOGA — Perimeter Place Shopping Ctr., Sp.
E, 6231 Perimeter Dr., 37421 615-894-5957
KNOXVILLE — 4118 North Broadway, 37917 615-6880921
MEMPHIS — 1085 East Brooks Rd., 38116 901-332-3444
NASHVILLE — 4811 Nolensville Rd., 37211 615-833-8277
TEXAS
AMARILLO — 3008 West 6th Ave., 79106 806-373-1531
AUSTIN — 6549 Burnet Rd., 78757 512-459-1133
DALLAS — 2257 Royal Lane, 75229 214-620-8655
EL PASO — 6822 Gateway East, 79915 915-778-9769
FORT WORTH — 721 North Beach St., 76111 817-831-
3828
GARLAND — 78 West Centerville Rd., 75043 214-686-
9302
HOUSTON — 536 East Tidwell Rd., 77022 713-692-7111
SAN ANTONIO — 500 Culebra Ave., 78201 210-732-1221
WEBSTER — 100 East Nasa Road One, Ste. 75, 77598
713-338-4556
UTAH
SALT LAKE CITY — 1541 S. Third West St., 84115 801486-5828
VIRGINIA
FALLS CHURCH — 344 W. Broad St., 22046 703-533-7313
HAMPTON — 3416 W. Mercury Blvd., 23666 804-826-
9382
NORFOLK — 7631 Sewells Point Rd., 23513 804-480-3333
RICHMOND — 1424 Chamberlayne Ave., 23222 804-649-
9245
WASHINGTON
SEATTLE — 421 S. Michigan, 98108 206-763-2010
SPOKANE — N. 7011 Division St., 99208 509-467-8190
TACOMA — 2602 S. 38th St., 98409 206-473-6040
WEST VIRGINIA
CHARLESTON — 1638 Sixth Ave., 25312 304-343-0289
WISCONSIN
MILWAUKEE (Wauwatosa) — 10424 W. Bluemound Rd.,
53226 414-453-4240
REV: 8/94
14
Page 15

15
Quick Tips
QUESTIONS & ANSWERS
1. Do I have to set the clock in order to brew coffee?
No. You don’t have to set the clock or the automatic timer to brew
coffee. Simply follow the regular brewing instructions and press the
“On/Off” Button to begin brewing.
2. Do I have to wait until my coffeemaker shuts off automatically to
extend the “Keeps Hot” plate for another two hours?
No. You can extend the “Keeps Hot” plate time for two more hours on
the clock models any time during operation by pressing the “On/Off”
Button twice — once to turn the unit off and again to turn it back on.
3. If there is a power outage, will I lose the brew time I programmed in?
If the power returns within 30 seconds, the automatic power back-up
will save the pre-set brew time and the current time of day on clock
models. If the outage lasts longer than 30 seconds, you will have to
re-program your clock and timer.
4. I have a black model and I noticed a dusty film on the unit.
What should I do?
The black coffeemakers are made of a durable plastic that
occasionally develop a thin white film. This is normal. To restore the
original black sheen, simply wipe the unit with a soft, dry cloth.
5. Will coffee drip from the basket when I remove the carafe during
brewing?
No. The Sneak-A-Cup™ Interrupt Feature on clock models has a drip
stop that keeps the coffee from dripping when the carafe is removed
to “sneak-a-cup” during brewing. However, be sure to return the
carafe to the “Keeps Hot” plate within 60 seconds to avoid overflow
from the brew basket.
ACCESSORIES Accessories or parts are available at most Black
OR REPLACEMENT & Decker Company-Owned Service Centers
PARTS (see list on pgs. 13-14). However, you may order
parts or accessories by phone.
To place an order by phone, call
TOLL-FREE: 1-800-258-6003
Orders may be called in 8:00 a.m. to 4:30 p.m. EST
Monday thru Friday. We accept VISA,
MasterCard, American Express, or Discover.
Offer good only in the United States. Allow 3-4
weeks for delivery.
Page 16

FULL Black & Decker (U.S.) Inc. warrants this product TWO-YEAR against any defects that are due to faulty material WARRANTY or workmanship for a two-year period after the
original date of consumer purchase or receipt as a
gift. This warranty does not include damage to the
product resulting from accident or misuse. If the
product should become defective within the
warranty period, we will repair it or elect to
replace it free of charge. We will return your
product, transportation charges prepaid, provided
it is delivered prepaid to any Black & Decker (U.S.)
Inc., Household Appliance Company-Owned or
Authorized Service Center.
This warranty gives you specific legal rights, and
you may also have other rights which vary from
state to state.
Answers to any questions regarding warranty or
service locations may be obtained by calling toll
free, 1-800-231-9786, or by writing:
Consumer Assistance and Information
Black & Decker (U.S.) Inc.
626 Hanover Pike
Hampstead, MD 21074-0618
Listed by Underwriters Laboratories Inc.
Copyright © 1989, 1994 Black and Decker
Pub. No. 168638-10-RV03
Printed in U.S.A.
 Loading...