

Page 1

www.blackanddecker.ae
DCM600
Page 2

ENGLISH
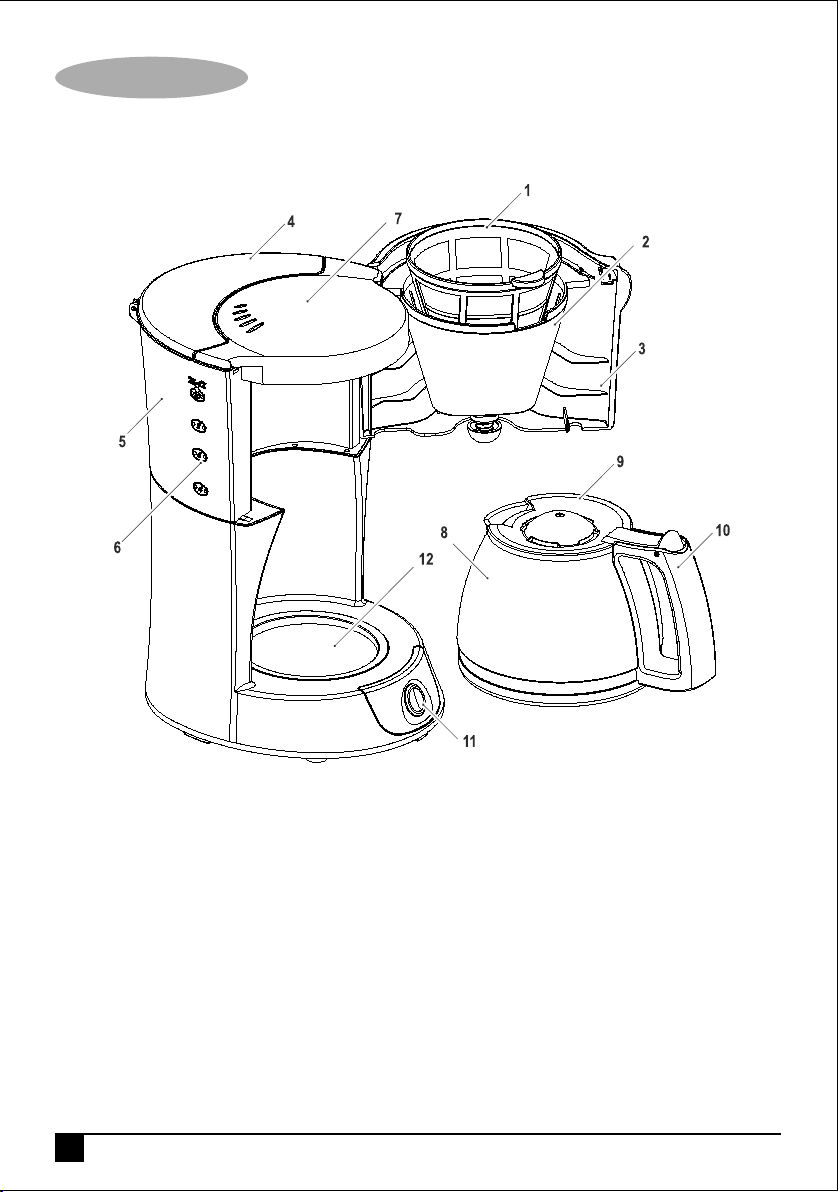
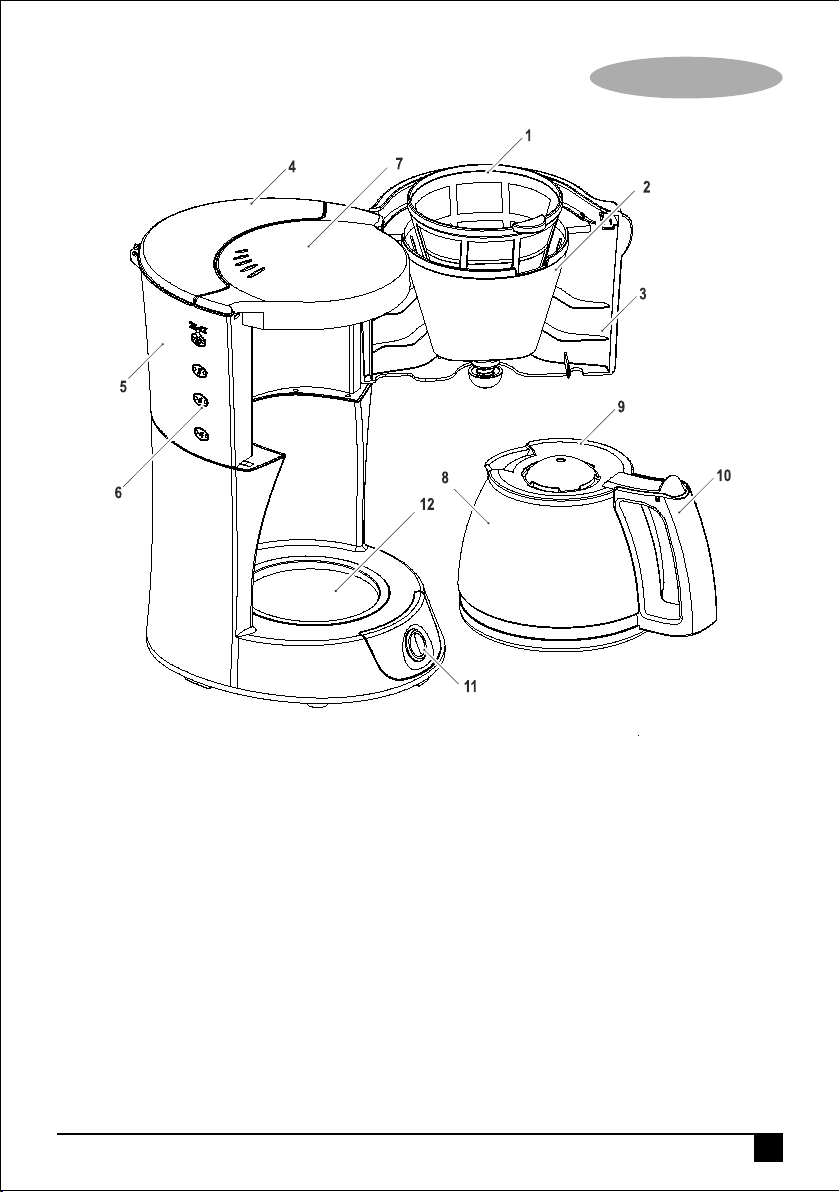
Parts Identification
1. Filter
2. Filter holder
3. Filter cover
4. Water tank lid
5. Water tank
6. Water guage
2
7. Lid
8. Carafe
9. Carafe lid
10. Carafe handle
11. On/Off switch
12. Hot plate
Page 3

ENGLISH
Intended use
Your Black & Decker coffee maker has been
designed for making coffee.
This product is intended for household use only.
Thank you for choosing Black & Decker. We
hope that you will enjoy using this product for
many years.
Read this entire manual carefully
before using the appliance.
Safety instructions
Warning! When using mains-powered
appliances, basic safety precautions, including
the following, should always be followed to
reduce the risk of fire, electric shock and
personal injury.
• The intended use is described in this manual.
The use of any accessory or attachment or
the performance of any operation with this
appliance other than those recommended in
this instruction manual may present a risk of
personal injury.
• Retain this manual for future reference.
Using your appliance
• Always take care when using the appliance.
• Do not use the appliance outdoors.
• Never pull the power supply cord to
disconnect the plug from the socket. Keep the
power supply cord away from heat, oil and
sharp edges.
• If the power supply cord is damaged during
use, disconnect the appliance from the power
supply immediately. Do not touch the power
supply cord before disconnecting from the
power supply.
• Disconnect the appliance from the power
supply when not in use and before cleaning.
Safety of others
• This appliance is not intended for use by
persons (including children) with reduced
physical sensory or mental capabilities, or
lack of experience and knowledge, unless
they have been given supervision or
instruction concerning use of the appliance by
a person responsible for their safety.
• Children should be supervised to ensure that
they do not play with the appliance.
After use
• Switch off, remove the plug from the socket
and let the appliance cool down before
leaving it unattended and before changing,
cleaning or inspecting any parts of the
appliance.
• Do not operate the appliance if your hands
are wet. Do not operate the appliance if you
are barefoot.
• Guide the power supply cord neatly so it
does not hang over the edge of a worktop
and cannot be caught accidentally or tripped
over.
• When not in use, the appliance should be
stored in a dry place. Children should not
have access to stored appliances.
Inspection and repairs
• Switch off the appliance before cleaning,
changing accessories or approaching parts
which move in use
3
Page 4

ENGLISH
• Before use, check the appliance for
damaged or defective parts. Check for
breakage of parts, damage to switches and
any other conditions that may affect its
operation.
• Do not use the appliance if any part is
damaged or defective.
• Have any damaged or defective parts
repaired or replaced by an authorised repair
agent.
• Before use, check the power supply cord for
signs of damage, ageing and wear.
• Do not use the appliance if the power supply
cord or mains plug is damaged or defective.
• If the power supply cord or mains plug is
damaged or defective it must be repaired by
an authorised repair agent in order to avoid a
hazard. Do not cut the power supply cord
and do not attempt to repair it yourself.
• Never attempt to remove or replace any
parts other than those specified in this
manual.
Electrical safety
Before use, check that the mains voltage
corresponds to the voltage on the rating plate.
This product must be earthed. Always check
that the mains voltage corresponds to the
voltage on the rating plate.
Appliance plugs must match the outlet. Never
modify the plug in any way. Do not use any
adapter plugs with earthed (Class 1) appliances.
Unmodified plugs and matching outlets will
reduce the risk of electric shock.
Extension cables & class 1
product
• A 3 core cable must be used as your tool is
earthed and of class 1 construction.
• Up to 30m (100 ft) can be used without loss
of power.If the supply cord is damaged, it
must be replaced by the manufacturer or an
authorised Black & Decker Service Centre in
order to avoid a hazard.
Mains plug replacement
If a new mains plug needs to be fitted:
• Safely dispose of the old plug
• Connect the brown lead to the live terminal of
the new plug
• Connect the blue lead to the neutral terminal
• If the product is class I (earthed), connect the
green/yellow lead to the earth terminal.
Note: If your product is class II double insulated
(only 2 wires in the cord set), no connection is to
be made to the earth terminal.
Follow the fitting instructions supplied with good
quality plugs
Any replacement fuse must be of the same
rating as the original fuse supplied with the
product.
Warning! The above section on mains plug
replacement is for authorized service centre
personals.
4
Page 5

ENGLISH
Additional safety instructions
for coffee makers
Warning! The lid may become hot during use.
Warning! Steam may escape from the unit.
• Allow the appliance to cool before fitting or
removing any parts and before cleaning.
• During use, the carafe and the hotplate can
get very hot.
• Do not use the appliance if the carafe shows
any sign of cracks.
• Do not immerse the appliance in liquid.
Use
Warning! Never use the appliance without
water in the reservoir.
Before first use
• Unpack the coffee maker and remove all
packaging, promotional materials and
stickers. Remove all printed documents.
• Check that your mains supply is the same as
the one indicated on the appliance.
• Position the appliance on a flat, stable work
surface, away from the edge and other
electrical appliances. Ensure that the coffee
maker is not positioned under any cupboards
or near any furnishings, wallpaper or similar
that could be damaged by hot steam.
• Wash all removable parts of the appliance in
warm, soapy water. Rinse and dry thoroughly
with a soft cloth. Do not use harsh/abrasive
cleaners or place any part of the appliance in
the dishwasher.
Warning! Never immerse the main body of the
appliance, cord set or plug in water or any other
liquid.
• We recommend that you first familiarise
yourself with all parts of the appliance before
using it for the first time. Do not fill with water
or connect to the mains supply when doing
this.
• To remove any remaining residue from the
manufacturing process, we recommend
operating the coffee maker as described in
the ‘ Use ’ section. This will flush the
appliance out. Use water only, do not add
coffee.
Note! Ensure that the coffee maker mains cord
does not overhang the edge of the worktop.
Note! When the coffee maker is plugged in and
operated for the first time, there may be a small
amount of smoke and/or odour as the heating
elements warm up. This represents no danger
or malfunction with the product and should clear
after a couple of uses.
Adding coffee
• Open the filter cover (3).
• Place the filter (1) in the filter holder (2). Add
the desired amount of coffee.
• Close the filter cover (3).
• Place the carafe (8) on the hotplate (12).
Adding water
• Using the glass carafe (8), fill the water tank
(5) with the desired quantity of COLD water.
5
Page 6

ENGLISH
Note! Do not fill with less than 2 cups of water
or above the MAX mark on the water tank
gauge.
• Close the water tank lid (4) and place the
empty carafe (8), with the lid closed,
Warning! DO NOT open the water tank lid (4)
whilst the coffee maker is on. Hot water may be
ejected.
Switching on and off
• To switch the appliance on, press the on/off
button (11).
• To switch the appliance off, press the on/off
button (11) again.
Note! Once the brewing process is complete the
coffee maker will begin the Keep Warm Time.
Pressing the ‘ON/OFF’ button (11), when the
coffee maker is already on, will cancel the
brewing process / keep warm time and will turn
the coffee maker off.
Anti-drip function
The appliance is fitted with an anti-drip function,
allowing you to remove the carafe at any time,
even when coffee is still dripping from the filter
bowl.
Cleaning and maintenance
Warning! Before cleaning and maintenance,
switch the appliance off and remove the plug
from the socket.
• Using the handles, remove the filter (1) from
the filter holderl (2). Remove the used coffee
grounds from the filter.
• Wash the carafe (8) and the filter (1) in hot,
soapy water. Dry all parts and refit them.
• Wipe the outside of the appliance with a
damp cloth.
Descaling the appliance
If the appliance is used in an area with hard
water, it is advised to de-scale the appliance
when from time to time.
• Use a commercial de-scaling agent for coffee
makers, or use water and vinegar as follows:
Technical data
DCM600
Voltage 220 – 240 Volts
(50/60 Hz)
Power 800W
Weight 2 kg
• Take the carafe (8) from the hotplate (12)
and pour the desired amount of coffee.
• Replace the carafe (8) on the hotplate (12)
and allow the remainder of the coffee to drip
into the carafe (8).
Note! The carafe should be returned to the
hotplate within 30 seconds of removal.
6
Page 7

ENGLISH
Protecting the environment
Separate collection. This product must not
be disposed of with normal household
waste.
Should you find one day that your Black &
Decker product needs replacement, or if it is of
no further use to you, do not dispose of it with
other household waste. Make this product
available for separate collection.
• Black & Decker provides a facility for
recycling Black & Decker products once they
have reached the end of their working life.
This service is provided free of charge. To
take advantage of this service please return
your product to any authorised repair agent
who will collect them on our behalf.
• You can check the location of your nearest
authorised repair agent by contacting your
local Black & Decker office at the address
indicated in this manual. Alternatively, a list of
authorized Black & Decker repair agents and
full details of our after-sales service and
contact are available on the Internet at:
www.2helpU.com.
Warranty
Black & Decker is confident of the quality of its
products and offers an outstanding warranty.
This warranty statement is in addition to and in
no way prejudices your statutory rights.
The warranty is valid within the territories of the
Member States of the European Union and the
European Free Trade Area.
If a Black & Decker product becomes defective
due to faulty materials, workmanship or lack of
conformity, within 24 months from the date of
purchase, Black & Decker warranty to replace
defective parts, repair products subjected to fair
wear and tear or replace such products to ensure
minimum inconvenience to the customer unless:
The product has been used for trade,
professional or hire purposes;
The product has been subjected to misuse
or neglect;
The product has sustained damage
through foreign objects, substances or
accidents;
Repairs have been attempted by persons
other than authorised repair agents or
Black & Decker service staff.
To claim on the warranty, you will need to submit
proof of purchase to the seller or an authorised
repair agent. You can check the location of your
nearest authorised repair agent by contacting
your local Black & Decker office at the address
indicated in this manual.
Alternatively, a list of authorised Black & Decker
repair agents and full details of our after-sales
service and contacts are available on the Internet
at: www.2helpU.com.
7
Page 8
FRANÇAIS
Identification des pièces
1. Filtre
2. Porte-filtre
3. Couvre-filtre
4. Couvercle du réservoir à eau
5. Réservoir à eau
6. Indicateur de niveau d’eau
8
7. Couvercle
8. Carafe
9. Couvercle de la carafe
10. Poignée de la carafe
11. Interrupteur Marche/Arrêt
(On/Off)
12. Plaque chauffante
Page 9

FRANÇAIS
Utilisation prévue
Votre cafetière Black & Decker a été conçue
pour infuser du café.
Cet appareil est uniquement destiné à un usage
domestique. Nous tenons à vous remercier
d’avoir choisi Black & Decker. Nous espérons
que vous prendrez plaisir à utiliser cet appareil
pendant de nombreuses années.
Lire ce manuel attentivement avant
d’utiliser l’appareil.
Consignes de sécurité
Avertissement! Lorsqu’on utilise un appareil
électrique, il faut toujours respecter certaines
règles de sécurité fondamentales, notamment
les suivantes, afin de prévenir les risques
d’incendie, de décharges électriques, de
blessures corporelles ou de dégâts matériels.
• Ce manuel décrit la manière d’utiliser cet
appareil. L’utilisation d’un accessoire ou
d’une fixation, ou l’utilisation de cet appareil
à d’autres fins que celles recommandées
dans ce manuel d’instruction peut présenter
un risque de blessures corporelles.
• Conservez ce manuel pour un usage
ultérieur.
Utilisation de votre appareil
• Prendre toutes les précautions nécessaires
avant d’utiliser l’appareil.
• Ne pas utiliser l’appareil à l’extérieur.
• Ne pas faire fonctionner l’appareil si vos
mains sont mouillées. Ne pas faire
fonctionner l’appareil si vous êtes pieds nus.
• Positionner soigneusement le cordon
d’alimentation et veiller à ce qu’il ne pende
pas du plan de travail pour éviter de le
coincer par mégarde ou de trébucher
dessus.
• Ne jamais tirer sur le cordon d’alimentation
pour débrancher la fiche de la prise. Tenir le
cordon d’alimentation éloigné des sources de
chaleur, de la graisse et des angles vifs.
• Si le cordon d’alimentation est endommagé
pendant le fonctionnement, débrancher
l’appareil du secteur électrique
immédiatement. Ne pas toucher le cordon
d’alimentation avant de l’avoir débranché du
secteur
• Débrancher l’appareil du secteur électrique
lorsqu’il n’est pas utilisé et avant de le
nettoyer.
Sécurité d’autrui
• Cet appareil ne doit pas être utilisé par des
personnes (y compris les enfants) ayant des
déficiences physiques, sensorielles ou
mentales. Cette consigne s’applique aussi
aux personnes manquant d’expérience ou de
connaissances du matériel, à moins que
celles-ci n’aient reçu les instructions
appropriées ou ne soient encadrées par une
personne responsable de leur sécurité pour
utiliser l’appareil.
• Ne laissez jamais les enfants sans
surveillance pour éviter qu’ils ne jouent avec
cet appareil.
Après utilisation
• Eteindre, débrancher l’appareil et attendre
son refroidissement avant de le laisser sans
surveillance et avant de changer, nettoyer ou
inspecter les éléments de l’appareil.
• Lorsque l’appareil n’est pas utilisé, rangez-le
dans un endroit sec. Ne pas permettre aux
enfants d’avoir accès aux appareils rangés.
Inspection et réparations
• Eteindre l’appareil avant de le nettoyer, de
changer les accessoires ou d’approcher les
pièces en mouvement pendant la phase de
fonctionnement
9
Page 10

FRANÇAIS
• Avant l’utilisation, vérifiez l’état de l’appareil
et des pièces. Vérifiez la présence de pièces
cassées, interrupteurs endommagés ou
toute autre anomalie susceptibles de nuire
au bon fonctionnement de l’appareil.
• N’utilisez pas l’appareil si un élément est
endommagé ou défectueux.
• Faites réparer ou remplacer toute pièce
endommagée ou défectueuse par un
réparateur agréé.
• Avant l’utilisation, vérifiez l’état du cordon
d’alimentation pour des signes de
dommages, de vieillissement ou d’usure.
• N’utilisez pas l’appareil si le cordon
d’alimentation ou la fiche secteur sont
endommagés ou défectueux.
• Si le cordon d’alimentation ou la fiche
secteur sont endommagés ou défectueux, ils
doivent être réparés par un réparateur agréé
pour éviter les risques d’accident. Ne coupez
pas le cordon d’alimentation et n’essayez
pas de le réparer vous-même.
• Ne tentez jamais d’enlever ou de remplacer
des pièces autres que celles citées dans ce
manuel.
Sécurité électrique
Avant d’utiliser l’appareil, vérifier que la tension
électrique correspond à celle indiquée sur
l’étiquette signalétique.
Cet appareil doit être mis à la terre.
Penser à toujours vérifier que la tension
électrique correspond à celle indiquée sur
l’étiquette signalétique.
• La fiche de l’appareil doit correspondre à la
prise utilisée. Ne jamais modifier la fiche de
quelque façon que ce soit. Ne pas utiliser
d’adaptateurs avec des appareils mis à la
terre (Classe 1). L’utilisation de fiches non
modifiées avec des prises correspondantes
réduit les risques de chocs électriques.
Rallonges et appareils de
classe 1
• Utilisez un cordon à 3 fils car votre appareil
est mis à la terre et de fabrication classe 1.
• Une longueur allant jusqu’à 30m (100 pieds)
peut être utilisée sans perte de puissance.
• Si le cordon d’alimentation est endommagé,
il doit être remplacé par le fabricant ou un
Centre de Service agréé Black & Decker afin
d’éviter tout danger.
Remplacement de la fiche
électrique
En cas d’installation d’une nouvelle fiche:
• Jetez l’ancienne fiche avec prudence
• Connectez le fil marron sur la borne sous
tension de la nouvelle fiche.
• Connectez le fil bleu sur la borne neutre
• Si l’appareil est de classe I (mis à la terre),
connectez le fil vert/jaune sur la borne terre.
Remarque: Si votre appareil est de classe II
double isolation (seulement 2 fils dans le
cordon), aucune connexion n’est à faire sur la
borne terre.
Suivez les instructions de montage fournies
avec les fiches de bonne qualité.
Tout fusible remplacé doit être du même calibre
que le fusible d’origine fourni avec l’appareil.
Avertissement! La section ci-dessus sur le
remplacement de la fiche concerne le personnel
des centres de service agréés.
10
Page 11

FRANÇAIS
Instructions de sécurité
supplémentaires pour les
cafetières
Attention! Le couvercle peur devenir brûlant
pendant le fonctionnement.
Attention! De la vapeur peut s’échapper de
l’appareil.
• Laisser refroidir l’appareil avant d’installer ou
d’enlever des pièces et avant de le nettoyer.
• Pendant le fonctionnement, la plaque
chauffante peut devenir brûlante.
• Ne pas utiliser l’appareil si des traces de
fissures apparaissent sur la carafe.
• Ne pas immerger l’appareil dans un liquide.
Utilisation
Attention! Ne jamais utiliser l’appareil sans eau
dans le réservoir.
Avant la première utilisation
• Déballer la cafetière et retirer tous les
matériaux d’emballages et promotionnels et
les étiquettes. Enlever toute la
documentation.
• Vérifier que votre alimentation électrique est
la même que celle indiquée sur l’appareil.
• Placer l’appareil sur un plan de travail plat et
stable, éloigné des bords et des autres
appareils électriques. Veiller à ne pas placer
la cafetière sous un placard ou à proximité
de tissus d’ameublement, de papier peint ou
similaire qui pourraient être endommagés
par de la vapeur très chaude.
• Laver toutes les pièces amovibles de
l’appareil à l’eau chaude savonneuse. Rincer
et sécher soigneusement avec un chiffon
doux. Ne pas utiliser de produits nettoyantsv
puissants ou abrasifs, et ne pas mettre les
pièces de l’appareil dans un lave-vaisselle.
Attention! Ne jamais immerger le corps
principal de l’appareil, le cordon ou la fiche,
dans de l’eau ou tout autre liquide.
• Nous vous recommandons de vous
familiariser avec toutes les pièces de
l’appareil avant de l’utiliser pour la première
fois. A cette occasion, ne pas le remplir d’eau
ni mettre sous tension.
• Pour enlever tout résidu de fabrication, nous
vous recommandons de faire fonctionner la
cafetière comme décrit dans la section ‘
Utilisation ’. Ceci permettra de nettoyer
l’appareil. Utiliser seulement de l’eau et pas
de café.
Remarque! S’assurer que le cordon de la
cafetière ne pende pas du plan de travail.
Remarque! Lorsque la cafetière est branchée et
fonctionne pour la première fois, il peut y avoir
une petite quantité de fumée et/ou une odeur
pendant que les éléments de chauffe
deviennent chauds. Cela ne représente aucun
danger, ni un mauvais fonctionnement de
l’appareil, et cet effet s’arrêtera après une ou
deux utilisations.
Ajouter du café
• Ouvrir le couvre-filtre (3).
• Placer le filtre (1) dans le porte-filtre (2).
Ajouter la quantité de café désirée.
• Fermer le couvre-filtre (3).
• Placer la carafe (8) sur la plaque chauffante
(12).
Ajouter de l’eau
• A l’aide de la carafe en verre (8), remplir le
réservoir à eau (5) de la quantité d’eau
FROIDE souhaitée.
Remarque! Remplir le réservoir avec 2 tasses
d’eau au minimum sans dépasser le repère
MAX de l’indicateur de niveau d’eau.
11
Page 12
FRANÇAIS
• Fermer le couvercle du réservoir à eau (4) et
placer la carafe vide (8), avec son couvercle
fermé,
Attention! NE PAS soulever le couvercle du
réservoir à eau (4) pendant le fonctionnement
de la cafetière. De l’eau brûlante pourrait être
éjectée.
Mise en marche et arrêt de
l’appareil
• Pour mettre l’appareil sous tension, appuyer
sur l’interrupteur On/Off (11).
• Pour éteindre l’appareil, appuyer à nouveau
sur l’interrupteur On/Off (11).
Remarque! Une fois l’infusion du café terminée,
la cafetière entamera une phase de maintien au
chaud. En pressant l’interrupteur ‘ON/OFF’ (11),
alors que la cafetière est déjà sous tension,
vous stoppez l’infusion du café ou la phase de
maintien au chaud, et vous mettez la cafetière
hors tension.
Nettoyage et entretien
Attention! Eteindre et débrancher l’appareil
avant d’effectuer toute action de nettoyage ou
d’entretien.
• A l’aide des poignées, enlever le filtre (1) du
porte-filtre (2). Vider le filtre et jeter le marc
de café.
• Laver la carafe (8) et le filtre (1) dans de
l’eau chaude savonneuse. Sécher les pièces
et les réinstaller.
• Essuyer l’extérieur de l’appareil avec un
chiffon humide.
Détartrage de l’appareil
Si l’appareil est utilisé dans une région où l’eau
est dure, il est conseillé de détartrer l’appareil
de temps à autre.
• Utiliser un détartrant pour cafetières vendu
dans le commerce, ou utiliser de l’eau et du
vinaigre de la façon suivante :
Fonction anti-gouttes
L’appareil est équipé d’un système anti-gouttes
qui permet de retirer la carafe à tout moment,
même pendant l’infusion lorsque le café sort
encore du filtre.
• Retirer la carafe (8) de la plaque chauffante
(12) et verser la quantité de café souhaité.
• Replacer la carafe (8) sur la plaque
chauffante (12), et laisser goutter le reste du
café dans la carafe (8).
Remarque! Il est conseillé de replacer la carafe
sur la plaque chauffante dans les 30 secondes
après son retrait.
12
Données techniques
DCM600
Tension 220 – 240 Volts
(50/60 Hz)
Puissance 800W
Poids 2 kg
Page 13
FRANÇAIS
Protection de l'environnement
Collecte séparée. Ce produit ne doit
pas être jeté avec les déchets
domestiques normaux.
Si vous décidez de remplacer ce produit Black &
Decker, ou si vous n'en avez plus l'utilité, ne le
jetez pas avec vos déchets domestiques
Rendez-le disponible pour une collecte séparée.
• Black & Decker fournit un dispositif
permettant de collecter et de recycler les
produits Black & Decker lorsqu'ils ont atteint
la fin de leur cycle de vie. Pour pouvoir
profiter de ce service, veuillez retourner votre
produit à un réparateur agréé qui se chargera
de le collecter pour nous.
• Pour connaître l'adresse du réparateur agréé
le plus proche de chez vous, contactez le
bureau Black & Decker à l'adresse indiquée
dans ce manuel. Vous pourrez aussi trouvez
un liste des réparateurs agréés de Black &
Decker et de plus amples détails sur notre
service après-vente sur le site Internet à
l'adresse suivante : www.2helpU.com
Garantie
Black & Decker est confiant dans la qualité de
ses produits et vous offre une garantie très
étendue.
Ce certificat de garantie est un document
supplémentaire et ne peut en aucun cas se
substituer à vos droits légaux.
La garantie est valable sur tout le territoire des
Etats Membres de l'Union Européenne et de la
Zone de Libre Echange Européenne.
Si un produit Black & Decker s'avère défectueux
en raison de matériaux en mauvaises conditions,
d'une erreur humaine, ou d'un manque de
conformité dans les 24 mois suivant la date
d'achat, Black & Decker garantit le remplacement
des pièces défectueuses, la réparation des
produits usés ou cassés ou remplace ces
produits à la convenance du client, sauf dans les
circonstances suivantes :
Le produit a été utilisé dans un but
commercial, professionnel, ou a été loué.
Le produit a été mal utilisé ou avec
négligence.
Le produit a subi des dommages à cause
d'objets étrangers, de substances ou à
cause d'accidents.
Des réparations ont été tentées par des
techniciens ne faisant pas partie du
service technique de Black & Decker.
Pour avoir recours à la garantie, il est nécessaire
de fournir une preuve d'achat au vendeur ou à un
réparateur agréé. Pour connaître l'adresse du
réparateur agréé le plus proche de chez vous,
contactez le bureau Black & Decker à l'adresse
indiquée dans ce manuel.
Vous pourrez aussi trouver une liste des
réparateurs agréés de Black & Decker et de plus
amples détails sur notre service après-vente sur
le site Internet à l'adresse suivante :
www.2helpU.com
13
Page 14

ARABIC
¿Éª°†dG
Ékfɪ°V ¢Vô©Jh É¡JÉéàæe IOƒL ‘ ôµjO ófBG ∑ÓH ≥ãJ
.πLC’G πjƒW
»àdG ∂bƒ≤M ¤EG áaÉ°VE’ÉH ¿ƒµj Gòg ¿Éª°†dG ¿É«H
.∫GƒMC’G øe ∫ÉM …CÉH É¡H πîj ’h ¿ƒfÉ≤dG É¡ëæÁ
OÉ–’G ‘ AÉ°†YC’G ∫hódG º«dÉbCG ‘ ¿Éª°†dG …öùj
.á«HhQhC’G Iô◊G IQÉéàdG á≤£æeh »HhQhC’G
‘ Ö«Y ÖÑ°ùH ôµjO ófBG ∑ÓH èàæe ‘ π∏N OƒLh ádÉM ‘
24 ∫ÓN ,ÒjÉ©ŸG ™e ≥aGƒàdG ΩóY hCG áYÉæ°üdG hCG OGƒŸG
∫GóÑà°SG ôµjO ófBG ∑ÓH øª°†J ,AGöûdG ïjQÉJ øe Gkô¡°T
πcBЙаdG IЙYGфe ™e дЙйажŸG мУ°UEGh бС«©ŸG AGхLC’G
πbCG ¿Йª°†d дЙйажŸG √тg ∫GуСа°SG hCG »©«С£dG ≈∏СdGh
:⁄ Ée 𫪩∏d êÉYREG
;ÒLCÉJ ¢VGôZCG
;çOGƒM hCG
™HÉàdG áfÉ«°üdG ≥jôa hCG øjóªà©ŸG áfÉ«°üdG AÓch
.ôµjO ófBG ∑ÓH ácöûd
Ëó≤J ¤EG êÉà– ±ƒ°S ,¿Éª°†dG ÖLƒÃ áÑdÉ£e Ëó≤àd
∂æµÁh .óªà©ŸG áfÉ«°üdG π«ch hCG ™FÉÑ∏d AGöûdG π«dO
∫ÓN øe óªà©e áfÉ«°U π«ch ÜôbCG ™bƒe ≈∏Y ±ô©àdG
¿Gƒæ©dG ‘ »∏ëŸG ôµjO ófBG ∑ÓH Öàµe ≈∏Y ∫É°üJ’G
.π«dódG Gòg ‘ í°VƒŸG
áÄ«ÑdG ájɪM
Gòg øe ¢ü∏îàdG ΩóY Ωõ∏j .π°üØæŸG ™ª÷G
.ájOÉ©dG á«dõæŸG áeɪ≤dG ™e èàæŸG
ôµjO ófBG ∑ÓH èàæe ∫GóÑà°SG ΩÉjC’G øe Ωƒj ‘ Ωõd GPEG
™e ¬æe ¢ü∏îàJ Óa ,¬eóîà°ùJ ó©J ⁄ GPEG hCG ,∂H ¢UÉÿG
èàæŸG Gòg áMÉJEG øe ócCÉJ πH ,iôNC’G á«dõæŸG áeɪ≤dG
.π°üØæŸG ™ªé∏d
ôjhóJ IOÉYE’ ≥aôe ôµjO ófBG ∑ÓH ácöT ôaƒJ
бjЙ¡f ¤EG Й¡dƒ°Uh OфйГ фµjO уfBG ∑УH дЙйажe
√òg Ëó≤J ºàjh .πª©∏d É¡à«MÓ°U ΩóYh ÉgôªY
hCG á«æ¡e hCG ájQÉŒ ¢VGôZCG ‘ èàæŸG ΩGóîà°SG ºàj
≈Lôj ,áeóÿG √òg øe IOÉØà°SÓd .ÉkfÉ› áeóÿG
±ƒ°S …òdGh óªà©e áfÉ«°U π«ch …CG ¤EG èàæŸG IOÉYEG
;∫ɪgE’G hCG ΩGóîà°S’G Aƒ°ùd èàæŸG ¢Vô©àj
áÑjôZ OGƒe hCG AÉ«°TCG áé«àf ∞∏à∏d èàæŸG ¢Vô©àj
óªà©e áfÉ«°U π«ch ÜôbCG ™bƒe ≈∏Y ±ô©àdG ∂æµÁ
ÒZ ¢UÉî°TCG ᣰSGƒH èàæŸG ìÓ°UEG ádhÉfi ºàj
»∏ëŸG ôµjO ófBG ∑ÓH Öàµe ≈∏Y ∫É°üJ’G ∫ÓN øe
,∂dP øe k’óHh .π«dódG Gòg ‘ í°VƒŸG ¿Gƒæ©dG ‘
Ú©HÉàdG øjóªà©ŸG áfÉ«°üdG AÓcƒH áªFÉb óLƒJ
Ée äÉeóÿ á∏eɵdG π«°UÉØàdGh ôµjO ófBG ∑ÓH ácöûd
âfÎfE’G ≈∏Y ÉæH á°UÉÿG ∫É°üJ’G πFÉ°Shh ™«ÑdG ó©H
.www.2helpU.com :ÊhεdE’G ™bƒŸG ≈∏Y
.ЙжY бHЙ«f дЙйажŸG ™ªL √QhуH ¤ƒаj
•
•
øjóªà©ŸG áfÉ«°üdG AÓcƒH áªFÉb óLƒJ ,∂dP øe k’óHh
äÉeóÿ á∏eɵdG π«°UÉØàdGh ôµjO ófBG ∑ÓH ácöûd Ú©HÉàdG
âfÎfE’G ≈∏Y ÉæH á°UÉÿG ∫É°üJ’G πFÉ°Shh ™«ÑdG ó©H Ée
.www.2helpU.com :ÊhεdE’G ™bƒŸG ≈∏Y
14
Page 15
ARABIC
¢Tɪb á©£b ΩGóîà°SÉH »LQÉÿG RÉ¡÷G º°ùL í°ùeG •
.á∏∏Ñe
RÉ¡÷G øe äÉÑ°SÎdG ádGREG
,öùY AÉe É¡«a á≤£æe πNGO RÉ¡÷G ΩGóîà°SG ádÉM ‘
.ôNBG ¤EG ÚM øe RÉ¡÷G øe äÉÑ°SÎdG ádGREÉH í°üæoj
äÉÑ°SÎdG ádGRE’ ájQÉŒ äÉÑ°SôJ ádGREG IOÉe Ωóîà°SG •
πÿGh AÉŸG Ωóîà°SG hCG ,Iƒ¡≤dG Ò°†– Iõ¡LCG øe
:»JB’Éc
DCM600
ﺖﻟﻮﻓ 220-240 ó¡÷G
(õJôg 50/60)
ﺕﺍﻭ 800 IQó≤dG
ﻢﺠﻛ 2 ¿RƒdG
á«æØdG äÉ«£©ŸG
RÉ¡L 𫨰ûJ AÉæKCG (4) √É«ŸG ¿GõN AÉ£Z íàØJ ’ !ôjò–
.øNÉ°ùdG AÉŸG ¬æe å©Ñæj ób PEG ,Iƒ¡≤dG Ò°†–
𫨰ûàdG ±É≤jEGh AóH
ìÉàØe ≈∏Y §¨°†dG ≈Lôj ,RÉ¡÷G 𫨰ûJ AóÑd •
.(11) 𫨰ûàdG ±É≤jEG/AóH
ìÉàØe ≈∏Y §¨°†dG ≈Lôj ,RÉ¡÷G 𫨰ûJ ±É≤jE’ •
.á«fÉK Iôe (11) 𫨰ûàdG ±É≤jEG/AóH
RÉ¡L CGóÑ«°S ,Ò°†ëàdG á«∏ªY ∫ɪàcG óæY !áXƒë∏e
πª©j .áfƒî°ùdG ≈∏Y á¶aÉëŸG âbh ‘ Iƒ¡≤dG Ò°†–
ó«b RÉ¡÷G ¿Éc GPEG (11) 𫨰ûàdG ìÉàØe ≈∏Y §¨°†dG
≈∏Y á¶aÉëŸG âbh/Ò°†ëàdG á«∏ªY AɨdEG ≈∏Y 𫨰ûàdG
.RÉ¡÷G ≥∏¨H Ωƒ≤«°Sh áfƒî°ùdG
§«≤æàdG ™æe á«°UÉN
ádGREG ∂æµÁ Gòd ,§«≤æàdG ™æe á«°UÉîH Ohõe RÉ¡÷G
AÉYh øe Iƒ¡≤dG §«≤æJ AÉæKCG ≈àM âbh …CG ‘ áæ«æ≤dG
.븯dG
,(12) Úî°ùàdG ìƒd øe (8) áæ«æ≤dG ádGREÉH ºb •
.¬∏°†ØJ …òdG Iƒ¡≤dG QGó≤e áaÉ°VEGh
,(12) Úî°ùàdG ìƒd ≈∏Y kGOó› (8) áæ«æ≤dG ™°V •
.(8) áæ«æ≤dG ‘ Iƒ¡≤dG §«≤æJ ≈àM ô¶àfGh
30 ∫ÓN Ò¶æàdG ìƒd ≈∏Y áæ«æ≤dG IOÉYEG Öéj !áXƒë∏e
.É¡àdGREG øe á«fÉK
áfÉ«°üdGh ∞«¶æàdG
πÑb ¢ùÑ≤ŸG øe ¢ùHÉ≤dG ´õfGh RÉ¡÷G ≥∏ZCG !ôjò–
.áfÉ«°üdGh ∞«¶æàdG
ΩGóîà°SÉH (2) Î∏ØdG πeÉM øY (1) Î∏ØdG ádGREÉH ºb •
.Î∏ØdG øe áeóîà°ùŸG Iƒ¡≤dG Ö°SGhQ ádGREGh ,¢†HÉ≤ŸG
øNÉ°ùdG AÉŸG ‘ Î∏ØdGh (8) áæ«æ≤dG π°ùZG •
.É¡Ñ«côJ óYCGh AGõLC’G áaÉc ∞ØLh ,¿ƒHÉ°üdGh
15
Page 16

ARABIC
∫hC’ ¬eGóîà°SG πÑb RÉ¡÷G AGõLCG ≈∏Y ±ô©àdÉH í°üæj •
Qó°üà ¬∏«°UƒJ hCG AÉŸÉH RÉ¡÷G Aπe ô¶ëjh ,Iôe
.∂dòH ΩÉ«≤dG AÉæKCG ¢ù«FôdG QÉ«àdG
í°üæf ,™«æ°üàdG á«∏ªY øe á«≤Ñàe Ö°SGhQ ájCG ádGRE’ •
π°üa ‘ ÚÑe ƒg ɪc Iƒ¡≤dG OGóYEG RÉ¡L 𫨰ûàH
,Iƒ¡≤dG áaÉ°VEG ¿hO §≤a AÉŸG ΩGóîà°SÉH ,"ΩGóîà°S’G"
.kÉeÉ“ RÉ¡÷G ∞«¶æJ ºà«°Sh
¢ù«FôdG »FÉHô¡µdG QÉ«àdG ∂∏°S ‹óJ ΩóY øe ócCÉJ !áXƒë∏e
.πª©dG ádhÉW áaÉM øe
QÉ«àdG òNCÉà Iƒ¡≤dG OGóYEG RÉ¡L π«°UƒJ óæY !áXƒë∏e
hCG/h ¿ÉNódG øe á∏«∏b ᫪c å©ÑæJ ób ,Iôe ∫hC’ ¬∏«¨°ûJh
ôeC’G Gòg πãÁ ’ .Úî°ùàdG öUÉæY áfƒî°S ÖÑ°ùH áëFGQ
√òg »¡àæà°Sh ,¬ØFÉXh ‘ kÓ∏N hCG èàæŸG ≈∏Y IQƒ£N
.RÉ¡÷G 𫨰ûJ øe ÚJôe ó©H IôgɶdG
Iƒ¡≤dG áaÉ°VEG
.(3) Î∏ØdG AÉ£Z íàaG •
QGó≤e ∞°VCG .(2) Î∏ØdG πeÉM ≈∏Y (1) Î∏ØdG ™°V •
.π°†ØŸG Iƒ¡≤dG
.(3) Î∏ØdG AÉ£Z ≥∏ZCG •
.(12) Úî°ùàdG ìƒd ≈∏Y (8) áæ«æ≤dG ™°V •
AÉŸG áaÉ°VEG
hCG É¡àdGREG hCG ™£b ájCG Ö«côJ πÑb OÈj RÉ¡÷G ô¶àfG •
.∞«¶æàdG πÑb
Úî°ùàdG ìƒdh áæ«æ≤dG ¿ƒµJ ób ,Úî°ùàdG AÉæKCG •
.ájɨ∏d ÚæNÉ°S
äÉeÓY ájCG áæ«æ≤dG ≈∏Y äô¡X GPEG RÉ¡÷G Ωóîà°ùJ ’ •
.¥ƒ≤°T OƒLh ≈∏Y ∫óJ
.πFGƒ°S ájCG ‘ RÉ¡÷G ôª¨J ’ •
ΩGóîà°S’G
.¿GõÿG ‘ AÉŸG ¿hO RÉ¡÷G ΩGóîà°SG ô¶ëj !ôjò–
Iôe ∫hC’ ΩGóîà°S’G πÑb
øe ¬«∏Y Ée ádGREGh Iƒ¡≤dG OGóYEG RÉ¡L êGôNEÉH ºb •
ádGREG ≈Lôj ɪc ,äÉ≤°ü∏eh á«FÉYO OGƒeh áØ∏ZCG
.áYƒÑ£ŸG OGƒŸG ™«ªL
™e ¢ù«FôdG »FÉHô¡µdG QÉ«àdG Qó°üe ≥aGƒJ øe ócCÉJ •
.RÉ¡÷G ≈∏Y ÚÑŸG ó¡÷G
∞°üàæŸG ‘ âHÉKh mƒà°ùe mí£°S ≈∏Y RÉ¡÷G ™°V •
á«FÉHô¡µdG Iõ¡LC’G øY kGó«©Hh áaÉ◊G ≈∏Y kGó«©H
áfGõN …CG â– RÉ¡÷G ™°Vh ΩóY øe ócCÉJh ,iôNC’G
¬HÉ°T Ée hCG ,§FÉM ¥Qh hCG çÉKCG …CG øe Üô≤dÉH hCG
øe å©ÑæŸG øNÉ°ùdG QÉîÑdG π©ØH ∞∏àJ ’ ≈àM ,∂dP
.IóMƒdG
OQÉÑdG AÉŸG øe á∏°†ØŸG ᫪µdÉH (5) √É«ŸG ¿GõN CÓeG •
.(8) á«LÉLõdG áæ«æ≤dG ΩGóîà°SÉH
,AÉŸG øe ¿ÉHƒc ƒg √É«ŸG ¿GõN AπŸ ≈fOC’G ó◊G !áXƒë∏e
áæ«ÑŸG ≈°übC’G ó◊G áeÓY RhÉéàj Éà ¬àÄÑ©J RƒŒ ’h
.√É«ŸG ¿GõN ¢SÉ«≤e ≈∏Y
(8) áZQÉØdG áæ«æ≤dG ™°Vh (4) √É«ŸG ¿GõN AÉ£Z ≥∏ZCG •
.≥∏¨e AÉ£¨dGh
16
AÉe ‘ ádGREÓd á∏HÉ≤dG RÉ¡÷G AGõLCG ™«ªL π°ùZG •
ΩGóîà°SÉH kGó«L É¡ØØLh É¡Ø£°TG ºK ,ÅaGO ¿ƒHÉ°U
äÉضæŸG ΩGóîà°SG ô¶ëjh ,ºYÉædG ¢Tɪ≤dG øe á©£b
‘ RÉ¡÷G øe AõL …CG ™°Vh hCG ᣰTɵdG/áæ°ûÿG
.¥ÉÑWC’G ádÉ°ùZ
∂∏°S á∏°Uh hCG RÉ¡é∏d á°ù«FôdG IóMƒdG ¢ùªZ ô¶ëj !ôjò–
.ôNBG πFÉ°S …CG ‘ hCG AÉŸG ‘ ¢ùHÉ≤dG hCG »FÉHô¡µdG QÉ«àdG
Page 17
ARABIC
(Ωób 100) kGÎe 30 ¤EG πHɵdG ∫ƒW π°üj ¿CG øµÁ •
.ábÉ£∏d ó≤a ¿hO
øe ¬dGóÑà°SG Öéj ,AÉHô¡µdG π«°UƒJ ∂∏°S ∞∏J ádÉM ‘ •
∑ÓH øe óªà©e áeóN õcôe …CG hCG ™«æ°üàdG á¡L πÑb
.ôWÉîŸG Öæéàd ôµjO ófBG
¢ù«FôdG πHɵdG ¢ùHÉb ∫GóÑà°SG
:¢ù«FôdG πHɵ∏d ójóL ¢ùHÉb Ö«cÎd IQhö†dG âYO GPEG
.¢UôëH Ëó≤dG ¢ùÑ≤ŸG øe ¢ü∏îJ •
¢ùHÉ≤dG ‘ »◊G ±ô£∏d »æÑdG ∂∏°ùdG π«°UƒàH ºb •
.ójó÷G
.ójÉëŸG ±ô£dÉH ¥QRC’G ∂∏°ùdG π«°UƒàH ºb •
∂∏°ùdG π«°UƒàH ºb ,(kÉ°VQDƒe) 1 áÄØdG èàæŸG ¿Éc GPEG •
.»°VQC’G ±ô£dÉH ôØ°UC’G/ö†NC’G
Úà≤Ñ£H kGOhõe á«fÉãdG áLQódG øe RÉ¡÷G ¿Éc GPEG :á¶MÓe
’ ,(§≤a ¿ÉæKG ¿ÉaôW ’EG πHɵdG πNGO óLƒj ’) ÚàdRÉY
.»°VQC’G ±ô£dÉH ɪ¡æe …CG π«°UƒJ ºàj
IOƒ÷G äGP ¢ùHGƒ≤dÉH á≤aôŸG Ö«cÎdG äɪ«∏©J ™ÑJG
.á«dÉ©dG
»∏°UC’G Rƒ«ØdG áÑJQ ¢ùØf øe πjóÑdG Rƒ«ØdG ¿ƒµj ¿CG Öéj
.èàæŸG ™e ≥aôŸG
πHɵdG ¢ùHÉb ∫GóÑà°SG ¢Uƒ°üîH á≤HÉ°ùdG äɪ«∏©àdG !ôjò–
.§≤a óªà©ŸG áeóÿG õcôe »ØXƒÃ á°UÉN ¢ù«FôdG
Ò°†– Iõ¡LC’ á«aÉ°VEG áeÓ°S äɪ«∏©J
Iƒ¡≤dG
.ΩGóîà°S’G AÉæKCG kÉæNÉ°S AÉ£¨dG ¿ƒµj ób !ôjò–
.IóMƒdG øe QÉîÑdG å©Ñæj ób !ôjò–
hCG Ö«Y …CG OƒLh ádÉM ‘ RÉ¡÷G ΩGóîà°SG ô¶ëoj •
.¬FGõLCG øe AõL …CÉH ∞∏J
hCG áÑ«©ŸG AGõLC’G ∫GóÑà°SG hCG í«∏°üàH íª°ùJ ’ •
.óªà©e í«∏°üJ π«ch πÑb øe ’EG áØdÉàdG
πcBÉJ hCG ∞∏J …CG OƒLh ΩóY øe ΩGóîà°S’G πÑb ócCÉJ •
.AÉHô¡µdG π«°UƒJ ∂∏°S ÜÉ°UCG
Ö«Y hCG ∞∏J OƒLh ádÉM ‘ RÉ¡÷G ΩGóîà°SG ô¶ëoj •
.¢ù«FôdG ¢ùHÉ≤dG hCG AÉHô¡µdG π«°UƒJ ∂∏°ùH
¢ùHÉ≤dG hCG AÉHô¡µdG π«°UƒJ ∂∏°S ∫GóÑà°SG Öéj •
í«∏°üJ π«ch ∫ÓN øe Ö«©ŸG hCG ∞dÉàdG ¢ù«FôdG
π«°UƒJ ∂∏°S ™£b ÖæŒ .ôWÉîŸG Öæéàd óªà©e
.∂°ùØæH ¬ë«∏°üJ ádhÉfi hCG AÉHô¡µdG
RÉ¡÷G AGõLCG øe …CG ∫GóÑà°SG hCG ádGREG ∫hÉ– ’ •
.π«dódG Gòg ‘ IOóëŸG AGõLC’G ∂∏J ±ÓîH
á«FÉHô¡µdG áeÓ°ùdG
QÉ«àdG ó¡L ≥aGƒJ øe RÉ¡÷G ΩGóîà°SG πÑb ≥≤–
.∞«æ°üàdG áMƒd ≈∏Y OóëŸG ó¡÷G ™e ¢ù«FôdG »FÉHô¡µdG
øe ócCÉàdG »¨Ñæj ɪc ,RÉ¡÷G Gòg ¢†jQCÉJ Öéj
ó¡÷G ™e ¢ù«FôdG »FÉHô¡µdG QÉ«àdG ó¡L ≥aGƒJ
.∞«æ°üàdG áMƒd ≈∏Y OóëŸG
,QÉ«àdG òNCÉe ™e RÉ¡÷G ¢ùHGƒb ≥aGƒàJ ¿CG Öéj •
øe πµ°T …CÉH ¢ùHÉ≤dG πjó©àH ΩÉ«≤dG kÉ≤∏£e ô¶ëjh
™e áÄ«¡J ¢ùHGƒb ájCG ΩGóîà°SG ô¶ëj ɪc .∫ɵ°TC’G
ádó©ŸG ÒZ ¢ùHGƒ≤dG .(1 áÄØdG) á°VQDƒŸG Iõ¡LC’G
IQƒ£N øe π«∏≤àdG É¡fCÉ°T øe á≤aGƒàŸG òNBÉŸGh
.á«FÉHô¡c áeó°üd ¢Vô©àdG
1 áÄØdG èàæeh ójóªàdG äÓHÉc
¢VQDƒe RÉ¡÷G ¿C’ A3 Ö∏≤H πHÉc ΩGóîà°SG Öéj •
.1 áÄØdG øe ¬à«æHh
17
Page 18

ARABIC
,ΩGóîà°S’G AÉæKCG »FÉHô¡µdG QÉ«àdG ∂∏°S ∞∏J ádÉM ‘ •
.QƒØdG ≈∏Y »FÉHô¡µdG QÉ«àdG Qó°üe øY RÉ¡÷G π°üaG
Qó°üe øY ¬∏°üa πÑb »FÉHô¡µdG QÉ«àdG ∂∏°S ¢ùª∏J ’h
.»FÉHô¡µdG QÉ«àdG
ádÉM ‘ »FÉHô¡µdG QÉ«àdG Qó°üe øY RÉ¡÷G π°üaG •
.¬Ø«¶æJ πÑbh ¬eGóîà°SG ΩóY
øjôNB’G áeÓ°S
¢UÉî°TC’G ᣰSGƒH ΩGóîà°SÓd ᪪°üe ÒZ IGOC’G √òg •
äGQó≤dG ¢ü≤f øe ¿ƒfÉ©j øjòdG (∫ÉØWC’G º¡«a øÃ)
IÈÿG ¢ü≤f hCG ájQƒ©°ûdG hCG á«fóÑdG hCG á«∏≤©dG
â– øµj ⁄ Ée ,RÉ¡÷G Gòg 𫨰ûàd áeRÓdG áaô©ŸGh
.º¡àeÓ°S øY ∫hDƒ°ùŸG ¢üî°ûdG ±GöTEG
ócCÉà∏d kɪFGO º¡àÑbGôeh ∫ÉØWC’G ≈∏Y ±GöTE’G Öéj •
.RÉ¡÷ÉH ¿ƒãÑ©j ’ º¡fCG øe
ΩGóîà°S’G ó©H
QÉ«àdG òNCÉe øe ¢ùHÉ≤dG ´õfGh RÉ¡÷G 𫨰ûJ ∞bhCG •
Ò«¨J πÑb hCG ΩGóîà°SG ¿hO ¬côJ πÑb OÈj RÉ¡÷G ´Oh
.¬FGõLCG øe AõL …CG ¢üëa hCG ∞«¶æJ hCG
ΩGóîà°S’G ¢VôZ
OGóYE’ kÉ°ü«°üN ôµjO ófBG ∑ÓH Iƒ¡≤dG OGóYEG RÉ¡L ºªo°U
ôµ°ûf .§≤a ‹õæŸG ΩGóîà°SÓd ºª°üe èàæŸG Gòg .Iƒ¡≤dG
∂d ≈жªаfh ,фµjO уfBG ∑УH дЙйажŸ ∑QЙ«аNG ∂d
.IójóY äGƒæ°ùd èàæŸG Gòg ΩGóîà°SÉH ´Éàªà°S’G
ΩGóîà°SG πÑb ájÉæ©H π«dódG Gòg IAGôb »¨Ñæj
.RÉ¡÷G
áeÓ°ùdG äɪ«∏©J
π«°UƒJ ∑Ó°SCÉH IOhõŸG Iõ¡LC’G ΩGóîà°SG óæY !ôjò–
‘ ÉÃ ,á«°SÉ°SC’G áeÓ°ùdG ÒHGóJ ´ÉÑJG Öéj ,á«FÉHô¡c
≥jô◊G ôWÉîŸ ¢Vô©àdG øe óë∏d á«dÉàdG äɪ«∏©àdG ∂dP
hCG á«°üî°ûdG äÉHÉ°UE’G hCG á«FÉHô¡µdG äÉeó°üdG hCG
.ájôgƒ÷G QGöVC’G
Oƒ°ü≤ŸG ΩGóîà°SÓd ∞°Uh ≈∏Y π«dódG Gòg …ƒàëj •
hCG äÉ≤ë∏e ájCG ΩGóîà°SG …ODƒj óbh .RÉ¡÷G Gòg øe
,RÉ¡÷G ΩGóîà°SÉH iôNCG äÉ«∏ªY ájCG AGOCG hCG äÉ≤aôe
ôWÉfl ¤EG ,π«dódG Gòg ‘ IOóëŸG ∂∏J ±ÓîH
.á«°üî°ûdG äÉHÉ°UEÓd ¢Vô©àdG
¿Éµe ‘ ¬æjõîJ Öéj ,RÉ¡÷G ΩGóîà°SG ΩóY ádÉM ‘ •
¤EG ∫ƒ°UƒdG øe ∫ÉØWC’G Úµ“ ΩóY Öéjh .±ÉL
.áfõîŸG Iõ¡LC’G
ìÓ°UE’Gh ¢üëØdG
ÉgÒ«¨J hCG äÉ≤ë∏ŸG ∞«¶æJ πÑb RÉ¡÷G 𫨰ûJ ∞bhCG •
.ΩGóîà°S’G AÉæKCG ácôëàŸG AGõLC’G øe ÜGÎb’G hCG
Ö«Y hCG ∞∏J …CG OƒLh ΩóY øe ΩGóîà°S’G πÑb ócCÉJ •
…CÉH öùc OƒLh ΩóY øe ∂dòc ≥≤– .RÉ¡÷G AGõLCÉH
Éeh ,𫨰ûàdG í«JÉØà ∞∏J hCG RÉ¡÷G AGõLCG øe AõL
πªY ≈∏Y ôKDƒJ ¿CG É¡fCÉ°T øe »àdG QƒeC’G øe ∂dP ¤EG
.RÉ¡÷G
18
.kÓÑ≤à°ùe ¬«dEG ´ƒLô∏d π«dódG Gò¡H ßØàMG •
RÉ¡÷G ΩGóîà°SG
.RÉ¡÷G ΩGóîà°SG óæY kɪFGO Qò◊G ΩõdEG •
.∫õæŸG êQÉN RÉ¡÷G Ωóîà°ùJ ’ •
âfCGh RÉ¡÷G π¨°ûJ ’h ,á∏àÑe ∑ójh RÉ¡÷G π¨°ûJ ’ •
.Úeó≤dG ‘ÉM
øe ¤óàj ’ å«ëH ábóH »FÉHô¡µdG QÉ«àdG ∂∏°S OôaG •
¬«a Ì©àdG hCG ¬H ≥∏©àdG hCG πª©dG ádhÉW ±GƒM ≈∏Y
.Oƒ°ü≤e ÒZ πµ°ûH
π°üØd »FÉHô¡µdG QÉ«àdG ∂∏°S ó°T kÉ≤∏£e ∫hÉ– ’ •
QÉ«àdG ∂∏°ùH ßØàMGh .QÉ«àdG òNCÉe øY ¢ùHÉ≤dG
.IOÉ◊G ±Gƒ◊Gh âjõdGh IQGô◊G øY kGó«©H »FÉHô¡µdG
Page 19
ARABIC
AÉ£¨dG .7
áæ«æ≤dG .8
áæ«æ≤dG AÉ£Z .9
áæ«æ≤dG ¢†Ñ≤e .10
𫨰ûàdG ìÉàØe .11
Úî°ùàdG áMƒd .12
RÉ¡÷G AGõLCG
븯dG .1
Î∏ØdG πeÉM .2
Î∏ØdG AÉ£Z .3
√É«ŸG ¿GõN AÉ£Z .4
√É«ŸG ¿GõN .5
√É«ŸG ¢SÉ«≤e .6
19
Page 20

Page 21
WARRANTY REGISTRATION CARD
YOUR NAME/
YOUR ADDRESS
POSTCODE
DATE OF PURCHASE
DEALER'S NAME & ADDRESS/
«ùßr
«∞FMu«Ê
«∞d±e «∞∂d¥bÍ
¢U¸¥a «∞Ad«¡
≈ßr Ë ´Mu«Ê «∞∂Uzl
PRODUCT MODEL NO.
DCM600
Page 22

N a m e s & A d d r e s s e s f o r B l a c k & D e c k e r S e r v i c e C o n c e s s i o n a r ie s
ALGERIA: SARL Outillage Corporation, After Sale Service Center-08, Rue Mohamed Boudiaf - Cheraga, Algiers, Algeria, Tel:
+213 21 375131, Fax: +213-0-369667. AZERBAIJAN: Kontakt - NN LLC, M.Qashqay 43, Baku, Azerbaijan Az1000. Tel:
+994 12 4082050, Fax: +994 12 4117090. BAHRAIN: Alfouz Services Co. WLL., P.O. Box 26562, Tubli, Manama, Tel: +973-17783562/
17879987, Fax: +973-17783479. Kewalram & Sons Co. WLL P.O. Box 84, Manama, Kingdom of Bahrain, Tel: +973-17213110/ 17210617/
17210619, Fax: +973-17213211/ 17210627. BANGLADESH: Ultra Corporation, 8, Kushol Centre, Uttara, Dhaka 1230. Tel:
+880-2-8922144, Fax: +880-2-8951339. EGYPT: Anasia Egypt for Trading S.A.E, P.O. Box 2443, 9, Mostafa Refaat Street,
Sheraton Heliopolis 11361, Cairo, Tel: +202-22684159, Fax: +202-22684169. ETHIOPIA: Seif Sherif Trade PLC -Arada Sub City,
Kebele 01-02, Global Insurance Bldg., 2nd Flr. Room 43, P.O.Box 2525, Addis Ababa, Ethiopia, Tel: 00-251-11-1563968/ 1563969, Fax:
00-251-11-1558009. INDIA: Gryphon Appliances Ltd., D-6/4, Okhla Industrial Area, Phase-I, New Delhi-110020, Tel: +91-11-46731111,
Fax: +91-11-46731111. JORDAN: Bashiti Hardware, 93 King Abdullah 2nd St., Opp ELBA House, P.O. Box 3005, Tel: +962-6-5349098
ext.11, Fax: +962-6-5330731. KENYA: Leading Concepts, P.O. Box: 40877-00100, Nairobi, Kenya. Tel: +254 20 690 5000, Fax:
+254 20 690 5111. KUWAIT: Al Omar Technical Co., P.O. Box 4062, Safat 13041, Kuwait, Tel: 00965-24848595/ 24840039, Fax:
00965-24845652. The Sultan Centre, P.O. Box 26567-13126 Safat, Kuwait, Tel: 00965-24343155 Etn. 432, Fax: 00965-24319071.
LEBANON: Aces Service Centre, P.O. Box 90-102, Nahr El Mot, Seaside Highway, Pharaon Building, Beirut. Tel: 00961-1-898989, Fax:
00961-1-245880. LIBYA: Homeworld Co., Building No.5, Senidal St., Amr Ibn Elaas Road, Benghazi, Libya. Tel: 00218-61-9094183.
Service Center1 - Benghazi: Tel: +218-061-3383994, Fax: +218-092-7640688, Service Center2 - Tripoli: Tel: +218-021-3606430, Fax:
+218-092-6514813. MALTA: John G Cassar Ltd. 36-Victory Street, Qormi QRM 06, Malta. Tel: +356-21493251, Fax: +356-21483231.
MAURITIUS: J.M. Goupille & Co. Ltd., Rogers Industrial Park 1, Riche Terre, Mauritius, Tel: +230 206 9450/ +230 207 1700, Fax:
+230 206 9474/ +230 248 3188. MOROCCO: UATS 26 Rue Ennarjisse, Hay Erraihan, Beausejour - Hay Hassani-Casablanca, Morocco.
Tel: +212 522945114, Fax: +212 522942442. NEPAL: Universal Electrocom, Tripureshwor, Kathmandu, Nepal. Tel:+977-1-4265191.
NIGERIA: Dana Electronics Ltd. (Lagos) 116/ 120, Apapa Oshodi Express Way, Isolo, Lagos, Nigeria. Tel: +234-17431818/
+234-8037767774/ +234-8057445477. (Abuja) 18, A.E. Ekukinam Street, Off Obsfemi Awolowo Road, Utako, Abuja, Nigeria. Tel:
+234-8032276101/ +234-8037767774. (Kano) 9A - Mai Malari Road, Bompai, Kano, Nigeria. Tel: +234-8053294947/ +234-8037767774.
OMAN: Oman Marketing & Service Co. (Omasco), P.O. Box 2734, Behind Honda Showroom, Wattayah, Oman, Tel: +968-24560232/
24560255, Fax: +968-24560993. Oman Marketing & Service Co. (Omasco), Al Ohi, Sohar, Oman, Tel: +968-26846379, Fax:
+968-26846379. Oman Marketing & Service Co. (Omasco) - Sanaya, Salalah, Oman, Tel: 00968-23212290, Fax: +968-23210936.
PAKISTAN: Ammar Service & Spares - 60-Bank Arcade, Serai Road, Karachi, Pakistan, Tel: 0092-21-32426905, Fax: 0092-21-32427214.
PHILIPPINES: 476 J. P. Rizal St., cor Kakarong St. Brgy Olympia, Makati City, Tel: +632 403-5698. QATAR: Al Muftah Service Centre -
Al Wakrah Road, P.O. Box 875, Doha, Qatar. Tel: 00974-4650880/ 4650110/ 4446868, Fax: 00974-4441415/ 4662599. SAUDI ARABIA:
(Al Khobar) Al-Suwaiket Catering & Trading Co., P.O.Box 4228, King A.Aziz Street, Al Khobar, Tel: +966-3-8591088, Fax:
+966-3-8595648. Fawaz Ebrahim Al Zayani Trading Est. P.O. Box 76026, Al Khobar #31952, Tel: +966-3-8140914, Fax: +966-3-8140824.
(Jeddah) Banaja Trading Co. Ltd, P.O. Box 366, Jeddah-21411, Tel: +966-2-6511111, Fax: +966-2-6503668. (Riyadh) Banaja Trading Co.
Ltd, P.O. Box 566, Riyadh-11421, Tel: 00966-1-4124444, Fax: +966-1-4033378. SOUTH AFRICA: Trevco Power Tool Service 14
Steenbok Street, Koedoespoort, 0186, Pretoria, South Africa, Tel: +27-86-1873826, Fax: +27-86-5001771. SRI LANKA: Delmege
Construction Products (Pvt) Ltd., No 101 Vinayalankara Mawatha, Colombo-10, Sri Lanka, Tel: +94-11-2693361-7, Service hotline:
+94-77-2211111. TUNISIA: Société Tunisienne De Manutention - Rue de la Physique, Nouvelle Zone Industrielle de Ben Arous-2013
Tunisie, Tel: +216-71-386102/ 380620, Fax: +216-71380412 ext 216. UGANDA: Anisuma Investment and Services Ltd., J R complex,
Ware House No.5, Plot No 101, 3rd Street Industrial Area, Jinja Road, Kampala, Tel: +256-414237106. UAE: (Abu Dhabi)
Light House Electrical, P.O. Box 120, Abu Dhabi, Tel: +971-2-6726131, Fax: +971-2-6720667. (Al Ain) Zillion Equipment and Spare Parts
Trading LLC, P.O. Box 19740, Opp. Bin Sadal/Trimix Redymix Sanaiya, Al Ain. Tel: +971-3-7216690, Fax:+971-3-7216103 (Dubai)
Black & Decker (Overseas) GmbH, P.O. Box 5420, Dubai, Tel: +971-4-8127400/ 8127406, Fax: +971-4-2822765. (Musaffah) Light House
Electrical, P.O. Box 120, Abu Dhabi, Tel: +971-2-5548315, Fax: +971-2-5540461. (Sharjah) Mc Coy Middle East LLC, P.O. Box 25793,
Sharjah, Tel: +971-6-5395931, Fax: +971-6-5395932. (Ras Al Khaimah) Mc Coy Middle East LLC, P.O.Box 10584, Ras Al Khaimah, Tel:
+971-7-2277095, Fax: +971-7-2277096. YEMEN: (Aden) Muala St., Tel: +967 2 222670, Fax: +967 2 222670. (Sana'a) Middle East Trad.
Co. Ltd., P.O. Box 12363, Hayel Street, Sana'a. Tel: +967-1-204201, Fax: +967-1-204204. (Taiz) Middle East Trading Co. (METCO),
5th Flr.Hayel Saeed Anam Bldg, Al-Mugamma St. Taiz, Yemen, Tel: +967-4-213455, Fax: +967-4-219869.
 Loading...