

ALL-TEMP STEAM
™
DIGITAL IRON
PLANCHA
ALL-TEMP STEAM
FER ALL-TEMP STEAM
Customer Care Line:
USA 1-800-231-9786
Accessories/Parts (USA)
1-800-738-0245
For online customer service
and to register your product, go to
www.prodprotect.com/applica
Servicio para el cliente:
México 01-800 714-2503
Accesorios/Partes (EE.UU)
1-800-738-0245
Para servicio al cliente y para
registrar su garantía, visite
www.prodprotect.com/applica
™
DIGITAL
MC
À AFFICHAGE NUMÉRIQUE
Service line à la clientèle :
Canada 1-800-231-9786
Accessoires/Pièces (Canada)
1-800-738-0245
Pour accéder au service à la clientèle en
ligne ou pour inscrire votre produit en
ligne, rendez-vous à
www.prodprotect.com/applica
When using your iron for the first time, you
may notice water residue inside the unit.
This is normal.
Cuando use su plancha por primera vez,
notará que hay agua adentro de la plancha.
Esto es normal.
À la première utilisation, il est possible qu’il
y ait un résidu d’eau à l’intérieur du fer à
repasser. Cela est normal.
MOdELS/MOdELOS/MOdÈLES
❍
D6000
❍
D6500
❍
D6000C
❍
D6500C
❍ D6100C
1

Please Read and Save this Use and Care Book.
IMPORTANT SAFEGUARDS
When using electrical appliances, basic safety precautions should always
be followed, including the following:
❍ Read all instructions before using.
❍ Use iron only for its intended use.
❍ To protect against a risk of electric shock, do not immerse the iron in
water or other liquid.
❍ The iron should always be turned off [0] (refer to HOW TO USE section)
before plugging into or unplugging from an outlet. Never yank cord to
disconnect from outlet; instead grasp plug and pull to disconnect.
❍ Do not allow cord to touch hot surfaces. Let iron cool completely
before putting away. Loop cord loosely around iron when storing.
❍ Always disconnect iron from electrical outlet when filling with or
emptying of water and when not in use.
❍ Do not operate iron with a damaged cord or if the iron has been
dropped or damaged. To avoid the risk of electric shock, do not
disassemble the iron, take it to a qualified serviceman for examination
and repair. Incorrect reassembly can cause a risk of electric shock
when the iron is used.
❍ Close supervision is necessary for any appliance being used by or
near children. Do not leave iron unattended while connected or on an
ironing board.
❍ Burns can occur from touching hot metal parts, hot water, or steam.
❍ Use caution when you turn a steam iron upside down or use the surge
of steam — there may be hot water in the water tank. Avoid rapid
movement of iron to minimize hot water spillage.
❍ The iron must be used and rested on a stable surface.
- When placing the iron on its stand, ensure that the surface on which
the stand is placed is stable.
- The iron is not to be used if it has been dropped, if there are visible
signs of damage or if it is leaking..
❍ To avoid a circuit overload, do not operate another high-wattage
appliance on the same circuit.
❍ If an extension cord is absolutely necessary, a 15-ampere and 120-
volt, or 7-ampere and 220-volt cord should be used. Cords rated
for less amperage may overheat. Care should be taken to arrange
the cord so that it cannot be pulled or tripped over.
SAVE THESE INSTRUCTIONS.
This product is for household use only.
POLARIZED PLUG (120V Models Only)
This appliance has a polarized plug (one blade is wider than the
other). To reduce the risk of electric shock, this plug is intended to fit
into a polarized outlet only one way. If the plug does not fit fully into
the outlet, reverse the plug. If it still does not fit, contact a qualified
electrician. Do not attempt to modify the plug in any way.
TAMPER-RESISTANT SCREW
Warning: This appliance is equipped with a tamper-resistant screw to
prevent removal of the outer cover.
To reduce the risk of fire or electric shock, do not attempt to remove the
outer cover. There are no user-serviceable parts inside. Repair should be
done only by authorized service personnel.
Note: If the power supply cord is damaged, it should be replaced
by qualified personnel or in Latin America by an authorized service
center.
ENGLISH
SPECIAL INSTRUCTIONS
2 3
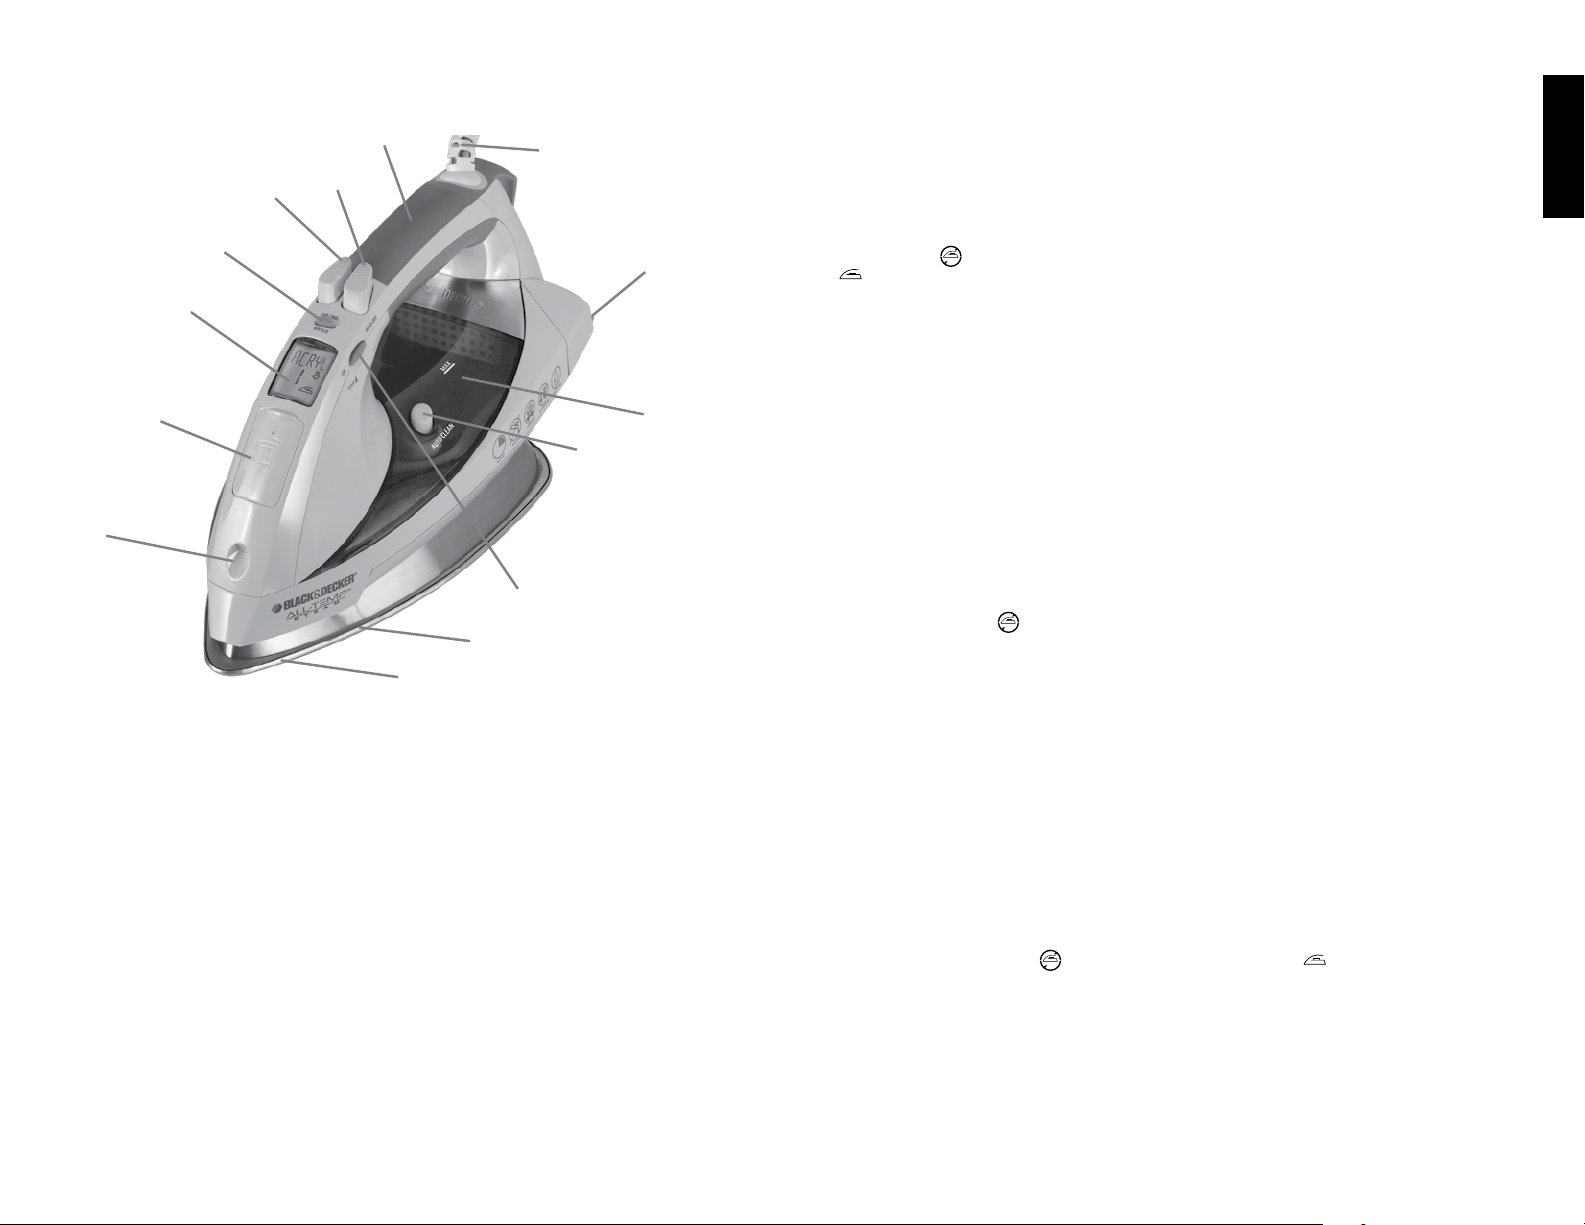
Product may vary slightly from what is illustrated.
1. Spray nozzle
2. Water-fill cover
3. Backlit LCD display
4. Steam ON/OFF button
5. Spray button
6. Surge-of-steam button
7. Comfort Grip
8. 360-degree swivel cord
9. Non-skid heel rest
10. Water tank
11. AUTO CLEAN
12. Temperature control buttons
13. Soleplate
14. Change language button (not shown)
® handle
®
button
How to Use
This appliance is intended for household use only.
GETTING STARTED
• Please go to www.prodprotect.com/applica to register your warranty.
• Remove and save literature.
• If ironing dry, place appliance on its heel rest on a stable ironing board.
• Uncoil cord and plug into standard electrical outlet.
Important: For optimum performance, allow the iron to stand for 90 seconds until
the Standby
.
FILLING WATER TANK
1. With iron on flat surface with soleplate down, open water-fill cover.
2. Tilt the iron and using a clean measuring cup, pour water into opened chamber
until water reaches the MAX level mark on the side of the water tank. Do not
overfill.
Note: This iron can be filled with ordinary tap water; if your water is hard or soft,
you may want to use distilled water. Do not use water processed through a home
softening system.
3. Close the water-fill cover.
Note: If you need to add water while ironing, unplug the iron and follow the above
steps.
4. Plug the iron into an electrical outlet
• The iron beeps.
• The backlight illuminates and turns off.
• The Standby
5. Turn on the iron by pressing the (+) temperature control button, located to the left
of the LCD display.
• The iron beeps.
• The LCD backlight turns on.
• The iron begins to heat up and the LCD displays the lowest heat setting.
SELECTING FABRIC TEMPERATURE
1. Read fabric labels to help determine fabric type to be ironed.
Tip: If unsure of fabric’s fiber content, test a small area (on the inside seam or hem)
before proceeding to iron the entire garment or cloth.
2. Once you determine the fabric type, press the (+) and (-) fabric selector buttons
on either side of the LCD display to select the appropriate fabric setting. The
LCD display will light up and the fabric type will appear at the top with the
corresponding number for the setting below it to the left. There will be a flashing
arrow
beep and the Standby
disappear.
3. Whenever the temperature setting is changed, the
on the LCD to show that the iron is either heating up or cooling down to the newly
selected setting.
Important: Always stand the iron on its heel when powered on but not in use.
STEAM SELECTION
1. The steam symbol can be displayed by pressing the Steam ON/OFF button, which
is located just behind the LED display and in front of the steam and spray buttons.
symbol in the bottom right of the LCD display changes to Ready
symbol remains on the LCD display.
▲
to show the iron is heating. When the iron is heated, the iron will
symbol will change to Ready and the arrow will
▲
or ▼ symbols will appear
ENGLISH
4 5
4
2. ALL-TEMP STEAM™ enables you to use steam on all settings. There will be one burst
0
3-WAY AUTO OFF
DIGITAL CONTROLS
of steam displayed on the LCD when using fabric settings 1 through 3. There will be
two bursts of steam displayed when using fabric settings 4 through 7.
3. The steam symbol on the LCD display will blink until the iron reaches the appropriate
temperature. It then remains constant.
4. If changing the setting from 1 through 3, the
symbol will flash until the iron is fully
heated to the next selection, and then remain constant. If changing to a setting higher
than 3, a
symbol appears and flashes until the selected temperature is reached,
then remains constant.
5. If the Steam ON/OFF button is pressed at any time during use, the iron stops
producing steam and the steam symbol disappears from the LCD display.
IRONING WITH STEAM
When using steam, be sure the iron is filled with water before you begin to iron.
ALL-TEMP STEAM™
ALL-TEMP STEAM™ utilizes Smart Steam™ technology and enables you to utilize steam
on all fabrics and temperature settings—even LOW.
Smart Steam™ Technology
The Smart Steam™ system automatically generates the right amount of steam for the
fabric type selected. Once you select the temperature, the Smart Steam™ technology
detects the set temperature and adjusts the steam power accordingly.
Suggestions for each setting:
• Acrylic: scarves, blouses, knits – iron inside out.
• Nylon: lingerie, robes, sleepwear, raincoats – iron inside out.
• Polyester: knits, dresses, blouses, skirts, travel wear - iron inside out.
• Blends: shirts, blouses, knits, uniforms, bed and table linens
• Wool: trousers, slacks, jackets, silk scarves and blouses
• Cotton: 100% cotton blouses and shirts, table linens
• Linen: slacks, summer wear, jackets, blouses
Press the Steam ON/OFF button to turn on the steam function. The Steam symbol
on the LCD display flashes during heat-up, and then appears constant when the steam
function is ready (I).
Surge-of-Steam
1. Use to remove stubborn creases.
2. Press the surge-of-steam button
to generate a burst of steam. For best results,
allow at least 5 seconds between bursts.
Using the Spray Button
Use to dampen tough wrinkles at any setting.
1. Be sure the iron is filled with water.
2. On first use, pump the Spray button
several times.
Ironing without Steam
1. Ironing without steam can be performed at any setting.
2. It is not necessary to empty the water tank; simply press the steam button to the OFF
position. The steam symbol(s) will disappear from the LCD display.
3. If desired, empty the water tank following the directions below and press the steam
button
to turn off the steam.
VERTICAL STEAM
Use for removing wrinkles from hanging garments, curtains and drapes.
1. Be sure water tank is filled to maximum capacity.
2. Hang garment to be steamed on a clothes hanger. Curtains and drapes can be
steamed where they are hung.
3. Press fabric selection button to reach appropriate fabric setting. Allow the iron to
stand for 90 seconds until the Standby
display changes to Ready
.
symbol in the bottom right of the LCD
4. Hold the iron close, but not touching the fabric.
5. Using your free hand, pull the fabric tight and pump the surge-of-steam button as
you move the iron over the fabric.
Emptying the Water Tank (optional)
Note: It is not necessary to empty the water tank after each use.
1. Unplug the iron and let it cool.
2. Open the water-fill cover.
3. To release the water, hold the iron over a sink with the tip pointing down. Water
will empty out of the water-fill opening.
SPECIAL FEATURES
Language Settings
Your iron has a multilingual digital display that lets you select from English, French
and Spanish.
To change the language:
1. Press and hold the (-) button for 2 seconds; the digital display shows EN (for
English).
2. Press the (-) button again, the display changes to FR (for French).
3. Press the (-) button one more time and the digital display changes to ES (Spanish).
Note: The languages will change in the order listed above.
3-Way Automatic Shutoff
The automatic shutoff feature in your iron works as follows:
• The iron will shut off after 30 seconds of inactivity if left on its soleplate or tipped
over on its side. If left vertically on its heel rest, it will shut off after 8 minutes of
inactivity.
• The unit beeps once and the AUTO OFF symbol
on the LCD display appears to
let you know the iron has stopped heating.
Important: Although the iron has turned off, it is still hot.
• After a few seconds, the backlight on the LCD display turns off.
• If you pick up the iron, an internal motion detector is activated and the iron starts
heating gain.
Tip: You might have to move the iron or shake it gently.
• The unit beeps once, the digital display light comes on, and the previously set
temperature is displayed again.
Note: Wait for iron to reheat completely before resuming operation.
ANTI-DRIP System
The anti-drip system prevents water from spotting at low temperatures.
ENGLISH
6 7

AUTO CLEAN® System
Note: If the AUTO CLEAN® symbol appears on the LCD display, the unit needs
cleaning. Follow the procedure under AUTO CLEAN® System.
Care and Cleaning
This product contains no user-serviceable parts. Refer service to qualified service
personnel.
CLEANING OUTSIDE SURFACES
1. Make sure iron is unplugged and has cooled completely. Wipe the soleplate and outer
surfaces with a soft cloth dampened with water. Add mild household detergent. Never
use abrasives, heavy-duty cleansers, vinegar or scouring pads that may scratch or
discolor the iron.
2. After cleaning, steam iron over an old cloth to remove any residue from the steam
vents.
AUTO CLEAN® SYSTEM
To keep the steam vents free of any buildup, follow these instructions about once a
month.
1. Fill the water tank well below the MAX line. Plug in the iron.
2. Select fabric temperature setting 6 and stand the iron on its heel rest.
3. Wait for the iron to beep and display temperature number with corresponding fabric.
4. Unplug the iron and hold over a sink with the soleplate facing down.
5. Press and hold the AUTO CLEAN® button. Be careful, as after several seconds,
hot water and steam will come out of the steam vents. Continue to hold the AUTO
CLEAN® button until all the water has emptied. If necessary, rock iron side-to-side
and front-to-back.
6. When finished, release the button, stand the iron on its heel rest and plug it in. Heat
for about 2 minutes to dry out any remaining water.
STORING YOUR IRON
1. Unplug the iron and allow it to cool.
2. Store vertically on its heel to prevent water leaking from the soleplate.
NEED HELP?
For service, repair or any questions regarding your appliance, call the appropriate
800 number on cover of this book. Please DO NOT return the product to the place of
purchase. Also, please DO NOT mail product back to manufacturer, nor bring it to a
service center. You may also want to consult the website listed on the cover of this
manual.
TWO-YEAR LIMITED WARRANTY
(Applies only in the United States and Canada)
What does it cover?
• Any defect in material or workmanship provided; however, Applica’s liability will not
exceed the purchase price of product.
For how long?
• Two years from the date of original purchase with proof of such purchase.
What will we do to help you?
• Provide you with a reasonably similar replacement product that is either new or
factory refurbished.
How do you get service?
• Save your receipt as proof of date of sale.
• Visit the online service website at www.prodprotect.com/applica, or call toll-free
1-800-231-9786, for general warranty service.
• If you need parts or accessories, please call 1-800-738-0245.
What does your warranty not cover?
• Damage from commercial use
• Damage from misuse, abuse or neglect
• Products that have been modified in any way
• Products used or serviced outside the country of purchase
• Glass parts and other accessory items that are packed with the unit
• Shipping and handling costs associated with the replacement of the unit
• Consequential or incidental damages (Please note, however, that some states do
not allow the exclusion or limitation of consequential or incidental damages, so this
limitation may not apply to you.)
How does state law relate to this warranty?
• This warranty gives you specific legal rights. You may also have other rights that
vary from state to state or province to province.
ENGLISH
is a registered trademark of The Black & Decker Corporation,
Towson, Maryland, USA
Made and Printed in People’s Republic of China
8 9

Por favor lea este instructivo antes de usar el producto.
INSTRUCCIONES IMPORTANTES
DE SEGURIDAD
Cuando se utilizan aparatos eléctricos, siempre se debe respetar ciertas
medidas de seguridad a fin de reducir el riesgo de un incendio, un
choque eléctrico y (o) lesiones a las personas, incluyendo las siguientes:
❍ Lea todas las instrucciones antes de utilizar el producto.
❍ Use la plancha únicamente para planchar.
❍ No sumerja la plancha en agua ni en ningún otro líquido para evitar el
riesgo de un choque eléctrico.
❍ Siempre apague [0] la plancha (vea la sección COMO USAR) antes de
conectarla o desconectarla del tomacorriente. Nunca tire del cable
para desconectarlo, sujete el enchufe para hacerlo.
❍ No permita que el cable entre en contacto con superficies calientes.
Permita que la plancha se enfríe antes de guardarla. Enrolle el cable
holgadamente alrededor de la plancha.
❍ Siempre desconecte la plancha cuando la llene o la vacíe y cuando no
esté en uso.
❍ No haga funcionar la plancha si ésta tiene dañado el cable o si la
plancha se ha dejado caer y se ha estropeado. A fin de reducir a un
mínimo el riesgo de un choque eléctrico, no desarme la plancha.
Acuda a una persona de servicio, calificada para revisar y efectuar las
reparaciones necesarias.
El armar la plancha incorrectamente puede ocasionar el riesgo de un
choque eléctrico cuando la plancha esté en funcionamiento.
❍ Se requiere supervisión cuando cualquier unidad electrónica esté
siendo usada cerca de los niños o por ellos mismos. No desatienda
la plancha mientras esté conectada o cuando esté sobre la tabla de
planchar.
❍ Pueden ocurrir quemaduras si se tocan las partes metálicas, el
agua caliente, o el vapor. Tome precaución al invertir una plancha de
vapor ya que puede haber agua caliente dentro del tanque. Evite los
movimientos bruscos para no derramar agua caliente.
❍ La plancha debe usarse o colocarse en una superficie plana y firme.
- Cuando se coloca la plancha sobre el talón de descanso, asegúrese de
que la superficie sea plana y firme.
- La plancha no se debe usar si se ha caido, si se ha dañado o si está
goteando.
❍ Este aparato no está diseñado para ser usado por personas
(incluído niños) con capacidad limitada fisica, mental o sensoriales
disminuidas y falta de experiencia o conocimiento que les impida
utilizar el aparato con toda seguridad sin supervisión o instrucción.
❍ Se debe asegurar la supervisión de los niños deben para evitar que
usen el aparato como juguete.
❍ La plancha debe usarse o colocarse en una superficie plana y
firme.
- Cuando se coloca la plancha sobre el talón de descanso,
asegúrese de que la superficie sea plana y firme.
- La plancha no se debe usar si se ha caido, si se ha dañado o si
está goteando.
INSTRUCCIONES ESPECIALES
❍ Para evitar sobrecargas, no opere ningún otro aparato de alto
consumo de corriente en el mismo circuito.
❍ Para evitar sobrecargas, no opere ningún otro aparato de alto
consumo de corriente en el mismo circuito. Si el uso de un cable
de extensión es absolutamente necesario, se deberá utilizar uno
de 15 amperios y 120 voltios o uno de 7 amperios y 220 voltios. Los
cables de menor amperaje se pueden sobrecalentar. Se debe tener
cuidado de acomodar el cable de manera que nadie lo hale ni se
tropiece.
CONSERVE ESTAS
INSTRUCCIONES.
Este aparato eléctrico es para uso doméstico solamente.
ESPAÑOL
10 11

Este producto puede variar ligeramente del que aparece ilustrado.
1. Boquilla de rociar
2. Tapa del tanque
3. Pantalla VCL
4. Botón de encendido y apagado de vapor
5. Botón de emisión de vapor
6. Botón de rociar
7. Mango Comfort Grip
8. Cable giratorio de 360 grados
9. Talón de descanso antideslizante
10. Tanque de agua
11. Botón de limpieza automática AUTO CLEAN®
12. Botones para el control de temperatura
13. Suela
14. Botón de selección de idioma (no ilustrado)
®
Como usar
Este aparato es para uso doméstico solamente.
PASOS PRELIMINARES
• Por favor, visite www.prodprotect.com/applica para registrar su garantía.
• Si va a planchar en seco, coloque el aparato verticalmente sobre una tabla de
planchar estable.
• Desenrolle el cable y enchúfelo a una tomacorriente estándar.
Importante: Para mejores resultados, deje reposar la plancha por 90 segundos
hasta que el icono "en espera"
VCL cambie a "listo"
COMO LLENAR EL TANQUE DE AGUA
1. Abra la tapa del orificio de llenado según la ilustración.
2. Incline la plancha y con una taza de medir limpia, vierta agua en el orificio hasta
alcanzar la marca de llenado MAX en el costado del tanque. No exceda el nivel de
llenado.
Nota: El tanque de esta plancha se puede llenar con agua corriente de la llave; si el
agua de la región es demasiado dura o blanda, se puede usar agua destilada. No use
agua procesada por un sistema doméstico de ablandamiento de agua.
3. Cierre la tapa del orificio de llenado.
Nota: Si tiene que agregar agua al tanque durante el planchado, desconecte la
plancha y siga los pasos citados anteriormente.
4. Enchufe la plancha a un tomacorriente.
• El aparato produce un sonido.
• La pantalla VCL se ilumina y después se apaga.
• El símbolo, “en espera” permanece en la pantalla VCL.
5. Para encender la plancha, presione el botón del control de temperatura (+), a la
izquierda de la pantalla VCL.
• El aparato produce un sonido.
• La pantalla VCL se ilumina.
• La plancha se empieza a calentar y la pantalla VCL exhibe la temperatura
más baja.
COMO AJUSTAR LA TEMPERATURA SEGÚN EL TEJIDO
1. Lea las etiquetas de las prendas para determinar el tipo de tejido a planchar.
Consejo: Si desconoce la fibra de cierto tejido, ensaye primero sobre una superficie
pequeña y planche una costura o ruedo interior.
2. Una vez que determine el tipo de tejido, presione los botones para la selección
de tejido (+) y (-) situados a uno y otro lado de la pantalla VCL y elija el tipo de
tejido apropiado. La pantalla VCL se ilumina y el tipo de tejido aparece en la parte
superior, con el número correspondiente debajo, hacia la izquierda. También
aparece una flecha intermitentemente mientras la plancha se está calentando.
La plancha produce un sonido cuando alcanza la temperatura programada y el
símbolo "en espera"
3. Siempre que uno ajusta el nivel de temperatura, las flechas ▲ o ▼ aparecen
nuevamente en la pantalla VCL, indicando que la plancha se está calentando o
enfriando según la temperatura programada.
Importante: Siempre coloque la plancha sobre el talón de descanso cuando esté
encendida pero no en uso.
.
cambia a "listo" y la flecha desaparece.
en la esquina inferior derecha de la pantalla
ESPAÑOL
12 13

SELECCIÓN DE VAPOR
1. El icono del vapor aparece al presionar el botón de encendido y apagado del vapor,
situado justo detrás de la pantalla DEL en la parte delantera de los botones de vapor
y del rociador.
2. El dispositivo ALL-TEMP STEAM™ permite usar vapor a todos los niveles. La plancha
emite vapor una vez cuando se usan los ajustes para los tejidos de 1 a 3, y dos veces
cuando se ajusta el nivel a los tejidos del 4 al 7.
3. El indicador de vapor en la pantalla VCL parpadea hasta que la plancha alcanza la
temperatura apropiada y luego permanece fijo.
4. Si uno regula la temperatura del 1 al 3, el símbolo
plancha alcanza el nuevo nivel programado, y luego permanece fijo. Si uno ajusta la
temperatura a un nivel mayor que 3, aparece
plancha alcanza esa temperatura y luego, el icono permanece constante.
5. Si uno presiona el botón de encendido y apagado de vapor mientras la plancha
está en uso, la emisión de vapor se interrumpe y el símbolo
pantalla VCL.
PLANCHADO A VAPOR
Cuando planche a vapor, asegúrese que el tanque de la plancha esté repleto de agua
antes de comenzar a planchar.
Sistema ALL-TEMP STEAM™
El sistema ALL-TEMP STEAM™ aprovecha la tecnología Smart Steam™ y permite planchar
a vapor todo tipo de tejido a cualquier nivel de temperatura, incluyendo la temperatura más
baja.
Sistema SMART STEAM™
El sistema Smart Steam™ automáticamente produce la cantidad de vapor necesaria
según el tipo de tejido. Después de que uno ajusta la temperatura, el dispositivo Smart
Steam™ detecta la temperatura programada y asimismo ajusta la potencia de la emisión
de vapor.
Sugerencias para los diferentes tejidos:
• Acrílico: pañuelos, blusas y tejidos de punto (planchar por el revés)
• Nailon: ropa interior, batas acedadas, ropa de dormir y gabardinas (planchar por el
revés)
• Poliéster: tejidos de punto, vestidos, blusas, faldas y ropa de viajar (planchar por el
revés)
• Combinación de tejidos: faldas, blusas, tejidos de punto, uniformes, ropa de cama
y mantelería
• Lana: pantalones, chaquetas, pañuelos de seda y blusas
• Algodón: blusas y camisas 100% de algodón y mantelería
• Lino: pantalones, ropa de verano, chaquetas y blusas
Presione el botón de encendido y apagado de vapor para activar dicha función.
El símbolo
calienta y luego, permanece fijo una vez que la función de vapor está lista.
Fuerte emisión de vapor
1. Apropiada para suavizar las arrugas persistentes.
2. Presione el botón
resultados, permita 5 segundos entre cada aplicación.
Uso del rociador
1. Asegúrese de que el tanque de agua esté lleno.
2. Para el primer uso, bombee el botón
aparece intermitentemente en la pantalla VCL mientras la plancha se
para producir una fuerte emisión de vapor. Para mejores
varias veces.
parpadea hasta que la
icon intermitentemente hasta que la
desaparece de la
Planchado en seco
1. Uno puede planchar sin vapor en cualquier momento.
2. No es necesario vaciar el tanque de agua; simplemente presione el botón a
la posición de apagado (OFF). El (los) símbolo(s) de vapor desaparecen de la
pantalla VCL.
3. Vaciar el tanque de agua es opcional. Para hacerlo, siga las instrucciones
citadas abajo.
EMISIÓN VERTICAL DE VAPOR
Ideal para suavizar las arrugas de las prendas colgantes o de las cortinas.
1. Asegúrese de llenar el tanque de agua hasta el nivel máximo.
2. Cuelgue en un gancho la prenda que desea vaporizar. Las cortinas se pueden
vaporizar una vez instaladas.
3. Ajuste el selector según el tejido a planchar. Deje reposar la plancha por
90 segundos hasta que el símbolo "en espera"
de la pantalla VCL cambie a "listo"
4. Sujete la plancha cerca, pero no en contacto con el tejido.
5. Hale el tejido con una mano y bombee el botón del vapor con la otra, a medida
pasa la plancha sobre la prenda.
Vaciado del tanque de agua (opcional)
Nota: No es necesario vaciar el tanque de agua después de cada uso.
1. Desconecte la plancha y espere que se enfríe.
2. Abra la tapa del orificio de llenado.
3. Para vaciar el agua, sujete la plancha con la punta hacia abajo sobre una pila.
El agua sale a través del orificio de llenado. Sujete la plancha en esa posición
hasta vaciar el tanque por completo.
CARACTERÍSTICAS ESPECIALES
SELECCIÓN DE IDIOMA
Su plancha tiene una pantalla digital multilingüe que le permite escoger entre inglés,
francés y español.
Para seleccionar un idioma:
1. Para inglés, presione el botón (-) por 2 segundos; la pantalla digital exhibe “EN”.
2. Para francés, presione el botón (-) nuevamente y aparece “FR”.
3. Para español, presione el botón (-) por tercera vez y la pantalla digital
exhibe “ES”.
Nota: Los idiomas cambian según el orden mencionado anteriormente.
Apagado automático de 3 vías
El dispositivo de apagado automático de esta plancha funciona de la siguiente
manera:
• La plancha se apaga automáticamente si permanece inactiva sobre la suela o de
lado durante 30 segundos. Lo mismo sucede si la plancha permanece inactiva
verticalmente sobre el talón de descanso durante 8 minutos.
• El aparato produce un sonido y el símbolo de apagado automático
la pantalla VCL, indicando que la plancha ha dejado de calentar.
Importante: Aunque la plancha se haya apagado, aun está caliente.
• Después de unos minutos, la luz de la pantalla VCL se apaga.
• Si uno levanta la plancha, se activa un detector interno y la plancha se calienta
nuevamente.
.
en la parte inferior derecha
aparece en
ESPAÑOL
14 15

Sugerencia: Mueva o agite la plancha ligeramente.
0
3-WAY AUTO OFF
DIGITAL CONTROLS
• El aparato produce un sonido, la pantalla digital se ilumina y exhibe la temperatura
programada anteriormente.
Nota: Espere que la plancha se caliente bien antes de comenzar a planchar nuevamente.
SISTEMA A PRUEBA DE GOTEO
El sistema a prueba de goteo evita las manchas de agua que puede ocasionar la plancha
a temperaturas bajas.
SISTEMA DE LIMPIEZA AUTOMÁTICA AUTO CLEAN®
Nota: Si la pantalla VCL exhibe este símbolo , quiere decir que la plancha requiere
limpieza. Siga los pasos de limpieza citados abajo en la sección, SISTEMA DE LIMPIEZA
AUTOMÁTICA AUTO CLEAN®.
Cuidado y limpieza
Este producto no contiene piezas reparables por el consumidor. Para servicio, acuda a
personal calificado.
LIMPIEZA DE LAS SUPERFICIES EXTERIORES
1. Asegúrese que la plancha esté desconectada y que se haya enfriado bien. Limpie
la suela y las superficies exteriores con un paño suave, humedecido con agua y
un detergente no abrasivo. Jamás use abrasivos, limpiadores fuertes, vinagre ni
almohadillas de fregar que puedan rallar o decolorar la plancha.
2. Para eliminar cualquier residuo acumulado en los orificios de escape de la suela,
planche a vapor sobre un paño viejo.
SISTEMA DE LIMPIEZA AUTOMÁTICA AUTO CLEAN®
Para mantener los orificios de salida de vapor libres de acumulaciones, siga las
siguientes instrucciones por lo menos una vez al mes:
1. Llene el tanque de agua por debajo de la línea MAX. Enchufe la plancha.
2. Ajuste el control de temperatura al nivel 6 y coloque la plancha en posición vertical
sobre el talón de descanso.
3. Espere que la plancha produzca un sonido y que aparezca el número que corresponde
al tejido.
4. Desconecte y sujete la plancha con la suela orientada hacia abajo sobre una pila.
5. Presione y sostenga el botón de limpieza automática AUTO CLEAN®. Tenga cuidado
del agua caliente y el vapor que emiten los orificios de la suela. Continúe sosteniendo
el botón de limpieza automática hasta haber vaciado toda el agua. Si es necesario,
mueva la plancha de lado a lado y de atrás para adelante.
6. Al terminar de vaciar el agua, suelte el botón, coloque la plancha sobre el talón de
descanso y enchúfela. Permita que la plancha se caliente unos dos minutos para
secar cualquier residuo de humedad.
ALMACENAMIENTO DE LA PLANCHA
1. Desconecte la plancha y espere que se enfríe.
2. Para evitar que la plancha gotee a través de la suela, guárdela verticalmente sobre el
talón de descanso.
¿NECESITA AYUDA?
Para servicio, reparaciones o preguntas relacionadas al producto, por favor llame
al número del centro de servicio que se indica para el país donde usted compró su
producto.
NO devuélva el producto al fabricante. Llame o lleve el producto a un centro de servicio
autorizado.
DOS AÑOS DE GARANTÍA LIMITADA
(Aplica solamente en Estados Unidos y Canada)
¿Qué cubre la garantía?
• La garantía cubre cualquier defecto de materiales o de mano de obra que no haya
sido generado por el uso incorrecto del producto.
¿Por cuánto tiempo es válida la garantía?
• Por dos años a partir de la fecha original de compra mientras que tenga una prueba
de la compra.
¿Cómo se obtiene el servicio necesario?
• Conserve el recibo original como comprobante de la fecha de compra, comuníquese
con el centro de servicio de su país y haga efectiva su garantía si cumple lo indicado
en el manual de instrucciones.
¿Cómo se puede obtener servicio?
• Conserve el recibo original de compra.
• Por favor llame al número del centro de servicio autorizado.
¿Qué aspectos no cubre esta garantía?
• Los productos que han sido utilizados en condiciones distintas a las normales.
• Los daños ocasionados por el mal uso, el abuso o negligencia.
• Los productos que han sido alterados de alguna manera.
• Los daños ocasionados por el uso comercial del producto.
• Los productos utilizados o reparados fuera del país original de compra.
• Las piezas de vidrio y demás accesorios empacados con el aparato.
• Los gastos de tramitación y embarque asociados al reemplazo del producto.
• Los daños y perjuicios indirectos o incidentales.
¿Qué relación tiene la ley estatal con esta garantía?
• Esta garantía le otorga derechos legales específicos y el consumidor podría tener
otros derechos que varían de una región a otra.
ESPAÑOL
es una marca registrada de The Black & Decker Corporation,
Towson, Maryland, E.U.
Fabricado e Impreso en la República Popular de China
16 17

Veuillez lire et conserver ce guide d’entretien et d’utilisation.
IMPORTANTES MISES
EN GARDE
Lorsqu’on utilise un fer, il faut toujours respecter certaines règles de
sécurité fondamentales, notamment les suivantes. :
❍ Lire toutes les directives avant d’utiliser.
❍ Utiliser le fer seulement aux fins auxquelles il a été prévu.
❍ Afin d’éviter les risques de secousses électriques, ne pas immerger
le fer.
❍ Toujours mettre le fer hors tension arrêt (voir “Utilisation”) avant de
le brancher ou de le débrancher. Ne jamais tirer sur le cordon pour
débrancher le fer. Il faut plutôt saisir la fiche et tirer.
❍ Éviter de mettre le cordon en contact avec des surfaces chaudes.
Laisser le fer refroidir complètement avant de le ranger. Enrouler le
cordon lâchement autour du fer avant de le ranger.
❍ Toujours débrancher le fer pour le remplir d’eau, pour le vider ou
pour le ranger.
❍ Ne pas utiliser le fer si le cordon électrique est endommagé ou si le
fer a été tombé ou endommagé. Pour éviter le risque de secousse
électrique, ne pas démonter le fer, l’apporter à un réparateur qualifié
pour le faire examiner et réparer. Mal le remonter peut causer un
risque de secousse électrique quand on utilise le fer.
❍ Exercer une étroite surveillance lorsque le fer est utilisé près
d’un enfant ou que ce dernier s’en sert. Ne pas laisser le fer sans
surveillance lorsqu’il est branché ou qu’il est placé sur une planche
à repasser.
❍ Les pièces métalliques, l’eau chaude ou la vapeur peuvent
occasionner des brûlures. Renverser avec précaution un fer à vapeur
ou prendre garde lorsqu’on se sert du jet de vapeur, car de l’eau
brûlante peut s’écouler du réservoir. Éviter de faire des mouvements
brusques lors du repassage afin de minimiser l’écoulement
accidentel d’eau brûlante.
❍ Le fer à repasser doit être utilisé et déposé sur une surface stable.
- Avant de déposer le fer à repasser sur son support, s'assurer que la
surface sur laquelle se trouve le support est stable.
- Ne pas utiliser le fer à repasser s'il a été échappé, s'il est
visiblement endommagé ou s'il fuit.
MESURES SPÉCIALES
❍ Afin d’éviter les surcharges, ne pas brancher d’autres appareils à
forte consommation électrique sur le même circuit.
❍ Lorsqu’il faut utiliser un cordon de rallonge, choisir un cordon de
10 ampères. Les cordons dont le calibre est inférieur risquentde
surchauffer. Placer le cordon de façon à ne pas trébucher sur ce
dernier, ou de sorte qu’il ne soit pas débranché accidentellement
CONSERVER CES MESURES.
L'appareil est conçu pour une utilisation domestique
seulement.
FICHE POLARISÉE (Modèles des É.-U. seulement)
L'appareil est muni d'une fiche polarisée (une lame plus large que l'autre).
Afin de minimiser les risques de secousses électriques, ce genre de fiche
n'entre que d'une façon dans une prise polarisée. Lorsqu'on ne peut insérer
la fiche à fond dans la prise, il faut tenter de le faire après avoir inversé
les lames de côté. Si la fiche n'entre toujours pas dans la prise, il faut
communiquer avec un électricien certifié. Il ne faut pas tenter de modifier la
fiche.
VIS INDESSERRABLE
Avertissement : L’appareil est doté d’une vis indesserrable empêchant
l’enlèvement du couvercle extérieur. Pour réduire les risques d’incendie ou
de secousses électriques, ne pas tenter de retirer le couvercle extérieur.
L’utilisateur ne peut pas remplacer les pièces de l’appareil. En confier la
réparation seulement au personnel des centres de service autorisés.
Note : Lorsque le cordon d’alimentation est endommagé, il faut le faire
remplacer par du personnel qualifié ou, en Amérique latine, par le personnel
d’un centre de service autorisé.
FRANÇAIS
18 19

Le produit peut différer légèrement de celui illustré.
1. Bec de pulverization
2. Couvercle du reservoir
3. Écran ACL rétroéclairé
4. Bouton de vapeur marche/arrêt
5. Bouton pour le jet de vapeur
6. Bouton de pulvérisation
7. Poignée Comfort Grip
8. Cordon pivotant à 360
9. Talon d’appui antidérapant
10. Réservoir d’eau
11. Bouton d’autonettoyage AUTO CLEAN
12. Boutons de réglage de la temperature
13. Semelle
14. Bouton de modification de la langue (non illustré)
MC
o
MD
Utilisation
Cet appareil est conçu uniquement pour une utilisation domestique.
POUR COMMENCER
• Visiter le www.prodprotect.com/applica pour enregistrer la garantie.
•
Pour le repassage à sec, déposer le talon d’appui de l’appareil sur une planche à
repasser stable.
•
Dérouler le cordon et le brancher dans une prise électrique standard.
Important : Pour obtenir un rendement optimal, laisser le fer reposer pendant
90 secondes jusqu’à ce que l’icône « en attente »
inférieure droite de l’écran ACL passe à « prét »
REMPLISSAGE DU RÉSERVOIR D’EAU
1. Déposer le fer à repasser sur une surface plane, la semelle dirigée vers le bas,
puis ouvrir le couvercle du réservoir.
2. Incliner le fer et, à l’aide d’une tasse à mesurer propre, verser de l’eau dans
l’orifice de remplissage jusqu’à ce qu’elle atteigne la marque MAX sur le côté du
réservoir. Ne pas trop remplir.
Nota : On peut se servir de l’eau du robinet pour remplir le fer à repasser. Si l’eau
du robinet est dure ou douce, on peut utiliser de l’eau distillée. Ne pas utiliser d’eau
traitée par un système d’adoucissement domestique.
3. Fermer le couvercle du réservoir.
Nota : Si vous devez ajouter de l’eau pendant le repassage, débrancher le fer et suivre
les étapes ci-dessus.
4. Brancher le fer dans une prise électrique.
• Le fer émet un bip.
• Le rétroéclairage ACL s’allume, puis s’éteint.
• Le symbole du mode Attente demeure affiché sur l’écran ACL.
5. Mettre le fer en marche en appuyant sur le bouton de réglage de la température
(+), situé à gauche de l’écran ACL.
• Le fer émet un bip.
• Le rétroéclairage de l’écran ACL s’allume.
• Le fer commence à chauffer et l’écran ACL affiche le degré de chaleur
le plus bas.
SÉLECTION DE LA TEMPÉRATURE SELON LE TISSU
1. Lire les étiquettes du vêtement pour connaître le type de tissu que vous allez
repasser.
Conseil : Si vous ne connaissez pas le type de fibres dont le tissu se compose, faire
un essai sur une petite partie (à l’intérieur d’un ourlet ou d’une couture) avant de
repasser le vêtement au complet.
2. Après avoir déterminé le type de tissu, appuyer sur les boutons de sélection
du tissu (+) et (-) situés de chaque côté de l’écran ACL pour choisir le réglage
approprié pour le tissu. L’écran ACL s’allume alors et le type de tissu sélectionné
est affiché dans le haut, au-dessus du numéro correspondant au réglage, situé
à gauche. Une flèche clignote pour indiquer que le fer chauffe. Lorsque le fer a
atteint la température appropriée, il émet un bip, le symbole
passe à
3. Aussitôt qu’on change le réglage de la température, les symboles
s’affichent à nouveau sur l’écran ACL, indiquant que le fer est en période de
chauffage ou de refroidissement pour s’ajuster au nouveau degré de température
sélectionné.
« prét »
et la flèche disparaît.
située dans la partie
.
« en attente »
▲ ou ▼
FRANÇAIS
20 21

Important : Toujours placer le fer à repasser sur son talon d’appui lorsqu’il n’est pas
utilisé, mais qu’il est en marche.
SÉLECTION DE LA VAPEUR
1. L’icône de vapeur s’affiche lorsqu’on appuie sur le bouton marche/arrêt ON/OFF pour
la vapeur, situé derrière l’affichage à DEL et devant les boutons pour la vapeur et la
pulvérisation.
2. LE SYSTÈME ALL-TEMP STEAMMC vous permet d’utiliser la vapeur, peu importe
le réglage. Un jet de vapeur s‘affichera sur l’écran ACL lorsque vous utiliserez les
réglages de tissus de 1 à 3. Deux jets de vapeur s’afficheront lorsque vous utiliserez
les réglages de tissus de 4 à 7.
3. L’indicateur de la vapeur sur l’écran ACL clignote jusqu’à ce que le fer atteigne la
température appropriée. Il reste ensuite allumé.
4. Si le réglage est modifié pour être fixé de 1 à 3, le symbole
clignote jusqu’à ce
que le fer atteigne le degré de chaleur sélectionné, puis il reste allumé. Si le réglage
sélectionné est supérieur à 3, le symbole
s’affiche et clignote jusqu’à ce que le
degré de température sélectionné soit atteint, puis il reste allumé.
5. Si on appuie sur le bouton de vapeur marche/arrêt (ON/OFF) pendant l’utilisation, le
fer cesse de produire de la vapeur et le symbole de la vapeur disparaît de l’écran ACL.
REPASSAGE À LA VAPEUR
Lorsque vous utilisez la vapeur, assurez-vous que le fer est rempli d’eau avant de
commencer à repasser.
ALL-TEMP STEAM
MC
Le système ALL-TEMP STEAMMC tire parti de la technologie Smart SteamMC et vous
permet d’utiliser la vapeur pour tous les tissus et réglages de température – même à
basse température.
Technologie Smart Steam
MC
Le système Smart SteamMC génère automatiquement la quantité de vapeur nécessaire
pour le type de tissu sélectionné. Une fois la température désirée sélectionnée, la
technologie Smart Steam
MC
détecte le réglage de la température et ajuste le jet de
vapeur en fonction de ce réglage.
Suggestions pour chacun des réglages :
• Acrylique : foulards, chemisiers, tricots – repasser à l’envers
• Nylon : lingerie, peignoirs, vêtements de nuit, imperméables – repasser à l’envers
• Polyester : tricots, robes, chemisiers, jupes, vêtements de voyage – repasser à
l’envers
• Mélanges : chemises, chemisiers, tricots, uniformes, literie et linges de table
• Laine : pantalons, vestons, foulards et chemisiers de soie
• Coton : chemisiers et chemises 100 % en coton, linges de table
• Lin : pantalons tout aller, vêtements d’été, vestons, chemisiers
Appuyer sur le bouton de vapeur marche/arrêtpour activer la vapeur. Pendant le
chauffage, le symbole de la vapeur clignote sur l’écran ACL. Il reste ensuite allumé
lorsque la fonction de vaporisation peut être utilisée.
Jet de Vapeur
1. Le jet de vapeur permet d’effacer les plis les plus tenaces.
2. Appuyer sur le bouton pour le jet de vapeur
pour générer un jet de vapeur. Pour
obtenir de meilleurs résultats, attendre au moins 5 secondes entre chaque jet.
Pulvérisation
On peut l’utiliser pour effacer les plis tenaces, peu importe le réglage.
1. S’assurer que le fer est rempli d’eau.
2. Au moment de la première utilisation, pomper le bouton de pulvérisation
à
plusieurs reprises.
Repassage Sans la Vapeur
1. Le repassage sans la vapeur peut se faire à tous les réglages.
2. Il n’est pas nécessaire de vider le réservoir d’eau; appuyer simplement sur le
bouton de vapeur pour le mettre en position d’arrêt. Le ou les symboles de la
vapeur disparaîtront de l’écran ACL .
3. Si désiré, vider le réservoir d’eau en suivant les directives ci-dessous et appuyer
sur le bouton de vapeur pour désactiver la fonction de génération de vapeur.
JET DE VAPEUR VERTICAL
Le jet de vapeur vertical vous permet de repasser des vêtements, des rideaux et des
tentures suspendus.
1. S’assurer que le réservoir d’eau est rempli à pleine capacité.
2. Suspendre le vêtement à repasser sur un cintre. Les rideaux ou les tentures
peuvent être vaporisés à l’endroit où ils sont suspendus.
3. Appuyer sur le bouton de sélection du tissu pour obtenir le réglage du tissu
approprié. Laisser le fer reposer pendant 90 secondes jusqu’à ce que l’icône « en
attente »
dans la partie inférieure droite de l’écran ACL passe à « prét » .
4. Tenir le fer près du tissu sans toucher à ce dernier.
5. Avec votre main libre, tirer fermement sur le tissu et pomper le bouton du jet de
vapeur en déplaçant le fer sur le tissu.
Vidage du réservoir d’eau (facultatif)
Nota : Il n’est pas nécessaire de vider le réservoir d’eau après chaque utilisation.
1. Débrancher le fer et le laisser refroidir.
2. Ouvrir le couvercle du réservoir.
3. Pour vider le fer, le tenir au-dessus d’un évier, la pointe vers le bas.
L’eau s’écoulera par l’orifice de remplissage.
CARACTÉRISTIQUES SPÉCIALES
Réglage de la langue
Votre fer à repasser est doté d’un écran numérique multilingue qui vous permet de
choisir une langue : anglais, français ou espagnol.
Pour modifier la langue:
1. Maintenir enfoncé le bouton (-) pendant 2 secondes; l’écran numérique affichera
EN (pour anglais).
2. Appuyer à nouveau sur le bouton (-), l’écran numérique indiquera alors FR (pour
français).
3. Appuyer encore une fois sur le bouton (-); l’écran numérique affichera ES (pour
espagnol).
Nota : La langue change dans l’ordre indiqué ci-dessus.
Arrêt automatique à 3 positions
La fonction d’arrêt automatique de votre fer fonctionne comme suit :
• Le fer s’éteint après 30 secondes d’inactivité, qu’il soit couché sur sa semelle
ou basculé sur le côté. Si le fer est placé à la verticale sur son talon d’appui, il
s’éteint après 8 minutes d’inactivité.
• L’appareil émet un bip et le symbole d’arrêt automatique
s’affiche sur
l’écran ACL pour indiquer que le fer a cessé de chauffer.
FRANÇAIS
22 23

Remarque : Même si le fer est éteint, il est encore chaud.
0
3-WAY AUTO OFF
DIGITAL CONTROLS
• Après quelques secondes, le rétroéclaiage de l’écran ACL s’éteint.
• Si vous saisissez le fer, un détecteur de mouvement interne s’active et le fer
recommence à chauffer.
Conseil : Il se peut que vous deviez bouger le fer ou l’agiter légèrement.
• L’appareil émet un bip, l’écran numérique s’allume et le dernier réglage de
température utilisé s’affiche à nouveau.
Nota : Laisser le fer chauffer complètement avant de recommencer à repasser.
SYSTÈME ANTIGOUTTES
Le système antigouttes protège les tissus des taches d’eau, même à basse température.
Système d’autonettoyage AUTO CLEAN
Nota : Si le symbole d’autonettoyage
l’appareil a besoin d’être nettoyé. Suivre les directives relatives au système AUTO
MD
CLEAN
.
MD
est affiché sur l’écran ACL, cela signifie que
Entretien et nettoyage
L’utilisateur ne peut effectuer lui-même l’entretien d’aucune pièce de ce produit. Confier
l’entretien à un technicien qualifié.
NETTOYAGE DES SURFACES EXTÉRIEURES
1. S’assurer que le fer est débranché et complètement froid. Essuyer la semelle et les
surfaces externes à l’aide d’un linge humide (d’eau) et doux. Ajouter du détergent doux
domestique. Ne jamais utiliser de produits nettoyants abrasifs ou pour service intensif,
de vinaigre ou de tampons à récurer qui peuvent égratigner ou décolorer le fer.
2. Après le nettoyage, faire évacuer la vapeur sur un vieux linge pour enlever tous les
résidus situés dans les évents à vapeur.
SYSTÈME D’AUTONETTOYAGE AUTO CLEAN
Pour garder les évents à vapeur exempts de toute accumulation, procéder comme suit
environ une fois par mois :
1. Remplir le réservoir d’eau de sorte que le niveau se trouve bien au-dessous de la
marque MAX. Brancher le fer.
2. Mettre le sélecteur de température pour tissu à 6 et laisser le fer reposer sur son
talon d’appui.
3. Attendre que le fer émette un bip et affiche le chiffre correspondant à la température
désirée pour le tissu.
4. Débrancher le fer et le tenir au-dessus d’un évier, la semelle vers le bas.
5. Maintenir enfoncé le bouton AUTO CLEAN
et la vapeur sortiront des évents après quelques secondes. Continuer de maintenir
enfoncé le bouton AUTO CLEAN
MD
basculer le fer sur les côtés et de l’avant vers l’arrière.
6. Une fois le fer vide, relâcher le bouton, laisser reposer le fer sur son talon d’appui et
le brancher. Laisser le fer chauffer pendant environ 2 minutes afin de bien l’assécher.
RANGEMENT DU FER
1. Débrancher le fer et le laisser refroidir.
2. Ranger le fer en position verticale sur son talon d’appui pour empêcher les fuites
d’eau de la semelle.
MD
MD
, mais soyez prudent, car l’eau chaude
jusqu’à ce que le fer soit vide. Au besoin, faire
BESOIN D’AIDE?
Pour communiquer avec les services d’entretien ou de réparation, ou pour adresser
toute question relative au produit, composer le numéro sans frais approprié indiqué
sur la page couverture. Ne pas retourner le produit où il a été acheté. Ne pas poster
le produit au fabricant ni le porter dans un centre de service. On peut également
consulter le site web indiqué sur la page couverture.
GARANTIE LIMITÉE DE DEUX ANS
(Valable seulement aux États-Unis et au Canada)
Quelle est la couverture?
• Tout défaut de main-d’oeuvre ou de matériau; toutefois, la responsabilité de la
société Applica se limite au prix d’achat du produit.
Quelle est la durée?
• Deux année(s) à compter de la date d’achat initiale, avec une preuve d’achat.
Quelle aide offrons nous?
• Remplacement par un produit raisonnablement semblable nouveau ou réusiné.
Comment se prévaut-on du service?
• Conserver son reçu de caisse comme preuve de la date d’achat.
• Visiter notre site web au www.prodprotect.com/applica, ou composer sans frais le 1
800 231-9786, pour obtenir des renseignements généraux relatifs à la garantie.
• On peut également communiquer avec le service des pièces et des accessoires au 1
800 738-0245.
Qu’est-ce que la garantie ne couvre pas?
• Des dommages dus à une utilisation commerciale.
• Des dommages causés par une mauvaise utilisation ou de la négligence.
• Des produits qui ont été modifiés.
• Des produits utilisés ou entretenus hors du pays où ils ont été achetés.
• Des pièces en verre et tout autre accessoire emballés avec le produit.
• Les frais de transport et de manutention reliés au remplacement du produit.
• Des dommages indirects (il faut toutefois prendre note que certains états ne
permettent pas l’exclusion ni la limitation des dommages indirects).
Quelles lois régissent la garantie?
• Les modalités de la présente garantie donnent des droits légaux spécifiques.
L’utilisateur peut également se prévaloir d’autres droits selon l’état ou la province
qu’il habite.
Marque de commerce déposée de la société The Black & Decker Corporation,
Towson, Maryland, É.-U.
FRANÇAIS
Fabriqué e Imprimé en République populaire de Chine
24 25

NOTES/NOTAS/NOTES
NOTES/NOTAS/NOTES
26 27

© 2011 Applica Consumer Products, Inc.
2011/4-6-10E/S/F
 Loading...