

Page 1
MILL & BREW
12-CUP PROGRAMMABLE
COFFEE MAKER
CAFETERA
12 TAZAS PROGRAMABLE
CAFETIÈRE PROGRAMMABLE
12 TASSES
DE
use & care manual
manual de uso y cuidado
guide d’utilisation et d’entretien
CM5000BD
CM5000GD
CM5000RD
CM5000WD
DE
TM
Page 2

CONTENTS
Important Safeguards
Getting to know your Mill & Brew Coffee Maker
Mill & Brew Coffee Maker Product Benefits
Getting to know your Control Panel
Before Brewing
Programming your Mill & Brew Coffee Maker
4 Elements to Brew the Perfect Cup
Tips for a Perfect Cup of Coffee
Brewing Coffee
Care and Cleaning
2-3
4–5
6
7
8
8–9
10
11
12–13
14–15
Troubleshooting
Warranty and Customer Service Information
RISK OF FIRE OR ELECTRIC SHOCK. DO NOT OPEN.
The lightning symbol refers to “dangerous voltage”; the exclamation symbol refers
to maintenance instructions. See below.
Warning: To reduce the risk of fire or electric shock, do not remove the cover of the
coffeemaker. There are no user-serviceable parts inside. Repair should be done by
authorized service personnel only.
1
16
17
WARNING
Page 3

Please Read and Save this Use and Care Book.
IMPORTANT SAFEGUARDS.
When using electrical appliances, basic safety precautions should always be followed to
reduce the risk of fire, electric shock, and/or injury, including the following:
• Read all instructions
• Do not touch hot surfaces. Use
handles or knobs.
• To protect against fire, electric
shock and injury to persons do not
immerse cord, plugs or appliance
in water or other liquid.
• Close supervision is necessary
when any appliance is used by
or near children.
• Unplug from outlet when not
in use and before cleaning.
Allow to cool before putting on
or taking off parts, and before
cleaning the appliance.
• Do not operate any appliance
with a damaged cord or
plug, or after the appliance
malfunctions or has been
damaged in any manner.
Contact the Consumer Support
department listed in these
instructions
• The use of accessory
attachments not recommended
by the appliance manufacturer
may result in fire, electric shock
or injury to persons.
• Do not use outdoors.
• Do not let cord hang over edge
of table or counter, or touch hot
surfaces.
• Do not place on or near a hot gas or
electric burner, or in a heated oven.
• To disconnect, turn any control to
off, then remove plug from wall
outlet.
• Do not use this appliance for
other than intended use.
• Keep lid on the carafe when in use.
• Scalding may occur if the lid is
removed during the brewing
cycles.
• The carafe is designed for use
with this appliance. It must
never be used on a range top.
• Do not set a hot carafe on a wet
or cold surface.
• Do not use a cracked carafe
or a carafe having a loose or
weakened handle.
• Do not clean carafe with
cleansers, steel wool pads or
other abrasive material.
• This appliance is not intended
for use by persons (including
children) with reduced physical,
sensory or mental capabilities,
or lack of experience and
knowledge, unless they have
been given supervision or
instruction concerning use
of the appliance by a person
responsible for their safety.
• Children should be supervised
to ensure that they do not play
with the appliance.
• Scalding and/or burns may occur if the
integrated grinder lid is removed
during the brewing cycle.
• Check the grinder basket for presence
of foreign objects before using.
• Only coffee beans and coffee grounds
should be placed into the grinder
basket.
• Avoid contact with moving
parts
2
Page 4

SAVE THESE INSTRUCTIONS.
This product is for household use only.
POLARIZED PLUG (120V models only)
This appliance has a polarized plug (one blade is wider than the other). To reduce the
risk of electric shock, this plug is intended to fit into a polarized outlet only one way. If
the plug does not fit fully into the outlet, reverse the plug. If it still does not fit, contact
a qualified electrician. Do not attempt to modify the plug in any way.
TAMPER-RESISTANT SCREW
Warning: This appliance is equipped with a tamper-resistant screw to prevent
removal of the outer cover. To reduce the risk of fire or electric shock, do not attempt
to remove the outer cover. There are no user-serviceable parts inside. Repair should
be done only by authorized service personnel.
ELECTRICAL CORD
1. A short power-supply cord is provided to reduce the risk resulting from becoming
entangled in or tripping over a longer cord.
2. Extension cords may be used if care is exercised in their use.
3. If a long detachable extension cord is used:
a) The marked electrical rating of the
power cord or extension cord should
be at least as great as the electrical
rating of the appliance.
b) If the appliance is of the grounded
type, the extension cord should be a
grounding-type 3-wire cord.
c) The cord should be arranged so that
it will not drape over the countertop
or tabletop where it can be pulled on
by children or tripped over.
Note: If the power cord is damaged, please contact the warranty department listed
in these instructions.
3
Page 5
GETTING TO KNOW YOUR
MILL & BREW COFFEE MAKER
3
2
1
8
4
5
6
7
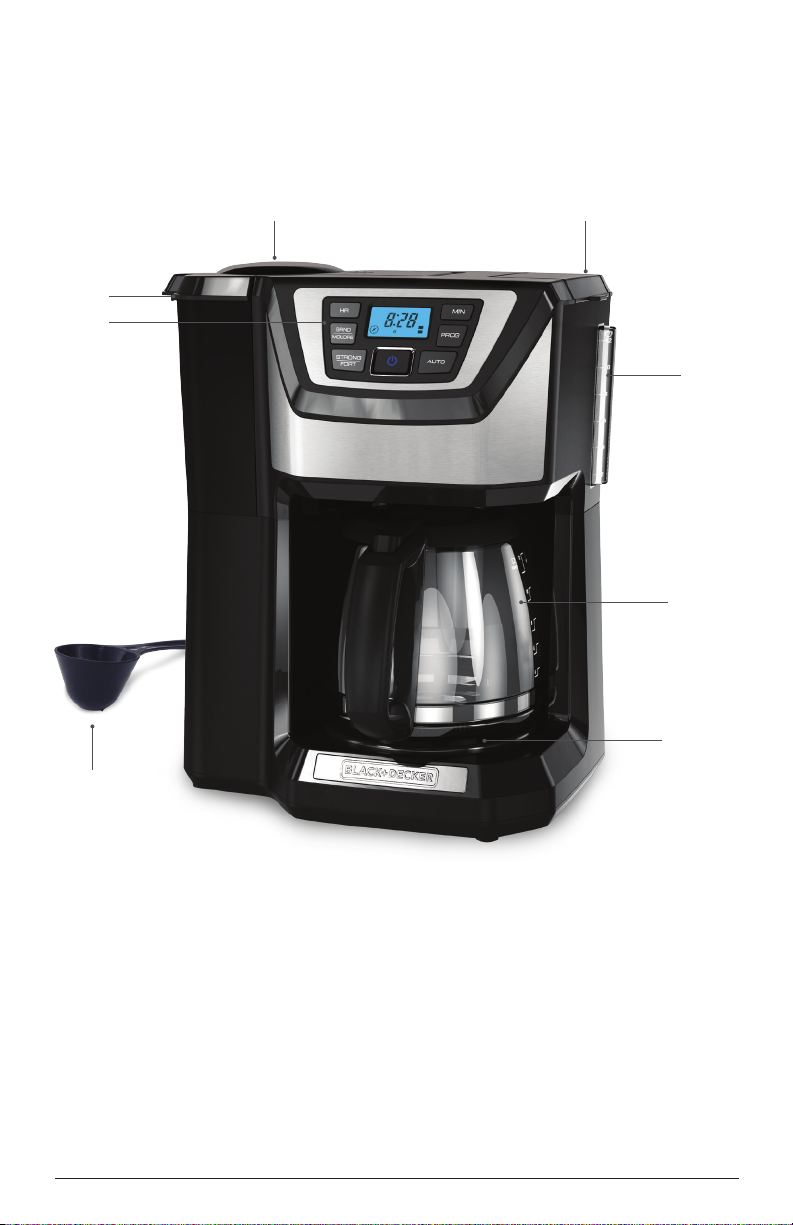
1. Control panel
2. Lift latch
3. Lid
4. Water reservoir cover
5. Easy viewing water window
Product may vary slightly
from what is illustrated.
6. Duralife™ glass carafe
(Part# CM5000-01 )
7. “Keep hot” carafe plate
8. Coffee scoop
(Part# CM5000-02 )
4
Page 6
GETTING TO KNOW YOUR
MILL & BREW COFFEE MAKER
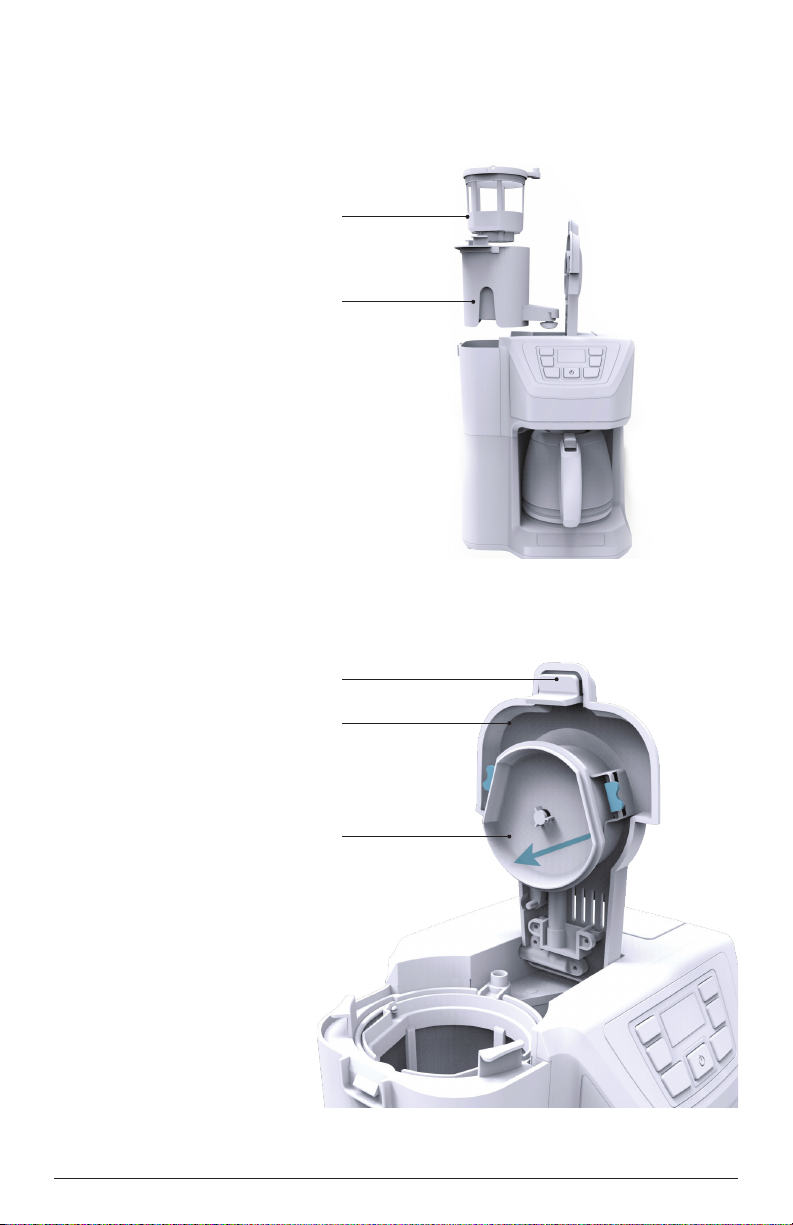
1. 2-in-1 grinder and
permanent filter basket
(Part# CM5000-03)
2. Washable brew basket
(Part# CM5000-04)
3. Lift latch
4. Grinder lid
5. Removable showerhead
(press highlighted tabs
to remove)
(Part# CM5000-05)
1
2
3
4
5
5
Page 7

MILL & BREW COFFEE MAKER
PRODUCT BENEFITS
Fresh Brew Timer
After the brew cycle is complete,
the time since brewed will be
displayed in 1-minute increments.
This information will be in place of
the digital clock during keep warm.
2-in-1 Grinder and
Permanent Filter Basket
Whole coffee beans are ground
and brewed in the same grinder
assembly, allowing for fast brewing
and easy clean-up.
Eco-Friendly Permanent Filter
The high-performance Bronze Tone
permanent filter eliminates the need
for paper filters and minimizes any
coffee staining appearance.
Washable Brew Basket
The washable brew basket can easily
be removed and washed after brewing,
and is top rack dishwasher safe.
Removable Showerhead
The coffeemaker’s showerhead is
removable for easy cleaning.
Brew Strength Selector
Customize the flavor of your coffee
by selecting from three brew
strength settings: regular, strong,
or bold.
Sneak-A-Cup™
Can’t wait for the full pot of coffee
to finish brewing? Sneak-A-Cup™
of coffee before brewing using this
great feature, which stops the flow
of coffee into your carafe. Replace
the carafe back in the coffee maker
within 20 seconds to prevent brew
basket overflow.
Grind Select
Cycles through optimal grind
settings (4, 6, 8, 10, 12) correlating
with the number of cups to be
brewed, or turns the grinder OFF
for brewing pre-ground coffee.
Duralife™ Glass Carafe
Durable construction provides an
extended carafe life. Water level
markings make for easy filling and
pouring.
Auto Brew
The programmable Auto Brew delay
start allows you to set the 24-hour
timer to brew coffee at the selected
time, day or night.
Digital Clock with Backlighting
The LCD display features a
programmable digital clock and
backlighting for easy-viewing in low
light conditions.
Adjustable Auto-Shutoff
This feature allows you to select
automatic shutoff times from 0-2
hours in 30 minute increments.
The “Keep Hot” carafe plate will
be activated until the automatic
shutoff time is reached.
Non-stick “Keep Hot” Carafe Plate
This feature allows you to keep your
carafe of coffee hot after brewing
until the selected auto-shutoff time
has been reached.
Easy Viewing Water Window
The water window shows the
amount of water in the reservoir for
easy and accurate filling.
Cord Storage
Keep excess cord out of the way
and your countertop neat with
simple cord storage.
6
Page 8
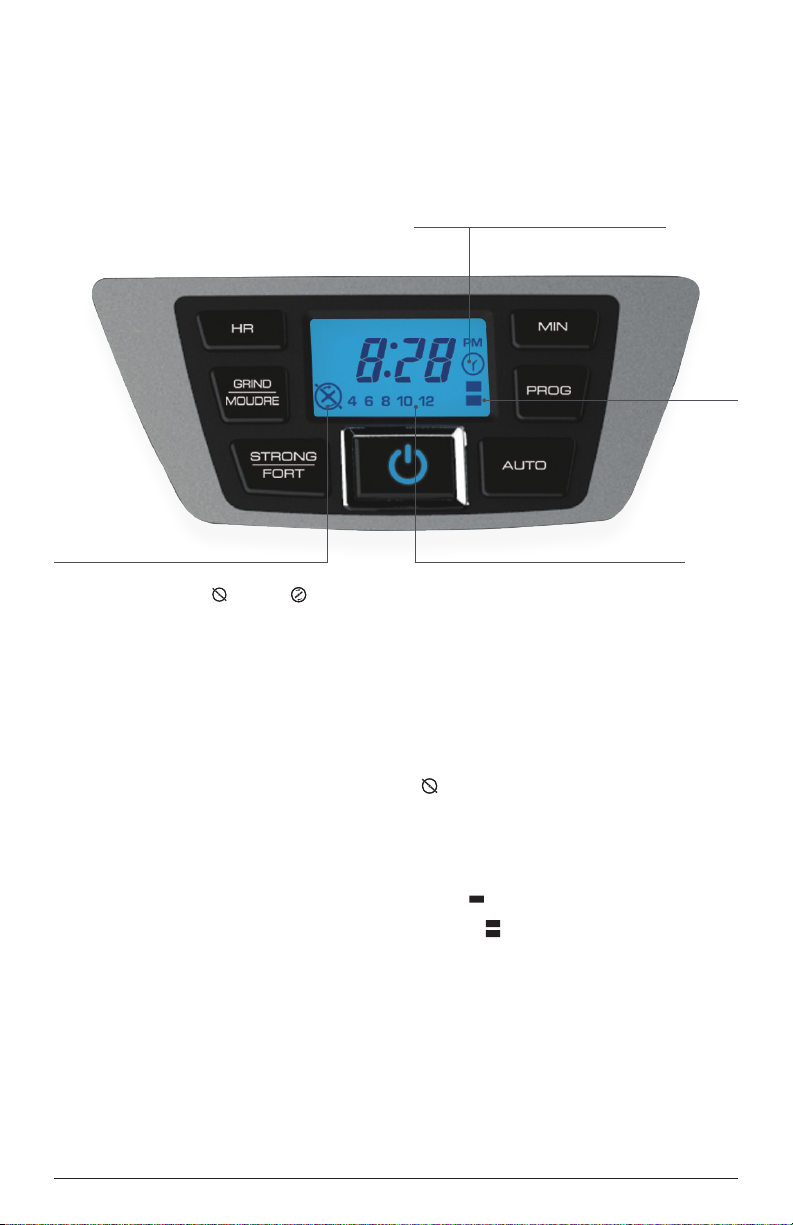
GETTING TO KNOW YOUR CONTROL PANEL
Indicates the delay start timer is set
Brew
strength
settings
Indicates if the whole bean grinder function
has been turned OFF ( ) or ON ( )
Clock / Backlit LCD Display
Power: Turns the unit ON or OFF.
Auto: Turns on the Auto
Brew delayed start.
Program: Auto Brew, press and
release button once.
Keep Warm, press and hold.
Hour: Use to program
the clock (see “Programming”
section).
Minute: Use to program
the clock (or cycle through
different keep warm settings when
in that program mode to adjust
“Keep Warm” time.)
Optimal grind setting correlating with
the number of cups to be brewed
Grind: Cycles through optimal grind
settings (4, 6, 8, 10, 12) correlating
with the number of cups to be
brewed. Also, turns the grinder OFF
( )for brewing pre-ground coffee.
Strong: Use to select the
Brew Strength setting (3 levels)
No bars = regular (default setting)
1 bar ( ) = strong
2 bars ( ) = bold
7
Page 9

BEFORE BREWING
1. Carefully unpack your coffeemaker, removing all packaging materials, labels,
and/or stickers from your coffeemaker.
2. Clean your coffeemaker thoroughly before using for the first time. Wash
the Glass Carafe, Washable Brew Basket, 2-in-1 Grinder and Permanent Filter
Basket, and Removable Showerhead in warm, soapy water. Rinse and dry, then
place back into your coffeemaker.
3. Clean the inside of your coffeemaker by running two full brewing cycles with
water only, no coffee.
a. Pour fresh, cold water into the water reservoir up to the 12-cup MAX
mark, then place carafe on the warming plate.
b. Plug cord into standard electrical outlet.
c. Press the GRIND button until you reach the symbol to turn the grinder
OFF ( )
d. Push the ON-OFF / Power Button to immediately brew water through
the coffeemaker without adding coffee.
e. Once the cycle is finished, discard water and rinse out the 2-in-1
Grinder and Permanent Filter Basket.
f. Turn off appliance, unplug and allow to cool down for 15 minutes
before repeating.
PROGRAMMING YOUR
MILL & BREW COFFEE MAKER
Note: The first button press illuminates the backlit display and any
subsequent presses will perform the programming.
Setting the Digital Clock
1. Plug the coffeemaker into a standard electrical outlet.
2. The digital clock display flashes “12:00”.
3. To set the time, press the HR button until the correct hour appears on the
display. The “PM” symbol will appear in the upper right corner of the digital
display for PM time settings.
4. Press the MIN button to select minutes.
Note: If the unit is unplugged or power interrupted, the time will need to
be reset, as will the Auto Brew delay start time.
Setting the Auto Brew Delay Start
The programmable Auto Brew delay start allows you to set the 24-hour timer
to brew coffee at the selected time, day or night. To activate the Auto Brew
timer, follow the steps on the next page
:
8
Page 10

PROGRAMMING YOUR
MILL & BREW COFFEE MAKER
1. After the digital clock is set, press the PROG button. The timer icon ( ) will
begin to flash and display will read 12:00.
2. Press the HR button and then MIN button to select the time you would
like automatic brewing to begin (for example: 7:30 AM). Make sure the PM light
is not on, if needed.
3. The timer display will flash several times then switch back to the current time of day.
4. Press and release the AUTO button to activate the delay start time that was just
programmed. The timer icon ( ) will remain solid, indicating Auto Brew is activated.
5. When the time of day matches the programmed Auto Brew set time, your
coffeemaker will activate the brew cycle.
6. To cancel the Auto Brew function, press the AUTO button until the timer
icon ( ) disappears.
Note: To check the preset Auto Brew time, press PROG button and the preset
Auto Brew time is displayed. Press AUTO button to reactivate the timer.
Setting the Adjustable Auto-off, Keep Warm Time
This feature allows you to select automatic shutoff times from 0-2 hours in
30 minute increments. The “Keep Hot” carafe plate will be activated until the
automatic shutoff time is reached.
1. Press and hold PROG button for 3 seconds. This will show the default (120
minutes) keep warm time setting.
2. Press the MIN button to toggle through the keep warm settings (00,
30, 60, 90, 120). The values correlate to length of time (in minutes) the keep
warm will remain on after brewing.
3. Press the PROG button to lock in the keep warm setting.
Note: To check the time Auto Brew is set for without making changes, press
the PROG button to display the Auto Brew time, then press the AUTO button.”
Setting the Brew Strength Selector
The Brew Strength Selector customizes the flavor of your coffee by selecting
from three brew strength settings.
1. Press the STRONG button to cycle through the different Brew Strength settings
(3 levels).
a. No bars = regular (default setting)
b. 1 bar ( ) = strong
c. 2 bars ( ) = bold
9
Page 11

4 ELEMENTS TO BREW THE PERFECT CUP
Water
Quality
A great cup of coffee starts with
fresh, quality water. Since water
represents more than 98% of
brewed coffee, it is just as important
as the coffee quality itself. The
water you use should taste like
fresh, good-quality drinking water,
have an odorless aroma, and
contain no visible impurities.
Grind
Selection
The particle size of the coffee
grind is vital for ensuring proper
flavor and extraction. A coffee
grind that is too coarse will allow
water to pass through too quickly
without proper extraction. A coffee
grind that is too fine will lead
to over-extraction and produce
a bitter taste. Your Mill & Brew
coffee maker comes with a Grind
setting to select the optimal grind,
correlating with the number of cups
to be brewed and ensuring proper
grind size for this type of coffee
maker.
™
Coffee
Freshness
A truly fresh cup of coffee only
comes from freshly ground coffee
beans. In fact, once a coffee bean
is broken or ground, its flavor will
begin to degrade over time. Your
Mill & Brew coffee maker maximizes
the freshness of your coffee by
grinding the coffee beans just prior
to brewing.
Proper
Proportion
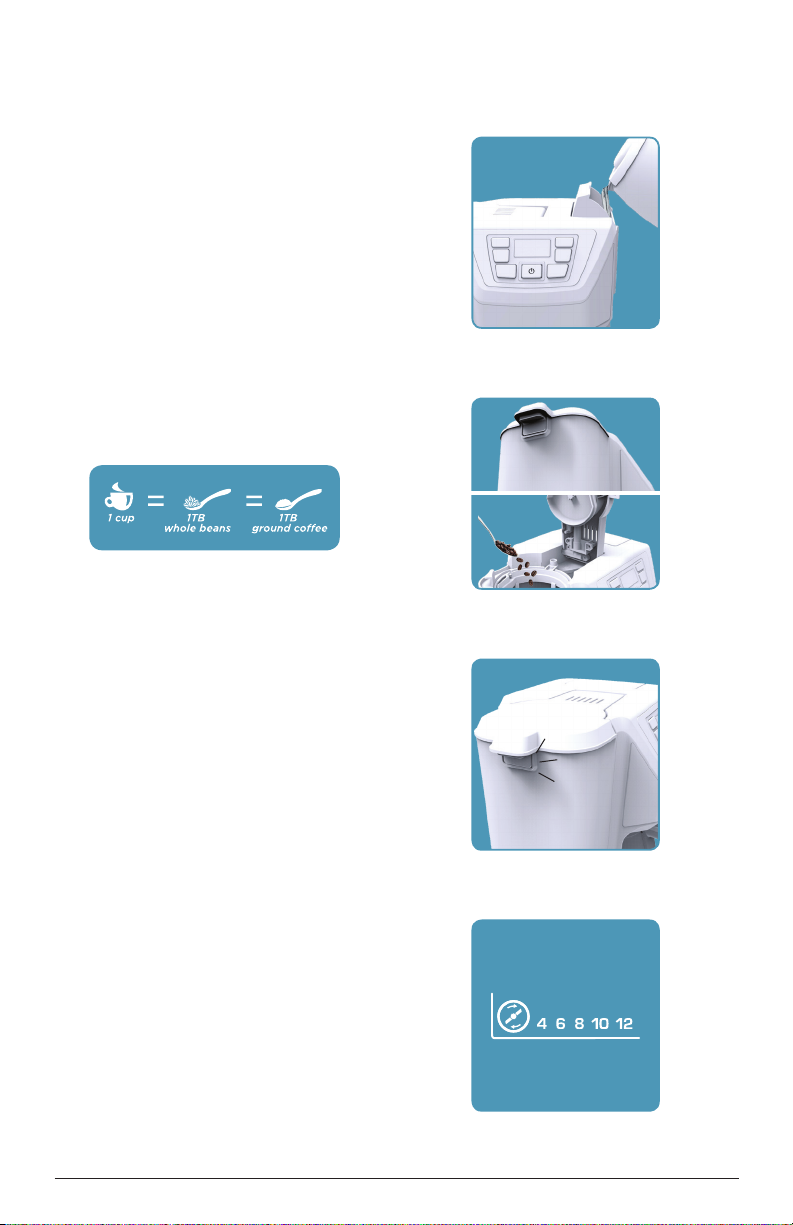
It is important to use the proper
coffee-to-water ratio to produce a
finished brew that isn’t too strong
or weak. When using whole coffee
beans or pre-ground coffee, we
recommend using 1 tablespoon for
every 1 cup of brewed coffee. This
proportion may be adjusted to suit
your individual taste, or try the Brew
Strength Selector to customize your
flavor!
10
Page 12

TIPS FOR A PERFECT CUP OF COFFEE
• To maximize the freshness of your
coffee, use the integrated grinder
to grind your coffee beans just
before brewing.
• When brewing whole bean coffee,
use the Grind setting to select
the optimal grind, correlating with
the number of cups to be brewed
and ensuring proper grind size.
• The coffee grinder is intended for
coffee beans only. Do not grind
other food products or spices in
the coffee grinder.
• Always use fresh, cold, clean
water in your coffee maker. The
water you use should have an
odorless aroma and contain no
visible impurities.
• Use spring water or filtered water,
not distilled water which lacks the
minerals necessary to bind to
elements of the coffee bean.
• A clean coffee maker is always
important. Regular cleaning is
required for the best tasting
coffee.
• Always store your coffee in a cool,
dry place. Once coffee has been
opened, keep it tightly sealed in
an airtight container.
• Do not refrigerate or freeze your
daily supply of coffee, as contact
with moisture will cause the
coffee to deteriorate.
• Never re-use your coffee grounds.
After brewing, the desirable
coffee flavors have been
extracted and only the bitter
flavors remain.
• Brewed coffee should be enjoyed
immediately! Allowing coffee to
sit too long and reheating coffee
will impact the flavor.
• Smell the aroma of your freshly
brewed coffee, and remember
that every sip is meant to be
savored and enjoyed!
11
Page 13
BREWING COFFEE
1. Fill the carafe with the
desired amount of fresh, cold
water and pour into the water
reservoir. Do not fill with more
than 12 cups of water.
2. Close the water reservoir
cover and place the carafe on
the Keep Hot carafe plate.
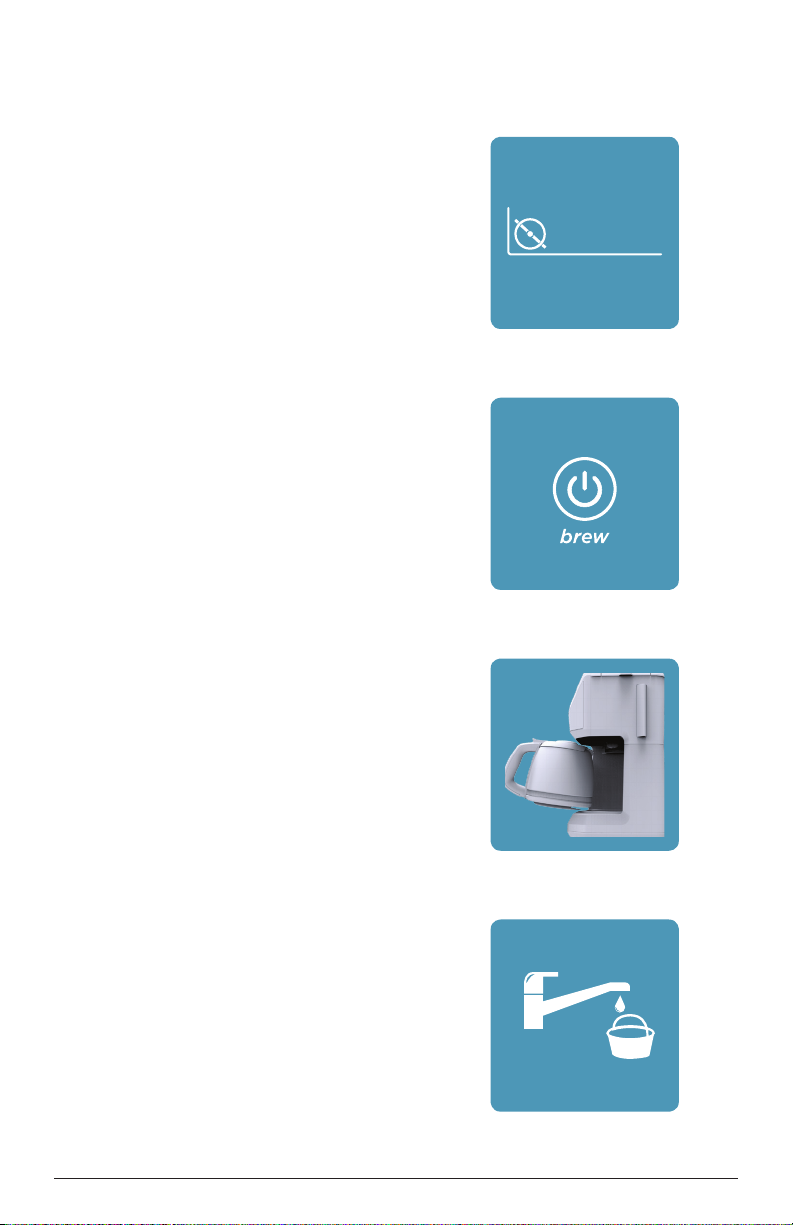
3. (a) Open the grinder lid using the
lift latch and (b) add the desired
amount of coffee into the 2-in-1
Grinder and Permanent Filter.
4. Secure the integrated grinder
lid back into place. Push the lid
cover down until it snaps into place
or until you hear a click. The coffee
maker will not operate without the
lid being closed, all grinder
assembly parts in place, and the
removable showerhead in place.
1
3a
3b
4
5. Make sure the coffee maker is
plugged into a standard electrical
outlet.
6. (a) If using whole beans, push the
GRIND button to cycle through
and select the optimal grind
setting (4, 6, 8, 10, 12) correlating
with the number of cups to be
brewed.
6a
whole beans
12
Page 14
BREWING COFFEE
6.
(b) If using ground coffee, push
the GRIND button to cycle through
the grind settings until you reach
the symbol to turn the grinder OFF
for brewing pre-ground coffee.
7. To set the Auto Brew delay
start, adjustable auto-off, and
Brew Strength Selector, follow
the detailed instructions in the
“Programming your Mill & Brew”
coffee maker section.
8. Press the ON-OFF/Power Button
just once to begin the brew cycle.
If using whole beans, the brew
cycle will automatically start after
grinding.
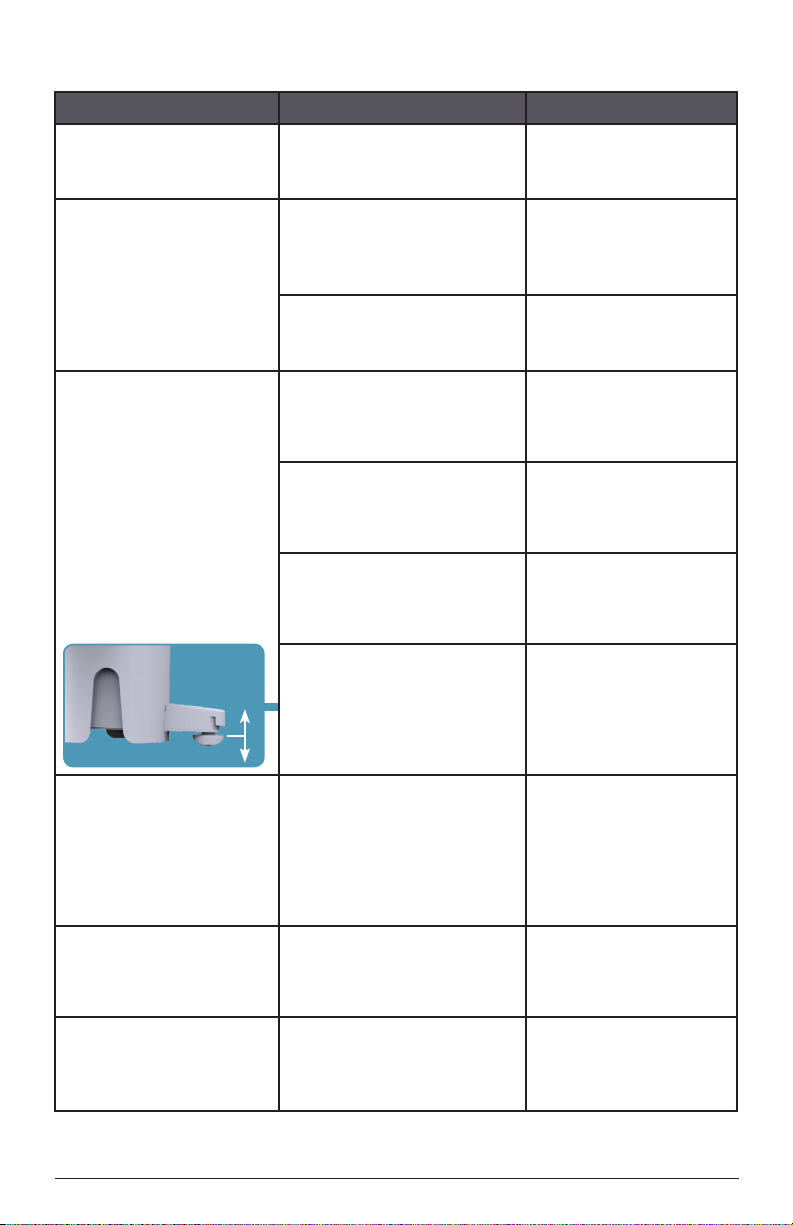
9. The Sneak-A-Cup™ feature allows
you to pour a cup of coffee before
the brewing cycle is complete. The
carafe must be placed back into
the coffeemaker within 20 seconds
to prevent overflow. Replacing the
carafe will restart the brewing
process.
6b
ground coffee
(grinder off)
8
9
10. Once the coffee grounds are cool,
empty your brew basket and rinse
after each brewing cycle just like a
regular permanent filter.
10
13
Page 15
CARE AND CLEANING
Cleaning your coffee maker, following the directions below is recommended
after every use. This product contains no user serviceable parts.
Cleaning
1. Make sure your coffee maker is turned OFF, unplugged and allow to cool.
2. Wipe the outside of your coffee maker and carafe warming plate with a soft,
damp cloth.
3. Remove the Washable Brew Basket and 2-in-1 Grinder and Permanent Filter
Basket, and discard the coffee grounds.
4. Wash the Removable Showerhead and 2-in-1 Grinder and Permanent Filter
Basket by hand in warm soapy water.
5. Wash the glass carafe and Washable Brew Basket either by hand in warm
soapy water, or in the dishwasher (top rack only).
6. To clean the inside of the cover and inside of the grinder assembly, open
the cover, leave in the open position, and wipe with a damp cloth.
Note: Do not use abrasive cleansers or scouring pads, and never immerse the
coffee maker housing or power cord in water.
COFFEEMAKER PART CLEANING INSTRUCTIONS
Housing
Carafe Warming Plate
Power Cord
Removable Showerhead
2-in-1 Grinder and
Permanent Filter Basket
Carafe and carafe lid
Washable Brew Basket
Wipe with a soft, damp cloth.
Wash by hand in warm
soapy water.
Wash by hand in warm soapy
water, or in the dishwasher
(top rack only).
14
Page 16

CARE AND CLEANING
Descaling with Vinegar
With regular use, minerals and hard water can clog your coffee maker. A full
cleaning with vinegar is recommended once a month.
1. Pour white vinegar into the water reservoir up to the 6-cup mark on the water
window. Add fresh, cold water up to the 10-cup mark.
2. Put the 2-in-1 Grinder and Permanent Filter and Washable Brew Basket into the
Mill & Brew™ Assembly and close the cover. Set empty carafe on the “Keep Hot”
carafe plate.
3. Push the GRIND button to cycle through the grind settings until you reach the
symbol to turn the grinder OFF ( )
4. Push the ON-OFF / Power Button and let half the cleaning mixture brew into
the carafe (until level is around 5-cup mark). Turn OFF coffee maker and let it
soak for at least 15 minutes.
5. Turn ON coffee maker again and brew remaining cleaning mixture into carafe.
6. Turn OFF coffee maker and empty the carafe.
7. Fill the water reservoir with cold water to the 11-cup line; replace carafe on the
carafe plate and then turn ON coffeemaker for a complete brewing cycle
to flush out remaining cleaning mixture. Repeat this step to completely remove
the vinegar smell/taste.
8. Wash the Removable Showerhead, Washable Brew Basket, 2-in-1 Grinder and
Permanent Filter Basket, and glass Carafe as instructed in the Care and
Cleaning Table.
15
Page 17
TROUBLESHOOTING
PROBLEM POSSIBLE CAUSE SOLUTION
Coffee maker does
not turn on.
Coffee maker
is leaking.
The brew basket
overflows.
Coffee sediment in
brewed cup of coffee.
The coffee maker
brews slowly.
Grinder does not
turn on
Coffee maker is not
plugged in.
Water reservoir may be
overfilled.
Carafe may not be
correctly placed on the
“Keep Hot” carafe plate
The carafe has been
removed for longer than
20 seconds when using
the Sneak-A-Cup™ feature.
Excessive amount of
coffee is used.
The coffee has been
ground too finely.
The brew basket SneakA-Cup™ mushroom may
be clogged with coffee
grounds.
Coffee grounds are small
enough to pass through
the permanent filter.
The coffee maker needs
cleaning.
Grinder overheated Let cool 15 minutes
Make sure appliance
is plugged into a
working outlet.
Make sure water
reservoir has not
been filled beyond
the 12-cup MAX line.
Make sure carafe is
placed correctly on the
“Keep Hot” carafe plate.
Make sure to replace
the carafe within 20
seconds during the
brewing cycle.
Reduce the amount
of coffee used to
eliminate brew basket
overflows.
Adjust the grind
setting, cup selection,
to a lower cup
setting.
Free the brew basket
of coffee grounds by
pushing the mushroom
shaped Sneak-A-Cup™
part up and down
during rinsing.
While it is normal
to see some coffee
sediment when using
a permanent filter,
a coarser grind can
reduce the amount of
sediment.
Follow the instructions
in the “Descaling with
Vinegar” section
on page 14.
and unplug unit for at
least 30 seconds to
reset fuse.
If additional assistance is needed, please contact our consumer service team at
1-800-231-9786.
16
Page 18

WARRANTY AND CUSTOMER SERVICE
INFORMATION
For service, repair or any questions regarding your appliance, call the
appropriate 800 number listed within this section. Please DO NOT return the
product to the place of purchase. Also, please DO NOT mail product back to
manufacturer, nor bring it to a service center. You may also want to consult
the website listed on the cover of this manual.
Two-Year Limited Warranty
(Applies only in the United States and Canada)
What does it cover?
• Any defect in material or workmanship provided; however, Applica’s liability will
not exceed the purchase price of product.
For how long?
• Two years from the date of original purchase with proof of purchase.
What will we do to help you?
• Provide you with a reasonably similar replacement product that is either new or
factory refurbished.
How do you get service?
• Save your receipt as proof of date of sale.
• Visit the online service website at www.prodprotect.com/applica, or call toll-free
1-800-231-9786, for general warranty service.
• If you need parts or accessories, please call 1-800-738-0245.
What does your warranty not cover?
• Damage from commercial use
• Damage from misuse, abuse or neglect
• Products that have been modified in any way
• Products used or serviced outside the country of purchase
• Glass parts and other accessory items that are packed with the unit
• Shipping and handling costs associated with the replacement of the unit
• Consequential or incidental damages (Please note, however, that some states do
not allow the exclusion or limitation of consequential or incidental damages, so
this limitation may not apply to you.)
How does state law relate to this warranty?
• This warranty gives you specific legal rights. You may also have other rights that
vary from state to state or province to province.
17
Page 19

TABLA DE CONTENIDOS
PRECAUCIÓN
RIESGO DE INCENDIO O DE CHOQUE ELÉCTRICO. NO ABRA.
El símbolo de un rayo indica voltaje peligroso. El signo de exclamación
indica importantes instrucciones de mantenimiento. Consulte a
continuación:
Precaución: Para reducir el riesgo de incendio o de choque eléctrico,
no retire la cubierta de la cafetera. No contiene por dentro partes
reparables por el consumidor. Cualquier reparación deberá ser
efectuada únicamente por personal autorizado.
Instrucciones Importantes de Seguridad
Familiarícese su cafetera Mill & Brew
Cafetera Mill & Brew™ beneficios del producto
Familiarícese con su panel de control
Antes de colar café
Programación de su cafetera Mill & Brew
4 Elementos principales para
colar la taza perfecta
Consejos para obtener la perfecta
taza de café
Preparación de café
Cuidado y limpieza
19-20
21-22
23
24
25
25-26
27
28
29-30
31-32
Resolución de fallas
Información de garantía y servicio al cliente
18
33
34
Page 20

Por favor lea este instructivo antes de usar el producto.
INSTRUCCIONES IMPORTANTES
DE SEGURIDAD
Cuando se utilizan aparatos eléctricos, siempre se debe respetar ciertas medidas
de seguridad a fin de reducir el riesgo de un incendio, un choque eléctrico y (o)
lesiones a las personas, incluyendo las siguientes:
• Por favor lea todas las
instrucciones
• No toque las superficies calientes.
Use las asas o las perillas.
• A fin de protegerse contra un
choque eléctrico y lesiones a las
personas, no sumerja el cable, los
enchufes ni el aparato en agua ni
en ningún otro líquido.
• Todo aparato eléctrico usado en la
presencia de los niños o por ellos
mismos requiere la supervisión de
un adulto.
• Desconecte el aparato del
tomacorriente cuando no esté en
uso y antes de limpiarlo. Espere
que el aparato se enfríe antes de
instalarle o retirarle piezas y antes
de limpiarlo.
• No use ningún aparato eléctrico
que tenga el cable o el enchufe
averiado, que presente un
problema de funcionamiento o que
esté dañado. Póngase en contacto
con el departamento de garantía
que aparece en estas instrucciones
• El uso de accesorios no
recomendados por el fabricante del
aparato puede ocasionar incendio,
choque eléctrico o lesiones a las
personas.
• No use este aparato a la
intemperie.
• No permita que el cable cuelgue
del borde de la mesa o del
mostrador ni que entre en
contacto con las superficies
calientes.
• No coloque el aparato sobre ni
cerca de las hornillas de gas o
eléctricas ni adentro de un horno
caliente.
• Para desconectar, ajuste todo
control a la posición de apagado
(OFF) y después, retire el enchufe
del tomacorriente.
• Este aparato se debe usar
únicamente con el fin previsto.
• La tapa debe permanecer sobre la
jarra cuando el aparato está en uso.
• El retirar la tapa durante los ciclos de
colado puede ocasionar quemaduras.
• La jarra está diseñada para ser
utilizada con este aparato. Jamás
se deberá utilizar sobre la estufa.
• Nunca coloque una jarra caliente
sobre una superficie fría ni húmeda.
• No utilice la jarra si el vidrio se
encuentra rajado o si el asa está
débil.
• No limpie la jarra con limpiadores
abrasivos, con almohadillas
de fibra de metal ni demás
limpiadores abrasivos.
• Este aparato no está diseñado
para ser usado por personas
(incluído niños) con capacidad
limitada física, mental o sensoriales
disminuidas y falta de experiencia
o conocimiento que les impida
utilizar el aparato con toda
seguridad sin supervisión o
instrucción.
• Se debe asegurar la supervisión de
los niños para evitar que usen el
aparato como juguete.
• El retirar la tapa del molino
integrado durante el ciclo
de colado puede ocasionar
quemaduras.
• Revise el cesto del molino para
asegurarse de que no contenga
objetos extraños antes de utilizarlo.
• Solo se debe colocar granos de café
y café molido en el cesto del molino.
• Evite el contacto con piezas
móviles.
19
Page 21

CONSERVE ESTAS
INSTRUCCIONES.
Este aparato eléctrico es para uso doméstico solamente.
ENCHUFE POLARIZADO (SOLAMENTE PARA LOS MODELOS DE 120V)
Este aparato cuenta con un enchufe polarizado (un contacto es más ancho que el
otro). A fin de reducir el riesgo de un choque eléctrico, este enchufe encaja en un
tomacorriente polarizado en un solo sentido. Si el enchufe no entra en el
tomacorriente,inviértalo y si aun así no encaja, consulte con un electricista. Por favor
no trate de alterar esta medida de seguridad.
TORNILLO DE SEGURIDAD
Advertencia: Este aparato cuenta con un tornillo de seguridad para evitar la remoción
de la cubierta exterior del mismo. A fin de reducir el riesgo de incendio o de choque
eléctrico, por favor no trate de remover la cubierta exterior. Este producto no
contiene piezas reparables por el consumidor. Toda reparación se debe llevar a cabo
únicamente por personal de servicio autorizado
CABLE ELÉCTRICO
1. El producto debe proporcionarse con un cable corto para reducir el riesgo de
enredarse o de tropezar con un cable largo.
2.Se encuentran disponibles cables de extensión más largos, que es posible utilizar si
se emplea el cuidado debido.
3. Si se utiliza un cable de extensión:
a) El régimen nominal del cable separable o del cable de extensión
debe ser, como mínimo, igual al del régimen nominal del aparato.
b) Si el aparato es de conexión a tierra, el cable de extensión debe
ser un cable de tres alambres de conexión a tierra.
c) Uno debe de acomodar el cable más largo de manera que no
cuelgue del mostrador o de la mesa, para evitar que un niño tire del
mismo o que alguien se tropiece.
Nota: Si el cordón de alimentación es dañado, por favor, póngase en contacto con el
departamento de garantía enumerado en estas instrucciones.
20
Page 22

FAMILIARÍCESE SU CAFETERA
MILL & BREW
3
2
1
8
4
5
6
7
1. Panel de control
2. Palanca de alzamiento
3. Tapa
4. Tapa del tanque de agua
5. Ventana para ver el nivel de
agua con facilidad
El producto puede variar ligeramente
del que aparece ilustrado aquí.
6. Jarra de vidrio Duralife™
(pieza no. CM5000-01 )
7. Placa calefactora
8. Cuchara para café
(pieza no. CM5000-02 )
21
Page 23

FAMILIARÍCESE SU CAFETERA
MILL & BREW
1. Molino de café y cesto
del filtro permanente
2 en 1
(pieza no. CM5000-03)
2. Cesto de colar lavable
(pieza no. CM5000-04)
3. Palanca de alzamiento
4. Tapa del molino
5. Distribuidor de agua
removible
(presione las lengüetas
destacadas para
retirarlo)
(pieza no. CM5000-05)
1
2
3
4
5
22
Page 24

CAFETERA MILL & BREW
BENEFICIOS DEL PRODUCTO
Reloj automático para colada fresca
Después que termina el ciclo de
colado, el tiempo transcurrido desde
que el café se coló aparecerá en la
pantalla en incrementos de 1 minuto.
Esta información aparacerá en lugar
del reloj digital durante la función de
mantener caliente.
Molino de café y cesto del filtro
permanente 2 en 1
Granos enteros de café son molidos
y colados todo en el mismo montaje
del molino, permitiendo colar con
rápidez y limpiar con facilidad.
Filtro permanente para el cuidado
del medio ambiente
El filtro permanente de alto
rendimiento con tono de bronce,
elimina la necesidad de utilizar filtros
de papel y reduce la presencia de las
manchas de café.
Cesto de colar lavable
El cesto de colar lavable se puede
retirar facilmente y lavarse después
que se termine de colar, y es apto
para lavarse en la bandeja superior
de la máquina de lavaplatos.
Distribuidor de agua, removible
El distribuidor de agua de la cafetera
es removible para facilitar la limpieza.
Colado automático
La función de colado automático
programable, le permite ajustar el
reloj automático de 24 horas para
colar café a la hora seleccionada, de
día o de noche.
Reloj digital con iluminación
La pantalla digital cuenta con un reloj
digital programable e iluminación
para ver con facilidad cuando haya
poca luz.
Apagado automático ajustable
Esta función el permite seleccionar
el tiempo de apagado automático
de 0 a 2 horas en incrementos de 30
minutos. La placa de calentamiento
se mantendrá activa hasta que el
tiempo seleccionado de apagado
automático sea alcanzado.
Selector de intensidad del café
Prepare el café a su gusto
seleccionando entre tres ajustes para
la intensidad del colado: regular,
fuerte o intenso.
Dispositivo de interrupción de
colado Sneak-A-Cup™
¿No puede esperar a que se termine
de colar una jarra llena de café?
Disfrute de una taza antes que
termine el ciclo de colado con la
función Sneak-A-Cup™, la cual para
el flujo de café que cae en su jarra.
Coloque la jarra de nuevo en la
cafetera en 20 segundos para evitar
que el cesto de colar se desborde.
Selección del grado de molido
Pasa a través de los ciclos de ajustes
de molidos óptimos (4, 6, 8, 10, 12)
de acuerdo al número de tazas que
se vaya a colar o apaga el molino
para colar café premolido.
Jarra de vidrio Duralife™
Su diseño duradero extiende la vida
de la jarra. Las marcas del nivel de
agua hacen fácil llenar la jarra y
servir el café.
Placa de calentamiento
antiadherente
Le permite mantener su jarra de café
caliente después que termine el ciclo
de colado hasta que el tiempo de
apagado automático seleccionado
sea alcanzado.
Ventana para ver el nivel de agua
con facilidad
La ventana muestra la cantidad de
agua que hay en el tanque para
asegurar un llenado fácil y correcto.
Guardacable
Almacenamiento simple mantiene
el exceso de cable escondido y su
mostrador ordenado.
23
Page 25

FAMILIARÍCESE CON SU PANEL DE CONTROL
Indica que el reloj automático de la función
de colado automático está ajustado.
intensidad
del colado
Ajuste
de la
Indica si la función para moler granos enteros
de café se ha apagado( ) o encendido( ).
Reloj / Pantalla digital
con iluminación.
Funcionamiento: Enciende o
apaga la unidad.
Automático: Activa la función de
colado automático.
Programa: Colado automático
(Auto Brew), presione y suelte el
botón una vez. Mantener caliente
(Keep Warm), presione y mantenga
presionado.
Hora: Utilice para programar el reloj
(vea la sección de programación).
Minuto: Utilice para programar
el reloj (o pasar a través de los
diferentes ajustes de la función
de mantener caliente cuando
se encuentre en ese modo de
programación para ajustar el
tiempo de mantener caliente).
Ajuste del grado de molido óptimo
de acuerdo al número de tazas que
se vaya a colar.
Molido: Pasa a través de los ciclos
de ajustes del grado de molido
óptimo (4, 6, 8, 10, 12) de acuerdo
al número de tazas que se vaya a
colar. También apaga el molino( )
para colar café premolido.
Fuerte: Utilice para seleccionar
Ajuste de la intensidad de
colado (3 niveles)
Ninguna barra = regular
(ajuste programado)
1 barra( ) = fuerte
2 barras( ) = intenso
24
Page 26

ANTES DE COLAR CAFÉ
1. Desempaque su cafetera con cuidado, retirando todo material de empaque,
etiquetas y calcomanías adheridas a las superficies de la cafetera.
2. Lave bien su cafetera antes de usarla por primera vez. Lave la jarra de vidrio,
el cesto de colar lavable, el molino de café y cesto del filtro permanente 2
en 1, y el distribuidor de agua removible con agua caliente jabonosa. Enjuague
y séquelos, luego colóquelos en su cafetera.
3. Limpie el interior de su cafetera colando dos ciclos completos de agua, sin café.
a. Vierta agua fría, fresca en el tanque de agua hasta la marca de llenado
máxima (MAX) de 12 tazas, luego coloque la jarra sobre la placa de
calentamiento.
b. Enchufe el cable a un tomacorriente estándar.
c. Presione el botón de la función de moler (GRIND) hasta que llegue al
símbolo que indica apagar el molino.
d. Presione el botón de encendido-apagado / funcionamiento para
inmediatamente colar agua a través de la cafetera sin añadir café.
e. Una vez que el ciclo de colado haya terminado, deseche el agua y enjuage
el molino y cesto del filtro permanente 2 en 1.
f. Apague el aparato, desenchúfelo y deje que se enfríe por 15 minutos antes
de repetir el proceso.
PROGRAMACIÓN DE SU
CAFETERA MILL & BREW
Nota: La primera vez que se presiona el botón, esto hace que se ilumine la
pantalla y después cualquier otra vez que se presione el botón hará que se
programe la función.
Ajuste del reloj digital
1. Enchufe la cafetera a un tomacorriente estándar.
2. El reloj digital muestra “12:00” de forma intermitente.
3. Para ajustar la hora, presione el botón HR hasta que la hora correcta aparezca
en la pantalla. El símbolo “PM” aparecerá en la esquina derecha superior de la
pantalla digital para ajustes de tiempo PM.
4. Presione el botón MIN para seleccionar los minutos.
Nota: Si la unidad es desenchufada o la electricidad interrumpida, la hora
tendrá que que ser ajustada de nuevo al igual que la hora programada para
comenzar la función de colado automático.
Ajuste para programar la función de colado automático
La función de colado automático programable le permite ajustar el reloj
automático de 24 horas a la hora seleccionada, de día o de noche. Para
activar el reloj automático de la función de colado automático, siga los pasos
descritos en la próxima página.
:
25
Page 27

PROGRAMACIÓN DE SU
CAFETERA MILL & BREW
1. Después que el reloj digital esté ajustado, presione el botón de programación (PROG). El ícono
de reloj automático ( ) comenzará a parpadear y la pantalla mostrará 12:00.
2. Presione el botón HR y luego el botón MIN para seleccionar la hora que usted desee que
el ciclo de colado automático comience (por ejemplo; 7:30 AM). Si es necesario, asegúrese de
que la luz indicadora de PM no esté encendida.
3. La pantalla del reloj automático parpadeará varias veces, luego cambiará de nuevo a la hora actual.
4. Presione y suelte el botón AUTO para activar la hora programada. El ícono de reloj automático ( )
se mantendrá sólido, indicando que la función de colado automático está activada.
5. Cuando la hora del día sea igual que la hora seleccionada para comenzar la función de colado
automático, su cafetera activará el ciclo de colado.
6. Para cancelar la función de colado automático, presione el botón AUTO hasta que el ícono de
reloj automático ( ) desaparezca.
Nota: Para verificar la hora seleccionada para el colado automático, presione el botón
de programación (PROG) y la hora programada para el colado automático es mostrada.
Presione el botón AUTO para activar de nuevo el reloj automático.
Ajuste de la función de apagado automático, tiempo de duración de la función
de mantener caliente
Esta función le permite seleccionar el tiempo de duración del apagado automático desde 0
a 2 horas en incrementos de 30 minutos. La placa de calentamiento se activará hasta que el
tiempo de apagado automático seleccionado sea alcanzado.
1. Presione y mantenga presionado el botón de programación (PROG) por 3 segundos. La pantalla
mostrará el tiempo de mantener caliente programado (120 minutos).
2. Presione el botón MIN para mostrar los ajustes de la función de mantenter caliente (00,
30, 60, 90, 120). Los valores son relacionados al tiempo de duración (en minutos), la función
de mantener caliente se mantendrá activa después que termine el ciclo de colado.
3. Presione el botón de programación (PROG) para fijar el ajuste de la función de mantener
caliente.
Nota: Para verificar la hora seleccionada para el colado automático sin hacer cambios,
presione el botón de programación (PROG) para mostrar la hora que comenzará el colado
automático, luego presione el botón AUTO.
Ajuste del selector de intensidad del colado
El selector de intensidad del colado personaliza el sabor de su café al brindarle la opción de
seleccionar entre tres ajustes de colado. Presione el botón de colado fuerte (STRONG) para
pasar a través de los diferentes ajustes de intensidad del colado (3 niveles).
1. El selector de intensidad del colado personaliza el sabor de su café al brindarle la opción de
seleccionar entre tres ajustes de colado. Presione el botón de colado fuerte (STRONG) para
pasar a través de los diferentes ajustes de intensidad del colado (3 niveles).
Ninguna barra = regular (ajuste programado)
1 barra( ) = fuerte
2 barras( ) = intenso
26
Page 28

4 ELEMENTOS PRINCIPALES PARA
COLAR LA TAZA PERFECTA
Calidad
del Agua
Una gran taza de café comienza
con el uso de agua fresca y de alta
calidad. Ya que el agua representa
más del 98% del café colado, ésta
es tan importante como la calidad
del café. El agua que usted use
debe tener un sabor fresco de agua
potable de buena calidad, con un
aroma sin olores y sin la presencia
de impuresas.
Selección del
Grado de Molido
El tamaño de las partículas de café
molido es esencial para asegurar
un sabor y extracción adecuada. Un
molido de café demasiado grueso
hará que el agua penetre demasiado
rápido sin la extracción adecuada.
Un molido de café demasiado fino
resultará en demasiada extracción
y producirá un sabor amargo. Su
cafetera Mill & Brew™ cuenta con un
ajuste de molido para seleccionar el
tipo de molido óptimo de acuerdo
al número de tazas que se vaya a
colar y asegurar el grado de molido
apropiado para este tipo de cafetera.
Frescura
del Café
Una verdadera taza de café fresco
solo viene de granos de café
acabados de moler. Es más, una
vez que un grano de café se rompe
o se muele, su sabor comienza
a deteriorarse con el tiempo. Su
cafetera Mill & Brew™ se encarga de
maximizar la frescura de su café al
moler los granos de café justo antes
de colarlos.
Proporción
Adecuada
Es importante utilizar la cantidad
adecuada de café en proporción
al agua para producir una colada
que no sea demasiado fuerte o
floja. Cuando se utilizan granos
enteros de café o café premolido,
recomendamos usar una cucharada
por cada taza de café colado. Esta
proporción puede ser ajustada para
satisfacer su gusto personal, o trate
con el selector de intensidad del
colado para personalizar el sabor.
27
Page 29

CONSEJOS PARA OBTENER LA
PERFECTA TAZA DE CAFÉ
• Para maximizar la frescura de su
café, utilice el molino integrado
para moler sus granos de café
justo antes de colar el café.
• Cuando esté colando granos
enteros, utilice el ajuste de molido
para seleccionar el grado del
molido óptimo de acuerdo al
número de tazas que se vaya
a colar y asegurar el tamaño
apropiado de molido.
• El molino está diseñado para solo
moler granos de café. No muela
otros alimentos o especias en el
molino.
• Siempre use agua fría, fresca y
limpia en su cafetera. El agua
que use debe tener un aroma
sin olores y sin la presencia de
impurezas.
• Utilice agua mineral o filtrada,
no utilice agua destilada la
cual carece de los minerales
necesarios para fijarse a los
elementos del grano de café.
• Una cafetera limpia siempre es
importante. Su limpieza regular es
requerida para obtener el mejor
sabor de café.
• Siempre almacene su café en
un lugar fresco y seco. Una vez
que el café se haya abierto,
mantengalo sellado en un
recipiente de cierre hermético.
• No coloque su café de uso diario
en el refrigerador ni lo congele ya
que el contacto con la humedad
causará que el café se deteriore.
• No reuse su café molido. Después
de colarlo, los sabores deseados
se han extraido y solo quedan los
sabores amargos.
• El café colado debe ser disfrutado
¡inmediatamente! Si se deja el
café en la jarra por mucho tiempo
o si se recalienta, esto tendrá un
impacto en su sabor.
• Huela el aroma de su café
acabado de colar y recuerde que
cada buche está destinado a ser
¡saboreado y disfrutado!
28
Page 30

PREPARACIÓN DE CAFÉ
1. Llene la jarra con la cantidad de
agua fresca fría y viértala en el
tanque de agua. No llene el tanque
con más de 12 tazas de agua.
2. Cierre la tapa del tanque y
coloque la jarra sobre la placa de
calentamiento.
3. (a) Abra la tapa del molino de
café utilizando la palanca deq
alzamiento (b) añada la cantidad
deseada de café en el molino y
filtro permanente 2 en 1.
1 taza 1 cucharada de
granos enteros
1 cucharada de
café molido
4. A s e g u r e la tapa del molino de
café integrado en su lugar. Empuje
la tapa hacia abajo hasta que encaje
en su lugar o hasta que escuche un
sonido. La cafetera no funcionará
si la tapa no está cerrada, si todas
las piezas del molino no están
en su lugar y si el distribuidor de
agua removible no está en su lugar.
1
3a
3b
4
5. Asegúrese de que la cafetera esté
enchufada a un tomacorriente
estándar.
6. (a) Si está usando granos enteros,
presione el botón de la función de
moler (GRIND) para pasar a
través de los ajustes y seleccionar
grado óptimo de molido (4, 6, 8, 10,
12) de acuerdo al número de tazas
que se vaya a colar.
6a
granos enteros
29
Page 31

PREPARACIÓN DE CAFÉ
6.
(b) Si está usando café molido,
presione el botón de la función
de moler para pasar a través de los
los ajustes hasta que llegue al
símbolo que indica apagar el
molino y colar café premolido.
7. Para ajustar la hora de comienzo
de la función de colado automático,
el tiempo de apagado automático
ajustable y la intensidad del colado,
siga las instrucciones descritas en
sección de Programación de su
cafetera Mill & Brew.
8. Presione el botón de encendido-
a p a g a d o / f u n c i o n a m i e n t o s ó l o u n a
vez para comenzar el ciclo de
colado. Si está usando granos
enteros, el ciclo de colado
comenzará automáticamente
una vez que se hayan molido los
granos.
9. El dispositivo de interrupción
de colado Sneak-A-Cup™ le
permite servirse una taza de café
antes que termine el ciclo de
colado. Para evitar un derrame,
la jarra se debe colocar de nuevo
sobre la placa de calentamiento
en 20 segundos. Cuando se coloca
la jarra en su lugar, el proceso de
colado comenzará de nuevo.
6b
café molido
(apagar el molino)
8
ciclo de colado
9
10. Cuando el café molido se enfrie,
vacie el cesto de colar y lávelo
después de cada ciclo de colado,
igual que se hace con un filtro
permanente regular.
10
30
Page 32

CUIDADO Y LIMPIEZA
Se recomienda limpiar su cafetera después de cada uso, siguiendo las
instrucciones a continuación. Este producto no contiene piezas que se
puedan reparar por el consumidor.
Limpieza
1. Asegúrese de que su cafetera esté apagada, desenchufada y que se haya
enfriado.
2. Limpie la superficie exterior de su cafetera y la placa de calentamiento con un
paño suave y húmedo.
3. Retire el cesto de colar lavable y el molino de café y cesto del filtro permanente
2 en 1, y deseche el café molido.
4. Lave el distribuidor de agua removible y el molino de café y cesto del filtro
permanente 2 en 1 a mano con agua caliente jabonosa.
5. Lave la jarra de vidrio y el cesto de colar lavable a mano con agua caliente
jabonosa o en la máquina lavaplatos (solamente en la bandeja superior).
6. Para limpiar el interior de la tapa y el interior del montaje del molino, abra la
tapa, déjela abierta y limpie las superficies con un paño húmedo.
Nota: No use limpiadores abrasivos o almohadilla de aluminio y nunca
sumerja la caja de la cafetera o el cable en agua.
PARTE DE CAFETERA INSTRUCCIONES PARA
LIMPIEZA
Caja
Placa de calentamiento
Cable
Rociador de agua removible
Molino de café y cesto del filtro
permanente, 2 en 1
Jarra y tapa de la jarra
Cesto de colar lavable
Limpie con un paño suave,
húmedo.
Lave a mano con agua
caliente jabonosa.
Lave a mano con agua caliente
jabonosa o en la máquina de
lavaplatos (solamente en la
bandeja superior).
31
Page 33

CUIDADO Y LIMPIEZA
Descalcificación con vinagre
Con el uso regular, los minerales y el agua dura pueden causar una
obstrucción en su cafetera. Se recomienda hacer una limpieza completa con
vinagre una vez al mes.
1. Vierta vinagre blanco en el tanque de agua hasta la marca que indica 6 tazas
en la ventana de agua. Agregue agua fresca, fría hasta la marca que indica 10
tazas.
2. Coloque el molino de café y filtro permanente 2 en 1, y el cesto de colar lavable
dentro de la caja del montaje de su cafetera Mill & Brew™ y cierre la tapa.
Coloque la jarra vacía sobre la placa de calentamiento..
3. Presione el botón de la función de moler (GRIND) para pasar a través de los
ajustes del grado de molido hasta que llegue al ícono que indica apagar el
molino ( ).
4. Presione el botón de encendido-apagado/funcionamiento y deje que la mitad
de la mezcla cuele en la jarra (hasta que el nivel de la mezcla esté cerca de la
marca de 5 tazas). Apague la cafetera y déjela remojada por lo menos 15
minutos.
5. Encienda la cafetera de nuevo y cuele la mezcla restante en la jarra.
6. Apague la cafetera y vacíe la jarra.
7. Llene el tanque de agua con agua fría hasta la marca que indica 11 tazas;
coloque la jarra en la placa de calentamiento y luego encienda la cafetera para
que cuele un ciclo completo y así desechar la mezcla restante. Repita este paso
para eliminar completamente el olor y sabor a vinagre.
8. Lave el distribuidor de agua removible, cesto de colar lavable, molino de café y
cesto del filtro permanente 2 en 1, y la jarra de vidrio como se indica en la tabla
de cuidado y limpieza.
32
Page 34

RESOLUCIÓN DE FALLAS
PROBLEMA CAUSA POSIBLE SOLUCIÓN
La cafetera no
se enciende.
La cafetera gotea.
El cesto de colar
se desborda.
Hay residuos de
molido en el café
colado.
La cafetera cuela
lentamente.
La cafetera no está
enchufada.
El tanque de agua podría
estar demasiado lleno.
Puede ser que la jarra
no esté colocada
correctamente sobre la
placa de calentamiento.
La jarra se ha retirado
por más de 20
segundos cuando al
usarse el dispositivo de
interrupción de colado
Sneak-A-Cup™.
Se ha utilizado una
cantidad excesiva de
café.
El café se ha molido
demasiado fino.
La pieza en forma de
hongo en el dispositivo
de interrupción de colado
Sneak-A-Cup™ del cesto
de colar puede estar
obstruida con granos de
café.
El café molido es lo
suficientemente pequeño
para que pueda pasar
a través del filtro
permanente.
La cafetera necesita
limpieza.
Asegúrese que el aparato
esté enchufado a un
tomacorriente
que tenga corriente.
Asegúrese de que el
tanque de agua no se haya
llenado más alla del nivel
de llenado máximo (MAX)
de 12 tazas.
Asegúrese que la jarra esté
bien colocada sobre la
placa de calentamiento.
Cuando retire la jarra
durante el ciclo de colado,
asegúrese de colocarla
dentro de 20 segundos
después de haberla
retirado.
Reduzca la cantidad de
café utilizada para evitar
que se desborde el cesto
de colar.
Ajuste el grado de molido,
tamaño de taza a un ajuste
más bajo.
Libere el cesto de colar de
granos de café, empujando
la pieza en forma de
hongo del dispositivo de
interrupción de colado
Sneak-A-Cup™ hacia arriba
y hacia abajo mientras se
está enjuagando.
Mientras que es normal
que se vea residuos de
café cuando se utiliza
un filtro permanente,
un molido de café más
grueso puede reducir la
cantidad de residuos.
Siga las instrucciones
descritas en la sección
de descalcificación con
vinagre, en la página
El molino no enciende.
El molino está
sobrecalentado.
33
Deje enfriar 15 minutos y
desenchufe la unidad por lo
menos 30 segundos para
reajustar el fusible
Page 35

INFORMACIÓN DE GARANTÍA Y
SERVICIO AL CLIENTE
Para servicio, reparaciones o preguntas relacionadas al producto, por favor
llame al número del centro de servicio que se indica para el país donde
usted compró su producto. NO devuélva el producto al fabricante. Llame o
lleve el producto a un centro de servicio autorizado.
Dos Años de Garantía Limitada
(No aplica en México, Estados Unidos y Canada)
¿Qué cubre la garantía?
• La garantía cubre cualquier defecto de materiales o de mano de obra que no haya
sido generado por el uso incorrecto del producto.
¿Por cuánto tiempo es válida la garantía?
• Por dos años a partir de la fecha original de compra mientras que tenga una
prueba de la compra.
¿Cómo se obtiene el servicio necesario?
• Conserve el recibo original como comprobante de la fecha de compra,
comuníquese con el centro de servicio de su país y haga efectiva su garantía si
cumple lo indicado en el manual de instrucciones.
¿Cómo se puede obtener servicio?
• Conserve el recibo original de compra.
• Para servicio al cliente y para registrar su garantía, visite www.prodprotect.com/
applica, o llame al número 1-800-231-9786, para servicio al cliente
• Por favor llame al número del centro de servicio autorizado. 1-800-738-0245.
¿Qué aspectos no cubre esta garantía?
• Los productos que han sido utilizados en condiciones distintas a las normales.
• Los daños ocasionados por el mal uso, el abuso o negligencia.
• Los productos que han sido alterados de alguna manera.
• Los daños ocasionados por el uso comercial del producto.
• Los productos utilizados o reparados fuera del país original de compra.
• Las piezas de vidrio y demás accesorios empacados con el aparato.
• Los gastos de tramitación y embarque asociados al reemplazo del producto.
• Los daños y perjuicios indirectos o incidentales.
¿Qué relación tiene la ley estatal con esta garantía?
• Esta garantía le otorga derechos legales específicos y el consumidor podría
tener otros derechos que varían de una región a otra.
Si necesita asistencia adicional, favor the ponerse en contacto con nuestro equipo
de servicio al consumidor llamando al número
1-800-231-9786.
34
Page 36

MATIÈRES
Importantes consignes de sécurité.
Familiarisation avec la cafetière Mill & Brew
Cafetière Mill & Brew avantages du produit
Familiarisation avec le panneau de commande
Avant l’infusion
Programmation de la cafetière Mill & Brew
4 facteurs d’infusion optimale
Conseils pour obtenir la tasse de café idéale
Infusion Du Café
Entretien et nettoyage
Dépannage
Renseignements de garantie et
service à la clientèle
36-37
38-39
40
41
42
42-43
44
45
46-47
48-49
50
51
Le symbole clignotant indique que la « tension est dangereuse »; le point
RISQUES D'INCENDIE OU DE CHOC ÉLECTRIQUE NE PAS OUVRIR
d'exclamation fait référence aux instructions d'entretien. Voir ci-dessous.
Avertissement : Pour réduire les risques d'incendie ou de choc électrique, ne pas
retirer le couvercle de la cafetière. L'appareil ne contient aucune pièce réparable
par l'utilisateur. Les réparations doivent être effectuées par un technicien autorisé
seulement.
AVERTISSEMENT
35
Page 37

Veuillez lire et conserver ce guide d’entretien et d’utilisation.
IMPORTANTES CONSIGNES
DE SÉCURITÉ.
Lorsque vous utilisez des appareils électriques, des précautions de base doivent
toujours être observées, y compris ce qui suit:
• Lire toutes les instructions
• Ne pas toucher aux surfaces
chaudes. Prendre l’appareil par les
poignées ou les boutons.
• Afin d’éviter les risques d’incendie,
de choc électrique et de blessures,
ne pas immerger le cordon, la fiche
ou l’appareil dans l’eau ou dans
d’autres liquides.
• Exercer une étroite surveillance
lorsque l’appareil est utilisé à
proximité d’un enfant ou que ce
dernier s’en sert.
• Débrancher l’appareil lorsqu’il
n’est pas en marche et avant le
nettoyage. Le laisser refroidir avant
d’installer ou de retirer des pièces,
et avant de le nettoyer.
• Ne pas utiliser un appareil dont la
fiche ou le cordon sont abîmés,
qui présente un problème de
fonctionnement, ou qui est
endommagé de quelque façon que
ce soit. Communiquer avec le
Service de soutien à la clientèle
dont les coordonnées figurent
dans les présentes instructions.
• L’utilisation d’accessoires non
recommandés par le fabricant
de l’appareil présente des risques
d’incendie, de choc électrique ou de
blessures.
• Ne pas utiliser l’appareil à l’extérieur.
• Ne pas laisser le cordon pendre
du rebord d’une table ou d’un
comptoir, ou toucher une surface
chaude.
• Ne pas placer l’appareil sur un
brûleur au gaz ou électrique, ou à
proximité, ni dans un four chaud.
• Pour débrancher l’appareil, d’abord
mettre tout bouton de commande
en position d’arrêt (OFF), puis
débrancher l’appareil de la prise de
courant.
• N’utiliser cet appareil que pour les
fonctions auxquelles il est destiné.
• Garder le couvercle sur la carafe
lors de l’utilisation de l’appareil.
• Le retrait du couvercle pendant les
cycles d’infusion peut causer des
brûlures.
• La carafe est conçue pour être
utilisée avec cet appareil. Elle ne
doit jamais être utilisée sur une
table de cuisson.
• Ne pas déposer la carafe chaude
sur une surface froide ou mouillée.
• Ne pas se servir de la carafe si le
verre en est fêlé ou si la poignée est
lâche ou affaiblie.
• Ne pas nettoyer la carafe avec des
produits nettoyants, des tampons
en laine d’acier, ou tout autre
produit abrasif.
• Cet appareil n’est pas conçu pour
être utilisé par des personnes
(notamment des enfants) dont les
capacités physiques, sensorielles
ou mentales sont réduites ou qui
manquent d’expérience ou de
connaissances, à moins qu’elles ne
soient supervisées ou dirigées par
une personne responsable de leur
sécurité pendant l’utilisation.
• Les enfants doivent être supervisés
afin d’éviter qu’ils ne jouent
avec l’appareil.
• Le retrait du couvercle intégré
pendant le cycle d’infusion peut
causer des brûlures et/ou blessures.
• Vérifier si des corps étrangers se
trouvent dans le panier à mouture
avant l’utilisation.
• Seuls des grains de café ou du marc
doivent être déposés dans le panier
à mouture.
• Evite el contacto con piezas
móviles.
36
Page 38

CONSERVER CES MESURES.
L’appareil est conçu pour une utilisation domestique.
FICHE POLARISÉE (MODÈLES DE 120 V SEULEMENT)
L’appareil est muni d’une fiche polarisée (une lame plus large que l’autre). Afin de
minimiser les risques de secousses électriques, ce genre de fiche n’entre que d’une
façon dans une prise polarisée. Lorsqu’on ne peut insérer la fiche à fond dans la prise,
il faut tenter de le faire après avoir inversé les lames de côté. Si la fiche n’entre toujours
pas dans la prise, il faut communiquer avec un électricien certifié. Il ne faut pas tenter
de modifier la fiche.
VIS INDESSERRABLE
AVERTISSEMENT : L’appareil est doté d’une vis indesserrable empêchant l’enlèvement
du couvercle extérieur. Pour réduire les risques d’incendie ou de secousses électriques,
ne pas tenter de retirer le couvercle extérieur. L’utilisateur ne peut pas remplacer les
pièces de l’appareil. En confier la réparation seulement au personnel des centres de
service autorisés.
CORDON
1. Le cordon d’alimentation de l’appareil est court afin de minimiser les risques
d’enchevêtrement ou de trébuchement.
2.Il existe des cordons d’alimentation amovibles ou de rallonge plus longs et il faut
s’en servir avec prudence.
3. Lorsqu’on utilise un cordon d’alimentation amovible ou de rallonge plus long, il faut
s’assurer que:
a) la tension nominale du cordon d’alimentation amovible ou de rallonge soit au
moins égale à celle de l’appareil, et que;.
b) lorsque l’appareil est de type mis à la terre, il faut utiliser un cordon de rallonge
mis à la terre à trois broches, et;
c) le cordon plus long soit placé de sorte qu’il ne soit pas étalé sur le comptoir
ou la table d’où des enfants pourraient le tirer, ni placé de manière à provoquer
un trébuchement.
Note: Lorsque le cordon d’alimentation est endommagé, il faut le faire remplacer par
du personnel qualifié ou, en Amérique latine, par le personnel d’un centre de service
autorisé.
37
Page 39

FAMILIARISATION AVEC LA
CAFETIÈRE MILL & BREW
3
2
1
8
4
5
6
7
1. Panneau de commande
2. Loquet
3. Couvercle
4. Couvercle du réservoir à eau
5. Indicateur du niveau d’eau
facile à lire
Le produit peut différer légèrement
de celui qui est illustré.
6. Carafe en verre Duralife™
(pièce n° CM5000-01)
7. Réchaud
8. Mesure à café
(pièce n° CM5000-02)
38
Page 40

FAMILIARISATION AVEC LA
CAFETIÈRE MILL & BREW
1. Moulin et panier-filtre
permanent 2 en 1
(pièce n° CM5000-03)
2. Panier d’infusion lavable
(pièce n° CM5000-04)
3. Loquet
4. Couvercle du moulin
5. Douchette amovible
(appuyer sur les languettes
illustrées pour retirer)
(pièce n° CM5000-05)
1
2
3
4
5
39
Page 41

CAFETIÈRE MILL & BREW
AVANTAGES DU PRODUIT
Minuterie d’infusion de café frais
Une fois le cycle d’infusion terminé,
le temps écoulé depuis l’infusion
s’affiche par tranche de 1 minute.
Cette durée remplace l’horloge
numérique en mode réchaud.
Moulin et panier-filtre
permanent 2 en 1
Les grains de café entiers sont moulus
et infusés dans le même module,de
façon à accélérer l’infusion et à
faciliter le nettoyage.
Filtre permanent écologique
Le filtre permanent haute
performance au ton mordoré élimine
le besoin de filtres en papier et
minimise l’aspect taché que peut
laisser le café.
Panier d’infusion lavable
Le panier d’infusion lavable peut être
retiré et nettoyé facilement après
l’infusion; il peut aussi être lavé au lavevaisselle dans le panier supérieur.
Douchette amovible
La douchette de la cafetière est
amovible pour faciliter le nettoyage.
Infusion automatique
La fonction programmable d’infusion
automatique différée vous permet de
régler l’heure d’infusion (jour et nuit) à
l’aide de la minuterie 24 heures.
Horloge numérique à rétro-éclairage
L’afficheur ACL comporte une
horloge numérique programmable
et rétroéclairée facile à lire dans les
endroits sombres.
Dispositif d’arrêt
automatique réglable
Cette caractéristique permet de
sélectionner des délais d’arrêt
automatique (0 à 2 heures) par
tranches de 30 minutes.
Sélecteur du degré d’infusion
Pour personnaliser la saveur du café
en sélectionnant un des trois degrés
d’infusion suivants : moyen, fort, corsé.
Fonction Sneak-A-Cup™
Vous ne voulez pas attendre que
le cycle d’infusion soit entièrement
terminé? Vous pouvez vous servir une
tasse avant la fin du cycle d’infusion
grâce à la fonction Sneak-A-Cup™ ,
qui interrompt l’écoulement dans la
carafe. Remettre la carafe en place
dans la cafetière dans les 20 secondes
suivantes pour éviter que le panier
d’infusion ne déborde.
Sélection de la mouture
Cette fonction permet de choisir la
mouture optimale (4, 6, 8, 10, 12)
correspondant au nombre de tasses
à infuser, ou d’éteindre le moulin pour
infuser du café prémoulu.
Carafe en verre Duralife™
Sa fabrication robuste procure à la
carafe une durée de vie prolongée.
Les indications du niveau d’eau
facilitent le remplissage et le service.
Réchaud antiadhésif
Cette caractéristique vous permet de
garder le café chaud après l’infusion
jusqu’à ce que le délai d’arrêt
automatique sélectionné soit écoulé.
Indicateur du niveau d’eau facile à lire
L’indicateur du niveau d’eau permet
de voir la quantité d’eau dans le
réservoir pour faciliter un remplissage
précis.
Range-cordon
Pour ranger soigneusement la
longueur de cordon superflue et
dégager le comptoir.
40
Page 42

FAMILIARISATION AVEC LE PANNEAU
DE COMMANDE
Indique l’heure à laquelle l’infusion
différée est réglée.
Sélecteur
du degré
d’infusion
Indique si la fonction de mouture de grains
entiers est DÉSACTIVÉE( ) ou ACTIVÉE( )
Horloge / afficheur ACL à
rétro-éclairage
Power (marche/arrêt) : Pour
allumer ou arrêter l’appareil
Auto : Turns on the Auto
Brew delayed start.
PROG (programme): Infusion
automatique - presser et relâcher
le bouton. Réchaud - presser et
maintenir le bouton enfoncé.
HR (heure): Pour programmer
l’horloge (voir la section «
Programmation de la cafetière
Mill & Brew
MIN (minute) : Pour programmer
l’horloge (ou sélectionner les
différents réglages du mode
réchaud; en mode réchaud, pour
régler la durée).
Mouture optimale correspondant au
nombre de tasses à infuser
GRIND (mouture) : Pour
sélectionner la mouture optimale
(4, 6, 8, 10, 12) correspondant au
nombre de tasses à infuser. Pour
éteindre aussi le moulin pour( )
infuser du café prémoulu.
STRONG (fort) : Pour sélectionner
le degré d’infusion (3 degrés)
Aucune barre = ordinaire
(réglage par défaut)
1 barre( ) = fort
2 barres( ) = corsé
41
Page 43

AVANT L’INFUSION
1. Déballer délicatement la cafetière et retirer tous les matériaux d’emballage, les
étiquettes et/ou les autocollants de l’appareil.
2. Bien nettoyer la cafetière avant de l’utiliser pour la première fois.Laver la carafe
en verre, le panier d’infusion, le moulin et le panier-filtre permanent 2 en 1 et la
douchette amovible à l’eau tiède savonneuse.Rincer et assécher, puis remettre
dans la cafetière.
3. Nettoyer l’intérieur de la cafetière en exécutant deux cycles complets
d’infusion à l’eau seulement (sans café).
a. Verser de l’eau fraîche froide dans le réservoir à eau, jusqu’à la marque
de 12 tasses (MAX), puis déposer la carafe sur le réchaud.
b. Brancher le cordon dans une prise de courant standard.
c. Appuyer sur le bouton GRIND jusqu’à ce que le symbole d’arrêt
apparaisse.( )
d. Appuyer sur le bouton marche/arrêt pour infuser immédiatement de
l’eau dans la cafetière sans ajouter de café.
e. Une fois le cycle terminé, jeter l’eau et rincer le moulin et le panier-filtre
permanent 2 en 1.
f. Éteindre l’appareil, le débrancher et le laisser refroidir pendant
15 minutes avant de recommencer.
PROGRAMMATION DE LA CAFETIÈRE
MILL & BREW
Remarque : La première pression du bouton allume l’afficheur à rétro-éclairage,
et les pressions subséquentes permettent de programmer l’appareil.
Réglage de l’horloge numérique
1. Brancher le cordon de la cafetière dans une prise électrique standard.
2. L’affichage de l’horloge numérique clignote et indique 12:00.
3. Pour régler l’heure, appuyer sur le bouton HR jusqu’à ce que l’heure exacte
soit affichée. Le symbole « PM » apparaît dans le coin supérieur droit de
l’afficheur numérique pour les réglages d’après-midi.
4. Appuyer sur le bouton MIN pour sélectionner les minutes.
Remarque :
réinitialiser l’horloge et l’heure de l’infusion automatique différée.
Réglage de l’heure de l’infusion automatique différée
La fonction programmable d’infusion automatique différée vous permet
de régler l’heure d’infusion (jour et nuit) à l’aide de la minuterie 24 heures.
Pour activer la fonction d’infusion automatique, suivez les étapes de la page
suivante :
Si l’appareil est débranché ou si le courant est interrompu, il faudra
42
Page 44

PROGRAMMATION DE LA CAFETIÈRE
MILL & BREW
1. Après le réglage de l’horloge numérique, appuyer sur le bouton PROG. L’icône
de la minuterie ( ) clignote, et l’afficheur indique 12:00.
2. Appuyer sur le bouton HR, puis sur MIN, pour sélectionner l’heure de l’infusion
automatique (par exemple, 7:30 AM). Au besoin, s’assurer que l’indicateur de
l’heure de l’après-midi (PM) n’est pas allumé.
3. L’afficheur de la minuterie clignote plusieurs fois, puis indique l’heure du jour.
4. Presser et relâcher le bouton AUTO pour activer la fonction d’infusion différée
préalablement programmée. L’icône de la minuterie ( ) reste fixe pour indiquer
que la fonction d’infusion automatique est activée.
5. Lorsque l’heure du jour atteint l’heure d’infusion automatique programmée, la
cafetière active le cycle d’infusion.
6. Pour annuler la fonction d’infusion automatique, appuyer sur le bouton AUTO
jusqu’à ce que l’icône de la minuterie ( ) disparaisse.
Remarque : Pour vérifier l’heure d’infusion automatique programmée, \
appuyer sur le bouton PROG; l’heure programmée s’affiche. Appuyer sur le
bouton AUTO pour réactiver la minuterie.
Réglage de la fonction d’arrêt automatique / mode réchaude
Cette caractéristique permet de sélectionner des délais d’arrêt automatique
(0 à 2 heures) par tranches de 30 minutes. Le mode réchaud sera activé
jusqu’à ce que le délai d’arrêt automatique soit écoulé.
1. Presser et maintenir enfoncé le bouton PROG pendant 3 secondes. L’afficheur
indique la durée du mode réchaud par défaut (120 minutes).
2. Appuyer sur le bouton MIN pour faire défiler les durées du mode réchaud
(00, 30, 60, 90, 120). Les valeurs correspondent à la durée (en minutes)
pendant laquelle le mode réchaud restera actif après l’infusion.
3. Appuyer sur le bouton PROG pour confirmer la durée.
Remarque: Pour vérifier l’heure de l’infusion automatique sans effectuer de
changement, appuyer sur le bouton PROG pour afficher l’heure, puis appuyer
sur le bouton AUTO.
Sélecteur du degré d’infusion
Le sélecteur du degré d’infusion permet de personnaliser la saveur du café en
fonction de trois degrés d’infusion.
1. Appuyer sur le bouton STRONG pour faire défiler les différents degrés
d’infusion (3 degrés).
a. Aucune barre = ordinaire (réglage par défaut)
b. 1 barre( ) = fort
c. 2 barres( ) = corsé
43
Page 45

4 FACTEURS D’INFUSION OPTIMALE
Qualité
de l’eau
Une tasse de café savoureuse exige
d’abord une eau fraîche de qualité.
Comme l’eau représente plus de
98 % du café infusé, sa qualité est
tout aussi importante que celle du
café lui-même. L’eau utilisée doit
avoir le goût d’une eau potable
fraîche de bonne qualité, ne pas
dégager d’odeur et ne contenir
aucune impureté visible.
Sélection de
la mouture
La taille des particules de café
moulu est essentielle à une saveur
et à une extraction appropriées. Une
mouture trop grossière permettra
à l’eau de passer trop rapidement,
sans extraction appropriée.
Une mouture trop fine produira une
extraction excessive et un goût amer.
La cafetière Mill & Brew
sélectionner la mouture optimale
correspondant au nombre de
tasses à infuser, et d’assurer que
la taille des particules de café est
appropriée à la cafetière.
™
permet de
Fraîcheur
du café
Une tasse de café réellement
fraîche n’est produite que par des
grains de café fraîchement moulus.
En fait, une fois qu’un grain de café
est rompu ou moulu, sa saveur
commence aussitôt à se dégrader.
La cafetière Mill & Brew
la fraîcheur du café, car la mouture
des grains précède immédiatement
l’infusion.
™
maximise
Proportion
appropriée
Il est important de respecter un
rapport café/eau approprié pour
obtenir une infusion finale ni
trop corsée ni trop faible. Nous
recommandons 1 cuillérée à table
de grains de café entiers ou de
café prémoulu par tasse (1) de
café infusé. Cette proportion peut
être ajustée en fonction des goûts
individuels; le sélecteur du degré
d’infusion peut aussi personnaliser
la saveur!
44
Page 46

CONSEILS POUR OBTENIR LA TASSE
DE CAFÉ IDÉALE
• Pour maximiser la fraîcheur
de café, utiliser le moulin
intégré pour moudre les grains
immédiatement avant l’infusion.
• Dans le cas de grains entiers,
utiliser le sélecteur de mouture
pour sélectionner la mouture
optimale correspondant au
nombre de tasses à infuser,
et d’assurer que la taille des
particules de café est appropriée.
• Le moulin est conçu pour moudre
des grains de café seulement. Ne
pas moudre d’autres aliments ou
épices à l’aide du moulin.
• Toujours utiliser de l’eau fraîche,
froide et propre dans la cafetière.
L’eau utilisée ne doit pas dégager
d’odeur et ne doit contenir
aucune impureté visible.
• Conserver toujours le café dans
un endroit frais et sec. Une
fois que l’emballage du café a
été ouvert, conservez-le dans
un contenant bien fermé et
hermétique.
• Ne pas réfrigérer ou congeler
la portion quotidienne de café,
car le contact avec l’humidité
provoquera la dégradation du
café.
• Ne jamais réutiliser du café
moulu. Après l’infusion, les
saveurs désirables du café ont
été extraites et seule demeure la
saveur amère.
• Le café infusé doit être
consommé immédiatement!
Laisser le café réchauffer trop
longtemps aura un effet négatif
sur sa saveur.
• Utiliser de l’eau de source ou
filtrée, et non de l’eau distillée
qui est dépourvue des minéraux
nécessaires à la fusion des
éléments du café.
• Une cafetière propre est toujours
importante. Un nettoyage régulier
est requis pour assurer le bon
goût du café.
• Humez l’arôme d’un café
fraîchement infusé et n’oubliez
pas que chaque gorgée doit être
savoureuse et agréable!
45
Page 47

INFUSION DU CAFÉ
1. Remplir la carafe d’eau fraîche
et froide en fonction de la quantité
désirée, et verser l’eau dans le
réservoir. Ne pas dépasser la
quantité de 12 tasses d’eau.
2. Fermer le couvercle du réservoir à
eau et déposer la carafe sur le
réchaud.
3. (a) Ouvrir le couvercle du moulin
en actionnant le loquet et
(b) ajouter la quantité de café
désirée dans le moulin et le panier filtre permanent 2 en 1.
1 tasse 1 cuil. à table de
grains entiers
1 cuil. à table
de café moulu
4. Refermer le couvercle du moulin
intégré. Appuyer sur le couvercle
jusqu’à ce qu’il ferme bien ou
jusqu’au déclic. La cafetière ne
fonctionnera pas si le couvercle
n’est pas fermé, si les pièces
du moulin ne sont pas en place
et si la douchette amovible n’est
pas installée.
1
3a
3b
4
5. S’assurer que la cafetière est
branchée dans une prise de
courant standard.
6. (a) Dans le cas de grains entiers,
appuyer sur le bouton GRIND pour
sélectionner la mouture optimale
(4, 6, 8, 10, 12) correspondant au
nombre de tasses à infuser.
6a
grains entiers
46
Page 48

INFUSION DU CAFÉ
6.
(b) Dans le cas de café moulu,
appuyer sur le bouton GRIND pour
faire défiler les options de mouture
jusqu’au symbole indiquant
d’éteindre la cafetière pour infuser
du café prémoulu.
7. Pour régler la fonction d’infusion
automatique différée, la fonction
réglable d’arrêt automatique
et le degré d’infusion, suivre les
instructions détaillées de la section
« Programmation de la cafetière
Mill & Brew ».
8. Appuyer une fois sur le bouton
marche/arrêt pour lancer le
cycle d’infusion. Dans le cas de
grains entiers, le cycle d’infusion
commence immédiatement après
la mouture.
9. La fonction Sneak-A-Cup™
vous permet de vous servir
une tasse de café avant la fin du
cycle d’infusion. La carafe doit
être replacée dans la cafetière
dans les 20 secondes suivantes
pour éviter les débordements. En
remettant la carafe en place, le
cycle d’infusion recommence.
6b
café moulu
(d'arrêt du moulin)
8
l'infusion
9
10. Une fois que le marc de café a
refroidi, vider le panier d’infusion
et le rincer après chaque cycle
d’infusion comme s’il s’agissait
d’un filtre permanent ordinaire.
10
47
Page 49

ENTRETIEN ET NETTOYAGE
Il est recommandé de suivre les instructions de nettoyage suivantes après
chaque utilisation de la cafetière. Cet appareil ne contient aucune pièce
réparable par l’utilisateur.
Nettoyage
1. S’assurer que la cafetière est éteinte et débranchée, et qu’elle a refroidi.
2. Essuyer les surfaces externes de la cafetière et le réchaud à l’aide d’un linge
doux humide.
3. Retirer le panier d’infusion lavable ainsi que le moulin et le panier-filtre
permanent 2 en 1, et jeter le marc de café.
4. Laver la douchette amovible ainsi que le moulin et le panier-filtre permanent 2
en 1 à la main dans de l’eau tiède savonneuse.
5. Laver la carafe en verre et le panier d’infusion lavable à la main à l’eau tiède
savonneuse, ou au lave-vaisselle (panier supérieur seulement).
6. Pour nettoyer l’intérieur du couvercle et l’intérieur du moulin, ouvrir le
couvercle, le laisser en position ouverte et essuyer à l’aide d’un linge humide.
Remarque : Ne pas utiliser de nettoyants abrasifs ou de tampons à récurer, et
ne jamais immerger le boîtier de la cafetière ou le cordon d’alimentation dans
l’eau.
CAFETIÈRE PARTIE INSTRUCTIONS DE LA
CAFETIÈRE
Appareil
Réchaud à carafe
Cordon d’alimentation
Douchette amovible
Moulin et panier-filtre
permanent 2 en 1
Carafe et couvercle
Panier d’infusion lavable
Essuyer à l’aide d’un linge
humide doux.
Laver à la main à l’eau tiède
savonneuse.
Laver à la main à l’eau tiède
savonneuse, ou au lave-vaisselle
(panier supérieur seulement).
48
Page 50

ENTRETIEN ET NETTOYAGE
Détartrage avec du vinaigre
Compte tenu de l’utilisation régulière de l’appareil, des dépôts de minéraux
provenant de l’eau dure peuvent obstruer la cafetière. Il est recommandé
d’effectuer un nettoyage complet au vinaigre, une fois par mois.
1. Verser dans le réservoir à eau une quantité de vinaigre blanc correspondant
à la marque de 6 tasses sur la fenêtre. Ajouter de l’eau fraîche froide jusqu’à la
marque correspondant à 10 tasses.
2. Placer le moulin et le panier-filtre permanent 2 en 1 ainsi que le panier
d’infusion lavable dans la cafetière Mill & Brew™ , et fermer le couvercle.
Déposer la carafe vide sur le réchaud.
3. Appuyer sur le bouton GRIND pour faire défiler les options de mouture
jusqu’au symbole indiquant d’éteindre la cafetière ( ).
4. Appuyer sur le bouton marche/arrêt et laisser le mélange nettoyant infuser
dans la carafe (jusqu’à ce que le niveau atteigne à peu près 5 tasses). Éteindre
la cafetière et laisser tremper pendant 15 minutes au moins.
5. Allumer la cafetière et faire infuser le reste du mélange nettoyant dans la carafe.
6. Éteindre la cafetière et vider la carafe.
7. Remplir le réservoir d’eau froide jusqu’à la marque correspondant à 11 tasses;
remettre la carafe sur le réchaud, puis rallumer la cafetière pour un cycle
d’infusion complet afin de chasser le reste du mélange nettoy Répéter cette
étape afin d’éliminer l’odeur et le goût du vinaigre. ant.
8. Laver la douchette amovible, le panier d’infusion lavable, le moulin et le panier filtre permanent 2 en 1 ainsi que la carafe en verre en suivant les instructions du
tableau d’entretien et de nettoyage.
49
Page 51

DÉPANNAGE
PROBLÈME CAUSE POSSIBLE SOLUTION
La cafetière ne
fonctionne pas.
La cafetière fuit.
Du liquide déborde du
panier d’infusion.
Résidus de grains de
café dans la tasse
infusée.
L’infusion est lente.
Le moulin ne se met
pas en marche.
Si une aide supplémentaire est nécessaire, s’il vous plaît contacter notre équipe de
La cafetière n’est pas
branchée.
Le réservoir à eau est
peut-être rempli au-delà
de sa capacité.
La carafe n’est peut-être pas
bien placée sur le réchaud.
La carafe a été retirée
pendant plus de
20 secondes en mode
Sneak-A-Cup™.
Quantité de café
excessive.
La mouture du café est
trop fine.
Il est possible que le
champignon du panier
d’infusion Sneak-A-Cup™
soit obstrué de marc de
café.
Le marc de café est
suffisamment fin pour
passer à travers le filtre
permanent.
La cafetière doit être
nettoyée.
Moulin surchauffé Laisser refroidir 15 minutes
service à la clientèle au
1-800-231-9786.
S’assurer que l’appareil est
branché à une prise de
courant fonctionnelle.
S’assurer que le réservoir
à eau n’a pas été rempli
au-delà de la ligne de
remplissage maximal de
12 tasses.
S’assurer que la carafe est
bien placée sur le réchaud.
S’assurer de remettre
la carafe en place
avant qu’un délai de
20 secondes soit écoulé
durant le cycle d’infusion.
Réduire la quantité de
café pour éliminer les
débordements.
Régler la mouture et
choisir un nombre de
tasses inférieur.
Pour retirer le marc de
café du panier d’infusion,
appuyer sur la partie en
forme de champignon du
panier Sneak-A-Cup™ en
le relevant et en l’abaissant
pendant le rinçage.
Bien qu’il soit normal de
constater un résidu de
café à l’utilisation d’un filtre
permanent, une mouture
plus grossière peut réduire
la quantité de résidu.
Suivre les instructions de la
section « Détartrage avec
du vinaigre » à la page 31.
et débrancher l’appareil
pendant au moins 30
secondes pour permettre
au fusible de se réinitialiser.
50
Page 52

RENSEIGNEMENTS DE GARANTIE ET
SERVICE À LA CLIENTÈLE
Pour communiquer avec les services d’entretien ou de réparation, ou pour
adresser toute question relative au produit, composer le numéro sans frais
approprié indiqué sur la page couverture. Ne pas retourner le produit où il a
été acheté. Ne pas poster le produit au fabricant ni le porter dans un centre
de service. On peut également consulter le site web indiqué sur la page
couverture.
Garantie Limitée De Deux Ans
(Valable seulement aux États-Unis et au Canada)
Quelle est la couverture?
• Tout défaut de main-d’oeuvre ou de matériau; toutefois, la responsabilité de la
société. Applica se limite au prix d’achat du produit.
Quelle est la durée?
• Deux année(s) à compter de la date d’achat initiale, avec une preuve d’achat.
Quelle aide offrons nous?
• Remplacement par un produit raisonnablement semblable nouveau ou réusiné.
Comment se prévaut-on du service?
• Conserver son reçu de caisse comme preuve de la date d’achat.
• Visiter notre site web au www.prodprotect.com/applica, ou composer sans frais le
1-800 231-9786, pour obtenir des renseignements généraux relatifs à la garantie.
• On peut également communiquer avec le service des pièces et des accessoires au
1-800 738-0245.
Qu’est-ce que la garantie ne couvre pas?
• Des dommages dus à une utilisation commerciale.
• Des dommages causés par une mauvaise utilisation ou de la négligence.
• Des produits qui ont été modifiés.
• Des produits utilisés ou entretenus hors du pays où ils ont été achetés.
• Des pièces en verre et tout autre accessoire emballés avec le produit.
• Les frais de transport et de manutention reliés au remplacement du produit.
• Des dommages indirects (il faut toutefois prendre note que certains états ne
permettent pas l’exclusion ni la limitation des dommages indirects).
Quelles lois régissent la garantie?
• Les modalités de la présente garantie donnent des droits légaux spécifiques.
L’utilisateur peut également se prévaloir d’autres droits selon l’état ou la province
qu’il habite.
51
Page 53

PÓLIZA DE GARANTÍA
(Válida sólo para México)
DURACIÓN
Rayovac de México SA de CV garantiza este producto por 2 años a partir de
la fecha original de compra.
¿Qué cubre esta garantía?
• Esta Garantía cubre cualquier defecto que presenten las piezas,
componentes y la mano de obra contenidas en este producto.
• Requisitos para hacer válida la garantía
• Para reclamar su Garantía deberá presentar al Centro de Servicio Autorizado
la póliza sellada por el establecimiento en donde adquirió el producto. Si no
la tiene, podrá presentar el comprobante de compra original.
¿Donde hago válida la garantía?
• Llame sin costo al teléfono 01 800 714 2503, para ubicar el Centro de
Servicio Autorizado más cercano a su domicilio en donde usted podrá
encontrar partes, componentes, consumibles y accesorios.
Procedimiento para hacer válida la garantía
Acuda al Centro de Servicio Autorizado con el producto con la póliza de
Garantía sellada o el comprobante de compra original, ahí se reemplazará
cualquier pieza o componente defectuoso sin cargo alguno para el usuario
final. Esta Garantía incluye los gastos de transportación que se deriven de su
cumplimiento.
Excepciones
Esta Garantía no será válida cuando el producto:
A) Se hubiese utilizado en condiciones distintas a las normales.
B) No hubiese sido operado de acuerdo con el instructivo de uso
que le acompaña.
C) Cuando el producto hubiese sido alterado o reparado por personas
no autorizadas por Rayovac de México SA de CV.
Nota: Usted podra encontrar partes, componentes, consumibles y
accesorios en los centros de servicios autorizados. Esta garantía incluyen los
gastos de transportación que se deriven de sus cumplimiento dentro de sus
red de servicio.
52
Page 54

Por favor llame al número correspondiente que aparece en la lista a continuación para solicitar
que se haga efectiva la garantía y donde Ud. puede solicitar servicio, reparaciones o partes en
el país donde el producto fué comprado.
Argentina
Servicio Técnico
Monroe 3351
CABA Argentina
Tel: 0800 – 444 - 7296
servicios@rayovac.com.ar
Chile
SERVICIO DE MAQUINAS Y HERRAMIENTAS
LTDA .
Portugal Nº 644
Santiago – Chile
Fonos: 02-6355208 / 02-6341169
Email: servicio@spectrumbrands.cl
Call center: 800-171-051
Colombia
Rayovac Varta S.A
Carrera 17 Número 89-40
Línea gratuita nacional
Tel. 018000510012
Costa Rica
Aplicaciones Electromecanicas, S.A.
Calle 26 Bis y Ave. 3
San Jose, Costa Rica
Tel. (506) 257-5716 / 223-0136
administracion@masterecuador.com
Ecuador
SERVICIO MASTER ECUADOR
ALMERIA N50-71 Y DE LOS ALAMOS
Tel. (593) 2281-3882 / 2240-9870
El Salvador
Calle San Antonio Abad 2936
San Salvador, El Salvador
Tel. (503) 2284-8374
México
Articulo 123 # 95 Local 109 y 112
Col. Centro, Cuauhtemoc,
Méxi co, D. F.
Tel. 01 800 714 2503
Nicaragua
ServiTotal
De semáforo de portezuelo
500 metros al sur.
Managua, Nicaragua,
Tel. (505) 248-7001
Panamá
Servicios Técnicos CAPRI
Tumbamuerto Boulevard
El Dorado Panamá
500 metros al sur.
Tel. 3020-480-800 sin costo
(507) 2360-236 / 159
Perú
Servicio Central Fast Service
Av. Angamos Este 2431
San Borja, Lima Perú
Tel. (511) 2251 388
Puerto Rico
Buckeye Service
Jesús P. Piñero #1013
Puerto Nuevo, SJ PR 00920
Tel.: (787) 782-6175
Republica Dominicana
Prolongación Av. Rómulo Betancourt
Zona Industrial de Herrera
Santo Domingo, República Dominicana
Tel.: (809) 530-5409
Guatemala
MacPartes SA
3ª Calle 414 Zona 9
Frente a Tecun
Tel. (502) 2331-5020 / 2332-2101
Honduras
ServiTotal
Contigua a Telecentro
Tegucigalpa, Honduras,
Tel. (504) 235-6271
Venezuela
Inversiones BDR CA
Av. Casanova C.C.
City Market Nivel Plaza Local 153
Diagonal Hotel Melia,
Caracas.
Tel. (582) 324-0969
www.applicaservice.com
servicio@applicamail.com
53
Page 55

Sello del Distribuidor:
Fecha de compra:
Modelo:
CM5000 - 1025 W 120 V ~ 60 Hz
Código de fecha / Date Code / Le code de date:
Comercializado por:
Rayovac de México S.A de C.V
Autopista México Querétaro
No 3069-C Oficina 004
Colonia San Andrés Atenco, Tlalnepantla
Estado de México, C.P. 54040
Mexico.
Tel: (55) 5831 – 7070
Servicio y Reparación
Art. 123 No. 95
Col. Centro, C.P. 06050
Deleg. Cuauhtemoc
Servicio al Consumidor,
Venta de Refacciones y Accesorios
01 800 714 2503
Importado por / Imported by:
RAYOVAC ARGENTINA S.R.L.
Humboldt 2495 Piso# 3
(C1425FUG) C.A.B.A. Argentina.
C.U.I.T No. 30-70706168-1
Importado por / Imported by:
Rayovac de México S.A de C.V
Autopista México Querétaro
No 3069-C Oficina 004
Colonia San Andrés Atenco, Tlalnepantla
Estado de México, C.P. 54040
Mexico.
Tel: (55) 5831-7070
Para atención de garantía marque:
01 (800) 714 2503
54
Page 56

www.BlackAndDeckerAppliances.com
BLACK & DECKER and the BLACK & DECKER Logo are
registered trademarks of The Black & Decker Corporation,
or one of its affiliates, and used under license.
BLACK & DECKER y el logo BLACK & DECKER son marcas
registradas de The Black & Decker Corporation o de una
de sus
compañias afiliadas y se utilizan bajo licencia.
Le nom et le logo BLACK & DECKER sont des
marques déposées de The Black & Decker Corporation,
ou une de ses sociétés affiliées, et sont utilisés sous licence.
(c) 2014 Spectrum Brands, Inc., Middleton WI 53562
2014/3-11-15
55
Made and printed in
People’s Republic of China
Fabricado e Impreso en
la República Popular de China
Fabriqué et Imprimé en
République populaire de Chine.
T22-5000969
 Loading...