

Page 1

INSTRUCTION MANUAL
60V MAX* CORDLESS MOWER
Thank you for choosing BLACK+DECKER!
PLEASE READ BEFORE RETURNING THIS PRODUCT FOR ANY REASON.
If you have a question or experience a problem with your BLACK+DECKER
purchase, go to http://www.blackanddecker.com/instantanswers
If you can’t find the answer or do not have access to the Internet, call
1-800-544-6986 from 8 a.m. to 5 p.m. EST Mon. - Fri. to speak with an agent.
Please have the catalog number available when you call.
SAVE THIS MANUAL FOR FUTURE REFERENCE.
VEA EL ESPANOL EN LA CONTRAPORTADA.
INSTRUCTIVO DE OPERACIÓN, CENTROS DE SERVICIO Y PÓLIZA DE GARANTÍA.
ADVERTENCIA: LÉASE ESTE INSTRUCTIVO ANTES DE USAR EL PRODUCTO.
*Maximum initial battery pack voltage (measured without a workload) is 60 volts. The nominal voltage is 54.
CATALOG NUMBER
CM2060
To register your new product, visit
www.BlackandDecker.com/NewOwner
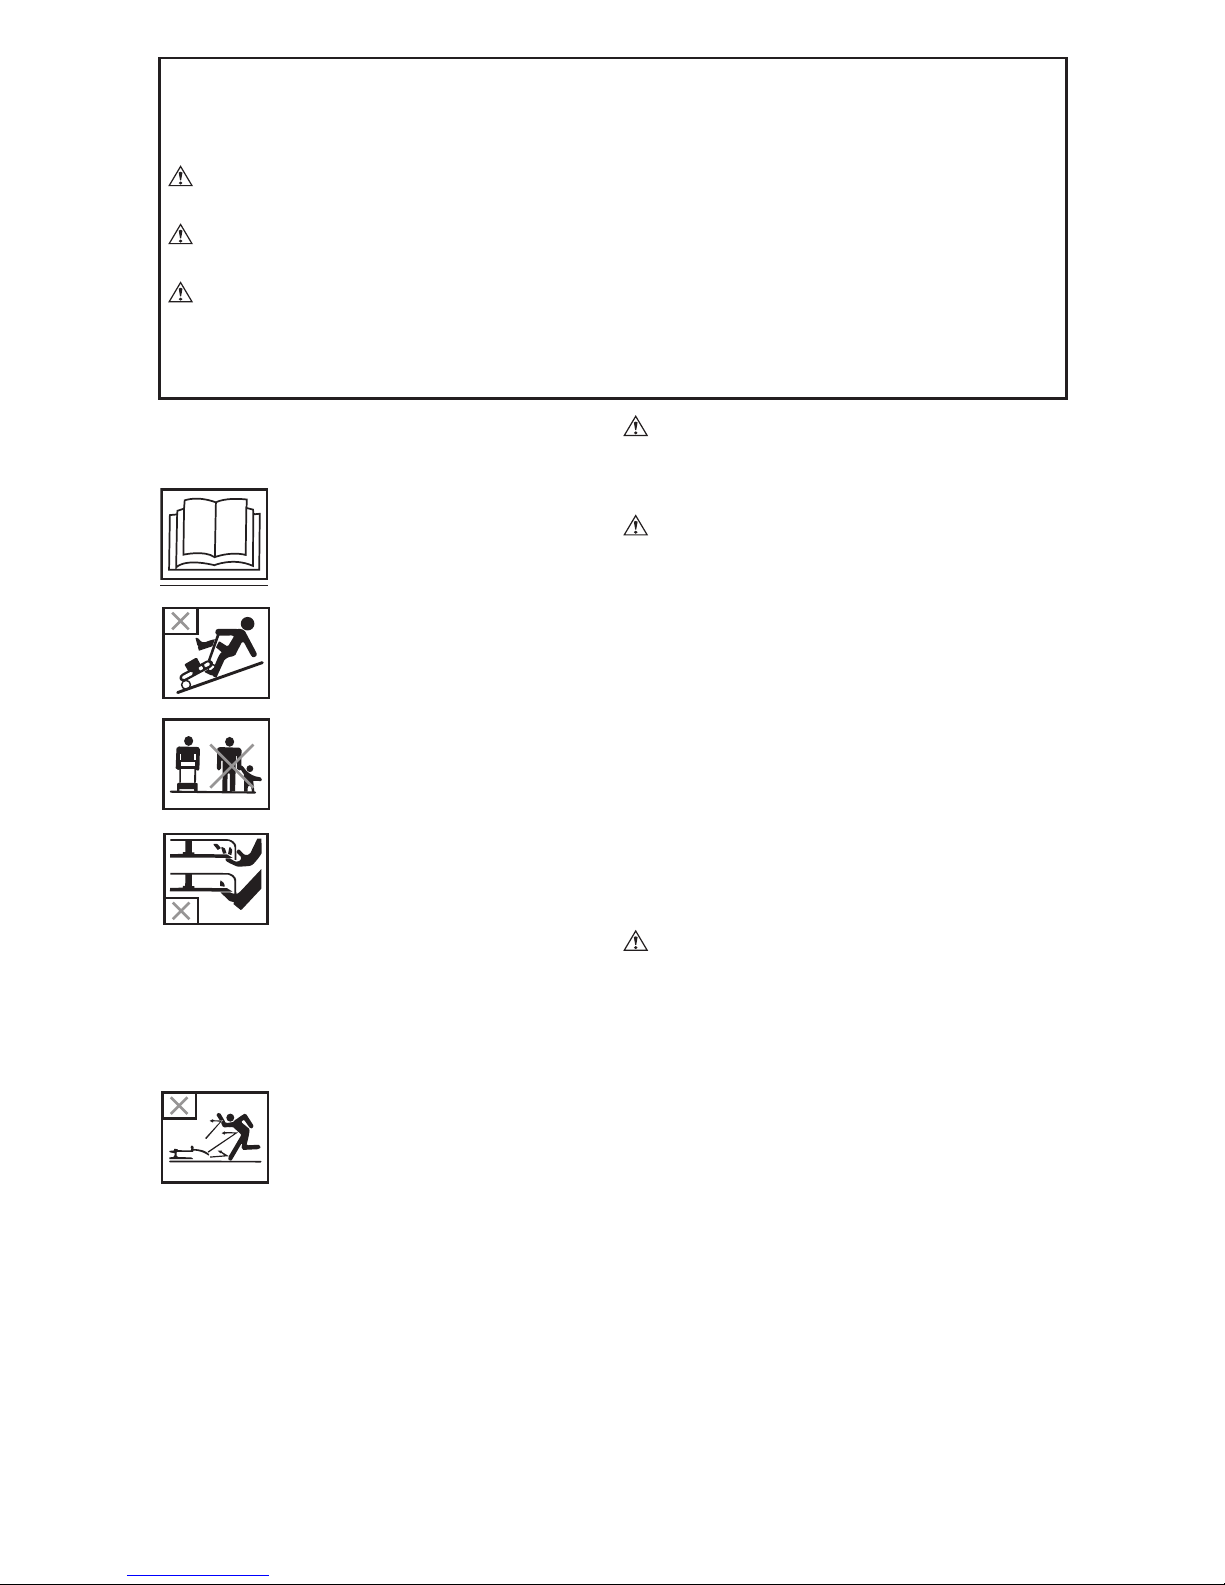
KEY INFORMATION YOU SHOULD KNOW:
• Do not operate mower unless handle is locked into position.
• For best cutting results, keep blade sharpened and balanced.
• Inspect and thoroughly clean your mower after each use (a deck with
caked grass will degrade performance).
• Make sure mowing area is clear of other persons or pets prior to
starting and during operation.
Page 2
2
The following are explanations of
important safety hazard pictorials on
the mower.
1. User must read and
understand the instruction
manual.
2. To avoid the risk of serious
injury do not mow up and
down slopes. Always mow
across slopes.
3. To avoid the risk of injury to
bystanders keep all persons
and pets at a safe distance
from the mower while operating.
4. Rotating blades can cause
serious injury. Keep hands
and feet clear of mower deck
and discharge opening at all
times. Always be sure blade
has stopped (wait for the blade to stop
rotating (approximately 3 seconds) after
releasing bail handle and removing the
safety key) before removing and replacing
grass catcher, cleaning, servicing,
transporting or lifting the mower.
5. Objects struck by mower
blade can cause serious injury.
Stay behind the handle when
the motor is running. Always
ensure persons and pets are
clear of the discharge from the mower
while operating. Always inspect mowing
area before mowing and remove objects
that could be thrown by blade. Release
bail handle to turn mower off and wait for
the blade to stop rotating (approximately
3 seconds) before crossing walk, roads,
patio and gravel drives.
WARNING: IMPORTANT
SAFETY WARNINGS AND
INSTRUCTIONS
WARNING: WHEN USING
ELECTRIC LAWN MOWERS, BASIC
SAFETY PRECAUTIONS SHOULD
ALWAYS BE FOLLOWED TO REDUCE
THE RISK OF FIRE, ELECTRIC SHOCK,
AND PERSONAL INJURY, INCLUDING
THE FOLLOWING:
READ ALL INSTRUCTIONS
TO REDUCE RISK OF INJURY:
• Before any use, be sure everyone using
this tool reads and understands all
safety instructions and other information
contained in this manual.
• Save these instructions and review
frequently prior to use and in instructing
others.
DANGER: IMPORTANT SAFE
PRACTICES FOR WALK-BEHIND
MOWERS
This mower is capable of amputating hands
and feet and throwing objects. Failure to
observe the following safety instructions
could result in serious injury or death.
GENERAL OPERATION
1. Read, understand, and follow all
instructions on the mower and in the
instruction manual before starting.
2. Do not put hands or feet near or under
the mower. Keep clear of the discharge
opening at all times.
3. Only allow responsible adults, who are
familiar with the instructions, to operate
this mower.
4. Clear the area where the mower is to be
used of objects such as rocks, sticks,
wire, toys, bones, etc., which could be
thrown by the blade. Objects struck by
the blade can cause severe injury to
persons. Stay behind the handle when
the motor is running.
5.
Be sure the area surrounding the mower
SAFETY GUIDELINES - DEFINITIONS
It is important for you to read and understand this manual. The information it contains
relates to protecting YOUR SAFETY and PREVENTING PROBLEMS. The symbols
below are used to help you recognize this information.
DANGER: Indicates an imminently hazardous situation which, if not avoided, will
result in death or serious injury.
WARNING: Indicates a potentially hazardous situation which, if not avoided,
could result in death or serious injury.
CAUTION: Indicates a potentially haz ard ous situation which, if not avoided,
may result in minor or mod er ate injury.
NOTICE: Used without the safety alert symbol indicates potentially hazardous
situation which, if not avoided, may result in property damage.
Page 3

3
is clear of bystanders before operating.
All bystanders and pets should be kept at
a safe distance. Stop the mower if anyone
enters the area surrounding the mower.
6. Do not operate mower barefooted or
while wearing sandals. Always wear
substantial footwear.
7. Do not pull mower backward unless
absolutely necessary. Always look down
and behind before and while moving
backward.
8. Never direct discharged material toward
anyone. Avoid discharging material
against a wall or obstruction. Material
may ricochet back toward the operator.
Release bail handle to turn mower off
and stop the blade when crossing
gravel surfaces.
9. Do not operate mower without the entire
grass catcher, discharge guard, rear
guard, or other safety protective devices
in place and working. Periodically check
all guards and safety protective devices
to ensure they are in good working
order and will operate properly and
perform their intended function. Replace
a damaged latch, guard or other safety
device before further use.
10.
Never leave a running mower unattended.
11. Always release the bail handle to
stop the motor and wait until the blade
comes to a complete stop and remove
the safety key before cleaning the
mower, removing the grass catcher,
un-clogging the discharge guard, when
leaving the mower, or before making
any adjustments, repairs or inspections.
12. Operate mower only in daylight or
good artificial light when objects in the
path of the blade are clearly visible from
the operating area of the mower.
13. Do not operate mower while under the
influence of alcohol or drugs, or when
you are tired or ill. Always stay alert,
watch what you are doing, and use
common sense.
14. Avoid dangerous environments. Never
operate mower in damp or wet grass,
never use mower in the rain. Always be
sure of your footing; walk; never run.
15. Disengage the drive system, if so
equipped, before starting the motor.
16. If the mower should start to vibrate
abnormally, release the bail handle, wait
for the blade to stop and remove the
safety key and battery pack, then check
for the cause immediately. Vibration is
generally a warning of trouble.
17. Always wear proper eye and
respiratory protection when operating
the mower.
18. The use of any accessory or
attachment not recommended for use
with this mower could be hazardous.
Only use accessories approved by
BLACK+DECKER.
19. Never overreach while operating the
mower. Always be sure to keep proper
footing and balance at all times while
operating the mower.
SLOPE OPERATION
Slopes are a major factor related to slip
and fall accidents, which can result in
severe injury. Operation on all slopes
requires extra caution. If you feel uneasy
on a slope, do not mow it.
1. Mow across the face of slopes; never
up and down. Exercise extreme caution
when changing direction on slopes.
2. Watch for holes, ruts, bumps, rocks, or
other hidden objects. Uneven terrain
could cause a slip and fall accident. Tall
grass can hide obstacles.
3. Do not mow on wet grass or excessively
steep slopes. Poor footing could cause
a slip and fall accident.
4. Do not mow near drop-offs, ditches,
or embankments. You could lose your
footing or balance.
CHILDREN
Tragic accidents can occur if the operator is
not alert to the presence of children. Children
are often attracted to the mower and the
mowing activity. Never assume that children
will remain where you last saw them.
1. Keep children out of the mowing area and
under the watchful care of a responsible
adult other than the operator.
2. Be alert and turn mower off if a child
enters the area.
3
. Never allow children to operate the mower.
4. Use extra care when approaching blind
corners, shrubs, trees, or other objects
that may block your view of a child
GENERAL SERVICE
1. Never operate mower in a closed area.
2. Keep all nuts and bolts tight to be
sure the equipment is in safe working
condition.
3. Never tamper with safety devices.
Check their proper operation regularly.
4. Keep mower free of grass, leaves, or
other debris build-up. Allow mower to
cool before storing.
5. If you strike a foreign object, release
bail handle to turn mower off, wait for
the blade to stop and remove the safety
key and battery pack, then inspect the
mower. Repair, any damage, before
starting and operating the mower.
6. Never make any adjustments or repairs
with the motor running or while the
safety key is in the mower.
7. Always remove safety key and battery
pack before adjusting, cleaning,
repairing, inspecting, transporting,
Page 4

4
storing or leaving the mower.
8.
Under normal usage, the grass catcher
components are subject to deterioration
and wear. Before each use of the mower,
check
the grass catcher components
and the discharge guard and when
necessary replace with BLACK+DECKER
recommended parts only.
9. Mower blades are sharp. Wrap the
blade or wear gloves, and use extra
caution when servicing them.
10. Maintain or replace safety and
instruction labels, as necessary.
This Class B digital apparatus complies
with Canadian ICES-003.
This device complies with part 15 of the
FCC rules. Operation is subject to the
following two conditions: (1) This device
may not cause harmful interference, and (2)
this device must accept any interference
received, including interference that may
cause undesired operation.
NOTE: This equipment has been tested
and found to comply with the limits for
a Class B digital device, pursuant to
Part 15 of the FCC Rules. These limits
are designed to provide reasonable
protection against harmful interference in
a residential installation. This equipment
generates, uses and can radiate radio
frequency energy and, if not installed and
used in accordance with the instructions,
may cause harmful interference to radio
communications. However, there is no
guarantee that interference will not occur
in a particular installation.
If this equipment does cause harmful
interference to radio or television
reception, which can be determined
by turning the equipment off and on,
the user is encouraged to try to correct
the interference by one or more of the
following measures:
•
Reorient or relocate the receiving antenna.
• Increase the separation between the
equipment and receiver.
• Connect the equipment into an outlet on
a circuit different from that to which the
receiver is connected.
• Consult the dealer or an experienced
radio/TV technician for help.
Changes or modifications to this unit
not expressly approved by the party
responsible for compliance could void
the user’s authority to operate the
equipment. This Class B digital apparatus
complies with Canadian ICES-003.
WARNING:
GENERAL
SAFETY WARNINGS AND
INSTRUCTIONS FOR ALL TOOLS
• THIS TOOL CAN BE DANGEROUS.
Follow all warnings and Safety
Instructions in this manual. The
operator is responsible for following
warnings and instructions in this
manual and on unit. Restrict use of
this mower to persons who read,
understand and follow warnings and
instructions in this manual and on unit.
• Avoid dangerous environment –
don’t use lawn mowers in damp or wet
locations.
• Don’t Use In Rain.
•
Keep Children Away – All visitors should
be kept a safe distance from work area.
• Dress Properly – Do not wear loose
clothing or jewelry. They can be
caught in moving parts. Use of rubber
gloves and footwear is recommended
when working outdoors.
• Use Safety Glasses – Always use face
or dust mask if operation is dusty.
• Use Right Appliance – Do not use
lawn mower for any job except that for
which it is intended.
• USE OF EXTENSION CORDS Make
sure the extension cord is in good
condition before using. Always use
the proper size extension cords with
the tool – that is, proper wire size for
various lengths of cord and heavy
enough to carry the current the tool
will draw. Use of an undersized cord
will cause a drop in line voltage
resulting in loss of power and
overheating. For proper size cords
see chart below.
• CHECK FOR DAMAGED PARTS.
Before further use of the mower, a
guard or other part that is damaged
should be carefully checked to
determine that it will operate properly
and perform its intended function.
Check for alignment of moving parts,
binding of moving parts, breakage
of parts, mounting, and any other
conditions that may affect their
operation. A guard or other part that is
damaged should be properly repaired
or replaced by an authorized service
center unless otherwise indicated
elsewhere in this manual.
• REPAIRS AND SERVICE. Repairs,
maintenance and any adjustments
Minimum Gage for Cord Sets
Volts Total Length of Cord in Feet
120V 0-25 26-50 51-100 101-150
(0-7,6m) (7,6-15,2m) (15,2-30,4m) (30,4-45,7m)
Ampere Rating
More Not more American Wire Gage
Than Than
0 6 18 16 16 14
6 10 18 16 14 12
10 12 16 16 14 12
12 16 14 12 Not Recommended
Page 5

5
not specified in this manual should
be performed by BLACK+DECKER
authorized service centers or other
qualified service organizations, always
using identical replacement parts.
DANGER: ADDITIONAL
WARNINGS FOR MOWERS
•
Avoid dangerous environment – don’t use
lawn mowers in damp or wet locations.
• Don’t Force Lawn Mower – It will do
the job better and safer at the rate for
which it was designed.
• Don’t Overreach – Keep proper
footing and balance at all times.
• St
ay Alert – Watch what you are doing.
Use common sense. Do not operate
lawn mower when you are tired.
• Store Idle Lawn Mower Indoors –
When not in use, lawn mower should
be stored in an indoor dry and lockedup place – out of reach of children.
Remove safety key
• Maintain Lawn Mower With Care –
Keep cutting edges sharp and clean
for best and safest performance.
•
Keep guards in place and in working order.
• Keep blades sharp.
• Keep hands and feet away from
cutting area.
• Objects struck by the lawn mower
blade can cause severe injuries to
persons. The lawn should always be
carefully examined and cleared of all
objects prior to each mowing.
• If lawn mower strikes a foreign
object, follow these steps:
1) Stop lawn mower. Release the bail
handle.
2) Remove battery and safety key.
3) Inspect for damage.
4)
Repair any damage before restarting
and operating the lawn mower.
•
Use identical replacement blades only.
SAVE THESE INSTRUCTIONS
WARNING: Some dust created by this
product contains chemicals known to the State of
California to cause cancer, birth defects or other
reproductive harm. Some examples of these
chemicals are:
• compounds in fertilizers
• compounds in insecticides,
herbicides and pesticides
• arsenic and chromium from
chemically treated lumber
To reduce your exposure to these
chemicals, wear approved safety
equipment such as dust masks that are
specially designed to filter out
microscopic particles.
• The label on your tool may include the
following symbols. The symbols and
their definitions are as follows:
V ................. volts
mW ............. milliwatts
nm ..............wavelength in nanometers
A ................. amperes
Hz ............... hertz
W ................ watts
min .............minutes
or AC .....alternating current
or DC ...direct current
n
o ...............no load speed
...............Class I Construction
(grounded)
................ earthing terminal
..............safety alert symbol
................Class II Construction
(double insulated)
.../min or rpm...revolutions or
reciprocation per minute
................ Use proper respiratory
protection
............Read instruction manual
before use
...............Use proper eye protection
................ Use proper hearing
protection
IMPORTANT SAFETY INSTRUCTIONS
FOR BATTERY CHARGERS
• Before using charger, read all
instructions and cautionary markings
on charger, battery pack, and product
using battery pack.
WARNING: SHOCK HAZARD. Do
not allow any liquid to get inside charger.
WARNING: BURN HAZARD. To
reduce the risk of injury, charge only
designated BLACK+DECKER batteries.
Other types of batteries may burst
causing personal injury and damage.
CAUTION: Under certain
conditions, with the charger plugged in to
the power supply, the charger can be
shorted by foreign material. Foreign
materials of a conductive nature such as,
but not limited to, steel wool, aluminum
foil, or any buildup of metallic particles
should be kept away from charger
cavities. Always unplug the charger from
the power supply when there is no
battery pack in the cavity. Unplug
charger before attempting to clean.
WARNING:
• DO NOT attempt to charge the battery
pack with any chargers other than
those specified by the manufacturer.
The charger and battery pack are
specifically designed to work together.
• These chargers are not intended
for any uses other than charging
designated BLACK+DECKER
rechargeable batteries. Any other uses
may result in risk of fire, electric shock
or electrocution.
Page 6

6
•
WARNING: The charger
supplied with this product is intended
to be plugged in such that it is
correctly orientated in a vertical or
floor mount position.
•
Do not expose charger to rain or snow.
• Pull by plug rather than cord when
disconnecting charger. This will
reduce risk of damage to electric plug
and cord.
•
Make sure that cord is located so that it
will not be stepped on, tripped over, or
otherwise subjected to damage or stress.
• Do not use an extension cord
unless it is absolutely necessary.
Use of improper extension cord could
result in risk of fire, electric shock, or
electrocution.
• Do not place any object on top of
charger or place the charger on
a soft surface that might block
the ventilation slots and result in
excessive internal heat. Place the
charger in a position away from any
heat source. The charger is ventilated
through slots in the top and the bottom
of the housing.
• Do not mount charger on wall or
permanently affix charger to any
surface. The charger is intended to use
on a flat, stable surface (i.e., table top,
bench top).
• Do not operate charger with damaged
cord or plug — have them replaced
immediately.
• Do not operate charger if it has
received a sharp blow, been dropped,
or otherwise damaged in any way.
Take it to an authorized service center.
• Do not disassemble charger; take it
to an authorized service center when
service or repair is required. Incorrect
reassembly may result in a risk of
electric shock, electrocution or fire.
• Disconnect the charger from the
outlet before attempting any cleaning.
This will reduce the risk of electric
shock. Removing the battery pack will
not reduce this risk.
• NEVER attempt to connect 2 chargers
together.
• The charger is designed to operate on
standard household electrical power
(120 Volts). Do not attempt to use it on
any other voltage.
IMPORTANT SAFETY
INSTRUCTIONS FOR
BATTERY PACKS
SAVE THESE INSTRUCTIONS
• This manual contains important
safety instructions for battery packs.
Before using the battery pack, read all
instructions and cautionary markings
on battery pack, charger, and product
using the battery pack.
READ ALL INSTRUCTIONS
• Do not incinerate the battery pack
even if it is severely damaged or is
completely worn out. The battery pack
can explode in a fire. Toxic fumes and
materials are created when battery
packs are burned.
• Do not charge or use battery in
explosive atmospheres, such as in
the presence of flammable liquids,
gases or dust. Inserting or removing
the battery from the charger may ignite
the dust or fumes.
• I
f battery contents come into contact
with the skin, immediately wash area
with mild soap and water. If battery liquid
gets into the eye, rinse water over the open
eye for 15 minutes or until irritation ceases.
If medical attention is needed, the battery
electrolyte for Li-ion batteries is composed
of a mixture of liquid organic carbonates
and lithium salts.
• Contents of opened battery cells may
cause respiratory irritation. Provide
fresh air. If symptoms persist, seek
medical attention.
WARNING: BURN HAZARD.
BATTERY LIQUID MAY BE FLAMMABLE
IF EXPOSED TO SPARK OR FLAME.
• Charge the battery packs only in
BLACK+DECKER chargers.
• DO NOT splash or immerse in water
or other liquids. This may cause
premature cell failure.
• Do not store or use the tool and
battery pack in locations where the
temperature may reach or exceed
105°F (40˚C) (such as outside sheds
or metal buildings in summer).
WARNING: NEVER ATTEMPT TO
OPEN THE BATTERY PACK FOR ANY
REASON. IF BATTERY PACK CASE IS
CRACKED OR DAMAGED, DO NOT
INSERT INTO CHARGER. DO NOT
CRUSH, DROP OR DAMAGE BATTERY
PACK. DO NOT USE A BATTERY PACK
OR CHARGER THAT HAS RECEIVED A
SHARP BLOW, BEEN DROPPED, RUN
OVER OR DAMAGED IN ANY WAY (I.E.,
PIERCED WITH A NAIL, HIT WITH A
HAMMER, STEPPED ON). DAMAGED
BATTERY PACKS SHOULD BE
RETURNED TO SERVICE CENTER FOR
RECYCLING.
WARNING: FIRE HAZARD. DO
Page 7

7
NOT STORE OR CARRY BATTERY SO
THAT METAL OBJECTS CAN
CONTACT EXPOSED BATTERY
TERMINALS. FOR EXAMPLE, DO NOT
PLACE BATTERY IN APRONS,
POCKETS, TOOL BOXES, PRODUCT KIT
BOXES, DRAWERS, ETC., WITH LOOSE
NAILS, SCREWS, KEYS, ETC.
TRANSPORTING BATTERIES CAN
POSSIBLY CAUSE FIRES IF THE
BATTERY TERMINALS
INADVERTENTLY COME IN CONTACT
WITH CONDUCTIVE MATERIALS SUCH
AS KEYS, COINS, HAND TOOLS AND
THE LIKE. THE US DEPARTMENT OF
TRANSPORTATION HAZARDOUS
MATERIAL REGULATIONS (HMR)
ACTUALLY PROHIBIT TRANSPORTING
BATTERIES IN COMMERCE OR ON
AIRPLANES (I.E., PACKED IN
SUITCASES AND CARRY-ON LUGGAGE)
UNLESS THEY ARE PROPERLY
PROTECTED FROM SHORT CIRCUITS.
SO WHEN TRANSPORTING INDIVIDUAL
BATTERIES, MAKE SURE THAT THE
BATTERY TERMINALS ARE PROTECTED
AND WELL INSULATED FROM
MATERIALS THAT COULD CONTACT
THEM AND CAUSE A SHORT CIRCUIT.
NOTE: BATTERIES SHOULD NOT BE
PUT IN CHECKED BAGGAGE.
TRANSPORTATION
Your BLACK+DECKER batteries comply with all
applicable shipping regulations as prescribed
by industry and legal standards, including UN
Recommendations on the Transport of Dangerous
Goods; International Air Transport Association (IATA)
Dangerous Goods Regulations, International Maritime
Dangerous Goods (IMDG) Regulations, and U.S.
Department of Transportation Regulations. Lithiumion cells and batteries have been tested to section
38.3 of the UN Recommendations on the Transport of
Dangerous Goods Manual of Tests and Criteria.
The shipping or transportation of the battery in this
product is restricted and may be classified as a Class
9 Hazardous material.
SHIPPING BY AIRPLANE
(BY AIR) OR SHIP (BY SEA)
• Contact your carrier for up to date instructions.
Have your contents (including the battery) with
you when contacting them. The specifications
written on them will be needed to prepare them
for shipment, pack them in a compliant box, and
properly label the box.
SHIPPING BY GROUND
(HIGHWAY OR RAIL)
• The original product box and its packing material
can be used for shipping by ground within the
United States and Canada with the following
stipulations:
1. The battery and all other contents must be in
their original packing materials and arranged
as received (including the battery in its original
plastic bag and or battery box).
2. The original product box and all other packing
materials must be undamaged.
3. The shipment must be include a document which
contains the following:
• The package contains lithium-ion cells or
batteries.
• The package must be handled with care
and that a flammability hazard exists if the
package is damaged.
• Special procedures should be followed in
the event the package is damaged, to include
inspection and repacking if necessary.
• The telephone numbers for additional
information (US and Canada 1-888-6982571, Elsewhere +1-410-329-9200).
• To ship by ground in a generic box, contact
your carrier for up to date instructions. Have
your contents (including the battery) with you
when contacting them. The specifications
written on them will be needed to prepare
them for shipment, pack them in a compliant
box, and properly label the box.
These batteries can be carried on airplanes if:
1. The airline allows spare batteries up to 160 Whr
(check airline website)
2. No more than 2 batteries are carried on, and
3. The batteries are protected against short circuit.
The information provided in this section of the
manual is provided in good faith and believed to
be accurate at the time the document was created.
However, no warranty, expressed or implied, is
given. The shipper is responsible to comply with the
applicable regulations.
STORAGE RECOMMENDATIONS
1. The best storage place is one that is
cool and dry away from direct sunlight
and excess heat or cold.
2. Long-term storage will not harm the
battery pack or the charger as long as
the battery is not depleted..
Page 8
8
CHARGING PROCEDURE
Use only with BLACK+DECKER BDCAC60 Series
chargers. Use only with BLACK+DECKER 60V MAX*
batteries. BLACK+DECKER chargers are designed to
charge BLACK+DECKER battery packs.
1. Plug the charger into an appropriate
outlet before inserting the battery pack.
2.
Insert the battery pack into the charger.
3. The green LED will flash
indicating that the battery is being
charged.
4. The completion of charge
is indicated by the green LED
remaining on continuously. The pack
is fully charged and may be used at
this time or left on the charger.
Recharge discharged batteries as soon
as possible after use or battery life
may be greatly diminished.
CHARGER DIAGNOSTICS
This charger is designed to detect certain
problems that can arise with the battery
packs or the power source. Problems are
indicated by one LED flashing in different
patterns.
BAD BATTERY
The charger can detect a weak
or damaged battery. The red LED
flashes in the pattern indicated
on the label. If you see this bad
battery blink pattern, do not
continue to charge the battery.
Return it to a service center or a
collection site for recycling.
HOT/COLD PACK DELAY
When the charger detects a
battery that is excessively hot or
excessively cold, it automatically
starts a Hot/Cold Pack Delay,
suspending charging until the
battery has normalized. After this
happens, the charger automatically
switches to the Pack Charging
mode. This feature ensures
maximum battery life. The red LED
flashes in the pattern indicated on
the label when the hot / cold pack
delay is detected.
IMPORTANT CHARGING NOTES
1. Longest life and best performance
can be obtained if the battery pack is
charged when the air temperature is
between 60°F and 80°F (16°- 27°C).
DO NOT charge the battery pack in an
air temperature below +40°F (+4.5°C),
or above +105°F (+40.5°C). This is
important and will prevent serious
damage to the battery pack.
2. The charger and battery pack may
become warm to touch while charging.
This is a normal condition, and does
not indicate a problem. To facilitate the
cooling of the battery pack after use,
avoid placing the charger or battery pack
in a warm environment such as in a metal
shed, or an uninsulated trailer.
3. If the battery pack does not charge
properly:
a. Check current at receptacle by
plugging in a lamp or other appliance
b. Check to see if receptacle is connected
to a light switch which turns power off
when you turn out the lights.
c. Move charger and battery pack
to a location where the surrounding
air temperature is approximately 60°F
- 80°F (16° - 27°C).
d. If charging problems persist, take the
tool, battery pack and charger to your
local service center.
4. The battery pack should be recharged
when it fails to produce sufficient
power on jobs which were easily done
previously. DO NOT CONTINUE to
use under these conditions. Follow
the charging procedure. You may also
charge a partially used pack whenever
you desire with no adverse affect on the
battery pack.
5.
Foreign materials of a conductive
nature such as, but not limited to, steel
wool, aluminum foil, or any buildup of
metallic particles should be kept away
from charger cavities. Always unplug the
charger from the power supply when there
is no battery pack in the cavity. Unplug
charger before attempting to clean.
6. Do not freeze or immerse charger in
water or any other liquid.
WARNING: SHOCK HAZARD.
Do not allow any liquid to get inside
charger.
NEVER ATTEMPT TO OPEN THE
BATTERY PACK FOR ANY REASON. IF
THE PLASTIC HOUSING OF THE
BATTERY PACK BREAKS OR CRACKS,
RETURN TO A SERVICE CENTER FOR
RECYCLING.
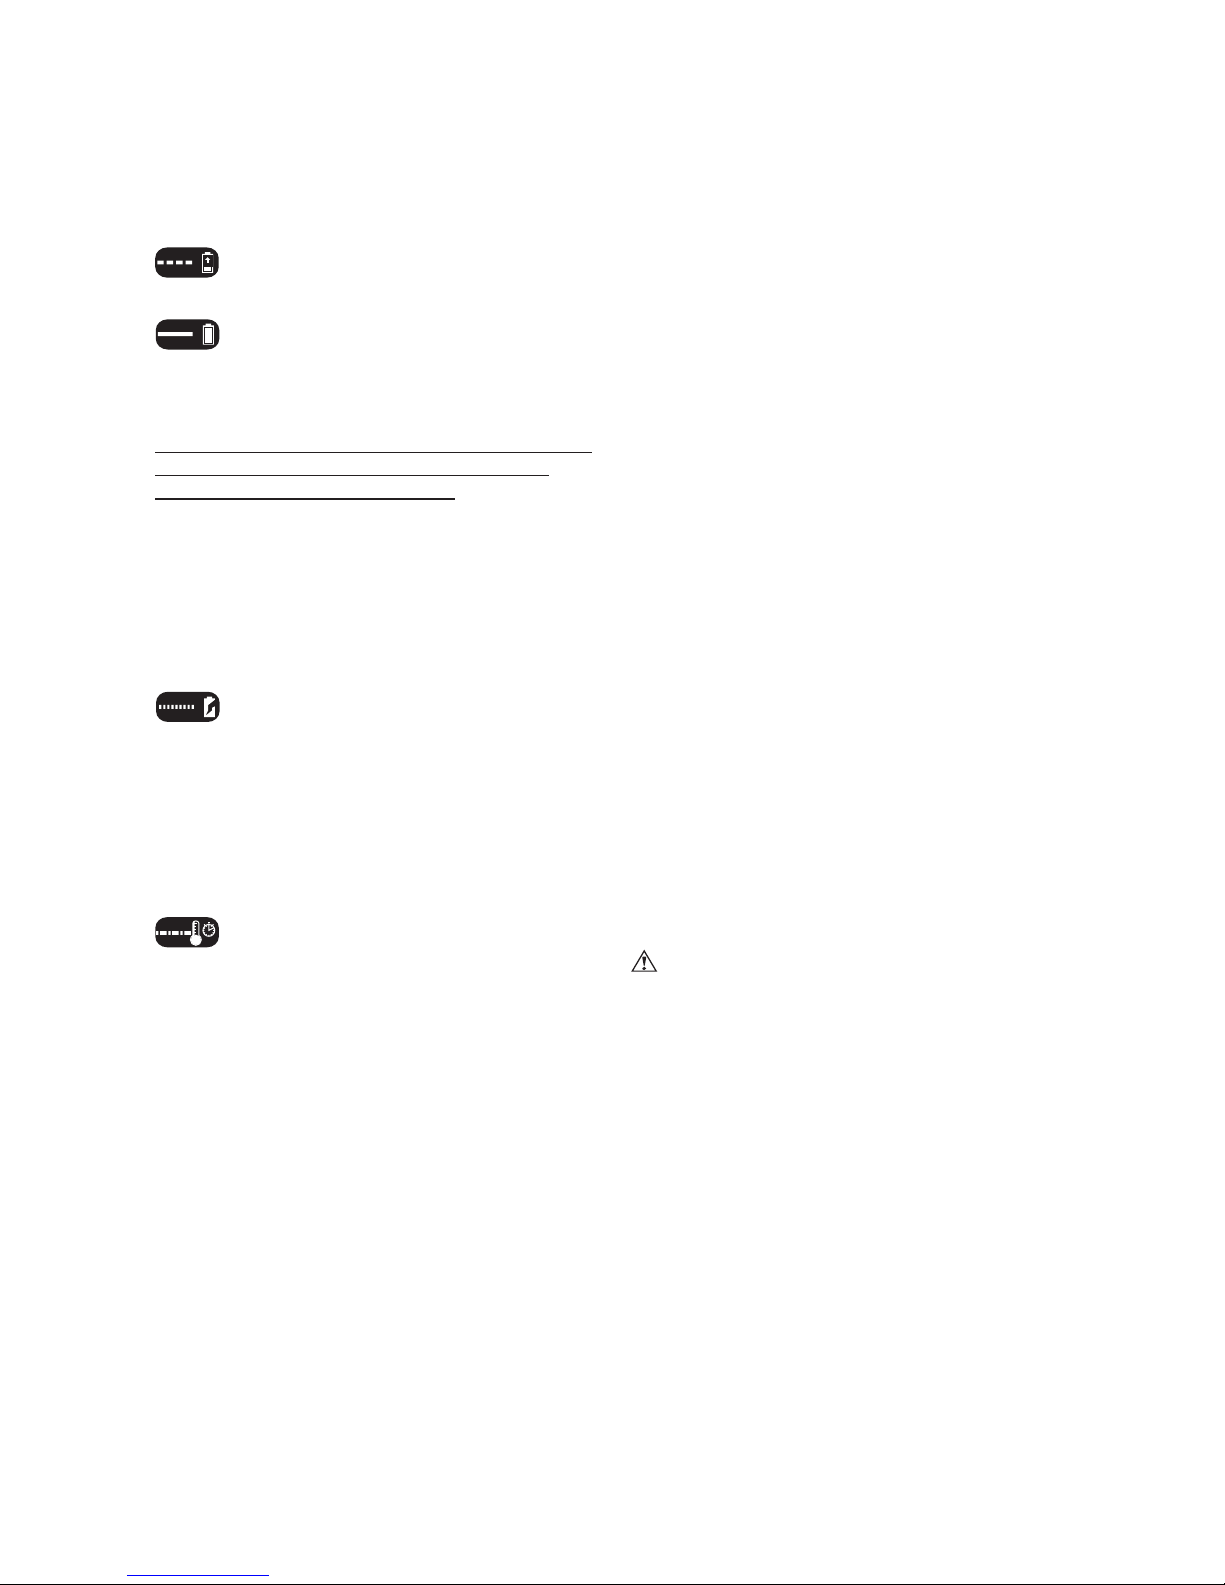
BATTERY STATE OF
CHARGE INDICATOR
The side of the battery is equipped with a state
of charge indicator. This can be used to display
the current level of charge in the battery during
use and during charging. It does not indicate
tool functionality and is subject to variation
based on product components, temperature
and end-user application.
CHECKING STATE OF CHARGE DURING USE:
• Press the state of charge indicator
button (A1).
• The three LED’s (A2) will illuminate
indicating the percent of charge in the
Page 9

9
FUNCTIONAL DESCRIPTION
1. Switch box
2. Bail handle
3. Upper-handle
4. Lower-handle
5. Upper-handle attachments (2)
6. Lower-handle attachments (2)
7. Cut height adjust lever
8. Grass collection bag
9. Rear door cover
10. Dashboard
11. POWERSWAP
TM
12. Battery port
13. Upper carrying handle
14. Lower carrying handle
battery. See chart in figure A.
• If LED light does not illuminate, charge
battery.
NOTE:
This battery is designed to not
operate when a charge below 20% of
its capacity is reached. After the battery
charge is depleted, the tool will not operate
until after the battery has been recharged.
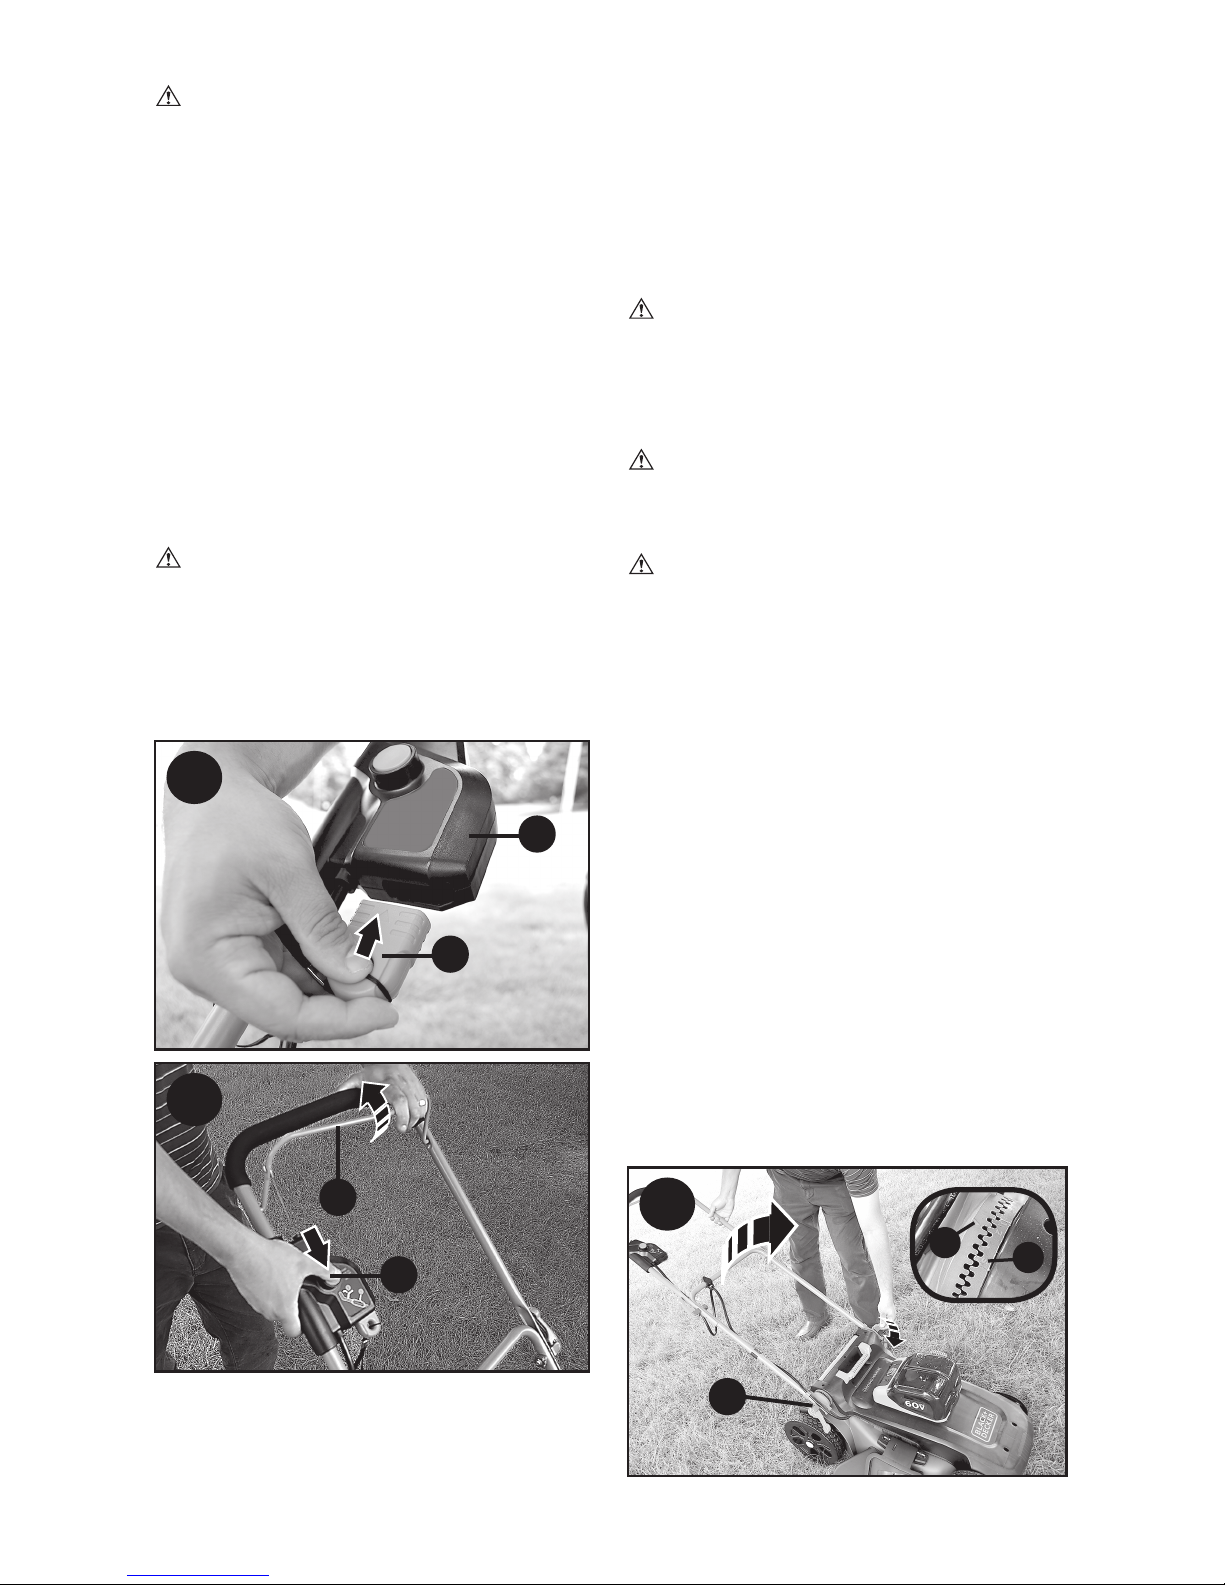
INSTALLING AND REMOVING
THE BATTERY PACKS
WARNING: MAKE CERTAIN THE
SAFETY KEY IS REMOVED TO PREVENT
ACTUATION BEFORE REMOVING OR
INSTALLING BATTERY.
TO INSTALL BATTERY PACKS:
• Lift and hold the battery port cover (12)
up to expose the battery port (15).
• Slide the battery (16) into the battery
port until it is fully seated and an audible
click is heard (figure B). Make sure
battery pack is fully seated and fully
latched into position. Repeat process
for the second battery port.
•
Close the battery port cover. Ensure the
cover is fully latched before starting mower.
TO REMOVE BATTERY PACK:
• Open the battery port cover (12) as
described above.
• Depress the battery release button (17)
on the battery pack and pull battery
pack out of tool as shown in figure C.
10
11
2
3
4
1
5
9
8
5
6
6
14
7
12
13
A
A1
A1
Page 10
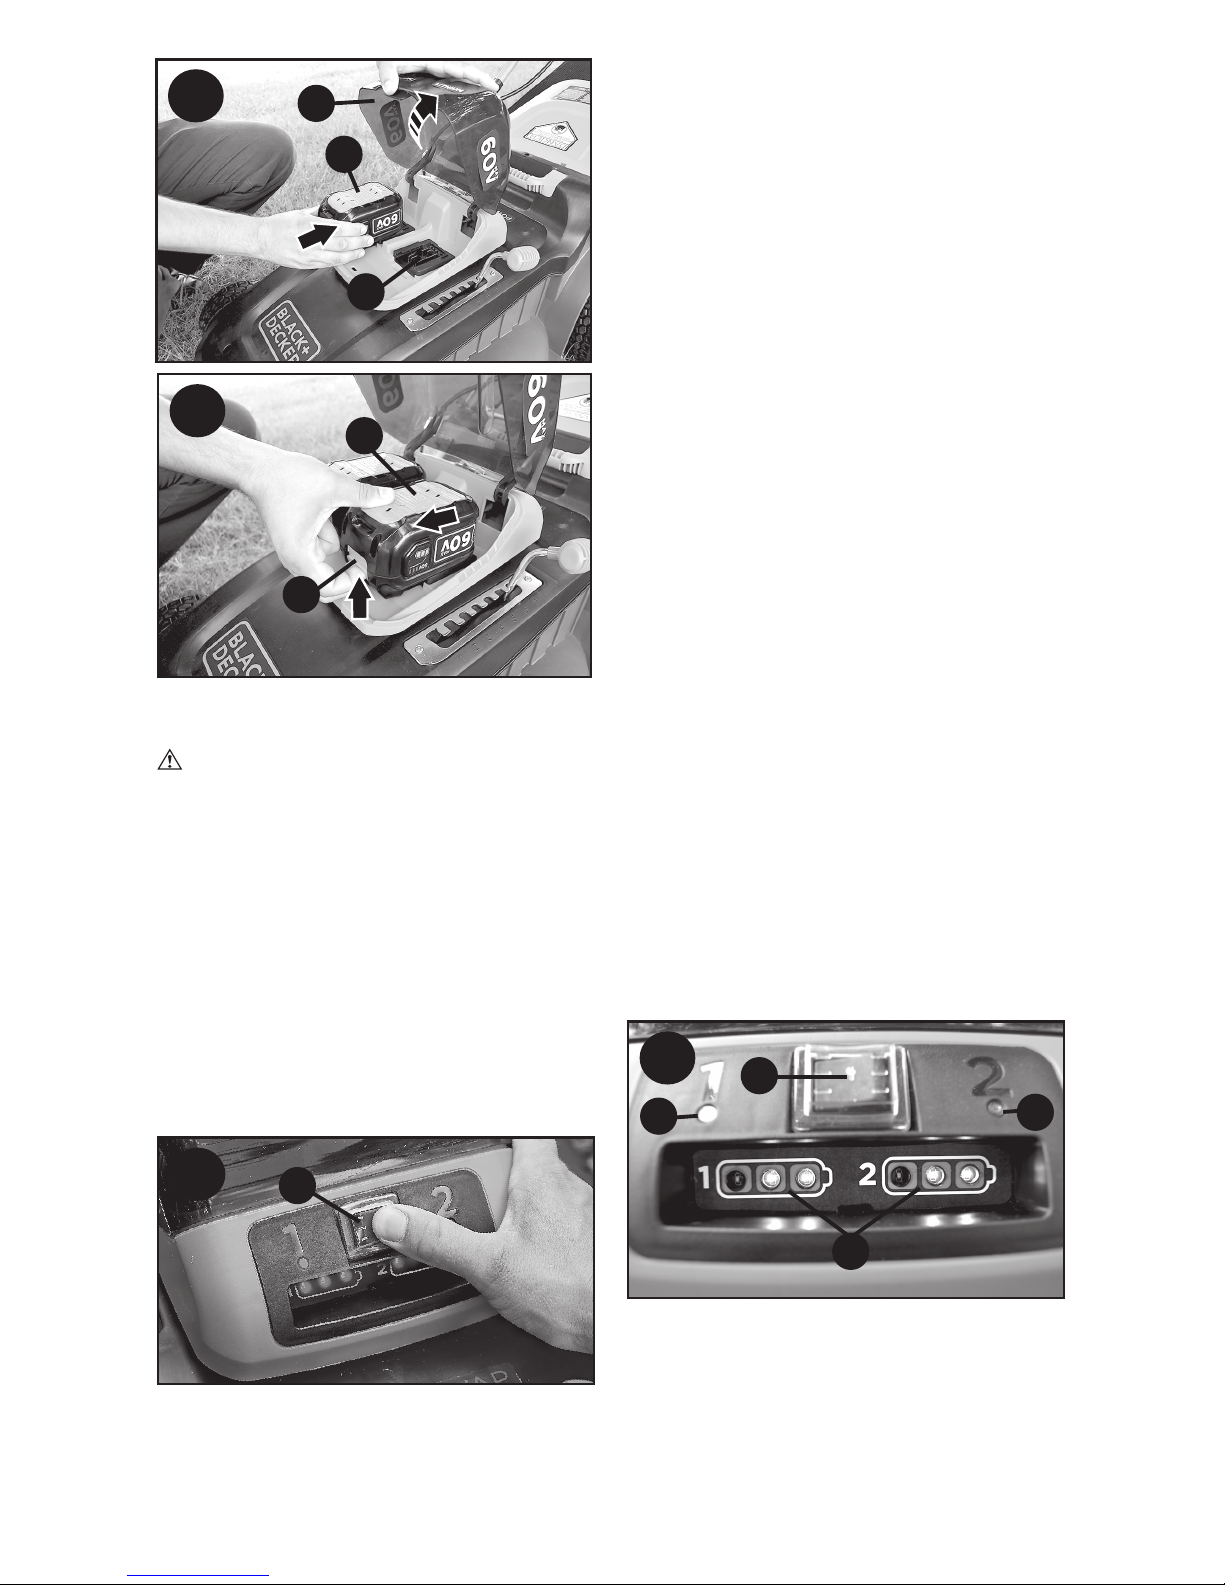
SELECTING BATTERY PACK
WARNING: MAKE CERTAIN THE
SAFETY KEY IS REMOVED TO PREVENT
ACTUATION BEFORE SELECTING
ACTIVE BATTERY.
The mower is equipped with a
POWERSWAPTM button (11). Press the
battery selection button (figure D) on the
left or right.
• The side marked “1” activates the left
side battery port.
• The side marked “2” activates the right
side battery port.
NOTE: The mower can be operated with
a single battery pack if the switch is in the
proper position.
ACTIVE BATTERY, STATE
OF CHARGE INDICATORS
NOTE:
State of charge is only indicated
when a battery pack is inserted, or when
the mower is turned on, or when a single
battery is present and the switch is
toggled to connect it to run the mower.
This mower is equipped with a state of
charge indicator located on the base of
the dashboard (10). This is used to display
the active battery port and the current
level of charge in the active battery. When
a battery pack is installed into the battery
ports, the three charge level LEDs will
illuminate for 30 seconds displaying the
current level of charge in the battery and
then turn off. While the mower is in use the
current level of charge for the selected,
active battery will be displayed.
•
When the mower is first activated,
all of the LED indicator lights on
the dashboard (10) will temporarily
illuminate.
• The dashboard LED lights on the
inactive battery side will turn off.
• The dashboard LEDs on the active
battery side LED (17) will remain lit and
the three charge level indicator LEDs
(18) will indicate the percent of charge
in the battery. (See chart in figure A.)
• If no LEDs illuminate for the active
battery, toggle the POWERSWAPTM
button (11) to the inactive battery. If
neither battery LEDs illuminate, charge
the battery.
NOTE: The safety key has to be inserted
for all of the LEDs and switch functions to
occur as described.
10
B
15
12
C
16
E
11
D
11
17
16
18
17
17
Page 11
11
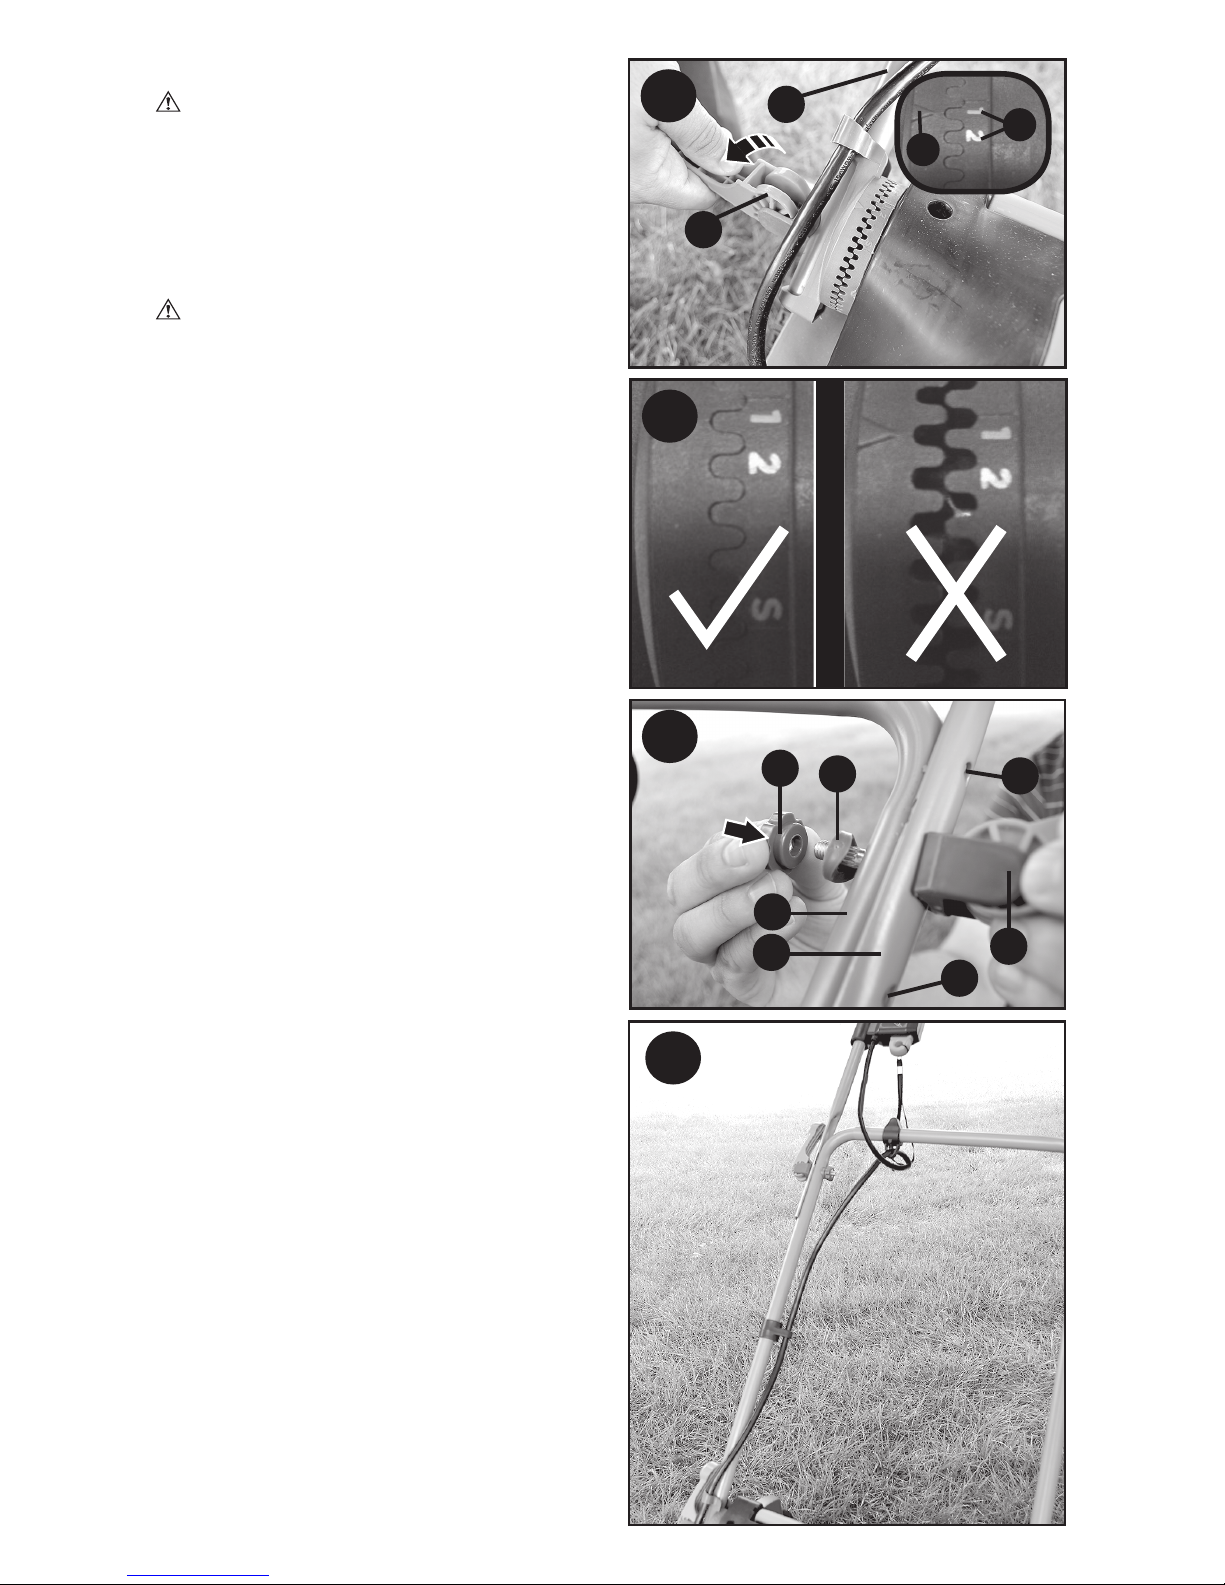
ASSEMBLY
WARNING: Before assembly,
make sure the bail handle is released and
the safety key is removed.
ATTACHING LOWER HANDLE
•
Lift lower handle (4) into place making
sure the arrow (19) on the base of the
mower lines up with 1, 2, or S on the base
of the handle (20) (inset of Figure F)
CAUTION: Ensure each side of the
lower handle is set on the same number.
The arrow must be lined up with
1, or 2
for
operation.
• Close the lower handle height adjust
levers (6) as shown in Figure F. As you
close each, make sure the teeth are
engaged as shown in Figure G.
• If the connection between the handle
and lever is too tight or loose, open the
lever and adjust the depth of the lever
by turning the lever. Close it again until
the teeth are fully clasped and each
lever stays securely closed.
ATTACHING UPPER HANDLE (Figure H)
The upper handle has three different
mounting positions holes (21) to adjust
length of the handle from deck. The
first set of holes near the bottom of the
upper handle tube allows for maximum
handle length. Using the middle and top
mounting positions will shorten handle
length.
• Remove the upper-handle attachment
levers (5), nuts (22), and washers (23)
from the handle.
• Line up the holes on the bottom of the
upper handle (3) with the holes on the
top of the lower handle (4).
NOTE: Make sure the cord is located
on the front of both handles as shown in
Figure I. If it is not it may result in the cord
tangling and the inability to easily store
the mower.
• From the outside of the upper handle
(3), slide the lever bolt (5) through the
mounting positions holes (21).
• Slide the washer over the bolt and
loosely assemble the entire assembly
with the nut.
• Rotate the upper handle (3) into its
operating position.
• Close the lever. If the lever is too tight
or too loose, open the lever and loosen/
tighten the nut to adjust the clamping
force. Check the levers by closing
them. They should be tight enough so
the handles are held firmly, but loose
enough so the levers can be fully
closed.
H
5
23
4
3
G
F
4
20
19
I
6
21
21
22
Page 12
MULCHING
DANGER: REMOVE KEY AND
BATTERY PACKS BEFORE REMOVING
SIDE DISCHARGE ATTACHMENT AND
COLLECTION BAG, AND WHEN
INSTALLING MULCHING INSERT.
• Ensure the side discharge attachment
(26) and the collection bag (8) are not
attached.
• Lift the rear door cover (9) and slide the
mulching insert (27) fully into the mower
as shown in Figure L.
• Ensure the rear door cover fully closes
before turning mower on.
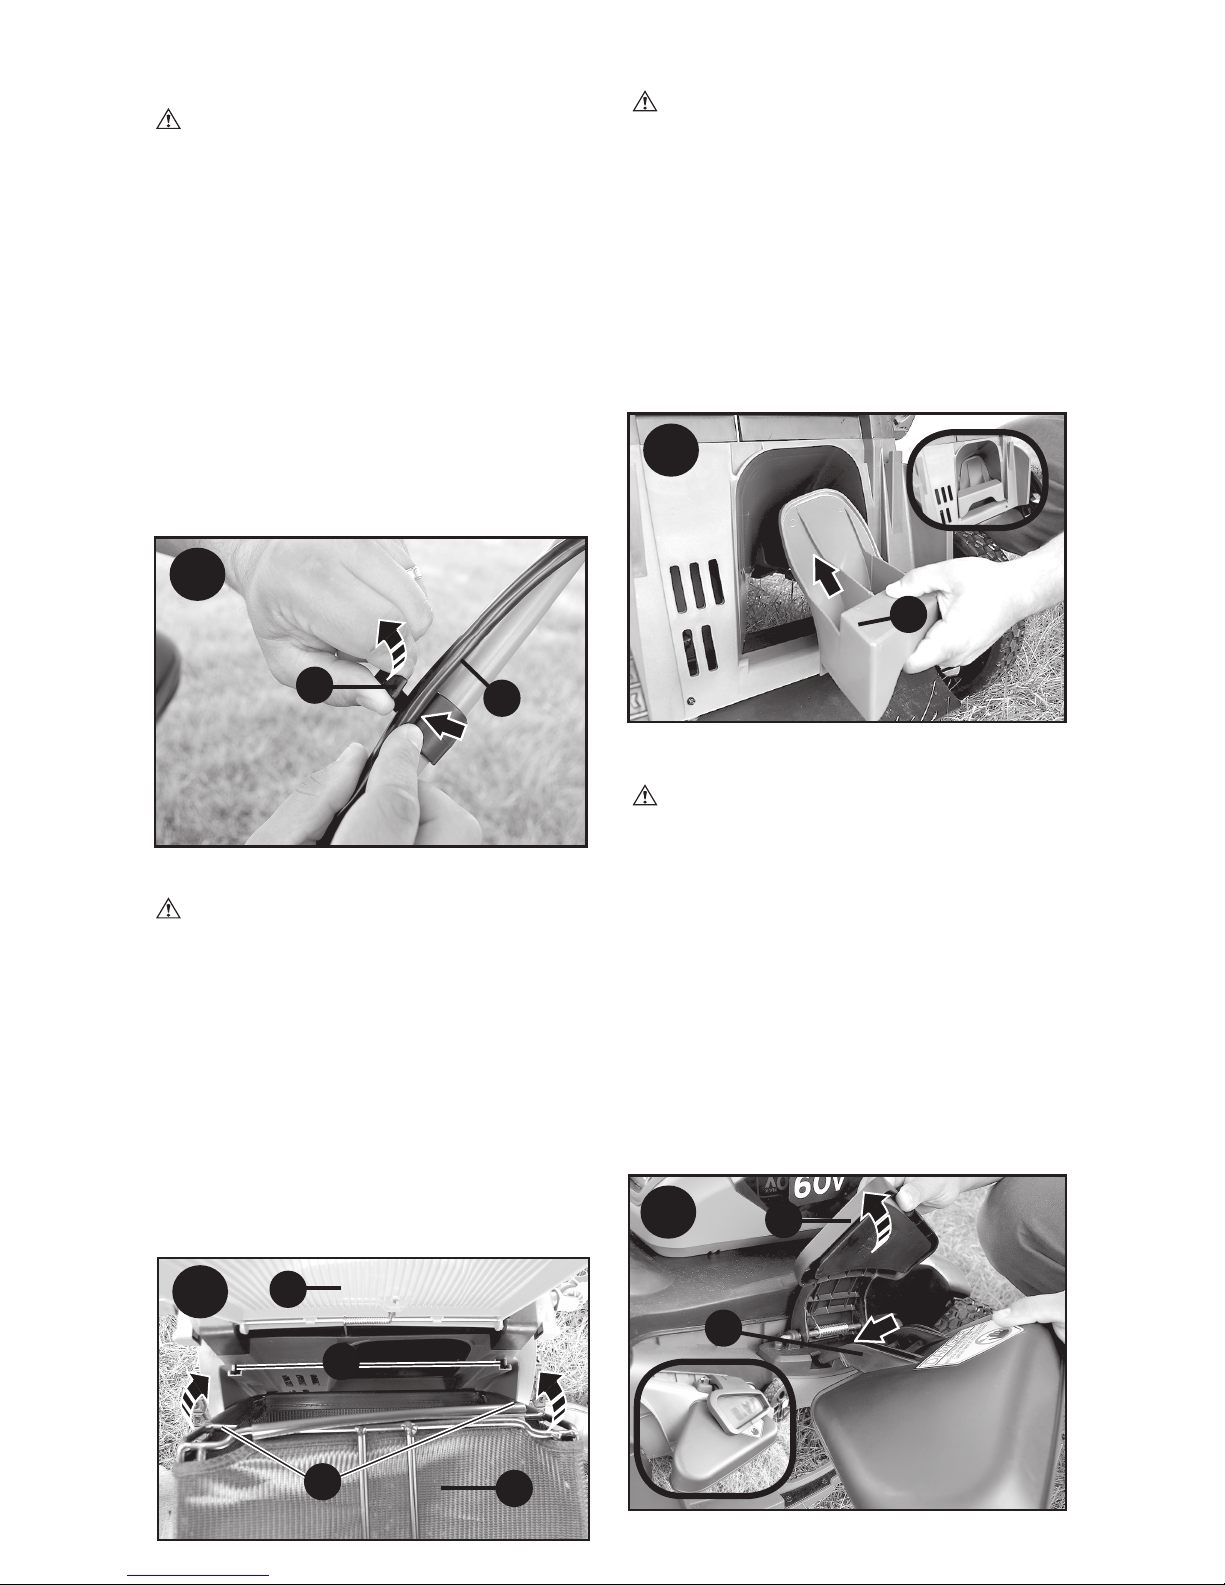
SIDE DISCHARGE
DANGER: REMOVE KEY AND
BATTERY PACKS BEFORE REMOVING
COLLECTION BAG, AND WHEN
INSTALLING MULCHING INSERT AND
SIDE DISCHARGE ATTACHMENT.
• Ensure the collection bag (8) is removed.
• Lift the rear flap (9) and slide the
mulching insert (27) fully into the mower
as shown in Figure L.
• Lift the side flap (30) and hook side
discharge attachment (26) onto the
mower as shown in Figure M.
• Release the side flap and ensure
the attachment holds in place before
turning mower on as shown in the insert
of Figure M.
12
SECURING THE MOTOR CABLE
(FIGURE J)
CAUTION: ATTACH CABLE SO
THAT IT DOES NOT BECOME
STRETCHED OR PINCHED IN THE
JOINTS OF THE HANDLES DURING USE
OR FOLDING. THIS CAN CAUSE
DAMAGE TO THE CORD.
The motor cable (24) has to be fixed to
the handles using the cable restraints (25)
that are already attached to the handle.
To clip the cable to the handle:
• Place the handles in operating position,
see “Attaching Lower Handle” section.
• Run the cable up the front of the lower
and upper handles.
• Pull back the cable restraint.
• Slide the motor cable under the clip
and ensure it is fully held in place by
the restraint.
BAGGING
DANGER: REMOVE KEY AND
BATTERY PACKS BEFORE REMOVING
SIDE DISCHARGE ATTACHMENT AND
MULCHING INSERT, AND WHEN
OPENING REAR DOOR COVER AND
INSTALLING BAG
• Ensure the side discharge attachment
(26) (Figure M) and the mulching insert
(27) (Figure L) are removed from the
mower before bagging.
• Lift the rear door cover (9) and place the
grass collection bag (8) onto the mower
so the bag hooks (28) rest on the lugs
(29) as shown in Figure K. Then lower
the rear door cover.
J
23
25
8
9
K
28
29
M
30
26
27
L
Page 13
13
OPERATION
READ THIS INSTRUCTION MANUAL
BEFORE OPERATING YOUR MOWER.
See “Functional Description” to
familiarize yourself with the location of
various controls and adjustments. Save
this manual for future reference.
DANGER: Sharp moving blade.
Do not operate the mower in side discharge
or mulching mode if the rear door is not
closed under spring tension as serious
injury could result. Take your mower to the
nearest service center for repair.
DANGER: Sharp moving blade.
Never operate the mower in bagging
mode unless the hanger hooks on the
grass catcher are seated properly on the
mower and the rear discharge door rests
firmly against the top of the grass catcher
as serious injury could result.
WARNING: Let the mower work at
its own pace. Do not overload.
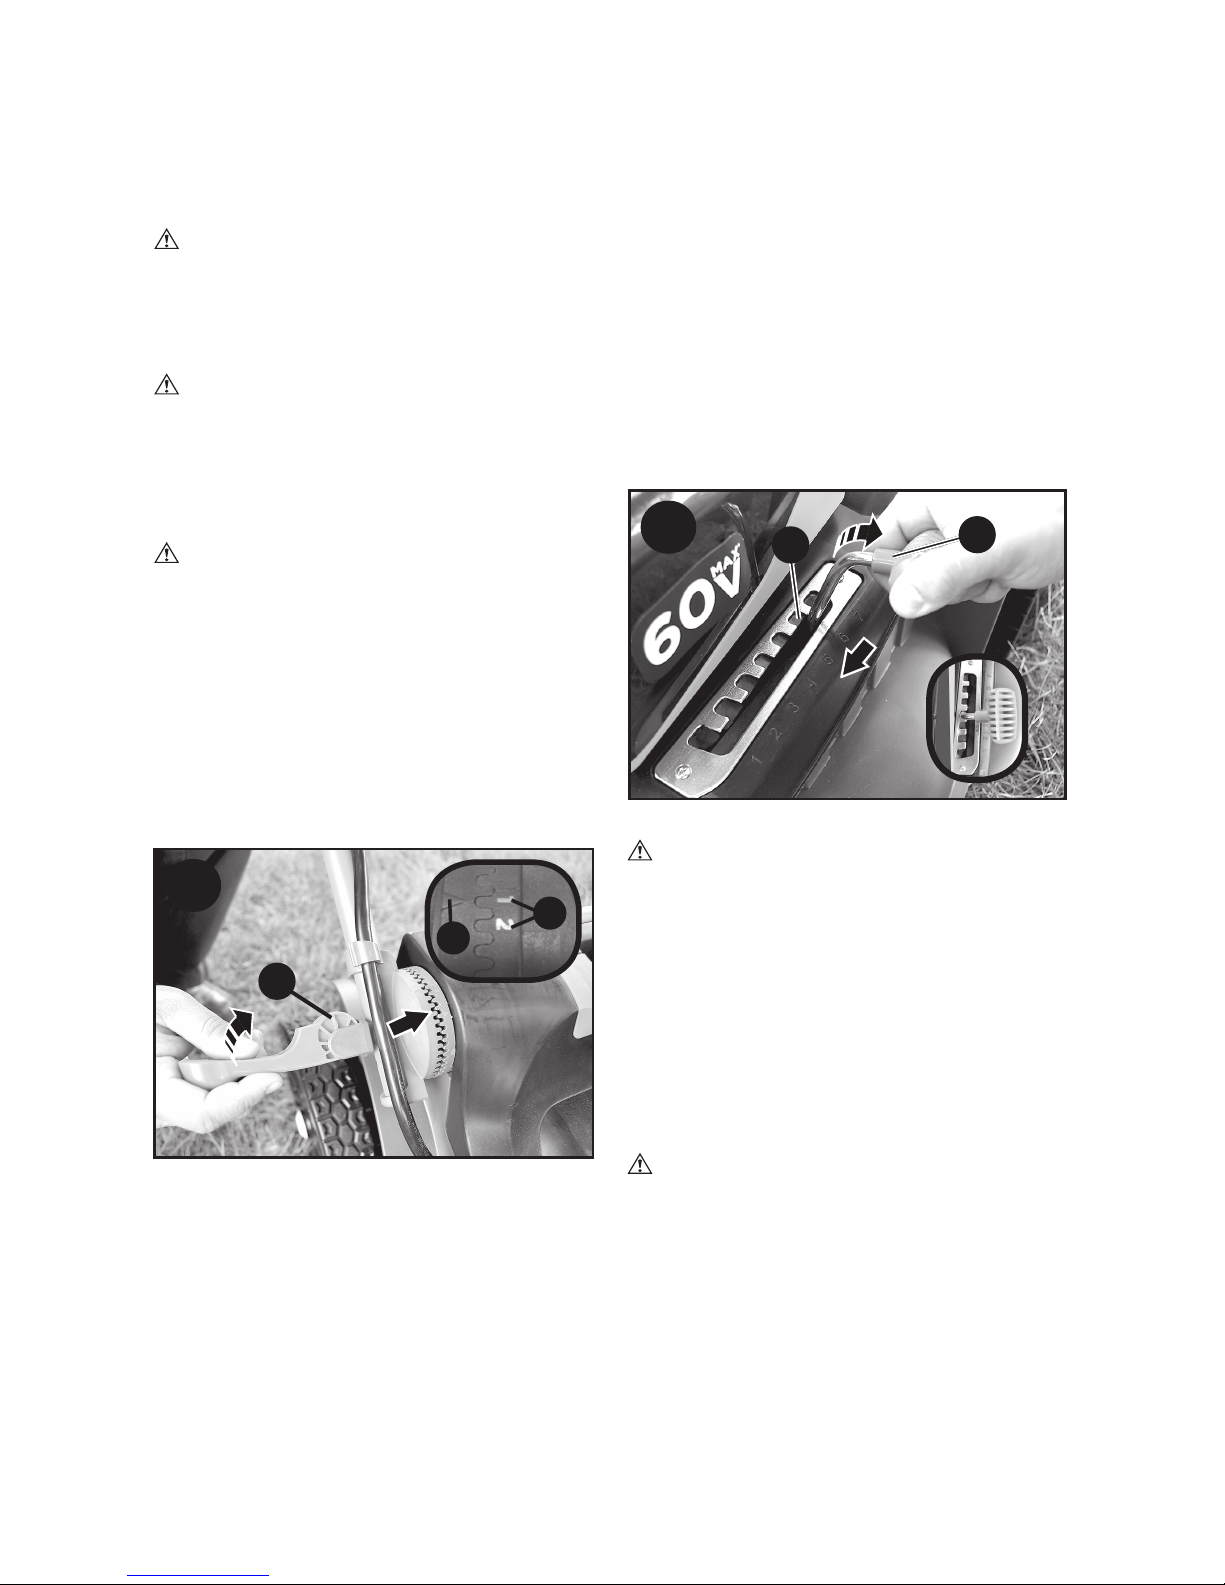
ADJUSTING HANDLE HEIGHT (FIGURE N)
• Open both lower-handle attachment
levers (6).
• Adjust the handle so the arrow (19) on
the base of the mower lines up with 1, or
2 on the base of the handle (20). Ensure
the handle is set to the same number on
both sides of the mower.
• Close both levers and ensure the handle
is firmly latched.
ADJUSTING MOWER HEIGHT (FIGURE O)
The height of cut is adjusted by the
central cut height adjust lever, there are
seven positions to choose from.
NOTE: If you are not sure which height
to cut, begin mowing with the height
adjustment lever (7) in position seven and
adjust the height down as needed, as
shown in figure O.
To set the height of cut
• Pull the mower height adjustment lever
(7) out of the locking notch (31).
• Move the lever towards the rear of the
appliance to raise the height of cut.
• Move the lever towards the front of the
appliance to lower the height of cut.
• Push the height adjustment lever into
one of the seven locking notches.
SAFETY KEY
DANGER:
SHARP MOVING BLADE.
In order to prevent accidental start-up
or unauthorized use of your Cordless
Mower, a removable safety key (32) has
been incorporated into the design of your
mower. The mower will be completely
disabled when the safety key has been
removed from the mower.
NOTE: THE SAFETY KEY HAS A
HOLE IN THE CENTER TO ALLOW
FOR STORAGE ON A NAIL, OUT OF
THE REACH OF CHILDREN. DO NOT
TETHER SAFETY KEY TO MOWER.
DANGER:
ROTATING BLADES CAN
CAUSE SERIOUS INJURY. TO PREVENT
SERIOUS INJURY, REMOVE SAFETY KEY
WHEN UNATTENDED, OR WHEN CHARGING,
CLEANING, SERVICING, TRANSPORTING,
LIFTING, OR STORING MOWER.
N
6
O
20
19
31
7
Page 14
14
AUTOSENSE™ TECHNOLOGY
AUTOSENSE™
Technology senses
the grass thickness and adjusts power
accordingly. In lighter grass the mower
will run at a normal speed to extend
runtime. In thick grass it will increase
power, making it easier to cut through the
thicker grass.
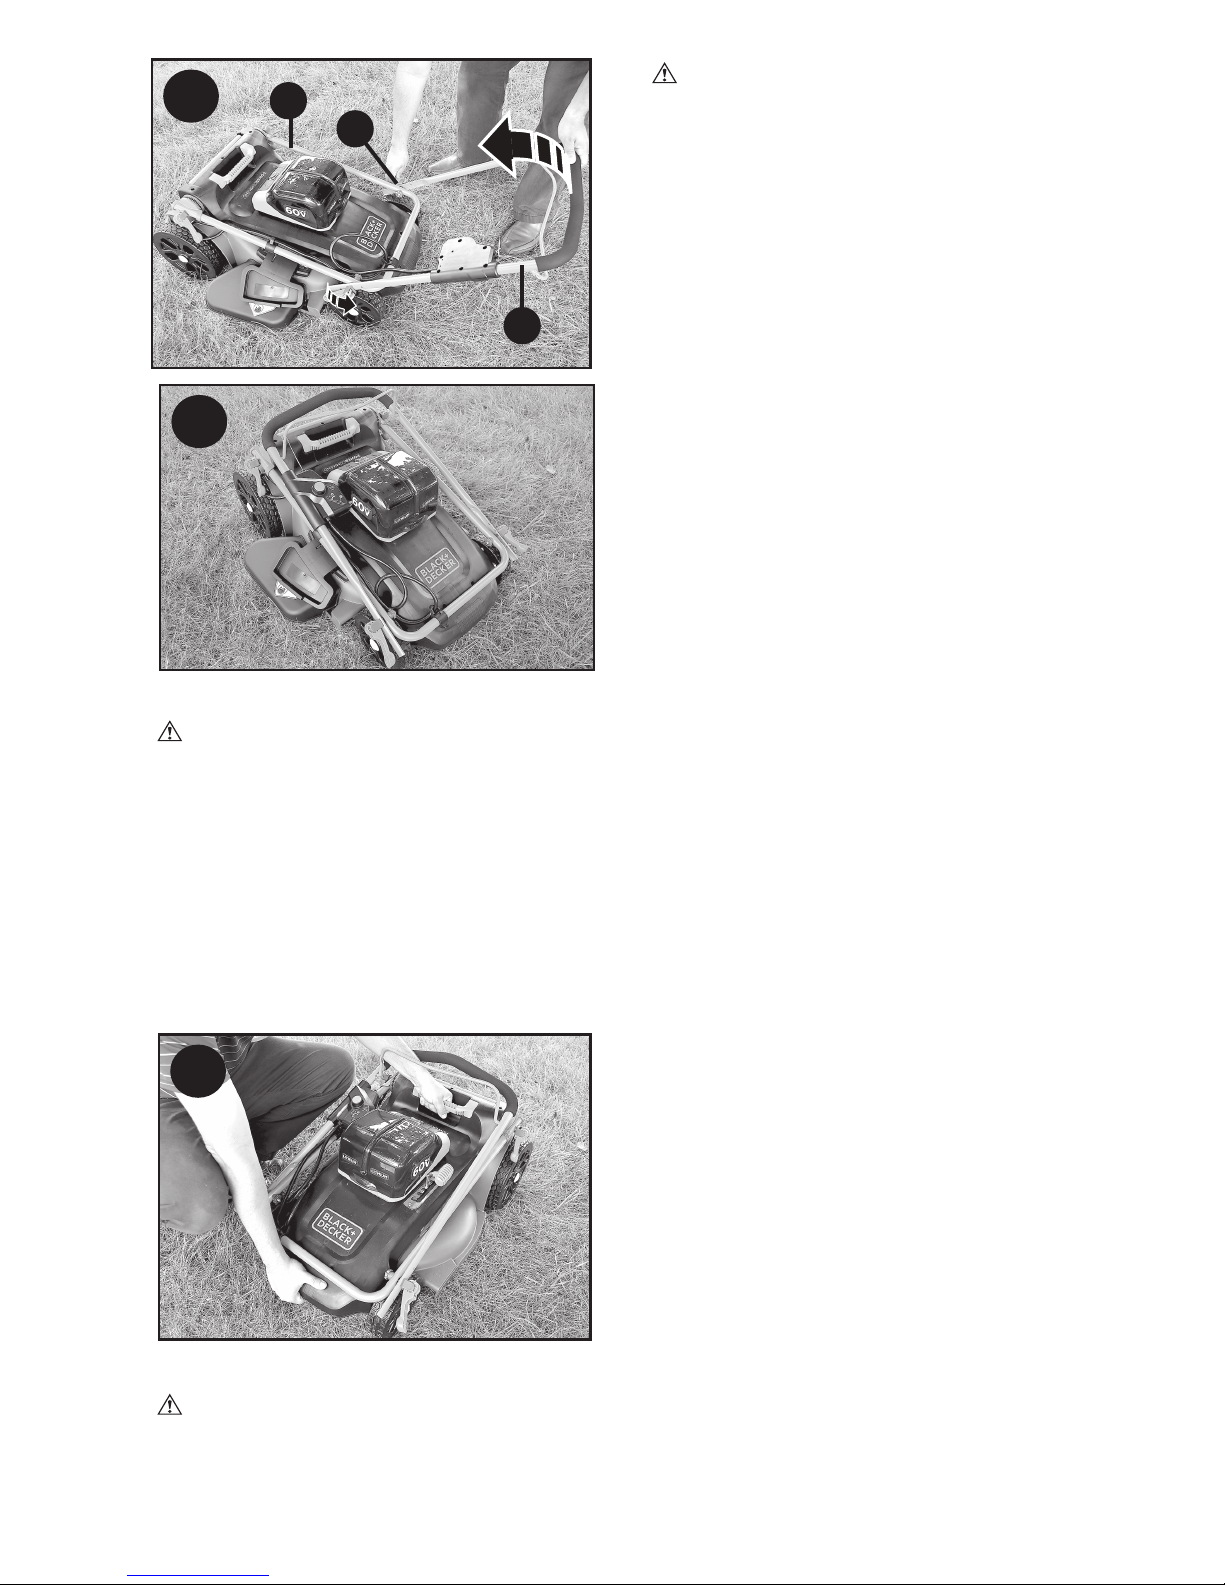
STORAGE
WARNING: Rotating blade can
cause serious injury. Release BAIL
HANDLE (2) to turn mower off, remove
safety key, and remove battery before
lifting, transporting, or storing the mower.
Store in a dry place.
CAUTION: PINCH POINT. TO
AVOID BEING PINCHED, KEEP FINGERS
AWAY FROM AREA BETWEEN HANDLES
WHEN FOLDING DOWN HANDLES.
CAUTION: MAKE SURE CORD
DOES NOT BECOME STRETCHED OR
PINCHED IN THE JOINTS OF THE
HANDLES DURING FOLDING. THIS CAN
CAUSE DAMAGE TO THE CORD.
The handle of the mower can be easily
folded down for quick and convenient
storage.
• Holding onto the handle, open, but
do not remove, the lower-handle
attachment levers (6) and fold the
handle to the front of the mower as
shown in Figure R.
• Adjust the handle so the arrow (19) on
the base of the mower lines up with “S”
(20). Ensure the handle is set the same
on both sides of the mower.
• Close both levers and ensure the handle
is firmly latched.
• Open, but do not remove, the upperhandle attachment levers (5) and fold
the upper handle (3) back over the
lower handle (4) as shown in Figure S.
• The mower should be compacted down
as shown in Figure T.
STARTING MOWER
DANGER:
SHARP MOVING
BLADE. NEVER ATTEMPT TO OVERRIDE
THE OPERATION OF THIS SWITCH BOX
AND SAFETY KEY SYSTEM AS SERIOUS
INJURY COULD RESULT.
NOTE:
Mower is operational when battery
and safety key are installed.
• Insert safety key (32) into the switch
housing (1) until it is fully seated inside
housing as shown in Figure P. The
mower is now operational.
•
Your mower is equipped with a special
on-off switch box. To operate the mower,
push and hold the button (33) on the switch
box (1), then pull the bail handle (2) to the
handlebar as shown in Figure Q. Once the
mower starts you can release the button.
• To turn the mower off, just release the
bail handle.
WARNING: Never attempt to lock a
switch or bail handle in the on position.
NOTE: Once the bail handle has returned
to the original position it will activate
the “Automatic Braking Mechanism”.
The motor is electrically braked and the
mower blade will stop rotating in three
seconds or less.
MOWER OVERLOAD
To prevent damage due to overload
conditions, do not try to remove too much
grass at one time. Slow down your cutting
pace, or raise the cut height.
P
32
Q
2
33
R
6
20
19
1
Page 15
15
CARRYING THE MOWER
DANGER: ROTATING BLADES
CAN CAUSE SERIOUS INJURY. TO
PREVENT SERIOUS INJURY, REMOVE
SAFETY KEY AND BATTERY PACKS
WHEN UNATTENDED, OR WHEN
CHARGING, CLEANING, SERVICING,
TRANSPORTING, LIFTING, OR
STORING MOWER.
• The mower can be carried using the
convenient carry handles (13, 14) as
shown in Figure U. DO NOT attempt
to lift the mower by grasping the upper
handle (3) or lower handle (4).
MOWING TIPS
WARNING: ALWAYS INSPECT
AREA WHERE MOWER IS TO BE
USED AND REMOVE ALL STONES,
STICKS, WIRE, BONES, AND OTHER
DEBRIS WHICH MIGHT BE THROWN
BY THE ROTATING BLADE.
1. WARNING: Mow across the face
of slopes, never up-and-down. Exercise
extreme caution when changing
direction on slopes. Do not mow
excessively steep slopes. Always
maintain good footing.
2. Release bail handle to turn mower
“OFF” when crossing any gravel area
(stones can be thrown by the blade).
3. Set mower at highest cutting height
when mowing in rough ground or in
tall weeds. Removing too much grass
at one time can cause the motor to
be overloaded and to stop. Refer to
troubleshooting guide.
4.
If a grass collection bag (8) is used
during the fast growing season, the grass
may tend to clog up at the discharge
opening. Release bail handle to turn
mower off and remove the safety key.
Remove the catcher and shake the grass
down to the back end of the bag. Also
clean out any grass or debris which
may be packed around the discharge
opening. Replace the grass catcher.
5. If mower should start to vibrate
abnormally, release bail handle to turn
mower off and remove safety key. Check
immediately for cause. Vibration is a
warning of trouble. Do not operate mower
until a service check has been made.
Refer to troubleshooting guide in manual.
6. ALWAYS RELEASE BAIL HANDLE
TO TURN MOWER OFF AND
REMOVE SAFETY KEY WHEN
LEAVING IT UNATTENDED EVEN
FOR A SHORT PERIOD OF TIME.
THE FOLLOWING SUGGESTIONS WILL
HELP YOU TO OBTAIN OPTIMUM RUN
TIME FROM YOUR CORDLESS MOWER:
1. Slow down in areas where the grass is
especially long or thick.
2. Avoid mowing when the grass is wet
from rain or dew-soaked.
3. Cut your lawn frequently, especially
during high growth periods.
NOTE: IT IS RECOMMENDED THAT
YOUR MOWER BE RECHARGED
AFTER USE TO PROLONG THE
BATTERY LIFE. FREQUENT CHARGING
WILL NOT HARM YOUR BATTERY,
AND WILL ENSURE THAT THE
BATTERY IS FULLY CHARGED AND
READY FOR ITS NEXT USE. STORING
BATTERY NOT FULLY CHARGED WILL
SHORTEN BATTERY LIFE.
S
5
3
4
T
U
Page 16

16
REMOVING AND INSTALLING
BLADE
DANGER: RISK OF INJURY.
WHEN REASSEMBLING THE BLADE
SYSTEM, ENSURE EACH PART IS
REINSTALLED CORRECTLY, AS
DESCRIBED BELOW. IMPROPER
ASSEMBLY OF THE BLADE OR OTHER
PARTS OF THE BLADE SYSTEM MAY
CAUSE SERIOUS INJURY.
1. WARNING: RELEASE BAIL
HANDLE TO TURN MOWER OFF,
WAIT FOR THE BLADE TO STOP, AND
REMOVE SAFETY KEY AND BATTERY
PACKS.
2. Cut a piece of 2x4 wood (34) (about
2 feet long) (610 mm) to keep blade
from turning while removing bolt (35).
3. WARNING: Wear gloves and
proper eye protection. Turn the mower
on its side. Be careful of sharp edges
of blade. Position wood and unscrew
bolt counterclockwise with a 1/2”
(13mm) wrench (36) as shown in
Figure V.
4. Remove bolt (35) and washer (37). Pull
off blade (38) as shown in Figure W.
The fan (39) should not be removed.
Examine all pieces for damage and
replace if necessary.
5. The blade can only be attached to the
fan in one direction. To reassemble,
line up the D-shaped hole of the blade
with the D-shaped post of the fan,
ensuring the writing on the blade faces
out away from the mower.
6. To tighten, position the piece of wood
as shown in Figure X to keep the
blade from turning. Slide the bolt
through the washer and tighten the
bolt clockwise into place with a 1/2”
(13mm) wrench (36) as shown in
Figure X.
BLADE SHARPENING
KEEP BLADE SHARP FOR BEST MOWER
PERFORMANCE. A DULL BLADE DOES
NOT CUT GRASS CLEANLY.
WARNING: USE PROPER EYE
PROTECTION WHILE REMOVING,
SHARPENING, AND INSTALLING BLADE.
ENSURE THAT SAFETY KEY AND
BATTERY PACK IS REMOVED.
Sharpening the blade twice during a
mowing season is usually sufficient under
normal circumstances. Sand causes the
blade to dull quickly. If your lawn has
sandy soil, more frequent sharpening may
be required.
REPLACE BENT OR DAMAGED BLADE
IMMEDIATELY.
W
37
35
38
39
X
V
34
35
36
34
35
36
Page 17
17
LUBRICATION
No lubrication is necessary. Do not oil
the wheels. They have plastic bearing
surfaces which require no lubrication.
CLEANING
Release bail handle (2) to turn mower off,
let the blade come to a stop and then
remove safety key. Use only mild soap
and a damp cloth to clean the mower.
Clean out any clippings which may
have accumulated on the underside of
the deck. After several uses, check all
exposed fasteners for tightness.
PREVENTING CORROSION
Fertilizers and other garden chemicals
contain agents which greatly accelerate
the corrosion of metals. If you mow in
areas where fertilizers or chemicals have
been used, the mower should be cleaned
immediately afterward as follows:
Release bail handle (2) to turn mower off
and remove safety key and battery. Wipe
all exposed parts with a damp cloth.
CAUTION: DO NOT POUR OR
SPRAY WATER ON THE MOWER IN AN
ATTEMPT TO CLEAN IT. Do not store the
tool on or adjacent to fertilizers or
chemicals. Such storage can cause rapid
corrosion.
MEETS CPSC SAFETY
REQUIREMENTS
BLACK+DECKER Mowers conform to
the safety standards of the American
National Standards Institute, and the U.S.
Consumer Product Safety Commission.
The Blade turns when the motor is running.
MAINTENANCE
IMPORTANT: To assure product SAFETY
and RELIABILITY, repairs, maintenance
and adjustment (including brush
inspection and replacement) should
be performed by BLACK+DECKER
Service Centers or other qualified
service organizations, always using
BLACK+DECKER replacement parts.
When servicing use ONLY IDENTICAL
REPLACEMENT PARTS.
WHEN SHARPENING THE
BLADE:
1. Make sure blade remains balanced.
2. Sharpen blade at the original cutting
angle.
3. Sharpen cutting edges on both ends
of blade, removing equal amounts of
material from both ends.
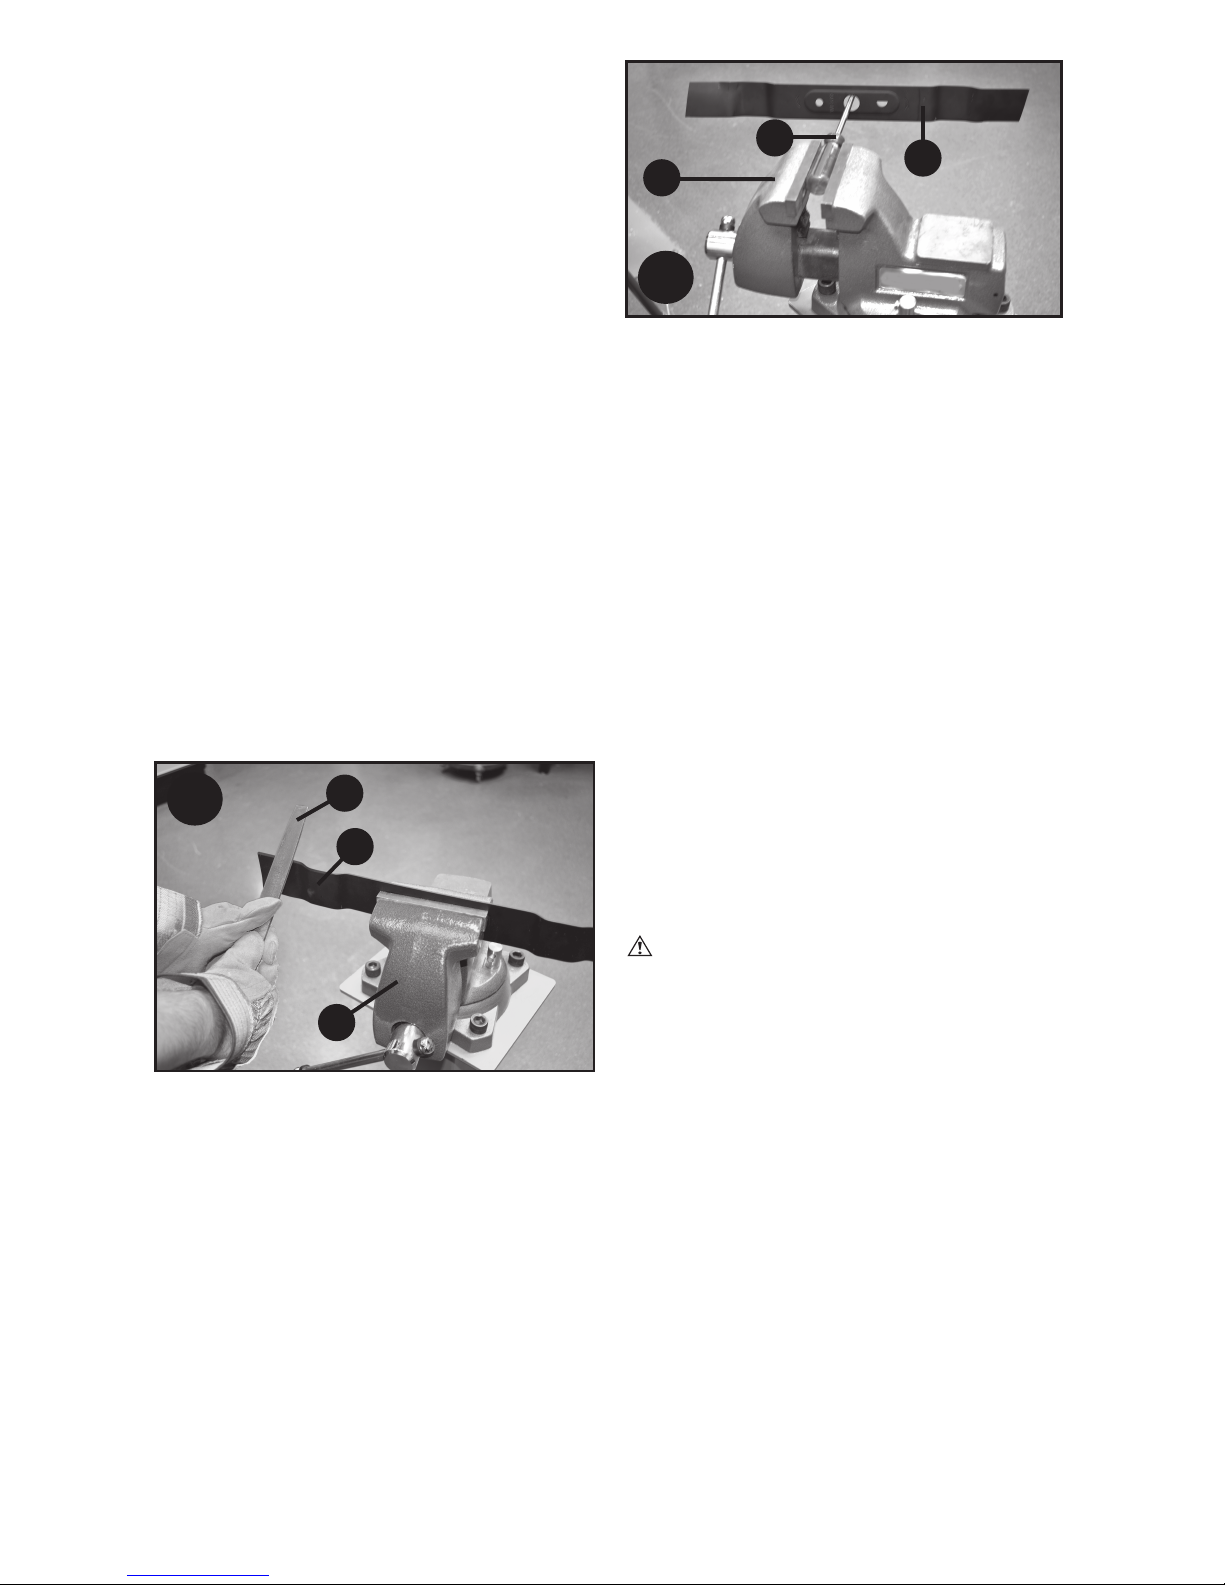
TO SHARPEN BLADE IN A VISE:
(Figure Y)
1. Be sure the bail handle is released,
the blade has stopped and safety key
and battery packs are removed before
removing the blade.
2. Remove blade from mower. See
instructions for removing and installing
blade.
3. Secure blade (38) in a vise (40).
4. Wear proper eye protection and gloves
and be careful not to cut yourself.
5. Carefully file the cutting edges of
the blade with a fine tooth file (41)
or sharpening stone, maintaining the
angle of the original cutting edge.
6. Check balance of blade. See
instructions for blade balancing.
7. Replace blade on mower and tighten
securely.
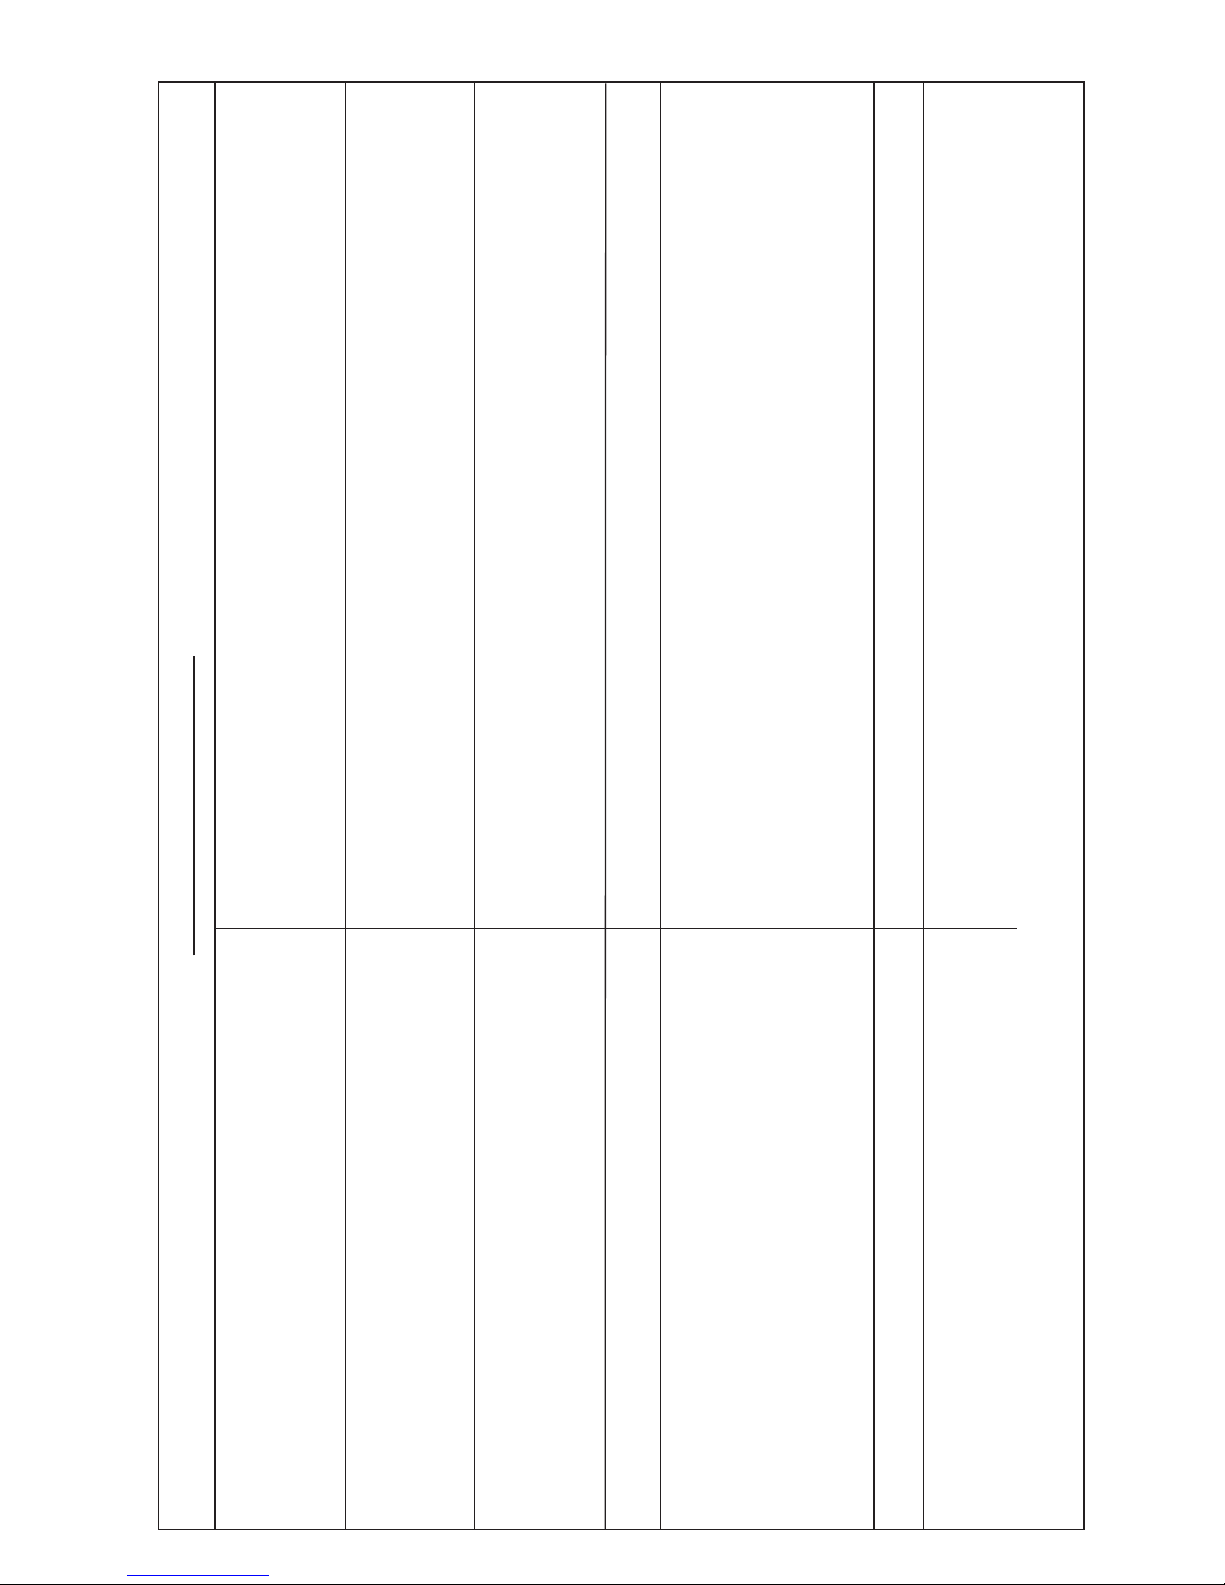
BLADE BALANCING (Figure Z)
Check balance of the blade (38) by
placing center hole in the blade over
a nail or round shank screwdriver (42),
clamped horizontally in a vise (40). If
either end of the blade rotates downward,
file along the sharp edge of that dropping
end. Blade is properly balanced when
neither end drops.
Y
40
41
38
Z
38
40
42
Page 18
18
TROUBLESHOOTING
PROBLEM SOLUTION
1. Mower doesn’t run when bail handle is activated.
A. Check to make sure safety key has been installed and is fully seated and that button on switch housing
is being completely depressed before pulling bail handle.
B. Release bail handle to turn mower off. Remove safety key and battery pack, turn mower over and
check that blade is free to turn.
C. Check that the battery cavity is free of debris and is connected properly.
D. Has battery been fully charged? Plug in charger and wait for green light to come on.
2. Motor stops while mowing. A. Release bail handle to turn mower off. Remove safety key and battery pack. Turn mower over and
check that blade is free to turn.
B. Raise cutting height of wheels to highest position and start mower.
C. Check that the battery cavity is free of debris and is connected properly.
D. Has battery been fully charged? Press state of charge button.
E. Avoid overloading the mower. Slow down the cutting pace, or raise the cut height.
3. Mower runs but cutting performance is unsatisfactory, A. Has battery been fully charged? Press state of charge button.
or does not cut entire lawn. B. Release bail handle to turn mower off. Remove safety key key and battery pack. Turn mower over
and check:
Blade for sharpness - Keep blade sharp.
Deck and discharge chute for clogging.
C. Wheel height adjustment may be set too low for grass condition. Raise cutting height.
4. Mower is too hard to push. A. Release bail handle to turn mower off. Remove safety key and battery pack. Raise cutting height
to reduce deck drag on grass. Check each wheel for free rotation.
5. Mower is abnormally noisy and vibrates. A. Release bail handle to turn mower off. Remove safety key and battery pack. Turn mower on side
and check blade to ensure it has not been bent or damaged. If blade is damaged, replace with a
BLACK+DECKER
replacement blade. If the underside of the deck is damaged, return mower to a BLACK+DECKER
Authorized service center.
B. If there is no visible damage to the blade and the mower still vibrates: Release bail handle to turn
mower off. Remove safety key and battery pack. Disassemble entire blade assembly as described in the
“Removing and Installing Blade” section. Remove any debris and clean each piece. Replace each piece
as described in the “Removing and Installing Blade” section. If mower still vibrates, return the mower to
an authorized BLACK+DECKER authorized service center.
6. Battery charger LEDs not on. A. Check plug connection.
B. Replace charger.
7. Mower not picking up clippings with bag. A. Chute clogged. Release bail handle to turn mower off. Remove safety key and battery pack. Clear
chute of grass clippings.
B. Raise cutting height of wheels to shorten length of the cut.
C. Bag full. Empty bag more often.
For assistance, visit our website www.blackanddecker.com for the location of the service center nearest you, or call the
BLACK+DECKER help line at 1-800-544-6986.
Page 19

19
ACCESSORIES
RECOMMENDED ACCESSORIES FOR USE
WITH YOUR MOWER ARE AVAILABLE FROM
YOUR LOCAL DEALER OR AUTHORIZED
SERVICE CENTER. IF YOU NEED
ASSISTANCE REGARDING ACCESSORIES,
PLEASE CALL: 1-800-544-6986
WARNING: The use of any
accessory not recommended for use with
this tool could be hazardous.
The RBRC® Seal
The RBRC® (Rechargeable
Battery Recycling Corp oration)
Seal on the nickel cadmium,
nickel metal hydride or lithiumionbatteries (or battery packs) indicates
that the costs to recycle these batteries
(or battery packs) at the end of their
useful life have already been paid by
BLACK+DECKER. In some areas, it is
illegal to place spent nickel cadmium,
nickel metal hydride or lithium-ion batteries
in the trash or municipal solid waste stream
and the Call 2 Recycle® program provides
an environmentally conscious alternative.
Call 2 Recycle, Inc., in cooperation with
BLACK+DECKER and other battery
users, has established the program in the
United States and Canada to facilitate the
collection of spent nickel cadmium, nickel
metal hydride or lithium-ion batteries. Help
protect our environment and conserve
natural resources by returning the spent
nickel cadmium, nickel metal hydride
or lithium-ion batteries to an authorized
BLACK+DECKER service center or to
your local retailer for recycling. You may
also contact your local recycling center for
information on where to drop off the spent
battery. RBRC® is a registered trademark
of Call 2 Recycle, Inc.
SERVICE INFORMATION
All BLACK+DECKER Service Centers
are staffed with trained personnel to
provide customers with efficient and
reliable power tool service. Whether you
need technical advice, repair, or genuine
factory replacement parts, contact the
BLACK+DECKER location nearest you. To
find your local service location, call: 1-800-
544-6986 or visit
www.blackanddecker.com
THREE-YEAR LIMITED WARRANTY
Black & Decker (U.S.) Inc. warranties this
product to be free from defects in material
or workmanship for a period of three (3)
years following the date of purchase,
provided that the product is used in a home
environment. This limited warranty does not
cover failures due to abuse, accidental
damage or when repairs have been
made or attempted by anyone other than
Black+Decker and its Authorized Service
Centers. A defective product meeting the
warranty conditions set forth herein will be
replaced or repaired at no charge in either
of two ways:
The first, which will result in exchanges
only, is to return the product to the retailer
from whom it was purchased (provided
that the store is a participating retailer).
Returns should be made within the
time period of the retailer’s policy for
exchanges. Proof of purchase may be
required. Please check with the retailer
for its specific return policy regarding
time limits for returns or exchanges. The
second option is to take or send the
product (prepaid) to a Black+Decker
owned or authorized Service Center for
repair or replacement at Black+Decker’s
option. Proof of purchase may be
required. Black+Decker owned and
authorized service centers are listed
online at www.blackanddecker.com.
This warranty does not apply to
accessories. This warranty gives you
specific legal rights and you may have
other rights which vary from state to state
or province to province. Should you have
any questions, contact the manager
of your nearest Black+Decker Service
Center. This product is not intended
for commercial use, and accordingly,
such commercial use of this product will
void this warranty. All other guarantees,
express or implied, are hereby disclaimed.
LATIN AMERICA: This warranty does not
apply to products sold in Latin America.
For products sold in Latin America, check
country specific warranty information
contained in the packaging, call the local
company or see the website for such
information.
Imported by
Black & Decker (U.S.) Inc.,
701 E. Joppa Rd.
Towson, MD 21286 U.S.A.
Page 20

20
Consulter le site Web www.BlackandDecker.com/NewOwner
pour enregistrer votre nouveau produit.
MODE D’EMPLOI
TONDEUSE SANS FIL AVEC BLOCPILES AU LITHIUM-ION DE 60 V MAX.*
Merci d’avoir choisi BLACK+DECKER! Consulter le site Web
www.BlackandDecker.com/NewOwner pour enregistrer votre nouveau produit.
ÀLIRE AVANT DE RETOURNER CE PRODUIT POUR QUELQUE
RAISON QUE CE SOIT :
Si des questions ou des problèmes surgissent après l’achat d’un produit
BLACK+DECKER, consulter le site Web www.blackanddecker.com/instantanswers
pour obtenir des réponses instantanément 24 heures par jour. Si la réponse est
introuvable ou en l’absence d’accès à l’Internet, composer le 1 800 544-6986 de 8 h à
17 h HNE, du lundi au vendredi, pour parler avec un agent. Prière d’avoir le numéro de
catalogue sous la main lors de l’appel.
CONSERVER CE MODE D’EMPLOI POUR UN USAGE ULTÉRIEUR.
*La tension initiale maximale du bloc-piles (mesurée sans charge de travail) est de 60 volts. La tension nominale est de 54.
NUMERO DE CATALOGUE
CM2060
CONSIGNES DE SÉCURITÉ – DÉFINITIONS
Il est important que vous lisiez et compreniez ce guide d’utilisation. Les informations qu’il
contient sont destinées à garantir VOTRE SÉCURITÉ ET PRÉVENIR LES PROBLÈMES. Les
symboles ci-dessous sont utilisés pour vous aider à identifier ces informations.
DANGER : indique une situation de danger imminent qui, si rien n’est fait pour l’éviter, aura
comme conséquences la mort ou des dommages corporels graves.
AVERTISSEMENT : indique une situation de danger potentiel qui, si rien n’est fait pour
l’éviter, pourra avoir comme conséquences la mort ou des dommages corporels graves.
MISE EN GARDE : indique une situation de danger potentiel qui, si rien n’est fait pour
l’éviter, pourra avoir comme conséquences des dommages corporels mineurs ou modérés.
AVIS : utilisé sans symbole de sécurité indique une situation de danger potentiel qui, si rien
n’est fait pour l’éviter, pourrait avoir comme conséquences des dommages matériels.
Page 21

21
Voici une explication des symboles de
danger importants sur la tondeuse.
1. L’utilisateur doit lire
et comprendre le mode
d’emploi.
2. Pour réduire le risque de
blessures graves, ne pas
tondre les pentes de haut
en bas ou de bas en haut.
Toujours tondre les pentes en
diagonale.
3. Pour éviter des blessures
aux personnes et aux
animaux à proximité, les
garder à bonne distance
de la tondeuse en cours de
fonctionnement.
4. Des lames en mouvement
(rotation) risquent de
provoquer de graves
blessures. Tenir les mains
et les pieds éloignés du châssis et de
l’ouverture de décharge de la tondeuse.
Toujours s’assurer que la lame s’est
arrêtée (attendre la fin de la rotation de
la lame, soit environ 3 secondes après
avoir relâché l’anse et retiré la clé de
sûreté) avant de retirer et de replacer
le collecteur d’herbe, de nettoyer,
d’entretenir, de transporter ou de
soulever la tondeuse.
5. Les objets percutés par
la lame de la tondeuse
peuvent provoquer de graves
blessures. Se tenir derrière
la poignée lorsque le moteur tourne.
Toujours s’assurer que les personnes et
les animaux de compagnie sont loin de
la décharge de la tondeuse lors de son
fonctionnement. Toujours inspecter la
surface à tondre avant de commencer et
retirer tout objet qui pourrait être projeté
par la lame. Relâcher l’anse pour éteindre
la tondeuse et attendre que la lame
s’immobilise (environ 3 secondes) avant
de traverser des allées, des routes, des
patios et des allées gravelées.
AVERTISSEMENT :
AVERTISSEMENTS DE
SÉCURITÉ ET DIRECTIVES
DE PREMIÈRE IMPORTANCE
AVERTISSEMENT : SI DES
OUTILS ÉLECTRIQUES DE JARDINAGE
SONT UTILISÉS, DES PRÉCAUTIONS DE
BASE EN MATIÈRE DE SÉCURITÉ
DOIVENT ÊTRE SUIVIES AFIN DE
RÉDUIRE LE RISQUE D’INCENDIE, DE
DÉCHARGE ÉLECTRIQUE ET DE
BLESSURE CORPORELLE, NOTAMMENT
LES SUIVANTES.
LIRE TOUTES CES
DIRECTIVES
RÉDUCTION DES RISQUES ET DES
BLESSURES :
• Avant tout usage, veiller à ce que
tout utilisateur de cet outil lise et
comprenne toutes les directives
de sécurité ainsi que l’information
comprise dans le présent manuel.
• Conserver ces directives et les
examiner fréquemment avant d’utiliser
l’appareil ou de donner des directives
aux autres.
DANGER : MESURES DE
SÉCURITÉ IMPORTANTES
POUR TONDEUSE À
CONDUCTEUR
ACCOMPAGNANT
Cette tondeuse peut amputer les bras
et les jambes et projeter des objets. Le
non-respect des directives de sécurités
ci-dessous peut provoquer de sérieuses
blessures ou un décès.
UTILISATION GÉNÉRALE
1. Lire, comprendre et respecter les
directives figurant sur la tondeuse
et dans le mode d’emploi avant de
commencer.
2. Ne pas approcher les mains ou les
pieds de la tondeuse ou de sa partie
inférieure. Toujours se tenir à l’écart de
l’ouverture d’éjection.
3. Ne permettre qu’à des adultes
responsables, familiers de ces
directives, d’utiliser cette tondeuse.
4. Débarrasser la zone à tondre des objets
tels les pierres, les tiges, les fils, les
jouets, les os, etc., qui pourraient être
projetés par la lame. Les objets percutés
par la lame peuvent provoquer de
graves blessures corporelles. Se tenir
derrière la poignée lorsque le moteur
tourne.
5. S’assurer qu’il n’y a personne à
proximité de la tondeuse avant
l’utilisation. Tenir les curieux et les
animaux à une distance sûre. Arrêter la
tondeuse si quelqu’un pénètre dans la
zone de tonte.
6. Ne pas utiliser l’appareil avec les
pieds nus ou des sandales. Toujours
mettre des chaussures épaisses.
7. Ne pas tirer la tondeuse vers l’arrière
sauf en cas d’absolue nécessité.
Regarder vers le bas et derrière soi
avant et pendant tout déplacement en
marche arrière.
8. Ne jamais diriger l’éjection en direction
d’une personne. Éviter d’éjecter les
Page 22

22
substances contre un mur ou un
obstacle. Les substances pourraient
ricocher vers l’opérateur. Dégager
l’anse pour éteindre la tondeuse et
arrêter la lame avant de traverser une
surface gravelée.
9. Ne pas utiliser la tondeuse sans
installer le collecteur d’herbe, la
protection de l’éjecteur, la protection
arrière ou toute autre protection de
sécurité en place et qui fonctionne.
Vérifier régulièrement toutes les
protections et tous les dispositifs de
sûreté pour s’assurer qu’ils sont en bon
état de fonctionnement afin d’assurer
un fonctionnement adéquat selon sa
fonction prévue. Remplacer tout verrou,
protection ou autre dispositif de sûreté
endommagé avant l’utilisation.
10. Ne jamais laisser une tondeuse en
marche sans surveillance.
11. Toujours dégager l’anse pour couper
le moteur, attendre que la lame
s’immobilise complètement et retirer
la clé de sûreté avant de nettoyer
la tondeuse, d’enlever le collecteur
d’herbe ou de déboucher la protection
de l’éjecteur, avant de laisser la
tondeuse ou avant tout réglage,
dépannage ou vérification.
12. N’utiliser la tondeuse qu’à la lumière
du jour ou avec un bon éclairage
artificiel lorsque les objets situés dans
le champ de la lame sont clairement
visibles à partir du point d’opération de
la tondeuse.
13. Ne pas utiliser la tondeuse sous
l’emprise de l’alcool ou de drogues
ou en cas de fatigue ou de maladie.
Demeurer vigilant, surveiller le travail
effectué, et faire preuve de jugement.
14. Éviter les conditions
environnementales dangereuses. Ne
jamais utiliser la tondeuse dans des
endroits humides ou mouillés et ne
jamais l’utiliser sous la pluie. Toujours
s’assurer d’avoir le pied sûr; marcher;
ne jamais courir.
15. Désengager le système
d’entraînement, le cas échéant, avant
de démarrer le moteur.
16. Si la tondeuse commence à vibrer
de façon anormale, relâcher la
poignée de libération sous caution
(levier de commande) (2), attendez
que la lame s’arrête et débrancher la
tondeuse, puis rechercher la cause
immédiatement. Les vibrations sont
généralement un avertissement de
problèmes.
17. Toujours mettre une protection
respiratoire et pour les yeux durant
l’utilisation de la tondeuse.
18. L’utilisation de tout accessoire
ou pièce non recommandés avec
cette tondeuse s’avérer dangereuse.
N’utiliser que les accessoires
approuvés par BLACK+DECKER.
19. Ne jamais trop tendre les bras en
utilisant la tondeuse. Toujours s’assurer
de conserver son équilibre à tout
moment au cours de l’utilisation de la
tondeuse.
UTILISATION SUR UNE PENTE
Les pentes sont un facteur majeur de
glissades et de chutes, qui peuvent
entraîner de graves blessures.
L’utilisation sur toutes les pentes
demande une attention particulière. Ne
pas tondre une pente sur laquelle on ne
se sent pas à l’aise.
1. Tondre les pentes en diagonale,
jamais de haut en bas. Être
extrêmement prudent lors des virages
sur les pentes.
2. Faire attention aux trous, ornières,
rebonds, pierres ou autres objets
cachés. Une surface inégale peut
provoquer une glissade ou une chute.
Une herbe haute peut cacher des
obstacles.
3. Ne pas tondre une herbe mouillée
ou des pentes excessivement
escarpées. Un équilibre instable
peut provoquer une glissade ou une
chute.
4. Ne pas tondre près des falaises,
des fossés ou des talus. Il y a un
risque de perdre sa stabilité ou son
équilibre.
ENFANTS
Des incidents tragiques peuvent
survenir si l’opérateur n’est pas vigilant
en présence d’enfants. Les enfants
sont parfois attirés par la tondeuse
et l’opération de tonte. Ne jamais
supposer qu’un enfant est resté au
dernier endroit où il a été vu.
1. Tenir les enfants à l’écart de la
zone de tonte et sous la surveillance
attentive d’un adulte responsable
autre que l’opérateur.
2. Rester vigilant et arrêter la tondeuse
si un enfant pénètre dans la zone.
3. Ne jamais laisser un enfant utiliser la
tondeuse.
4. Être très prudent aux environs des
virages, arbustes, arbres ou autres
objets qui peuvent vous empêcher
de voir un enfant.
RÉVISION GÉNÉRALE
1. Ne jamais utiliser la tondeuse dans
un endroit clos.
2. Maintenir tous les écrous et les boulons
Page 23

23
serrés pour s’assurer que le matériel
est en bon état de fonctionnement.
3. Ne jamais altérer le dispositif de
sécurité. S’assurer régulièrement de
son fonctionnement adéquat.
4. Éviter l’accumulation d’herbe, de
feuilles et d’autres débris sur la
tondeuse. Laisser la tondeuse
refroidir avant de la stocker.
5. Si vous heurtez un objet, relâchez la
poignée de libération sous caution
(levier de commande) (2) pour
éteindre la tondeuse, attendre que
la lame d’arrêter et de débrancher la
tondeuse, puis inspecter la tondeuse.
Réparation, des dommages, avant
de démarrer et d’utiliser la tondeuse.
6. Ne jamais effectuer de réglages ou
de réparations lorsque le moteur est
en marche ni lorsque la tondeuse
est branchée.
7. Débranchez toujours la tondeuse
avant d’ajuster, le nettoyage, la
réparation, l’inspection, le transport,
le stockage ou laisser la tondeuse.
8. Dans des conditions normales
d’utilisation, les composants du bac
à herbe sont sujets à détérioration
et usure. Avant chaque utilisation
de la tondeuse, vérifiez les
composants du bac à herbe et le
carter d’élimination, et remplacez les
pièces le cas échéant uniquement
avec des pièces recommandées par
Black+Decker.
9. Les lames de tondeuses sont
tranchantes. Recouvrir la lame
ou mettre des gants, et être très
prudent lors de l’entretien.
10. Prendre soin ou remplacer les
étiquettes et les directives de
sécurité, au besoin.
Cet appareil numérique de la classe B
est conforme à la norme NMB-003 du
Canada.
Cet appareil est conforme aux
dispositions du paragraphe 15
des règlements de la FCC. Son
fonctionnement est régi par les deux
conditions suivantes : (1) Cet appareil ne
peut pas causer d’interférence nuisible
et (2) cet appareil doit accepter toutes
les interférences reçues, y compris
celles qui risquent d’en gêner le
fonctionnement.
REMARQUE : ce matériel a été testé
et a été déclaré conforme aux limites
en vigueur concernant les dispositifs
numériques de classe B, en vertu
de la partie 15 de la réglementation
FCC. Ces limites visent à assurer une
protection raisonnable contre tout
brouillage nuisible dans une installation
résidentielle. Ce matériel produit,
consomme et peut émettre une énergie
de radiofréquence et, s’il n’est pas
installé et utilisé conformément aux
directives qui l’accompagnent, il peut
entraîner un brouillage nuisible des
communications radio. Cependant,
nous ne garantissons pas l’absence
de brouillage dans tous les types
d’environnement. Si, après avoir effectué
une vérification en mettant l’appareil hors
tension puis sous tension, l’utilisateur
s’aperçoit que ce matériel provoque un
brouillage nuisible à la réception des
signaux de radio ou de télévision, il lui
faudra essayer de corriger ce brouillage
en prenant une ou plusieurs des mesures
ci-dessous :
• Réorienter ou repositionner l’antenne de
réception.
• Éloigner le plus possible le matériel du
récepteur.
• Brancher le matériel dans une prise
électrique située sur un circuit différent de
celui du récepteur.
• Consulter le distributeur ou un
technicien radio/télévision expérimenté
pour obtenir de l’aide.
Tout changement ou toute modification à
cet appareil qui n’est pas expressément
approuvé par l’institution responsable
de la conformité peut faire annuler le
droit de l’utilisateur d’utiliser ce matériel.
Cet appareil numérique de la classe B
est conforme à la norme NMB-003 du
Canada.
CONSERVER CES MESURES.
AVERTISSEMENT :
AVERTISSEMENTS ET DIRECTIVES
DE SÉCURITÉ GÉNÉRALES POUR
TOUS LES OUTILS
• CET OUTIL PEUT ÊTRE
DANGEREUX. Respecter tous
les avertissements et directives
de sécurité contenues dans ce
manuel. L’opérateur est responsable
du respect des avertissements et
directives de sécurité contenus dans
ce manuel et indiqués sur la machine.
Restreindre l’usage de cette tondeuse
à des personnes capables de lire,
de comprendre et de respecter
les avertissements et directives de
sécurité contenus dans ce manuel et
indiqués sur la machine.
• Éviter tout environnement dangereux.
Ne pas utiliser de tondeuse à gazon
dans un endroit humide ou mouillé.
• Ne pas utiliser sous la pluie.
• Tenir les enfants à l’écart. Tous
les visiteurs doivent se trouver à une
distance sûre de la zone de travail.
Page 24

24
• S’habiller de manière appropriée. Ne
pas porter de vêtements amples ni de
bijoux. Ils peuvent se prendre dans
les pièces mobiles. Lors de travaux
à l’extérieur, il est recommandé de
porter des gants en caoutchouc et des
chaussures.
• Porter des lunettes de sécurité.
Toujours utiliser un masque protecteur
ou antipoussières si le travail dégage
beaucoup de poussière.
• Utiliser le bon appareil électrique. Ne
pas utiliser une tondeuse à gazon pour
une autre application que celle pour
laquelle elle a été prévue.
• Utilisation de rallonges. S’assurer que
la rallonge est en bon état avant de
l’utiliser. Toujours utiliser une rallonge
de calibre approprié avec l’outil, c’est-àdire un calibre de fil approprié pour des
cordons de diverses longueurs et dont
l’intensité est suffisante pour transporter
le courant débité par l’outil. L’utilisation
d’un cordon de calibre inférieur causera
une chute de tension de ligne et
donc une perte de puissance et une
surchauffe. Pour connaître les cordons
de bon calibre à utiliser, consulter le
tableau suivant.
Calibre minimal des cordons de rallonge
Tension Longueur totale du cordon en pieds
120V 0-25 26-50 51-100 101-150
(0-7,6m) (7,6-15,2m) (15,2-30,4m) (30,4-45,7m)
Intensité (A)
Au Au Calibre moyen des fils (AWG)
moins plus
0 - 6 18 16 16 14
6 - 10 18 16 14 12
10 - 12 16 16 14 12
12 - 16 14 12 Non recommandé
• VÉRIFIER QUE LES PIÈCES NE
SONT PAS ENDOMMAGÉES. Si un
dispositif de protection, ou toute autre
pièce, est endommagé, il faut faire
examiner soigneusement l’outil, avant
toute utilisation ultérieure, afin d’assurer
un fonctionnement adéquat selon sa
fonction prévue. Vérifier l’alignement
des pièces mobiles, la présence de
grippage des pièces mobiles et de
rupture de pièces, l’assemblage et
tout autre problème pouvant nuire au
fonctionnement de l’outil. Un dispositif
de protection endommagé, ou toute
autre pièce endommagée, doit être
réparé ou remplacé adéquatement
par un centre de réparation autorisé à
moins d’un avis contraire indiqué dans
le présent mode d’emploi.
• RÉPARATIONS ET ENTRETIEN. Les
réparations, l’entretien et tout réglage
non précisés dans ce mode d’emploi
devraient être effectués à un centre de
réparation autorisé BLACK+DECKER
ou à tout autre centre de réparation
professionnel. Utiliser toujours des
pièces de rechange identiques.
DANGER : AVERTISSEMENTS
SUPPLÉMENTAIRES POUR
TONDEUSES
• Évitez environnement dangereux - ne
pas utiliser des tondeuses à gazon
dans les endroits humides ou mouillés.
• Ne pas forcer la tondeuse à gazon.
Le travail sera mieux accompli et
plus sécuritaire au rythme prévu pour
l’appareil.
• Ne pas trop tendre les bras.
Conserver son équilibre en tout temps.
• Être vigilant. Surveiller le travail
effectué. Faire preuve de jugement. Ne
pas utiliser la tondeuse à gazon si l’on
est fatigué.
• Entreposer les tondeuses à gazon
inutilisées à l’intérieur. Lorsque les
tondeuses à gazon ne sont pas utilisées,
elles doivent être entreposées à l’intérieur,
dans un endroit sec et dans un endroit
verrouillé, hors de la portée des enfants.
• Bien entretenir la tondeuse à gazon.
S’assurer que les lames de coupe sont
aiguisées et propres afin d’optimiser
sécurité et performance.
• Maintenir les pare-mains en place et
en état de fonctionnement.
• Maintenir les lames affûtées.
• Tenir les mains et les pieds éloignés
de la zone de coupe.
• Les objets percutés par la lame de
tondeuse à gazon peuvent provoquer
de graves blessures corporelles. Il
faut toujours inspecter soigneusement la
pelouse et éliminer tous les objets avant
chaque tonte.
• Si la tondeuse à gazon rencontre un
objet étranger, suivre la démarche
suivante :
1) Arrêter la tondeuse à gazon.
Relâcher l’interrupteur marche/arrêt.
2) Débrancher le cordon
d’alimentation.
3) Rechercher tout signe de
dommage.
4) Réparer tout dommage avant de
démarrer et d’utiliser la tondeuse à
gazon.
• Utiliser seulement des pièces de
rechange identiques.
AVERTISSEMENT : certaines
poussières produites par ce produit
contiennent des produits chimiques
reconnus par l’État de la Californie
comme pouvant causer le cancer, les
anomalies congénitales et d’autres
dangers pour la reproduction. Voici
quelques exemples de ces produits
chimiques :
• composés présents dans les engrais
• composés présents dans les
insecticides, herbicides et pesticides
• arsenic et chrome provenant de bois
Page 25

25
traité chimiquement
Pour réduire votre exposition à
ces produits chimiques, porter un
équipement de sécurité approuvé
comme un masque antipoussières
conçu spécialement pour filtrer les
particules microscopiques.
L’étiquette apposée sur votre outil peut
comprendre les symboles suivants.
V .................volts
mW .............milliwatts
nm ..............longueur d’onde en
nanomètres
A ................. ampères
Hz ............... hertz
W ................watts
min ..............minutes
ou AC ....courant alternatif
ou DC ..courant continu
n
o ...............sous vide
................ Construction de classe I
(mis à la terre)
................. borne de mise à la minute
................
Construction de classe II
................ symbole d´avertissement
.../min ..........tours à la minute
.............. Lire le mode d’emploi
avant l’utilisation
.................Utiliser une protection
respiratoire adéquate.
................Utiliser une protection
oculaire adéquate.
.................Utiliser une protection
auditive adéquate.
DIRECTIVES DE SÉCURITÉ
IMPORTANTES POUR LES
CHARGEURS DE PILES
CONSERVEZ CES INSTRUCTIONS:
Ce manuel contient des consignes de
sécurité importantes pour les chargeurs
de batterie.
• Avant d’utiliser le chargeur, lire toutes
les instructions et mises en garde
figurant sur le chargeur, la batterie, et
le produit utilisant la batterie.
AVERTISSEMENT : risque
d’électrocution. Ne jamais laisser de
liquide s’infiltrer dans le chargeur.
AVERTISSEMENT :
risque de
brûlure. Pour réduire le risque de
blessures, charger les batteries
BLACK+DECKER
ne désignés. D’autres
types de piles peuvent exploser et
causer des blessures et des dommages.
MISE EN GARDE :
dans certaines
circonstances, lorsque le chargeur est
branché au bloc d’alimentation, le chargeur
peut être court-circuité par des corps
étrangers conducteurs tels que, mais sans
s’y limiter, la laine d’acier, le papier
d’aluminium ou toute accumulation de
particules métalliques. Ils doivent être
maintenus à distance des ouvertures du
chargeur. Débrancher systématiquement
celui-ci si aucun bloc-piles n’y est inséré.
Débrancher le chargeur avant tout
nettoyage
.
AVERTISSEMENT
• NE PAS tenter de charger le bloc-piles
avec autre chose qu’un chargeur
de marque. Les chargeurs et blocs-
piles sont conçus spécialement pour
fonctionner ensemble.
• Ces chargeurs ne sont pas destinés à
être utilisés à d’autres fins que celles
de charger les piles rechargeables
conseillées BLACK+DECKER. Toute autre
utilisation risque de provoquer un incendie,
un choc électrique ou une électrocution.
• AVERTISSEMENT : Le chargeur
fourni avec ce produit est correctement
branché s’il est orienté en position
verticale ou au plancher.
• Protéger le chargeur de la pluie et de
la neige.
• Tirer la fiche plutôt que le cordon
pour débrancher le chargeur ou pour
débrancher les cordons à l’aide de la
fonction de guirlande. Cela permet de
réduire le risque d’endommager la fiche ou
le cordon d’alimentation.
• S’assurer que le cordon est situé en
lieu sûr de manière à ce que personne
ne marche ni ne trébuche dessus ou
à ce qu’il ne soit pas endommagé ni
soumis à une tension.
• Ne pas utiliser de rallonge à moins que
cela ne soit absolument nécessaire.
L’utilisation d’une rallonge inadéquate
risque d’entraîner un incendie, un choc
électrique ou une électrocution.
• Ne pas installer le chargeur sur un mur ni
le fixer de manière permanente sur toute
surface. Le chargeur est destiné à une
utilisation sur une surface plane et stable
(c.-à-d. un dessus de table ou d’établi).
• Ne pas faire fonctionner le chargeur si
la fiche ou le cordon est endommagé;
les remplacer immédiatement.
• Ne jamais se servir d’un chargeur qui
a subi un choc violent, qui est tombé
par terre ou qui est endommagé de
quelque manière que ce soit. Le faire
vérifier dans un centre de réparation
autorisé.
• Ne pas démonter le chargeur;
confier l’entretien ou la réparation de
l’appareil à un centre de réparation
autorisé. Le remontage non conforme
du chargeur comporte des risques
de choc électrique, d’électrocution ou
d’incendie.
• Débrancher le chargeur avant de le
nettoyer. Cela réduira le risque de choc
Page 26

26
électrique. Le risque ne sera pas éliminé
en enlevant simplement le bloc-piles.
• NE JAMAIS relier deux chargeurs
ensemble.
• Le chargeur est conçu pour être
alimenté en courant domestique
standard (120 V). Ne pas utiliser une
tension supérieure pour le chargeur.
DIRECTIVES DE SÉCURITÉ
IMPORTANTES POUR LES
BLOCS-PILES
CONSERVER CES INSTRUCTIONS
• Ce guide d’utilisation contient des
directives importantes de sécurité
propres aux blocs-piles. Avant toute
utilisation du bloc-piles, lire toute
consigne et tout avertissement apposés
sur le chargeur, le bloc-piles et le
produit utilisant le bloc-piles.
AVERTISSEMENT : Le bloc-piles
n’est pas complètement chargé à la sortie
de l’emballage. Avant d’utiliser le bloc-piles
et le chargeur, lire les directives de
sécurité ci-après. Respecter ensuite les
consignes de chargement décrites.
LIRE TOUTES LES
DIRECTIVES.
• Ne pas incinérer le bloc-piles, même s’il
est très endommagé ou complètement
usé, car il pourrait exploser au contact
des flammes. Des vapeurs et des
matières toxiques sont dégagées lorsque
les blocs-piles sont incinérés.
• Ne pas charger ou utiliser de pile dans
un milieu déflagrant, en présence
de liquides, de gaz ou de poussière
inflammables. Insérer ou retirer la
pile du chargeur peut enflammer de la
poussière ou des émanations.
• Si le contenu de la pile entre
en contact avec la peau, laver
immédiatement la zone touchée au
savon doux et à l’eau. Si le liquide de
la pile entre en contact avec les yeux,
rincer l’œil ouvert à l’eau pendant 15
minutes ou jusqu’à ce que l’irritation
cesse. Si des soins médicaux sont
nécessaires, l’électrolyte des piles au
lithium-ion est composé d’un mélange
de carbonates organiques liquides et de
sels de lithium.
• Le contenu des éléments de pile
ouverts peut provoquer une irritation
respiratoire. Exposer la personne à de
l’air frais. Si les symptômes persistent,
obtenir des soins médicaux.
AVERTISSEMENT : RISQUE DE
BRÛLURE. LE LIQUIDE DE LA PILE PEUT
S’ENFLAMMER S’IL EST EXPOSÉ À DES
ÉTINCELLES OU À UNE FLAMME.
• Charger uniquement les blocs-piles au
moyen de chargeurs
BLACK+DECKER
.
• NE PAS éclabousser le bloc-piles ni
l’immerger dans l’eau ou dans tout autre
liquide. Cela peut entraîner une défaillance
prématurée de l’élément.
• Ne pas ranger ni utiliser l’outil et
le bloc-piles dans un endroit où
la température peut atteindre ou
dépasser les 40 °C (105 °F) (comme
dans les remises extérieures ou les
bâtiments métalliques en été).
AVERTISSEMENT : NE JAMAIS
TENTER D’OUVRIR LE BLOC-PILES POUR
QUELQUE RAISON QUE CE SOIT. SI LE
BOÎTIER DU BLOC-PILES EST FISSURÉ OU
ENDOMMAGÉ, NE PAS L’INSÉRER DANS
UN CHARGEUR. NE PAS ÉCRASER,
LAISSER TOMBER OU ENDOMMAGER LE
BLOC-PILES. NE PAS UTILISER UN BLOCPILES OU UN CHARGEUR QUI A REÇU UN
CHOC VIOLENT, QUI EST TOMBÉ, A ÉTÉ
ÉCRASÉ OU EST ENDOMMAGÉ DE
QUELQUE MANIÈRE QUE CE SOIT (P. EX.
PERCÉ PAR UN CLOU, FRAPPÉ D’UN
COUP DE MARTEAU, PIÉTINÉ). LES
BLOCS-PILES ENDOMMAGÉS DOIVENT
ÊTRE ENVOYÉS AU CENTRE DE
RÉPARATION POUR ÊTRE RECYCLÉS.
AVERTISSEMENT : RISQUE
D’INCENDIE. NE PAS RANGER OU
TRANSPORTER LES PILES DE MANIÈRE
À CE QUE DES OBJETS MÉTALLIQUES
PUISSENT ENTRER EN CONTACT AVEC
LES BORNES EXPOSÉES DES PILES.
PAR EXEMPLE, NE PAS METTRE DE PILE
DANS UN TABLIER, UNE POCHE, UNE
BOÎTE À OUTILS, UN BOÎTIER DE
RANGEMENT, UN TIROIR, ETC.
CONTENANT DES OBJETS TELS QUE DES
CLOUS, DES VIS OU DES CLÉS. LE
TRANSPORT DES PILES PEUT CAUSER
UN INCENDIE SI LES BORNES DES
PILES ENTRENT EN CONTACT
INVOLONTAIREMENT AVEC DES
MATIÈRES CONDUCTRICES COMME
DES CLÉS, DE LA MONNAIE, DES
OUTILS MANUELS ET D’AUTRES
ÉLÉMENTS SEMBLABLES. SELON LE
RÈGLEMENT HMR DU DOT (US
DEPARTMENT OF TRANSPORTATION
HAZARDOUS MATERIAL REGULATIONS),
IL EST EFFECTIVEMENT INTERDIT DE
TRANSPORTER DES PILES POUR LE
COMMERCE ET DANS LES AVIONS
(C.-À-D. DANS LES VALISES ET LES
BAGAGES À MAIN) À MOINS QU’ELLES
NE SOIENT BIEN PROTÉGÉES CONTRE
LES COURTS-CIRCUITS. POUR LE
TRANSPORT DE PILES INDIVIDUELLES,
ON DOIT DONC S’ASSURER QUE LES
BORNES SONT PROTÉGÉES ET BIEN
ISOLÉES CONTRE TOUTE MATIÈRE
POUVANT ENTRER EN CONTACT AVEC
ELLES ET PROVOQUER UN COURT-
Page 27

27
CIRCUIT. REMARQUE : IL NE FAUT
PAS LAISSER DE PILES AU LI-ION
DANS LES BAGAGES ENREGISTRÉS.
TRANSPORT
Vos blocs-piles BLACK+DECKER sont conformes à
toutes les normes de transport en vigueur conformément aux standards industriels et juridiques, y compris les recommandations de l’ONU sur le transport
des marchandises dangereuses, la réglementation
sur le transport des marchandises dangereuses de
IATA (Association du transport aérien international),
du code maritime international des marchandises
dangereuses (IMDG), et de la réglementation du
Département américain des transports. Les cellules
et blocs-piles au lithium-ion ont été testés conformément au paragraphe 38.3 du Manuel d’épreuves et de
critères de l’ONU sur le transport des marchandises
dangereuses. L’expédition ou le transport des blocspiles de ce produit est soumis à des restrictions et
ce dernier pourra être classé comme marchandise
dangereuse de classe 9.
EXPÉDITION PAR AVION
(AIR) OU BATEAU (MER)
• Contacter le transporteur pour obtenir
les directives les plus récentes. Avoir
sous la main le produit à transporter (y
compris le bloc-piles) lors de l’appel.
Les caractéristiques techniques
inscrites sur le produit et le blocpiles pourront s’avérer nécessaires
pour préparer leur expédition, et les
emballer dans un contenant conforme
et dûment étiqueté.
EXPÉDITION PAR VOIE TERRESTRE (ROUTE OU RAIL)
• Le carton et le matériel d’emballage d’origine du
produit pourront être utilisés pour l’expédition
par voie terrestre au sein des États-Unis ou du
Canada en suivant les stipulations ci-après :
1. Le bloc-piles ou toute autre pièce détachée doit
être emballé dans son matériel d’emballage
d’origine et disposé comme à l’origine (y compris
placer le bloc-piles dans son sac plastique ou
carton d’origine).
2. Le carton d’origine du produit et son matériel
d’emballage ne doivent pas être endommagés.
3. L’expédition doit inclure un document comprenant
les éléments suivants :
• Cet emballage contient des cellules ou blocspiles au lithium-ion.
• L’emballage doit être manipulé avec
prudence, car il y a risques d’inflammabilité si
l’emballage est endommagé.
• Une procédure spécifique doit être suivie
dans l’éventualité où l’emballage serait
endommagé, y compris l’inspection et le
reconditionnement du produit le cas échéant.
• Numéros de téléphone pour toute information
additionnelle (É.-U. et Canada : 1-888-6982571, partout ailleurs : +1-410-329-9200).
• Pour toute expédition par voie terrestre dans
un emballage générique, contacter votre
transporteur pour obtenir les directives les
plus récentes. Avoir sous la main le produit
à transporter (y compris le bloc-piles) lors
de l’appel. Les caractéristiques techniques
inscrites sur le produit et le bloc-piles
pourront s’avérer nécessaires pour préparer
leur expédition, et les emballer dans un
contenant conforme et dûment étiqueté.
Ces blocs-piles peuvent être transportés en avion si :
1. La compagnie aérienne permet le transport de
blocs-piles de rechange jusqu’à 160 wattheures
(vérifier sur le site de la compagnie aérienne);
2. Pas plus de 2 blocs-piles sont transportés; et
3. Les blocs-piles sont protégés contre tout courtcircuit.
Les informations contenues dans cette section du
guide d’utilisation sont fournies de bonne foi et
réputées exactes au moment de la création de ce
document. Cependant, aucune garantie, expresse ou
implicite, n’est offerte. L’expéditeur est chargé de se
conformer à toute réglementation en vigueur.
RECOMMANDATIONS EN MATIÈRE DE
RANGEMENT
1. Le meilleur endroit de rangement
est celui qui est frais et sec, loin de
toute lumière directe et protégé d’une
température extrême (chaleur ou froid).
2. Le stockage de longue durée ne nuira
pas au bloc-piles ou au chargeur pourvu
que le bloc-piles ne soit pas épuisé.
PROCÉDURE DE CHARGE
Utiliser uniquement avec
BLACK+DECKER BDCAC60 chargeurs
série. Utiliser uniquement avec
BLACK+DECKER 60v MAX* les blocspiles. Les chargeurs Black+Decker ont
été conçus pour recharger les blocs-piles
Black+Decker.
1. Brancher le chargeur dans une prise
appropriée avant d’insérer le bloc-piles.
2. Insérer le bloc-piles dans le chargeur.
3. Le voyant DEL vert clignotera
indiquant ainsi que la pile est en
cours de charge.
4. La fin de la charge est
indiquée par le voyant DEL vert
qui demeure allumé. Le bloc-piles
est chargé à plein et peut être utilisé ou
laissé sur le chargeur.
Recharger les piles épuisées aussitôt
que possible après leur utilisation pour
prolonger leur durée de vie.
FONCTIONS DE DIAGNOSTIC DU
CHARGEUR
Ce chargeur est conçu pour détecter
certains problèmes pouvant être
associés au bloc-piles ou à la source
d’alimentation. Le type de clignotement
de la DEL indique les problèmes.
Page 28

28
PILE EN MAUVAIS ÉTAT
Le chargeur est en mesure de détecter
une pile faible ou endommagée. Le
voyant DEL rouge clignote selon la
séquence indiquée sur l’étiquette. Si la
séquence code correspondant à une pile en
mauvais état est en clignotement, cesser de
recharger la pile. Retourner la pile à un centre
de réparation ou à un site de cueillette pour
le recyclage.
FONCTION DE SUSPENSION DU BLOCPILES CHAUD/FROID
Lorsque le chargeur détecte
qu’une pile est excessivement
chaude ou froide, il commence
automatiquement la suspension du
bloc-piles chaud/froid, la charge est
ainsi interrompue jusqu’à ce que l’état
de la pile redevienne normal. Une fois
la température revenue à la normale,
le chargeur passe automatiquement
au mode de recharge du bloc-piles.
Cette fonction assure une durée de
vie maximale des piles. La DEL rouge
clignote de la manière indiquée sur
l’étiquette lorsque la suspension du blocpiles chaud/froid est détectée.
REMARQUES IMPORTANTES SUR LE
CHARGEMENT
1. Pour augmenter la durée de vie du
bloc-piles et optimiser son rendement, le
charger à une température située entre 16
et 27 °C (60 et 80 °F). NE PAS charger le
bloc-piles à des températures inférieures
à 4,5 °C (40 °F) ou supérieures à 40,5 °C
(105 °F). Ces consignes sont importantes
et permettent d’éviter d’endommager
gravement le bloc-piles.
2. Le chargeur et le bloc-piles peuvent
devenir chauds au toucher pendant la
recharge. Il s’agit d’un état normal et cela
n’indique pas un problème. Pour faciliter
le refroidissement du bloc-piles après son
utilisation, éviter de mettre le chargeur
ou le bloc-piles dans un endroit chaud
comme dans une remise métallique ou une
remorque non isolée.
3. Si le bloc-piles ne se charge pas
adéquatement, on doit :
a. Vérifier le courant à la prise en
branchant une lampe ou un autre
appareil électrique.
b. Vérifier si la prise est reliée à un
interrupteur d’éclairage qui coupe le
courant au moment d’éteindre la lumière.
c. Déplacer le chargeur et le bloc-piles
à un endroit où la température ambiante
est entre 16 °C et 27 °C (60 °F et 80 °F).
d. Si le problème persiste, apporter
ou envoyer l’outil, le bloc-piles et le
chargeur au centre de réparation de
votre région.
4. Le bloc-piles doit être rechargé
lorsqu’il n’arrive pas à produire
suffisamment de puissance pour des
travaux qui étaient facilement réalisés
auparavant. NE PAS CONTINUER à
utiliser le bloc-piles dans ces conditions.
Suivre les procédures de charge. On
peut également recharger à tout moment
un bloc-piles partiellement déchargé sans
DESCRIPTION FONCTIONNELLE
1. Boîtier de commande
2. Poignée étrier
3. Poignée supérieure
4. Poignée inférieure
5. Fixations de la poignée supérieure (2)
6. Fixations de la poignée inférieure (2)
7. Levier de réglage de la hauteur de coupe
8. Bac de remplissage
9. Couvercle arrière
10. Tableau de bord
11. POWERSWAP
MC
12. Logement du bloc-piles
13. Poignée de transport supérieure
14. Poignée de transport inférieure
10
11
2
3
4
1
5
9
8
5
6
6
14
7
12
13
Page 29

29
affecter sa longévité.
5.
Tout corps étranger conducteur, tel
que notamment la laine d’acier, le papier
d’aluminium ou toute accumulation de
particules métalliques, doit être maintenu
à distance des ouvertures du chargeur.
Débrancher systématiquement celui-ci si
aucun bloc-piles n’y est inséré. Débrancher
le chargeur avant tout nettoyage.
6. Ne pas congeler le chargeur, l’immerger
dans l’eau ou dans tout autre liquide.
AVERTISSEMENT : RISQUE DE
CHOC ÉLECTRIQUE. ÉVITER LA
PÉNÉTRATION DE TOUT LIQUIDE DANS LE
CHARGEUR. NE JAMAIS TENTER D’OUVRIR
LE BLOC-PILES POUR QUELQUE RAISON
QUE CE SOIT. SI LE BOÎTIER EN PLASTIQUE
DU BLOC-PILES EST BRISÉ OU FISSURÉ, LE
RETOURNER À UN CENTRE DE
RÉPARATION POUR QU’IL SOIT RECYCLÉ.
RETURN TO A SERVICE CENTER FOR
RECYCLING.
INDICATEUR DE STATUT DE
CHARGE DU BLOC-PILES
(FIGURE A)
Le côté du bloc-piles comporte un indicateur de statut de charge Il peut être utilisé
pour afficher le niveau de charge du blocpiles pendant l’utilisation et le chargement.
Il ne donne aucune indication quant au
fonctionnement de l’outil. Son propre fonctionnement pourra aussi varier en fonction
des composants produit, de la température
et de l’application d’utilisation.
Vérification de l’état de charge pendant
l’utilisation :
• Appuyez sur le bouton indicateur de
statut de charge (A1).
• Les trois voyants DEL (A2) s’allumeront
pour indiquer le pourcentage de charge
du bloc-piles. Reportez-vous au tableau
en figure A.
• Si le voyant DEL ne s’allume pas,
rechargez le bloc-piles.
REMARQUE : Ce bloc-piles a été conçu
pour ne plus fonctionner si la charge
descend au-dessous de 20% de sa
capacité. Une fois le bloc-piles déchargé,
l’outil ne fonctionnera plus tant que le
bloc-piles ne sera pas rechargé.
A
A1
A1
INSERTION ET RETRAIT DES
BLOCS-PILES
AVERTISSEMENT : S’assurer que
la clé de sûreté est enlevée pour
empêcher la mise en marche avant la
pose ou le retrait du bloc-piles.
POSE DU BLOC-PILES :
• Soulevez le couvercle du logement des
blocs-piles (12) pour mettre à découvert
le port de connexion de bloc-piles (15).
• Poussez le bloc-piles (16) dans le port de
connexion de bloc-piles jusqu’à ce qu’il
y soit bien encastré et qu’un clic se fasse
entendre (figure B). Assurez-vous que le
bloc-piles est bien calé et complètement
verrouillé en place. Répétez l’opération
pour le second port de connexion de
bloc-piles.
• Refermez le couvercle du logement du
bloc-piles. Assurez-vous que le couvercle
est soigneusement verrouillé avant de
démarrer la tondeuse.
RETRAIT DU BLOCS-PILES :
• Ouvrez le couvercle du logement
du bloc-piles (12), comme expliqué
ci-dessus.
• Appuyez sur le bouton de libération du
bloc-piles (17) puis retirez le bloc-piles
de l’outil, comme illustré en figure C.
Page 30

30
B
15
12
C
16
17
16
SÉLECTION DU BLOC-PILES
AVERTISSEMENT :
s’assurer que
la clé de sécurité a bien été retirée pour
prévenir tout démarrage accidentel avant
de sélectionner le bloc-piles actif.
La tondeuse est équipée d’un bouton
POWERSWAPMC (11). Poussez le bouton
de sélection de bloc-piles (figure D) vers
la gauche ou la droite.
• La partie avec « 1 » active le port de
connexion du bloc-piles gauche.
• La partie avec « 2 » active le port de
connexion du bloc-piles droit.
REMARQUE : la tondeuse peut
fonctionner sur seulement un bloc-piles si
l’interrupteur est placé correctement.
D
11
BLOC-PILES ACTIF, INDICATEUR DE STATUT DE
CHARGE
REMARQUE : le statut de charge n’est
indiqué que si le bloc-piles est inséré,
ou si la tondeuse est en marche, ou
lorsqu’un seul bloc-piles est présent et
que l’interrupteur a été paramétré sur
celui-ci pour activer la tondeuse.
Cette tondeuse est équipée d’un indicateur de statut de charge situé à la base
du tableau de bord (10). Il indique le
port de connexion de bloc-piles actif et
le niveau actuel de charge du bloc-piles
actif. Lorsqu’un bloc-piles est inséré dans
l’un des ports de connexion de blocpiles, les trois voyants DEL de charge
s’allument 30 secondes pour afficher le
niveau actuel de charge du bloc-piles
puis s’éteignent. Pendant l’utilisation de
la tondeuse, le niveau de charge actuel
du bloc-piles choisi, actif, sera affiché.
• Lorsque la tondeuse est démarrée,
tous les voyants DEL du tableau de
bord (10) s’allument temporairement.
• Les voyants Del du tableau de bord du
bloc-piles inactif s’éteindront.
•
Les voyants DEL du tableau de bord du
bloc-piles actif (17) resteront allumés
et les trois voyants DEL indicateur de
charge (18) indiqueront le pourcentage
de charge restant du bloc-piles.
(Reportez-vous au tableau en figure A.)
• Si aucun voyant DEL ne s’allume pour
le bloc-piles actif, poussez le bouton
POWERSWAP
MC
(11) sur le bloc-piles
inactif. Si aucun voyant DEL ne s’allume,
rechargez alors les blocs-piles.
REMARQUE : la clé de sécurité doit être
insérée pour que tous les voyants DEL et
les fonctionnalités de l’interrupteur fonctionnent comme indiqué.
E
11
18
17
17
MONTAGE
AVERTISSEMENT :
avant
l’assemblage, s’assurer que la poignée
étrier est relâchée et que la clé de
sécurité a été retirée.
ASSEMBLAGE DE LA POIGNÉE
INFÉRIEURE
• Installez la poignée inférieure (4) en
vous assurant que la flèche (19) sur la
base de la tondeuse s’aligne sur 1, 2,
ou S sur la base de la poignée (20),
Page 31

31
H
5
23
4
3
G
F
4
20
19
I
6
21
21
22
(encadré de la figure F).
MISE EN GARDE : s’assurer
que chaque côté de la poignée inférieure
est paramétré sur la même chose. La
flèche doit être alignée sur 1 ou 2 pour
faire fonctionner la tondeuse.
• Refermez les leviers de réglage de la
hauteur (6) de la poignée inférieure,
comme illustré en figure F. Alors que
vous les refermez, assurez-vous que
leurs dents s’encastrent bien comme
illustré en figure G.
• Si la connexion entre la poignée
et le levier est trop lâche ou trop
serrée, ouvrez le levier et ajustez la
hauteur du levier en le faisant tourner.
Refermez-les en vérifiant que les dents
s’encastrent pleinement et que chaque
levier reste soigneusement verrouillé.
INSTALLATION DE LA POIGNÉE
SUPÉRIEURE (Figure H)
La poignée supérieure possède trois
positions de trous d’installation possibles
(21) pour régler la hauteur de la poignée
à partir de la plateforme. Le premier
groupe de trous près de l’extrémité
du tube de la poignée supérieure
permet d’avoir la hauteur maximale de
poignée. Utiliser les positions centrale ou
supérieure réduira la hauteur de poignée.
• Retirez les leviers de fixation de la
poignée supérieure (5), les écrous (22)
et les rondelles (23) de la poignée.
•
Alignez les orifices à l’extrémité de la
poignée supérieure (3) sur les orifices sur
le dessus de la poignée inférieure (4).
REMARQUE : s’assurer que le cordon
est bien situé devant les deux poignées,
comme illustré en figure I. Dans le cas
contraire, le cordon pourra s’emmêler
et rendre difficile le stockage de la
tondeuse.
• À partir de l’extérieur de la poignée
supérieure (3), insérez le boulon
du levier (5) dans les trous de
positionnement (21).
• Insérez une rondelle sur le boulon et
assemblez le tout avec un écrou sans
trop serrer.
• Faites pivoter la poignée supérieure (3)
sur sa position d’utilisation.
• Refermez le levier. Si le levier est trop
serré ou trop lâche, ouvrez-le et serrez/
desserrez l’écrou pour réajuster sa
force de fixation. Vérifiez les leviers
en les refermant. Ils devraient être
assez serrés pour pouvoir maintenir
les poignées fermement, mais pas trop
de façon à pouvoir refermer les leviers
complètement.
Page 32

32
8
9
K
28
29
BROYAGE
DANGER : retirez la clé de
sécurité et les blocs-piles avant de retirer
la fixation de la goulotte d’éjection
latérale et le bac de remplissage, et lors
de l’installation de la plaque de
déchiquetage.
• Assurez-vous que la fixation de la
goulotte d’éjection latérale (26) et le
bac de remplissage (8) ne sont pas
rattachés.
• Soulevez le couvercle arrière (9) et
insérez complètement la plaque de
déchiquetage (27) dans la tondeuse,
comme illustré en figure L.
• Assurez-vous que le couvercle arrière
est complètement fermé avant de
démarrer la tondeuse.
27
L
GOULOTTE D’ÉJECTION LATÉRALE
DANGER : retirer la clé de sécurité
et les blocs-piles avant de retirer le bac
de remplissage et pour installer la plaque
de déchiquetage et la fixation de la
goulotte d’éjection latérale.
• Assurez-vous que le bac de
remplissage (8) a été retiré.
• Soulevez le couvercle arrière (9) et
insérez complètement la plaque de
déchiquetage (27) sur la tondeuse,
comme illustré en figure L.
• Soulevez le clapet latéral (30) et
accrochez la fixation de la goulotte
d’éjection latérale (26) sur la tondeuse,
comme illustré en figure M.
INSTALLATION DU CÂBLE
DU MOTEUR (FIGURE J)
MISE EN GARDE : attacher le
câble de façon à ce qu’il ne soit ni étiré ni
pincé dans l’armature des poignées
pendant l’utilisation de la tondeuse ou
son stockage. Dans le cas contraire, cela
pourrait endommager le câble.
Le câble du moteur (24) doit être rattaché
aux poignées à l’aide des fixations de
câble (25) intégrées aux poignées.
Pour accrocher le câble à la poignée :
• Placez les poignées en position de
fonctionnement, reportez-vous à la
section Installation de la poignée
inférieure.
• Faites passer le câble devant les
poignées inférieure et supérieure.
• Tirez vers l’arrière la fixation de câble.
• Passez le câble du moteur sous
le clip et assurez-vous qu’il est
soigneusement retenu en place par la
fixation.
J
23
25
BAC DE REMPLISSAGE
DANGER : retirez la clé de sécurité
et les blocs-piles avant de retirer la
fixation de la goulotte d’éjection latérale
et la plaque de déchiquetage et avant
d’ouvrir le couvercle arrière pour installer
le bac de remplissage.
• Assurez-vous que la fixation de la
goulotte d’éjection latérale (26) (Figure
M) et la plaque de déchiquetage
(27) (Figure L) ont été retirées de la
tondeuse avant le remplissage.
• Ouvrez le couvercle arrière (9) et
placez le bac de remplissage (8)
sur les crochets de retenue (28) de
façon à ce qu’il repose sur les pattes
(29), comme illustré en figure K. Puis
refermez le couvercle arrière.
Page 33

33
• Relâchez le clapet latéral et assurezvous que les fixations restent en place
avant de démarrer la tondeuse, comme
illustré sur l’encadré en figure M.
M
30
26
UTILISATION
LIRE CE GUIDE D’UTILISATION
AVANT TOUTE UTILISATION DE
LA TONDEUSE. Reportez-vous à la
section Description fonctionnelle pour
vous familiariser avec l’emplacement
des différentes commandes et divers
réglages. Conservez le présent manuel à
titre de référence.
DANGER : organe de coupe
mobile acéré. Pour éviter tout risque de
dommages corporels graves, ne pas
utiliser la tondeuse en mode goulotte
latérale ou broyage si le couvercle arrière
n’est pas refermé sous la tension du
ressort. Ramenez la tondeuse auprès du
centre de service le plus proche pour
réparation.
DANGER : organe de coupe
mobile acéré. Ne jamais utiliser la
tondeuse en mode de remplissage sans
les crochets de suspension du bac à
herbe correctement calés sur la tondeuse
et la porte arrière fermement refermée
contre le dessus du bac pour éviter tout
risque de dommages corporels graves.
AVERTISSEMENT :
laisser la
tondeuse fonctionner à son propre
rythme. Ne pas la forcer.
RÉGLAGE DE LA HAUTEUR DE
POIGNÉE (FIGURE N)
• Ouvrez les deux leviers de fixation de
la poignée inférieure (6).
• Ajustez la poignée de façon à ce
que la flèche (19) sur la base de la
tondeuse s’aligne sur 1 ou 2 sur la
base de la poignée (20). Assurez-vous
que de chaque côté de la tondeuse, la
poignée est paramétrée sur le même
chiffre.
• Refermez les deux leviers et assurez-
vous que la poignée est fermement
verrouillée.
N
6
20
19
RÉGLAGE DE LA HAUTEUR DE LA
TONDEUSE (FIGURE O)
La hauteur de coupe est ajustée grâce
au levier central de réglage de la hauteur
de coupe. Il y a sept positions possibles.
REMARQUE : si l’on n’est pas sûr de la
hauteur de coupe requise, commencer
par mettre le levier de réglage de la
hauteur (7) sur la position sept et ajuster
vers le bas le cas échéant, comme
illustré en figure O.
POUR RÉGLER LA HAUTEUR DE COUPE
• Sortez le levier de réglage de la
hauteur (7) de la tondeuse hors de
l’encoche de verrouillage (31).
• Déplacez le levier vers l’arrière de
l’appareil pour augmenter la hauteur
de coupe.
• Déplacez le levier vers l’avant de
l’appareil pour diminuer la hauteur de
coupe.
• Poussez le levier de réglage de la
hauteur sur l’une des sept encoches
de verrouillage.
O
31
7
CLÉ DE SÛRETÉ
DANGER : organe de coupe
mobile acéré.
Pour prévenir tout démarrage accidentel
ou non autorisé de votre tondeuse sans
fil, une clé de sécurité (32) amovible a
Page 34

34
secondes suivantes ou moins.
P
32
Q
2
33
1
SURCHARGE DE LA TONDEUSE
Pour éviter tout dommage dû à des
conditions de surcharge, n’essayez
pas de tondre trop d’herbe à la fois.
Ralentissez votre rythme ou augmentez la
hauteur de coupe.
TECHNOLOGIE AUTOSENSE
MC
La technologie AUTOSENSEMC détecte
l’épaisseur de l’herbe pour ajuster
la puissance de la tondeuse en
conséquence. Si l’herbe n’est pas dense,
la tondeuse fonctionnera à la vitesse
normale pour allonger sa durée d’utilisation.
Si l’herbe est épaisse, elle augmentera la
puissance pour faciliter la coupe.
STOCKAGE
AVERTISSEMENT :
une lame en
rotation peut causer des dommages
corporels graves. Relâcher la poignée
étrier (2) pour arrêter la tondeuse, retirer
la clé de sécurité et les blocs-piles avant
de soulever, transporter ou ranger la
tondeuse. La ranger dans un endroit sec.
MISE EN GARDE : risques de
pincement. Pour éviter d’être pincé,
éloigner les doigts de la zone entre les
poignées alors qu’elles sont repliées.
MISE EN GARDE : s’assurer
que le câble n’est ni étiré ni pincé dans
l’armature des poignées alors que les
poignées sont repliées. Cela pourrait
endommager le câble.
été intégrée lors de la conception de
votre tondeuse. La tondeuse ne pourra
absolument pas démarrer lorsque la clé
de sécurité en sera retirée.
REMARQUE : LA CLÉ DE SÉCURITÉ
A UN TROU EN SON CENTRE POUR
PERMETTRE DE L’ACCROCHER À
UN CLOU, HORS DE LA PORTÉE DES
ENFANTS. NE PAS ACCROCHER LA
CLÉ DE SÉCURITÉ À LA TONDEUSE.
DANGER : UNE LAME EN
ROTATION PEUT CAUSER DE SÉRIEUX
DOMMAGES CORPORELS. POUR
ÉVITER TOUT RISQUE DE DOMMAGES
CORPORELS GRAVES, RETIRER LA
CLÉ DE SÉCURITÉ DE LA TONDEUSE
AVANT DE LA LAISSER SANS
SUPERVISION, OU AVANT DE LA
RECHARGER, LA NETTOYER,
L’ENTRETENIR, LA TRANSPORTER OU
DE LA RANGER.
DÉMARRAGE DE LA TONDEUSE
DANGER : organe de coupe
mobile acéré. POUR LIMITER TOUT
RISQUE DE DOMMAGES CORPORELS
GRAVES, NE JAMAIS TENTER DE
DÉSACTIVER LE BOÎTIER DE
COMMANDE OU LE SYSTÈME À CLÉ
DE SÉCURITÉ.
REMARQUE : la tondeuse sera
opérationnelle lorsque le bloc-piles et la
clé de sécurité seront installés.
• Insérez à fond la clé de sécurité (32)
dans son boîtier (1), comme illustré en
figure P. La tondeuse est à présent
opérationnelle.
• Votre tondeuse est équipée d’un boîtier
de commande particulier. Pour utiliser
la tondeuse, maintenez appuyé le
bouton (33) du boîtier de commande
(1), puis poussez la poignée étrier (2)
contre la poignée de guidon, comme
illustré en figure Q. Relâchez le bouton
dès que la tondeuse démarre.
• Pour arrêter la tondeuse, relâchez juste
la poignée étrier.
AVERTISSEMENT :
ne jamais
tenter de verrouiller la gâchette ou la
poignée étrier en position de marche.
REMARQUE : lorsque la poignée
étrier retourne sur sa position initiale,
cela active le « mécanisme de frein
automatique ». Le moteur est freiné
électriquement et la lame de la tondeuse
s’arrête de tourner dans les trois
Page 35

35
La poignée de la tondeuse peut
facilement être repliée pour faciliter et
accélérer son rangement.
• En maintenant la poignée, ouvrez sans
les retirer les leviers de fixation de
la poignée inférieure (6) et repliez la
poignée vers l’avant de la tondeuse,
comme illustré en figure R.
• Ajustez la poignée de façon à ce
que la flèche (19) sur la base de la
tondeuse s’aligne sur « S » (20).
Assurez-vous que de chaque côté
de la tondeuse, la poignée est bien
paramétrée sur la même chose.
• R
efermez les deux leviers et assurez-vous
que la poignée est fermement verrouillée.
• Ouvrez, sans les retirer les leviers de
fixation de la poignée supérieure (5)
puis repliez la poignée supérieure (3)
sur la poignée inférieure (4), comme
illustré en figure S.
• La tondeuse devrait être repliée
comme illustré en figure T.
R
6
20
19
S
5
3
4
T
TRANSPORT DE LATONDEUSE
DANGER : UNE LAME EN
ROTATION PEUT CAUSER DE SÉRIEUX
DOMMAGES CORPORELS. POUR
ÉVITER TOUT RISQUE DE DOMMAGES
CORPORELS GRAVES, RETIRER LA
CLÉ DE SÉCURITÉ DE LA TONDEUSE
ET LES BLOCS-PILES AVANT DE LA
LAISSER SANS SURVEILLANCE, OU
AVANT DE LA RECHARGER, LA
NETTOYER, L’ENTRETENIR, LA
TRANSPORTER, LA SOULEVER OU LA
RANGER.
•
La tondeuse peut être transportée très
facilement grâce aux poignées de
transport (13, 14), comme illustré en
figure U. N’essayez PAS de soulever la
tondeuse en l’attrapant par la poignée
supérieure (3) ou la poignée inférieure (4).
U
CONSEIL POUR TONDRE
AVERTISSEMENT :
BIEN
INSPECTER L’ENDROIT OÙ LA
TONDEUSE SERA UTILISÉE ET EN
RETIRER TOUTE PIERRE, TOUT
MORCEAU DE BOIS, FILS, OS OU
AUTRE DÉBRIS QUI POURRAIT ÊTRE
ÉJECTÉ PAR LA LAME EN ROTATION.
1.
AVERTISSEMENT :
tondre
perpendiculairement une pente, jamais
parallèlement. Faire extrêmement
attention lors du changement de
direction sur une pente. Ne pas tondre
de pente excessivement raide.
Maintenir systématiquement son
équilibre.
2. Relâcher la poignée étrier pour
ARRÊTER la tondeuse alors que l’on
traverse des zones avec graviers (les
pierres pourraient être éjectées par la
lame).
3. Régler la tondeuse sur sa hauteur de
coupe la plus haute pour tondre un
terrain difficile ou des herbes hautes.
Retirer trop d’herbe à la fois pourra
causer la surcharge du moteur et le
faire caler. Se reporter au guide de
dépannage.
Page 36

36
poignée étrier pour arrêter la tondeuse,
ATTENDRE L’ARRÊT COMPLET DE LA
LAME, ET RETIRER LA CLÉ DE
SÉCURITÉ ET LES BLOCS-PILES.
2. Découpez un morceau de bois (34)
d’environ 610 mm (2 pieds) pour
empêcher la lame de tourner alors que
l’on retirera le boulon (35).
3.
AVERTISSEMENT :
porter des
gants et une protection oculaire
adéquats. Mettez la tondeuse sur son
flanc. Faites attention aux bords acérés
de la lame. Positionnez le morceau de
bois et dévissez le boulon vers la
gauche avec une clé de 13 mm
(1/2 po), comme illustré en Figure V.
4. Retirez le boulon (35) et la rondelle
(37). Retirez la lame (38), comme
illustré en figure W. Le ventilateur (39)
ne doit pas être retiré. Examinez toutes
les pièces et changez celles qui sont
endommagées.
5. La lame ne peut être rattachée au
ventilateur que dans un sens. Pour la
réassembler, alignez l’orifice en D de la
lame sur la tige en D du ventilateur, en
vous assurant que les inscriptions sur
la lame soient tournées vers l’extérieur,
et non pas vers la tondeuse.
6. Pour resserrer, positionnez le morceau
de bois comme illustré en figure X
pour empêcher la lame de tourner.
Insérez le boulon dans la rondelle
et resserrez le boulon vers la droite
avec une clé de 13 mm (1/2 po) (36),
comme illustré en figure X.
4. Si le bac de remplissage (8) est utilisé
lors de la saison de croissance rapide,
l’herbe pourra avoir tendance à obstruer
l’ouverture d’éjection. Relâcher la
poignée étrier pour arrêter la tondeuse
et retirer la clé de sécurité. Retirer le
bac et secouer l’herbe pour la faire
tomber à l’extrémité du bac. Éliminer
aussi herbe et débris qui auraient
pu s’accumuler autour de la goulotte
d’éjection. Réinstaller le bac.
5. Si la tondeuse venait à vibrer
anormalement, relâcher la poignée
étrier pour arrêter la tondeuse et
retirer la clé de sécurité. Chercher la
cause des vibrations immédiatement.
Les vibrations sont un signe de
dysfonctionnement. Ne plus utiliser
la tondeuse tant qu’elle n’aura pas
été vérifiée. Se reporter au guide de
dépannage dans ce guide d’utilisation.
6. RETIRER SYSTÉMATIQUEMENT LA
POIGNÉE ÉTRIER POUR ARRÊTER
LA TONDEUSE, ET RETIRER LA CLÉ
DE SÉCURITÉ AVANT DE LAISSER
LA TONDEUSE SANS SUPERVISION
MÊME POUR TRÈS PEU DE TEMPS.
Les suggestions suivantes vous
aideront à optimiser le temps
d’utilisation de votre tondeuse sans fil :
1. Ralentir dans les zones où l’herbe est
particulièrement haute ou épaisse.
2. Éviter de tondre lorsque l’herbe est
humide à cause de la pluie ou de la
rosée.
3. Tondre la pelouse fréquemment,
particulièrement dans les périodes de
pousse intense.
REMARQUE : il est recommandé de
recharger la tondeuse après utilisation
pour prolonger la durée de vie des
blocs-piles. Recharger fréquemment un
bloc-piles ne lui nuira pas, et permettra
qu’il soit pleinement rechargé et prêt à
l’emploi. Entreposer un bloc-piles pas
complètement chargé réduira sa durée
de vie.
RETRAIT ET INSTALLATION
DES LAMES
DANGER : risques de dommages
corporels. Pour réassembler le dispositif
de lame, s’assurer que chaque pièce est
réinstallée correctement, comme décrit cidessous. Tout réassemblage incorrect de
la lame ou des autres pièces du dispositif
de lame posera des risques de
dommages corporels graves.
1.
AVERTISSEMENT :
relâcher la
Page 37

37
CHANGER IMMÉDIATEMENT TOUTE
LAME VOILÉE OU ENDOMMAGÉE.
LORS DE L’AIGUISAGE DE LA
LAME :
1. Assurez-vous que la lame reste
équilibrée.
2. Aiguisez la lame en suivant l’angle
de coupe d’origine.
3. Aiguisez les deux bords de la lame,
en retirant la même quantité de
matériau de chaque côté.
POUR AIGUISER UNE LAME
DANS UN ÉTAU : (Figure Y)
1. Assurez-vous que la poignée étrier
est bien relâchée, que la lame est
immobile, et que la clé de sécurité
et les blocs-piles ont bien été retirés
avant de retirer la lame.
2. Retirez la lame de la tondeuse.
Reportez-vous aux instructions
d’installation et de retrait de la lame.
3. Resserrez la lame (38) dans l’étau (40).
4. Portez une protection oculaire et des
gants adéquats et faites attention à ne
pas vous couper.
5. Aiguisez soigneusement les bords de
coupe de la lame avec une lime à fine
denture (41) ou une pierre à aiguiser,
en maintenant l’angle du bord de
coupe original.
6. Vérifiez l’équilibre de la lame.
Reportez-vous aux instructions
relatives à l’équilibrage de la lame.
7. Réinstallez la lame sur la tondeuse et
resserrez-la soigneusement.
Y
40
41
38
ÉQUILIBRAGE DE LA LAME
(FIGURE Z)
Vérifier l’équilibre de la lame (38)
en plaçant le trou central de la lame
au-dessus d’un clou ou d’un tournevis
à tige ronde (42), horizontalement fixé
sur un étau (40). Si l’une des extrémités
de la lame pivote vers le bas, limer le
tranchant de cette extrémité. La lame est
W
37
35
38
39
X
V
34
35
36
34
35
36
AIGUISAGE DE LA LAME
MAINTENIR LA LAME BIEN AIGUISÉE
POUR OPTIMISER LES PERFORMANCES
DE LA TONDEUSE. UNE LAME
ÉMOUSSÉE NE COUPERA PAS L’HERBE
PROPREMENT.
AVERTISSEMENT :
UTILISER UNE
PROTECTION OCULAIRE ADÉQUATE
LORS DU RETRAIT, DE L’AIGUISAGE ET DE
L’INSTALLATION DE LA LAME. S’ASSURER
QUE LA CLÉ DE SÉCURITÉ ET LE BLOCPILES ONT BIEN ÉTÉ RETIRÉS.
Aiguiser la lame deux fois au cours de
la saison de tonte est habituellement
suffisant dans des circonstances
normales. Le sable émoussera la lame
rapidement. Si votre pelouse est sur un sol
sableux, il sera peut-être requis d’aiguiser
la lame plus souvent.
Page 38

38
produits américains. La lame tourne
lorsque le moteur est en marche.
ENTRETIEN
IMPORTANT : pour garantir la SÉCURITÉ
et la FIABILITÉ du produit, les réparations,
l’entretien et le réglage (y compris
l’inspection et le remplacement du balai)
doivent être réalisés par un centre de
réparation
BLACK+DECKER
ou tout autre
centre de réparation professionnel, et des
pièces de rechange
BLACK+DECKER
doivent toujours être utilisées. En cas de
réparation, utiliser UNIQUEMENT DES
PIÈCES DE RECHANGE IDENTIQUES.
ACCESSOIRES
LES ACCESSOIRES RECOMMANDÉS
POUVANT ÊTRE UTILISÉS AVEC LA
TONDEUSE SONT DISPONIBLES AUPRÈS
DE VOTRE DISTRIBUTEUR OU CENTRE DE
RÉPARATION LOCAL AUTORISÉ. POUR
TOUT RENSEIGNEMENT CONCERNANT
LES ACCESSOIRES, COMPOSER LE : 1 800
544-6986
AVERTISSEMENT : l’utilisation
de tout accessoire non recommandé
avec cet outil pourrait s’avérer
dangereuse.
INFORMATION SUR LES
RÉPARATIONS
Tous les centres de réparation
BLACK+DECKER
sont dotés de
personnel qualifié en matière d’outillage
électrique; ils sont donc en mesure
d’offrir à leur clientèle un service efficace
et fiable. Que ce soit pour un avis
technique, une réparation ou des pièces
de rechange authentiques installées en
usine, communiquer avec l’établissement
BLACK+DECKER
le plus près de chez
vous. Pour trouver l’établissement de
réparation de votre région, composer le
numéro suivant :
1 800 544-6986 ou consulter le site
www.blackanddecker.com
Cet appareil numérique de la classe B
est conforme à la norme NMB-003 du
Canada.
Cet appareil est conforme aux
dispositions du paragraphe 15
des règlements de la FCC. Son
fonctionnement est régi par les deux
conditions suivantes : (1) Cet appareil ne
peut pas causer d’interférence nuisible
et (2) cet appareil doit accepter toutes
les interférences reçues, y compris
celles qui risquent d’en gêner le
fonctionnement.
REMARQUE : ce matériel a été testé et
a été déclaré conforme aux limites en
vigueur
correctement en équilibre quand aucune
extrémité ne penche vers le bas.
Z
38
40
42
LUBRICATION
Aucun graissage n’est nécessaire. Ne pas
huiler les roues. Elles
comportent des surfaces d’appui en
plastique qui n’exige aucun graissage.
NETTOYAGE
Relâcher l’anse (2) pour éteindre la
tondeuse, attendre que la lame
s’immobilise puis retirer la clé de sûreté
et le bloc-piles. Utiliser seulement un
détergent doux et un chiffon humide pour
nettoyer la tondeuse. Nettoyer toute trace
d’herbe coupée qui se serait accumulée
sous le châssis. Après plusieurs
utilisations, inspecter toute la quincaillerie
exposée et serrer au besoin. Bien garder
le logement et les bornes de la pile de la
tondeuse exempts de débris.
PRÉVENTION DE LA
CORROSION
Les engrais et autres produits chimiques
de jardin renferment des agents qui
accélèrent la corrosion du métal. Si l’aire
à tondre a reçu un épandage d’engrais
ou de produits chimiques, nettoyer
immédiatement la tondeuse après son
utilisation comme suit :
Relâcher l’anse (2) pour éteindre la
tondeuse, puis retirer la clé de sûreté et
le bloc-piles. Essuyer toutes les pièces
exposées avec un chiffon humide.
MISE EN GARDE : NE PAS
VERSER NI PULVÉRISER D’EAU
SUR LA TONDEUSE POUR LA
NETTOYER.
Ne pas ranger l’outil sur
des engrais ou des produits chimiques ou
à proximité de ceux-ci. Un tel rangement
risque de provoquer une corrosion rapide.
RENCONTRE CPSC EXIGENCES
DE SÉCURITÉ
BLACK+DECKER Tondeuse sont
conformes aux normes de sécurité de
l’American National Standards Institute,
et de la commission de la sécurité des
Page 39

39
Canada pour faciliter la collecte des piles
au nickel-cadmium, à l’hydrure métallique
de nickel ou au lithium-ion usagées.
Aidez-nous à protéger l’environnement et
à conserver nos ressources naturelles en
renvoyant les piles au nickel-cadmium,
à l’hydrure métallique de nickel ou au
lithium-ion usagées à un centre de
réparation autorisé BLACK+DECKER
ou chez votre détaillant afin qu’elles
y soient recyclées. On peut en outre
se renseigner auprès d’un centre de
recyclage local pour connaître d’autres
sites les acceptant. SRPRC® est une
marque déposée de l’Appel à Recycler
Canada, Inc.
concernant les dispositifs numériques de
classe B, en vertu de la partie 15 de la
réglementation FCC. Ces limites visent
à assurer une protection raisonnable
contre tout brouillage nuisible dans une
installation résidentielle. Ce matériel
produit, consomme et peut émettre une
énergie de radiofréquence et, s’il n’est
pas installé et utilisé conformément
aux directives qui l’accompagnent, il
peut entraîner un brouillage nuisible
des communications radio. Cependant,
nous ne garantissons pas l’absence
de brouillage dans tous les types
d’environnement. Si, après avoir effectué
une vérification en mettant l’appareil hors
tension puis sous tension, l’utilisateur
s’aperçoit que ce matériel provoque un
brouillage nuisible à la réception des
signaux de radio ou de télévision, il lui
faudra essayer de corriger ce brouillage
en prenant une ou plusieurs des mesures
ci-dessous :
• Réorienter ou repositionner l’antenne de
réception.
• Éloigner le plus possible le matériel du
récepteur.
• Brancher le matériel dans une prise
électrique située sur un circuit différent de
celui du récepteur.
• Consulter le distributeur ou un technicien
radio/télévision expérimenté pour obtenir
de l’aide.
Tout changement ou toute modification à
cet appareil qui n’est pas expressément
approuvé par l’institution responsable
de la conformité peut faire annuler le
droit de l’utilisateur d’utiliser ce matériel.
Cet appareil numérique de la classe B
est conforme à la norme NMB-003 du
Canada.
Le sceau SRPRC
®
Le sceau SRPRC® (Société
de recyclage des piles
rechargeables du Canada)
apposé sur une pile au
nickel-cadmium, à hydrure métallique de
nickel ou au lithium-ion (ou un bloc-piles)
indique que les coûts de recyclage de
ces derniers en fin d’utilisation ont déjà
été réglés par BLACK+DECKER. Dans
certaines régions, la mise au rebut ou
aux ordures municipales des piles au
nickel-cadmium, à l’hydrure métallique
de nickel ou au lithium-ion, est illégale ;
le programme de l’Appel à Recycler®
constitue donc une solution pratique et
écologique.
Appel à Recycler Canada, Inc., en
collaboration avec BLACK+DECKER et
d’autres utilisateurs de piles, a mis sur
pied de programme aux États-Unis et au
Page 40

40
GARANTIE LIMITÉE DE TROIS ANS
Black & Decker (É.-U.) Inc. garantie ce
produit contre tout vice de matière ou de
fabrication pendant une période de trois
(3) ans à compter de la date d’achat, dans
la mesure où ce produit sera utilisé dans
un cadre familial. Cette garantie limitée
ne couvre pas toute défaillance due à
tout abus, tout dommage accidentel ou
toute réparation effectuée ou tentée par
tout tiers autre que Black+Decker et ses
centres de réparation agréés. Le produit
défectueux remplissant les conditions
de garantie ci-incluses sera remplacé ou
réparé sans frais, suivant l’une des deux
options suivantes.
La première option consiste en un
échange seulement. Le produit doit être
retourné au détaillant qui l’a vendu (dans
la mesure où il fait partie des détaillants
participants). Tout retour doit respecter les
délais stipulés dans la politique relative
aux échanges du détaillant. Une preuve
d’achat pourra être requise. Veuillez
vérifier la politique de retour du détaillant
pour connaitre ses délais spécifiques aux
retours ou aux échanges. La deuxième
option consiste à apporter ou à envoyer
le produit (prépayé) à un centre Black
& Decker ou à un centre de service
agréé pour y être réparé ou remplacé,
au choix de Black+Decker. Une preuve
d’achat pourra être requise. Les centres
de réparation agréés ou appartenant à
Black+Decker sont disponibles en ligne à
www. blackanddecker.com.
Cette garantie ne s’applique pas aux
accessoires. Cette garantie vous confère
des droits légaux particuliers, mais
vous pouvez aussi bénéficier d’autres
droits variant d’un territoire à l’autre.
Pour toute question, veuillez contacter le
responsable de votre centre de réparation
Black+Decker le plus proche. Ce produit
n’est pas destiné à un usage commercial,
et par conséquent tout usage commercial
en annule sa garantie. Toute autre
garantie, expresse ou implicite, est exclue
par les présentes.
AMÉRIQUE LATINE : cette garantie ne
s’applique pas aux produits vendus en
Amérique Latine. Pour les produits vendus
en Amérique Latine, veuillez-vous reporter
aux informations de garantie propres
au pays, contenues dans l’emballage,
appeler la compagnie locale ou consulter
ces informations sur le site web.
Garantie du châssis
Le châssis est garanti à vie seulement
contre les vices de matière ou de
fabrication.
Imported by / Importé par
Black & Decker Canada Inc.
100 Central Ave.
Brockville (Ontario) K6V 5W6
Page 41

41
GUIDE DE DÉPANNAGE
PROBLÈME SOLUTION
1. La tondeuse ne fonctionne pas quand l’anse A.
Vérifier que la clé de sûreté est correctement insérée et enfoncée complètement et que le
bouton sur le logement de l’interrupteur est bien enfoncé avant de tirer l’anse.
B. Relâcher l’anse pour éteindre la tondeuse. Retirer la clé de sûreté et le
bloc-piles, retourner la tondeuse et vérifier que la lame tourne librement.
C. Vérifier que le logement de la pile est exempt de débris et connecté correctement.
D. Est-ce que la pile est à pleine charge? Brancher le chargeur et attendre que le
voyant vert s’illumine.
2. Le moteur s’arrête en cours de coupe. A. Relâcher l’anse pour éteindre la tondeuse. Retirer la clé de sûreté et le
bloc-piles. Retourner la tondeuse et vérifier que la lame tourne librement.
B. Relever la hauteur de coupe des roues à la position la plus élevée et
commencer la tonte.
C. Vérifier que le logement de la pile est exempt de débris et connecté correctement.
D. Est-ce que la pile est à pleine charge? Enfoncer le bouton d’état de charge.
E.
Éviter de surcharger la tondeuse. Ralentir la tonte ou augmenter la hauteur de coupe.
3. La tondeuse fonctionne,¸ mais le rendement est A. Est-ce que la pile est à pleine charge? Enfoncer le bouton d’état de charge.
insatisfaisant ou la tondeuse ne coupe pas toute B.
Relâcher l’anse pour éteindre la tondeuse. Retirer la clé de sûreté et le bloc-piles.
la pelouse.
Retourner la tondeuse et vérifier : Le tranchant de la lame. Maintenir la lame affûtée.
La présence éventuelle d’un bourrage de la goulotte de vidange ou du châssis.
C. Le réglage de la hauteur des roues pourrait être trop bas pour l’état de la
pelouse. Augment er la hauteur de coupe.
4. Il est trop difficile de pousser la tondeuse. A. Relâcher l’anse pour éteindre la tondeuse. Retirer la clé de sûreté et le bloc-
piles. Augmenter la hauteur de coupe pour réduire le frottement du châssis sur
l’herbe. Vérifier que chaque roue tourne librement.
5. La tondeuse produit des sons anormaux et vibre. A.
Relâcher l’anse pour éteindre la tondeuse. Retirer la clé de sûreté et le
bloc-piles. Placer la tondeuse sur le côté et vérifier que la lame n’est pas tordue
ou endommagée. Si la lame est endommagée, la remplacer avec une lame de
rechange BLACK+DECKER. Si la face inférieure du châssis est endommagée,
confier la réparation à un centre de réparations BLACK+DECKER autorisé.
B.
Si aucun dommage visible à la lame n’est identifié et que la tondeuse vibre toujours
: Relâcher l’anse pour éteindre la tondeuse. Retirer la clé de sûreté et le bloc-piles.
Démonter tout l’ensemble de lame comme le décrit la section « Retrait et installation de
la lame ». Retirer les débris et nettoyer chaque pièce. Remettre chaque pièce en place
comme le décrit la section « Retrait et installation de la lame ». Si la tondeuse vibre
toujours, confier la réparation à un centre de réparation agréé BLACK+DECKER.
6. Le voyant du chargeur de piles est éteint. A. Vérifier le branchement de la fiche.
B. Remplacer le chargeur.
7. La tondeuse ne ramasse pas l’herbe coupée dans le A. La goulotte est encrassée. Relâcher l’anse pour éteindre la tondeuse.
sac. Retirer la clé de sûreté et le bloc-piles. Vider la goulotte de l’herbe coupée.
B. Trop d’herbe coupée. Relever la hauteur de coupe des roues pour en couper moins.
C. Le sac est plein. Vider le sac plus souvent.
Pour de l’aide avec l’outil, consulter notre site Web
www.blackanddecker.com pour l’emplacement du centre de réparation le plus près ou
communiquer avec l’assistance BLACK+DECKER au 1-800-544-6986.
Page 42

42
PAUTAS DE SEGURIDAD - DEFINICIONES
Es importante que lea y comprenda este manual. La información que contiene se
refiere la protección de SU SEGURIDAD y la PREVENCIÓN DE PROBLEMAS. Los
símbolos a continuación se utilizan para ayudarle a reconocer esta información.
PELIGRO: Indica una situación de peligro inminente que, de no evitarse,
ocasionará la muerte o lesiones graves.
ADVERTENCIA: Indica una situación potencialmente peligrosa que, de no
evitarse, podría ocasionar la muerte o lesiones graves.
ATENCIÓN: Indica una situación potencialmente peligrosa que, de no evitarse,
puede ocasionar lesiones leves o moderadas.
AVISO: Si se usa sin el símbolo de alerta de seguridad indica una situación
potencialmente peligrosa que, de no evitarse, puede ocasionar daño material.
Visite www.BlackandDecker.com/NewOwner
para registrar su nuevo producto.
MANUAL DE INSTRUCCIONES
CORTADORA DE PASTO INALÁMBRICA
DE 60 V MÁX*
Gracias por elegir BLACK+DECKER!
Visite www.BlackandDecker.com/NewOwner para registrar su nuevo producto.
LEA EL MANUAL ANTES DE DEVOLVER ESTE PRODUCTO POR
CUALQUIER MOTIVO:
Si tiene una consulta o algún inconveniente con su producto BLACK+DECKER,
visite http://www.blackanddecker.com/instantanswers
para obtener respuestas instantáneas las 24 horas del día.
Si no encuentra la respuesta o no tiene acceso a Internet, llame al 1-800-544-6986
de lunes a viernes de 8 a. m. a 5 p. m. hora del Este para hablar con un agente.
Cuando llame, tenga a mano el número de catálogo.
CONSERVE ESTE MANUAL PARA FUTURAS CONSULTAS.
SÓLO PARA USO DOMÉSTICO.
*El máximo voltaje inicial del paquete de baterías (medido sin una carga de trabajo) es 60 voltios. Si se
mide con una carga de trabajo,
el voltaje nominal es 54.
CATÁLOGO N°
CM2060
Page 43

43
A continuación se presentan
explicaciones de las ilustraciones
de importantes riesgos de seguridad
correspondientes a la podadora.
1. El usuario debe leer y
comprender el manual de
instrucciones.
2. Para evitar el riesgo de
lesiones graves no corte el
césped subiendo y bajando
pendientes. En pendientes,
siempre corte el césped
transversalmente.
3. Para evitar el riesgo
de lesiones hacia las
personas de alrededor,
mantenga a todas las
personas y las mascotas a
una distancia segura de la
podadora mientras esté en
funcionamiento.
4. Las hojas giratorias pueden
provocar lesiones graves.
Mantenga las manos y los
pies lejos de la plataforma y
la abertura de descarga de la podadora
en todo momento. Antes de retirar y
volver a colocar el recolector de césped,
limpiar, transportar, levantar o realizar el
mantenimiento de la podadora, siempre
asegúrese de que la hoja se haya
detenido (espere hasta que la hoja deje
de girar, aproximadamente 3 segundos,
después de soltar la palanca del
interruptor y retirar la llave de
seguridad).
5. Los objetos golpeados
por la hoja de la podadora
pueden provocar lesiones
graves. Manténgase detrás del mango
cuando el motor esté en funcionamiento.
Siempre asegúrese de que las personas
y las mascotas estén lejos de la
descarga de la podadora mientras
esté en funcionamiento. Siempre
inspeccione el área de trabajo antes
de cortar el césped y retire los objetos
que podrían ser lanzados por la hoja.
Antes de cruzar aceras, calles, patios
y senderos de grava, suelte la palanca
del interruptor para apagar la podadora
y espere hasta que la hoja deje de girar
(aproximadamente 3 segundos).
ADVERTENCIA:
INSTRUCCIONES Y
ADVERTENCIAS DE
SEGURIDAD IMPORTANTES
ADVERTENCIA: AL
UTILIZAR HERRAMIENTAS ELÉCTRICAS
PARA EL JARDÍN, SIEMPRE SE DEBEN
TOMAR PRECAUCIONES BÁSICAS DE
SEGURIDAD PARA REDUCIR EL
RIESGO DE INCENDIOS, DESCARGAS
ELÉCTRICAS Y LESIONES
PERSONALES, INCLUIDAS LAS
SIGUIENTES.
LEA TODAS LAS
INSTRUCCIONES
PARA REDUCIR EL RIESGO DE
LESIONES:
• Antes de cada uso, asegúrese
de que todos los que utilizan esta
herramienta lean y comprendan todas
las instrucciones de seguridad y el
resto de la información incluida en este
manual.
• Conserve estas instrucciones y
revíselas con frecuencia antes del uso
y al instruir a otras personas.
PELIGRO: PRÁCTICAS DE
SEGURIDAD IMPORTANTES
PARA PODADORAS DE
EMPUJAR
Esta podadora puede amputar manos y
pies, y lanzar objetos. El incumplimiento
de las siguientes instrucciones de
seguridad puede producir lesiones
graves o la muerte.
OPERACIÓN GENERAL
1. Antes de hacerla arrancar, lea,
comprenda y siga todas las instrucciones
en la podadora y en el manual de
instrucciones.
2. No ponga las manos ni los pies cerca
o debajo de la podadora. Manténgase
alejado de la abertura de descarga en
todo momento.
3. Sólo permita que adultos
responsables, familiarizados con las
instrucciones, operen esta podadora.
4. Despeje el área donde se utilizará la
podadora de objetos como piedras,
palos, alambre, juguetes, huesos,
etc., que la hoja podría lanzar. Los
objetos golpeados por la hoja pueden
causar graves lesiones a las personas.
Manténgase detrás del mango cuando
el motor esté en funcionamiento.
5. Asegúrese de que no haya personas
en el área que rodea a la podadora
antes de utilizarla. Todas las personas
y mascotas en los
alrededores deben mantenerse a una
distancia segura. Detenga la podadora
si alguien entra en el área que la
rodea.
6. No opere la podadora descalzo o
con sandalias. Siempre use calzado
resistente.
7. No tire de la podadora hacia atrás a
menos que sea absolutamente necesario.
Siempre mire hacia abajo y hacia atrás
Page 44

44
antes y durante movimientos de retroceso.
8. En condiciones normales de uso, los
componentes del recolector de pasto
están sujetos a deterioro y desgaste.
Antes de cada uso de la cortadora de
pasto, compruebe los componentes
del recolector de pasto y el protector
de descarga y cuando sea necesario
cámbielos solamente por piezas
recomendadas Black+Decker.
9. No opere la podadora si el recolector
de césped completo, el protector de
la descarga, el protector posterior
u otros dispositivos de seguridad
no están en su lugar y funcionando.
Verifique periódicamente todos los
protectores y dispositivos de seguridad
para asegurarse de que estén en
buenas condiciones, que funcionen
correctamente y que cumplan con su
función correspondiente. Reemplace
un seguro, protector u otro dispositivo
de seguridad dañado antes de un uso
posterior.
10. Nunca deje funcionando una
podadora sin supervisión.
11. Antes de limpiar la podadora, retirar
el recolector de césped, desatascar
el protector de la descarga, alejarse
de la podadora o antes de realizar
cualquier ajuste, reparación o
inspección, siempre suelte la palanca
del interruptor para detener el motor y
espere hasta que la hoja se detenga
por completo para retirar la llave de
seguridad.
12. Opere la podadora sólo con luz
diurna o buena iluminación artificial
para que los objetos en el trayecto
de la hoja sean visibles claramente
desde el área de funcionamiento de la
podadora.
13. No opere la podadora bajo la
influencia del alcohol o las drogas,
ni cuando esté cansado o enfermo.
Siempre manténgase alerta, ponga
atención a lo que hace y use el sentido
común.
14. Evite los entornos peligrosos. Nunca
opere la podadora sobre césped
húmedo o mojado; nunca use la
podadora bajo la lluvia. Siempre
asegúrese de tener los pies bien
apoyados; camine, nunca corra.
15. Desconecte el sistema de
accionamiento, de haberlo, antes de
arrancar el motor.
16. Si el cortacésped comienza a
vibrar de manera anormal, suelte la
empuñadura de estribo (interruptor
de palanca) (2), espere a que la hoja
se detenga y desconecte segadora,
a continuación, busque la causa
inmediatamente. La vibración es
generalmente una advertencia de
algún problema.
17. Siempre use protección adecuada
para los ojos y las vías respiratorias
cuando opere la podadora.
18. El uso de accesorios o dispositivos
no recomendados para utilizar con
esta podadora puede ser peligroso.
Sólo utilice accesorios aprobados por
BLACK+DECKER.
19. Nunca se estire demasiado mientras
opera la podadora. Siempre asegúrese
de tener los pies bien apoyados y
de conservar el equilibrio en todo
momento mientras opera la podadora.
OPERACIÓN EN PENDIENTES
Las pendientes son un factor importante
en los accidentes de resbalamiento y
caída, que pueden provocar lesiones
graves. La operación en todas las
pendientes requiere de cuidado
adicional. Si se siente incómodo en una
pendiente, no corte el césped en ella.
1. En las pendientes corte el césped
transversalmente a la superficie;
nunca subiéndolas y bajándolas. Sea
extremadamente cuidadoso cuando
cambie de dirección sobre pendientes.
2. Tenga cuidado con agujeros, surcos,
bultos, piedras u otros objetos ocultos.
Un terreno irregular puede provocar
un accidente de resbalamiento y
caída. El césped alto puede ocultar los
obstáculos.
3. No corte el césped si éste está
mojado o en pendientes demasiado
pronunciadas. No tener los pies bien
apoyados puede provocar un
accidente de resbalamiento y caída.
4. No corte el césped cerca de
barrancos, zanjas o terraplenes.
Puede perder el apoyo de los pies o el
equilibrio.
NIÑOS
Pueden producirse accidentes trágicos
si el operador no está atento a la
presencia de niños. Con frecuencia
los niños se sienten atraídos por la
podadora y la actividad de cortar el
césped. Nunca dé por sentado que los
niños permanecerán donde los vio por
última vez.
1. Mantenga a los niños fuera del área
de trabajo y bajo el cuidado atento de
un adulto responsable que no sea el
operador.
2. Esté atento y apague la podadora si
un niño entra al área.
3. Nunca permita que los niños operen la
podadora.
Page 45

45
4. Tenga especial cuidado al acercarse
a esquinas ciegas, arbustos, árboles u
otros objetos que puedan bloquear su
vista de un niño.
MANTENIMIENTO GENERAL
1. Nunca opere la podadora en un área
cerrada.
2. Mantenga ajustados todos los pernos
y tuercas para asegurarse de que el
equipo esté en condiciones de trabajo
seguras.
3. Nunca haga cambios indebidos
en los dispositivos de seguridad.
Verifique regularmente que funcionen
correctamente.
4. Mantenga la podadora libre de
césped, hojas u otras acumulaciones
de residuos. Espere a que la podadora
se enfríe antes de guardarla.
5. Si golpea un objeto extraño, suelte
empuñadura de estribo (interruptor
de palanca) (2) para apagar la
podadora, espere que la hoja se
detenga y desconecte cortadora, luego
inspeccione la podadora. Reparación,
cualquier daño, antes de arrancar y
operarla..
6. Nunca realice ajustes o reparaciones
con el motor en funcionamiento o con
la llave de seguridad en la podadora.
7. Desenchufe siempre podadora antes
de ajustar, limpiar, reparar, inspección,
transporte, almacenamiento o salir de la
corte.
8. Verifique frecuentemente los
componentes del recolector de
césped y el protector de la descarga,
y cuando sea necesario reemplácelos
sólo con piezas recomendadas por
BLACK+DECKER.
9. Las hojas de la podadora son filosas.
Envuelva la hoja o use guantes, y
tenga especial cuidado al realizar
mantenimiento en ellas.
10. Cuide o reemplace las etiquetas de
seguridad y de instrucciones, según sea
necesario.
Este aparato digital Clase B cumple con
la norma canadiense ICES-003.
Este mecanismo cumple con la parte 15
de las normas de la Comisión Federal
de Comunicaciones de Estados Unidos
(FCC). La operación está sujeta a las
dos condiciones siguientes: (1) Este
mecanismo posiblemente no cause
interferencia perjudicial; y (2) este
mecanismo puede aceptar cualquier
interferencia recibida, incluso interferencia
que podría provocar una operación no
deseada.
NOTA: Este equipo ha sido probado y se
encontró que cumple con los límites para
dispositivo digital Clase B, según la parte
15 de las normas de la FCC. Estos límites
están diseñados para brindar protección
razonable contra interferencia perjudicial
en una instalación residencial. Este equipo
genera, usa y puede irradiar energía en
frecuencia de radio y, si no se instala y
se usa de acuerdo con las instrucciones,
puede provocar interferencia perjudicial en
las comunicaciones de radio. Sin embargo,
no hay garantía de que la interferencia no
ocurra en una instalación en particular.
Si este equipo provoca interferencia
perjudicial en la recepción de radio o
televisión, lo que se puede determinar al
apagar y encender el equipo, el usuario
debe tratar de corregir la interferencia
mediante una o más de las siguientes
medidas:
• Cambiar la orientación o la
ubicación de la antena de
recepción.
• Aumentar la separación entre el
equipo y el receptor.
• Conectar el equipo a un
tomacorriente sobre un circuito
diferente de aquel al que está
conectado el receptor.
• Consultar al vendedor o pedir la
ayuda de un técnico en radio y
televisión con experiencia.
Los cambios o las modificaciones que se
le realicen a esta unidad sin aprobación
expresa del tercero responsable
del cumplimiento pueden anular la
autorización del usuario para operar el
equipo. Este aparato digital de la clase B
se conforma con ICES-003 canadiense.
ADVERTENCIA:
INSTRUCCIONES Y
ADVERTENCIAS GENERALES
DE SEGURIDAD PARA TODAS
LAS HERRAMIENTAS
• ESTA HERRAMIENTA PUEDE SER
PELIGROSA. Respete todas las
advertencias y las instrucciones de
seguridad de este manual. El operador
es responsable de respetar las
advertencias e instrucciones de este
manual y las que están en la unidad.
Restrinja el uso de esta podadora a
las personas que lean, comprendan
y respeten las advertencias e
instrucciones de este manual y las que
están en la unidad.
• Evite los entornos peligrosos: No
utilice podadoras de césped en lugares
húmedos o mojados.
• No utilice la unidad bajo la lluvia.
Page 46

46
• Mantenga a los niños alejados: Todos
los visitantes deben mantenerse a una
distancia segura del área de trabajo.
• Use la vestimenta adecuada: No use
ropa holgada ni joyas. Pueden quedar
atrapadas en las piezas móviles. Al
trabajar al aire libre, se recomienda
usar guantes de goma y calzado.
• Use anteojos de seguridad: Siempre
use una careta o una máscara contra el
polvo si la operación produce polvo.
• Utilice el aparato correcto: No utilice
la podadora de césped para ningún
trabajo salvo aquel para el cual se
diseñó.
• Se debe contar con la protección de
un interruptor de corte por falla a tierra
(GFCI, por sus siglas en inglés) en el
o los circuitos o tomacorrientes que se
utilizarán para la cortadora de césped.
Existen receptáculos disponibles con
protección GFCI incorporada y pueden
utilizarse para esta medida de seguridad.
• USO DE CABLES PROLONGADORES
Antes de utilizar un cable prolongador,
asegúrese de que esté en buenas
condiciones. Siempre utilice cables
prolongadores del tamaño adecuado
para la herramienta; es decir, un
tamaño de conductor adecuado para
las diversas longitudes de cable y con
la suficiente capacidad para conducir
la corriente que utilizará la herramienta.
El uso de un cable de menor capacidad
provocará una caída del voltaje de línea
que resultará en pérdida de potencia
y sobrecalentamiento. Consulte la
tabla a continuación para conocer las
capacidades adecuadas de los cables.
Calibre mínimo para cables de extensión
Volts Longitud total del cable en
pies
120V 0-25 26-50 51-100 101-150
(0-7,6m) (7,6-15,2m) (15,2-30,4m) (30,4-45,7m)
Amperaje
Más No más American Wire Gage
de de
0 - 6 18 16 16 14
6 - 10 18 16 14 12
10 - 12 16 16 14 12
12 - 16 14 12 No se recomienda
• VERIFIQUE QUE NO HAYA PIEZAS
DA ÑADAS. Antes de volver a usar la
podadora, se debe controlar cualquier
protección u otra pieza que esté
averiada para determinar si funcionará
correctamente y realizará la función
para la que fue diseñada. Verifique la
alineación de las piezas móviles o si éstas
se traban, la rotura de piezas, el montaje
y cualquier otra condición que pueda
afectar su operación. Cualquier protección
u otra pieza que esté dañada debe ser
reparada correctamente o reemplazada
por un centro de mantenimiento
autorizado, a menos que este manual
indique otra cosa.
• MANTENIMIENTO Y REPARACIONES.
Las reparaciones, el mantenimiento y
los ajustes que no estén especificados
en este manual deben ser realizados
por los centros de mantenimiento
autorizados de BLACK+DECKER o por
otras organizaciones de mantenimiento
calificadas, y siempre deben usarse
piezas de repuesto idénticas.
PELIGRO: ADVERTENCIAS
ADICIONALES PARA
PODADORAS
• Evite ambientes peligrosos – no
use cortadoras de césped en lugares
húmedos o mojados.
• No fuerce la podadora de césped:
Funcionará mejor y en forma más
segura si la utiliza a la velocidad para
la que fue diseñada.
• No se estire demasiado: Conserve la
estabilidad y el equilibrio adecuados
en todo momento.
• Manténgase alerta Fíjese en lo que
está haciendo. Use el sentido común.
No utilice la podadora de césped si
está cansado.
• Guarde la podadora de césped en
desuso bajo techo: Cuando no se
utilice, la podadora de césped debe
guardarse bajo techo en un lugar seco
y bajo llave, lejos del alcance de los
niños.
• Realice el mantenimiento de la
podadora de césped con cuidado:
Mantenga afilados y limpios los bordes
de corte para obtener el mejor y más
seguro rendimiento.
• Mantenga los protectores en su
lugar y en buenas condiciones.
• Mantenga afiladas las hojas.
• Mantenga las manos y los pies
alejados del área de corte.
• Los objetos golpeados por la hoja
de la podadora de césped pueden
provocar lesiones graves a las
personas. Siempre debe examinar el
césped cuidadosamente y remover
todo objeto antes de cada poda.
• Si la podadora de césped golpea
un objeto extraño, siga los pasos a
continuación:
• Detenga la podadora de césped.
Suelte el interruptor.
• Desenchufe el cable de alimentación.
• Inspeccione si hay daños.
• Repare cualquier daño antes de volver
a arrancar y utilizar la podadora de
césped.
• Utilice únicamente hojas de repuesto
idénticas.
Page 47

47
ADVERTENCIA: Parte del polvo
generado por este producto contiene
producto químicos reconocidos por el
Estado de California como causantes de
cáncer, defectos de nacimiento u otros
problemas reproductivos. Algunos ejemplos
de estos productos químicos son:
• compuestos en fertilizantes
• compuestos en insecticidas,
herbicidas y pesticidas
• arsénico y cromo de madera con
tratamiento químico
Para reducir su exposición a estos
productos químicos, use equipo de
seguridad aprobado, como máscaras para
polvo que están diseñadas especialmente
para filtrar las partículas microscópicas.
La etiqueta de su herramienta puede incluir
los siguientes símbolos.
V .................voltios
mW .............milivatios
nm ..............longitud de ondas en
nanómetros
A ................. amperios
Hz ............... hertz
W ................vatios
min ..............minutos
o AC ......corriente alterna
o DC ....corriente directa
no ...............no velocidad sin carga
................Construcción Clase I
(mis à la terre)
................terminal a tierra
...............Construcción de clase II
.............. simbolo de alerta
.../min .......... revoluciones o minuto
seguridad
............ Lea el manual de
instrucciones antes del uso
........... ..... Use protección adecuada
para las vías respiratorias
................ Use protección adecuada
para los ojos
........... ..... Use protección adecuada
para los oídos
INSTRUCCIONES DE SEGURIDAD
IMPORTANTES PARA LOS
CARGADORES DE BATERÍAS
CONSERVE ESTAS INSTRUCCIONES: Este
manual contiene instrucciones de seguridad
importantes para los cargadores de baterías.
• Antes de utilizar el cargador, lea todas
las instrucciones y las prevenciones en el
cargador, en el paquete de baterías y en el
producto que utiliza el paquete de baterías.
ADVERTENCIA:
RIESGO DE
DESCARGA ELÉCTRICA. NO PERMITA
QUE NINGÚN LÍQUIDO ENTRE EN EL
CARGADOR.
ADVERTENCIA:
RIESGO DE
QUEMADURAS. PARA REDUCIR EL
RIESGO DE LESIONES, CARGUE
SOLAMENTE BATERÍAS BLACK+DECKER.
OTROS TIPOS DE BATERÍAS PUEDEN
ESTALLAR Y PROVOCAR DAÑOS
PERSONALES Y MATERIALES.
PRECAUCIÓN: EN
DETERMINADAS CIRCUNSTANCIAS, CON
EL CARGADOR ENCHUFADO EN EL
TOMACORRIENTE, ALGUNOS
MATERIALES EXTRAÑOS PUEDEN
PROVOCAR UN CORTOCIRCUITO EN EL
CARGADOR. SE DEBEN MANTENER
LEJOS DE LAS CAVIDADES DEL
CARGADOR LOS MATERIALES EXTRAÑOS
DE NATURALEZA CONDUCTORA, ENTRE
LOS QUE SE INCLUYEN LA LANA DE
ACERO, EL PAPEL DE ALUMINIO O
CUALQUIER ACUMULACIÓN DE
PARTÍCULAS METÁLICAS. ÉSTOS SON
SÓLO ALGUNOS EJEMPLOS Y NO
CONSTITUYEN UNA LISTA TAXATIVA.
SIEMPRE DESENCHUFE EL CARGADOR
DEL TOMACORRIENTE CUANDO NO
HAYA UN PAQUETE DE BATERÍAS EN LA
CAVIDAD. DESENCHUFE EL CARGADOR
ANTES DE INTENTAR LIMPIARLO.
ADVERTENCIA:
• NO intente cargar el paquete de
baterías con otros cargadores que no
sean de la marca. Los cargadores y los
paquetes de baterías
están diseñados
específicamente para trabajar juntos.
• Estos cargadores están diseñados
para utilizarse exclusivamente
con las baterías recargables
BLACK+DECKER designadas.
Otros usos pueden provocar riesgo
de incendio, descarga eléctrica o
electrocución.
•
ADVERTENCIA:
El cargador
suministrado con este producto debe
enchufarse de manera que quede
correctamente orientado en posición de
montaje vertical o en el piso.
• No exponga el cargador a la lluvia ni a
la nieve.
• Para desconectar el cargador o los
cables para cadena de margarita, tire del
enchufe en lugar del cable. Esto reducirá
el riesgo de dañar el enchufe o el cable.
• Asegúrese de que el cable esté ubicado
de modo que no lo pise o se tropiece
con él y que no esté sujeto a daños o
tensiones de alguna otra forma.
• No utilice un cable prolongador
Page 48

48
a menos que sea absolutamente
necesario. El uso de un cable
prolongador incorrecto puede provocar
riesgo de incendio, descarga eléctrica o
electrocución.
• No coloque objetos en la parte
superior del cargador ni coloque el
cargador en una superficie blanda
que pueda bloquear las ranuras
de ventilación y provocar un calor
interno excesivo. Coloque el cargador
en una posición alejada de cualquier
fuente de calor. El cargador se ventila
a través de ranuras en la parte superior
e inferior de la cubierta.
• No monte el cargador en la pared ni
lo instale en forma permanente sobre
ninguna superficie. El cargador está
diseñado para ser utilizado sobre una
superficie plana y estable (p. ej., un
banco o una mesa).
• No opere el cargador con cables o
enchufes dañados: reemplácelos de
inmediato.
• No opere el cargador si éste ha
recibido un golpe fuerte, se ha
caído, o se ha dañado de cualquier
otra manera. Llévelo a un centro de
mantenimiento autorizado.
• No desarme el cargador; llévelo a un
centro de mantenimiento autorizado
cuando se requiera mantenimiento o
una reparación. El armado incorrecto
puede implicar un riesgo de descarga
eléctrica, electrocución o incendio.
• Antes de limpiarlo, desconecte el
cargador del tomacorriente. Esto
reducirá el riesgo de descarga eléctrica.
Quitar el paquete de baterías no reducirá
este riesgo.
• NUNCA intente conectar 2
cargadores juntos.
• El cargador está diseñado para operar
con corriente eléctrica doméstica
estándar (120 voltios). No intente
utilizarlo con otro voltaje.
INSTRUCCIONES
IMPORTANTES DE
SEGURIDAD PARA LOS
PAQUETES DE BATERÍAS
ADVERTENCIA:
Para un
funcionamiento seguro, lea éste y todos
los manuales de instrucciones incluidos
con la herramienta antes de usar el
cargador. El paquete de baterías incluido
en la caja no está completamente
cargado. Antes de utilizar el paquete de
baterías y el cargador, lea las
instrucciones de seguridad a continuación.
Luego, siga los procedimientos de carga
descritos.
LEA TODAS LAS
INSTRUCCIONES
• No incinere el paquete de baterías,
aun si tiene daños importantes o
está completamente desgastado. El
paquete de baterías puede explotar en el
fuego. Cuando se queman los paquetes
de baterías, se generan vapores y
materiales tóxicos.
• No cargue ni use la batería en
atmósferas explosivas, como
ambientes en los que hay líquidos,
gases o polvo inflamables. Insertar
o retirar la batería del cargador puede
encender el polvo o los vapores.
• Si el contenido de las baterías entra
en contacto con la piel, lave el área de
inmediato con agua y jabón suave. Si
el líquido de la batería entra en contacto
con los ojos, enjuague con agua
manteniendo los ojos abiertos durante
15 minutos o hasta que la irritación
cese. Si se necesita atención médica,
el electrolito de las baterías de iones de
litio contiene una mezcla de carbonatos
orgánicos líquidos y sales de litio.
• El contenido de las células de la
batería abierta puede causar irritación
respiratoria. Respire aire fresco. Si los
síntomas persisten, busque atención
médica.
ADVERTENCIA: RIESGO DE
QUEMADURAS. EL LÍQUIDO DE LA
BATERÍA PUEDE ENCENDERSE SI SE
EXPONE A CHISPAS O LLAMAS.
• Cargue los paquetes de baterías
solamente en cargadores
BLACK+DECKER.
• NO salpique ni sumerja en agua u
otros líquidos. Esto puede causar una
falla prematura de las células.
• No almacene ni utilice la herramienta
y el paquete de baterías en lugares en
los que la temperatura pueda alcanzar
o superar los 40 °C (105 °F) (como en
toldos al aire libre o construcciones de
metal en verano).
ADVERTENCIA: NUNCA
INTENTE ABRIR EL PAQUETE DE
BATERÍAS POR NINGÚN MOTIVO. SI LA
CAJA DEL PAQUETE DE BATERÍAS ESTÁ
AGRIETADA O DAÑADA, NO LA
INTRODUZCA EN EL CARGADOR. NO
COMPRIMA, DEJE CAER NI DAÑE EL
PAQUETE DE BATERÍAS. NO UTILICE
UN PAQUETE DE BATERÍAS O UN
CARGADOR QUE HAYA RECIBIDO UN
GOLPE FUERTE, SE HAYA CAÍDO, ESTÉ
AGOTADO O DAÑADO DE ALGUNA
FORMA (POR EJEMPLO, PERFORADO
CON UN CLAVO, GOLPEADO CON UN
MARTILLO, PISADO). LOS PAQUETES
DE BATERÍAS DAÑADOS DEBEN
Page 49

DEVOLVERSE AL CENTRO DE
MANTENIMIENTO PARA SU RECICLADO.
ADVERTENCIA: Riesgo de
incendio. No guarde o transporte la
batería de ninguna manera que permita
que los terminales expuestos de la
batería entren en contacto con objetos
metálicos. Por ejemplo, no coloque la
batería en delantales, bolsillos, cajas de
herramientas, cajas de juegos de
productos, cajones, con clavos, tornillos,
llaves sueltos, etc. Transportar baterías
puede provocar incendios si los
terminales de la batería entran en
contacto accidentalmente con materiales
conductores como llaves, monedas,
herramientas manuales y similares. Las
Normas para Materiales Peligrosos del
Departamento de Transporte de los EE.
UU. (HMR) concretamente prohíben
transportar baterías comercialmente o en
aviones (es decir, empacadas en maletas
y equipaje de mano) A MENOS que estén
debidamente protegidas de cortocircuitos.
Por lo tanto, cuando transporte baterías
individuales, asegúrese de que los
terminales de la batería estén protegidos y
bien aislados de materiales que puedan
hacer contacto y causar un cortocircuito.
NOTA: Las baterías de IONES DE LITIO no
deben guardarse en el equipaje que se
despacha.
TRANSPORTE
ADVERTENCIA: Peligro
de incendio. No guarde o transporte la batería de
forma que los terminarles expuestos de la misma
puedan estar en contacto con objetos metálicos. Por
ejemplo, no ponga la batería en delantales, bolsillos, cajas de
herramientas, estuches de productos, cajones, etc., junto con
clavos, tornillos, y llaves, etc. sueltos. El transporte de
baterías puede causar incendios si sus terminales
inadvertidamente entran en contacto con materiales
conductores como llaves, monedas, herramientas
manuales y otros por el estilo. El Reglamento sobre
Materiales Peligrosos (HMR) del Departamento de Transporte
de EE.UU. prohíbe transportar baterías comercialmente o en
aviones en el equipaje de mano A MENOS que estén
debidamente protegidas contra cortocircuitos. Por lo tanto,
cuando transporte baterías individuales, asegúrese de que
sus terminales estén protegidos y debidamente aislados de
los materiales que pudieran entrar en contacto con ellos y
provocar un cortocircuito.
NOTA: Las baterías de iones de litio no deben ponerse
en un equipaje que se facture.
ENVÍO
Sus baterías DeWALT cumplen con todos los
reglamentos de envío correspondientes según lo
establecido por las normas legales y de la industria,
las que incluyen las recomendaciones de las Naciones
Unidas sobre el transporte de mercancías peligrosas,
los reglamentos para mercancías peligrosas de
la Asociación Internacional de Transporte Aéreo
(International Air Transport Association, IATA), los
reglamentos del código Marítimo Internacional
para Mercancías Peligrosas (International Maritime
Dangerous Goods, IMDG) y los reglamentos de
Departamento de Transporte de EE. UU. Las celdas y
baterías de iones de litio han sido probadas de acuerdo
con la sección 38.3 de las recomendaciones de las
Naciones Unidas en el manual de pruebas y criterios
para el transporte de mercancías peligrosas.
El envío o transporte de la batería de este producto está
restringido y puede clasificarse como un material peligroso
clase 9.
ENVÍO EN AVIÓN (POR AIRE) O EN
BARCO (POR MAR)
• Comuníquese con la empresa de transporte para
obtener instrucciones actualizadas. Tenga el
contenido (incluida la batería) con usted cuando
se comunique con ellos. Las especificaciones
impresas en estos elementos serán necesarias
para prepararlos para el envío, empacarlos en una
caja que cumpla los requisitos y etiquetar la caja
debidamente.
ENVÍO POR TIERRA (CARRETERA O
FERROCARRIL)
• La caja original del producto y su material de
empaque pueden utilizarse para enviarlo por tierra
dentro de los Estados Unidos y Canadá con las
siguientes estipulaciones:
1. La batería y el resto del contenido deben estar en
sus materiales de empaque originales y encontrarse
ordenados como se recibieron (lo que incluye la
batería en su bolsa de plástico y/o su caja de batería
originales).
2. La caja original del producto y el resto de los
materiales de empaque no deben presentar daños.
3. El envío debe incluir un documento que contenga
lo siguiente:
• El paquete contiene celdas o baterías de iones de
litio.
• El paquete debe manipularse con cuidado y que
existe un peligro de inflamabilidad si el paquete se
daña.
• Deben seguirse procedimientos especiales en caso
de que el paquete se dañe, los que deben incluir
inspección y reempaque si es necesario.
• Los números de teléfono para información adicional
(EE. UU. y Canadá 1-888-698-2571, en otros
lugares +1-410-329-9200).
• Para enviar por tierra en una caja genérica,
comuníquese con la empresa de transporte para
obtener instrucciones actualizadas. Tenga el
contenido (incluida la batería) con usted cuando
se comunique con ellos. Las especificaciones
impresas en estos elementos serán necesarias
para prepararlos para el envío, empacarlos en una
caja que cumpla los requisitos y etiquetar la caja
debidamente.
49
Page 50

50
ESTAS BATERÍAS PUEDEN
TRANSPORTARSE EN AVIONES SI:
1. La aerolínea permite baterías de repuesto de hasta
160 Whr (compruebe el sitio web de la aerolínea)
2. No se transportan más de 2 baterías, y
3. Las baterías están protegidas contra cortocircuito.
La información provista en esta sección del manual se
entrega de buena fe y se considera exacta al momento
en que se creó el documento. Sin embargo, no se
ofrece ninguna garantía, explícita o implícita. La
empresa de transporte es responsable de cumplir con
los reglamentos correspondientes.
RECOMENDACIONES CON RESPECTO
AL ALMACENAMIENTO
1. El mejor lugar de almacenamiento es
uno que sea fresco y seco fuera de la luz
solar directa y de un exceso de calor o frío.
2. El almacenamiento prolongado no
dañará el paquete de baterías o el
cargador, siempre y cuando la batería no
esté completamente descargada.
PROCEDIMIENTO DE CARGA
Use sólo BLACK+DECKER con cargador de la serie
BDCAC60. Use sólo BLACK+DECKER con 60 V MÁX*
paquetes de baterías. Los cargadores BLACK+DECKER
están diseñados para cargar paquetes de baterías
BLACK+DECKER.
1. Enchufe el cargador en un
tomacorriente adecuado antes de insertar
el paquete de baterías.
2. Introduzca el paquete de baterías en
el cargador.
3. El indicador LED verde
destellará indicando que la batería
se está cargando.
4. La batería está completamente
cargada cuando el indicador
LED verde permanece encendido
continuamente. El paquete está
completamente cargado y puede
utilizarse en este momento o dejarse en
el cargador.
Después del uso, recargue las baterías
descargadas a la brevedad posible o de
lo contrario la vida útil de las baterías
podría acortarse en gran medida.
DIAGNÓSTICO DEL CARGADOR
Este cargador está diseñado para
detectar ciertos problemas que pueden
surgir con los paquetes de baterías o
el cargador. Los problemas se indican
mediante el indicador LED ámbar, que
destella en diferentes patrones.
BATERÍA DAÑADA
El cargador puede detectar una
batería débil o dañada. El indicador
LED destellará en el patrón
indicado en la etiqueta. Si observa este
patrón de destello de batería dañada, no
continúe cargando la batería. Devuélvala
a un centro de mantenimiento o a un
lugar de recolección para reciclado.
RETRASO POR PAQUETE CALIENTE/FRÍO
Cuando el cargador detecta que la
ba
tería está excesivamente
caliente o fría, comienza un
Retraso por paquete caliente/
frío, y suspende la carga hasta que la
batería se haya normalizado. Después
que ocurra esto, el cargador cambia
automáticamente al modo de Paquete
cargando. Esta función garantiza la
duración máxima de la batería. El
indicador LED rojo destellará en un patrón
indicado en la etiqueta cuando detecte el
retraso por paquete caliente / frío.
NOTAS IMPORTANTES SOBRE LA CARGA
1. Se puede obtener una mayor
duración y óptimo rendimiento si se
carga el paquete de baterías cuando la
temperatura del aire está entre los 16°C
y los 27°C (60°F y 80°F). NO cargue el
paquete de batería con una temperatura
ambiental por debajo de +4,5 °C
(+40 °F) o por encima de +40,5 °C (+105
°F). Esto es importante y evitará daños
graves en el paquete de baterías.
2. El cargador y el paquete de baterías
pueden estar calientes al tacto durante
la carga. Esto es una condición normal
y no indica un problema. Para facilitar el
enfriado del paquete de baterías después
de su uso, evite colocar el cargador o
el paquete de baterías en un ambiente
cálido, como debajo de un toldo de metal
o en un remolque sin aislamiento.
3. Si el paquete de baterías no se carga
adecuadamente:
a. Revise el tomacorriente enchufando
una lámpara u otro aparato
b. Verifique si el tomacorriente está
conectado a un interruptor que corta
la energía cuando usted apaga la luz.
c. Mueva el cargador y el paquete
de baterías a un lugar donde la
temperatura ambiental sea alrededor
de 16 °C a 27 °C (60 °F a 80 °F).
d. Si los problemas de carga
persisten, lleve la herramienta, el
paquete de baterías y el cargador al
centro de mantenimiento local.
4. Se debe recargar el paquete de baterías
cuando no produce energía suficiente
para tareas que previamente realizaba
con facilidad. NO CONTINÚE utilizando la
herramienta en estas condiciones. Siga el
procedimiento de carga. También se puede
cargar un paquete de baterías parcialmente
agotado cuando se desee, sin ningún
efecto negativo sobre éstas.
5. Se deben mantener lejos de las
cavidades del cargador los materiales
extraños de naturaleza conductora,
entre los que se incluyen la lana de
acero, el papel de aluminio o cualquier
acumulación de partículas metálicas.
Siempre desenchufe el cargador del
Page 51

51
tomacorriente cuando no haya un paquete
de baterías en la cavidad. Desenchufe el
cargador antes de intentar limpiarlo.
6. No congele ni sumerja el cargador en
agua ni en ningún otro líquido.
ADVERTENCIA:
RIESGO DE DESCARGA ELÉCTRICA.
NO
PERMITA QUE NINGÚN LÍQUIDO ENTRE EN
EL CARGADOR. NUNCA INTENTE ABRIR
EL PAQUETE DE BATERÍAS POR NINGÚN
MOTIVO. SI LA CUBIERTA PROTECTORA
DE PLÁSTICO DEL PAQUETE DE
BATERÍAS SE ROMPE O AGRIETA,
DEVUÉLVALA A UN CENTRO DE
MANTENIMIENTO PARA SU RECICLADO
RECOMENDACIONES CON RESPECTO
AL ALMACENAMIENTO
1. El mejor lugar de almacenamiento es
uno que sea fresco y seco fuera de la luz
solar directa y de un exceso de calor o frío.
2. El almacenamiento prolongado no dañará
el paquete de baterías o el cargador.
INDICADOR DEL ESTADO DE
CARGA - FIGURA A
El lateral de la batería está equipado con
un indicador de estado de carga. Este
puede utilizarse para mostrar el nivel actual
de carga en la batería durante el uso y
durante la carga. No indica la funcionalidad
de la herramienta y está sujeto a variación
basándose en los componentes del
producto, la temperatura y la aplicación del
usuario final.
Comprobación del estado de carga
durante el uso:
• Presione el botón indicador de estado
de carga (A1).
• Las tres LED (A2) se iluminarán
indicando el porcentaje de carga en la
batería. Véase la tabla en la figura A.
• Si la luz LED no se ilumina, cargue la
batería.
NOTA: Esta batería está diseñada para
no operar cuando se alcance una carga
de menos del 20% de su capacidad.
Cuando se agote la carga de la batería, la
herramienta no funcionará hasta después
de que se haya recargado la batería.
A
A1
A1
DESCRIPCIÓN FUNCIONAL
1. Caja del interruptor
2. Asa de varilla
3. Mango superior
4. Mango inferior
5. Palancas de fijación del mango superior (2)
6. Palancas de fijación del mango inferior (2)
7. Palanca de ajuste de la altura de corte
8. Bolsa de recolección de pasto
9. tapa de puerta trasera
10. Panel
11. POWERSWAP
TM
12. Puerto de batería
13. Asa de transporte superior
14. Asa de transporte inferior
10
11
2
3
4
1
5
9
8
5
6
6
14
7
12
13
Page 52

52
INSTALACIÓN Y
EXTRACCIÓN DE LAS
BATERÍAS
ADVERTENCIA:
Compruebe que
la llave de seguridad esté quitada para
impedir la puesta en marcha antes de
sacar o instalar la batería.
PARA INSTALAR LAS BATERÍAS:
• Levante y sujete la cubierta del puerto
de batería (12) hacía arriba para
exponer el puerto de batería (15).•
Deslice la batería (16) en el puerto
de batería hasta que esté totalmente
asentada y se oiga un clic (figura B).
Compruebe que la batería esté bien
asentada y totalmente asegurada
en su sitio. Repita el proceso para el
segundo puerto de batería.
• Cierre la tapa del puerto de batería.
Asegúrese de que la tapa esté
totalmente fijada antes de arrancar la
cortadora de pasto.
PARA SACAR LA BATERÍA:
• Abra la tapa del puerto de batería (12)
como se describe más arriba.
• Presione el botón de liberación de la
batería (17) en la batería y tire de la
batería para sacarla de la herramienta
como se muestra en la figura C.
B
15
12
C
16
17
16
SELECCIÓN DE LA BATERÍA
ADVERTENCIA:
Compruebe que
la llave de seguridad esté quitada para
impedir la puesta en marcha antes de
seleccionar la batería activa.
La cortadora de pasto está equipada con
un botón POWERSWAPTM (11). Presione el
botón de selección de batería (figura D) a
la izquierda o a la derecha.
• La parte marcada con “1” activa el
puerto de batería del lado izquierdo.
• La parte marcada con “2” activa el
puerto de batería del lado derecho.
NOTA: La cortadora de pasto puede
funcionar con una sola batería si el
interruptor está en la posición adecuada.
D
11
BATERÍA ACTIVA,
INDICADORES DE ESTADO
DE CARGA
NOTA: El estado de carga se indica
solamente cuando se inserta una batería
o cuando se enciende la cortadora o
cuando una sola batería está presente y
el interruptor se activa y se desactiva para
conectarlo para poner en funcionamiento la
cortadora de pasto.
Esta cortadora de pasto está equipada con
un indicador de estado de carga ubicado
en la base del panel (10). Este se usa para
mostrar el puerto de batería activa y el
nivel actual de carga de la batería activa.
Cuando se instala una batería en los
puertos de baterías, las tres LED de nivel
de carga se iluminarán por 30 segundos
mostrando el nivel actual de carga de la
batería y luego se apagan. Mientras la
cortadora esté utilizándose, se mostrará el
nivel actual de carga para la batería activa
seleccionada.
• Cuando la cortadora se activa por
primera vez, todas las luces indicadoras
LED en el panel (10) se iluminarán
temporalmente.
• Las luces LED del panel en el lado de la
batería inactiva se apagarán.
• Las LED del panel en el lado de la batería
activa (17) permanecerán encendidas
Page 53

53
INSTALACIÓN DEL MANGO
SUPERIOR (Figura H)
El mango superior tiene tres orificios
de posición de montaje diferentes (21)
para ajustar la longitud del mango
desde la plataforma. La primera serie
de orificios cerca de la parte inferior
del tubo del mango superior permite la
máxima longitud del mango. Al utilizar
las posiciones de montaje intermedia
y superior se acortará la longitud del
mango.
• Saque las palancas de fijación del
mango superior (5), las tuercas (22), y
las arandelas (23) del mango.
• Alinee los orificios en la parte inferior
del mango superior (3) con los orificios
de la parte superior del mango inferior
(4).
NOTA: Asegúrese de que el cable esté
ubicado en la parte delantera de ambos
mangos, como se muestra en la Figura I.
Si no es así, el cable puede enredarse y
la cortadora de pasto no podrá guardarse
fácilmente.
• Desde la parte de fuera del mango
superior (3), deslice el perno de la
palanca (5) a través de los orificios de
las posiciones de montaje (21).
• Deslice la arandela sobre el perno
y ensamble sin apretar la unidad
completa con la tuerca.
• Gire el mango superior (3) hasta su
posición de funcionamiento.
• Cierre la palanca. Si la palanca está
demasiado apretada o demasiado floja,
abra la palanca y afloje/apriete la tuerca
para ajustar la fuerza de sujeción.
Compruebe las palancas cerrándolas.
Deberían estar lo suficientemente
ajustadas de manera que los
mangos se mantengan firmes, pero
lo suficientemente flojas para que las
palancas puedan cerrarse totalmente.
y las tres LED indicadoras de nivel de
carga (18) indicarán el porcentaje de
carga de la batería. (Véase la tabla en
la figura A).
• Si no se ilumina ninguna LED para la
batería activa, encienda y apague el
botón POWERSWAPTM (11) para la
batería inactiva. Si ninguna LED de
batería se ilumina, cargue la batería.
NOTA: La llave de seguridad tiene que
estar insertada para que todas las LED y
funciones de interruptor ocurran como se
describe.
E
11
18
17
17
MONTAJE
ADVERTENCIA:
Antes del
ensamblaje, asegúrese de que el asa de
varilla se haya soltado y que la llave de
seguridad se haya sacado.
INSTALACIÓN DEL MANGO INFERIOR
• Levante el mango inferior (4) hasta su
sitio asegurándose de que la flecha
(19) en la base de la cortadora de
pasto se alinee con el 1, el 2, o la S en
la base del mango (20) (recuadro de la
Figura F)
ATENCIÓN: Asegúrese de que
cada lado del mango inferior esté fijado
en el mismo número. La flecha debe
estar alineada con el 1, o el 2 para el
funcionamiento.
• Cierre las palancas de ajuste de altura
del mango inferior (6) como se muestra
en la Figura F. Cuando cierre cada
una, asegúrese de que los dientes
estén engranados, como se muestra en
la Figura G.
• Si la conexión entre el mango y la
palanca está demasiado apretada o
demasiado floja, abra la palanca y
ajuste la profundidad de la palanca
girando la palanca. Vuelva a cerrarla
hasta que los dientes estén totalmente
sujetos y cada palanca esté firmemente
cerrada.
Page 54

54
H
5
23
4
3
G
F
4
20
19
I
6
21
21
22
FIJACIÓN DEL CABLE DEL
MOTOR (FIGURA J)
ATENCIÓN:
Fije el cable de manera
que no esté estirado ni se enganche en
las juntas de los mangos durante el uso o
al plegarlos. Esto puede ocasionar daño
al cable.
El cable del motor (24) tiene que estar
fijado a los mangos utilizando los
sujetacables (25) que ya están fijados en
el mango.
Para sujetar el cable al mango:
• Coloque los mangos en la posición de
funcionamiento, consulte la sección
“Instalación del mango inferior”.
• Pase el cable por la parte delantera de
los mangos inferior y superior.
• Tire hacia atrás del sujetacables.
• Deslice el cable del motor bajo el
gancho y asegúrese de que esté
totalmente fijado en su sitio por el
sujetacables.
J
23
25
USO DE LA BOLSA
PELIGRO: Saque la llave y las baterías
antes de sacar el accesorio de descarga
lateral y el accesorio de trituración y
cuando abra la tapa de puerta trasera e
instale la bolsa.
• Asegúrese de que el accesorio de
descarga (26) (Figura M) y el accesorio
de trituración (27) (Figura L) estén
sacados de la cortadora de pasto antes
de colocar la bolsa.
• Levante la tapa de puerta trasera (9) y
ponga la bolsa de recolección de pasto
(8) en la cortadora de manera que los
ganchos de la bolsa (28) descansen
sobre las orejetas (29) como se muestra
en la Figura K. Luego baje la tapa de
puerta trasera.
Page 55

55
8
9
K
28
29
TRITURACIÓN
PELIGRO: Saque la llave y las
baterías antes de retirar el accesorio
de descarga lateral y la bolsa de
recolección, y al instalar el accesorio de
trituración.
• Asegúrese de que el accesorio de
descarga lateral (26) y la bolsa de
recolección (8) no estén instaladas.
• Levante la tapa de puerta trasera (9) y
deslice el accesorio de trituración (27)
totalmente en la cortadora de pasto,
como se muestra en la Figura L.
• Asegúrese de que la tapa de puerta
trasera se cierre completamente antes
de arrancar la cortadora de pasto.
27
L
DESCARGA LATERAL
PELIGRO: Saque la llave y las
baterías antes de quitar la bolsa de
recolección y al instalar el accesorio de
trituración y el accesorio de descarga
lateral.
• Asegúrese de que la bolsa de
recolección (8) esté quitada.
• Levante la tapa trasera (9) y deslice el
accesorio de trituración (27) totalmente
en la cortadora de pasto, como se
muestra en la Figura L.
• Levante la tapa lateral (30) y enganche
el accesorio de descarga lateral (26) en
la cortadora de pasto, como se muestra
en la Figura M.
• Suelte la tapa lateral y asegúrese de
que el accesorio esté sujeto en su
sitio antes de arrancar la cortadora de
pasto, como se muestra en el recuadro
de la Figura M.
M
30
26
FUNCIONAMIENTO
LEA ESTE MANUAL DE
INSTRUCCIONES ANTES DE UTILIZAR
LA CORTADORA DE PASTO. Mire
la “Descripción funcional” para
familiarizarse con la ubicación de los
distintos controles y ajustes. Conserve
este manual para futuras consultas.
PELIGRO: La cuchilla en
movimiento está afilada. No opere la
cortadora de pasto en la modalidad de
descarga lateral o trituración si la puerta
trasera no está cerrada bajo la tensión del
resorte, ya que podrían producirse graves
lesiones. Lleve su cortadora de pasto al
centro de servicio más cercano para la
reparación.
PELIGRO: La cuchilla en
movimiento está afilada. No opere
nunca la cortadora de pasto en la
modalidad de uso de bolsa a menos que
los ganchos de la percha del colector de
pasto estén asentados adecuadamente
en la cortadora y la puerta de descarga
trasera descanse firmemente contra la
parte superior del colector de pasto,
puesto que podrían producirse lesiones
graves.
ADVERTENCIA: Deje que la
cortadora de pasto funcione a su propio
ritmo. No la sobrecargue.
AJUSTE DE LA ALTURA DEL
MANGO (FIGURA N)
• Abra ambas palancas de fijación del
mango inferior (6).
• Ajuste el mango de manera que la
flecha (19) en la base de la cortadora
de pasto se alinee con el 1, o el 2, en
la base del mango (20). Asegúrese
de que el mango esté fijado en el
mismo número en ambos lados de la
Page 56

56
diseño de la misma una llave de seguridad
extraíble (32). La cortadora de pasto se
desactivará totalmente cuando la llave de
seguridad se haya sacado de la cortadora.
NOTA: LA LLAVE DE SEGURIDAD
TIENE UN ORIFICIO EN EL CENTRO
PARA PODER GUARDARLA COLGADA
A UN CLAVO, FUERA DEL ALCANCE
DE LOS NIÑOS. NO ATE LA LLAVE
DE SEGURIDAD A LA CORTADORA DE
PASTO.
PELIGRO: LAS CUCHILLAS EN
MOVIMIENTO PUEDEN CAUSAR
LESIONES GRAVES. PARA EVITAR
GRAVES LESIONES, SAQUE LA
LLAVE DE SEGURIDAD CUANDO
LA CORTADORA NO ESTÉ SIENDO
SUPERVISADA, O AL CARGARLA,
LIMPIARLA, REPARARLA,
TRANSPORTARLA, LEVANTARLA O
GUARDARLA.
Arrancar la CORTADORA DE PASTO
PELIGRO: LA CUCHILLA EN
MOVIMIENTO ESTÁ AFILADA. NO
INTENTE NUNCA ANULAR LA
OPERACIÓN DE ESTA CAJA DEL
INTERRUPTOR Y SISTEMA DE LLAVE
DE SEGURIDAD PUESTO QUE PODRÍAN
PRODUCIRSE GRAVES LESIONES.
NOTA: la cortadora de pasto funciona
cuando la batería y la llave de seguridad
están instaladas.
• Inserte la llave de seguridad (32) en la
caja del interruptor (1) hasta que esté
totalmente asentada en la caja, como se
muestra en la Figura P. La cortadora de
pasto funciona ahora.
• Su cortadora de pasto está equipada
con una caja especial del interruptor
de encendido/apagado. Para operar la
cortadora de pasto, empuje y mantenga
apretado el botón (33) de la caja del
interruptor (1), luego tire del asa de
varilla (2) hacia el manillar, como se
muestra en la Figura Q. Cuando se
arranca la cortadora puede soltar el
botón.
• Para apagar la cortadora, suelte el asa
de varilla.
ADVERTENCIA: No intente nunca
bloquear el interruptor o el asa de varilla en
la posición de encendido.
NOTA: Cuando el asa de varilla haya
vuelto a la posición original se activará
el “Mecanismo de freno automático”. El
motor se frena eléctricamente y la cuchilla
de la cortadora dejará de girar en tres
segundos o menos.
cortadora de pasto.
• Cierre ambas palancas y asegúrese de
que el mango esté firmemente ajustado.
N
6
20
19
AJUSTE DE LA ALTURA DE
LA CORTADORA DE PASTO
(FIGURA O)
La altura del corte se ajusta con la palanca
de ajuste de altura de corte central y hay
siete posiciones entre las que elegir.
NOTA:
Si no está seguro a qué altura cortar,
empiece a cortar con la palanca de ajuste
de altura (7) en la posición siete y ajuste
la altura hacia abajo según sea necesario,
como se muestra en la figura O.
PARA FIJAR LA ALTURA DE CORTE
• Tire de la palanca de ajuste de altura
de la cortadora (7) para sacarla de la
muesca de fijación (31).
• Mueva la palanca hacia la parte trasera
del aparato para levantar la altura de
corte.
• Mueva la palanca hacia la parte
delantera del aparato para bajar la altura
de corte.
• Empuje la palanca de ajuste de altura en
una de las siete muescas de fijación.
O
31
7
LLAVE DE SEGURIDAD
PELIGRO: La cuchilla en movimiento
está afilada.
Para impedir el arranque accidental o
el uso no autorizado de su cortadora de
pasto inalámbrica, se ha incorporado al
Page 57

57
y práctica.
• Sujetando el mango, abra, pero no
saque, las palancas de fijación del
mango inferior (6) y pliegue el mango
hacia adelante de la cortadora de pasto,
como se muestra en la Figura R.
• Ajuste el mango de manera que la flecha
(19) en la base de la cortadora de pasto
se alinee con la “S” (20). Asegúrese de
que el mango esté fijado igual en ambos
lados de la cortadora de pasto.
• Cierre ambas palancas y asegúrese de
que el mango esté firmemente ajustado.
• Abra, pero no saque, las palancas de
fijación del mango superior (5) y pliegue
el mango superior (3) hacia atrás por
encima del mango inferior (4), como se
muestra en la Figura S.
•
La cortadora de pasto debe comprimirse,
como se muestra en la Figura T.
R
6
20
19
S
5
3
4
T
P
32
Q
2
33
1
SOBRECARGA DE LA CORTADORA DE PASTO
Para evitar daños debidos a condiciones
de sobrecarga, no intente cortar demasiado
césped de una vez. Ralentice el ritmo de
corte o levante la altura de corte.
TECNOLOGÍA AUTOSENSE™
La tecnología AUTOSENSE™ detecta
el grosor del pasto y ajusta la potencia
en consecuencia. En pasto más ligero
la cortadora funciona a velocidad
normal para prolongar el tiempo de
funcionamiento. En pasto más grueso
aumentará la potencia, facilitando el corte
del pasto más grueso.
ALMACENAMIENTO
ADVERTENCIA: Las cuchillas
en movimiento pueden causar lesiones
graves. Suelte el asa de varilla (2) para
apagar la cortadora de pasto, saque la
llave de seguridad y saque la batería
antes de levantar, transportar o guardar la
cortadora. Guárdela en un lugar seco.
ATENCIÓN: Punto de pellizco. Para
evitar pellizcarse, mantenga los dedos
lejos del área entre los mangos al plegar
los mangos.
ATENCIÓN:
Asegúrese de que el cable
no se estire ni se enganche en las juntas de
los mangos durante el uso o al plegarlos. Esto
puede ocasionar daño al cable.
El mango de la cortadora puede plegarse
fácilmente para guardarla de forma rápida
Page 58

58
TRANSPORTAR LA
CORTADORA DE PASTO
PELIGRO: LAS CUCHILLAS EN
MOVIMIENTO PUEDEN CAUSAR
GRAVES LESIONES. PARA EVITAR
GRAVES LESIONES, saque la llave
de seguridad y las baterías cuando
LA CORTADORA NO ESTÉ SIENDO
SUPERVISADA, O AL CARGARLA,
LIMPIARLA, REPARARLA,
TRANSPORTARLA, LEVANTARLA O
GUARDARLA.
• La cortadora de pasto puede
transportarse utilizando las prácticas
asas de transporte (13, 14), como
se muestra en la Figura U. NO
intente levantar la cortadora de pasto
agarrando el mango superior (3) o el
mango inferior (4).
U
CONSEJOS PARA CORTAR
PASTO
ADVERTENCIA: INSPECCIONE
SIEMPRE EL ÁREA DONDE VAYA A
USARSE LA CORTADORA Y QUITE
TODAS LAS PIEDRAS, PALOS,
ALAMBRES, HUESOS Y OTROS
RESIDUOS QUE PUEDAN SALIR
DISPARADOS AL CHOCAR CONTRA
LA CUCHILLA EN MOVIMIENTO.
1. ADVERTENCIA: Corte a través
de la superficie de las gradientes,
nunca hacia arriba y hacia abajo.
Tenga mucho cuidado cuando cambie
de dirección en las gradientes. No
corte gradientes excesivamente
inclinadas. Mantenga siempre el
equilibrio.
2. Suelte el asa de varilla para “APAGAR”
la cortadora de pasto cuando cruce
zonas con gravilla (las piedras pueden
salir disparadas al chocar contra las
cuchillas).
3. Fije la cortadora de pasto en la altura
de corte más alta cuando corte en
terrenos desiguales o en maleza alta.
Cortar demasiado césped a la vez
puede hacer que se sobrecargue el
motor y se pare. Consulte la guía de
solución de problemas.
4. Si se usa una bolsa de recolección
de pasto (8) durante la estación de
crecimiento rápido, el césped puede
tender a atascarse en la abertura de
descarga. Suelte el asa de varilla para
apagar la cortadora y saque la llave de
seguridad. Saque el colector y agite el
pasto para que quede en el extremo
trasero de la bolsa. Limpie también el
césped o residuos que hayan podido
acumularse alrededor de la abertura de
descarga. Vuelva a colocar el colector
de pasto.
5. Si la cortadora empezara a vibrar
anormalmente, suelte el asa de varilla
para apagar la cortadora y saque
la llave de seguridad. Compruebe
inmediatamente para determinar la
causa. La vibración es una advertencia
de problemas. No opere la cortadora
de pasto hasta que se haya realizado
una verificación de mantenimiento.
Consulte la guía de solución de
problemas en el manual.
6. Suelte SIEMPRE el asa de varilla
para apagar la cortadora de
pasto Y SAQUE LA LLAVE DE
SEGURIDAD CUANDO NO ESTÉ
SUPERVISÁNDOLA AUNQUE SOLO
SEA POR UN CORTO PERÍODO.
LAS SIGUIENTES SUGERENCIAS LE
AYUDARÁN A OBTENER UN TIEMPO
DE FUNCIONAMIENTO ÓPTIMO
DE SU CORTADORA DE PASTO
INALÁMBRICA:
1. Vaya más despacio en
áreas donde el pasto sea
especialmente largo o
grueso.
2. Evite cortar cuando
el pasto esté mojado de la lluvia o
empapado del rocío.
3. Corte el pasto con frecuencia,
especialmente durante los períodos de
gran crecimiento.
NOTA: Se recomienda que recargue
su cortadora de pasto después de
usarla para prolongar la vida útil de la
batería. La carga frecuente no dañará la
batería y garantizará que la batería esté
totalmente cargada y lista para usarse
la próxima vez. Guardar la batería sin
que esté totalmente cargada acortará la
vida útil de la misma.
EXTRACCIÓN E
INSTALACIÓN DE LA
Page 59

59
CUCHILLA
PELIGRO: Riesgo de lesiones.
Cuando vuelva a ensamblar la unidad
de la cuchilla, asegúrese de que cada
pieza vuelva a instalarse correctamente,
como se describe más abajo. Un
ensamblaje incorrecto de la cuchilla o
de otras piezas del sistema de cuchilla
puede causar lesiones graves.
1. ADVERTENCIA: suelte el asa
de varilla para apagar la cortadora de
pasto, ESPERE A QUE SE DETENGA
LA CUCHILLA Y SAQUE LA LLAVE DE
SEGURIDAD y las baterías.
2. Corte un trozo de madera de 2 x 4
(34) (61 cm) (unos dos pies de largo)
para impedir que la cuchilla gire
mientras saca el perno (35).
3.
ADVERTENCIA: use guantes
y protección ocular adecuada.
Coloque la cortadora de pasto sobre
un costado. Tenga cuidado con los
bordes afilados de la cuchilla. Coloque
la madera y desatornille el perno en
sentido antihorario con una llave de 13
mm (1/2 pulg.) (36) como se muestra
en la Figura V.
4. Saque el perno (35) y la arandela (37).
Saque la cuchilla (38) tirando de ella,
como se muestra en la Figura W. El
ventilador (39) no debería quitarse.
Examine todas las piezas para
determinar si hay daños y cámbielas si
es necesario.
5. La cuchilla solo puede fijarse en el
ventilador en una dirección. Para
volver a ensamblarla, alinee el orificio
en forma de D de la cuchilla con el
poste en forma de D del ventilador,
asegurándose de que las letras de la
cuchilla estén mirando hacia afuera en
dirección opuesta a la cortadora de
pasto.
6. Para ajustar, coloque un trozo de
madera como se muestra en la
Figura X para impedir que la cuchilla
gire. Deslice el perno a través de
la arandela y ajústelo en su sitio en
sentido horario con una llave de 13
mm (1/2 pulg.), como se muestra en la
Figura X.
W
37
35
38
39
X
V
34
35
36
34
35
36
AFILADO DE LA CUCHILLA
MANTENGA LA CUCHILLA AFILADA
PARA UN RENDIMIENTO ÓPTIMO
DE LA CORTADORA DE PASTO. UNA
CUCHILLA ROMA NO CORTA BIEN EL
PASTO.
ADVERTENCIA: USE
PROTECCIÓN OCULAR APROPIADA
MIENTRAS SAQUE, AFILE O INSTALE
LA CUCHILLA. ASEGÚRESE DE QUE
SE HAYAN SACADO LA LLAVE DE
SEGURIDAD y la batería.
Afilar la cuchilla dos veces durante
una estación de corte normalmente es
suficiente en circunstancias normales.
La arena hace que la cuchilla se desafile
rápidamente. Si su pasto tiene tierra
arenosa, puede ser necesario un afilado
más frecuente.
CAMBIE LA CUCHILLA
Page 60

60
DOBLADA O DAÑADA
INMEDIATAMENTE.
AL AFILAR LA CUCHILLA:
1. Asegúrese de que la cuchilla se
mantenga equilibrada.
2. Afile la cuchilla en el ángulo de corte
original.
3. Afile los bordes de corte en ambos
extremos de la cuchilla, eliminando
la misma cantidad de material de
ambos extremos.
PARA AFILAR LA CUCHILA
EN UN TORNILLO DE
BANCO: (Figura Y)
1. Asegúrese de que se suelte el asa de
varilla, la cuchilla se haya detenido
y la llave de seguridad y las baterías
se hayan sacado antes de sacar la
cuchilla.
2. Saque la cuchilla de la cortadora de
pasto. Vea las instrucciones para sacar
e instalar la cuchilla.
3. Asegure la cuchilla (38) en un tornillo
de banco (40).
4. Use protección ocular adecuada
y guantes y tenga cuidado de no
cortarse.
5. Lime con cuidado los bordes de corte
de la cuchilla con una lima fina de
dientes (41) o una piedra de afilar,
manteniendo el ángulo del borde de
corte original.
6. Compruebe el equilibrio de la cuchilla.
Vea las instrucciones para el equilibrio
de la cuchilla.
7. Vuelva a colocar la cuchilla en
la cortadora de pasto y ajústela
firmemente.
Y
40
41
38
SIMETRÍA DE LA HOJA
(FIGURA Z)
Revise la simetría de la hoja (38)
colocando el agujero central de esta
sobre un clavo o un destornillador
de vástago redondo (42), sujeto
horizontalmente en una prensa (40).
Si alguno de los extremos de la hoja
gira hacia abajo, lime el borde filoso de
ese extremo. La hoja tiene una simetría
adecuada cuando ninguno de los
extremos baja.
Z
38
40
42
LUBRICACIÓN
No se necesita ningún tipo de lubricación.
No aceite las ruedas. Tienen superficies
plásticas en los rodamientos que no
requieren lubricación alguna.
LIMPIEZA
Suelte la palanca del interruptor para
apagar la podadora, espere hasta que la
hoja se detenga y luego retire la llave de
seguridad y el paquete de baterías. Para
limpiar la podadora, utilice únicamente
jabón suave y un paño húmedo. Limpie
todos los recortes de césped que podrían
haberse acumulado por debajo de la
plataforma. Después de varios usos,
verifique el ajuste de todos los elementos
de fijación expuestos. Asegúrese de que
los terminales y el compartimiento de
baterías de la podadora estén libres de
residuos.
PREVENCIÓN DE LA
CORROSIÓN
Los fertilizantes y otros productos
químicos para el jardín contienen
agentes que aceleran considerablemente
la corrosión de los metales. Si corta el
césped en áreas donde se han utilizado
fertilizantes o productos químicos, se
debe limpiar la podadora inmediatamente
después del modo siguiente: Suelte el
mango de suspensión (2) para apagar la
cortadora de césped y quite la llave de
seguridad y la batería. Limpie todas las
piezas expuestas con un paño húmedo.
PRECAUCIÓN: NO VIERTA NI
ROCÍE AGUA SOBRE LA PODADORA
PARA LIMPIARLA. No guarde la
herramienta sobre o junto a fertilizantes o
productos químicos. Dicho
almacenamiento puede provocar una
rápida corrosión.
Page 61

61
CUMPLE CON LOS REQUISITOS
DE SEGURIDAD CPSC
BLACK+DECKER Cortadoras se ajustan
a las normas de seguridad del American
National Standards Institute, y de la
Comisión de Seguridad de Productos
del Consumidor EE.UU.. La cuchilla gira
cuando el motor está en marcha.
ACCESORIOS
LOS ACCESORIOS RECOMENDADOS
PARA USO CON LA PODADORA
ESTÁN DISPONIBLES EN SU
DISTRIBUIDOR LOCAL O CENTRO DE
MANTENIMIENTO AUTORIZADO. SI
NECESITA ASISTENCIA EN RELACIÓN
CON LOS ACCESORIOS, LLAME AL:
1-800-544-6986
ADVERTENCIA: El uso de
cualquier accesorio no recomendado
para uso con esta herramienta puede
resultar peligroso.
EL SELLO RBRC™
El sello RBRC™ (Corporación de
reciclado de baterías recargables) que
se encuentra en la batería de iones
de litio (o paquete de baterías) indica
que los costos de reciclar la batería
(o el paquete de baterías) al final de
su vida útil ya fueron pagados por
BLACK+DECKER .
RBRC™ en cooperación con
BLACK+DECKER y otros usuarios de
baterías, ha establecido programas
en los Estados Unidos para facilitar
la recolección de baterías de iones
de litio agotadas. Ayude a proteger
nuestro medio ambiente y a conservar
los recursos naturales: devuelva las
baterías de iones de litio agotadas a un
centro de mantenimiento autorizado de
BLACK+DECKER o a un comerciante
minorista local para que se reciclen.
También puede comunicarse con el
centro local de reciclado para obtener
información sobre dónde dejar las
baterías agotadas. RBRC™ es una
marca comercial registrada de la
Corporación de reciclado de baterías
recargables.
INFORMACIÓN DE
MANTENIMIENTO
Todos los Centros de mantenimiento de
BLACK+DECKER cuentan con personal
altamente capacitado dispuesto a
brindar a todos los clientes un servicio
eficiente y confiable en la reparación
de herramientas eléctricas. Si necesita
consejo técnico, reparaciones o piezas
de repuesto originales de fábrica,
póngase en contacto con el centro de
mantenimiento de BLACK+DECKER
más cercano a su domicilio. Para ubicar
su centro de servicio local, llame al
(55)5326-7100 o visite nuestro sitio
www.blackanddecker.com.
GARANTÍA LIMITADA POR TRES
AÑOS
Black & Decker (U.S.) Inc. garantiza este producto
contra defectos de material o mano de obra por
un período de tres (3) años a partir de la fecha
de compra, siempre que el producto se utilice en
un entorno doméstico. Esta garantía limitada no
cubre las fallas debidas al abuso, daño accidental
o reparaciones que se hayan hecho o intentado por
cualquier persona que no sea de Black+Decker y
sus Centros de servicio autorizados. Un producto
defectuoso que cumpla con las condiciones de la
garantía expuestas aquí será reemplazado o reparado
sin cargos de una de estas dos formas:
La primera, que resultará solamente en cambios, es
devolver el producto al minorista donde se compró
(siempre que la tienda sea un minorista participante).
Las devoluciones deberían hacerse dentro del
período de tiempo especificado en la política de
cambios del minorista. Puede exigirse prueba de
compra. Compruebe con el minorista los límites de
tiempo de las devoluciones o cambios establecidos
en su política específica de devoluciones. La segunda
opción es llevar o enviar el producto (previo pago)
a un centro de servicio propiedad de o autorizado
por Black+Decker para su reparación o reemplazo
a elección de Black+Decker. Puede exigirse prueba
de compra. Los centros de servicio propiedad de o
autorizados por Black+Decker están indicados en
línea en www.blackanddecker.com.
Esta garantía no se aplica a los accesorios. Esta
garantía le otorga derechos legales específicos y
usted puede tener otros derechos que varían de
un estado a otro o de una provincia a otra. Si tiene
preguntas, contacte con el gerente de su Centro de
Servicio Black+Decker más cercano. Este producto
no es para uso comercial y, por consiguiente, dicho
uso comercial de este producto anulará esta garantía.
Por la presente se renuncia a todas las demás
garantías, expresas o implícitas.
AMÉRICA LATINA: Esta garantía no se aplica a los
productos que se venden en América Latina. Para
productos vendidos en América Latina, remítase a
la información de garantía específica de su país, la
cual encontrará en el embalaje, llame a su compañía
local o visite nuestro sitio web a fin de obtener esa
información.
Page 62

62
GUÍA DE SOLUCIÓN DE PROBLEMAS
PROBLEMA SOLUCIÓN
1. La podadora no funciona al activar la A. Revise para asegurarse de que la llave de seguridad se ha instalado y esté
palanca de seguridad. bien asentada, y de que el botón de la caja del interruptor esté completamente oprimido antes de tirar
del mango de suspensión.
B. Suelte la palanca del interruptor para apagar la podadora. Retire la llave de seguridad y el paquete
de baterías, voltee la podadora y verifique que la hoja pueda girar libremente.
C. Verifique que la cavidad de la batería esté libre de residuos y correctamente conectada.
D. ¿
Se ha cargado la batería por completo? Enchufe el cargador y espere hasta que se encienda la luz verde.
2. El motor se detiene mientras está cortando el césped. A. Suelte la palanca del interruptor para apagar la podadora. Retire la llave de seguridad y el paquete
de baterías. Voltee la podadora y verifique que la hoja pueda girar libremente.
B. Eleve la altura de corte de las ruedas a la posición más alta y encienda la podadora.
C. Verifique que la cavidad de la batería esté libre de residuos y
correctamente conectada.
D. ¿Se ha cargado la batería por completo? Enchufe el cargador y espere hasta que se prenda la luz
verde.
E. Evite sobrecargar la podadora. Reduzca el ritmo de corte o eleve la altura de corte.
3. La podadora funciona, pero el rendimiento de corte A. ¿Se ha cargado la batería por completo? Enchufe el cargador y espere
no es satisfactorio o no corta el césped en su totalidad. hasta que se prenda la luz verde.
B. Suelte la palanca del interruptor para apagar la podadora. Retire la llave de seguridad y el paquete
de baterías. Voltee la podadora y verifique que:
El filo de la hoja. Mantenga la hoja afilada. No haya obstrucciones en la plataforma o en el conducto
de descarga
C. Es posible que el ajuste de altura de las ruedas se haya fijado demasiado bajo para el estado del
césped. Eleve la altura de corte.
4. Cuesta mucho empujar la podadora.
A. Suelte el mango de suspensión para apagar la cortadora de césped. Quite la llave de seguridad y el paquete
de baterías. Eleve la altura de corte para reducir el arrastre de la plataforma sobre el césped. Revise que
cada rueda gire libremente.
.5. La podadora produce vibraciones y ruidos anormales. A. Suelte la palanca del interruptor para apagar la podadora. Retire la llave de seguridad y el paquete
de baterías. Voltee la podadora sobre el costado y verifique la hoja para asegurarse de que no esté
doblada o dañada. Si la hoja está dañada, reemplácela por una hoja de repuesto BLACK+DECKER.
Si la parte inferior de la plataforma está dañada, envíe la podadora a un
centro de mantenimiento autorizado de BLACK+DECKER.
B.
Si no hay daños visibles en la hoja y la cortadora de césped aún vibra: Suelte el mango de suspensión para
apagar la cortadora de césped. Quite la llave de seguridad y el paquete de baterías. Desensamble todo el
ensamblaje de la hoja como se describe en la sección “Extracción e instalación de la hoja”. Elimine todo
residuo y limpie cada pieza. Vuelva a instalar cada pieza como se describe en la sección “Extracción e
instalación de la hoja”. Si la cortadora de césped aún vibra, envíela a un centro de mantenimiento autorizado
de BLACK+DECKER.
.6. El LED del cargador de la batería no se enciende. A. Verifique la conexión del enchufe.
B. Reemplace el cargador.
7. La podadora no recoge los recortes de césped A. El conducto está obstruido. Suelte la palanca del interruptor para apagar la
con la bolsa. podadora. Retire la llave de seguridad y el paquete de baterías. Elimine los recortes de césped del
conducto.
B. Demasiado césped cortado. Eleve la altura de corte de las ruedas para acortar la longitud del corte.
C. La bolsa está llena. Vacíe la bolsa con mayor frecuencia.
Solamente para Propósitos de México
para conocer la ubicación del centro de servicio más cercano a fin de recibir ayuda con su producto, visite nuestro sitio Web www.blackanddecker.com.mx o llame a la
línea de ayuda BLACK+DECKER al 01 800 847 2309/01 800 847 2312.
Page 63

63
· GARANTÍA BLACK+DECKER · BLACK+DECKER WARRANTY
. SOLAMENTE PARA PROPOSITOS DE MEXICO
Distributor Name · Sello firma del distribuidor
Date of purchase · Fecha de compra Invoice No. · No. de factura
PRODUCT INFOMATION · IDENTIFICACIÓN DEL PRODUCTO
Cat. No. · Catalogo ó Modelo Serial Number · No. de serie
Name · Nombre Last Name · Apellido
Address · Dirección
City · Ciudad State · Estado
Postal Code · Código Postal Country · País
Telephone · No. Teléfono
2 AÑOS DE GARANTIA
Este producto cuenta con dos años de garantía a partir de la fecha de compra contra
cualquier defecto de su funcionamiento, así como cualquier falla debido a materiales
empleados para su fabricación ó mano de obra defectuosa.
Nuestra garantía incluye la reparación o reposición del producto y/o componentes sin
cargo alguno para el cliente incluyendo la mano de obra, esta incluye los gastos de
trasportación erogados para lograr cumplimiento de esta garantía en los domicilios
diversos señalados.
Para hacer efectiva esta garantía deberá presentar su herramienta y esta póliza sellada
por el establecimiento comercial donde se adquirió el producto.
Nos comprometemos a entregar el producto en un lapso no mayor a 30 días hábiles
contados a partir de la fecha de recepción del mismo en nuestros talleres de servicio
autorizados.
ESTA GARANTIA NO APLICA CUANDO:
El producto se hubiese utilizado en condiciones distintas a las normales.
El producto no hubiese sido operado de acuerdo con el instructivo de uso que se
acompaña.
El producto hubiese sido alterado o reparado por personas no autorizadas por
nosotros.
Importador: Black & Decker S.A. de .C.V
Bosque de Cidros Acceso Radiatas No.42
3ra.Seccion de Bosques de las lomas
C.P.05120, Mexico, D.F. Tel: (01 55) 5326 7100
Page 64

64
Cat.No. CM2060 Form No. 90640573 October 2016
Copyright
©
2016 BLACK+DECKER Printed in China
Grupo Realsa en herramientas,
S.A. de C.V.
Súper Manzana 69 MZ.01 Lote 30
(Av. Torcasita)
Col. Puerto Juárez
Cancún, Quintana Roo
Tel. 01 998 884 72 27
Ferre Pat de Puebla, S.A. de C.V.
16 de Septiembre No. 6149
Col. El Cerrito
Puebla, Puebla
Tel. 01 222 264 12 12
Ferre Pat de Puebla, S.A. de C.V.
Ejército Mexicano No. 15
Col. Ejido 1ro. de Mayo
Boca del Rio, Veracruz
Tel. 01 229 167 89 89
Servicio de Fabrica BLACK+DECKER,
S.A. de C.V.
Lázaro Cardenas No. 18
Col. Obrera
Distrito Federal
Tel. 55 88 95 02
Representaciones Industriales Robles,
S.A. de C.V.
Tezozomoc No. 89
Col. La Preciosa
Distrito Federal
Tel. 55 61 86 82
Gpo. Comercial de Htas. y Refacciones
de Occidente, S.A. de C.V.
Av. La Paz No. 1779
Col. Americana, S. Juaréz
Guadalajara, Jalisco
Tel. 01 33 38 25 69 78
Herramientas y Equipos Profesionales
Av. Colón 2915 Ote.
Col. Francisco I. Madero
Monterrey, Nvo. León
Tel. 01 81 83 54 60 06
Htas. Portátiles de Chihuahua,
S.A. de C.V.
Av. Universidad No. 2903
Col. Fracc. Universidad
Chihuahua, Chihuahua
Tel. 01 614 413 64 04
Fernando González Armenta
Bolivia No. 605
Col. Felipe Carrillo Puerto
Cd. Madero, Tamaulipas
Tel. 01 833 221 34 50
Perfiles y Herramientas de Morelia
Gertrudis Bocanegra No. 898
Col. Ventura Puente
Morelia, Michoacán
Tel. 01 443 313 85 50
Enrique Robles
Av. de la Solidaridad No. 12713
Col. La Pradera
Irapuato, Guanajuato
Tel. 01 462 626 67 39
Hernández Martinez Jeanette
Prolongación Corregidora Nte. No. 1104
Col. Arboledas
Queretaro, Qro.
Tel. 01 442 245 25 80
SOLAMENTE PARA PROPOSITOS DE MEXICO
PARA OTRAS LOCALIDADES LLAME AL 01 800 847 2309 o 01 800 847 2312.
BLACK & DECKER S.A. DE C.V.
BOSQUES DE CIDROS ACCESO RADIATAS NO. 42
COL. BOSQUES DE LAS LOMAS.
05120 MÉXICO, D.F
TEL. (01 55) 5326 7100
01 800 847 2309/01 800 847 2312
 Loading...