

Page 1
12-CUP* PROGRAMMABLE
COFFEEMAKER
CAFETIÈRE PROGRAMMABLE
DE 12 TASSES*
CM1231BC
CM1231SC
*One cup equals approximately 5 oz. (varies by brewing technique)
*Une tasse équivaut à environ 115 g (5 oz; varie selon la technique de brassage)
1
Page 2

Thank you for your purchase!
Merci de votre achat!
www.prodprotect.com/blackanddecker
www.BlackAndDeckerAppliances.com
Should you have any questions or concerns with your new product,
please call our Customer Service Line at 1-800-465-6070 (US and
Canada). Please do not return to the store.
Si vous avez des questions ou des préoccupations à propos de
votre nouveau produit, veuillez communiquer avec notre Service à
la clientèle au 1 800 465-6070 (États-Unis et Canada). Veuillez ne
pas rapporter le produit au magasin.
2
Page 3

WELCOME!
Congratulations on your purchase of the Black+Decker™ 12-Cup Programmable
Coffeemaker. We have developed this guide to ensure optimal product
performance and your complete satisfaction. Save this use and care manual
and be sure to register your appliance online at www.prodprotect.com/
blackanddecker.
CONTENTS
IMPORTANT SAFEGUARDS ........................................... 4
GETTING TO KNOW YOUR COFFEEMAKER .............................. 5
GETTING STARTED ................................................. 6
PROGRAMMING YOUR COFFEE MAKER ................................ 6
BREWING COFFEE ................................................. 7
TM
SNEAK-A- CU P
KEEP WARM FUNCTION WITH BREW FRESHNESS TIME ................... 8
BREW LATER FUNCTION ............................................ 8
CARE AND CLEANING .............................................. 8
F E ATUR E ........................................... 7
®
AUTO CLEAN
SYSTEM ..............................................9
TROUBLESHOOTING ...............................................10
WARRANTY AND CUSTOMER SERVICE INFORMATION ....................11
WARNING
The lightning symbol refers to “dangerous voltage”; the exclamation symbol refers
to maintenance instructions. See below.
Warning: To reduce the risk of fire or electric shock, do not remove the cover of the
coffeemaker. There are no user-serviceable parts inside. Repair should be done by
authorized service personnel only.
RISK OF FIRE OR ELECTRIC SHOCK. DO NOT OPEN.
SAVE THESE INSTRUCTIONS.
This product is for household use only.
3
Page 4
Please Read and Save this Use and Care Book.
IMPORTANT SAFEGUARDS.
When using electrical appliances, basic safety precautions should always be followed to
reduce the risk of fire, electric shock, and/or injury, including the following:
• Read all instructions.
• Do not touch hot surfaces. Use handles or knobs.
• To protect against fire, electric shock and injury to
persons do not immerse cord, plugs or appliance in
water or other liquid.
• Close supervision is necessary when any appliance
is used by or near children.
• Unplug from outlet when either the appliance or
display clock is not in use, and before cleaning. Allow
to cool before putting on or taking off parts, and
before cleaning the appliance.
• Do not operate any appliance with a damaged cord
or plug, or after the appliance malfunctions or has
been damaged in any manner. Contact Consumer
Support at the number listed in this manual.
• The use of accessory attachments not
recommended by the appliance manufacturer may
result in fire, electric shock or injury to persons.
• Do not use outdoors.
• Do not let cord hang over edge of table or counter,
or touch hot surfaces.
• Do not place on or near a hot gas or electric
burner, or in a heated oven.
SAVE THESE INSTRUCTIONS.
This product is for household use only.
POLARIZED PLUG (120V models only)
This appliance has a polarized plug
(one blade is wider than the other). To
reduce the risk of electric shock, this
plug is intended to fit into a polarized
outlet only one way. If the plug does not
fit fully into the outlet, reverse the plug.
If it still does not fit, contact a qualified
electrician. Do not attempt to modify the
plug in any way.
TAMPER-RESISTANT SCREW
Warning: This appliance is equipped
with a tamper-resistant screw to prevent
removal of the outer cover. To reduce
the risk of fire or electric shock, do not
attempt to remove the outer cover.
There are no user-serviceable parts
inside. Repair should be done only by
authorized service personnel.
4
• To disconnect, turn the unit off by pressing the ON/
OFF (
) button, making sure the ON/OFF ( )
light goes out, then remove plug from wall outlet.
• Do not use this appliance for other than
intended use.
• Keep lid on the carafe when in use.
• Scalding may occur if the lid is removed during the
brewing cycles.
• The carafe is designed for use with this appliance.
It must never be used on a range top.
• Do not set a hot carafe on a wet or cold surface.
• Do not use a cracked carafe or a carafe having a
loose or weakened handle.
• Do not clean carafe with cleansers, steel wool pads
or other abrasive material.
• This appliance is not intended for use by persons
(including children) with reduced physical, sensory
or mental capabilities, or lack of experience
and knowledge, unless they have been given
supervision or instruction concerning use of the
appliance by a person responsible for their safety.
• Children should be supervised to ensure that they
do not play with the appliance.
ELECTRICAL CORD
1. A short power-supply cord is provided
to reduce the risk resulting from
becoming entangled in or tripping over a
longer cord.
2. Extension cords may be used if care
is exercised in their use.
3. If an extension cord is used:
a) The marked electrical rating of the
extension cord should be at least as
great as the electrical rating of the
appliance.
b) If the appliance is of the grounded
type, the extension cord should be a
grounding-type 3-wire cord.
c) The cord should be arranged so that
it will not drape over the countertop or
tabletop where it can be pulled on by
children or tripped over.
Note: If the power cord is damaged,
please contact the warranty department
listed in these instructions.
Page 5
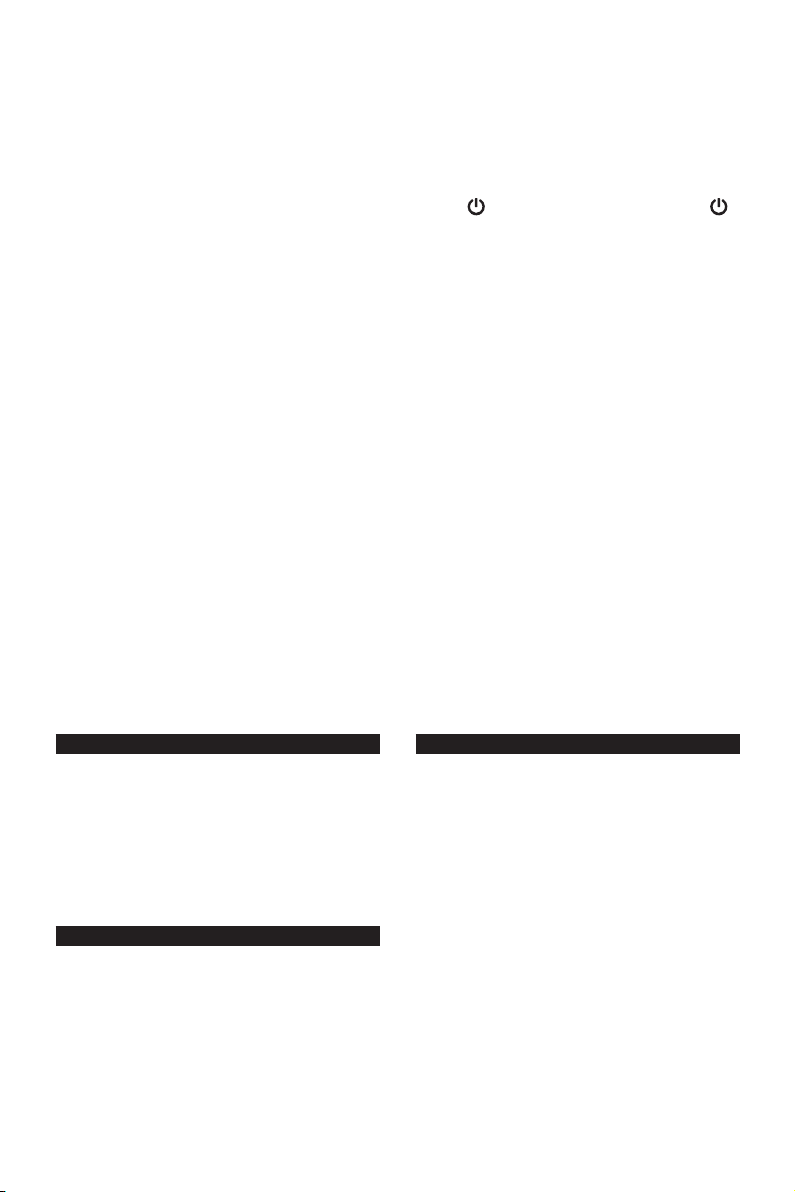
GETTING TO KNOW YOUR COFFEEMAKER
1. Permanent filter (only comes with
CM1231SC) (Part # CM1231-01)
2. Brew basket (Part # CM1231-02)
3. Control panel
4. Carafe with lid (Part # CM1231-03)
5. Lid
6. Vortex showerhead
Product may vary slightly from what is illustrated.
7. Water reservoir
8. Water level markings
9. Sneak-A-Cup™ interrupt feature
10. Nonstick “keep hot” carafe plate
11. Built-in cord storage (not shown)
5
Page 6
HOW TO USE
This product is for household use only.
GETTING STARTED
1. Remove all packing material, any stickers, and the plastic band around the
power plug.
2. Go to www.prodprotect.com/blackanddecker to register your product.
3. Wash removable parts as instructed in CARE AND CLEANING.
4. Clean the inside of your coffeemaker by running two full brewing cycles with
water only, no coffee.
a. Pour fresh, cold water into the water reservoir up to the 12-cup MAX
mark, then place carafe onto the carafe plate.
b. Plug cord into standard electrical outlet.
c. Push the ON/OFF (
coffeemaker without adding coffee.
d. Once the cycle is finished, discard water.
e. Turn off appliance, unplug and allow to cool down for 15 minutes
before repeating.
) button to immediately brew water through the
PROGRAMMING YOUR COFFEE MAKER
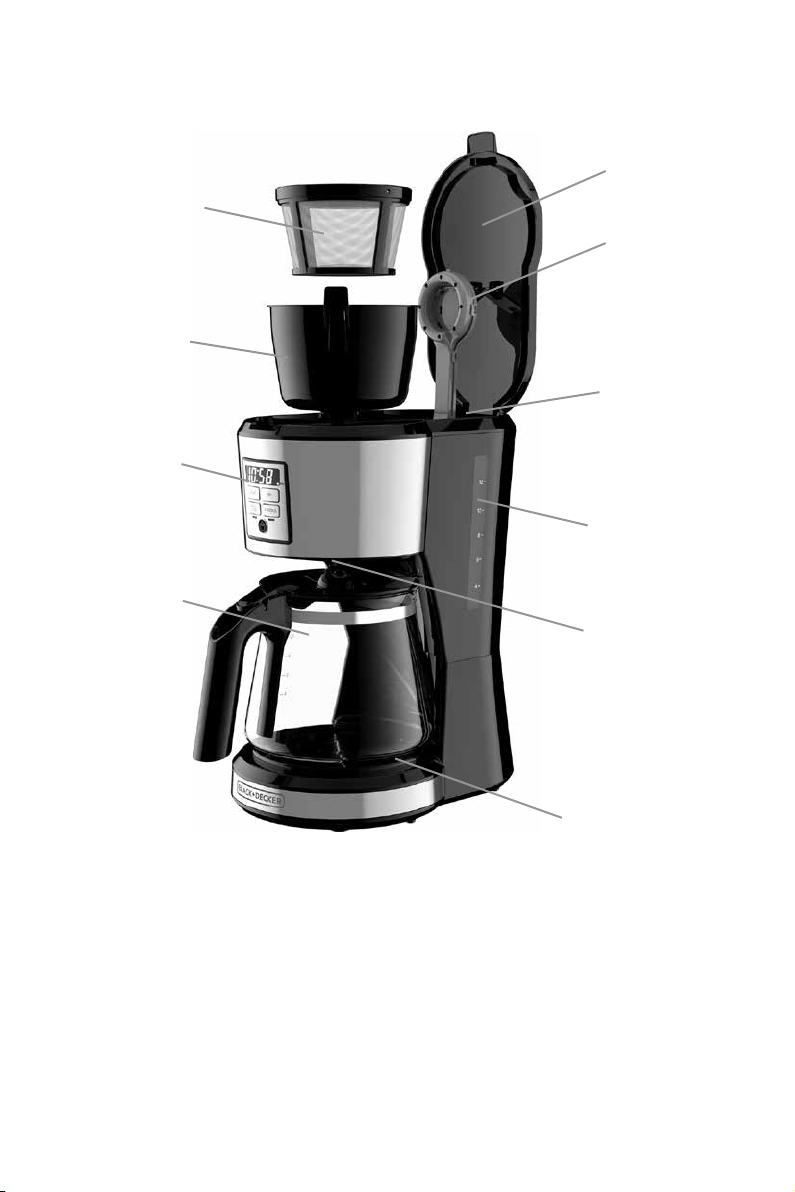
Setting the Digital Clock
1. Plug the coffeemaker into a standard electrical outlet.
2. The numbers and colon “:” on the digital clock display flashes “12:00”.
3. Press HOUR and MIN buttons to set time:
Press HOUR button until the correct time
appears on the display. The colon “:” will
continue to flash even after the time is set. (A)
4. When the time passes noon the LED light
next to PM illuminates to let you know you are
in PM time. If the PM light is not illuminated it
is AM time.
5. To change time, use HOUR and MIN buttons
at any time.
Note: If the appliance is unplugged or power is
interrupted even momentarily, the time may need
to be reset.
6
Page 7
BREWING COFFEE
1. Open cover.
2. Fill water reservoir with desired amount of
water. The 12 line on the side of the reservoir
represents a full carafe of coffee. Do not fill
past this 12 Cup line.
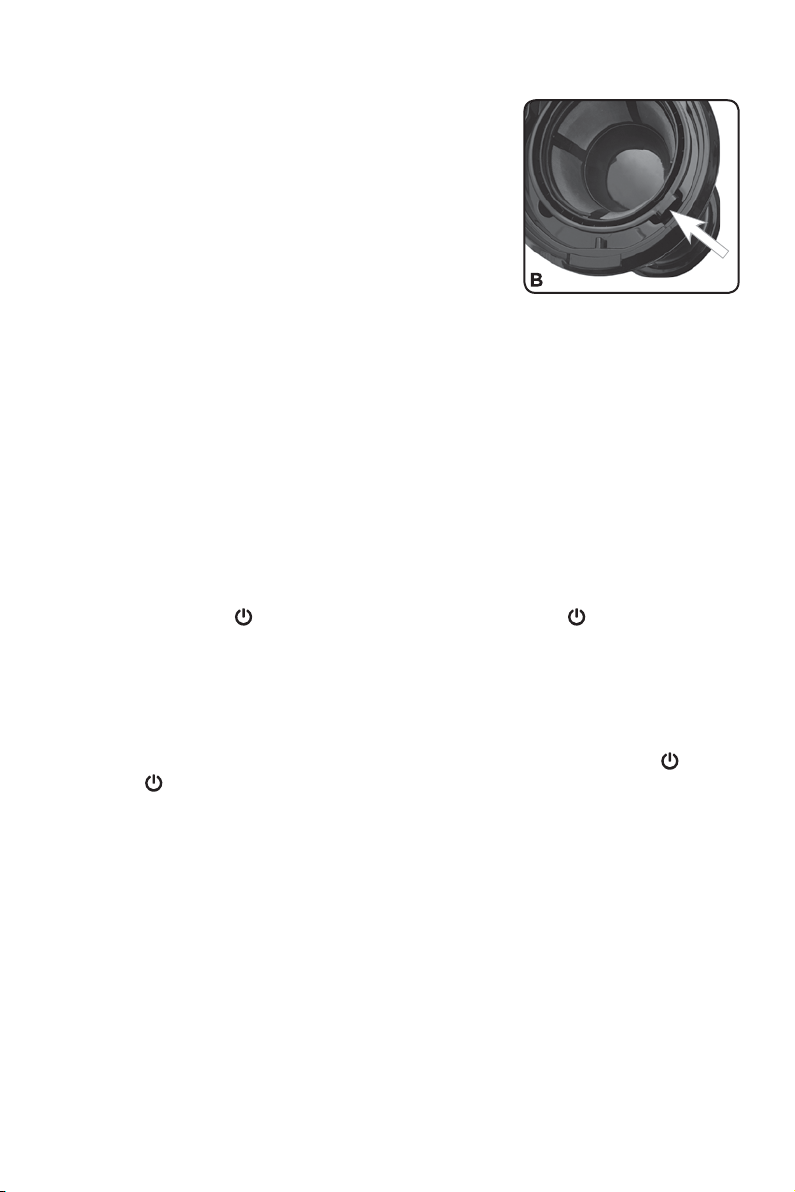
3. Insert a basket type paper filter or the
permanent filter into the brew basket. Make
sure the tab on the brew basket fits into its
slot on the right side of the opening (B) so
that the lid closes.
4. Add desired amount of ground coffee. Close
lid, making sure it clicks.
5. Make sure carafe lid is properly attached to the empty carafe. Close the
carafe lid.
Note: Coffee may overflow if carafe lid is not properly placed.
6. Place empty carafe on the carafe plate.
7. If regular brew strength is desired, your coffeemaker is set to brew coffee.
8. If strong coffee is desired, press the STRONG button once to select
the strong brew. The light below the STRONG will illuminate. To turn
STRONG mode off press the STRONG button again and the light below
will turn off.
Note: We recommend using the STRONG setting to ensure the best flavor
whenever brewing 4 cups of coffee or less.
9. Press ON/OFF (
illuminates while brewing.
10. Once coffee grounds have cooled, carefully open cover and, discard
used grounds. Close cover.
11. The coffeemaker will keep brewed coffee hot for 2 hours and then
automatically turn off.
) button and brewing begins. The ( ) button
To turn off the coffeemaker at any time press the ON/OFF button (
ON/OFF (
) light goes off. Unplug appliance when not in use.
). The
SNEAK-A-CUP® FEATURE
Remove the carafe and brewing is paused. The carafe must be placed back
on the carafe plate in 30 seconds to prevent overflow. Brewing begins again.
7
Page 8
KEEP WARM FUNCTION WITH BREW FRESHNESS TIME
The hot plate remains in “keep warm” mode for 2 hours (120 minutes)
following the brew cycle.
• During this time, the “keep warm” time displays instead of the clock,
counting down minutes (starting at 120, ending at 0). The numbers let
you know how long the coffee has been kept warm.
• After 2 hours has passed, the heater turns off, the ON/OFF (
turns off, and the display reverts to the clock time.
) light
To turn off the coffeemaker at any time press the ON/OFF button (
).
BREW LATER FUNCTION
If BREW LATER function has not been previously set:
1. Press the BREW LATER button.
2. The light below BREW LATER illuminates and flashes once per second.
3. Clock shows last BREW LATER time programmed (if no time has been
programmed, or unit has been unplugged, BREW LATER time defaults
to 12:00).
4. Use HOUR and MIN buttons to set BREW LATER time (while BREW
LATER in display is blinking).
5. After 3 seconds with no button pressed, BREW LATER time is set.
6. The unit will begin brewing at the BREW LATER time.
If BREW LATER function is already set:
1. Press BREW LATER button to check the BREW LATER time. The
clock will flash once per second and display the BREW LATER time
for 3 seconds. At this point, you may reset the BREW LATER setting if
desired.
2. After 3 seconds, clock reverts to current time.
3. Press the ON/OFF (
Unit begins brewing immediately. If you don’t want to brew right then,
press ON/OFF (
Note: Even though BREW LATER is disabled, the BREW LATER time will still
be stored unless unit is unplugged.
) button to cancel the BREW LATER function.
) again and the ON/OFF ( ) light will turn off.
CARE AND CLEANING
This product contains no user serviceable parts. Refer service to qualified
service personnel.
CLEANING
• Be sure the unit is unplugged and has cooled.
• Wash the removable parts in the top rack of the dishwasher or wash by
hand in hot water with dish detergent.
8
Page 9

• Wipe the appliance’s exterior surface, control panel and carafe plate with
a soft damp cloth. Do not use abrasive cleansers or scouring pads. Never
immerse the coffeemaker in water.
• To clean the inside of the cover, open the cover and leave in the open
position. Wipe surfaces with a damp cloth.
AUTO CLEAN® SYSTEM
De-scaling With Auto Clean™
Over time, calcium deposits or “scale” may build up in your brewer. Scale is
non-toxic but if left unattended will hinder brewer performance. Regularly
de-scaling your brewer helps to maintain quality coffee as well as the
lifespan of the heating element, and other internal parts that come in
contact with water throughout the brew process.
To make the de-scaling process as effortless as possible, an Auto Clean™
system has been programmed into your coffeemaker.
When should I use Auto Clean™?
You should clean your coffeemaker after every 60 brews (approximately 2
months). If you would like to clean your coffeemaker prior to 60 brew cycles
because of hard water, you may do so.
How do I use Auto Clean™?
Follow the simple steps below. Your coffeemaker will take care of the rest.
1. Combine 6 cups of white vinegar and 4 cups of cold water in carafe.
2. Pour into water reservoir.
3. Press and Hold the On/Off button for 3 seconds
4. On/Off Button LED illuminates (no blinking)
5. “CL” appears in the display, blinking once per second and the Auto-
Clean cycle begins.
During the Auto-Clean Cycle Function:
1. Machine will brew approximately 5 cups of cleaning solution
2. Part of the mixture will brew through. Remaining mixture will be held in
coffeemaker for 30 minutes before completing its brew through.
3. Machine will continue brewing remainder of cleaning solution
Note: The entire cleaning cycle will take 45–60 minutes to complete.
4. When the coffeemaker completes the AUTO CLEAN cycle, it shuts off
automatically.
5. Brew fresh water through appliance following instructions given in
GETTING STARTED before brewing coffee again.
9
Page 10

TROUBLESHOOTING
PROBLEM POSSIBLE CAUSE SOLUTION
Coffeemaker does
not turn on.
Coffeemaker
is leaking.
The filter basket
overflows.
Coffee sediment in
brewed cup of coffee.
Coffeemaker is not plugged in. Make sure appliance is
plugged into a working
outlet.
Water reservoir may be
overfilled.
Cover may not be correctly
placed on carafe.
Carafe may not be correctly
placed on the carafe plate.
The carafe has been removed
for longer than 30 seconds
when using the Sneak-ACup™ feature.
Excessive amount of coffee
is used.
The filter and/or the brew
basket are not properly
placed.
Make sure water reservoir
has not been filled
beyond the 12-cup line.
Make sure cover is
correctly placed and
tightened on carafe
Make sure carafe is
placed securely onto
the carafe plate.
Make sure to replace
the carafe within 30
seconds during the
brewing cycle.
Reduce the amount of
coffee used.
Insert filter and basket
properly.
The coffeemaker
brews slowly.
The coffeemaker does
not brew all water in the
reservoir.
Coffee grounds are small
enough to pass through
the permanent filter.
The coffeemaker needs
cleaning.
The coffeemaker needs
cleaning.
While it is normal
to see some coffee
sediment when using
a permanent filter,
a coarser grind can
reduce the amount of
sediment.
Follow the instructions in
the “Auto Clean” section.
Follow the instructions in
the “Auto Clean” section.
If additional assistance is needed, please contact our consumer service team at
1-800-465-6070.
10
Page 11

WARRANTY AND CUSTOMER
SERVICE INFORMATION
Two-Year Limited Warranty
(Applies only in the United States and Canada)
For service, repair or any questions regarding your appliance, call the
appropriate 800 number listed within this section. Please DO NOT return the
product to the place of purchase. Also, please DO NOT mail product back to
manufacturer, nor bring it to a service center. You may also want to consult
the website listed on the cover of this manual.
What does it cover?
• Any defect in material or workmanship provided; however, Spectrum Brands,
Inc.’s liability will not exceed the purchase price of product.
For how long?
• Two years from the date of original purchase with proof of purchase.
What will we do to help you?
• Provide you with a reasonably similar replacement product that is either new or
factory refurbished.
How do you get service?
• Save your receipt as proof of date of sale.
• Visit the online service website at www.prodprotect.com/blackanddecker, or call
toll-free 1-800-465-6070, for general warranty service.
• If you need parts or accessories, please call 1-800-738-0245.
What does your warranty not cover?
• Damage from commercial use
• Damage from misuse, abuse or neglect
• Products that have been modified in any way
• Products used or serviced outside the country of purchase
• Glass parts and other accessory items that are packed with the unit
• Shipping and handling costs associated with the replacement of the unit
• Consequential or incidental damages (Please note, however, that some states do
not allow the exclusion or limitation of consequential or incidental damages, so
this limitation may not apply to you.)
How does state law relate to this warranty?
• This warranty gives you specific legal rights. You may also have other rights that
vary from state to state or province to province.
11
Page 12

BIENVENUE!
Félicitations pour votre achat de la cafetière de 12 tasses facile à utiliser de
Black+Decker™. Nous avons élaboré le présent guide d’utilisation et d’entretien
pour assurer le rendement optimal du produit et votre entière satisfaction.
Conservez le présent guide d’utilisation et d’entretien, et enregistrez votre
appareil en ligne au www.prodprotect.com/blackanddecker.
MATIÈRES
MISES EN GARDE IMPORTANTES......................................13
FAMILIARISATION AVEC LA CAFETIÈRE................................14
POUR COMMENCER ................................................15
PROGRAMMATION DE LA CAFETIÈRE..................................15
INFUSION DU CAFÉ ................................................16
MD
FONCTION SNEAK-A-CUP
..........................................16
FONCTION DE RÉCHAUD ET INDICATEUR
DE LA FRAÎCHEUR DU CAFÉ INFUSÉ ................................17
FONCTION D’INFUSION DIFFÉRÉE ....................................17
ENTRETIEN ET NETTOYAGE ..........................................18
MD
SYSTÈME DE NETTOYAGE AUTOMATIQUE AUTO CLEAN
.................18
DÉPANNAG E .....................................................20
INFORMATION SUR LA GARANTIE ET LE SERVICE À LA CLIENTÈLE.........21
Le symbole clignotant indique que la « tension est dangereuse »; le point
RISQUES D'INCENDIE OU DE CHOC ÉLECTRIQUE NE PAS OUVRIR
d'exclamation fait référence aux instructions d'entretien. Voir ci-dessous.
Avertissement : Pour réduire les risques d'incendie ou de choc électrique, ne pas
retirer le couvercle de la cafetière. L'appareil ne contient aucune pièce réparable
par l'utilisateur. Les réparations doivent être effectuées par un technicien autorisé
seulement.
AVERTISSEMENT
12
Page 13

Veuillez lire et conserver ce guide d’entretien et d’utilisation.
IMPORTANTES CONSIGNES DE SÉCURITÉ.
Lorsqu’on utilise des appareils électriques, il faut toujours respecter certaines règles de sécurité fondamentales
afin de réduire les risques d’incendie, de décharge électrique et/ou de blessures, notamment les suivantes :
• Lire toutes les instructions.
• Ne pas toucher aux surfaces chaudes. Prendre
l’appareil par les poignées ou les boutons.
• Afin d’éviter les risques d’incendie, de choc électrique
et de blessures, ne pas immerger le cordon, la fiche
ou l’appareil dans l’eau ou dans d’autres liquides.
• Exercer une étroite surveillance lorsque l’appareil est utilisé
à proximité d’un enfant ou que ce dernier s’en sert.
• Débrancher l’appareil lorsque l’appareil et l’horloge
ne sont pas en marche, et avant le nettoyage. Laisser
refroidir l’appareil avant d’installer ou de retirer des
pièces, et avant de le nettoyer.
• Ne pas utiliser un appareil dont la fiche ou le
cordon sont abîmés, qui présente un problème de
fonctionnement, ou qui est endommagé de quelque
façon que ce soit. Communiquer avec le Service de
soutien à la clientèle au numéro sans frais indiqué à la
section « Garantie ».
• L’utilisation d’accessoires non recommandés par
le fabricant de l’appareil présente des risques
d’incendie, de choc électrique ou de blessures.
• Ne pas utiliser l’appareil à l’extérieur.
• Ne pas laisser le cordon pendre du rebord d’une table
ou d’un comptoir, ou toucher une surface chaude.
• Ne pas placer l’appareil sur un brûleur au gaz ou
électrique, ou à proximité, ni dans un four chaud.
• Pour débrancher l’appareil, d’abord l’éteindre en
appuyant sur le bouton de marche/arrêt (
s’assurant que le témoin de marche/arrêt (
puis retirer la fiche de la prise de courant murale.
• N’utiliser cet appareil que pour les fonctions
auxquelles il est destiné.
• Garder le couvercle sur la carafe lors de l’utilisation de
l’appareil.
• Le retrait du couvercle pendant les cycles d’infusion
peut causer des brûlures.
• La carafe est conçue pour être utilisée avec cet appareil.
Elle ne doit jamais être utilisée sur une table de cuisson.
• Ne pas déposer la carafe chaude sur une surface
froide ou mouillée.
• Ne pas se servir de la carafe si le verre en est fêlé ou
si la poignée est lâche ou affaiblie.
• Ne pas nettoyer la carafe avec des produits
nettoyants, des tampons en laine d’acier, ou tout
autre produit abrasif.
• Cet appareil n’est pas conçu pour être utilisé par des
personnes (notamment des enfants) dont les capacités
physiques, sensorielles ou mentales sont réduites ou
qui manquent d’expérience ou de connaissances, à
moins qu’elles ne soient supervisées ou dirigées par une
personne responsable de leur sécurité pendant l’utilisation.
• Les enfants doivent être supervisés afin d’éviter qu’ils
ne jouent avec l’appareil.
) en
) s’éteint,
CONSERVER CES MESURES.
L’appareil est conçu pour une utilisation domestique.
FICHE POLARISÉE (modèles de 120 v seulement)
L’appareil est muni d’une fiche polarisée (une lame plus large que l’autre). Afin de minimiser les risques de
secousses électriques, ce genre de fiche n’entre que d’une façon dans une prise polarisée. Lorsqu’on ne peut
insérer la fiche à fond dans la prise, il faut tenter de le faire après avoir inversé les lames de côté. Si la fiche n’entre
toujours pas dans la prise, il faut communiquer avec un électricien certifié. Il ne faut pas tenter de modifier la fiche.
VIS INDESSERRABLE
AVERTISSEMENT :
extérieur. Pour réduire les risques d’incendie ou de secousses électriques, ne pas tenter de retirer le couvercle
extérieur. L’utilisateur ne peut pas remplacer les pièces de l’appareil. En confier la réparation seulement au
personnel des centres de service autorisés.
CORDON D’ALIMENTATION
a) Un cordon d’alimentation court est fourni pour éviter qu’un cordon long s’emmêle ou fasse trébucher.
b) Des rallonges électriques sont disponibles et peuvent être utilisées avec prudence.
c) En cas d’utilisation d’une rallonge :
1) Le calibre indiqué de la rallonge doit être au moins aussi élevé que celui de l’appareil,
2) si l’appareil est mis à la terre, la rallonge doit être de type mise à la terre avec 3 broches; et
3) le cordon électrique doit être disposé de façon à ce qu’il ne pende pas du comptoir ou de la table, qu’il ne
soit pas à la portée des enfants et qu’il ne fasse pas trébucher.
Remarque : Si le cordon d’alimentation est endommagé, veuillez communiquer avec le Service de la garantie
dont les coordonnées figurent dans les présentes instructions.
L’appareil est doté d’une vis indesserrable empêchant l’enlèvement du couvercle
13
Page 14

FAMILIARISATION AVEC LA CAFETIÈRE
1. Filtre permanent (fourni
uniquement avec le modèle
CM1231SC) (pièce no CM1231-01)
2. Panier d’infusion
(pièce no CM1231-02)
3. Panneau de commande
4. Carafe avec couvercle
(pièce no CM1231-03)
5. Couvercle
Le produit peut différer légèrement de celui qui est illustré.
14
6. Douchette à tourbillon
7. Réservoir à eau
8. Indicateurs de niveau d’eau
9. Fonction de pause et service
Sneak-A-CupMC
10. Réchaud antiadhésif
11. Range-cordon intégré (non illustré)
Page 15

UTILISATION
Cet appareil est conçu pour un usage domestique seulement.
POUR COMMENCER
1. Retirer tout matériau d’emballage, toute étiquette et la bande de plastique
entourant la fiche.
2. Aller à www.prodprotect.com/blackanddecker pour enregistrer votre
produit.
3. Laver toutes les pièces amovibles en suivant les directives de la section «
ENTRETIEN ET NETTOYAGE ».
4. Nettoyer l’intérieur de la cafetière en exécutant deux cycles complets
d’infusion à l’eau seulement (sans café).
a. Verser de l’eau froide fraîche dans le réservoir à eau, jusqu’à la marque
de 12 tasses (MAX), puis déposer la carafe sur le réchaud.
b. Brancher le cordon dans une prise de courant standard.
c. Appuyer sur le bouton de marche/arrêt (
immédiatement de l’eau dans la cafetière sans ajouter de café.
d. Une fois le cycle terminé, jeter l’eau.
e. Éteindre l’appareil, le débrancher et le laisser refroidir pendant 15
minutes avant de recommencer.
) pour infuser
PROGRAMMATION DE LA CAFETIÈRE
Réglage de l’horloge numérique
1. Brancher le cordon de la cafetière dans une prise électrique standard.
2. Les chiffres et le deux-points « : » de
l’affichage de l’horloge numérique clignotent
et indiquent « 12:00 ».
3. Appuyer sur les boutons HOUR (heure) et
MIN (minute) pour régler l’heure : Appuyer
sur le bouton HOUR jusqu’à ce que l’heure
exacte soit affichée. Les deux points « : »
continueront à clignoter même après le
réglage de l’heure. (A)
4. Le témoin à DEL PM s’allume lorsque l’horloge
passe à l’heure de l’après-midi. Si le témoin
PM est éteint, il s’agit de l’heure du matin.
5. Pour changer l’heure, utiliser les boutons
HOUR et MIN à tout moment.
Remarque : Si la cafetière est débranchée ou si le courant est interrompu,
même momentanément, l’horloge pourrait devoir être réglée de nouveau.
15
Page 16

INFUSION DU CAFÉ
1. Ouvrir le couvercle.
2. Remplir le réservoir à eau avec la quantité
voulue d’eau. La ligne 12 sur le côté du
réservoir représente une carafe complète de
café. Ne pas remplir au-delà de celle-ci.
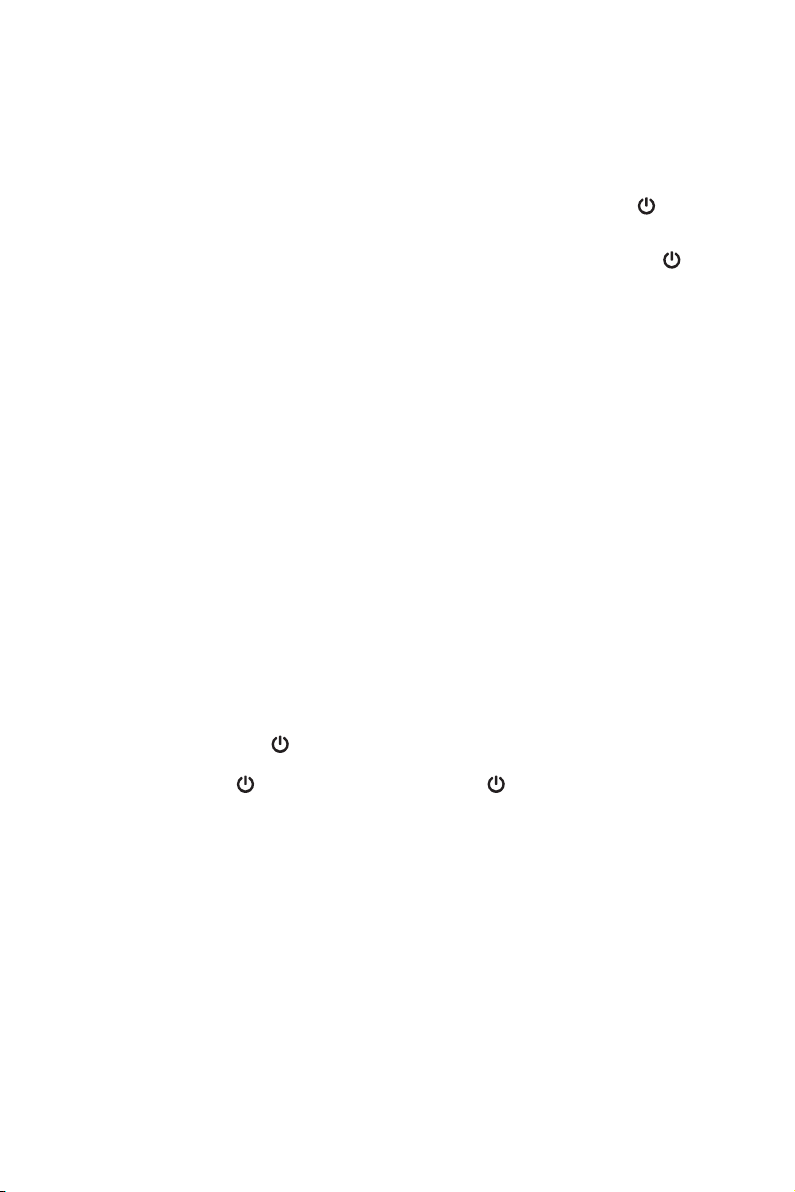
3. Placer le filtre en papier de type panier ou
le filtre permanent dans le panier d’infusion.
S’assurer que la languette du panier d’infusion
s’insère bien dans la fente du côté droit de
l’ouverture (B) afin que le couvercle se ferme.
4. Ajouter la quantité désirée de café moulu. Fermer le couvercle en vous
assurant qu’il s’encliquette.
5. Veiller à ce que le couvercle de la carafe soit correctement fixé à la
carafe vide. Fermer le couvercle de la carafe.
Remarque : Le café peut déborder si le couvercle de la carafe n’est pas
bien placé.
6. Déposer la carafe vide sur le réchaud.
7. Si le degré d’infusion moyennement corsé est souhaité, la cafetière est
prête à infuser le café.
8. Pour obtenir un café plus fort, appuyer une fois sur le bouton STRONG
(CORSÉ) pour sélectionner le degré d’infusion corsé. Le témoin sous le
bouton STRONG s’allume. Pour annuler le mode STRONG, appuyer de
nouveau sur le bouton STRONG; le témoin lumineux s’éteint.
Remarque : Nous recommandons d’utiliser le réglage STRONG pour
obtenir un meilleur goût lors d’une infusion de 4 tasses de café ou moins.
9. Appuyer sur le bouton de marche/arrêt (
Le bouton (
10. Une fois que le marc de café a refroidi, ouvrir soigneusement le
couvercle et jeter le marc. Fermer le couvercle.
11. La cafetière conservera le café chaud pendant deux heures, puis
s’éteindra automatiquement.
) s’allume pendant l’infusion.
), l’infusion commence alors.
Pour éteindre la cafetière en tout temps, appuyer sur le bouton de marche/
arrêt (
quand il ne sert pas.
). Le témoin de marche/arrêt ( ) s’éteint. Débrancher l’appareil
FONCTION SNEAK-A-CUPMD
Enlever la carafe; l’infusion s’interrompt alors. La carafe doit être replacée
sur le réchaud dans les 30 secondes suivantes pour éviter les débordements.
L’infusion reprend.
16
Page 17

FONCTION DE RÉCHAUD ET INDICATEUR
DE LA FRAÎCHEUR DU CAFÉ INFUSÉ
La plaque chauffante reste en mode de réchaud pendant 2 heures (120
minutes) après le cycle d’infusion.
• Pendant ce temps, l’affichage indique le temps du mode réchaud à
la place de l’horloge, sous forme de compte à rebours (commençant
à 120 et finissant à 0). Les chiffres permettent de savoir combien de
temps le café sera gardé au chaud.
• Au bout de 2 heures, le réchaud s’éteint, le témoin de marche/arrêt (
s’éteint et l’affichage indique l’heure de nouveau.
Pour éteindre la cafetière en tout temps, appuyer sur le bouton de marche/
arrêt (
).
FONCTION D’INFUSION DIFFÉRÉE
Si la fonction d’INFUSION DIFFÉRÉE n’a pas été réglée précédemment :
1. Appuyer sur le bouton BREW LATER (INFUSION DIFFÉRÉE).
2. Le témoin sous le bouton BREW LATER s’allume et clignote une fois
par seconde.
3. L’horloge indique la dernière heure programmée pour la fonction
d’INFUSION DIFFÉRÉE (si aucune heure n’a été programmée ou
si l’appareil a été débranché, l’heure de la fonction d’INFUSION
DIFFÉRÉE est réglée par défaut à 12:00).
4. Utiliser les boutons HOUR et MIN pour régler l’heure de la fonction
BREW LATER (pendant que le témoin BREW LATER clignote).
5. Après 3 secondes sans appuyer sur aucun bouton, l’heure de la
fonction d’INFUSION DIFFÉRÉE est réglée.
6. L’appareil commencera l’infusion à l’heure réglée pour la fonction
d’INFUSION DIFFÉRÉE.
)
Si la fonction d’INFUSION DIFFÉRÉE est déjà définie :
1. Pour vérifier l’heure d’INFUSION DIFFÉRÉE, appuyer sur le bouton
BREW LATER (INFUSION DIFFÉRÉE). L’horloge clignote une fois par
seconde et affiche l’heure d’INFUSION DIFFÉRÉE pendant 3 secondes.
À ce stade, il est possible de réinitialiser le réglage d’INFUSION
DIFFÉRÉE si désiré.
2. Après 3 secondes, l’horloge revient à l’heure actuelle.
3. Appuyer sur le bouton de marche/arrêt (
d’INFUSION DIFFÉRÉE. L’appareil commence à infuser immédiatement.
Si l’infusion n’est pas souhaitée à ce moment, appuyer de nouveau sur le
bouton de marche/arrêt (
Remarque : Même si la fonction d’INFUSION DIFFÉRÉE est désactivée,
l’heure d’INFUSION DIFFÉRÉE restera en mémoire sauf si l’appareil est
débranché.
) et le témoin de marche/arrêt ( ) s’éteint.
) pour annuler la fonction
17
Page 18

ENTRETIEN ET NETTOYAGE
Cet appareil ne contient aucune pièce réparable par l’utilisateur. En confier la
réparation à un technicien qualifié.
NETTOYAGE
• S’assurer que la cafetière est débranchée et a refroidi.
• Laver les pièces amovibles dans le panier supérieur du lave-vaisselle, ou
les nettoyer à la main dans de l’eau chaude, en utilisant un détergent à
vaisselle.
• Essuyer la surface externe de l’appareil, le panneau de commande et le
réchaud à l’aide d’un linge doux humide. Ne pas utiliser de nettoyants
abrasifs ou de tampons à récurer. Ne jamais immerger la cafetière dans
l’eau.
• Pour nettoyer l’intérieur du couvercle, ouvrir le couvercle et le laisser en
position ouverte. Essuyer les surfaces à l’aide d’un linge humide.
SYSTÈME DE NETTOYAGE AUTOMATIQUE AUTO CLEAN
Détartrage à l’aide du système de nettoyage automatique Auto Clean
MD
MC
Au fil du temps, des dépôts de calcium ou « tartre » peuvent s’accumuler
dans votre cafetière. Le tartre n’est pas toxique, mais si on le laisse
s’accumuler, il nuira au rendement de la cafetière. Un détartrage régulier de
votre cafetière aide à maintenir la qualité du café ainsi qu’à assurer la durée
de vie de l’élément chauffant et des autres pièces qui sont en contact avec
l’eau tout au long de l’infusion.
Pour vous faciliter la tâche le plus possible, votre cafetière est dotée d’un
système de nettoyage automatique Auto Clean
Quand dois-je effectuer le nettoyage automatique Auto Clean
MC
préprogrammé.
MC
?
Vous devez nettoyer votre cafetière toutes les 60 infusions (environ 2 mois).
Si vous désirez nettoyer la cafetière avant 60 infusions en raison d’une eau
dure, vous pouvez le faire.
18
Page 19

Que dois-je faire pour effectuer le nettoyage automatique Auto CleanMD?
Il suffit de suivre les étapes simples indiquées ci-dessous. Votre cafetière
s’occupera du reste.
1. Verser 1,5 litre (6 tasses) de vinaigre blanc et 1 litre (4 tasses) d’eau
froide dans la carafe.
2. Verser le mélange dans le réservoir à eau.
3. Presser et maintenir enfoncé le bouton de marche/arrêt pendant 3
secondes.
4. Le témoin à DEL du bouton de marche/arrêt s’allume (aucun
clignotement).
5. La mention « CL » apparaît à l’écran, clignote une fois par seconde, puis
le cycle de nettoyage automatique commence.
Pendant le fonctionnement du cycle de nettoyage automatique :
1. La machine infusera environ 5 tasses de solution de nettoyage.
2. Une partie du mélange sera infusée. Le reste demeurera dans la
cafetière pendant 30 minutes avant d’être infusé complètement.
3. La machine continuera à infuser le reste de la solution de nettoyage.
Remarque : Le cycle de nettoyage complet prend de 45 à 60 minutes..
4. À la fin du cycle de nettoyage automatique, la cafetière s’éteint
automatiquement.
5. Avant d’infuser du café à nouveau, infuser de l’eau fraîche dans la
cafetière en suivant les instructions de la section POUR COMMENCER.
19
Page 20

DÉPANNAGE
PROBLÈME CAUSE POSSIBLE SOLUTION
La cafetière ne se met
pas en marche.
La cafetière fuit.
Le panier-filtre déborde.
Il y a des résidus de
grains de café dans la
tasse de café infusé.
La cafetière n’est pas
branchée.
Le réservoir à eau est peutêtre rempli au-delà de sa
capacité.
Le couvercle n’est peut-être
pas placé correctement sur
la carafe.
La carafe n’est peut-être pas
bien placée sur le réchaud.
La carafe a été retirée
pendant plus de 30 secondes
en mode Sneak-A-CupMC.
Une quantité de café
excessive est produite.
Le filtre en papier et/ou le
panier d’infusion ne sont pas
correctement placés.
S’assurer que l’appareil
est branché à une
prise de courant
fonctionnelle.
S’assurer que le réservoir
à eau n’a pas été rempli
au-delà de la ligne de
remplissage de 12 tasses.
S’assurer que le
couvercle est bien placé
et fixé sur la carafe.
S’assurer que la carafe
est bien placée sur le
réchaud.
S’assurer de remettre
la carafe en place
avant qu’un délai de
30 secondes se soit
écoulé durant le cycle
d’infusion.
Réduire la quantité de
café utilisée.
Insérer le filtre et le
panier correctement.
L’infusion
est lente.
La cafetière n’infuse pas
toute l’eau contenue dans
le réservoir.
Si une aide supplémentaire est nécessaire, s’il vous plaît contacter
20
Le marc de café est
suffisamment petit pour
passer à travers le filtre
permanent.
La cafetière a besoin d’un
nettoyage.
La cafetière a besoin d’un
nettoyage.
Bien qu’il soit normal de
constater un résidu de
café à l’utilisation d’un
filtre permanent, une
moutureplus grossière
peut réduire la quantité
de résidu.
Suivre les instructions
figurant dans la section «
Nettoyage automatique
».
Suivre les instructions
figurant dans la section «
Nettoyage automatique
».
notre équipe de service à la clientèle au
1-800-465-6070.
Page 21

RENSEIGNEMENTS DE GARANTIE ET
SERVICE À LA CLIENTÈLE
Pour communiquer avec les services d’entretien ou de réparation, ou pour
adresser toute question relative au produit, composer le numéro sans frais
approprié indiqué sur la page couverture. Ne pas retourner le produit où il a
été acheté. Ne pas poster le produit au fabricant ni le porter dans un centre
de service. On peut également consulter le site web indiqué sur la page
couverture.
Garantie Limitée De Deux Ans
(Valable seulement aux États-Unis et au Canada)
Quelle est la couverture?
• Tout défaut de main-d’oeuvre ou de matériau; toutefois, la responsabilité de la
société. Applica se limite au prix d’achat du produit.
Quelle est la durée?
• Deux année(s) à compter de la date d’achat initiale, avec une preuve d’achat.
Quelle aide offrons nous?
• Remplacement par un produit raisonnablement semblable nouveau ou réusiné.
Comment se prévaut-on du service?
• Conserver son reçu de caisse comme preuve de la date d’achat.
• Visiter notre site web au www.prodprotect.com/blackanddecker, ou composer
sans frais le 1-800 465-6070, pour obtenir des renseignements généraux relatifs
à la garantie.
• On peut également communiquer avec le service des pièces et des accessoires au
1-800 738-0245.
Qu’est-ce que la garantie ne couvre pas?
• Des dommages dus à une utilisation commerciale.
• Des dommages causés par une mauvaise utilisation ou de la négligence.
• Des produits qui ont été modifiés.
• Des produits utilisés ou entretenus hors du pays où ils ont été achetés.
• Des pièces en verre et tout autre accessoire emballés avec le produit.
• Les frais de transport et de manutention reliés au remplacement du produit.
• Des dommages indirects (il faut toutefois prendre note que certains états ne
permettent pas l’exclusion ni la limitation des dommages indirects).
Quelles lois régissent la garantie?
• Les modalités de la présente garantie donnent des droits légaux spécifiques.
L’utilisateur peut également se prévaloir d’autres droits selon l’état ou la province
qu’il habite.
21
Page 22

1000 W 120 V ~ 60 Hz
BLACK+DECKER and the BLACK+DECKER logos and product names are trademarks of
The Black & Decker Corporation, used under license. All rights reserved.
BLACK+DECKER y los logos y nombres de productos de BLACK+DECKER son marcas
registradas de The Black & Decker Corporation, usados bajo licencia. Todos los derechos
reservados.
BLACK+DECKER et les logos et noms de produits BLACK+DECKER sont des marques de
commerce de The Black & Decker Corporation, utilisées sous licence. Tous droits réservés.
All other marks are Trademarks of Spectrum Brands, Inc.
Todas la demás marcas son Marcas Registradas de Spectrum Brands, Inc.
Toutes les autres marques sont des marques de commerce de Spe ctrum Brands, Inc.
Made in China.
Fabricado en China.
Fabriqué en Chine.
© 2019 The Black & Decker Corporation and Spectrum Brands, Inc., Middleton, WI 53562
22
Page 23

23
Page 24

www.BlackAndDeckerAppliances.com
24
T22-5004232-A
25030- 006
 Loading...