

Page 1
4-IN-1 COFFEE STATION
ESTACIÓN DE CAFÉ 4-EN-1
CAFETIÈRE 4-EN-1
use and care manual
manual de uso y cuidado
guide d’utilisation et d’entretien
CM0750
CM0755
Series / Série
Page 2

2
Please Read and Save this Use and Care Book.
IMPORTANT
SAFEGUARDS
When using electrical appliances, basic safety
precautions should always be followed to
reduce the risk of fire, electric shock, and/or
injury, including the following:
• READ ALL INSTRUCTIONS.
• Do not touch hot surfaces. Use
handle or knobs.
• To protect against electrical shock,
do not immerse cord, plug, or base
unit in water or other liquid.
• Close supervision is necessary when
any appliance is used by or near
children.
• Unplug from outlet when not in use
and before cleaning. Allow to cool
before putting on or taking o parts
and before cleaning the appliance.
• Do not operate any appliance with
a damaged cord or plug or after the
appliance malfunctions, or has been
damaged in any manner. Contact
Consumer Support at the toll-free
number listed in the warranty section.
• The use of accessory attachments
not recommended by the appliance
manufacturer may result in re,
electric shock or injury.
• Do not use outdoors.
• Do not let cord hang over the edge
of table or counter, or touch hot
surfaces.
• Do not place on or near a hot gas or
electric burner or in a heated oven.
• To disconnect, turn any control to OFF
(O), then remove plug from wall outlet.
CONTENTS
Important Safeguards.............. 2
Getting to Know Your Coffeemaker .....4
Getting Started ...................5
General Brewing Instructions .........5
Brewing Coffee Into Carafe ...........5
Brewing Coffee Into a Mug ...........6
Brewing Coffee Into Travel Mug .......6
Pour Over Brewing .................6
Care and Cleaning .................7
Warranty and Customer Service
Information ......................8
WELCOME!
Congratulations on your purchase of the
Black+Decker™ 4-in-1 Coffee Station!
We have developed this guide to ensure
optimal product performance for your
complete satisfaction. Save this use and
care manual and be sure to register your
appliance online at
www.prodprotect.com/applica
WARNING
RISK OF FIRE OR ELECTRIC SHOCK. DO NOT OPEN.
The lightning symbol refers to “dangerous voltage”; the exclamation symbol refers
to maintenance instructions. See below.
Warning: To reduce the risk of fire or electric shock, do not remove the cover of the
coffeemaker. There are no user-serviceable parts inside. Repair should be done by
authorized service personnel only.
Page 3

3
• Do not use this appliance for other
than intended use.
• Keep lid on the carafe when in use.
• Scalding may occur if the lid is
removed during the brewing cycles.
• The carafe is designed for use with
this appliance. It must never be
used on a range top.
• Do not set a hot carafe on a wet or
cold surface.
• Do not use a cracked carafe or a carafe
having a loose or weakened handle.
• Do not clean carafe with cleansers, steel
wool pads or other abrasive material.
• This appliance is not intended for
use by persons (including children)
with reduced physical, sensory
or mental capabilities, or lack of
experience and knowledge, unless
they have been given supervision
or instruction concerning use of the
appliance by a person responsible
for their safety.
• Children should be supervised to
ensure that they do not play with
the appliance.
SAVE THESE
INSTRUCTIONS.
This product is for household use only.
POLARIZED PLUG
(120V model only)
This appliance has a polarized plug
(one blade is wider than the other). To
reduce the risk of electric shock, this
plug is intended to t into a polarized
outlet only one way. If the plug does
not t fully into the outlet, reverse the
plug. If it still does not t, contact a
qualied electrician. Do not attempt
to modify the plug in any way.
TAMPE R-R ESISTANT SCREW
Warning: This appliance is equipped
with a tamper-resistant screw to
prevent removal of the outer cover. To
reduce the risk of re or electric shock,
do not attempt to remove the outer
cover. There are no user-serviceable
parts inside. Repair should be done
only by authorized service personnel.
ELECTRICAL CORD
a) A short power-supply cord is
provided to reduce the risks
resulting from becoming entangled
in or tripping over a longer cord.
b) Extension cords are available and
may be used if care is exercised in
their use.
c) If an extension cord is used:
1) The marked electrical rating of
the extension cord should be at
least as great as the electrical rating
of the appliance;
2) If the appliance is of the
grounded type, the extension cord
should be a grounding-type 3-wire
cord; and
3) The cord should be arranged
so that it will not drape over the
counter top or tabletop where it
can be pulled on by children or
tripped over.
Note: If the power cord is damaged,
please contact the warranty
department listed in these instructions.
Page 4
4
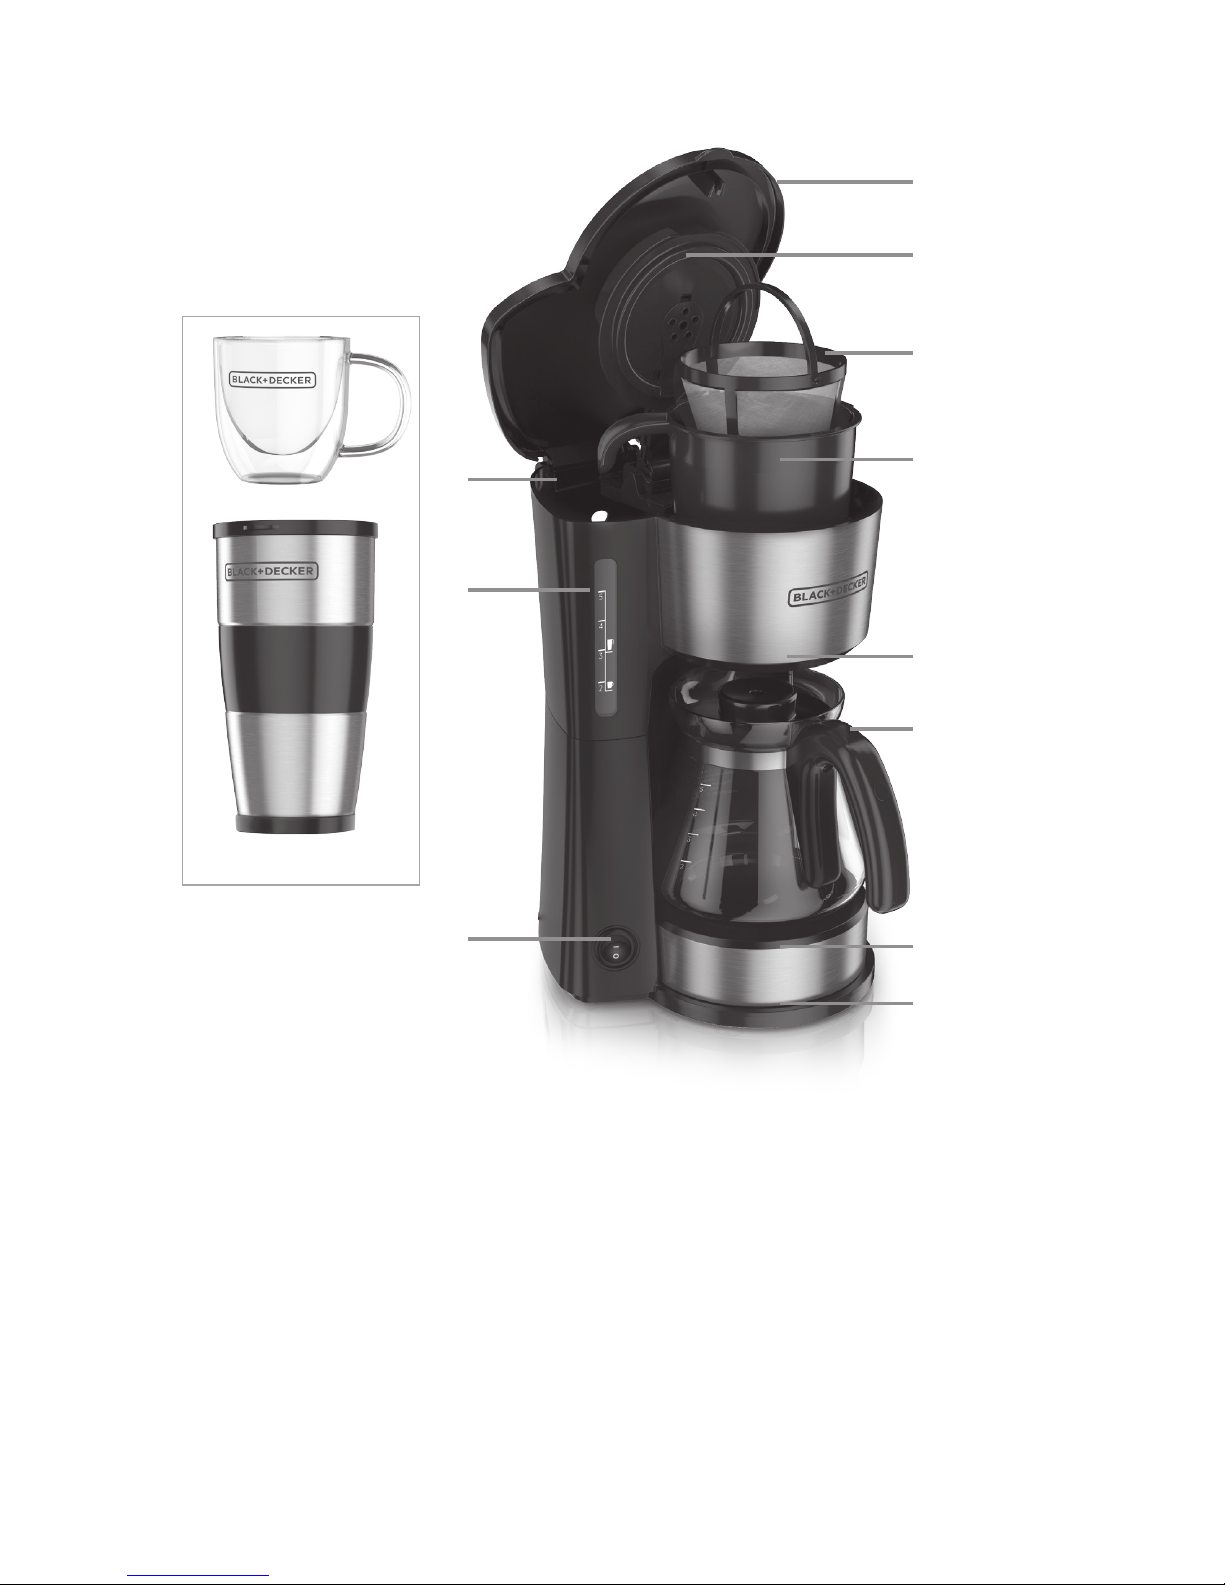
The parts supplied with the coffeemaker depend on which model was purchased.
Product may vary slightly from what is illustrated.
GETTING TO KNOW YOUR 4-in-1 COFFEE STATION
1. Water reservoir
2. Water level window
3. Lighted On/Off (I/O) switch
4. Lid
5. Shower head
6. Permanent filter
(part no. CM0700-01)
7. Brew basket, pour over compatible
(part no. CM0750-02)
8. Spout
9. Duralife™ 5 cup Carafe with lid
(part no. CM0700-03)
10. Adjustable stand
(part no. CM0750S-04) stainless
(part no. CM0750B-04) black
11. Base
12. Tritan™ Mug
(part no. CM0755BZ-05)
13. Travel Mug
(part no. CM0755B-05)
3
2
1
9
8
10
11
7
6
5
4
12
*
13
*
* Not included in all models
Page 5
5
GETTING STARTED
This appliance is intended for household
use only.
• Remove all packing material, any stickers,
and the plastic band around the power plug.
• Remove all accessories and components.
• Go to www.prodprotect.com/applica to
register your product.
• Open lid
• Pour fresh cold water into water reservoir
up to 5-cup mark.
• Place empty basket-style paper lter into
removable brew basket.
• Place basket into lter basket holder.
• Uncoil power cord and plug into
standard electrical outlet.
• Brew water through appliance without
adding coee grounds. This removes any
dust or residue that may remain in the
system during the manufacturing process.
• Discard the water from the carafe and
paper lter from brew basket.
• Turn o the appliance; unplug and allow
appliance to cool down.
GENERAL BREWING INSTRUCTIONS
1. Open one-piece cover.
2. Pour fresh cold water up to desired
level mark into water reservoir.
-If brewing a single cup into a mug,
fill to the icon. This will produce
8 oz of coffee.
-If brewing into a travel mug, fill to
the icon. This will produce 12 oz.
of coffee.
3. Place permanent filter or paper
filter into the brew basket.
4. Insert brew basket into top of
coffeemaker.
5. Add desired amount of ground
coffee.
Not sure how much coee to use?
Begin by using 1 level tablespoon of
medium grind coee for each 5 oz. of
coee to be brewed. A full carafe holds
25 oz. of coee.
6. Close lid securely.
7. By using or taking away the
adjustable stand, arrange the
receptacle of your choice so that its
top is close to the spout.
8. Plug cord into standard electrical
outlet.
9. Press on/off (I/O) switch button;
blue light comes on and brewing
begins.
10. Turn off coffeemaker when done
brewing.
11. Unplug appliance when not in use.
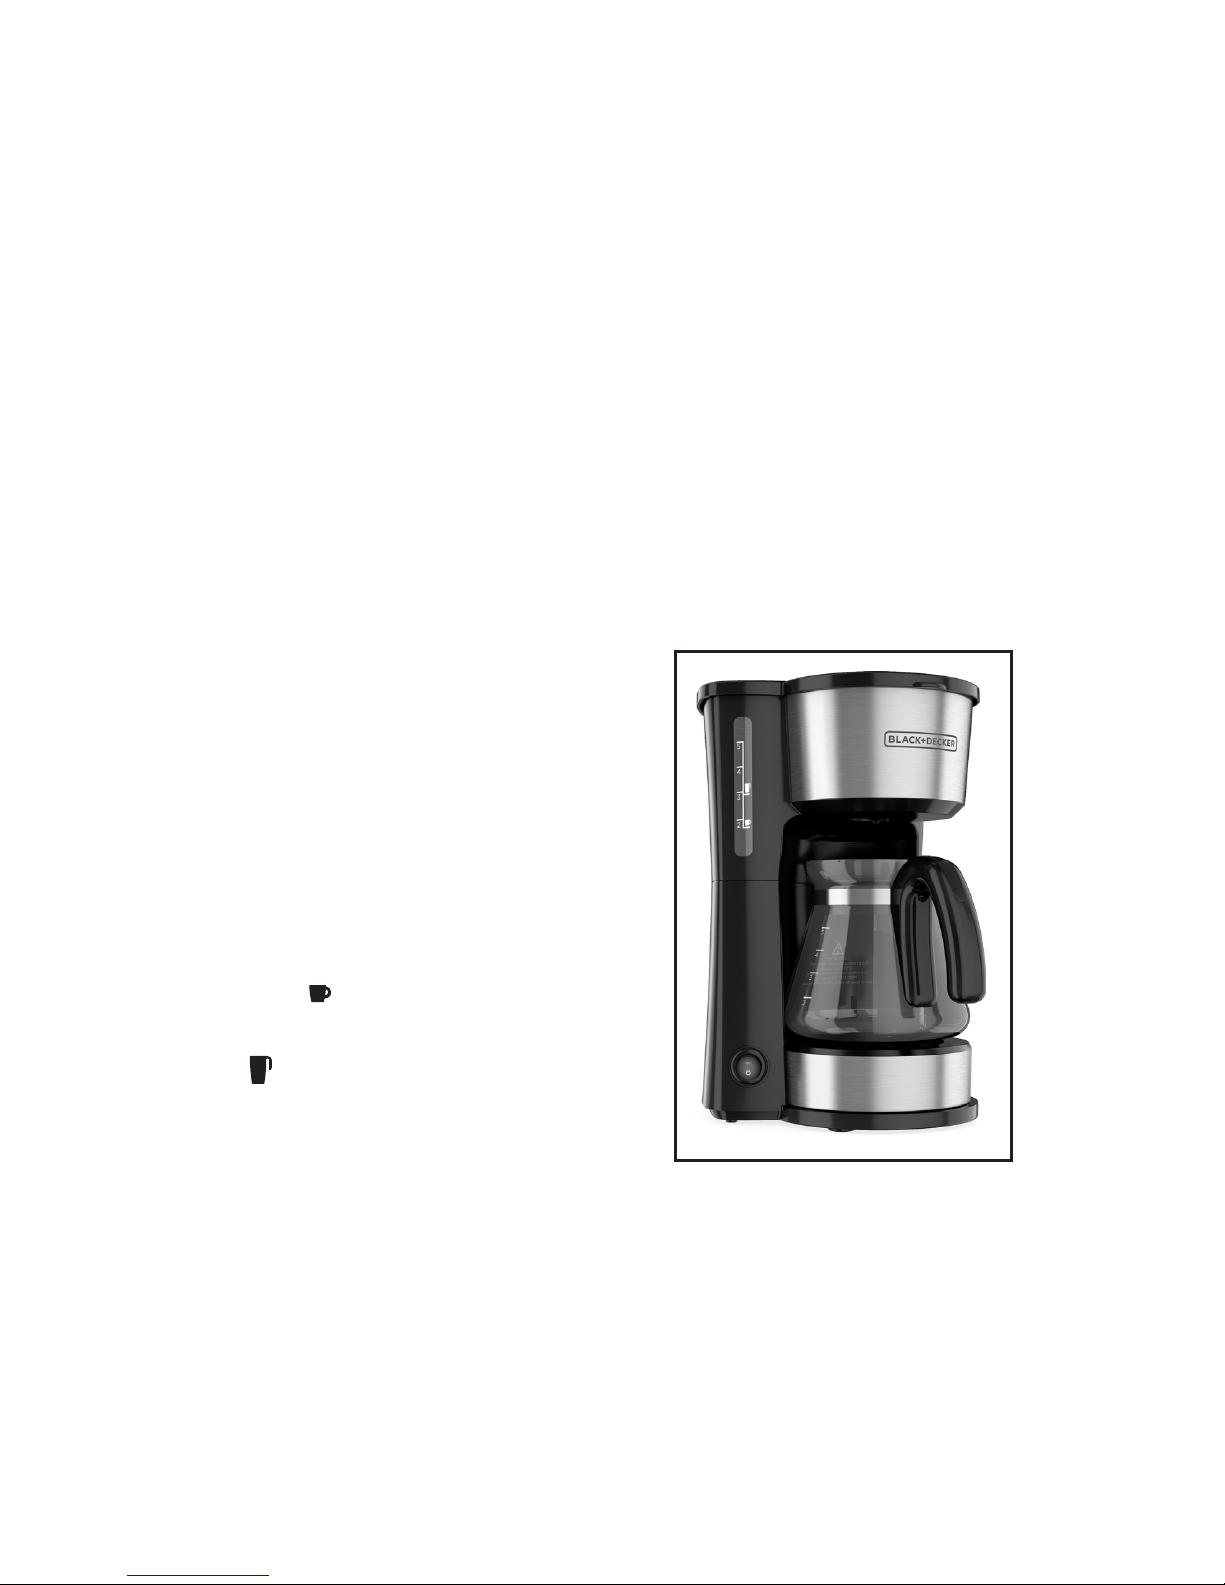
BREWING COFFEE INTO THE CARAFE
1. Place adjustable stand on the base.
2. Place empty carafe on the
adjustable stand.
3. Brew coffee following the general
brewing instructions.
Page 6
6
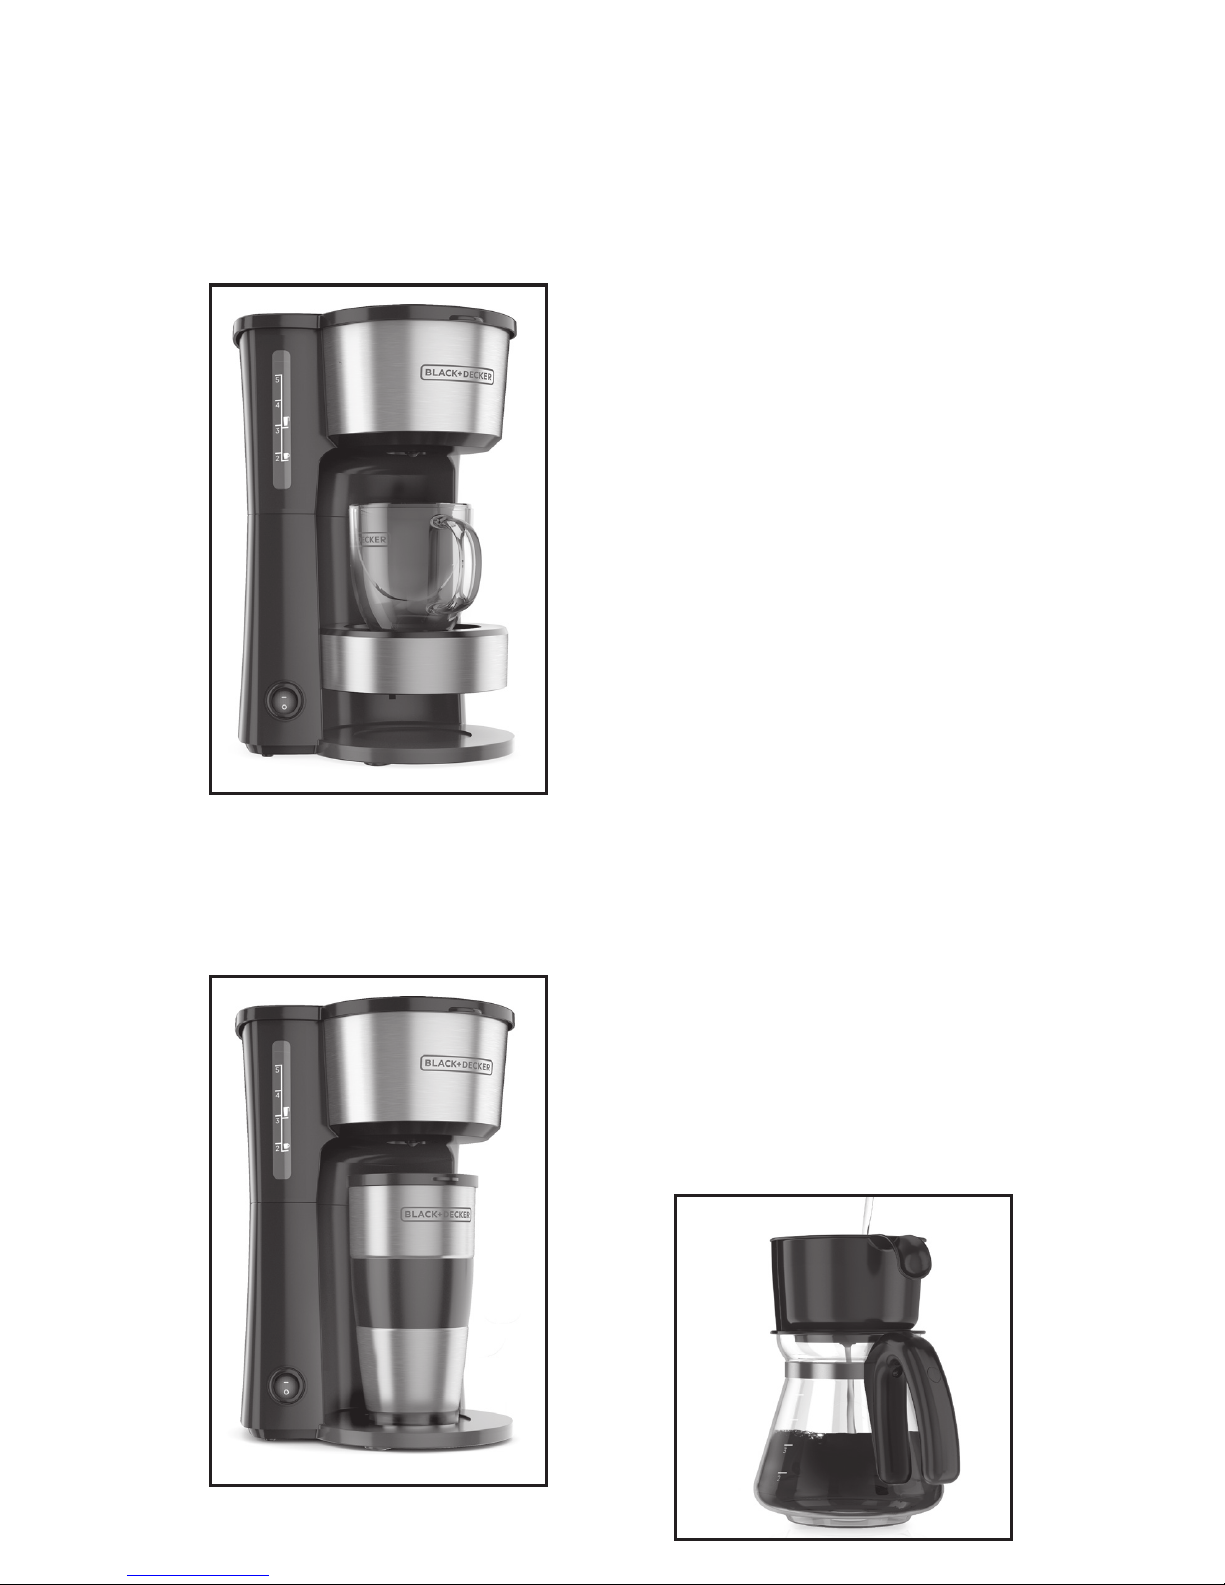
BREWING COFFEE INTO A MUG
1. By inserting the hooks on the stand
into the concave wall above the
base, adjust it so that it holds your
coffee mug close to the spout.
2. Brew coffee following the general
brewing instructions.
BREWING COFFEE INTO A TRAVEL MUG
1. Remove the stand and put travel
mug on the base.
2. Brew coffee following the general
brewing instructions.
POUR OVER BREWING
Why Pour Over?
Take more control over your coffee
brewing – you control the amount of
coffee and rate of brewing. The slower the
pour, the richer the flavor.
1. Pour cold water into a kettle or other
container [not included] and bring to
a boil. Once water reaches a boil, turn
off and let sit for 30 seconds.
2. Place the pour over compatible brew
basket on top of a mug of your choice
or the carafe with its lid removed.
3. Place the permanent filter or a #2
paper filter inside brew basket
Note: for best results, we recommend
using this brew method with paper filters.
4. Rinse the filter and carafe by pouring
your boiled water over the filter. This
helps preheat the brew basket and
carafe. Pour out the water from your
carafe or mug.
5. Add desired amount of freshly
ground coffee to the filter. About
2 tablespoons per serving is
recommended for this brew method.
6. Starting at the center of your grounds,
gently pour your boiled water onto
your grounds (just enough to wet all
of the coffee). Let rest for 30 seconds.
This allows the coffee to Bloom before
continuing.
7. Continue pouring slowly and gently
over the grounds then resting for 30
seconds after each pour. Continue
until you have your desired amount of
coffee. The process should take about
2–3 minutes.
Experiment! Find the method that brews
your perfect cup.
Page 7

7
CARE AND CLEANING
This product contains no user serviceable
parts. Refer service to qualied service
personnel.
CLEANING
1. Be sure the unit is unplugged
and cooled.
2. Open the one-piece cover, remove the
brew basket (lift straight up).
3. Empty the permanent filter or discard
the paper filter from the brew basket
(if using).
4. Wash the permanent filter, brew
basket, carafe, and carafe lid in the
dishwasher, top-rack only, or handwash with warm water and dish soap.
5. To clean inside one-piece cover, open
the cover and allow it to rest in the
open position.
6. Wipe surfaces with a damp cloth, and
close the cover.
CLEANING WITH VINEGAR (Descaling)
Mineral deposits left by hard water can
clog your coffeemaker. Cleaning with
vinegar is recommended once a month.
Your coffeemaker will not work
properly if it is not descaled regularly.
1. Pour white vinegar into water
reservoir up to 2-cup level on
water window.
2. Add cold water up to 5-cup line.
3. Place a paper filter in the brew
basket and close the cover.
4. Set empty carafe on adjustable
stand.
5. Turn on coffeemaker and let half the
cleaning solution brew into carafe
(until water level goes down to
around 3). Turn off coffeemaker and
let it soak for at least 15 minutes to
soften the deposits.
6. Turn on coffeemaker and brew
remaining cleaning solution
into carafe.
7. Turn off coffeemaker, empty carafe
and discard soiled filter.
8. Fill reservoir with cold water to
5-cup line, replace empty carafe,
then turn on coffeemaker for a
complete brew cycle to flush out
remaining cleaning solution. You
may wish to repeat this step to
eliminate any remaining vinegar
smell/taste.
9. Wash the brew basket and carafe as
instructed in CLEANING.
STORING
Make sure that the appliance is thoroughly
dry. Never wrap the cord tightly around the
appliance; keep it loosely coiled.
Page 8

8
Two-Year Limited Warranty
(Applies only in the United States and Canada)
For service, repair or any questions regarding your appliance, call the appropriate 800
number listed within this section. Please DO NOT return the product to the place of
purchase. Also, please DO NOT mail product back to manufacturer, nor bring it to a service
center. You may also want to consult the website listed on the cover of this manual.
What does it cover?
• Any defect in material or workmanship provided; however,
Spectrum Brands, Inc.’s liability will not exceed the purchase price of product.
For how long?
• Two years from the date of original purchase with proof of purchase.
What will we do to help you?
• Provide you with a reasonably similar replacement product that is either new or factory refurbished.
How do you get service?
• Save your receipt as proof of date of sale.
• Visit the online service website at www.prodprotect.com/applica, or call toll-free
1-800-231-9786, for general warranty service.
• If you need parts or accessories, please call 1-800-738-0245.
What does your warranty not cover?
• Damage from commercial use
• Damage from misuse, abuse or neglect
• Products that have been modied in any way
• Products used or serviced outside the country of purchase
• Glass parts and other accessory items that are packed with the unit
• Shipping and handling costs associated with the replacement of the unit
• Consequential or incidental damages (Please note, however, that some states do not allow the
exclusion or limitation of consequential or incidental damages, so this limitation may not apply to you.)
How does state law relate to this warranty?
• This warranty gives you specic legal rights. You may also have other rights that vary from state to
state or province to province.
WARRANTY INFORMATION
Page 9

9
Por favor lea este instructivo antes de usar el producto.
INSTRUCCIONES
IMPORTANTES
DE SEGURIDAD
Cuando se utilizan aparatos eléctricos, siempre
se debe respetar ciertas medidas de seguridad
a fin de reducir el riesgo de un incendio, un
choque eléctrico y (o) lesiones a las personas,
incluyendo las siguientes:
• POR FAVOR LEA TODAS LAS
INSTRUCCIONES.
• No toque las supercies calientes.
Use las asas o las perillas.
• A n de protegerse contra un
choque eléctrico y lesiones a las
personas, no sumerja el cable, los
enchufes ni el aparato en agua ni en
ningún otro líquido.
• Todo aparato eléctrico usado en la
presencia de los niños o por ellos
mismos requiere la supervisión de
un adulto.
• Desconecte el aparato del
tomacorriente cuando no esté en uso
y antes de limpiarlo. Espere que el
aparato se enfríe antes de instalarle o
retirarle piezas y antes de limpiarlo.
• No use ningún aparato eléctrico que
tenga el cable o el enchufe averiado,
que presente un problema de
funcionamiento o que esté dañado.
Acuda a un centro de servicio
autorizado para que lo examinen,
reparen o ajusten o llame gratis
al número correspondiente en la
cubierta de este manual.
• El uso de accesorios no recomendados
por el fabricante del aparato puede
ocasionar incendio, choque eléctrico o
lesiones a las personas.
INFORMACIÓN
CONTENIDA
Instrucciones Importantes de Seguridad ......... 9
Conozca su Cafetera.......................... 11
Antes del Primer Uso .........................12
Instrucciones Generales de Prepraración ........12
Preparación de Café dentro de la Jarra ..........12
Preparación de Café dentro de la Taza ..........13
Preparación de Café dentro de la Taza Portátil .....13
Preparación de Café Filtrado a Mano............13
Cuidado y Limpieza ..........................14
Información de Garantía y Servicio al Cliente..... 16
¡BIENVENIDO!
¡Felicitaciones por su compra de la
Estación de Café 4-en-1 Black+Decker™!
Hemos desarrollado este manual
para asegurar rendimiento óptimo y
su satisfacción total. Conserve este
manual de uso y cuidado y asegúrese de
registrar su producto en línea visitando
www.prodprotect.com/applica.
PRECAUCIÓN
RIESGO DE INCENDIO O DE CHOQUE ELÉCTRICO. NO ABRA.
El símbolo de un rayo indica voltaje peligroso. El signo de exclamación
indica importantes instrucciones de mantenimiento. Consulte a
continuación:
Precaución: Para reducir el riesgo de incendio o de choque eléctrico,
no retire la cubierta de la cafetera. No contiene por dentro partes
reparables por el consumidor. Cualquier reparación deberá ser
efectuada únicamente por personal autorizado.
Page 10

10
• No use este aparato a la intemperie.
• No permita que el cable cuelgue del
borde de la mesa o del mostrador
ni que entre en contacto con las
supercies calientes.
• No coloque el aparato sobre ni cerca
de las hornillas de gas o eléctricas ni
adentro de un horno caliente.
• Para desconectar, ajuste todo control
a la posición de apagado (OFF) O
y después, retire el enchufe del
tomacorriente.
• Este aparato se debe usar
únicamente con el n previsto.
• La tapa debe permanecer sobre la
jarra cuando el aparato está en uso.
• El retirar la tapa durante los
ciclos de colado puede ocasionar
quemaduras.
• La jarra está diseñada para ser
utilizada con este aparato. Jamás se
deberá utilizar sobre la estufa.
• Nunca coloque una jarra caliente
sobre una supercie fría ni húmeda.
• No utilice la jarra si el vidrio se
encuentra rajado o si el asa está
débil.
• No limpie la jarra con limpiadores
abrasivos, con almohadillas de bra
de metal ni demás limpiadores
abrasivos.
• Este aparato no está diseñado para
ser usado por personas (incluído
niños) con capacidad limitada física,
mental o sensoriales disminuidas y
falta de experiencia o conocimiento
que les impida utilizar el aparato con
toda seguridad sin supervisión o
instrucción.
• Se debe asegurar la supervisión de
los niños para evitar que usen el
aparato como juguete.
CONSERVE ESTAS
INSTRUCCIONES.
Este aparato electrico es para uso domesti-
co unicamente.
ENCHUFE POLARIZADO
(Solamente para modelos de 120V)
Este aparato cuenta con un enchufe
polarizado (un contacto es más ancho
que el otro). A n de reducir el riesgo
de un choque eléctrico, este enchufe
encaja en un tomacorriente polarizada
en un solo sentido. Si el enchufe no
entra en le tomacorriente, inviértalo
y si aun así no encaja, consulte con
un electricista. Por favor no trate de
alterar esta medida de seguridad.
TORNILLO DE SEGURIDAD
Advertencia: Este aparato cuenta con
un tornillo de seguridad para evitar la
remoción de la cubierta exterior del
mismo. A n de reducir el riesgo de
incendio o de choque eléctrico, por
favor no trate de remover la cubierta
exterior. Este producto no contiene
piezas reparables por el consumidor.
Toda reparación se debe llevar a cabo
únicamente por personal de servicio
autorizado.
CABLE ELÉCTRICO
a) Un cable de alimentación corto es
provisto para reducir los riesgos de
enredarse o tropezar con un cable
más largo.
b) Existen cables de extensión
disponibles y estos pueden ser
utilizados si se toma el cuidado
debido en su uso.
c) Si se utiliza un cable de extensión:
1) La clasificación eléctrica
marcada del cable de extensión
debe ser, como mínimo, igual a la
clasificación eléctrica del aparato;
2) Si el aparato es del tipo de
conexión a tierra, el cable de
extensión debe ser un cable de tres
alambres de conexión a tierra; y
3) El cable debe ser acomodado
de manera que no cuelgue del
mostrador o de la mesa para evitar
que un niño tire del mismo o que
alguien se tropiece sin darse cuenta.
Nota: Si el cable de alimentación está
dañado, por favor llame al número
del departamento de garantía que
aparece en estar instrucciones.
Page 11

11
Las piezas suministradas con la cafetera dependen del modelo ordenado.
El producto puede variar ligeramente del que aparece ilustrado.
CONOZCA SU ESTACIÓN DE CAFÉ 4-en-1
1. Tanque de agua
2. Ventana para ver el nivel de agua
3. Interruptor de encendido/apagado (I/O)
4. Tapa
5. Distribuidor de agua
6. Filtro permanente
(pieza no. CM0700-01)
7. Cesta de preparación, compatible
con un goteador para filtrado a mano
(pieza no. CM0750-02)
8. Boquilla
9. Jarra con tapa de 5 tazas Duralife™
(pieza no. CM0700-03)
10. Soporte ajustable
(pieza no CM0750S-04) acero inoxidable
(pieza no. CM0750B-04) negro
11. Base
12. Taza Tritan™
(pieza no. CM0755BZ-05)
13. Taza portátil
(pieza no. CM0755B-05)
3
2
1
9
8
10
11
7
6
5
4
12
*
13
*
* No se incluye en todos
los modelos
Page 12

12
ANTES DEL PRIMER USO
Este aparato está diseñado solamente para
uso doméstico.
• Retire todo material de empaque,
etiquetas adheridas y la banda plástica
alrededor del enchufe.
• Retire todos los accesorios y
componentes.
• Vaya a www.prodprotect.com/applica
para registrar su producto.
• Abra la tapa.
• Vierta agua fresca fría en el tanque de
agua hasta la marca de 5 tazas.
• Coloque un ltro de papel vacío, estilo
cesta adentro de la cesta de preparación
removible.
• Coloque la cesta en el compartimiento de
la cesta del ltro.
• Desenrolle el cable de alimentación y
enchúfelo a un tomacorriente estándar.
• Cuele agua a través del aparato sin
agregar granos de café. Esto remueve
cualquier polvo o residuo que pueda
haber quedado durante el proceso de
fabricación.
• Deseche el agua de la jarra y el ltro de
papel de la cesta.
• Apague el aparato, descenchúfelo y deje
que se enfríe.
INSTRUCCIONES GENERALES DE
PREPARACIÓN
1. Abra la tapa enteriza.
2. Vierta agua fresca fría hasta la
marca del nivel deseado en el
tanque de agua.
- Si va a preparar una sola taza
dentro de una taza, llene hasta el
icono . Esto producirá una taza
de café de 8 onzas.
- Si va a preparar dentro de una taza
portátil, llene hasta el icon .
Esto producirá una taza de café
de 12 onzas.
3. Coloque el filtro permanente o
un filtro de papel en la cesta de
preparación.
4. Inserte la cesta de preparación en
la parte superior de la cafetera.
5. Añada la cantidad de café molido
deseada.
¿No está seguro que cantidad de café debe
usar? Comience usando 1 cucharada de
café de molido mediano al ras, por cada
5 onzas de café a preparar. Una jarra llena
contiene 25 onzas de café.
6. Cierre la tapa de forma segura.
7. Utilice o retire el soporte ajustable y
acomode su taza favorita de manera
que la parte superior quede cerca
de la boquilla.
8. Enchufe el cable a un tomacorriente
estándar.
9. Presione el interruptor de
encendido/apagado (I/O), la luz azul
se ilumina y la preparación de café
comienza.
10. Apague la cafetera cuando la
preparación termine.
11. Desenchufe el aparato cuando no
esté en uso.
PREPARACIÓN DE CAFÉ DENTRO DE LA
JARRA
1. Coloque el soporte ajustable en la
base.
2. Coloque la jarra vacía sobre el
soporte ajustable.
3. Prepare el café siguiendo las
instrucciones generales de
preparación.
Page 13

13
PREPARACIÓN DE CAFÉ DENTRO DE
UNA TAZA
1. Insertando los ganchos en el
soporte dentro de la pared cóncava
arriba de la base, ajústelo de
manera que sostenga su taza de
café cerca de la boquilla.
2. Prepare el café siguiendo las
instrucciones generales de
preparación.
PEPARACIÓN DE CAFÉ DENTRO DE
UNA TAZA PORTÁTIL
1. Retire el soporte y coloque la taza
portátil sobre la base.
2. Prepare el café siguiendo las
instrucciones generales de
preparación.
PREPARACIÓN DE CAFÉ FILTRADO A MANO
¿Por qué café filtrado a mano?
Adquiera más control sobre la preparación
de su café—usted controla la cantidad
de café y la velocidad de la preparación.
Mientras más lento sea el vertido, más
fuerte será el sabor.
1. Vierta agua fría en un hervidor u otro
recipiente (no incluido) y póngala
a hervir. Una vez que el agua haya
hervido, apague y deje reposar por 30
segundos.
2. Coloque la cesta de preparación
compatible con un goteador encima
de una taza de su preferencia o de la
jarra con su tapa.
3. Coloque el filtro permanente o un
filtro de papel #2 dentro de la cesta de
preparación.
Nota: Para mejores resultados,
recomendamos utilizar este método de
preparación con filtros de papel.
4. Enjuague el filtro y la jarra vertiendo el
Page 14

14
agua hervida sobre el filtro. Esto ayuda a
precalentar la cesta de preparación y la
jarra. Deseche el agua de su jarra o taza.
5. Añada la cantidad deseada de
café recién molido al filtro. Es
recomendado usar aproximadamente
2 cucharadas por taza para este
método de preparación.
6. Comenzando en el centro de sus
granos, suavemente vierta su agua
hervida sobre los granos (justo la
cantidad suficiente para mojar todo el
café). Deje reposar por 30 segundos.
Esto permite que el café se expanda
antes de continuar.
7. Continue vertiendo lentamente y
suavemente sobre los granos, luego
deje reposar por 30 segundos después
de cada vertido. Continue hasta que
tenga la cantidad deseada de café. El
proceso debe tomar 2 a 3 minutos.
¡Experimente! Encuentre el método de
preparación ideal para lograr su perfecta
taza de café.
CUIDADO Y LIMPIEZA
Este producto no contiene piezas que
deban ser reparadas por el usuario. Para
servicio, consulte con personal de servicio
calicado.
LIMPIEZA
1. Asegúrese de que su cafetera esté
desenchufada y enfriada.
2. Abra la tapa enteriza, retire la cesta
de preparación (álzela directo hacia
arriba).
3. Vacíe el filtro permanente o deseche
el filtro de papel de la cesta de
preparación (si se ha utilizado).
4. Lave el filtro permanente, la cesta
de preparación, la jarra y la tapa de
la jarra en la máquina lavadora de
platos, rejilla superior solamente,
o lave a mano con agua caliente y
líquido de fregar.
5. Para limpiar el interior de la tapa
enteriza, abra la tapa y déjela reposar
en la posición abierta.
6. Limpie las superferficies con un paño
húmedo y cierre la tapa.
Page 15

15
LIMPIEZA CON VINAGRE
(DESCALCIFICACIÓN)
Los depósitos minerales acumulados
por el agua dura pueden tupir su
cafetera. La limpieza con vinagre es
recomendada una vez al mes.
Su cafetera no funcionará
adecuadamente si no es descalcificada
regularmente.
1. Llene el tangue de agua con vinagre
blanco hasta el nivel de 2 tazas en
la ventana de agua.
2. Añada agua fría hasta el nivel de
5 tazas.
3. Coloque un filtro de papel en la cesta
de preparación y cierre la tapa.
4. Coloque la jarra vacía en el soporte
ajustable.
5. Encienda la cafetera y deje que la
mitad de la solución cuele en la
jarra (hasta que el nivel de agua
baje hasta aproximadamente 3).
Apague la cafetera y deje remojar
por 15 minutos como mínimo para
suavizar los depósitos.
6. Encienda la cafetera y cuele el resto
de la solución en la jarra.
7. Apague la cafetera, vacíe la jarra y
deseche el filtro sucio.
8. Llene el tanque de agua con agua
fría hasta el nivel de 5 tazas,
coloque la jarra vacía, luego
encienda la cafetera para iniciar
un ciclo de colado completo y dejar
salir el resto de la solución. Tal vez
deba repetir este paso para eliminar
cualquier olor/sabor a vinagre que
haya quedado.
9. Lave la cesta de preparación y
la jarra según las instrucciones
indicadas en la sección de
LIMPIEZA.
ALMACENAMIENTO
Asegúrese de que el aparato esté
completamente seco. Nunca enrolle el
cable de forma ajustada alrededor del
aparato, manténgalo enrollado de forma
holgada.
Page 16

16
¿NECESITA AYUDA?
Garantía limitada de dos años
(Solamente aplica en los Estados Unidos y el Canadá).
Para servicio, reparaciones o cualquier pregunta sobre su electrodoméstico, por favor llame
a nuestra Línea de Servicio al Cliente al 1-800-231-9786. Por favor, NO devuelva el producto
al lugar donde lo compró. Además, por favor NO envie el producto por correos al fabricante
ni lo lleve a un centro de servicio. También puede consultar el sitio web que aparece en la
portada de este manual.
¿Qué cubre mi garantía?
• Su garantía cubre cualquier defecto de material o de mano de obra, siempre y cuando la
responsabilidad de Spectrum Brands, Inc. no exceda el precio de compra del producto.
¿Por cuánto tiempo es valida la garantía?
• Su garantía se extiende por dos años a partir de la fecha original de compra mientras que tenga una
prueba de la compra.
¿Qué tipo de asistencia provee mi garantía?
• Su garantía le brinda un producto de reemplazo similar que sea nuevo o que ha sido restaurado de
fábrica.
¿Cómo se puede obtener asistencia?
• Conserve el recibo original de compra.
• Para servicio al cliente y para registrar su garantía, visite www.prodprotect.com/applica, o llame al
número 1-800-231-9786, para servicio al cliente
• Por favor llame al número del centro de servicio autorizado. 1-800-738-0245.
¿Qué no cubre mi garantía?
• Los productos que han sido utilizados en condiciones distintas a las normales.
• Los daños ocasionados por el mal uso, el abuso o negligencia.
• Los productos que han sido alterados de alguna manera.
• Los daños ocasionados por el uso comercial del producto.
• Los productos utilizados o reparados fuera del país original de compra.
• Las piezas de vidrio y demás accesorios empacados con el aparato.
• Los gastos de tramitación y embarque asociados al reemplazo del producto.
• Los daños y perjuicios indirectos o incidentales.
¿Cómo afecta a mi garantía la ley estatal?
• Esta garantía le otorga derechos legales especícos y el consumidor podría tener otros
derechos que varían de una región a otra.
Page 17

17
PÓLIZA DE GARANTÍA
(Válida sólo para México)
DURACIÓN
Spectrum Brands de México, SA de CV garantiza este producto por 2 años a partir de la
fecha original de compra.
¿Qué cubre esta garantía?
• Esta Garantía cubre cualquier defecto que presenten las piezas, componentes y la mano de
obra contenidas en este producto.
• Requisitos para hacer válida la garantía
• Para reclamar su Garantía deberá presentar al Centro de Servicio Autorizado la póliza
sellada por el establecimiento en donde adquirió el producto. Si no la tiene, podrá presentar
el comprobante de compra original.
¿Donde hago válida la garantía?
• Llame sin costo al teléfono 01 800 714 2503, para ubicar el Centro de Servicio Autorizado
más cercano a su domicilio en donde usted podrá encontrar partes, componentes,
consumibles y accesorios.
Procedimiento para hacer válida la garantía
Acuda al Centro de Servicio Autorizado con el producto con la póliza de Garantía sellada
o el comprobante de compra original, ahí se reemplazará cualquier pieza o componente
defectuoso sin cargo alguno para el usuario nal. Esta Garantía incluye los gastos de
transportación que se deriven de su cumplimiento.
Excepciones
Esta Garantía no será válida cuando el producto:
A) Se hubiese utilizado en condiciones distintas a las normales.
B) No hubiese sido operado de acuerdo con el instructivo de uso
que le acompaña.
C) Cuando el producto hubiese sido alterado o reparado por personas
no autorizadas por Spectrum Brands de México, SA de CV.
Nota: Usted podra encontrar partes, componentes, consumibles y accesorios en los
centros de servicios autorizados. Esta garantía incluyen los gastos de transportación que se
deriven de sus cumplimiento dentro de sus red de servicio.
Page 18

18
¿NECESITA AYUDA?
Para servicio, reparaciones o preguntas relacionadas al producto, por favor llame al
número del centro de servicio que se indica para el país donde usted compró su producto.
NO devuélva el producto al fabricante. Llame o lleve el producto a un centro de servicio
autorizado.
DOS AÑOS DE GARANTÍA LIMITADA
(No aplica en México, Estados Unidos y Canada)
¿Qué cubre la garantía?
• La garantía cubre cualquier defecto de materiales o de mano de obra que no haya sido generado por
el uso incorrecto del producto.
¿Por cuánto tiempo es válida la garantía?
• Por dos años a partir de la fecha original de compra mientras que tenga una prueba de la compra.
¿Cómo se obtiene el servicio necesario?
• Conserve el recibo original como comprobante de la fecha de compra, comuníquese con el
centro de servicio de su país y haga efectiva su garantía si cumple lo indicado en el manual de
instrucciones.
¿Cómo se puede obtener servicio?
• Conserve el recibo original de compra.
• Por favor llame al número del centro de servicio autorizado.
¿Qué aspectos no cubre esta garantía?
• Los productos que han sido utilizados en condiciones distintas a las normales.
• Los daños ocasionados por el mal uso, el abuso o negligencia.
• Los productos que han sido alterados de alguna manera.
• Los daños ocasionados por el uso comercial del producto.
• Los productos utilizados o reparados fuera del país original de compra.
• Las piezas de vidrio y demás accesorios empacados con el aparato.
• Los gastos de tramitación y embarque asociados al reemplazo del producto.
• Los daños y perjuicios indirectos o incidentales.
¿Qué relación tiene la ley estatal con esta garantía?
• Esta garantía le otorga derechos legales especícos y el consumidor podría tener otros
derechos que varían de una región a otra.
Page 19

19
Por favor llame al número correspondiente que aparece en la lista a continuación para solicitar que
se haga efectiva la garantía y donde Ud. puede solicitar servicio, reparaciones o partes en el país
donde el producto fué comprado.
Argentina
Atención al consumidor
0800 444 7296
Horario de atención:
Lunes a viernes de 9 a 13 hs
y de 14.30 a 17 hs.
email: servicios@spectrumbrands.com
Humboldt 2495 piso 3
C.A.B.A. – Argentina
Chile
SERVICIO DE MAQUINAS Y
HERRAMIENTAS LTDA.
Portugal Nº 644
Santiago – Chile
Fonos: 02-6355208 / 02-6341169
Email: servicio@spectrumbrands.cl
Call center: 800-171-051
Colombia
Rayovac Varta S.A
Carrera 17 Número 89-40
Línea gratuita nacional
018000510012
Costa Rica
Aplicaciones Electromecanicas
Calle 22 y 24 en Avenida 3 BLV de la torre
Mercedes Benz
200 mts norte y 50 mts este
San José, Costa Rica
Tel. (506) 2257-5716
Ecuador
Servicio Master
Dirección: Capitán Rafael
Ramos OE 1-85 y Galo plaza lasso.
Tel (593) 2281-3882 / 2240-9870
El Salvador
Sedeblack
Calle San Antonio Abad, Colonia Lisboa
No 2936
San Salvador, Depto. de San Salvador
Tel. (503) 2284-8374
Guatemala
Kinal
17 avenida 26-75, zona 11 Centro
comercial Novicentro,
Local 37 - Ciudad
Guatemala
Tel. (502)-2476-7367
Honduras
Serviteca
San Pedro Sula, B Los Andes, 2 calleentre 11-12 Avenida
Honduras
Tel. (504) 2550-1074
México
Articulo 123 # 95 Local 109 y 112
Col. Centro, Cuauhtemoc,
México, D. F.
Tel. 01 800 714 2503
Nicaragua
LRM ELECTRONICA
Managua - Sinsa Altamira 1.5
kilómetros al norte
Nicaragua
Tel. (505) 2270-2684
Panamá
Supermarcas
Centro comercial El dorado, Plaza
Dorado, Local 2.
Panama
Tel. (507) 392-6231
Perú
Servicio Central Fast Service
Av. Angamos Este 2431
San Borja, Lima Perú
Tel. (511) 2251 388
Puerto Rico
Buckeye Service
Jesús P. Piñero #1013
Puerto Nuevo, SJ PR 00920
Tel.: (787) 782-6175
Republica Dominicana
Prolongación Av. Rómulo
Betancourt
Zona Industrial de Herrera
Santo Domingo, República
Dominicana
Tel.: (809) 530-5409
Venezuela
Inversiones BDR CA
Av. Casanova C.C.
City Market Nivel Plaza Local 153
Diagonal Hotel Melia,
Caracas.
Tel. (582) 324-0969
Page 20

20
Veuillez lire et conserver ce guide d’entretien et
d’utilisation.
IMPORTANTES CONSIGNES
DE SÉCURITÉ
Lorsqu’on utilise des appareils électriques, il
faut toujours respecter certaines règles de sécurité fondamentales, notamment les suivantes:
• LIRE TOUTES LES INSTRUCTIONS.
• Ne pas toucher aux surfaces
chaudes. Prendre l’appareil par les
poignées ou les boutons.
• An d’éviter les risques d’incendie,
de choc électrique et de blessures,
ne pas immerger le cordon, la che
ou l’appareil dans l’eau ou dans
d’autres liquides.
• Exercer une étroite surveillance
lorsque l’appareil est utilisé à
proximité d’un enfant ou que ce
dernier s’en sert.
• Débrancher l’appareil lorsqu’il n’est
pas en marche et avant le nettoyage.
Le laisser refroidir avant d’installer ou
de retirer des pièces, et avant de le
nettoyer.
• Ne pas utiliser un appareil dont
la che ou le cordon sont abîmés,
qui présente un problème de
fonctionnement, ou qui est
endommagé de quelque façon
que ce soit. Communiquer avec le
service à la clientèle en composant
le numéro indiqué dans le présent
guide.
• L’utilisation d’accessoires non
recommandés par le fabricant de
l’appareil présente des risques
d’incendie, de choc électrique ou de
blessures.
MATIÈRES
Mises en garde importantes .................20
Familiarisation avec la cafetière ..............22
Pour commencer...........................23
Instructions générales sur l’infusion...........23
Infusion du café dans la carafe ...............24
Infusion du café dans une tasse ..............24
Infusion du café dans une tasse de voyage .....25
Infusion par versement d’eau ................25
Entretien et nettoyage ......................26
Information sur la garantie
et le service à la clientèle....................27
BIENVENUE!
Félicitations pour votre achat de la
cafetière 4-en-1 de Black+DeckerMC!
Nous avons élaboré le présent
guide d’utilisation et d’entretien
pour assurer le rendement optimal
du produit et votre entière
satisfaction. Conservez le présent
guide d’utilisation et d’entretien, et
enregistrez votre appareil en ligne au
www.prodprotect.com/applica.
AVERTISSEMENT
RISQUES D'INCENDIE OU DE CHOC ÉLECTRIQUE NE PAS OUVRIR
Le symbole clignotant indique que la « tension est dangereuse »; le point
d'exclamation fait référence aux instructions d'entretien. Voir ci-dessous.
Avertissement : Pour réduire les risques d'incendie ou de choc électrique, ne pas
retirer le couvercle de la cafetière. L'appareil ne contient aucune pièce réparable
par l'utilisateur. Les réparations doivent être effectuées par un technicien autorisé
seulement.
Page 21

21
• Ne pas utiliser l’appareil à l’extérieur.
• Ne pas laisser le cordon pendre du
rebord d’une table ou d’un comptoir,
ou toucher une surface chaude.
• Ne pas placer l’appareil sur un
brûleur au gaz ou électrique, ou à
proximité, ni dans un four chaud.
• Pour débrancher l’appareil, d’abord
mettre tout bouton de commande en
position d’arrêt (OFF) O, puis débrancher
l’appareil de la prise de courant.
• N’utiliser cet appareil que pour les
fonctions auxquelles il est destiné.
• Garder le couvercle sur la carafe lors
de l’utilisation de l’appareil.
• Le retrait du couvercle pendant les
cycles d’infusion peut causer des
brûlures.
• La carafe est conçue pour être utilisée
avec cet appareil. Elle ne doit jamais
être utilisée sur une table de cuisson.
• Ne pas déposer la carafe chaude sur
une surface froide ou mouillée.
• Ne pas se servir de la carafe si le
verre en est fêlé ou si la poignée est
lâche ou aaiblie.
• Ne pas nettoyer la carafe avec des
produits nettoyants, des tampons en
laine d’acier, ou tout autre produit abrasif.
• Cet appareil n’est pas conçu pour
être utilisé par des personnes
(notamment des enfants) dont les
capacités physiques, sensorielles
ou mentales sont réduites ou qui
manquent d’expérience ou de
connaissances, à moins qu’elles ne
soient supervisées ou dirigées par
une personne responsable de leur
sécurité pendant l’utilisation.
• Les enfants doivent être supervisés
an d’éviter qu’ils ne jouent avec
l’appareil.
CONSERVER CES
MESURES.
L’appareil est conçu pour une utilisation
domestique.
FICHE POLARISÉE
(Seulement model 120V)
L’appareil est muni d’une che
polarisée (une lame plus large que
l’autre). An de minimiser les risques
de secousses électriques, ce genre de
che n’entre que d’une façon dans
une prise polarisée. Lorsqu’on ne peut
insérer la che à fond dans la prise,
il faut tenter de le faire après avoir
inversé les lames de côté. Si la che
n’entre toujours pas dans la prise, il
faut communiquer avec un électricien
certié. Il ne faut pas tenter de
modier la che.
VIS INDESSERRABLE
Avertissement: L’appareil est doté
d’une vis indesserrable empêchant
l’enlèvement du couvercle extérieur.
Pour réduire les risques d’incendie
ou de secousses électriques, ne pas
tenter de retirer le couvercle extérieur.
L’utilisateur ne peut pas remplacer
les pièces de l’appareil. En coner la
réparation seulement au personnel
des centres de service autorisés.
CORDON D’ALIMENTATION
a) Un cordon d’alimentation court est
fourni pour éviter qu’un cordon
long s’emmêle ou fasse trébucher.
b) Des rallonges électriques sont
disponibles et peuvent être
utilisées avec prudence.
c) En cas d’utilisation d’une rallonge :
1) Le calibre indiqué de la rallonge
doit être au moins aussi élevé que
celui de l’appareil,
2) si l’appareil est mis à la terre, la
rallonge doit être de type mise à la
terre avec 3 broches; et
3) le cordon électrique doit être
disposé de façon à ce qu’il ne pende
pas du comptoir ou de la table, qu’il
ne soit pas à la portée des enfants et
qu’il ne fasse pas trébucher.
Remarque : Si le cordon d’alimentation
est endommagé, veuillez communiquer
avec le Service de la garantie dont
les coordonnées gurent dans les
présentes instructions.
Page 22

22
Les pièces fournies avec la cafetière dépendent du modèle acheté.
Le produit peut différer légèrement de celui qui est illustré.
FAMILIARISATION AVEC LA CAFETIÈRE 4-EN-1
1. Réservoir à eau
2. Indicateur de niveau d’eau
3. Interrupteur marche/arrêt (I/O) illuminé
4. Couvercle
5. Douchette
6. Filtre permanent (pièce no CM0700-01)
7. Panier d’infusion, compatible avec
l’infusion par versement d’eau
(pièce no CM0750-02)
8. Capuchon rétractable
9. Carafe DuralifeMD de 5 tasses avec
couvercle (pièce no CM0700-03
10. Support réglable
(pièce no CM0750S-04) acier inoxydable
(pièce no CM0750B-04) noir
11. Socle
12. Tasse TritanMD
(pièce no CM0755BZ-05)
13. Tasse de voyage
(pièce no CM0755B-05)
3
2
1
9
8
10
11
7
6
5
4
12
*
13
*
* Non inclus dans tous
les modèles
Page 23

23
POUR COMMENCER
Cet appareil est conçu uniquement pour
une utilisation domestique.
• Retirer tout matériau d’emballage,
toute étiquette et la bande de plastique
entourant la che.
• Retirer tous les accessoires et les
composants.
• Aller à www.prodprotect.com/applica
pour enregistrer votre produit.
• Ouvrir le couvercle.
• Verser de l’eau fraîche froide dans le
réservoir à eau, jusqu’à la marque de
5 tasses.
• Placer le ltre en papier de type panier
vide dans le panier d’infusion amovible.
• Placer le panier-ltre dans le porte-panier.
• Dérouler le cordon d’alimentation et
le brancher dans une prise de courant
standard.
• Eectuer un cycle d’infusion de l’appareil
sans ajouter de café moulu. Cette étape
permet d’éliminer toute poussière ou
tout résidu qui pourrait s’être logé dans
le système pendant le processus de
fabrication.
• Jeter l’eau de la carafe et le ltre en papier
du panier d’infusion.
• Éteindre l’appareil, le débrancher et le
laisser refroidir.
INSTRUCTIONS GÉNÉRALES SUR
L’INFUSION
1. Soulever le couvercle.
2. Verser de l’eau fraîche froide dans le
réservoir à eau, jusqu’à la marque
indiquant la quantité désirée.
- Pour une infusion dans une seule
tasse, remplir jusqu’à l’icône , ce
qui permet de produire 236 ml (8 oz)
de café.
- Pour une infusion dans une tasse
de voyage, remplir jusqu’à l’icône ,
ce qui permet de produire 355 ml
(12 oz) de café.
3. Placer le filtre permanent ou le
filtre en papier dans le panier
d’infusion.
4. Placer le panier d’infusion dans la
partie supérieure de la cafetière.
5. Ajouter la quantité désirée de café
moulu.
Incertain de la quantité de café requise?
Commencer par utiliser 1 c. à table rase de
café de mouture moyenne pour chaque
quantité de 150 ml (5 oz) de café à infuser.
Une carafe peut contenir jusqu’à 740 ml
(25 oz) de café.
6. Bien fermer le couvercle.
7. En utilisant ou en retirant le support
réglable, disposer le récipient
de votre choix de sorte que le
dessus se situe près du capuchon
rétractable.
9. Brancher le cordon dans une prise
de courant standard.
10. Appuyer sur l’interrupteur marche/
arrêt (I/O); un témoin bleu s’illumine
et l’infusion commence.
11. Éteindre la cafetière une fois
l’infusion terminée.
12. Débrancher l’appareil quand il ne
sert pas.
Page 24

24
INFUSION DU CAFÉ DANS LA CARAFE
1. Mettre en place le support réglable
sur le socle.
2. Déposer la carafe vide sur le
support réglable.
3. Infuser le café en suivant les
instructions générales sur l’infusion.
INFUSION DU CAFÉ DANS UNE TASSE
1. En insérant les crochets sur le
support dans la paroi concave
au-dessus du socle, régler le
support pour faire en sorte qu’il
tienne votre tasse à café près du
capuchon rétractable.
2. Infuser le café en suivant les
instructions générales sur l’infusion.
Page 25

25
INFUSION DU CAFÉ DANS UNE TASSE
DE VOYAGE
1. Retirer le support et placer la tasse
de voyage sur le socle.
2. Infuser le café en suivant les
instructions générales sur l’infusion.
INFUSION PAR VERSEMENT D’EAU
Pourquoi l’infusion par versement
d’eau?
Pour mieux contrôler l’infusion de votre
café – permet un contrôle de la quantité
de café et de la vitesse de l’infusion. Plus le
versement est lent, plus la saveur est riche.
1. Verser de l’eau froide dans une
bouilloire ou un autre contenant [non
inclus] et amener à ébullition. Lorsque
l’eau bout, éteindre et laisser reposer
pendant 30 secondes.
2. Placer le panier d’infusion compatible
pour l’infusion par versement d’eau sur
le dessus de la tasse de votre choix ou
de la carafe avec le couvercle retiré.
3. Placer le filtre permanent ou un
filtre en papier no 2 dans le panier
d’infusion.
Remarque: Nous vous recommandons
d’utiliser cette méthode d’infusion avec
des filtres en papier pour obtenir de
meilleurs résultats.
4. Rincer le filtre et la carafe en versant
l’eau bouillante sur le filtre, ce qui
permet de préchauffer le panier
d’infusion et la carafe. Verser l’eau de la
carafe ou de la tasse.
5. Ajouter la quantité désirée de café
fraîchement moulu dans le filtre. Une
quantité d’environ 30 ml (2 c. à table)
par portion est recommandée pour
cette méthode d’infusion.
6. En commençant par le centre du
café moulu, verser doucement l’eau
bouillante sur le café moulu (juste
assez pour imbiber tout le café).
Laisser reposer pendant 30 secondes,
ce qui permet au café de développer
sa saveur avant de poursuivre.
7. Continuer de verser l’eau lentement
et doucement sur le café moulu, en
faisant une pause de 30 secondes
entre chaque versement. Continuer
jusqu’à l’obtention de la quantité de
café désirée. Le processus devrait
prendre de 2 à 3 minutes.
Expérimentez! Trouvez la méthode qui
vous permet d’infuser un café parfait.
Page 26

26
ENTRETIEN ET
NETTOYAGE
Cet appareil ne contient aucune pièce
réparable par l’utilisateur. Coner la
réparation à un technicien qualié.
NETTOYAGE
1. S’assurer que la cafetière est
débranchée et a refroidi.
2. Ouvrir le couvercle monopièce et
retirer le panier d’infusion (en le
soulevant à la verticale).
3. Vider le filtre permanent ou jeter le
filtre en papier du panier d’infusion (le
cas échéant).
4. Laver le filtre permanent, le panier
d’infusion, la carafe et le couvercle
de la carafe au lave-vaisselle, dans le
panier supérieur seulement, ou laver
à la main avec de l’eau tiède et du
savon à vaisselle.
5. Pour nettoyer l’intérieur du couvercle
monopièce, ouvrir le couvercle et
le placer de façon à ce qu’il reste en
position ouverte.
6. Essuyer les surfaces à l’aide d’un linge
humide et refermer le couvercle.
NETTOYAGE AVEC DU VINAIGRE
(détartrage)
Les dépôts de minéraux laissés par
l’eau dure peuvent boucher la cafetière.
Il est recommandé d’effectuer un
nettoyage au vinaigre, une fois par mois.
Votre cafetière ne fonctionnera
pas correctement si elle n’est pas
détartrée régulièrement.
1. Verser dans le réservoir à eau
une quantité de vinaigre blanc
correspondant à la marque de 2 tasses
dans l’indicateur de niveau d’eau.
2. Ajouter de l’eau froide jusqu’à la
marque correspondant à 5 tasses.
3. Placer un filtre en papier dans le panier
d’infusion et fermer le couvercle.
4. Déposer la carafe vide sur le
support réglable.
5. Allumer la cafetière et laisser la
moitié de la solution nettoyante
infuser dans la carafe (jusqu’à
ce que le niveau d’eau atteigne
à peu près 3 tasses). Éteindre la
cafetière et laisser tremper pendant
au moins 15 minutes pour faire
ramollir les dépôts.
6. Allumer la cafetière et faire infuser
le reste de la solution nettoyante
dans la carafe.
7. Éteindre la cafetière, vider la carafe
et jeter le filtre usé.
8. Remplir le réservoir d’eau froide
jusqu’à la marque correspondant
à 5 tasses, remettre la carafe vide,
puis allumer la cafetière pour
un cycle d’infusion complet afin
d’éliminer le reste de la solution
nettoyante. Il faudra peut-être
recommencer cette dernière étape
pour éliminer l’odeur ou le goût de
vinaigre restant.
9. Laver le panier d’infusion et
la carafe conformément aux
instructions dans la section
NETTOYAGE.
RANGEMENT
S’assurer que l’appareil est complètement
séché. Ne jamais serrer le cordon fermement
autour de l’appareil; l’enrouler lâchement.
Page 27

27
BESOIN D’AIDE?
Garantie Limitée De Deux Ans
(Valable seulement aux États-Unis et au Canada)
Pour communiquer avec les services d’entretien ou de réparation, ou pour adresser toute
question relative au produit, composer le numéro sans frais approprié indiqué sur la page
couverture. Ne pas retourner le produit où il a été acheté. Ne pas poster le produit au
fabricant ni le porter dans un centre de service. On peut également consulter le site web
indiqué sur la page couverture.
Quelle est la couverture?
• Tout défaut de main-d’oeuvre ou de matériau; toutefois, la responsabilité de la société. Spectrum
Brands, Inc. se limite au prix d’achat du produit.
Quelle est la durée?
• Deux années à compter de la date d’achat initiale, avec une preuve d’achat.
Quelle aide orons nous?
• Remplacement par un produit raisonnablement semblable nouveau ou réusiné.
Comment se prévaut-on du service?
• Conserver son reçu de caisse comme preuve de la date d’achat.
• Visiter notre site web au www.prodprotect.com/applica, ou composer sans frais le
1-800 231-9786, pour obtenir des renseignements généraux relatifs à la garantie.
• On peut également communiquer avec le service des pièces et des accessoires au
1-800 738-0245.
Qu’est-ce que la garantie ne couvre pas?
• Des dommages dus à une utilisation commerciale.
• Des dommages causés par une mauvaise utilisation ou de la négligence.
• Des produits qui ont été modiés.
• Des produits utilisés ou entretenus hors du pays où ils ont été achetés.
• Des pièces en verre et tout autre accessoire emballés avec le produit.
• Les frais de transport et de manutention reliés au remplacement du produit.
• Des dommages indirects (il faut toutefois prendre note que certains états ne permettent pas
l’exclusion ni la limitation des dommages indirects).
Quelles lois régissent la garantie?
• Les modalités de la présente garantie donnent des droits légaux spéciques. L’utilisateur peut
également se prévaloir d’autres droits selon l’état ou la province qu’il habite.
Page 28

28
Sello del Distribuidor:
Fecha de compra:
Modelo:
Código de fecha / Date Code / Le code de date:
650W 120V~ 6 0Hz
650W 220V~ 50Hz
Comercializado por:
SPECTRUM BRANDS DE MÉXICO,
SA de C.V Autopista México Querétaro
No 3069-C Oficina 004
Colonia San Andrés
Atenco, Tlalnepantla
Estado de México,
C.P. 54040 Mexico.
Teléfono: (55) 5831-7070
Servicio y Reparación
Art. 123 No. 95
Col. Centro, C.P. 06050
Deleg. Cuauhtemoc
Servicio al Consumidor,
Venta de Refacciones
y Accesorios
01 800 714 2503
Importado y Distribuido por:
Rayovac Argentina S.R.L.
Humboldt 2495 Piso# 3
C1425FUG) C.A.B.A. Argentina
C.U.I.T No. 30-70706168-1
Importado por / Imported by:
SPECTRUM BRANDS DE MÉXICO,
SA de C.V
Autopista México Querétaro No 3069-C
Oficina 004
Colonia San Andrés Atenco, Tlalnepantla
Estado de México, C.P. 54040
Mexico.
Telefono: (55) 5831 – 7070
Para atención de garantía marque:
01 (800) 714 2503
Importado por / Imported by:
Spectrum Brands En Chile,
Household Products Chile Ltda
Av. Del Valle 570, Ofic. 704
Ciudad Empresarial, Huechuraba
Santiago - Chile
Fono: (562) 2571 3700
Importado por / Imported by:
Spectrum Brands Colombia S.A.
Carrera 17 No.89-40
Bogotá, Colombia
Línea de atención al cliente:
018000510012
Made in China.
Fabricado en China.
Fabriqué en Chine.
BLACK & DECKER, BLACK+DECKER, the BLACK & DECKER and BLACK+DECKER logos and
product names are trademarks of The Black & Decker Corporation, used under license. All
rights reserved.
BLACK & DECKER, BLACK+DECKER, the BLACK & DECKER y los logos y nombres de
productos de BLACK+DECKER son marcas registradas de The Black & Decker Corporation,
usados bajo licencia. Todos los derechos reservados.
BLACK & DECKER, BLACK+DECKER, les logos et noms de produits BLACK & DECKER
et BLACK+DECKER sont des marques de commerce de The Black & Decker Corporation,
utilisées sous licence. Tous droits réservés.
Tritan is a Registered Trademark of Eastman Chemical Company.
Tritan es una marca registrada de Eastman Chemical Company.
Tritan est une marque déposée d’Eastman Chemical Company.
© 2017 The Black & Decker Corporation and Spectrum Brands, Inc., Middleton, WI 53562
www.BlackAndDeckerAppliances.com
T22-5003864
18155-01
 Loading...