

Page 1

BX200 Blender
First Use Safety Recommendation
Please read through this booklet for safe and efficient use of the appliance.
We urge you to read the "Do's & Don'ts" section and also follow all detailed
instructions even if you are familiar with a similar appliance.
Keep this guide handy for future reference.
BX200
Page 2

IMPORTANT SAFEGUARDS
While using electrical appliances, in order to reduce the risk of fire, electric shock,
and / or injury to persons, basic safety precautions should be followed, including the
following:
• Read all instructions carefully, even if you are familiar with the appliance.
• To protect against the risk of electric shock, DO NOT IMMERSE the appliance,
cord set or plug in water or other liquids.
• To clean, wipe the exterior with a damp cloth.
• Close supervision is necessary when any appliance is used near children. Do not
allow children or any person unfamiliar with these instructions use this appliance.
Never leave an appliance unattended when in use.
• Switch off and remove the plug from the power outlet when not in use, before
assembling or disassembling parts, cleaning or carrying out any maintenance of
the appliance. Never pull the cord while unplugging out from power outlet.
• Do not operate any appliance with a damaged cord or plug, or after the appliance
malfunctions, or is dropped or damaged in any manner. Return the complete
appliance to your nearest authorized service facility for examination, electrical
repair, mechanical repair or adjustment to avoid any hazard.
• The use of attachments or accessories not recommended or sold by this
appliance manufacturer may result in fire, electric shock or personal injury.
• Do not let the cord hang over the edge of a table, counter, or touch hot surfaces.
• Avoid touching hot surfaces, use handles and knobs.
• Do not operate or place any part of this appliance on or near any hot surfaces
(such as gas or electric burner or in a heated oven).
• Do not abuse the cord. Never carry the appliance by the cord or yank it to
disconnect it from the outlet; instead, grasp the plug and pull to disconnect.
• When using an extension cord with your appliance, make sure the extension cord
is correctly wired, and rated for its use.
• This product is intended for household use only.
• Do not attempt to repair the appliance yourself; instead, take it to your Black &
Decker-owned or Authorized Service Centre for repair.
• Care should be taken when handling slicing discs & blade, especially when
removing them from the holders and during cleaning.
• Keep children and animals away from the appliance and cord set.
SAVE THESE INSTRUCTIONS
Page 3

Parts Identification
1. Motor Unit
2. Speed Switch
3. Power Cord
6
5
7
4. Blade Assembly
5. Blending Jar
6. Jar Lid
4
8
2
7. Measuring cup
1
9
8. Grinder jar
9. Grinder Blade assembly
3
Product Features
350W of motor power to take care of toughest grinding needs
Cord storage to reduce clutter
Non slip rubber feet for a firmer grip of product on standing platform.
1.5 lt transparent jar for meeting your daily requirements
70 gms Dry Grinder unit for meeting all your small dry grinding requirements.
How to use your Blender :-
Your blender is designed for indoor household blending and grinding operations only.
• Remove all the packaging from the product.
• Wash the jar, lid, measuring cup and blade assembly in warm sudsy water and dry it thoroughly.
• Ensure that the rated voltage on your appliance is the same as the line voltage in the socket you
will be using to operate your blender.
• Your blade assembly has a sealing ring, which can be removed while cleaning and
should be replaced immediately to prevent damage and loss. (figure A)
Fig. A
• Now take the blade assembly with the sealing ring in place and rotate it
anticlockwise lock it in place at the bottom of the blender jar. (figure B)
• Place the assembled jar on the main unit with the handle positioned on the
Fig. B
right side of the unit as shown in the figure C.
• Put your ingredients into the jar before plugging it into the power supply.
• Place the lid on the jar and rotate it clockwise to lock it in position. The lid
Fig. C
will also operate the safety switch which will make the unit operational.
NOTE: Unless the lid is in the locked position the unit will not work.
• Select the desired speed to mix and blend the ingredients in the jar.
• Turn the Knob to "0" position and wait until blades have stopped before removing the jar.
NOTE : Never run the blender continuously for more than 2 minutes in a stretch. Turn off as soon
as the right consistency is reached. If you want to continue operating the blender, allow a rest of
not less than 1 minute between operating cycles.
Page 4

How to use your Grinding Mill
• Make sure that the switch is in the off position.
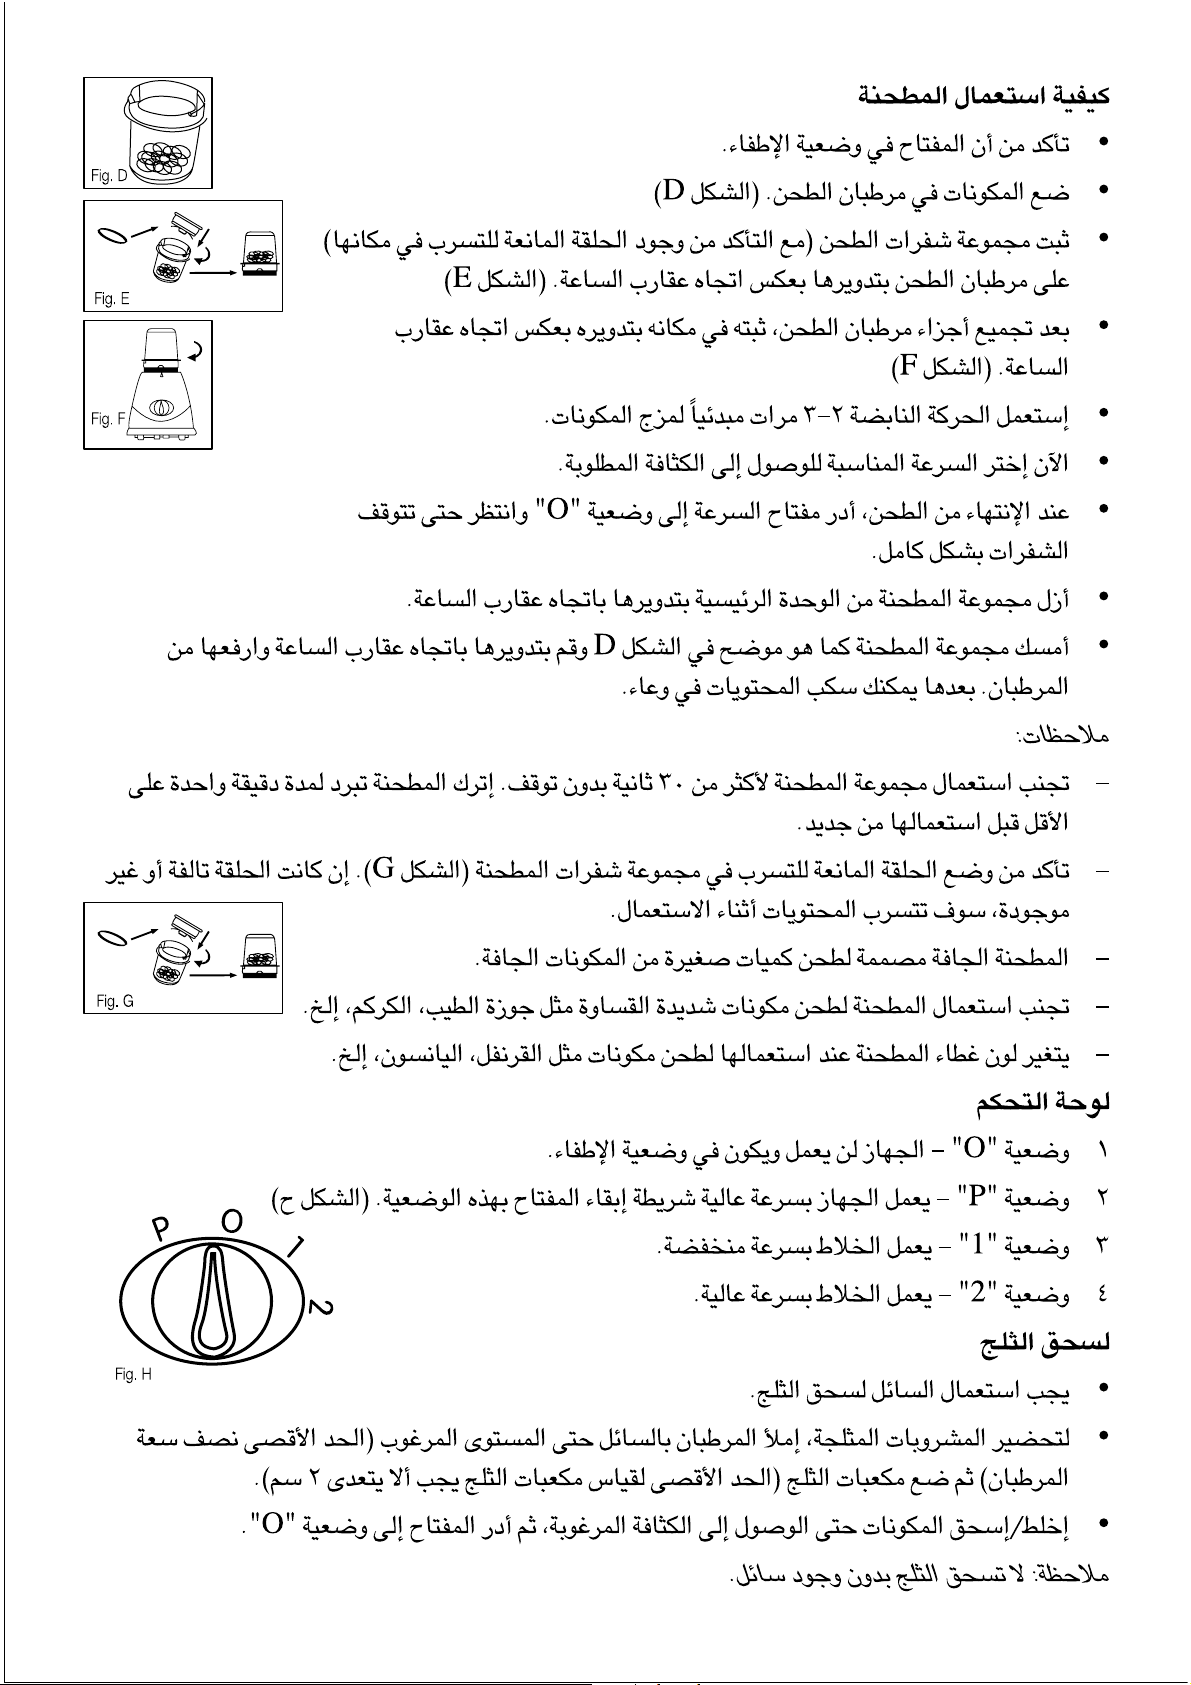
• Place the ingredients in the grinder Jar (figure D)
• Tighten the grinder blade assembly (ensure that the sealing ring is in
place) onto the grinder jar by rotating it anticlockwise. (figure E)
• Assemble the grinder Jar assembly onto the main unit by locking
it in position by rotating it anticlockwise. (figure F)
• Use the pulse operation 2~3 times initially to mix the ingredients.
• Now select the speed till the desired consistency is achieved.
• When the grinding is finished turn the speed knob to "0" position and wait till the blade
comes to complete stop.
• Remove the grinder assembly from the main unit by rotating it clockwise.
• Hold the grinder assembly as shown in figure D, rotate the blade assembly clockwise & lift
it from the jar. You can then pour the contents out.
NOTE:
- Never use the grinder assembly for more than 30seconds without interruption. Allow the
grinder to cool down for at least one minute between two consecutive operating cycles.
Fig. E
Fig. D
Fig. F
- Never forget to place the sealing ring in the grinder blade assembly
(figure G). If it is not present or damaged, it will cause leakage
of ingredients during usage.
- Your dry grinding mill is meant for grinding small quantities of dry ingredients.
- Never use the grinder to grind very hard ingredients such as nutmeg, turmeric etc.
- The Grinding mill cover will get discoloured when the grinder is used to process
ingredients such as cloves, anise etc.
Control Panel
1. Position "0" - the unit does not operate, and it is in OFF position.
2. Position "P"- the unit will operate at high speed as long as
the knob is held in this position. (figure H)
3. Position "1" - the blender works at low speed.
4. Position "2" - the blender works at high speed.
To Crush Ice
• Liquid must be used to crush ice.
Fig. H
Fig. G
P
O
1
2
• To make frozen drinks, fill the jar with liquid upto desired level ( max half the jar capacity)
and then put in ice cubes ( the max size of diced ice cubes should be not more than 2cms).
• Blend / crush the content till desired consistency is achieved, then turn the knob to the
"0"position.
NOTE : Do not crush ice without liquid.
Page 5

Speed Guide:-
Speed Function Ingredients Time (Maximum quality)
0 OFF
1 Stirring & Mixing All liquids, fruits & warm soups 40-60 seconds (max 1.25 lt)
1 & 2 Puree/Smoothie Vegetables, baby food, yogurt 60-120 seconds
drink and deserts ( Max 1.25 lt)
P & 2 Grinding Dry grinding 30 seconds ( max 50 gms)
P & 2 Ice Crushing Ice cubes (max 200 gms) & 30-45 seconds
liquid (max 500 ml)
P 2-5 seconds
How to care for your Blender / Blender with Mill
Wash the blender jar and its associated parts in warm sudsy water after each use. Dry all parts
thoroughly before storing. These parts are not dishwasher safe. Powdered cleanser and abrasive
pads will damage the surface of the parts. Remove stubborn stains by soaking and wiping with
soft cloths and mild liquids. Wipe the motor unit with a damp cloth only.
NOTE : Never immerse the motor unit in liquids.
To clean the base, wipe clean with a damp cloth. Allow to dry thoroughly before re-using or
storing.
To prolong the life of the blender, always :-
1. Use it on a flat dry surface.
2. Switch off before you scrape food down the inside of the jar with a long handle spatula.
3. Make sure that there is something in the jar each time you switch on. The cutter bearing may
get damaged if run dry.
4. Cut cooked meats into one centimeter cubes before adding into the jar.
5. Remember that a blender cannot process raw meat.
6. Ensure that the food being blended is not too thick or heavy for the motor to handle. If it
seems to be having difficulty, either add a little liquid through the lid or switch off, remove the lid
and scrape the mixture down towards the blade with a spatula.
7. Please DO NOT use the jar for storing foods or beverages.
Some Do's and Don'ts
• Never allow items of jewellery, clothing, long hair etc. to come in contact with moving parts.
• Special care should be taken when handling the cutting blades, especially when handling the
blade, emptying the jars, and during cleaning.
• Always allow the motor to stop turning before removing any cover or accessory.
• Do not touch any moving part until it has stopped turning.
Page 6

• Always allow the rotating parts to come to a full stop before removing any accessory.
• Always use a long spatula to scrape / mix the ingredients inbetween blending process. Never
use your bare hands to scrape the inside of the jar.
• Never leave the appliance unattended while in use.
Protecting the environment
Separate collection. This product must not be disposed of with normal household waste.
Should you find one day that your Black & Decker product needs replacement, or if it is of no
further use to you, do not dispose it off with other household waste. Make this product available for
separate collection.
Separate collection of used products and packaging allows materials to be recycled and
used again. Use of recycled materials helps prevent environmental pollution and reduces the
demand for raw materials.
Local regulations may provide for separate collection of electrical products from the household, at
municipal waste sites or by the retailer when you purchase a new product.
Black & Decker provides a facility for the collection and recycling of Black & Decker products once
they have reached the end of their working life. To take advantage of this service please return your
product to any authorised repair agent who will collect them on our behalf. You can check the
location of your nearest authorised repair agent by contacting your local Black & Decker office at
the address indicated in this manual.
Page 7

Page 8
Page 9

Page 10

Page 11

BLACK & DECKER HOME APPLIANCE 2 YEAR WARRANTY
Black & Decker provides a 2 Year Warranty for this product from the date of purchase against defects due
to defective materials or workmanship. Motor/element burn-outs due to voltage fluctuations are not
covered under warranty. If the product should become defective within the warranty period, Black &
Decker will repair or (at Black & Decker's discretion) replace it free of charge.
The warranty provisions do not cover failure due to accident, misuse, abuse, negligence or non
observation of local regulations on the part of the user. Equally, the warranty provisions do not apply
where the appliance has been serviced by a person not authorized by Black & Decker or serviced with
non-approved parts and this has contributed to the fault of the product. Superseded models without a
replacement equivalent will either be repaired or (at Black & Decker's discretion) replaced with another
product of similar retail value.
UPON PURCHASE
Fill in the Warranty Registration Card with the original Authorized Dealer's stamp (indicating date of
purchase) and attach your purchase receipt to it. Retain in case of claims in the future.
MAKING A CLAIM
Take your defective product together with the Warranty Registration Card & purchase receipt to your local
service Centre. You can either do this in person or send it freight prepaid. If mailing or shipping your
appliance, ensure that it is packed carefully in a sturdy carton with enough packing material to prevent
damage. Include a note describing the problem to the service Centre and be sure to give your return
address.
DESIGNED FOR DOMESTIC PURPOSES ONLY.
Page 12

Names & Addresses for Black & Decker Service Concessionaries
 Loading...