

Page 1

900gm Bread Maker
BMH110
Page 2

Page 3

3
Important Safeguards
When using electrical appliances, in order to reduce
the risk of re, electric shock, and/or injury to
persons, basic safety precautions should always be
followed.
For Your Safety
Read all instructions carefully, even if you feel you are
quite familiar with the appliance.
To protect against the risk of electric shock DO
NOT IMMERSE any part of this appliance in water
or any other liquid.
This appliance is not intended for use by young
children or inrm persons without supervision.
Never leave an appliance unattended when in
use.
Young children should be supervised to ensure
that they do not play with the appliance.
Switch off and remove the plug from the power
outlet before cleaning or when not in use. To
unplug, grasp the plug and pull from power
outlet. Never pull cord. Never carry the appliance
by the cord.
Do not operate the appliance with a damaged
cord or plug or after the appliance malfunctions,
has been dropped or damaged in any manner.
Do not let the cord hang over the edge of a table
or counter, or touch hot surfaces. Do not place
any part of this appliance on or near a hot gas or
electric burner or in a heated oven.
Do not use this appliance for anything other than
its intended use. This product is intended for
household use only.
Do not attempt to repair or disassemble the
appliance.There are no user serviceable parts.
Do not use outdoors.
The use of attachments or accessories not
recommended or sold by this appliance
manufacturer may result in re, electric shock or
personal injury.
Avoid touching hot surfaces during use as they
may become hot and could cause burns. Use the
handles or knobs. Allow to cool before cleaning.
The appliance should always be operated on
a level, heat resistant surface. Operating the
appliance on sinks, drainboards, uneven or
inclined surfaces should be avoided.
Never use harsh, abrasive or caustic cleaners or
oven cleaners to clean this appliance.
FAILURE TO OBSERVE THESE CAUTIONS MAY
RESULT IN DAMAGE TO THE APPLIANCE.
COMPULSORY WARNING
If the supply cord is damaged it must be replaced by
the manufacturer or its service agent or a similarly
qualied person in order to avoid a hazard.
This product has not been designed for any uses
other than those specied in this booklet.
Save These Instructions
Page 4
4
Loaf Colour
Features of Your Black & Decker Bread Maker
Loaf Size
Stop/Start
Timer Up
Timer Down
Menu
Bread Baking Pan
Baking Chamber
Kneading Bar
Maesuring Cup & Spoon
Page 5

5
Your Black & Decker
Bread Maker
Congratulations on the purchase of your new Black &
Decker Bread Maker.
Before rst using your Black & Decker Bread Maker,
it is most important that you read and follow the
instructions in this use and care booklet, even if
you feel your are quite familiar with this type of
appliance.
Your attention is drawn particularly to the section
dealing with IMPORTANT SAFEGUARDS. Find a place
and keep this booklet handy for future reference.
This appliance has been designed to operate from a
standard domestic power outlet. It is not intended for
industrial or commercial use.
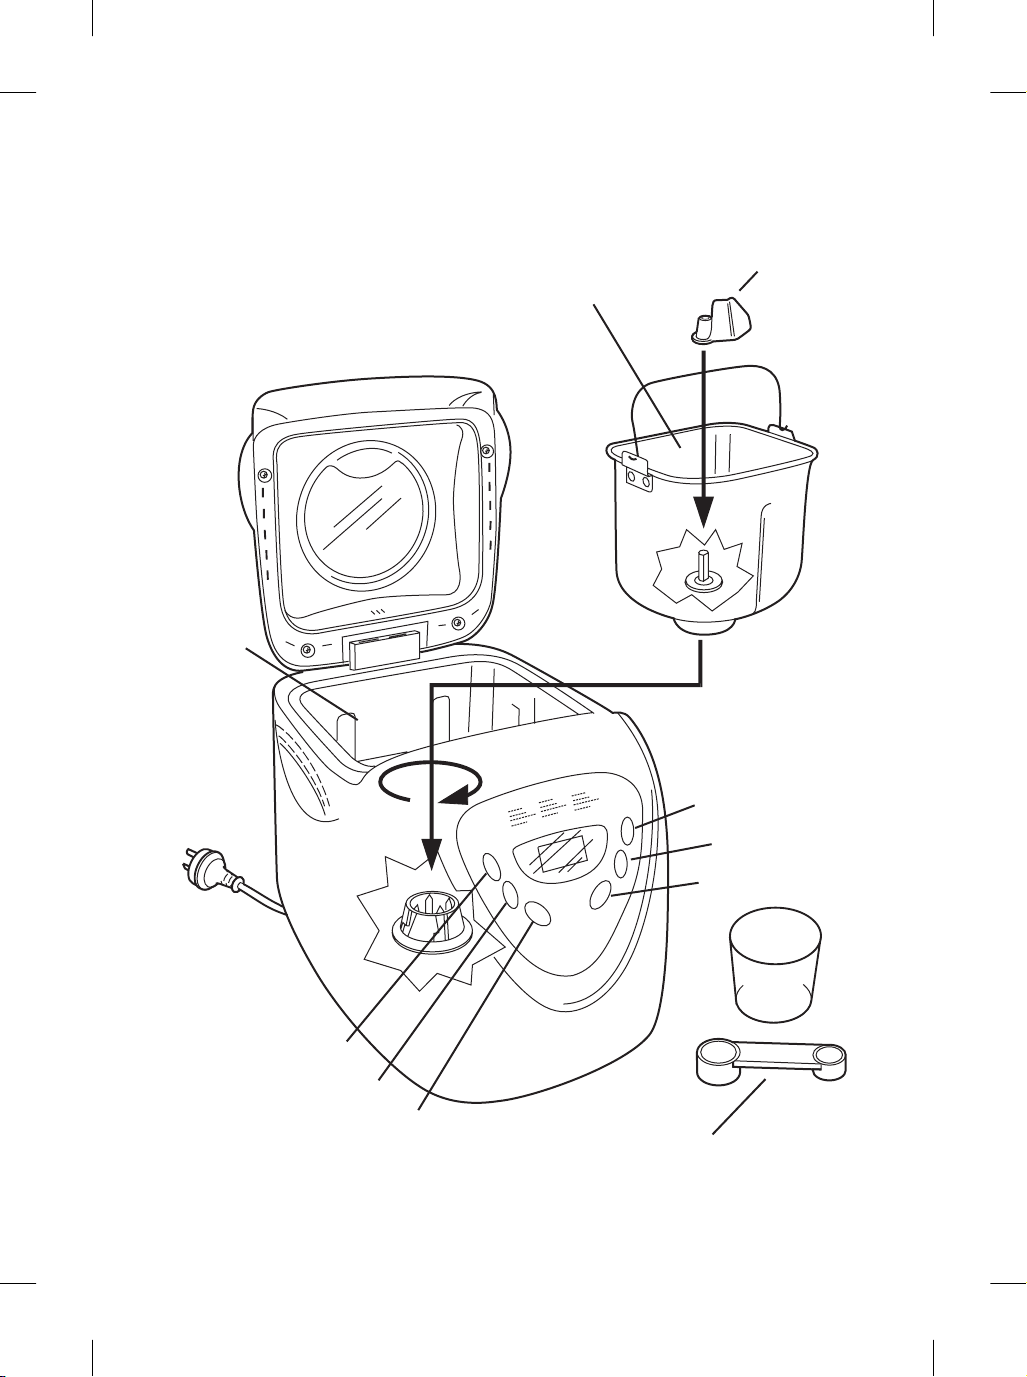
Preparing Your Bread Maker
For Use
1. Carefully unpack your Bread Maker. Remove all
packaging materials and discard or retain for
future use.
2. Remove the baking pan. Wipe the baking
chamber with a soft damp cloth or sponge.
Never use abrasive or strong household
cleaners since they may damage the nish of the
chamber.
3. Wash the baking pan with warm soapy water.
Rinse and dry thoroughly.
4. Grease the bread pan and return to the chamber
and bake empty for approximately 10 minutes.
Clean once more.
5. Return the baking pan to the chamber and place
the kneading bar on the axle in the baking area.
Your Bread Maker is now ready for use.
Operating The Bread Maker
Before rst using your bread maker, please read the
instruction manual carefully and ensure the voltage of
your electricity supply is the same as that indicated
on the rating label on the appliance.
1. Connect the Bread Maker to a power outlet.
When the bread maker is connected to power, a
beep will be heard and "3:00" will appear on the
display after a short time. The two dots between
the "3" and "00" are not constantly lit.
2. The machine is now ready to operate and
is automatically set to program "1" (normal
position), but the program has not yet started.
Functions of The Bread Maker
Program Menu
This is used to select the baking program menu.
Each time it is pressed (accompanied by a short
beep) the program changes. The current program
is shown on the LCD display. The machine has 12
program menus. Refer to the program menu.
Colour of crust
This is used to select a light, medium or dark color
for the crust.
Loaf size
This is used to select a small(1.5Ib) or a larger(2Ib)
loaf setting for bread recipes.
Start/Stop button
This starts and stops or nishes the selected baking
program.
Start
In order to start a program, press the "Start/Stop"
button for approx 1 second. A short beep is heard
and the two dots in the time display begin to ash
and the program starts.
Stop
In order to stop a program, press the "Start/Stop"
button for approx 2 seconds until a beep conrms
that the program has been switched off.
On/Off
Two dots ashing: Program is started.
Two dots continuously lit: Program is stopped.
Page 6

6
Delay Timer
You can delay the time your bread maker starts to
have fresh bread ready at a particular time. This is
ideal when you would like fresh bread for when you
get up in the morning or when you come home from
work. Use the "Timer" button to advance the time in
10 minute increments. If necessary, use the "Timer"
button to decrease the time. When the delay timer is
set where you want it, make sure to press the "Start/
Stop" button. The colon " : " ashes and your bread
will be ready when you planned.
The time which appears on the clock after it switches
on automatically is the remaining baking time.
Therefore ensure you set the time for when you
would like the bread ready. The maximum delay is 13
hours.
For Example
It is 8.30pm and you would like your bread to be
ready the next morning at 7 o’clock. i.e in 10 hours
and 30 minutes. Press the "arrow pointing upwards"
until 10.30 appears, as the time between "now"
(8.30 pm) and the time the bread should be ready
is 10 hours and 30 minutes. If you work with the
delay timer option, do not use any easily perishable
ingredients such as eggs, fresh milk, etc.
Keep Warm
Your bread is kept warm for 60 minutes after
baking. If you would like to take the bread out during
this time, switch the program off with the Start/Stop
Button.
Warning display
If the display shows "H:HH" after you have pressed
Start. The temperature inside is still too high. Press
Stop: open the lid and let the machine cool down for
10 to 20 minutes.
If the display shows "E:EE" after you have pressed
Start, the temperature sensor is disconnected. The
sensor must be checked by an authorised service
agent.
The Program Menu
1. Basic kneading, rise and baking normal bread.
2. French kneading, rise and baking with a longer
rise time.
3. Whole-wheat kneading, rise and baking of whole
wheat bread.
4. Quick kneading, and baking loaf with baking soda
or baking powder.
5. Sweet kneading, rise and baking of sweet bread.
6. Ultra fast-1 kneading, rise and baking 1.5LB
bread in a short time.
7. Ultra fast-2 kneading, rise and baking 2.0LB
bread in a short time.
8. Dough kneading and rising.
9. Jam mixing and cooking jam.
10. Cake kneading, rise and baking cake, rising with
soda or baking powder.
11. Sandwich kneading, rise and baking sandwich.
12. Bake only baking, no kneading and rise.
Inserting and Removing the Bread Pan
Insertion: Insert the bread pan by pressing lightly and
revolving clockwise until xed in correct position.
Remove: Remove the bread pan by pressing lightly
and revolving the pan anti-clockwise until the pan has
been released and then pulling it out. Oven protective
gloves should be worn to remove a hot baking pan.
Page 7

7
How To Make A Loaf of Bread
1. Remove the bread pan.
2. Place the kneading bar on the shaft.
3. Place the ingredients in the bread pan. All
ingredients, including the liquid ingredients,
should be at room temperature. Add the
ingredients in the order specied in the recipe.
Add the yeast AS THE LAST INGREDIENT:
Sprinkle sugar and salt around the outside of the
rest of mixture. Place the yeast in a small hollow
in the our.
4. Place the bread pan in the machine ensuring the
pan is locked into place.
5. Close the lid.
6. Connect the machine to the power and refer to
the "Operating the Bread Maker Section".
7. Select the baking program menu and crust
colour.
8. Set the timer delay if required.
9. Press the START button. The ":" will ash.
10. If the bread maker program menu is set at:
Basic, French, Whole wheat, Sweet, Sandwich
bread, beeps are heard during the second
kneading process.These inform you when fruits
and or nuts may be added.
It is possible that steam will escape through the
vent slits in the lid during baking. This is normal.
11. At the end of the baking program 10 beeps
are heard and the machine switches over
automatically to the keep warm function for
1 hour. A further 10 beeps are then heard,
indicating all programming has nished. If you
would like to remove the bread beforehand, stop
the "keep warm" function by pressing the "Start/
Stop" button. Open the lid and take out the bread
pan. It is essential that you use an oven cloth,
glove or similar object as the bread pan is hot.
12. Turn the bread pan over and shake it lightly until
the bread comes out. If the kneading bar is still
in the bread, loosen it with a knife or similar
object. Let the bread cool down.
13. Remove the plug from the power outlet.
Recipes For Your
Bread Maker
Bread Pre-Mix Recipes
Pre-packaged Bread Mixes are available from most
supermarkets. The recipes in this section are for use
with pre-packaged Bread Mixes only. We recommend
the Lowan Brand of Bread Mixes in Australia.
Procedure
Place ingredients into bread pan in the order listed in
the recipe.
Wipe spills from the outer edge of pan and close the lid.
Press the BREAD TYPE button to the cycle that best
suits the bread mix you are using. For example, if
using Multigrain bread mix press the WHEAT cycle.
Press START.
White Bread Mix
1 cup & 2 tablespoons water
3 cups white bread mix our
2 teaspoons yeast
Mode: BASIC
Wholemeal Bread Mix
1 cups water
4 cups wholemeal bread mix our
2 teaspoons yeast
Mode: BASIC
Rye Bread Mix
1 cups water
4 cups rye bread mix our
2 teaspoons yeast
Mode: BASIC
Page 8

8
Italian Bread
1 cup & 3 tablespoons water
2 tablespoons butter or oil
2 teaspoons milk powder
1 teaspoon salt
2 tablespoons sugar
cup tomato paste
4 cups plain our
3 teaspoons dried basil
1 tablespoon dry active yeast
Herb Bread
1
1
/
3
cups water
2 tablespoons butter or oil
1 tablespoon milk powder
2 teaspoons salt
2 tablespoons sugar
2 tablespoons dried parsley
1 tablespoon & 2 teaspoons caraway seeds
1 tablespoon & 2 teaspoons dill
4 cups plain our
1 tablespoon dry active yeast
Garlic Bread
1
1
/3 cups water
2 tablespoons butter or oil
1 tablespoon milk powder
1 teaspoons salt
2 tablespoons sugar
4 tablespoons dried garlic akes
4 cups plain our
1 tablespoon dry active yeast
Oatmeal Bread
cup & 2 tablespoons water
cup milk
2 tablespoons butter or oil
2 teaspoons salt
2 tablespoons sugar
1
/
3
cup rolled oatmeal
4 cups plain our
1 tablespoon dry active yeast
Walnut Bread
1
1
/
3
cups water
2 tablespoons butter or oil
1 tablespoon milk powder
Multigrain Bread Mix
1 cups water
4 cups multigrain bread mix our
2 teaspoons yeast
Mode: BASIC
Fruit Loaf Bread Mix
1 cups water
4 cups fruit loaf bread mix our
1 teaspoons yeast
1 packets mixed fruit
Mode: BASIC
White Breads
White bread recipes can be baked on the BASIC
cycle and also on the RAPID cycle.
Procedure
Place ingredients into bread pan in the order listed in
the recipe.
Wipe spills from the outer edge of pan and close the lid.
Press the BREAD TYPE button to Basic Bread cycle.
Press START.
Basic White Loaf
1
1
/
3
cups water
2 tablespoons butter or oil
1 tablespoon milk powder
2 teaspoons salt
2 tablespoons sugar
4 cups plain our
1 tablespoon dry active yeast
Onion Bread
1
1
/
3
cups water
2 tablespoons butter or oil
1 tablespoon milk powder
2 teaspoons salt
2 tablespoons sugar
cup nely chopped onion
4 cups plain our
1 tablespoon dry active yeast
Recipes For Your
Bread Maker (continued)
Page 9

9
2 teaspoons salt
2 tablespoons sugar
1
/
3
cup nely chopped walnuts
4 cups plain our
1 tablespoon dry active yeast
Spicy Cheese Bread
1
1
/
3
cups water
1 tablespoon milk powder
2 teaspoons salt
1 tablespoon sugar
1 teaspoons dry mustard
teaspoon black pepper
1 tablespoons Worcestershire sauce
1
/
3
cup shredded cheddar cheese
4 cups plain our
1 tablespoon dry active yeast
Cornmeal Bread
1 cup & 1 tablespoon water
2 tablespoons & 2 teaspoons butter or oil
1 x 130g can corn kernels, drained
2 teaspoons salt
2 tablespoons sugar
4 cups plain our
1
/
3
cup cornmeal (polenta)
1 tablespoon dry active yeast
Sundried Tomato Bread
1
1
/
3
cups water
2 tablespoons butter or oil
1 tablespoon milk powder
1 teaspoons salt
2 tablespoons sugar
cup sun-dried tomatoes, nely chopped
2 teaspoons dried mixed herbs
4 cups plain our
1 tablespoon dry active yeast
Potato Bread
1
1
/
3
cups & 2 tablespoons water
5 tablespoons instant mashed potato akes
2 tablespoons butter or oil
1 tablespoon milk powder
2 teaspoons salt
2 tablespoons sugar
4 cups plain our
1 tablespoon dry active yeast
Sour Dough Starter
2 teaspoons yeast
475ml warm water
2 cups our
To Make Starter
In a 2 litre glass bowl, mix yeast and warm water;
allow to stand for 10 minutes. Add our, mixing until
a thick batter forms.
Cover loosely with a plastic wrap, and stand in a
warm place for 24 hours.
Stir mixture, cover with plastic wrap and put in a
warm place for a further 2-3 days or until mixture
bubbles and smells sour. Refrigerate.
After using a portion of starter, replenish with equal
amounts of our and warm water. Allow to stand for
4-5 hours until bubbly. Store in refrigerator.
Note: Never use metal bowl or utensils as this will
react with sour dough.
To keep starter alive, always reserve at least 1 cup
of active starter to replenish.
Sour Dough Bread
1 cup & 1 tablespoon sour dough starter
cup & 2 tablespoons water
1 teaspoons salt
2 tablespoons sugar
3 cups our
3 teaspoons yeast
Sweet Breads
Sweet breads are best baked on the BASIC cycle.
These recipes can also be baked on the RAPID cycle.
Procedure
Place ingredients into bread pan in the order listed in
the recipe.
Wipe spills from the outer edge of pan and close the lid.
Press the BREAD TYPE button to Basic Bread cycle.
Press START.
Page 10

10
Spicy Apple Bread
1
1
/
3
cups water
2 tablespoons butter or oil
1 tablespoon milk powder
2 teaspoons salt
2 tablespoons sugar
cup dried apple, nely chopped
4 cups plain our
1 teaspoon ground cinnamon
1 teaspoon ground nutmeg
1 tablespoon dry active yeast
Cinnamon Raisin Bread
1
1
/
3
cups water
2 tablespoons butter or oil
1 tablespoons milk powder
2 teaspoons salt
2 tablespoons sugar
cup raisins
4 cups plain our
1 tablespoon ground cinnamon
1 tablespoon dry active yeast
Choc Chip Bread
1
1
/
3
cups water
2 tablespoons butter or oil
1 tablespoons milk power
2 teaspoons salt
2 tablespoons sugar
1 teaspoons cocoa
1 cup choc bits
4 cups plain our
1 tablespoon dry active yeast
Banana Nut Bread
cup water
2 tablespoons & 2 teaspoons butter or oil
1 egg
2 teaspoons salt
2 tablespoons sugar
cup mashed ripe banana
cup walnuts, nely chopped
4 cups plain our
1 tablespoon dry active yeast
Wholemeal Honey Bread
1
1
/
3
cups water
2 tablespoons butter or oil
1 tablespoon milk powder
2 teaspoons salt
3 tablespoons honey
4 cups wholemeal plain our
1 tablespoon dry active yeast
Wholemeal Date & Nut Bread
1 cups & 2 tablespoons water
2 tablespoons butter or oil
1 tablespoon milk powder
2 teaspoons salt
2 tablespoons sugar
1
/
3
cup dates, nely chopped
cup pecan nuts, nely chopped
4 cups wholemeal plain our
1 tablespoon dry active yeast
Mixed Fruit Bread
1
1
/
3
cups water
2 tablespoons butter or oil
1 tablespoon milk powder
2 teaspoons salt
2 tablespoons sugar
cup mixed dried fruits
4 cups plain our
teaspoon ground nutmeg
teaspoon ground cloves
1 tablespoon dry active yeast
Apricot Loaf
1
1
/
3
cups water
2 tablespoons butter or oil
1 tablespoon milk powder
2 teaspoons salt
2 tablespoons sugar
cup dried apricots, nely chopped
4 cups plain our
teaspoon ground nutmeg
1 tablespoon dry active yeast
Page 11

11
Hot Cross Buns
1
1
/
3
cups water
2 tablespoons oil
2 teaspoons salt
2 tablespoons brown sugar
4 cups plain our
2 tablespoons mixed spice
1 tablespoon cinnamon
1 tablespoon yeast
1 cups sultanas
cup mixed peel
Place all ingredients in bread pan in order listed,
select DOUGH cycle and press START.
When cycle is complete, remove dough from bread pan.
Divide dough into 18 equal pieces and roll into balls.
Cover the balls with plastic wrap and allow to rise
for 20 minutes or until double in size. Remove the
wrap and proceed to make the mixture for the
crosses as follows:
Crosses
2 tablespoons water
cup our
Blend to a smooth batter, place in a piping bag and
pipe individual crosses over each roll.
Place in a pre-heated oven (200oC). Bake for
12-15 minutes or until golden brown.
Remove from oven, allow to cool slightly, and if
desired, apply a Glaze to the nished Hot Cross Buns.
Glaze
cup icing sugar
teaspoon all spice
teaspoon cinnamon
1 tablespoon water
Combine until smooth and thin enough to drizzle and
brush over the hot buns. Allow to stand for up to 10
minutes prior to serving.
Wholemeal Breads
Wholemeal breads are best baked on the
WHEAT cycle.
As wholemeal breads are usually denser, they do
not rise as high as white breads due to the nature
of the our. To improve the rise of wholemeal bread,
a “bread improver” or gluten can be added to the
mix. These are generally available from health food
stores. These recipes can also be baked on the
RAPID cycle but this causes them to be even denser.
Procedure
Place ingredients into bread pan in the order listed in
the recipe.
Wipe spills from the outer edge of pan and close the lid.
Press the BREAD type button to Wheat cycle.
Press START.
Wholemeal Bread
1
1
/
3
cups water
2 tablespoons butter or oil
1 tablespoon milk powder
2 teaspoons salt
2 tablespoons sugar
4 cups wholemeal plain our*
1 tablespoon dry active yeast
*As a variation, and to give a wholemeal loaf a not so
dense texture, use 2 cups wholemeal plain our and
2 cups plain our.
Seven Grain Bread
1
1
/
3
cups water
2 tablespoons butter or oil
1 tablespoon milk powder
2 teaspoons salt
2 tablespoons molasses
cup 7 grain cereal
4 cups wholemeal plain our
1 tablespoon dry active yeast
Page 12

12
Double Bran Bread
1
1
/
3
cups water
2 tablespoons butter or oil
1 tablespoon milk powder
2 teaspoons salt
2 tablespoons brown sugar
cup bran akes
1
/
3
cup toasted bran
4 cups plain our
1 tablespoon dry active yeast
Cracked Wheat & Sunower Bread
1
1
/
3
cups water
2 tablespoons butter or oil
1 tablespoon milk powder
2 teaspoons salt
1 tablespoon sugar
1 tablespoons honey
1
/
3
cup cracked wheat cereal
1
/
3
cup sunower seeds
4 cups plain our
tablespoon dry active yeast
Bran Bread
1
1
/
3
cups water
2 tablespoons butter or oil
2 tablespoons milk powder
2 teaspoons salt
2 tablespoons & 2 teaspoons brown sugar
cup wheat bran
3 cups plain our
1 tablespoon dry active yeast
Doughs
The recipes in this section are all made on the
DOUGH setting. They do not cook in the unit and
require further preparation after removing from the
machine.
Many of the recipes in this section will require you to
rest the dough after removing from the machine and
then instruct you to “punch down”. To do this, use
your st and punch dough once to release air.
Procedure
The procedure and preparation of doughs will vary from
recipe to recipe. Follow each recipe procedure carefully.
Bread Rolls
1 cup & 2 tablespoons water
2 tablespoons & 2 teaspoons butter or oil
2 teaspoons salt
2 tablespoons sugar
1 egg
4 cups plain our
1 tablespoon dry active yeast
Place all ingredients in bread pan in order listed,
select DOUGH cycle and press START.
When cycle is complete, remove dough from bread pan.
Divide dough into 12 equal pieces and roll into
desired shapes. Place 2-3 cm apart on a greased
baking tray and brush with milk.
Cover the rolls with plastic wrap and allow to rise for
30 minutes until doubled in size.
Place in a pre-heated oven (200°C). Bake for
12-15 minutes or until golden brown.
Croissants
1 cups water
2 tablespoons butter or oil
2 tablespoons milk powder
2 teaspoons salt
2 tablespoons sugar
4 cups plain our
1 tablespoon dry active yeast
250g butter
1 egg
2 tablespoons milk
Place the rst 7 ingredients in the bread pan in the
order listed. Select the DOUGH cycle and press START.
When the cycle is complete, remove dough from the
bread pan and place in a buttered bowl.
Cover with plastic wrap and allow to stand on the
bench to let the dough rise for 30 minutes.
Place the 250g of butter between 2 pieces of plastic
wrap and roll the butter with a rolling pin to 2.5cm
thick. Chill until rm. Punch the dough down and roll
into a 25 x 30cm rectangle.
Place the sheet of chilled butter onto the dough,
leaving 2.5cm on 3 sides.
Page 13

13
Fold in 3 parts by folding the unbuttered section over
the centre buttered portion and then fold the buttered
third over the centre.
On a oured surface, roll the pastry into a
25 x 35cm rectangle.
Cut into 8 equal sized triangles.
Starting from the base of the triangle, roll the dough
up to the tip.
Turn ends in to form the traditional crescent shape.
Place on a greased baking tray and allow to stand on
the bench for an hour to rise. Combine beaten egg
with milk for glaze.
Preheat oven to 200°C.
Brush each pastry with glaze and bake for 10
minutes or until golden.
Cool on a wire rack.
Focaccia Bread
1 cup water
2 tablespoons butter or oil
2 teaspoons salt
1 tablespoon sugar
3 cups plain our
1 tablespoon dry active yeast
2 tablespoons rosemary, chopped
2 tablespoons chives, chopped
2 tablespoons minced garlic
2
/
3
cup olive oil
Place the rst 6 ingredients in the bread pan in the
order listed, select the DOUGH cycle and press START.
When cycle is complete, remove dough from the bread
pan and place into a bowl greased with 1 tablespoon
of olive oil. Cover with plastic wrap and allow the
dough to stand on the bench to rise for 30 minutes.
Roll dough onto a large greased baking tray until
2.5 cm thick, cover dough with remaining olive oil
and sprinkle with herbs and garlic.
Preheat oven to 200°C, bake for 30-35 minutes or
until golden brown.
Pizza Dough
1 cups water
2 tablespoons & 2 teaspoons vegetable oil
2 teaspoons salt
2 teaspoons sugar
4 cups plain our
1 tablespoon dry active yeast
Place all ingredients in the bread pan in the order
listed, select the DOUGH cycle and press START.
Preheat oven to 200°C. Grease 2 pizza trays.
When cycle is complete, remove dough from the
bread pan. Divide dough in half and spread onto the
pizza trays. Add favourite toppings.
Bake for 20 minutes or until the crust has browned.
About Quick Breads:
Quick breads are made with baking powder and
baking soda that are activated by moisture and heat.
For perfect quick breads, it is suggested that all
liquids be placed in the bottom of the bread pan, dry
ingredients on top. During the initial mixing of quick
bread batters, dry ingredients may collect in the
corners of the pan. It may be necessary to use a
rubber spatula to help the machine mix the batter and
avoid our clumps.
About The Ultra Fast Program Menu:
The bread maker can bake a loaf in just under 1 hour
with the 2 ultra fast menu settings. Using these settings,
the bread loaf becomes a little more dense in texture.
When making these recipes, hot water in the range of 4850oC must be used. We recommend you use a cooking
thermometer to gauge the temperature of the water.
Strawberry Jam
500 grams, hulled and chopped strawberries
1
2
/
3
cup sugar
2 tablespoons lemon juice
2 tablespoons jam setter
Place strawberries, sugar, lemon juice and jam setter
in bread pan.
Lock bread pan into position in the baking chamber
and close the lid.
Program unit to setting 10. Press START.
Page 14

14
Plum Jam
2 cups chopped Blood Plums
1 cup sugar
2 tablespoons jam setter
Place plums, sugar and jam setter in the bread pan.
Lock the bread pan into position in the baking
chamber and close the lid.
Program unit to setting 10. Press START.
Orange Marmalade
500 grams oranges, thinly sliced
1 cup sugar
2 tablespoons jam setter
Place oranges in a heat proof bowl. Pour over enough
boiling water to just cover. Set aside until cool, and
peel has softened, approximately 3 hours. Drain.
Place orange slices in bread pan with sugar and jam setter.
Lock the bread pan into position in the baking
chamber and close the lid.
Program unit to setting 10. Press START.
Trouble Shooting Guide
PROBLEM
The Bread Maker Machine Will Not Start
Cause 1: The appliance is not plugged in
correctly to power outlet.
Solution: Always plug appliance correctly
into 230-240 volt power outlet.
Note: There is a preheat at the beginning of
the wheat cycle. It is normal for there to be no
dough blade activity during this time.
PROBLEM
The Bread Maker Does Not Bake the Bread
Cause: The DOUGH program was selected.
Solution: Choose the appropriate program for the
recipe you have chosen.
PROBLEM
Bread Collapses When Baked
Cause 1: Salt was reduced or omitted.
Solution: Measure salt carefully using standard
measuring spoons that have been
levelled off.
Cause 2: Too much liquid was used.
Solution: If dough is too wet the bread will
collapse. In future reduce water or liquid
by at least 1 tablespoon and up to 4
tablespoons. Let the machine knead for
1 to 2 minutes. If dough appears too
dry, add additional water 1 tablespoon
at a time, up to 4 tablespoons.
Cause 3: Warm weather, high humidity or
overheated liquid all speed up yeast
action which may cause the dough to
rise too fast and the bread to collapse
during baking.
Solution: If room temperature is over 27°C try
using chilled water. Try reducing the
amount of yeast used by teaspoon.
PROBLEM
The Bread or Dough Did Not Rise Enough
Cause 1: Not enough sugar was used.
Solution:
Measure sugar carefully. Do not reduce
amount of sugar or sugar sweeteners in
a recipe. Do not use articial sweeteners.
Cause 2: Yeast did not activate.
Solution:
Make sure yeast is fresh, check “use-by”
date. Yeast should be placed in a little
hollow well made in the our.
Cause 3: Too much salt inhibited rising.
Solution: Use amount specied in recipe and
measure carefully.
Cause 4: High altitude.
Solution: For every 1,000 feet over 3,000 feet
above sea level, reduce the water by
1 tablespoon up to 4 tablespoons
maximum.
Page 15

15
PROBLEM
The Loaf of Bread is Small or Out of Shape
Cause: Too much our was used.
Solution: Measure our carefully. Spoon our into
measuring cup being careful not to pack
down. Level cup off with a knife.
PROBLEM
Bread Rose too High, Touching the Lid
Cause 1: Weather very hot and/or humid.
Solution: Do not bake bread in the machine until
the weather is cooler and/or less humid.
Cause 2: Too much or wrong type of yeast used.
Solution:
Measure yeast carefully. Active dry
yeast is recommended for all recipes in
this
booklet.
PROBLEM
Bread Did Not Bake Thoroughly
Cause 1: Lid was opened during baking.
Solution: Do not open lid during nal rising and
baking cycle.
Cause 2:
Ingredients were not measured correctly.
Solution: Measure ingredients carefully,
remembering to level off all cup and
spoon measurements of dry ingredients.
Cause 3: Machine is being used in a very
cold room.
Solution: Only use appliance in warm location.
Cleaning and Storage
Disconnect the machine from the power outlet and
allow it to cool down completely before you start to
clean it.
1. Clean the inside of the machine with a damp,
slightly soapy dish cloth. Wipe over again with
a clean damp cloth to remove any of the soapy
residue.
2. To clean the Bread Pan, rub the inside and
outside of the pan with a damp cloth. Kneading
Bar: If the kneading bar is difcult to remove
from the axle, soak the bread pan in water
beforehand.
3. Lid and window: Clean the lid and machine inside
and outside with a slightly damp cloth.
Note: DO NOT use abrasive or strong
household cleaners as these will damage the
non-stick surfaces of the Bread Maker.
Page 16

Warranty
The benets conferred by this warranty are in
addition to all implied warranties, other rights
and remedies in respect of the product which the
consumer has under the Trade Practices Act and
similar State and Territory Laws.
The original purchaser of this Black & Decker product
is provided with the following warranty subject to the
following conditions.
Mistral International Pty Ltd warrant this product for
a period of 2 years from the date of purchase for
all parts defective in workmanship or materials. This
product or defective parts will be replaced free of
charge.
WARRANTY CONDITIONS
1. This warranty is only valid for appliances used
according to the manufacturer’s instructions.
2. This appliance must not be modied or changed
in any way.
3. Connection must be to the voltage requirements
as specied in the ratings label located on the
product.
4. The manufacturer does not accept liability for
any direct or consequential damage, loss or
other expense arising from misuse or incorrect
installation and operation of the appliance.
5. Warranty will only be given where proof of
purchase is provided, e.g. original invoice.
6. Not designed or warranted for industrial or
commercial use.
DO NOT SEND IN THIS WARRANTY
Fill out the following details and le with your
purchase invoice.
RETAIN & FILE WITH YOUR RECEIPT.
Your Purchase Receipt/Invoice is proof of date of
purchase. You must be able to present it at the place
of purchase to obtain a replacement or service under
warranty.
Mistral International Pty Ltd reserves the right to
discontinue items, modify designs and change
specications without incurring obligation. Whilst
every effort is made to ensure that descriptions,
specications and other information in this publication
is correct, no warranty is given in respect thereof
and the company shall not be liable for any errors
therein.
Purchased from:
Co. Name:
Address:
Date of Purchase:
Note: Consistent with our continuing product
development policy, improvements may have
been made which render the contents of this
package slightly different to that shown.
Cat. No. BMH110
September 2003
Product of Mistral International Pty Ltd ABN 25 006 680 315
324 Frankston-Dandenong Road
Dandenong South, Victoria, Australia 3175
Facsimile +61 3 9212 1340
Consumer Hotline: 1300 654 488
RINGGRIP (NZ) Pty Ltd ACN 006 771 922
PO Box 33672, Takapuna, Auckland NZ
Telephone 0800 328 280 Facsimile 0800 328 238
Mistral is a registered trademark of Mistral International Pty. Ltd.
© 2003
is a trademark of Black & Decker Corporation, Towson, Maryland, USA
 Loading...