

Page 1

TM
BLENDING SYSTEM WITH
ANALOG CONTROL
SISTEMA DE LICUADO CON
CONTROL ANÁLOGO
À COMMANDES ANALOGIQUES
use and care manual
manual de uso y cuidado
guide d’utilisation et d’entretien
BL6005
Page 2
2
Should you have any questions or concerns with your new product, please
call our Customer Service Line at 1-800-231-9786 (US and Canada). Please
do not return to the store.
Si usted tiene alguna inquietud o pregunta con su producto, por favor llame
a nuestra línea de servicio al cliente una atención inmediata 1-800-231-9786
(EE.UU/Canadá) 01-800-714-2503 (México). No devuela a la tienda.
Si vous avez des questions ou des préoccupations à propos de votre
nouveau produit, veuillez communiquer avec notre Service à la clientèle au
1 800 231-9786 (États-Unis et Canada). Veuillez ne pas rapporter le produit
au magasin.
Thank you for your purchase!
Gracias por su compra!
Merci de votre achat!
Page 3

3
• Read all instructions.
• Unit has a motor protection system. If the indicator blinks
rapidly, unplug and let cool. Plug back in to restart.
• To protect against risk of electrical shock, do not put
blender base, cord or plug in water or other liquid.
• Close supervision is necessary when any appliance is
used by or near children.
• Unplug from outlet when not in use, before putting on
or taking off parts, and before cleaning.
• Avoid contacting moving parts.
• Do not operate any appliance with a damaged cord
or plug, or after the appliance malfunctions or has
been damaged in any manner. Contact the consumer
service number listed in this manual.
• The use of attachments, including canning jars, not
recommended or sold by the appliance manufacturer
may cause fire, electric shock or injury.
• Do not use outdoors.
• Do not let cord hang over the edge of table or
counter, or touch hot surfaces.
• Keep hands and utensils out of container while
blending to reduce the risk of severe injury to persons
or damage to the blender. A scraper may be used but
must be used only when the blender is not running.
• Blades are sharp. Handle carefully.
• To reduce the risk of injury, never place personal jar
blade assembly on base without the jar
properly attached.
• Always operate blender with cover in place.
• When blending hot liquids, remove the lid cap from
the Easy-off lid. Do not blend hot liquids in the
personal blender jar.
• Do not use appliance for other than intended use.
• Do not place on or near a hot gas or electric burner or
in a heated oven.
• The maximum rating is based on the blender jar
attachment. The power input of the optional personal
jar is less than the allowable deviation.
• This appliance is not intended for use by persons
(including children) with reduced physical, sensory
or mental capabilities, or lack of experience and
knowledge, unless they have been given supervision
or instruction concerning use of the appliance by a
person responsible for their safety.
• Children should be supervised to ensure that they do
not play with the appliance.
• This appliance has important markings on the plug
blade. The attachment plug or entire cordset (if plug
is molded onto cord) is not suitable for replacement.
If damaged, the appliance shall be replaced.
PLEASE READ AND SAVE THIS USE AND CARE BOOK.
IMPORTANT SAFEGUARDS.
When using electrical appliances, always follow basic safety precautions to reduce the
risk of fire, electric shock, and/or injury, including the following:
SAVE THESE INSTRUCTIONS.
This product is for household use only.
POLARIZED PLUG (120V models only)
This appliance has a polarized plug (one blade is
wider than the other). To reduce the risk of electric
shock, this plug is intended to fit into a polarized
outlet only one way. If the plug does not fit fully
into the outlet, reverse the plug. If it still does not
fit, contact a qualified electrician. Do not attempt to
modify the plug in any way.
TAMPER-RESISTANT SCREW
Warning: This appliance is equipped with a
tamper-resistant screw to prevent removal of the
outer cover. To reduce the risk of fire or electric
shock, do not attempt to remove the outer
cover. There are no user-serviceable parts inside.
Repair should be done only by authorized service
personnel.
ELECTRICAL CORD
1) A short power-supply cord is provided to reduce
the risk resulting from becoming entangled in or
tripping over a longer cord.
2) Longer detachable power cords or extension
cords are available and may be used if care is
exercised in their use.
3) If a long detachable power-supply cord or
extension cord is used,
a) The marked electrical rating of the extension
cord should be at least as great as the electrical
rating of the appliance,
b) If the appliance is of the grounded type, the
extension cord should be a grounding-type
3-wire cord, and
c) The longer cord should be arranged so that it
will not drape over the countertop or tabletop
where it can be pulled on by children or tripped
over unintentionally.
Note: If the power cord is damaged, please
contact the warranty department listed in these
instructions.
SAFETY FEATURES
Page 4
4
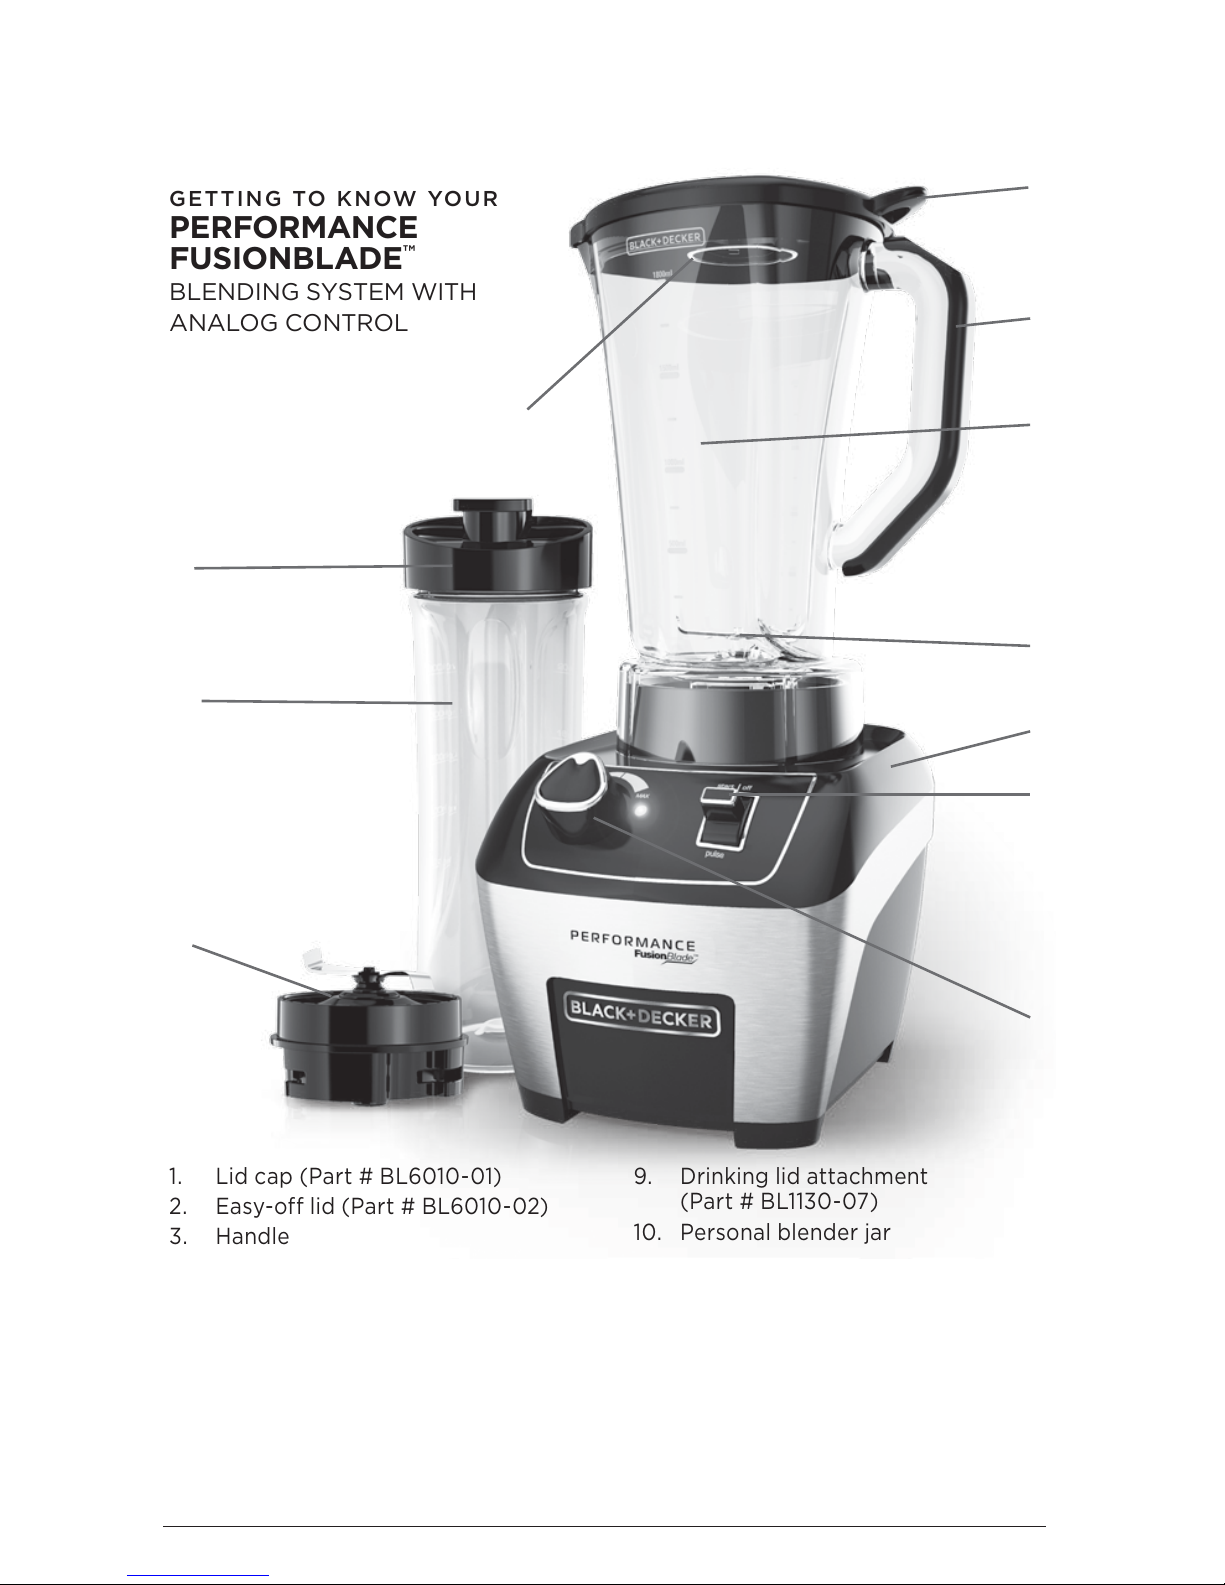
GETTING TO KNOW YOUR
PERFORMANCE
FUSIONBLADE™
BLENDING SYSTEM WITH
ANALOG CONTROL
1. Lid cap (Part # BL6010-01)
2. Easy-off lid (Part # BL6010-02)
3. Handle
4. One-piece Tritan™ blender jar
(Part # BL6010-03)
5. Integrated blade
(non-removable)
6. Base
7. START|OFF and PULSE toggle switch
8. Variable speed dial
9. Drinking lid attachment
(Part # BL1130-07)
10. Personal blender jar
(Part # BL1130-08)
11. Personal jar blade assembly
(Part # BL1130-09)
Note: additional personal jars
can be purchased separately at
BlackAndDeckerAppliances.com
Congratulations on your new Performance FusionBlade™ Blending System!
Designed for premium food prep and culinary excellence, your new performance
blender will help you crush, create, blend, chop, mix and prep. Enjoy!
* Tritan
™
is a trademark of Eastman Chemical Company, or one of its subsidiaries.
1
2
3
4
5
6
7
8
9
11
10
Page 5
5
GETTING STARTED
• Remove all packing material, any stickers, and the plastic band around
the power plug.
• Remove and save literature.
• Please visit www.prodprotect.com/applica to register your warranty.
• Wash all removable parts as instructed in CARE AND CLEANING
section of this manual.
HOW TO USE
This product is for household use only.
USING YOUR BLENDER
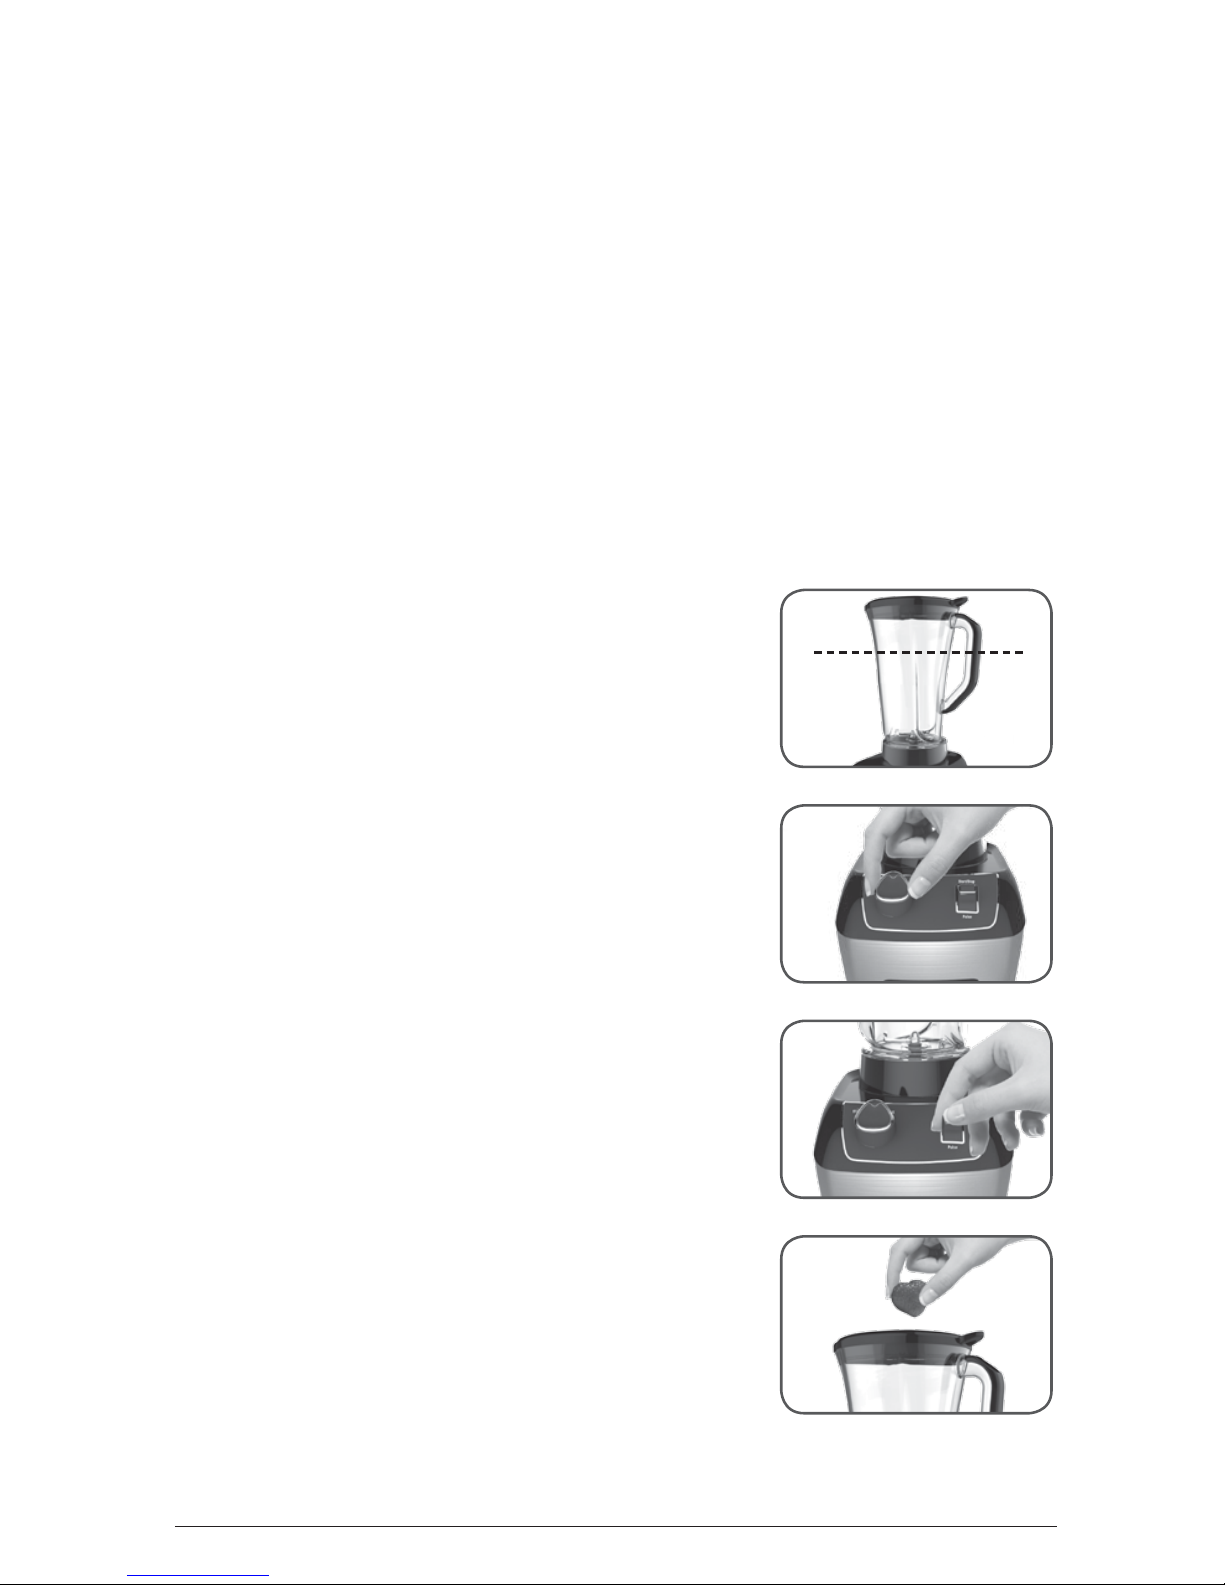
1. Make sure appliance is off and the jar is securely situated on the base.
2. Place foods to be blended into jar. Do not fill past the 64 oz. marking.
NOTE: When blending hot ingredients, only fill blender jar 2/3 full. (A)
NOTE: For best results, add ingredients in the
following order:
a. Liquids
b. Powders
c. Soft foods
d. Hard foods
e. Ice
3. Place lid securely on jar. Make sure lid cap is
in place.
NOTE: Before blending hot liquids, remove lid cap
and cover with a towel to prevent hot liquids
from spattering.
4. Plug power cord into outlet.
5. Use the dial to select a speed. (B) Turn
the dial clockwise for faster speeds and
counterclockwise for slower speeds (See
SPEED CHART).
6. Press the toggle upwards to START|OFF to
turn on the motor. (C) LED will illuminate.
7. When food reaches desired consistency, press
toggle upwards to START|OFF to stop the
motor. (C) LED will go out.
IMPORTANT: Do not leave the blender
unattended while it is in use.
8. You may remove the lid cap and drop
ingredients through the lid cap opening while
the blender is running. (D)
A
C
B
D
Page 6

6
9. When using the PULSE function, press and
hold the toggle downward towards PULSE for
a few seconds, then release. (E) Repeat until
food reaches desired consistency. Releasing
pulse stops the blending. LED will illuminate
when motor is operating.
IMPORTANT: Do not hold toggle down for more
than a few seconds at a time when pulsing.
IMPORTANT: Do not remove the lid while the blender is running.
10. Make sure blades have completely stopped before attempting to remove
the blending jar from the base. (Refer to troubleshooting for any issues)
11. To remove the jar, grasp the handle and lift up.
12. Remove lid to pour.
13. Always unplug the appliance when not in use.
USING THE PERSONAL BLENDER JAR
(NOT INCLUDED WITH ALL MODELS)
Personal blender jars may be purchased separately.
NOTE: Do not blend hot liquids in the personal jar.
1. Place the personal blender jar on a flat surface with the open end facing
up. Fill the jar with ingredients, keeping the amount below the top marking.
NOTE: For best results, add ingredients in the following order:
a. Liquids
b. Ice
c. Hard Foods
d. Soft Foods
e. Powders
2. Tighten the personal jar blade assembly on the open end of the personal
jar with the blade facing down towards the ingredients. It is important to
tighten to prevent leaking during blending.
3. Turn personal jar upside down and place on the blender base, turning
clockwise to lock into place.
4. Select Low speed.
IMPORTANT: It is recommended to only use Low speed when using the
personal jar. Do NOT use PULSE when using the personal jar.
5. Press the toggle upwards towards START|OFF to turn on the motor. The
LED will illuminate. Blend to desired consistency.
6. Press the toggle upwards towards START|OFF to stop the motor. The LED
light will turn off.
7. Once blending has finished, remove the personal jar by turning
counterclockwise and lifting off the base. Turn the jar over and place it
on a flat surface.
E
Page 7

7
IMPORTANT: If the jar gets stuck on the blending base or begins to loosen
from the blade assembly, follow these steps:
a. Unplug the unit
b. Turn the jar clockwise to tighten jar onto the blade assembly
c. Turn jar and blade assembly counterclockwise to unlock
from blending base and lift up.
8. Remove the blade assembly from the personal jar by turning
counterclockwise. Place the personal jar drinking lid on the personal jar
and enjoy your delicious drinks on the go.
SPEED CHART
This blender uses a variable speed dial to control the speed of use. The
lowest speed is when the dial is turned all the way to the left. The highest
speed is when the dial is turned all the way to the right. The variable speed
dial allows you full control of your blend. The following speed chart contains
recommendations for speeds and functions.
FUNCTION FOOD TYPE SPEED SETTING
Puree Fruits and Vegetables
Soups
Baby food
Milkshakes
Start on Low and increase as needed
to desired consistency
Crumb Bread crumbs
Cereals
Cookies
Pulse to desired consistency
Mix Dressings
Batters
Dips
Low or Medium
Chop Salsa
Nuts
Vegetables
Pulse to desired consistency
Ice Crush/Frozen
Blend
Ice (max 2 cups0
Frozen fruits
High or Pulse
Blend/Smoothies Smoothies
Fruits
Vegetables
High or Pulse
Flours Rice
Corn
Oats
Grains
Medium or High
Nut butters Peanuts
Almonds
Walnuts
Cashews
High
Personal jar
recipes
Half recipe/Use with
Personal jar (not included
with all models)
Low
Page 8

8
HELPFUL HINTS AND TIPS
• When using hard foods, such as ice or cheese, keep one hand on the lid
to keep blender jar and base in place.
• Cut food into pieces no larger than 3/4” before blending.
• When ingredients splatter onto the sides of the jar or the mixture is very
thick, turn the appliance off. Remove the lid and use a rubber spatula to
scrape down the sides of the jar and to redistribute the food, pushing
food toward the blades. Replace the lid and continue blending.
• The lid cap holds up to 2 oz. of liquid and can be used as a measure
when adding ingredients such as oil, milk, cream or liquor.
• When making bread, cookie, cereal, or cracker crumbs, make sure
blending jar is completely dry.
• When using the PULSE function, use short bursts of a second or two.
Allow the blades to stop rotating between pulses. If you hold down the
toggle for more than 30 continuous seconds, the safety feature will
engage and the unit will have to be reset.
• It is helpful to begin the blending process on the lowest speed and then
increase to a higher speed, if necessary.
• Never operate the blender without the lid.
• To stop blending at any time, press the toggle upwards towards
START|OFF.
• When blending hot ingredients, always let them cool at least 5 minutes
before blending. Begin blending on the lowest speed with the lid cap
off to allow steam to escape. Cover lid cap hole with towel or hot pad.
• When crushing ice with no other ingredients, use 2 cups ice max (about
15 cubes). Make sure blender jar is completely dry before ice crushing.
CARE AND CLEANING
This product contains no user serviceable parts. Refer service to qualified
service personnel.
• Unplug the blender base before cleaning. Wipe the blender base using
a damp cloth. Do not immerse the blender base in water.
• Lift the blending jar, by the handle, off the base.
• Remove lid and lid cap.
• Wash removable parts by hand or in the dishwasher. Place the jar on the
bottom rack and the rest of the parts on the top rack only.
CAUTION: Blades are sharp. Handle with care when hand washing.
CLEANING TIPS
• For quick cleanup, combine 1 cup hot water and a drop of liquid dish
soap in the blending jar.
• Cover and blend on medium for about 30 seconds.
• Discard liquid and rinse thoroughly.
IMPORTANT:
• Do not place the jar parts in boiling liquids.
• Do not immerse the base in liquid. Wipe the base with a damp cloth and
dry thoroughly.
Page 9

9
• Remove stubborn spots by rubbing with a damp cloth and nonabrasive
cleaner.
Note: If liquids spill onto the base, wipe with a damp cloth and dry
thoroughly. Do not use rough scouring pads or cleansers on parts or finish.
TROUBLESHOOTING
Problem Possible Cause Solution
Blender is
having difficulty
blending
Mixture is too thick or
air bubble has formed
between mixture and
blade.
Turn blender off. Use rubber spatula
to scrape down sides of jar and
redistribute, pushing food towards
blades. Add more liquid if needed.
LED is blinking
rapidly
Blender overheated.
Motor protection caused
blender to stop working.
Unit must be reset. Unplug unit and
let cool for at least 20 minutes.
RECIPES
PEANUT BUTTER
3 cups peanuts
1
⁄3 cup peanut oil
Place all ingredients into the blender. Press toggle upwards to START|OFF
and use the dial to adjust your speed and blend. Press the toggle upwards to
START|OFF when peanut butter has reached your desired consistency.
RICE FLOUR
½ cup white rice
Freeze rice for 15 minutes prior to blending. Place in the blender and use the
dial to adjust your speed.
PINEAPPLE STRAWBERRY SMOOTHIE
1 cup pineapple juice
2 cups vanilla flavored yogurt
1 cup fresh strawberries
8-10 ice cubes
Place all ingredients, in the order listed, into your blender and blend on High.
Page 10

10
PERSONAL JAR ORANGE MANGO SMOOTHIE
½ cup orange juice
4-5 ice cubes
½ cup fresh mango
1 cup plain or vanilla flavored yogurt
Place all ingredients in your personal jar in the order listed. Place blade base
on top of jar and screw tightly in place. Flip the jar onto the blender base
and blend, on lowest speed.
CREAMY BUTTERNUT SQUASH SOUP
2 Tbsp. butter
1 small onion, chopped
2 lbs. butternut squash, peeled, seeded and cut into 1-inch cubes
2 cups chicken or vegetable broth
/ tsp. salt
/ tsp. black pepper
½ cup heavy cream
Melt butter in large sauce pan on medium heat. Add onion; cook and stir 3
minutes or until tender crisp.
Add squash, chicken broth, salt and pepper. Bring to boil. Reduce heat to
medium low, cover and simmer 20 minutes or until squash is tender.
Puree squash mixture in blender in two batches on low speed, 15 seconds or
until smooth.
Return pureed soup to sauce pan. Stir in cream and heat through. Do not boil.
Page 11

11
WARRANTY AND CUSTOMER
SERVICE INFORMATION
For support or any questions regarding your appliance, call the appropriate
800 number listed within this section. Please DO NOT return the product
to the place of purchase. Also, please DO NOT mail product back to
manufacturer, nor bring it to a service center. You may also want to consult
our Product Protection Center at www.prodprotect.com/applica .
Three-Year Limited Warranty
(Applies only in the United States and Canada)
What does my warranty cover?
• Your warranty covers any defect in material or workmanship provided; however, the
liability of Spectrum Brands Inc. will not exceed the purchase price of product.
How long is the warranty period?
• Your warranty extends three years from the date of original purchase with proof
of purchase.
What support does my warranty provide?
• Your warranty provides you with a reasonably similar replacement product that is
either new or factory refurbished.
How do you get support?
• Save your receipt as proof of date of sale.
• Visit the online service website at www.prodprotect.com/applica, or call toll-free
1-800-231-9786, for general warranty service.
• If you need parts or accessories, please call 1-800-738-0245.
What does my warranty not cover?
• Damage from commercial use
• Damage from misuse, abuse or neglect
• Products that have been modified in any way
• Products used or serviced outside the country of purchase
• Glass parts and other accessory items that are packed with the unit
• Shipping and handling costs associated with the replacement of the unit
• Consequential or incidental damages (Please note, however, that some states do
not allow the exclusion or limitation of consequential or incidental damages, so
this limitation may not apply to you.)
How does state law affect my warranty?
• This warranty gives you specific legal rights. You may also have other rights that
vary from state to state or province to province.
Page 12

12
• Lea todas las instrucciones.
• El aparato cuenta con un sistema de protección para
el motor. Si la luz indicadora parpadea rápidamente,
desenchúfelo y deje que se enfríe. Enchúfelo de nuevo
para hacerla funcionar.
• A fin de protegerse contra el riesgo de una descarga
eléctrica, no sumerja la base de la licuadora, el cable ni
el enchufe en agua ni en ningún otro líquido.
• Todo aparato eléctrico utilizado cerca de la presencia
de los niños o por ellos mismos, requiere la supervisión
de un adulto.
• Desenchufe del tomacorriente cuando no esté en uso,
antes de ensamblar/desensamblar y antes de limpiar.
• Evite el contacto con las piezas móviles.
• No utilice ningún aparato eléctrico que tenga el cable
o el enchufe averiado, que presente un problema de
funcionamiento o que esté dañado. Llame al número de
servicio para el cliente que aparece en este manual.
• El uso de accesorios, incluyendo los tarros de envasar,
no recomendados por el fabricante pueden ocasionar
incendio, descarga eléctrica o lesiones.
• No utilice este aparato a la intemperie.
• No permita que el cable cuelgue del borde de la mesa o
del mostrador ni que toque superficies calientes.
• Para reducir el riesgo de lesiones severas a las
personas o daño a la licuadora, mantenga las manos y
utensilios fuera de la jarra mientras la licuadora esté en
funcionamiento.
• Las cuchillas tienen filo. Manéjelas con cuidado.
• A fin de evitar el riesgo de lesiones, nunca coloque el
montaje de las cuchillas sobre la base sin antes ajustar
bien la jarra.
• Siempre opere la licuadora con la tapa en su lugar.
• Para licuar líquidos calientes, se debe retirar la taza
medidora del centro de la tapa fácil de remover. No se
debe licuar líquidos calientes en el vaso personal.
• El aparato se debe usar sólo para el fin previsto.
• No coloque el aparato sobre ni cerca de una hornilla de
gas o eléctrica ni adentro de un horno caliente.
• La clasificación máxima es basada en el acesorio de jarra
de la licuadora. La potencia de entrada del vaso personal
opcional es menor que la desviación permitida.
• Este aparato no está diseñado para ser usado por
personas (incluyendo los niños) con su capacidad física,
psíquica o sensorial reducida, o con falta de experiencia
o sabiduria, a menos que sean supervisadas o instruidas
acerca del uso del aparato por una persona responsable
de su seguridad.
• Los niños deben ser supervisados para asegurar que no
jueguen con el aparato.
• Este aparato tiene marcas importantes en la clavija del
enchufe. Ni el enchufe accessorio ni el conector del
cable (si el enchufe está moldado en el cable) son aptos
para reemplazamiento. Si se daña, el aparato debe ser
reemplazado.
ENCHUFE POLARIZADO (Solamente
para los modelos de 120V)
Este aparato cuenta con un enchufe polarizado (un contacto
es más ancho que el otro). A fin de reducir el riesgo de un
choque eléctrico, este enchufe encaja en un tomacorriente
polarizada en un solo sentido. Si el enchufe no entra en el
tomacorriente, inviértalo y si aun así no encaja, consulte con
un electricista. Por favor no trate de alterar esta medida de
seguridad.
TORNILLO DE SEGURIDAD
Advertencia: Este aparato cuenta con un tornillo de seguridad
para evitar la remoción de la cubierta exterior del mismo. A
fin de reducir el riesgo de incendio o de choque eléctrico, por
favor no trate de remover la cubierta exterior. Este producto no
contiene piezas reparables por el consumidor. Toda reparación
se debe llevar a cabo únicamente por personal de servicio
autorizado.
CABLE ÉLECTRICO
1. El producto se debe de proporcionar con un cable eléctrico
corto, a fin de reducir el riesgo de tropezar o de enredarse
en un cable más largo.
2. Si se utiliza un cable separable o de extensión,
a) El régimen nominal del cable separable o del cable de
extensión debe ser, como mínimo, igual al del régimen
nominal del aparato.
b) Si el aparato es de conexión a tierra, el cable de extensión
debe ser un cable de tres alambres de conexión a tierra.
c) Uno debe de acomodar el cable más largo de manera que
no cuelgue del mostrador o de la mesa, para evitar que un
niño tire del mismo o que alguien se tropiece.
Nota: Si el cordón de alimentación es dañado, en América
Latina debe sustituirse por personal calificado o por el centro
de servicio autorizado.
CONSERVE ESTAS INSTRUCCIONES.
Este aparato eléctrico es para uso doméstico solamente.
Por favor lea este instructivo antes de usar el producto.
INSTRUCCIONES IMPORTANTES
DE SEGURIDAD
Cuando se utilizan aparatos eléctricos, siempre se deben respetar las precauciones básicas de seguridad
para reducir el riesgo de incendio, descarga eléctrica, y/o lesiones personales, incluyendo las siguientes:
Page 13

13
1
2
3
4
5
6
7
8
9
11
10
CONOZCA SU
SISTEMA DE LICUADO
CON CONTROL ANÁLOGO
RENDIMIENTO
FUSIONBLADE™
¡Felicitaciones por su nuevo Sistema de Licuado de Rendimiento FusionBlade™!
Diseñado para la preparación suprema de los alimentos y excelencia culinaria, su
nueva licuadora de alto rendimiento le ayudará a triturar, crear, licuar, picar, mezclar y
preparar. ¡Disfrútela!
1. Taza medidora en la tapa
(pieza no. BL6010-01)
2. Tapa fácil de remover
(pieza no. BL6010-02)
3. Asa
4. Jarra enteriza Tritan™
(pieza no. BL6010-03)
5. Cuchilla integrada (no es removible)
6. Base
7. Interruptor de inicio/apagado
(STA RT/O FF)
8. Dial de velocidad variable
9. Vaso de licuadora personal
(Pieza no. BL1130-07)
10. Tapa de transporte, antiderrames
(Pieza no. BL1130-08)
11. Conjunto de cuchillas
(Pieza no. BL1130-09 )
Nota: Vasos personales adicionales
pueden ser comprados en
BlackAndDeckerAppliances.com
* Tritan™ es una marca registrada de Eastman Chemical Company o de una de
sus empresas filiales.
Page 14

14
PRIMEROS PASOS
• Retire todo material de empaque y cualquier etiqueta adherida al producto.
• Retire y conserve la literatura.
• Por favor, visite www.prodprotect.com/applica para registrar su garantía.
• Lave todas las piezas removibles según las instrucciones en la sección
de CUIDADO Y LIMPIEZA de este manual.
COMO USAR
Este producto es para uso doméstico solamente.
USO DE SU LICUADORA
1. Asegúrese de que el aparato esté apagado y que la jarra esté colocada
de forma segura sobre la base.
2. Coloque los alimentos a licuar en la jarra. No llene pasado de la marca
de 64 oz.
NOTA: Cuendo licúe ingredientes calientes, solo
llene la jarra 2/3 de su capacidad completa. (A).
NOTA: Para obtener mejores resultados, añada los
ingredientes en el orden siguiente:
a. Líquidos
b. Polvos
c. Alimentos blandos
d. Alimentos duros
e. Hielo
3. Coloque la tapa de forma segura sobre la
jarra. Asegúrese de que la taza medidora esté
segura en su lugar.
NOTA: Antes de licuar los alimentos calientes,
retire la taza medidora de la tapa y cubra
con una toalla para prevenir que los líquidos
calientes salpiquen.
4. Enchufe el cable de alimentación a un
tomacorriente.
5. Utilice el dial para seleccionar la velocidad.
(B). Gire el dial hacia la derecha para
seleccionar las velocidades más rápidas y
hacia la izquierda para velocidades más lentas
(consulte la TABLA DE VELOCIDADES).
6. Presione el interruptor hacia arriba hasta la
posición de inicio/apagado (START/OFF)
para encender el motor. (C). La luz LED se
iluminará.
A
C
B
D
Page 15

15
7. Cuando los alimentos alcancen la consistencia
deseada, presione el interruptor hacia arriba
hasta la posición de inicio/apagado (START/
OFF) para apagar el motor (C). La luz LED se
apagará.
IMPORTANTE: No deje la licuadora desatendida
mientras esté en uso.
8. Si desea, puede retirar la taza medidora de la tapa y añadir ingredientes
a través de la abertura mientras que la licuadora está funcionando. (D).
9. Cuando utilice la función de pulso (PULSE), presione y sostenga el
interruptor hacia abajo en dirección a la función de pulso (PULSE) por
varios segundos, luego suéltelo. (E). Repita hasta que los alimentos
alcancen la consistencia deseada. Al soltar el interruptor, el ciclo de licuado
se detiene. La luz LED se iluminará cuando el motor esté funcionando.
IMPORTANTE: No mantenga el interruptor presionado hacia abajo por más
de varios segundos a la vez cuando utilice la función de pulso.
IMPORTANTE: No retire la tapa mientras la licuadora está funcionando.
10. Asegúrese de que las cuchillas han parado completamente antes de
intentar remover la jarra de la base. (Consulte la Tabla de Resolución de
Problemas para cualquier dificultad que se le presente).
11. Para retirar la jarra, sujétela por el asa y álcela.
12. Retire la tapa para verter su contenido.
13. Siempre desenchufe el aparato cuando no esté en uso.
USO DEL VASO PERSONAL
(NO SE INCLUYE EN TODOS LOS MODELOS)
Vasos personales para la licuadora pueden comprarse por separado.
Nota: No licue líquidos calientes en el vaso personal.
1. Coloque el vaso personal sobre una superficie plana con el extremo abierto
mirando hacia arriba. Llene el vaso con los ingredientes, manteniendo la
cantidad por debajo de la marca en la parte de arriba.
NOTA: Para obtener mejores resultados, añada los ingredientes en el order
siguiente.
a. Líquidos
b. Hielo
c. Alimentos duros
d. Alimentos blandos
e. Polvos
2. Coloque y apriete el conjunto de cuchillas sobre el extremo abierto del
vaso personal, con las cuchillas mirando hacia abajo en direccion a los
ingredientes. Es importante que la base de las cuchillas se apriete bien
para prevenir goteos durante el ciclo de licuado.
E
Page 16

16
3. Invierta el vaso personal y colóquelo en la base de la licuadora,
girándolo hacia la derecha para que encaje seguro en su lugar.
4. Seleccione la velocidad baja.
IMPORTANTE: Se recomienda solo utilizar la velocidad baja cuando se
utiliza el vaso personal. No utilice la función de pulso (PULSE) cuando use el
vaso personal.
5. Presione el interruptor hacia arriba hasta la posición de inicio/apagado
(START/OFF) para encender el motor. La luz LED se iluminará. Licúe los
ingredientes hasta alcanzar la consistencia deseada.
6. Presione el interruptor hacia arriba hasta la posición de inicio/apagado
(START/OFF) para apagar el motor. La luz LED se apagará.
7. Una vez que el ciclo de licuado haya terminado, retire el vaso personal
girándolo hacia la izquierda y alzándolo fuera de la base. Invierta el vaso
personal y colóquelo sobre un superficie plana.
IMPORTANTE: Si el vaso personal se atasca en la base o comienza a
aflojarse de el conjunto de cuchillas, siga estos pasos.
a. Desenchufe la unidad.
b. Gire el vaso personal hacia la derecha para apretarlo sobre el
conjunto de cuchillas.
c. Gire el vaso y el conjunto de cuchillas hacia la izquierda para
aflojarlo de la base de la licuadora y álcelo.
8. Retire el conjunto de cuchillas del vaso personal, girándola hacia la
izquierda. Coloque la tapa del vaso personal sobre el vaso y disfrute de
sus deliciosas bebidas en el camino.
TABLA DE VELOCIDADES
Esta licuadora utiliza un dial de velocidad variable para controlar la
velocidad utilizada. La velocidad más baja es activada cuando el dial se
gira completamente hacia la izquierda. La velocidad más alta es activada
cuando el dial se gira completamente hacia la derecha. El dial de velocidad
variable le permite tener control completo de su licuado. La siguiente tabla de
velocidades contiene recomendaciones para velocidades y funciones a utilizar.
FUNCIÓN TIPO DE ALIMENTO AJUSTE DE VELOCIDAD
Puré Frutas y vegetales
Sopas
Comida de bebé
Batidos con leche
Comience en la velocidad baja
y aumente la velocidad según
sea necesario para alcanzar la
consistencia deseada.
Migas Migas de pan
Cereales
Galleticas
Pulse hasta lograr la consistencia
deseada.
Mezclar Aderezos
Mezclas
Dips
Baja o mediana
Picar Salsa
Nueces o frutos secos
Vegetales
Pulse hasta lograr la consistencia
deseada.
Page 17

17
Triturar hielo /
Licuado
Congelado
Hielo (máximo 2 tazas)
Frutas congeladas
Alta o función de pulso (PULSE)
Licuar/Batidos Batidos de frutas
Frutas
Vegetales
Alta o función de pulso (PULSE)
Harinas Arroz
Maíz
Granos de avena
Granos
Mediana o Alta
Mantequillas de
nuez
Maní
Almendras
Nuez
Anacardos o castaña de cajú
Alta
Recetas en el vaso
personal
Mitad de la receta/utilice con el
vaso personal (no incluído
en todos los modelos)
Baja
CONSEJOS Y TRUCOS PRÁCTICOS
• Cuando utilice ingredientes duros, como hielo o queso, mantenga una
mano sobre la tapa para mantener la licuadora firme en su lugar.
• Corte los alimentos sólidos en pedazos de no más de 3/4 de pulgada
antes de comenzar a licuar.
• Primero coloque los líquidos en la jarra, luego añada los ingredientes
adicionales.
• Cuando los ingredientes estén salpicando sobre los lados de la jarra o la
mezcla esté muy espesa, apague el aparato. Retire la tapa y utilice una
espátula de goma para raspar los lados de la jarra y volver a distribuir
los ingredientes, empujandolos hacia las cuchillas. Coloque la tapa sobre
la jarra de nuevo y continue licuando.
• La taza medidora de la tapa acomoda hasta 2 onzas de líquido y se
puede utilizar como medida para añadir ingredientes como aceite, leche,
crema o licor.
• Cuando vaya a hacer migas de pan, galleticas, cereales o galletas,
asegúrese de que la jarra esté completamente seca.
• Cuando utilice la función de pulso (PULSE), use impulsos cortos de un
segundo o dos. Deje que las cuchillas paren the girar entre cada pulso. Si
presiona el interruptor por más de 30 segundos continuos, el dispositivo
de seguridad se activará y la unidad tendrá que ser reajustada.
• Sirve como una ayuda comenzar el proceso de licuado con la velocidad
más baja y luego ir aumentando gradualmente hasta llegar a la
velocidad más alta, si es necesario.
• Nunca opere la licuadora sin la tapa.
• Para detener el licuado en cualquier momento, presione el interruptor
hacia arriba en dirección a la función de inicio/apagado (START/OFF).
• Cuando vaya a licuar ingredientes calientes, siempre déjelos enfríar
por lo menos 5 minutos antes de licuarlos. Comience licuando en la
velocidad más lenta sin la taza medidora en la tapa para permitir que
el vapor escape. Cubra la apertura de la taza medidora con una toalla o
una almohadilla caliente.
• Cuando triture hielo, utilice un máximo de 2 tazas de hielo
(aproximadamente 15 cubos). Asegúrese de que la jarra de la licuadora
esté completamente seca antes triturar hielo.
Page 18

18
CUIDADO Y LIMPIEZA
Este producto no contiene piezas que puedan ser reparadas por el consumidor.
Para servicio, acuda a personal de servicio calificado.
• Desnechufe la licuadora antes de limpiarla. Limpie la base de la licuadora
con un paño húmedo. No sumerja la base de la licuadora en agua.
• Sujete la jarra por el asa y álcela fuera de la base.
• Retire la tapa y la taza medidora.
• Lave las piezas removibles a mano o en la máquina lavaplatos. Coloque la
jarra en la rejilla inferior y el resto de las piezas sólo en la rejilla superior.
Precaución: La cuchillas tienen filo. Manéjelas con cuidado cuando las esté
lavando a mano.
CONSEJOS DE LIMPIEZA
• Para una limpieza rápida, combine 1 taza de agua caliente y una gota de
detergente líquido para fregar en la jarra.
• Cubra y licúe a velocidad mediana por aproximadamente 30 segundos.
• Deseche la mezcla de líquido y enjuáguela bien.
Importante:
• No coloque las piezas de la jarra en líquidos que están hirviendo.
• No sumerja la base en ningún líquido. Limpie la base con un paño
húmedo y séquela por completo.
• Remueva las manchas difíciles frotandolas con un paño húmedo y un
limpiador que no sea abrasivo.
Nota: Si los líquidos se derraman sobre la base, límpiela con un paño
húmedo y séquela por completo. No use almohadillas de metal o
limpiadores ni en las piezas ni en el acabado.
RESOLUCIÓN DE PROBLEMAS/FALLAS
PROBLEMA CAUSA POSIBLE SOLUCIÓN
La licuadora
está teniendo
dificultad para
licuar.
La mezcla está
demasiado espesa o una
burbuja de aire se ha
formado entre la mezcla
y la cuchilla.
Apague la licuadora. Utilice una
espátula de goma para raspar
los lados de la jarra y volver a
distribuir la mezcla, empujando
los ingredientes hacia las cuchillas.
Añada más líquido, si es necesario.
La luz LED está
parpadeando
rápidamente.
La licuadora está
sobrecalentada.
El sistema de protección
del motor causó que
la licuadora parara de
funcionar.
Es necesario reajustar el aparato.
Desenchufe el aparato y deje que se
enfríe por lo menos 20 minutos.
Page 19

19
RECETAS
MANTEQUILLA DE MANÍ
3 tazas de maní
1
⁄3 taza de aceite de maní
Coloque todos los ingredientes en la licuadora. Presione el interruptor hacia
arriba hasta la posición de inicio/apagado (START/OFF) y utilice el dial de
control para ajustar su velocidad y licuar. Presione el interruptor hacia arriba
hasta la posición de inicio/apagado (START/OFF) cuando la mantequilla de
maní haya alcanzado la consistencia deseada.
HARINA DE ARROZ
½ taza de arroz blanco
Congele el arroz por 15 minutos antes de comenzar el ciclo de licuado.
Coloque en la licuadora y utilicee el dial de control para ajustar su velocidad.
BATIDO DE PIÑA Y FRESAS
1 taza de jugo de piña
2 tazas de yogur con sabor a vainilla
1 taza de fresas frescas
8 a 10 cubitos de hielo
Coloque todos los ingredientes, en el orden indicado, dentro de su licuadora
y licúelos a velocidad alta.
BATIDO DE NARANJA Y MANGO, PREPARADO EN EL VASO PERSONAL
½ taza de jugo de naranja
4 a 5 cubitos de hielo
½ taza de mango fresco
1 taza de yogur natural o con sabor a vainilla
Coloque todos los ingredientes en el vaso personal en el orden mencionado.
Coloque la base del montaje de cuchillas sobre la parte superior del vaso
personal y enrósquelo ajustado en su lugar. Invierta el vaso para colocarlo
sobre la base de la licuadora y licúe los ingredientes en la velocidad más baja.
Page 20

20
SOPA CREMOSA DE CALABAZA MOSCADA
2 cucharadas de mantequilla
1 cebolla pequeña, picada
2 libras de calabaza moscada, sin semillas y cortada en cubitos de 1 pulgada
½ taza de zanahorias, picadas
2 tazas de caldo de pollo o vegetal
/ cucharadita de sal
/ cucharadita de pimienta negra
½ taza de crema doble
Derrita la mantequilla en una olla grande a fuego mediano. Añada la cebolla;
cocine y revuelva por 3 minutos o hasta que esté tierna pero firme.
Añada la calabaza moscada, el caldo de pollo, la sal y la pimienta. Deje que
hierva. Reduzca la temperatura a mediana-baja, cubra y cocine a fuego lento
durante 20 minutos o hasta que la calabaza esté tierna.
Haga puré de la mezcla de calabacín en dos tandas a velocidad baja, por 15
segundos o hasta que la consistencia esté suave.
Regrese el puré de sopa a la olla. Incorpore y revuelva la crema y caliéntela.
No deje hervir.
Page 21

21
INFORMACIÓN DE GARANTÍA Y
SERVICIO AL CLIENTE
Para servicio, reparaciones o preguntas relacionadas al producto, por favor
llame al número del centro de servicio que se indica para el país donde
usted compró su producto. NO devuélva el producto al fabricante. Llame o
lleve el producto a un centro de servicio autorizado. Usted también puede
consultar a nuestro Centro de Protección del Producto en www.prodprotect.
com/applica.
Tres Años de Garantía Limitada
(No aplica en México, Estados Unidos y Canada)
¿Qué cubre mi garantía?
• Su garantía cubre cualquier defecto de material o de mano de obra, siempre y
cuando la responsabilidad de Spectrum Brands, Inc. no exceda el precio de
compra del producto.
¿Por cuánto tiempo es valida la garantía?
• Su garantía se extiende por tres años a partir de la fecha original de compra
mientras que tenga una prueba de la compra.
¿Qué tipo de asistencia provee mi garantía?
• Su garantía le brinda un producto de reemplazo similar que sea nuevo o que ha
sido restaurado de fábrica.
¿Cómo se puede obtener asistencia?
• Conserve el recibo original de compra.
• Para servicio al cliente y para registrar su garantía, visite www.prodprotect.com/
applica, o llame al número 1-800-231-9786, para servicio al cliente
• Por favor llame al número del centro de servicio autorizado. 1-800-738-0245.
¿Qué no cubre mi garantía?
• Los productos que han sido utilizados en condiciones distintas a las normales.
• Los daños ocasionados por el mal uso, el abuso o negligencia.
• Los productos que han sido alterados de alguna manera.
• Los daños ocasionados por el uso comercial del producto.
• Los productos utilizados o reparados fuera del país original de compra.
• Las piezas de vidrio y demás accesorios empacados con el aparato.
• Los gastos de tramitación y embarque asociados al reemplazo del producto.
• Los daños y perjuicios indirectos o incidentales.
¿Cómo afecta a mi garantía la ley estatal?
• Esta garantía le otorga derechos legales específicos y el consumidor podría
tener otros derechos que varían de una región a otra.
Page 22

22
PÓLIZA DE GARANTÍA
(Válida sólo para México)
DURACIÓN
Rayovac de México SA de CV garantiza este producto por 2 años a partir de
la fecha original de compra.
¿Qué cubre esta garantía?
• Esta Garantía cubre cualquier defecto que presenten las piezas,
componentes y la mano de obra contenidas en este producto.
• Requisitos para hacer válida la garantía
• Para reclamar su Garantía deberá presentar al Centro de Servicio Autorizado
la póliza sellada por el establecimiento en donde adquirió el producto. Si no
la tiene, podrá presentar el comprobante de compra original.
¿Donde hago válida la garantía?
• Llame sin costo al teléfono 01 800 714 2503, para ubicar el Centro de
Servicio Autorizado más cercano a su domicilio en donde usted podrá
encontrar partes, componentes, consumibles y accesorios.
Procedimiento para hacer válida la garantía
Acuda al Centro de Servicio Autorizado con el producto con la póliza de
Garantía sellada o el comprobante de compra original, ahí se reemplazará
cualquier pieza o componente defectuoso sin cargo alguno para el usuario
final. Esta Garantía incluye los gastos de transportación que se deriven de su
cumplimiento.
Excepciones
Esta Garantía no será válida cuando el producto:
A) Se hubiese utilizado en condiciones distintas a las normales.
B) No hubiese sido operado de acuerdo con el instructivo de uso
que le acompaña.
C) Cuando el producto hubiese sido alterado o reparado por personas
no autorizadas por Rayovac de México SA de CV.
Nota: Usted podra encontrar partes, componentes, consumibles y
accesorios en los centros de servicios autorizados. Esta garantía incluyen los
gastos de transportación que se deriven de sus cumplimiento dentro de sus
red de servicio.
Page 23

23
Por favor llame al número correspondiente que aparece en la lista a continuación
para solicitar que se haga efectiva la garantía y donde Ud. puede solicitar servicio,
reparaciones o partes en el país donde el producto fué comprado.
Argentina
Servicio Técnico
Monroe 3351
CABA Argentina
Tel: 0800 – 444 - 7296
servicios@rayovac.com.ar
Chile
SERVICIO DE MAQUINAS Y
HERRAMIENTAS LTDA.
Portugal Nº 644
Santiago – Chile
Fonos: 02-6355208 / 02-6341169
Email: servicio@spectrumbrands.cl
Call center: 800-171-051
Colombia
Rayovac Varta S.A
Carrera 17 Número 89-40
Línea gratuita nacional
018000510012
Costa Rica
Aplicaciones Electromecanicas
Calle 22 y 24 en Avenida 3 BLV de la
torre Mercedes Benz
200 mts norte y 50 mts este
San José, Costa Rica
Tel. (506) 2257-5716
Ecuador
Servicio Master
Dirección: Capitán Rafael
Ramos OE 1-85 y Galo plaza lasso.
Tel (593) 2281-3882 / 2240-9870
El Salvador
Sedeblack
Calle San Antonio Abad, Colonia Lisboa
No 2936
San Salvador, Depto. de San Salvador
Tel. (503) 2284-8374
Guatemala
Kinal
17 avenida 26-75, zona 11 Centro
comercial Novicentro,
Local 37 - Ciudad
Guatemala
Tel. (502)-2476-7367
Honduras
Serviteca
San Pedro Sula, B Los Andes, 2 calle
-entre 11-12 Avenida
Honduras
Tel. (504) 2550-1074
México
Articulo 123 # 95 Local 109 y 112
Col. Centro, Cuauhtemoc,
México, D.F.
Tel. 01 800 714 2503
Nicaragua
LRM ELECTRONICA
Managua - Sinsa Altamira 1.5
kilómetros al norte
Nicaragua
Tel. (505) 2270-2684
Panamá
Supermarcas
Centro comercial El dorado, Plaza
Dorado, Local 2.
Panama
Tel. (507) 392-6231
Perú
Servicio Central Fast Service
Av. Angamos Este 2431
San Borja, Lima Perú
Tel. (511) 2251 388
Puerto Rico
Buckeye Service
Jesús P. Piñero #1013
Puerto Nuevo, SJ PR 00920
Tel.: (787) 782-6175
Republica Dominicana
Prolongación Av. Rómulo Betancourt
Zona Industrial de Herrera
Santo Domingo, República Dominicana
Tel.: (809) 530-5409
Venezuela
Inversiones BDR CA
Av. Casanova C.C.
City Market Nivel Plaza Local 153
Diagonal Hotel Melia,
Caracas
Tel. (582) 324-0969
www.applicaservice.com
servicio@applicamail.com
Page 24

24
• Lisez toutes les instructions.
• L’appareil est équipé d’un dispositif de protection du
moteur. Si le témoin clignote rapidement, débrancher
l’appareil et le laisser refroidir. Le rebrancher pour le
remettre en marche.
• Pour éviter tout risque de choc électrique, ne mettez
pas la base du mélangeur, le cordon ou la fiche dans
l’eau ou tout autre liquide.
• Une surveillance étroite est nécessaire lorsque l’appareil
est utilisé par ou près des enfants.
• Débranchez l’appareil lorsqu’il n’est pas utilisé, avant de
mettre ou d’enlever des pièces et avant de le nettoyer.
• Évitez tout contact avec les pièces mobiles.
• Ne pas utiliser un appareil dont la fiche ou le
cordon sont abîmés, qui présente un problème
de fonctionnement, qui a été échappé ou qui a
été endommagé de quelque façon que ce soit.
Communiquer avec le service à la clientèle en
composant le numéro indiqué dans le présent guide.
• L’utilisation d’accessoires, y compris les bocaux de
conserve, non recommandés ou vendus par le fabricant
de l’appareil peut provoquer un incendie, de choc
électrique ou de blessure.
• Ne pas utiliser à l’extérieur.
• Ne laissez pas la fiche ou le cordon pendre sur le
bord d’une table ou un comptoir, ou contact avec des
surfaces chaudes y compris la cuisinière.
• Gardez les mains et les ustensiles hors du contenantl
tout en mélangeant afin de réduire le risque de
blessures graves ou de dommages au mélangeur.
Un grattoir peut être utilisé, mais doit être utilisé
uniquement lorsque l’appareil ne fonctionne pas.
• Les lames sont tranchantes. Manipuler avec précaution.
• Pour réduire les risques de blessures, ne jamais installer
l’assemblage de lames sur la base lorsque le récipient
individuel n’est pas bien fixé en place.
• Toujours faire fonctionner le mélangeur avec le
couvercle en place.
• Pour mélanger des liquides chauds, retirer le capuchon
du couvercle facile à retirer. Ne pas mélanger de
liquides chauds dans le récipient individuel.
• N’utiliser cet appareil que pour les fonctions auxquelles
il est destiné.
•
Ne pas placer l’appareil sur un brûleur au gaz ou
électrique ou près d’un tel appareil, ni dans un four chaud.
• L’intensité maximale est fonction de celle du récipient.
La puissance d’entrée du récipient individuel facultatif
est inférieure à l’écart toléré.
• Cet appareil n’est pas conçu pour être utilisé par des
personnes (notamment des enfants) dont les capacités
physiques, sensorielles ou mentales sont réduites ou qui
manquent d’expérience ou de connaissances, à moins
qu’elles ne soient supervisées ou dirigées par une personne
responsable de leur sécurité pendant l’utilisation.
• Les enfants doivent être supervisés afin d’éviter qu’ils
ne jouent avec l’appareil.
• D’importantes indications sont inscrites sur la lame de
la fiche de cet appareil. La fiche de branchement ou
l’ensemble du cordon (si la fiche est moulée à même
le cordon) ne peuvent pas être remplacés. S’ils sont
endommagés, l’appareil doit être remplacé.
FICHE POLARISÉE
(Modéles 120V Seulement)
L’appareil est muni d’une fiche polarisée (une lame
plus large que l’autre). Afin de minimiser les risques de
secousses électriques, ce genre de fiche n’entre que d’une
façon dans une prise polarisée. Lorsqu’on ne peut insérer
la fiche à fond dans la prise, il faut tenter de le faire après
avoir inversé les lames de côté. Si la fiche n’entre toujours
pas dans la prise, il faut communiquer avec un électricien
certifié. Il ne faut pas tenter de modifier la fiche.
VIS INDESSERRABLE
Avertissement : L’appareil est doté d’une vis
indesserrable empêchant l’enlèvement du couvercle
extérieur. Pour réduire les risques d’incendie ou de
secousses électriques, ne pas tenter de retirer le
couvercle extérieur. L’utilisateur ne peut pas remplacer les
pièces de l’appareil. En confier la réparation seulement au
personnel des centres de service autorisés.
CORDON
1. Le cordon d’alimentation de l’appareil est court afin
de minimiser les risques d’enchevêtrement ou de
trébuchement.
2. Il existe des cordons d’alimentation amovibles ou de
rallonge plus longs et il faut s’en servir avec prudence.
3. Lorsqu’on utilise un cordon d’alimentation amovible ou de
rallonge plus long, il faut s’assurer que:
a) la tension nominale du cordon d’alimentation amovible
ou de rallonge soit au moins égale à celle de l’appareil,
et que;.
b) lorsque l’appareil est de type mis à la terre, il faut
utiliser un cordon de rallonge mis à la terre à trois
broches, et;
c) le cordon plus long soit placé de sorte qu’il ne soit
pas étalé sur le comptoir ou la table d’où des enfants
pourraient le tirer, ni placé de manière à provoquer un
trébuchement.
Remarque : Lorsque le cordon d’alimentation est
endommagé, il faut le faire remplacer par du personnel
qualifié ou, en Amérique latine, par le personnel d’un
centre de service autorisé.
CONSERVER CES MESURES.
Cet appareil est conçu pour un usage domestique seulement.
VEUILLEZ LIRE ET CONSERVER CE GUIDE D’ENTRETIEN ET D’UTILISATION.
IMPORTANTES CONSIGNES DE SÉCURITÉ
Lorsque vous utilisez des appareils électriques, des précautions de base doivent
toujours être observées, y compris ce qui suit:
CARACTÉRISTIQUES DE SÉCURITÉ
Page 25

25
FAMILIARISATION AVEC
VOTRE MÉLANGEUR
FUSIONBLADEMC
PERFORMANCE
1. Capuchon du couvercle
(pièce n° BL6010-01)
2. Couvercle facile à retirer
(pièce n° BL6010-02)
3. Poignée
4. Récipient monobloc Tritan
MC
(pièce n° BL6010-03)
5. Lame intégrée
(non-removable)
6. Base
7. Commutateur MARCHE|ARRÊT
(START|OFF) et IMPULSION (PULSE)
8. Cadran de vitesse variable
9. Couvercle pour boire
(pièce n° BL1130-07)
10. Récipient individuel
(pièce n° BL1130-08)
11. Assemblage de la lame du récipient
individuel (pièce n° BL1130-09)
Remarque : des récipients
individuels additionnels peuvent
être achetés séparément à
BlackAndDeckerAppliances.com
Félicitations pour votre achat du mélangeur FusionBladeMC Performance!
Conçu pour une préparation d’aliments par excellence, votre nouveau mélangeur
Performance vous aidera à broyer, à créer, à mélanger, à hacher, à battre et à
préparer. Dégustez!
* Tritan est une marque de commerce de Eastman Chemical Company, ou d’une de ses filiales.
1
2
3
4
5
6
7
8
9
11
10
Page 26

26
UTILISATION DU MÉLANGEUR
1. S’assurer que l’appareil est en position d’arrêt et que le récipient est
bien fixé sur sa base.
2. Mettre les aliments dans le récipient. Ne pas remplir au-delà de la
marque des 64 oz.
REMARQUE : pour le mélange d’ingrédients
chauds, ne remplir le récipient qu’aux 2/3 de
sa capacité. (A)
REMARQUE : Pour obtenir les meilleurs résultats,
ajouter les ingrédients dans l’ordre suivant :
a. Liquides
b. Poudres
c. Aliments mous
d. Aliments solides
e. Glace
3. Bien placer le couvercle sur le récipient.
S’assurer que le capuchon du couvercle est
bien en place.
REMARQUE : avant de mélanger des liquides
chauds, retirer le capuchon du couvercle
et couvrir d’une serviette pour éviter les
éclaboussures.
4. Brancher la fiche du cordon d’alimentation
dans une prise de courant.
5. Utiliser le cadran pour sélectionner une vitesse.
(B) Tourner le cadran dans le sens horaire pour
accélérer la vitesse et dans le sens antihoraire
pour réduire la vitesse (voir le TABLEAU DES
VITESSES).
6. Actionner le commutateur vers le haut à la
position MARCHE|ARRÊT pour démarrer le
moteur. (C) Le voyant à DEL s’allume.
A
C
B
D
POUR COMMENCER
• Retirer tout matériau d’emballage, tout autocollant apposé sur le
produit, et la bande de plastique entourant la fiche.
• Visiter le www.prodprotect.com/applica pour enregistrer la garantie.
• Laver toutes les pièces amovibles en suivant les directives de la section
ENTRETIEN ET NETTOYAGE du présent guide.
UTILISATION
Cet appareil est conçu pour un usage domestique seulement.
Page 27

27
7. Lorsque les aliments on atteint la consistance
désirée, actionner le commutateur vers le haut
à la position MARCHE|ARRÊT pour arrêter le
moteur. (C) Le voyant à DEL s’éteint.
IMPORTANT : ne pas laisser le mélangeur sans
surveillance pendant qu’il est en marche.
8. Vous pouvez retirer le capuchon du couvercle
et insérer des aliments dans l’ouverture pendant que le mélangeur est
en marche. (D)
9. Pour utiliser la fonction d’IMPULSION, actionner et maintenir le commutateur
vers le bas à la position IMPULSION pendant quelques secondes, puis
relâcher. (E) Répéter jusqu’à ce que les ingrédients aient la consistance
voulue. Lorsque le bouton d’impulsion est relâché, le mélangeur s’arrête.
Le voyant à DEL s’allume lorsque le moteur est en marche.
IMPORTANT : ne pas actionner le commutateur vers le bas en mode
d’impulsion plus de quelques secondes à la fois.
IMPORTANT : ne pas retirer le couvercle lorsque le mélangeur est en marche.
10. S’assurer que les lames ont cessé complètement de tourner avant de
tenter de retirer le récipient de la base. (Voir la section « Dépannage »
en cas de problèmes.)
11. Pour retirer le récipient, le saisir par sa poignée et le lever.
12. Retirer le couvercle pour verser.
13. Toujours débrancher l’appareil lorsqu’il ne sert pas.
UTILISATION DU RÉCIPIENT INDIVIDUEL
(NON INCLUS AVEC TOUS LES MODÈLES)
Des récipients individuels peuvent être achetés séparément.
REMARQUE : Ne pas mélanger de liquides chauds dans le récipient
individuel.
1. Placer le récipient individuel sur une surface plane, l’ouverture vers le haut.
Remplir le récipient avec les ingrédients en s’assurant de ne pas excéder la
marque maximale.
REMARQUE : Pour obtenir les meilleurs résultats, ajouter les ingrédients
dans l’ordre suivant :
a. Liquides
b. Glace
c. Aliments solides
d. Aliments mous
e. Poudres
2. Serrer l’assemblage de la lame dans l’extrémité ouverte du récipient
individuel, la lame orientée vers le bas (les ingrédients). Il est important
de serrer la base pour éviter toute fuite pendant l’opération.
E
Page 28

28
3. Mettre le récipient individuel à l’envers et le déposer sur la base du
mélangeur; tourner dans le sens horaire pour verrouiller.
4. Sélectionner la basse vitesse.
IMPORTANT : il est recommandé de n’utiliser que la basse vitesse avec le
récipient individuel. Ne PAS utiliser le mode d’IMPULSION avec le récipient
individuel.
5. Actionner le commutateur vers le haut à la position MARCHE|ARRÊT
pour démarrer le moteur. Le voyant à DEL s’allume. Mélanger jusqu’à la
consistance désirée.
6. Actionner le commutateur vers le haut à la position MARCHE|ARRÊT
pour arrêter le moteur. Le voyant à DEL s’éteint.
7. Une fois l’opération terminée, retirer le récipient individuel de la base en
tournant dans le sens antihoraire. Remettre le récipient à l’endroit et le
placer sur une surface plane.
IMPORTANT : si le récipient reste coincé sur la base ou commence à se
détacher de l’assemblage de la lame, suivez les étapes suivantes :
a. Débrancher l’appareil.
b. Tourner le récipient dans le sens horaire sur l’assemblage de la lame
c. Tourner le montage récipient/assemblage de la lame dans le sens
antihoraire pour le déverrouiller de la base du mélangeur et pour le retirer.
8. Retirer l’assemblage de la lame du récipient individuel en tournant dans
le sens antihoraire. Placer le couvercle sur le récipient individuel et
déguster vos boissons préférées pendant vos déplacements.
TABLEAU DES VITESSES
Ce mélangeur utilise un cadran de vitesse variable. Pour régler la vitesse
la plus basse, tourner le cadran complètement vers la gauche. Pour régler
la vitesse la plus élevée, tourner le cadran complètement vers la droite. Le
cadran de vitesse variable permet de commander entièrement le mélangeur.
Le tableau des vitesses ci-dessous contient des recommandations pour les
vitesses et les fonctions.
FONCTION TYPE D’ALIMENT VITESSE
Purée Fruits et légumes
Soupes
Aliments pour bébé
Lait frappé
Commencer à basse vitesse, puis
augmenter la vitesse, au besoin,
jusqu’à l’obtention de la consistance
désirée.
Chapelure Chapelure
Céréales
Biscuits
Mélanger par impulsion jusqu’à la
consistance désirée
Mélanges Vinaigrettes
Pâte
Trempettes
Basse ou moyenne
Hachage Salsa
Noix
Légumes
Mélanger par impulsion jusqu’à la
consistance désirée
Page 29

29
Glace broyée/
mélanges glacés
Glaçons (500 ml (2 tasses)
max.)
Fruits congelés
Élevée ou Impulsion
Mélanges/frappés
aux fruits
Frappés aux fruits
Fruits
Légumes
Élevée ou Impulsion
Farine Riz
Maïs
Avoine
Grains
Moyenne ou élevée
Beurre de noix Arachides
Amandes
Noix de Grenoble
Cajou
Élevée
Recettes pour
récipient
individuel
Demi-recette/Avec récipient
individuel (non inclus avec
tous les modèles)
Basse
ASTUCES ET CONSEILS UTILES
• Pour garder le récipient et la base en place lorsque l’on concasse des aliments
durs, tels que de la glace ou du fromage, placer la main sur le couvercle.
• Couper les aliments en petits morceaux d’au plus 2 cm (3/4 po) avant
de les mettre dans le mélangeur.
• Si des ingrédients éclaboussent les parois du récipient ou si le mélange
est très consistant, arrêter l’appareil. Retirer le couvercle et, à l’aide
d’une spatule en caoutchouc, racler les parois du récipient pour
redistribuer le mélange en le rapprochant des lames. Remettre le
couvercle en place et recommencer à mélanger.
• Le capuchon du couvercle peut contenir jusqu’à 30 ml (2 oz) de liquide
et peut servir à mesurer et à ajouter des ingrédients comme de l’huile,
du lait, de la crème ou des liqueurs.
• Pour la préparation de pain, de biscuits, de céréales ou de chapelure,
s’assurer que le récipient est complètement sec.
• Lors de l’utilisation du mode d’impulsion, actionner le bouton à brefs
intervalles d’une ou deux secondes. Attendre que les lames cessent
de tourner entre deux impulsions. Si vous maintenez le commutateur
abaissé pendant plus de 30 secondes, le dispositif de sécurité
s’enclenchera et l’appareil devra être réinitialisé.
• Il est recommandé de commencer à mélanger à basse vitesse, puis
d’augmenter la vitesse par la suite, au besoin.
• Ne jamais faire fonctionner le mélangeur sans le couvercle.
• Pour arrêter l’appareil en tout temps, actionner le commutateur vers le
haut à la position MARCHE|ARRÊT.
• Toujours laisser refroidir les ingrédients chauds au moins 5 minutes
avant de les mélanger. Commencer à mélanger à la vitesse la plus
basse, le capuchon du couvercle enlevé, pour laisser la vapeur
s’échapper. Couvrir le trou du capuchon du couvercle avec une
serviette ou une manique.
• Pour broyer de la glace sans autres ingrédients, utiliser au plus 500 ml
(2 tasses) de glace (environ 15 glaçons). S’assurer que le récipient est
complètement sec avant de broyer de la glace.
Page 30

30
ENTRETIEN ET NETTOYAGE
Cet appareil ne contient aucune pièce réparable par l’utilisateur. Confier la
réparation à un technicien qualifié.
• Débrancher la base l’appareil avant le nettoyage. Essuyer la base
du mélangeur avec un linge humide. Ne pas immerger la base du
mélangeur dans l’eau.
• Retirer le récipient de la base en utilisant la poignée.
• Retirer le couvercle et son capuchon.
• Les pièces amovibles peuvent être lavées à la main ou dans le lavevaisselle. Placer le récipient dans le panier inférieur et les autres
composants dans le panier supérieur seulement.
MISE EN GARDE : Les lames sont tranchantes. Les manipuler avec soin
pendant le nettoyage à la main.
CONSEILS POUR LE NETTOYAGE :
• Pour un nettoyage rapide, verser dans le récipient 250 ml (1 tasse) d’eau
chaude et une goutte de détergent à vaisselle
• Mettre le couvercle et mélanger à vitesse moyenne pendant environ 30
secondes.
• Jeter le liquide et rincer le récipient à fond.
IMPORTANT :
• Ne pas placer les pièces du récipient dans des liquides bouillants.
• Ne pas immerger la base dans un liquide. Essuyer la base à l’aide d’un
linge humide et bien assécher.
• Enlever les taches tenaces en frottant à l’aide d’un chiffon humide et
d’un produit nettoyant non abrasif.
REMARQUE : Si un liquide se renverse sur la base du mélangeur, l’essuyer avec
un chiffon humide et bien l’assécher. Ne pas utiliser de tampons à récurer ni de
produits nettoyants abrasifs sur les pièces ou la surface de l’appareil.
DÉPANNAGE
Problème Cause possible Solution
L’appareil
fonctionne avec
difficulté
Le mélange est trop
épais ou des bulles d’air
se sont formées entre le
mélange et les lames.
Arrêter l'appareil. Utiliser une
spatule pour racler des bords du
récipient et redistribuer les aliments
en les poussant vers les lames.
Ajouter du liquide au besoin.
La DEL clignote
rapidement
Le mélangeur surchauffe.
Le dispositif de
protection du moteur
a provoqué l’arrêt du
mélangeur.
L’appareil doit être réinitialisé.
Débrancher l’appareil et le laisser
refroidir pendant 20 minutes au
moins.
Page 31

31
RECETTES
BEURRE D’ARACHIDES
750 ml (3 tasses) d’arachides
85 ml (
1
⁄3 tasse) d’huile d’arachide
Placer tous les ingrédients dans le mélangeur. Actionner le commutateur
vers le haut à la position MARCHE/ARRÊT, utiliser le cadran pour régler la
vitesse et mélanger. Actionner le commutateur vers le haut à la position
MARCHE/ARRÊT lorsque le beurre d’arachide a atteint la consistance
désirée.
FARINE DE RIZ
125 ml ( ½ tasse) de riz blanc
Congeler le riz pendant 15 minutes avant de mélanger. Verser dans le
mélangeur et utiliser le cadran pour régler la vitesse.
FRAPPÉ AUX ANANAS ET AUX FRAISES
1250 ml (1 tasse) de jus d’ananas
500 ml (2 tasses) de yogourt à la vanille
250 ml (1 tasse) de fraises fraîches
8-10 glaçons
Verser tous les ingrédients dans le mélangeur dans l’ordre indiqué, et
mélanger à la vitesse élevée..
FRAPPÉ AUX ORANGES ET AUX MANGUES - RÉCIPIENT INDIVIDUEL
125 ml ( ½ tasse) de jus d’orange
4-5 glaçons
125 ml ( ½ tasse) de mangue fraîche
250 ml (1 tasse) de yogourt nature ou à la vanille
Verser tous les ingrédients dans le récipient individuel dans l’ordre de la
liste. Fixer la base des lames au-dessus du récipient et visser fermement en
place. Renverser le récipient, le déposer sur la base et mélanger à la vitesse
la plus basse.
Page 32

32
SOUPE CRÉMEUSE À LA COURGE MUSQUÉE
1 petit oignon, haché
900 g (2 lb) de courge musquée, pelée, épépinée et découpée en cubes
de 2,5 cm (1 po)
500 ml (2 tasses) de bouillon de poulet ou de légumes
1/2 ml (/ c. à thé) de sel
1/2 ml (/ c. à thé) de poivre noir
125 ml (½ tasse) de crème épaisse
Faire fondre le beurre dans un grand poêlon à feu moyen. Ajouter l’oignon;
cuire et remuer pendant 3 minutes ou jusqu’à ce qu’il soit croustillant.
Ajouter la courge, le bouillon de poulet, le sel et le poivre. Amener à
ébullition. Réduire à feu moyen/doux, couvrir et mijoter 20 minutes, ou
jusqu’à ce que la courge soit tendre.
Réduire la courge en purée dans le mélangeur, en deux portions, à basse
vitesse pendant 15 secondes ou jusqu’à l’obtention d’une consistance
uniforme.
Verser la soupe en purée dans le poêlon. Ajouter la crème et chauffer. Ne
pas faire bouillir.
Page 33

33
BESOIN D’AIDE?
Pour communiquer avec les services d’entretien ou de réparation, ou pour
adresser toute question relative au produit, composer le numéro sans frais
approprié indiqué sur la page couverture. Ne pas retourner le produit où il a
été acheté. Ne pas poster le produit au fabricant ni le porter dans un centre
de service. On peut également consulter le site web indiqué sur la page
couverture.
Garantie Limitée De Trois Ans
(Valable seulement aux États-Unis et au Canada)
Quelle est la couverture?
• Tout défaut de main-d’oeuvre ou de matériau; toutefois, la responsabilité de la
société. Applica se limite au prix d’achat du produit.
Quelle est la durée?
• Trois années à compter de la date d’achat initiale, avec une preuve d’achat.
Quelle aide offrons nous?
• Remplacement par un produit raisonnablement semblable nouveau ou réusiné.
Comment se prévaut-on du service?
• Conserver son reçu de caisse comme preuve de la date d’achat.
• Visiter notre site web au www.prodprotect.com/applica, ou composer sans frais le
1-800 231-9786, pour obtenir des renseignements généraux relatifs à la garantie.
• On peut également communiquer avec le service des pièces et des accessoires au
1-800 738-0245.
Qu’est-ce que la garantie ne couvre pas?
• Des dommages dus à une utilisation commerciale.
• Des dommages causés par une mauvaise utilisation ou de la négligence.
• Des produits qui ont été modifiés.
• Des produits utilisés ou entretenus hors du pays où ils ont été achetés.
• Des pièces en verre et tout autre accessoire emballés avec le produit.
• Les frais de transport et de manutention reliés au remplacement du produit.
• Des dommages indirects (il faut toutefois prendre note que certains états ne
permettent pas l’exclusion ni la limitation des dommages indirects).
Quelles lois régissent la garantie?
• Les modalités de la présente garantie donnent des droits légaux spécifiques.
L’utilisateur peut également se prévaloir d’autres droits selon l’état ou la province
qu’il habite.
Page 34

34
BL6005 - 9.4A 120V 60Hz
Sello del Distribuidor:
Fecha de compra:
Modelo:
Código de fecha / Date Code / Le code de date:
Comercializado por:
Rayovac de México S.A de C.V
Autopista México Querétaro
No 3069-C Oficina 004
Colonia San Andrés Atenco, Tlalnepantla
Estado de México, C.P. 54040
Mexico.
Tel: (55) 5831 – 7070
Servicio y Reparación
Art. 123 No. 95
Col. Centro, C.P. 06050
Deleg. Cuauhtemoc
Servicio al Consumidor,
Venta de Refacciones y Accesorios
01 800 714 2503
Importado por / Imported by:
RAYOVAC ARGENTINA S.R.L.
Humboldt 2495 Piso# 3
(C1425FUG) C.A.B.A. Argentina.
C.U.I.T No. 30-70706168-1
Importado por / Imported by:
Rayovac de México S.A de C.V
Autopista México Querétaro
No 3069-C Oficina 004
Colonia San Andrés Atenco, Tlalnepantla
Estado de México, C.P. 54040
Mexico.
Tel: (55) 5831-7070
Para atención de garantía marque:
01 (800) 714 2503
Importado por / Imported by:
Spectrumbrands
En Chile, Household Products Chile Ltda
Av. Del Valle 570, Ofic. 704
Ciudad Empresarial, Huechuraba
Santiago - Chile
Fono: (562) 2571 3700
Importado por / Imported by:
Spectrumbrands S.A.
Carrera 17 No.89-40
Bogotá, Colombia
Línea de atención al cliente:
018000510012
Page 35

35
Page 36

36
TM
13070-01 E/S/F
T22-5001073
© 2015 The Black & Decker Corporation
and Spectrum Brands, Inc.
Middleton, WI 53562
Made in People’s Republic of China
Fabricado en la República Popular de China
Fabriqué en République populaire de Chine
BLACK+DECKER and the BLACK+DECKER logo are trademarks of The Black & Decker
Corporation and are used under license. All rights reserved.
BLACK+DECKER y el logo tipo BLACK+DECKER son marcas registradas de The
Black&Decker Corporation y son utilizados bajo licencia. Todos los derechos reservados.
BLACK+DECKER et le logo BLACK+DECKER sont des marques de commerce de The
Black & Decker Corporation, et sont utilisés sous licence. Tous droits réservés.
All other marks are Trademarks of Spectrum Brands, Inc.
Todas la demás marcas son Marcas Registradas de Spectrum Brands, Inc.
Toutes les autres marques sont des marques de commerce de Spectrum Brands, Inc.
 Loading...