

Page 1

LICUADORA
BLENDER
use and care manual
manual de uso y cuidado
BL1600/BL1610 series
1
Page 2

PLEASE READ AND SAVE THIS USE AND CARE BOOK.
IMPORTANT SAFEGUARDS.
When using electrical appliances, always follow basic safety precautions to
reduce the risk of fire, electric shock, and/or injury, including the following:
• Read all instructions.
• To protect against risk of electrical shock, do
not put blender base, cord or plug in water or
other liquid.
• Close supervision is necessary when any
appliance is used by or near children.
• Turn the appliance OFF, then unplug
from the outlet when not in use, before
assembling or disassembling parts and
before cleaning. To unplug, grasp the
plug and pull from the outlet. Never pull
from the power cord.
• Avoid contacting moving parts.
• Do not operate any appliance with a
damaged cord or plug or after the appliance
malfunctions or is dropped or damaged in
any manner. Contact the consumer service
number listed in this manual. This appliance
has important markings on the plug blade.
The attachment plug or entire cordset (if
plug is molded onto cord) is not suitable for
replacement. If damaged, the appliance must
be replaced.
• The use of attachments, including canning
jars, not recommended or sold by the
appliance manufacturer may cause fire,
electric shock or injury.
• Do not use outdoors.
• Do not let the plug or cord hang over the edge
of table or counter.
• Do not place on or near a hot gas or electric
burner or in a heated oven.
• Keep hands and utensils out of container while
blending to reduce the risk of severe injury to
persons or damage to the blender. A scraper
may be used but must be used only when the
blender is not running.
• Blades are sharp. Handle carefully.
• To reduce the risk of injury, never place blade
assembly on base without the jar properly
attached.
• Always operate blender with cover in place.
• Do not blend hot liquids.
• Do not use appliance for other than intended use.
• This appliance is not intended for use by
persons (including children) with reduced
physical, sensory or mental capabilities, or
lack of experience and knowledge, unless they
have been given supervision or instruction
concerning use of the appliance by a person
responsible for their safety.
• Children should be supervised to ensure that
they do not play with the appliance.
SAVE THESE INSTRUCTIONS.
This product is for household use only.
SAFETY FEATURES
POLARIZED PLUG (120V models only)
This appliance has a polarized plug (one blade
is wider than the other). To reduce the risk of
electric shock, this plug is intended to fit into a
polarized outlet only one way. If the plug does
not fit fully into the outlet, reverse the plug. If it
still does not fit, contact a qualified electrician.
Do not attempt to modify the plug in any way.
TAMPER-RESISTANT SCREW
Warning: This appliance is equipped with a
tamper-resistant screw to prevent removal
of the outer cover. To reduce the risk of fire
or electric shock, do not attempt to remove
the outer cover. There are no user-serviceable
parts inside. Repair should be done only by
authorized service personnel.
2
ELECTRICAL CORD
1) A short power-supply cord is provided to
reduce the risk resulting from becoming
entangled in or tripping over a longer cord.
2) Extension cords are available and may be
used if care is exercised in their use.
3) If an extension cord is used,
a) The marked electrical rating of the
extension cord should be at least as great
as the electrical rating of the appliance,
b) If the appliance is of the grounded
type, the extension cord should be a
grounding-type 3-wire cord, and
c) The cord should be arranged so that it
will not drape over the countertop or
tabletop where it can be pulled on by
children or tripped over unintentionally.
Note: If the power cord is damaged, please
contact the warranty department listed in these
instructions.
Page 3

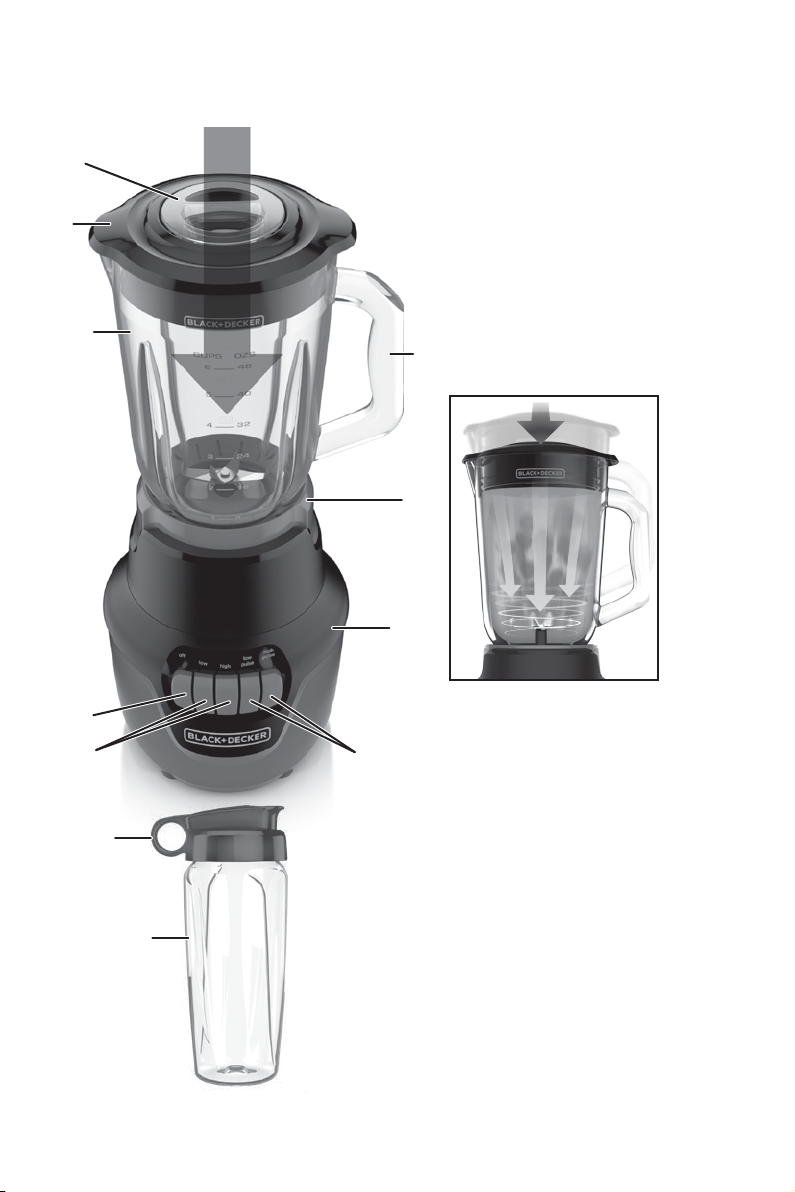
GETTING TO KNOW YOUR
HELIX™
PERFORMANCE BLENDER
1
2
3
7
8
10
11
Product may vary slightly from what is illustrated.
9
using Blade Boost Technology.
The blades reach up through an air
pocket into the ingredients above.
This allows the blending vortex to
reestablish.
If air pocket is persistent, add liquid.
4
5
6
1. Measuring cup lid insert
(Part# BL1600-02)
2. Lid (Part# BL1600-01)
3. Blending jar (Part# BL1600-03)
4. Handle
5. Jar base/Blade assembly
(Part# BL1600-04)
6. B a s e
7. Off button
8. Speed buttons
9. Pulse buttons
10. Single serve jar travel lid*
(part no. BL1400-03)
11. Single serve jar*
(part no. BL1400-04)
*Not included with all models.
Note: additional single serve jars and
lids can be purchased separately at
BlackAndDeckerAppliances.com
Press lid to boost blade height,
3
Page 4

HOW TO USE
This product is for household use only.
GETTING STARTED
• Remove all packing material, any stickers from the product, and the plastic
band around the plug.
• Remove and save literature.
• Please visit www.prodprotect.com/blackanddecker to register your warranty.
• Wash all removable parts as instructed in CARE AND CLEANING
section of this manual.
BLENDER JAR ASSEMBLY
1. Turn blending jar upside down and place flat on
counter top or work surface.
Caution: Blades are sharp. Handle carefully.
2. Place jar base/blade assembly onto jar and rotate
clockwise until it is tight. (A)
3. Turn assembled jar right side up.
4. Place lid on blending jar.
Note: Make sure the ingredient slot is closed.
5. Unwrap power cord from storage area under the base.
6. Place jar assembly on base and turn clockwise to lock
into place. The marks on the jar assembly will align with
the marks on the top edge of the base. (B)
7. Blender is now ready for use.
USING YOUR BLENDER
Important: Appliance should always have lid in place when in use.
Caution: Do not place blender jar onto base when motor is running.
1. Make sure appliance is OFF.
2. Place foods to be blended into jar. For best results place ingredients in jar
in the following order: liquids, powders, soft foods, hard foods, ice.
Note: You must always add a liquid before blending.
3. Place lid on jar; make sure measuring cup lid insert is in place.
4. Plug power cord into outlet.
Note: When in use, do not leave blender unattended. When using hard foods,
such as ice or cheese, keep one hand on the lid to keep blender in place.
5. Select the speed that best suits your desired task.
(See SPEED CHART)
6. When blending thick mixtures, such as smoothies and
milkshakes, press the High Pulse button for several seconds,
then release. Repeat until food has desired consistency. (C)
4
Page 5

Note: Use PULSE for no more than five seconds at a time,
allowing the blender to rest briefly between each pulse, no
more than two minutes total. This helps break up the ice and
distribute the ingredients.
7. Open the lid cap to add ingredients while the blender is
running and drop ingredients through the opening (D).
• The lid cap holds up to 1 oz. liquid and can be used as a
measure when adding ingredients such as juices, milk,
cream and liquor (E).
• If air pockets or clogs form in the mixture, press down on
the lid to break them up. (F) This lowers the jar and raises
the blades within the mixture. (G)
Important: Do not remove the lid while the blender is running.
8. When finished, press the OFF button. Make sure blades
have completely stopped before attempting to remove
the blending jar from the base.
9. To remove the jar, grasp the handle, turn jar
counterclockwise and lift up.
Note: Always unplug the appliance when not in use.
DD
EE
F
USING THE SINGLE SERVE BLENDER JAR
(NOT INCLUDED WITH ALL MODELS)
Note: Do not blend hot liquids in the single serve jar.
1. Place the single serve blender jar on a flat surface with
the open end facing up. Fill the jar with ingredients. Do not fill ingredients
past the Max fill line.
Note: For best results, add ingredients in the following order:
1. Liquids 2. Powders 3. Soft foods 4. Hard foods 5. Ice
2. Place blade assembly in the jar opening with blades down.
3. Place jar base onto jar and rotate clockwise until it is tight. It is important
to tighten to prevent leaking during blending.
4. Turn single serve jar upside down and place on the blender base.
5. While blending, keep one hand holding the single serve jar. Select the
speed that best suits your desired task.
6. Once blending has finished, remove the single serve jar by lifting off the
base. Turn the jar over and place it on a flat surface.
Note: Always make sure blades have stopped moving before removing jar.
Important: If the jar gets stuck on the blending base or begins to loosen
from the jar base, follow these steps:
a. Unplug the unit
b. Turn the jar clockwise to tighten jar onto the jar base
7. Remove the jar base from the single serve jar by turning
counterclockwise. Then carefully remove blade assembly
8. Place the single serve jar drinking lid on the single serve jar and enjoy
your delicious drinks on-the-go.
Caution: Blades are sharp. Handle carefully.
G
5
Page 6

BLENDING TIPS AND TRICKS
• Cut food into pieces no larger than ¾” for use in the blender.
• When preparing foods that have several different kinds of ingredients,
always add liquid ingredients first.
• When making bread crumbs make sure blender jar is completely dry.
• When using PULSE function; use short bursts. Allow the blades to stop
rotating between pulses. Do not use PULSE for more than 2 minutes.
• Use the High Pulse button when crushing ice cubes or anything frozen.
For efficient ice crushing, repeatedly press down and release the High
Pulse button and the lid in unison.
• It is helpful to begin the blending process on the lowest speed and then
increase to a higher speed, if necessary.
• To stop blending at any time, press the OFF button.
• Do not store foods in the blending jar.
• Do not overfill the blender (the blender is more efficient with less rather
than more).
• Do not run blender for longer than 1 ½ minutes at a time. Scrape down
sides of blending jar, if necessary, and continue blending.
• Do not use if blending jar is chipped or cracked.
• It is not recommended to use your blender to beat egg whites, mix
dough, mash potatoes, or grind meats.
• Refrain from tapping or banging the Jar base/Blade assembly on
the counter.
DO NOT PLACE ANY OF THE FOLLOWING IN THE BLENDER:
• Large pieces of frozen foods
• Tough foods such as raw turnips, sweet potatoes and potatoes
• Bones
• Hard salami, pepperoni
• Boiling liquids (cool for 5 minutes before placing in blending jar)
6
Page 7

SPEED CHART
SPEED
LOW
HIGH
LOW
PULSE
HIGH
PULSE
FUNCTION USAGE
Mix,
Milkshake,
Easy clean
Puree,
Icy drink,
Smoothie
Dice/Chop,
Salsa,
Crumb
Ice Crush
Prepare sauces, and remove lumps from gravies
Blend milkshakes and malts
Blend drop of soap with hot water to clean blender quickly
Puree fruits and vegetables
Liquefy frozen drinks
Prepare smoothies
Chop fruits, vegetables, and cooked meats
Create salsas
Make cookie, cereal and bread crumbs
Crush ice and frozen food
CARE AND CLEANING
This product contains no user serviceable parts. Refer service to qualified
service personnel.
CLEANING:
1. Before cleaning, turn off and unplug the appliance.
2. Lift the blending jar by the handle off the base.
3. Remove jar base/blade assembly by turning it counterclockwise
until loose.
Caution: Blades are sharp. Handle carefully.
4. Combine 1 cup hot water and a drop of liquid dish soap
in the blending jar. Cover and blend for about 30 seconds while pressing
down on the lid a few times to clean the seal and mechanism.
5. Disassemble and wash the removable parts by hand or in the
dishwasher. Place the jar on the bottom rack and the rest of the parts on
the top rack only.
Important:
• Do not place the jar parts in boiling liquids.
• Do not immerse the base in liquid. Wipe the base with a damp cloth and
dry thoroughly.
• Remove stubborn spots by rubbing with a damp cloth and nonabrasive
cleaner.
Note: Do not use rough scouring pads or cleansers on parts or finish.
7
Page 8

RECIPES
CLASSIC SMOOTHIE
This easy-to-blend classic smoothie is a great way to refresh at any time of day!
Ingredients:
2 cups apple juice
2 medium bananas, halved
2 cups whole strawberries, frozen
Directions:
Place all ingredients in blender jar in order shown. Cover and blend on High
for 30 seconds, or until smooth.
Makes about 3 cups.
Tip: Substitute orange juice for apple juice.
QUICK AND EASY SALSA
This fast and easy restaurant-style salsa is a great substitute for fresh Pico de
Gallo when tomatoes are no longer in season. Serve it with your favorite chips
or as a topping for tacos.
Ingredients:
2 (10 oz.) cans diced tomatoes with green chilies
½ small onion, quartered
1 small jalapeno pepper, seeded, deveined
1 clove garlic, peeled and smashed
½ cup cilantro, loosely packed
1 Tbsp. lime juice
1 tsp. sugar
½ tsp. cumin
½ tsp. salt
Directions:
Place ingredients in blender jar, in order shown. Cover and pulse on LOW
PULSE for 30 seconds or to desired consistency. For a small batch, cut recipe
in half.
8
Page 9

NEED HELP?
For service, repair or any questions regarding your appliance, please call
our Customer Service Line at 1-800-465-6070. Please DO NOT return the
product to the place of purchase. Also, please DO NOT mail product back
to manufacturer, nor bring it to a service center. You may also want to
consult the website listed on the cover of this pamphlet.
Warranty Information
(Applies only in the United States and Canada)
What does it cover?
• Any defect in material or workmanship provided; however, Spectrum
Brands’ liability will not exceed the purchase price of product.
For how long?
• Three years from the date of original purchase with proof of such
purchase.
What will we do to help you?
• Provide you with a reasonably similar replacement product that is either
new or factory refurbished.
How do you get service?
• Save your receipt as proof of date of sale.
• Visit the online service website at www.prodprotect.com/blackanddecker,
or call toll-free
• If you need parts or accessories, please call
How does state law relate to this warranty?
• This warranty gives you specific legal rights. You may also have other
rights that vary from state to state or province to province.
What does your warranty not cover?
• Damage from commercial use
• Damage from misuse, abuse or neglect
• Products that have been modified in any way
• Products used or serviced outside the country of purchase
• Glass parts and other accessory items that are packed with the unit
• Shipping and handling costs associated with the replacement of the unit
• Consequential or incidental damages (Please note, however, that some
states do not allow the exclusion or limitation of consequential or
incidental damages, so this limitation may not apply to you.)
Are there additional warranty exclusions?
• This warranty shall not be valid where it is contrary to U.S. and other
applicable laws, or where the warranty would be prohibited under
any economic sanctions, export control laws, embargos, or other
restrictive trade measures enforced by the United States or other
applicable jurisdictions. This includes, without limitation, any warranty
claims implicating parties from, or otherwise located in, Cuba, Iran,
North Korea, Syria and the disputed Crimea region.
1-800-465-6070
, for general warranty service.
1- 800-738-0245
.
9
Page 10

Por favor lea este instructivo antes de usar el producto.
INSTRUCCIONES IMPORTANTES DE SEGURIDAD
Cuando se utilizan aparatos eléctricos, siempre se deben respetar las precauciones básicas
de seguridad para reducir el riesgo de incendio, descarga eléctrica, y/o lesiones personales,
incluyendo las siguientes:
• Por favor lea todas las instrucciones.
• A fin de protegerse contra el riesgo de un choque
eléctrico, asegúrese que la base de la licuadora, el
cable y el enchufe no puedan entrar en contacto
con agua u otro líquido.
• Todo aparato eléctrico utilizado en la presencia
de menores de edad o por ellos mismos requiere
la supervisión de un adulto.
• Apague el aparato, luego desenchúfelo del
tomacorriente cuando no esté en uso, antes
de ensamblar o desensamblar las piezas y
antes de limpiar. Para desenchufar, sujete
firmemente el enchufe y hálelo fuera del
tomacorriente. Nunca hale el cable para sacar
el enchufe del tomacorriente.
• Evite el contacto con las piezas móviles.
• No utilice ningún aparato eléctrico que tenga el
cable o el enchufe averiado, que se haya caído o
que tenga cualquier tipo de daño. Llame al número
de servicio para el cliente que aparece en este
manual.Este aparato tiene marcas importantes en
la clavija del enchufe. Ni el enchufe accessorio ni
el conector del cable (si el enchufe está moldado
en el cable) son aptos para reemplazo. Si están
dañados, el aparato debe ser reemplazado.
• El uso de accesorios no recomendados por el
fabricante del aparato, podría ocasionar fuego,
descarga eléctrica o lesiones personales.
• Este aparato no se debe utilizar a la intemperie.
• No permita que el cable cuelgue del borde
de la mesa ni del mostrador, ni que toque
superficies calientes.
• No coloque el aparato sobre ni cerca de las
hornillas de gas o eléctricas ni adentro de un
horno caliente.
• Mantenga las manos y utensilios fuera del vaso
cuando esté licuando para reducir el riesgo
de lesiones graves a personas o daños a la
licuadora. Una espátula se puede utilizar, pero
debe usarse sólo cuando la licuadora no esté en
funcionamiento.
• Las cuchillas tienen filo y se deben manejar con
prudencia.
• Para reducir el riesgo de lesiones personales,
nunca coloque el montaje de las cuchillas en la
base sin haber colocado la jarra correctamente
en su lugar.
• Siempre haga funcionar la licuadora con la tapa
en su lugar.
• No licúe líquidos calientes.
• Este aparato se debe utilizar solamente con el fin
previsto. No licue líquidos calientes para el vaso
de la licuadora personal.
• Este aparato no está diseñado para ser usado
por personas (incluído niños) con capacidad
limitada física, mental o sensoriales disminuidas
y falta de experiencia o conocimiento que les
impida utilizar el aparato con toda seguridad sin
supervisión o instrucción.
• Se debe asegurar la supervisión de los niños para
evitar que usen el aparato como juguete.
CONSERVE ESTAS INSTRUCCIONES.
Este aparato eléctrico es para uso doméstico solamente.
CARACTERÍSTICAS DE SEGURIDAD
ENCHUFE POLARIZADO
(Solamente para los modelos de 120V)
Este aparato cuenta con un enchufe polarizado (un
contacto es más ancho que el otro). A fin de reducir
el riesgo de un choque eléctrico, este enchufe
encaja en un tomacorriente polarizada en un solo
sentido. Si el enchufe no entra en el tomacorriente,
inviértalo y si aun así no encaja, consulte con
un electricista. Por favor no trate de alterar esta
medida de seguridad.
TORNILLO DE SEGURIDAD
Advertencia: Este aparato cuenta con un tornillo
de seguridad para evitar la remoción de la cubierta
exterior del mismo. A fin de reducir el riesgo de
incendio o de choque eléctrico, por favor no trate
de remover la cubierta exterior. Este producto no
contiene piezas reparables por el consumidor. Toda
reparación se debe llevar a cabo únicamente por
personal de servicio autorizado.
10
CABLE ÉLECTRICO
1. El producto se debe de proporcionar con un
cable eléctrico corto, a fin de reducir el riesgo de
tropezar o de enredarse en un cable más largo.
2. Si se utiliza un cable separable o de extensión,
a) El régimen nominal del cable separable o del
cable de extensión debe ser, como mínimo, igual
al del régimen nominal del aparato.
b) Si el aparato es de conexión a tierra, el cable de
extensión debe ser un cable de tres alambres de
conexión a tierra.
c) Uno debe de acomodar el cable más largo de
manera que no cuelgue del mostrador o de la
mesa, para evitar que un niño tire del mismo o
que alguien se tropiece.
Nota: Si el cable de alimentación está dañado,
por favor llame al número del departamento de
garantía que aparece en estar instrucciones.
Page 11
CONOZCA SU LICUADORA
PERFORMANCE HELIX™
1
2
3
6
Presione la tapa para
impulsar hacia arriba
la cuchilla, utilizando
la tecnología Blade Boost
(impulso de cuchilla).
Las cuchillas suben a través de
una bolsa de aire y penetran los
ingredientes de arriba.
Esto permite que el vórtice de
licuado se reestablezca.
Si la bolsa de aire persiste,
4
añada más líquido.
5
7
8
10
11
El producto puede variar ligeramente
del que aparece ilustrado aquí.
1. Tapa con taza medidora
(pieza no. BL1600-02)
9
2. Tapa (pieza no. BL1600-01)
3. Jarra (pieza no. BL1600-03)
4. Asa
5. Base de la jarra/montaje de cuchillas
(pieza no. BL1600-04)
6. B a s e
7. Botón apagado
8. Botones de velocidad
9. Botones de función de pulso
10. Tapa del vaso de porción individual
portátil* (pieza no. BL1400-03)
11. Vaso de porción individual *
(pieza no. BL1400-04)
*No se incluye en todos los modelos.
Nota: Vasos y las tapas de
porción individual adicionales
pueden ser comprados en
BlackAndDeckerAppliances.com
11
Page 12

COMO USAR
Este producto es para uso doméstico solamente.
PASOS PRELIMINARES
• Retire todo el material de embalaje, calcomanía adherida al producto, y
labanda de plástico alrededor de la clavija.
• Por favor, visite www.prodprotect.com/blackanddecker
para registrar su garantía.
• Lave todas las piezas desmontables siguiendo las instrucciones
indicadas en la sección de CUIDADO Y LIMPIEZA de este manual.
ENSAMBLAJE DE LA JARRA DE LICUADORA
1. Voltee la jarra boca abajo y colóquela de forma plana sobre el mostrador
o superficie de trabajo.
Precaución: Las cuchillas tienen filo. Manéjelas con cuidado.
2. Coloque la base de la jarra/montaje de cuchillas sobre
la jarra y gire hacia la derecha hasta que esté asegurada
firmemente. (A)
3. Voltee el la jarra ensamblada con la aperture mirando
hacia arriba.
4. Coloque la tapa de doble apertura sobre la jarra.
Nota: Verifique que la boquilla vertedora y la ranura para
ingredientes estén cerradas.
5. Desenrolle el cable de alimentación del área de
almacenamiento debajo de la base.
6. Coloque el ensamble de jarra sobre la base y gire hacia
la derecha para asegurar en su lugar. Las marcas en el
ensamble de jarra se alinearán con las marcas en el borde superior de la
base. (B)
7. La licuadora ya está lista para ser utilizada.
USO DE SU LICUADORA
Importante: El aparato siempre debe tener la tapa colocada en su lugar
cuando esté uso.
Precaución: No coloque la jarra de la licuadora en la base cuando el motor
esté funcionando.
1. Asegúrese de que el aparato esté apagado (OFF).
2. Coloque los alimentos a licuar en la jarra. Para obtener mejores
resultados, coloque los ingredientes en el orden siguiente: líquidos,
polvos, alimentos suaves, alimentos duros, hielo.
Nota: Siempre debe añadir un líquido antes de comenzar a licuar.
3. Coloque la tapa y asegúrese de que la taza medidora esté en su lugar.
4. Enchufe el cable de alimentación a un tomacorriente.
Nota: No deje la licuadora desentendida cuando esté en uso. Cuando utilice
12
Page 13

alimentos duros, tales como hielo o queso, mantenga una
mano sobre la tapa para mantener la licuadora en su lugar.
5. Seleccione la velocidad adecuada para la tarea a realizar.
(Consulte la TABLA DE VELOCIDADES).
6. Cuando licue mezclas espesas, como batidos de frutas y
batidos de leche, presione el botón de pulso a velocidad
alta (High Pulse) por varios segundos, luego suéltelo.
Repita hasta que los alimentos tengan la consistencia
deseada. (C)
Nota: Use la función de pulso (Pulse) por no más de 5 segundos a la vez, permitiendo que la licuadora descanse un poco
entre cada pulso, no más de 2 minutos en total. Esto ayuda a
partir el hielo y distribuir los ingredientes.
7. Quite la taza medidora para agregar ingredientes
mientras la licuadora está en funcionamiento; para ello,
deje caer los ingredientes a través de la abertura (D).
• La taza medidora de la tapa sostiene hasta
1 onza de líquido; puede usarse cómo medida y para
añadir ingredientes cómo jugos, leche, crema y licor (E).
• Si se forman bolsas de aire u obstrucciones en la mezcla,
presione hacia abajo sobre la tapa para romperlos. (F)
Esto baja la jarra y sube las cuchillas dentro de la mezcla. (G)
Importante: No retire la tapa mientras la licuadora esté funcionando.
8. Al terminar, pulse el botón de pulso/apagado. Asegúrese
de que las cuchillas hayan parado por completo antes de
intentar retirar la jarra de la base de la licuadora.
9. Para desmontar el ensamble de jarra, sujete la base de la
jarra, gire hacia la izquierda y álcela.
DD
EE
F
G
Nota: Siempre desenchufe el aparato cuando no esté en uso.
USO DEL VASO DE PORCIÓN INDIVIDUAL
(NO SE INCLUYE EN TODOS LOS MODELOS)
Precaución: No licue ingredientes calientes en el vaso personal.
1. Cologe el vaso de porción individual sobre una superficie plana con el
extremo abierto mirando hacia arriba. Llene el vaso con los ingredientes.
No llene de ingredientes pasado de la línea de llenado Max.
Nota: Para mejores resultados, añada los ingredientes en el orden siguiente:
1. Líquidos 2. Polvos 3. Alimentos suaves 4. Alimentos duros 5. Cubos de
hielo último
2. Coloque el montaje de cuchillas en la apertura del vaso con las cuchillas
hacia abajo.
3. Coloque la base del vaso sobre el vaso y gire hacia la derecha hasta
que esté ajustada. Es importante adjustar la base para prevenir goteos
durante el licuado.
4. Voltee el vaso boca abajo y colóquelo en la base de la licuadora.
13
Page 14

5. Cuando licue, mantenga una mano sosteniendo el vaso personal.
Seleccione la velocidad que le resulte mejor para la tarea deseada.
6. Una vez que haya terminado el ciclo de licuado, retire el vaso alzándolo
fuera de la base. Voltee el vaso y colóquelo sobre una superficie plana.
Nota: Siempre asegúrese de que las cuchillas se hayan detenido
completamente antes de retirar el vaso.
Importante: Si el vaso se traba en la base o comienza a aflojarse de la base,
siga estos pasos:
a. Desenchufe la unidad.
b. Gire el vaso hacia la derecha para ajustarlo en la base
7. Retire la base del vaso girándolo hacia la izquierda. Luego retire
cuidadosamente el montaje de cuchillas.
8. Coloque la tapa del vaso sobre el vaso y disfrute de sus deliciosas
bebidas en el camino.
CONSEJOS Y TRUCOS PARA LICUAR
• Corte los alimentos en trozos de no más de 3⁄4 pulgada antes de
introducirlos en la licuadora.
• A la hora de preparar alimentos con diferentes tipos de ingredientes,
vierta siempre los ingredientes líquidos en primer lugar.
• Cuando vaya a moler pan asegúrese de que la jarra esté completamente seca.
• Cuando utilice la función de pulso (PULSE), realice presiones breves.
Espere a que las cuchillas dejen de girar entre cada pulsación. No utilice
el modo de pulso (PULSE) durante más de 2 minutos.
• Utilice el botón Pulse High (pulso, velocidad alta) para triturar cubos de
hielo o cualquier ingrediente congelado. Para una trituración de hielo
eficiente, presione y suelte repetidamente el botón High Pulse y la tapa
conjuntamente.
• Se recomienda empezar el proceso de batido en la velocidad más baja
y, si fuera necesario, ir aumentado la velocidad de manera progresiva.
• Para detener la licuadora en cualquier momento, presione el botón de
apagado (OFF).
• No coloque el aparato sobre ni cerca de las hornillas de gas o eléctricas
ni adentro de un horno caliente
• No conserve alimentos en la jarra de la licuadora.
• No llene en exceso la licuadora (la licuadora es más eficaz mientras
menos alimentos contiene).
• No haga funcionar la licuadora durante más de 1 minuto y medio de
manera ininterrumpida; si fuera necesario, rebañe las paredes de la jarra
y siga batiendo.
• No utilice la licuadora si la jarra está rota o deteriorada.
• No es recomendado utilizar su licuadora para batir claras de huevo,
mezclar masa, hacer puré de papas ni para moler carnes.
• No golpee de manera suave o fuerte la base de la jarra/montaje de
cuchillas sobre el mostrador.
14
Page 15

NO INTRODUZCA NINGUNO DE ESTOS PRODUCTOS EN LA LICUADORA:
• Grandes trozos de alimentos congelados
• Alimentos excesivamente duros como nabos, boniatos o patatas en crudo
• Huesos
• Salami o chorizo curado
• Líquidos hirviendo (deje enfriar 5 minutos antes de verter en la jarra)
TABLA DE VELOCIDADES
VELOCIDAD
BAJA
ALTA
BAJA
PULSO
ALTA
PULSO
FUNCIÓN USO
Mezclar,
Batido de leche,
Limpieza fácil
Hacer puré,
Bebida helada,
Batido de frutas
Cortar en cubos/Picar,
Salsa,
Migas
Triturar hielo
Prepare salsas, y elimine grumos de salsas espesas
Licue batidos de leche y malteadas
Mezcle una gota de líquido de fregar con agua
caliente para limpiar rápidamente la licuadora
Haga puré de futas y vegetales
Licue bebidas congeladas
Prepare batidos de frutas
Pique frutas, vegetales y carnes cocinadas
Cree salsas
Prepare migas de pan, galleticas y cereal
Triture hielo y alimentos congelados
CUIDADO Y LIMPIEZA
Este producto no contiene piezas que deban ser reparadas por el usuario.
Para servicio, comuníquese con personal de servicio calificado.
LIMPIEZA:
1. Antes de limpiar, apague y desenchufe el aparato.
2. Alce la jarra por el asa para sacar de la base.
3. Retire la base de la jarra/montaje de cuchillas girándola hacia la izquierda
hasta que se afloje.
Precaución: Las cuchillas tienen filo. Manéjelas con cuidado.
4. Combine 1 taza de agua caliente y una gota de líquido de fregar en la
jarra licuadora. Tape y licue por unos 30 segundos mientras presiona
hacia abajo sobre la tapa unas pocas veces para limpiar el sellado y el
mecanismo.
5. Desensamble y las piezas removibles y lave a mano o en el lavaplatos.
Coloque la jarra en la rejilla inferior y el resto de las piezas solamente en la
rejilla superior.
Importante:
• No coloque las piezas de la jarra en líquidos que estén hirviendo.
• No sumerja la base en líquido. Limpie la base con un paño húmedo y
seque completamente.
15
Page 16

• Elimine manchas difíciles, restregando con un paño húmedo y un
limpiador no abrasivo.
Nota: No use estropajos ni limpiadores fuertes en las piezas o los acabados.
RECETAS
BATIDO DE FRUTAS CLÁSICO
Este batido, fácil de licuar, es una gran manera de refrescarse ¡a cualquier
hora del dia!
Ingredientes:
2 tazas de jugo de manzana
2 plátanos medianos, cortados a la mitad
2 tazas de fresas enteras, congeladas
Preparación:
Coloque todos los ingredientes en la jarra de la licuadora en el orden
mostrado. Tape y licúe en la velocidad alta (High) por 30 segundos o hasta
que la consistencia esté suave.
Prepara aproximadamente 3 tazas.
Consejo: Sustituya el jugo de manzana por jugo de naranja.
SALSA RÁPIDA Y FÁCIL
Esta salsa estilo restaurante, fácil y rápida de preparar es un gran sustituto
para Pico de Gallo fresco cuando los tomates no están en temporada. Sírvala
con sus papitas favoritas o como una cobertura para tacos.
Ingredientes:
2 latas (10 onzas) de tomates picados con chiles verdes
1
⁄2 cebolla pequeña, cortada en cuartos
1 pimiento jalapeño pequeño, sin semillas, vena removida
1 diente de ajo, pelado y machacado
1
⁄2 taza de cilantro, empacado suelto
1 cucharada de jugo de lima
1 cucharadita de azúcar
1
⁄2 cucharadita de comino
1
⁄2 cucharadita de sal
Preparación:
Coloque los ingredientes en la jarra, en el orden mostrado. Tape y pulse en la
función de picar a velocidad de pulso bajo (LOW PULSE) por 30 segundos
o hasta lograr la consistencia deseada. Para una tanda pequeña, reduzca la
receta a la mitad.
16
Page 17

PÓLIZA DE GARANTÍA
(Válida sólo para México)
Duración
Spectrum Brands de México, SA de CV garantiza este producto por 3 años a partir
de la fecha original de compra.
¿Qué cubre esta garantía?
• Esta Garantía cubre cualquier defecto que presenten las piezas, componentes y la
mano de obra contenidas en este producto.
• Requisitos para hacer válida la garantía
• Para reclamar su Garantía deberá presentar al Centro de Servicio Autorizado
la póliza sellada por el establecimiento en donde adquirió el producto. Si no la
tiene, podrá presentar el comprobante de compra original.
¿Donde hago válida la garantía?
• Llame sin costo al teléfono 01 800 714 2503, para ubicar el Centro de Servicio
Autorizado más cercano a su domicilio en donde usted podrá encontrar partes,
componentes, consumibles y accesorios.
Procedimiento para hacer válida la garantía
Acuda al Centro de Servicio Autorizado con el producto con la póliza de Garantía
sellada o el comprobante de compra original, ahí se reemplazará cualquier pieza
o componente defectuoso sin cargo alguno para el usuario final. Esta Garantía
incluye los gastos de transportación que se deriven de su cumplimiento.
Excepciones
Esta Garantía no será válida cuando el producto:
A) Se hubiese utilizado en condiciones distintas a las normales.
B) No hubiese sido operado de acuerdo con el instructivo de uso
que le acompaña.
C) Cuando el producto hubiese sido alterado o reparado por personas
no autorizadas por Spectrum Brands de México, SA de CV.
Nota:
Usted podra encontrar partes, componentes, consumibles y accesorios
en los centros de servicios autorizados. Esta garantía incluyen los gastos de
transportación que se deriven de sus cumplimiento dentro de sus red de servicio.
¿Existen exclusiones de garantía adicionales?
• Esta garantía no será válida donde exista oposición a EE.UU. y otras leyes
aplicables, o donde la garantía sería prohibida bajo cualquier sanción
económica, ley de control de exportación, embargo u otra medida comercial
impuesta por los Estados Unidos u otras jurisdicciones aplicables. Esto incluye,
sin limitación, cualquier reclamo de garantía que implique partes de, u de otro
modo localizadas en, Cuba, Irán, Corea del Norte, Siria y la región disputada
de Crimea.
17
Page 18

¿NECESITA AYUDA?
Para servicio, reparaciones o preguntas relacionadas al producto,
por favor llame al número del centro de servicio que se indica para
el país donde usted compró su producto. NO devuélva el producto al
fabricante. Llame o lleve el producto a un centro de servicio autorizado.
TRES AÑOS DE GARANTÍA LIMITADA
(No aplica en México, Estados Unidos y Canada)
¿Qué cubre la garantía?
• La garantía cubre cualquier defecto de materiales o de mano de obra que no
haya sido generado por el uso incorrecto del producto.
¿Por cuánto tiempo es válida la garantía?
• Por tres años a partir de la fecha original de compra mientras que tenga una
prueba de la compra.
¿Cómo se obtiene el servicio necesario?
• Conserve el recibo original como comprobante de la fecha de compra,
comuníquese con el centro de servicio de su país y haga efectiva su garantía
si cumple lo indicado en el manual de instrucciones.
¿Cómo se puede obtener servicio?
• Conserve el recibo original de compra.
• Por favor llame al número del centro de servicio autorizado.
¿Qué relación tiene la ley estatal con esta garantía?
• Esta garantía le otorga derechos legales específicos y el consumidor podría
tener otros derechos que varían de una región a otra.
¿Qué aspectos no cubre esta garantía?
• Los productos que han sido utilizados en condiciones distintas a las
normales.
• Los daños ocasionados por el mal uso, el abuso o negligencia.
• Los productos que han sido alterados de alguna manera.
• Los daños ocasionados por el uso comercial del producto.
• Los productos utilizados o reparados fuera del país original de compra.
• Las piezas de vidrio y demás accesorios empacados con el aparato.
• Los gastos de tramitación y embarque asociados al reemplazo del producto.
• Los daños y perjuicios indirectos o incidentales.
¿Existen exclusiones de garantía adicionales?
• Esta garantía no será válida donde exista oposición a EE.UU. y otras leyes
aplicables, o donde la garantía sería prohibida bajo cualquier sanción
económica, ley de control de exportación, embargo u otra medida comercial
impuesta por los Estados Unidos u otras jurisdicciones aplicables. Esto incluye,
sin limitación, cualquier reclamo de garantía que implique partes de, u de otro
modo localizadas en, Cuba, Irán, Corea del Norte, Siria y la región disputada
de Crimea.
18
Page 19

Por favor llame al número correspondiente que aparece en la lista a continuación
para solicitar que se haga efectiva la garantía y donde Ud. puede solicitar servicio,
reparaciones o partes en el país donde el producto fué comprado.
Argentina
Atención al consumidor
0800 444 7296
Horario de atención:
Lunes a viernes de 9 a 13 hs
y de 14.30 a 17 hs.
Mail: postventa@spectrumbrands.com
Bolivia
Atención al consumidor
La Paz: c. Villalobos N°100 esq.
Busch. Miraflores. Tel. (02) 2224924
Santa Cruz: Av. Paraguá C.
Socoris N°2415 (03) 3602002
Cochabamba: c. Uruguay N°211 esq.
Nataniel Aguirre (04) 4501894
Chile
Atención al consumidor
Inversiones la Mundial Ltda.
Dirección: Libertad 790,
Santiago de Chile.
Teléfonos: +56 226820217 – 226810032
Colombia
Spectrum Brands Corp, S.A.S.
Transversal 23 #97-73
Oficinas 403-404-405, Bogotá, Colombia
Línea Servicio al Cliente: 018000510012
Costa Rica
Aplicaciones Electromecanicas
Calle 22 y 24 en Avenida 3 BLV de la torre
Mercedes Benz
200 mts norte y 50 mts este
San José, Costa Rica
Tel. (506) 2257-5716
Ecuador
Servicio Master
Dirección: Capitán Rafael
Ramos OE 1-85 y Galo plaza lasso.
Tel (593) 2281-3882 / 2240-9870
El Salvador
Sedeblack
Calle San Antonio Abad, Colonia Lisboa
No 2936
San Salvador, Depto. de San Salvador
Tel. (503) 2284-8374
Guatemala
Kinal
17 avenida 26-75, zona 11 Centro
comercial Novicentro,
Local 37 - Ciudad
Guatemala
Tel. (502)-2476-7367
Honduras
Serviteca
San Pedro Sula, B Los Andes, 2 calle-entre
11-12 Avenida
Honduras
Tel. (504) 2550-1074
México
Articulo 123 # 95 Local 109 y 112
Col. Centro, Cuauhtemoc,
México, D.F.
Tel. 01 800 714 2503
Nicaragua
LRM ELECTRONICA
Managua - Sinsa Altamira 1.5
kilómetros al norte
Nicaragua
Tel. (505) 2270-2684
Panamá
Supermarcas
Centro comercial El dorado, Plaza
Dorado, Local 2.
Panama
Tel. (507) 392-6231
Perú
Servicio Central Fast Service
Av. Angamos Este 2431
San Borja, Lima Perú
Tel. (511) 2251 388
Puerto Rico
Buckeye Service
Jesús P. Piñero #1013
Puerto Nuevo, SJ PR 00920
Tel.: (787) 782-6175
Republica Dominicana
Prolongación Av. Rómulo
Betancourt
Zona Industrial de Herrera
Santo Domingo, República
Dominicana
Tel.: (809) 530-5409
Venezuela
Inversiones BDR CA
Av. Casanova C.C.
City Market Nivel Plaza Local 153
Diagonal Hotel Melia,
Caracas.
Tel. (582) 324-0969
19
Page 20

Sello del Distribuidor:
Fecha de compra:
Modelo:
COMERCIALIZADO POR:
SPECTRUM BR ANDS DE MEXICO, S.A. DE C.V.
Avenida 1° de Mayo No. 120 Piso 7, Oficina 702.
Colonia San Andres Atoto, C.P.53500 Naucalpan
de Juárez, Estado de México, México
Código de fecha / Date Code / Le code de date :
Tel. 01-800-714-2503
SERVICIO Y REPARACIÓN
Art. 123 No. 95 Col. Centro, C.P. 06050 Deleg.
Cuauhtemoc SERVICIO AL CONSUMIDOR,
VENTA DE REFACCIONES Y ACCESORIOS
120Vac 60Hz 3.3A Max.
Note: The maximum rating is based on the blending jar attachment, which draws the greatest load
(power or current). Other recommended attachments may draw significantly less power or current.
Nota: La clasificación máxima es basada en el accesorio de jarra licuadora, que extrae la mayor
cantidad de carga (de potencia o electricidad). Otros accesorios recomendados pueden extraer
considerablemente menos potencia o electricidad.
Comercializado por:
Spectrum Brands de México,
SA de C.V Avenida 1° de Mayo No. 120
Piso 7, Oficina 702.
Colonia San Andres Atoto,
C.P. 53500 Naucalpan de Juárez,
Estado de México, México
SERVICIO Y REPARACIÓN
Art. 123 No. 95 Col. Centro, C.P. 06050 Deleg.
Cuauhtemoc Servicio al Consumidor, Venta de
Refacciones y Accesorios 01 800 714 2503
Importado y Distribuido por:
SPECTRUM BR ANDS ARGENTINA S.R.L
Av. Del Libertador 6810,
piso 2 dpto. A
1429, CABA, Argentina
+ 54 11 5353-9500
CUIT: 30-70706168-1
Importador N° # 76983
IMPORTADO POR / IMPORTED BY:
AIDISA BOLIVIA S.A.
Av. Chacaltaya No. 2141- Zona
Achachicala La Paz, Bolivia.
01 800 714 2503
NIT 1020647023,
Resolución Ministerial 0661-12.
IMPORTADO POR / IMPORTED BY:
Inversiones la Mundial Ltda.
Rut: 78.146.900-9
Libertad 790, Santiago – Chile
Fono: (562) 26810217 info@ilm.cl
IMPORTADO POR / IMPORTED BY:
Spectrum Brands de México, SA de C.V
Avenida 1° de Mayo No. 120
Piso 7, Oficina 702. Colonia San Andres Atoto,
C.P. 53500 Naucalpan de Juárez, Estado de México,
México
Para atención de garantía marque:
01 (800) 714 2503
IMPORTADO POR / IMPORTED BY:
Spectrum Brands Corp, S.A.S.
Transversal 23 #97-73
Oficinas 403-404-405,
Bogotá, Colombia
Línea Servicio al Cliente:
018000510012
Teléfono (591)2- 2305353
At the end of this product’s life, you can mail it to Spectrum Brands at 507 Stokely Drive, Deforest, WI 53532
marked “Product Takeback: Please Recycle!"
Al final de la vida útil de este producto, puede enviarlo por correo a Spectrum Brands, 507 Stokely Drive,
Deforest, WI 53532 marcado “Product Takeback: Please Recycle!"
BLACK+DECKER and the BLACK+DECKER logos are trademarks of The Black & Decker Corporation, used under
license by Spectrum Brands, Inc. for its manufacturing and sale of this product. All rights reserved.
BLACK+DECKER y los logotipos BLACK+DECKER son marcas registradas de Black & Decker Corporation, utilizados por
Spectrum Brands, Inc. bajo su licencia para su manufactura y venta de este producto. Todos los derechos reservados.
© 2021 Spectrum Brands, Inc., Middleton, WI 53562 All Rights Reserved.
Made in China.
Fabricado en China.
20
T22-900229 6-A
28424 E /S
 Loading...