

Page 1
1
POLSKU
80
Cat. # BC6BDWE October 2015
Printed in China
ENGLISH 3
DEUTSCH 8
FRANÇAIS 14
ITALIANO 20
NEDERLANDS 26
ESPAÑOL 32
PORTUGUÊS 38
SVENSKA 44
NORSK 49
DANSK 54
SUOMI 60
ΕΛΛΗΝΙΚΗ
65
POLSKU 72
BC6BDWE_Manual_102815.indd 80-1 10/28/2015 11:15:08 AM
Page 2
ENGLISH
32
2
INSTRUCTION MANUAL
INTENDED USE
Your Black & Decker battery charger/maintainer is
designed to charge lead-acid batteries. This product is
intended for household, consumer use only.
SAFETY INSTRUCTIONS
IMPORTANT SPECIFICATION NOTE: Battery capacity:
lead acid type, maximum 12VDC, 120Ah.
Warning! When using appliances, basic safety
precautions, including the following, should always be
followed to reduce the risk of fire, leaking batteries,
personal injury and material damage.
• Read all of this manual carefully before using the
appliance.
• The intended use is described in this manual.
The use of any accessory or attachment or the
performance of any operation with this appliance
other than those recommended in this instruction
manual may present a risk of personal injury.
• Retain this manual for future reference.
Using your appliance
Always take care when using the appliance.
• This appliance is not intended for use by young or
infirm persons without supervision.
• The appliance is not to be used as a toy.
• Do not open body casing. There are no userserviceable parts inside.
• Do not operate the appliance in explosive
atmospheres, such as in the presence of flammable
liquids, gases or dust.
• To reduce the risk of damage to plugs and cords
never pull the cable to remove the plug from a
socket.
After use
• When not in use, the appliance should be stored in a
dry, well ventilated place out of the reach of children.
• Children should not have access to stored
appliances.
• When the appliance is stored or transported in a
vehicle it should be placed in the boot or restrained
to prevent movement following sudden changes in
speed or direction.
• The appliance should be protected from direct
sunlight, heat and moisture.
Inspection and repairs
• Before use, check the appliance for damaged or
defective parts. Check for breakage of parts, damage
to switches and any other conditions that may affect
its operation.
• Do not use the appliance if any part is damaged or
defective.
• Have any damaged or defective parts repaired or
replaced by the manufacturer.
• Never attempt to remove or replace any parts other
than those specified in this manual.
Power cord safety
Warning! Never alter the mains cord or plug. If it will
not fit, have a proper socket installed by a qualified
electrician. Improper connection may result in an
electric shock.
The following symbols are marked on
the appliance:
This tool is double insulated; therefore
no earth wire is required. Always check
that the power supply corresponds to
the voltage on the rating plate.
Read all of this instruction manual
carefully.
Electrical safety
Always check that the power supply corresponds to
the voltage on the rating plate.
• If the supply cord is damaged, it must be replaced
by the manufacturer in order to avoid a hazard.
• Warning! To avoid serious injury or death from
fire, explosion or electric shock: This device must
be connected to a Ground Fault Circuit Interrupt
(GFCI) protected AC outlet.
Specific safety instructions for battery
chargers
• Never attempt to charge non-rechargeable batteries.
• Have defective cords replaced immediately.
• Do not expose the battery charger to water.
• Do not open the battery charger.
• Do not probe the battery charger.
• Never allow the red and black clamps to touch each
other or another common metal conductor. This
could cause damage to the appliance and/or create a
spark/explosion hazard.
BATTERIES
Warning! Never attempt to charge a frozen battery.
• Under extreme conditions, battery leakage may
occur. When you notice liquid on the batteries,
carefully wipe the liquid off using a cloth. Avoid skin
contact.
• In case of skin or eye contact, follow the instructions
below.
– Warning! Battery fluid is a diluted sulphuric acid
and may cause personal injury or damage to
property. In case of skin contact, immediately rinse
with water. If redness, pain or irritation occurs seek
medical attention. In case of eye contact, rinse
immediately with clean water and seek immediate
medical attention.
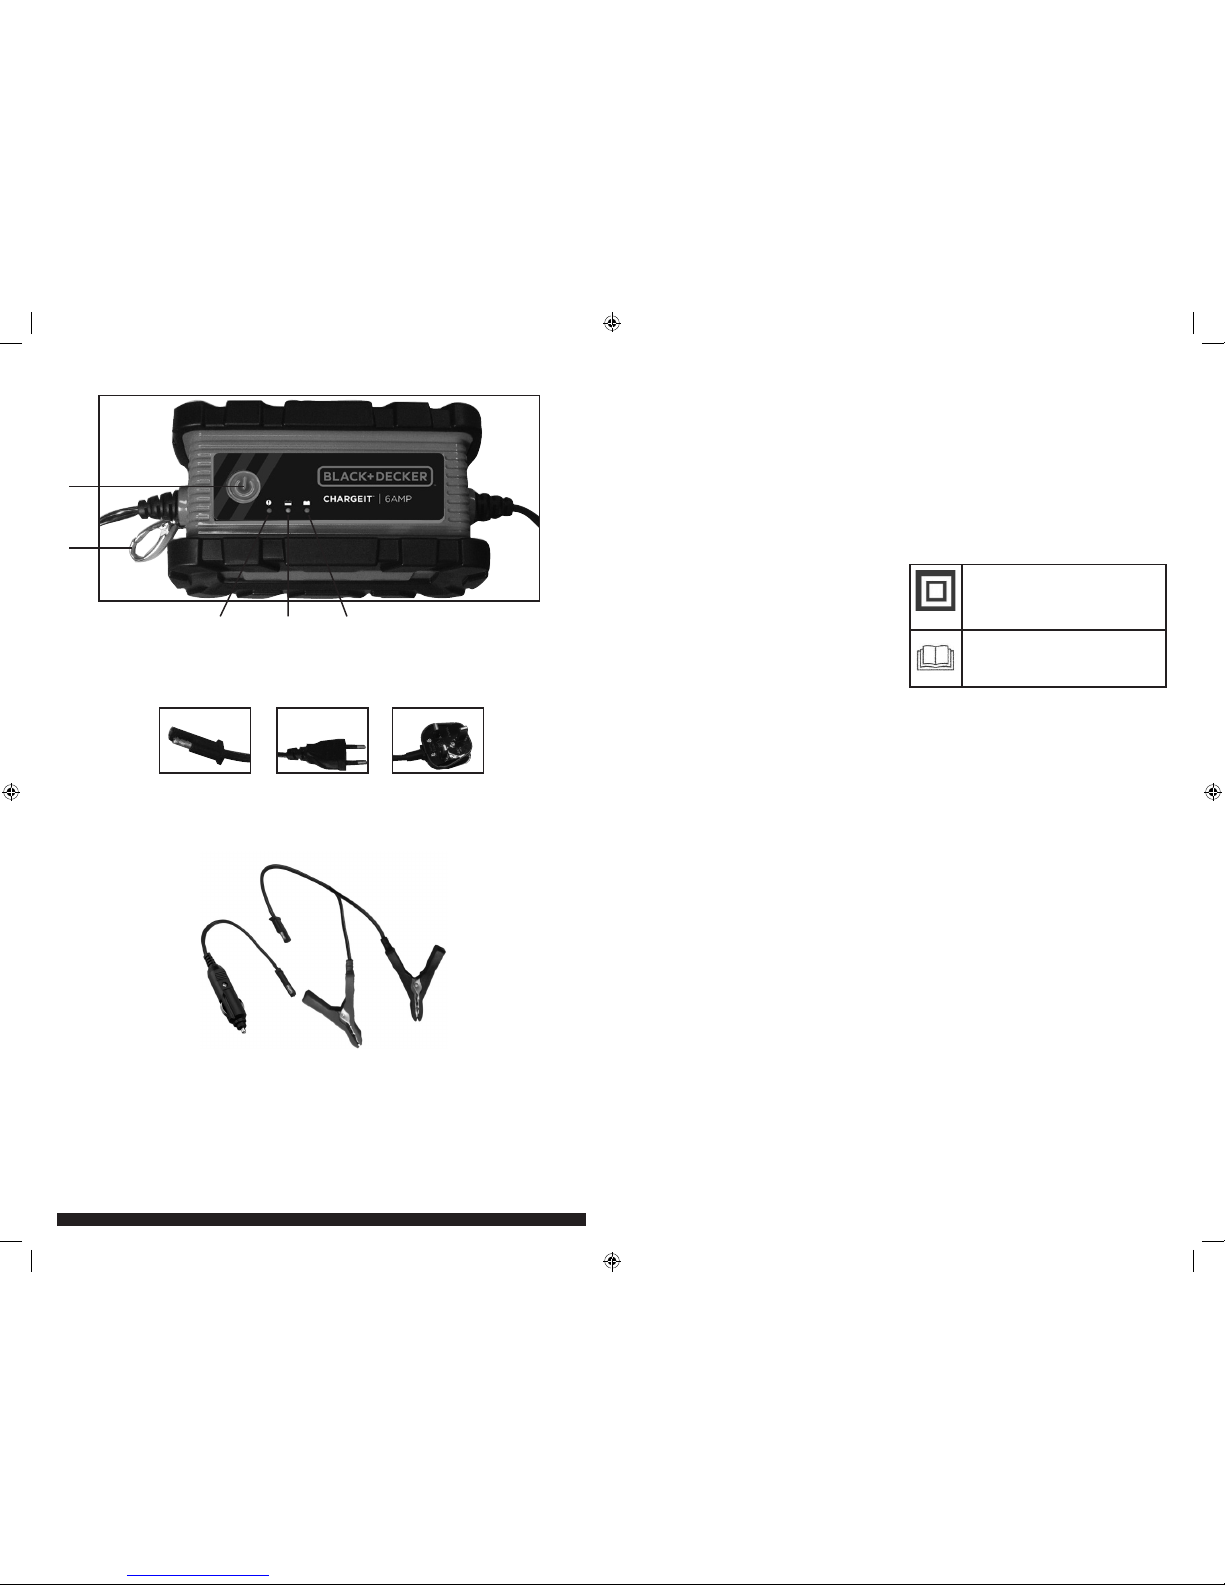
UK Model
76 7
9
8
1
3 4 5
2
BC6BDWE_Manual_102815.indd 2-3 10/28/2015 11:15:09 AM
Page 3

ENGLISH ENGLISH
4 5
• When disposing of batteries, follow the instructions
given in the section “Protecting the environment”.
• Add distilled water in each cell until the battery
acid reaches the level specified by the battery
manufacturer. This helps to purge excess gas from
the cells. Do not overfill. For a battery without
cell caps (maintenance free), carefully follow the
manufacturer’s charging instructions.
• Study all the battery manufacturer’s specific precautions,
such as removing or not removing cell caps while
charging, and the recommended charging rates.
• Make sure that the initial charging rate does not
exceed the battery manufacturer’s requirement.
• Warning! Risk of explosive gas mixtures. Working
in the vicinity of a lead-acid battery is dangerous.
Batteries generate explosive gases during normal
battery operation. For this reason, it is of utmost
importance that each time, before using your
battery charger, you read this manual and follow the
instructions exactly.
• Use of an attachment not recommended or sold by
Black & Decker may result in a risk of fire, electric
shock, or injury to persons.
• An extension cord should not be used unless
absolutely necessary. Use of an improper extension
cord could result in a risk of fire and electric shock,
and will void the warranty.
• IMPORTANT: This unit features an aluminum heat
sink, which is used for heat dissipation and is
located at the base of the unit. Never touch the
heat sink while the unit is operating and never
allow the bottom of the unit to contact flammable
materials while operating.
Dc accessory plug safety
• Warning! NEVER connect this unit to a positive
grounded vehicle by the dc accessory plug.
• Make sure that the vehicle’s accessory socket is
clean and free of debris before connecting the unit.
• Warning – risk of fire! If the vehicle accessory
socket fuse opens (blows) when plugging in this
battery charger, do not use this battery charger with
this vehicle accessory socket.
– Do not repeatedly replace the fuse.
– Do not replace the vehicle accessory socket fuse
with one of a higher amperage rating.
– Never attempt to patch the fuse with tin foil or wire.
Any of these actions may cause serious electrical
damage and/or a fire.
Specific safety instructions for using
the unit in wet environments
The housing of this unit is rated to IP67 dustproof and waterproof standards. However, it is
recommended that you observe the following:
• Never submerge the unit in water deeper than 1
meter, for time longer than 30 minutes and/or in
temperatures other than between 5ºC and 40ºC, or
the unit could sustain permanent damage.
• Never submerge the unit in water unless the bushing
(insulation) of the mains or dc cord is intact.
• Do not allow plug or clamps to be exposed to
the elements for long periods of time; and never
submerge them.
Personal safety
Wear complete eye protection and suitable clothing to
give protection from contact with battery fluid.
Avoid touching the eyes while working with a battery.
Acid, acid particles or corrosion may get into the eyes.
Remove personal metal items such as rings, bracelets,
necklaces and watches when working with a lead-acid
battery. A lead-acid battery can produce a short circuit
current high enough to cause a severe burn.
Be extra cautious to reduce the risk of dropping a
metal object onto the battery. This might cause sparks
or short-circuit the battery or other electrical part,
which can cause an explosion.
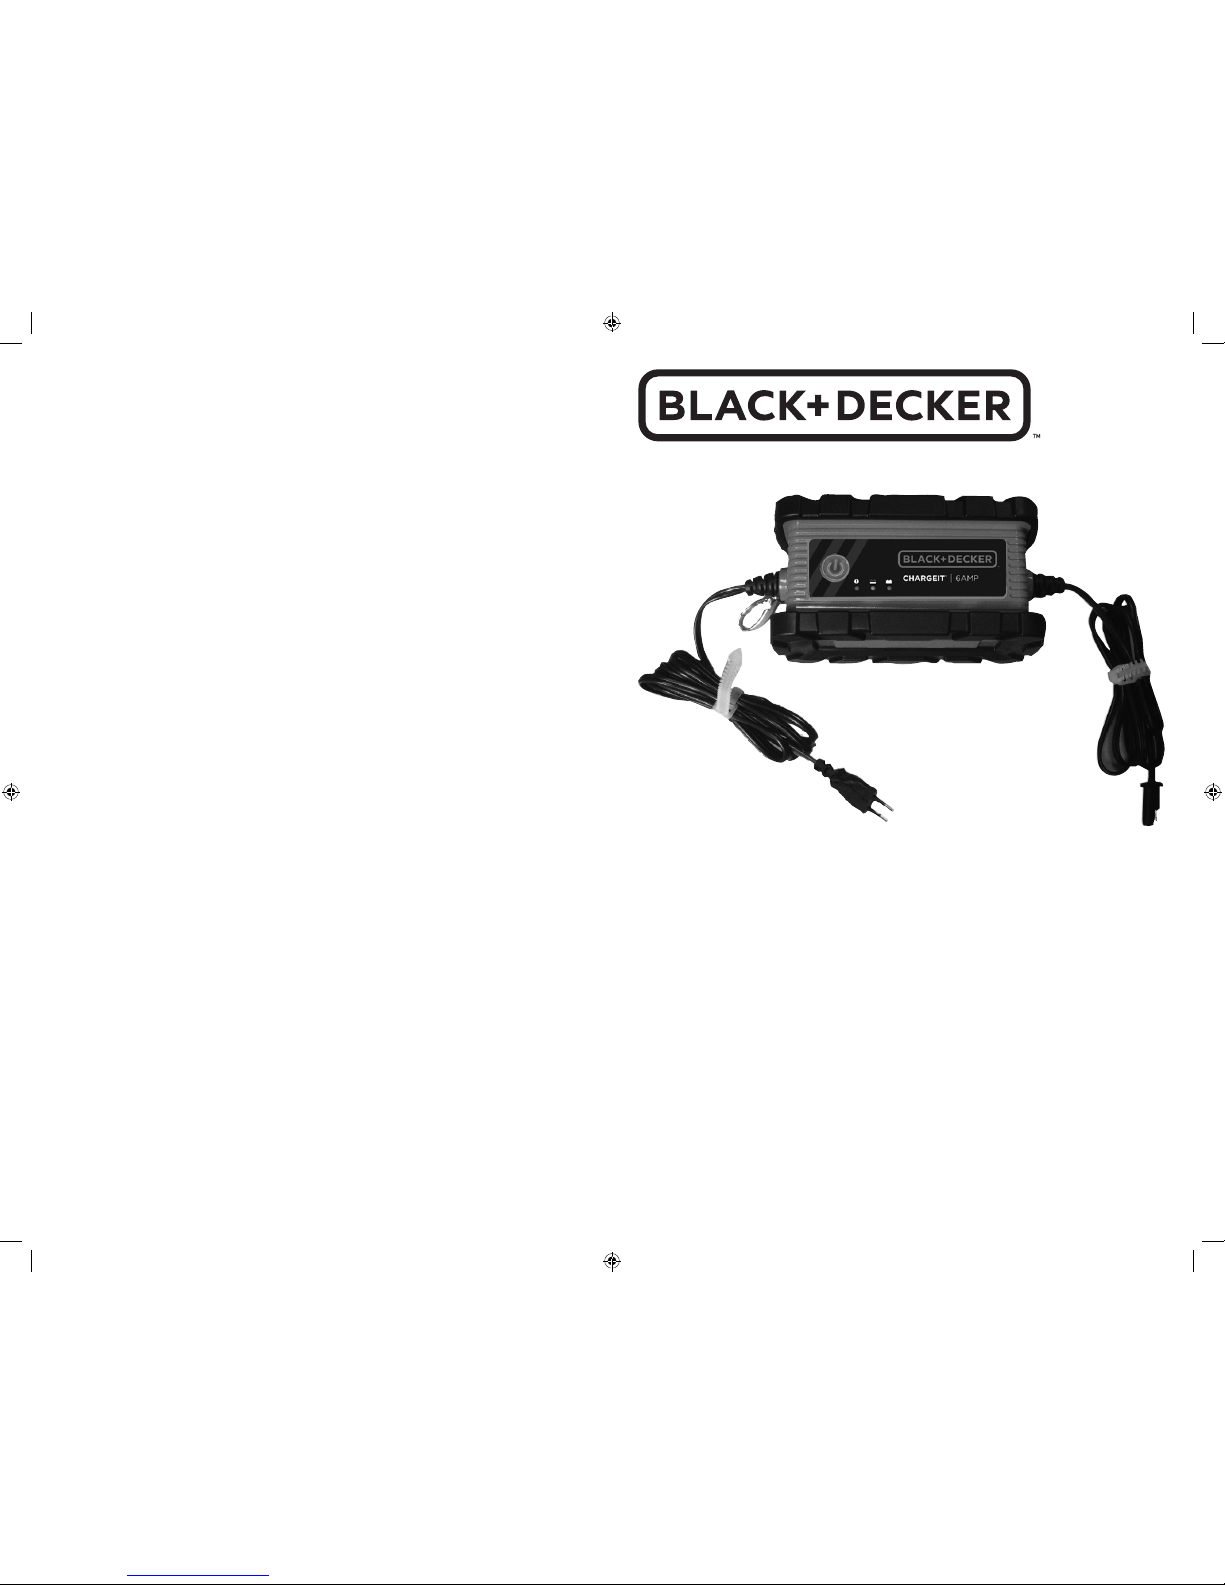
FEATURES
1. Power LED
2. Hanging hook
3. Reverse polarity LED
4. Battery charging LED
5. Charging complete LED
6. In-line connector
7. Mains plug
8. DC accessory plug
9. Battery clamps
PREPARATION BEFORE CHARGING
The appliance must only be connected to a 12V
lead-acid battery. Before charging, confirm that the
voltage of the battery is 12V by referring to the label
on the battery or from the information available
relating to its application e.g. car user manual.
Do not use the appliance for charging dry-cell batteries
that are commonly used with home appliances. These
batteries may burst and cause injury to persons and
damage to property.
Warning! Explosive gas may be vented from lead acid
batteries when charging. Make sure that the area is
well ventilated and remove any sources of ignition
when conducting charging procedures.
• Never place the battery charger directly above the
battery; gases from the battery will corrode and
damage the battery charger.
• Never allow battery acid to drip on the battery
charger.
• Position the battery charger as far away from the
battery as the leads will allow. The battery charger
contains switches that may create a spark.
• Do not set a battery on top of the charger.
• Explosive gases may collect near the ground. Locate
the battery charger as high as possible above ground
level.
• Do not use power tools in the charging area.
• Do not smoke or have a naked flame in the charging
area.
• Follow the instructions for connecting and
disconnecting the battery charger leads or battery
terminals.
Warning! A marine (boat) battery must be removed
and charged on shore. To charge it on board requires
equipment specially designed for marine use. This
appliance is NOT designed for such use.
Vehicles may have electrical and electronic systems
(e.g. engine management systems, mobile phones)
that may be damaged if subjected to high starting
voltages and voltage peaks. Before connecting the
appliance to the vehicle, read the vehicle’s owner’s
manual to confirm that external charging is allowed.
• Follow these instructions and those published by the
battery manufacturer and vehicle manufacturer.
• Only connect and disconnect the dc output clamps
after removing the supply cord from the electric
socket. Never allow clamps to touch each other.
• Check the polarity of the vehicle battery terminals
before connecting the appliance. Always disconnect
the negative (black) cable first: followed by the
positive (red) cable.
When charging a battery installed in the circuit follow
the manufacturers instructions for accessing the
battery and the following:
• Do not charge the battery while the engine is
operating.
• Be aware that engine components e.g. the coolant
fan may start automatically. Keep hands and body
away from engine components and position the
battery charger and cables to prevent contact.
• Make sure that the battery charger and the cables
are located to prevent damage from closure of doors
and engine compartment covers.
• Make sure that the connections can be made without
touching the metal body or components adjacent to
the battery.
• When using this appliance in proximity to the
vehicle’s battery and engine, stand the appliance on
a flat, stable surface and be sure to keep all clamps,
cords, clothing and body parts away from moving
parts of the vehicle.
• If it is necessary to remove the battery from the
vehicle to charge or to clean the terminals, make
sure that all accessories in the vehicle are switched
off, so as not to cause a spark.
• To reduce the risk of electric shock, disconnect the
appliance from any power source before attempting
maintenance or cleaning.
USE
When all the preparations for charging and personal
safety have been completed, proceed as follows:
• For most automotive and similar applications the
battery charger may be connected to the battery
while it is connected to the dc circuit. Follow the
instructions given in “Charging a battery installed in
the circuit”.
• If the battery must be disconnected from the circuit
before charging, follow the instructions given in
“Charging a battery disconnected from the circuit”.
Charging a battery installed in the
circuit
Warning! Incorrect connection, battery short circuit,
location of battery and location of the battery charger
may create a hazard. Make sure that adequate
preparation has been made before proceeding.
Warning! If the battery posts cannot be accessed or
the battery charger clamps will contact the bodywork
or components adjacent to the battery, the battery
must be removed before charging using the battery
clamps. Follow the manufacturer’s instructions to
remove the battery.
• Check the polarity of the battery posts. A positive
(POS, P, +) battery post usually has a larger diameter
than the negative (NEG, N, –) battery post.
• Follow the manufacturers’ instructions to remove any
insulating covers from the battery posts.
• Connect the positive (red) clamp from the battery
charger to the positive (POS, P, +) post of the
battery.
• Connect the negative (black) clamp from the battery
charger to the negative (NEG, N, –) post of the
battery or to the chassis.
When disconnecting the battery charger from the
battery, always:
• Unplug the battery charger.
• Remove the negative (black) clamp first.
• Remove the positive (red) clamp last.
• Refit any insulating covers to the battery posts.
Charging a battery disconnected from
the circuit
Warning! Incorrect connection, battery short circuit,
location of battery and location of the battery charger
may create a hazard. Make sure that adequate
preparation has been made before proceeding.
• If the battery is not already removed from the circuit,
follow the manufacturers’ instructions to remove the
battery before charging.
• Check the polarity of the battery posts. A positive
(POS,P, +) battery post usually has a larger diameter
than the negative (NEG, N, –) battery post.
• Connect the positive (red) clamp from the battery
charger to the positive (POS, P, +) post of the
battery.
BC6BDWE_Manual_102815.indd 4-5 10/28/2015 11:15:09 AM
Page 4

ENGLISH ENGLISH
6 7
• Connect the negative (black) clamp from the battery
charger to the negative (NEG, N, –) post of the
battery.
When disconnecting the battery charger from the
battery, always:
• Unplug the battery charger.
• Remove the negative (black) clamp first.
• Remove the positive (red) clamp last.
• Refit any insulating covers to the battery posts.
Connecting the appliance with the
battery clamps
Warning! Always disconnect the mains plug from the
mains socket before connecting or disconnecting the
appliance to or from the battery.
Warning! Never connect any of the accessory leads
together as this will cause a hazard. The accessory
leads should only ever be connected to the in-line
connector.
• Connect the battery clamps to the battery charger
with the in-line connector.
• The appliance’s output leads have colour-coded
battery clamps (red-positive and black-negative).
These connect directly to the corresponding
connectors on the battery terminals.
• Follow the steps outlined in the appropriate section
(“Charging a battery installed in the circuit” or
“Charging a battery disconnected from the circuit”).
• Insert the mains plug of the battery charger into a
mains socket.
Charging using the battery clamps
1. Set up the battery charger and connect to the
battery following the steps in the “Connecting the
appliance with the battery clamps” section.
2. Plug the battery charger’s power cord into an
mains socket. The power LED will light blue to
indicate that the charger is ready.
Note:
If the Power LED does not come on, check the
connection to the mains socket. Make sure the mains
socket is functional.
3. When the unit is properly connected and
charging, the battery charging LED ( ) will light
yellow to indicate the battery is charging.
Notes:
If the Charging LED did not come on, check the
connection to the battery. If the clamps are properly
connected, the battery may be in fault condition.
Manufacturer suggests to have the battery tested by a
qualified battery service technician.
If the clamps are incorrectly connected with regard to
polarity, the reverse polarity LED ( ) will light.
Unplug the charger; then remove the clamps.
Reconnect the clamps properly.
4. When the charging complete LED ( ) lights
green, the battery is fully charged.
When disconnecting the battery charger, disconnect
the mains cord, remove the clamp from the vehicle
chassis, and then remove the clamp from the battery
terminal.
Connecting the appliance with the dc
accessory plug
Warning! Always disconnect the mains plug from the
mains socket before connecting or disconnecting the
appliance to or from the battery.
Warning! Never connect any of the accessory leads
together as this will cause a hazard. The accessory
leads should only ever be connected to the in-line
connector.
• Connect the dc accessory plug to the battery charger
with the in-line connector.
• Insert the dc accessory plug into the vehicle’s dc
accessory socket.
• Insert the mains plug of the battery charger into an
mains socket.
Note:
Some vehicles require that the ignition be switched to the
accessory socket position in order to power the accessory
socket.
Charging using the dc accessory plug
Caution! To reduce the risk of property damage:
Make sure that the vehicle’s accessory socket is clean
and free of debris before connecting the unit.
1. Set up the battery charger and connect to the
battery following the steps in the “Connecting the
appliance with the dc accessory plug” section.
2. Plug the battery charger’s power cord into an
mains socket. The power LED will light blue to
indicate that the charger is ready.
Note:
If the Power LED does not come on, check the
connection to the mains socket. Make sure the mains
socket is functional.
3. When the unit is properly connected and
charging, the battery charging LED ( ) will light
yellow to indicate the battery is charging.
Notes:
If the Charging LED did not come on, check the
connection to the vehicle’s dc accessory socket.
Rotate the adapter slightly to make sure there is good
contact. If it is properly connected, the battery may be
in fault condition. Manufacturer suggests to have the
battery tested by a qualified battery service technician.
Some vehicles require that the ignition be turned
to the ACC (accessory) position to activate the dc
accessory socket. If your vehicle ignition is required to
be turned to the ACC position, be sure all the vehicle
accessories (i.e. heater, fan, radio, TV, lights... etc) are
turned off. If not turned off, the charger might not be
able to charge the battery.
4. When the charging complete LED ( ) lights, the
battery is fully charged.
When disconnecting the charger, disconnect the mains
cord, and then remove the 12 volt dc accessory plug
from the vehicle accessory socket.
Hanging the Battery Charger
The hanging hook allows you to position the battery
charger for convenient, hands-free operation.
Caution! To reduce the risk of property damage:
• When charger is hung by the hanging hook, do not
shake the charger or object that it is hanging from.
• Do not hang the charger from any electrical wires or
anything that it is not secure.
• Only use the hanging hook for hanging the charger.
The hanging hook is not intended to support
additional weight. Do not hang anything additional to
the hanging hook or risk of breakage may occur.
TROUBLESHOOTING
If the appliance is not charging:
• Check that the battery charger is properly connected
to a live 220-240V mains socket.
• Make sure the output connections are secured and
the polarity connection is correct when using the
battery clamps.
• If the voltage of the battery to be charged has fallen
below 2 volts, the battery cannot be charged with
this battery charger.
MAINTENANCE
Your Black & Decker tool has been designed to
operate over a long period of time with a minimum
of maintenance. Continuous satisfactory operation
depends upon proper tool care and regular cleaning.
Warning! Before performing any maintenance or
cleaning of the tool, unplug the unit from the power
supply.
• From time to time wipe the appliance with a damp
cloth. Do not use any abrasive or solvent-based
cleaner. Do not immerse the appliance in water.
Replacing the fuse in the dc accessory
plug
• Remove the grooved cap by turning it counter
clockwise.
• Remove the rubber washer, centre pin and the
spring.
• Remove the fuse.
• Fit a new fuse of the same type and size (8A).
• Install the centre pin, spring and rubber washer.
• Install the grooved cap by turning it clockwise onto
the plug.
PROTECTING THE ENVIRONMENT
Correct disposal of this product
This marking indicates that this product
should not be disposed with other
household wastes throughout the EU. To
prevent possible harm to the environment
or human health from uncontrolled
waste disposal, recycle it responsibly to promote the
sustainable reuse of material resources. To return
your used device, please use the return and collection
systems or contact the retailer where the product
was purchased. They can take this product for
environmentally safe recycling.
Separate collection of used products and packaging
allows materials to be recycled and used again.
Re-use of recycled materials helps prevent
environmental pollution and reduces the
demand for raw materials.
Local regulations may provide for separate collection
of electrical products from the household, at municipal
waste sites or by the retailer when you purchase a
new product.
TECHNICAL DATA
Input: 220-240V ac, 50/60 Htz,
0,6A
Output: 12V dc, 6A
GUARANTEE
Baccus World Wide LLC is confident of the quality
of its products and offers an outstanding guarantee.
This guarantee statement is in addition to and in no
way prejudices your statutory rights. The guarantee is
valid within the territories of the Member States of the
European Union and the European Free Trade Area.
If a Baccus World Wide LLC product becomes
defective due to faulty materials, workmanship or
lack of conformity, within 24 months from the date
of purchase, Baccus World Wide LLC guarantees to
replace defective parts, repair products subjected to
fair wear and tear or replace such products to make
sure of the minimum inconvenience to the customer
unless:
• the product has been used for trade, professional or
hire purposes;
• the product has been subjected to misuse or neglect;
• the product has sustained damage through foreign
objects, substances or accidents;
• repairs have been attempted by persons other than
Baccus World Wide LLC service staff.
To claim on the guarantee, you will need to submit
proof of purchase to Baccus World Wide LLC at the
address indicated in this manual.
Please visit our website www.baccusworldwide.com
to register your new Baccus World Wide LLC product
and to be kept up to date on new products and special
offers. Further information on the Baccus World Wide
LLC brand and our range of products is available at
www.baccusworldwide.com.
Baccus Worldwide LLC
Weena 290, 3012 NJ Rotterdam or
Postbus 819, 3000 AV Rotterdam
BC6BDWE_Manual_102815.indd 6-7 10/28/2015 11:15:10 AM
Page 5
DEUTSCH DEUTSCH
8 9
ANWEISUNGSHANDBUCH
BESTIMMUNGSGEMÄSSE
VERWENDUNG
Ihr Black & Decker Akku Ladegerät/Betreuer dient zum
Aufladen von Bleisäurebatterien. Dieses Gerät ist nicht
für den gewerblichen Einsatz vorgesehen.
SICHERHEITSHINWEISE
WICHTIGER HINWEIS ZUR SPEZIFIZIERUNG:
Batteriekapazität: Bleiakku, max. 12V DC, 120Ah.
Achtung! Bei der Verwendung von Geräten sollten
grundlegende Sicherheitsvorkehrungen, einschließlich
der folgenden. Dadurch verhindern Sie so weit
wie möglich das Entstehen von Bränden, das
Auslaufen von Batterien oder Akkus sowie Sach- und
Personenschäden.
• Lesen Sie diese Anleitung vollständig und
aufmerksam durch, bevor Sie das Gerät zum ersten
Mal verwenden.
• Der vorgesehene Verwendungszweck ist in dieser
Anleitung beschrieben. Bei Verwendung von Zubehör
oder Anbauteilen, die nicht in dieser Anleitung
empfohlen sind, sowie bei der Bedienung des
Geräts in Abweichung von den in dieser Anleitung
beschriebenen Verfahren besteht Verletzungsgefahr.
• Heben Sie diese Anleitung auf.
Verwendung des Geräts
• Verwenden Sie das Gerät stets mit Umsicht.
• Das Gerät ist nicht für die unbeaufsichtigte
Verwendung durch Kinder oder gebrechliche
Personen vorgesehen.
• Tauchen Sie das Gerät nicht in Wasser.
• Versuchen Sie nicht, das Gehäuse zu öffnen. Im
Inneren befinden sich keine zu wartenden Teile.
• Betreiben Sie das Gerät nicht in
explosionsgefährdeter Umgebung, in der sich
brennbare Flüssigkeiten, Gase oder Stäube befinden.
• Ziehen Sie niemals am Kabel, wenn Sie den Stecker
aus der Steckdose ziehen möchten. Kabel und
Stecker können sonst beschädigt werden.
Nach dem Gebrauch
• Bewahren Sie das Gerät bei Nichtgebrauch an
einem trockenen, gut belüfteten Ort außerhalb der
Reichweite von Kindern auf.
• Kinder sollten keinen Zugang zu aufbewahrten
Geräten haben.
• Wenn das Gerät in einem Fahrzeug transportiert
oder gelagert wird, bewahren Sie es im
Kofferraum oder einer geeigneten Ablage auf,
damit es bei plötzlichen Geschwindigkeits- oder
Richtungsänderungen nicht in Bewegung geraten
kann.
• Schützen Sie das Gerät vor direkter
Sonneneinstrahlung, Hitze und Feuchtigkeit.
Inspektion und Reparaturen
• Prüfen Sie das Gerät vor der Verwendung auf
beschädigte oder defekte Teile. Prüfen Sie, ob Teile
gebrochen sind, Schalter beschädigt sind oder ob
andere Bedingungen vorliegen, die die Funktion
beeinträchtigen könnten.
• Betreiben Sie das Gerät nicht, wenn ein Teil
beschädigt oder defekt ist.
• Lassen Sie beschädigte oder defekte Teile zu
reparieren oder durch den Hersteller ersetzt.
• Ersetzen oder entfernen Sie keine Teile, für die in
dieser Anleitung keine entsprechende Beschreibung
enthalten ist.
Sichere Verwendung des Netzkabels
Achtung! Nehmen Sie keine Veränderungen an Kabel
oder Stecker vor. Wenn der Stecker nicht passt,
wenden Sie sich an eine qualifizierte Fachkraft.
Bei falschem Anschließen besteht die Gefahr eines
elektrischen Schlages.
Am Gerät sind die folgenden Symbole
angebracht:
Dieses Gerät ist schutzisoliert, daher ist
keine Erdleitung erforderlich. Überprüfen
Sie immer, ob die Netzspannung der
auf dem Typenschild des Gerätes
angegebenen Spannung entspricht.
Lesen Sie diese Anleitung vollständig
und aufmerksam durch.
Elektrische Sicherheit
Überprüfen Sie immer, ob die Netzspannung der auf
dem Typenschild des Gerätes angegebenen Spannung
entspricht.
• Wenn das Netzkabel beschädigt ist, muss es
vom Hersteller ersetzt werden, um Gefahren zu
vermeiden.
• Warnung! Um schwere oder tödliche Verletzungen
durch Brand, Explosion oder Stromschlag zu
vermeiden: Dieses Gerät muss angeschlossen
werden um eine Masse Störung Stromkreis
unterbrechen (FI-Schalter) geschützt Netzsteckdose.
Spezielle Sicherheitshinweise für
Ladegeräte
• Versuchen Sie keinesfalls, nicht aufladbare Batterien
zu laden.
• Lassen Sie beschädigte Kabel sofort austauschen.
• Achten Sie darauf, dass das Ladegerät nicht mit
Wasser in Berührung kommt.
• Versuchen Sie nicht, das Ladegerät zu öffnen.
• Nehmen Sie am Ladegerät keine Veränderungen
vor.
• Niemals zulassen die roten und schwarzen Klemmen
einander oder einen anderen gemeinsamen
metallischen Leiter zu berühren. Dies könnte zu
Schäden am Gerät und / oder erstellen Sie einen
Funken / Explosionsgefahr.
BATTERIEN
Achtung! Versuchen Sie keinesfalls, eine gefrorene
Batterie aufzuladen.
• Unter extremen Bedingungen können Batterien
undicht werden. Wenn Sie feststellen, dass aus
der Batterie Flüssigkeit austritt, wischen Sie diese
vorsichtig mit einem Tuch ab. Vermeiden Sie
Hautkontakt.
• Beachten Sie nach Haut- oder Augenkontakt die
folgenden Hinweise.
– Achtung! Batterieflüssigkeit ist verdünnte
Schwefelsäure und kann Sach- oder
Personenschäden verursachen. Spülen Sie die
Säure nach Hautkontakt reichlich mit Wasser ab.
Wenn sich auf der Haut Rötungen, Reizungen oder
andere Irritationen zeigen, suchen Sie einen Arzt
auf. Nach Augenkontakt spülen Sie das Auge sofort
reichlich mit sauberem Wasser ab und suchen Sie
umgehend einen Arzt auf.
• Bei der Entsorgung von Batterien die Hinweise im
Abschnitt „Umweltschutz“ beachten.
• Füllen Sie in jede Zelle destilliertes Wasser ein,
bis die Batterieflüssigkeit den vom Hersteller
angegebenen Pegel erreicht. Dadurch wird
überschüssiges Gas aus den Zellen entfernt. Füllen
Sie das Wasser nicht bis zum Überlaufen ein. Ist
kein Zugang zu den Zellen möglich (wartungsfreie
Batterie), beachten Sie die Aufladeanleitung des
Herstellers.
• Beachten Sie die empfohlene Ladestromstärke
und die spezifischen Sicherheitshinweise des
Batterieherstellers. Diese geben beispielsweise
an, ob die Abdeckung der Zellen beim Aufladen
abgenommen werden soll.
• Stellen Sie sicher, dass der Anfangsladestrom
nicht den vom Batteriehersteller angegebenen Wert
übersteigt.
• Achtung! Risiko explosiver Gasmischungen. Das
Arbeiten in der Nähe von Bleisäurebatterien ist
gefährlich. Bei normalem Betrieb der Batterien
können explosive Gase entstehen. Lesen Sie daher
unbedingt vor dem Gebrauch des Ladegeräts die
vorliegende Bedienungsanleitung, und befolgen Sie
alle Hinweise genau.
• Die Verwendung von Zubehörteilen, die nicht
von Black & Decker empfohlen oder verkauft
werden, kann zu Brand, elektrischen Schlägen oder
Verletzungen führen.
• Ein Verlängerungskabel sollte nur verwendet werden,
wenn dies unbedingt nötig ist. Die Verwendung
eines ungeeigneten Verlängerungskabels kann Brand
und elektrische Schläge verursachen und führt zum
Erlöschen der Garantie.
• WICHTIG: Dieses Gerät verfügt über einen
Aluminium Kühlkörper, die für die Wärmeabgabe
daß befindet sich an der Unterseite des Geräts.
Berühren Sie niemals die Kühlkörper während
die Einheit in Betrieb ist und nie erlauben die
Unterseite des Geräts zu kommen in Kontakt mit
brennbaren Materialien während des Betriebs.
Fahrzeug Adapter Stecker Sicherheit
• Warnung! Schließen Sie NIEMALS diese Einheit
zu einem positiven geerdet Fahrzeug durch das
Fahrzeug adapter stecken.
• Sicherstellen, dass das Fahrzeug Zubehörsteckdose
ist sauber und frei von Schmutz vor dem
Anschließen des Gerätes.
• Warnung – Brandgefahr! Wenn die
Fahrzeugzubehörsteckdose Sicherung öffnet
(Schläge), wenn Sie in diesem Ladegerät stecken,
nicht verwenden dieses Ladegerät mit diesem
Fahrzeugzubehörsteckdose.
– Sie ersetzen Sie die Sicherung nicht wiederholt.
– Nicht ersetzen Sie keine das Fahrzeug Sicherung
Zubehörsteckdose mit eine von einer höheren
Amperezahl.
– Niemals versuchen, patch die Sicherung mit
Alufolie oder Kabel.
Von jeder dieser Aktionen kann dazu führen,
schwere elektrische Schäden und/oder eines
Feuers.
Spezifische Sicherheitshinweise für
Verwendung des Gerätes in nassen
Umgebungen
Das Gehäuse des Geräts wird bewertet Schutzart
IP 67 staub- und wasserdicht standards. Es wird
jedoch empfohlen, dass Sie die folgenden Hinweise
beachten:
• Niemals in Flüssigkeit eintauchen das Gerät in
Wasser das tiefer als 1 Meter, für mehr als 30
Minuten und/oder anderen als zwischen 5 ºC und 40
ºC Temperaturen, oder das Gerät aufrechterhalten
kann dauerhafte Schäden.
• Niemals eintauchen das Gerät in Wasser es sei
denn die Buchse (Isolierung) der AC- oder DC-Kabel
intakt ist.
• Niemals lassen die Stecker oder Batterieklemmen zu
sein ausgesetzt werden den Elementen über längere
Zeit; und niemals in Flüssigkeit eintauchen.
Sicherheit von Personen
Tragen Sie einen vollständigen Augenschutz und
geeignete Arbeitskleidung, um Kontakt mit der
Batterieflüssigkeit zu vermeiden.
BC6BDWE_Manual_102815.indd 8-9 10/28/2015 11:15:10 AM
Page 6

DEUTSCH DEUTSCH
10 11
Während der Arbeit mit einer Batterie sollten Sie
nicht Ihre Augen berühren. Dadurch können Säure,
Säurepartikel oder korrodiertes Material in die Augen
gelangen.
Tragen Sie bei der Arbeit mit Bleisäurebatterien
keinen Metallschmuck wie Ringe, Armbänder,
Halsketten oder Uhren. Bleisäurebatterien können
einen Kurzschlussstrom produzieren, der zu schweren
Verbrennungen führt.
Achten Sie besonders darauf, dass keine
Metallgegenstände auf die Batterie fallen. In diesem
Fall besteht Explosionsgefahr durch Funkenbildung
oder Kurzschluss.
MERKMALE
1. Betriebs-LED
2. Aufhängehaken
3. Umgekehrte Polarität-LED
4. Batterie wird lade-LED
5. Ladevorgang abgeschlossen-LED
6. Verbindungsstecker
7. AC-Netzstecker
8. DC Zubehör Stecker
9. Batterieklemmen
VORBEREITUNG VOR DEM
AUFLADEN
Das Gerät darf nur an 12-V-Bleisäurebatterien
angeschlossen werden. Überprüfen Sie vor dem
Aufladen, ob die Spannung der Batterie 12 V
beträgt. Diese Information finden Sie auf der
Batterie selbst oder in der Dokumentation zu dem
entsprechenden Gerät (z. B. Fahrzeughandbuch).
Laden Sie mit dem Gerät keine Trockenbatterien auf,
die vielfach in Haushaltsgeräten eingesetzt werden.
Diese Batterien können platzen und Sachschäden
sowie Verletzungen verursachen.
Achtung! Aus Bleisäurebatterien kann beim
Aufladen explosives Gas entweichen. Sorgen Sie bei
Aufladevorgängen für ausreichende Belüftung, und
entfernen Sie mögliche Zündquellen.
• Nicht platzieren Sie das Ladegerät an der Oberseite
der Batterie; Gase aus der Batterie wird korrodieren
und Beschädigung Ladegerät.
• Niemals zulassen Batteriesäure zu tropfen auf das
Ladegerät.
• Stellen Sie das Ladegerät so weit wie möglich von
der Batterie entfernt auf. Das Ladegerät enthält
Schalter, die Funken erzeugen können.
• Eine Batterie auf der Oberseite des Ladegeräts nicht
festlegen.
• Explosive Gase können sich in Bodennähe
ansammeln. Stellen Sie das Ladegerät so hoch wie
möglich über dem Boden auf.
• Keine elektrischen Werkzeuge verwenden in der Nähe
von Aufladen.
• Vermeiden Sie offenes Feuer im Aufladebereich, und
rauchen Sie nicht.
• Befolgen Sie die Anleitung zum Anschließen und
Trennen der Ladegerätkabel und Batteriekontakte.
Achtung! Batterien von Schiffen und Booten müssen
ausgebaut und an Land geladen werden. Das Laden
an Bord ist nur mit speziell dafür entwickelten Geräten
möglich. Dieses Gerät ist NICHT für einen solchen
Gebrauch vorgesehen.
Kraftfahrzeuge können mit elektrischen und
elektronischen Systemen ausgestattet sein, etwa
mit Motorsteuerungssystemen oder Mobiltelefonen,
die durch hohe Anlassspannungen und
Spannungsspitzen beschädigt werden können. Bevor
Sie das Gerät am Fahrzeug anschließen, lesen Sie
deshalb in der Betriebsanleitung nach, ob externes
Aufladen zulässig ist.
• Befolgen Sie diese Bedienungsanleitung sowie
die Anleitungen des Batterieherstellers und des
Fahrzeugherstellers.
• Ziehen Sie das Netzkabel aus die Klemmen, bevor
Sie die Klemmen anschließen oder trennen. Die
Klemmen dürfen sich niemals berühren.
• Überprüfen Sie die Polarität der FahrzeugbatterieAnschlüsse, bevor Sie das Gerät anschließen.
Trennen Sie immer zuerst das Minus-Kabel
(schwarz), dann das Plus-Kabel (rot).
Beachten Sie beim Aufladen einer eingebauten, mit
dem Stromkreis verbundenen Batterie die Anleitung
des Herstellers sowie folgende Hinweise:
• Laden Sie die Batterie nicht bei laufendem Motor auf.
• Beachten Sie, dass bestimmte Motorkomponenten
(z. B. Kühlventilator) möglicherweise automatisch
gestartet werden. Halten Sie Hände und Körper
von den Motorkomponenten fern, und bringen
Sie das Ladegerät und die Kabel so an, dass kein
gegenseitiger Kontakt entsteht.
• Bringen Sie das Ladegerät und die Kabel so an, dass
diese nicht durch das Schließen von Türen oder
Abdeckungen von Motorteilen beschädigt werden
können.
• Stellen Sie sicher, dass ein Anschließen des Geräts
möglich ist, ohne das Metallgehäuse oder anliegende
Metallkomponenten zu berühren.
• Wenn dieses Gerät in der Nähe der Fahrzeugbatterie
und des Fahrzeugmotors verwendet wird, achten
Sie darauf, dass das Gerät auf einer ebenen und
ausreichend stabilen Unterlage steht. Achten Sie
außerdem darauf, dass keine Klemmen, Kabel,
Kleidungsstücke und Körperteile in die Nähe von
bewegten Fahrzeugteilen geraten.
• Wenn die Batterie zum Aufladen oder zum Reinigen
der Kontakte aus dem Fahrzeug ausgebaut werden
muss, vergewissern Sie sich, dass alle Zubehörteile
im Fahrzeug ausgeschaltet sind, um Funkenbildung
zu verhindern.
• Trennen Sie das Gerät von der Stromversorgung,
bevor Sie Wartungs- oder Reinigungsarbeiten
durchführen. Andernfalls besteht Stromschlaggefahr.
GEBRAUCH
Gehen Sie nach Abschluss der Vorbereitungs- und
Sicherheitsmaßnahmen wie folgt vor:
• Bei den meisten Fahrzeugen und ähnlichen
Anwendungen kann das Ladegerät an die Batterie
angeschlossen werden, während diese mit dem
Gleichstromkreis verbunden ist. Beachten Sie in
diesem Fall die Anleitung unter „Aufladen einer
eingebauten Batterie“.
• Wenn die Batterie vor dem Aufladen vom
Stromkreis getrennt werden muss, befolgen Sie die
Anweisungen unter „Aufladen einer ausgebauten
Batterie“.
Aufladen einer Batterie im Schaltung
Achtung! Falsches Anschließen, ein
Batteriekurzschluss, die Position der Batterie
und die Position des Ladegeräts sind potenzielle
Gefahrenquellen. Stellen Sie sicher, dass alle
Vorbereitungen ordnungsgemäß getroffen wurden.
Achtung! Wenn die Batteriekontakte schwer
zugänglich sind oder die Klemmen des Ladegeräts
mit anliegenden Komponenten in Berührung kommen,
muss die Batterie vor dem Aufladen ausgebaut
werden mit den Batterieklemmen. Beachten Sie die
Herstelleranleitung zum Ausbauen der Batterie.
• Überprüfen Sie die Polarität der Batteriekontakte. Der
positive (POS, P, +) Batteriekontakt hat meist einen
größeren Durchmesser als der negative (NEG, N, –)
Kontakt.
• Nehmen Sie Isolierabdeckungen gemäß
den Anweisungen des Herstellers von den
Batteriekontakten ab.
• Schließen Sie die positive (rote) Klemm des
Ladegeräts an den positiven (POS, P, +)
Batteriekontakt an.
• Schließen Sie die negative (schwarze) Klemm
des Ladegeräts an den negativen (NEG, N, –)
Batteriekontakt an oder mit dem Chassis.
Führen Sie zum Trennen des Ladegeräts von der
Batterie immer folgende Schritte aus:
• Ziehen Sie den Netzstecker.
• Nehmen Sie zuerst die negative (schwarze) Klemme ab.
• Nehmen Sie danach die positive (rote) Klemme ab.
• Bringen Sie die Isolierabdeckungen wieder an den
Batteriekontakten an.
Aufladen einer Batterie dass ist nicht
angeschlossen aus der Schaltung
Achtung! Falsches Anschließen, ein
Batteriekurzschluss, die Position der Batterie
und die Position des Ladegeräts sind potenzielle
Gefahrenquellen. Stellen Sie sicher, dass alle
Vorbereitungen ordnungsgemäß getroffen wurden.
• Wenn die Batterie noch eingebaut ist, befolgen Sie
die Anweisungen des Herstellers zum Ausbauen der
Batterie vor dem Aufladen.
• Überprüfen Sie die Polarität der Batteriekontakte. Der
positive (POS, P, +) Batteriekontakt hat meist einen
größeren Durchmesser als der negative (NEG, N, –)
Kontakt.
• Schließen Sie die positive (rote) Klemme
des Ladegeräts an den positiven (POS, P, +)
Batteriekontakt an.
• Schließen Sie die negative (schwarze) Klemme
des Ladegeräts an den negativen (NEG, N, –)
Batteriekontakt an.
Führen Sie zum Trennen des Ladegeräts von der
Batterie immer folgende Schritte aus:
• Ziehen Sie den Netzstecker.
• Nehmen Sie zuerst die negative (schwarze) Klemm ab.
• Nehmen Sie danach die positive (rote) Klemm ab.
• Bringen Sie die Isolierabdeckungen wieder an den
Batteriekontakten an.
Anschließen des Geräts mit den
Batterieklemmen
Achtung! Ziehen Sie immer den Netzstecker, bevor
Sie das Gerät an die Batterie anschließen oder von der
Batterie trennen.
Achtung! Schließen Sie niemals eine der Zubehör führt
zusammen, da dies eine Gefahr verursachen. Das
Zubehör führt sollte sich immer nur auf die in-lineAnschluss angeschlossen werden.
• Verbinden Sie die Batterieklemmen über den
Verbindungsstecker mit dem Ladegerät.
• Die Batterieklemmen sind farblich gekennzeichnet
(rot = positiv, schwarz = negativ). Diese werden
direkt an die entsprechenden Batteriekontakte
angeschlossen.
• Befolgen Sie die Schritte im entsprechenden
Abschnitt („Aufladen einer Batterie im Schaltung”
oder „Aufladen einer Batterie dass ist nicht
angeschlossen aus der Schaltung”).
• Stecken Sie den Netzstecker des Ladegeräts in eine
Steckdose.
Laden der Batterie mit den
Batterieklemmen
1. Richten Sie das Ladegerät und an die
Batterie anschließen folgenden Schritte
in der „Anschließen des Geräts mit den
Batterieklemmen“ abschnitt.
2. Schließen Sie das Ladegerät Netzkabel an
eine Netzsteckdose anschließen. Die LEDBetriebsanzeige leuchtet blau, um anzuzeigen,
dass das Ladegerät ist nun betriebsbereit.
BC6BDWE_Manual_102815.indd 10-11 10/28/2015 11:15:10 AM
Page 7

DEUTSCH DEUTSCH
12 13
Hinweis:
Wenn die LED-Betriebsanzeige leuchtet
nicht auf, überprüfen Sie die Verbindung
mit der Netzsteckdose. Stellen Sie sicher,
dass die Steckdose funktioniert.
3. Wenn das Gerät richtig angeschlossen ist und der
Akku geladen wird, die Batterie wird lade-LED ( )
leuchtet gelb, um zeigen die Batterie geladen wird.
Hinweis:
Wenn die Batterie wird lade-LED nicht
aufleuchtet, prüfen Sie den Anschluss
an die Batterie. Wenn die Klammern
korrekt angeschlossen sind, ist der Akku
möglicherweise im Fehlerbedingung.
Der Hersteller legt nahe, dass der
Akku von einem qualifizierten Batterie
Servicetechniker überprüft werden.
Wenn die Schellen sind falsch verbunden
hinsichtlich die Polarität, dann die
umgekehrte Polarität-LED ( ) leuchtet
auf. Trennen Sie das Ladegerät, und Sie
trennen Sie die Klemmen. Wieder
anschließen Klemmen ordnungsgemäß
funktioniert.
4. Wann der ladevorgang abgeschlossen-LED ( )
leuchtet grün, ist der Akku voll aufgeladen.
Beim Abklemmen der Batterie Ladegerät, trennen
Sie das netzkabel, entfernen Sie die Klemme vom
Fahrgestell, und entfernen Sie dann die Klemme von
der Batterie.
Anschließen des Geräts mit dem DC
Zubehör Stecker
Achtung! Ziehen Sie immer den Netzstecker, bevor
Sie das Gerät an die Batterie anschließen oder von der
Batterie trennen.
Achtung! Schließen Sie niemals eine der Zubehör führt
zusammen, da dies eine Gefahr verursachen. Das
Zubehör führt sollte sich immer nur auf die in-lineAnschluss angeschlossen werden.
• Verbinden Sie den DC-Stecker über den
Verbindungsstecker mit dem Ladegerät.
• Stecken Sie den DC-Stecker in die
Zigarettenanzünderbuchse des Fahrzeugs.
• Stecken Sie den Netzstecker des Ladegeräts in eine
Steckdose.
Hinweis:
Einige Fahrzeuge erfordern, dass die
Zündung, um das Zubehör-Buchse
geschaltet werden, um Strom zu den
Zubehöranschluss.
Laden der Batterie mit dem DC
Zubehör Stecker
Achtung! Zur Verringerung der Gefahr von
Sachschäden: Stellen Sie sicher, dass die Steckdose
ist sauber und frei von Ablagerungen vor dem
Anschluss des Gerätes.
1. Richten Sie das Ladegerät und an die
Batterie anschließen folgenden Schritte in der
„Anschließen des Geräts mit dem DC Zubehör
Stecker“ abschnitt.
2. Schließen Sie das Ladegerät Netzkabel an
eine Netzsteckdose anschließen. Die LEDBetriebsanzeige leuchtet blau, um anzuzeigen,
dass das Ladegerät ist nun betriebsbereit.
Hinweis:
Wenn die LED-Betriebsanzeige leuchtet
nicht auf, überprüfen Sie die Verbindung
mit der Netzsteckdose. Stellen Sie sicher,
dass die Steckdose funktioniert.
3. Wenn das Gerät richtig angeschlossen ist und der
Akku geladen wird, die Batterie wird lade-LED ( )
leuchtet gelb, um zeigen die Batterie geladen wird.
Hinweise:
Wenn die Batterie wird lade-LED
nicht aufleuchtet, überprüfen Sie die
Verbindung zum Fahrzeug DC-Steckdose
für Zubehör. Rotieren Sie den Adapter
ein wenig zu vergewissern, es gibt guten
Kontakt. Wenn es korrekt angeschlossen
ist, ist die der Akku möglicherweise
im Fehlerbedingung. Der Hersteller
legt nahe, dass der Akku von einem
qualifizierten Batterie Servicetechniker
überprüft werden.
Bei einigen Fahrzeugen ist es erforderlich
dass die Zündung ist in der (Zubehör)
“ACC” Stellung schalten zur Aktivierung
der DC-Steckdose für Zubehör. Wenn
Ihr Fahrzeug Zündung ist erforderlich
um zu die ACC-Stellung gedreht werden,
stellen sie sicher alle Auto-Teile (dh
Heizung, Gebläse, Radio, TV, Lampen
... usw.) ausgeschaltet sind. Wenn
nicht abgeschaltet, das Ladegerät
möglicherweise nicht in der Lage, um die
Batterie zu laden.
4. Wann der ladevorgang abgeschlossen-LED ( )
leuchtet grün, ist der Akku voll aufgeladen.
Beim Abklemmen der Batterie Ladegerät, trennen Sie
das netzkabel, und entfernen Sie dann die DC Zubehör
Stecker.
Hängende des Ladegeräts
Der Aufhängehaken erlaubt es Ihnen, zu positionieren
das Ladegerät für die komfortable, freihändige
Bedienung.
Achtung! Zur Verringerung der Gefahr von
Sachschäden:
• Wann das Ladegerät suspendiert ist auf der
Aufhängehaken, nicht schütteln Sie das Ladegerät,
oder das Objekt es wird hängenden auf.
• Nie hängen das Ladegerät auf elektrischen Kabeln
oder etwas das es nicht sicher ist.
• Verwenden Sie das Hängehaken nur zum Aufhängen
der Ladegerät. Der Aufhängehaken ist nicht
beabsichtigt, zusätzliches Gewicht zu unterstützen.
Niemal befestigen sie keine zusätzliche Objekte zum
Hängehaken oder beschädigen können auftreten.
PROBLEMBEHEBUNG
Wenn das Gerät nicht lädt:
• Überprüfen Sie, ob das Ladegerät ordnungsgemäß
an eine 220-240-V-Wechselstromsteckdose
angeschlossen ist.
• Sicherstellen, dass die Ausgänge gesichert sind
und die Polarität korrekt angeschlossen ist bei
Verwendung der Batterieklemmen.
• Wenn die Spannung der Batterie unter 2 V gesunken
ist, kann sie nicht mit diesem Ladegerät aufgeladen
werden.
WARTUNG
Ihr Black & Decker Gerät wurde im Hinblick auf eine
lange Lebensdauer und einen möglichst geringen
Wartungsaufwand entwickelt. Ein dauerhafter,
einwandfreier Betrieb setzt eine regelmäßige Pflege
und Reinigung voraus.
Achtung! Ziehen Sie den Netzstecker des Geräts
aus der Steckdose, bevor Sie mit Wartungs- oder
Reinigungsarbeiten am Gerät beginnen.
• Wischen Sie das Gerät gelegentlich mit einem
feuchten Tuch ab. Verwenden Sie keine scheuernden
Reinigungsmittel oder Reinigungsmittel auf
Lösungsmittelbasis. Tauchen Sie das Gerät nicht in
Wasser.
Ersetzen der Sicherung im DC Zubehör
Stecker
• Entfernen Sie die Kappe Mit Nuten durch Drehung
gegen den Uhrzeigersinn.
• Entfernen Sie den Gummiring, den Zentrierstift und
die Feder.
• Nehmen Sie die Sicherung heraus.
• Setzen Sie eine neue Sicherung desselben Typs und
derselben Größe (8 A) ein.
• Setzen Sie den Zentrierstift, die Feder und den
Gummiring ein.
• Bringen Sie die Kappe Mit Nuten durch Drehung im
Uhrzeigersinn an.
UMWELTSCHUTZ
Korrekte Entsorgung dieses Produkts
Diese Markierung zeigt an, dass dieses
Produkt nicht mit dem Hausmüll in
der gesamten EU beseitigt werden.
Um mögliche Schäden für die Umwelt
oder die menschliche Gesundheit nicht
durch unkontrollierte Entsorgung, Recycling es um
die nachhaltige Wiederverwertung von stofflichen
Ressourcen zu fördern. Für die Rückgabe Ihres
Altgerätes nutzen Sie bitte das Rückgabe-und
Sammelsysteme oder kontaktieren Sie den Händler, bei
dem das Produkt gekauft wurde. Sie können dieses
Produkt auf umweltfreundliche Weise recyceln können.
Getrennte Sammlung von gebrauchten Produkten und
Verpackungen können die Materialien recycelt und
wieder verwendet werden. Re-Verwendung von
recycelten Materialien hilft zu verhindern,
Umweltverschmutzung und verringert die
Nachfrage nach Rohstoffen.
Lokale Vorschriften können für die getrennte
Sammlung von Elektro-Produkte aus dem Haushalt
bereitzustellen, auf kommunaler Deponien oder durch
den Händler beim Kauf eines neuen Produkts
TECHNISCHE DATEN
Eingang: 220-240V AC, 50/60 Htz,
0,6 A
Ausgang: 12V DC, 6A
GUARANTIE
Baccus World Wide LLC ist überzeugt von der
Qualität seiner Produkte und bietet eine hervorragende
garantieren. Diese Garantieerklärung ist zusätzlich zum
und präjudiziert in keiner Weise auf Ihre gesetzlichen
Rechte. Die Garantie gilt innerhalb der Gebiete der
Mitgliedstaaten der Europäischen Union und der
Europäischen Freihandelszone.
Wenn ein Baccus World Wide LLC Produkt defekt
aufgrund fehlerhafter Materialien, Verarbeitung oder
mangelnde Übereinstimmung, innerhalb von 24
Monaten ab dem Datum des Kaufs, Baccus World
Wide LLC garantiert solche defekter Teile zu ersetzen,
reparieren Produkte fair Verschleiß unterworfen
oder solche Produkte, Zu gewährleisten minimale
Unannehmlichkeiten für den Kunden, es sei denn:
• wenn das Gerät verwendet gewerblich, beruflich oder
im Verleihgeschäft benutzt wurde;
• wenn das Gerät missbräuchlich verwendet oder mit
mangelnder Sorgfalt behandelt wurde;
• wenn das Gerät durch irgendwelche fremdes
Gegenstände, Stoffe oder Unfälle beschädigt wurde;
• wenn ein unbefugter Reparaturversuch durch
anderes Personal als das Baccus World Wide
Servicepersonal.
Um Anspruch auf die Garantie, müssen Sie einen
Kaufbeleg vorzulegen zu Baccus World Wide LLC an
die angegebene Adresse in diesem Handbuch.
Bitte besuchen Sie unsere Webseite www.
baccusworldwide.com, zu registrieren Ihr neues
Baccus World Wide LLC-Produkt. Dort erhalten
Sie auch Informationen über neue Produkte und
Sonderangebote. Weitere Informationen über die
Marke Baccus World Wide LLC und unsere Produkte
finden Sie unter www.baccusworldwide.com.
Baccus Worldwide LLC
Weena 290, 3012 NJ Rotterdam oder
Postbus 819, 3000 AV Rotterdam
BC6BDWE_Manual_102815.indd 12-13 10/28/2015 11:15:10 AM
Page 8
FRANÇAIS FRANÇAIS
14 15
MANUEL
D’INSTRUCTION
UTILISATION
Votre chargeur de batterie/mainteneur de Black
& Decker est conçu pour charger les batteries au
plomb. Il est destiné à une utilisation exclusivement
domestique.
CONSIGNES DE SÉCURITÉ
IMPORTANTE SPÉCIFICATION REMARQUE : capacité
de la batterie : type de plomb-acide, 12V c.c.
maximum, 120 Ah.
Attention ! De simples précautions de sécurité sont
à prendre pour l’utilisation d’appareil. Les conseils
suivants doivent toujours être appliqués, ceci afin de
réduire le risque d’incendie, les fuites de batterie, les
blessures et les dommages matériels.
• Lisez attentivement et entièrement le manuel avant
d’utiliser l’appareil.
• Ce manuel décrit comment utiliser cet appareil.
L’utilisation d’un accessoire ou d’une fixation, ou
bien l’utilisation de cet appareil à d’autres fins que
celles recommandées dans ce manuel d’instruction
peut présenter un risque de blessures.
• Gardez ce manuel pour référence ultérieure.
Utilisation de votre appareil
• Prenez toutes les précautions nécessaires pour
utiliser l’appareil.
• Cet appareil n’est pas destiné à être utilisé par des
personnes jeunes ou déficientes sans surveillance.
• Cet appareil ne doit pas être utilisé comme jouet.
• N’ouvrez pas le boîtier. Il n’y a aucune pièce
réparable par l’utilisateur à l’intérieur.
• N’utilisez pas l’appareil dans un environnement
présentant des risques d’explosion, ni en présence
de liquides, gaz ou poussières inflammables.
• Pour limiter le risque d’endommagement des
prises et des fils électriques, ne débranchez jamais
l’appareil en tirant sur le câble.
Après l’utilisation
• Quand il n’est pas utilisé, l’appareil doit être rangé
dans un endroit suffisamment aéré, sec et hors de
portée des enfants.
• Les enfants ne doivent pas avoir accès aux appareils
rangés.
• Quand l’appareil est rangé ou transporté dans
un véhicule, il doit être installé dans le coffre ou
correctement calé pour éviter les mouvements dus
aux changements de direction ou de vitesse.
• L’appareil doit être protégé de la lumière directe, de
la chaleur et de l’humidité.
Vérification et réparations
• Avant l’utilisation, vérifiez si l’appareil est en bon
état ou si aucune pièce ne manque. Recherchez
des pièces cassées, des boutons endommagés et
d’autres anomalies susceptibles de nuire au bon
fonctionnement de l’appareil.
• N’utilisez pas l’appareil si une pièce est endommagée
ou défectueuse.
• Des pièces endommagées ou défectueuses réparées
ou remplacées par le fabricant.
• Ne tentez jamais de retirer ou de remplacer des
pièces autres que celles citées dans ce manuel.
Consignes de sécurité concernant le
câble d’alimentation
Attention ! Ne modifiez en aucun cas une prise ou
un câble CA L’installation, pour être appropriée, doit
se faire par un électricien qualifié. Une connexion
incorrecte peut entraîner un choc électrique.
Les symboles suivants se trouvent sur
l’appareil :
Cet outil est doublement isolé; par
conséquent, aucun câble de masse n’est
nécessaire. Vérifiez si l’alimentation
mentionnée sur la plaque signalétique de
l’appareil correspond bien à la tension
présente sur le lieu.
Lisez attentivement le manuel
d’instruction complet.
Sécurité électrique
Vérifiez si l’alimentation mentionnée sur la plaque
signalétique de la machine correspond bien à la
tension de réseau présente sur le lieu.
• Si le câble d’alimentation est endommagé, il doit être
remplacé par le fabricant pour éviter tout risque.
• Avertissement ! Pour éviter les blessures graves
ou mortelles causées par un incendie, une
explosion ou de choc électrique : cet appareil doit
être connecté à Un disjoncteur de fuite à la terre
protégée prise CA.
Consignes de sécurité spécifiques aux
chargeurs de batterie
• Si le câble d’alimentation est endommagé, il doit
être remplacé par le fabricant ou par un centre de
réparation agréé Black & Decker pour éviter tout
risque.
• Ne tentez jamais de recharger des batteries non
rechargeables.
• Remplacez immédiatement les fils électriques
endommagés.
• N’approchez pas le chargeur de batterie de l’eau.
• N’ouvrez pas le chargeur de batterie.
• Ne testez pas le chargeur de batterie.
• Les pinces rouge et noire ne doivent jamais se
toucher ou toucher un autre conducteur en métal.
Ceci peut endommager l’appareil et/ou provoquer
une étincelle/une explosion.
BATTERIES
Attention ! Ne tentez jamais de recharger une batterie
ayant gelée.
• Dans des conditions extrêmes, il peut y avoir une
fuite de batterie. Si vous détectez une fuite, utilisez
un chiffon pour essuyer le liquide avec précaution.
Évitez le contact avec la peau.
• En cas de contact avec la peau ou les yeux, suivez
les instructions ci-dessous.
– Attention ! Le liquide de batterie est un acide
sulfurique dilué qui peut provoquer des blessures
et des dommages. En cas de contact avec la peau,
rincez immédiatement à l’eau. Si des rougeurs, une
douleur ou une irritation se produisent, consultez
un médecin. En cas de contact avec les yeux, rincez
à l’eau et consultez immédiatement un médecin.
• Pour jeter les batteries, suivez les instructions
données dans la section “Protection de
l’environnement”.
• Ajoutez de l’eau distillée dans chaque élément
jusqu’à ce que la batterie atteigne le niveau spécifié
par le fabricant. Ceci permet de purger l’excès de
gaz provenant des éléments. Ne pas faire déborder.
Pour une batterie sans bouchon sur l’élément (sans
entretien), suivez avec précaution les instructions de
charge du fabricant.
• Étudiez toutes les précautions données par
le fabricant de batterie, comme l’intensité
recommandée et si le bouchon doit être enlevé
pendant le chargement.
• Assurez-vous que l’intensité initiale ne dépasse pas
les exigences du fabricant de batterie.
• Attention ! Risque d’explosion des mélanges gazeux.
Le travail à proximité d’une batterie au plomb est
dangereux. Une batterie qui fonctionne normalement
dégage des gaz explosifs. Pour cette raison, il est
essentiel qu’à chaque utilisation de votre chargeur,
vous lisiez ce manuel et suiviez exactement les
instructions.
• L’utilisation de raccord non recommandé ou vendu
par un autre fabricant que Black & Decker peut
entraîner un risque d’incendie, de choc électrique ou
de blessures.
• L’utilisation d’une rallonge est à réserver au cas de
nécessité absolue. Si celle-ci n’est pas appropriée,
elle peut entraîner un risque d’incendie et de choc
électrique et annulera la garantie.
• IMPORTANT : Cette unité dispose d’un dissipateur
thermique en aluminium , qui est utilisé pour
la dissipation ther-mique et est situé à la base
de l’unité. Ne jamais toucher le dissipateur de
chaleur pendant le fonctionnement de l’appareil et jamais permettre à la partie inférieure de
l’appareil pour entrer en contact avec des matières
combustibles pendant le fonctionnement.
Consignes de sécurité particulières
pour l’utilisation de la fiche accessoire
CC
• Avertissement ! Ne jamais connecter cet appareil
à un taux positif de mise à la masse véhicule par
l’adaptateur de véhicule.
• Assurez-vous que la prise auxiliaire du véhicule est
propre et exempte de débris avant de connecter
l’unité.
• Avertissement – Risque d’incendie ! Si le fusible
de la prise d’accessoire de véhicule s’ouvre (coups)
au moment de brancher ce chargeur de batterie,
ne pas utiliser ce chargeur de batterie avec ce prise
d’accessoire de véhicule.
– Ne pas de manière répétée remplacer le fusible.
– Ne pas remplacer le fusible de prise d’accessoire
du véhicule avec celle d’un ampérage supérieur.
– Ne jamais tenter de patch le fusible avec papier
d’aluminium ou le fil.
Quelconque de ces actions peut entraîner de
graves dommages électriques et/ou un incendie.
Consignes de sécurité particulières
pour l’utilisation de l’appareil dans des
environnements humides
Le logement de cette unité est conforme à la norme
IP 67 étanche à la poussière et étanche normes.
Toutefois, il est recommandé de respecter les
consignes suivantes :
• Ne jamais immerger l’appareil dans de l’eau plus
profonde que 1 mètre, pour des temps plus de 30
minutes et/ou à des températures autres que entre
5ºC et 40ºC, ou l’unité pourrait subir des dommages
permanents.
• Ne jamais immerger l’appareil dans de l’eau à moins
que la bague (isolation) de l’AC ou DC cordon est
intact.
• Ne pas autoriser les plug ou les pinces de la batterie
à être exposés aux éléments pendant de longues
périodes de temps; et jamais les submerger.
Sécurité personnelle
Portez des lunettes de protection et des vêtements
appropriés pour éviter tout contact avec le liquide de
batterie.
Ne touchez pas vos yeux lorsque vous travaillez sur
la batterie. De l’acide, des particules d’acide ou de la
rouille peuvent rentrer dans vos yeux.
Retirez vos objets personnels métalliques, comme
les bagues, les bracelets, les colliers et les montres
lors de travaux effectués sur une batterie au plomb.
BC6BDWE_Manual_102815.indd 14-15 10/28/2015 11:15:11 AM
Page 9

FRANÇAIS FRANÇAIS
16 17
Si cette consigne n’est pas respectée, un important
court-circuit peut se produire et provoquer de
sérieuses brûlures.
Prenez les précautions nécessaires pour réduire le
risque de chute d’un objet métallique sur la batterie.
Si cela se produit, des étincelles, un court-circuit à la
batterie ou autres courts-circuits peuvent provoquer
une explosion.
CARACTÉRISTIQUES
1. DEL d’alimentation
2. Crochet de suspension
3. DEL d’inversion de polarité
4. DEL de chargement de la batterie
5. DEL de charge complète
6. Connecteur en ligne
7. Fiche d’alimentation secteur CA
8. Fiche accessoire CC
9. Pinces de batterie
PRÉPARATION AVANT DE
CHARGER LA BATTERIE
L’appareil ne devrait seulement être branché qu’à
une batterie au plomb de 12V. Avant de charger
la batterie, vérifiez si la tension est de 12V sur
l’étiquette ou sur les documents relatifs à son
application, comme par exemple dans le manuel de
l’utilisateur du véhicule.
N’utilisez pas l’appareil pour charger des batteries à
anode sèche généralement utilisées sur les appareils
domestiques. Ces batteries risquent d’exploser et de
provoquer des blessures ainsi que des dommages.
Attention ! Des gaz explosifs peuvent s’évaporer
des batteries au plomb pendant la charge. Vérifiez
l’aération et éliminez toutes sources d’inflammation
pendant le processus de charge.
• Ne placez pas le chargeur de batterie sur le dessus
de la batterie, les gaz de la batterie sera corroder et
endommager le chargeur.
• Ne jamais autoriser acide de batterie à goutter sur le
chargeur de batterie.
• Placez le chargeur de batterie le plus loin possible de
la batterie (en fonction de la longueur des câbles). Le
chargeur de batterie contient des commutateurs qui
peuvent créer une étincelle.
• Ne définissez pas une batterie sur le dessus du
chargeur.
• Gaz explosifs peuvent recueillir près du sol. Localiser
le chargeur de batterie aussi haut que possible
au-dessus du niveau du sol.
• N’utilisez pas d’outils électriques dans la zone de
charge.
• N’approchez pas de flamme dans la zone de charge
et ne fumez pas.
• Suivez les instructions pour connecter et
déconnecter les câbles du chargeur de la batterie ou
les bornes de la batterie.
Attention ! Le chargement d’une batterie-marine
ne peut pas se faire à bord du bateau. Ce type de
chargement nécessite un équipement spécifique. Cet
appareil N’EST PAS adapté à ce genre d’utilisation.
Les véhicules peuvent être munis de systèmes
électriques et électroniques (comme par exemple, les
systèmes d’exploitation du moteur, des téléphones
cellulaires) qui peuvent être endommagés en cas de
tension de démarrage élevée et de crêtes de tension.
Avant de brancher l’appareil sur le véhicule, vérifiez sur
le guide du propriétaire du véhicule si le chargement
externe est autorisé.
• Suivez ces instructions et celles publiées par le
fabricant de batterie et le constructeur automobile.
• Ne branchez ou débranchez les pinces CC qu’après
avoir débranché le câble d’alimentation. Les pinces
ne doivent en aucun cas être en contact.
• Vérifiez la polarité des bornes de la batterie du
véhicule avant de brancher l’appareil. Débranchez
d’abord le câble négatif (noir), puis le câble positif
(rouge).
Pendant le chargement d’une batterie installée dans
le circuit, suivez les instructions du fabricant pour
accéder à la batterie et ce qui suit :
• Ne chargez pas la batterie quand le moteur tourne.
• Tenez compte du fait que les composants du
moteur, comme par exemple le ventilateur de
refroidissement, peuvent démarrer automatiquement.
Éloignez les mains et le corps, des composants du
moteur. Placez le chargeur de batterie et les câbles
de manière à éviter tout contact.
• Vérifiez l’emplacement du chargeur de batterie et des
câbles afin d’éviter de les endommager en fermant
les portes et les couvercles du compartiment moteur.
• Assurez-vous que les connexions sont possibles
sans toucher la carrosserie métallique ou les
composants près de la batterie.
• Si cet appareil est utilisé à proximité de la batterie
et du moteur du véhicule, posez-le à plat sur une
surface stable. Assurez-vous que les pinces, fils,
vêtements et parties du corps sont éloignés des
pièces mobiles du véhicule.
• Si la batterie doit être retirée du véhicule pour le
chargement ou le nettoyage des bornes, tous les
accessoires dans le véhicule doivent être hors
fonction pour qu’aucune étincelle ne se produise.
• Pour réduire le risque de choc électrique, débranchez
l’appareil avant l’entretien ou le nettoyage.
UTILISATION
Après avoir pris les précautions de sécurité
nécessaires et avoir préparé correctement la mise en
charge, le processus est le suivant :
• Pour la plupart des applications automobiles
et similaires, le chargeur doit être branché à la
batterie quand il est relié au circuit CC. Suivez
les instructions données dans “Chargement de la
batterie installée dans le circuit”.
Chargement d’une batterie installée
dans le circuit
Attention ! Une connexion inappropriée, un courtcircuit de batterie, l’emplacement de la batterie et du
chargeur peuvent être source de danger. Préparez
correctement l’installation avant de démarrer le
processus de charge.
Attention ! Si les bornes de batterie ne sont pas
accessibles ou les pinces du chargeur se trouvent en
contact avec la carrosserie ou avec des composants
proches de la batterie, vous devez retirer la batterie
avant la mise en charge en utilisant les pinces de
la batterie. Suivez les instructions du fabricant pour
retirer la batterie.
• Vérifiez la polarité des bornes de batterie. Une borne
positive (POS, P, +) a généralement un plus grand
diamètre que la borne négative (NEG, N, –).
• Suivez les instructions du fabricant pour retirer les
couvercles d’isolation des bornes de la batterie.
• Branchez la pince positive (rouge) entre le chargeur
et la borne positive (POS, P, +) de la batterie.
• Branchez la pince négative (noire) entre le chargeur
et la borne positive (NEG, N, –) de la batterie ou au
châssis.
Pour débrancher le chargeur de la batterie, exécutez
toujours ce qui suit :
• Débranchez le chargeur de batterie.
• Retirez d’abord, la pince négative (noire).
• Retirez ensuite la pince positive (rouge).
• Replacez les couvercles d’isolation sur les bornes de
la batterie.
Chargement d’une batterie débranchée
du circuit
Attention ! Une connexion inappropriée, un courtcircuit de batterie, l’emplacement de la batterie et du
chargeur peuvent être source de danger. Préparez
correctement l’installation avant de démarrer le
processus de charge.
• Si la batterie n’est pas débranchée du circuit, suivez
les instructions du fabricant pour retirer la batterie
avant la mise en charge.
• Vérifiez la polarité des bornes de batterie.
Une borne positive (POS, P, +) a généralement un
plus grand diamètre que la borne négative (NEG,
N, –).
• Branchez la pince positive (rouge) entre le chargeur
et la borne positive (POS, P, +) de la batterie.
• Branchez la pince négative (noire) entre le chargeur
et la borne positive (NEG, N, –) de la batterie.
Pour débrancher le chargeur de la batterie, exécutez
toujours ce qui suit :
• Débranchez le chargeur de batterie.
• Retirez d’abord, la pince négative (noire).
• Retirez ensuite la pince positive (rouge).
• Replacez les couvercles d’isolation sur les bornes de
la batterie.
Branchement de l’appareil avec les
pinces de batterie
Attention ! Débranchez systématiquement la prise
secteur CA avant de brancher ou de débrancher
l’appareil de la batterie.
Attention ! Ne raccordez jamais l’un de l’accessoire
conduit ainsi au risque de provoquer un danger.
Le conduit accessoire ne doit jamais être relié au
connecteur de ligne.
• Branchez les pinces de batterie au chargeur avec le
connecteur intégré.
• Les câbles de la sortie de l’appareil ont des pinces
avec code couleur (rouge-positif et noir-négatif).
Elles se branchent directement aux connecteurs
correspondants sur les bornes de la batterie.
• Suivez les étapes décrites dans la section appropriée
(«Chargement d’une batterie installée dans le circuit»
ou «Chargement d’une batterie débranchée du
circuit»).
• Insérez la prise CA du chargeur dans une prise
secteur CA.
Charge de la batterie avec les pinces
de batterie
1. Installez le chargeur de la batterie et reliez-le en
respectant les étapes de la section « Branchement
de l’appareil avec les pinces de batterie ».
2. Branchez le cordon d’alimentation du chargeur
de batterie sur une prise secteur. Le voyant
d’alimentation se allumeront en bleu pour indiquer
que le chargeur est prêt.
Remarque :
si le voyant d’alimentation ne s’allume
pas, vérifier la connexion à l’alimentation
secteur CA sortie. Assurez-vous que la
prise secteur est fonctionnelle.
3. Lorsque l’unité est correctement connectée et de
charge, le DEL de chargement de la batterie ( )
s’allumeront jaune pour indiquer que la batterie
est en charge.
Remarques :
si le DEL de chargement de la batterie
ne s’allume pas, vérifier la connexion à
la batterie. Si les pinces de serrage sont
correctement connectés, il se peut que
la batterie soit en condition de panne.
Fabricant suggère d’avoir la batterie
BC6BDWE_Manual_102815.indd 16-17 10/28/2015 11:15:11 AM
Page 10

FRANÇAIS FRANÇAIS
18 19
testée par une qualifié technicien de
service de la batterie.
Si les pinces sont incorrectement
connectés en qui concerne la polarité, la
DEL d’inversion de polarité ( )
s’allume. Débranchez le chargeur, puis
déposer les pinces. Rebrancher les
pinces correctement.
4. Lorsque la recharge terminée voyant ( ) s’allume
en vert, la batterie est entièrement chargée.
Lors de la déconnexion du chargeur de batterie,
débranchez le cordon d’alimentation, retirez le pince
du châssis du véhicule, puis retirer le pince de serrage
de la cosse de la batterie.
Branchement de l’appareil avec la fiche
accessoire CC
Attention ! Débranchez systématiquement la fiche
secteur CA avant de brancher ou de débrancher
l’appareil de la batterie.
Attention ! Ne raccordez jamais l’un de l’accessoire
conduit ainsi au risque de provoquer un danger.
Le conduit accessoire ne doit jamais être relié au
connecteur de ligne.
• Branchez la fiche accessoire CC au chargeur avec le
connecteur intégré.
• Insérez la fiche accessoire CC dans la prise
accessoire CC du véhicule.
• Insérez la prise CA du chargeur dans une prise
secteur CA
Remarque:
Certains véhicules nécessitent que l’allumage
est activé à la position prise accessoire, afin
de pouvoir la prise accessoire.
Charge de la batterie avec la fiche
accessoire CC
Attention ! Afin de réduire les risques de dommages
à la propriété : Assurez-vous que la sortie
d’accessoire CC est propre et exempte de débris avant
de connecter l’unité.
1. Installez le chargeur de la batterie et reliez-le en
respectant les étapes de la section « Branchement
de l’appareil avec la fiche accessoire CC ».
2. Branchez le cordon d’alimentation du chargeur
de batterie sur une prise secteur. Le voyant
d’alimentation se allumeront en bleu pour indiquer
que le chargeur est prêt.
Remarque :
si le voyant d’alimentation ne s’allume
pas, vérifier la connexion à l’alimentation
secteur CA sortie. Assurez-vous que la
prise secteur est fonctionnelle.
3. Lorsque l’unité est correctement connectée et de
charge, le DEL de chargement de la batterie ( )
s’allumeront jaune pour indiquer que la batterie
est en charge.
Remarques :
si le DEL de chargement de la batterie
ne s’allume pas, vérifier la connexion
au véhicule le CC prise accessoire.
Tourner l’adaptateur légèrement pour
s’assurer qu’il y a un bon contact. S’il
est correctement connecté, il se peut que
la batterie soit en condition de panne.
Fabricant suggère d’avoir la batterie
testée par une qualifié technicien de
service de la batterie.
Certains véhicules nécessitent que le
allumage de voiture soit mis à la position
ACC (accessoires) pour activer le CC
prise accessoire. Si l’allumage de votre
véhicule est requis pour être tourné à la
position ACC (accessoires), s’assurer que
tous les accessoires du véhicule ( c’està-dire de chauffage, ventilation, radio, TV,
feux ... etc) sont désactivées. Si ils ne
sont pas désactivées, le chargeur risque
de ne pas être capable de charger la
batterie.
4. Lorsque la recharge terminée voyant ( ) s’allume
en vert, la batterie est entièrement chargée.
Lors de la déconnexion du chargeur de batterie,
débranchez le cordon d’alimentation, puis retirez le 12
volts CC fiche de l’accessoire de la prise accessoire de
véhicule.
Pendaison le chargeur de batterie
Le crochet de suspension vous permet de positionner
le chargeur de batterie pour fonctionnement pratique,
mains libres.
Attention ! Afin de réduire les risques de dommages
à la propriété :
• Lorsque le chargeur est suspendu par le crochet de
suspension, ne pas la secouer le chargeur ou l’objet
qu’il est accroché à partir de.
• Ne fixez pas le chargeur à tout les fils électriques ou
quoi que ce soit qu’il n’est pas sécurisé.
• Utilisez uniquement le crochet de suspension pour
accrocher le chargeur. Le crochet de suspension n’est
pas destinée à soutenir poids supplémentaire. Ne rien
accrocher additionnel au crochet de suspension ou de
risques de rupture peut se produire.
DÉPANNAGE
Si la mise en charge ne commence pas :
• Vérifiez si le chargeur de batterie est correctement
branché à une prise de 220-240V CA.
• Assurez-vous que les connexions de sortie
sont sécurisés et la polarité est correcte lors de
l’utilisation des pinces de batterie.
• Si la tension de la batterie à charger descend en
dessous de 2 volts, la batterie ne peut pas être
chargée avec ce chargeur.
ENTRETIEN
Votre appareil Black & Decker a été conçu pour
fonctionner pendant longtemps avec un minimum
d’entretien. Un fonctionnement continu satisfaisant
dépend d’un nettoyage régulier et d’un entretien
approprié de l’outil.
Attention ! Avant d’effectuer des réparations ou un
nettoyage de l’appareil, débranchez-le.
• De temps en temps, passez un chiffon humide sur
l’appareil. N’utilisez pas de produit abrasif ou à base
de solvant. Ne plongez pas l’appareil dans l’eau.
Remplacement du fusible dans la prise
accessoire CC
• Tournez le bouchon avec rainures dans le sens
inverse des aiguilles de montre pour le retirer.
• Retirez la rondelle en caoutchouc, la goupille centrale
et le ressort.
• Retirez le fusible.
• Installez un fusible neuf de même type et dimension
(8 A).
• Installez la goupille centrale, le ressort et la rondelle
en caoutchouc.
• Tournez le bouchon avec rainures dans le sens
horaire pour l’installer.
PROTECTION DE
L’ENVIRONNEMENT
Élimination correcte de ce produit
Ce marquage indique que ce produit
ne doit pas être jetées avec les autres
déchets ménagers à travers l’UE. Pour
prévenir les dommages possibles pour
l’environnement ou la santé humaine
élimination incontrôlée des déchets, les recycler de
façon responsable pour promouvoir la réutilisation
durable des ressources matérielles. Pour revenir sur
votre appareil utilisé, s’il vous plaît utiliser le retour et
les systèmes de collecte ou contactez le revendeur
où le produit a été acheté. Ils peuvent prendre ce
produit pour leur recyclage.
La collecte séparée des produits utilisés et les
emballages permet matériaux à être recyclés et
réutilisés. Réutilisation des matériaux
recyclés aide à prévenir la pollution de
l’environnement et réduit la demande de
matières premières.
La réglementation locale peut prévoir la collecte
séparée des produits électriques de la maison, sur
les sites de déchets municipaux ou par le détaillant
lorsque vous achetez un nouveau produit.
CARACTÉRISTIQUES TECHNIQUES
Entrée : 220-240V CA, 50/60 Htz,
0,6 A
Sortie : 12V CC, 6 A
GARANTIE
Baccus Worldwide LLC vous assure la qualité de
ses produits et vous offre une garantie très étendue.
Ce garantie en plus de et ne peut en aucun cas
se substituer à vos droits légaux. La garantie est
valable sur tout le territoire des États Membres de
l’Union Européenne et de la Zone de Libre Échange
Européenne.
Si un produit Baccus Worldwide LLC s’avère
défectueux en raison de matériaux défectueux,
fabrication, ou d’un manque de conformité dans les
24 mois suivant la date d’achat, Baccus Worldwide
LLC garantit le remplacement des pièces défectueuses,
la réparation des produits usés ou cassés ou remplace
ces produits à la convenance du client, sauf dans les
circonstances suivantes :
• le produit a été utilisé dans un but commercial,
professionnel, ou a été loué ;
• le produit a été mal utilisé ou utilisé avec
négligence ;
• le produit a subi des dommages à cause de corps
étrangers, de substances ou d’accidents ;
• des réparations ont été tentées par des techniciens
ne faisant pas partie du service technique de Baccus
Worldwide LLC.
Pour avoir recours à la garantie, il est nécessaire de
fournir une preuve d’achat au Baccus Worldwide LLC
at the address indicated in this manual.
Visitez notre site Web www.baccusworldwide.com
pour enregistrer votre nouveau produit Baccus
Worldwide LLC et être informé des nouveaux produits
et des offres spéciales. Pour plus d’informations
concernant la marque Baccus Worldwide LLC et
notre gamme de produits, consultez notre site : www.
baccusworldwide.com.
Baccus Worldwide LLC
Weena 290, 3012 NJ Rotterdam ou
Postbus 819, 3000 AV Rotterdam
BC6BDWE_Manual_102815.indd 18-19 10/28/2015 11:15:11 AM
Page 11
ITALIANO ITALIANO
20 21
MANUALE DI
ISTRUZIONI
USO PREVISTO
Il caricabatterie/manutentore Black & Decker è stato
progettato per caricare le batterie al piombo. Questo
prodotto è destinato al solo uso domestico.
ISTRUZIONI DI SICUREZZA
IMPORTANTE SPECIFICHE NOTA: Capacità della
batteria: tipo piombo-acido, massimo 12V CC, 120Ah.
Attenzione! Quando si usano elettroutensili, osservare
sempre le normali precauzioni di sicurezza per ridurre
il rischio di incendio, di perdita di liquido dalle batterie,
di lesioni personali e di danni materiali.
• Leggere attentamente il presente manuale prima di
usare l’elettroutensile.
• L’uso previsto è descritto nel presente manuale. Se
questo elettroutensile viene usato con accessori o
per usi diversi da quelli raccomandati nel presente
manuale d’uso, si potrebbero verificare lesioni
personali.
• Conservare il presente manuale per futura
consultazione.
Utilizzo dell’elettroutensile
Prestare sempre attenzione quando si usa
l’elettroutensile.
• L’utilizzo di questo elettroutensile non è destinato a
ragazzi o persone inferme senza supervisione.
• Questo elettroutensile non deve essere usato come
un giocattolo.
• Non aprire il corpo dell’elettroutensile, dato che al
suo interno non vi sono componenti riparabili.
• Evitare d’impiegare questo apparecchio in ambienti
esposti al rischio di esplosione, ad esempio in
presenza di liquidi, gas o polveri infiammabili.
• Per ridurre il rischio di danni a spine o fili, non tirare
mai il filo per scollegare la spina da una presa.
Dopo l’impiego
• Quando non viene usato, l’apparecchio deve essere
conservato in un luogo asciutto e ben ventilato, fuori
dalla portata dei bambini.
• Gli elettroutensili non devono essere riposti alla
portata dei bambini.
• Se viene conservato o trasportato in un veicolo,
l’apparecchio deve essere messo nel bagagliaio
o legato per evitare che si sposti in caso di
cambiamento repentino della velocità o della
direzione di marcia.
• L’elettroutensile deve essere protetto dalla luce diretta
del sole, dal calore e dall’umidità.
Ispezione e riparazioni
• Prima dell’impiego, controllare che l’elettroutensile
non sia danneggiato e non presenti parti difettose.
Controllare che non vi siano parti rotte, che gli
interruttori non siano danneggiati e che non vi siano
altre condizioni che potrebbero avere ripercussioni
sulle prestazioni.
• Non usare l’elettroutensile se alcune parti sono
danneggiate o difettose.
• Hai delle parti danneggiate o difettose riparate o
sostituite dal produttore.
• Non tentare di smontare o sostituire qualsiasi parte
ad eccezione di quelle specificate nel presente
manuale.
Sicurezza del filo elettrico
Attenzione! Non modificare mai il filo CA o la spina.
Se non è delle giuste dimensioni, far installare
una presa idonea da un elettricista qualificato. Un
collegamento errato può essere causa di folgorazione.
I seguenti simboli sono stampigliati
sull’elettroutensile.
Il doppio isolamento di cui è provvisto
l’elettroutensile rende superfluo
il filo di terra. Controllare sempre
che l’alimentazione corrisponda alla
tensione indicata sulla targhetta delle
caratteristiche. Leggere attentamente
questo manuale d’uso nella sua totalità.
Questo elettroutensile è stato progettato
solo per uso all’interno.
Sicurezza elettrica
Controllare sempre che l’alimentazione corrisponda
alla tensione indicata sulla targhetta delle
caratteristiche.
• In caso di danneggiamento del filo di alimentazione,
è necessario farlo riparare dal fabbricante in modo
da evitare eventuali pericoli.
• Avvertimento! Per evitare il rischio di lesioni
gravi o mortali, da incendio, esplosione o scosse
elettriche: Questo dispositivo deve essere collegato
ad un Di guasto a massa di interrupt (interruttore
differenziale) protetto presa CA.
Istruzioni di sicurezza specifiche per i
caricabatteria
• Non tentare mai di ricaricare batterie non ricaricabili.
• Fare sostituire immediatamente i fili di alimentazione
difettosi.
• Non lasciare che il caricabatteria si bagni.
• Non aprire il caricabatteria.
• Non collegare il caricabatteria a sonde.
• Non lasciare mai che i morsetti rosso e nero si
tocchino o vengano a contatto di un altro conduttore
metallico comune, dato che potrebbero causare
danni all’elettroutensile e/o pericolose scintille oppure
essere causa di un’esplosione.
BATTERIE
Attenzione! Non tentare mai di caricare una batteria
congelata.
• In condizioni estreme, si potrebbe verificare la
perdita di liquido dalle batterie. Se si nota la presenza
di liquido sulle batterie, pulirle con attenzione con
uno straccio. Evitare il contatto con l’epidermide.
• In caso di contatto con la pelle o gli occhi, seguire le
istruzioni riportate di seguito.
– Attenzione! La batteria contiene acido solforico
che può causare lesioni alle persone e danni alle
cose. In caso di contatto con la pelle, risciacquare
immediatamente con acqua. In caso di rossore,
dolore o irritazione, rivolgersi immediatamente
a un medico. In caso di contatto con gli occhi,
risciacquarli immediatamente con acqua pulita e
consultare subito un medico.
• Quando si smaltiscono le batterie, seguire
le istruzioni riportate al capitolo “Protezione
dell’ambiente”.
• Versare acqua in ciascuna cella fino a quando
l’acido della batteria raggiunge il livello indicato dal
fabbricante della batteria. In questo modo è possibile
spurgare dalle celle il gas in eccesso. Non rifornire
eccessivamente. In caso di batteria con celle senza
coperchietti (tipo che non richiede manutenzione),
seguire alla lettera le istruzioni di ricarica del
fabbricante.
• Leggere attentamente tutte le precauzioni specifiche
fornite dal fabbricante della batteria, come ad
esempio, se togliere o non togliere i coperchietti delle
celle durante la ricarica e i tassi di carica consigliati.
• Accertarsi che il tasso di carica iniziale non superi le
indicazioni del fabbricante della batteria.
• Attenzione! Pericolo di miscele di gas esplosivi.
È pericoloso lavorare in prossimità di batterie al
piombo. Le batterie esalano gas esplosivi durante il
normale funzionamento. Per questa ragione, prima
di usare il caricabatteria, è estremamente importante
leggere ogni volta questo manuale e seguirne alla
lettera le istruzioni.
• L’impiego di un accessorio non consigliato o non
venduto da Black & Decker potrebbe essere causa
di incendio, folgorazione o lesioni alle persone.
• Non usare un filo di prolunga a meno che non
sia assolutamente necessario. L’uso di un filo di
prolunga non idoneo potrebbe essere causa di
incendio e folgorazione e invalida la garanzia.
• IMPORTANTE: Questa unità è dotata di un
dissipatore di calore in alluminio, che viene
utilizzato per la dissipazione del calore, e
si trova sul fondo dell’unità. Non toccare il
dissipatore di calore mentre l’unità è in funzione
e non permettere che il fondo entrare in contatto
materiale infiammabile durante il funzionamento.
Adattatore di veicoli misure di
sicurezza
• Avvertimento! MAI collegare questa unità ad un
veicolo a terra positivo con questo adattatore veicolo
spina.
• Assicurarsi che la presa accessoria del veicolo è
pulito e privo di detriti prima di collegare l’unità.
• Attenzione – pericolo di incendio! Se il veicolo
presa accessori il fusibile Se il fusibile si apre (salta)
quando si collega il caricabatterie, non utilizzare
questo caricabatterie con questo veicolo presa
accessori.
– Non sostituire il fusibile ripetutamente.
– Non sostituire l’accessorio del veicolo fusibile
uscita con uno di un amperaggio superiore.
– Non tentare mai di patch il fusibile con carta
stagnola o filo.
Una di queste azioni può provocare gravi danni
elettrici e/o incendi.
Istruzioni specifiche di sicurezza per
usare l’unità in ambienti umidi
Il corpo di questa unità è conforme agli IP67 norme
impermeabile e antipolvere. Tuttavia, si consiglia di
osservare le seguenti norme:
• Non mettere l’unità nelle acque più di 1 metro, per il
tempo più lungo di 30 minuti, e/o a altre temperature
rispetto a tra 5 ºC e 40 ºC, o l’unità potrebbe subire
danni permanenti.
• Non mettere l’unità in acqua, a meno che non siano
la boccola (isolamento) del cavo CA o CC è intatta.
• Non permettere alla spina o morsetti per essere
esposta alle intemperie per lunghi periodi di tempo ;
e non mettere.
Sicurezza delle persone
Indossare occhiali protettivi avvolgenti e un
abbigliamento idoneo per proteggersi da un eventuale
contatto con il liquido della batteria.
Evitare di toccarsi gli occhi mentre si lavora sulla
batteria. L’acido, le particelle di acido o la corrosione
potrebbero penetrare negli occhi.
Togliere oggetti personali in metallo quali anelli,
braccialetti, collane e orologi quando si lavora su di
una batteria al piombo. Una batteria al piombo può
produrre corrente di cortocircuito abbastanza forte da
causare ustioni gravi.
Agire con la massima cautela per evitare di lasciar
cadere sulla batteria un oggetto metallico, che
potrebbe causare scintille o il cortocircuito della
BC6BDWE_Manual_102815.indd 20-21 10/28/2015 11:15:11 AM
Page 12

ITALIANO ITALIANO
22 23
batteria, o di altri componenti elettrici, con il pericolo
di esplosione.
CARATTERISTICHE
1. LED di alimentazione
2. Gancio appeso
3. LED di polarità inversa
4. LED di ricarica della batteria
5. LED di carica completata
6. Connettore in linea
7. Spina per presa CA
8. Spina accessori CC
9. Morsetti batteria
PREPARATIVI PRIMA DELLA
RICARICA
L’elettroutensile deve essere collegato solo
a una batteria al piombo da 12V. Prima della
carica, accertarsi che la tensione della batteria
sia di 12V consultando l’etichetta sulla batteria
o le informazioni disponibili relative alla sua
applicazione, ad esempio il manuale di auto.
Non usare l’elettroutensile per caricare batterie con pile
a secco, comunemente usate su elettrodomestici, dato
che queste batterie potrebbero scoppiare e causare
lesioni alle persone e danni alle cose.
Attenzione! Le batterie al piombo possono esalare
gas esplosivi durante la ricarica. Accertarsi che la zona
sia ben ventilata ed eliminare ogni fonte di ignizione
durante le procedure di ricarica.
• Non posizionare il caricabatterie nella parte superiore
della batteria; gas dalla batteria si corrodono e danni
caricabatterie.
• Non permettere acido della batteria di gocciolare sul
caricabatterie.
• Posizionare il caricabatteria alla distanza massima
consentita dai fili. Il caricabatteria contiene
interruttori che potrebbero creare una scintilla.
• Non impostare una batteria del caricabatterie.
• Gas esplosivi possono raccogliere vicino a terra.
Posizionare il caricabatteria più in alto possibile
livello del suolo superiore.
• Non usare elettroutensili nella zona di ricarica.
• Non fumare e non utilizzare fiamme vive nella zona
di ricarica.
• Seguire le istruzioni per il collegamento e
scollegamento dei cavi del caricabatteria o dei
morsetti della batteria.
In caso di batteria marina, toglierla dalla barca e
ricaricarla a terra. La ricarica della batteria a bordo
richiede l’impiego di un’apparecchiatura appositamente
progettata per uso marino. Questo elettroutensile NON
è omologato per tale impiego.
I veicoli possono essere dotati di impianti elettrici e
di sistemi elettronici (ad esempio sistemi di gestione
motore, telefoni cellulari) che potrebbero subire danni
se soggetti a elevate tensioni di avviamento e a picchi
di tensione. Prima di collegare l’elettroutensile al
veicolo, leggere il Manuale del proprietario del veicolo
per verificare se è possibile eseguire l’avviamento con
avviatore di emergenza.
• Seguire queste istruzioni e quelle redatte dai
fabbricanti della batteria e del veicolo.
• Collegare e scollegare i morsetti di uscita CC solo
dopo aver scollegato il filo di alimentazione dalla
presa di corrente. Evitare ogni contatto tra i morsetti.
• Controllare la polarità dei morsetti della batteria del
veicolo prima di collegare l’elettroutensile. Scollegare
sempre per primo il cavo negativo (nero), seguito da
quello positivo (rosso).
Durante la ricarica di una batteria montata in un
circuito, seguire le istruzioni del fabbricante per
raggiungere la batteria e le precauzioni riportate di
seguito:
• Non ricaricare la batteria con il motore acceso.
• Tenere presente che certi componenti del motore,
ad esempio la ventola, potrebbero avviarsi
automaticamente. Tenere mani e corpo lontani dai
componenti del motore e posizionare il caricabatteria
e i cavi in modo tale da evitare ogni contatto.
• Accertarsi che il caricabatteria e i cavi siano situati in
modo tale da evitare danni causati dalla chiusura di
portiere o del cofano del vano motore.
• Accertarsi che sia possibile eseguire i collegamenti
senza toccare la carrozzeria metallica o i componenti
adiacenti alla batteria.
• Quando si usa l’elettroutensile in prossimità della
batteria del veicolo e del motore, appoggiarlo su
di una superficie piana e stabile e tenere morsetti,
conduttori, abbigliamento e parti del corpo lontani
dalle parti in movimento del veicolo.
• Se è necessario smontare la batteria dal veicolo per
ricaricarla o per pulirne i morsetti, accertarsi che tutti
gli accessori del veicolo siano stati spenti in modo
da non causare scintille.
• Per ridurre il rischio di scosse elettriche, scollegare
l’elettroutensile e la fonte di alimentazione prima di
iniziare la manutenzione o la pulitura.
USO
Dopo aver completato tutti i preparativi per la ricarica
e aver osservato le precauzioni per l’incolumità
personale, procedere come descritto di seguito:
• Nella maggior parte delle applicazioni
automobilistiche o di tipo simile, è possibile collegare
il caricabatteria alla batteria mentre è collegata al
circuito CC Seguire le istruzioni riportate al paragrafo
“Ricarica di una batteria montata nel circuito”.
• Se la batteria deve essere scollegata dal circuito
prima della ricarica, seguire le istruzioni riportate
al paragrafo “Ricarica di una batteria scollegata dal
circuito”.
Attenzione! Togliere una batteria marina dalla barca
e ricaricarla a terra. La ricarica della batteria a bordo
richiede l’impiego di un’apparecchiatura appositamente
progettata per uso marino.
Carica di una batteria installata nel
circuito
Attenzione! L’errato collegamento, il cortocircuito della
batteria, l’ubicazione della batteria o del caricabatteria
possono contribuire a creare situazioni pericolose.
Prima di procedere accertarsi di aver eseguito gli
adeguati preparativi.
Attenzione! Se non è possibile raggiungere i poli della
batteria oppure se i morsetti del caricabatteria possono
venire a contatto della carrozzeria o dei componenti
adiacenti alla batteria, smontare la batteria prima della
ricarica utilizzando i morsetti della batteria. Seguire le
istruzioni del fabbricante prima di smontare la batteria.
• Controllare la polarità dei poli della batteria.
Il polo positivo (POS, P, +) della batteria ha di solito
un diametro più grande di quello negativo (NEG,
N, –).
• Seguire le istruzioni del fabbricante per il distacco dei
coperchietti isolanti dai poli della batteria.
• Collegare il morsetto positivo (rosso) del
caricabatteria al polo positivo (POS, P, +) della
batteria.
• Collegare il morsetto negativo (nero) del
caricabatteria al polo negativo (NEG, N, –) della
batteria o al telaio.
Quando si scollega il caricabatteria dalla batteria,
ricordare quanto segue:
• scollegare il caricabatteria;
• scollegare per primo il morsetto negativo (nero);
• scollegare per ultimo il morsetto positivo (rosso);
• rimettere gli eventuali coperchietti isolanti sui poli
della batteria.
Carica di una batteria scollegata dal
circuito
Attenzione! L’errato collegamento, il cortocircuito della
batteria, l’ubicazione della batteria o del caricabatteria
possono contribuire a creare situazioni pericolose.
Prima di procedere accertarsi di aver eseguito gli
adeguati preparativi.
• Se la batteria non è già stata smontata dal circuito,
seguire le istruzioni del fabbricante per smontarla
prima della ricarica.
• Controllare la polarità dei poli della batteria.
Il polo positivo (POS, P, +) della batteria ha di solito
un diametro più grande di quello negativo (NEG,
N, –).
• Collegare il morsetto positivo (rosso) del
caricabatteria al polo positivo (POS, P, +) della
batteria.
• Collegare il morsetto negativo (nero) del
caricabatteria al polo negativo (NEG, N, –) della
batteria.
Quando si scollega il caricabatteria dalla batteria,
ricordare quanto segue:
• scollegare il caricabatteria;
• scollegare per primo il morsetto negativo (nero);
• scollegare per ultimo il morsetto positivo (rosso);
• rimettere gli eventuali coperchietti isolanti sui poli
della batteria.
Collegamento dell’elettroutensile con i
morsetti batteria
Attenzione! Scollegare sempre la spina CA dalla
presa di corrente CA prima di collegare o scollegare
l’elettroutensile dalla batteria.
Attenzione! Mai collegare qualsiasi accessorio
conduce insieme come questo causerà un pericolo.
Il porta accessori deve mai essere collegato al
connettore in linea.
• Collegare i morsetti della batteria al caricabatteria
mediante il connettore in linea.
• I fili di uscita dell’elettroutensile hanno dei morsetti
della batteria con codice colorato (positivo-rosso
e negativo nero), che si collegano direttamente ai
corrispondenti connettori sui morsetti della batteria.
• Seguire la procedura descritta nella sezione
appropriata (“Carica di una batteria installata nel
circuito” o “Carica di una batteria scollegata dal
circuito”).
• Inserire la spina CA del caricabatteria nella presa di
corrente CA.
Carica della batteria con i morsetti
della batteria
1. Impostare il caricabatterie e connettersi al
seguente batteria passaggi nella sezione
“Collegamento dell’elettroutensile con i morsetti
della batteria”.
2. Collegare il caricabatteria cavo di alimentazione
in una presa elettrica. Il LED di alimentazione si
accende blu per indicare che il caricabatterie è
pronto.
Nota:
Se il LED di alimentazione non si accende, controllare
il collegamento alla presa di corrente. Accertarsi che la
presa elettrica è funzionale.
3. Quando l’unità è collegata correttamente e carica,
il LED di ricarica della batteria ( ) si accende
gialla per indicare la batteria è in carica.
Note:
Se il LED di ricarica non si accende, controllare il
collegamento alla batteria. Se i morsetti sono collegati
correttamente, la batteria potrebbe essere in condizione
di guasto. Produttore suggerisce di disporre di una
batteria testato da un qualificato servizio tecnico della
batteria.
Se i morsetti della batteria sono collegati in modo non
corretto per quanto riguarda la polarità, LED di polarità
BC6BDWE_Manual_102815.indd 22-23 10/28/2015 11:15:11 AM
Page 13

ITALIANO ITALIANO
24 25
inversa ( ) si illumina. Scollegare il caricabatterie,
quindi rimuovere i morsetti. Ricollegare i morsetti
correttamente.
4. Quando la LED di carica completata ( ) si
illumina verde, la batteria è completamente carica.
Quando si scollega il caricabatteria, scollegare il cavo
di alimentazione CA, rimuovere la pinza del telaio del
veicolo, e quindi rimuovere la pinza dal terminale della
batteria.
Collegamento dell’elettroutensile con
la spina accessori CC
Attenzione! Scollegare sempre la spina CA dalla
presa di corrente CA prima di collegare o scollegare
l’elettroutensile dalla batteria.
Attenzione! Mai collegare qualsiasi accessorio
conduce insieme come questo causerà un pericolo.
Il porta accessori deve mai essere collegato al
connettore in linea.
• Collegare la spina accessori CC al caricabatteria
mediante il connettore in linea.
• Infilare la spina accessori CC nella presa accessori
CC del veicolo.
• Inserire la spina CA del caricabatteria nella presa di
corrente CA
Nota:
Alcuni veicoli richiedono che il motore sia impostato sulla
posizione presa accessori al fine di alimentare la presa
accessori.
Carica della batteria con la spina
accessori CC
Attenzione! Per ridurre il rischio di danni alla
proprietà: assicurarsi che il veicolo CC presa
accessoria è pulita e priva di particelle prima di
collegare l’unità.
1. Impostare il caricabatterie e connettersi al
seguente batteria passaggi nella sezione
“Collegamento dell’elettroutensile con la spina
accessori CC”.
2. Collegare il caricabatteria cavo di alimentazione
in una presa elettrica. Il LED di alimentazione si
accende blu per indicare che il caricabatterie è
pronto.
Nota:
Se il LED di alimentazione non si accende, controllare
il collegamento alla presa di corrente. Accertarsi che la
presa elettrica è funzionale.
3. Quando l’unità è collegata correttamente e carica,
il LED di ricarica della batteria ( ) si accende
gialla per indicare la batteria è in carica.
Note:
Se il LED di ricarica non si accende, controllare
il collegamento al veicolo DC uscita. Far ruotare
l’adattatore leggermente per accertarsi che non vi
sia un buon contatto. Se è collegato correttamente,
la batteria potrebbe essere in condizione di guasto.
Produttore suggerisce di disporre di una batteria
testato da un qualificato servizio tecnico della batteria.
Alcuni veicoli richiedono che il contatto sia rivolta
a ACC (accessorio) per attivare la DC uscita. Se il
contatto del veicolo deve essere rivolta alla posizione
ACC, assicurarsi che tutti gli accessori del veicolo (ad
es. riscaldamento, ventilatore, radio, TV, luci... etc)
sono disattivati. Se non sono spenti, il caricabatterie
potrebbe non essere in grado di caricare la batteria.
4. Quando la LED di carica completata ( ) si
illumina verde, la batteria è completamente carica.
Quando si scollega il caricabatteria, scollegare il cavo
di alimentazione CA, e poi togliere la spina accessori
CC dalla presa accessori CC del veicolo.
Appeso il caricabatterie
Il gancio di sospensione consente di posizionare il
caricabatterie per uso a conveniente, mani libere.
Attenzione! Per ridurre il rischio di danni alla
proprietà:
• Quando il caricabatterie è appeso per il gancio di
sospensione, non agitare il caricabatterie o oggetto
che è appeso da.
• Non appendere il caricabatterie da fili elettrici o
qualsiasi altra cosa che non è sicuro.
• Utilizzare solo il gancio di sospensione per
appendere il caricabatterie. Il gancio di sospensione
non è destinata a supportare peso aggiuntivo.
Non aggiungere nulla addizionale, al gancio di
sospensione o rischio di rottura potrebbe verificarsi.
RICERCA GUASTI
Se l’elettroutensile non ricarica la batteria:
• Controllare che il caricabatteria sia collegato in modo
corretto a una presa di corrente funzionante de 220240 V CA.
• Assicurarsi che le connessioni di uscita sono
garantiti e la connessione polarità sia corretta
quando si utilizzano i morsetti della batteria.
• Verificare che la tensione corretta è stata selezionata
per la batteria in carica.
• Se la tensione della batteria da ricaricare è scesa a
meno di 2 V, non è possibile ricaricarla con questo
caricabatteria.
MANUTENZIONE
Questo elettroutensile Black & Decker è stato
progettato per funzionare a lungo con un minimo di
manutenzione.
Per ottenere prestazioni sempre soddisfacenti
occorre avere cura dell’elettroutensile e sottoporlo a
manutenzione periodica.
Attenzione! Prima di eseguire la manutenzione
dell’elettroutensile oppure di pulirlo, scollegarlo dalla
presa.
• Strofinare di tanto in tanto l’elettroutensile con
un panno umido. Non usare materiali abrasivi
o detergenti a base di solventi. Non immergere
l’elettroutensile in acqua.
Sostituzione del fusibile nella spina
accessori CC
• Staccare il cappuccio con scanalature ruotandola in
senso antiorario.
• Sfilare la rondella in gomma, la spina centrale e la
molla.
• Estrarre il fusibile.
• Inserire un nuovo fusibile del medesimo tipo e
misura (8 A).
• Infilare la spina centrale, la molla e la rondella in
gomma.
• Montare la calotta con scanalature ruotandola in
senso orario sulla spina.
PROTEZIONE DELL’AMBIENTE
Corretto smaltimento di questo
prodotto
Questo marchio indica che il prodotto
non deve essere smaltito con altri rifiuti
domestici in tutta l’UE. Per evitare
eventuali danni all’ambiente o alla salute
umana smaltimento dei rifiuti, riciclare è
responsabile per favorire il riutilizzo sostenibile delle
risorse materiali. Per restituire il dispositivo utilizzato,
si prega di utilizzare il ritorno e sistemi di raccolta o
rivolgersi al rivenditore presso cui è stato acquistato
il prodotto. Possono prendere questo prodotto per il
riciclaggio sicuro per l’ambiente.
Raccolta differenziata dei prodotti utilizzati e
confezionamento dei materiali permette di essere
riciclati e riutilizzati. Riutilizzo dei materiali
riciclati aiuta a prevenire l’inquinamento
ambientale e riduce la domanda di materie
prime.
Le regolamentazioni locali possono prevedere la
raccolta differenziata dei prodotti elettrici di casa, in siti
di rifiuti comunali o dal rivenditore quando si acquista
un nuovo prodotto.
DATI TECNICI
Ingresso: 220-240V CA, 50/60 Htz,
0,6A
Uscita: 12V CC, 6A
GARANZIA
Certa della qualità dei suoi prodotti, Baccus Worldwide
LLC offre una garanzia eccezionale. Il presente
certificato di garanzia è complementare ai diritti legali
e non li pregiudica in alcun modo. La garanzia è
valida entro il territorio degli Stati membri dell’Unione
Europea e dell’EFTA (European Free Trade Area).
Se un Baccus World Wide LLC prodotto diventa
difettoso a causa di difetti dei materiali, lavorazione o
la mancanza di conformità entro 24 mesi dalla data
di acquisto, Baccus World Wide LLC garantisce per
sostituire le parti difettose, riparazione dei prodotti
sottoposti a normale logorio o sostituire tali prodotti
per assicurarsi di un minimo disagio per il cliente a
meno che:
• il prodotto è stato utilizzato per il commercio,
professionali o noleggio;
• il prodotto è stato sottoposto ad uso improprio o
negligenza;
• il prodotto ha subito danni causati da oggetti
estranee o sostanze oppure incidenti;
• riparazioni sono state tentate da qualcuno diverso da
B&D del personale di servizio.
Per fare un reclamo sulla garanzia, è necessario
presentare la prova di acquisto per Baccus World
Wide LLC all’indirizzo indicato in questo manuale.
Per favore visita il nostro sito web www.
baccusworldwide.com per registrare il nuovo Baccus
World Wide LLC prodotto e per essere sempre
aggiornati su nuovi prodotti e offerte speciali. Ulteriori
informazioni sul Baccus World Wide LLC brand e
la nostra gamma di prodotti è disponibile a www.
baccusworldwide.com.
Baccus Worldwide LLC
Weena 290, 3012 NJ Rotterdam o
Postbus 819, 3000 AV Rotterdam
BC6BDWE_Manual_102815.indd 24-25 10/28/2015 11:15:12 AM
Page 14

NEDERLANDS NEDERLANDS
26 27
HANDLEIDING
BEOOGD GEBRUIK
De batterijlader/onderhouder van Black & Decker is
ontworpen voor het opladen van loodzuuraccu’s. Het
product is uitsluitend bestemd voor huishoudelijk
consumentengebruik.
VEILIGHEIDSINSTRUCTIES
BELANGRIJKE SPECIFICATIE OPMERKING:
Batterijcapaciteit: loodzuuraccu’s, maximaal DC 120Ah.
Waarschuwing! Bij het gebruik van apparaten,
elementaire voorzorgsmaatregelen, waaronder de
navolgende, altijd in acht worden genomen om het
gevaar voor brand, lekkende accu’s, persoonlijk letsel
en materiële schade tot een minimum te beperken.
• Lees deze handleiding zorgvuldig door voordat u het
apparaat in gebruik neemt.
• In deze handleiding wordt ingegaan op het beoogde
gebruik. Het gebruik van andere accessoires of
hulpstukken dan wel de uitvoering van andere
handelingen dan in deze gebruikershandleiding
worden aanbevolen, kan tot persoonlijk letsel leiden.
• Bewaar deze handleiding zorgvuldig zodat u deze
altijd nog eens kunt raadplegen.
Gebruik van het apparaat
Ga bij gebruik van het apparaat altijd voorzichtig te
werk.
• Dit apparaat mag niet zonder supervisie door jonge
of lichamelijk zwakke mensen worden gebruikt.
• Het apparaat mag niet als speelgoed worden
gebruikt.
• Open de behuizing niet. Het apparaat bevat geen
onderdelen die door de gebruiker kunnen worden
gerepareerd.
• Gebruik het apparaat niet in een omgeving met
explosiegevaar, zoals in de nabijheid van brandbare
vloeistoffen, gassen of stof.
• Haal de stekker nooit uit het stopcontact door aan de
kabel te trekken. Zo voorkomt u beschadiging aan de
stekker of de kabel.
Na gebruik
• Bewaar het apparaat na gebruik op een droge, goed
geventileerde plaats, buiten het bereik van kinderen.
• Zorg dat het bewaarde apparaat niet toegankelijk is
voor kinderen.
• Wanneer het apparaat in de auto ligt, moet u
het apparaat in de kofferruimte plaatsen of goed
vastzetten, zodat het apparaat niet kan wegschieten
bij plotselinge veranderingen in snelheid of richting.
• Bescherm het apparaat tegen direct zonlicht, hitte en
vocht.
Inspectie en reparaties
• Controleer het apparaat vóór gebruik op
beschadigingen en defecten. Controleer het vooral
op gebroken onderdelen, schade aan de schakelaars
en andere omstandigheden die de werking ervan
kunnen beïnvloeden.
• Gebruik het apparaat niet in geval van een of meer
beschadigde of defecte onderdelen.
• Zijn er beschadigde of defecte onderdelen
gerepareerd of vervangen door de fabrikant.
• Probeer nooit andere onderdelen te verwijderen of
vervangen dan in deze handleiding zijn vermeld.
Veiligheid aansluitsnoer
Waarschuwing! Wijzig nooit het aansluitsnoer of
de stekker. Als de stekker niet past, laat u een goed
stopcontact installeren door een bevoegde elektriciën.
Een onjuiste aansluiting kan tot een elektrische schok
leiden.
Het apparaat is voorzien van de
volgende symbolen:
Dit gereedschap is dubbel geïsoleerd.
Een aardaansluiting is daarom niet
noodzakelijk. Controleer altijd of uw
netspanning overeenkomt met de
waarde op het typeplaatje.
Lees de gehele gebruiksaanwijzing
zorgvuldig door.
Elektrische veiligheid
Controleer altijd of uw netspanning overeenkomt met
de waarde op het typeplaatje.
• Als het netsnoer beschadigd is, moet het worden
vervangen door de fabrikant om een gevaar te
voorkomen.
• Waarschuwing! Ter voorkoming van ernstig of
dodelijk letsel als gevolg van brand, explosie of
elektrische schok: Dit apparaat moet dit apparaat
worden aangesloten op een Aardlek Schakeling
Interruptie (aardlekschakelaar) beschermd
stopcontact.
Veiligheidsinstructies voor acculaders
• Niet-laadbare batterijen mogen nooit worden
opgeladen.
• Een defect snoer moet direct worden vervangen.
• Stel de acculader niet bloot aan water.
• Open de acculader niet.
• Prik nooit met een scherp voorwerp in de acculader.
• Nooit toestaan dat de rode en zwarte klemmen te
raken elkaar of een andere gemeenschappelijke
metalen dirigent. Dit kan leiden tot schade aan het
toestel en/of maak een vonk/explosie gevaar.
ACCU’S
Waarschuwing! Probeer nooit een bevroren accu op
te laden.
• Onder extreme omstandigheden kunnen accu’s
lekkages vertonen. Wanneer de accu’s nat of vochtig
zijn, veegt u de vloeistof voorzichtig af met een doek.
Vermijd huidcontact.
• Bij huid- of oogcontact volgt u de onderstaande
instructies.
– Waarschuwing! Accuvloeistof is verdund
zwavelzuur en kan letsel of materiële schade
veroorzaken. Bij huidcontact moet u de vloeistof
direct afspoelen met water. Raadpleeg uw huisarts
als er rode vlekken ontstaan of bij een pijnlijke of
geïrriteerde huid. Bij oogcontact moet u de vloeistof
direct afspoelen met water en meteen uw huisarts
raadplegen.
• Gooi lege accu’s weg volgens de instructies in het
gedeelte “Milieu”.
• Voeg in elke cel gedestilleerd water toe totdat het
accuzuur het door de accufabrikant opgegeven
niveau bereikt. Hierdoor kan overtollig gas de cellen
verlaten. Overschrijd het maximale niveau niet. Volg
voor een accu zonder celdopjes (onderhoudsvrije
accu) nauwkeurig de oplaadinstructies van de
fabrikant op.
• Bestudeer de specifieke voorzorgsmaatregelen van
de accufabrikant, zoals het al dan niet verwijderen
van de celdopjes tijdens het opladen en de
aanbevolen oplaadsnelheden.
• Zorg ervoor dat de eerste oplaadsnelheid de vereiste
van de accufabrikant niet overschrijdt.
• Waarschuwing! Gevaar voor explosieve
gasmengsels. Werken in de nabijheid van een
loodzuuraccu is gevaarlijk. Tijdens de normale
werking van accu’s worden explosieve gassen
gegenereerd. Daarom is het van het allergrootste
belang dat u telkens voordat u de acculader gebruikt,
deze handleiding leest en de instructies nauwkeurig
opvolgt.
• Het gebruik van een hulpstuk dat niet door Black &
Decker wordt aanbevolen of verkocht, kan tot gevaar
voor brand, een elektrische schok of persoonlijk
letsel leiden.
• Gebruik geen verlengsnoer, tenzij dit absoluut
noodzakelijk is. Het gebruik van een ongeschikt
verlengsnoer kan gevaar voor brand en een
elektrische schok opleveren en maakt de garantie
ongeldig.
• BELANGRIJK: Dit apparaat is voorzien van een
aluminium koellichaam , die wordt gebruikt voor
hitte dissipatie en bevindt zich aan de onderzijde
van de inrichting. Raak nooit de warmteafleider
wanneer het apparaat in gebruik is en nooit de
bodem van de inrichting toestaan in contact te
komen met brandbare materialen tijdens gebruik.
Autostekker veiligheid
• Waarschuwing! Sluit dit apparaat NOOIT op
een positief geaard voertuig met gebruik van de
autostekker aan.
• Zorg dat de uitgang voor hulpstukken van het
voertuig schoon en vrij van vuil is alvorens het
apparaat aan te sluiten.
• Waarschuwing – gevaar van brand! Indien
het voertuig zekering opent (blaast) wanneer u
verbinding deze batterijlader, maak dan geen gebruik
van deze batterijoplader met deze auto accessoirecontactdoos.
– Vervang niet herhaaldelijk, vervang daarna de zekering.
– Vervang niet de auto accessoire-contactdoos
zekering met een zekering met een hogere rating.
– Probeer nooit om een patch de zekering met tinfolie
of draad.
Even welk van deze acties kunnen ernstige
elektrische schade en/of brand.
Specifieke veiligheidsinstructies
voor het gebruik van het apparaat in
vochtige omgevingen
De behuizing van het apparaat is conform IP67
stofen waterbestendig normen. Het is echter
aanbevolen dat u het volgende in acht:
• Dompel nooit het apparaat in water dieper dan 1
meter, voor langer dan 30 minuten en/of in andere
temperaturen dan tussen 5 ºC en 40 ºC, of het
apparaat kan volhouden permanente schade.
• Dompel nooit het apparaat in water tenzij de lagerbus
(isolatie) van de AC of DC snoer intact is.
• Niet laten de stekker of klemmen te worden
blootgesteld aan de elementen voor langere tijd ; en
nooit onderdompelen.
Veiligheid van personen
Draag een veiligheidsbril en geschikte kleding ter
bescherming tegen contact met accuvloeistof.
Vermijd aanraking van de ogen terwijl u met een accu
werkt. Zuur, zuurdeeltjes of corrosie kunnen in uw
ogen komen.
Verwijder persoonlijke metalen voorwerpen, zoals
ringen, armbanden, halskettingen en horloges, wanneer
u met een loodzuuraccu werkt. Een loodzuuraccu kan
een kortsluitstroom produceren die krachtig genoeg is
om een ernstige brandwond te veroorzaken.
Wees extra voorzichtig om de kans te verminderen dat
er een metalen voorwerp op de accu valt. Daardoor
kunnen er vonken of kortsluiting in de accu of een
ander elektrisch onderdeel ontstaan, wat tot een
explosie kan leiden.
BC6BDWE_Manual_102815.indd 26-27 10/28/2015 11:15:12 AM
Page 15

NEDERLANDS NEDERLANDS
28 29
ONDERDELEN
1. Stroom LED
2. Opknoping haak
3. Omgekeerde polariteit LED
4. Opladen van de batterij LED
5. Opladen voltooid LED
6. In lijn aansluiting
7.
AC-netstekker
8. DC accessoire stekker
9. Accuklemmen
VOORBEREIDINGEN ALVORENS
HET OPLADEN
Het toestel moet alleen worden aangesloten op
een 12V lood-zuur batterij. Voordat het opladen,
bevestigen dat de spanning van de batterij is
12V door te verwijzen naar het label op de
batterij of op de informatie beschikbaar met
betrekking tot de toepassing, bijvoorbeeld de auto
gebruikershandleiding.
Gebruik het apparaat niet voor het opladen van droge
batterijen die in huishoudelijke apparaten worden
gebruikt. Deze batterijen kunnen exploderen en zo
personen verwonden en schade aanrichten.
Waarschuwing! Tijdens het opladen kan explosief
gas vrijkomen uit loodzuuraccu’s. Zorg ervoor dat
de ruimte goed wordt geventileerd en verwijder
eventuele ontstekingsbronnen tijdens het uitvoeren van
oplaadprocedures.
• Plaats nooit de batterij oplader direct boven
de batterij; gassen uit de accu gaat roesten en
beschadigt de batterij oplader.
• Sta nooit accuzuur te druppelen op de batterijlader.
• Plaats de acculader zo ver van de accu zoals de
kabels zal toestaan. De acculader bevat schakelaars
die een vonk kunnen veroorzaken.
• Plaats nooit de batterij bovenop de oplader.
• Explosieve gassen kunnen vlak boven de grond
ophopen. Plaats de acculader zo hoog boven de
grond mogelijk.
• Gebruik geen elektrisch gereedschap in het gebied
waar opladen.
• Rook niet en gebruik geen open vuur in het gebied
waar opladen.
• Volg de instructies voor het aansluiten en
loskoppelen van de draden van de lader of de
accuklemmen op.
De accu van een boot moet aan land worden
opgeladen. Voor het aan boord opladen van de accu
is speciale apparatuur nodig. Dit apparaat is NIET
ontworpen voor een dergelijke toepassing.
Voertuigen kunnen zijn voorzien van elektrische
en elektronische systemen (bijvoorbeeld een
motorbeheersysteem, mobiele telefoon) die
beschadigd kunnen raken als ze worden blootgesteld
aan hoge voltages en spanningspieken. Lees
voordat u het apparaat op het voertuig aansluit de
gebruikershandleiding van het voertuig door om na te
gaan of extern opladen is toegestaan.
• Volg deze instructies op, evenals de instructies die
door de accufabrikant en de voertuigfabrikant zijn
gepubliceerd.
• Alleen aansluiten en loskoppelen van de dc-uitgang
klemmen na het verwijderen van het aanbod-snoer
uit het stopcontact. Nooit toestaan klemmen aan
elkaar raken.
• Controleer de polariteit van de accupolen van het
voertuig voordat u het apparaat aansluit. Sluit altijd
eerst de negatieve (zwarte) kabel aan en vervolgens
de positieve (rode) kabel.
Wanneer u een accu oplaadt die in het circuit is
geïnstalleerd, volgt u de instructies van de fabrikant
voor toegang tot de accu en de volgende instructies
op:
• Laad de accu niet op terwijl de motor draait.
• Houd er rekening mee dat motoronderdelen, zoals de
ventilator voor de koelvloeistof, automatisch kunnen
starten. Houd handen en andere lichaamsdelen uit de
buurt van motoronderdelen en plaats de acculader en
kabels zo dat contact wordt voorkomen.
• Zorg ervoor dat de acculader en de kabels zo zijn
aangebracht dat schade door het sluiten van deuren
en kleppen van het motorcompartiment wordt
voorkomen.
• Zorg ervoor dat aansluitingen tot stand kunnen
worden gebracht zonder aanraking van de metalen
carrosserie of onderdelen in de buurt van de accu.
• Als u dit apparaat in de buurt van de accu en motor
van een voertuig gebruikt, moet u het apparaat
op een vlakke, stabiele ondergrond plaatsen en
klemmen, kabels, kleding en lichaamsdelen uit de
buurt houden van bewegende onderdelen van het
voertuig.
• Als de accu uit het voertuig moet worden verwijderd
om deze op te laden of om de polen te reinigen,
zorgt u ervoor dat alle toebehoren in het voertuig is
uitgeschakeld, zodat dit geen vonk kan veroorzaken.
• Koppel het apparaat los als u het gaat reinigen of
onderhouden om kans op elektrische schokken te
voorkomen.
GEBRUIK
Nadat alle voorbereidingen voor het opladen en voor
de persoonlijke veiligheid zijn voltooid, gaat u als volgt
te werk:
• Voor de meeste auto- en soortgelijke toepassingen
kan de acculader op de accu worden aangesloten
terwijl deze is aangesloten op het gelijkstroomcircuit.
Volgt u de instructies op die worden vermeld in ‘Een
accu opladen die in het circuit is geïnstalleerd’.
• Als de accu van het circuit moet worden
losgekoppeld voordat u deze kunt opladen, volgt u
de instructies op die worden vermeld in ‘Een accu
opladen die van het circuit is losgekoppeld’.
Waarschuwing! De accu van een boot moet aan land
worden opgeladen. Voor het aan boord opladen van de
accu is speciale apparatuur nodig.
Het opladen van een batterij die is
aangesloten op het circuit
Waarschuwing! Onjuiste aansluiting, kortsluiting
van de accu, locatie van de accu en locatie van de
acculader kunnen een gevaar vormen. Zorg ervoor dat
u de juiste voorbereidingen hebt getroffen voordat u
verdergaat.
Waarschuwing! Als de accupolen onbereikbaar zijn
of als de klemmen van de acculader de carrosserie
of onderdelen in de buurt van de accu raken, moet u
de accu verwijderen voordat u deze oplaadt met de
accuklemmen. Volg de instructies van de fabrikant
voor het verwijderen van de accu op.
• Controleer de polariteit van de accupolen. Een
positieve (POS, P, +) accupool heeft meestal een
grotere diameter dan de negatieve (NEG, N, –)
accupool.
• Volg de instructies van de fabrikant op voor het
verwijderen van eventuele isolerende kapjes van de
accupolen. Sluit de positieve (rode) klem van de
acculader aan op de positieve (POS, P, +) pool van
de accu.
• Sluit de negatieve (zwarte) klem van de acculader
aan op de negatieve (NEG, N, –) pool van de accu of
aan het chassis.
Wanneer u de acculader loskoppelt van de accu, gaat
u altijd als volgt te werk:
• Stekker uit het acculader.
• Verwijder eerst de negatieve (zwarte) klem.
• Verwijder de positieve (rode) klem het laatst.
• Breng eventuele isolerende kapjes weer aan op de
accupolen.
Het opladen van een batterij die wordt
losgekoppeld van het circuit
Waarschuwing! Onjuiste aansluiting, kortsluiting
van de accu, locatie van de accu en locatie van de
acculader kunnen een gevaar vormen. Zorg ervoor dat
u de juiste voorbereidingen hebt getroffen voordat u
verdergaat.
• Als de accu nog niet uit het circuit is verwijderd,
volgt u de instructies van de fabrikant voor het
verwijderen van de accu op voordat u deze oplaadt.
• Controleer de polariteit van de accupolen. Een
positieve (POS, P, +) accupool heeft meestal een
grotere diameter dan de negatieve (NEG, N, –)
accupool.
• Sluit de positieve (rode) klem van de acculader aan
op de positieve (POS, P, +) pool van de accu.
• Sluit de negatieve (zwarte) klem van de acculader
aan op de negatieve (NEG, N, –) pool van de accu.
Wanneer u de acculader loskoppelt van de accu, gaat
u altijd als volgt te werk:
• Stekker uit het acculader.
• Verwijder eerst de negatieve (zwarte) klem.
• Verwijder de positieve (rode) klem het laatst.
• Breng eventuele isolerende kapjes weer aan op de
accupolen.
Het apparaat aansluiten met de
accuklemmen
Waarschuwing! Verwijder altijd de
wisselstroomstekker uit het wisselstroomstopcontact
voordat u het apparaat aansluit op of loskoppelt van
de accu.
Waarschuwing! Sluit nooit een van de accessoire leidt
samen als dit zal leiden tot een gevaar. Het accessoire
leidt alleen ooit worden aangesloten op de in-line
connector.
• Sluit de accuklemmen op de acculader aan met de
doorlopende aansluiting.
• De uitgangsdraden van het apparaat zijn voorzien
van accuklemmen met een kleurcode (rood-positief
en zwart-negatief). Deze worden rechtstreeks
aangesloten op de overeenkomstige aansluitingen op
de accupolen.
• Volg de stappen zoals beschreven in het
desbetreffende hoofdstuk (“Het opladen van een
batterij die is aangesloten op het circuit” of “Het
opladen van een batterij die wordt losgekoppeld van
het circuit”).
• Duw de wisselstroomstekker van de acculader in een
wisselstroomstopcontact.
De accu opladen met de accuklemmen
1. De acculader instellen en verbinding maken
met de batterij de stappen te volgen in het “Het
apparaat aansluiten met de accuklemmen” sectie.
2. Sluit de acculader het netsnoer in een stopcontact.
De voedings-LED brandt blauw om aan te geven
dat de oplader is gereed.
Opmerking:
Als het aan-uitlampje niet brandt,
controleer dan de aansluiting naar
het stopcontact. Controleer of het
stopcontact werkt.
3. Wanneer het apparaat correct is aangesloten en
wordt opgeladen, de Opladen van de batterij LED
( ) brandt geel om aan te geven dat de batterij
wordt opgeladen.
Opmerkingen:
Indien de opladen van de batterij
LED niet gaat branden, controleer de
verbinding naar de batterij. Als de
klemmen goed zijn aangesloten, is
de batterij mogelijk defect. Fabrikant
BC6BDWE_Manual_102815.indd 28-29 10/28/2015 11:15:12 AM
Page 16

NEDERLANDS NEDERLANDS
30 31
adviseert het hebben van de batterij
getest door een gekwalificeerde accu
service monteur.
Als de klemmen zijn verkeerd
aangesloten met betrekking op de
polariteit, de omgekeerde polariteit
LED ( ) gaat branden. Haal de
stekker uit het stopcontact en
verwijder daarna de klemmen. Sluit
de klemmen goed.
4. Wanneer het Opladen voltooid LED ( ) groen
oplicht, is de batterij volledig opgeladen.
Bij het losmaken van de accu oplader, koppel het
netsnoer, verwijder de klem van het chassis van de
auto en verwijder vervolgens de klem van de accupool.
Het apparaat aansluiten met de DC
accessoire stekker
Waarschuwing! Verwijder altijd de
wisselstroomstekker uit het wisselstroomstopcontact
voordat u het apparaat aansluit op of loskoppelt van
de accu.
Waarschuwing! Sluit nooit een van de accessoire leidt
samen als dit zal leiden tot een gevaar. Het accessoire
leidt alleen ooit worden aangesloten op de in-line
connector.
• Sluit de DC accessoire stekker op de acculader aan
met de doorlopende aansluiting.
• Duw de DC accessoire stekker in het stopcontact
voor gelijkstroomhulpmiddelen van het voertuig.
• Duw de wisselstroomstekker van de acculader in een
wisselstroomstopcontact.
Opmerking:
ommige voertuigen vereisen dat de
ontsteking worden overgeschakeld naar de
accessoire-aansluiting positie om de macht
van de accessoire-aansluiting.
De accu opladen met de DC accessoire
stekker
Voorzichtigheid! Om het risico van schade aan
eigendommen: zorg ervoor dat de accessoire
stopcontact DC is schoon en vrij van vuil voordat de
eenheid aansluiten.
1. De acculader instellen en verbinding maken
met de batterij de stappen te volgen in het “Het
apparaat aansluiten met de DC accessoire stekker”
sectie.
2. Sluit de acculader het netsnoer in een stopcontact.
De voedings-LED brandt blauw om aan te geven
dat de oplader is gereed.
Opmerking:
Als het aan-uitlampje niet brandt,
controleer dan de aansluiting naar
het stopcontact. Controleer of het
stopcontact werkt.
3. Wanneer het apparaat correct is aangesloten en
wordt opgeladen, de Opladen van de batterij LED
( ) brandt geel om aan te geven dat de batterij
wordt opgeladen.
Opmerkingen:
Indien de opladen van de batterij LED
niet gaat branden, controleer dan de
aansluiting naar de auto’s stopcontact
voor gelijkstroomhulpmiddelen. Draai
de adapter iets om er zeker van te zijn
dat er goed contact is. Als alles goed
is aangesloten, kan de accu worden
in storing staat. Fabrikant adviseert
het hebben van de batterij getest
door een gekwalificeerde accu service
monteur.
Sommige voertuigen vereisen dat het
contact worden omgeschakeld naar
de ACC (accessoire) stand voor het
activeren van de DC toebehoren. Als
uw auto contact nodig is kan worden
gedraaid om de ACC stand, controleer
of alle auto accessoires (bijv.
verwarming, ventilator, radio, TV,
verlichting ... etc) zijn uitgeschakeld.
Indien niet wordt uitgeschakeld, kan
het zijn dat de lader niet in staat zijn
om de batterij op te laden.
4. Wanneer het Opladen voltooid LED ( ) groen
oplicht, is de batterij volledig opgeladen.
Bij het losmaken van de accu oplader, koppel het
netsnoer, en verwijder vervolgens de 12 volt DC
accessoire stekker uit het voertuig-stopcontact.
Opknoping de batterijlader
Kunt u de hangende haak voor opknoping de
batterijlader voor eenvoudig, handsfree werking.
Voorzichtigheid! Om het risico van schade aan
eigendommen:
• Als oplader is opgehangen aan de hangende haak,
niet doen schud de lader of het object dat het is
opknoping van.
• Niet doen hang de oplader van elektrische draden of
iets anders dat het niet veilig is.
• Gebruik alleen de hangende haak voor het
ophangen de oplader. De hangende haak is niet
bedoeld ter ondersteuning van extra gewicht. Hang
niets toegevoegd aan de haak hangen of kans op
beschadiging kan optreden.
PROBLEMEN OPLOSSEN
Als het apparaat niet oplaadt:
• Controleer of de acculader goed is aangesloten op
een functionerend 220-240V stopcontact.
• Zorg ervoor dat de aansluitingen zijn beveiligd en
de polariteit aansluiting correct is bij gebruik van de
accuklemmen.
• Als de spanning van de accu die moet worden
opgeladen is gedaald onder 2 Volt, kan de accu niet
met deze acculader worden opgeladen.
ONDERHOUD
Uw Black & Decker-gereedschap/apparaat is
ontworpen om gedurende langere periode te
functioneren met een minimum aan onderhoud. U
kunt het gereedschap naar volle tevredenheid blijven
gebruiken als u voor correct onderhoud zorgt en het
gereedschap regelmatig schoonmaakt.
Waarschuwing! Verwijder altijd de stekker
uit het stopcontact voordat u onderhouds- of
reinigingswerkzaamheden aan het gereedschap/
apparaat uitvoert.
• Neem het apparaat van tijd tot tijd af met een
vochtige doek. Gebruik geen schuur- of oplosmiddel.
Dompel het apparaat niet onder in water.
De zekering in het stopcontact voor
gelijkstroomhulpmiddelen vervangen
• Draai de dop met groeven linksom om deze te
verwijderen.
• Verwijder de rubberen afdichtring, de centrale pin en
de veer.
• Verwijder de zekering.
• Plaats een nieuwe zekering van hetzelfde type en
formaat (8 A).
• Installeer de centrale pin, de veer en de rubberen
afdichtring.
• Draai de dop met groeven rechtsom om deze te vast
te zetten.
BESCHERMING VAN HET MILIEU
Correcte verwijdering van dit product
Deze markering geeft aan dat dit product
niet mag worden weggegooid met ander
huishoudelijk afval in de gehele EU. Om te
voorkomen dat mogelijke schade aan het
milieu of de menselijke gezondheid door
ongecontroleerde afvalverwijdering, verantwoorde
manier recyclen, zodat het duurzame hergebruik
van grondstoffen te bevorderen. Terug te keren het
gebruikte toestel, gebruik dan de inzamelsysteem of
contact opnemen met de winkelier waar het product
is gekocht. Ze kunnen dit product milieuvriendelijk
kunnen l aten recyclen.
Gescheiden inzameling van gebruikte producten en
verpakkingen te recycleren materiaal en opnieuw
gebruikt. Re-gebruik van gerecycleerde
materialen voorkomt milieuvervuiling en
vermindert de vraag naar grondstoffen.
De plaatselijke voorschriften kunnen voorzien voor de
gescheiden inzameling van elektrische producten uit
het huishouden, bij gemeentelijke stortplaatsen of door
de verkoper bij aankoop van een nieuw product.
TECHNISCHE GEGEVENS
Ingang: 220-240 VAC, 50/60 Htz,
0,6 A
Uitgang: 12V DC, 6A
GARANTIE
Baccus World Wide LLC heeft vertrouwen in hun
producten en biedt een uitstekende garantie. Dit
garantiebewijs is naast en op geen enkele wijze
vooroordelen uw wettelijke rechten. De garantie geldt
in de lidstaten van de Europese Unie en de Europese
Vrijhandelsassociatie.
Mocht uw Baccus World Wide LLC product, binnen 24
maanden na de datum van aankoop, defect zou blijken
ten gevolge van defecte materialen, vakmanschap
of het gebrek aan overeenstemming, dan Baccus
World Wide LLC garanties de kosteloze vervanging
van defecte onderdelen, de reparatie van het product
onderworpen aan normale slijtage of de vervanging
van het product, tenzij:
• het product is gebruikt voor handelsdoeleinden,
professionele toepassingen of verhuurdoeleinden;
• het product is blootgesteld aan verkeerd gebruik of
verwaarlozing;
• het product heeft opgelopen schade door vreemde
voorwerpen, stoffen of ongevallen;
• Reparaties zijn uitgevoerd door andere personen dan
Baccus World Wide LLC service personeel.
Om aanspraak op de garantie maken, moet u indienen
aankoopbewijs te naar Baccus World Wide LLC, op het
adres vermeld in deze handleiding.
Bezoek alstublieft onze website www.baccusworldwide.
com registreer uw Baccus World Wide LLC product en
op de hoogte te worden gesteld van nieuwe producten
en speciale aanbiedingen. Meer informatie over het
Baccus World Wide LLC merk en onze producten is
beschikbaar op www.baccusworldwide.com.
Baccus Worldwide LLC
Weena 290, 3012 NJ Rotterdam of
Postbus 819, 3000 AV Rotterdam
BC6BDWE_Manual_102815.indd 30-31 10/28/2015 11:15:12 AM
Page 17

ESPAÑOL ESPAÑOL
32 33
MANUAL DE
INSTRUCCIONES
USO PREVISTO
Su cargador de batería Black & Decker está diseñado
para cargar baterías de ácido de plomo. Este producto
está pensado únicamente para uso doméstico.
INSTRUCCIONES DE SEGURIDAD
NOTA IMPORTANTE DE ESPECIFICACIONES:
Capacidad de la batería: plomo-ácido, máximo 12V
CC, 120Ah.
¡Atención! Si utiliza aparatos, es necesario seguir las
precauciones de seguridad básicas, incluidas las que
se indican a continuación, para reducir el riesgo de
incendios, derrame de líquido de baterías, lesiones y
daños materiales.
• Lea todo el manual detenidamente antes de utilizar
el aparato.
• En este manual se describe el uso para el que se
ha diseñado el aparato. La utilización de accesorios
o la realización de operaciones distintas de las
recomendadas en este manual de instrucciones
puede presentar un riesgo de lesiones.
• Conserve este manual para futuras consultas.
Utilización del aparato
Tenga mucho cuidado al utilizar el aparato.
• Este aparato está pensado para utilizarse con la
supervisión correspondiente en el caso de menores
o personas que no cuentan con la fuerza necesaria.
• Este aparato no es un juguete.
• No abra la carcasa. Las piezas del interior del aparato
no pueden ser reparadas por el usuario.
• No utilice el aparato en un entorno con peligro de
explosión, en el que se encuentren combustibles
líquidos, gases o material en polvo.
• Para evitar dañar las clavijas y los cables, no tire del
cable para extraer la clavija de la toma de corriente.
Después de la utilización
• Cuando el aparato no esté en uso, deberá guardarse
en un lugar seco, bien ventilado, y lejos del alcance
de los niños.
• Los niños no deben tener acceso a los aparatos
guardados.
• Cuando se guarde o transporte el aparato en
un vehículo, deberá colocarse en el maletero o
asegurarse para evitar movimientos producidos por
cambios repentinos en la velocidad o la dirección.
• El aparato debe protegerse de la luz directa del sol,
el calor y la humedad.
Inspecciones y reparaciones
• Antes de utilizarlo, compruebe que el aparato no
tiene piezas dañadas o defectuosas. Compruebe que
no hay piezas rotas, que los interruptores no están
dañados y que no existen otros defectos que puedan
afectar al funcionamiento del aparato.
• No utilice el aparato si presenta alguna pieza dañada
o defectuosa.
• Haga que las partes dañadas o reparado o
reemplazado por el fabricante.
• Nunca intente extraer o sustituir piezas no
especificadas en este manual.
Seguridad del cable de alimentación
¡Atención! Nunca modifique el cable de CA ni el
enchufe. Si no se adapta, haga que un electricista
cualificado le instale una toma adecuada. Una
conexión inadecuada puede provocar una descarga
eléctrica.
El aparato muestra los siguientes
símbolos:
La herramienta lleva un doble
aislamiento; por lo tanto no requiere de
una toma a tierra. Compruebe siempre
que la tensión de la red corresponda con
el valor indicado en la placa de datos de
la herramienta.
Lea este manual de instrucciones con
atención.
Sicurezza elettrica
Controllare sempre che l’alimentazione corrisponda
alla tensione indicata sulla targhetta delle
caratteristiche.
• In caso di danneggiamento del filo di alimentazione,
è necessario farlo riparare dal fabbricante in modo
da evitare eventuali pericoli.
• ¡Advertencia! Para evitar lesiones graves o
la muerte por incendio, explosión o descarga
eléctrica: Este dispositivo debe estar conectado
a un circuito de falla a tierra (GFCI) protegidos
tomacorriente CA.
Instrucciones de seguridad específicas
para cargadores de batería.
• Nunca intente cargar baterías no recargables.
• Sustituya los cables defectuosos inmediatamente.
• No exponga el cargador de batería al agua.
• No abra el cargador de batería.
• No aplique ningún dispositivo para medir la
resistencia del cargador de batería.
• Nunca permita que las pinzas roja y negra entren
en contacto entre sí ni con otro conductor de metal
común, ya que, de lo contrario, podrían producirse
daños en el aparato o peligro de que se originen
chispas o una explosión.
BATERÍAS
¡Atención! No cargue una batería helada.
• Es posible que se produzcan fugas en las baterías
en condiciones extremas. Cuando observe
que se producen fugas en las baterías, limpie
cuidadosamente el líquido con un paño. Evite el
contacto con la piel.
• En caso de que se produzca contacto con la piel
o los ojos, siga las instrucciones facilitadas a
continuación.
– ¡Atención! El líquido de las baterías es un ácido
sulfúrico diluido y puede provocar lesiones
personales o daños materiales. En caso de
que se produzca contacto con la piel, aclare la
zona con agua. Si se produce enrojecimiento,
dolor o irritación, solicite atención médica. En
caso de contacto con los ojos, aclare la zona
inmediatamente con agua limpia y solicite atención
médica inmediata.
• Cuando vaya a desechar las baterías, siga las
instrucciones facilitadas en la sección “Protección
del medio ambiente”.
• Añada agua destilada a cada celda hasta que el
ácido de la batería alcance el nivel especificado por
el fabricante. Esto ayuda a purgar el exceso de gas
de las celdas. No llene la celda en exceso. Para una
batería sin cubiertas de celdas (sin mantenimiento)
siga con cuidado las instrucciones de carga del
fabricante.
• Tenga en cuenta todas las precauciones específicas
del fabricante de la batería, como quitar o no las
cubiertas de las celdas durante la carga, así como
los niveles de carga recomendados.
• Asegúrese de que el nivel inicial de carga no
sobrepasa los requisitos del fabricante de la batería.
• ¡Atención! Riesgo de mezclas de gas explosivas.
Es peligroso trabajar cerca de una batería de ácido
de plomo. Las baterías generan gases explosivos
durante su funcionamiento normal. Por este motivo,
es de mayor importancia que antes de utilizar el
cargador de baterías lea siempre este manual y siga
las instrucciones con exactitud.
• El uso de un accesorio que no venda o recomiende
Black & Decker puede suponer un riesgo de
incendio, de descarga eléctrica o de daño para las
personas.
• No se debería utilizar un cable de prolongación si
no es absolutamente necesario. El uso de un cable
de extensión que no sea adecuado podría suponer
un riesgo de incendio y de descarga eléctrica e
invalidaría la garantía.
• IMPORTANTE: Esta unidad cuenta con un disipador
de calor del disipador de calor de aluminio, que se
utiliza para la disipación de calor y se encuentra
en la base de la unidad. Nunca toque el disipador
de calor mientras la unidad está funcionando
y nunca permitir que la parte inferior de la
unidad para ponerse en contacto con materiales
inflamables durante el funcionamiento.
Seguridad de enchufe de adaptador
del vehículo
• ¡Advertencia! Nunca conecte esta unidad a una toma
de tierra positiva vehículo mediante el adaptador de
enchufe del vehículo.
• Asegúrese de que enchufe del accesorio del vehículo
esté limpio y libre de escombros antes de conectar
la unidad.
• Advertencia – riesgo de incendio! Si el vehículo
del fusible de salida del accesorio se abre (golpes)
al enchufar este cargador de baterías, no utilice este
cargador de batería con este enchufe del accesorio
del vehículo.
– No reemplace el fusible repetidamente.
– No reemplace el fusible con un fusible con un
amperaje superior.
– Nunca intente parchear el fusible con papel de
estaño o alambre.
Cualquiera de estas acciones puede causar serios
daños eléctricos y/o un incendio.
Instrucciones de seguridad específicas
para el uso de la unidad en ambientes
mojados
La cubierta de esta unidad está clasificada hasta los
estándares IP67 como prueba de polvo y resistente
al agua. Sin embargo, se recomienda que usted
observe los siguientes:
• Nunca sumerja la unidad en agua más allá de 1
metro, por tiempo superior a 30 minutos y / o
temperaturas diferentes a entre 5 º C y 40 º C, o la
unidad podría sufrir daños permanentes.
• Nunca sumerja la unidad en agua a menos que el
buje (aislamiento) de cable de CA o de cable de CC
está intacto.
• Nunca permita que los enchufes o pinzas se
expongan a los elementos durante largos períodos
de tiempo, y nunca sumerja.
Seguridad personal
Utilice gafas protectoras y ropa adecuada que le
proteja del contacto con el líquido de la batería.
No se toque los ojos mientras trabaje con una batería.
Podría entrar ácido, partículas de ácido o corrosión en
los ojos.
Quítese los elementos personales de metal como
anillos, pulseras, collares y relojes cuando trabaje
con una batería de ácido de plomo. Una batería de
ácido de plomo puede provocar un cortocircuito con
suficiente corriente para provocar una quemadura
importante.
Tenga especial cuidado para reducir el riesgo de caída
de objetos de metal en la batería. Esto podría provocar
BC6BDWE_Manual_102815.indd 32-33 10/28/2015 11:15:12 AM
Page 18

ESPAÑOL ESPAÑOL
34 35
chispas o cortocircuitos en la batería o en otras piezas
eléctricas, que podrían causar una explosión.
CARACTERÍSTICAS
1. Indicador LED de encendido
2. Gancho colgante
3. Indicador LED de polaridad reversa
4. Indicador LED de la batería se está cargando
5. Indicador LED que la carga está completa
6. Conector en línea
7. Enchufe de CA
8. Enchufe accesorio de CC
9. Pinzas de batería
PREPARACIÓN ANTES DE CARGAR
El aparato sólo debe ser conectado a una batería de
12V de plomo-ácido. Antes de la carga, confirmar
que el voltaje de la batería es de 12V por referencia
a la etiqueta de la batería o de información
disponible en relación con de la batería operación,
por ejemplo en la manual del usuario coche.
No utilice el aparato para cargar pilas secas utilizadas
normalmente en aparatos domésticos, ya que es
posible que se produzcan explosiones que provoquen
lesiones y daños materiales.
¡Atención! Gas explosivo puede ser ventilado desde
baterías de plomo durante la carga. Asegúrese de que
la zona esté bien ventilada y quite todas las fuentes de
ignición al realizar procedimientos de carga.
• No coloque el cargador de la batería en la parte
superior de la batería; los gases de la batería corroen
y dañar el cargador.
• Nunca permita que el ácido de la batería gotee sobre
el cargador cuando lee la gravedad o llena la batería.
• Colocar el cargador de la batería lo más alejado de
la batería ya que los cables permitirá. El cargador de
batería contiene interruptores que podrían provocar
chispas.
• No coloque la batería encima del cargador.
• Se pueden acumular gases explosivos cerca del
suelo. Localice el cargador de la batería lo más alto
posible por encima del nivel del suelo.
• No utilice herramientas eléctricas en el área de carga.
• No fume ni tenga llamas abiertas en el área de carga.
• Siga las instrucciones para conectar y desconectar
los cables del cargador de baterías o los terminales
de la batería.
Las baterías marinas (de embarcación) deben
extraerse y cargarse en tierra. Para cargarlas en la
embarcación es necesario disponer de un equipo
diseñado específicamente para uso marino. Este
aparato NO está diseñado para este uso.
Es posible que los vehículos dispongan de sistemas
electrónicos y eléctricos, (por ejemplo, sistemas de
gestión del motor, teléfonos móviles, etc.) que pueden
dañarse si se someten a voltajes elevados durante el
encendido o a sobretensiones. Antes de conectar el
aparato al vehículo, lea el manual de instrucciones del
mismo para comprobar si se admite la carga externa.
• Siga estas instrucciones, además de las que publican
el fabricante de la batería y del vehículo.
• Para conectar y desconectar las pinzas de salida de
CC, primero debe quitar el cable de alimentación
de la toma eléctrica. No permita que las pinzas o
terminales de anillo se toquen.
• Compruebe la polaridad de los terminales de la
batería del vehículo antes de conectar el aparato.
Desconecte primero siempre el cable negativo
(negro), seguido del cable positivo (rojo).
Cuando cargue una batería instalada en el circuito,
siga las instrucciones del fabricante para acceder a la
misma y las siguientes indicaciones:
• No cargue la batería mientras el motor esté en
funcionamiento.
• Tenga en cuenta que los componentes del motor,
como por ejemplo, el ventilador de refrigeración, se
pueden encender automáticamente. Mantenga las
manos y el cuerpo alejados de los componentes del
motor y ubique el cargador de la batería y los cables
para evitar el contacto.
• Asegúrese de que el cargador de batería y los cables
se ubican de modo que se eviten daños al cerrar las
puertas y las cubiertas del compartimiento del motor.
• Asegúrese que se pueden realizar las conexiones
sin tocar el cuerpo de metal o los componentes
contiguos a la batería.
• Si utiliza este aparato cerca de la batería y el motor
del vehículo, coloque el aparato en una superficie
plana y estable y asegúrese de mantener todas las
pinzas, cables, ropas y partes del cuerpo alejadas de
las piezas móviles del vehículo.
• Si se debe quitar la batería del vehículo para cargar
o limpiar los terminales, asegúrese de que todos los
accesorios del vehículo estén desconectados para no
provocar chispas.
• Para reducir el riesgo de que se produzcan
descargas eléctricas, desconecte el aparato de
cualquier fuente de alimentación antes de realizar el
mantenimiento o la limpieza del mismo.
USO
Cuando hayan finalizado todos los preparativos para
la carga y la seguridad personal, siga el procedimiento
indicado a continuación:
• Para la mayoría de aplicaciones en automoción
y similares, el cargador de batería puede estar
conectado a la batería mientras ésta esté conectada
al circuito cc. Siga las instrucciones que aparecen en
“Carga de una batería instalada en el circuito”.
• Si la batería se debe desconectar del circuito antes
de la carga, siga las instrucciones que aparecen en
“Carga de una batería desconectada del circuito”.
¡Atención! Las baterías marinas (de embarcación)
deben extraerse y cargarse en tierra. Para cargarlas en
la embarcación es necesario disponer de un equipo
diseñado específicamente para uso marino.
Cargar una batería instalada en
el circuito
¡Atención! Una conexión incorrecta, un cortocircuito
de la batería, la ubicación de la batería y la ubicación
del cargador pueden suponer un peligro. Asegúrese de
que se hayan realizado preparativos adecuados antes
de continuar.
¡Atención! Si no se puede acceder a los bornes
de la batería, o bien, si las pinzas del cargador de
misma entran en contacto con la carrocería o los
componentes contiguos a la batería, se debe quitar
la batería antes de la carga con las pinzas. Siga las
instrucciones del fabricante para quitar la batería.
• Compruebe la polaridad de los bornes de la batería.
Normalmente, un borne de batería positivo (POS,
P, +) tiene un diámetro más grande que un borne
negativo (NEG, N, –).
• Siga las instrucciones del fabricante para quitar las
cubiertas aislantes de los bornes de la batería.
• Conecte la pinza positiva (roja) del cargador de
batería al borne positivo (POS, P, +) de la misma.
• Conecte la pinza negativa (negra) del cargador de
batería al borne negativo (NEG, N, –) de la misma o
en el chasis.
Al desconectar el cargador de batería de la misma,
siempre:
• Desenchufe el cargador de batería.
• Quite primero la pinza negativa (negra).
• Quite la pinza pinza (roja) en último lugar.
• Vuelva a montar las cubiertas de aislamiento en los
bornes de la batería.
Cargar una batería desconectada
del circuito
¡Atención! Una conexión incorrecta, un cortocircuito
de la batería, la ubicación de la batería y la ubicación
del cargador pueden suponer un peligro. Asegúrese de
que se hayan realizado preparativos adecuados antes
de continuar.
• Si no se ha quitado la batería del circuito, siga las
instrucciones del fabricante para quitar la batería
antes de la carga.
• Compruebe la polaridad de los bornes de la batería.
Normalmente, un borne de batería positivo (POS,
P, +) tiene un diámetro más grande que un borne
negativo (NEG, N, –).
• Conecte la pinza positiva (roja) del cargador de
batería al borne positivo (POS, P, +) de la misma.
• Conecte la pinza negativa (negra) del cargador de
batería al borne negativo (NEG, N, –) de la misma.
Al desconectar el cargador de batería de la misma,
siempre:
• Desenchufe el cargador de batería.
• Quite primero la pinza negativa (negra).
• Quite la pinza positiva (roja) en último lugar.
• Vuelva a montar las cubiertas de aislamiento a los
bornes de la batería.
Conexión del aparato con las pinzas
de la batería
¡Atención! Desconecte siempre el conector de ca de la
toma de corriente ca antes de conectar o desconectar
el aparato de la batería.
¡Advertencia! Nunca conecte cualquiera de los
accesorios de cables juntos, ya que esto causa un
peligro. Los cables de los accesorios deben ser sólo
ha conectado al conector en línea.
• Conecte las pinzas de la batería al cargador de
batería con el conector en línea.
• Los cables de salida del aparato tienen pinzas de
batería con códigos de colores (rojo-positivo y
negro-negativo). Éstas se conectan directamente con
los conectores correspondientes en los terminales
de la batería.
• Siga los pasos descritos en la sección
correspondiente (“Cargar una batería instalada en
el circuito” o “Cargar una batería desconectada
del circuito”).
• Inserte el enchufe ca del cargador de batería en la
toma de corriente ca.
Carga de batería con las pinzas de la
batería
1. Fije el cargador de batería y conecte con la batería
después de los pasos en la sección de “conexión
del aparato con las pinzas de la batería”.
2. Conecte el cargador de batería del cable de
alimentación a una toma de alimentación de
CA. Se iluminará el LED de encendido azul para
indicar que el cargador está listo.
Nota:
Si el LED de alimentación no se enciende, verificar la
conexión a la toma de corriente. Asegúrese de que la
toma de alimentación de CA es funcional.
3. Cuando la unidad es conectada correctamente y
da carga, la LED de carga de batería ( ) se
encenderá en amarillo para indicar que la batería
está cargando.
Notas:
Si el piloto LED de carga no se ilumina, compruebe la
conexión con la batería. Si existe una buena conexión,
puede que la batería tenga algún defecto. Fabricante
sugiere de tener la batería probada por un técnico
cualificado de la batería.
Si las pinzas están conectadas de forma incorrecta con
respecto a la polaridad, el Indicador LED de polaridad
reversa ( ) se encenderá. Desenchufe el cargador y,
BC6BDWE_Manual_102815.indd 34-35 10/28/2015 11:15:13 AM
Page 19

ESPAÑOL ESPAÑOL
36 37
a continuación, extraiga las pinzas. Conectar las pinzas
correctamente.
4. Cuando el indicador LED que la carga está
completa ( ) se ilumina de color verde, la batería
está completamente cargada.
Al momento de desconectar el cargador de batería,
desconecte el cable de CA, quitar la pinza del chasis
del vehículo y, a continuación, quitar la pinza del borne
de la batería.
Conexión del aparato con el conector
accesorio de CC
¡Atención! Desconecte siempre el conector de CA
de la toma de corriente ca antes de conectar o
desconectar el aparato de la batería.
¡Advertencia! Nunca conecte cualquiera de los
accesorios de cables juntos, ya que esto causa un
peligro. Los cables de los accesorios deben ser sólo
ha conectado al conector en línea.
• Conecte el conector accesorio de CC al cargador de
batería con el conector en línea.
• Inserte el conector accesorio de CC en la toma de
salida auxiliar cc del vehículo.
• Inserte el enchufe ca del cargador de batería en la
toma de corriente ca.
Nota:
Algunos vehículos requieren que el motor se cambió a la
posición de toma de accesorios con el fin de poder la toma
de accesorios.
Carga de batería con el conector
accesorio de CC
Precaución! Para reducir el riesgo de de daños a
la propiedad: cerciórese de que el enchufe accesorio
del vehículo esté limpio y libre de la ruina antes de
conectar la unidad.
1. Fije el cargador de batería y conecte con la batería
después de los pasos en la sección de “conexión
del aparato con el conector accesorio de CC”.
2. Conecte el cargador de batería del cable de
alimentación a una toma de alimentación de
CA. Se iluminará el LED de encendido azul para
indicar que el cargador está listo.
Nota:
Si el LED de alimentación no se enciende, verificar la
conexión a la toma de corriente. Asegúrese de que la
toma de alimentación de CA es funcional.
3. Cuando la unidad es conectada correctamente y
da carga, la LED de carga de batería ( ) se
encenderá en amarillo para indicar que la batería
está cargando.
Notas:
Si el LED de carga no se enciende, verificar la
conexión a la red de DC tomacorriente de accesorios.
Girar ligeramente el adaptador para asegurarse
de que hay buen contacto. Si no está conectado
incorrectamente, la batería puede estar en estado de
avería. Fabricante sugiere de tener la batería probada
por un técnico cualificado de la batería.
Algunos vehículos requieren que el encendido se
gira a la posición ACC (accesorio) para activar la
salida de accesorios DC. Si se requiere el encendido
del vehículo para ser movido a la posición ACC,
asegúrese de que todos los accesorios del vehículo
(es decir, calentador, ventilador, radio, TV, luces ... etc)
estén apagados. Si no se desactiva, el cargador no
podría ser capaz de cargar la batería.
4. Cuando el indicador LED que la carga está
completa ( ) se ilumina de color verde, la batería
está completamente cargada.
Al momento de desconectar el cargador de batería,
desconecte el cable de CA, y luego retire el enchufe
de la CC de accesorios de 12 voltios desde la toma de
accesorios de vehículos.
Usando el gancho colgante
El gancho colgante permite colocar el cargador de
batería para la operación conveniente, manos libres.
Precaución! Para reducir el riesgo de daño a la
propiedad:
• Cuando el cargador está colgado por el gancho que
cuelga, no agite el cargador o el objeto sobre el que
está colgado.
• No cuelgue el cargador de los cables eléctricos o
cualquier cosa que no es seguro.
• Sólo use el gancho colgante para colgar el cargador.
El gancho colgante no está diseñado para soportar el
peso adicional. No cuelgue nada adicional al gancho
colgante o un riesgo de rotura puede ocurrir.
SOLUCIÓN DE PROBLEMAS
Si el aparato no carga:
• Compruebe que el cargador de batería esté
conectado correctamente a una toma de 220-240
VCA que funcione.
• Asegúrese de que las conexiones de salida están
asegurados y la conexión de la polaridad es correcta
al utilizar las pinzas de la batería.
• Si el voltaje de la batería a cargar está por debajo
de los 2 voltios, ésta no se podrá cargar con este
cargador.
MANTENIMIENTO
El aparato de Black & Decker ha sido diseñado para
que funcione durante un largo período de tiempo
con un mantenimiento mínimo. El funcionamiento
satisfactorio continuado depende de un cuidado
apropiado y una limpieza periódica de la herramienta.
¡Atención! Para realizar el mantenimiento o limpieza
del aparato, antes debe desenchufarlo.
• Limpie el aparato de vez en cuando con un paño
húmedo. No utilice limpiadores de base abrasiva o
disolventes. No introduzca el aparato en agua.
Sustitución del fusible del conector
accesorio de CC
• Gire la tapa con surcos hacia en sentido horario para
extraerla.
• Extraiga la arandela de goma, el pasador central y el
muelle.
• Extraiga el fusible.
• Coloque un fusible nuevo del mismo tipo y tamaño
(8 A).
• Vuelva a colocar el pasador central, el muelle y la
arandela.
• Gire la tapa con surcos en sentido antihorario para
colocarla en la clavija para reemplazar.
PROTECCIÓN DEL MEDIO
AMBIENTE
Eliminación correcta de este producto
Esta marca indica que este producto no
debe eliminarse junto con otros en toda
la UE. Para evitar posibles daños al medio
ambiente oa la salud humana eliminación
incontrolada de residuos, su reciclaje de
forma responsable para promover la reutilización
sostenible de los recursos materiales. Para volver
su dispositivo usado, utilice sistemas de devolución
y recogida o de contacto con el distribuidor donde
adquirió el producto. Ellos pueden tomar este
producto para el reciclaje ecológico y seguro.
La recogida selectiva de productos y embalajes
permite que los materiales para ser reciclados y
utilizados de nuevo. Re-uso de materiales
reciclados ayuda a prevenir la contaminación
ambiental y reduce la demanda de materias
primas.
La normativa local puede ofrecer para la recogida
selectiva de productos eléctricos del hogar, en sitios
de desechos municipales o por el distribuidor al
comprar un producto nuevo.
DATOS TÉCNICOS
Entrada: 220-240V CA, 50/60 Htz,
0,6 A
Salida: 12 V CC, 6A
GARANTÍA
Baccus World Wide LLC Se está confiado en la calidad
de sus productos y ofrece una garantía extraordinaria.
Esta garantía es además de, y de ninguna manera los
prejuicios para sus derechos estatutarios. La garantía
es válida dentro de los territorios de los Estados
miembros de la Unión Europea y de los de la Zona
Europea de Libre Comercio.
Si cualquier producto de Baccus Worldwide LLC
resultara defectuoso debido a materiales o mano de
obra defectuosos o a la falta de conformidad, Baccus
Worldwide LLC garantiza, dentro de los 24 meses
posteriores a la fecha de compra, la sustitución de
las piezas defectuosas, la reparación de los productos
sujetos a un desgaste y rotura razonables o la
sustitución de tales productos para garantizar al cliente
el mínimo de inconvenientes, a menos que:
• el producto se haya utilizado con propósitos
comerciales, profesionales o de alquiler;
• el producto se haya sometido a un uso inadecuado
o negligente;
• el producto haya sufrido daños causados por objetos
o sustancias extrañas o accidentes;
• se hayan realizado reparaciones por parte de
personas que no sean del personal de servicio de
Baccus Worldwide LLC.
Para presentar una reclamación de la garantía,
tendrá que presentar la prueba de compra a Baccus
Worldwide LLC a la dirección indicada en este manual.
Por favor, visite nuestro sitio web www.
baccusworldwide.com para registrar el nuevo Baccus
World Wide LLC producto y mantenerse al tanto
de los nuevos productos y ofertas especiales. Más
información en el Baccus World Wide LLC marca y
nuestra gama de productos está disponible en www.
baccusworldwide.com.
Baccus Worldwide LLC
Weena 290, 3012 NJ Rotterdam o
Postbus 819, 3000 AV Rotterdam
BC6BDWE_Manual_102815.indd 36-37 10/28/2015 11:15:13 AM
Page 20

PORTUGUÊS PORTUGUÊS
38 39
MANUAL DE
INSTRUÇÕES
UTILIZAÇÃO
O seu carregador de bateria/mantenedor Black &
Decker foi concebido para carregar baterias de
chumbo-ácido. Este produto destina-se apenas a
utilização doméstica do consumidor.
INSTRUÇÕES DE SEGURANÇA
ESPECIFICAÇÕES IMPORTANTES NOTA: Capacidade
da bateria: tipo chumbo-ácido, no máximo 12V CC,
120Ah.
Advertência! Ao utilizar aparelhos, deve sempre
cumprir medidas de segurança básicas, incluindo as
seguintes, de modo a reduzir os riscos de incêndio,
fuga do líquido da bateria, lesões pessoais e danos
materiais.
• Leia cuidadosamente o manual completo antes de
utilizar este aparelho.
• A utilização prevista para este aparelho está descrita
no manual. A utilização de qualquer acessório ou a
realização de qualquer operação com este aparelho
que não se inclua no presente manual de instruções
poderá representar um risco de ferimentos pessoais.
• Conserve este manual para referência futura.
Utilizar o seu aparelho
Tenha sempre cuidado quando utiliza este aparelho.
• Este aparelho não deve ser utilizado por jovens ou
pessoas doentes sem supervisão.
• Este aparelho não deve ser utilizado como um
brinquedo.
• Não abra a estrutura do produto. Não existem peças
para manipulação pelo utilizador no interior.
• Não utilize o equipamento em áreas com risco de
explosão, nas quais se encontrem líquidos, gases ou
poeiras inflamáveis.
• Para reduzir o risco de danos nas fichas e cabos,
nunca puxe o cabo para remover a ficha de uma
tomada.
• Após a utilização
• Quando não for utilizado, o aparelho deve ser
guardado num local seco e com boa ventilação,
longe do alcance das crianças.
• As crianças não devem ter acesso aos aparelhos
armazenados.
• Quando o aparelho for guardado ou transportado
num veículo, deverá ser colocado na bagageira
ou fixo de forma a evitar o movimento devido a
alterações súbitas na velocidade ou direcção.
• Este aparelho deve ser protegido da luz solar directa,
do calor e da humidade.
Inspecção e reparações
• Antes da utilização, verifique o aparelho quanto a
peças danificadas ou avariadas. Verifique se há peças
partidas, danos nos interruptores ou outro tipo de
condições que possam afectar o seu funcionamento.
• Não utilize o aparelho se alguma das peças se
encontrar danificada ou avariada.
• Ter todas as peças danificadas ou com defeito
reparado ou substituído pelo fabricante.
• Nunca tente retirar ou substituir quaisquer peças que
não as especificadas neste manual.
Segurança – cabo de alimentação
Advertência! Nunca faça alterações no cabo ou ficha
CA. Se não encaixar, peça a um electricista qualificado
para instalar uma tomada apropriada. Uma ligação
incorrecta pode causar choques eléctricos.
Os seguintes símbolos estão
marcados no aparelho:
Esta ferramenta tem um isolamento
duplo e, por isso, não é necessário um
fio de terra. Verifique sempre se a fonte
de alimentação corresponde à tensão
indicada na placa de especificações.
Leia com atenção este manual na
íntegra.
Segurança eléctrica
Verifique sempre se a fonte de alimentação
corresponde à tensão indicada na placa de
especificações.
• Se o cabo de alimentação for danificado, terá de ser
substituído pelo fabricante para evitar acidentes.
• Atenção! Para evitar ferimentos graves ou morte
por incêndio, explosão ou choque elétrico: Este
aparelho deve ser ligado a um terra de circuito de
falha de interrupção (GFCI) protegido tomada.
Instruções de segurança específicas
para carregadores de bateria
• Se o cabo de alimentação for danificado, terá de
ser substituído pelo fabricante ou por um centro de
assistência autorizada Black & Decker para evitar
acidentes.
• Nunca tente carregar baterias não recarregáveis.
• Substitua os cabos defeituosos imediatamente.
• Não exponha o carregador de bateria à água.
• Não abra o carregador de bateria.
• Não desmonte o carregador de bateria.
• Os grampos vermelho e preto não devem entrar em
contacto entre si ou com outro condutor de metal
comum. Isso poderia danificar o aparelho e/ou criar
o risco de faísca/explosão.
BATERIAS
Advertência! Nunca tente carregar uma bateria
congelada.
• Em condições extremas, pode ocorrer uma fuga nas
baterias. Se detectar a fuga de líquido das baterias,
limpe o líquido cuidadosamente com um pano. Evite
o contacto com a pele.
• Em caso de contacto com a pele ou com os olhos,
siga as instruções seguintes.
– Advertência! O líquido da bateria é um ácido
sulfúrico diluído e pode causar lesões pessoais ou
danos materiais. Em caso de contacto com a pele,
enxagúe imediatamente com água. Em caso de
vermelhidão, dor ou irritação, contacte um médico.
Em caso de contacto com os olhos, enxagúe
imediatamente com água limpa e contacte um
médico imediatamente.
• Quando eliminar as baterias, siga as instruções da
secção “Proteger o ambiente”.
• Acrescente água destilada em cada célula até que
o ácido da bateria atinja o nível especificado pelo
fabricante de bateria. Isto ajuda a purgar o gás
em excesso das células. Não encha em demasia.
Para uma bateria sem tampas de células (sem
manutenção), respeite cuidadosamente as instruções
de carga do fabricante.
• Leia todas as precauções específicas do fabricante
da bateria, como remover ou não remover as tampas
das células enquanto carrega, e os níveis de carga
recomendados.
• Certifique-se de que o nível de carga inicial não
excede o requisito do fabricante de bateria.
• Advertência! Risco de misturas de gases explosivos.
É perigoso trabalhar perto de uma bateria de
chumbo-ácido. As baterias geram gases explosivos
durante o funcionamento normal da bateria. Por
este motivo, é da máxima importância que, antes
de utilizar o carregador de bateria, leia sempre este
manual e siga exactamente as instruções.
• A utilização de um acessório não recomendado ou
vendido pela Black & Decker pode causar choque
eléctrico, incêndio ou lesões pessoais.
• Não deve ser utilizado um cabo de extensão, excepto
se for absolutamente necessário. A utilização de
um cabo de extensão inadequado pode resultar em
risco de incêndio e choque eléctrico, e irá anular a
garantia.
• IMPORTANTE: Esta unidade dispõe de um
dissipador de calor em alumínio , que é usado
para dissipação de calor e está localizado na base
da unidade. Nunca toque o dissipador de calor
enquanto a unidade está em operação e nunca
permita que a parte inferior da unidade a entrar
em contato com materiais inflamáveis durante a
operação.
CC plugue acessório segurança
• Aviso! NUNCA ligue a unidade a um positivo
aterrado veículo com seu adaptador de plugue.
• Certifique-se de que a tomada acessória do veículo
está limpo e livre de detritos antes de ligar o
aparelho.
• Aviso – risco de incêndio! Se o acessório do veículo
fusível de saída abre (queimar) quando ligar este
carregador de bateria, não use este carregador de
bateria com este tomada acessória do veículo.
– Não várias vezes substitua o fusível.
– Não substitua o fusível da tomada acessório do
veículo com uma maior amperagem.
– Nunca tentar remendar o fusível com folha de
estanho ou fio.
Qualquer uma destas acções poderá causar sérios
danos elétricos e/ou um incêndio
Instruções de segurança específicas
para o uso do aparelho em ambientes
molhados
A estrutura da unidade é classificado para IP67
normas à prova de poeira e à prova d’água. No
entanto, é recomendável que você observe o
seguinte:
• Nunca mergulhe o aparelho em águas mais
profundas do que 1 metro, por tempo superior a
30 minutos e / ou temperaturas em outros do que
entre 5ºC e 40ºC, ou a unidade poderia sofrer danos
permanentes.
• Nunca mergulhe a unidade na água, a não ser que a
bucha (isolamento) do AC ou DC cabo está intacto.
• Não deixe que a ficha ou os grampos ser exposta
aos elementos por longos períodos de tempo; e
nunca mergulhe-os.
Segurança pessoal
Use sempre protecção para os olhos e vestuário
adequado para se proteger do líquido da bateria.
Evite tocar nos olhos quando estiver a trabalhar com
uma bateria. Ácido, partículas de ácido ou corrosão
podem entrar nos olhos.
Retire objectos de metal pessoais, tais como, anéis,
pulseiras, colares e relógios, antes de trabalhar
com uma bateria de chumbo-ácido. Uma bateria de
chumbo-ácido pode provocar um curto-circuito com a
corrente suficientemente alta para causar queimaduras
graves.
Tenha muita atenção para não deixar cair objectos
metálicos dentro da bateria. Isto pode causar faíscas
ou causar curto¬circuito noutra peça eléctrica,
podendo causar uma explosão.
BC6BDWE_Manual_102815.indd 38-39 10/28/2015 11:15:13 AM
Page 21

PORTUGUÊS PORTUGUÊS
40 41
FUNÇÕES
1. LED de poder
2. Gancho de suspensão
3. LED de polaridade reversa
4. LED de carregamento da bateria
5. LED de carregamento completo
6. Conector em linha
7. Ficha de alimentação CA
8. Ficha acessória CC
9. Grampos da bateria
PREPARAÇÃO ANTES DE
CARREGAR A BATERIA
O aparelho só deve ser ligado a uma bateria de 12V
chumbo-ácido. Antes de carregar, certifique-se de
que a voltagem da bateria é de 12V, consultando a
etiqueta na bateria ou as informações disponíveis
relacionadas com sua aplicação, p. ex., manual do
utilizador do automóvel.
Não utilize o aparelho para carregar baterias de células
secas normalmente utilizadas em electrodomésticos.
Estas baterias podem explodir e causar ferimentos e
danos materiais.
Advertência! Gases explosivos podem ser ventilada
desde baterias de chumbo-ácido durante o
carregamento. Certifique-se de que a área é bem
ventilado e remover todas as fontes de ignição ao
realizar procedimentos de carregamento.
• Nunca coloque o carregador da bateria directamente
por cima da bateria; gases a partir da bateria irá
corroer e danificar o carregador de bateria.
• Nunca deixe a bateria ácido para pingar no
carregador de bateria.
• Coloque o carregador de bateria como distante da
bateria quanto os cabos permitam. O carregador de
bateria contém interruptores que podem provocar
faíscas.
• Não coloque a bateria em cima do carregador.
• Gases explosivos poderão formar-se junto do solo.
Coloque o carregador de bateria o mais alto possível
acima do nível do solo.
• Não utilize ferramentas eléctricas na área de
carregamento.
• Não fume ou tenha chamas nuas na área de
carregamento.
• Siga as instruções para ligar ou desligar os cabos do
carregador de bateria ou terminais da bateria.
As baterias náuticas devem ser retiradas do barco e
carregadas em terra. A operação de carga a bordo
requer equipamento especialmente destinado à
utilização náutica. Este aparelho NÃO foi concebido
para esses fins.
Os veículos podem ter sistemas eléctricos e
electrónicos (p. ex. sistema de gestão do motor,
telemóvel) que podem ser danificados se forem
submetidos a tensões de arranque elevadas e a picos
de voltagem. Antes de ligar o aparelho ao veículo, leia
o manual de utilização do veículo para confirmar se é
possível recorrer a um dispositivo externo.
• Siga estas instruções e as que foram publicadas pelo
fabricante de bateria e pelo fabricante automóvel.
• Somente conectar e desconectar as grampos saída
DC após a remoção do cabo de alimentação da
tomada elétrica. Nunca permita que grampos uns
aos outros.
• Verifique a polaridade dos terminais da bateria do
veículo antes de ligar o aparelho. Desligue sempre o
cabo de arranque negativo (preto) primeiro: seguido
pelo cabo de arranque positivo (vermelho).
Quando carregar uma bateria instalada no circuito,
siga as instruções do fabricante para aceder à bateria
e efectue o seguinte:
• Não carregue a bateria quando o motor estiver em
funcionamento.
• Tenha em atenção que os componentes do motor,
p. ex., a ventoinha de refrigeração pode arrancar
automaticamente. Mantenha as mãos e o corpo
afastados dos componentes do motor e posicione
o carregador de bateria e os cabos para evitar
contactos.
• Certifique-se de que o carregador de bateria e os
cabos estão localizados de forma a evitar danos pelo
fechar das portas e protecções do compartimento
do motor.
• Certifique-se de que as ligações podem ser
efectuadas sem tocar no corpo metálico ou
componentes adjacentes à bateria.
• Quando utilizar este aparelho perto da bateria e do
motor do veículo, coloque-o sobre uma superfície
plana e estável e certifique-se de que todos os
grampos, cabos, peças de vestuário e partes do
corpo não podem entrar em contacto com as peças
móveis do veículo.
• Se for necessário retirar a bateria do veículo para
carregar ou limpar os terminais, certifique-se de que
todos os acessórios no veículo estão desligados para
não causar faísca.
• Para reduzir o risco de choque eléctrico, desligue o
aparelho de qualquer fonte de alimentação antes de
realizar uma operação de manutenção ou limpeza.
UTILIZAÇÃO
Quando todas as preparações para carregar e
as operações de segurança pessoal tiverem sido
concluídas, execute o seguinte:
• Para a maioria das aplicações da área automóvel e
similares, o carregador de bateria pode estar ligado
à bateria enquanto estiver ligado ao circuito de
alimentação CC. Siga as instruções fornecidas em
“Carregar uma bateria instalada no circuito”.
• Se a bateria tiver de ser desligada do circuito antes
de ser carregada, siga as instruções fornecidas em
“Carregar uma bateria desligada do circuito”.
Advertência! As baterias náuticas devem ser retiradas
do barco e carregadas em terra. O carregamento a
bordo requer equipamento especialmente destinado à
utilização náutica.
Carregar uma bateria instalada no
circuito
Advertência! Uma ligação incorrecta, curto-circuito
da bateria, localizações da bateria e do carregador
incorrectas podem causar perigos. Certifique-se de
que foi feita uma preparação adequada antes de
carregar a bateria.
Advertência! Se não for possível aceder aos
bornes da bateria ou os grampos do carregador de
bateria entrarem em contacto com a armação ou
componentes adjacentes à bateria, a bateria deve ser
removida antes de ser carregada com os grampos da
bateria. Siga as instruções do fabricante para retirar
a bateria.
• Verifique a polaridade dos bornes da bateria.
Um borne de bateria positivo (POS, P, +) possui
normalmente um diâmetro maior do que o borne de
bateria negativo (NEG, N, –).
• Siga as instruções do fabricante para retirar
quaisquer protecções isolantes dos bornes de
bateria.
• Ligue o grampo positivo (vermelho) do o carregador
da bateria o terminal positivo (POS, P, +) da o
bateria.
• Ligue o grampo negativo (vermelho) do o carregador
da bateria o terminal negativo (NEG, N, –) da o
bateria.
Quando desligar o carregador da bateria, execute
sempre as seguintes operações:
• Desconecte o carregador.
• Retire primeiro o grampo negativo (preto).
• Retire, por último, positivo (vermelho).
• Volte a colocar tampas isolantes nos bornes da
bateria.
Carregar uma bateria desconectado do
circuito
Advertência! Uma ligação incorrecta, curto-circuito
da bateria, localizações da bateria e do carregador
incorrectas podem causar perigos. Certifique-se de
que foi feita uma preparação adequada antes de
carregar a bateria.
• Se a bateria ainda não tiver sido removida do
circuito, siga as instruções do fabricante para
remover a bateria antes de a carregar.
• Verifique a polaridade dos bornes da bateria.
Um borne de bateria positivo (POS, P, +) possui
normalmente um diâmetro maior do que o borne de
bateria negativo (NEG, N, –).
• Ligue o grampo positivo (vermelho) do o carregador
da bateria o terminal positivo (POS, P, +) da o
bateria.
• Ligue o grampo negativo (vermelho) do o carregador
da bateria o terminal negativo (NEG, N, –) da o
bateria.
Quando desligar o carregador da bateria, execute
sempre as seguintes operações:
• Desconecte o carregador.
• Retire primeiro o grampo negativo (preto).
• Retire, por último, o grampo positivo (vermelho).
• Volte a colocar tampas isolantes nos bornes da
bateria.
Ligar o aparelho com os grampos da
bateria
Advertência! Desligue sempre a ficha CA da tomada
da corrente CA, antes de ligar ou desligar o aparelho
à/da bateria.
Advertência! Nunca ligue qualquer um dos acessório
leva juntos como isso irá causar um perigo. A leva de
acessórios só deve ser ligado ao conector in-line.
• Ligue os grampos da bateria ao carregador da
bateria com o conector em linha.
• Os cabos de saída do aparelho possuem grampos
de bateria com codificação de cores (vermelhopositivo e preto-negativo). Ligam directamente
aos conectores correspondentes nos terminais da
bateria.
• Siga os passos descritos na seção apropriada
(“Carregar uma bateria instalada no circuito” ou
“Carregar uma bateria desconectado do circuito”).
• Introduza a ficha CA do carregador de bateria na
tomada de corrente CA.
Carregar a bateria com os grampos da
bateria
1. Configure o carregador de bateria e ligar para
o seguinte etapas no “ligar o aparelho com os
grampos da bateria” seção.
2. Conecte o cabo de alimentação do carregador de
bateria em uma tomada de corrente CA. O LED de
energia acende azul para indicar que o carregador
está pronto.
Nota:
Se o LED de energia não acender, verifique a ligação
à tomada. Certifique-se de que a tomada de corrente
alternada é funcional.
3. Quando a unidade está ligada correctamente e
carregamento, o LED de carregamento da bateria
( ) luz amarela para indicar a bateria está sendo
carregada.
Notas:
Se o LED de carregamento da bateria não acender,
verifique a conexão com a bateria. Se as grampos
estão conectados corretamente, a bateria pode estar em
BC6BDWE_Manual_102815.indd 40-41 10/28/2015 11:15:13 AM
Page 22

PORTUGUÊS PORTUGUÊS
42 43
condição de falha. Fabricante sugere de ter a bateria
testada por um técnico qualificado da bateria.
Se as grampos estão conectados incorretamente em
relação à polaridade, a LED de polaridade reversa ( )
irá acender. Desligue o carregador; em seguida, retire
os grampos. Volte a ligar os grampos corretamente.
4. Quando o LED de carregamento completo ( )
acende-se a verde, a bateria está totalmente
carregada.
Ao desconectar o carregador da bateria, desligue o
cabo de alimentação AC, retire o grampo do chassi do
veículo e, em seguida, remova o grampo do terminal
da bateria.
Ligar o aparelho com a ficha
acessória CC
Advertência! Desligue sempre a ficha CA da tomada
da corrente CA, antes de ligar ou desligar o aparelho
à/da bateria.
Advertência! Nunca ligue qualquer um dos acessório
leva juntos como isso irá causar um perigo. A leva de
acessórios só deve ser ligado ao conector in-line.
• Ligue a ficha acessória CC ao carregador da bateria
com o conector em linha.
• Introduza a ficha acessória CC na saída acessória CC
do veículo.
• Introduza a ficha CA do carregador de bateria na
tomada de corrente CA.
Nota:
Alguns veículos exigem que a ignição ser comutada para
a posição tomada acessório, a fim de poder no soquete
acessório.
Carregar a bateria com a ficha
acessória CC
Cuidado! A fim de reduzir o risco de danos à
propriedade: certifique-se de que o veículo na saída
do acessório está limpo e livre de detritos antes de
ligar o aparelho.
1. Configure o carregador de bateria e ligar para o
seguinte etapas no “ligar o aparelho com a ficha
acessória CC” seção.
2. Conecte o cabo de alimentação do carregador de
bateria em uma tomada de corrente CA. O LED de
energia acende azul para indicar que o carregador
está pronto.
Nota:
Se o LED de energia não acender, verifique a ligação
à tomada. Certifique-se de que a tomada de corrente
alternada é funcional.
3. Quando a unidade está ligada correctamente e
carregamento, o LED de carregamento da bateria
( ) luz amarela para indicar a bateria está sendo
carregada.
Notas:
Se o LED de carregamento da bateria não acender,
verifique a conexão com o veículo na saída acessório
da DC. Gire o adaptador ligeiramente para certificarse de que não existe um bom contato. Se ele está
corretamente conectado, a bateria pode estar em
condição de falha. Fabricante sugere que o teste da
bateria por um qualificado serviço técnico da bateria.
Alguns veículos exigem que a ignição ser girado para
a posição ACC (acessórios)para ativar o DC tomada de
acessórios. Se a ignição do seu veículo é necessário
para ser girado para a posição ACC, certifique-se
de que todos os acessórios do veículo (ou seja
aquecimento, ventoinha, televisão, rádio, luzes ... etc)
são desligados. Se não for desligado, o carregador
pode não ser capaz de carregar a bateria.
4. Quando o LED de carregamento completo ( )
acende-se a verde, a bateria está totalmente
carregada.
Ao desconectar o carregador da bateria, desligue o
cabo de alimentação AC, e retire a 12 volts CC plugue
acessório da tomada de acessório do veículo.
Pendurando o carregador de bateria
O gancho permite que você posicione o carregador de
bateria para operação conveniente mãos-livres.
Cuidado! Para reduzir o risco de danos à
propriedade:
• Quando carregador está pendurado pelo gancho,
não agite o carregador ou o objeto que ele está que
pendura de.
• Não pendure o carregador de quaisquer fios elétricos
ou de qualquer coisa que não é seguro.
• Apenas use o gancho para pendurar o carregador.
O gancho não se destina a suportar peso adicional.
Não pendure nada adicional ao gancho ou risco de
quebra pode ocorrer.
RESOLUÇÃO DE PROBLEMAS
Se o aparelho não estiver a carregar:
• Verifique se o carregador de bateria está ligado
correctamente a uma tomada ao vivo de 220-240
V CA.
• Verifique se as conexões são garantidos ea conexão
polaridade está correta quando usando os grampos
de da bateria.
• Se a voltagem da bateria a ser carregada cair para
menos de 2 Volts, a bateria não pode ser carregada
com este carregador de bateria.
MANUTENÇÃO
O seu aparelho/ferramenta Black & Decker foi
concebido para funcionar por um longo período
de tempo com uma manutenção mínima. Um
funcionamento contínuo e satisfatório depende de
uma manutenção adequada e da limpeza regular da
ferramenta.
Advertência! Antes de executar qualquer manutenção
ou limpeza no aparelho/ferramenta, desligue-o.
• De vez em quando, limpe o aparelho com um pano
húmido. Não utilize nenhum produto de limpeza
abrasivo ou à base de solvente. Não mergulhe o
aparelho em água.
Substituir o fusível na ficha
acessória CC
• Retire a cobertura com sulcos, rodando-a no sentido
oposto aos ponteiros do relógio.
• Retire a anilha de borracha, pino central e mola.
• Retire o fusível.
• Encaixe um novo fusível do mesmo tipo e tamanho
(8 A).
• Instale o pino central, mola e anilha de borracha.
• Instale a cobertura com sulcos, rodando-a no
sentido dos ponteiros do relógio na plugue.
PROTEGER O MEIO AMBIENTE
Eliminação correcta deste produto
Esta marca indica que este produto
não deve ser eliminado com outros
lixos domésticos em toda a UE. Para
impedir danos ao ambiente ou à saúde
humana causados pela eliminação não
controlada de resíduos, recicle-o responsavelmente
para promover a reutilização sustentável dos recursos
materiais. Para retornar o produto usado, por favor
use a sistemas de recolha ou contacte o revendedor
onde o produto foi comprado. Eles podem levar
esteproduto para reciclagem segura.
Recolha separada de produtos e embalagens utilizados
permite que os materiais podem ser reciclados e
usados novamente. Reutilização de materiais
reciclados ajuda a evitar a poluição
ambiental e reduz a demanda por
matérias-primas.
Regulamentos locais podem proporcionar para a
recolha separada de produtos eléctricos da casa, em
sites de resíduos urbanos e pelo varejista quando você
compra um produto novo.
DADOS TÉCNICOS
Entrada: 220-240V CA, 50/60 Htz
e 0,6A
Saída: 12V CC, 6A
GARANTIA
Baccus Worldwide LLC está confiante de na qualidade
dos seus produtos e oferece uma garantia excelente.
Esta declaração de garantia é, para além e em nada
prejudica os seus direitos legais. A garantia é válida
nos territórios dos Estados Membros da União
Europeia e da Associação Europeia de Comércio Livre.
Se um produto Baccus Worldwide LLC se avariar
devido a defeitos de material, fabrico ou não
conformidade, num período de 24 meses após a
data da compra, Baccus Worldwide LLC garante
a substituição de peças defeituosas, a reparação
de produtos sujeitos a um desgaste aceitável ou a
substituição dos mesmos para garantir o mínimo de
inconveniente ao cliente, excepto se:
• o produto tem sido utilizado para fins da as trocas
comerciais, profissionais ou de aluguer;
• o produto tiver sido submetido a utilização indevida
ou descuido;
• o produto tiver sido danificado por objectos
estranhos, substâncias ou acidentes.
• reparos foram tentadas por pessoas que não sejam
da Baccus World Wide LLC equipe de serviço.
Para apresentar uma reclamação sobre a garantia,
você terá de apresentar a prova de compra ao Baccus
World Wide LLC no endereço indicado neste manual.
Por favor, visite o nosso site em www.
baccusworldwide.com para registar o seu novo
Baccus World Wide LLC produtos e para ser mantido
até à data sobre novos produtos e ofertas especiais.
Mais informações sobre a Baccus World Wide LLC
marca e a nossa gama de produtos está disponível em
www.baccusworldwide.com.
Baccus Worldwide LLC
Weena 290, 3012 NJ Rotterdam ou
Postbus 819, 3000 AV Rotterdam
BC6BDWE_Manual_102815.indd 42-43 10/28/2015 11:15:13 AM
Page 23

SVENSKA SVENSKA
44 45
INSTRUKTIONSMANUAL
ANVÄNDNINGSOMRÅDE
Denna batteri laddare/ansvarige från Black & Decker
är utformad för laddning av blybatterier. Produkten
är endast avsedd som konsumentverktyg för
hemmabruk.
SÄKERHETSINSTRUKTIONER
VIKTIGA SPECIFIKATIONER OBS! Batteriets kapacitet:
blybatterier, max 12V DC, 120Ah.
Varning! För att minska risken för brand,
personskador och materialskador ska du alltid följa
grundläggande säkerhetsföreskrifter, inklusive de som
följer, vid användning av batteridrivna apparater.
• Läs den här bruksanvisningen noggrant innan du
använder apparaten.
• Användningsområdet beskrivs i den här
bruksanvisningen. Användning av andra tillbehör
eller tillsatser eller om någon annan åtgärd utförs
med apparaten än de som rekommenderas i den här
bruksanvisningen kan leda till personskador.
• Behåll bruksanvisningen för framtida referens.
Använda apparaten
Var alltid försiktig när du använder apparaten.
• Apparaten är inte avsedd att användas av unga eller
oerfarna personer utan övervakning.
• Apparaten ska inte användas som leksak.
• Öppna inte höljet. Det finns inga delar som kan
repareras inuti.
• Undvik explosionsrisk och använd inte apparaten i
omgivningar med brandfarliga vätskor, gaser eller damm.
• Dra aldrig i sladden när du vill ta ut kontakten ur
vägguttaget. Detta för att minska risken för skador på
kontakter och sladdar.
Efter användning
• När den inte används bör apparaten förvaras på en
torr plats med god ventilation utom räckhåll för barn.
• Placera apparaten på ett ställe där barn inte kan
komma åt den.
• När apparaten förvaras eller transporteras i en bil,
ska den placeras i bagageutrymmet eller spännas
fast för att förhindra rörelse till följd av plötsliga
ändringar i hastighet eller riktning.
• Utsätt inte apparaten för direkt solljus, värme eller
fukt.
Kontroll och reparationer
• Kontrollera att apparaten är hel och att den inte
innehåller några skadade delar innan du använder
den. Kontrollera att inga delar är trasiga, att
strömbrytaren fungerar och att inget annat föreligger
som kan påverka apparatens funktioner.
• Använd inte apparaten om någon del har skadats
eller gått sönder.
• Har några skadade eller defekta delar repareras eller
bytas ut av tillverkaren.
• Försök aldrig ta bort eller byta ut andra delar än dem
som anges i den här bruksanvisningen.
Säkerhetsföreskrifter gällande
nätsladden
Varning! Du får inte modifiera nätsladden eller
stickkontakten. Passar inte stickkontakten i vägguttaget
bör du låta en elektriker installera ett nytt uttag. En
felaktig inkoppling medför risk för elektriska stötar.
Apparaten är märkt med följande
symboler:
Eftersom verktyget är dubbelisolerat
behövs ingen jordledare. Kontrollera
alltid att nätspänningen överensstämmer
med värdet på typskylten.
Läs noga igenom den här
bruksanvisningen.
Elektrisk säkerhet
Kontrollera alltid att nätspänningen överensstämmer
med värdet på typskylten.
• Om nätsladden är skadad måste den ersättas av
tillverkaren för att undvika fara.
• Varning! För att undvika allvarliga personskador
eller dödsfall orsakat av brand, explosion eller
elektrisk stöt: Den här enheten måste vara ansluten
en jordfelsbrytare Interrupt (PRCD) skyddade
nätuttag.
Specifika säkerhetsinstruktioner för
batteriladdare
• Försök aldrig att ladda ej uppladdningsbara batterier.
• Byt defekta sladdar genast.
• Utsätt inte batteriladdaren för väta.
• Öppna inte batteriladdaren.
• Försök inte komma åt någon del inuti batteriladdaren.
• Låt aldrig de röda och svarta klämmor komma i
kontakt med varandra, eller en gemensam ledande
föremålets. Detta kan skada apparaten och/eller
orsaka gnistbildning och/eller explosionen.
BATTERIER
Varning! Försök inte ladda ett fruset batteri.
• Under extrema förhållanden kan batterierna läcka.
Om det finns vätska på batterierna, ska du torka
bort vätskan försiktigt med hjälp av en trasa. Undvik
hudkontakt.
• Vid kontakt med hud eller ögon, följ instruktionerna
nedan.
– Varning! Batterivätskan består av utspädd
svavelsyra och kan orsaka personskador eller
materiella skador. Skölj genast med vatten om
batterivätskan kommer i kontakt med huden
Vid rodnader, smärta eller irritation ska läkare
uppsökas. Vid kontakt med ögonen ska du genast
skölja med rent vatten och snarast uppsöka läkare.
• Följ instruktionerna som anges i avsnittet ”Miljö” när
du kastar batterierna.
• Fyll på destillerat vatten i varje cell upp till den
nivå som tillverkaren specificerat. Detta driver ut
överskottsgas ur cellerna. Överfyll ej. Om du har ett
underhållsfritt batteri (utan cellhöljen) ska du följa
tillverkarens laddningsinstruktioner noga.
• Läs batteritillverkarens specifika instruktioner, t.ex.
huruvida cellhöljena ska vara på eller av under
laddning, samt rekommenderad laddström.
• Se till att den initiala laddströmmen inte överskrider
batteritillverkarens rekommenderade värde.
• Varning! Risken för explosiva gasblandningar.
Det är farligt att arbeta i närheten av ett blybatteri.
Batterier alstrar explosiva gaser under normal
drift. Det är därför av största betydelse att du inför
varje användning av batteriladdaren läser denna
bruksanvisning och följer instruktionerna noga.
• Användning av tillbehör som ej rekommenderats
eller sålts av Black & Decker kan innebära risk för
eldsvåda, elektriska stötar eller personskador.
• Använd inte förlängningssladdar om det inte är
absolut nödvändigt. Användning av en olämplig
förlängningssladd kan orsaka eldsvåda och elektriska
stötar, och innebär att garantin inte gäller.
• VIKTIGT: Denna enhet har en aluminium kylfläns
som används för värmeavledning och ligger på
enhetens undersida. Vidrör aldrig kylflänsen
medan enheten är i drift och låt aldrig längst ned
på enheten att kontakta brandfarliga material
medan enheten är i drift.
DC tillbehör kontakt säkerhet
• Varning! Anslut aldrig enheten till ett positivt jordat
bilen med DC tillbehör kontakt.
• Se till att bilens uttag är rena och fria från skräp
innan du ansluter enheten.
• Varning – risk för brand! Om fordonstillbehörs
utlopp säkring öppnas (går) när du ansluter
batteriladdaren, använd inte batteriladdaren med
denna fordonstillbehörs utlopp.
– Inte upprepade gånger byt ut säkringen.
– Byt inte bil uttagets säkring med en av en högre
amperetal.
– Försök aldrig att laga säkring med tenn folie eller tråd.
Vilken som helst av dessa åtgärder kan orsaka
allvarliga elektriska skador och/eller en brand.
Särskilda säkerhetsanvisningar för att
använda enheten i våta miljöer
Höljet av denna enhet är klassificerade enligt
IP 67 damm- och vattentät standarder. Det
rekommenderas dock att du observera följande:
• Aldrig dränka enheten i vatten djupare än 1 meter, för
längre tid än 30 minuter och/eller andra temperaturer
än mellan 5 ºC och 40 ºC, eller den enhet som skulle
kunna upprätthålla permanenta skador.
• Aldrig dränka enheten i vatten såvida bussningen
(isolering) av AC eller DC sladd är intakt.
• Låt inte stickkontakten eller klämmor vara utsättas
för väder och vind under lång tid , och doppa aldrig
dem.
Personlig säkerhet
Bär heltäckande ögonskydd och lämplig klädsel som
skydd mot kontakt med batterivätskan.
Undvik att vidröra ögonen när du arbetar med ett
batteri. Du kan få syra, eller partiklar med syra eller
rost på, i ögonen.
Bär inte smycken och metallföremål som ringar,
armband, halsband och klockor när du arbetar
med ett blybatteri. Ett blybatteri kan alstra en
kortslutningsström kraftig nog att orsaka allvarliga
brännskador.
Se noga till att inga metallföremål kan falla ned på
batteriet. Detta skulle kunna orsaka gnistbildning eller
kortslutning i batteriet eller annan elektrisk komponent,
vilket kan orsaka explosion.
FUNKTIONER
1. Ström LED
2. Hängande krok
3. Omvänd polaritet LED
4. Batteriladdning LED
5. Laddningen klar LED
6. I-linje kontakt
7. AC nätsladd
8. DC tillbehörskontakt
9. Batteriklämmor
FÖRBEREDELSER INFÖR
LADDNING
Apparaten skall endast anslutas till ett 12-volts
blybatteri. Före laddning, kontrollera att
batterispänningen är 12 V genom att hänvisa till
beteckningen på batteriet eller från den information
som finns tillgänglig om dess tillämpning t.ex. bil
användarhandboken.
Använd inte apparaten till laddning av torrbatterier
som vanligtvis används med hushållsapparater. Dessa
batterier kan spricka och orsaka personskador och
materiella skador.
Varning! Explosiv gas kan ventileras från blybatterier
vid laddning. Se till att området är väl ventilerad och
ta bort eventuella antändningskällor när ledande
laddningsproceduren.
• Placera aldrig laddaren direkt ovanför batteriet;
gaser från batteriet kommer att korrodera och
batteriladdaren skadas.
BC6BDWE_Manual_102815.indd 44-45 10/28/2015 11:15:14 AM
Page 24

SVENSKA SVENSKA
46 47
• Låt aldrig batterisyra droppa på batteriladdaren.
• Placera batteriladdaren så långt bort från batteriet så
kablarna kommer att tillåta. Batteriladdaren innehåller
kontakter som kan skapa en gnista.
• Sätt inte ett batteri ovanpå laddaren.
• Explosiva gaser kan ansamlas nära marken. Placera
batteriladdaren lika högt över marken som möjligt.
• Inte röka eller ha öppen eld i närheten när laddning
pågår.
• Det får inte finnas öppna lågor eller tända cigaretter i
närheten när laddning pågår.
• Följ instruktionerna för att ansluta och koppla bort
batteriladdaren kablar eller batteripolerna.
Båtbatterier måste lyftas ur båten och laddas på land.
Om batterier ska laddas ombord måste utrustning som
är särskilt anpassad för marina ändamål användas.
Denna apparat är EJ avsedd för sådana ändamål.
Fordon kan ha elektriska och elektroniska system
(t.ex. motorövervakningssystem eller mobiltelefon)
som kan skadas om de utsätts för hög startspänning
och spänningstoppar. Innan du ansluter enheten till
fordonet ska du kontrollera i fordonsmanualen om
externa hjälpströmkällor får användas.
• Följ såväl dessa instruktioner som de som utfärdats
av batteri- respektive fordonstillverkaren.
• Bara ansluta och koppla loss DC-utgång klämmor
efter att ta bort stickkontakten ur vägguttaget. Låt
aldrig klämmor att röra varandra.
• Kontrollera polariteten hos fordonets batteripoler
innan du ansluter apparaten. Koppla alltid loss
minuskabeln (svart) först och därefter pluskabeln
(röd).
När du laddar ett batteri som är kopplat till bilens
elsystem måste du följa tillverkarens instruktioner
samt iaktta följande förhållningsregler:
• Ladda inte batteriet när motorn är igång.
• Observera att motorkomponenter som kylfläkten kan
starta automatiskt. Håll händerna och kroppen på
avstånd från motorns delar. Se i möjligaste mån till
att inte heller laddare eller kablar kommer i kontakt
med motorn.
Se till att laddare eller kablar inte kan komma i kläm
om en dörr, motorhuv eller annan motorkåpa skulle
stängas.
• Kontrollera att anslutning till batteriet kan ske utan
att kablarna kommer i kontakt med intilliggande
metalliska karossdelar eller motorkomponenter.
• När denna enhet används i närheten av fordonets
batteri och motor ska enheten ställas på en plan
och stadig yta. Se till att inga klämmor, sladdar,
klädesplagg eller kroppsdelar kommer i närheten av
fordonets rörliga delar.
• Om batteriet behöver tas ur fordonet för laddning
eller rengöring av polerna, ska du först stänga av
alla elektriska tillbehör i fordonet för att undvika
gnistbildning.
• Minska risken för elstötar genom att koppla ur
apparaten från strömkällan innan underhåll eller
rengöring påbörjas.
ANVÄNDNING
När du har förberett laddningen och vidtagit personliga
säkerhetsåtgärder fortsätter du enligt följande:
• För de flesta tillämpningar för bilar och liknande
kan laddaren vara ansluten till batteriet och bilens
elsystem samtidigt. Om så är fallet följer du
instruktionerna i avsnittet ”Ladda ett batteri anslutet
till elsystemet”.
• Om batteriet måste kopplas bort från elsystemet före
laddning följer du instruktionerna i avsnittet ”Ladda
ett batteri ej anslutet till elsystemet”.
• Varning! Båtbatterier måste lyftas ur båten och
laddas på land. Om batterier ska laddas ombord
måste utrustning som är särskilt anpassad för
marina ändamål användas.
Laddar ett batteri som är installerat i
den krets
Varning! Observera riskerna med felaktiga
anslutningar, kortslutning av batteri samt felaktig
placering av batteri och laddare. Se till att korrekta
förberedelser gjorts innan du fortsätter.
Varning! Om batteripolerna är svåra att komma
åt, eller om det finns risk för att klämmor eller
terminaler ringen kommer i kontakt med karossen
eller motordelar intill batteriet, måste batteriet tas
ut innan det kan laddas med batteriklämmorna. Följ
tillverkarens instruktioner för urmontering av batteriet.
• Kontrollera batterianslutningarnas polaritet. Batteriets
pluspol (POS, P, +) är oftast grövre än minuspolen
(NEG, N, –).
• Se även tillverkarens instruktioner om att avlägsna
eventuella isolerande höljen från batteripolerna.
• Anslut batteriladdarens plusklämma (röd) till
batteriets pluspol (POS, P, +).
• Anslut batteriladdarens minusklämma (svart) till
batteriets minuspol (NEG, N, –) eller chassiet.
När du kopplar loss batteriladdaren från batteriet bör
du alltid:
• Dra ur batteriladdaren.
• Lossa minusklämman (svart) först.
• Lossa plusklämman (röd) sist.
• Sätta tillbaka eventuella höljen på batteripolerna.
Laddar ett batteri kopplats bort från
kretsen
Varning! Observera riskerna med felaktiga
anslutningar, kortslutning av batteri samt felaktig
placering av batteri och laddare. Se till att korrekta
förberedelser gjorts innan du fortsätter.
• Om batteriet inte redan är bortkopplat från
elsystemet ska du koppla ur det enligt tillverkarens
instruktioner innan du påbörjar laddningen.
• Kontrollera batterianslutningarnas polaritet. Batteriets
pluspol (POS, P, +) är oftast grövre än minuspolen
(NEG, N, –).
• Anslut plusklämman (röd) från batteriladdaren till
batteriets pluspol (POS, P, +).
• Anslut minusklämman (svart) från batteriladdaren till
batteriets minuspol (NEG, N, –).
När du kopplar loss batteriladdaren från batteriet ska
du alltid:
• Dra ur batteriladdaren.
• Lossa minusklämman (svart) först.
• Lossa plusklämman (röd) sist.
• Sätta tillbaka eventuella höljen på batteripolerna.
Ansluta apparaten med hjälp av
batteriklämmorna
Varning! Koppla alltid bort nätspänningen genom att
dra ur kontakten innan du ansluter apparaten till eller
kopplar loss den från batteriet.
Varning! Anslut aldrig någon av de tillbehör leder
tillsammans som detta kommer att orsaka en fara.
Tillbehöret leder bör alltid bara vara ansluten till
in-line-kontakt.
• Anslut batteriklämmorna till batteriladdaren med
skarvkontakten.
• Apparatens laddkablar har färgkodade batteriklämmor
(röd: plus och svart: minus). Dessa ska anslutas
direkt till motsvarande poler på batteriet.
• Följ stegen som beskrivs i lämpligt avsnitt (“Laddar
ett batteri som är installerat i den krets” eller “Laddar
ett batteri kopplats bort från kretsen”).
• Sätt i kontakten till batteriladdaren i ett 220-240
V nätuttag.
Laddning batteriet med hjälp av
batteriklämmorna
1. Ställ in batteriladdaren och anslut till batteriet
följa steg i “Ansluta apparaten med hjälp av
batteriklämmorna”-avsnittet.
2. Anslut batteriladdarens strömkabeln till ett eluttag.
Ström LED lyser blått för att indikera att laddaren
är klar.
Obs:
Om Ström LED inte tänds, kontrollera anslutningen till
växelströmsuttaget. Kontrollera att vägguttaget fungerar.
3. När enheten är ansluten och batteriet laddas,
Batteriladdning LED ( ) kommer att lysa gult för
att indikera att batteriet laddas.
Obs:
Om Batteriladdning LED inte tänds, kontrollera
anslutningen till batteriet. Om klämmorna är korrekt
anslutna, batteriet kan vara fel. Tillverkaren föreslår
att batteriet testas av en kvalificerad batteri service
tekniker.
Om klämmorna är felaktigt anslutna med beaktande av
polaritet, omvänd polaritet LED ( ) tänds. Koppla ur
laddaren och sedan ta bort klämmorna. Anslut
klämmorna ordentligt.
4. När Laddningen klar ( ) lyser grönt är batteriet
fulladdat.
När du kopplar bort laddaren, koppla bort nätsladden
och ta bort klämman från bilens chassi och sedan ta
bort klämman från batteriets pluspol.
Ansluta apparaten med hjälp av 12 V
tillbehörskontakt
Varning! Koppla alltid bort nätspänningen genom att
dra ur kontakten innan du ansluter apparaten till eller
kopplar loss den från batteriet.
Varning! Anslut aldrig någon av de tillbehör leder
tillsammans som detta kommer att orsaka en fara.
Tillbehöret leder bör alltid bara vara ansluten till
in-line-kontakt.
• Anslut tillbehörskontakten till batteriladdaren med
skarvkontakten.
• Anslut tillbehörskontakten till fordonets
tillbehörsuttag.
• Sätt i kontakten till batteriladdaren i ett 220-240 V
nätuttag.
Obs:
Vissa fordon kräver att tändningen slås till tillbehörsuttag
position för att driva tillbehörsuttag.
Laddning batteriet med hjälp av 12 V
tillbehörskontakt
Försiktighet! För att minska risken för skada på
egendom: Kontrollera att DC uttaget är rena och fria
från skräp innan du ansluter enheten.
1. Ställ in batteriladdaren och anslut till batteriet
följa steg i “Ansluta apparaten med hjälp av 12 V
tillbehörskontakt”-avsnittet.
2. Anslut batteriladdarens strömkabeln till ett eluttag.
Ström LED lyser blått för att indikera att laddaren
är klar.
Obs:
Om Ström LED inte tänds, kontrollera anslutningen till
växelströmsuttaget. Kontrollera att vägguttaget fungerar.
3. När enheten är ansluten och batteriet laddas,
Batteriladdning LED ( ) kommer att lysa gult för
att indikera att batteriet laddas.
Obs:
Om Batteriladdning LED inte tänds, kontrollera
anslutningen till fordonets DC-uttag. Rotera adaptern
lite så att det är god kontakt. Om det är korrekt
ansluten, kan batteriet vara i fel. Tillverkaren föreslår
att batteriet testas av en kvalificerad batteri service
tekniker.
Vissa bilar krävs att tändningen slås till ACC-läge
(tillbehör) för att aktivera den DC-uttag. Om tändningen
måste vridas till läge ACC, kontrollera att bilens alla
tillbehör (dvs värmare, fläkt, radio, TV, belysning ...
osv.) är avstängd. Om inte avstängd, kan laddaren inte
kunna ladda batteriet.
4. När Laddningen klar ( ) lyser grönt är batteriet
fulladdat.
När du kopplar bort laddaren, koppla bort nätsladden
och sedan ta bort 12 volts DC-tillbehör kontakt från
bilen tillbehörsuttag.
BC6BDWE_Manual_102815.indd 46-47 10/28/2015 11:15:14 AM
Page 25

NORSK
49
SVENSKA
48
Hängande batteriladdaren
Den hängande krok kan du placera batteriladdare för
bekväm handsfree-funktion.
Försiktighet! För att minska risken för skada på
egendom:
• När laddaren är hängde med hängande krok, skaka
inte laddaren eller objekt som det hänger på.
• Häng inte laddaren från elektriska ledningar eller
något som det inte är säkert.
• Använd endast den hängande krok för upphängning
laddaren. Den hängande krok är inte avsett att stödja
ytterligare vikt. Lägg inte på något extra till den
hängande krok eller risken för brott kan uppstå.
FELSÖKNING
Om enheten är inte laddar:
• Kontrollera att batteriladdaren är ordentligt ansluten
till en levande 220-240-volts uttag.
• Se till att utgående anslutningar är säkrade och
att polariteten är korrekt när du använder batteri
klämmor.
• Om spänningen för batteriet som ska laddas har fallit
under 2 V, går det inte att ladda det med den här
batteriladdaren.
UNDERHÅLL
Den här Black & Decker-apparaten är konstruerad
för att fungera under lång tid med minsta möjliga
underhåll. Med rätt underhåll och regelbunden
rengöring behåller verktyget sina prestanda.
Varning! Dra ur nätkontakten innan du rengör eller
utför underhåll på apparaten.
• Torka av apparaten med en fuktig trasa ibland.
Använd aldrig rengöringsmedel med lösnings- eller
slipmedel. Doppa aldrig apparaten i vatten.
Byta säkring i 12 V tillbehörskontakt
• Ta bort locket med räfflor genom att vrida det
moturs.
• Ta bort gummibrickan, och centrumtappen och
fjädern.
• Ta bort säkringen.
• Sätt dit en ny säkring av samma typ och storlek
(8 A).
• Sätt dit centrumtappen, fjädern och gummibrickan.
• Sätt tillbaka locket med räfflor genom att vrida det
medurs på kontakten.
SKYDDA MILJÖN
Korrekt avfallshantering av denna
produkt
Denna märkning betyder att produkten
inte ska kastas tillsammans med annat
hushållsavfall i hela EU. För att förhindra
eventuell skada på miljön eller människors
hälsa på grund av okontrollerad
avfallshantering, återvinning ansvarsfullt sätt som
främjar en hållbar återanvändning av materiella
resurser. För att återgå din begagnade enhet,
använd återlämnande och insamling eller kontakta
återförsäljaren där produkten köptes. De kan ta den
här produkten för miljösäker återvinning.
Separat insamling av använda produkter och
förpackningar gör att material som skall återvinnas
och användas igen. Återanvändning av återvunnet
material hjälper till att förhindra förorening
av miljön och minskar efterfrågan
på råvaror.
Lokala föreskrifter kan föreskriva separat insamling
av elektriska produkter från hushållet, vid kommunala
deponier eller av återförsäljaren när du köper en ny
produkt.
TEKNISKA DATA
Ingång: 220-240V AC, 50/60 Htz,
0,6 A
Utgång: 12V DC, 6A
GARANTI
Baccus World Wide LLC är övertygad om kvaliteten
på sina produkter och erbjuder en enastående garanti.
Garantin gäller utöver konsumentens rättigheter enligt
lag och påverkar inte dessa. Garantin gäller inom
medlemsstaterna i Europeiska Unionen och i det
Europeiska Frihandelsområdet.
Om en Baccus World Wide LLC produkt Blir fel
beror på felaktiga material, utförande eller bristande
överensstämmelse, Baccus World Wide LLC garantier
för att byta ut defekta delar, reparera produkter utsätts
för rättvis slitage eller byt ut sådana produkter att se
till att minsta olägenhet för kunden om inte:
• produkten har använts i kommersiellt, yrkesmässigt
eller uthyrningssyfte;
• produkten har utsatts för felaktig användning eller
skötsel;
• produkten har skadats av främmande föremål,
ämnen eller genom olyckshändelse;
• reparationer har försökts av personer andra än
Baccus World Wide LLC servicepersonal.
Att göra anspråk på garantin måste du uppvisa
inköpsbevis till Baccus World Wide LLC på den adress
som anges i den här handboken.
Besöka var god vår webbplats www.baccusworldwide.
com för att registrera din nya Baccus World Wide LLC
produkt och hållas uppdaterade om nya produkter och
specialerbjudanden. Ytterligare information om Baccus
World Wide LLC varumärke och våra produkter finns
på www.baccusworldwide.com.
Baccus Worldwide LLC
Weena 290, 3012 NJ Rotterdam eller
Postbus 819, 3000 AV Rotterdam
INSTRUKSJONSBOK
Black & Decker-batteriladeren er utformet for å lade
blybatterier. Produktet er kun ment for bruk i private
husholdninger og som konsumentverktøy.
SIKKERHETSINSTRUKSER
VIKTIGE SPESIFIKASJONER MERK: Batteriets
kapasitet: blysyre type, maksimalt 12 VDC, 120 Ah.
Advarsel! Ved bruk apparater grunnleggende
sikkerhetsforholdsregler (inkludert punktene som er
beskrevet nedenfor) bør som følges for å redusere
risikoen for brann, batterilekkasje, personskade og
skade på materiell.
• Les hele håndboken nøye før du bruker apparatet.
• Tiltenkt bruk er beskrevet i denne håndboken. Bruk
av tilbehør eller utføring av oppgaver som ikke
er anbefalt for apparatet i denne håndboken, kan
medføre fare for personskade.
• Oppbevar håndboken for fremtidig referanse.
Bruk av apparatet
Vær alltid forsiktig når du bruker apparatet.
• Dette apparatet skal ikke brukes av barn eller
svakelige personer uten tilsyn.
• Apparatet skal ikke brukes som leketøy.
• Ikke åpne apparathuset. Det er ingen deler inni som
kan repareres av brukere.
• Ikke arbeid med apparatet i eksplosjonsfarlige
omgivelser, som for eksempel der det befinner seg
brennbare væsker, gass eller støv.
• Dra aldri i kabelen når du skal ta støpselet ut av
stikkontakten. Da risikerer du å skade både den og
støpselet.
Etter bruk
• Når apparatet ikke er i bruk, skal det oppbevares på
et tørt og luftig sted utenfor barns rekkevidde.
• Barn skal ikke ha tilgang til apparater som ikke er i
bruk.
• Når apparatet oppbevares eller transporteres i et
kjøretøy, bør det plasseres i bagasjerommet eller
låses, slik at det ikke påvirkes av raske farts- eller
retningsendringer.
• Apparatet må beskyttes mot direkte sollys, varme og
fuktighet.
Kontroll og reparasjon
• Kontroller at apparatet ikke er skadet eller har defekte
deler før du bruker det. Kontroller om noen av delene
har sprekker, om bryterne er skadet eller om det er
andre forhold som kan ha innvirkning på driften.
• Ikke bruk apparatet hvis det har skadde eller defekte
deler.
• Har noen skadet eller defekte deler repareres eller
skiftes ut av produsenten
• Forsøk aldri å fjerne eller skifte ut andre deler enn de
som er oppgitt i denne håndboken.
Strømkabel og sikkerhet
Advarsel! Gjør aldri endringer på strømkabelen
eller støpselet. Hvis støpselet ikke passer, får du
en kvalifisert elektriker til å installere en passende
stikkontakt. Dårlig kontakt kan føre til elektrisk sjokk.
Apparatet er merket med følgende
symboler:
Dette apparatet er dobbeltisolert. Jording
er derfor ikke nødvendig. Kontroller at
spenningen er i overensstemmelse med
spenningen på typeskiltet.
Les hele denne bruksanvisningen
grundig.
Elektrisk sikkerhet
Kontroller at spenningen er i overensstemmelse med
spenningen på typeskiltet.
• Hvis strømledningen er skadet, må den erstattes av
produsenten for å unngå fare.
• Advarsel! For å unngå alvorlig skade eller død
fra brann, eksplosjon eller elektrisk støt: Denne
enheten må være koblet til en jordet feil krets Avbryte
(jordfeilbryteren) beskyttet strømuttak.
Spesielle sikkerhetsinstrukser for
batteriladere
• Prøv aldri å lade ikke-oppladbare batterier.
• Skift ut defekte ledninger umiddelbart.
• Ikke utsett batteriladeren for vann.
• Ikke åpne batteriladeren.
• Ikke stikk gjenstander eller fingre inn i batteriladeren.
• Du må aldri la de røde og svarte klemmer berøre
hverandre eller en annen felles metalleder. Det kan
føre til skader på apparatet og/eller fare for gnister/
eksplosjon.
BATTERIER
Advarsel! Prøv aldri å lade et frossent batteri.
• I ekstreme forhold kan batterilekkasje forekomme.
Hvis du oppdager væske på batteriene, tørker du den
forsiktig av med en klut. Unngå kontakt med huden.
• Hvis væsken kommer i kontakt med huden eller
øynene, følger du instruksjonene nedenfor.
– Advarsel! Batterivæsken er fortynnet svovelsyre
og kan føre til person- eller materialskade. Ved
hudkontakt, skyll straks med vann. Hvis huden
blir rød eller irritert, eller det oppstår smerter, søk
medisinsk hjelp straks. Hvis væsken kommer i
kontakt med øynene, skyll umiddelbart med vann,
og søk straks medisinsk hjelp.
• Følg instruksene som finnes i avsnittet “Miljø” når du
skal kaste batterier.
BC6BDWE_Manual_102815.indd 48-49 10/28/2015 11:15:14 AM
Page 26

NORSK NORSK
50 51
• Ha destillert vann i hver celle til batterisyren når det
nivået som er spesifisert av batteriprodusenten. Dette
bidrar til å fjerne overflødig gass fra cellene. Ikke
fyll for mye. Når det gjelder batteri uten cellehetter
(vedlikeholdsfritt), følger du nøye produsentens
instrukser for ladning.
• Sett deg inn i alle spesielle forholdsregler fra
batteriprodusenten, for eksempel for å fjerne eller
ikke fjerne cellehetter under ladning, og anbefalte
ladehastigheter.
• Sørg for at den innledende ladehastigheten ikke
overskrider batteriprodusentens krav.
• Advarsel! Risiko for eksplosive gassblandinger.
Det er farlig å arbeide i nærheten av et blybatteri.
Batterier danner eksplosive gasser ved normal
bruk av batteri. Derfor er det svært viktig at du
har satt deg inn i denne håndboken før du bruker
batteriladeren, og at du følger instruksene nøye.
• Bruk av tilbehør som ikke er anbefalt eller solgt av
Black & Decker, kan føre til brannfare, elektrisk sjokk
eller personskade.
• Ikke bruk skjøteledning med mindre det er absolutt
nødvendig. Bruk av en uegnet skjøteledning kan gi
risiko for brann og elektrisk sjokk og gjør garantien
ugyldig.
• VIKTIG: Denne enheten har en aluminium
kjøleribbe, som brukes for å spre varmen og
er plassert på bunnen av enheten. Berør aldri
varmeavlederen mens enheten er i drift og aldri
tillate nederst på enheten for å kontakte brennbare
materialer under drift.
DC-tilbehøret plugg sikkerhet
• Advarsel! Du må aldri koble denne enheten til en
positiv jordet kjøretøy med DC-tilbehøret plugg.
• Kontroller at kjøretøyets uttak for ekstrautstyr er rene
og frie for smuss før du kobler enheten.
• Advarsel – fare for brann! Hvis kjøretøyet uttak for
ekstrautstyr sikring åpnes (blåser) når du setter i
denne batteriladeren, må du ikke bruke dette batteriet
lader med dette kjøretøyet uttak til tilbehør.
– Ikke gjentatte ganger bytt ut sikringen.
– Ikke bytt ut kjøretøyet uttak for ekstrautstyr sikring
med én av en høyere ampere.
– Forsøk aldri å reparere den sikring med tin-folie
eller ledning.
Eventuelle av disse handlingene kan forårsake
alvorlige elektriske skader og/eller brann.
Spesifikke sikkerhetsinstrukser for
bruk av enheten i våte miljøer
Husets av denna enhet er rangert til IP67 støv- og
vanntett standarder. Det anbefales imidlertid at du
observere følgende:
• Aldri senk enheten i vann dypere enn 1 meter, for
lengre enn 30 minutter, og/eller i andre temperaturer
enn mellom 5 ºC og 40 ºC, eller enheten kunne
opprettholde permanent skade.
• Aldri senk enheten i vann med mindre bøssingen
(isolasjon) av AC eller DC ledningen er intakt.
• Ikke la plugg eller klemmer til å bli utsatt for
elementene i lange perioder av gangen , og dypp
ikke dem.
Personsikkerhet
Bruk alltid vernebriller og egnede klær som beskytter
mot kontakt med batterivæske.
Unngå å berøre øynene mens du arbeider med
et batteri. Det kan komme syre, syrepartikler eller
korrosjon i øynene.
Fjern metallgjenstander som ringer, armbånd,
halskjeder og klokker når du arbeider med
et blybatteri. Et blybatteri kan forårsake en
kortslutningsstrøm som er sterk nok til å gi alvorlige
forbrenninger.
Vær ekstra forsiktig så du reduserer risikoen for å
slippe en metallgjenstand på batteriet. Dette kan
forårsake gnister eller kortslutte batteriet eller andre
elektriske deler, noe som kan forårsake en eksplosjon.
FUNKSJONER
1. Strøm LED
2. Hengende krok
3. Revers polaritet LED
4. Batterilading LED
5. Lading fullført LED
6. I-tråd kontakten
7. Vekselstrøm plugg
8. Likestrøm tilbehørsplugg
9. Batteriklemmer
FORBEREDELSER FØR DU LADER
BATTERIET
Apparatet må bare koples til et 12 V blybatteri. Før
du lader, bekrefter du at batterispenningen er 12
V ved å se på etiketten på batteriet eller benytte
tilgjengelige opplysninger knyttet til bruken av det,
for eksempel en håndbok for bil.
Ikke bruk apparatet for å lade tørrbatterier som
vanligvis brukes i apparater til hjemmebruk. Disse
batteriene kan briste og føre til personskader og
materielle skader.
Advarsel! Eksplosiv gass kan slippes ut fra blybatterier
når lading. Pass på at området er godt ventilert, og
fjern alle kilder til antennelse når du lader.
• Plasser aldri batteriladeren direkte over batteriet,
gasser fra batteriet vil ruste og skade batteriet lader.
• Tillat aldri batteriet syre til å dryppe på batteriladeren.
• Plasser batteriet lader så langt vekk fra batteriet som
ledningene vil tillate. Laderen inneholder brytere som
kan lage en gnist.
• Ikke sett batteriet på toppen av laderen.
• Eksplosive gasser kan samle inn nær bakken. Plasser
batteriladeren så høyt som mulig over bakkeplan.
• Ikke bruk elektroverktøy i ladeområdet.
• Ikke røyk og ikke bruk åpen ild i ladeområdet.
• Følg instruksjonene for tilkopling og frakopling av
batteriet lader kabler eller batterikontakter.
Et båtbatteri må tas ut og lades på land. Hvis
batteriet skal lades om bord, kreves det utstyr som er
konstruert spesielt for bruk på sjøen. Dette apparatet
er IKKE konstruert for slik bruk.
Kjøretøyer kan ha elektriske og elektroniske systemer
(f.eks. motorstyringssystemer eller mobiltelefoner)
som kan bli skadet, dersom de utsettes for høy
startspenning og spenningstopper. Før du kopler
apparatet til kjøretøyet, må du lese brukerhåndboken
for kjøretøyet for å sjekke at ekstern ladning er tillatt.
• Følg disse instruksene og instrukser
batteriprodusenten og kjøretøyprodusenten har
publisert.
• Bare koble til og koble fm utgang klemmer etter
fjerning av strømledningen fra stikkontakten. La aldri
klemmer å berøre hverandre.
• Kontroller polariteten til kjøretøyets batteriterminaler
før du kopler til apparatet. Kople alltid fra
minuskabelen (svart) først og deretter plusskabelen
(rød).
Når du lader et batteri som er installert i kretsen,
følger du produsentens instrukser for å få tilgang til
batteriet samt disse:
• Ikke lad batteriet mens motoren er i gang.
• Vær oppmerksom på at maskindeler, for eksempel
kjøleviften, kan starte automatisk. Hold hendene
og kroppen unna maskinkomponenter, og plasser
batterilader og kabler slik at kontakt unngås.
• Sørg for at batteriladeren og kablene er plassert slik
at det ikke oppstår skade når dører og deksler til
maskinrom lukkes.
• Sørg for at tilkoplingene kan utføres uten å berøre
metallgodset eller komponenter i nærheten av
batteriet.
• Når du bruker dette apparatet i nærheten av
kjøretøyets batteri og motor, må du plassere
apparatet på et flatt, stabilt underlag og passe på å
holde alle klemmer, ledninger, klær og kroppsdeler
unna kjøretøyets bevegelige deler.
• Hvis det er nødvendig å fjerne batteriet fra kjøretøyet
for å lade det eller rengjøre terminalene, må du
passe på at alt utstyr i bilen er slått av så det ikke
oppstår gnist.
• For å redusere risikoen for elektrisk støt må du kople
apparatet fra enhver strømkilde før du vedlikeholder
eller rengjør det.
BRUK
Når alle forberedelsene for ladning og personsikkerhet
er gjort, går du frem slik:
• Ved de fleste anvendelser knyttet til bil og lignende
kan batteriladeren koples til batteriet mens det
er koplet i likestrømskretsen. Hvis så, følger du
instruksene som er gitt i avsnittet “Lade et batteri
som er koplet i kretsen”.
• Hvis batteriet må koples fra kretsen før ladning,
følger du instruksene som er gitt i avsnittet “Lade et
batteri som er koplet fra kretsen”.
Advarsel! Et båtbatteri må tas ut og lades på land.
Hvis batteriet skal lades om bord, kreves det utstyr
som er konstruert spesielt for bruk på sjøen.
Lade et batteri som er installert i
kretsen
Advarsel! Feil kopling, kortslutning av batteriet,
plasseringen av batteriet og plasseringen av
batteriladeren kan medføre fare. Sørg for at det er
gjort tilstrekkelige forberedelser før du fortsetter.
Advarsel! Hvis du ikke får tilgang til batteripolene eller
batteriladeren klemmer vil ta kontakt med karosseriet
eller komponenter ved siden av batteriet, må
batteriet fjernes før lading med batteriklemmer. Følg
produsentens instruksjoner for å ta ut batteriet.
• Kontroller polariteten for batteripolene. En positiv
(POS, P, +) batteripol har vanligvis større diameter
enn den negative (NEG, N, –) batteripolen.
• Følg produsentens instrukser for å fjerne eventuelle
isolerende deksler fra batteripolene.
• Kople den positive (røde) klemmen fra batteriladeren
til den positive (POS, P, +) polen på batteriet.
• Kople den negative (svarte) klemmen fra
batteriladeren til den negative (NEG, N, –) polen på
batteriet eller til chassiset.
Når du kopler batteriladeren fra batteriet, skal du alltid
• Koble batteriladeren.
• Kople den negative (svarte) klemmen fra først.
• Kople den positive (røde) klemmen fra sist.
• Sette eventuelle isolasjonsdeksler tilbake på
batteripolene.
Lader et batteri frakoplet fra kretsen
Advarsel! Feil kopling, kortslutning av batteriet,
plasseringen av batteriet og plasseringen av
batteriladeren kan medføre fare. Sørg for at det er
gjort tilstrekkelige forberedelser før du fortsetter.
• Hvis ikke batteriet allerede er tatt ut av kretsen, følger
du produsentens instrukser for å ta ut batteriet før
ladning.
• Kontroller polariteten for batteripolene. En positiv
(POS, P, +) batteripol har vanligvis større diameter
enn den negative (NEG, N, –) batteripolen.
• Kople den positive (røde) klemmen fra batteriladeren
til den positive (POS, P, +) polen på batteriet.
BC6BDWE_Manual_102815.indd 50-51 10/28/2015 11:15:14 AM
Page 27

NORSK NORSK
52 53
• Kople den negative (svarte) klemmen fra
batteriladeren til den negative (NEG, N, –) polen på
batteriet.
Når du kopler batteriladeren fra batteriet, skal du alltid
• Koble batteriladeren.
• Kople den negative (svarte) klemmen fra først.
• Kople den positive (røde) klemmen fra sist.
• Sette eventuelle isolasjonsdeksler tilbake på
batteripolene.
Kople til apparatet med
batteriklemmene
Advarsel! Trekk alltid støpselet ut av stikkontakten før
du kopler apparatet til eller fra batteriet.
Advarsel! Koble aldri noe av tilbehøret fører sammen
da dette vil føre til en fare. Tilbehøret fører bare skal
kobles til den in-line-kontakten.
• Kople batteriklemmene til batteriladeren med
skjøtekontakten.
• Utgangskablene til apparatet har fargekodede
batteriklemmer (rød er positiv og svart er negativ).
Disse koples direkte til de tilsvarende tilkoplingene på
batteriterminalene.
• Følg fremgangsmåten som er beskrevet i det aktuelle
avsnittet (“Lade et batteri som er installert i kretsen”
eller “Lader et batteri frakoplet fra kretsen”).
• Sett støpselet til batteriladeren inn i stikkontakten.
Ladning av batteriet med
batteriklemmene
1. Sett opp batteriladeren og koble til batteriet
følgende trinnene i “Kople til apparatet med
batteriklemmene” -delen.
2. Plugg batteriladeren er strømledningen til en AC
stikkontakt. Strøm LED vil lyse blått for å indikere
at laderen er klar.
Merk:
Hvis strøm LED ikke lyser, kontroller tilkoblingen til AC
stikkontakt. Kontroller at stikkontakten fungerer.
3. Når enheten er riktig koblet til og lading,
batterilading LED ( ) vil lyse gult for å angi at
batteriet lades.
Merknader:
Hvis batterilading LED ikke kom på,
kontroller tilkoblingen til batteriet. Hvis
klemmene er riktig tilkoblet, kan batteriet
være i feil tilstand. Produsenten foreslår
å ha batteriet er testet av en kvalifisert
batteri service tekniker.
Hvis klemmene er koblet feil med hensyn
til polaritet, omvendt polaritet LED ( )
lyser. Koble fra laderen, og deretter fjern
klemmene. Kople klemmene skikkelig.
4. Når lading fullført LED ( ) lyser grønt, er
batteriet fulladet.
Når du frakopler fra batteriet lader, koble fra
strømledningen, fjern klemmen fra kjøretøyets chassis,
og deretter fjern klemmen fra batteriet.
Kople til apparatet med
tilbehørspluggen
Advarsel! Trekk alltid støpselet ut av stikkontakten før
du kopler apparatet til eller fra batteriet.
Advarsel! Koble aldri noe av tilbehøret fører sammen
da dette vil føre til en fare. Tilbehøret fører bare skal
kobles til den in-line-kontakten.
• Kople tilbehørspluggen til batteriladeren med
skjøtekontakten.
• Sett tilbehørspluggen inn i kjøretøyets
likestrømsuttak for tilbehør.
• Sett støpselet til batteriladeren inn i stikkontakten.
Merk:
Noen biler krever at tenningen slås til tilbehøret socket
posisjon for å drive tilbehøret kontakten.
Ladning av batteriet med
tilbehørspluggen
Forsiktig! For å redusere risikoen for skade på
eiendom: Forsikre deg om at kjøretøyet er DC
kontakten er rene og frie for smuss før du kobler til
enheten.
1. Sett opp batteriladeren og koble til batteriet
følgende trinnene i “Kople til apparatet med
tilbehørspluggen” -delen.
2. Plugg batteriladeren er strømledningen til en AC
stikkontakt. Strøm LED vil lyse blått for å indikere
at laderen er klar.
Merk:
Hvis strøm LED ikke lyser, kontroller tilkoblingen til AC
stikkontakt. Kontroller at stikkontakten fungerer.
3. Når enheten er riktig koblet til og lading,
batterilading LED ( ) vil lyse gult for å angi at
batteriet lades.
Merknader:
Hvis batterilading LED ikke kom på,
kontroller tilkoblingen til kjøretøyets
DC uttak. Drei adapter litt for å forsikre
deg om at det er god kontakt. Hvis det
er riktig tilkoblet, kan batteriet være i
feil tilstand. Produsenten foreslår å ha
batteriet er testet av en kvalifisert batteri
service tekniker.
Noen kjøretøy krever at tenningen slås
til ACC (tilbehør) posisjon for å aktivere
DC uttak. Hvis kjøretøyet tenningen er
nødvendig for å bli slått til ACC-stilling,
være sikker på at alle kjøretøy tilbehør
(det vil si varmeapparat, vifte, radio, TV,
lys ... osv) er slått av. Hvis ikke slått av,
laderen kanskje ikke være i stand til å
lade batteriet.
4. Når lading fullført LED ( ) lyser grønt, er
batteriet fulladet.
Når du frakopler fra batteriet lader, koble fra
strømledningen, og deretter fjerne den 12 volt DC
tilbehørspluggen fra kjøretøyet uttak.
Hengende batteriladeren
Den henger kroken gjør at du kan plassere batterilader
for praktisk, håndfri betjening.
Forsiktig! For å redusere risikoen for skade på
eiendom:
• Når laderen er hengt av henger kroken, ikke rist
laderen eller objekt som det er henger fra.
• Ikke heng laderen fra alle elektriske ledninger eller
noe som det ikke er sikkert.
• Bruk bare henge krok for laderen. Den henger kroken
er ikke beregnet til å støtte ekstra vekt. Ikke heng
noe ekstra til henge kroken eller fare for knusing kan
oppstå.
FEILSØKING
Hvis apparatet ikke lader:
• Kontroller at batteriladeren er riktig koplet til en
stikkontakt som gir 220-240 volt vekselstrøm.
• Kontroller at utganger er sikret og at
polariteten tilkoblingen er korrekt når du bruker
batteriklemmene.
• Hvis spenningen for batteriet som skal lades har
sunket under 2 volt, batteriet kan ikke lades med
denne batteriladeren.
VEDLIKEHOLD
Ditt Black & Decker verktøy har blitt utviklet for
å kunne brukes i lang tid med et minimum av
vedlikehold. Kontinuerlig tilfredsstillende drift avhenger
av riktig stell og regelmessig rengjøring.
Det er avhengig av godt vedlikehold og regelmessig
rengjøring for å fungere som det skal til enhver tid.
Advarsel! Før du utfører noe vedlikehold på eller
rengjøring av verktøyet/apparatet, må du koble fra
strømmen.
• Av og til kan du tørke av apparatet med en fuktig
klut. Ikke bruk slipende eller løsemiddelbaserte
rengjøringsmidler. Ikke senk apparatet ned i vann.
Bytte sikring i tilbehørspluggen
• Fjern lokket med riller ved å skru det mot klokken.
• Fjern gummiringen, pinnen og fjæren.
• Ta ut sikringen.
• Sett inn en ny sikring av samme type og i samme
størrelse (8 A).
• Sett på plass pinnen, fjæren og gummiringen.
• Sett på lokket med riller ved å skru det med klokken.
BESKYTTE MILJØET
Riktig avhending av dette produktet
Denne merkingen angir at dette produktet
ikke skal kastes sammen med annet
husholdningsavfall i hele EU. For å hindre
mulig skade på miljøet eller menneskelig
helse fra ukontrollert avhending, resirkuler
det ansvarlig for å fremme bærekraftig gjenbruk av
materielle ressurser. Å returnere dine brukte enhet,
vennligst benytt retur og innsamling systemer eller
ta kontakt med forhandleren der produktet ble kjøpt.
De kan ta dette produktet for miljømessig trygg
resirkulering.
Separat innsamling av brukte produkter og emballasje
gjør at materialer som skal gjenvinnes og brukes på
nytt. Gjenbruk av resirkulerte materialer bidrar
til å forebygge miljøforurensning og
reduserer etterspørselen etter råvarer.
Lokale forskrifter kan sørge for separat innsamling av
elektriske produkter fra husholdningen, på kommunalt
avfall nettsteder eller av forhandleren når du kjøper et
nytt produkt.
TEKNISKE DATA
Inngang: 220-240V AC, 50/60 Htz,
0,6 A
Utdata: 12V DC, 6A
GARANTI
Baccus World Wide LLC er trygg på kvaliteten på
sine produkter og tilbyr en enestående garanti. Dette
garanterer er i tillegg til og gjør ikke på noen måte
fordommene dine lovmessige rettigheter. Garantien
er gyldig innenfor områder av medlemslandene i Den
europeiske union og det europeiske Frihandelsområde.
Hvis en Baccus World Wide LLC produktet blir
defekt på grunn av defekter i materialer, utførelse
eller manglende samsvar innen 24 måneder fra
kjøpsdatoen, Baccus World Wide LLC garanterer å
erstatte defekte deler, reparasjon produkter utsettes
for rettferdig slitasje eller erstatte slike produkter for å
sikre minst mulig ulempe for kunden med mindre:
• produktet har blitt brukt for handel, profesjonelle eller
leie formål;
• produktet har blitt utsatt for misbruk eller
forsømmelse.
• produktet har blitt skadet av fremmede gjenstander
eller stoffer eller ved et uhell.
• reparasjoner ble forsøkt utført av andre enn Baccus
World Wide LLC serviceteknikere.
For å gjøre krav på garanti, du må fremlegge
kjøpsbevis til Baccus World Wide LLC på adressen
som er angitt i denne håndboken.
Besøk vårt nettsted www.baccusworldwide.com å
registrere din nye Baccus World Wide LLC produkt
og for å holdes oppdatert på nye produkter og
spesialtilbud. Ytterligere informasjon på Baccus World
Wide LLC merkevare og komplett utvalg av produkter
er tilgjengelig på www.baccusworldwide.com.
Baccus Worldwide LLC
Weena 290, 3012 NJ Rotterdam eller
Postbus 819, 3000 AV Rotterdam
BC6BDWE_Manual_102815.indd 52-53 10/28/2015 11:15:15 AM
Page 28

DANSK DANSK
54 55
INSTRUKTIONSBOG
ANVENDELSESOMRÅDE
Black & Decker-batterioplader/vedligeholder er
designet til opladning af blysyrebatterier. Dette produkt
er kun beregnet til privat brug.
SIKKERHEDSVEJLEDNINGER
VIGTIG SPECIFIKATIONER BEMÆRK: Batterikapacitet:
blyakkumulatorer type, maks. 12VDC, 120Ah.
Advarsel! Ved brug apparater er det vigtigt, at
grundlæggende sikkerhedsforholdsregler, herunder
bl.a. nedenstående, altid følges for at mindske risikoen
for brand, batterilækage, personskade og materiel
skade.
• Læs hele denne vejledning omhyggeligt, før du
bruger apparatet.
• Apparatets påtænkte anvendelse fremgår af
vejledningen. Brugen af ekstraudstyr eller tilbehør
eller udførelse af opgaver med apparatet ud over de i
brugervejledningen anbefalede kan medføre risiko for
personskade.
• Opbevar denne vejledning til fremtidig brug.
Brug af apparatet
Vær altid opmærksom ved brugen af apparatet.
• Dette apparat må ikke bruges af børn eller svagelige
personer uden opsyn.
• Apparatet må ikke bruges som legetøj.
• Kabinettet må ikke åbnes. Der er ingen dele inde i
kabinettet, som kan serviceres af brugeren.
• Brug ikke apparatet i eksplosive omgivelser, f.eks.
hvor der er brændbare væsker, gasser eller støv.
• Træk aldrig i ledningen for at tage stikket ud af en
stikkontakt; det kan beskadige stik eller ledninger.
Efter brug
• Når apparatet ikke er i brug, skal det opbevares
på et tørt sted med god ventilation, hvor det er
utilgængeligt for børn.
• Børn må ikke have adgang til opbevarede apparater.
• Når apparatet opbevares eller transporteres i et
køretøj, skal det anbringes i bagagerummet eller
fastgøres, for at forhindre at det flytter sig som følge
af pludselige ændringer i hastighed eller retning.
• Apparatet skal beskyttes mod direkte sollys, varme
og fugt.
Eftersyn og reparationer
• Før brug skal apparatet kontrolleres for beskadigede
eller defekte dele. Se efter knækkede dele, skader
på kontakter og eventuelle andre tilstande, der kan
påvirke apparatets drift.
• Brug ikke apparatet, hvis nogen af dets dele er
beskadigede eller defekte.
• Er der beskadigede eller defekte dele repareres eller
udskiftes af producenten.
• Forsøg aldrig at fjerne eller udskifte dele ud over
dem, der er beskrevet i denne vejledning.
Sikkerhed i forbindelse med
netledningen
Advarsel! Netledningen eller stikket må aldrig ændres.
Hvis de ikke passer, skal en kvalificeret elektriker
installere en korrekt stikkontakt. En forkert forbindelse
kan medføre elektrisk stød.
Følgende symboler er anbragt på
apparatet:
Denne maskine er dobbelt isoleret.
Derfor er jordledning ikke nødvendig.
Kontroller altid, at strømforsyningen
svarer til spændingen på typeskiltet.
Læs hele betjeningsvejledningen
omhyggeligt.
Elektricitet og sikkerhed
Kontroller altid, at strømforsyningen svarer til
spændingen på typeskiltet.
• Hvis ledningen er beskadiget, skal den udskiftes af
producenten for at undgå enhver risiko.
• Advarsel! For at undgå alvorlig tilskadekomst eller
dødsfald som følge af brand, eksplosion eller
elektrisk stød: Denne enhed skal være tilsluttet en
jordfejl kredsløb interrupt (HFI) beskyttet stikkontakt.
Specifikke sikkerhedsvejledninger til
batteriopladere
• Hvis netledningen beskadiges, skal den udskiftes
af producenten eller et autoriseret Black & Deckerværksted, så farlige situationer undgås.
• Prøv aldrig på at oplade ikke-opladelige batterier.
• Udskift straks defekte ledninger.
• Batteriopladeren må ikke udsættes for fugt.
• Batteriopladeren må ikke åbnes.
• Undersøg ikke batteriopladeren.
• Lad aldrig den røde og sorte klemmer berøre
hinanden eller en anden, fælles metalleder. Det
kan forårsage skader på apparatet og/eller gnist/
eksplosionsfare.
BATTERIER
Advarsel! Prøv aldrig at oplade et iskoldt batteri.
• Under ekstreme forhold kan der forekomme
batterilækage. Når du bemærker væske på
batterierne, skal du omhyggeligt tørre væsken af med
en klud. Undgå kontakt med huden.
• I tilfælde af kontakt med hud eller øjne, skal du følge
nedenstående instrukser.
– Advarsel! Batterivæske er en fortyndet svovlsyre,
der kan forårsage personskade eller materielle
skader. I tilfælde af kontakt med huden skylles
straks med vand. Hvis der opstår rødme, smerte
eller irritation, skal der søges læge. I tilfælde af
kontakt med øjnene skylles straks med rent vand,
og der søges straks læge.
• Følg ved bortskaffelse af batterier vejledningen i
afsnittet “Miljø”.
• Hæld destilleret vand på de enkelte celler,
indtil batterisyreniveauet er som specificeret
af batteriproducenten. Dette medvirker til at
tømme overskydende luft ud af cellerne. Undgå
overfyldning. Hvis batteriet ikke har cellehætter
(vedligeholdelsesfrit), skal producentens
opladningsvejledning følges nøje.
• Gennemgå alle batteriproducentens forholdsregler,
f.eks. om hvorvidt cellehætter skal fjernes under
opladning samt anbefalede ladestrømstyrker.
• Sørg for, at startladestrømstyrken ikke overstiger
batteriproducentens krav.
• Advarsel! Risiko for eksplosive gasblandinger. Det
er farligt at arbejde i nærheden af et blysyrebatteri.
Batterier udvikler eksplosive gasser under normal
brug. Derfor er det vigtigt at læse denne vejledning,
hver gang inden brug af batteriopladeren og følge
instruktionerne nøje.
• Brug af tilbehør, som ikke anbefales eller sælges
af Black & Decker, kan medføre risiko for brand,
elektrisk stød eller personskade.
• Der må kun bruges forlængerledning, hvis
det er strengt nødvendigt. Brug af en forkert
forlængerledning kan medføre risiko for brand og
elektrisk stød, og ugyldiggør garantien.
• VIGTIGT: Denne enhed er udstyret med
en aluminium køleprofil, som bruges til
varmeafledning og er placeret i bunden af
enheden. Berør aldrig køleprofil, mens enheden
er i drift og lad aldrig bunden af enheden kontakte
brændbare materialer under drift.
DC tilbehør stik sikkerhed
• Advarsel! Slut aldrig dette apparat til en positiv
jordet bilen med DC tilbehøret stik.
• Sørg for at køretøjets strømudtag er rene og fri for
snavs før tilslutning af enheden.
• Advarsel – Risiko for brand! Hvis sikring for
køretøjets strømudtag åbner (springer) ved tilslutning
denne batterioplader, brug ikke denne batteri oplader
med denne køretøjets strømudtag.
– Ikke gentagne gange udskift sikringen.
– Udskift ikke køretøjet sikring for køretøjets
strømudtag med en af en højere amperespænding.
– Forsøg aldrig at reparere sikringen med sølvpapir
eller ledning.
Enhver af disse handlinger kan medføre alvorlige
skader på det elektriske system og/eller brand.
Specifikke sikkerhedsinstruktioner til
brug af apparatet i våde miljøer
Kabinettet af indretningen enhed er godkendt iht.
IP67 støv- og vandtætte standarder. Det anbefales
dog, at du overholder følgende:
• Nedsænk aldrig enheden i vand, der er dybere end
1 meter, for længere tid end 30 minutter og/eller i
temperaturer andre end mellem 5 ºC og 40 ºC, eller
enheden kan opretholde permanente skader.
• Nedsænk aldrig enheden i vand medmindre bøsning
(isolering) af AC- eller DC-ledning er intakt.
• Lad ikke stik eller klemmer til at være udsat for de
elementer i lange perioder og nedsænk aldrig dem.
Personlig sikkerhed
Bær beskyttelsesbriller og egnet tøj, som kan beskytte
mod kontakt med batterivæske.
Undgå at røre øjnene under arbejdet med et
batteri. Der er risiko for at få syre eller syre- eller
korrosionspartikler i øjnene.
Fjern personlige metalgenstande. f.eks. ringe,
armbånd, halskæder og ure, under arbejdet med
et blysyrebatteri. Et blysyrebatteri kan forårsage en
kortslutning, som er kraftig nok til at give alvorlige
forbrændinger.
Pas især på ikke at tabe en metalgenstand på batteriet.
Det kan frembringe gnister eller kortslutte batteriet
eller en anden elektrisk del, som kan forårsage en
eksplosion.
FUNKTIONER
1. Strøm LED
2. Hængende krog
3. Omvendt polaritet LED
4. Batteriet oplades LED
5. Opladning komplet LED
6. In-linje-stik
7. AC netstikket
8. DC tilbehør plug
9. Batteriklemmer
KLARGØRING INDEN OPLADNING
Apparatet må kun sluttes til et 12V-blysyrebatteri.
Inden opladning skal du kontrollere, at
spaendingen på batteriet er 12V ved at henvise
til den etiket på batteri eller fra de tilgaengelige
oplysninger vedrørende dens anvendelse, f.eks bil
brugervejledning.
Brug ikke apparatet til opladning af tørcellebatterier,
der ofte anvendes i husholdningsapparater. Disse
batterier kan eksplodere og anrette skade på personer
og ting.
Advarsel! Eksplosiv gas kan udluftes fra blybatterier
ved opladning. Sørg for tilstrækkelig ventilation på
stedet, og fjern eventuelle antændingskilder under
opladning.
BC6BDWE_Manual_102815.indd 54-55 10/28/2015 11:15:15 AM
Page 29

DANSK DANSK
56 57
• Anbring aldrig batteriopladeren direkte over batteriet;
gasser fra batteriet korroderer og beskadige batteriet
oplader.
• Lad aldrig batterisyre dryppe på batteriopladeren.
• Anbring batteriopladeren så langt fra batteriet
som kabler vil tillade. Batteriopladeren indeholder
kontakter som kan frembringe en gnist.
• Indstil ikke et batteri oven på opladeren.
• Eksplosive gasser kan indsamle nær jorden. Hæv
batteriopladeren så meget som muligt fra gulvhøjde.
• Brug ikke el-værktøj i opladningsområdet.
• Undgå at ryge eller bruge åben ild i
opladningsområdet.
• Følg vejledningen i montering og afmontering af
batteriopladerens ledninger eller batteriterminaler.
Et marinbatteri (båd) skal fjernes og oplades på land.
Opladning om bord kræver særligt udstyr beregnet
til brug på vandet. Dette apparat er IKKE beregnet til
sådanne formål.
Der kan være elektriske og elektroniske systemer
i køretøjer (f.eks. motorstyringssystemer eller
mobiltelefoner), som kan blive beskadiget, hvis de
udsættes for høje start- og spidsspændinger. Læs
instruktionsbogen til køretøjet for at kontrollere, om
ekstern opladning er tilladt, inden du slutter apparatet
til køretøjet.
• Følg denne vejledning og vejledningen udgivet af
batteriproducenten og bilproducenten.
• Kun tilslutte og frakoble DC-udgang klemmer efter
fjernelse af ledningen ud af stikkontakten. Lad aldrig
klemmer til at røre hinanden.
• Kontroller polariteten på køretøjets batteriterminaler,
inden apparatet tilsluttes. Fjern altid først det negative
(sorte) kabel efterfulgt at det positive (røde) kabel.
Ved opladning af et batteri, der er installeret i
strømkredsen, skal producentens anvisning følges
vedrørende adgang til batteriet og følgende:
• Oplad ikke batteriet, mens motoren kører.
• Vær opmærksom på, at motorkomponenter,
f.eks. køleventilatoren, kan starte automatisk.
Hold hænderne og kroppen på afstand af
motorkomponenter, og anbring batteriopladeren og
kablerne, så der ikke opstår kontakt.
• Sørg for, at batteriopladeren og kablerne er placeret,
så de ikke beskadiges, når døre og motorhjelme
lukkes.
• Sørg for, at forbindelserne kan etableres, uden at
metalkarosseriet eller komponenterne ved siden af
batteriet berøres.
• Placer apparatet på en plan, stabil overflade, og
hold klemmer, ledninger, tøj og kropsdele på afstand
af køretøjets bevægelige dele, når dette apparat
anvendes i nærheden af køretøjets batteri og motor.
• Sørg for, at alt tilbehør i bilen er slukket, så der
ikke dannes gnister, hvis det er nødvendigt at
tage batteriet ud af køretøjet for at oplade det eller
rengøre terminalerne.
• For at reducere risikoen for elektrisk stød skal
apparatet kobles fra alle strømkilder, inden der gøres
forsøg på vedligeholdelse og rengøring.
ANVENDELSE
Fortsæt som følger, når alle forberedelser til opladning
og personlig beskyttelse er gennemført:
• For de fleste biler o.l. gælder, at batteriopladeren
kan sluttes til batteriet, mens det er sluttet til
jævnstrømskredsen. Følg vejledningen under
“Opladning af et batteri installeret i strømkredsen”,
hvis dette er tilladt.
• Følg vejledningen under “Opladning af et batteri, der
ikke er sluttet til strømkredsen”, hvis batteriet skal
kobles fra strømkredsen inden opladning.
Advarsel! Et marinbatteri (båd) skal fjernes og oplades
på land. Opladning om bord kræver særligt udstyr
beregnet til brug på vandet.
Opladning af et batteri, der er
installeret i kredsløbet
Advarsel! Forkert tilslutning, kortslutning af
batteriet, placeringen af batteriet og placeringen
af batteriopladeren kan udgøre en risiko. Sørg for
passende klargøring, inden der fortsættes.
Advarsel! Batteriet skal tages ud, inden oplades ved
hjælp batteriet klemmer hvis det ikke er muligt at få
adgang til batteripolerne, eller batteriklemmer kommer
kontakt med karosseriet eller komponenterne ved
siden af batteriet. Følg producentens vejledning i
udtagning af batteriet.
• Kontroller batteripolernes polaritet. En positiv (POS,
P, +) batteripol har normalt en større diameter end
den negative (NEG, N, –) batteripol.
• Følg producentens vejledning fjernelse af eventuelle
beskyttende afskærmninger fra batteripolerne.
• Sæt batteriopladerens positive (røde) klemme på
batteriets positive (POS, P, +) pol.
• Sæt batteriopladerens negative (sorte) klemme på
batteriets negative (NEG, N, –) pol eller til chassiset.
Gør altid følgende, når batteriopladeren kobles fra
batteriet:
• Tag batteriopladeren.
• Tag først den negative (sorte) klemme af.
• Tag den positive (røde) klemme af til sidst.
• Sæt eventuelle beskyttende afskærmninger på
batteripolerne.
Opladning af et batteri, der er kobles
fra kredsløbet
Advarsel! Forkert tilslutning, kortslutning af
batteriet, placeringen af batteriet og placeringen
af batteriopladeren kan udgøre en risiko. Sørg for
passende klargøring, inden der fortsættes.
• Følg producentens vejledning i udtagning af batteriet
inden opladning, hvis det ikke allerede er taget ud.
• Kontroller batteripolernes polaritet. En positiv (POS,
P, +) batteripol har normalt en større diameter end
den negative (NEG, N, –) batteripol.
• Sæt batteriopladerens positive (røde) klemme på
batteriets positive (POS, P, +) pol.
• Sæt batteriopladerens negative (sorte) klemme på
batteriets negative (NEG, N, –) pol.
Gør altid følgende, når batteriopladeren kobles fra
batteriet:
• Tag batteriopladeren.
• Tag først den negative (sorte) klemme af.
• Tag den positive (røde) klemme af til sidst.
• Sæt eventuelle beskyttende afskærmninger på
batteripolerne.
Tilslutning af apparatet med
batteriklemmerne
Advarsel! Tag altid netledningen ud af stikkontakten,
inden apparatet kobles til eller fra batteriet.
Advarsel! Tilslut aldrig noget af tilbehøret fører
sammen, da dette vil medføre en fare. Tilbehøret leder
skal altid kun være forbundet til in-line-stik.
• Slut batteriklemmerne til batteriopladeren med
in-line stikket.
• Apparatets udgangsledninger har farvekodede
batteriklemmer (rød-positiv og sort-negativ).
Disse sættes direkte på de tilsvarende stik på
batteriterminalerne.
• Følg de trin, der er beskrevet i de relevante
afsnit (“Opladning af et batteri, der er installeret
i kredsløbet” eller “Opladning af et batteri, der er
kobles fra kredsløbet”).
• Sæt batteriopladerens strømstik i en stikkontakt.
Opladning af batteriet med
batteriklemmerne
1. Konfigurer batteriopladeren og oprette forbindelse
til batteriet følgende trinene i ”Tilslutning af
apparatet med batteriklemmerne” afsnittet
2. Sæt batteri opladerens strømstik i en stikkontakt.
strøm LED lyser blåt for at indikere, at opladeren
er klar.
Bemærk:
Hvis strøm LED ikke lyser, skal du
kontrollere forbindelsen til AC-stikkontakten.
Sørg for, at stikkontakten virker.
3. Når enheden er korrekt tilsluttet og opladningen,
af batteriet opladning LED ( ) lyser gult for at
angive, at batteriet oplades.
Bemærkninger:
Hvis opladning LED ikke lyser,
skal du kontrollere forbindelsen
til batteriet. Hvis klemmerne er
korrekt tilsluttet, kan batteriet er i
fejltilstand. Producenten anbefaler at
få batteriet testes af en kvalificeret
batteri servicetekniker.
Hvis klemmerne er forkert forbundet
med hensyn til polaritet, omvendt
polaritet LED ( ) lyser. Tag stikket
ud af opladeren, og fjern
klemmerne. Tilslut klemmerne
ordentligt.
4. Når opladning komplet LED ( ) lyser grønt, er
batteriet fuldt opladet.
Når batteriet frakobles laderen, tag netledningen, fjern
klemmen fra køretøjets chassis, og fjern derefter
klemmen fra batteri terminal.
Tilslutning af apparatet med DC
tilbehør plug
Advarsel! Tag altid netledningen ud af stikkontakten,
inden apparatet kobles til eller fra batteriet.
Advarsel! Tilslut aldrig noget af tilbehøret fører
sammen, da dette vil medføre en fare. Tilbehøret leder
skal altid kun være forbundet til in-line-stik.
• Slut jævnstrømsstikket til tilbehør til batteriopladeren
med in-line-stikket.
• Sæt jævnstrømsstikket til tilbehør i køretøjets udtag
til tilbehør.
• Sæt batteriopladerens strømstik i en stikkontakt.
Bemærk:
Nogle biler kræver, at tændingen slås
til tilbehørsstikket position for at drive
tilbehørsstikket.
Opladning af batteriet med DC tilbehør
plug
Forsigtig! For at reducere risikoen for skader på
ejendom: Sørg for, at køretøjets DC udtag er rene og
fri for snavs før tilslutning af enheden.
1. Konfigurer batteriopladeren og oprette forbindelse
til batteriet følgende trinene i ”Tilslutning af
apparatet med DC tilbehør plug” afsnittet
2. Sæt batteri opladerens strømstik i en stikkontakt.
strøm LED lyser blåt for at indikere, at opladeren
er klar.
Bemærk:
Hvis strøm LED ikke lyser, skal du
kontrollere forbindelsen til AC-stikkontakten.
Sørg for, at stikkontakten virker.
3. Når enheden er korrekt tilsluttet og opladningen,
af batteriet opladning LED ( ) lyser gult for at
angive, at batteriet oplades.
Bemærkninger:
Hvis opladning LED ikke lyser,
skal du kontrollere forbindelsen til
køretøjets DC udtag. Drej adapter
lidt for at sikre, at der er god
kontakt. Hvis det er korrekt tilsluttet,
kan batteriet er i fejltilstand.
Producenten anbefaler at få batteriet
testes af en kvalificeret batteri
servicetekniker.
BC6BDWE_Manual_102815.indd 56-57 10/28/2015 11:15:15 AM
Page 30

DANSK DANSK
58 59
• produktet har været brugt til handel, liberale erhverv
eller leje;
• produktet er blevet udsat for misbrug eller
forsømmelse.
• produktet har taget skade gennem fremmedlegemer,
stoffer eller ulykker;
• reparation har været forsøgt af andre personer end
Baccus World Wide LLC service personale.
For at gøre krav på garantien, skal du indsende
dokumentation for købet til Baccus World Wide LLC
på den adresse, der er angivet i denne manual.
Besøg venligst vores hjemmeside www.
baccusworldwide.com for at registrere dit nye
Baccus World Wide LLC-produkt og for at blive
holdt opdateret om nye produkter og tilbud. Mere
oplysninger om Baccus World Wide LLC brand
og vores varesortiment er tilgængelige på www.
baccusworldwide.com.
Baccus Worldwide LLC
Weena 290, 3012 NJ Rotterdam eller
Postbus 819, 3000 AV Rotterdam
Nogle køretøjer kræver, at
tændingskontakten er drejet til
positionen ACC (tilbehør) for at
aktivere DC udtag. Hvis dit køretøj
tændingen skal være slået til
positionen ACC, sørg for, at alle
køretøjets tilbehør (f. eks. varmer,
blæser, radio, tv, lys ... osv) er
slået fra. Hvis ikke slukket, oplader
muligvis ikke være i stand til at
oplade batteriet.
4. Når opladning komplet LED ( ) lyser grønt, er
batteriet fuldt opladet.
Når batteriet frakobles laderen, tag netledningen, og
fjern derefter den 12 volt DC tilbehør stik fra køretøjet
tilbehør stikkontakt.
Ophængning af batterioplader
Den krog giver dig mulighed for at placere batteriet
oplader til nem, håndfri betjening.
Forsigtig! For at reducere risikoen for skader på
ejendom:
• Når laderen er hængt på hængende krog, ryst ikke
opladeren eller det objekt det hænger fra.
• Hæng ikke opladeren fra elektriske ledninger eller
noget det er ikke sikkert.
• Kun brug krog til ophængning af opladeren. Den
krog er ikke beregnet til at støtte yderligere vægt.
Hæng ikke noget ekstra til krog eller risikoen for brud
kan forekomme.
FEJLFINDING
Hvis apparatet ikke oplader:
• Kontroller, at batteriopladeren er tilsluttet en
fungerende 220-240 V stikkontakt.
• Sørg for, at output-forbindelser er sikret, og polaritet
forbindelsen er korrekt når der bruges batteri
klemmer.
• Hvis batteriet, der skal oplades har en spænding
på under 2 Volt, kan det ikke oplades med denne
batterioplader.
VEDLIGEHOLDELSE
Dit Black & Decker-værktøj er beregnet til at fungere i
en længere periode med minimal vedligeholdelse.
Fortsat tilfredsstillende drift afhænger af korrekt
behandling af værktøjet samt regelmæssig rengøring.
Advarsel! Frakobl apparatet ud af stikkontakten, før
der udføres nogen form for vedligeholdelse eller
rengøring.
• Aftør regelmæssigt apparatet med en fugtig klud.
Brug ikke slibende eller opløsningsmiddelbaseret
rengøringsmiddel. Apparatet må ikke nedsænkes i
væsker.
Udskiftning af sikringen i DC tilbehør
plug
• Fjern hætten med riller ved at dreje den mod uret.
• Fjern gummiskiven, midterstiften og fjederen.
• Fjern sikringen.
• Isæt en ny sikring af samme type og størrelse (8 A).
• Montér midterstiften, fjederen og gummiskiven.
• Montér hætten med riller ved at dreje den med uret
på stikket.
BESKYTTELSE AF MILJØET
Korrekt bortskaffelse af dette produkt
Denne markering angiver, at produktet
ikke må bortskaffes sammen med
almindeligt husholdningsaffald i hele EU.
For at undgå eventuel skade på miljøet
eller menneskers sundhed som følge af
ukontrolleret bortskaffelse af affald, indleveres behørigt
til fremme for bæredygtig genanvendelse af materielle
ressourcer. At returnere dine brugte enhed, skal du
bruge returnerings-og indsamlingsordninger eller ved
at kontakte forhandleren, hvor produktet blev købt. De
kan tage dette produkt med henblik på miljøforsvarlig
genvinding.
Separat indsamling af brugte produkter og emballage
gør det muligt for materialer, der skal genvindes
og bruges igen. Genanvendelse af
genbrugsmaterialer bidrager til at forebygge
forurening af miljøet og reducerer
efterspørgslen efter råvarer.
Lokale regler kan give for separat indsamling
af elektriske produkter fra husholdningen, ved
kommunale lossepladser eller af detailhandleren, når
du køber et nyt produkt.
TEKNISKE DATA
Input: 220-240V AC, 50/60 Htz,
0,6 A
Output: 12V DC, 6A
GARANTI
Baccus World Wide LLC har tillid til kvaliteten af sine
produkter og tilbyder en enestående garanti. Denne
garanti er desuden til og på ingen måde skader dine
lovmæssige rettigheder. Garantien er gyldig inden
for omraader af medlemsstaterne af den Europæiske
Union og det Europæiske Frihandelsområde.
Hvis Baccus World Wide LLC-produkt bliver defekt
på grund af defekte materialer, fremstillingsfejl eller
manglende overensstemmelse inden for 24 måneder
fra købsdatoen, Baccus World Wide LLC garantier for
at erstatte defekte dele, reparation produkter udsat for
slid og retfærdig ælde eller erstatte sådanne produkter
for at sikre, af den mindste ulempe for kunden,
medmindre:
BC6BDWE_Manual_102815.indd 58-59 10/28/2015 11:15:15 AM
Page 31

SUOMI SUOMI
60 61
KÄYTTÖOHJE
KÄYTTÖTARKOITUS
Black & Decker akkulaturin/ylläpitäjä on tarkoitettu
lyijyakkujen lataamiseen. Tuote on tarkoitettu
ainoastaan kotikäyttöön.
TURVALLISUUSOHJEET
TÄRKEÄÄ TEKNISET HUOM: Akun kapasiteetti:
lyijyakku paras 12VDC, 120 Ah.
Varoitus! Käytettäessä laitteita on aina noudatettava
perusvarotoimenpiteitä mukaan lukien alla, välttää riski
tulipalo, vuotavien paristojen, vammat ja aineellisia
vahinkoja.
• Lue nämä ohjeet huolellisesti ennen laitteen käyttöä.
• Käyttötarkoitus kuvataan ohjeissa. Muiden
kuin ohjeissa suositeltujen lisävarusteiden tai
-osien käyttö sekä laitteen käyttö muuhun kuin
oppaassa suositeltuun tarkoitukseen voi aiheuttaa
henkilövahingon vaaran.
• Säilytä ohjeet tulevaa tarvetta varten.
Laitteen käyttö
Ole aina huolellinen käyttäessäsi laitetta.
• Tätä laitetta ei ole tarkoitettu nuorten tai
lihasvoimaltaan heikkojen henkilöiden käyttöön ilman
valvontaa.
• Laitetta ei tule käyttää leluna.
• Älä avaa laitteen koteloa. Sen sisällä ei ole käyttäjän
huollettavissa olevia osia.
• Älä käytä laitetta räjähdysalttiissa ympäristössä, jossa
on palavaa nestettä, kaasua tai pölyä.
• Älä koskaan irrota johtoa pistorasiasta johdosta
vetäen. Pistoke tai johto voi vahingoittua.
Käytön jälkeen
• Kun laitetta ei käytetä, säilytä sitä kuivassa, ilmavassa
paikassa poissa lasten ulottuvilta.
• Pidä laite lasten ulottumattomissa.
• Kun laitetta säilytetään tai kuljetetaan ajoneuvossa,
sijoita se tavaratilaan tai kiinnitä se kunnolla, ettei se
matkan aikana pääse liikkumaan.
• Muunnin pitää suojata suoralta auringonvalolta,
kuumuudelta ja kosteudelta.
Tarkastus ja korjaus
• Tarkista ennen laitteen käyttöä, ettei laitteessa ole
vahingoittuneita tai viallisia osia. Tarkista osien
ja kytkimien kunto sekä muut seikat, jotka voivat
vaikuttaa laitteen toimintaan.
• Älä käytä laitetta, jos jokin osa on vahingoittunut tai
viallinen.
• Onko vaurioituneet tai vialliset osat korjataan tai
vaihdetaan valmistajan.
• Älä koskaan yritä korjata tai vaihtaa muita kuin
ohjeissa erikseen määriteltyjä osia.
Virtajohtoon liittyvät
turvallisuusnäkökohdat
Varoitus! Älä yritä tehdä muutoksia virtajohtoon tai
pistokkeeseen. Jos pistoke ei sovi pistorasiaan, pyydä
sähkömiestä vaihtamaan johto. Huolimaton kytkentä
voi aiheuttaa sähköiskun.
Laitteessa on seuraavat merkinnät
Tämä laite on kaksoiseristetty, joten
erillistä maadoitusta ei tarvita. Tarkista
aina, että virtalähde vastaa arvokilvessä
ilmoitettua jännitettä.
Lue tämä käyttöohje huolellisesti.
Sähköturvallisuus
Tarkista aina, että syöttövirta vastaa laitekilvessä
ilmoitettua jännitettä.
• Jos virtajohto on vaurioitunut, se täytyy korvata
valmistajan välttämiseksi vaaran.
• Varoitus! Vältä vakavat tapaturmat tai kuoleman
tulipalon, räjähdyksen tai sähköisku: laite on
kytkettävä vikavirtakatkaisin (PRCD) suojattu
pistorasiaan.
Latauslaitteita koskevat turvaohjeet
• Jos virtajohto vahingoittuu, sen vaihtaminen tulee
turvallisuussyistä jättää valmistajan tai valtuutetun
Black & Decker -huollon tehtäväksi.
• Älä koskaan yritä ladata paristoja, joita ei ole
tarkoitettu ladattavaksi.
• Vaihda vialliset johdot välittömästi ehjiin.
• Älä anna latauslaitteen kastua.
• Älä avaa latauslaitetta.
• Älä työnnä mitään latauslaitteen sisään.
• Älä koskaan anna punainen ja musta pihdit koskettaa
toisiaan tai toinen yleinen metalli kapellimestari.
Tämä voi vahingoittaa laitetta ja / tai luoda kipinä /
räjähdysvaaran.
PARISTOT
Varoitus! Älä koskaan yritä ladata jäätynyttä akkua.
• Vaativissa oloissa voi ilmetä akkuvuotoja. Jos
havaitset akkujen pinnalla nestettä, pyyhi se
huolellisesti pois. Vältä ihokosketusta.
• Jos nestettä joutuu silmiin tai iholle, noudata alla
olevia ohjeita.
– Varoitus! Akkuneste on laimennettua rikkihappoa,
joka voi aiheuttaa materiaali- tai henkilövahinkoja.
Jos nestettä joutuu iholle, se on välittömästi
huuhdeltava pois vedellä. Jos ihoa kirvelee tai se
punottaa tai on muuten ärtynyt, hakeudu lääkäriin.
Jos nestettä joutuu silmiin, huuhdo välittömästi
puhtaalla vedellä ja mene mahdollisimman pian
lääkäriin.
• Noudata paristoja hävittäessäsi kohdassa
”Ympäristönsuojelu” annettuja ohjeita.
• Lisää kuhunkin akkukennoon tislattua vettä kunnes
pinta on valmistajan ilmoittamalla tasolla. Näin
ylimääräinen kaasu pääsee ulos kennoista. Älä täytä
yli merkityn tason. Huoltoa vaatimattoman akun
(kannettomat kennot) lataamisessa on seurattava
valmistajan ohjeita.
• Lue kaikki akun valmistajan erityiohjeet, kuten pitääkö
kennokannet poistaa latauksen ajaksi ja mikä on
suositeltava latausvirta.
• Varmista, ettei latausvirta ylitä valmistajan ohjeessa
mainittua.
• Varoitus! Räjähdysalttiit kaasut. Lyijyakun
läheisyydessä työskentely on vaarallista. Akuista
vapautuu räjähdysalttiita kaasuja normaalin toiminnan
aikana. Tästä syystä on erityisen tärkeää, että ennen
akun lataamista luet tämän käyttöoppaan ja noudatat
tarkoin ohjeita.
• Muun kuin Black & Deckerin suositteleman tai
myymän laitteen liittäminen saattaa aiheuttaa
tulipalon, sähköiskun tai loukkaantumisen.
• Älä käytä jatkojohtoa, ellei se ole täysin
välttämätöntä. Hyväksymättömän virtajohdon käyttö
saattaa aiheuttaa tulipalon tai sähköiskun, ja se
mitätöi takuun.
• TÄRKEÄÄ: Tämä yksikkö on alumiininen
jäähdytyslevy, jota käytetään haihduttaa lämpöä
ja sijaitsee laitteen alaosan. Älä koskaan kosketa
jäähdytyslevy kun laite on käyttö- ja älä anna
laitteen pohjassa ottamaan yhteyttä syttyvien
materiaalien käytön aikana.
DC-lisävaruste pistoke turvallisuutta
• Varoitus! Älä koskaan kytke laitetta positiivinen
maadoitettu ajoneuvon kanssa DC-lisävaruste
pistoke.
• Varmista, että auton lisävarustepistorasian on puhdas
ennen kuin liität laitteen.
• Varoitus – tulipalon! Jos autossa
lisävarustepistorasian sulake puhaltaa (palanut),
kun kytket akkulaturi, älä käytä akkulaturi autoon
virtalähteestä.
– Älä toistuvasti, vaihda sulake.
– Älä vaihda auton lisävarustepistorasian sulake
korkeamman ampeeriluku.
– Älä koskaan yritä korjata sulake kanssa foliota tai
lanka.
Nämä toimet voivat aiheutua vakava
vaurioituminen ja/tai tulipalon.
Erityisiä turvallisuusohjeita laitteen
käyttöä märissä olosuhteissa
Kotelon on IP67-luokitus pöly- ja vesitiivis
standardeja. On kuitenkin suositeltavaa, että
noudattaa seuraavia:
• Älä koskaan upota yksikköä veteen syvempi kuin 1
metri, yli 30 minuutin ajan ja/tai lämpötiloissa muu
kuin 5 ºC kohteeseen 40 ºC, tai yksikkö voisi ylläpitää
pysyviä vaurioita.
• Älä koskaan upota laitetta veteen ellei holkki (eristys)
AC tai DC johto on kunnossa.
• Älä anna pistoke tai pihdit altistua elementtejä pitkiä
aikoja; ja älä upota niitä veteen.
Henkilöturvallisuus
Vältä kosketusta akkunesteen kanssa käyttämällä
suojalaseja sekä suojaavaa vaatetusta.
Älä kosketa silmiäsi käsitellessäsi akkua. Akkuhappoa,
happoisia hiukkasia tai ruostetta saattaa joutua silmiin.
Riisu metalliesineet kuten sormukset, kaulaketjut,
rannerenkaat ja kellot ennen kuin käsittelet akkua.
Lyijyakun aiheuttama oikosulkuvirta on riittävän
voimakas aiheuttamaan vakavia palovammoja.
Varo erityisesti, ettei akun päälle putoa metalliesineitä.
Metalliesineet voivat aiheuttaa oikosulun, kipinöintiä ja
mahdollisen räjähdysvaaran.
YLEISKUVAUS
1. Virran LED
2. Ripustuskoukku
3. Käänteinen polaarisuus LED
4. Akku latautuu LED
5. Ladattu täyteen LED
6. Linjassa liittimen
7. AC verkkopistokkeella
8. DC lisälaitepistoke
9. Akun kiristimet
VALMISTELUT ENNEN AKUN
LATAAMISEN
Laite on vain kytkettävä 12V:n lyijyakku. Ennen
lataamista, varmista, että akun jännite on 12V,
viittaamalla ovat akun tarrassa, tai käytettävissä
olevien tietojen, jotka liittyvät sen soveltamisesta
esimerkiksi auton käyttöoppaassa.
Älä käytä sitä kodin sähkölaitteissa yleisesti käytettyjen
paristojen tai akkujen lataamiseen. Ne voivat räjähtää ja
aiheuttaa laite- ja henkilövahinkoja.
Varoitus! Räjähtäviä kaasuseoksia voidaan ilmattu
mennessä lyijyakut lataamisen aikana. Varmista,
että alue on hyvin ilmastoitu ja poista mahdolliset
syttymislähteet ennen lataamisen aikana.
• Älä koskaan aseta akkulaturi suoraan yläpuolella
akku; kaasujen alkaen akun voivat syövyttää ja
vahingot akkulaturi.
• Älä koskaan anna akkuhapon pisaroi akkulaturi.
• Sijoita akkulaturi niin kauas paristo kuten kaapelit
sallivat. Akkulaturi sisältää kytkimiä joita voi luoda
kipinää.
• Älä aseta akun päälle laturista.
BC6BDWE_Manual_102815.indd 60-61 10/28/2015 11:15:15 AM
Page 32

SUOMI SUOMI
62 63
• Räjähtävät kaasut voivat kerätä lähellä pohja. Etsi
akkulaturi mahdollisimman korkealle maanpinnan
yläpuolelle kuin mahdollista.
• Älä käytä sähkötyökaluja vuonna paristo lataaminen
alueella.
• Älä tupakoi tai ole avotulta vuonna paristo lataaminen
alueella.
• Seuraa ohjeita liittäminen ja irrottaminen akkulaturi
kiinnikkeet tai akun navat.
Veneen akku on irrotettava veneestä ja ladattava
maissa. Sen lataaminen veneessä vaatii nimenomaan
veneilykäyttöön tarkoitettuja laitteita. Tätä laitetta EI
OLE suunniteltu venekäyttöön.
Ajoneuvojen sähköjärjestelmät (esim. moottorin
ohjausjärjestelmä tai matkapuhelin) voivat vaurioitua
korkeista käynnistysjännitteistä ja jännitepiikeistä.
Ennen kuin kytket latauslaitteen autoon, varmista auton
käsikirjasta, onko ulkoisen käynnistysavun käyttö
sallittu.
• Noudata näitä sekä akun että ajoneuvon valmistajan
antamia ohjeita.
• Vain liittää ja irrottaa ulostulolla kiinnikkeet
poistamisen jälkeen virtajohto pistorasiasta. Älä
koskaan anna pihdit koskettaa toisiaan.
• Tarkista ajoneuvon akun napojen polaarisuus ennen
kuin kytket apukäynnistimen. Irrota aina ensin
apukäynnistimen (musta) miinuskaapeli, vasta sen
jälkeen positiivinen (punainen) pluskaapeli.
Noudata käyttökohteeseen kytketyn akun käsittelyssä
ja lataamisessa sekä seuraavissa asioissa valmistajan
ohjeita:
• Älä lataa akkua moottorin ollessa käynnissä.
• Ota huomioon, että esimerkiksi jäähdyttimen puhallin
saattaa käynnistyä automaattisesti. Älä koske
moottorin osiin, ja sijoita latauslaite ja kaapelit siten,
etteivät nekään kosketa.
• Varmista, etteivät ajoneuvon ovet tai konepelti
mahdollisesti sulkeutuessaan vahingoita latauslaitetta
tai kaapeleita.
• Varmista, että kaapelit voi kytkeä koskematta
ajoneuvon metalliosiin.
• Kun laitetta käytetään ajoneuvon akun ja moottorin
läheisyydessä, se on asettava tukevalle ja tasaiselle
alustalle. Pidä hauenleuat ja kaapelit sekä käyttäjän
vaatteet ja kädet poissa ajoneuvon liikkuvista osista.
• Jos akku on irrotettava ajoneuvosta lataamisen tai
napojen puhdistamisen ajaksi, varmista, että kaikki
ajoneuvon sähkölaitteet on sammutettu kipinöinnin
välttämiseksi.
• Sähköiskujen välttämiseksi laite on irrotettava
virtalähteestä ennen huoltoa ja puhdistusta.
KÄYTTÖ
Kun lataamisvalmistelut ja turvallisuusnäkökohdat on
huomioitu, jatka seuraavasti:
• Useimmissa ajoneuvo- ja muissa tapauksissa
latauslaite voidaan kytkeä akkuun, joka on kytkettynä
omaan käyttökohteeseensa. Jos näin on, noudata
ohjeita, jotka on selitetty kohdassa Käyttökohteeseen
kytketyn akun lataaminen.
• Jos akku on irrotettava käyttökohteesta ennen
lataamista, noudata ohjeita, jotka on selitetty
kohdassa Käyttökohteesta irrotetun akun lataaminen.
Varoitus! Veneen akku on irrotettava veneestä ja
ladattava maissa. Sen lataaminen veneessä vaatii
nimenomaan veneilykäyttöön tarkoitettuja laitteita.
Latauksen akku, joka on asennettu
piiristä
Varoitus! Huolimaton kytkentä, oikosulku, akun
ja latauslaitteen sijoituspaikka saattavat kukin olla
vaaratekijöitä. Varmista, että latausvalmistelut on
suoritettu asianmukaisesti.
Varoitus! Jos akun navat ei voi käyttää tai akkulaturin
kiinnikkeet yhteyttä korin tai komponentteja vieressä
akku, akku on poistettava ennen lataamista kanssa
akun kiristimet. Noudata valmistajan ohjeita ja poista
akku.
• Tarkista akun liitinten napaisuus.
• Positiivinen plusnapa (POS, P +) on tavallisesti
suurempi kuin negatiivinen miinusnapa (NEG,
N, –).
• Positiivinen kiinnitä (+) punainen hauenleuka akun
plusnapaan (POS, P, +).
• Negatiivinen kiinnitä (–) musta hauenleuka akun
miinusnapaan (NEG, N, –) tai rungon.
Toimi seuraavasti aina, kun irrotat latauslaitteen akusta:
• Irrota akkulaturi.
• Irrota negatiivinen (musta) puristin ensin..
• Irrota positiivinen (punainen) puristin viimeksi.
• Laita mahdollisesti irrotetut napojen eristekannet
takaisin paikoilleen.
Latauksen akku, joka on irrotettu
piiristä
Varoitus! Huolimaton kytkentä, oikosulku, akun
ja latauslaitteen sijoituspaikka saattavat kukin olla
vaaratekijöitä. Varmista, että latausvalmistelut on
suoritettu asianmukaisesti.
• Jos akkua ei vielä ole irrotettu käyttökohteesta, irrota
se valmistajan ohjeita noudattaen, ennen kuin yrität
ladata sitä.
• Tarkista akun liitinten napaisuus. Positiivinen
plusnapa (POS, P +) on tavallisesti suurempi kuin
negatiivinen miinusnapa (NEG, N, –).
• Positiivinen kiinnitä (+) punainen hauenleuka akun
plusnapaan (POS, P, +).
• Negatiivinen kiinnitä (–) musta hauenleuka akun
miinusnapaan (NEG, N, –).
Toimi seuraavasti aina, kun irrotat latauslaitteen akusta:
• Irrota akkulaturi.
• Irrota negatiivinen (musta) puristin ensin..
• Irrota positiivinen (punainen) puristin viimeksi.
• Pane takaisin mahdollisesti irrotetut napojen
eristekannet.
Liittäminen akkulaturi kanssa akun
kiristimet
Varoitus! Latauslaite ei saa olla kytkettynä
verkkovirtaan, kun akku kytketään siihen.
Varoitus! Älä koskaan kytke mitään lisävarusteen
johtaa yhdessä, koska se aiheuttaa vaaraa.Lisävaruste
johtaa vain koskaan kytkeä in-liitin.
• Kiinnitä hauenleuat latauslaitteen liittimeen.
• Latauslaitteen ja hauenleukojen väliset kaapelit on
merkitty värein, punainen = positiivinen ja musta =
negatiivinen. Ne kytketään suoraan vastaaviin, akun
napoihin tuleviin liittimiin.
• Seuraa kuvatut vaiheet kyseistä menetelmää
käsittelevässä jaksossa (“Latauksen akku, joka on
asennettu piiristä” tai “Latauksen akku, joka on
irrotettu piiristä”).
• Työnnä laturin pistoke verkkopistorasiaan.
Akun lataaminen akku kanssa akun
kiristimet
1. Perustettu laturi ja kytke akun seuraavat vaiheet
kohdassa “Liittäminen akkulaturi kanssa akun
kiristimet” osiossa.
2. Pistoke akkulaturi virtajohto se verkkopistorasiaan.
Virran merkkivalo alkaa vaaleansininen merkkinä
siitä, että laturi on valmis.
Huomautus:
Jos virran merkkivalo ei syty, tarkista
liitäntä pistorasiaan. Varmista, että
pistorasiaan toimii.
3. Kun laite on kytketty oikein ja latauksen, akun
latausmerkkivalo ( ) syttyy keltainen
osoittamaan, että akku latautuu.
Huomautukset:
Jos latausmerkkivalo ei syty, tarkista
kytkentä akkuun. Jos puristimet ovat
kytketty oikein, akku voi olla vika.
Valmistaja ehdottaa pariston testattu
pätevän akku huoltoteknikko.
Jos puristimet ovat kytketty väärin
päin osalta, käänteinen polaarisuus
LED ( ) syttyy. Irrota laturi ja sitten
irrota pihdit. Kytke puristimet
kunnolla.
4. Kun Ladattu täyteen LED ( ) palaa vihreänä, akku
on ladattu täyteen.
Kun irrotat laturin, irrota virtajohto, poista puristin
etäisyydellä autosta alusta, ja sitten poista puristin
etäisyydellä akkunapa.
Liittäminen akkulaturi kanssa DC
lisälaitepistoke
Varoitus! Latauslaite ei saa olla kytkettynä
verkkovirtaan, kun akku kytketään siihen.
Varoitus! Älä koskaan kytke mitään lisävarusteen
johtaa yhdessä, koska se aiheuttaa vaaraa.Lisävaruste
johtaa vain koskaan kytkeä in-liitin.
• Kiinnitä lisälaiteliitin latauslaitteen liittimeen.
• Työnnä lisälaiteliitin ajoneuvon lisälaiteliitäntään.
• Työnnä laturin pistoke verkkopistorasiaan.
Huomaa:
Joidenkin autojen edellyttävät, että virta on
kytketty lisälaite socket kannan, jotta valta
lisävaruste pistorasiaan.
Akun lataaminen akku kanssa DC
lisälaitepistoke
Huolellinen! Riskin vähentämiseksi
omaisuusvahinkoja: varmista, että auton DC
lisävarusteiden pistorasia on puhtaita ja selkeä roskista
ennen laitteen kytkeminen.
1. Perustettu laturi ja kytke akun seuraavat vaiheet
kohdassa “Liittäminen akkulaturi kanssa DC
lisälaitepistoke” osiossa.
2. Pistoke akkulaturi virtajohto se verkkopistorasiaan.
Virran merkkivalo alkaa vaaleansininen merkkinä
siitä, että laturi on valmis.
Huomautus:
Jos virran merkkivalo ei syty, tarkista
liitäntä pistorasiaan. Varmista, että
pistorasiaan toimii.
3. Kun laite on kytketty oikein ja latauksen, akun
latausmerkkivalo ( ) syttyy keltainen
osoittamaan, että akku latautuu.
Huomautukset:
Jos latauksen merkkivalo ei
syty, tarkista liitäntä kohteeseen
ajoneuvoon DC lisävarusteiden
pistorasia. Pyörittää sovitin hieman
varmistamaan hyvän kontaktin. Jos
se on kytketty oikein, akku voi olla
vika. Valmistaja ehdottaa pariston
testattu pätevän akku huoltoteknikko.
Joissain autoissa vaadittava, että
virta käännetään ACC-asentoon
aktivoidaksesi DC lisävarusteiden
pistorasia. Jos ajoneuvo virta on
käännettävä ACC-asentoon, varmista,
että kaikki auton varusteet (eli
lämmitin, tuuletin, radio, TV, valot ...
Jne.) eivät ole käytössä. Jos ei ole
sammutettu, laturi ei ehkä voi ladata
akkua.
4. Kun Ladattu täyteen LED ( ) palaa vihreänä, akku
on ladattu täyteen.
Kun irrotat laturin, irrota virtajohto, ja irrota 12 voltin
DC lisävaruste pistoke irti auton lisävaruste outlet.
Riippuva akkulaturi
Ripustuskoukku avulla voit määrittää akkulaturi helpon,
handsfree-toiminnon avulla.
BC6BDWE_Manual_102815.indd 62-63 10/28/2015 11:15:16 AM
Page 33

ΕΛΛΗΝΙΚΗ
65
SUOMI
64
Varoitus! Riskin vähentämiseksi omaisuusvahinkoja:
• Kun laturi on ripustetaan koukkuun, älä ravista laturia
tai esine se roikkuu-sta.
• Älä ripusta akkulaturi sähköjohtoja tai mihinkään
esineeseen, joka ei ole turvallinen.
• Käytä vain roikkuu koukku varten riippuva laturin.
Ripustuskoukku ei ole tarkoitettu tukemaan
lisäpainoa. Älä ripusta mitään lisäksi ripustuskoukku
tai riskin rikkoutumisen voi esiintyä.
VIANMÄÄRITYS
Jos laite eivät lataudu:
• Tarkista, että että laturi on liitetty oikein 220-240
voltin pistorasiaan että teokset.
• Varmista lähtöliitännät on turvattu ja napaisuuden
yhteys on oikea, kun käytät akkua kiristimet.
• Jos akun jännite on laskenut alle 2 voltin, akku ei
ehkä lataudu käyttäen tätä akkulaturi.
HUOLTO
Teidän Black & Decker laite on suunniteltu toimimaan
pitkään kanssa vähintään huoltoa. Jatkuva tyydyttävä
toiminta riippuu oikea työkalu hoito ja säännöllistä
puhdistusta.
Varoitus! Ennen huoltoa ja puhdistusta laitteen, tulee
olla pois päältä ja irti virtalähteestä.
• Pyyhi laite säännöllisesti kostealla liinalla. Älä
koskaan käytä puhdistamiseen liuotinaineita tai
syövyttäviä puhdistusaineita. Älä upota laitetta
veteen.
DC lisälaitepistoke sulakkeen
vaihtaminen
• Irrota uritetun korkki kiertämällä sitä vastapäivään.
• Poista kumirengas, keskitappi ja jousi.
• Irrota sulake.
• Vaihda tilalle saman tyyppinen ja kokoinen (8 A)
sulake.
• Asenna keskitappi, jousi ja kumirengas paikalleen.
• Korvata uritetun korkki päälle tulppa kiertämällä
myötäpäivään.
YMPÄRISTÖNSUOJELU
Hävittäminen asianmukaisesti tämän
tuotteen
Tämä merkintä tarkoittaa, että tuotetta ei
tule hävittää kotitalousjätteen mukana koko
EU: ssa. Jotta vältetään haittaa ympäristölle
tai ihmisten terveydelle jätteiden
hävityksestä, kierrätettävä asianmukaisesti
edistää kestävää materiaalien uudelleenkäyttöä.
Palauttaaksesi käytetty laite, käytä keräys-tai
palautuspisteeseen tai ota yhteyttä jälleenmyyjään,
jolta tuote on ostettu. He voivat ottaa tämän tuotteen
kierrätysmahdollisuuksista.
Erilliskeräys käytettyjen tuotteiden ja pakkausten avulla
materiaaleja voidaan kierrättää ja käyttää uudelleen.
Uudelleenkäyttö kierrätysmateriaaleista auttaa
estämään ympäristön saastumista ja
vähentää raaka-aineiden kysyntä.
Paikalliset säännökset voivat säätää erillistä keräystä
sähkö tuotteita kotitalous kello yhdyskuntajätteen
sivustoja tai vähittäismyyjän kun ostat uuden tuotteen.
TEKNISET TIEDOT
Tulo: 220-240V AC, 50/60 Htz,
0,6 A
Lähtö: 12V DC, 6A
TAKUU
Baccus World Wide LLC on varma tuotteidensa
laatua ja tarjoaa erinomaisen takuun. Takuun on
lisäys kuluttajan laillisiin oikeuksiin eikä vaikuta niihin.
Takuu on voimassa Euroopan unionin jäsenmaissa ja
Euroopan vapaakauppa-alueella (EFTA).
Jos Baccus World Wide LLC tuote, tulee viallinen
johdosta viallinen materiaalit tai valmistusvirheitä
tai puutteita, 24 kuukauden kuluessa ostopäivästä,
Baccus World Wide LLC takeet siitä, vaihda vialliset
osat, korjaus tuotteita alttiiksi normaalista kulumisesta,
tai korvata kyseisten tuotteiden sen varmistamiseksi
vähintään haittaa asiakkaalle, ellei:
• tuotetta on käytetty sovellettaessa ammattiala- tai
vuokraus;
• tuote on altistunut väärinkäytöstä tai laiminlyönnistä;
• tuote on kohdistunut vahinkoja vieraita esineitä,
aineita tai onnettomuuksia;
• korjausten on yritetty muut henkilöt kuin Baccus
World Wide LLC palveluhenkilöstölle.
Esittää korvausvaatimuksen takuu, sinun on lähetettävä
hankintatosite voi Baccus World Wide OÜ ilmoitettuun
osoitteeseen tässä käyttöohjeessa.
Käy sivustossamme osoitteessa www.
baccusworldwide.com rekisteröidä uuden Baccus
World Wide LLC tuotteen ja pidettävä ajan tasalla
uusista tuotteista ja erikoistarjouksista. Lisätietoja
Baccus World Wide LLC brand ja tuotevalikoimamme
on saatavilla www.baccusworldwide.com.
Baccus Worldwide LLC
Weena 290, 3012 NJ Rotterdam tai
Postbus 819, 3000 AV Rotterdam
ΟΔΗΓΊΕΣ ΧΡΗΣΗΣ
ΕΝΔΕΔΕΙΓΜΕΝΗ ΧΡΗΣΗ
Ο φορτιστής μπαταριών σας Black & Decker
έχει σχεδιαστεί για τη φορτίση μπαταριών
μολύβδου. Αυτό το προϊόν προορίζεται για
οικιακή, καταναλωτική χρήση μόνο.
ΟΔΗΓΙΕΣ ΑΣΦΑΛΕΙΑΣ
Σημαντικό προδιαγραφές σημείωση:
χωρητικότητα μπαταρίας: μολύβδου-οξέος
κλειστού τύπου, μέγιστη 12VDC, 120Ah.
Προειδοποίηση! Κατά τη χρήση συσκευών
βασικές προφυλάξεις ασφαλείας θα πρέπει
να ληφθούν, συμπεριλαμβανομένων των
παρακάτω, για τον περιορισμό του κινδύνου
πυρκαγιάς, διαρροής των μπαταριών,
τραυματισμού προσώπων και υλικών ζημιών.
• Πριν χρησιμοποιήσετε τη συσκευή διαβάστε
προσεχτικά ολόκληρο το εγχειρίδιο.
• Η ενδεδειγμένη χρήση περιγράφεται σε αυτό
το εγχειρίδιο. Τόσο η χρήση εξαρτημάτων
ή προσθηκών όσο και η πραγματοποίηση
εργασιών με τη συσκευή που δεν συνιστώνται
σε αυτό το εγχειρίδιο οδηγιών εγκυμονεί
κίνδυνο τραυματισμού.
• Φυλάξτε αυτό το εγχειρίδιο για μελλοντική
αναφορά.
Χρησιμοποίηση της συσκευής
Προσέχετε πάντα όταν χρησιμοποιείτε τη
συσκευή.
• Αυτή η συσκευή δεν προορίζεται για χρήση
από νεαρά ή αδύναμα άτομα χωρίς επίβλεψη.
• Η συσκευή δεν πρέπει να χρησιμοποιείται σαν
παιχνίδι.
• Μην ανοίγετε το περίβλημα του σώματος της
συσκευής. Τα εξαρτήματα στο εσωτερικό δεν
επιδέχονται επισκευής από το χρήστη.
• Μη χρησιμοποιείτε τη συσκευή σε περιβάλλον
όπου υπάρχει κίνδυνος έκρηξης, π.χ.
παρουσία εύφλεκτων υγρών, αερίων ή σκόνης.
• Για να βγάλετε το φις από την πρίζα, μην
τραβάτε από το καλώδιο αλλά από το ίδιο το
φις. Έτσι θα αποφύγετε τον κίνδυνο φθοράς
του φις και του καλωδίου.
Μετά τη χρήση
• Όταν δεν χρησιμοποιείται, η συσκευή πρέπει
να φυλάσσεται σε στεγνό μέρος, με καλό
αερισμό και μακριά από παιδιά.
• Τα παιδιά δεν πρέπει να έχουν πρόσβαση σε
αποθηκευμένες συσκευές.
• Όταν η συσκευή φυλάσσεται ή μεταφέρεται
με ένα όχημα, πρέπει να τοποθετείται στο
χώρο αποσκευών ήνα στερεώνεται ώστε
να μη μετακινείται σε περίπτωση απότομων
μεταβολών της ταχύτητας ή της κατεύθυνσης
του οχήματος.
• Η συσκευή θα πρέπει να προστατεύεται από
το απευθείας ηλιακό φως, τη ζέστη και την
υγρασία.
Επιθεώρηση και επισκευές
• Πριν από τη χρήση, ελέγξτε τη συσκευή σας
για τυχόν κατεστραμμένα ή ελαττωματικά
τμήματα. Ελέγξτε αν υπάρχουν σπασμένα
εξαρτήματα, ζημιά στους διακόπτες και
οποιεσδήποτε άλλες συνθήκες που θα
μπορούσαν να επηρεάσουν τη λειτουργία της.
• Μη χρησιμοποιείτε τη συσκευή, αν κάποιο
εξάρτημά της παρουσιάζει ζημιά ή ελάττωμα.
• Έχετε οποιαδήποτε βλάβη ή ελαττωματικά
εξαρτήματα επισκευαστεί ή να αντικατασταθεί
από τον κατασκευαστή.
• Ποτέ μην επιχειρείτε να αφαιρέσετε ή να
αντικαταστήσετε εξαρτήματα, άλλα από αυτά
που προσδιορίζονται σε αυτό το εγχειρίδιο.
Ασφάλεια Καλώδιο τροφοδοσίας
Προειδοποίηση! Μην τροποποιείτε ποτέ
το καλώδιο AC ή το φις. Σε περίπτωση δεν
ταιριάζει, έχει εγκαταστήσει μια κατάλληλη
πρίζα από εξειδικευμένο ηλεκτρολόγο. Η
ακατάλληλη σύνδεση μπορεί να οδηγήσουν σε
ηλεκτροπληξία.
Τα ακόλουθα σύμβολα αναγράφεται
στη συσκευή:
Αυτό το εργαλείο φέρει διπλή
μόνωση, επομένως δεν απαιτείται
σύρμα γείωσης. Ελέγχετε πάντοτε
αν η τάση τροφοδοσίας αντιστοιχεί
σε αυτήν που αναγράφεται στην
πινακίδα στοιχείων του εργαλείου.
Διαβάστε προσεκτικά ολόκληρο το
εγχειρίδιο οδηγιών.
Ασφαλής χρήση του ηλεκτρικού
ρεύματος
Ελέγχετε πάντοτε αν η τάση τροφοδοσίας
αντιστοιχεί σε αυτήν που αναγράφεται στην
πινακίδα στοιχείων του εργαλείου.
• Εάν το σκοινί ανεφοδιασμού είναι
χαλασμένο, πρέπει να αντικατασταθεί από το
κατασκευαστής προκειμένου να αποφευχθεί
ένας κίνδυνος.
• Προειδοποίηση! Για την αποφυγή σοβαρών
ως και θανατηφόρων τραυματισμών από
φωτιά, έκρηξη ή ηλεκτρικό σοκ: Αυτή η
συσκευή πρέπει να είναι συνδεδεμένη σε
BC6BDWE_Manual_102815.indd 64-65 10/28/2015 11:15:16 AM
Page 34

ΕΛΛΗΝΙΚΗ ΕΛΛΗΝΙΚΗ
66 67
ένα γειωμένο κύκλωμα διακοπής (GFCI)
προστατευόμενη πρίζα AC.
Ειδικές οδηγίες ασφαλείας για
φορτιστές μπαταριών
• Αν το καλώδιο ρεύματος έχει υποστεί
βλάβη, πρέπει να αντικατασταθεί από τον
κατασκευαστή προκειμένου να αποφευχθεί ο
κίνδυνος.
• Αν το καλώδιο τροφοδοσίας έχει υποστεί ζημιά,
πρέπει να αντικατασταθεί από το
• κατασκευαστής ή εξουσιοδοτημένος “Black &
Decker” Υπηρεσία Κέντρο, προκειμένου να
αποφευχθεί ο κίνδυνος.
• Μην επιχειρήσετε ποτέ να φορτίσετε μη
επαναφορτιζόμενες μπαταρίες.
• Έχετε ελαττωματικά καλώδια αντικατασταθεί
αμέσως.
• Μην εκθέτετε το φορτιστή της μπαταρίας στο
νερό.
• Μην ανοίξτε το φορτιστή μπαταριών.
• Ποτέ μην αφήνετε το κόκκινο και το μαύρο
σφιγκτήρες σε επαφή μεταξύ τους ή ένα άλλο
κοινό μεταλλικό αγωγό. Αυτό θα μπορούσε
να προκαλέσει βλάβη στη συσκευή και / ή να
δημιουργήσετε μια σπίθα / έκρηξης.
ΜΠΑΤΑΡΊΕΣ
Προειδοποίηση! Ποτέ μην επιχειρήσετε να
φορτίσετε μια μπαταρία που έχει παγώσει.
• Κατά τη διάρκεια ακραίες συνθήκες, διαρροή
της μπαταρίας μπορεί να συμβεί. Όταν
παρατηρήσετε υγρό για τις μπαταρίες,
σκουπίστε προσεκτικά το υγρό μακριά
χρησιμοποιώντας ένα πανί. Αποφύγετε την
επαφή με το δέρμα.
• Στην περίπτωση επαφής με το δέρμα ή τα
μάτια, ακολουθήστε τις παρακάτω οδηγίες.
– Προειδοποίηση! Το υγρό της μπαταρίας
είναι αραιωμένο θειικό οξύ και μπορεί να
προκαλέσει τραυματισμό ή υλικές ζημιές. Στην
περίπτωση επαφής με το δέρμα, ξεπλύντε
αμέσως με άφθονο νερό. Αν παρουσιαστεί
κοκκίνισμα του δέρματος, πόνος ή ερεθισμός,
ζητήστε ιατρική βοήθεια. Στην περίπτωση
επαφής με τα μάτια, ξεπλύντε αμέσως με
άφθονο καθαρό νερό και ζητήστε άμεση
ιατρική βοήθεια.
• Όταν απορρίπτετε τις μπαταρίες, ακολουθήστε
τις οδηγίες που δίνονται στην ενότητα
‘Προστασία του περιβάλλοντος’.
• Προσθέστε το αποσταγμένο νερό σε κάθε
κυψέλη μέχρι το οξύ μπαταρίας φτάσει στο
επίπεδο που ορίζεται από τον κατασκευαστή
της μπαταρίας. Αυτό βοηθά να εξαγνίσει
την περίσσια αέρα από τα κύτταρα. Μη
γεμίζετε υπερβολικά. Για μια μπαταρία χωρίς
καλύμματα κυψελών (χωρίς συντήρηση),
ακολουθήστε προσεκτικά τις οδηγίες φόρτισης
του κατασκευαστή.
• Μελέτη όλες τις ειδικές προφυλάξεις του
κατασκευαστή της μπαταρίας, όπως η άρση ή
μη αφαιρώντας τα καλύμματα των κυττάρων
κατά τη φόρτιση και τις συνιστώμενες τιμές
χρέωσης.
• Βεβαιωθείτε ότι το αρχικό ρυθμός φόρτισης δεν
υπερβαίνει την
• απαίτηση του κατασκευαστή της μπαταρίας.
• Προειδοποίηση! Κίνδυνος μιγμάτων
εκρηκτικών αερίων. Η εργασία κοντά σε
μπαταρίες μολύβδου είναι επικίνδυνη. Οι
μπαταρίες παράγουν εκρηκτικά αέρια κατά τη
διάρκεια της κανονικής λειτουργίας τους. Για το
λόγο αυτό, είναι ύψιστης σημασίας κάθε φορά,
να διαβάζετε το παρόν εγχειρίδιο και να τηρείτε
επακριβώς τις οδηγίες.
• Η χρήση κάποιου εξαρτήματος που δε
συστήνεται ή δεν πωλείται από την Black &
Decker μπορεί να έχει ως αποτέλεσμα κίνδυνο
πυρκαγιάς, ηλεκτροπληξίας ή τραυματισμού.
• Ένα καλώδιο επέκτασης δεν πρέπει να
χρησιμοποιείται, εκτός αν είναι απολύτως
απαραίτητο. Η χρήση ακατάλληλης καλωδίου
προέκτασης θα μπορούσε να οδηγήσει σε
κίνδυνο πυρκαγιάς και ηλεκτροπληξίας, και θα
ακυρώσει την εγγύηση.
• Προσοχη: Αυτή η μονάδα διαθέτει
μια ψήκτρα από αλουμίνιο, το οποίο
χρησιμοποιείται για την απαγωγή
θερμότητας και βρίσκεται στη βάση της
μονάδας. Μην αγγίζετε ποτέ την ψήκτρα
ενώ η μονάδα βρίσκεται σε λειτουργία και
ποτέ δεν επιτρέπουν στο κάτω μέρος της
μονάδας να έρθουν σε επαφή με εύφλεκτα
υλικά ενώ λειτουργεί.
Συμβουλές ασφαλείας για τη χρήση
του εξαρτήματος σύνδεσης DC
• Προειδοποίηση! Μην συνδέετε ποτέ αυτή τη
μονάδα να μια θετική γειωμένο αυτοκίνητο με
το εξάρτημα σύνδεσης DC.
• Βεβαιωθείτε ότι το αυτοκίνητο είναι το εξάρτημα
εξόδου είναι καθαρά και χωρίς ακαθαρσίες
προτού συνδέσετε τη μονάδα.
• Προειδοποίηση – Κίνδυνος πυρκαγιάς!
Αν το αυτοκίνητο αξεσουάρ ασφάλεια εξόδου
ανοίγει (χτυπήματα) όταν συνδέετε σε αυτό
το φορτιστή μπαταρίας, μην χρησιμοποιήσετε
αυτό το φορτιστή της μπαταρίας με το
αυτοκίνητο αυτό το εξάρτημα εξόδου.
– Μην επανειλημμένα, αντικαταστήστε την
ασφάλεια.
– Μην αντικαταστήσετε το εξάρτημα εξόδου
ασφάλεια με μία μεγαλύτερη ένταση (αμπέρ).
– Μην επιχειρήσετε ποτέ να patch την
ασφάλεια με κασσίτερο πλέγμα ή καλώδιο
Οποιαδήποτε από τις παραπάνω
ενέργειες ενδέχεται να προκαλέσει
σημαντικές ηλεκτρικές βλάβες ή/και
πυρκαγιάς.
Ειδικές οδηγίες ασφαλείας για
τη χρήση της μονάδας σε υγρό
περιβάλλοντα
Το περίβλημα της μονάδας αυτής είναι
σύμφωνα με το IP67 σκόνη και αδιάβροχη
πρότυπα. Ωστόσο, συνιστάται να τηρείτε τα
παρακάτω:
• Ποτέ μη βυθίζετε τη μονάδα σε νερά που
είναι πιο βαθιά από 1 μέτρο, για χρονικό
διάστημα μεγαλύτερο των 30 λεπτών ή/και σε
θερμοκρασίες εκτός του μεταξύ 5 °C και 40 ºC,
ή η μονάδα θα μπορούσε να αντέξει μόνιμη
ζημιά.
• Ποτέ μη βυθίζετε τη μονάδα στο νερό αν
το τριβέας άξονος (μόνωση) των AC ή DC
καλώδιο είναι δεν ανέπαφο.
• Μην αφήνετε βύσμα ή τους σφιγκτήρες να
εκτεθεί στα στοιχεία για μεγάλο χρονικό
διάστημα , και ποτέ μην βυθίζετε τους.
Ασφάλεια προσώπων
Φοράτε πλήρη προστασία των ματιών
και κατάλληλο ρουχισμό για την παροχή
προστασίας από την επαφή με υγρά της
μπαταρίας.
Αποφύγετε να αγγίζετε τα μάτιαενώ εργάζεστε
με μια μπαταρία. Οξύ, οξύ σωματίδια ή
διάβρωση μπορεί να πάρει στα μάτια.
Αφαιρέστε όλα τα εξαρτήματα είναι
κατασκευασμένα από μέταλλο, όπως δαχτυλίδια,
βραχιόλια, κολιέ και ρολόγια κατά την εργασία με
μια μπαταρία μολύβδου-οξέος. Ένα μολύβδουοξέος της μπαταρίας μπορεί να παράγει ένα
ρεύμα βραχυκυκλώσεως αρκετά υψηλό ώστε να
προκαλέσουν σοβαρό έγκαυμα.
Να είστε ιδιαίτερα προσεκτικοί για να μειώσει
τον κίνδυνο να πέσει ένα μεταλλικό αντικείμενο
πάνω στην της μπαταρίας. Αυτό θα μπορούσε
να προκαλέσει σπινθήρες ή βραχυκυκλώνετε
την της μπαταρίας ή άλλες ηλεκτρικές μέρος,
που μπορεί να προκαλέσει έκρηξη.
ΧΑΡΑΚΤΗΡΙΣΤΙΚΑ
1. LED τροφοδοσίας
2. Άγκιστρο ανάρτησης
3. LED αντίστροφης πολικότητας
4. Φόρτιση της μπαταρίας LED
5. Ολοκλήρωση φόρτισης LED
6. Υποδοχή συνδετήρα
7. Φις τροφοδοσίας AC
8. DC αξεσουάρ βύσμα
9. Σφιγκτήρες μπαταρίας
ΠΡΟΕΤΟΙΜΑΣΙΑ ΠΡΙΝ ΤΗ
ΦΟΡΤΙΣΗ
Η συσκευή πρέπει να συνδέεται μόνο με μια
12V μολύβδου-οξέος της μπαταρίας. Πριν τη
φόρτιση, επιβεβαιώστε ότι η τάση είναι 12V
με την αναφορά στην ετικέτα της μπαταρίας
ή από τις διαθέσιμες πληροφορίες σχετικά
με την εφαρμογή, π.χ. αυτοκίνητο εγχειρίδιο
χρήσης.
Μη χρησιμοποιείτε τη συσκευή για τη
φόρτιση ξηρού στοιχείου μπαταρίες που
χρησιμοποιούνται συνήθως για οικιακές
συσκευές. Οι μπαταρίες μπορεί να σπάσει και
να προκαλέσει τραυματισμό σε πρόσωπα και
υλικές ζημιές.
Προειδοποίηση! Εκρηκτικό αέριο μπορεί να
διοχετεύεται από μπαταρίες μολύβδου-οξέος κατά
τη φόρτιση. Βεβαιωθείτε ότι ο χώρος αερίζεται
καλά και αφαιρέστε τυχόν πηγές ανάφλεξης κατά
τη διεξαγωγή διαδικασίες φόρτισης.
• Μην τοποθετείτε ποτέ το φορτιστή μπαταρίας
απευθείας πάνω από την μπαταρία, τα αέρια
από τη μπαταρία θα σκουριάσουν και ζημιές το
φορτιστή μπαταρίας.
• Ποτέ μην αφήνετε οξύ μπαταρίας να στάξει το
φορτιστή μπαταρίας.
• Τοποθετήστε το φορτιστή όσο πιο μακριά από
την μπαταρία όπως τα καλώδια θα επιτρέψει. Ο
φορτιστής της μπαταρίας περιέχει διακόπτες που
μπορούν να δημιουργήσουν ένα σπίθα.
• Μην τοποθετείτε την μπαταρία στην κορυφή του
φορτιστή.
• Εκρηκτικά αέρια μπορούν να συλλέγουν κοντά
στο έδαφος. Εντοπίστε το φορτιστή μπαταρίας
όσο το δυνατόν πιο ψηλά πάνω από το επίπεδο
του εδάφους.
• Μη χρησιμοποιείτε ηλεκτρικά εργαλεία σε περιοχή
όπου φόρτιση μιας μπαταρίας.
• Μην καπνίζετε ή έχουν έχουν μια γυμνή φλόγα
στην περιοχή φόρτισης.
• Ακολουθήστε τις οδηγίες για τη σύνδεση και
αποσύνδεση του φορτιστή μπαταρίας καλωδίων
ή ακροδέκτες μπαταρίας.
Όλες οι μπαταρίες για τα σκάφη πρέπει να
αφαιρεθεί και να χρεωθεί στην ξηρά. Για να
φορτίσετε την επί του πλοίου απαιτεί εξοπλισμό
ειδικά σχεδιασμένο για θαλάσσια χρήση. Αυτή η
συσκευή δεν προορίζεται για τέτοια χρήση.
Τα οχήματα που μπορούν να διαθέτουν
ηλεκτρικά και ηλεκτρονικά συστήματα (π.χ.
συστήματα διαχείρισης του κινητήρα, κινητά
BC6BDWE_Manual_102815.indd 66-67 10/28/2015 11:15:16 AM
Page 35

ΕΛΛΗΝΙΚΗ ΕΛΛΗΝΙΚΗ
68 69
τηλέφωνα) που μπορεί να καταστραφεί αν
υπόκεινται σε υψηλές τάσεις αρχίζουν και αιχμές
στην τάση. Πριν συνδέσετε τη συσκευή στο
όχημα, διαβάστε το εγχειρίδιο ιδιοκτήτη του
οχήματος για να επιβεβαιώσει ότι η εξωτερική
φόρτιση επιτρέπεται.
• Τηρείτε τις οδηγίες αυτές και εκείνες που
δημοσιεύθηκαν από την κατασκευαστής
μπαταριών και κατασκευαστή του οχήματος.
• Μόνο σύνδεσης και αποσύνδεσης του
σφιγκτήρες εξόδου DC μετά από την αφαίρεση
του καλωδίου τροφοδοσίας από την ηλεκτρική
πρίζα. Μην επιτρέπετε ποτέ σφιγκτήρες να
αγγίξει ο ένας τον άλλον.
• Ελέγξτε την πολικότητα των ακροδεκτών
μπαταρίας του οχήματος πριν από τη
σύνδεση της συσκευής. Αποσυνδέστε πάντα
τον αρνητικό (μαύρο) καλώδιο πρώτα:
ακολουθούμενο από το θετικό (κόκκινο)
καλώδιο.
Όταν φορτίζετε μπαταρία εγκατασταθεί
στο κύκλωμα ακολουθήστε τις οδηγίες του
κατασκευαστή για την πρόσβαση στην μπαταρία
και τις ακόλουθες:
• Μη φορτίζετε τη μπαταρία, ενώ ο κινητήρας
βρίσκεται σε λειτουργία.
• Έχετε υπόψη σας ότι τα εξαρτήματα του
κινητήρα π.χ. του ανεμιστήρα του ψυκτικού
υγρού μπορεί να ξεκινήσει αυτόματα.
Κρατήστε τα χέρια και το σώμα μακριά από
τα εξαρτήματα του κινητήρα και τη θέση του
φορτιστή και καλώδια για να αποφευχθεί η
επαφή.
• Βεβαιωθείτε ότι ο φορτιστής μπαταριών και τα
καλώδια βρίσκονται στην πρόληψη των ζημιών
από το κλείσιμο των θυρών και καλύπτει χώρο
του κινητήρα.
• Βεβαιωθείτε ότι οι συνδέσεις μπορούν να
γίνουν χωρίς να αγγίξετε το μεταλλικό σώμα ή
τα στοιχεία που γειτνιάζουν με την μπαταρία.
• Όταν χρησιμοποιείτε αυτή τη συσκευή κοντά
στη μπαταρία και ο κινητήρας του οχήματος,
σταθείτε τη συσκευή σε μια επίπεδη, σταθερή
επιφάνεια και να είστε βέβαιος να κρατήσει
όλους τους σφιγκτήρες, καλώδια, είδη
ένδυσης και μέρη του σώματος μακριά από τα
κινούμενα μέρη του οχήματος.
• Εάν είναι απαραίτητο να αφαιρέσετε την
μπαταρία από το όχημα για να φορτίσετε ή να
καθαρίσετε τα τερματικά, βεβαιωθείτε ότι όλα
τα εξαρτήματα στο αυτοκίνητο σβήσει, έτσι
ώστε να μην προκαλέσουν σπινθήρα.
• Για να μειώσετε τον κίνδυνο ηλεκτροπληξίας,
αποσυνδέστε τη συσκευή από την πρίζα πριν
επιχειρήσετε συντήρηση ή καθαρισμό.
ΧΡΗΣΗ
Όταν όλες οι προετοιμασίες για τη χρέωση
και την προσωπική ασφάλεια ολοκληρωθούν,
συνεχίστε ως ακολούθως:
• Για τις περισσότερες αυτοκίνητα και σε
παρόμοιες εφαρμογές του φορτιστή μπαταριών
μπορεί να συνδεθεί με την μπαταρία ενώ είναι
συνδεδεμένο με το κύκλωμα dc. Ακολουθήστε
τις οδηγίες που δίνονται σε “Φόρτιση μιας
μπαταρίας εγκατασταθεί στο κύκλωμα”.
• Εάν η μπαταρία πρέπει να αποσυνδεθεί από
το κύκλωμα πριν από τη χρέωση, ακολουθήστε
τις οδηγίες που δίνονται σε “Φόρτιση μιας
μπαταρίας αποσυνδεθεί από το κύκλωμα».
Προειδοποίηση! Μια θαλάσσια μπαταριών
πρέπει να αφαιρεθεί και να χρεωθεί στην ξηρά.
Για να το φορτίσετε επί του πλοίου απαιτεί
εξοπλισμό ειδικά σχεδιασμένο για θαλάσσια
χρήση.
Η φόρτιση μιας μπαταρίας
εγκατασταθεί στο κύκλωμα
Προειδοποίηση! Λανθασμένη σύνδεση,
μπαταρία βραχυκύκλωμα, τη θέση της
μπαταρίας και τη θέση του φορτιστή της
μπαταρίας μπορεί να δημιουργήσει κίνδυνο.
Βεβαιωθείτε ότι η κατάλληλη προετοιμασία είχε
γίνει πριν προχωρήσετε.
Προειδοποίηση! Εάν οι θέσεις μπαταρία
δεν μπορεί να έχει πρόσβαση ή τη μπαταρία
σφιγκτήρες φορτιστή ή τερματικά δαχτυλίδι θα
επικοινωνήσει με το αμάξωμα ή τα στοιχεία που
γειτνιάζουν με την μπαταρία, η μπαταρία πρέπει
να αφαιρεθεί πριν τη φόρτιση. Ακολουθήστε τις
οδηγίες του κατασκευαστή για να αφαιρέσετε την
μπαταρία.
• Ελέγξτε την πολικότητα των θέσεων
μπαταριών. Μια θετική (POS, P, +) θέση
μπαταριών έχει συνήθως μια μεγαλύτερη
διάμετρο από την αρνητική (NEG, Ν, –) θέση
μπαταριών.
• Ακολουθήστε τις οδηγίες του κατασκευαστή για
την εξάλειψη κάθε μονωτικά καλύμματα από
την μπαταρία θέσεις .
• Συνδέστε το θετικό σφιγκτήρα (κόκκινο)
σφιγκτήρα από το φορτιστή μπαταρίας στο
θετικό (POS, P,) θέση της μπαταρίας.
• Συνδέστε το αρνητικό σφιγκτήρα (μαύρο)
σφιγκτήρα από το φορτιστή μπαταρίας για τα
αρνητικά (NEG, N, –) θέση της μπαταρίας ή
στο αμάξωμα.
Όταν αποσυνδέετε το φορτιστή από την
μπαταρία,πάντα:
• Να αποσυνδέετε το φορτιστή μπαταρίας.
• Αφαιρέστε τον αρνητικό σφιγκτήρα (μαύρο)
σφιγκτήρα πρώτα.
• Αφαιρέστε την θετικό σφιγκτήρα (κόκκινο)
σφιγκτήρας τελευταία.
• Τοποθετήστε τυχόν μονωτικά καλύμματα στις
θέσεις μπαταρίας.
Η φόρτιση μιας μπαταρίας
αποσυνδεθεί από το κύκλωμα
Προειδοποίηση! Λανθασμένη σύνδεση,
μπαταρία βραχυκύκλωμα, τη θέση της
μπαταρίας και τη θέση του φορτιστή της
μπαταρίας μπορεί να δημιουργήσει κίνδυνο.
Βεβαιωθείτε ότι η κατάλληλη προετοιμασία είχε
γίνει πριν προχωρήσετε.
• Αν η μπαταρία δεν έχει ήδη αφαιρεθεί από
το κύκλωμα, ακολουθήστε τις οδηγίες των
κατασκευαστών για να αφαιρέσετε την
μπαταρία πριν τη φόρτιση.
• Ελέγξτε την πολικότητα των μπαταριών
θέσεις. Θετική (POS, P,) μπαταρία η ανάρτηση
έχει συνήθως μεγαλύτερη διάμετρο από τον
αρνητικό (ΑΡΝ, N, –} μετά την μπαταρία.
• Συνδέστε το θετικό (κόκκινο) σφιγκτήρα από το
φορτιστή μπαταρίας στο θετικό (POS, P,) θέση
της μπαταρίας.
• Συνδέστε το αρνητικό (μαύρο) σφιγκτήρα από
το φορτιστή μπαταρίας για τα αρνητικά (ΑΡΝ,
N, –) θέση της μπαταρίας.
Όταν αποσυνδέετε το φορτιστή από την
μπαταρία, είναι πάντα:
• Να αποσυνδέετε το φορτιστή μπαταρίας.
• Αφαιρέστε το αρνητικό σφιγκτήρα (μαύρο)
σφιγκτήρας πρώτα.
• Αφαιρέστε το θετικό σφιγκτήρα δαχτυλίδι
(κόκκινο) σφιγκτήρας τελευταία.
• Επανατοποθετήστε τυχόν μονωτικά καλύμματα
στις θέσεις μπαταρία.
Σύνδεση της συσκευής με τη χρήση
την μπαταρία σφιγκτήρες
Προειδοποίηση! Πάντα να αποσυνδέετε
το βύσμα AC από την πρίζα ρεύματος AC
πριν από τη σύνδεση ή την αποσύνδεση της
συσκευής από και προς την μπαταρία.
Προειδοποίηση! Ποτέ μη συνδέετε
οποιοδήποτε από τα αξεσουάρ οδηγεί μαζί
δεδομένου ότι αυτό θα προκαλέσει κίνδυνο. Το
εξάρτημα θα πρέπει να οδηγεί μόνο ποτέ να
συνδεθεί με το in-line σύνδεση.
• Συνδέστε την μπαταρία σφιγκτήρες για το
φορτιστή μπαταρίας με την υποδοχή στη
γραμμή.
• Η έξοδος οδηγεί της συσκευής έχουν
χρωματική κωδικοποίηση σφιγκτήρες
μπαταρίας (κόκκινο-μαύρο και θετικήαρνητικές). Αυτά τα συνδέουν άμεσα με τις
αντίστοιχες συνδέσεις στη ακροδέκτες της
μπαταρίας.
• Ακολουθήστε τα βήματα που περιγράφονται
στην κατάλληλη ενότητα («Η φόρτιση μιας
μπαταρίας εγκατασταθεί στο κύκλωμα» ή «Η
φόρτιση μιας μπαταρίας αποσυνδεθεί από το
κύκλωμα»).
• Συνδέστε το βύσμα του AC του φορτιστή της
μπαταρίας σε μια πρίζα ρεύματος AC.
Φόρτιση της μπαταρίας με τη χρήση
την μπαταρία σφιγκτήρες
1. Ρυθμίστε και συνδέστε το φορτιστή
μπαταρίας, ακολουθώντας τα βήματα στην
ενότητα «Σύνδεση της συσκευής με τη
χρήση την μπαταρία σφιγκτήρες».
2. Συνδέστε το βύσμα της φορτιστής μπαταρίας
σε μια πρίζα. Η LED τροφοδοσίας θα ανάψει
μπλε υποδεικνύοντας ότι η συσκευή είναι
έτοιμη.
Σημείωση:
Εάν η LED τροφοδοσίας δεν ανάψει,
ελέγξτε τη σύνδεση με το ηλεκτρικό
δίκτυο AC πρίζα. Βεβαιωθείτε ότι η πρίζα
λειτουργεί.
3. Όταν η μονάδα είναι συνδεδεμένη σωστά και
φόρτισης, η LED φόρτισης μπαταρίας ( )
ανάβει με κίτρινο χρώμα, υποδεικνύοντας ότι
η μπαταρία φορτίζεται.
Σημειώσεις:
Εάν η Φόρτιση της μπαταρίας LED
δεν ανάβει, ελέγξτε τη σύνδεση της
μπαταρίας. Εάν το σφιγκτήρες μπαταρίας
είναι συνδεδεμένο σωστά, η μπαταρία
μπορεί να είναι σε κατάσταση βλάβης.
Ο κατασκευαστής προτείνει να έχει
η μπαταρία ελέγχεται από μια ειδική
υπηρεσία μπαταρίας τεχνικός.
Εάν οι σφιγκτήρες έχει συνδεθεί
λανθασμένα όσον αφορά την πολικότητα,
την αντίστροφη πολικότητα LED βλάβης
( ) θα ανάψει. Αποσυνδέστε τη βάση
φόρτισης από την πρίζα. Στη συνέχεια,
αφαιρέστε τους σφιγκτήρες.
Επανασυνδέστε τους σφιγκτήρες σωστά.
4. Όταν η φόρτιση ολοκληρώθηκε LED ( )
ανάβει με πράσινο χρώμα, η μπαταρία είναι
πλήρως φορτισμένη.
Όταν αποσυνδέσετε το φορτιστή της μπαταρίας,
αποσυνδέστε το καλώδιο AC, αφαιρέστε το
σφιγκτήρα από το αμάξωμα του αυτοκινήτου και,
στη συνέχεια, αφαιρέστε το σφιγκτήρα από τον
ακροδέκτη της μπαταρίας.
Σύνδεση της συσκευής με τη χρήση το
βύσμα DC αξεσουάρ
Προειδοποίηση! Πάντα να αποσυνδέετε
το βύσμα AC από την πρίζα ρεύματος AC
πριν από τη σύνδεση ή την αποσύνδεση της
συσκευής από και προς την μπαταρία.
Προειδοποίηση! Ποτέ μη συνδέετε
οποιοδήποτε από τα αξεσουάρ οδηγεί μαζί
δεδομένου ότι αυτό θα προκαλέσει κίνδυνο. Το
BC6BDWE_Manual_102815.indd 68-69 10/28/2015 11:15:16 AM
Page 36

ΕΛΛΗΝΙΚΗ ΕΛΛΗΝΙΚΗ
70 71
εξάρτημα θα πρέπει να οδηγεί μόνο ποτέ να
συνδεθεί με το in-line σύνδεση.
• Συνδέστε το βύσμα DC αξεσουάρ για το
φορτιστή μπαταρίας με το ενσωματωμένο
βύσμα.
• Συνδέστε το βύσμα του αξεσουάρ DC σε DC
έξοδο εξάρτημα του οχήματος.
• Συνδέστε το βύσμα του AC του φορτιστή της
μπαταρίας σε μια πρίζα ρεύματος AC.
Σημείωση:
Ορισμένα οχήματα απαιτούν η ανάφλεξη να
αλλάξει τη θέση υποδοχή αξεσουάρ με σκοπό
να τροφοδοτήσει την υποδοχή αξεσουάρ.
Φόρτιση της μπαταρίας με τη χρήση το
βύσμα DC αξεσουάρ
Προσοχη! Για να μειωθεί ο κίνδυνος ζημιών:
βεβαιωθείτε ότι το αυτοκίνητο DC πρίζα είναι
καθαρές και απαλλαγμένες από συντρίμμια πριν
συνδέσετε τη μονάδα.
1. Ρυθμίστε και συνδέστε το φορτιστή
μπαταρίας, ακολουθώντας τα βήματα στην
ενότητα «Σύνδεση της συσκευής με τη
χρήση το βύσμα DC αξεσουάρ».
2. Συνδέστε το βύσμα της φορτιστής μπαταρίας
σε μια πρίζα. Η LED τροφοδοσίας θα ανάψει
μπλε υποδεικνύοντας ότι η συσκευή είναι
έτοιμη.
Σημείωση:
Εάν η LED τροφοδοσίας δεν ανάψει,
ελέγξτε τη σύνδεση με το ηλεκτρικό
δίκτυο AC πρίζα. Βεβαιωθείτε ότι η πρίζα
λειτουργεί.
3. Όταν η μονάδα είναι συνδεδεμένη σωστά και
φόρτισης, η LED φόρτισης μπαταρίας ( )
ανάβει με κίτρινο χρώμα, υποδεικνύοντας ότι
η μπαταρία φορτίζεται.
Σημειώσεις:
Εάν η Φόρτιση της μπαταρίας LED
δεν ανάβει, ελέγξτε τη σύνδεση του
αυτοκινήτου DC πρίζα. Περιστρέψτε τον
προσαρμογέα ελαφρώς για να βεβαιωθείτε
ότι υπάρχει καλή επαφή. Εάν είναι σωστά
συνδεδεμένη, η μπαταρία μπορεί να είναι
σε κατάσταση βλάβης. Ο κατασκευαστής
προτείνει να έχει η μπαταρία ελέγχεται από
μια ειδική υπηρεσία μπαταρίας τεχνικός.
Μερικά αυτοκίνητα απαιτούν η ανάφλεξη
πρέπει να ρυθμιστεί στη θέση ACC
(αξεσουάρ) για να ενεργοποιήσετε τη
λειτουργία DC πρίζα. Εάν το αυτοκίνητο
η ανάφλεξη διακόπτη πρέπει να είναι
ενεργοποιημένη η θέση ACC, βεβαιωθείτε
ότι όλα τα αξεσουάρ του οχήματος
(δηλαδή θερμαντήρα, ανεμιστήρα,
ραδιόφωνο, τηλεόραση, φώτα... Κλπ)
αποτελούν απενεργοποιημένη. Αν δεν
απενεργοποιηθεί, ο φορτιστής μπορεί
να μην είναι σε θέση να φορτίσει την
μπαταρία.
4. Όταν η φόρτιση ολοκληρώθηκε LED ( )
ανάβει με πράσινο χρώμα, η μπαταρία είναι
πλήρως φορτισμένη.
Όταν αποσυνδέσετε το φορτιστή της μπαταρίας,
αποσυνδέστε το καλώδιο AC, και, στη συνέχεια,
αφαιρέστε το 12 volt DC αξεσουάρ βύσμα από
την έξοδο εξάρτημα του οχήματος.
Κρέμασμα του φορτιστή μπαταρίας
Το άγκιστρο για κρέμασμα σας επιτρέπει να
τοποθετήσετε το φορτιστή μπαταρίας για βολική,
λειτουργία hands-free.
Προσοχη! Για να μειωθεί ο κίνδυνος ζημιών:
• Όταν ο φορτιστής είναι κρεμασμένο από
το γάντζο για κρέμασμα, μην ανακινείτε
το φορτιστή ή το αντικείμενο που είναι
κρεμασμένα από.
• Μην κρεμάσετε το φορτιστή από οποιαδήποτε
ηλεκτρικά καλώδια ή οτιδήποτε δεν είναι
ασφαλής.
• Χρησιμοποιείτε μόνο το κρέμασμα άγκιστρο
για κρέμασμα του φορτιστή. Το άγκιστρο
για κρέμασμα που δεν προορίζεται για την
υποστήριξη επιπλέον βάρος. Μην κρεμάτε
τίποτα επιπλέον για το άγκιστρο για κρέμασμα
ή κίνδυνος θραύσης ενδέχεται να συμβούν.
ΑΝΤΙΜΕΤΩΠΙΣΗ ΠΡΟΒΛΗΜΑΤΩΝ
Εάν η συσκευή δεν φόρτισης:
• Βεβαιωθείτε ότι ο φορτιστής μπαταρίας είναι
σωστά συνδεδεμένη με ένα ζωντανό 220-240
Vac έξοδο.
• Βεβαιωθείτε ότι οι συνδέσεις εξόδου
εξασφάλισε και η σύνδεση πολικότητα είναι
σωστή όταν χρησιμοποιείτε τη μπαταρία τους
σφιγκτήρες.
• Εάν η τάση της μπαταρίας που θα επιβαρύνει
έχει πέσει κάτω από το 2 Volt, η μπαταρία δεν
μπορεί να χρεωθεί με το φορτιστή μπαταρίας.
ΣΥΝΤΗΡΗΣΗ
Συσκευή σας Black & Decker έχει σχεδιαστεί
έτσι ώστε να λειτουργεί για μεγάλο χρονικό
διάστημα με την ελάχιστη δυνατή συντήρηση.
Η αδιάλειπτη και ικανοποιητική λειτουργία του
εργαλείου εξαρτάται από τη φροντίδα και τον
τακτικό καθαρισμό.
Προειδοποίηση! Πριν πραγματοποιήσετε
οποιοδήποτε συντήρηση ή καθαρισμό πάνω στη
συσκευή, βγάλτε τη συσκευή από την πρίζα.
• Από καιρό σε καιρό σκουπίζετε τη συσκευή με
ένα υγρό πανί. Μη χρησιμοποιείτε λειαντικά
ή υγρά καθαρισμού που περιέχουν διαλυτικά.
Μην βουτάτε τη συσκευή μέσα σε νερό.
Αντικαθιστώντας την ασφάλεια στο
βύσμα αξεσουάρ DC
• Αφαιρέστε την αυλακωτή καπάκι
περιστρέφοντας αριστερόστροφα.
• Αφαιρέστε την ροδέλα από καουτσούκ, κέντρο
pin και την άνοιξη.
• Αφαιρέστε την ασφάλεια .
• Τοποθετήστε μια νέα ασφάλεια του ίδιου τύπου
και μεγέθους (8 Α).
• Τοποθετήστε το pin κέντρο, την άνοιξη και το
πλυντήριο καουτσούκ.
• Αντικαταστήστε το αυλακωτή καπάκι το
περιστρέφοντας προς τα δεξιά επάνω στο
βύσμα.
Η ΠΡΟΣΤΑΣΙΑ ΤΟΥ
ΠΕΡΙΒΑΛΛΟΝΤΟΣ
Σωστή απόρριψη αυτού του προϊόντος
Η εν λόγω σήμανση υποδεικνύει
ότι το προϊόν δεν πρέπει να
απορρίπτονται με άλλα απόβλητα των
νοικοκυριών σε όλη την Ευρωπαϊκή
Ένωση. Για να αποφύγετε τυχόν
κινδύνους για το περιβάλλον ή την ανθρώπινη
υγεία από την ανεξέλεγκτη διάθεση αποβλήτων,
ανακύκλωση ώστε να βοηθήσετε στην βιώσιμη
επαναχρησιμοποίηση των υλικών πόρων. Για να
επιστρέψετε χρησιμοποιείται τη συσκευή σας,
χρησιμοποιήστε τα συστήματα επιστροφής και
συλλογής ή επικοινωνήστε με το κατάστημα από
το οποίο αγοράστηκε το προϊόν. Μπορούν να
λάβουν αυτό το προϊόν για την περιβαλλοντικά
ασφαλή ανακύκλωση.
Η χωριστή συλλογή των χρησιμοποιημένων
προϊόντων και συσκευασιών επιτρέπει στα υλικά
να ανακυκλωθούν και να χρησιμοποιηθούν
ξανά. Η επαναχρησιμοποίηση των
ανακυκλωμένων υλικών βοηθάει στην πρόληψη
της ρύπανσης του περιβάλλοντος και
μειώνει τη ζήτηση για
πρώτες ύλες.
Οι τοπικοί κανονισμοί μπορεί να προβλέπει
χωριστή συλλογή ηλεκτρικών προϊόντων από
το νοικοκυριό, σε δημοτικούς χώρους διάθεσης
αποβλήτων ή από τον έμπορο όταν αγοράζετε
ένα καινούργιο προϊόν.
ΤΕΧΝΙΚΑ ΔΕΔΟΜΕΝΑ
Είσοδος: 220-240 VAC, 50/60 Htz,
0,6A
Έξοδος: 12 VDC, 6A
ΕΓΓΥΗΣΗ
Baccus World Wide LLC είναι σίγουροι για
την ποιότητα των προϊόντων και παρέχει μια
εξαιρετική εγγύηση. Η παρούσα εγγύηση
αποτελεί πρόσθετο δικαίωμά σας και δεν
ζημιώνει υπάρχοντα θεσπισμένα δικαιώματά.
Η εγγύηση ισχύει εντός της επικράτειας των
Κρατών Μελών της Ευρωπαϊκής Ένωσης
και της Ευρωπαϊκής Ζώνης Ελευθέρων
Συναλλαγών.
Αν Baccus World Wide LLC προϊόν καθίσταται
ελαττωματική λόγω ελαττωματικών υλικών,
κατασκευή ή έλλειψη συμμόρφωσης εντός 24
μηνών από την ημερομηνία αγοράς, Baccus
World Wide LLC εγγυήσεις προς αντικατάσταση
των ελαττωματικών εξαρτημάτων, επισκευή
προϊόντα υπόκεινται σε δίκαιη και φυσιολογική
φθορά ή αντικαταστήστε τα προϊόντα για
να βεβαιωθείτε ότι η ελάχιστη ενόχληση του
πελάτη, εκτός εάν:
• tο προϊόν έχει χρησιμοποιηθεί για εμπορικών,
επαγγελματικών, ή ενοικίου σκοπούς;
• το προϊόν έχει υποβληθεί σε κακή χρήση ή
αμέλεια;
• tο προϊόν έχει υποστεί ζημιές από ξένα
αντικείμενα, ουσίες ή ατυχημάτων;
• επισκευές έχουν επιχειρήσει από άλλα
πρόσωπα πλην Baccus World Wide LLC
προσωπικό σέρβις.
Για να κάνετε μια αξίωση για την εγγύηση, θα
πρέπει να υποβάλλουν αποδεικτικό αγοράς να
Baccus World Wide LLC, στη διεύθυνση που
αναγράφεται στο παρόν εγχειρίδιο.
Παρακαλώ επισκεφθείτε την ιστοσελίδα μας
να www.baccusworldwide.com δηλώστε το
νέο σας Baccus World Wide LLC προϊόν και
να ενημερώνονται για νέα προϊόντα και ειδικές
προσφορές. Περαιτέρω πληροφορίες για τη
Baccus World Wide LLC brand μας και το
εύρος των προϊόντων είναι διαθέσιμα στο www.
baccusworldwide.com.
Baccus Worldwide LLC
Weena 290, 3012 NJ Rotterdam ή
Postbus 819, 3000 AV Rotterdam
BC6BDWE_Manual_102815.indd 70-71 10/28/2015 11:15:17 AM
Page 37

POLSKU POLSKU
72 73
INSTRUKCJA
OBSŁUGI
ZAMIERZONEGO STOSOWANIA
Twój Black & Decker prostownik akumulatora/
konserwator przeznaczona do ładowania
akumulatorów kwasowo-ołowiowych. Ten
produkt jest przeznaczony dla gospodarstwa
domowego, konsumentów użytku.
INSTRUKCJE DOTYCZĄCE
BEZPIECZEŃSTWA
WAŻNE SPECYFIKACJA UWAGA: Pojemność
akumulatora: kwasowo typu, maksymalna
12VDC, 120Ah.
Ostrzeżenie! Podczas korzystania z urządzeń,
podstawowe środki bezpieczeństwa, w
tym wymienionych poniżej, należy zawsze
przestrzegać, aby zmniejszyć ryzyko pożaru,
nieszczelne baterie, obrażeń ciała i strat
materialnych.
• Czytaj całość tę instrukcję przed rozpoczęciem
korzystania z urządzenia.
• Zamierzonego stosowania jest opisany w tej
instrukcji obsługi. Korzystanie z jakichkolwiek
akcesoriów lub osprzętu lub wykonywania
jakichkolwiek czynności przy tym urządzenie
inne niż zalecane w niniejszej instrukcji mogą
stwarzać ryzyko obrażeń.
• Należy zachować tę instrukcję do przyszłego
użytku.
Korzystanie z urządzenie
Zawsze należy zachować ostrożność podczas
korzystania z urządzenia.
• To urządzenie nie jest przeznaczone do
użytkowania przez osób niedołężnych lub
młodych bez nadzoru.
• Urządzenie nie powinno być używane jako
zabawka.
• Zastosowanie w suchym miejscu. Nie wolno
dopuszczać do modelowania stają się mokre.
• Nie zanurzaj urządzenia w wodzie.
• Nie wolno otwierać obudowy urządzenie. Nie
ma części, które może naprawiać użytkownik.
• Urządzenie nie powinno pracować w atmosfer
zagrożonych wybuchem, np. w obecności
łatwopalnych cieczy, gazów lub pyłów.
• Aby zmniejszyć ryzyko uszkodzenia świec
i kabli nigdy nie ciągnij za kabel, aby wyjąć
wtyczkę z gniazda sieciowego.
Po wykorzystaniu
• Gdy nie jest używany, urządzenie należy
przechowywać w suchym, dobrze
wentylowanym miejscu, z dala od dzieci.
• Dzieci nie powinny mieć dostępu do
przechowywane urządzenia.
• Gdy urządzenie jest przechowywane lub
transportowane w pojeździe powinien on być
umieszczony w bagażniku lub powściągliwy,
aby uniemożliwić przemieszczanie się po
nagłych zmian prędkości lub kierunku.
• Urządzenia powinny być zabezpieczone
przed bezpośrednim działaniem promieni
słonecznych, źródeł ciepła i wilgoci.
Inspekcja i naprawy
• Przed użyciem należy sprawdzić urządzenie
pod kątem uszkodzonych lub wadliwych
części. Sprawdzić pod kątem pęknięć,
uszkodzeń zwrotnice i wszystkie inne warunki,
które mogą wpływać na jego działanie.
• Nie korzystaj z urządzenia, jeśli jakikolwiek
element jest uszkodzony lub wadliwy.
• Mieć wszelkie uszkodzone lub wadliwe części
naprawiane lub wymieniane przez producenta.
• Nigdy nie próbować demontować lub
wymieniać części innych niż wymienione w tej
instrukcji.
Przewód zasilający bezpieczeństwa
Ostrzeżenie! Nigdy nie należy zmieniać za
pomocą przewodu zasilającego lub wtyczki. Jeśli
wtyczka nie pasuje, zainstalowano prawidłowe
wylot zainstalowany przez wykwalifikowanego
elektryka. Niewłaściwe podłączenie może
spowodować porażenie prądem.
Poniższe symbole są oznaczone na
urządzeniu:
Narzędzie to jest podwójnie
izolowane; stąd przewód
uziemiający nie jest wymagany.
Zawsze należy sprawdzić, czy
przewód zasilania jest zgodne z
wartością napięcia na ocena płyta.
Czytaj całość tej instrukcji ostrożnie.
Bezpieczeństwo elektryczne
Zawsze należy sprawdzić, czy przewód
zasilania jest zgodne z wartością napięcia na
ocena płyta.
• Jeśli kabel zasilający jest uszkodzony, musi
zostać wymieniony przez producenta w celu
uniknięcia niebezpieczeństwa.
• Ostrzeżenie! Aby uniknąć poważnych
obrażeń lub śmierci z pożaru, eksplozji lub
porażenia prądem elektrycznym: Urządzenie
musi być podłączone do obwodu przerwania
przerwania (GFCI) zabezpieczone gniazdka.
Szczególne instrukcje bezpieczeństwa
dotyczące ładowarki do baterii
• Nigdy nie próbuj ładować baterie nie
przeznaczona do doładowywania.
• Mają dowolny wadliwe przewody zasilające
natychmiast wymieniać.
• Nie wolno wystawiać prostownika na działanie
wody.
• Nie należy otwierać prostownika akumulatora.
• Nie sondować prostownika akumulatora.
• Nigdy nie pozwalaj na czerwone i czarne
zaciski stykały się ze sobą bądź inny wspólny
metalowy przewodnik. Może to spowodować
uszkodzenie urządzenia i/lub stwórz iskierkę/
zagrożenie wybuchem.
BATERIE
Ostrzeżenie! Nigdy nie próbuj ładować
zamarzniętego akumulatora.
• W ekstremalnych warunkach, wyciek z
akumulatora może wystąpić. Gdy można
zauważyć cieczy na baterie, starannie wytrzeć
cieczy za pomocą ściereczki. Unikać kontaktu
ze skórą.
• W przypadku kontaktu z oczami lub skórą,
należy postępować zgodnie z poniższymi
instrukcjami.
– Ostrzeżenie! Płynu z akumulatora jest
rozcieńczony kwas siarkowy, który
może doprowadzić do obrażeń ciała lub
uszkodzenia mienia. W przypadku kontaktu
ze skórą natychmiast zmyć wodą. Jeśli
Zaczerwienienie, ból lub podrażnienia
skonsultować się z lekarzem. W przypadku
kontaktu z oczami natychmiast przemyć
czystą wodą i natychmiast udać się do
lekarza.
• Podczas pozbywania akumulatorów, należy
postępować zgodnie z instrukcjami zawartymi
w rozdziale “Ochrona środowiska”.
• Dolać wody destylowanej, w każdej komórce,
aż kwas z akumulatora osiągnie poziom
określony przez producenta akumulatora.
Pomaga to usunąć nadmiar gazu od komórek.
Nie przepełniać. W przypadku akumulatorów
bez czapki komórek (bezobsługowy), należy
dokładnie przestrzegać zaleceń producenta
instrukcje ładowania.
• Przejrzeć producenta baterii szczególne
środki ostrożności, takie jak usuwanie czy nie
wyjmując korki ogniw podczas ładowania, a
także zalecane sposoby ładowania.
• Upewnij się, że początkowy prąd ładowania nie
przekracza producenta baterii wymóg.
• Ostrzeżenie! Ryzyko mieszanin wybuchowych
gazów. Praca w pobliżu a akumulator
kwasowo-ołowiowy jest to niebezpieczne.
Akumulatory wytwarzają gazy wybuchowe
podczas normalnej operacja. Z tego powodu
niezmiernie ważne jest, że za każdym razem
przed użyciem ładowarki należy przeczytać
niniejszą instrukcję i zastosować się do
instrukcji dokładnie.
• Stosowanie osprzętu nie zalecane lub
sprzedawanych przez Black & Decker może
spowodować ryzyko pożaru, porażenia prądem
lub obrażeń osób.
• Przedłużacza, nie powinny być używane,
chyba że jest to absolutnie konieczne.
Użycie niewłaściwego przedłużaczu może
spowodować ryzyko pożaru i porażenia
elektrycznego, i spowoduje unieważnienie
gwarancji.
• Ważne: Urządzenie ten jest wyposażony
w aluminiowy radiator, który jest
wykorzystywany na rozpraszanie ciepła
i jest zlokalizowany w dolnej części
urządzenia. Nigdy nie dotykaj radiatora,
gdy urządzenie pracuje i nigdy pozwolić
spód urządzenia kontaktu materiałów
łatwopalnych, podczas pracy.
DC wtykowe akcesoria wskazówek
bezpieczeństwa
• Ostrzeżenie! Nigdy nie podłączaj tego
urządzenia do uziemionego dodatniego
pojazdu przez DC wtyczka osprzętu.
• Upewnić się, że gniazda osprzętu jest czysty i
wolny od zanieczyszczeń przed podłączeniem
urządzenia.
• Ostrzeżenie – Niebezpieczeństwo
pożaru! Jeżeli w pojeździe bezpiecznik
gniazda akcesoriów otwiera (wieje) podczas
podłączania tego prostownika, nie używaj tego
prostownika z tego pojazdu gniazda osprzętu.
– Nie kilkakrotnie wymienić bezpiecznik.
– Nie wymieniać w pojeździe bezpiecznik
gniazda akcesoriów z jednym z wyższym
amperażu.
– Nigdy nie próbować patch bezpiecznika z
folią aluminiową lub drutu.
Dowolny z tych działań może spowodować
poważne uszkodzenie elektryczne i/lub
pożar.
BC6BDWE_Manual_102815.indd 72-73 10/28/2015 11:15:17 AM
Page 38

POLSKU POLSKU
74 75
Szczególne instrukcje dotyczące
korzystania z urządzenia w wilgotnym
środowisku
Obudowa z urządzenia jest pyłoszczelne i
wodoszczelne IP67 norm. Niemniej jednak,
zaleca się przestrzegać następujących
zasad:
• Nigdy nie zanurzaj urządzenia w wodzie
głębiej niż 1 metr, przez czas dłuższy niż 30
minut i/lub w temperaturach innych niż między
5ºC i 40ºC, lub jednostka mogłaby utrzymać
trwałe uszkodzenia.
• Nigdy nie zanurzaj urządzenia w wodzie
chyba tuleję (izolacja) na AC lub DC przewód
zasilający jest nienaruszona.
• Nie wolno pozwolić na korek lub zaciski
być narażone na działanie czynników
środowiskowych przez długie okresy czasu; i
nigdy nie zanurzaj je.
Bezpieczeństwo osobiste
Zużycie kompletnych okularów ochronnych
i odpowiedniej odzieży ochronnej w celu
zapewnienia ochrony przed kontaktem z płynem
akumulatorów.
Unikaj dotykania oczu podczas pracy z
akumulatorem. Kwas, cząsteczki kwasu lub
korozji mogą dostać się do oczu.
Zdejmować danych osobowych elementów
metalowych, takich jak pierścionki, bransolety,
naszyjniki i zegarkow podczas pracy z
akumulatorem kwasowo-ołowiowym.
A akumulator kwasowo-ołowiowy może
produkować prądu zwarciowego są
wystarczająco wysokie, aby spowodować
poważne oparzenia.
Zaleca się szczególną ostrożność w
celu zmniejszenia ryzyka upuszczenia
metalowych przedmiotów na akumulator.
Może to spowodować iskrzenie lub zwarcie do
akumulatora lub do innych części elektrycznej,
która może spowodować eksplozję.
FUNKCJE
1. Wskaźnik LED zasilania
2. Hak wiszące
3. Odwróceniem polaryzacji LED
4. Ładowania akumulatora LED
5. Ładowanie zakończone LED
6. Złącza w linii
7. Wtyczka AC
8. DC pojazdu akcesoria wtyk
9. Zacisków akumulatora
PRZYGOTOWANIA PRZED
ROZPOCZĘCIEM ŁADOWANIA
AKUMULATORA
Urządzenie musi być połączone tylko do
12V akumulator kwasowo-ołowiowy. Przed
rozpoczęciem ładowania należy sprawdzić,
czy napięcie akumulatora wynosi 12V,
zapoznając się na etykiecie akumulatora
lub z dostępnych informacji dotyczących
jej stosowania np, podręcznik użytkownika
samochodu.
Nie używaj urządzenia do ładowania
suchych ogniw, które są najczęściej używane
w domu urządzeń. Baterie te mogą pęknąć i
spowodować obrażenia osób i uszkodzenie
mienia.
Ostrzeżenie! gazów wybuchowych mogą być
wypuszczane od akumulatorów kwasowoołowiowych podczas ładowania. Upewnij się, że
powierzchnia jest dobrze wentylowane i usunąć
wszelkie źródła zapłonu podczas przeprowadzania
procedury ładowania.
• Nigdy nie umieszczaj ładowarkę bezpośrednio
nad akumulatorem; gazy z akumulatora ulegną
koroduje i uszkodzenia prostownika akumulatora.
• Nigdy nie pozwalaj kwas akumulatorowy do
kroplówki na ładowarce.
• Umieścić ładowarkę jak najdalej od akumulatora
jak przewody pozwoli.Ładowarka zawiera
przełączniki, które mogą wytworzyć iskrę.
• Nigdy nie umieszczaj baterię na szczycie
ładowarki.
• Wybuchowe gazy mogą zebrać blisko podłoża.
Zlokalizuj akumulator ładowarka możliwie jak
najwyżej nad poziomem ziemi.
• Nie używaj elektronarzędzi w obszarze ładowania.
• Nie palić tytoniu i nie używać otwartego ognia w
obszarze ładowania.
• Należy postępować zgodnie z instrukcjami
znajdującymi się w podłączanie i odłączanie
ładowarki akumulatora przewodów lub biegunów
akumulatora.
Ostrzeżenie! Akumulator morski (Łódź)
powinien być usunięty przed ładowaniem. W
celu naładowania go na pokładzie wymaga
sprzętu specjalnie zaprojektowanego do
zastosowań morskich. Niniejsze urządzenie nie
jest przeznaczone do takiego użytku.
Pojazdy mogą mieć układy elektryczne i
elektroniczne (np. engine management
systems, telefony), które może być uszkodzony,
jeśli poddane wysokim napięciem i skokami
napięcia. Przed podłączeniem urządzenia do
pojazdu, należy zapoznać się z informacjami
przedstawionymi w instrukcji obsługi pojazdu.
Upewnić się, że zewnętrzne ładowanie jest
dozwolone.
• Wykonaj te instrukcje i wytyczne opublikowane
przez producenta akumulatora i producenta
pojazdu.
• Tylko podłączyć i odłączyć złącze dc zaciski
wyjściowe po wyjąć wy wtyczkę przewodu
zasilającego od gniazdka elektrycznego. Nie
wolno dopuszczać do zacisków zetknęły się
ze sobą.
• Sprawdzić biegunowość akumulatora pojazdu
styków przed podłączeniem urządzenia.
Zawsze odłączać przewód ujemny
(czarny) przewód w pierwszej kolejności:
przestrzeganych przez dodatnie (czerwony)
kabel.
Podczas ładowania akumulator zainstalowany w
obwodzie, postępować zgodnie z instrukcjami
producenta, aby uzyskać dostęp do akumulatora
i następującymi:
• Nie należy ładować akumulatora podczas
pracy silnika.
• Należy pamiętać, że podzespoły silnika np.
płyn chłodzący wentylator może rozpocząć
się automatycznie. Trzymać z dala dłonie
i inne części ciała od elementów silnika i
ustawić ładowarka i kable, aby nie dopuścić do
kontaktu.
• Upewnij się, że ładowarka i kable są
umieszczone, aby uniknąć uszkodzeń na
skutek zamknięcia drzwi i pokryw skrzynki
połączeń silnika.
• Upewnij się, że połączenia mogą być
wykonywane bez dotykania korpusu
metalowego lub elementów przylegających do
akumulatora.
• Podczas korzystania z tego urządzenia
w pobliżu akumulatora pojazdu i silnika,
pozostawić urządzenie na płaskiej, stabilnej
powierzchni, i upewnij się, aby wszystkie
zaciski, kable połączeniowe, ubrań i części
ciała są z dala od ruchomych części pojazdu.
• Jeśli konieczne jest usunąć akumulatora od
pojazdu do aktu oskarżenia lub do czyszczenia
styków, upewnij się, że wszystkie akcesoria w
pojeździe są wyłączone, tak aby dopuścić do
powstania iskry.
• Aby zmniejszyć ryzyko porażenia
elektrycznego, należy odłączyć urządzenie
od źródła zasilania przed przystąpieniem do
konserwacji lub czyszczenia.
INSTRUKCJA UŻYTKOWANIA
Gdy wszystkie przygotowania do ładowania i
osobistego bezpieczeństwa zostały zakończone,
należy postępować w następujący sposób:
• Dla większości motoryzacyjnych i podobnych
zastosowań baterii ładowarka może być
podłączona do akumulatora, podczas gdy jest
ono podłączone do obwodu prądu stałego.
Postępować zgodnie z instrukcjami zawartymi
w rozdziale “Ładowanie akumulatora
zamontowany w obwodzie”.
• Jeśli akumulator musi być odłączony od
obwodu przed rozpoczęciem ładowania,
należy postępować zgodnie z instrukcjami
zawartymi w rozdziale “Ładowanie akumulatora
odłączone od obwodu”.
Ostrzeżenie! Morskich (Łódź) akumulator
powinien być usunięty, a opłata na brzegu. W
celu naładowania go na pokładzie wymaga
sprzętu specjalnie zaprojektowanego do
zastosowań morskich.
Ładowanie baterii, który jest
zainstalowany w obwód
Ostrzeżenie! Nieprawidłowe podłączenie
akumulatora, zwarcie, umiejscowienia
akumulatora i lokalizacja ładowarka może
stwarzać zagrożenie. Upewnij się, że
odpowiednie przygotowanie zostało dokonane
przed kontynuowaniem.
Ostrzeżenie! Jeśli nie można uzyskać dostępu
bieguny akumulatora lub prostownik zaciski
nawiążą kontakt nadwozia lub elementów
przylegających do akumulatora, akumulator
musi zostać usunięte przed rozpoczęciem
ładowania. Postępować zgodnie z instrukcjami
producenta, aby wyjąć akumulator.
• Sprawdzić biegunowość bieguny akumulatora.
Pozytywny (POS, P, +) bieguna akumulatora
zazwyczaj ma większą średnicę niż ujemne
(NEG, N, –) bieguna akumulatora.
• Postępuj zgodnie z zaleceniami producentów,
w celu usunięcia wszelkich okładki izolacyjnych
z biegunami akumulatora.
• Podłączyć dodatni (czerwony) zacisk z
prostownika do dodatniego (POS, P, +)
bieguna akumulatora.
• Podłączyć ujemny (czarny) zacisk z
prostownika do ujemnego (NEG, N, –) bieguna
akumulatora lub do podwozie.
Podczas odłączania akumulatora od
prostownika akumulatora, należy zawsze:
• Wyjąć wtyczkę prostownik.
• Wymontować ujemny (czarny) zacisk w
pierwszej kolejności.
BC6BDWE_Manual_102815.indd 74-75 10/28/2015 11:15:17 AM
Page 39

POLSKU POLSKU
76 77
• Wymontować dodatnie (czerwony) clamp
ostatni.
• Zamontować wszystkie osłony izolacyjne do
biegunów akumulatora.
Ładowanie baterii, który jest odłączony
od obwodu
Ostrzeżenie! Nieprawidłowe podłączenie
akumulatora, zwarcie, umiejscowienia
akumulatora i lokalizacja ładowarka może
stwarzać zagrożenie. Upewnij się, że
odpowiednie przygotowanie zostało dokonane
przed kontynuowaniem.
• Jeśli akumulator nie jest wymontowana
z obwodu, należy postępować zgodnie z
zaleceniami producentów, w celu usunięcia
akumulator przed rozpoczęciem ładowania.
• Sprawdzić biegunowość bieguny akumulatora.
Pozytywny (POS, P, +) bieguna akumulatora
zazwyczaj ma większą średnicę niż ujemne
(NEG, N, –) bieguna akumulatora.
• Podłączyć dodatni (czerwony) zacisk z
prostownika do dodatniego (POS, P, +)
bieguna akumulatora.
• Podłączyć ujemny (czarny) zacisk z
prostownika do ujemnego (NEG, N, –) bieguna
akumulatora.
Podczas odłączania akumulatora od
prostownika akumulatora, należy zawsze:
• Wyjąć wtyczkę prostownik.
• Wymontować ujemny (czarny) zacisk w
pierwszej kolejności.
• Wymontować dodatnie (czerwony) clamp
ostatni.
• Zamontować wszystkie osłony izolacyjne do
biegunów akumulatora.
Podłączenie urządzenia z zacisków
akumulatora
Ostrzeżenie! Zawsze rozłączać wtyczkę z
gniazdka elektrycznego przed podłączeniem lub
odłączeniem urządzenia do lub z akumulatora.
Ostrzeżenie! Nie wolno podłączać żadnych
akcesoriów prowadzi razem jak będzie to
spowodować niebezpieczeństwo. Przewody
akcesoria powinny być zawsze tylko podłączony
do złącza w linii.
• Podłącz zaciski akumulatora do ładowarki za
pomocą złącza w linii.
• Przewody wyjściowe posiadają zaciski
akumulatora kodowane kolorami (czerwonym
jest pozytywny i czarny jest ujemna). Te
podłączyć bezpośrednio do odpowiednich
złączy na zaciskach akumulatora.
• Wykonaj kroki opisane w odpowiedniej sekcji
(“Ładowanie baterii, który jest zainstalowany
w obwód” lub “Ładowanie baterii, który jest
odłączony od obwodu”).
• Włóż wtyczkę ładowarki do gniazdka
elektrycznego.
Ładowanie za pomocą zacisków
akumulatora
1. Konfigurowanie prostownik i podłączyć
do akumulatora, wykonując czynności
opisane w części “Podłączanie urządzenia z
zacisków akumulatora”.
2. Podłączyć prostownik kabla zasilającego do
gniazda sieciowego. Dioda LED zasilania
zaświeci się niebiesko, sygnalizując, że
ładowarka jest gotowy.
Uwaga: Jeśli dioda LED zasilania nie zapala
się, sprawdzić podłączenie do gniazdka
elektrycznego. Upewnić się, że gniazda
sieciowego jest funkcjonalny.
3. Kiedy urządzenie jest podłączone
prawidłowo i ładowania, dioda LED
ładowania akumulatora ( ) zaświeci się na
żółto, wskazując że trwa ładowanie baterii.
Uwagi: Jeśli wskaźnik ładowania LED nie zapala
się, sprawdzić podłączenie do akumulatora.
Jeżeli zaciski są prawidłowo podłączone,
akumulator może być w błędzie. Producent
sugeruje aby mieć akumulator sprawdzany
przez wykwalifikowanego akumulator
technika serwisowego.
Jeżeli zaciski są nieprawidłowo połączone z
uwzględnieniem biegunowości,
odwróceniem polaryzacji LED ( ) będzie
świecić. Odłącz ładowarkę; następnie zdjąć
zaciski. Podłączyć zaciski właściwie.
4. Kiedy ładowanie zakończone LED ( )
świeci na zielono, akumulator jest w pełni
naładowany.
Podczas odłączania ładowarka akumulatorów,
odłączyć przewód zasilający, zdjąć zacisk z
podwozia pojazdu, a następnie zdjąć zacisk z
zacisku akumulatora.
Podłączenie urządzenia z DC pojazdu
akcesoria wtyk
Ostrzeżenie! Zawsze rozłączać wtyczkę z
gniazdka elektrycznego przed podłączeniem lub
odłączeniem urządzenia do lub z akumulatora.
Ostrzeżenie! Nie wolno podłączać żadnych
akcesoriów prowadzi razem jak będzie to
spowodować niebezpieczeństwo. Przewody
akcesoria powinny być zawsze tylko podłączony
do złącza w linii.
• Podłącz DC pojazdu akcesoria wtyk do
ładowarki za pomocą złącza w linii.
• Włóż DC pojazdu akcesoria wtyk do pojazdu
DC akcesoriów gniazda.
• Włóż wtyczkę ładowarki do gniazdka
elektrycznego.
Uwaga: Niektóre pojazdy wymagają zapłonu być
przełączony do akcesorium pozycji w do
zasilania DC akcesorium wylot.
Ładowanie za pomocą DC pojazdu
akcesoria wtyk
Ostrożnie! Aby zmniejszyć ryzyko
uszkodzenia mienia: Upewnij się, że
akcesorium wylot pojazdu jest czyste i wolne od
brud przed podłączeniem urządzenia.
1. Konfigurowanie prostownik i podłączyć do
akumulatora, wykonując czynności opisane
w części “Podłączenie urządzenia z DC
pojazdu akcesoria wtyk”.
2. Podłączyć prostownik kabla zasilającego do
gniazda sieciowego. Dioda LED zasilania
zaświeci się niebiesko, sygnalizując, że
ładowarka jest gotowy.
Uwaga:
Jeśli dioda LED zasilania nie zapala
się, sprawdzić podłączenie do gniazdka
elektrycznego. Upewnić się, że gniazda
sieciowego jest funkcjonalny.
3. Kiedy urządzenie jest podłączone
prawidłowo i ładowania, dioda LED
ładowania akumulatora ( ) zaświeci się na
żółto, wskazując że trwa ładowanie baterii.
Uwagi: Jeśli wskaźnik ładowania LED nie zapala
się, sprawdzić połączenie pojazdu do DC
gniazda osprzętu. Obrócić łącznik lekko
aby upewnić się, że nie ma dobrego
kontaktu. Jeśli jest prawidłowo podłączone,
akumulator może być w błędzie. Producent
sugeruje aby mieć akumulator sprawdzany
przez wykwalifikowanego akumulator
technika serwisowego Jeśli wskaźnik
ładowania LED nie zapala się, sprawdzić
połączenie pojazdu do DC gniazda
osprzętu. Obrócić łącznik lekko aby upewnić
się, że nie ma dobrego kontaktu. Jeśli
jest prawidłowo podłączone, akumulator
może być w błędzie. Producent sugeruje
aby mieć akumulator sprawdzany przez
wykwalifikowanego akumulator technika
serwisowego.
Niektóre pojazdy wymagają zapłonu
zostanie obrócony do położenie ACC
(akcesoriów) , aby uaktywnić DC gniazda
osprzętu. Jeśli zapłon w pojeździe musi
być obrócona do położenie ACC, pamiętaj
wszystkie akcesoria pojazdu (np. grzejnik,
wentylator, radio, TV, lampki... itd.) są
wyłączone. Jeśli nie są one wyłączone,
ładowarka może nie być w stanie naładować
akumulator.
4. Kiedy ładowanie zakończone LED ( )
świeci na zielono, akumulator jest w pełni
naładowany.
Podczas odłączania ładowarka akumulatorów,
odłączyć przewód zasilający, a następnie wyjąć
a następnie usunąć DC 12 V Akcesorium
wtyczkę z samochodowego gniazdka.
Zawieszające ładowarkę
Hak wiszące umożliwia pozycjonowanie
ładowarkę do wygodnego, obsługi wolne ręce.
Ostrożnie! Aby zmniejszyć ryzyko
uszkodzenia mienia:
• Gdy ładowarka jest powieszony przez hak
zawieszany, nie wstrząsać ładowarki lub obiekt
to jest on zawieszony od.
• Nie wolno wieszać ładowarkę od wszelkie
przewody elektryczne lub czegokolwiek, co nie
jest bezpieczne.
• Używaj tylko wisiał hak do wieszania
ładowarkę. Hak wiszące nie jest przeznaczone
do obsługi dodatkowych obciążników. Nie
wolno wieszać niczego dodatkowego do
wieszania haczyka lub niebezpieczeństwo
uszkodzenia mogą się pojawić.
ROZWIĄZYWANIE PROBLEMÓW
Jeśli urządzenie nie jest ładowania:
• Sprawdzić, czy ładowarka jest prawidłowo
podłączona do live 220-240 VAC gniazda.
• Upewnij się, że złącza wyjściowe są
zabezpieczone i biegunowość jest prawidłowa,
gdy wykorzystując zaciski akumulatora.
• Jeżeli napięcie akumulatora naładowany spadł
poniżej 2 V, akumulatora nie można ładować
przy użyciu tego prostownika akumulatora.
KONSERWACJA
Twój Black & Decker przyrząd został
zaprojektowany do działania w długim okresie
czasu przy minimalnej konserwacji. Ciągłe
działanie zależy od właściwego narzędzia
pielęgnacja i regularne czyszczenie.
Ostrzeżenie! Przed wykonaniem jakichkolwiek
czynności konserwacyjnych lub czyszczenia
przyrządu, należy odłączyć urządzenie od
zasilania.
• Od czasu do czasu wyczyść urządzenie
wilgotną szmatką. Nie wolno używać
żadnych środków ściernych lub na bazie
rozpuszczalników do czyszczenia. Nie zanurzaj
urządzenia w wodzie.
Wymiana bezpiecznika w DC wtyczka
osprzętu
• Wymontować korek rowkowane, obracając ją
przeciwnie do ruchu wskazówek zegara.
• Wymontować podkładkę gumową, środkowym
pinem i sprężyny.
• Wyjąć bezpiecznik.
• Zamontować nowy bezpiecznik o takim
samym typie i rozmiarze (8 A).
BC6BDWE_Manual_102815.indd 76-77 10/28/2015 11:15:18 AM
Page 40

79
POLSKU
78
• Zamontować kołek ustalający, sprężynę i
podkładkę gumową.
• Zamontować rowkowane pokrywę, obracając
ją zgodnie ze wskazówkami zegara.
OCHRONA ŚRODOWISKA
Prawidłowa utylizacja tego produktu
Oznakowanie to wskazuje, że tego
produktu nie należy wyrzucać razem
z innymi odpadami komunalnymi
w całej Unii Europejskiej. Aby
uniknąć ewentualnych szkód dla
środowiska lub zdrowia ludzkiego ze strony
niekontrolowanego usuwania odpadów,
recykling ją odpowiedzialnie aby promować
zrównoważone użycie zasobów materialnych.
Aby powrócić urządzenie na zakończenie
okresu użytkowania, proszę wykorzystać z zwrot
i zbierania systemu lub skontaktować się ze
sprzedawcą gdy produkt został zakupiony. Mogą
one przyjmować tego produktu bezpiecznego
dla środowiska recyklingu.
Oddzielny zbiórkę zużytych produktów i
opakowań pozwala na materiały, które mają być
poddane recyklingowi i ponownie użyte.
Ponowne wykorzystanie surowców wtórnych
pomaga zapobiegać zanieczyszczeniu
środowiska i zmniejsza popyt na
surowce.
Przepisy lokalne mogą zapewnić oddzielny
zbiórkę produktów elektrycznych z
gospodarstwa domowego, w odpady komunalne
witryn lub przez detalistę podczas zakupu
nowego produktu.
DANE TECHNICZNE
Input: 220-240VAC, 50/60 Htz,
0,6A
Output: 12VDC, 6A
GWARANCJI
Producent kwestie niniejszą ograniczoną Baccus
World Wide LLC jest przekonany o jakości
swoich produktów oraz i oferuje doskonałą
gwarancję. Gwarancja ta deklaracja jest
uzupełnieniem i w żaden sposób nie narusza
praw ustawowych. Gwarancja jest ważna w
ciągu terytorium Państw Członkowskich Unii
Europejskiej i Europejskiej Strefy Wolnego
Handlu.
Jeśli Baccus World Wide LLC produkt staje się
wadliwe ze względu na uszkodzone materiały,
wykonawstwo lub brak zgodności, w ciągu
24 miesięcy od daty zakupu Baccus World
Wide LLC gwarantuje wymienić uszkodzone
części, naprawy produktów poddanych godziwej
zużycia lub wymienić takie produkty w celu
zapewnienia minimalnych niedogodności dla
klienta, chyba że:
• produkt został wykorzystany do działalności
handlowej, zawodowej lub wynajem celów;
• produkt został poddany niewłaściwego
użytkowania lub zaniedbania;
• produkt uległ zniszczeniu przez obcych
przedmiotów, substancji lub awarii;
• naprawy zostały próby przez osoby inne niż
Baccus World Wide LLC pracownicy obsługi.
Do reklamacji na gwarancji, trzeba będzie
przedstawić dowód zakupu do Baccus World
Wide LLC, na adres wskazany w niniejszej
instrukcji.
Prosimy odwiedzić naszą stronę internetową
www.baccusworldwide.com aby zarejestrować
nowy Baccus World Wide LLC produktu i aby
być na bieżąco w zakresie nowych produktów
i ofert specjalnych. Dalsze informacje znajdują
się na stronie Baccus World Wide LLC marka i
naszą gamę produktów dostępna pod adresem
www.baccusworldwide.com.
Baccus Worldwide LLC
Weena 290
3012 NJ Rotterdam lub
Postbus 819, 3000 AV Rotterdam
BC6BDWE_Manual_102815.indd 78-79 10/28/2015 11:15:18 AM
 Loading...