

Page 1
Blacks. Decker.
OWNER’S MANUAL
Your new Black & Decker Drill is an out
standing value, combining quality con
struction, excellent performance and ver
satility with low price. It's DOUBLE-
INSULATED for added safety and is a very
good choice for light duty work and occa
sional building or remodeling projects.
Not only will it DRILL holes in practically
any material, but with optional accessories
it can SAND, POLISH, BUFF, DRIVE
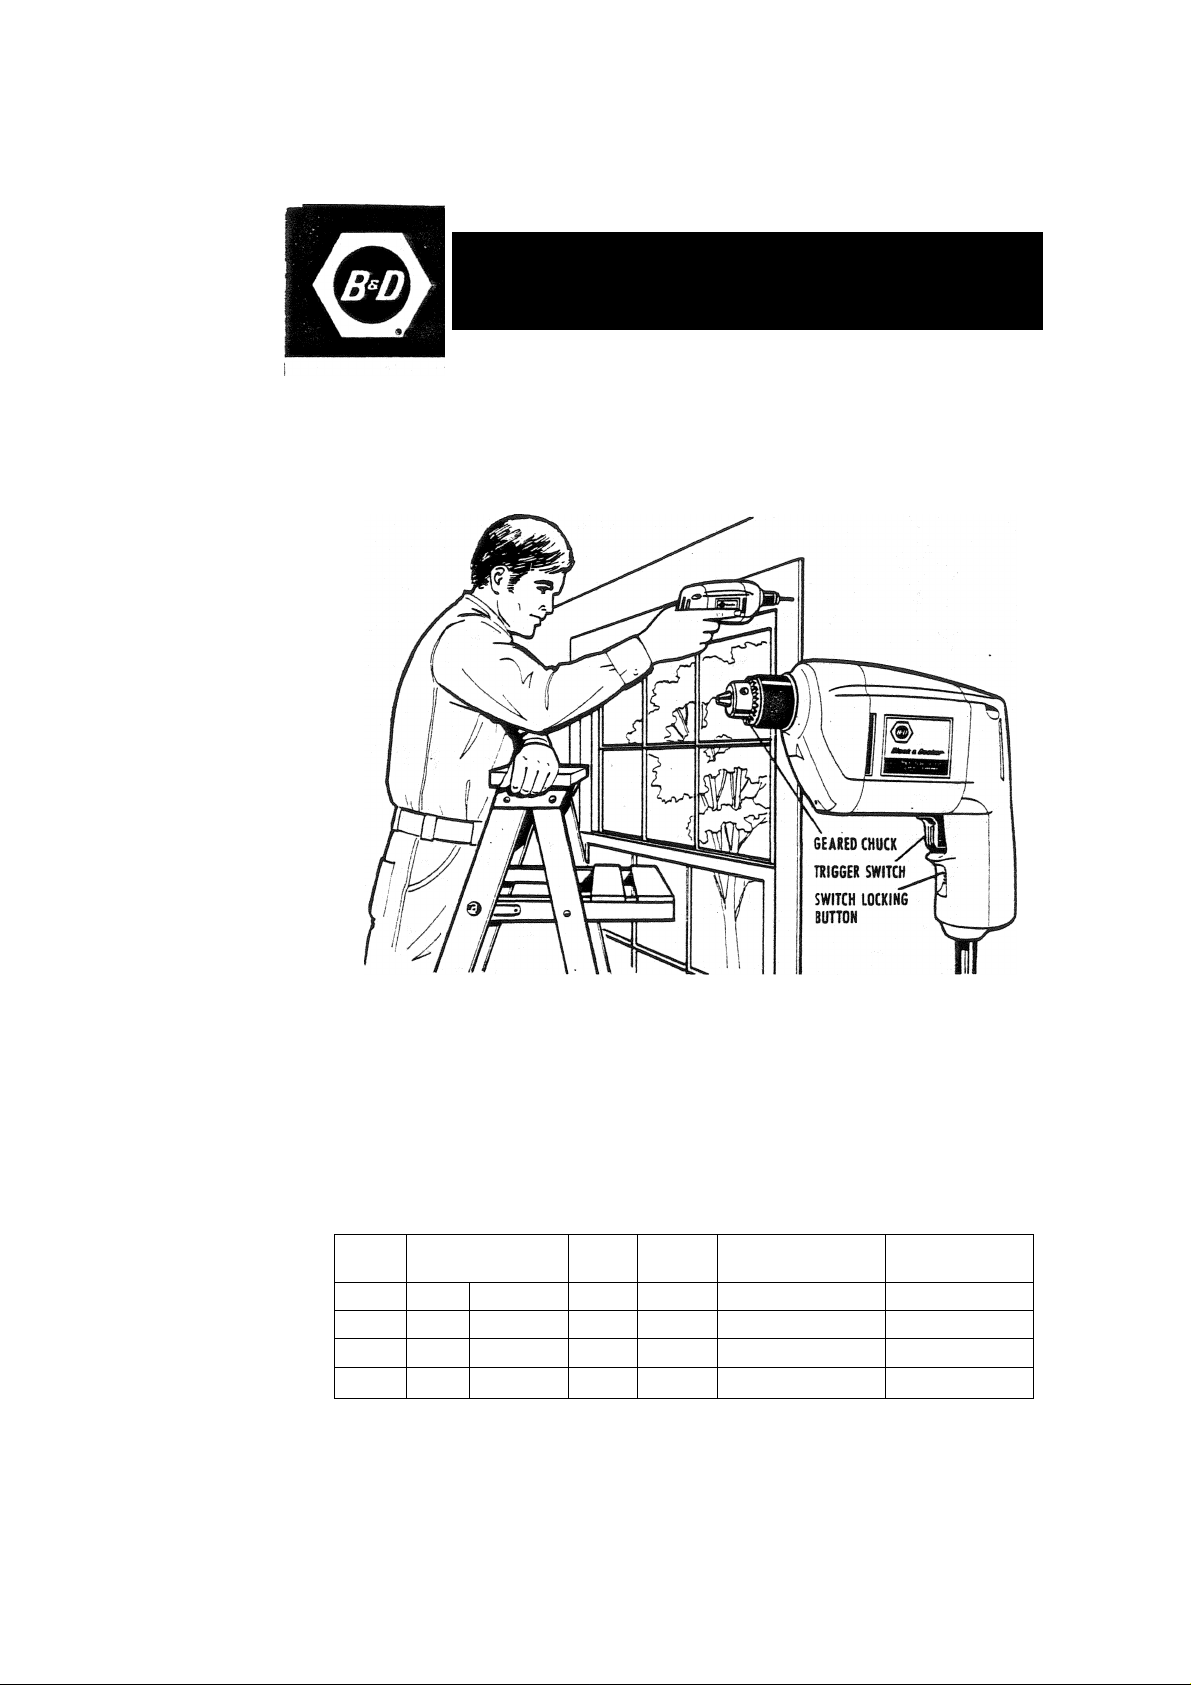
1/4" & 3/8" DOUBLE INSULATED DRILLS
Cat.
No,
7TO4
7104
7014
7114
Capacity
Steal Hardwood
^2'
3/4"
3/2"
3/4'
. Volts
AC
120
120
120
120
Amps
screws, GRIND, DRIVE hole saws, MIX
paint and REMOVE rust and old paint.
For personal safety and for proper opera
tion of the Drill, please take the time to
carefully read all of the safety rules and
instructions in this booklet. Don't forget to
send in the owner registration card.
THANK YOU for buying BUCK DECKER!
Switch
ZO Single Speed
zo
Z3
Z3
Single Speed
Variable Speed
Variable Speed
2500
1200
0 to 2500
.0 to mm
Page 2

1. IMPORTANT INFORMATION
SAFETY RULES FOR POWER TOOLS
1. KNOW YOUK POWER TOOL — Read owner's manual carefully. Learn
its applications and limitations as well as the specific potential
hazards peculiar to this tool.
2. KEEP WORK AREA CLEAN» Cluttered areas and benches invite
accidents.
3. AVOID DANGEROUS ENVIRONMENT, Don't expose power tools to
rain. Don't use power tool in damp or wet locations. And keep work
area well lit.
4. KEEP CHILDREN AWAY. All visitors should be kept safe distance
from work area.
5. STORE IDLE TOOLS. When not in use, tools should be stored In dry,
high or locked-up place — out of reach of children.
6. DON'T FORCE TOOL. It will do the job better and safer at the rate
for which it was designed.
7. USE RIGHT TOOL. Don't force small tool or attachment to do the
job of a heavy duty tool.
8. WEAR PROPER APPAREL. No loose clothing or jewelry to get caught
in moving parts. Rubber gloves and footwear are recommended
when working outdoors.
9. USE SAFETY GLASSES with most tools. Also face or dust mask if
cutting operation is dusty.
10. DON'T ABUSE CORD. Never carry tool by cord or yank it to dis
connect from receptacle. Keep cord from heat, oil and sharp edges.
11. SECURE WORK. Use clamps or a vise to hoid work. It's safer than
using your hand and it frees both hands to operate tool.
12. DON'T OVERREACH. Keep proper footing and balance at all times.
13. MAINTAIN TOOLS WITH CARE. Keep tools sharp at all times, and
clean for best and safest performance. Follow instructions for
lubricating and changing accessories.
14. DISCONNECT TOOLS. When not in use, before servicing; when
changing accessories such as blades, bits, cutters, etc.
15. REMOVE ADJUSTING KEYS AND WRENCHES, Form habit of check
ing to see that keys and adjusting wrenches are removed from
tool before turning it on.
16. AVOID ACCIDENTAL STARTING. Don't carry plugged-in tool with
finger on switch. Be sure switch is off when plugging in.
17. OUTDOOR USE EXTENSION CORDS — When tool is used outdoors,
use only extension cords suitable for use outdoors and so marked.
18. DO NOT OPERATE portable electric tools in gaseous or explosive
^ atmospheres. Motors in these tools normally spark, and the sparks
TT^ght Ignite fumes.
CAUTION: When drilling into walls, floors or wherever “live" electrical
wires may be encountered, DO NOT TOUCH THE CHUCK OR ANY FRONT
METAL PARTS OF THE DRILL! Hold the Drill only by the plastic handle to
prevent electric shock if you drill into a “live" wire.
Page 3

2o IMPORTANT INFORMATION
DOUBLE INSUUTION
Yoyr Drill is DOUBLE-INSULATED to give you added safety. This means
that it is constructed throughout with TWO separate “layers" of electrical
insulation or one DOUBLE thickness of insulation between you and the
tool’s electrical system.
Tools built with this insulation system are not intended to be grounded.
As a result, your Drill is equipped with a two-pronged plug which permits
you to use any conventional 120 volt electrical outlet without concern
for maintaining a ground connection.
NOTE: DOUBLE-INSULATION does not take the place of normal safety
precautions when operating this tool. The insulation system is for added
protection against injury resulting from a possible electrical insulation
failure within the tool. CAUTION: When servicing Double-Insulated Tools,
use ONLY IDENTICAL REPLACEMENT PARTS. Replace or repair damaged
cords.
EXTENSION CORD
When using this drill at a considerable distance from power source, an
extension cord of adequate size must be used for safety, and to prevent
loss of power and over-heating. For a 120-volt tool, the minimum size of
the wires in any extension cord up to 75 feet long must be 18-gauge
(American Wire Gauge). From 75 to 100 feet, 16-gauge wire is required
throughout the extension. 220-volt tools require a minimum wire size of
only 18-gauge in extension cord lengths up to 100 feet long. (NOTE:
16-gauge wire is heavier than 18-gauge wire and will carry current for
longer distances without a voltage drop.)
Before using Extension Cords, inspect them for loose or exposed wires
and damaged insulation. Make any needed repairs or replacement before
using your power tool.
CHUCK
UNPLUG DRILL
Turn collar to open chuck jaws.
Insert bit into chuck as far as it
will go. Tighten chuck collar by
hand. Place chuck key in each
of the three holes, and tighten
in clockwise direction. It's im
portant to tighten chuck with ail
three holes. To release bit, turn
chuck key counterclockwise in
just one hole, then loosen chuck
To remove the chuck from the Drill, for
using a threaded shank accessory or
for chuck replacement, first unplug tba ^
tool. Insert the key in the chuck and "
tap it sharply in the direction the tool
normally rotates—see at right. This will
loosen the chuck shank threads and
the chuck may be unscrewed by hand.
Do not lubricate the three chuck jaws or the inside of the chuck; how
ever, a light film of oil can be applied to the outside of the chuck to
prevent any rust from forming.
by hand.
.n\
Page 4

CARE IN DRILLING
4. OPERATION
Twist drills are brittle and will break if enough bending stress is applied. To avoid
stress on the drill bit, try extending your index finger along the side of the drill*
housing V ith your middle finger on the trigger. Remember guide the tool, don’t
force it! Should the tool become overheated., run it free of any load at maximum
speed. The drill will cool faster by running it without toad.
DRILLING IN METAL
Use a cutting lubricant when drilling metals. The exceptions are cast iron and brass
whi'-h should be drilled dry. The cutting lubricant that works best is sulphurized
cutting oil. Aluminum is best drilled with kerosene.
DRILLING IN WOOD
Holes In wood can be made with the same twist drills used for metal. These bits
may overheat unless pulled out frequently to clear Chios from the flutes» For
larger holes, use Power Drill Wood Bits with a shank size that will fit your drill's
chuck. Work that is apt to splinter should be backed up with a block of wood. Let
up on the pressure just before the tip cuts through, this will give a good clean hole.
ACCESSORIES
Recommended accessories for use with your Drill are shown below and in
Black & Decker catalogs (CAUTION: The use of any other accessory or
attachment might be hazardous.) For safety in use, the following acces
sories should -be used only in the sizes specified below:
BITS, METAL DRILLING - Up to V*" with 1/4" DRILL, up to with Vs" DRILL.
BITS, MASONRY DRILLING - Up to ^2".
BITS. WOOD DRILLING - Up to Vs" with V4" DRILL: up to 3/4" with Vg" DRILL.
HOLE SAWS — Up to I Vs" with Vr DRILL: up to IV2" with DRILL.
WIRE BRUSHES— Up to 3" diam. GRINDING WHEELS — Up to 2" diam.
BUFFING WHEELS - Uo to 4" diameter.
BACKING PADS -4%" diameter. SANDING DISCS & POLISHING BONNETS up to
5" diameter.
We strongly recommend that your first curchase be the No. U-2106 Safety Glasses
which should be worn when using all drill accessories.
ÛJ
y
L
---□------
HOLE SAWS will cut
larger diameter holes in
wood up to 3/4" thick.
POLISHING BONNETS.
For cleaning, polishing,
waxing of cars, floors,
etc.
I 1 ,, Ti :ij
-
1 II j| i!'
WIRE CUP BRUSH re
moves rust, scale, and
old paint from metal
surfaces.
DRILL BIT SHARPENER
enables you to extend
the useful life of your
drill bits.
SAFETY GLASSES (No. U2106).
Lightweight, clear plastic with
side shields. Wear alone or over
regular glasses.
TT
SHAPING SET includes
3 cutters—bevel, bead
ing and corner round.
PAINT
PAINT MIXER. Thorough
ly mixes paint in up to
1-gal. cans. Fast, easy.
CAUTION; Keep paint
and thinners off of drill
to prevent serious dam
age to plastic.
Page 5

3. OPERATION'
SWITCH
To Start Drill, depress trigger switch; to stop Drill, release trigger. To
lock trigger in “ON" position for continuous operation, depress trigger
and push up locking button (located below the trigger), then gently
release trigger. To release locking mechanism, depress trigger fully, then
release It. Before using the tool (each time) be sure that the lock button
release mechanism is working freely.
Do not lock the switch “ON" when drilling by hand so that you can
instantly release the trigger switch if the bit binds in the hole.
Be sure to release the switch locking button before disconnecting the
plug from the power supply. Failure to do so will cause the tool to start
immediately the next time it is plugged in. Damage or injury could result.
The Variable Speed Trigger Switch (Nos. 7014 & 7114 Drills only) permits
speed control — the farther the trigger is depressed, the higher the speed
of the Drill. NOTE: Use lower speeds for starting holes without a center
punch, drilling in metal or plastics, driving screws, drilling ceramics, or
mixing paint. Higher speeds are better for drilling wood and composition
boards, and for using abrasive and polishing accessories.
0.
_
J'i
DRILLING
1. Unplug the Drill when attaching or changing bits or accessories.
2. Use sharp drill bits only. For WOOD, use twist drill bits, spade bits,
power auger bits, or hole saws. For METAL, use high-speed steel
twist drill bits or hole saws. For MASONRY, such as brick, cement,
cinder block, etc., use carbide-tipped bits.
3. Be sure the material to be drilled is anchored or clamped firmly,
if drilling thin material, use a wood “back-up" block to prevent
damage to material.
4. Center-punch an indentation at the point to be drilled. This will
overcome tendency of bit to slip around on a smooth surface. Place
the tip of bit in indentation and turn motor “ON." NOTE: With the
Variable Speed Drills, holes can be started at low speed without the
need for center punching.
5. Always apply pressure in a straight line with the bit. Use enough
pressure to keep drill biting, but do not push hard enough to stall
motor or deflect bit. To minimize stalling on breaking through the
material, reduce pressure on drill and ease the bit through last part
of hole.
6. Hold drill firmly to control the twisting action of the drill.
7. THE DRILL STALLS if it is being overloaded or improperly used.
RELEASE TRIGGER IMMEDIATELY, remove drill bit from work, and
determine cause of stalling. DO NOT CLICK TRIGGER OFF AND ON
IN ATTEMPT TO START A STALLED DRILL
8. Keep motor running when pulling bit back out of a drilled hole.
This will help prevent jamming.
Page 6

CLEANING & LUBRICATION
Use only mild soap and a damp cloth to clean the tool. Many household
cleaners contain chemicals which could seriously damage the plastic.
Also, do not use gasoline, turpentine, lacquer or paint thinner, dry
cleaning fluids or similar products. Never let any liquid get inside the
tool; never immerse any part of the tool into a liquid.
Self lubricating bearings are used In the tool and periodic relubrication
is not required. However, it is recommended that, once a year, you take
or send the tool to a 6&D Service Center for a thorough cleaning,
inspection and lubrication of the gear case.
IMPORTANT
To assure product SAFETY and RELIABILITY, repairs, maintenance and
adjustment (Including brush inspection and replacement), should be
performed by Black & Decker Service Centers or other qualified service
organizations, always using Black & Decker replacement parts. When
servicing Double-Insulated Tools, it is extremely important that ONLY
IDENTICAL REPLACEMENT PARTS BE USED and that REASSEMBLY OF
TOOL IS IDENTICAL TO THE ORIGINAL ASSEMBLY.
HOME USE WARRANTY
(A FULL ONE YEAR WARRANTY)
Black & Decker warrants this product for one year against any defects
that are due to faulty material or workmanship. Please return the
complete unit, transportation prepaid, to the seller (if a participating
retailer) for free replacement (proof of purchase may be required). The
unit may also be returned to a Black & Decker Service Center or
Authorized Service Station, listed under “Tools Electric“ in the yellow
pages for free replacement or repair at our option. This warranty does
not apply to accessories. This warranty gives you specific legal rights
and you may have other rights which vary from state to state. Should
you have any questions, contact your nearest Black & Decker Service
Center Manager.
THE BLACK & DECKER MFC. CO.
Towson, Md. 21204, U.S.A.
Form No. 97184-03 (NOV76-PS) Printed in U.S.A.
 Loading...