

Page 1
WARNING: Read and understand all instructions. Failure to
follow all instructions listed below may result in electric shock, fire
and/or serious personal injury.
WARNING: Always use proper eye and respiratory protection.
CALCULATOR
Liquid Crystal Display (First Aid Measures)
• If liquid crystal comes in contact with your skin:
Wash area off completely with plenty of water. Remove
contaminated clothing.
• If liquid crystal gets into your eye:
Flush the affected eye with clean water and then seek medical
attention.
• If liquid crystal is swallowed:
Flush your mouth thoroughly with water. Drink large quantities of
water and induce vomiting. Then seek medical attention.
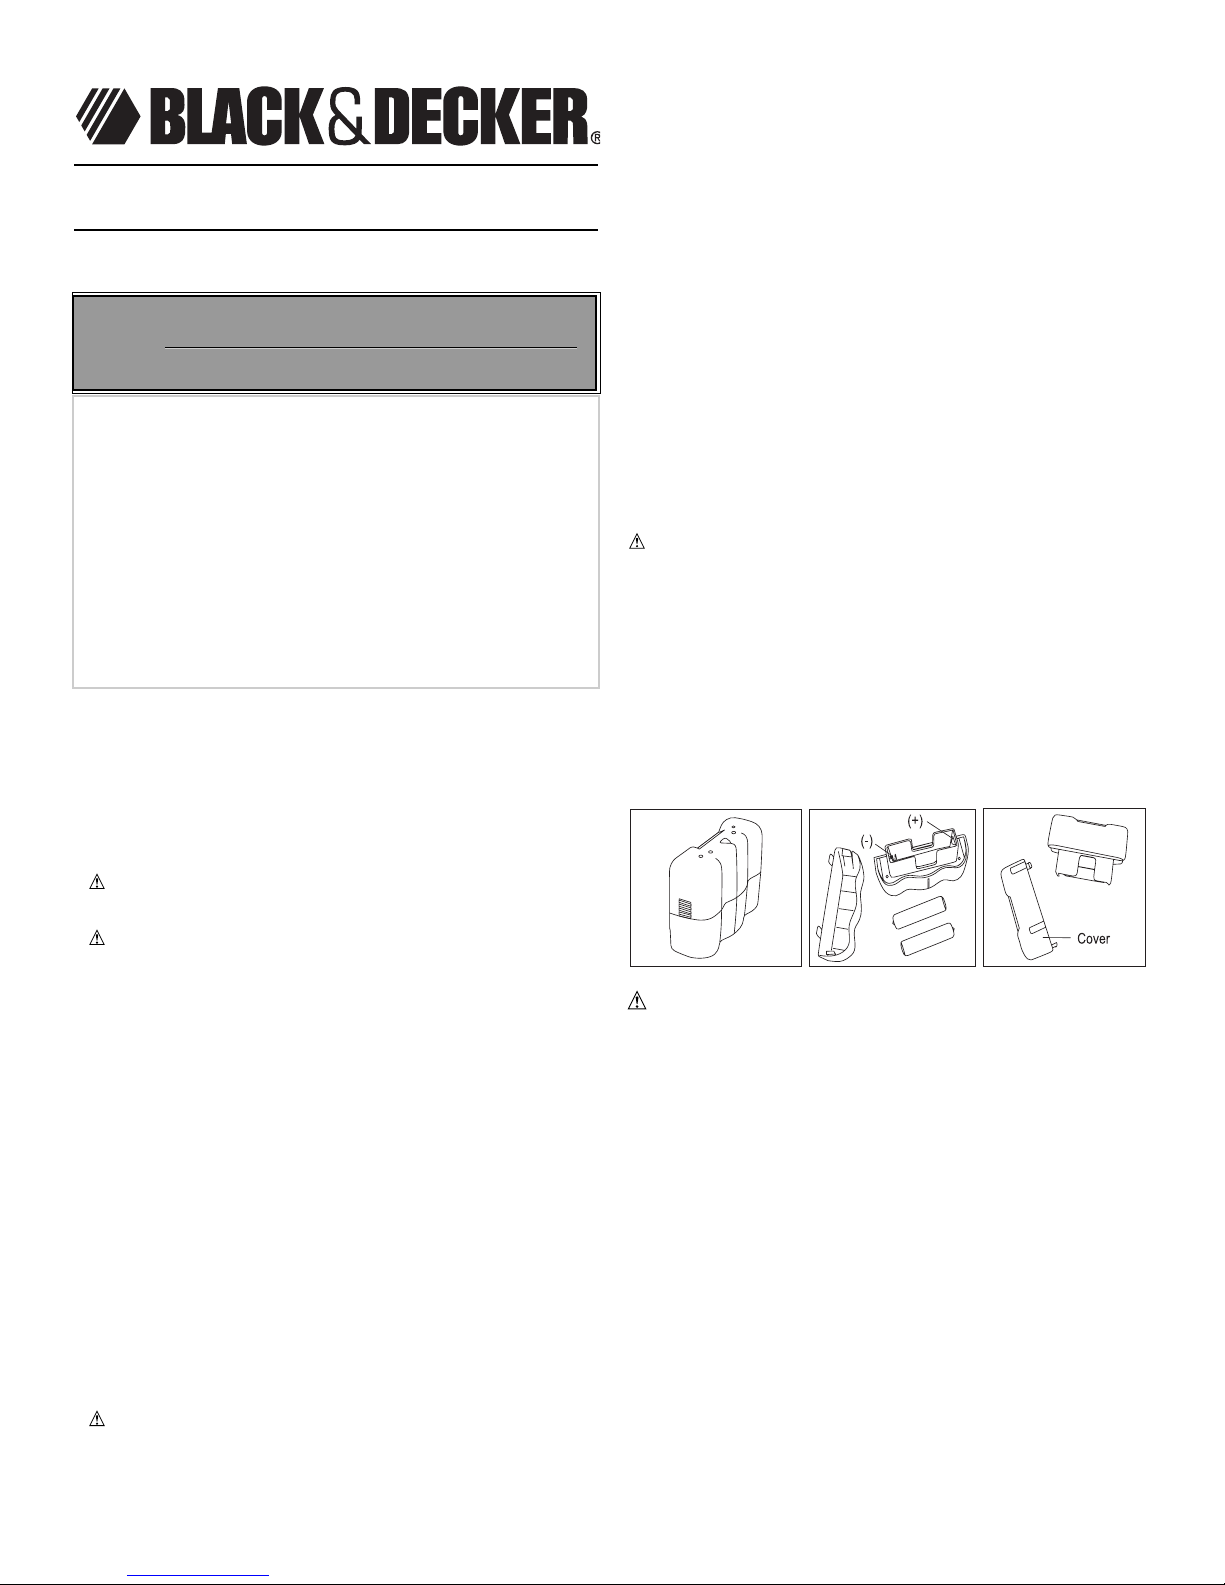
Power Supply
Battery: LR1130
To Replace the Batteries:
1. Press [Off] to turn the power off.
2. Using a small screwdriver, remove the screws from the back of
the calculator cover.
3. Load a new LR1130 battery into the unit with the positive sides
(+) facing up.
4. Replace the back cover.
5. Press [ON/C] to turn the power on.
WARNING: FIRE OR BURN HAZARD. Batteries can
explode, or leak, and can cause injury or fire. To reduce this
risk:
• Carefully follow all instructions and warnings on the battery label
and package.
• Always insert batteries correctly with regard to polarity (+ and -),
marked on the battery and the equipment.
• Do not short battery terminals.
• Do not recharge.
• Do not mix old and new batteries. Replace all of them at the
same time with new batteries of the same brand and type.
• Remove dead batteries immediately and dispose of per local
codes.
• Do not dispose of batteries in fire.
• Keep batteries out of reach of children.
• Remove batteries if the device will not be used for several
months.
"Transporting batteries can possibly cause fires if the battery
terminals inadvertently come in contact with conductive materials
such as keys, coins, hand tools and the like. The US Department
of Transportation Hazardous Material Regulations (HMR) actually
prohibit transporting batteries in commerce or on airplanes (i.e.
packed in suitcases and carryon luggage) UNLESS they are
properly protected from short circuits. So when transporting
individual batteries, make sure that the battery terminals are
protected and well insulated from materials that could contact
them and cause a short circuit."
TAPE MEASURE
CAUTION: To prevent injury avoid “full speed” blade return.
STUD SENSOR
Operating Temperature: 32°F (0°C) - 104° F (40°C)
• indoor use
• altitude up to 2000m
• maximum relative humidity 80% for temperatures up to 31° C
decreasing linearly to 50% relative humidity at 40° C
Installing the Batteries
Remove the battery compartment cover. Insert 2 fresh 1.5 volt
AAA batteries making sure to match (+) and (-) terminals
correctly. Replace battery compartment cover.
WARNING: FIRE OR BURN HAZARD. Batteries can
explode, or leak, and can cause injury or fire. To reduce this
risk:
• Carefully follow all instructions and warnings on the battery label
and package.
• Always insert batteries correctly with regard to polarity (+ and -),
marked on the battery and the equipment.
• Do not short battery terminals.
• Do not recharge.
• Do not mix old and new batteries. Replace all of them at the
same time with new batteries of the same brand and type.
• Remove dead batteries immediately and dispose of per local
codes.
• Do not dispose of batteries in fire.
• Keep batteries out of reach of children.
• Remove batteries if the device will not be used for several
months.
"Transporting batteries can possibly cause fires if the battery
terminals inadvertently come in contact with conductive materials such as keys, coins, hand tools and the like. The US
Department of Transportation Hazardous Material Regulations
(HMR) actually prohibit transporting batteries in commerce or
on airplanes (i.e. packed in suitcases and carryon luggage)
UNLESS they are properly protected from short circuits. So
when transporting individual batteries, make sure that the battery terminals are protected and well insulated from materials
that could contact them and cause a short circuit."
INSTRUCTION MANUAL
PROJECT PAL - Cat. No. 71-045
VEA EL ESPAÑOL EN LA CONTRAPORTADA.
SAVE THIS MANUAL FOR FUTURE REFERENCE.
INSTRUCTIVO DE OPERACIÓN, CENTROS DE SERVICIO Y PÓLIZA
DE GARANTÍA. ADVERTENCIA: LÉASE ESTE INSTRUCTIVO ANTES
DE USAR EL PRODUCTO.
CAT. NO. 71-045 FORM NO.641141-00 Copyright2006 Black & Decker
(JUNE ‘06) Printed in China
BEFORE RETURNING THIS PRODUCT
FOR ANY REASON PLEASE CALL
1-800-544-6986
BEFORE YOU CALL, HAVE THE CATALOG No. AND DATE CODE AVAILABLE.
IN MOST CASES, ABLACK & DECKER REPRESENTATIVE CAN RESOLVE
THE PROBLEM OVER THE PHONE. IF YOU HAVE A SUGGESTION OR
COMMENT, GIVE US ACALL. YOUR FEEDBACK IS VITAL TO
BLACK & DECKER.
T
T
HANK
HANK
YOU
YOU
FOR
FOR
CHOOSING
CHOOSING
B
B
LACK
LACK
&&D
D
ECKER
ECKER
!
!
G
G
OOTTOOWWW
WWW
.B
.B
LACKAND
LACKAND
D
D
ECKER
ECKER
.
.
COM
COM
/N
/N
EW
EW
O
O
WNER
WNER
TTOOREGISTER
REGISTER
YOUR
YOUR
NEW
NEW
PRODUCT
PRODUCT
.
.
Page 2
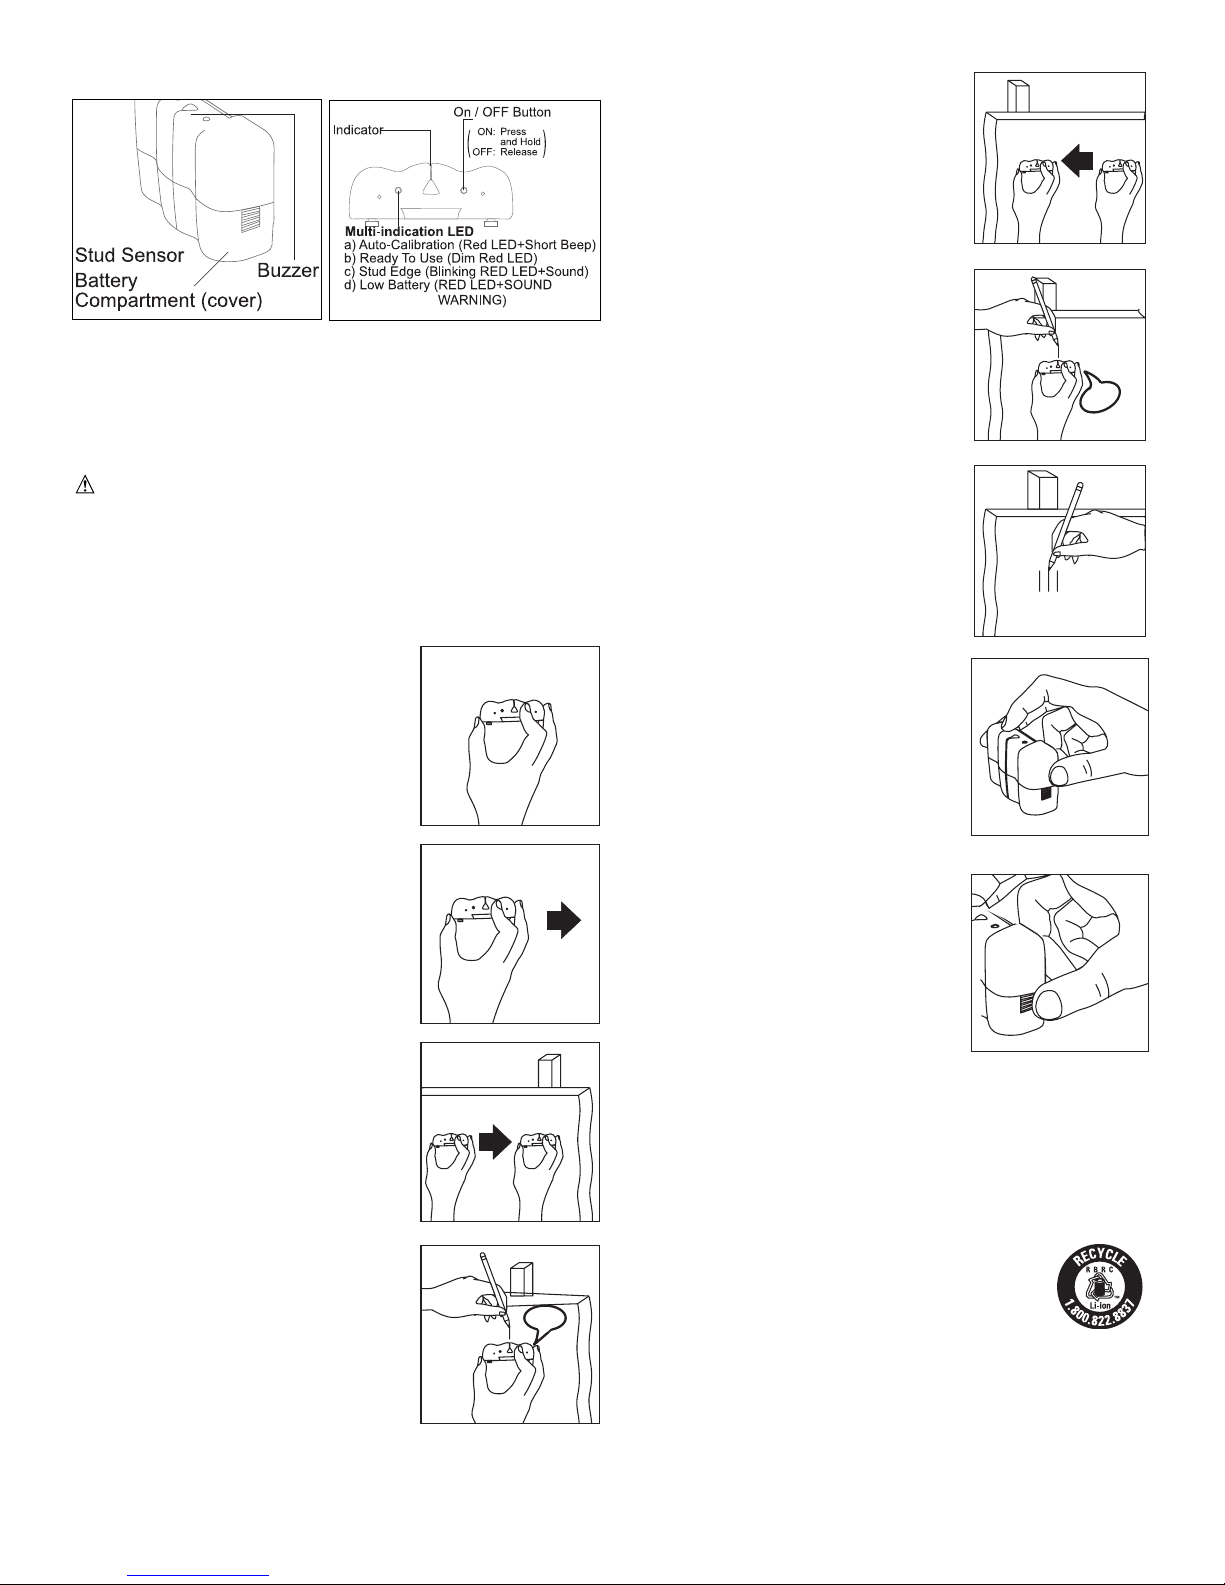
FEATURES
Safety Instructions
• Do not operate the stud sensor in explosive atmospheres, such as
in the presence of flammable liquids, gases, or dust.
• Use the stud sensor only with the specifically designated
batteries. Use of any other batteries may create a risk of fire.
OPERATING INSTRUCTIONS
CAUTION: Shock Hazard. Use caution when drilling, nailing or
cutting into walls, floors and ceilings which may contain electrical
wiring or pipes. These items may be detected by the Stud Finder
in the same manner in which studs are detected. Because studs
are normally spaced 16 inches or 24 inches apart and are 1-1/2
inches wide, beware of anything closer together or of a different
width. Always turn off the power when working near
electrical wires.
STEP 1 - Place stud sensor on wall as
shown in figure 1. Press and hold the
ON/OFF button. The red LED will light and
the unit will beep several times indicating
that the calibration is complete and the
unit is ready for use.
STEP 2 - With the ON/OFF button still
depressed, move the unit slowly and
smoothly along the wall in a straight line
without lifting or tilting.
STEP 3 - When a stud edge is detected
the red LED will begin to blink quickly with
short chirping beeps.
STEP 4 - Use a pencil to mark the stud
edge.
STEP 5 - Repeat this cycle coming from
the other direction and again mark the
spot where the red LED lights and beeper
sounds.
STEP 6 - Mark the spot where the red
LED lights and beeper sounds.
STEP 7 - Use a pencil to mark a spot
midway between the two lines. This is the
center of the stud.
TIPS FOR OPTIMUM USE
- Hold the stud sensor with your thumb
on the upper half as shown for highest
sensitivity.
- Avoid holding the stud sensor with your
thumb on the lower half as shown.
- Because studs are normally spaced 16
inches or 24 inches apart and are 1-1/2
inches wide, beware of anything closer
together or of a different width. Doors and
windows are constructed with studs and
headers which are closer together.
- Acontinuous buzzing sound heard when holding down the ON /
OFF button indicates a “Low Battery”.
- To avoid interference and inaccuracy, keep your free hand
away from the unit while operating.
- The unit is not suitable for use on walls or ceilings insulated
with metallic foil / fiber composition, or on walls of lath or heavy
plaster surfaces.
- It is important to double check the location of studs by taking
several readings.
The RBRC™ Seal
The RBRC™ (Rechargeable Battery Recycling
Corporation) Seal on the lithium-ion battery (or
battery pack) indicates that the costs to recycle the
battery (or battery pack) at the end of its useful life have already
been paid by Black & Decker. In some areas, it is illegal to place
spent lithium-ion batteries in the trash or municipal solid waste
stream and the RBRC program provides an environmentally
conscious alternative.
RBRC in cooperation with Black & Decker and other battery
users, has established programs in the United States and Canada
to facilitate the collection of spent lithium-ion batteries. Help
Beep
Beep
Page 3
protect our environment and conserve natural resources by
returning the tool to an authorized Black & Decker service center
for recycling. You may also contact your local recycling center for
information on where to drop off the spent battery, or call
1-800-8-BATTERY.
Maintenance
Use only mild soap and damp cloth to clean the tool. Never let any
liquid get inside the tool; never immerse any part of the tool into a
liquid.
IMPORTANT: To assure product SAFETY and RELIABILITY,
repairs, maintenance and adjustment (other than those listed in
this manual) should be performed by authorized service centers or
other qualified service personnel, always using identical
replacement parts.
WARNING: The use of any accessory not recommended
for use with this tool could be hazardous.
SERVICE INFORMATION
All Black & Decker Service Centers are staffed with trained
personnel to provide customers with efficient and reliable power
tool service. Whether you need technical advice, repair, or
genuine factory replacement parts, contact the Black & Decker
location nearest you. To find your local service location, refer to
the yellow page directory under "Tools—Electric" or call:
1-800-544-6986 or visit www.blackanddecker.com
FULL TWO-YEAR HOME USE WARRANTY
Black & Decker (U.S.) Inc. warrants this product for two years
against any defects in material or workmanship. The defective
product will be replaced or repaired at no charge in either of two
ways.
The first, which will result in exchanges only, is to return the
product to the retailer from whom it was purchased (provided that
the store is a participating retailer). Returns should be made
within the time period of the retailer’s policy for exchanges
(usually 30 to 90 days after the sale). Proof of purchase may be
required. Please check with the retailer for their specific return
policy regarding returns that are beyond the time set for
exchanges.
The second option is to take or send the product (prepaid) to a
Black & Decker owned or authorized Service Center for repair or
replacement at our option. Proof of purchase may be
required.Black & Decker owned and authorized Service Centers
are listed under
"Tools-Electric" in the yellow pages of the phone directory.
This warranty does not apply to accessories. This warranty gives
you specific legal rights and you may have other rights which vary
from state to state or province to province. Should you have any
questions, contact the manager of your nearest Black & Decker
Service Center. This product is not intended for commercial use.
FREE WARNING LABEL REPLACEMENT: If your warning
labels become illegible or are missing, call 1-800-544-6986 for a
free replacement.
CONSERVER LE PRÉSENT GUIDE À TITRE DE
RÉFÉRENCE.
AVERTISSEMENT : lire et comprendre toutes les
directives. Négliger de suivre toutes les directives de sécurité
figurant ci-après peut entraîner un choc électrique, un incendie
et/ou des blessures corporelles.
AVERTISSEMENT : toujours utiliser une protection oculaire et
respiratoire adéquate.
CALCULATRICE
Affichage à cristaux liquides (Premiers soins)
• Si des cristaux liquides entrent en contact avec la peau :
Laver complètement la zone affectée avec beaucoup d’eau.
Retirer les vêtements contaminés.
• En cas de contact oculaire avec les cristaux liquides :
Rincer l’oeil touché à l’eau propre, puis obtenir des soins
médicaux.
• En cas d’ingestion de cristaux liquides :
Rincer la bouche à l’eau. Boire de grandes quantités d’eau, puis
faire vomir. Obtenir ensuite des soins médicaux.
Bloc d’alimentation
Piles : LR1130
Pour remplacer les piles :
1. Appuyer sur [Off] pour mettre l’appareil hors tension.
2. À l’aide d’un petit tournevis, ôter les vis situées au dos du
couvercle de la calculatrice.
3. Mettre une nouvelle pile LR1130 dans l’appareil avec les pôles
positifs (+) vers le haut.
4. Remettre le couvercle en place.
5. Appuyer sur [ON/C] pour mettre l’appareil en marche.
AVERTISSEMENT : risque d’incendie ou de brûlures. Les
piles peuvent exploser ou couler et causer des blessures ou
un incendie. Pour réduire ce risque :
• Suivre attentivement toutes les directives et avertissements
figurant sur l’étiquette des piles et de l’emballage de l’appareil.
• Toujours insérer les piles selon la polarité correcte (+ et -),
comme indiqué sur les piles et le matériel.
• Ne pas créer de court-circuit dans les bornes des piles.
• Ne pas recharger.
• Ne pas mélanger piles neuves et usagées. Les remplacer toutes
en même temps par des piles neuves de la même marque et du
même type.
• Retirer immédiatement les piles déchargées et les éliminer en
fonction de la réglementation locale en vigueur.
• Ne pas jeter les piles dans un feu.
• Garder les piles hors de la portée des enfants.
• Retirer les piles si l’appareil n’est pas utilisé pendant plusieurs
mois.
« Le transport des piles peut provoquer un incendie si les
bornes des piles entrent en contact involontairement avec des
matières conductrices comme des clés, de la monnaie, des
outils manuels et d’autres éléments semblables. La
Hazardous Material Regulation du département américain
des transports interdit en fait le transport des piles pour le
commerce ou dans les avions (par ex. : piles emballées dans
des valises et des bagages à main) À MOINS qu’elles soient
bien protégées contre les courts-circuits. Pour le transport de
piles individuelles, s’assurer que les bornes sont protégées et
bien isolées contre toute matière pouvant entrer en contact
avec elles et causer un court-circuit. »
TTTTRRRROOOOUUUUBBBBLLLLEEEESSSSHHHHOOOOOOOOTTTTIIIINNNNGG
GG
Problem
• LED does not
light.
Possible Cause
• Weak battery.
• Nothing to detect
in that area.
Solution
• Replace with fresh
batteries.
• Start again moving
farther to either
side.
• LEDs light in too
many places.
• Detects other
objects besides
studs.
• Electrical wiring
and metal or
plastic pipes may
be near or
touching back
surface of wall.
• Because studs are
normally spaced 16
inches or 24 inches
apart and are 1-1/2
inches wide,
beware of anything
closer together or of
a different width.
AAAAVVVVAAAANNNNTTTT DDDDEEEE RRRREEEETTTTOOOOUUUURRRRNNNNEEEERRRR CCCCEEEE PPPPRRRROOOODDDDUUUUIIIITTTT PPPPOOOOUUUURR
RR
QQQQUUUUEEEELLLLQQQQUUUUEEEE RRRRAAAAIIIISSSSOOOONNNN QQQQUUUUEEEE CCCCEEEE SSSSOOOOIIIITTTT,,,, CCCCOOOOMMMMPPPPOOOOSSSSEEEERR
RR
LLLLEEEE NNNNUUUUMMMMÉÉÉÉRRRROOOO
SSSSUUUUIIIIVVVVAAAANNNNTTTT :::: 1111 888800000000 555544444444----66669999888866
66
MMMMEEEERRRRCCCCIIII DDDD’’’’AAAAVVVVOOOOIIIIRRRR CCCCHHHHOOOOIIIISSSSIIII BBBBLLLLAAAACCCCKKKK &&&& DDDDEEEECCCCKKKKEEEERRRR!!
!!
VVVVIIIISSSSIIIITTTTEEEEZZ
ZZ
WWWWWWWWWW
WW
....BBBBLLLLAAAACCCCKKKKAAAANNNNDDDDDDDDEEEECCCCKKKKEEEERRRR....CCCCOOOOMMMM////NNNNEEEEWWWWOOOOWWWWNNNNEEEERR
RR
PPPPOOOOUUUURRRR EEEENNNNRRRREEEEGGGGIIIISSSSTTTTRRRREEEERRRR VVVVOOOOTTTTRRRREEEE NNNNOOOOUUUUVVVVEEEEAAAAUUUU
PPPPRRRROOOODDDDUUUUIIIITTTT..
..
See ‘Tools-Electric’
– Yellow Pages –
for Service & Sales
Black & Decker (U.S.) Inc.,
701 E. Joppa Rd.
Towson, MD 21286 U.S.A.
Page 4

MÈTRE À RUBAN
MISE EN GARDE : éviter l’enroulement à « toute vitesse » du
ruban pour empêcher une blessure.
DÉTECTEUR DE MONTANT
Température de fonctionnement : 0 °C (32 °F) – 40 °C (104 °F)
• utilisation à l’intérieur
• fonctionne jusqu’à une altitude de 2 000 m et
• à une humidité relative maximale de 80 % pour des
températures jusqu’à 31 °C qui décroît linéairement jusqu’à une
humidité relative de 50 % à 40 °C
Pose des piles
Enlever le couvercle du logement des piles. Insérer 2 piles
alcalines AAAneuves de 1,5 V et s’assurer de bien faire
correspondre les bornes (+) et (-). Remettre le couvercle du
logement des piles.
AVERTISSEMENT : RISQUE D’INCENDIE OU DE
BRÛLURES. Les piles peuvent exploser ou couler et causer
des blessures ou un incendie. Pour réduire ce risque :
• Suivre attentivement toutes les directives et avertissements
figurant sur l’étiquette des piles et de l’emballage de l’appareil.
• Toujours insérer les piles selon la polarité correcte (+ et -),
comme indiqué sur les piles et le matériel.
• Ne pas créer de court-circuit dans les bornes des piles.
• Ne pas recharger.
• Ne pas mélanger piles neuves et usagées. Les remplacer toutes
en même temps par des piles neuves de la même marque et du
même type.
• Retirer immédiatement les piles déchargées et les éliminer en
fonction de la réglementation locale en vigueur.
• Ne pas jeter les piles dans un feu.
• Garder les piles hors de la portée des enfants.
• Retirer les piles si l’appareil n’est pas utilisé pendant plusieurs
mois.
« Le transport des piles peut provoquer un incendie si les
bornes des piles entrent en contact involontairement avec des
matières conductrices comme des clés, de la monnaie, des
outils manuels et d’autres éléments semblables. La
Hazardous Material Regulation du département américain
des transports interdit en fait le transport des piles pour le
commerce ou dans les avions (par ex. : piles emballées dans
des valises et des bagages à main) À MOINS qu’elles soient
bien protégées contre les courts-circuits. Pour le transport de
piles individuelles, s’assurer que les bornes sont protégées et
bien isolées contre toute matière pouvant entrer en contact
avec elles et causer un court-circuit. »
CARACTÉRISTIQUES
Directives de sécurité
• Ne pas faire fonctionner le détecteur de montant dans un milieu
déflagrant, en présence de liquides, de gaz ou de poussières
inflammables par exemple.
• N’utiliser le détecteur de montant qu’avec les piles spécialement
conçues à cet effet. L’utilisation de toute autre pile peut
provoquer un incendie.
Mode d’emploi
AVERTISSEMENT : danger de choc électrique. Être
prudent pour le perçage, le clouage ou la coupe dans les murs,
les planchers et les plafonds pouvant contenir des câblages
électriques ou des tuyaux. Ces composants peuvent être
détectés par le détecteur de montant de la même façon que les
montants. Les montants étant généralement espacés de 40,6
cm (16 po) ou de 61 cm (24 po) et présentant une largeur
habituelle de 3,8 cm (1 1/2 po), être prudent pour tout ce qui est
moins espacé ou de largeur différente. Toujours effectuer une
mise hors tension au moment de travailler près des fils
électriques.
ÉTAPE 1 - Placer le détecteur de montant
sur le mur comme le montre la figure 1.
Maintenir le bouton ON/OFF appuyé. La
diode rouge s’allume et l’appareil émettra
plusieurs bips indiquant que la calibration
est terminée et que l’appareil est prêt à
être utilisé.
ÉTAPE 2 - En maintenant toujours le
bouton ON/OFF enfoncé, déplacer
l’appareil doucement et lentement le long
du mur en suivant une ligne droite sans le
soulever ou le faire pencher.
ÉTAPE 3 - lorsqu’un bord de montant est
détecté, la diode rouge commence à
clignoter rapidement en émettant de
petits bips courts et aigus.
ÉTAPE 4 - Utiliser un crayon pour
marquer le bord du montant.
O
O
COUVERCLE
BOTÓN DE ENCENDIDO/APAGAD
(ON/OFF)
INDICADOR
LED DE INDICACIONES MÚLTIPLES
a) Calibración automática (LED rojo + sonido corto)
b) Listo para usar (LED rojo tenue)
c) Borde de viga (LED rojo intermitente + sonido)
d) Batería baja (LED rojo + advertencia sonora)
ON: MANTÉNGALO PRESIONAD
OFF: SUÉLTELO
COMPARTIMENT POUR PILES
DU DÉTECTEUR DE
MONTANT
(COUVERCLE))
AVERTISSEUR SONORE
Bip
sonore
Page 5

ÉTAPE 5 - Répéter la procédure en
venant de l’autre direction et marquer
une nouvelle fois l’endroit du mur où la
diode rouge clignote et où l’appareil émet
des sons.
ÉTAPE 6 - Marquer l’endroit où la diode
rouge clignote et où l’appareil émet des
sons.
ÉTAPE 7 - Utiliser un crayon pour
marquer l’endroit se trouvant à mi-chemin
des deux lignes. Il s’agit du milieu du
montant.
CONSEILS POUR UNE UTILISATION
OPTIMALE
- Tenir le détecteur de montant avec le
pouce sur la moitié supérieure de
l’appareil comme illustré pour une
meilleure sensibilité.
- Éviter de tenir le détecteur de montant
avec le pouce sur la moitié inférieure
comme illustré.
- Les montants étant généralement
espacés de 40,6 cm (16 po) ou de 61 cm
(24 po) et présentant une largeur
habituelle de 3,8 cm (1 1/2 po), être
prudent pour tout ce qui est moins
espacé ou de largeur différente. Les
portes et fenêtres sont construites avec
des montants et des linteaux qui sont
plus rapprochés.
- Si un bourdonnement se fait entendre
lorsque le bouton ON/OFF est maintenu appuyé, cela indique
une « pile faible ».
- Pour éviter toute interférence ou manque d’exactitude,
maintenir la main libre éloignée de l’appareil lorsque celui-ci
fonctionne.
- L’appareil ne convient pas aux murs ou plafonds isolés avec
des feuilles ou des fibres métalliques, ou aux murs de plâtre ou
de lattes très épais.
- Il est important de vérifier l’emplacement des montants en
effectuant plusieurs lectures.
Le sceau RBRC
MC
Le sceau SRPRCMC(Société de Recyclage des
Piles Rechargeables au Canada) sur la pile
lithium-ion (ou sur le bloc-piles) indique que son coût de
recyclage (ou celui du bloc-piles) à la fin de sa vie utile sera
payé par Black & Decker. Dans certaines régions, il est illégal
de jeter les piles lithium-ion dans les poubelles ou dans le
système municipal d'évacuation des résidus solides. Le
programme RBRC représente donc une alternative sensibilisée
La SRPRC en collaboration avec Black & Decker et d’autres
utilisateurs de piles ont établi aux États-Unis et au Canada des
programmes facilitant la cueillette des piles
lithium-ion épuisées. Aidez-nous à protéger l’environnement et
à conserver nos ressources naturelles en retournant l’outil à un
centre de réparation Black & Decker pour qu’elles soient
recyclées. Vous pouvez aussi communiquer avec votre centre
local de recyclage qui vous fera part du lieu de disposition de
vos batteries épuisées ou composer le numéro
1-800-8-BATTERY.
ENTRETIEN
Nettoyer l’outil au moyen d’un savon doux et d’un linge humide
seulement. Ne jamais laisser de liquide s’infiltrer à l’intérieur de
l’outil ni tremper ce dernier dans un liquide quelconque.
IMPORTANT : pour assurer la SÉCURITÉ et la FIABILITÉ de
ce produit, toutes les opérations de réparation, d’entretien et de
réglage (autres que celles décrites aux présentes) doivent être
effectuées dans un centre de service autorisé ou par du
personnel qualifié; on ne doit utiliser que des pièces de
rechange identiques.
AVERTISSEMENT : il pourrait s'avérer dangereux d'utiliser des
accessoires autres que ceux recommandés pour cet outil.
INFORMATION SUR LES RÉPARATIONS
Tous les centres de réparation Black & Decker sont dotés de
personnel qualifié en matière d’outillage électrique; ils sont donc
en mesure d’offrir à leur clientèle un service efficace et fiable.
Que ce soit pour un avis technique, une réparation ou des pièces
de rechange authentiques installées en usine, communiquer
avec l’établissement Black & Decker le plus près de chez vous.
Pour trouver l’établissement de réparation de votre région,
consulter le répertoire des Pages jaunes à la rubrique « Outils
électriques » ou composer le numéro suivant : 1-800-544-6986
ou consulter le site www.blackanddecker.com
GARANTIE COMPLÈTE DE DEUX ANS POUR UNE
UTILISATION DOMESTIQUE
Black & Decker (É.-U.) Inc. garantit ce produit pour une durée de
deux ans contre tout défaut de matériau ou de fabrication. Le
produit défectueux sera remplacé ou réparé sans frais de l’une
des deux façons suivantes :
La première façon consiste en un simple échange chez le
détaillant qui l’a vendu (pourvu qu’il s’agisse d’un détaillant
participant). Tout retour doit se faire durant la période
correspondant à la politique d’échange du détaillant
(habituellement, de 30 à 90 jours après l’achat). Une preuve
d’achat peut être requise. Vérifier auprès du détaillant pour
connaître sa politique concernant les retours hors de la période
définie pour les échanges.
La deuxième option est d’apporter ou d’envoyer le produit
(transport payé d’avance) à un centre de réparation autorisé ou à
un centre de réparation de Black & Decker pour faire réparer ou
échanger le produit, à notre discrétion. Une preuve d’achat peut
Cause probable
• Pile faible.
• Rien à détecter dans
cette zone.
Solution
• Remplacer les
piles usées avec
des piles neuves.
• Recommencer
en déplaçant
l’outil plus loin
d’un côté ou de
l’autre.
Problème
• La diode ne
s’allume pas.
• Les montants
étant généralement
espacés de 40,6
cm (16 po) ou de
61 cm (24 po) et
présentant une
largeur habituelle
de 3,8 cm (1 1/2
po), être prudent
pour tout ce qui est
moins espacé ou
de largeur
différente.
• La diode
s’allume à trop
d’endroits
différents.
• D’autres objets que
les montants sont
détectés.
• Un câblage
électrique et des
tuyaux métalliques
ou en plastique
peuvent être à
proximité ou en
contact avec la
surface d’appui du
mur.
DDDDÉÉÉÉPPPPAAAANNNNNNNNAAAAGGGGEE
EE
Bip
sonore
Page 6

être requise. Les centres Black & Decker et les centres de service
autorisés sont répertoriés dans les pages jaunes, sous la rubrique
« Outils électriques ».
Cette garantie ne s’applique pas aux accessoires. Cette garantie
vous accorde des droits légaux spécifiques et vous pourriez avoir
d’autres droits qui varient d’un État ou d’une province à l’autre.
Pour toute question, communiquer avec le directeur du centre de
réparation Black & Decker le plus près de chez vous. Ce produit
n’est pas destiné à un usage commercial.
REMPLACEMENT GRATUIT DES ÉTIQUETTES
D’AVERTISSEMENT : si les étiquettes d’avertissement
deviennent illisibles ou sont manquantes, composer le
1-800-544-6986 pour en obtenir le remplacement gratuit.
Imported by / Importé par
Black & Decker Canada Inc.
100 Central Ave.
Brockville (Ontario) K6V 5W6
Voir la rubrique “Outils électriques”
des Pages Jaunes
pour le service et les ventes.
¡¡¡¡GGGGRRRRAAAACCCCIIIIAAAASSSS PPPPOOOORRRR EEEELLLLEEEEGGGGIIIIRRRR BBBBLLLLAAAACCCCKKKK &&&& DDDDEEEECCCCKKKKEEEERRRR!!
!!
VVVVAAAAYYYYAAAA AA
AA
WWWWWWWWWWWW....BBBBLLLLAAAACCCCKKKKAAAANNNNDDDDDDDDEEEECCCCKKKKEEEERRRR....CCCCOOOOMMMM////NNNNEEEEWWWWOOOOWWWWNNNNEEEERR
RR
PPPPAAAARRRRAAAA RRRREEEEGGGGIIIISSSSTTTTRRRRAAAARRRR SSSSUUUU NNNNUUUUEEEEVVVVOOOO PPPPRRRROOOODDDDUUUUCCCCTTTTOOOO..
..
AAAANNNNTTTTEEEESSSS DDDDEEEE DDDDEEEEVVVVOOOOLLLLVVVVEEEERRRR EEEESSSSTTTTEEEE PPPPRRRROOOODDDDUUUUCCCCTTTTOOOO PPPPOOOORR
RR
CCCCUUUUAAAALLLLQQQQUUUUIIIIEEEERRRR MMMMOOOOTTTTIIIIVVVVOOOO,,,, LLLLLLLLAAAAMMMMEEEE AAAALLLL ((((55555555)))) 5555333322226666----77771111000000
00
CONSERVE ESTE MANUAL PARA REFERENCIAS
FUTURAS.
ADVERTENCIA: Lea y comprenda todas las instrucciones.
El incumplimiento de cualquiera de las instrucciones
enumeradas a continuación puede provocar una descarga
eléctrica, un incendio y/o lesiones personales graves.
ADVERTENCIA: Utilice siempre protección adecuada para los
ojos y las vías respiratorias.
CALCULADORA
Pantalla de cristal líquido (Medidas de primeros auxilios)
• Si el cristal líquido entra en contacto con la piel:
Lave el área por completo con mucha agua. Retire las ropas
contaminadas.
• Si el cristal líquido le entra en los ojos:
Enjuague el ojo afectado con agua limpia y luego busque
atención médica.
• Si ingiere cristal líquido:
Enjuague la boca completamente con agua. Beba abundante
cantidad de agua e induzca el vómito. Acontinuación, busque
asistencia médica de inmediato.
Fuente de energía
Batería: LR1130
Para reemplazar las baterías:
1. Presione [Off] para apagar la unidad.
2. Retire los tornillos de la tapa posterior de la calculadora con un
destornillador pequeño.
3. Coloque una nueva batería LR1130 en la unidad con los lados
positivos (+) hacia arriba.
4. Vuelva a colocar la tapa posterior.
5. Presione [ON/C] para encender la unidad.
ADVERTENCIA: Peligro de incendio y quemadura. Las
baterías pueden explotar o perder, y pueden provocar
lesiones o incendios. Para disminuir este riesgo:
• Siga cuidadosamente todas las instrucciones y las advertencias
de la etiqueta y el envase de la batería.
• Introduzca siempre las baterías correctamente respetando la
polaridad (+ y -) indicada en la batería y en el equipo.
• No produzca un cortocircuito con los terminales de la batería.
• No recargue las baterías.
• No mezcle baterías nuevas y viejas. Reemplácelas todas al
mismo tiempo por baterías nuevas de la misma marca y tipo.
• Retire todas las baterías agotadas inmediatamente y elimínelas
de acuerdo con los códigos locales.
• No arroje las baterías al fuego.
• Mantenga las baterías fuera del alcance de los niños.
• Retire las baterías si el aparato no se va a usar durante varios
meses.
"Transportar baterías puede provocar incendios si los terminales de la batería entran en contacto accidentalmente con
materiales conductores como llaves, monedas,
herramientas de mano u objetos similares. Las Normas para
Materiales Peligrosos del Departamento de Transporte de
Estados Unidos (HMR) en realidad prohíben
transportar baterías comercialmente o en aeroplanos (es
decir, empacadas en valijas y equipaje de mano) A MENOS
que estén protegidas correctamente de cortocircuitos. Por lo
tanto, cuando transporte baterías individuales, asegúrese de
que los terminales de éstas estén protegidos y bien aislados
de materiales con los que puedan hacer contacto y causar un
cortocircuito”.
CINTA MÉTRICA
PRECAUCIÓN: Para evitar lesiones, evite el retroceso de la
cinta a "máxima velocidad".
DETECTOR DE VIGAS
Temperatura de funcionamiento: 0°C (32°F) - 40°C (104°F)
• uso en interiores
• hasta 2.000 m de altitud
• 80% de humedad máxima relativa para temperaturas de hasta
31 °C que disminuye a 50% de humedad relativa a 40 °C
Instalación de las baterías
Retire la tapa del compartimiento de las baterías. Inserte 2
baterías AAAde 1,5 voltios nuevas y asegúrese de que los
terminales (+) y (-) coincidan correctamente. Vuelva a colocar la
tapa del compartimiento de las baterías.
ADVERTENCIA: PELIGRO DE INCENDIO Y QUEMADURA.
Las baterías pueden explotar o perder, y pueden provocar
lesiones o incendios. Para disminuir este riesgo:
• Siga cuidadosamente todas las instrucciones y las advertencias
de la etiqueta y el envase de la batería.
• Introduzca siempre las baterías correctamente respetando la
polaridad (+ y -) indicada en la batería y en el equipo.
• No produzca un cortocircuito con los terminales de la batería.
• No recargue las baterías.
• No mezcle baterías nuevas y viejas. Reemplácelas todas al
mismo tiempo por baterías nuevas de la misma marca y tipo.
• Retire todas las baterías agotadas inmediatamente y elimínelas
de acuerdo con los códigos locales.
• No arroje las baterías al fuego.
• Mantenga las baterías fuera del alcance de los niños.
• Retire las baterías si el aparato no se va a usar durante varios
meses.
"Transportar baterías puede provocar incendios si los terminales de la batería entran en contacto accidentalmente con
materiales conductores como llaves, monedas,
herramientas de mano u objetos similares. Las Normas para
Materiales Peligrosos del Departamento de Transporte de
Estados Unidos (HMR) en realidad prohíben
transportar baterías comercialmente o en aeroplanos (es
decir, empacadas en valijas y equipaje de mano) A MENOS
que estén protegidas correctamente de cortocircuitos. Por lo
tanto, cuando transporte baterías individuales, asegúrese de
que los terminales de éstas estén protegidos y bien aislados
de materiales con los que puedan hacer contacto y causar un
cortocircuito”.
TAPA
Page 7

CARACTERÍSTICAS
Instrucciones de seguridad
• No use el detector de vigas en atmósferas explosivas, como
ambientes donde se encuentran líquidos, gases o polvo
inflamables.
• Utilice el detector de vigas únicamente con las baterías
indicadas específicamente. El uso de otro tipo de batería
puede producir riesgo de incendio.
INSTRUCCIONES DE OPERACIÓN
PRECAUCIÓN: Riesgo de descarga eléctrica. Tenga
precaución al taladrar, clavar o cortar paredes, pisos y techos
que puedan contener cableado eléctrico o tuberías. Estos
artículos pueden detectarse con el detector de la misma forma
que las vigas. Dado que las vigas están normalmente a una
distancia de 40,6 cm o 60,9 cm (16 ó 24 pulgadas) y tienen un
ancho de 3,8 cm (1 1/2 pulgada), tenga en cuenta cualquier
objeto que esté más cerca o que tenga un ancho diferente.
Desconecte siempre la electricidad para trabajar cerca de
cableado eléctrico.
PASO 1: Coloque el detector de vigas
en la pared como se muestra en la
figura 1. Presione y sostenga el botón
ON/OFF. El indicador LED rojo se
iluminará y la unidad emitirá un sonido
varias veces para indicar que la
calibración está completa y que la
unidad está lista para usar.
PASO 2: Con el botón ON/OFF todavía
presionado, mueva la unidad lenta y
suavemente por la pared en línea
recta sin levantarla ni inclinarla.
PASO 3: Cuando detecte el borde de
una viga, el indicador LED rojo
comenzará a parpadear rápidamente y
al mismo tiempo emitirá sonidos
breves.
PASO 4: Marque con un lápiz el
borde de la viga.
PASO 5: Repita el procedimiento
viniendo desde la dirección contraria y
marque nuevamente el lugar donde se
emitan las luces LED rojas y el sonido.
PASO 6: Marque el lugar donde se
emitan las luces LED rojas y los
sonidos.
PASO 7: Marque con el lápiz el punto
que se encuentra a mitad de camino
entre las dos líneas. Ese es el centro
de la viga.
SUGERENCIAS PARA UN USO ÓPTIMO
- Sostenga el detector de vigas con el
pulgar en la mitad superior (como se
muestra) para lograr una sensibilidad
más alta.
- Evite sostener el detector de vigas
con el pulgar en la mitad inferior
(como se indica).
- Dado que las vigas están normalmente a una distancia de
40,6 cm o 60,9 cm (16 ó 24 pulgadas) y tienen un ancho de
3,8 cm (1 1/2 pulgada), tenga en cuenta que puede haber
cualquier objeto que esté más cerca o que tenga un ancho
diferente. Las puertas y las ventanas están construidas con
vigas y cabeceras que están más cerca entre sí.
- Si se escucha un zumbido continuo al mantener presionado
el botón ON / OFF, significa “Batería baja”.
- Para evitar interferencia e imprecisiones, mantenga su
mano libre alejada de la unidad mientras la utiliza.
- La unidad no es adecuada para usar en paredes ni techos
FF
Sonido
COMPARTIMIENTO DE
BATERÍAS DEL DETECTOR
DE VIGAS (TAPA)
INDICADOR
LED DE INDICACIONES MÚLTIPLES
a) Calibración automática (LED rojo + sonido corto)
b) Listo para usar (LED rojo tenue)
c) Borde de viga (LED rojo intermitente + sonido)
d) Batería baja (LED rojo + advertencia sonora)
ZUMBADOR
BOTÓN DE ENCENDIDO/APAGADO (ON/O
ON: MANTÉNGALO PRESIONADO
OFF: SUÉLTELO
Sonido
Page 8

con aislamiento compuesto de papel o fibras metálicas, ni en
paredes de listones o superficies de yeso pesado.
- Es importante revisar atentamente la ubicación de las vigas
realizando varias lecturas.
El sello RBRC™
El sello RBRC™ (Corporación de reciclado de
baterías recargables) que se encuentra sobre la
batería de iones de litio (o paquete de baterías)
indica que los costos para reciclar la batería (o el
paquete de baterías) al final de su vida útil ya fueron pagados por
Black & Decker. En algunas zonas, es ilegal tirar las baterías
usadas de iones de litio en la basura o en el depósito de
desechos sólidos del municipio. El programa RBRC proporciona
una alternativa de conciencia sobre el cuidado del medio
ambiente.
RBRC, en cooperación con Black & Decker y otros usuarios de
baterías, estableció programas en los Estados Unidos y Canadá
para facilitar la recolección de baterías de iones de litio usadas.
Ayude a proteger nuestro medio ambiente y a conservar los
recursos naturales: devuelva la herramienta a un centro de
mantenimiento autorizado Black & Decker para que sean
recicladas. También puede comunicarse con el centro de
reciclado para informarse sobre dónde dejar las baterías, o llame
al (55)5326-7100.
MANTENIMIENTO
Utilice únicamente jabón suave y un trapo húmedo para limpiar la
herramienta. Nunca permita que se introduzcan líquidos en la
herramienta; nunca sumerja ninguna parte de la herramienta en
ningún líquido.
IMPORTANTE: Para garantizar l SEGURIDAD y la
CONFIABILIDAD del producto, la reparaciones, el mantenimiento
y los ajustes deberán efectuarse en centros de servicio
autorizado u otras organizaciones de servicio calificado, que
utilicen siempre refacciones idénticas.
ADVERTENCIA: El uso de cualquier accesorio no
recomendado para emplearse con esta herramienta puede ser
peligroso.
INFORMACIÓN DE MANTENIMIENTO
Todos los Centros de mantenimiento de Black & Decker cuentan
con personal altamente capacitado dispuesto a brindar a todos
los clientes un servicio eficiente y confiable en la reparación de
herramientas eléctricas. Si necesita consejo técnico,
reparaciones o piezas de repuesto originales de fábrica, póngase
en contacto con el centro de mantenimiento de Black & Decker
más cercano a su domicilio. Para ubicar su centro de servicio
local, consulte la sección “Herramientas eléctricas” (Tools-
Electric) de las páginas amarillas, llame al (55)5326-7100 o visite
nuestro sitio www.blackanddecker.com.
GARANTÍA COMPLETA DE DOS AÑOS PARA USO
EN EL HOGAR
Black & Decker (Estados Unidos) Inc. ofrece una garantía de dos
años por cualquier defecto del material o de fabricación de este
producto. El producto defectuoso se reparará o reemplazará sin
costo alguno de dos maneras.
La primera opción, el reemplazo, es devolver el producto al
comercio donde se lo adquirió (siempre y cuando se trate de un
comercio participante). Las devoluciones deben realizarse
conforme a la política de devolución del comercio (generalmente,
entre 30 y 90 días posteriores a la venta). Le pueden solicitar
comprobante de compra. Consulte en el comercio acerca de la
política especial sobre devoluciones una vez excedido el plazo
establecido.
La segunda opción es llevar o enviar el producto (con flete pago)
a un Centro de mantenimiento propio o autorizado de Black &
Decker para su reparación o reemplazo según nuestro criterio. Le
pueden solicitar el comprobante de compra. Los Centros de
mantenimiento autorizados y de propiedad de Black & Decker se
detallan en la sección
“Herramientas eléctricas” (Tools-Electric) de las páginas amarillas
de la guía telefónica.
Esta garantía no se extiende a los accesorios. Esta garantía le
concede derechos legales específicos; usted puede tener otros
derechos que pueden variar según el estado o la provincia. Si
tiene alguna pregunta, comuníquese con el gerente del Centro de
mantenimiento de Black & Decker de su zona. Este producto no
está diseñado para uso comercial.
REEMPLAZO GRATUITO DE LAS ETIQUETAS DE
ADVERTENCIAS: si sus etiquetas de advertencia se tornan
ilegibles o faltan, llame al (55)5326-7100 para que se le
reemplacen gratuitamente.
Causa posible
• La batería está
agotada.
• No hay objetos para
detectar en el área.
Solución
• Coloque baterías
nuevas.
• Comience
nuevamente
moviendo más
lejos a ambos
lados.
Problème
• El LED no se
ilumina.
• Dado que las
vigas están
normalmente a
una distancia de
40,6 cm ó 60,9
cm (16 ó 24
pulgadas) y
tienen un ancho
de 3,8 cm (1 1/2
pulgada), tenga
en cuenta que
puede haber
cualquier objeto
que esté más
cerca o que tenga
un ancho
diferente.
• La luz LED se
ilumina en
demasiados
lugares.
• Detecta otros objetos
además de las vigas.
• Posiblemente haya
cableado eléctrico o
tuberías de metal o
plástico cerca o
tocando la superficie
posterior de la pared.
DDDDEEEETTTTEEEECCCCCCCCIIIIÓÓÓÓNNNN DDDDEEEE PPPPRRRROOOOBBBBLLLLEEEEMMMMAAAASS
SS
CULIACAN, SIN
Av. Nicolás Bravo #1063 Sur
(667) 7 12 42 11
Col. Industrial Bravo
GUADALAJARA, JAL
Av. La Paz #1779
(33) 3825 6978
Col. Americana Sector Juarez
MEXICO, D.F.
Eje Central Lázaro Cardenas
No. 18
(55) 5588 9377
Local D, Col. Obrera
MERIDA, YUC
Calle 63 #459-A
(999) 928 5038
Col. Centro
MONTERREY, N.L.
Av. Francisco I. Madero
No.831
(81) 8375 2313
Col. Centro
PUEBLA, PUE
17 Norte #205
(222) 246 3714
Col. Centro
QUERETARO, QRO
Av. Madero 139 Pte.
(442) 214 1660
Col. Centro
SAN LUIS POTOSI, SLP
Av. Universidad 1525
(444) 814 2383
Col. San Luis
TORREON, COAH
Blvd. Independencia, 96 Pte.
(871) 716 5265
Col. Centro
VERACRUZ, VER
Prolongación Díaz Mirón #4280
(229)921 7016
Col. Remes
VILLAHERMOSA, TAB
Constitución 516-A
(993) 312 5111
Col. Centro
PARA OTRAS LOCALIDADES
LLAME AL:
(55) 5326 7100
Para reparación y servicio de sus herramientas
eléctricas, favor de dirigirse al Centro de Servicio más
cercano:
BLACK & DECKER S.A. DE C.V.
BOSQUES DE CIDROS ACCESO RADIATAS NO. 42
COL. BOSQUES DE LAS LOMAS.
05120 MÉXICO, D.F
TEL. 55-5326-7100
Vea “Herramientas
eléctricas (Tools-Electric)”
– Páginas amarillas –
para Servicio y ventas
 Loading...