

Page 1
The Automatic
Shut-Off
™
Iron
by Black & Decker
SAVE THIS USE AND CARE BOOK
MODEL 862784
1-800-231-9786
QUESTIONS? Please call us TOLL FREE
?
Sears, Roebuck and Co., Hoffman Estates, IL 60179, U.S.A.
Page 2

When using your iron, basic safety precautions should always be
followed, including the following:
■ Read all instructions.
■ Use iron only for its intended use.
■ To protect against a risk of electric shock, do not immerse the iron in
water or other liquid.
■ The iron should always be turned to Off before plugging into or unplugging from an outlet. Never yank cord to disconnect from outlet; instead
grasp plug and pull to disconnect.
■ Do not allow cord to touch hot surfaces. Let iron cool completely
before putting away. Loop cord loosely around cordwrap when storing.
■ Always disconnect iron from electrical outlet when filling with or emptying of water and when not in use. Be careful to avoid spilling water
over iron when filling.
■ Do not operate iron with a damaged cord or plug or if the iron has
been dropped or damaged.
■ To avoid the risk of electric shock, do not disassemble the iron;
instead, take it to an authorized service center for examination and
repair. Incorrect reassembly can cause a risk of electric shock when
the iron is used.
■ Close supervision is necessary for any appliance being used by or near
children. Do not leave iron unattended while connected or on an ironing board. Always position iron carefully to prevent it from falling if
ironing board is accidentally moved or cord is pulled. Always use heel
rest.
■ Burns can occur from touching hot metal parts, hot water, or steam.
Use caution when you turn a steam iron upside down — there may be
hot water in the water tank. Avoid rapid movement of iron to minimize
hot water spillage.
■ Do not operate in the presence of explosive and/or flammable fumes.
■ Do not use iron outdoors.
■ This product is for household use only.
2
IMPORTANT SAFEGUARDS
Page 3

SPECIAL INSTRUCTIONS
■ To avoid a circuit overload, do not operate another high-wattage appliance on the same circuit.
■ If an extension cord is necessary, a 10-ampere rated cord with a polarized plug and Underwriters Laboratories listing should be used. Cords
rated for less amperage may overheat. Care should be taken to
arrange the cord so that it cannot be pulled on or tripped over.
POLARIZED PLUG This appliance has a polarized plug—one
blade is wider than the other. To reduce the
risk of electric shock, this plug will fit into a
polarized outlet only one way. If the plug
does not fit fully into the outlet, reverse it. If
it still does not fit, contact a qualified electrician. Do not attempt to defeat this safety
feature by modifying the plug in any way.
This appliance is equipped with a tamperresistant screw to prevent removal of the
outer cover. To reduce the risk of fire or
electric shock, do not attempt to remove the
outer cover. There are no user serviceable
parts inside. Repair should be done only by
authorized service personnel.
3
SAVE THESE INSTRUCTIONS
TAMPERRESISTANT
SCREW
Page 4
4
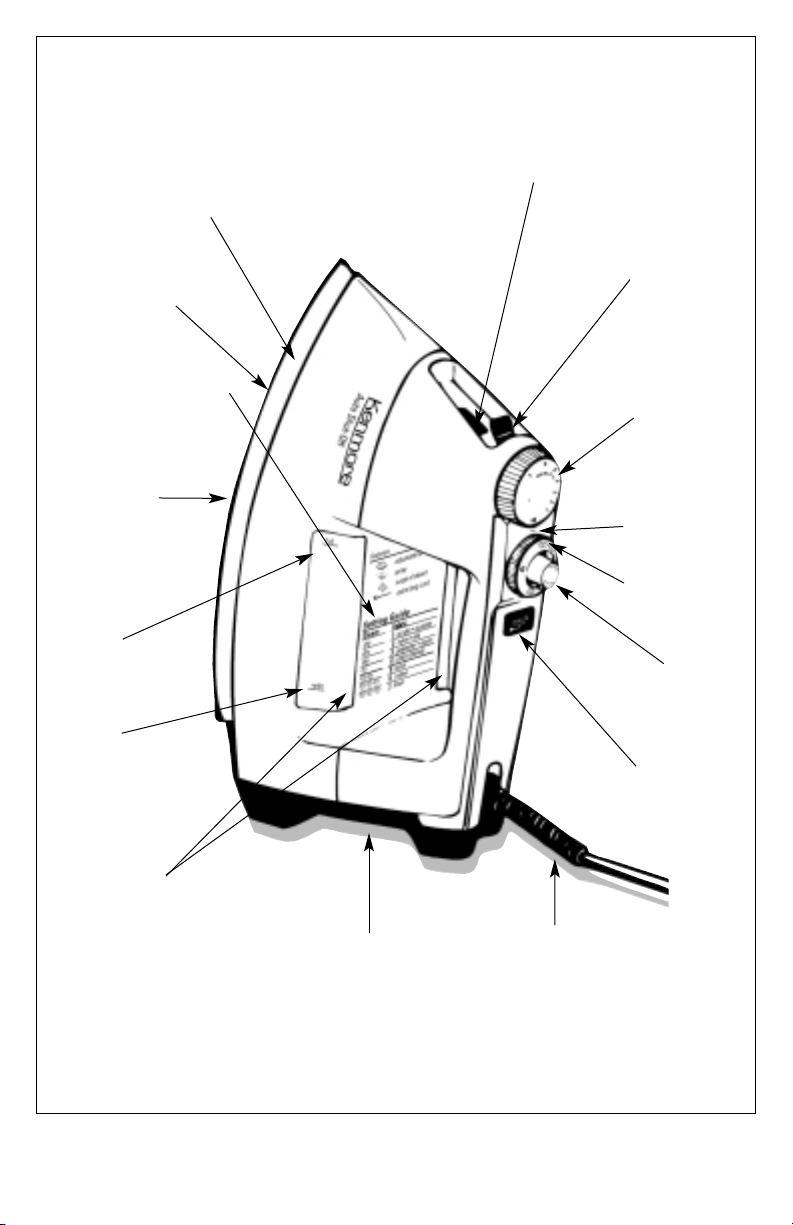
Water Fill Hole
Temperature
Selector Dial
Spray Nozzle
Indicator
Mark
Adjustable
Steam/Dry Dial
Push ON Button/
Power Light
Spray/Surge Button
Pivoting Cord
Cord Wrap/
Stable Heel Rest
Large Water Windows
Water Refill Mark
Water Full Mark
Heat Setting Guide
*SilverStone
®
Non-Stick Soleplate
Full-Length
Button Grooves
*SilverStone®is a trademark of E.I. DuPont de Nemours & Co.
**SurgeClean™ is a trademark of The Black & Decker Corp.
**SurgeClean
TM
Page 5

IMPORTANT: Follow this procedure to clean the iron
before first use and to become familiar with its
features.
1. Remove any labels, stickers, or tags which may be
attached to the body or soleplate of the iron.
2. Fill the Water Tank about 1/3 full with water (approximately 2 oz.). (See “Filling With Water,” page 6)
3. Plug the iron into a standard 120V (polarized) electrical outlet.
4. Set the TEMPERATURE SELECTOR DIAL to the
Cotton or Linen settings (6 or 7). Press the PUSH ON
Button and the light will come on. Preheat for about 2
minutes. (See “Starting The Iron,” page 6)
5. While ironing on an old cotton terry cloth towel for
about two minutes, try using each of the iron’s features being careful to avoid placing hands or face near
the steam vents:
SPRAY: Turn the SPRAY/SURGE Button so that the
Spray faces the INDICATOR MARK. Pump the SPRAY
Button a few times to see the amount of water that is
released.
SURGE OF STEAM: Turn the SPRAY/SURGE Button so
that the Surge faces the INDICATOR MARK. Pump the
SURGE Button a few times to see the blast of steam
that comes out. This will also activate the
SurgeClean™ feature that will help clean the steam
vents.
STEAM SETTINGS: Turn the ADJUSTABLE STEAM/DRY
DIAL to the INDICATOR MARK for (light), (medium), and (heavy) settings to become familiar
with the different amounts of steam at each setting.
5
How To Use
PREPARING
THE IRON
Page 6

FILLING WITH WATER
1. Ordinary tap water can generally
be used for ironing. However, do not
use water processed through a
home softening system.
2. In extremely hard water areas
(over 180 parts per million) consider
using distilled or demineralized
water. If using distilled or demineralized water, tap water should be used
the first time you use the iron and
once per month thereafter to maintain steam performance.
3. When filling with water, be sure
the TEMPERATURE SELECTOR DIAL
is turned to Off and the ADJUSTABLE STEAM/DRY DIAL is set to Dry.
Stand the iron upright on its HEEL
REST.
4. Using a clean cup, pour approximately 6-7 oz. of water into the
WATER FILL HOLE until the water
level reaches the WATER FULL
MARK on the WATER WINDOW
(Figure A). Do not overfill. The iron
can be refilled as necessary while
hot following Steps 3 & 4.
NOTE: Never place the iron directly
under a faucet to add water.
Starting the Iron
1. Plug in the iron.
2. Press the PUSH ON Button and a
green light will come on. (Figure B).
3. Use the HEAT SETTING GUIDE on
the body of the iron to select the
setting for the fabric to be ironed.
(For more detail, see the “Fabric
Ironing Chart” on page 11).
6
Figure A
FULL
Figure B
Page 7

4. Turn the TEMPERATURE SELECTOR DIAL to the appropriate setting
and allow to preheat for approximately 45 seconds.
NOTE: The iron will automatically
shut off after one hour. (see
“Automatic Shut-Off” page 8)
Dry Ironing
Turn the ADJUSTABLE STEAM/DRY
DIAL to the INDICATOR MARK for
Dry to iron without steam. (Figure C)
Spray
1. Be sure the iron is filled with
water before operating the SPRAY
feature.
2. Move the TEMPERATURE SELECTOR DIAL to the appropriate setting.
3. Turn the SPRAY/SURGE Button so
that the Spray (Figure D) faces the
INDICATOR MARK. Pump the
SPRAY Button a few times to get
a mist.
Surge of Steam
1. Be sure the iron is filled with water
before using the SURGE feature.
2. Move the TEMPERATURE SELECTOR DIAL to a setting within the
steam band (choose one of the
settings 4 thru 7 for the appropriate
fabric).
3. Turn the SPRAY/SURGE Button so
that the Surge (Figure E) faces the
INDICATOR MARK. Pump the
SURGE Button for a concentrated
blast of steam.
7
USING MOISTURE
Figure C — Dry
Figure D — Spray
INDICATOR
MARK
INDICATOR
MARK
Figure E — Surge
INDICATOR
MARK
Page 8

8
AUTOMATIC
SHUT-OFF
Adjustable Steam
1. The TEMPERATURE SELECTOR
DIAL must be set within the steam
band (settings 4 thru 7) in order to
produce adjustable steam.
2. Turn the ADJUSTABLE
STEAM/DRY DIAL to the INDICATOR
MARK for (light), (medium),
and (heavy) settings. (Figure
F) Use the HEAT SETTING GUIDE on
the body of the iron to help you
match the type of fabric to the
appropriate steam setting.
3. If water spotting occurs, reduce
the steam level and/or increase the
heat setting on the TEMPERATURE
SELECTOR DIAL.
1. The Automatic Shut-Off™ Iron is designed to shut-off
automatically after one hour whether or not it is in use.
After the iron has been on for 55 minutes, the power light
will begin to blink. It will continue to blink for 5 minutes to
alert you that the iron is getting ready to shut off.
2. To extend your ironing time once the light begins blinking or to restart the iron if it has shut off automatically,
simply press the PUSH ON button and the power light will
come on.
3. To shut the iron off manually, turn the TEMPERATURE
SELECTOR DIAL to Off and unplug the iron. NOTE: Simply
turning the TEMPERATURE SELECTOR DIAL to Off will
cause the soleplate to cool down but will not shut off the
iron completely (the Power Light will stay on). The
Automatic Shut-Off feature will turn the iron off completely
after one hour.
Figure F — Adjustable Steam
INDICATOR
MARK
Page 9

9
SURGE
CLEAN™
1. Turn the ADJUSTABLE STEAM/DRY DIAL to Dry.
2. Turn the TEMPERATURE SELECTOR DIAL to Off.
3. Unplug the iron.
4. Allow the iron to cool, wrap the cord, and clip it in place
using the cord clip on the plug.
5. It is not necessary to empty the water if the iron is used
frequently.
6. Store the iron on its heel rest to prevent water from
leaking from the Soleplate.
1. Using the Surge of Steam feature during regular ironing
helps clean the steam vents. At the end of an ironing session and while the iron is still hot, use the the
SurgeClean™ feature to help flush out lint. If lint is
allowed to accumulate in the vents, it can scorch and
cause brown spotting on garments being ironed.
2. Be sure the iron has water in it. Turn the TEMPERATURE
SELECTOR DIAL to a setting within the steam band (settings 4 thru 7).
3. Turn the SPRAY/SURGE Button so that the Surge faces
the INDICATOR MARK. Hold the iron over an old cloth or
over the sink and pump the SURGE Button 5 or 6 times.
Then iron over an old cloth to clean residue from the
soleplate.
Care Of The Iron
*The Automatic Shut-Off IronTMis a trademark of The Black & Decker Corp.
STORING
THE IRON
Page 10

1. Is the iron plugged in and the green Power Light on?
Press the PUSH ON Button.
2. If the Light is not on, will a lamp plugged into the outlet turn on?
3. Is the TEMPERATURE SELECTOR DIAL turned to a
fabric setting?
1. Check to see if there is enough water in the Water
Tank.
2. Is the ADJUSTABLE STEAM/DRY DIAL set at , ,
or ? Adjust the Dial to Dry and back to the
desired steam level several times.
1. Turn the TEMPERATURE SELECTOR
DIAL to Off.
2. Set the ADJUSTABLE STEAM/DRY
DIAL to the INDICATOR MARK for Dry.
3. Unplug the iron and allow it to cool.
4. Empty the water by holding the iron
over a sink with the tip pointing downward (Figure G). Take care to avoid
any hot water splatter. Water will
empty out the WATER FILL HOLE.
5. If all the water hasn’t drained,
repeat the emptying process.
1. Allow the iron to cool completely.
2. Wipe the outer shell and
SilverStone
®
non-stick soleplate with
a cloth dampened in water and a mild
household detergent. Never use abrasives, heavy-duty cleansers, or scouring pads.
10
EMPTYING THE IRON
Figure G
CLEANING
THE OUTSIDE
SURFACES
Need Help?
IRON
WON’T HEAT?
IRON WON’T
START
STEAMING
Page 11

FABRIC
IRONING CHART
11
FABRIC ADJUSTABLE STEAM TEMP. IRONING INSTRUCTIONS
ACRYLIC
ACETATE
NYLON
SILK
POLYESTER
SOME
RAYONS
PERM. PRESS
COTTON
BLENDS
WOOL
COTTON
LINEN
Dry iron on wrong side. Press
washables while damp.
Dry iron on wrong side to prevent
shine. Press washables while
damp.
Dry iron washables while fabric
is damp. Iron rayon fabrics on the
wrong side. Steam iron if fabric
manufacturer directs.
Check care label and follow the
manufacturer's instructions for
blends: use the setting for the
fiber requiring the lowest heat.
Steam iron on wrong side to prevent shine, or use a press cloth on
right side. Do not press completely dry.
Dry iron washables while damp.
Use steam as needed. Iron dark
fabrics on wrong side to avoid
shine.
Dry iron washables while damp
and until dry. Use steam as needed. Iron dark linens on wrong side
to avoid shine.
1.
2.
3.
4.
5.
6.
7.
DRY IRON
AT ANY
SETTING
LIGHT
REGULAR
HEAVY
NOTE: USE THE SPRAY FEATURE AT ANY TEMPERATURE SETTING STEAM AND SURGE OF
STEAM SHOULD ONLY BE USED IN THE STEAM AREA OF THE TEMPERATURE SELECTOR DIAL
(Settings 4 thru 7). WATER SPOTTING MAY OCCUR IF THE SETTING IS TOO LOW.
3. If steaming doesn’t start, gently tap the Soleplate
on the ironing board once or twice.
1. Is the TEMPERATURE SELECTOR DIAL set in a
steam area (setting 4 thru 7) and is the
ADJUSTABLE STEAM/DRY DIAL set at the corresponding , , or steam setting?
1. Has the iron been on for an hour? Press the
PUSH ON Button to restart the iron and the green
light will come on. You will have another hour to
iron before the unit shuts off automatically.
NOTE: You may press the PUSH ON Button at any
time during ironing to extend your “On” time for an
additional hour.
Refer to this chart for recommended Temperature
and Steam Settings and ironing instructions for various fabrics. Always read garment labels and follow
manufacturer’s ironing instructions.
WATER
DROPLETS
COMING FROM
STEAM VENTS?
SHUTS OFF
AUTOMATICALLY
WHILE IRONING?
Page 12

12
For three years from the date of purchase, Sears
will replace this electric appliance, free of charge,
if defective in material or workmanship. TO
OBTAIN REPLACEMENT UNDER THIS WARRANTY,
SIMPLY RETURN THE SMALL APPLIANCE TO THE
NEAREST SEARS STORE IN THE UNITED STATES.
This warranty gives you specific legal rights which
vary from state to state.
Listed by Underwriters Laboratories Inc.
Copyright © 1994 Black & Decker
Printed in Malaysia
Pub. No. 168640-44-RV00
FULL THREE-YEAR
WARRANTY
ON SEARS
KENMORE SMALL
APPLIANCES
3-YEAR
REPLACEMENT
WARRANTY
Sears, Roebuck and Co.,
Dept. 817WA,
Hoffman Estates, IL 60179
 Loading...