

Page 1

Instruction Manual
4255 7" Angle Grinder
6112 779" Angle Sander
Page 2
Getting the most out of your tool.
Please take time to read this manual and pay particular attention to the safety
rules we’ve provided for your protection. Don’t forget to send in your owner’s
registration card. If you have any questions about your tool please call:
1-800-9-BD TOOL
(1-800-923-8665)
4255 7“ Angle Grinder
6112 7“/9" Angie Sander
Page 3

FOR YOUR SAFETY ■ ALL TOOLS
Important Safety Instructions
WARNING: When using electric tools, basic safety precautions should
always be followed to reduce risk of fire, electric shock, and personal
injury, including the following:
READ ALL INSTRUCTIONS
Double Insulation
Double insulated tools are constructed throughout with two separate layers
of electrical insulation or one double thickness of insulation between you
and the tool’s electrical system. Tools built with this insulation system are
not intended to be grounded. As a result, your tool is equipped with a two
prong plug which permits you to use extension cords without concern for
maintaining a ground connection.
NOTE: Double insulation does not take the place of normal safety precau
tions when operating this tool. The insulation system is for added protec
tion against injury resulting from a possible electrical insulation failure
within the tool.
CAUTION: WHEN SERVICING USE ONLY IDENTICAL REPLACEMENT
PARTS. Repair or replace damaged cords.
Polarized Plugs
Polarized plugs (one blade is wider than the other) are used on equipment
to reduce the risk of electric shock. When provided, this plug will fit into a
polarized outlet only one way. If the plug does not fit fully into the outlet,
reverse the plug. If it still does not fit, contact a qualified electrician to
install the proper outlet. Do not change the plug in any way.
Safety Instructions For All Tools
KEEP WORK AREA CLEAN. Cluttered areas and benches invite injuries.
CONSIDER WORK AREA ENVIRONMENT. Don’t expose power tools to rain.
Don’t use power tools in damp or wet locations. Keep work area well lit. Do
not use tool in presence of flammable liquids or gases.
GUARD AGAINST ELECTRIC SHOCK. Prevent body contact with grounded
surfaces. For example; pipes, radiators, ranges, and refrigerator enclosures.
KEEP CHILDREN AWAY. Do not let visitors contact tool or extension cord.
All visitors should be kept away from work area.
STORE IDLE TOOLS. When not in use, tools should be stored in dry, and
high or locked-up place — out of reach of children.
DON’T FORCE TOOL. It will do the job better and safer at the rate for which
it was intended.
USE RIGHT TOOL. Don’t force small tool or attachment to do the job of a
heavy-duty tool. Don’t use tool for purpose not intended.
DRESS PROPERLY. Do not wear loose clothing or jewelry. They can be
caught in moving parts. Rubber gloves and non-skid footwear are recom
mended when working outdoors. Wear protective hair covering to contain
long hair.
USE SAFETY GLASSES. Also use face or dust mask if operation is dusty.
DON’T ABUSE CORD. Never carry tool by cord or yank it to disconnect from
receptacle. Keep cord from heat, oil, and sharp edges.
SECURE WORK. Use clamps or a vise to hold work. It’s safer than using
your hand and it frees both hands to operate tool.
DON’T OVERREACH. Keep proper footing and balance at all times.
MAINTAIN TOOLS WITH CARE. Keep tools sharp and clean for better and
safer performance. Follow instructions for lubricating and changing acces
sories. Inspect tool cords periodically and if damaged, have repaired by
authorized service facility. Inspect extension cords periodically and replace if
damaged. Keep handles dry, clean, and free from oil and grease.
Page 4

• DISCONNECT OR LOCK OFF TOOLS when not in use, before servicing, and
when changing accessories, such as blades, bits, cutters.
• REMOVE ADJUSTING KEYS AND WRENCHES. Form habit of checking to see
that keys and adjusting wrenches are removed from tool before turning it on.
• AVOID UNINTENTIONAL STARTING. Don’t carry tool with finger on switch.
Be sure switch is off when plugging in.
• EXTENSION CORDS. Make sure your extension cord is in good condition.
When using an extension cord, be sure to use one heavy enough to carry the
current your product will draw. An undersized cord will cause a drop in line
voltage resulting in loss of power and overheating. The following table
shows the correct size to use depending on cord length and nameplate
ampere rating. If in doubt, use the next heavier gage. The smaller the gage
number, the heavier the cord.
Minimum Gage for Cord Sets
Volts
120V 0-25 26-50
240V
Ampere
More Not more AWG
Than Than
0 6 - 10
10 12 -
Rating
6 18 16 16 14
12
16
Total Length of Cord in Feet
51-100 101
0-50 51-100 101-200
18 16
16 16 14 12
14 12
14
Not Recommer
201
12
OUTDOOR USE EXTENSION CORDS. When tool is used outdoors, use only
extension cords intended for use outdoors and so marked.
STAY ALERT. Watch what you are doing. Use common sense. Do not oper
ate tool when you are tired.
CHECK DAMAGED PARTS. Before further use of the tool, a guard or other
part that is damaged should be carefully checked to determine that it will
operate properly and perform its intended function. Check for alignment of
moving parts, binding of moving parts, breakage of parts, mounting, and
any other conditions that may affect its operation. A guard or other part that
is damaged should be properly repaired or replaced by an authorized service
center unless otherwise indicated elsewhere in this instruction manual. Have
defective switches replaced by authorized service center. Do not use tool if
switch does not turn it on and off.
Page 5

ADDITIONAL SAFETY INSTRUCTIONS
TOOL OPERATION
Additional Safety Instructions for Grinders
• ALWAYS WEAR EYE PROTECTION.
• KEEP GUARDS IN PLACE.
• Use only grinding wheels having a maximum operating speed at least high
as “No Load RPM” marked on the tool’s nameplate.
• Before using, inspect recommended accessory for cracks or flaws. If such a
crack or flaw is evident, discard the accessory. The accessory should also
be inspected whenever you think the tool may have been dropped.
• When starting the tool (with a new or replacement wheel installed) hold the
tool in a well protected area and let it run for one minute. If the wheel has an
undetected crack or flaw, it should burst in less than one minute. Never start
the tool with a person in line with the wheel. This includes the operator.
• In operation, avoid bouncing the wheel or giving it rough treatment. If this
occurs, stop the tool and inspect the wheel.
• ALWAYS USE GUARDS with depressed center wheels or flaring cup grind
ing wheels.
• Clean your tool out periodically.
• CAUTION: Some wood contains preservatives such as copper chromium
arsenate (CCA) which can be toxic. When sanding these materials extra care
should be taken to avoid inhalation and minimize skin contact.
SAVE THESE INSTRUCTIONS
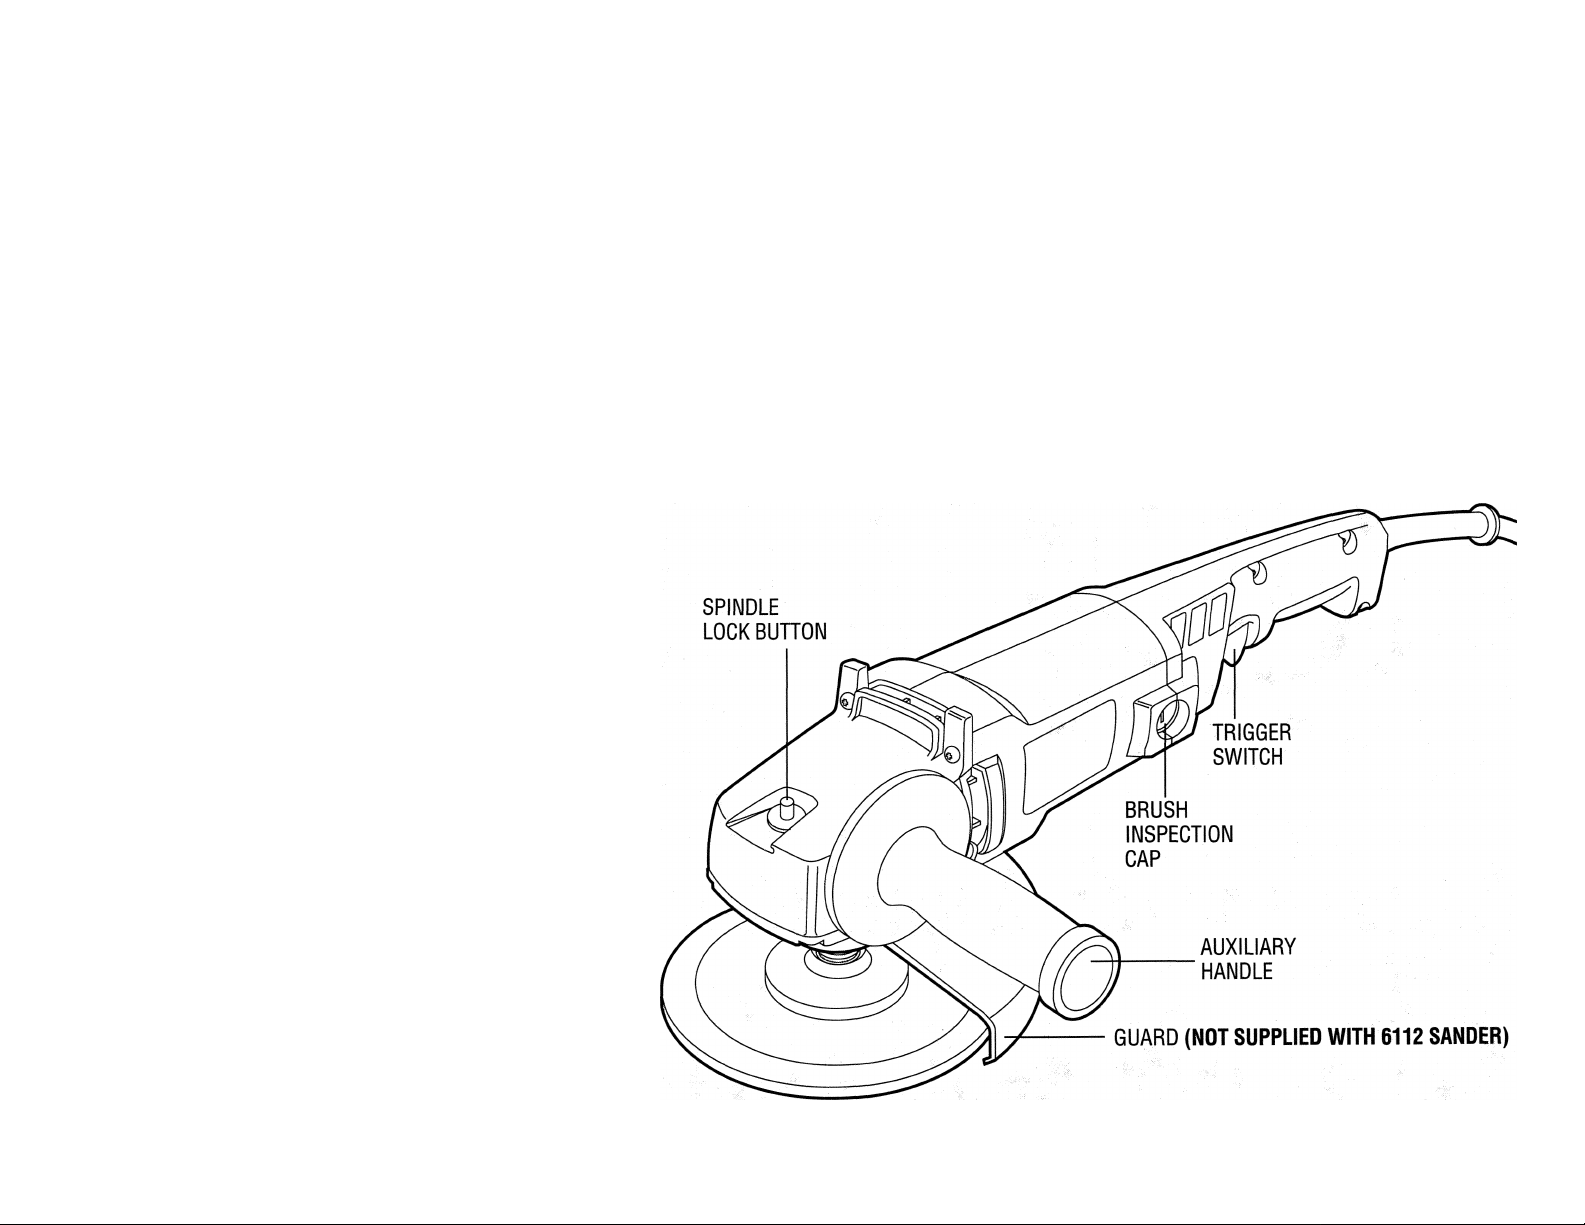
Switch
To start the tool, squeeze the trigger switch shown in Figure 1. To turn the tool
off, release the switch.The tool can be locked on for continuous use by holding
the trigger switch depressed while you depress the switch locking button next
to the trigger, shown in Figure 1. Hold the locking button in as you gently
release the trigger. Release the locking button and the tool will continue to run.
To turn the tool off from a locked on condition, squeeze and release the trigger
once.
Auxiliary Handle
An auxiliary handle is provided with your tool for convenience. The handle can
be screwed into either side of the gear case, shown in Figure 2, and should be
used at all times when sanding or grinding.
Figure 1
AUXILIARY HANDLE
Figure 2
Motor
Your B&D tool is powered by a B&D built motor. Be sure your power supply
agrees with the nameplate marking. Voltage decrease of more than 10% will
cause loss of power and overheating. All B&D tools are factory tested; if this
tool does not operate, check the power supply.
Page 6

Spindle Lock Button
Turn off and unplug tool. In order to prevent the spindle of the unit from rotat
ing while installing or removing accessories, a spindle lock button has been
provided in the gear head of the machine. Depress spindle lock button and
rotate the spindle until the lock pin engages to lock the spindle.
NEVER DEPRESS THE SPINDLE LOCK BUTTON WITH THE TOOL RUNNING OR COASTING.
Sanding With Abrasive Discs (Figure 3)
To install sanding discs;
1. TURN OFF TOOL AND DISCONNECT FROM POWER SUPPLY.
2. Push the hub of the disc nut through the center of the sanding disc, as far
as it will go, and also through the backing disc.
Figure 3
SPINDLE
3. Put the assembled discs on the tool spindle and engage the disc nut into
the disc nut hub.
4. Thread the assembly clockwise, completely down on the spindle.
5. Engage the lock button to lock the spindle in place.
When using a sanding disc, hold the tool at an angle of 10°-15° to the work. If
only the outer edge of the sanding disc is used, a rough cut surface will result.
If the sanding disc is pressed flat against the work, the surface will be irregular
and bumpy, and the tool will be difficult to control.
To remove disc:
1. Engage spindle lock button to lock the spindle in place.
2. Using a cloth or glove to protect your hand, turn disc assembly counter
clockwise to remove it from the tool spindle. (Figure 4)
BACKING DISC
Figure 4
SANDING DISC
DISC NUT
Page 7

Figure 5
Figure6
Depressed-Center Wheels
Depressed center wheels may be used for moderate metal removal on flat or
contoured surfaces. CAUTION: Never use depressed center wheels without the
proper guard.
To install depressed center wheels: (See Figure 6)
as shown above.
M/ften sanding, leave 10°-15°
between the wheel and the work.
RAISED
PORTION OF
FLANGE
TOWARD
SPINDLE
RAISED
PORTION
WHEEL
TOWARD
FLANGE
DEPRESSED CENTER WHEEL
SPINDLE
BACKING FLANGE
1. TURN OFF TOOL AND DISCONNECT FROM POWER SUPPLY.
2. Be sure the guard assembly is securely attached to the spindle housing.
Position guard so that the open part of the guard is facing away from the
operator.
3. Put the backing flange onto the tool spindle.
4. Check rated speed on depressed center wheel. Never use wheel with rated
speed lower than the speed in the “WARNING” statement on the nameplate
of the tool.
5. Place the depressed center wheel on the tool spindle.
6. Thread the clamp washer on tool spindle, hold the tool spindle by engaging
the lock button, and tighten clamp washer with wrench.
When using a depressed center wheel, hold the tool so that an angle of approx
imately 30° exists between the wheel and the work. (See Figure 5)
Wire Brushing
Common applications for wire cup brushes include cleaning welds, angles,
corners and removal of paint.
1. Disconnect tool from power source. Rest grinder on its back with spindle
facing up.
2. Ensure that the rated speed of the wire brush is equal to or higher than the
rated speed of the grinder found on the nameplate.
Page 8

3. Thread wire cup brush onto spindle and tighten.
ENVIRONMENTAL SAFETY
4. Always wear eye protection and appropriate protective clothing.
Precautions To Take When Sanding Paint
1. Sanding of lead based paint is NOT RECOMMENDED due to the difficulty
of controlling the contaminated dust. The greatest danger of lead poison
ing is to children and pregnant women.
2. Since it is difficult to identify whether or not a paint contains lead without
a chemical analysis, we recommend the following precautions when sand
ing any paint:
PERSONAL SAFETY
a. No children or pregnant women should enter the work area where the
paint sanding is being done until all clean up is completed.
b. A dust mask or respirator should be worn by all persons entering the work
area. The filter should be replaced daily or whenever the wearer has diffi
culty breathing.
NOTE: Only those dust masks suitable for working with lead paint dust
and fumes should be used. Ordinary painting masks do not offer this pro
tection. See your local hardware dealer for the proper N.I.O.S.H. approved
mask.
a. Paint should be removed in such a manner as to minimize the amount of
dust generated.
b. Areas where paint removal is occurring should be sealed with plastic
sheeting of 4 mils thickness.
c. Sanding should be done in a manner to reduce tracking of paint dust out
side the work area.
CLEANING AND DISPOSAL
a. All surfaces in the work area should be vacuumed and thoroughly cleaned
daily for the duration of the sanding project. Vacuum filter bags should be
changed frequently.
b. Plastic drop cloths should be gathered up and disposed of along with any
dust chips or other removal debris. They should be placed in sealed refuse
receptacles and disposed of through regular trash pick-up procedures.
During clean up, children and pregnant women should be kept away from
the immediate work area.
c. All toys, washable furniture and utensils used by children should be
washed thoroughly before being used again.
c. NO EATING, DRINKING or SMOKING should be done in the work area to
prevent ingesting contaminated paint particles. Workers should wash and
clean up BEFORE eating, drinking or smoking. Articles of food, drink, or
smoking should not be left in the work area where dust would settle on
them.
Page 9

MAINTENANCE
ACCESSORIES
Cleaning
Blowing dust and grit out of the motor housing using compressed air is a nec
essary regular maintenance procedure. Dust and grit containing metal parti
cles often accumulate on interior surfaces and could create an electrical shock
hazard if not frequently cleaned out. ALWAYS WEAR SAFETY GLASSES.
CAUTION: Never use solvents or other harsh chemicals for cleaning the non-
metallic parts of the tool. Use clean, dry rag only.
Lubrication
B&D tools are properly lubricated at the factory and are ready for use. Tools
should be relubricated regularly every sixty days to six months, depending on
usage. (Tools used constantly on production or heavy-duty jobs and tools
exposed to heat may require more frequent lubrication.) This lubrication
should only be attempted by trained power tool repairpersons, such as those
at B&D service centers or in other qualified service organizations.
Motor Brushes
Be sure tool is turned off and disconnected before inspecting brushes. Carbon
brushes should be regularly inspected for wear. To inspect brushes, unscrew
the plastic brush inspection caps (located in the sides of the motor housing)
and the spring and brush assemblies may be withdrawn from the tool.
Keep brushes clean and sliding freely in their guides. Carbon brushes have
varying symbols stamped into them, and if the brush is worn down to the line
closest to the spring, they must be replaced. New brush assemblies are avail
able at B&D service centers.
NOTE: Use accessories recommended per chart below:
Accessory Type
DEPRESSED CENTER
WHEEL
SANDING DISCS
WIRE CUP
BRUSHES
Depressed center grinding wheels must fit within the confines of the guard and
must be rated higher than the recommended speed as marked on the name
plate.
CAUTION: Strands of wire cup brushes may break and fly off while in use.
Users and others in the area should wear adequate eye, face and body protec
tion. Use only wire cup brushes that are rated at or greater than the RPM
shown on the tool’s nameplate.
WARNING: To reduce the risk of injury, always use proper guards when grind
ing and wear eye protection.
CAUTION: The use of any non-recommended accessory may be hazardous.
Recommended accessories for use with your tool are available at extra cost
from your distributor or local service center. A complete listing of service cen
ters is included with your tool.
Max - 4" Knotted Wheel
Max-2-3/4" Cup Wheel
Notes Usage
Use guard supplied
with tool
Use for moderate metal
Use for smoothing welds,
Use for rust removal and
and masonry removal
on flat or contoured
surfaces
and sharp edges, and
automotive body work
surface preparation
before painting
Page 10

IMPORTANT!
To assure product safety and reliability, particularly for double insulated tools,
repairs, maintenance and adjustment (excluding maintenance described in this
manual) should be performed by B&D service centers or authorized service
centers, using identical B&D replacement parts.
One Year Free Maintenance
All B&D tools for Industry and Construction are covered under a service/safety check program where B&D will inspect your tool for safety and provide nec
essary maintenance or repairs, including normal wear and tear parts, for one
year, FREE OF CHARGE.
Full Warranty
All B&D tools for Industry and Construction are warranted to be free of any
defects in materials or workmanship. Upon thorough examination of tool,
B&D will repair or replace, at our option, any product that is determined to be
defective.
Conditions
The service/safety check and the warranty do not apply to: repairs made or
attempted by anyone other than an authorized B&D service location; misuse,
abuse, neglect, improper application of the tool; missing parts; or normal wear
and tear (after first year of ownership). Please return the complete unit, trans
portation prepaid, to any B&D factory owned or B&D authorized service center
location (list provided with tool or see Yellow Pages under “Tools Electric”).
Page 11

YOUR POWER TOOLS MAY BE SERVICED AT THE FOLLOWING B&D SERVICE CENTERS.
AUBAMA:
Birmingham 35209, 2412 Green Springs Hwy
Mobile 36608, 3831 Airport Blvd..........................................205-343-6624
ALASKA:
Anchorage 99518, 910 West International Airport Rd
ARIZONA:
Mesa 85202, 535 S. Dobson, Suite 7
Phoenix 85013, 4501 N. 7th Avenue
Tucson 85712, 4845 E. Speedway Blvd
ARKANSAS:
Little Rock 72201,519 W. Seventh St
CALIFORNIA;
Anaheim 92806, 540 South State College Blvd
Chula Vista 91910, 309 Broadway ......................................
Concord 94520, 1500 Monument Blvd., #C2
Fresno 93710, 5412 North Blackstone Ave
Long Beach 90805, 2011 South St
Los Angeles 90040, 4820 South Eastern Ave., Suite “L”
Riverside 92506, 6215 Magnolia Ave., Suite “B”................. 909-787-9700
Sacramento 95825, 2033 Fulton Ave
San Diego 92123, 9270 Clairemont Mesa Blvd
San Jose 95128, 1185 So. Bascom Ave
San Leandro 94578, 15206 E. 14th St................................. 510-276-1610
Van Nuys 91411, 14920 Victory Blvd
COLORADO:
Denver 80219, 1171 S. Federal Blvd................................... 303-922-8325
CONNECTICUT:
Orange 06477, 481 Boston Post Rd
Wethersfield (Hartford) 06109, 662 Silas Dean Hwy
DISTRICT OF COLUMBIA: Washington
Colmar Manor 20722, 4153 Bladensburg Rd<
Falls Church, VA 22046, 344 W. Broad St
FLORIDA:
Ft. Lauderdale 33334, 799 E. Oakland Pk. Blvd
Ft. Myers 33907, 5224 Bank Street
Jacksonville 32205, 920 Cassat Ave...........................
Miami (North) 33168, 13345 N.W. Seventh Ave.
Miami (South) 33156, 12233 So. Dixie Hwy...
Orlando 32803, 3807 E. Colonial Dr
St. Petersburg 33709, 5635 49th St„ N
Tampa 33609, 3432 W. Kennedy Blvd
West Palm Beach 33415, 310 South Military Trail
GEORGIA:
Atlanta (South) 30349, 5330 Old National Hwy
Smyrna 30080, 2550 Cobb Pkwy
Stone Mountain (Atlanta) 30086, 5723 Memorial Dr
HAWAII:
Honolulu 96819, 330 Sand Island Access Road
ILLINOIS:
Des Plaines (Chicago) 60018,1277 South Elmhurst Rd..
Lincolnwood (Chicago) 60646, 6710 N. Crawford Ave
Lisle (West Chicago) 60532, 2950 Ogden Ave., Unit H.... 708-717-1075
Moline 61265, 4433 23rd Ave
Oak Lawn (Chicago) 60453, 6343 W. 95th St
Waukegan 60085, 39 S. Greenbay Rd.
INDIANA;
Evansville 47710, 307 First Ave., Crescent Ctr
Hammond 46323, 7103 Kennedy Ave..
Indianapolis 46224, 5999 Crawfordsville Rd
......................................
....................................
.....................................
....................................
.......................................404-956-0869
..............................................
.....
.............
.........
..................................
.................................
....
..........................
..................................
..................
......................
.........................
..................................
................. 619-279-2011
.............................
..................................
...........
....................
..........................
.................
.......
................
.................
............................
..........................
813-872-8317
..............
...................
...........
.................
.......
.....................
...........
................... 708-249-4390
...................
..............................
.......................
. 205-942-0538
907-563-4664
602-461-1074
602-279-6414
602-323-3388
501-372-3040
714-772-4050
619-420-6350
510-682-4880
209-435-0810
310-422-5825
....
213-720-1834
916-972-9090
408-293-7350
818-787-5531
203-795-3583
203-563-5800
301-779-3808
703-533-7313
305-566-5102
813-278-1188
904-781-2253
305-681-6658
305-232-9497
407-894-7011
813-525-0273
407-689-3247
404-762-8844
404-292-4714
808-847-7447
....708-364-5220
708-673-0923
309-762-3000
708-423-7212
812-425-4269
219-845-5100
317-243-8308
IOWA:
Des Moines 50310, 3427 Merle Hay Rd
KANSAS:
Wichita 67213, 155 S. West St.............................................316-943-1271
KENTUCKY:
Louisville 40213, 5211 Preston Hwy.................................... 502-968-7100
LOUISIANA:
Baton Rouge 70815, 11859 Florida Blvd
Harvey 70058, 2500 Lapalco Blvd
Metairie (New Orleans) 70002, 3504 N. Causeway Blvd
Shreveport 71108, 7710-7714 Jewella Rd...........................318-688-1553
MARYLAND:
Baltimore (East) 21205, 4712 Erdman Ave
Baltimore (North) 21030, 29-31 Cranbrook Rd., Cockeysville ... 410-666-5966
Baltimore (South) 21122, 8220 Ritchie Hwy., Pasadena
Colmar Manor 20722, 4153 Bladensburg Rd. .
MASSACHUSEHS:
Brighton (Boston) 02135, 12 Market St...
Seekonk 02771, 120 Highland Ave......................................508-336-6510
MICHIGAN;
Grand Rapids 49512, 3040 28th St., S.E.............................616-949-8331
Lansing 48917, 3203 W. Saginaw Hwy
Warren 48093, 27035 Van Dyke Blvd.................................. 313-756-6711
Westland (Detroit) 48185, 8067 North Wayne Rd............ . 313-427-1520
MINNESOTA:
Bloomington (Minneapolis-St. Paul) 55420, 9517 Lyndale Ave., S. . 612-884-9191
MISSOURI:
Kansas City 64111, 4324 Main St........................................ 816-531 -0629
St. Ann (North St. Louis) 63074, 3637 North Lindbergh Blvd. . . . 314-739-4661
St. Louis 63131, 12852 Manchester Rd...............................314-821-8740
NEBRASKA;
Omaha 68127, 4225 S. 84th St............................................402-592-5666
NEVADA;
Las Vegas 89104, 3411 East Charleston Blvd
NEW JERSEY;
Cherry Hill 08034, 1444 E. Marlton Pike/Rte. 70
Little Falls 07424, 1189 U.S. Highway 46
Union (Scotch Plains) 07076, 2520 Route #22 East
NEW MEXICO:
Albuquerque 87110, 5617 Menaul Blvd., N.E
NEW YORK:
Buffalo 14209, 881 W. Delavan Ave
Centereach L.I. 11720, 2061-63 Middle Country Rd.
Elmhurst (New York) 11373, 77-20 Queens Blvd
Latham (Albany) 12110, 836 Troy-Schenectady Rd............ 518-785-1867
Rochester 14623, 2969 W. Henrietta Rd
Syracuse 13214, 3485 Erie Blvd., East................................315-446-3086
Westbury L.I. (New York) 11590, 1061 Old Country Rd
NORTH CAROLINA:
Charlotte 28205, 3007 E. Independence Blvd
Greensboro 27407, 3716 High Point Rd
Raleigh 27604, 2930 Capital Blvd
OHIO:
Cincinnati 45241,2310 E. Sharon Rd
Columbus 43227, 3975 E, Livingston Ave
Dayton 45409, 2898 S. Dixie Dr....................................
Mayfield Heights (East Cleveland) 44124, 5881 Mayfield Rd... . 216-449-2770
..............................
.............................
.............................. 504-366-8676
.........................
................... 301-779-3808
...........................
..............................
....................
.................
............................
....
....
...........
515-270-1340
504-272-8111
504-837-2550
410-485-5550
410-647-8456
617-782-6264
517-323-4181
702-641-6555
609-429-2822
201-256-9373
908-233-5665
................. 505-884-1002
....................................
...............
.............................
.................... 704-374-1779
............................
......................................
...................................
...........................
716-884-6220
.... 516-737-4706
718-335-1042
716-424-1310
......
516-997-6140
910-852-1300
919-878-0357
513-772-3111
614-237-0461
.......
513-298-1951
OHIO (CONT’D)
Parma Heights (Cleveland) 44130, 6483 Pearl Road..
Toledo 43607, 3231 Dorr St............................................. 419-531-8921
OKLAHOMA;
Oklahoma City 73106, 1318 Linwood Blvd
Tulsa 74145, 3120 S. Sheridan Rd
OREGON;
Portland 97209, 1640 N.W. Johnson St
PENNSYLVANIA:
Evans City 16033, 20808 Rt. 19 North
Harrisburg 17112, 6080 Allentown Blvd...............................717-545-0651
Lancaster 17601,118 Keller Ave................................ 717-393-5251 ,
Philadelphia 19103, 333 N. 20th St
Philadelphia (North) 19115, 9977-81 Bustleton Ave. .......... 215-464-7771
Pittsburgh 15232, 5437 Baum Blvd
Whitehall (Allentown) 18052, 2242 MacArthur Rd
Wilkes-Barre 18702, 759 Kidder Street
PUERTO RICO:
Puerto Nuevo............................................................... 809-783-3535
RHODE ISLAND:
See Seekonk, MA
SOUTH CAROLINA;
Greenville 29607, 1557 Laurens Rd
TENNESSEE:
Chattanooga 37421,6231 Perimeter Drive, Space E. ......... 615-894-5957
Knoxville 37917, 4118 N. Broadway.
Memphis 38116, 1085 East Brooks Rd,
Nashville 37211,4811 Noiensville Rd
TEXAS:
Amarillo 79106, 3008 West 6th Ave
Austin 78757, 6549 Burnet Rd
Dallas 75229, 2257 Royal Ln
El Paso 79915, 6822 Gateway East
Fort Worth 76111, 721 North Beach St
Garland 75043, 718 W. Centerville Rd.
Houston 77022, 536 E. Tidwell Rd............................. 713-692-7111
Houston (S.W.) 77025, 9319 Stella Link Blvd............ 713-664-3666
San Antonio 78201, 500 Culebra Ave........................ 210-732-1221
Webster 77598, 100 East Nasa Rd. One..................... 713-338-4556
UTAH:
Salt Lake City 84115, 1541 S. Third West St
VIRGINIA;
Falls Church 22046, 344 W. Broad St..................... 703-533-7313
Hampton 23666, 3416 W. Mercury Blvd
Norfolk 23513, 7631 Sewells Point Rd.
Richmond 23222, 1424 Chamberlayne Ave
WASHINGTON:
Seattle 98108, 421 S. Michigan St
Spokane 99208, N. 7011 Division St...................................
Tacoma 98409, 2602 S, 38th St................................... 206-473-6040
WEST VIRGINIA:
Charleston 25312, 1638 Sixth Ave
WISCONSIN;
Milwaukee (Wauwatosa) 53226, 10424 West Bluemound Rd,. ., 414-453-4240
............................................
................................... 214-620-6655
.............. 405-232-7515
.......................... 918-622-5666
.................. 503-228-8631
...............................
............................... 215-564-5520
........................... 412-362-2700
.........
..................
...................... 615-688-0921
...................... 901-332-3444
.......................... 615-833-8277
.....................................
........................ 915-778-9769
......................... 817-831-3828
.................. 214-686-9302
.............. 804-826-9382
.............................
............ 804-649-9245
.....................................
......................................
216-842-9100
412-779-9600
..... 610-435-9544
.......... 717-824-5704
.......
...... 803-232-3038
806-373-1531
512-459-1133
............ 801-486-5828
804-480-3333
206-763-2010
509-467-8190
304-343-0289
Page 12

ALBERTA
Edmonton T6E 6H6, 3845 99th St.......... . 403-462-5005
BRITISH COLUMBIA
Vancouver V5M 3Y7, 1735 Boundary Rd. .... 604-291-9942
MANITOBA
Winnipeg R3H OK3, 934 St. James St. ......204-783-7294
NOVA SCOTIA
Halifax B3K 2A4, 6100 Young Street. ........902-453-5090
ONTARIO
Brockville K6V 5W6, 100 Central Ave
Kanata K2L 1V3. 462 Hazeldean Rd #11 ..... 613-831-2332
Glencairn Plaza
London N6E 3A9, 981 Wellington Rd #6
Markham L3P 3J3, 9275 Hwy 48 Unit 12/13 .. . 905-472-6168
Mississauga L4X 1L3, 1480 Dundas St. E #7. . 905-277- 0011
North York M3J 3G5, 48 Kodiak Cres
QUEBEC
Brossard J4W 1M6, 5840 Boul Taschereau ... 514-462-4881
Montreal H1Y 1B4, 3061 Belanger
....... . 613-342-6641
.....
519-649-2407
.........
416-635-6740
......... 514-722-1021
FOR ADDITIONAL SERVICE LOCATIONS
CALL: 1-800-9-BO TOOL
10
Page 13

Black & Decker (U.S.) Inc. • 701 East Joppa Road, Towson, Maryland 21286
Printed in U.S.A. (APR95-CD-2) Form No. 159244-01 Copyright© 1994,1995
 Loading...