

Page 1

ACCESSORIES
The accessories listed in this manual are available at extra cost from your local dealer,
Black & Decker Service Center, or by writing to: Customer Services, Black & Decker
(U.S.) Inc., 626 Hanover Pike, Hampstead. Md. 21074
PRE PUNCHED ABRASIVE PAPER
Cat. No. Grit
59920 60 ^
59921 80
59922 100 ^ Packs of 10.
59923 120
59924 150
Replacement Paper Punch Cat. No. 59928
Replacement Dust Bag Cat. No. 59929
Replacement Pad Cat. No. 59930
NOTE: Recommendeci accessories for this tool are listed in this manual. The use of
any other accessory may be hazardous.
LUBRICATION
Self lubricating bearings are used in the tool and periodic relubrication is not required.
However, it is recommended that, once a year, you take or send the tool to a B&D Service
Centerfor a thorough cleaning and inspection.
IMPORTANT
To assure product SAFETY and RELIABILITY, repairs, maintenance and adjustment, (in
cluding brush inspection and replacement) should be performed by Black & Decker Ser
vice Centers or other qualified service organizations, always using Black & Decker
replacement parts.
COMMERCIAL7INDUSTRIAL USE WARRANTY
Black & Decker warrants this product for one year from date of purchase. We will repair
without charge, any defects due to faulty material or workmanship. Please return the com
plete unit, transportation prepaid, to any Black & Decker Service Center or Authorized
Service Station listed under “Tools Electric” in the yellow pages. This warranty does not
apply to accessories or damage caused where repairs have been made or attempted by
others.
BLACK & DECKER (U.S.) INC.
626 Hanover Pike Hampstead, MD 21074 U. S. A.
(April 1984-OH)
Printed in U.S.A.
Page 2
IMPORTANT SAFETY INSTRUCTIONS (FOR ALL TOOLS)
WARNING: When using Electric Tools, basic safety precautions should always be
KEEP WORK AREA CLEAN. Cluttered areas and benches invite injuries.
CONSIDER WORK AREA ENVIRONMENT. Don’t expose power tools to rain. Don’t
use power tools in damp or wet locations. Keep work area well lit.
GUARD AGAINST ELECTRIC SHOCK. Prevent body contact with grounded sur
faces. For example, pipes, radiators, ranges, refrigerator enclosures.
KEEP CHILDREN AWAY. All visitors should be kept away from work area. Do not let
visitors contact tool or extension cord.
STORE IDLE TOOLS. When not in use, tools should be stored in dry, and high or
locked-up place—out of reach of children.
DON’T FORCE TOOL. It will do the job better and safer at the rate for which it was In
tended.
USE RIGHT TOOL. Don’t force small tool or attachment to do the job of heavy-duty
tool. Don’t use tool for purpose not intended, for example, don’t use circular saw for
cutting tree limbs or logs.
DRESS PROPERLY. Do not wear loose clothing or jewelry. They can be caught In
moving parts. Rubber gloves and nonskid footwear are recommended when working
outdoors. Wear protective hair covering to contain long hair.
USE SAFETY GLASSES. Also use face or dustmask if cutting operation is dusty.
9.
DON’T ABUSE CORD. Never carry tool by cord or yank it to disconnect from recepta
10.
cle. Keep cord from heat, oil and sharp edges.
SECURE WORK, Use clamps or a vise to hold work. It’s safer than using your hand
11.
and it frees both hands to operate tool.
DON’T OVERREACH. Keep proper footing and balance at all times.
12.
MAINTAIN TOOLS WITH CARE, Keep tools sharp and clean for better and safe per
13.
formance. Follow instructions for lubricating and changing accessories. Inspect tool
cords periodically and if damaged have repaired by authorized service facility. Inspect
extension cords periodically and replace if damaged. Keep handles dry, clean, and
free from oil and grease.
DISCONNECT TOOLS. When not in use, before servicing, and when changing ac
14.
cessories, such as blades, bits, cutters.
REMOVE ADJUSTING KEYS AND WRENCHES. Form habit of checking to see that
15.
keys and adjusting wrenches are removed from tool before turning it on.
AVOID UNINTENTIONAL STARTING. Don’t carry plugged-in tool with finger on
16.
switch. Be sure switch is off when plugging in.
OUTDOOR USE EXTENSION CORDS. When tool is used outdoors, use only exten
17.
sion cords intended for use outdoors and so marked.
STAY ALERT. Watch what you are doing. Use common sense. Do not operate tool
18.
when you are tired.
CHECK DAMAGED PARTS. Before further use of the tool, a guard or other part that
19.
is damaged should be carefully checked to determine that it will operate properly and
perform its intended function. Check for alignment of moving parts, binding of moving
parts, breakage of parts, mounting, and other conditions that may affect its operation.
A guard or other part that is damaged should be properly repaired or replaced by an
authorized service center unless otherwise indicated elsewhere in this instruction
manual. Do not use tool if switch does not turn it on and off.
20. DO NOT OPERATE portable electric tools near flammable liquids or in gaseous or
explosive atmospheres. Motors in these tools normally spark, and the sparks might
ignite fumes.
followed to reduce the risk of fire, electric shock, and personal injury,
including the following.
READ ALL INSTRUCTIONS
METAL QUIOE
FIG. S
HOLE PUNCHER
STOP
PAPER HOLDER
SANDING
It is not necessary to exert a lot of pressure on the tool when sanding horizontally. A slight
amount of pressure (just to control the tool) is usually sufficient to ensure satisfactory re
sults. Any excess will reduce its efficiency.
In order to obtain an optimum finish, it is essential to progressively reduce the grain size of
the paper being used. With each change in grain size, it is recommended to sand at right
angles in relation to the previous sanding. In order to obtain a perfect finish, after using a
very fine-grained paper, we recommend wiping the work surface with a slightly damp rag
and sanding again with the finest paper possible.
In order to obtain maximum dust collection, it is important to empty the dust bag fre
quently, and make sure opening in housing is not clogged.
The rate at which the dust bag will fill up is largely dependent on the type of material being
sanded and the size of grit used. A good rule of thumb is to empty the bag when it be
comes about 1/3 full. So that the recovery bag can be thoroughly cleaned, it is washable
and must be dried before replacing in sander.
TOOL CARE
Keep your machine as clean as possible by wiping with a clean cloth and occasionally
blowing through with air.
Avoid overloading your sander. Overloading will result in a considerable reduction in
speed and efficiency and the unit will become hot. in this event, run sander at a “no load’’
condition for a minute or two. This may be accomplished by holding unit away from work
surface and allowing it to run “free speed.’’
Page 3

To operate unit, press right side of rocker switch. A white mark should appear to indicate
switch is in the “on” position. To stop unit, press left side of rocker switch. The white mark
should no longer be visible.
SWITCH
FIG. ?
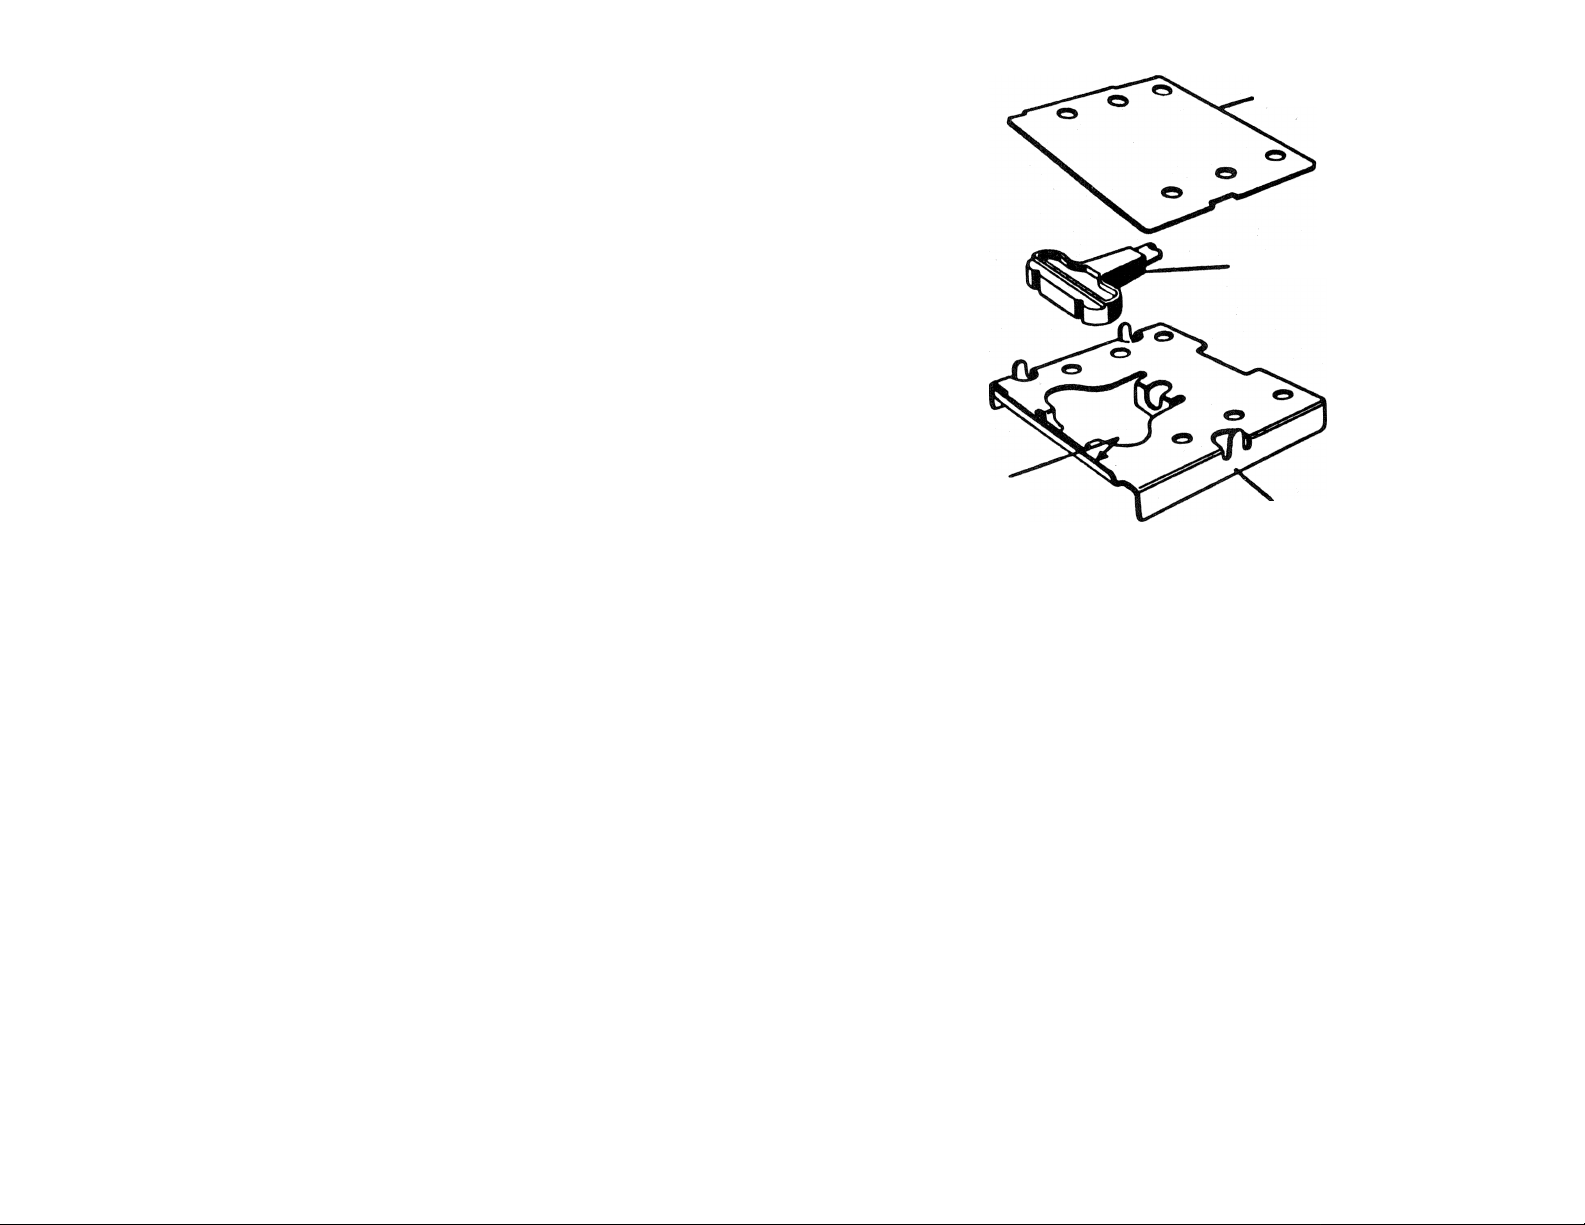
HOLE PUNCH OPERATION (FIG, 8)
1. Remove the metal guide and the hole-puncher from the paper holder.
2. Place the paper^ grain upwards on the holder so that the paper is in contact with the
stop.
3. Place the metal guide above the paper so that it is correctly positioned in relation to the
holder.
4. With the aid of the holepuncher, make holes by pressing firmly through the guide and
the paper.
5. Take out the paper, checking that all the holes are clean and match the sender per
fectly.
6. If the holepuncher, after a considerable period of use, produces poor holes, then it is
essential to sharpen or replace it.
SPECIAL SAFETY INSTRUCTIONS FOR SANDERS
Always wear eye protection and a respirator when sanding.
DOUBLE INSULATION
Your Sander is DOUBLE-INSULATED to give you added safety. This means that it is con
structed throughout with TWO separate “layers” of electrical insulation or one DOUBLE
thickness of insulation between you and the tool’s electrical system.
Tools built with this insulation system are not intended to be grounded. As a result, your
Drill is equipped with a two-prong plug which permits you to use extension cords without
concern for maintaining a ground connection.
NOTE DOUBLE-INSULATION does not take the place of normal safety precautions when
operating this tool. The insulation system is for added protection against injury resulting
from a possible electrical insulation failure within the tool.
CAUTION: When servicing Double insulated Tools. USE ONLY IDENTICAL RE
PLACEMENT PARTS. Repair or replace damaged cords.
EXTENSION CORDS
Double insulated tools have 2 wire cords, and can be used with 2 wire or 3 wire extension
cords. Only round jacketed extension cords should be used, and we recommend that they
be listed by Underwriters Laboratories (U.L) (C.S.A. in Canada). If the extension will be
used outside, the cord must be suitable for outdoor use. Any cord marked as outdoor can
also be used for indoor work.
An extension cord must have adequate wire size (AWG or American Wire Gauge) for
safety, and to prevent loss of power and overheating. The smaller the gauge number of
the wire, the greater the capacity of the cable, that is 16 gauge has more capacity than 18
gauge. When using more than one extension to make up the total length, be sure each in
dividual extension contains at least the minimum wire size.
To determine the minimum wire size required, refer to the chart below.
............
CHART FOR MINIMUM WIRE SIZE CORPS ^
NAME PLATE TOTAL EXTENSION CORD LENGTH - FEET
RATING - AMPS 25 50 75 100 125 150 175 200
0-10.0
10.1-13.0
13.1-15.0 14 14
Before using an extension cord, inspect it for loose or exposed wires, damaged insulation,
and defective fittings. Make any needed repairs or replace the cord if necessary. Black &
Decker has extension cords available that are U.L (C.S.A in Canada) listed for outdoor
use,
18
16 16
18 16 16 14
14
12
14
12
14 12
12 12
14
12 12
12 12
12
_
MOTOR
Your Black & Decker tool is powered by a B & D built motor. Be sure your power supply
agrees with the nameplate marking.
Volts 50/60 Hz or “AC only” means your tool must be operated only with alternating cur
rent and never with direct current. Volts DC-60Hz or AC/DC means your tool may be op
erated with either alternating or direct current.
Voltage decrease of more than 10% will cause loss of power and overheating. All B&D
tools are factory tested. If this tool does not operate, check the power supply.
SAVE THESE INSTRUCTIONS
Page 4

ATTACHING ABRASIVE PAPER
The V4 sheet Palm-Grip Sander will operate well using either plain abrasive paper or
paper punched out for use with the built-in dust extraction feature.
For normal operations, assemble the abrasive paper to your unit as follows.
1. Burnish the reverse side of the abrasive paper over a right angle in order to soften it.
2. Release clamp by pulling up on clamp lever and disengaging it from the tab on the
base plate. (See Fig. 1)
3. Insert abrasive paper under the clamp, pul! up on lever and lock into place. (Fig. 2)
4. Stretch paper over backing pad and insert under the opposite clamp in the same way.
Should you desire to utilize the dust extracting feature of the tool, simply use perforated
paper (available as an accessory item or make your own using template and punch sup
plied), and assemble in the same manner, making sure the holes in the paper line up with
the holes in the base pad. (See “hole punch operation”)
Caution: When using perforated paper be sure to remove dust cover (Fig 6), and In
stall dust recovery bag to insure maximum effectiveness.
FIG. 1
DUST RECOVERY BAG
To utilize Sander with dust recovery feature, assemble bag as follows:
1. Remove Dust Cover and make sure dust is not packed in opening.
2. Insert the wire frame into the two holes in the plastic adapter. (Fig.3)
3. With wire frame attached, insert assembly into dust collecting bag so the plastic
adapter protrudes through the opening in the end of the bag, and the wire frame is
positioned at the zippered opening. (Fig 4)
4. Slide assembly into opening located on the cord set side of the sander. (Fig. 5)
NOTE: When not utilizing dust recovery feature, remove bag and close opening to
avoid getting dust on operator. (Fig. 6)
WIRE
FIG. 4
AiRASIVi
PAPER
FIG- S
 Loading...