

Page 1

MAINTENANCE (Unplug Chain Saw)
1. Keep chain sharp and tensioned correctly.
2. Turn bar over periodically (5 hours use) to ensure even wear on topand bottom rails.
3. Clean accumulated sawdust and oil from passages at the base of the bar, to ensure
proper lubrication of chain and bar groove.
4. Do not use fluids or cleaning agents to clean the saw. Excessive moisture can cause
a short-circuit. Strong cleaning agents and solvents such as kerosene and gasoline
can attach the plastic housings. Wipe the saw clean with rags and use a small brush
to clean the motor cooling air inlet and exhaust slots,
5. The chain saw uses self-lubricating bearings and relubrication is not required.
However, after two seasons of use we recommend a thorough cleaning and
inspection at a Black & Decker Service Center.
6. If the Chain Saw fails to operate, disconnect extension cord from power source first,^
and then from the chain saw. Check service panel for blown fuse or tripped circuit
breaker and examine the extension cord for damage. If chain saw still will not operate,
do not attempt to repair it yourself, take it to a Black & Decker Service Center
for repair.
ACCESSORIES
Use of other than specified accessories may be hazardous.
Model
Guide Bar
Saw Chain 38003
File
File Guide
3801-10
38000
38006
38007 38007
14"
3802-10
38001
38004
38006 38006
16"
3803-10
38002
38005
38007
IMPORTANT
To ensure product safety and reliability, repairs, maintenance and adjustment (other
than those described in the mianual) should be performed by B & D Authorized Service
Centers or other qualified service organizations. Always use B & D replacement parts.
Note: Use only the correct length of bar and chain types as replacements (See
nameplate). An increase in length may overload and damage the motor.
COMMERCIAL/INDUSTRIAL USE WARRANTY
Black & Decker warrants this product for one year from date of purchase. We will repair
without charge, any defects due to faulty material or workmanship. Please return the
complete unit, transportation prepaid, to any Black & Decker Service Center or
Authorized Service Station listed under ‘Tools Electric" in the yellow pages. This
warranty does not apply to accessories or damage caused where repairs have been
made or attemped by others.
MOTOR
Your Black and Decker tool is powered by a B&D-built motor. Be sure your power supply
agrees with nameplate marking. Volts 50/60 Hz means Aiternatiiig Cyrrentiy ONLY, Volts
DC“60 Hi means it will also operate on Direet Current, Voltage decrease of more than 10%
will cause loss of power and over-heating. All B&D tools are factory-tested; if this tool does not
operate, check the power supply,
Eieistrie ©ihiiiic Sm:
Model 3801-10 - 12" Electric Chain Saw
Model 3802-10 - 14" Electric Chain Saw
Model 3803-10 - 16" Electric Chain Saw
IMPORTANT
BEFORE YOU PLUG IN YOUR BLACK & BECKER ELECTRIC CHAIN SAW...
© Read Owner’s Manual
© Check chain for proper tension
© Ensure chain brake lever is pulled back fully
(Motor will not run if brake engaged.)
Black & Decker Electric Chain Saws are Double-Insulated for added protec
tion against electric shock. This also eliminates the need for a 3 prong
grounding plug.
DO NOT CONNECT TOOL TO DC POWER SUPPLY
Form No. 237595
626 HANOVER PIKE, HAMPSTEAD, MD 21074 U.S.A,
BLACK & DECKER (U.S.) INC.
INDUSTRIAL/CONSTRUCTION DIVISION
omima
Page 2

IMPORTANT SAFETY INSTRUCTIONS (FOR ALL TOOLS)
WARNING; When using Electric Tools, basic safety precautions should always be
followed to reduce the risk of fire, electric shock, and personal injury,
including the following;
READ ALL INSTRUCTIONS
1. KEEP WORK AREA CLEAN. Do not clutter work area.
2. CONSIDER WORK AREA ENVIRONMENT. Don’t expose power tools to rain. Don’t
use power tools in damp or wet locations. Keep work area well lit.
3. GUARD AGAINST ELECTRIC SHOCK. Prevent body contact with grounded sur
faces. For example; pipes, radiators, ranges, refrigerator enclosures.
4. KEEP CHILDREN AWAY. Ail visitors should be kept away from work area. Do not let
visitors contact tool or extension cord.
5. STORE IDLE TOOLS. When not in use, tools should be stored in dry, and high or
locked-up place-out of reach of children.
6. DON’T FORCE TOOL. It will do the job better and safer at the rate for which it was
intended.
7. USE RIGHT TOOL. Don't force small tool or attachment to do the job of a heavyduty tool. Don’t use tool for purpose not intended.
8. DRESS PROPERLY, Do not wear loose clothing or jewelry. They can be caught in
moving parts. Rubber gloves and nonskid footwear are recommended when work
ing outdoors. Wear protective hair covering to contain long hair.
9. USE SAFETY GLASSES. Also use face or dust mask if cutting operation is dusty.
10. DON’T ABUSE CORD. Never carry tool by cordoryank it to disconnect from recep
tacle. Keep cord away from heat, oil, and sharp edges.
11. SECURE WORK. Use clamps or a vise to hold work. Both hands must be used to
operate Chain Saw.
12. DON'T OVERREACH. Keep proper footing and balance at all times.
13. MAINTAIN TOOLS WITH CARE, Keep tools sharp and clean for better and safe
performance. Follow instructions for lubricating and changing accessories. Inspect
tool cords periodically and replace if damaged have repaired by authorized service
facility. Inspect extension cords penodcally andhf damaged. Keep handles dry,
clean, and free from oil and grease.
14. DISCONNECT TOOLS, When not m use, before servicing, and when changing bar
and chain.
15. REMOVE ADJUSTING KEYS AND WRENCHES, Form habit of checking to see that
keys and adjusting wrenches are removed from tool before turning it on.
16. AVOID UNINTENTIONAL STARTING. Don't carry plugged-in too! with finger on
switch. Be sure switch is off when plugging in.
17. OUTDOOR USE EXTENSION CORDS. When tool is used outdoors, use only exten
sion cords intended for use outdoors and so marked.
18. STAY ALERT. Watch what you are doing. Use common sense. Do not operate tool
when you are tired.
19. CHECK DAMAGED PARTS. Before further use of thetool, a guard or other part that
is damaged should be carefully checked to determine that it will operate properly
and perform its intended function. Check for alignment of moving parts, binding of
moving parts, breakage of parts, mounting, and any other conditions that may affect
its operation. A guard or other part that is damaged should be properly repaired or
replaced by an authorized service center unless otherwise indicated elsewhere in
this instruction manual. Have defective switches replaced by authorized service
center. Do not use tool if switch does not turn it on and off.
20. DO NOT OPERATE portable electric tools near flammable liquids or in gaseous or
explosive atmospheres. Motors in these tools normally spark, and the sparks might
ignite fumes.
2ND CUT DIRECTION
FIG. 27
FIG. 26
FIG. 28
FIG. 29
FIG. 30
Bucking
1. Work from uphill side, if log lies on a slope. (FIG. 7),
2. Make sure you have firm footing with weight on both feet.
3. When possible raise log and support clear of ground to avoid touching ground with
saw chain,
4. Log Supported along Entire Length, Cut from top (overbuck) being careful to avoid
cutting earth, (FIG. 28).
5. Log Raised at One End. First, cut from bottom (underbuck) for 1/3 of diameter of log
to avoid splintering. (FIG, 30). Second, cut from top (overbuck) to meet the first cut.
6. Log Supported on Both Ends. First, cut from top (overbuck) for 1/3 of diameter of log.
(FIG. 29). Second, cut from bottom (underbuck) to meet the first cut and avoid
pinching the guide bar
15
Page 3
GENERAL CUTTING INSTRUCTIONS
1. Before using chain saw, review the Safety instructions listed in this Manual and be
aware of local regulations covering the operation of your saw.
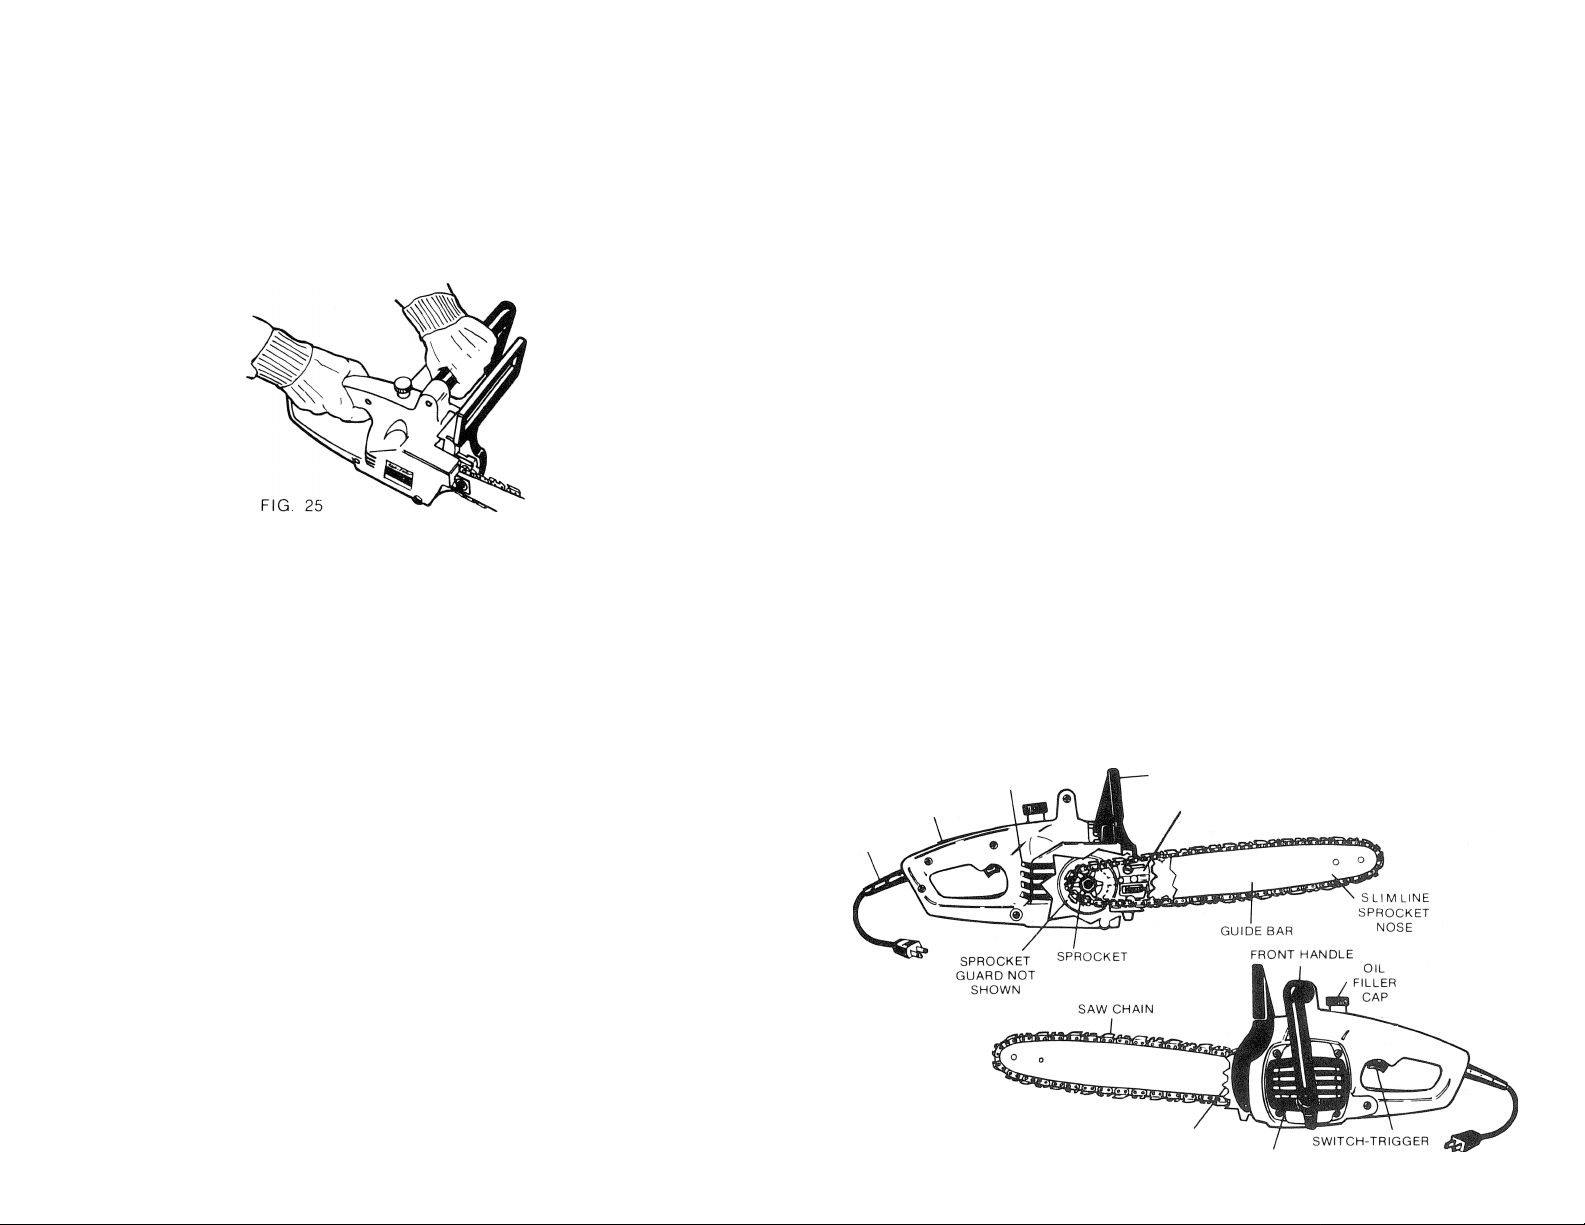
2. For all types of cutting always hold the saw firmly in both hands, with thumbs
fingers encircling the handles. (FIG. 25).
3. Ensure work area is clear, and that you have firm footing.
4. When cutting through the log, reduce the cutting pressure near the end of the cut
without relaxing your grip on the chain saw to maintain complete control.
5. After completing cut, allow saw chain to stop before moving saw, or moving to
another tree.
Felling
1. When felling and,bucking operations are being performed by two or more persons at
the same tinrie, the felling operation should be separated from the bucking operation
by a distance of at least twice the height of the tree being felled.
2. Trees should not be felled in a manner that would endanger any person, strike any
utility line or cause any property damage. If the tree does contact a utility
line notify the utility company without delay.
3. Before felling is started clear your retreat path diagonally away from the expected line
of the fall. (FIG. 6).
4. Remove dirt, stones, loose bark, nails, staples and wirefrom thetreewherethefelling
cuts are to be made.
5. Notching Undercut should be 1/3 the thickness of the tree at right angles to the
direction of the fall (FIG. 26).
6. Make the horizontal notching cut first, to help avoid pinching of saw. chain or
guide bar when the second notching cut is made.
Felling back cut. Should be 2" above the horizontal notching cut. (FIG. 26). Do not cut
through the hinge which will stop the tree from twisting and falling in the wrong
direction.
As the felling back cut nears the hinge, the tree should begin to fall. If the tree tends to
rock backwards, to avoid pinching the guide bar and chain use hard wedges to hold the
cut open and drop the tree in the right direction. When the tree begins to fall, withdraw
the chain saw from the cut, release the trigger, put the saw down and retreat along the
planned path; Be alert for over limbs dropping and watch your footing.
Limbing, Leave the large lower limbs to support the trunk of the tree on the ground.
Remove other limbs in preparation for bucking the trunk to required lengths. (FIG. 31).
Note: Limbs under load will pinch and trap the guide bar if cut from the inside. Always
cut from the outside.
READ ALL SECTIONS OF THIS MANUAL BEFORE
PREPARING AND USING YOUR CHAIN SAW
CHAIN SAW NAMES & TERM!
Become familiar with these particular
names and terms, so that you will fully
understand the advice contained in this
Manual.
BORING ~ The process involved in cutting
with the Saw Chain at the nose of the
Guide Bar in order to make a hole. (Boring
should only be attempted by experienced
operators who have been specifically
trained. See Sawing Precautions Page 3).
BUCKING - The process of cross cutting a
felled tree, or log, into lengths.
CHAIN BRAKE - A device designed to
stop the saw chain whbn kickback occurs.
CLUTCH - A mechanism connecting and
disconnecting the chain from a rotating
source of power.
FELLING - The process of cutting down a
tree.
FELLING BACK CUT - The final cut in the
felling process, made on the opposite side
of the tree from Notching Undercut.
FRCNT HANDLE - The handle located
toward the front of the chain saw normally
gripped by the left hand.
GUIDE BAR - A solid railed structure
which supports and guides the saw
chain.
HANDGUARD - A shield located ahead of
the front handle to protect the left hand,
and prevent the hand from contacting the
saw chain should it slip off the handle.
COOLING AIR
EXHAUST SLOTS
REAR HANDLE
POWER
CORD
KICKBACK - The backward and/or
upward motion of the guide bar resulting
from nose contact of the guide bar, or
pinching of the saw chain in the cut. (See
Page 3 for advise on the avoidance of
Kickback).
LIMBING - The process of removing the
branches from a felled tree.
NCRMAL CUTTING PCSITICN - The
position assumed in performing the
Bucking or Felling Cuts.
NCTCHING UNDERCUT - A notch cut m
a tree which directs the fall of the tree.
CILER - A system for oiling the guide bar
and saw chain.
REAR HANDLE - The handle located
toward the rear of the chain saw. normally
gripped by the right hand.
SAW CHAIN - A loop of chain with teeth
for cutting wood.
SPIKED BUMPER (Spike) - The pointed
projections located at the front of the
chain saw beside the guide bar, on which
the chain saw pivots when felling or
bucking.
SPRCCKET - The toothed part that drives
the saw chain.
SWITCH - A device which can complete,
or interrupt, an electrical power circuit to
the motor.
CHAIN BRAKE HAND GUARD
GUIDE BAR MOUNTING
PAD (Behind Bar)
14
SPIKED BUMPER '
COOLING AIR INTAKE SLOTS
Page 4

EXTENSION CORDS
Double insuitated toote have 2 wire cords, and can be used with 2 wire or 3 wire exten
sion cords. Only round jacketed extension cords should be used, and we recommend
that they be listed by Underwriters Laboratories (U.L.). If the extension will be used out
side, the cord must be suitable for outdoor use. Any cord marked as outdoor can also be
used for indoor work.
An extension cord must have adequate wire size (AWG or American Wire Gauge) for
safety, and to prevent loss of power and overheating. The smaller the gauge number of
the wire, the greater the capacity of the cable, that is 16 gauge has more capacity than 18
gauge. When using more than one extension to make up the total length, be sure each
individual extension contains at least the minimum wire size.
To determine the minimum wire size required, refer to the chart below.
CHART FOR MINIMUM WIRE SIZE (AWG) OF EXTENSION CORDS
NAMEPLATE
RATING-AMPS
0-10.0
10.1- 13.0
13.1- 15.0
Before using an extension cord, inspect it for loose or exposed wires, damaged
insulation, and defective fittings. Make any needed repairs or replace the cord if
neccessary. Black & Decker has extension cords available that are U.L. listed for
outdoor use.
25
18
16
14
TOTAL EXTENSION CORD LENGTH - FEET
50 75 100 125 150 175 200
14
16
18
16
14
16
14
14
12
12
14
14
12
12
12
12
12
12
12
12
DOUBLE INSULATION
Your Chain Saw is DOUBLE INSULATED.
This means that it is constructed throughout with TWO separate “layers” of electrical
insulation or one DOUBLE thickness of insulation between you and the tool’s electrical
system. Tools built with this insulation system are not intended to be grounded. As a
result the extension cord used with your saw can be plugged into any conventionaM20
Volt electrical outlet, without concern for maintaining a ground connection.
Note; DOUBLE INSULATION does not take the place of normal safety precautions
when operating this saw. The insulation system is for protection against injury resulting
from a possible electrical insulation failure within the saw.
Caution: When servicing Double Insulated Tools. USE ONLY IDENTICAL REPLACE
MENT PARTS. Replace or repair damaged cords.
Warning; When using an electric chain saw these basic safety precautions should
always be followed to reduce the risk of fire, electric shock and personal injury. READ
ALL INSTRUCTIONS.
ELECTRICAL PRECAUTIONS
SECURE CORDS as shown (FIG. 2) to prevent
disconnection.
AVOID ENTANGLEMENT. Keep cords clear
of operator, saw chain and branches at all
times.
GUARD AGAINST ELECTRIC SHOCK. Avoid
body contact with any grounded conductor
such as metal pipes and wire fences.
INSPECT EXTENSION CORDS periodically
and replace if damaged.
Inspect Tool Cords periodically and if
damaged have repaired by Black & Decker
Authorized Service Center.
4
FIG. 2
SAW CHAIN MAINTENANCE
1. Keep the saw chain sharp at all times.
2. A dulled chain needs heavy pressure, and
overloads the motor and bar.
3. Cuttings (sawdust) should be in the form,
of chips.
4. Should they change to powder and the
motor labors, unplug the saw and sharpen
the chain.
CHAIN SHARPENING - REGULAR CHAIN
Black & Decker saw chain is a precision manufactured cutting attachment and requires
regular inspection and care to maintain peak cutting efficiency. Touch up sharpening
may be required once or twice during a day’s wood cutting. In some areas where sand
or other abrasives have become embedded m the bark of trees, cutter teeth dull more
rapidly and more frequent sharpening may be required. As illustrated on FIG. 8, remove
the bar nut, flat washer, and bar plate. Using gloves, tilt bar so chain clears the sprocket
assembly and remove.
1. Cham can be sharpened on saw by replacing the bar in a bench vise while resting the
saw on the bench.
2. Use a 5/32 inch (3.9 mm) round file and guide marked for a 30'' top filing angle, P/N
38007.
3. Align the file guide at 30° angle, apply pressure against the face of the tooth, and push
the file toward the outside of the tooth. Release pressure on the cutting edge on the
return stroke.
4. Repeat sharpening stroke until tooth is sharp.
5. Sharpen ail teeth on one side of chain before sharpening teeth on the other side. Use
same number of strokes on each tooth to help keep all teeth the same length.
NOTE; Most chain problems are caused by incorrect filing, lack of lubrication, and/or
loose chain tension. Refer to troubleshooting chart for common filing errors. This chart
illustrates some of the most common signs to look for if the saw chain is not functioning
properly.
COMMON FILING ERRORS
All of these errors must be corrected by refiling.
Cutter Fault Cause
Hook
Backslope
Depth Gauges Not filed down,
too high (p7
Depth Gauges<¿2=5^Too much filing.
too low.
(a) File too small.
(b) Handle held too high.
(a) File too large.
S J (b) Handle held too low.
13
Result
Dulls quickly and will not cut
smoothly.
Cuts slowly and requires extra
pressure.
Cuts slowly, requires extra
pressure and leads to cutter
damage.
Rough cutting, requires more
power (cuts 100 deep)
Page 5

The delivery of oil to the bar and chain is preset at the factory, and for normal use is
unlikely to need altering. If adjustment is required, the regulator is located in the bar
mounting pad (FIG. 22).
Turn the screw in ’; turn steps, clockwise to decrease or counterclockwise to increase
the oil flow.
Ensure adequate supply of oil to the bar and chain by cleaning accumulated sawdust
from oilways in bar and bar mounting pad after use, (FIG. 21)
FIG. 22
REGULATOR
SCREW HEAD
FIG. 23
12
BAR MOUNTING PAD
PERSONAL SAFETY PRECAUTIONS
FATIGUE, DRUGS AND ALC0F10L. Do not operate chain saw when fatigued or under
the influence of drugs or alcohol.
USE A SAFETY HARD HAT when working with branches overhead.
USE HEARING PROTECTION
DISCONNECT CHAIN SAW WHEN IDLE, and before adjusting or servicing the bar and
chain.
REMOVE TOOLS, Check that all hand tools have been removed before using saw.
AVOID UNINTENTIONAL STARTING. Make a habit of keeping your finger off the
trigger until you are ready to start a cut.
CARRY THE CHAIN SAW BY THE FRONT HANDLE, with finger off the trigger and the
bar and chain pointed to the rear.
KEEP CLEAR. Keep all parts of your body away from the saw chain whenever the saw is
connected to power.
BEFORE STARTING THE SAW ensure the saw chain is not touching anything.
SAW IN GOOD Condition. Never use a chain saw that is damaged, improperly
adjusted or not completely assembled. Be certain that saw chain stops moving when
trigger is released.
STORE IDLE SAW. Chain Saw should be stored in a carrying case or with a scabbard
over the saw chain, locked up in a high place out of reach of children.
SAWING PRECAUTIONS
USE BOTH HANDS. When the motor is running always hold the chain saw with both
hands, keeping the left arm as straight as possible. Grip firmly, with thumbs and fingers
encircling the handles. (FIG. 4) Never hold log with one hand while sawing, if necessary
clamp the log to free both hands to hold the chain saw.
CLEAN HANDLES. Keep handles dry and oil free.
NOT ALOFT. Do not operate a chain saw in a tree unless specifically trained to do so.
DON’T OVERREACH. Keep proper footing and balance at all times. Never run chain saw
while standing on an unstable surface.
MAINTAIN CHAIN SAW. Keep saw chain sharp, oiled and properly tensioned for safest
operation. Follow instructions for lubricating and changing accessories. For
information about chain brake see pages 9. 10, & 11.
DON'T FORCETHE CHAIN SAW TO CUT. Itwill do the job better and more safely at the
rate for which it was designed.
USE RIGHT TOOL. Never cut plastics, sheet metal or any non-wood substance. Don’t
force a small chain saw to do the job of a heavy duty saw.
CUT AT FULL SPEED ONLY. Always have chain moving at full speed before touching
the wood and starting to cut. A slow moving chain will catch in the wood and may pull
you off balance.
SPRINGY SAPLINGS, Use extreme caution when cutting small saplings, branches or
brush, because the whippy material tends to catch the saw chain and pull or throw the
saw.
WATCH FOR SPRING BACK when sawing a limb under tension, so that you will not be
struck when the tension in the limb is released,
GUARD AGAINST KICKBACK. Kickback is the fast upward motion of the guide bar
which occurs when thesawchain at the noseof the guide bar contactsan object (FIG. 3).
Kickback can cause dangerous loss of control of the chain saw.
Page 6

TO AVOID KICKBACK
© Hold the chain saw firmly with both hands.
® Don’t overreach.
© Prevent the nose of the guide bar (FIG. 5) from contacting a log, branch, ground or
other obstruction.
© Don’t cut above shoulder height.
® Keep saw chain sharp and in proper adjustment.
® Follow instructions for lubrication and guide bar maintenance.
® Do not use chain saw without all safety features functioning.
® When bucking (cutting as illustrated in FIG. 5 & 7) always grip front handle directly
behind the chain brake hand guard lever - see FIG. 4
KICKBACK
IMPORTANT
— DO NOT HOLD THE SAW BY THE HANDGUARD/CHAIN BRAKE LEVER.
— Carry only by front handle.
NOTE: When the Chain Brake has been actuated, before you can continue to saw, you
must:
1. Release trigger.
2. Disengage Cham Brake by pulling Handguard/Lever backwards until it
locks,
3. When ready to operate, squeeze the trigger.
CHAIN BRAKE CHECKLIST
When the chain brake is engaged (lever pushed forward) the saw will not run. The chain
brake lever must be pulled back to lock before the saw will run again. See "Cham Brake
Operation" on pages 9, 10, & 11 of the Owners Manual,
If saw will not run, check . , , .
1. That chain brake lever is pulled back.
2. Extension cord is properly connected at each end.
3. Fuse for power outlet is not blown
CHAIN BRAKE MAINTENANCE
The clutch drum and chain brakeshould
be kept as clean and free of sawdust as
possible to allow free movement and full
contact of the brake hand. Clean out the
areas shown in FIG. 19,
We also recommend that the entire chain
brake mechanism be checked for wear at
a Black & Decker Service Center every
year, or after 10 hours of actual chain
saw running time, whichever occurs
first.
CLEAN
HERE
CUTTING AREA PRECAUTIONS
KEEP AREA CLEAR. Cluttered work areas invite injuries.
KEEP CHILDREN AWAY. Do not permit onlookers in the work area or to contact the
extension cord.
DON'T START CUTTING UNTIL YOU HAVE A CLEAR WORK AREA, secure footing
and a planned retreat path from the falling tree (FIG.6).
AVOID SNAGS. Keep extension cord away from saw chain, and clear of branches and
the like while cutting.
STAND ON UPHILL SIDE when bucking a log or felling atreesothat sections will roll or
slide away from you. (FIG. 7)
KEEP FEET CLEAR when cutting logs suspended off the ground.
AVOID POWER LINES. Do not fell a tree that has power or telephone lines running
through it or close by.
SIZE UP TREE to determine if it can be safely felled' in the desired direction. Consider
the lean of the tree, unbalanced branches and wind direction/strength (See General
Cutting Instructions).
NOBODY NEAR. When felling allow no one closer than twice the height of the tree being
felled.
KEEP WORK AREA WELL LIT.
CHAIN OILING - SAE SOW OIL IS RECOMMENDED
The chain on your saw requires lubrication while in use, to minimize friction with the
guide bar.
1. The tank holds enough oil for 15-30 minutes sawing.
2. The level of the oil in the tank can be checked in the slot provided (FIG. 23). When the
oil IS level with the bottom of the slot the oil tank should be refilled.
NOTE: Models 3801-10, 3802-10, and 3803-10 when use for felling (saw on its side)
should not have less than 1/2 tank of oil to avoid starving the chain.
Avoid spilling oil over the saw. Use a funnel when filling the tank and wipe up any spills.
Do not let sawdust or other dirt enter the oil tank.
The oil filler cap is located adjacent to the front handle. The cap must be tight to ensure
proper operation of the oil pump.
An automatic pump delivers oil to the bar and chain whenever the chain saw is operated.
When new and after the tank has been emptied, or after periods of disuse, it may be
necessary to prime the pump. This is done by using the right hand to continually run the
saw, and at the same time pressing down on the filler cap with the heel of your left hand
covering the small venthole for 5 seconds. Observe all safety precautions.See FIG.20.
11
Page 7

CHAIN BRAKE OPERATION
The brake is actuated if pressure is applied against the lever when, as in the event of
“kickback,” the operator’s hand strikes the lever. When the brake is actuated, chain
movement stops abruptly and the power supply to the motor is cut off.
CAUTION: Purpose of the CHAIN BRAKE is to reduce the possibility of injury due to
“kickback” but it cannot provide the measure of protection intended if the saw is
operated carelessly.
CAUTION; Hand placement is important. ALWAYS grip front handle directly behind the
handguard/chain brake lever (See FIG. 16).
FRONT HANDLE
The CHAIN BRAKE is disengaged (the chain can move) when the brake lever is pulled
back and locked. (FIG. 17). This is the normal running position. The CHAIN BRAKE is
engaged (chain is stopped) when the brake lever is in the forward position. (FIG. 18)
Before cutting with your saw, test the CHAIN BRAKE as follows:
1. Place the saw on a firm flat surface.
2. Follow the correct procedures to operate the saw.
3. Grasp the rear handle firmly with the right hand.
4. With the left hand, hold the front handle (not the CHAIN BRAKE lever) firmly. (FIG.
16)
5. Squeeze the trigger so that the chain begins to move, then activate (push forward) the
CHAIN BRAKE lever (FIG. 18).
CAUTION: Activate the CHAIN BRAKE SLOWLY and DELIBERATELY. Be careful to
keep the chain from touching any surface: don't let saw tip forward.
6. The chain should stop abruptly.
NOTE: If the chain doesn't stop, shut off the motor. Take the saw to your B & D dealer for
repair or replacement of the CHAIN BRAKE.
HANDGUARD. chain-
SAVE THESE INSTRUCTIONS
BAR & CHAIN INSTALLATION
All Models.
REMOVE LOOSE PARTS from the plastic bag. The combination wrench is the only tool
you need,
STUDY THE ILLUSTRATIONS to become familiar with the parts and their positions
(FIG 8).
BE CERTAIN SAW IS UNPLUGGED from power supply.
SUPPORT SAW on its side with sprocket facing up.
CHECK THAT THE ADJUSTER SCREW ASSEMBLY IS IN ITS SLOT, Ensure that the
adjuster nut is positioned as far to the rear as possible with the lug pointing outwards
ready to engage in the hole in the guide bar. (FIG, 9) Wearing gloves, mount the chain on
the guide bar with the cutters facing forward on the top of the bar (FIG. 11)
fig. 17
10
FIG. 18
PLATE-BAR
WASHER-FLAT
NUT-BAR
FIG.8
GUIDE BAR
MOUNTING BOLT
Page 8

ENSURE ADJUSTER NUT IS POSITIONED at the rear of the slot.
HOLD THE CHAIN SNUGLY on the guide bar with one hand (FIG, 12).
WITH THE GUIDE BAR AT A SLIGHT UPWARD ANGLE to clear the mounting bolt,
enter the loop end of chain into the housing and over the sprocket. If necessary, guide
the loop of chain with a finger of your other hand.
SLIP THE GUIDE BAR DOWN over the mounting bolt and set it on the mounting pad.
MAKE SURE THAT THE LUG ON THE ADJUSTER NUT ENTERS THE HOLE in the
guide bar. (Se¥ere damage will result if the lug is not properly located).
INSTALL BAR PLATE AND WASHER on bar bolt, and secure with hex nut finger tight.
STAND SAW UPRIGHT and turn adjuster screw clockwise to move bar outwards and
tighten chain (FIG. 10)
YOU ARE NOW READY to adjust chain tension.
TURN ADJUSTER SCREW
CLOCKWISE TO TAKE UP
CHAIN SLACK
FIG, 10
ADJUST CHAIN TENSION
With saw unplugged, using gloves and with the bar nut finger tight so that bar can move:
DRAW THE CHAIN along the bar rails by hand while turning the adjuster screw
clockwise to increase the chain tension. Cold tension is correct when the chain side
links are touching the bar rails, and the chain can be pulled along the bar without
binding. (FIG. 13)
TIGHTEN MOUNTING NUT with wrench to lock the bar at proper chain tension.
MAINTAIN CHAIN TENSION
A new Cham and bar will break in and need re-adjustment after as little as five cuts. This
IS normal, and the interval between adjustments will lengthen quickly.
Patience, to unplug the saw and adjust the chain, will result in longer life and improve
cutting performance.
After the break-in period, the chain will tend to droop when hot. This is normal and the
chain should not be adjusted unless the drive links are close to coming out of the bar
grooves (See FIG. 14). When this occurs, unplug the saw, loosen bar mounting nut,
adjust tension of warm chain to a maximum droop of 'T' (FIG. 15). Tighten nut.
Note; Correct chain tension is important for long life. If a chain is too loose or too tight,
the bar, chain and saw bearing will wear more rapidly.
FIG 12
§ 1
&
0
1
FIG. 11
HOUSING CUT
AWAY FOR
CLARITY
SIDE LINK
CONTACTING BAR
FIG. 13
HANGING OUT OF BAR
FIG. 14
18 INCH (3mm)
BETWEEN SIDE
LINK AND BAR
AT BOTTOM
FIG. 15
CHAIN BRAKE AND HANDGUARD
Handguards on Models 3801-10, 3802-10, and 3803-10 also serve as chain brake
actuating lever.
 Loading...