

Page 1
Important Safety Instructions
WARNING: For your own safety read instruction manual before operating miter saw.
Polarized Plugs
REPLACEMENT P ARTS. When servicing, use only identical replacement parts.
To reduce the risk of electric shock, this equipment has a polarized plug (one blade is wider than
the other). This plug will fit in a polarized outlet only one way. If the plug does not fit fully into the
outlet, reverse the plug. If it still does not fit, contact a qualified electrician to install the proper
outlet. Do not change the plug in any way . Units rated for 220 volts will have a different style plug
that will not fit the outlet and is not polarized.
Important Safety Instr uctions
• KEEP GUARDS IN PLACE and in working order.
• REMOVE ADJUSTING KEYS AND WRENCHES. Form habit of checking to see that keys and adjusting
wrenches are removed from tool before turning it on.
• KEEP WORK AREA CLEAN. Cluttered areas and benches invite injuries.
• DON’T USE IN DANGEROUS ENVIRONMENT. Don’t use power tools in damp or wet locations, or
expose them to rain. Keep work area well lighted.
• KEEP CHILDREN AWAY. All visitors should be kept safe distance from work area.
• MAKE WORKSHOP KID PROOF with padlocks, master switches, or by removing starter keys.
• DON’T FORCE TOOL. It will do the job better and safer at the rate for which it was designed.
• USE RIGHT TOOL. Don’t force tool or attachment to do a job for which it was not designed.
• USE PROPER EXTENSION CORD. Make sure your extension cord is in good condition. When using an
extension cord, be sure to use one heavy enough to carry the current your product will draw. An undersized cord will cause a drop in line voltage resulting in loss of power and overheating. The table shows
the correct size to use depending on cord length and nameplate ampere rating. If in doubt, use the next
heavier gage. The smaller the gage number, the heavier the cord.
• WEAR PROPER APPAREL. Do not wear loose clothing, gloves, neckties, rings, bracelets, or other jewel-
ry which may get caught in moving parts. Nonslip footwear is recommended. Wear protective hair covering to contain long hair.
• ALWAYS USE SAFETY GLASSES. Also use face or dust mask if cutting operation is dusty. Everyday eye-
glasses only have impact resistant lenses, they are NOT safety glasses.
• SECURE WORK. Use clamps or a vise to hold work when practical. It’s safer than using your hand and
it frees both hands to operate tool.
• DON’T OVERREACH. Keep proper footing and balance at all times.
• MAINTAIN TOOLS WITH CARE. Keep tools sharp and clean for best and safest performance. Follow
instructions for lubricating and changing accessories.
• DISCONNECT TOOLS before ser vicing; when changing accessories, such as blades, bits, cutters, and
the like.
• REDUCE THE RISK OF UNINTENTIONAL ST AR TING. Make sure switch is in off position before plugging
in.
• USE RECOMMENDED ACCESSORIES. Consult the instruction manual for recommended accessories. The
use of improper accessories may cause risk of injury to persons.
• NEVER STAND ON TOOL. Serious injury could occur if the tool is tipped or if the cutting tool is unin-
tentionally contacted.
• CHECK DAMAGED P ARTS. Before further use of the tool, a guard or other part that is damaged should
be carefully checked to determine that it will operate properly and perform its intended function–check
for alignment of moving parts, binding of moving parts, breakage of parts, mounting, and any other
conditions that may affect its operation. A guard or other part that is damaged should be properly
repaired or replaced.
• NEVER LEAVE TOOL RUNNING UNATTENDED. TURN POWER OFF. Don’t leave tool until it comes to a
complete stop.
Additional Safety Rules for Miter Saw
• Wear eye protection.
• Keep hands out of path of saw blade.
• Do not operate saw without guards in place.
• Do not perform any operation freehand.
• Never reach in back of saw blade.
• Turn of f tool and wait for saw blade to stop before moving workpiece or changing settings.
• Disconnect power before changing blade or servicing.
• Blade adjustment is to be made only with the power off and the blade stopped.
• Rated saw blade diameter is 10".
• No load speed is 5,500 R.P.M.
Additional Safety Instructions for Miter Saws
CAUTION:Do not connect unit to electrical power source until complete instructions are read and
understood.
• DO - Protect electric supply line with at least a 15 ampere time delay fuse or a circuit breaker.
• DO - Make cer tain the blade rotates in the correct direction and that the teeth at the bottom of
the blade are pointing to the rear of the miter saw.
• DO - Be sure all clamp handles are tight before starting any operation.
• DO - Be sure all blade and clamp washers are clean and recessed sides of collars are against
blade. Tighten arbor screw securely.
• DO - Keep saw blade sharp.
• DO - Keep motor air slots free of chips and dirt.
• DO - Support long work with an outboard tool rest.
• DON’T - Attempt to operate on anything but designated voltage.
• DON’T - Wedge anything against fan to hold motor shaft.
• DON’T - Cut ferrous metals (those with any iron or steel content) or any masonry.
• DON’T - Use abrasive wheels. The excessive heat and abrasive particles generated by them will
damage the saw.
• DON’T - Allow anyone to stand behind saw.
• DON’T - Apply lubricants to the blade when it’s running.
• DON’T - Use blades rated less than 5500 R.P.M.
• DON’T - Attempt to cut pieces smaller than 6" (153mm) without clamping.
• DON’T - Perform any operation freehand.
• DON’T - Reach underneath the saw unless it is turned off and unplugged. The saw blade is exposed
on the underside of the saw.
• DON’T - Move either hand from saw or workpiece or raise arm until blade has stopped.
• DON’T - Use any blade which is not 10" (254mm) in diameter.saw.
CAUTION: Some wood contains preservatives such as copper chromium arsenate (CCA) which
can be toxic. When cutting these materials extra care should be taken to avoid inhalation and
minimize skin contact.
CAUTION: WHEN SERVICING ALL TOOLS, USE IDENTICAL REPLACEMENT PAR TS. REPAIR OR
REPLACE DAMAGED CORDS.
• DON’T - Tie, tape or other wise hold guard open when operating saw.
SAVE THESE INSTRUCTIONS
For your convenience and safety, the following warning labels are on your miter saw.
ON GUARD: (DANGER - KEEP AWAY FROM BLADE.) ON TABLE: (2 PLACES)
ON FIELD CASE:
Electrical Connection
Be sure your power supply agrees with the nameplate marking. 120 volts, AC only means that
your saw is operated on alternating current only and never on direct current. A voltage decrease of
10 percent or more will cause a loss of power and overheating. All B&D tools are factory tested. If
this tool does not operate, check the power supply .
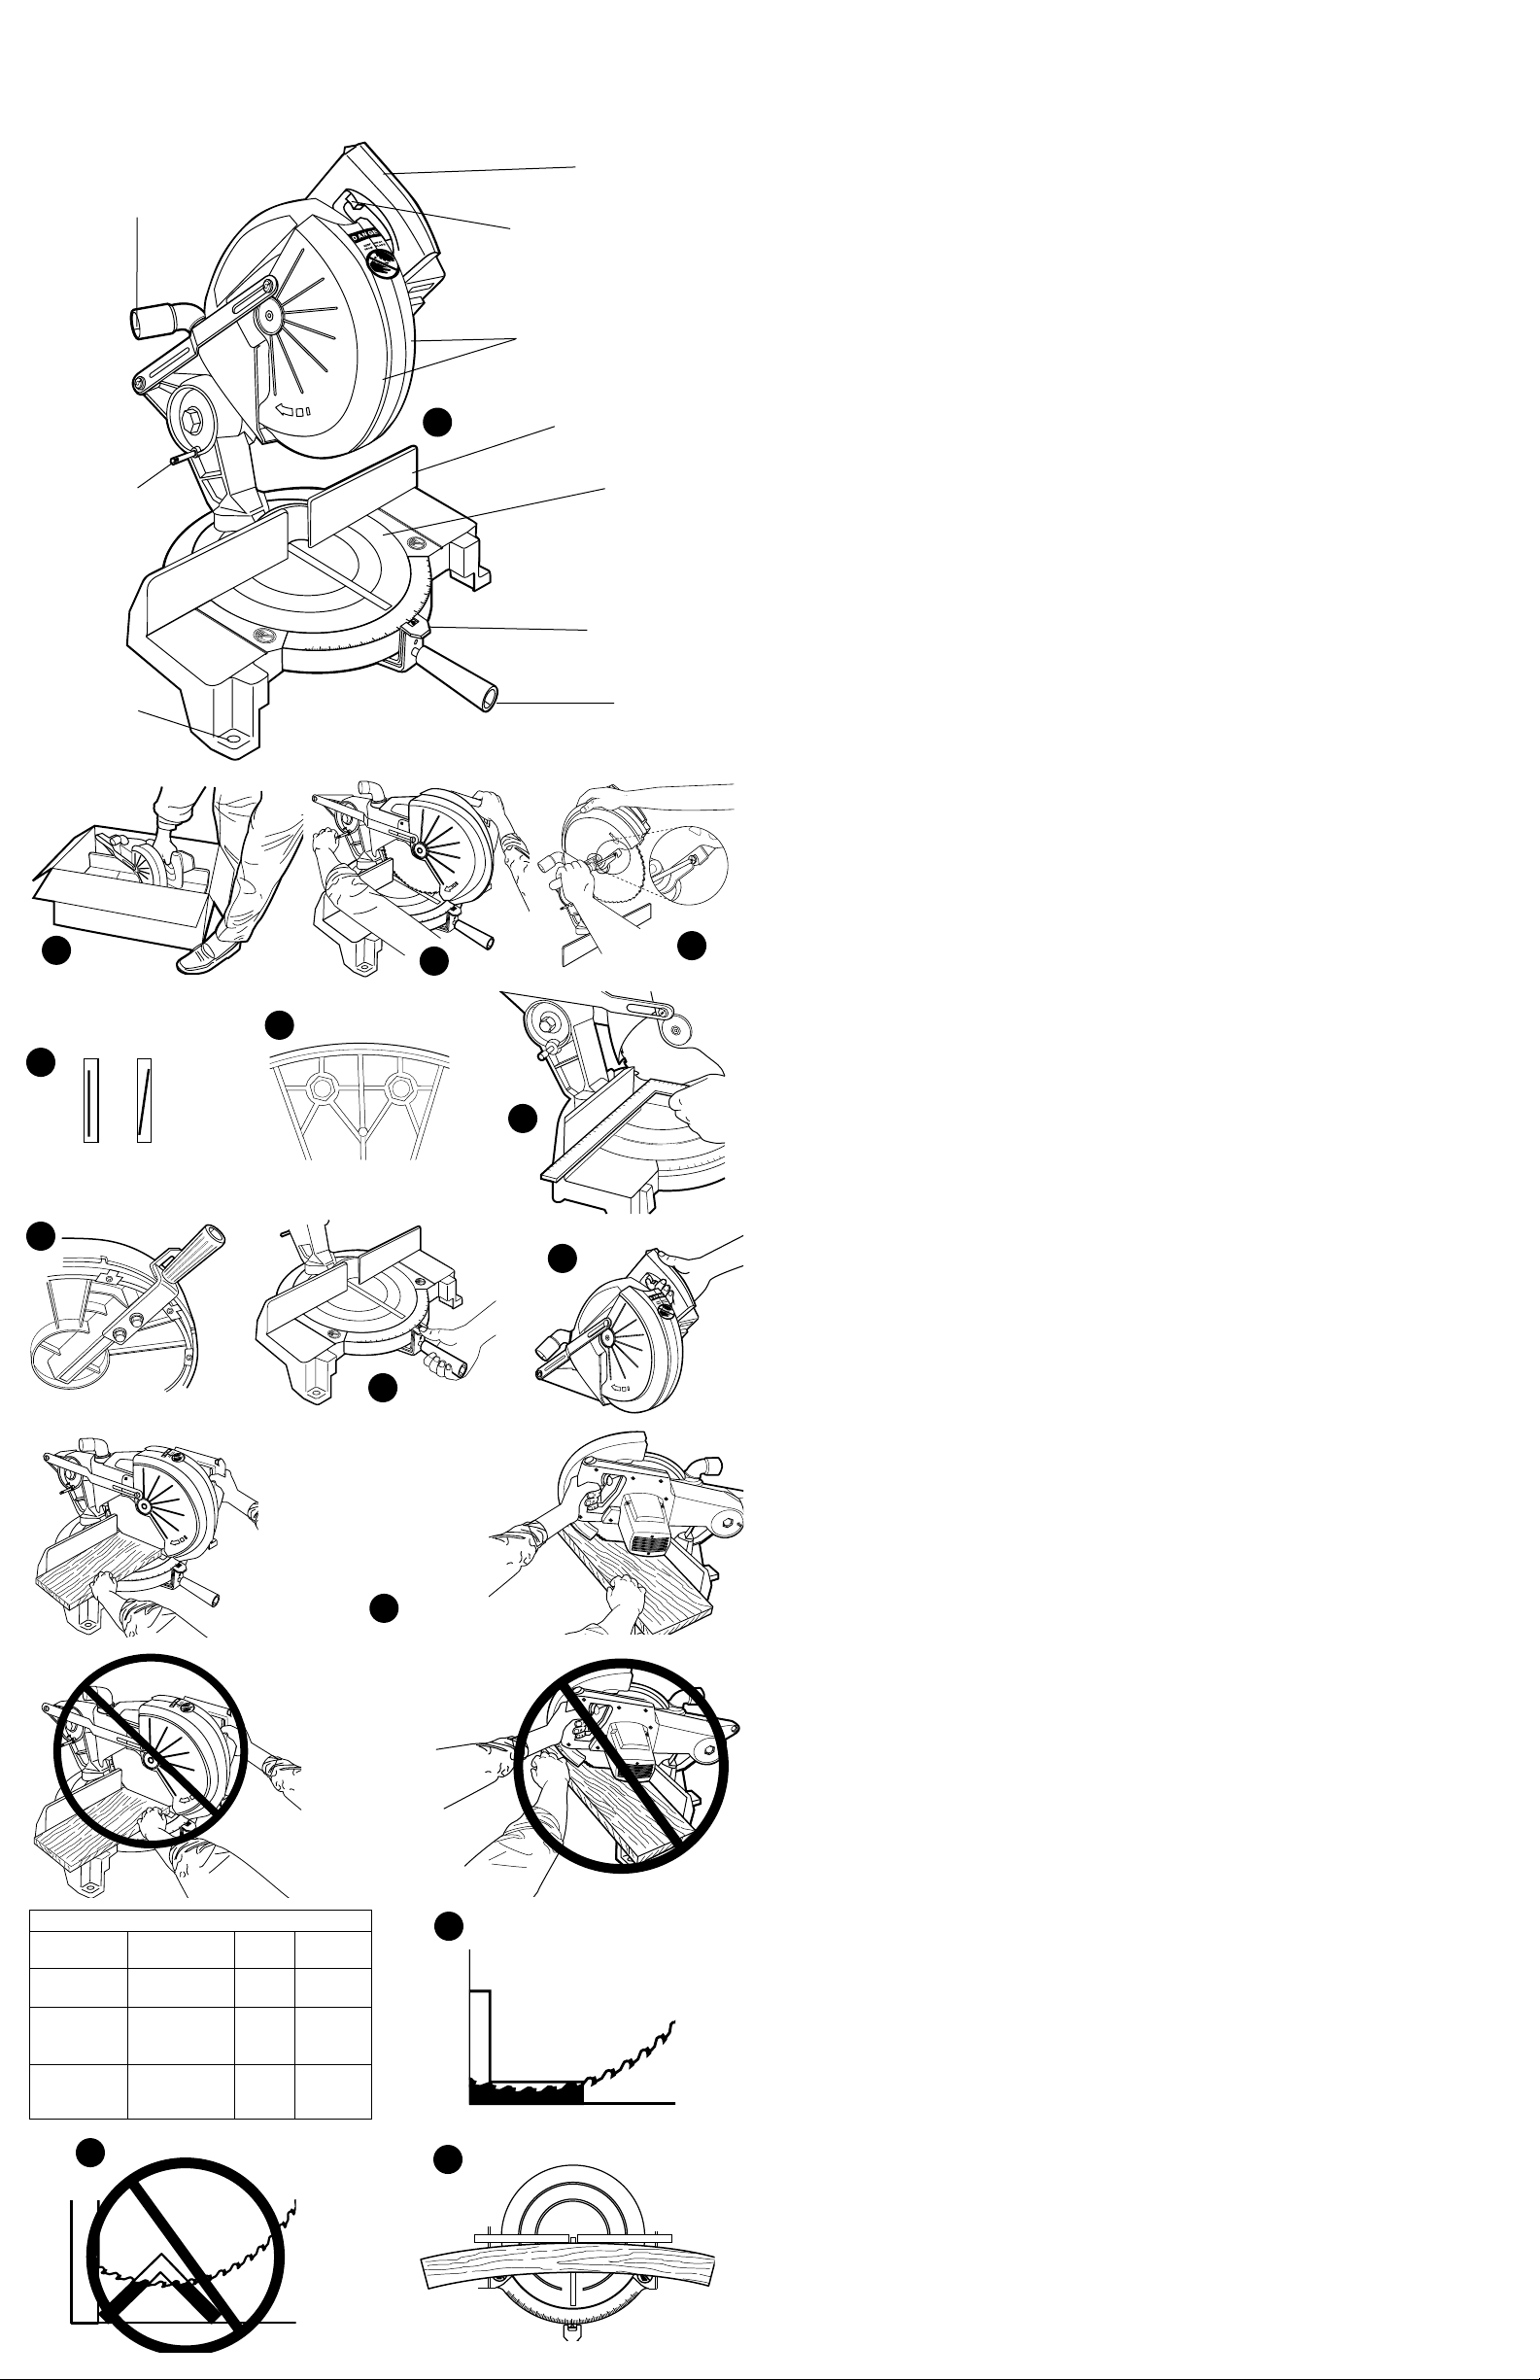
Familiarization
Your miter saw is fully assembled in the carton. Open the box and lift the saw out by the handle, as shown in Figure 1. Place the saw on a smooth, flat surface such as a workbench or
strong table.
Examine Figure A to become familiar with the saw and its various parts. The following section
on adjustments will refer to these terms and you must know what the parts are.
Press down lightly on the operating handle and pull out the lock down pin, as shown in Figure
2. Gently release the downward pressure and allow the arm to rise to its full height. Use the
lock down pin when carrying the saw from one place to another. Always use the handle to
transport the saw.
Bench Mounting
Holes are provided in all four feet to facilitate bench mounting. Always mount your saw firmly
to prevent movement. To enhance the tool’s portability, it can be mounted to a piece of 1/2"
(12.7mm) or thicker plywood which can then be clamped to your work support or moved to
other job sites and reclamped.
NOTE: If you elect to mount your saw to a piece of plywood, make sure the mounting screws
don’t protrude from the bottom of the wood. The plywood must sit flush on the work support.
When clamping the saw to any work surface, clamp only on the clamping bosses where the
mounting screw holes are located. Clamping at any other point will surely interfere with the
proper operation of the saw.
Changing the Blade
1. TURN OFF TOOL AND DISCONNECT FROM POWER SUPPLY.
2. With the saw arm in the upper position, raise the lower guard as far as possible.
3. Loosen (but do not remove) the guard bracket screw, shown in Figure 3 until the guard
bracket can be raised enough to permit access to the blade screw.
4. Push down on the saw arm to dig the saw blade teeth into a piece of scrap wood. Use the
blade wrench to remove (clockwise) the left hand threaded blade screw.
5. Remove outer clamp washer and saw blade.
6. Install the new blade making sure that the teeth at the bottom edge of the blade are pointing toward the back of the saw.
7. Replace the outer clamp washer and tighten the blade screw (counterclockwise) while hold-
VEA EL ESPAÑOL EN LA CONTRAPORTADA.
SAVE THIS MANUAL FOR FUTURE REFERENCE.
INSTRUCTIVO DE OPERACIÓN, CENTROS DE SERVICIO Y PÓLIZA DE
GARANTÍA. ADVERTENCIA: LÉASE ESTE INSTRUCTIVO ANTES DE USAR EL
PRODUCTO.
R
INSTRUCTION MANUAL
1710
11110000"""" ((((222255554444mmmmmmmm)))) MMMMiiiitttteeeerrrr SSSSaaaaww
ww
KEY INFORMA TION YOU SHOULD KNOW:
•Cut only with sharp blades. Dull blades cut poorly and overload the motor .
•If the saw does not cut accurately , refer to the TROUBLE SHOOTING chart in this
manual.
Cat # 1710 Form # 387479 MAR98-CD-1 Copyright © 1998 Black & Decker Printed in U.S.A.
Minimum Gage for Cord Sets
Volts Total Length of Cord in Feet
120V 0-25 26-50 51-100 101-150
240V 0-50 51-100 101- 200 201-300
Ampere Rating
More Not more American Wire Guage (AWG)
Than Than
0 - 6 18 16 16 14
6 - 10 18 16 14 12
10 - 12 16 16 14 12
12 - 16 14 12 Not Recommended
BEFORE RETURNING THIS PRODUCT
FOR ANY REASON PLEASE CALL
1-800-54-HOW-TO
IF YOU SHOULD EXPERIENCE A PROBLEM
WITH YOUR BLACK & DECKER PURCHASE,
CALL 1-800-54-HOW-TO.
IN MOST CASES, A BLACK & DECKER REPRESENTATIVE
CAN RESOLVE YOUR PROBLEM OVER THE PHONE.
IF YOU HAVE A SUGGESTION OR COMMENT,
GIVE US A CALL. YOUR FEEDBACK IS VITAL
TO THE SUCCESS OF BLACK & DECKER'S QUALITY
IMPROVEMENT PROGRAM.
0
4
5
3
0
3
5
2
0
2
15
0
1
5
0
5
0
1
5
1
0
2
5
2
30
4
3
5
5
0
4
DANGER
KEEP AWAY
FROM BLADE
!
WARNING:
For safe operation read instruction manual. Always
wear eye protection. Keep hands 6'' (153mm) from
path of saw blade. Do not operate saw without guards
in place. Keep guards in working order. Do not perform
any operation freehand. Never reach in back of saw
blade. Turn off tool, keep saw head down and wait for
saw blade to stop before moving work piece or
changing settings. Unplug tool before changing blade,
moving or servicing unit. Never cross arms in front of
blade. Secure unit before using.
WARNING: When servicing use only
identical replacement parts. Do not expose to
rain or use in damp locations.
AVERTISSEMENT : Pour
s'assurer du fonctionnement sûr, lire le guide
d'utilisation. Ne pas exposer à la pluie et ne pas
utiliser dans les emplacement humidies.
Black & Decker (U.S.) Inc., Towson, MD 21286 USA Made in USA
Page 2
ing the lower guard up and the saw blade teeth dug into the scrap wood.
8. AFTER INSTALLING THE SAW BLADE, REPOSITION GUARD BRACKET MAKING SURE IT
IS FULLY SEATED ON GUARD SCREW. FIRMLY TIGHTEN SCREW. FAILURE TO DO SO
WILL CAUSE SERIOUS DAMAGE TO THE SAW.
Adjustments
PERFORM ALL ADJUSTMENTS WITH THE MITER SAW UNPLUGGED!
NOTE: Your miter saw is fully and accurately adjusted at the factory. If readjustment is
required, follow the steps listed to adjust your saw.
PIVOT BOLT ADJUSTMENTS
Adjustments to the pivot bolt may be required as wear occurs. Adjustment must be made with the
saw fully assembled, including the blade. Loosen or tighten the pivot bolt by turning the hex head
located on the left side of the pivot assembly until nearly all play is removed and the motor moves
up smoothly when released.
BLADE TO FENCE SQUARENESS: Perform the steps listed:
NOTE: After adjustments, blade may not align with slot in table top.
1. With the saw unplugged, lower the pivot arm until tip of saw blade is even with top of saw
table. Blade should appear to be parallel to the sides of the slot. It is not important that the
blade be perfectly centered to the slot, but more importantly it should be reasonably parallel. See Figure 4.
If the blade appears to be parallel, proceed to "miter pointer adjustment" below. If not,
loosen (do not remove) the two bolts under the back edge of the saw table that hold the
pivot arm (see Figure 5) to the saw. Align the blade as necessary and tighten the bolts (2327 ft. lbs.). (DO NOT OVERTIGHTEN)
2. Check the squareness of the blade to the fence using a square. If the blade checks OK,
then saw is ready for use.
3. If blade and fence are not square (90°), the saw must be adjusted.
To adjust the squareness, loosen the two handle bar bolts, which are located underneath
the saw in the middle of the rotary table, (Figure 7). DO NOT REMOVE THESE BOLTS.
With the handle bar bolts loose and the rotary base set in the zero position, align the
blade square to the fence, (Figure 6).
Tighten the handle bar bolts (23-27 ft. lbs.) and your saw should be properly adjusted.
MITER POINTER ADJUSTMENT
TURN OFF TOOL AND DISCONNECT FROM POWER SUPPLY.
1. Loosen the miter clamp knob and squeeze the miter latch to move the miter arm to the 0
position, as shown in Figure 8.
2. With the miter clamp knob loose, allow the miter latch to snap into place as you rotate the
miter arm past 0.
3. Observe the pointer and miter scale through the viewing opening. If the pointer does not
indicate exactly 0, use a flat bladed screwdriver to gently push it left or right as required.
Guard Actuation and Visibility
The blade guard on your saw has been designed to automatically raise when the arm is
brought down and to lower over the blade when the arm is raised. The guard can be raised by
hand when installing or removing saw blades or for inspection of the saw. NEVER RAISE THE
BLADE GUARD MANUALLY UNLESS THE SAW IS TURNED OFF.
Switch
To turn the saw on, depress the trigger switch- Figure 9. To turn the tool off, release the switch.
There is no provision for locking the switch on, but a hole is provided in the trigger for insertion
of a padlock to lock the saw off.
Cutting with Your Saw
NOTE: Although this saw will cut wood and many nonferrous materials, we will limit our discussion to the cutting of wood only. The same guidelines apply to the other materials. DO NOT
CUT FERROUS METAL (IRON AND STEEL) OR MASONRY MATERIALS WITH THIS SAW. Do not
use any abrasive blades.
Set the miter arm at the desired angle. Be sure to tighten the miter clamp knob and hold the
wood on the table and firmly against the fence. Turn on the saw by squeezing the trigger switch
shown in Figure 9.
When the saw comes up to speed (about 1 second) lower the arm smoothly and slowly cut
through the wood. Let the blade come to a full stop before raising arm.
Quality of Cut
The smoothness of any cut depends on a number of variables. Things like material being cut,
blade type, blade sharpness and rate of cut all contribute to the quality of the cut.
When smoothest cuts are desired for molding and other precision work, a sharp (60 tooth or
greater) carbide blade and a slower, even cutting rate will produce the desired results.
Ensure that material does not creep while cutting, clamp it securely in place. Always let the
blade come to a full stop before raising the arm.
If small fibers of wood still split out at the rear of the workpiece, stick a piece of masking tape
on the wood where the cut will be made. Saw through the tape and carefully remove tape when
finished.
For varied cutting applications, refer to Table 2. Select the blade that best fits your needs.
Body and Hand Position (Figure 10)
Proper positioning of your body and hands when operating the miter saw will make cutting
easier , more accurate and safer. Never place hands near cutting area. Place hands no closer than
6" (153mm) from the blade. Hold the workpiece tightly to the table and the fence when cutting.
Keep hands in position until the trigger has been released and the blade has completely stopped.
ALWA YS MAKE DR Y RUNS (UNPOWERED) BEFORE FINISH CUTS SO THAT YOU CAN CHECK
THE P ATH OF THE BLADE. DO NOT CROSS HANDS IN FRONT OF BLADE AS SHOWN IN
FIGURE 10.
Keep both feet firmly on the floor and maintain proper balance. As you move the miter arm left
and right, follow it and stand slightly to the side of the saw blade.
Support for Long Pieces
TURN OFF TOOL AND DISCONNECT FROM POWER SUPPLY.
Support long workpieces using any convenient means, such as sawhorses or similar devices to
keep the ends from dropping.
Special Cuts
NEVER MAKE ANY CUT WITHOUT FIRMLY CLAMPING THE MATERIAL. ALWAYS USE PROPER
BLADE.
ALUMINUM CUTTING
Aluminum extrusions such as those used when making aluminum screens and storm windows
can easily be cut with your saw. Position the material so that you will be cutting the thinnest
cross section, as shown in Figure 11. Figure 12 illustrates the wrong way to cut these extrusions.
Use a wax lubricant when cutting aluminum such as Johnson’s Stick Wax No. 140. Apply the
stick wax directly to the saw blade before cutting. Never apply stick wax to a moving blade.
The wax, available at most hardware stores and industrial mill supply houses, provides proper
lubrication and keeps chips from adhering to the blade.
BOWED MATERIAL
When cutting bowed material always position it as shown in Figure 13. Positioning the material incorrectly will cause it to pinch the blade near the completion of the cut.
CUTTING PLASTIC PIPE
Plastic pipe can be easily cut with your saw. It should be cut just like wood andclamped or held
firmly to the fence to keep it from rolling.
45
25
20
1
5
1
0
5
0
5
1
0
1
5
20
2
5
30
35
40
35
4
0
30
DUST CHUTE
FENCE
LOCK DOWN PIN
TABLE
UPPER GUARD
SWITCH
SWITCH HANDLE
MOUNTING FOOT
MITER HANDLE
MITER LATCH
SPECIFICATIONS
120 Volts
1152 Watts
60 Hz
12 Amps
ORIFICE D'ÉVACUATION DE LA POUSSIÈRE
GUIDE
TIGE DE VERROUILLAGE
PROTECTEUR SUPÉRIEUR
INTERRUPTEUR
POIGNÉE D'INTERRUPTEUR
PATTE DE MONTAGE
POIGNÉE POUR ONGLETS
DISPOSITIF DE VERROUILLAGE POUR ONGLETS
TABLE
CANAL PARA POLVO
GUIA
PERNO DE TRABADO
MESA
GUARDA SUPERIOR
INTERRUPTOR
MANIJA DEL INTERRUPTOR
PIE DE MONTAJE
ASA ANGULAR
SEGURO DE ANGULO
FICHE TECHNIQUE
120 volts
1152 watts
60 Hz
12 A
ESPECIFICACIONES
Tensión de alimentación: 120 V~
Potencia nominal: 1152 W
Frecuencia de operacion: 60 Hz
Consumo de corriente: 12 A
A
1
2
3
4
5
6
4
5
2
5
2
0
1
5
1
0
5
0
5
1
0
1
5
2
0
2
5
3
0
3
5
4
0
3
5
4
0
3
0
7
8
9
45
25
2
0
1
5
1
0
5
0
5
1
0
15
2
0
2
5
3
0
3
5
4
0
35
4
0
30
4
5
25
2
0
1
5
1
0
5
0
5
10
1
5
20
25
3
0
3
5
4
0
3
5
4
0
3
0
10
11
APPLICATION
BLADE
DESCRIPTION
NO. OF
TEETH
TYPE
OF CUT
Fine Trim
Molding
Trim, Framing
Pressure Treated
Decking
Aluminum
Precision
Ground Carbide
Combination
Multi-Purpose
Non-Ferrous
Metal Cutting
Carbide
60-100
32-60
60-80
Very Smooth
Splinter Free
Smooth
Fast Cut
—
Table 2
12
13
0
5
1
0
1
5
2
0
2
5
3
0
35
40
4
5
45
4
0
35
3
0
25
20
15
1
0
5
40
35
30
5
2
0
2
5
1
0
1
5
0
5
10
5
1
0
2
5
2
0
3
5
3
0
4
4
5
Page 3

Maintenance
1 All bearings are sealed and lubricated for life. They need no fur ther maintenance.
2. Periodically clean all dust and wood chips from around AND UNDER the base and the
rotary table. Even though slots are provided to allow debris to pass through, some dust will
accumulate.
3. Use only mild soap and a damp cloth to clean the tool. Never let any liquid get inside the
tool; never immerse any part of the tool into a liquid.
Accessories
Recommended accessories for use with your tool are available at extra cost from your local
dealer or authorized service center.
CAUTION: The use of any accessor y not recommended for use with this tool could be haz-
ardous.
Important
To assure product SAFETY and RELIABILITY, repairs, maintenance and adjustment (including
brush inspection and replacement) should be performed by authorized service centers or other
qualified service organizations, always using identical replacement parts.
Trouble Shooting Guide
BE SURE TO FOLLOW SAFETY RULES AND INSTRUCTIONS
TROUBLE! SAW WILL NOT START
WHAT’S WRONG? WHAT TO DO…
1. Saw not plugged in. 1. Plug in saw.
2. Fuse blown or circuit breaker tripped. 2. Replace fuse or reset circuit breaker.
3. Cord damaged. 3. Have cord replaced by authorized ser vice
center.
4. Brushes worn out. 4. Have brushes replaced by authorized
service center.
TROUBLE! SAW MAKES UNSATISFACTORY CUTS
WHAT’S WRONG? WHAT TO DO…
1. Dull blade. 1. Replace blade.
2. Blade mounted backwards. 2. Turn blade around.
3. Gum or pitch on blade. 3. Remove blade and clean with turpen-
tine and coarse steel wool or household
oven cleaner.
4. Incorrect blade for work being done. 4. Change the blade.
TROUBLE! BLADE DOES NOT COME UP TO SPEED
WHAT’S WRONG? WHAT TO DO…
1. Extension cord too light or too long. 1. Replace with adequate size cord.
2. Low house current. 2. Contact your electric company.
TROUBLE! MACHINE VIBRATES EXCESSIVELY
WHAT’S WRONG? WHAT TO DO…
1. Saw not mounted securely to stand or work 1. Tighten all mounting hardware.
bench.
2. Stand or bench on uneven floor. 2. Reposition on flat level surface.
3. Damaged saw blade. 3. Replace blade.
TROUBLE! DOES NOT MAKE ACCURATE MITER CUTS
WHAT’S WRONG? WHAT TO DO…
1. Miter scale not adjusted correctly. 1. Check and adjust.
2. Blade is not square to fence. 2. Check and adjust.
3. Blade is not perpendicular to table. 3. Check and adjust fence.
4. Workpiece moving. 4. Clamp workpiece to fence or glue 120
grits and paper to fence with rubber
cement.
TROUBLE! MATERIAL PINCHES BLADE
WHAT’S WRONG? WHAT TO DO…
1. Cutting bowed material. 1. Position bowed material as shown
Service Information
Black & Decker offers a full network of company-owned and authorized service locations
throughout North America. All Black & Decker Service Centers are staf fed with trained personnel to provide customers with efficient and reliable power tool service.
Whether you need technical advice, repair, or genuine factory replacement par ts, contact the
Black & Decker location nearest you.
To find your local service location, refer to the yellow page directory under "Tools—Electric" or
call: 1-800-54-HOW TO.
Full Two-Year Home Use Warranty
Black & Decker (U.S.) Inc. warrants this product for two years against any defects in material
or workmanship. The defective product will be replaced or repaired at no charge in either of
two ways:
The first, which will result in exchanges only, is to return the product to the retailer from whom
it was purchased (provided that the store is a participating retailer). Returns should be made
within the time period of the retailer’s policy for exchanges (usually 30 to 90 days after the
sale). Proof of purchase may be required. Please check with the retailer for their specific return
policy regarding returns that are beyond the time set for exchanges.
The second option is to take or send the product (prepaid) to a Black &Decker owned or
authorized Service Center for repair or replacement at our option. Proof of purchase may be
required. Black & Decker owned and authorized service centers are listed under "Tools-Electric"
in the yellow pages of the phone directory.
This warranty does not apply to accessories. This warranty gives you specific legal rights and
you may have other rights which vary from state to state. Should you have any questions, contact the manager of your nearest Black & Decker Service Center.
Importantes mesures de sécurité
AVERTISSEMENT : Par mesure de sécurité personnelle, lire le guide d’utilisation avant de se
servir de l’outil.
Fiche polarisée
Afin de réduire les risques de secousses électriques, l’outil est muni d’une fiche polarisée (une lame
plus large que l’autre). Ce genre de fiche n’entre que d’une façon dans une prise polarisée.
Lorsqu’on ne peut insérer la fiche à fond dans la prise, il faut tenter de le faire après avoir inversé
les lames de côté. Si la fiche n’entre toujours pas dans la prise, il faut communiquer avec un électricien certifié. Il ne faut en aucun cas modifier la fiche.
Importantes mesures de sécurité
•LAISSER LES PROTECTEURS EN PLACE et s’assurer qu’ils sont toujours en bon état.
• ENLEVER LES CLÉS DE RÉGLAGE. Prendre l’habitude de vérifier si les clés de réglage ont été
retirées de l’outil avant de le faire démarrer.
•BIEN DÉGAGER LA SURFACE DE TRAVAIL. Des surfaces et des établis encombrés peuvent être
la cause de blessures.
• TENIR COMPTE DU MILIEU DE TRAVAIL. Ne pas se servir des outils électriques dans des endroits
humides ou mouillés. Les protéger de la pluie. Bien éclairer la surface de travail.
• ÉLOIGNER LES ENFANTS. Tous les visiteurs doivent être tenus à l’écart de l’aire de travail.
• GARDER L’ATELIER À L’ÉPREUVE DES ENFANTS en y installant des cadenas, des interrupteurs
généraux ou en retirant les clés des démarreurs.
• NE JAMAIS FORCER L’OUTIL. Afin d’obtenir un rendement sûr et efficace, utiliser l’outil à son
rendement nominal.
• UTILISER L ’OUTIL APPROPRIÉ. Ne jamais exiger d’un petit outil ou d’un accessoire le rendement
d’un outil de fabrication plus robuste. Se servir de l’outil selon l’usage prévu.
• UTILISER LES CORDONS DE RALLONGE APPROPRIÉS. S’assurer que le cordon de rallonge est
en bon état. Lorsqu’on se sert d’un cordon de rallonge, s’assurer qu’il est de calibre approprié
pour la tension nécessaire au fonctionnement de l’outil. L’utilisation d’un cordon de calibre
inférieur occasionne une baisse de tension entraînant une perte de puissance et la surchauffe.
Le tableau suivant indique le calibre approprié selon la longueur du cordon et les mentions de
la plaque signalétique de l’outil. En cas de doute, utiliser un cordon de calibre supérieur. Le
chiffre indiquant le calibre est inversement proportionnel au calibre du cordon.
Calibre minimal des cordons de rallonge
Tension Longueur totale de la rallonge en pieds
120 V 0-25 26-50 51-100 101-150
240 V 0-50 51-100 101-200 201-300
Intensité nominale (A)
Plus Moins Calibre moyen de fil (AWG)
de de
0-6 18 16 16 14
6 - 10 18 16 14 12
10 - 12 16 16 14 12
12 - 16 14 12 Non recommandé
• PORTER DES VÊTEMENTS APPROPRIÉS. Éviter de porter des vêtements amples, des gants, des
cravates, des bagues, des bracelets ou tout autre bijou qui peuvent être happés par les pièces
en mouvement. Il est conseillé de porter des chaussure à semelle antidérapante. Protéger la
chevelure si elle est longue.
• TOUJOURS PORTER DES LUNETTES DE SÉCURITÉ. Porter également un masque respiratoire si
le travail de coupe produit de la poussière. Les lentilles des verres correcteurs résistent seulement
aux chocs; ce ne sont pas des lunettes de sécurité.
• NE P AS DÉPASSER SA PORTÉE. Toujours demeurer dans une position stable et garder son équili-
bre.
• PRENDRE SOIN DES OUTILS. Conserver les outils propres et affûtés pour qu’ils donnent un rendement supérieur et sûr. Suivre les directives concernant la lubrification et le remplacement des
accessoires.
• DÉBRANCHER LES OUTILS avant de les réparer ou d’en changer un accessoire (comme une
lame, un foret ou un couteau).
• ÉVITER LES DÉMARRAGES ACCIDENTELS. S’assurer que l’interrupteur est en position hors ten-
sion (OFF) lorsqu’on branche l’outil.
• UTILISER LES ACCESSOIRES RECOMMANDÉS. Consulter le guide d’utilisation pour connaître la
liste des accessoires recommandés. L’utilisation d’accessoires inappropriés peut présenter des
risques de blessures.
• NE JAMAIS SE TENIR SUR L’OUTIL. Cela présente des risques de blessures graves si l’outil bas-
cule ou si on touche à la lame par inadvertance.
• VÉRIFIER LES PIÈCES ENDOMMAGÉES. Avant de continuer à utiliser l’outil, il faut vérifier si le
protecteur ou toute autre pièce endommagée remplit bien la fonction pour laquelle il a été prévu.
Vérifier l’alignement et les attaches des pièces mobiles, le degré d’usure des pièces et leur montage, ainsi que tout autre facteur susceptible de nuire au bon fonctionnement de l’outil. Faire
réparer ou remplacer tout protecteur ou toute autre pièce endommagée.
• TOUJOURS SURVEILLER L’OUTIL. LE METTRE HORS TENSION. Laisser l’outil seulement lorsqu’il
est complètement immobilisé.
• PIÈCES DE RECHANGE. Lors de l’entretien, utiliser seulement des pièces de rechange identiques.
Mesures de sécurité additionnelles relatives aux scies à onglets mixtes
coulissants
• Porter des lunettes de sécurité.
• Éloigner les mains du tracé de la lame. NE JAMAIS COUPER UNE PIÈCE AVEC UNE MAIN À
MOINS DE 152 mm (6 po) DE LA LAME.
• Ne pas se servir de la scie sans les protecteurs en place.
• Ne faire aucune manœuvre à main levée.
• Ne jamais placer les mains derrière la lame de la scie.
• Mettre l’outil hors tension et attendre l’immobilisation complète de la lame avant de déplacer la
pièce à ouvrer ou de modifier les réglages.
• Débrancher l’outil avant d’en remplacer la lame ou d’en faire l’entretien.
• Régler la lame seulement lorsque l’outil est hors tension et que la lame est immobile.
• Ne jamais utiliser la scie sans la plaque rainurée.
• Remplacer la plaque lorsque la largeur de la rainure dépasse 3 mm (1/8 po).
• Afin de réduire les risques de blessures, remonter la scie en position arrière complète après
chaque coupe en travers.
MISE EN GARDE : LE NON-RESPECT DES PRÉSENTS AVERTISSEMENTS PEUT PRÉSENTER DES
RISQUES DE BLESSURES ET DE DOMMAGES IMPORTANTS.
• PROTÉGER le circuit électrique avec un fusible à action différée ou un disjoncteur d’au moins
15 ampères.
• S’ASSURER que la lame tourne dans le bon sens et que les dents du bas de la lame pointent
vers l’arrière de la scie à onglets mixtes coulissants.
• SE SERVIR des stabilisateurs en tout temps.
• VÉRIFIER si tous les boutons et les poignées de serrage sont bien fixés avant de commencer à
se servir de la scie.
• S’ASSURER que les rondelles de la lame et de l’arbre sont propres et que le côté en retrait des
collets repose contre la lame. Bien serrer la vis de l’arbre.
• VEILLER à ce que la lame soit bien affûtée et réglée.
• S’ASSURER que les orifices d’aération du moteur sont propres et libres de copeaux.
• UTILISER en tout temps les protecteurs de la lame.
• ÉLOIGNER les mains du tracé de la lame.
• METTRE la scie hors tension, débrancher le cordon d’alimentation et attendre l’immobilisation
complète de la lame avant d’entretenir ou de régler l’outil.
• SOUTENIR les grandes pièces à découper à l’aide de chevalets ou d’un établi.
• NE PAS essayer de faire fonctionner l’outil à une tension autre que la tension nominale.
• NE PAS faire fonctionner la scie à onglets si les boutons de serrage ne sont pas bien fixés.
• NE PAS utiliser de lame dont le diamètre est inférieur ou supérieur à celui recommandé.
• NE RIEN coincer dans le ventilateur pour soutenir l’arbre du moteur.
• NE PAS forcer la coupe. (Le blocage partiel ou complet du moteur peut causer des dommages
irrémédiables. Laisser le moteur atteindre son régime nominal avant de commencer à couper.)
• NE PAS couper des métaux ferreux (ceux qui renferment du fer ou de l’acier) ni de la maçon-
nerie.
See ‘Tools-Electric’
– Yellow Pages –
for Service & Sales
Imported by
Black & Decker (U.S.) Inc.,
701 E. Joppa Rd.
Towson, MD 21286 U.S.A.
SSSScccciiiieeee àààà oooonnnngggglllleeeettttssss ddddeeee 222255554444 mmmmmmmm ((((11110000 ppppoooo))
))
RENSEIGNEMENTS IMPORTANTS
•Couper seulement avec des lames affûtées. Des lames émoussées coupent mal et
surchargent le moteur.
•Lorsque la scie ne coupe pas bien, consulter le guide de dépannage
GUIDE D’UTILISATION
CONSERVER LE PRÉSENT GUIDE À TITRE DE RÉFÉRENCE.
AVANT DE RETOURNER LE PRODUIT, PEU IMPORTE LA RAI-
SON PRIÈRE DE COMPOSER
1 800 544-6986
YOU'VE GOT THE TOOL
http://www.blackanddecker.com
NOW GET THE KNOW-HOW
Page 4

• NE PAS utiliser des meules abrasives. La chaleur excessive et les particules abrasives dégagées
abîmeraient la scie.
• NE PAS utiliser des lames abrasives.
• NE permettre à personne de rester derrière la scie.
• NE PAS lubrifier la scie lorsqu’elle fonctionne.
• NE PAS mettre les mains près de la lame lorsque la scie est branchée.
• NE PAS se servir de lames conçues pour fonctionner à un régime inférieur à 5500 trs/min.
• NE PAS essayer de découper de petites pièces (152 mm - 6 po) non fixées.
• NE PAS se servir de la scie sans les protecteurs.
• NE PAS utiliser la scie sans la tenir d’au moins une main.
• NE PAS placer les mains près de la lame de la scie.
• NE PAS placer les mains à moins de 152 mm (6 po) de la lame.
• NE PAS placer les mains sous la scie sauf si celle-ci est hors tension et débranchée.
• NE P AS déplacer les mains de la scie ni de la pièce à découper et ne pas soulever les bras avant
l’immobilisation complète de la lame.
MISE EN GARDE : Ne pas brancher l’outil avant d’avoir bien lu et compris toutes les mesures
de sécurité.
MISE EN GARDE : Certaines essences de bois renferment des agents de conservation (comme
de l’arséniate de cuivre et de chrome) qui peuvent être toxiques. Lorsqu’on doit couper de tels
matériaux, prendre des mesures supplémentaires afin d’éviter d’inhaler les vapeurs toxiques et de
minimiser les contacts avec la peau.
À titre de commodité et de sécurité, les étiquettes suivantes se trouvent sur la scie à onglets mixtes
coulissants.
Connexion électrique
Il faut s’assurer que la source d’alimentation utilisée est conforme aux inscriptions qui figurent
sur la plaque signalétique. La mention 120 volts c.a. seulement signifie que l’outil utilise seulement du courant alternatif et jamais du courant continu. Une baisse de tension de plus de
10 p. 100 provoque une perte de puissance et la surchauffe de l’outil. Tous les outils
Black & Decker sont vérifiés à l’usine. Si l’outil ne fonctionne pas, vérifier la source d’alimentation.
Familiarisation
La scie à onglets est complètement assemblée dans l’emballage. Il suffit d’ouvrir la boîte et d’en sortir la
scie en la soulevant par sa poignée, comme le montre la figure 1. Déposer la scie sur une surface uniforme
et plate (comme un établi ou une table solide).
Examiner les figures qui se trouvent sur la page couverture intérieure avant du présent guide afin de
mieux connaître la scie et ses composantes. La rubrique suivante relative aux réglages utilise les termes
indiqués sur les figures et il faut les connaître.
Appuyer légèrement sur la poignée de fonctionnement et retirer la tige de verrouillage (fig. 2). Relâcher
doucement la pression exercée vers le bas et laisser le bras remonter à sa position de service. Utiliser la
tige de verrouillage pour transporter la scie. Toujours saisir la scie par sa poignée pour le transport.
Montage sur établi
Les quatre pattes de l’outil sont pourvues d’un trou afin d’en faciliter le montage sur établi.
Toujours installer la scie solidement afin d’éviter qu’elle ne bouge. Afin de pouvoir transporter
la scie facilement, il est conseillé de fixer l’outil à un morceau de contreplaqué d’au moins
12,7 mm (1/2 po) d’épaisseur qu’on pourra ensuite fixer à un établi ou à un autre endroit
lorsqu’on a à se déplacer.
NOTE : Lorsqu’on fixe la scie sur un morceau de contreplaqué, s’assurer que les vis ne
dépassent pas sous le bois. Le contreplaqué doit reposer à plat sur la surface de travail.
Lorsqu’on fixe la scie à une surface quelconque, il faut installer les brides de serrage seulement
aux épaulements où se trouvent les trous des vis de montage. L’installation des brides à tout
autre endroit nuira au bon fonctionnement de la scie.
Remplacement de la lame
1. METTRE L’OUTIL HORS TENSION ET LE DÉBRANCHER.
2. Lorsque le moteur de la scie est en position élevée, soulever au maximum le protecteur
inférieur.
3. Desserrer (sans l’enlever) la vis de la patte d’attache du protecteur illustrée à la figure 3
jusqu’à ce qu’on puisse soulever la patte d’attache du protecteur suffisamment pour
accéder à la vis de la lame.
4. Abaisser le bras de la scie jusqu’à ce que les dents de la lame s’enfoncent dans un bout de
bois. Utiliser la clé pour enlever (dans le sens horaire) la vis de la lame (filet à gauche).
5. Retirer la rondelle de fixation extérieure et la lame de la scie.
6. Installer la nouvelle lame en s’assurant que les dents au bas de la lame pointent vers l’arrière de la scie.
7. Remettre en place la rondelle de fixation extérieure et serrer la vis de la lame (dans le sens
antihoraire) tout en retenant le protecteur inférieur en position élevée et les dents de la
lame coincées dans un bout de bois.
8. BIEN RABAISSER LA PATTE D’ATTACHE DU PROTECTEUR ET SERRER FERMEMENT LA VIS
DE LA PATTE D’ATTACHE DU PROTECTEUR APRÈS AVOIR INSTALLÉ LA LAME, SINON LA
SCIE SERA ENDOMMAGÉE.
Réglages
S’ASSURER QUE LA SCIE À ONGLETS EST DÉBRANCHÉE AVANT DE LA RÉGLER.
NOTE : La scie à onglets est complètement et précisément réglée en usine. Lorsqu’on doit la
régler de nouveau, se conformer aux consignes suivantes.
RÉGLAGE DU BOULON DE PIVOT
Il peut être nécessaire de régler le boulon de pivot en raison de l’usure. Il faut effectuer ce
réglage lorsque la scie est complètement montée, y compris la lame. Desserrer ou serrer le
boulon de pivot en faisant tourner la tête hexagonale située à gauche du pivot jusqu’à ce qu’il
n’y ait plus de jeu et que le moteur monte doucement lorsqu’on le relâche.
LAME PERPENDICULAIRE AU GUIDE- Faire ce qui suit.
NOTE : Après ce réglage, la lame peut ne plus s’aligner sur la rainure de la plaque.
1. Lorsque la scie est débranchée, abaisser le bras de pivot jusqu’à ce que le rebord de la
lame soit à égalité avec le dessus de la plaque rainurée. La lame doit alors sembler être
parallèle aux côtés de la plaque rainurée. La lame ne doit pas nécessairement être parfaitement au centre de la plaque rainurée, mais elle doit y être parallèle, dans la mesure
du possible (fig. 4).
Lorsque la lame semble parallèle, effectuer le réglage de l’indicateur d’onglets décrit.
Sinon, desserrer (mais ne pas enlever) les deux boulons qui se trouvent sous le rebord
arrière de la table de la scie retenant le bras de pivot (fig. 5) à la scie. Aligner la lame au
besoin et resserrer les boulons (couple de 23 à 27 lb-pi). (ÉVITER DE TROP SERRER.)
2. Vérifier si la lame est perpendiculaire au guide à l’aide d’une équerre. Le cas échéant, on
peut se servir de la scie.
3. Lorsque ce n’est pas encore le cas, il faut régler la scie.
Pour la régler, desserrer les deux boulons de la barre de poignée qui se trouvent sous la
scie, au centre de la table rotative (fig. 7). NE PAS RETIRER CES BOULONS.
Lorsque les boulons de la barre de poignée sont lâches et que la base rotative est réglée à
la position zéro, placer la lame perpendiculaire au guide (fig. 6).
Serrer les boulons de la barre de poignée (couple de 23 à 27 pi-lb) et la scie devrait être
bien réglée.
RÉGLAGE DE L’INDICATEUR D’ONGLETS
METTRE L ’OUTIL HORS TENSION ET LE DÉBRANCHER.
1. Desserrer le bouton de serrage pour onglets et serrer le dispositif de verrouillage pour onglets
afin de déplacer l’indicateur d’onglets à la position 0, comme le montre la figure 8.
2. Laisser le bouton pour onglets desserré et faire enclencher le dispositif de verrouillage pour
onglets en faisant tourner l’indicateur d’onglets au-delà de zéro.
3. Examiner l’indicateur et l’échelle d’onglets par l’ouverture. Lorsque l’indicateur ne montre pas
exactement le zéro, le déplacer doucement vers la gauche ou la droite à l’aide d’un tournevis
à lame plate.
Fonctionnement du protecteur et visibilité
Le protecteur de la scie est conçu pour se soulever automatiquement lorsqu’on abaisse le
moteur et pour se rabaisser sur la lame lorsque le moteur remonte. On peut le soulever à la
main lors de l’installation et du retrait de la lame ou pour effectuer l’inspection de la scie. NE
JAMAIS SOULEVER LE PROTECTEUR À LA MAIN LORSQUE LA SCIE EST SOUS TENSION.
Interrupteur
Pour mettre la scie en marche, enfoncer l’interrupteur à détente (fig. 9). Pour arrêter l’outil,
relâcher l’interrupteur. Il n’est pas possible de verrouiller la scie en marche, mais la détente est
dotée d’un trou permettant d’y insérer un cadenas afin de bloquer la scie en position d’arrêt.
Coupe
NOTE : Même si la scie peut couper le bois et de nombreux métaux non-ferreux, le présent
guide ne traite que de la coupe du bois. Les mêmes directives valent pour les autres matériaux.
NE PAS UTILISER LA SCIE POUR COUPER DES MÉTAUX FERREUX (COMME LE FER ET L’ACIER)
NI DE LA MAÇONNERIE. Ne pas utiliser de lame abrasive.
Régler l’indicateur d’onglets à l’angle voulu. Bien serrer le bouton de verrouillage pour
onglets et bien retenir le bois contre la table en l’appuyant fermement contre le guide. Mettre
la scie en marche en enfonçant la détente de l’interrupteur (fig. 9).
Lorsque la scie atteint son régime de fonctionnement (en environ 1 seconde), abaisser le
moteur doucement et couper le bois lentement. Attendre l’immobilisation complète de la lame
avant de soulever le moteur.
Qualité de la coupe
La qualité de la coupe dépend d’un certain nombre de facteurs. Il peut s’agir du type de
matériau à couper, du type de lame utilisé, de l’affûtage de la lame et de la vitesse de coupe.
Ces éléments influencent tous la qualité de la coupe.
Lorsqu’on veut une coupe douce pour une moulure ou tout autre travail de précision, une lame
tranchante (d’au moins 60 dents, au carbure) ainsi qu’une vitesse de coupe lente et uniforme
procurent les résultats voulus.
Afin d’éviter que le matériau ne glisse pendant la coupe, bien le fixer en place. Toujours
attendre l’immobilisation complète de la lame avant de soulever le moteur de la scie.
Lorsque de petites fibres de bois éclatent encore à l’arrière de la pièce à découper, coller du
ruban-cache sur le bois sur la ligne de coupe. Découper dans le ruban-cache et le retirer à la
fin des travaux.
Consulter le tableau 2 pour les lames recommandées pour les diverses applications de la scie.
Choisir celle qui convient le mieux à la tâche.
Position du corps et des mains
(Figure 10)
Une bonne position du corps et des mains facilite l’utilisation de la scie tout en donnant de
meilleurs résultats de façon sûre. Ne jamais placer les mains près de la zone de coupe. Les
tenir à plus de 153 mm (6 po) de la lame. Bien placer la pièce à découper contre la plaque et
le guide pendant la coupe. Ne pas déplacer les mains jusqu’à ce qu’on ait relâché la détente
et que la lame ne s’immobilise complètement. TOUJOURS FAIRE DES ESSAIS À BLANC (AVEC
L’OUTIL HORS TENSION) AVANT LES COUPES DE FINITION AFIN DE VÉRIFIER LA TRAJECTOIRE DE LA LAME. NE PAS CROISER LES MAINS, COMME LE MONTRE LA FIGURE 10.
Laisser les deux pieds sur le plancher et garder un bon équilibre. Lorsqu’on déplace la scie à
onglets à gauche et à droite, la suivre et se tenir un peu sur le côté de la lame. Regarder par
les volets du protecteur pour suivre un tracé au crayon
Soutien des grandes pièces
METTRE L’OUTIL HORS TENSION ET LE DÉBRANCHER.
Soutenir les grandes pièces à l’aide de chevalets ou de tout autre dispositif semblable qui
empêchera les bouts de tomber.
Coupes particulières
NE JAMAIS COUPER LE MATÉRIAU AVANT DE L’AVOIR BIEN FIXÉ. TOUJOURS UTILISER LA
LAME APPROPRIÉE .
COUPE DE L’ALUMINIUM
La scie peut facilement couper des profilés d’aluminium comme ceux utilisés dans la fabrication de moustiquaires et de contre-fenêtres. Placer le matériau de façon à couper la partie
transversale la plus mince, comme le montre la figure 11. La figure 12 illustre une façon incorrecte de découper ces profilés.
Utiliser une cire lubrifiante pour couper l’aluminium (comme la cire en bâtons n° 140 de
Johnson). Appliquer le bâton de cire directement sur la lame de la scie avant la coupe. Ne
jamais enduire de cire une lame en mouvement.
La cire (vendue dans la plupart des quincailleries et des centres de fournitures industrielles)
assure la lubrification adéquate de l’outil et empêche l’adhésion d’éclats à la lame.
MATÉRIAU ARQUÉ
Toujours placer les matériaux arqués de la façon illustrée à la figure 13. Lorsque le matériau
n’est pas bien placé, il se coince sur la lame avant la fin de la coupe.
DANGER
KEEP AWAY
FROM BLADE
SUR LE BOÎTIER DU CHAMP :
SUR LE PROTECTEUR :
DANGER –
ÉLOIGNER
DE LA LAME.
CONSERVER CES MESURES À TITRE DE RÉFÉRENCE.
UTILISATION
DESCRIPTION DE
LA LAME
NOMBRE
DE DENTS
TYPE
DE COUPE
Moulure
délicate
Moulure,
cadrage et bois
traité
Aluminium
Au carbure,
évidée et précise
De60
à100
De32
à60
De60
à80
Très douce;
sans éclat
Douce;
coupe rapide
—
Tableau 2
Universelle
À usages
multiples
À métaux
non-ferreux
Au carbure
!
WARNING: When servicing use only
identical replacement parts. Do not expose to
rain or use in damp locations.
AVERTISSEMENT : Pour
s'assurer du fonctionnement sûr, lire le guide
d'utilisation. Ne pas exposer à la pluie et ne pas
utiliser dans les emplacement humidies.
Black & Decker (U.S.) Inc., Towson, MD 21286 USA Made in USA
WARNING:
For safe operation read instruction manual. Always
wear eye protection. Keep hands 6'' (153mm) from
path of saw blade. Do not operate saw without guards
in place. Keep guards in working order. Do not perform
any operation freehand. Never reach in back of saw
blade. Turn off tool, keep saw head down and wait for
saw blade to stop before moving work piece or
changing settings. Unplug tool before changing blade,
moving or servicing unit. Never cross arms in front of
blade. Secure unit before using.
Page 5

Tuyau en plastique et autre matériau rond à coupe transversale
La scie coupe facilement les tuyaux en plastique et autres matériaux semblables. Ils se coupent
comme le bois et il faut BIEN LES SAISIR OU LES FIXER AU GUIDE POUR LES EMPÊCHER DE
ROULER SURTOUT LORSQU’ON COUPE EN ANGLE.
Entretien
1. Tous les roulements sont scellés et ils sont lubrifiés en permanence et ne nécessitent aucun
entretien.
2. Nettoyer régulièrement la poussière et les copeaux qui se trouvent autour ET EN DESSOUS
du socle et de la plaque tournante. Même s’il y a des fentes pour laisser passer les débris,
ceux-ci s’accumulent.
3. Utiliser seulement un savon doux et un chiffon humide pour nettoyer l’outil. Ne laisser
aucun liquide s’infiltrer dans l’outil et ne jamais l’immerger.
Accessoires
Les accessoires recommandés pour l´outil sont vendus chez le détaillant ou au centre de ser-
vice autorisé de la région.
MISE EN GARDE : L’utilisation de tout autre accessoire non recommandé pour l’outil peut être
dangereuse.
Important
Pour assurer la SÉCURITÉ D’EMPLOI et la FIABILITÉ de l’outil, n’en confier la réparation, l’entretien et les rajustements (y compris l’inspection et le remplacement des balais) qu’à un centre
de service ou à un atelier d’entretien autorisé n’utilisant que des pièces de rechange identiques.
Guide de dépannage
SE CONFORMER AUX MESURES DE SÉCURITÉ ET AUX DIRECTIVES.
PROBLÈME : LA SCIE NE DÉMARRE PAS.
VÉRIFIER SI : SOLUTION
1. La scie est branchée. 1. Brancher la scie.
2. Le fusible a sauté ou le disjoncteur est enclenché. 2. Remplacer le fusible ou
enclencher le disjoncteur.
3. Le cordon est endommagé. 3. Faire remplacer le cordon au
centre de service autorisé.
4. Les balais sont usés. 4. Faire remplacer les balais au
centre de service autorisé
PROBLÈME : LA SCIE NE COUPE PAS BIEN.
VÉRIFIER SI : SOLUTION
1. La lame est émoussée 1. Remplacer la lame
2. La lame est installée à l’envers. 2. La replacer à l’endroit
3. Il y a de la gomme ou de la poix sur la lame. 3. Enlever la lame, la nettoyer
avec de la térébenthine et
une laine d’acier de gros cal
ibre ou à l’aide d’un nettoy
ant à fours.
4. La lame ne convient pas à la coupe. 4. Remplacer la lame.
PROBLÈME : LA SCIE N’ATTEINT PAS SON PLEIN RÉGIME.
VÉRIFIER SI : SOLUTION
1. Le cordon de rallonge est de trop faible calibre ou il est 1. Utiliser un cordon
trop long. de dimensions appropriées
2. Le courant domestique est trop faible. 2. Appeler la compagnie d’élec
tricité.
PROBLÈME : LA SCIE VIBRE DÉMESURÉMENT.
VÉRIFIER SI : SOLUTION
1. La scie n’est pas bien installée sur le soutien ou 1. Serrer toutes les ferrures de
sur l’établi montage
2. Le soutien ou l’établi se trouve sur un plancher inégal. 2. Replacer sur une surface
plane.
3. La lame est endommagée. 3. Remplacer la lame
PROBLÈME : LA SCIE NE COUPE PAS BIEN LES ONGLETS.
VÉRIFIER SI : SOLUTION
1. L’échelle pour onglets est bien réglé. 1. Vérifier et régler.
2. La lame n’est pas perpendiculaire au guide. 2. Vérifier et régler.
3. La lame n’est pas perpendiculaire à la plaque. 3. Vérifier et régler
4. La pièce à découper bouge. 4. Fixer la pièce au guide ou
coller du papier abrasif de
grain 120 sur le guide avec
une dissolution.
PROBLÈME : LE MATÉRIAU SE COINCE SUR LALAME.
VÉRIFIER SI : SOLUTION
1. On coupe un matériau arqué. 1. Placer les matériaux arqués
de la façon illustrée
Renseignements relatifs au service
Black & Decker exploite un réseau complet de centres de service et d’ateliers d’entretien autorisés par toute
l’Amérique du Nord. Le personnel de tous les centres de service Black & Decker a reçu la formation voulue
pour assurer l’entretien efficace et fiable des outils électriques.
Pour obtenir des renseignements d’ordre technique, des conseils relatifs aux réparations ou des pièces de
rechange d’origine, communiquer avec le centre de service Black & Decker de la région.
On peut trouver l’adresse du centre de service de la région dans l’annuaire des Pages Jaunes à la rubrique
«Outils électriques» ou en composant le numéro suivant : 1 800 544-6986
Garantie complète de deux ans pour utilisation domestique
Black & Decker garantit ce produit pour une période de deux ans contre les vices de matière ou
de fabrication. Le produit défectueux sera réparé ou remplacé sans frais conformément à l’une
des conditions suivantes.
Pour échanger l’outil, il suffit de le retourner au détaillant (si le détaillant participe au programme
d’échange rapide Black & Decker). Le retour doit être effectuer dans les délais impartis par la
politique de retour du détaillant (habituellement entre 30 et 90 jours suivant la date d’achat). Le
détaillant peut exiger une preuve d’achat. Prière de vérifier la politique de retour du détaillant
au-delà des délais impartis.
On peut également retourner l’outil port payé à un centre de service Black & Decker ou à tout
autre atelier d’entretien accrédité pour y être remplacé ou réparé, à notre gré. On peut exiger
une preuve d’achat. Les adresses des centres de service Black & Decker se trouvent à la rubrique
«Outils électriques» des Pages jaunes.La présente garantie ne vaut pas pour les accessoires. Les
modalités de la présente garantie donnent des droits légaux spécifiques. L ’utilisateur peut
également se prévaloir d’autres droits selon l’état ou la province qu’il habite. Pour obtenir de
plus amples renseignements, communiquer avec le directeur du centre de service Black & Decker
de la région.
INFORMACION CLAVE QUE DEBE SABER
•Corte únicamente con discos afilados. Los discos desafilados cortan pobremente y
sobrecargan el motor.
•Si la sierra no corta con precisión consulte la GUIA PARA SOLUCION DE
PROBLEMAS FRECUENTES
INSTRUCCIONES IMPORTANTES DE SEGURIDAD
ADVERTENCIA: Por su propia seguridad lea el manual de instrucciones antes de operar la sier-
ra de ángulo compuesto corrediza.
Clavijas polarizadas
Este equipo cuenta con una clavija polarizada (con una pata más ancha que la otra) para reducir
los riesgos de choque eléctrico. Este tipo de clavija, ajustará en un contacto polarizado solamente
de una manera. Si la clavija no ajusta completamente en su contacto, inviértala. Si aún así no
ajusta, llame a un electricista calificado para que le instale un contacto polarizado apropiado.
No modifique o haga cambios en la clavija por ningún motivo.
Instrucciones de seguridad importantes
• CONSERVE LAS GUARDAS EN SU SITIO y listas para el trabajo.
• RETIRE LAS LLAVES DE AJUSTE Y OTRAS HERRAMIENTAS. Hágase el hábito de revisar para
verificar que las llaves se hayan retirado de la herramienta antes de encenderla.
• CONSERVE LIMPIA EL AREA DE TRABAJO. Los lugares y los bancos desordenados propician
los accidentes.
• NO SE UTILICE EN AMBIENTES PELIGROSOS. No utilice herramientas eléctricas en lugares
húmedos o inundados, ni las exponga a la lluvia. Conserve el área de trabajo bien iluminada.
• CONSERVE APARTADOS A LOS NIÑOS. Todos los visitantes deben permanecer a distancia
segura del área de trabajo.
• HAGA SU TALLER A PRUEBA DE NIÑOS con candados, interruptores maestros o quitando las
llaves de encendido.
• NO FUERCE LA HERRAMIENTA. Esta hará el trabajo mejor y de manera más segura bajo las
especificaciones para las que se diseñó.
• UTILICE LA HERRAMIENTA ADECUADA. No fuerce a una herramienta o sus dispositivos a hacer
trabajos para los que no se han diseñado.
• UTILICE CABLES DE EXTENSION ADECUADOS. Asegúrese que su cable de extensión esté en
buenas condiciones. Cuando utilice una extensión, asegúrese que tenga el calibre necesario
para soportar la corriente que su herramienta requiere. Un cale con calibre menor causará una
caída en el voltaje de la línea, ocasionando pérdida de potencia y sobrecalentamiento. El
cuadro siguiente muestra el calibre correcto para usarse de acuerdo con la longitud y el amperaje descrito en la placa de identificación. Si tiene dudas, utilice el calibre siguiente. Mientras
más pequeño sea el número del calibre, mayor será su capacidad.
Calibre mínimo requerido (AWG) para cables de extensión
Volts Longitud total de la extensión (metros)
120 V 0 - 7.5 7.6 - 15.2 15.3 -30.4 30.5 - 45.7
240 V 0 - 15.2 15.3 - 30.4 30.5 - 60.8 60.9 - 121.2
Amperaje en la placa de identificación
Más No más Calibre promedio del alambrede
de de
0 - 6 18 16 16 14
6 - 10 18 16 14 12
10 - 12 16 16 14 12
12 - 16 14 12 No se recomienda
• UTILICE LAS ROPAS ADECUADAS. No utilice prendas flojas, guantes corbatas, anillos brazaletes ni otros artículos de joyería que pudiesen quedar atrapados por las piezas en movimiento. Se recomienda el uso de calzado antiderrapante. Cúbrase el cabello si lo tiene largo.
• SIEMPRE UTILICE ANTEOJOS DE SEGURIDAD. También utilice una máscara contra polvo si la
operación que efectuará lo produce. Los anteojos de diario solamente tienen lentes resistentes
al impacto, no son anteojos de seguridad.
• ASEGURE LAS PIEZAS DE TRABAJO. Utilice prensas para sujetar su trabajo cuando le sea práctico. Esto es más seguro que usar sus manos y le deja ambas libres para operar la herramienta.
• NO SE SOBREEXTIENDA. Conser ve los pies bien apoyados, lo mismo que el equilibrio.
• CUIDE SUS HERRAMIENTAS. Consérvelas afiladas y limpias para un rendimiento más seguro y
más eficaz. Siga las instrucciones para la lubricación y el cambio de accesorios.
• DESCONECTE LAS HERRAMIENTAS antes de darles servicio y cuando cambie de accesorios,
tales como discos, brocas, cuchillas, y otros similares.
• EVITE EL RIESGO DE ENCENDIDO ACCIDENTAL. Asegúrese que el interruptor esté en posición
de apagado antes de conectar la herramienta.
• UTILICE LOS ACCESORIOS RECOMENDADOS. Consulte el manual de instrucciones para conocer los accesorios recomendados. El empleo de accesorios no apropiados puede ocasionar riesgos de lesiones a las personas.
• NUNCA SE PARE EN LA HERRAMIENTA. Se puede lesionar gravemente si la herramienta se
vuelca o hace contacto accidental con la pieza de corte.
• REVISE LAS PARTES DAÑADAS. Antes de seguir utilizando la herramienta, una guarda u otra
pieza que esté dañada debe ser examinada cuidadosamente para determinar si funcionará
apropiadamente y cumplirá con su función. Revise la alineación de las piezas móviles, su montaje, la ruptura de las piezas, montajes y cualesquiera otras condiciones que pudiesen afectar
su operación. Una guarda u otra parte dañada debe ser reparada correctamente o reemplazada.
• SENTIDO DE ALIMENTACION. Alimente la pieza de trabajo hacia el disco únicamente en contra de su sentido de rotación.
• NUNCA DEJE LA HERRAMIENTA EN OPERACION DESATENDIDA. APAGUELA. No deje la herramienta hasta que se haya detenido completamente.
• PARTES DE REPUESTO. Utilice únicamente piezas de repuesto idénticas cuando haga servicio.
Instrucciones de seguridad adicionales para sierras angulares
PRECAUCION: No conecte la unidad a la toma de corriente hasta que haya leído y compren-
dido completamente las instrucciones.
• PROTEJA la alimentación eléctrica con un relevador o un interruptor de circuito de por lo
menos 15 amperes.
• ASEGURESE de que el disco gire en la dirección correcta y de que los dientes en la parte inferior apuntan hacia la parte trasera de la sierra.
• ASEGURESE de que todos los mangos de sujeción estén apretados antes de iniciar cualquier
operación.
• ASEGURESE de que el disco y las arandelas de sujeción estén limpias y los lados huecos de
los collarines estén contra el disco. Apriete firmemente el tornillo - eje.
• CONSERVE el disco afilado y correctamente dispuesto.
• CONSERVE las rendijas de ventilación del motor libres de mugre y virutas.
• COLOQUE soportes fuera de la mesa de trabajo para las piezas largas.
•NOintente operar la unidad con un voltaje diferente al designado.
•NOatore con ningún objeto el ventilador para detener el eje del motor.
•NOcorte metales ferrosos (aquellos con algún contenido de hierro o acero), ni piezas de
mampostería.
•NOutilice discos abrasivas. El calor excesivo y las partículas abrasivas generadas por ellas
dañarán la sierra.
Imported by / Importé par Black & Decker Canada Inc.
100 Central Ave. Brockville (Ontario) K6V 5W6
Voir la rubrique “Outils électriques”
des Pages Jaunes
pour le service et les ventes.
MANUAL DE INSTRUCCIONES
SSSSiiiieeeerrrrrrrraaaa aaaannnngggguuuullllaaaarrrr ddddeeee 222255554444mmmmmmmm ((((11110000""""))
))
CONSERVE ESTE MANUAL PARA REFERENCIAS FUTURAS
Page 6

•NOper mita que nadie se pare por detrás de la sierra.
•NOaplique lubricantes al disco cuando está funcionando.
•NOutilice discos cuya velocidad nominal sea menor a 5500 R.P.M.
•NOintente cortar piezas menores a 153mm (6") sin sujetarlas con una pr ensa.
•NOrealice ninguna operación a manos libres.
•NOacerque las manos a menos de153mm (6") del disco.
•NOse coloque por debajo de la sierra a menos que esté apagada y desconectada. El disco
se encuentra expuesto por la parte de abajo de la sierra.
•NOmueva ninguna de las manos de la sierra o la pieza en que esté trabajando, o levante los
brazos, hasta que el disco se haya detenido.
•NOutilice discos que no tengan 254mm (10") de diámetro.
PRECAUCION: Algunas maderas contienen conser vadores como el arsenato cúprico de
cromo (CCA) que pueden ser tóxicos. Cuando corte estos materiales debe tomar precauciones adicionales para evitar la inhalación y minimizar el contacto con la piel.
PRECAUCION: Cuando HAGA SERVICIO A SUS HERRAMIENTAS, UTILICE PARTES DE
REEMPLAZO IDENTICAS. REPARE O REEMPLACE LOS CORDONES ELECTRICOS
DAÑADOS.
•NOamarre, encinte o sujete de alguna otra manera la guarda para que permenezca abierta cuando opere la sierra.
EN LA GUARDA: EN LA CUBIERTA DEL CAMPO:
PELIGRO – ALEJE DEL DISCO.
Conexiones eléctricas
Asegúrese de que su toma de corriente concuerde con la marca en la placa de identificación.
120 volts CA significa que su sierra operará con corriente alterna, nunca corriente directa. Un
decremento en el voltaje de 10 por ciento o mayor causará una pérdida de potencia y sobrecalentamiento. Todas las herramientas B&D vienen probadas de origen. Si esta herramienta no
funciona, verifique la alimentación de corriente.
Desempacando su herramienta
Verifique el contenido de la caja de su sierra angular para asegurarse de que ha recibido
todas las partes. Además de este manual de instrucciones, la caja debe contener: una sierra
angular 1710.
Familiarícese con su herramienta
Su sierra angular viene completamente ensamblada en la caja. Abra la caja y levante la sierra tomándola por el asa, como se ilustra en la figura 1. Coloque la unidad en una superficie
plana, como un banco de trabajo o una mesa estable.
Examine las figuras del interior de la cubierta para familiarizarse con la sierra y sus partes.
La sección referente a los ajustes hace mención a esos términos, y usted debe cuales son y en
donde están estas partes.
Presione ligeramente hacia abajo el mango de operación y jale el perno de trabado, como se
ilustra en la figura 2. Libere suavemente la presión hacia abajo y permita que el brazo se levante hasta su altura total. Utilice el perno de trabado cuando transporte la sierra de un lugar a
otro. Emplee siempre el asa para transportar la unidad.
Montaje en banco
Las cuatro patas están provistas con perforaciones para facilitar el montaje en un banco.
Monte siempre su sierra firmemente para evitar movimiento. Para incrementar la portabilidad
de la unidad, puede montarse en un pieza de madera contraplacada de
12.7mm (1/2") o más gruesa, que puede sujetarse a su mesa de trabajo o moverse a otros
lugares y resujetarse.
NOTA: Si elige montar su sierra a una pieza de triplay, asegúrese de que los tornillos no
sobrepasan el fondo de la madera. La hoja de madera debe asentarse perfectamente en el
soporte de trabajo. Cuando monte la unidad a cualquier otra superficie, sujete sólo en los
lugares destinados a ello en la zona en donde se localizan los agujeros para los tornillos.
Sujetarse de cualquier otro lugar seguramente interferirá con la operación apropiada de la
sierra.
Cambio de disco
1. APAGUE LA HERRAMIENTA Y DESCONECTELA DE LA TOMA DE CORRIENTE.
2. Con el brazo de la sierra en la posición elevada, levante la guarda inferior tanto como sea
posible.
3. Afloje (pero no desarme) el tornillo de montaje de la guarda, ilustrado en la figura 3,
hasta que la montura de la guarda se pueda levantar lo suficiente para permitir el acceso
al tornillo del disco.
4. Empuje el brazo de la sierra hacia abajo para clavar los dientes del disco en un pedazo
de madera de desperdicio. Emplee la llave del disco para remover (en el sentido de las
manecillas del reloj) el tornillo del disco (cuerda izquierda).
5. Quite arandela de presión exterior y el disco de la sierra.
6. Instale el disco de la sierra asegurándose de que los dientes en la parte inferior del disco
apuntan hacia la parte trasera de la sierra.
7. Coloque la tuerca exterior del disco y apriete el tornillo (en sentido opuesto a las manecillas del reloj) mientras sostiene la guarda inferior hacia arriba y los dientes del disco permanecen enterrados en la pieza de madera de desperdicio.
8. DESPUES DE INSTALAR EL DISCO DE LA SIERRA, REPOSICIONE LA MONTURA DE LA
GUARDA ASEGURANDOSE DE QUE ASIENTA COMPLETAMENTE EN EL TORNILLO DE
LA GUARDA. APRIETE FIRMEMENTE EL TORNILLO. NO HACERLO CAUSARA DAÑOS A
LA UNIDAD.
Ajustes
¡REALICE TODOS LOS AJUSTES CON LA SIERRA ANGULAR DESCONECTADA!
NOTA: Su sierra angular viene ajustada completamente y con precisión de origen. Si se
requiere reajustarla, siga los pasos a continuación.
AJUSTE DEL EJE
Se pueden requerir ajustes en el eje conforme pase el tiempo. Se deben hacer los ajustes con
la sierra totalmente ensamblada, incluyendo el disco. Afloje o apriete el eje girando la cabeza
hexagonal situada del lado izquierdo del ensamble del eje hasta eliminar el juego y el motor se
mueva con suavidad cuando se libera.
AJUSTE EL DISCO A ESCUADRA CON LA GUIA: Realice los siguientes pasos:
NOTA: DESPUÉS DE LOS AJUSTES, EL DISCO PUEDE NO ESTAR ALINEADO CON LA RANURA
DE LA CUBIERTA DE LA MESA.
1. Con la sierra desconectada, baje el brazo hasta que la punta del disco quede al ras de la
cubierta. El disco debe quedar paralelo a los lados de la ranura. No es importante que el
disco esté perfectamente centrado en la ranura, pero debe estar razonablemente en paralelo, observe la figura 4.
Si el disco está paralelo, proceda con el "ajuste del indicador de ángulos" explicado más
adelante. Si no lo está, afloje (no quite) los dos tornillos que están situados debajo del
borde posterior de la mesa de la sierra que sujetan el brazo (observe la figura 5) a la sierra. Alinee el disco como lo requiera y apriete los tornillos (23-27 ft. lbs.). (NO SOBREAPRIETE.)
2. Verifique la alineación del disco con respecto a la guía utilizando una escuadra. Si el
disco está alineado correctamente, la sierra está lista para usarse.
3. Si el disco y la guía no están a escuadra (90º), debe ajustarse la sierra.
Para lograr el ajuste a escuadra, afloje los dos tornillos de la barra del asa, que se
encuentran debajo de la sierra, al centro de la base giratoria (figura 7). NO QUITE
ESTOS TORNILLOS.
Cuando los tornillos de la barra del asa estén flojos y la base giratoria esté colocada en la
posición cero, escuadre al disco con respecto ala guía (figura 6).
Apriete los tornillos de la barra del asa (23-27 ft. lbs.) y su sierra quedará ajustada correctamente.
AJUSTE DEL INDICADOR DE ANGULOS
APAGUE LA HERRAMIENTA Y DESCONECTELA DE LA TOMA DE CORRIENTE.
1. Afloje la perilla de fijación de ángulos y oprima el seguro para mover el brazo angular a
posición cero, como se ilustra en la figura 8.
2. Con la perilla de fijación de ángulos floja, permita que el seguro de ángulo se coloque en
su posición como usted vaya girando el brazo angular hasta 0.
3. Observe el indicador y el cuadrante a través de la mirilla. Si el indicador no está exactamente en 0, córralo suavemente a izquierda o derecha utilizando un destornillador de
punta plana.
Actuación de la guarda y visibilidad
La guarda del disco de su sierra ha sido diseñada para levantarse automáticamente cuando
se baje el brazo, y cubrir el disco cuando el brazo se levante. La guarda se puede levantar con
la mano cuando instale o remueva discos, o para inspeccionar la sierra. NUNCA LEVANTE LA
GUARDA DEL DISCO CON LA MANO A MENOS QUE LA SIERRA ESTE APAGADA.
La sección frontal de la guarda está enrejillada para permitir visibilidad mientras se corta.
Aunque la rejilla reduce en gran medida la salida de astillas, son aberturas, lo que implica que
deben utilizarse anteojos de seguridad siempre que se mire a través de las hendiduras.
Interruptor
Para encender la sierra, oprima el gatillo interruptor como se ilustra en la figura 9. Suéltelo
para apagarla. Esta herramienta no cuenta con dispositivo para trabar el interruptor en la
posición de encendido, pero éste tiene un orificio para que se inserte una chaveta de seguridad
en su interior a fin de trabarlo en posición de apagado.
Cortes con su sierra
NOT A:Aunque esta sierra cortará madera y muchos materiales no ferrosos, la descripción se
limitará aquí únicamente al corte de madera. Se aplican las mismas guías de referencia a los
otros materiales. NO CORTE MA TERIALES FERROSOS (HIERRO Y ACERO) O MAMPOSTERÍA CON
EST A SIERRA. No utilice ningún disco de tipo abrasivo.
Ajuste el brazo en el ángulo deseado, y sostenga la pieza de madera firmemente contra la guía.
Accione a continuación la sierra oprimiendo el interruptor como se ilustra en la figura 9.
Cuando la sierra alcanza su máxima velocidad (en cerca de un segundo), baje el brazo con
suavidad y lentamente para hacer el corte a través de la madera. Deje que el disco llegue hasta el
tope antes de levantar el brazo.
Calidad del corte
La lisura del corte dependerá de diversas variables. Contribuirán a la calidad del mismo
aspectos como material que se está cortando, tipo de disco de sierra, filo de éste y velocidad de
corte.
Cuando se desean los cortes más lisos para molduras y otros trabajos de precisión, se obtendrán
los resultados deseados con un disco filoso (de carburo de 60 dientes) y una velocidad de corte
suave y uniforme.
Asegúrese que el material no salte cuando lo está cortando, y para esta finalidad sujételo
bien en su sitio. Permita siempre que el disco de sierra llegue al tope para levantar el brazo.
Si aún saltan fibrillas de madera por la parte de atrás del disco, adhiera una tira de cinta de
enmascarillar sobre la línea de la pieza de madera sobre la que se está haciendo el corte.
Efectúe este sobre la cinta y quítela con cuidado una vez que haya acabado de cortar.
Consulte el cuadro 2 para las diferentes aplicaciones de corte. Seleccione el disco que mejor
se ajuste a sus necesidades.
Posición de cuerpo y manos (figura 10)
La colocación adecuada de cuerpo y manos cuando se está operando esta sierra facilitará el
corte y lo volverá más preciso y seguro. Nunca ponga las manos cerca del sitio de corte. No las
acerque a menos de 15 cm del disco de sierra. Conserve la pieza de trabajo sujeta firmemente
a la base y a la guía mientras la esté cortando. Conserve las manos en la posición adecuada
hasta que haya soltado el interruptor de gatillo y el disco se detenga por completo. EFECTUE
SIEMPRE ASCENSOS Y DESCENSOS DEL BRAZO SIN CORRIENTE ANTES DE REALIZAR LOS
CORTES, CON OBJETO DE VERIFICAR LA TRAYECTORIA QUE SIGUE EL DISCO. NO CRUCE
LAS MANOS SOBRE DICHA TRAYECTORIA, COMO SE ILUSTRA EN LA FIGURA 10.
Conserve ambos pies apoyados firmemente en el suelo y mantenga el equilibrio. Al mover el
brazo de inglete a izquierda y derecha, sígalo y párese ligeramente hacia un lado del disco de
la sierra. Mire a través de la guarda cuando siga una línea trazada con lápiz..
Sujeción de la pieza de trabajo
APAGUE LA HERRAMIENTA Y DESCONECTELA DE LA TOMA DE CORRIENTE.
PARA EVITAR LA PERDIDA DE CONTROL, SIEMPRE SUJETE LA MADERA A LA SIERRA, ESTO
ES AUN MAS IMPORTANTE CUANDO SE REQUIERA ACERCAR SU MANO A MENOS DE 15
cm DEL DISCO. Puede sujetar la pieza de cualquier lado del disco. Recuerde colocar la prensa
en una parte plana y sólida de la guía.
Soporte para piezas largas
AP AGUE LA HERRAMIENTA Y DESCONECTELA DE LA TOMA DE CORRIENTE.
Ofrezca soporte a las piezas largas utilizando un medio adecuado, como un sargento o algún
otro dispositivo para evitar que los extremos de la pieza caigan al suelo.
Cortes especiales
NUNCA HAGA UN CORTE SIN SUJETAR FIRMEMENTE EL MATERIAL. SIEMPRE UTILICE EL
DISCO ADECUADO (vea la cuadro 2)
CORTE DE ALUMINIO:
Los extruídos de aluminio tales como los que se utilizan para hacer pantallas y ventanas se
pueden cortar fácilmente con su sierra. Coloque el material de manera que corte la sección más
delgada, como se ilustra en la figura 11. La figura 12 muestra la manera incorrecta de cortar estos
perfiles.
Utilice un lubricante de cera cuando corte aluminio. Aplique la barra de cera directamente al
disco de la sierra antes de cortar . Nunca aplique la cera cuando el disco esté girando.
DANGER
KEEP AWAY
FROM BLADE
GUARDE ESTAS INSTRUCCIONES PARA REFERENCIAS FUTURAS
!
WARNING:
identical replacement parts. Do not expose to
rain or use in damp locations.
AVERTISSEMENT :
s'assurer du fonctionnement sûr, lire le guide
d'utilisation. Ne pas exposer à la pluie et ne pas
utiliser dans les emplacement humidies.
Black & Decker (U.S.) Inc., Towson, MD 21286 USA Made in USA
When servicing use only
Pour
WARNING:
For safe operation read instruction manual. Always
wear eye protection. Keep hands 6'' (153mm) from
path of saw blade. Do not operate saw without guards
in place. Keep guards in working order. Do not perform
any operation freehand. Never reach in back of saw
blade. Turn off tool, keep saw head down and wait for
saw blade to stop before moving work piece or
changing settings. Unplug tool before changing blade,
moving or servicing unit. Never cross arms in front of
blade. Secure unit before using.
Cuadro 2
APLICACION
Corte fino
Molduras
Recorte, marcos
Tratada a presión
Tableros
Aluminio
DESCRIPCION
DEL DISCO
Precisión
Carburo abrasivo
Combinación
Multi-Propósito
No ferroso
Corte de metal
Carburo
NO. DE
DIENTES
60-100
32-60
60-80
TIPO
DE CORTE
Muy liso
Libre de astillas
Liso
Corte rápido
—
Page 7

La cera, disponible en la mayoría de las ferreterías, proporciona la lubricación adecuada y evita
que las rebabas se adhieran al disco.
MATERIAL ARQUEADO:
Cuando corte materiales arqueados colóquelos como se ilustra en la figura 13. Colocar el
material de manera incorrecta causará que estrangule al disco cuando esté cerca de terminar
el corte.
CORTE DE TUBERIA DE PLASTICO
Se puede cortar tubería de plástico fácilmente con su sierra. Se debe cortar tal como se hace
con la madera y SUJETADA FIRMEMENTE A LA GUÍA PARA EVITAR QUE RUEDE.
Mantenimiento
1. Todos los rodamientos son baleros de bolas sellados. Están lubricados permanentemente y
no requieren mantenimiento adicional.
2. Limpie periódicamente todo el polvo y virutas de madera que estén alrededor Y DEBAJO
de la mesa y la base giratoria. Aún cuando las ranuras están diseñadas para permitir la
salida de los desperdicios, es posible que se acumule un poco de polvo.
3. Utilice únicamente jabón suave y un paño húmedo para limpiar la herramienta. Nunca
permita que ningún líquido llegue al interior de la unidad, ni sumerja ninguna parte de
ésta en líquidos.
Accesorios
Los accesorios recomendados para emplearse con su herramienta están a su disposición con
costo extra con su distribuidor o centro de servicio local. Si necesita ayuda para encontrar un
accesorio, por favor comuníquese al: 326-7100.
PRECAUCION: El empleo de cualquier accesorio no recomendado para usarse con esta
herramienta puede ser peligroso.
Guía para la solución de problemas frecuentes
ASEGURESE DE SEGUIR LAS REGLAS DE SEGURIDAD Y LAS INSTRUCCIONES
¡PROBLEMA! LA SIERRA NO SE ENCIENDE
¿QUE ESTA MAL? QUE HACER...
1. La sierra no está conectada. 1. Conecte la sierra.
2. Se fundió un fusible o se activó 2. Reemplace el fusible o cierre el circuito.
un interruptor de circuito.
3. Cordón eléctrico dañado. 3. Reemplace el cordón eléctrico en
su centro de servicio autorizado.
4. Los carbones están desgastados. 4. Reemplace los carbones en su centro
de servicio autorizado.
¡PROBLEMA!: LA SIERRA HACE CORTES NO SATISFACTORIOS
¿QUE ESTA MAL? QUE HACER...
1. El disco está mellado. 1. Reemplace el disco.
2. El disco está montado al revés. 2. Voltee al revés el disco.
3. El disco está sucio. 3. Quite el disco y límpielo con
aguarrás y una fibra metálica
o con limpia hornos.
4. Se está utilizando un disco 4. Cambie el disco.
incorrecto para el trabajo que
se hace.
¡PROBLEMA!: EL DISCO NO LLEGA A LA VELOCIDAD DE TRABAJO
¿QUE ESTA MAL? QUE HACER...
1. El cordón de extensión es 1. Reemplácelo con el cordón
muy delgado o muy largo. de extensión adecuado.
2. El voltaje está bajo. 2. Comuníquese con la compañía
eléctrica.
¡PROBLEMA!: LA MAQUINA VIBRA EXCESIVAMENTE
¿QUE ESTA MAL? QUE HACER...
1. La sierra no está correctamente 1. Apriete los herrajes de montaje.
asegurada a la mesa de trabajo o
al banco.
2. La mesa o el banco están en una 2. Reposicione en una super ficie
superficie irregular. regular.
3. El disco de la sierra está dañado. 3. Cambie el disco.
¡PROBLEMA!: NO HACE CORTES ANGULARES PRECISOS
¿QUE ESTA MAL? QUE HACER...
1. La escala de ángulos no está 1. Verifique y ajuste.
bien ajustada.
2. El disco no está a escuadra con 2. Verifique y ajuste.
la guía.
3. El disco no está perpendicular a la base 3. Verifique y ajuste la guía.
4. La pieza de trabajo se mueve. 4. Sujete la pieza de trabajo a la guía o
péguele lija de grano 120 con cemento
de goma.
¡PROBLEMA!: EL MATERIAL ESTRANGULA EL DISCO
¿QUE ESTA MAL? QUE HACER...
1. Está cortando material arqueado. 1. Cambie de posición el
material arqueado.
Importante
Para garantizar la SEGURIDAD y CONFIABILIDAD del producto, deberán hacerse reparaciones,
mantenimiento y ajustes (incluyendo inspección y reemplazo de carbones) por centros de servicio
autorizados u otras organizaciones de servicio calificadas, que empleen siempre refacciones
idénticas.
PARA REPARACION Y SERVICIO DE SUS HERRAMIENTAS ELECTRICAS FA VOR DE DIRIGIRSE
AL CENTRO DE SERVICIO MAS CERCANO
CULIACAN
Av . Nicolas Bravo #1063 Sur (91 671) 242 10
GAUDALAJARA
Av . La Paz #1779 (91 3) 826 69 78.
MEXICO
Eje Lázaro Cárdenas No. 18 Local D, Col. Obrera 588-9377
MERIDA
Calle 63 #459-A (91 99) 23 54 90
MONTERREY
Av . Francisco I. Madero Pte. 1820-A (91 83) 72 11 25
PUEBLA
17 Norte #205 (91 22) 46 37 14
QUERETARO
Av . Madero 139 Pte. (91 42) 14 16 60
SAN LOUIS POTOSI
Pedro Moreno #100 Centro (91 48) 14 25 67
TORREON
Blvd. Independencia, 96 pte. (91 17) 16 52 65
VERACRUZ
Prolongación Diaz Miron #4280 (91 29) 21 70 16
VILLAHERMOSA
Constitucion 516-A (91 93) 12 53 17
PARAOTRAS LOCALIDADES LLAME AL: 326 7100
INFORMACIÓN DE SERVICIO
Black & Decker ofrece una red completa de centros de servicio propiedad de la compañía y franquiciados a
través de toda Norteamérica. Todos los centros de servicio Black & Decker cuentan con personal capacitado
para proporcionar el servicio a herramientas más eficiente y confiable.
Siempre que necesite consejo técnico, reparaciones o partes de repuesto genuinas, comuníquese con el
centro Black & Decker más cercano a usted.
Para encontrar su centro de servicio local, consulte la sección amarilla bajo “Herramientas eléctricas”, o
llame al: 326-7100.
POLIZA DE GARANTIA IDENTIFICACION DEL PRODUCTO:
Sello firma del Distribuidor .
N
ombre del producto:_____________ Mod/Cat.: ____________________
Marca: _________________________ Núm. de serie: _________________
(Datos para ser llenados por el distribuidor)
Fecha de compra y/o entrega del producto: ____________________________
Nombre y domicilio del distribuidor donde se adquirió el producto:
Este producto esta garantizado por dos años a partir de la fecha de entrega, contra cualquier defecto en su
funcionamento, así como en materiales y mano de obra empleados para su fabricación. Nuestra garantía
incluye la reparación o reposición del producto y/o componentes sin cargo alguno para el cliente,
incluyendo mano de obra, así como los gastos de transportación razonablemente erogados derivados del
cumplimiento de este certificado.
Para hacer efectiva esta garantía deberá presentar su herramienta y esta póliza
sellada por el establecimiento comercial donde se adquirió el producto, de no contar con ésta, bastará la
factura de compra.
EXCEPCIONES. Esta garantía no será válida en los siguientes casos:
• Cuando el producto se hubiese utilizado en condiciones distintas a las normales;
• Cuando el producto no hubiese sido operado de acuerdo con el instructivo de uso que se acompaña;
• Cuando el producto hubiese sido alterado o reparado por personas distintas a las enlistadas al final de
este certificado.
Anexo encontrará una relación de sucursales de servicio de fábrica, centros de servicio autorizados y
franquiciados en la República Mexicana, donde podrá hacer efectiva su garantía y adquirir partes,
refaciones y accesorios originales. T odas las herramientas Black & Decker son de la mejor calidad
IMPORTADOR: BLACK & DECKER S.A. DE C.V.
BOSQUES DE RADIATAS NO. 42
BOSQUES DE LAS LOMAS, 05120 MEXICO, D.F.
TEL 326-7100
Para servicio y ventas consulte
“HERRAMIENTAS ELECTRICAS”
en la sección amarilla.
Page 8

 Loading...