

Page 1
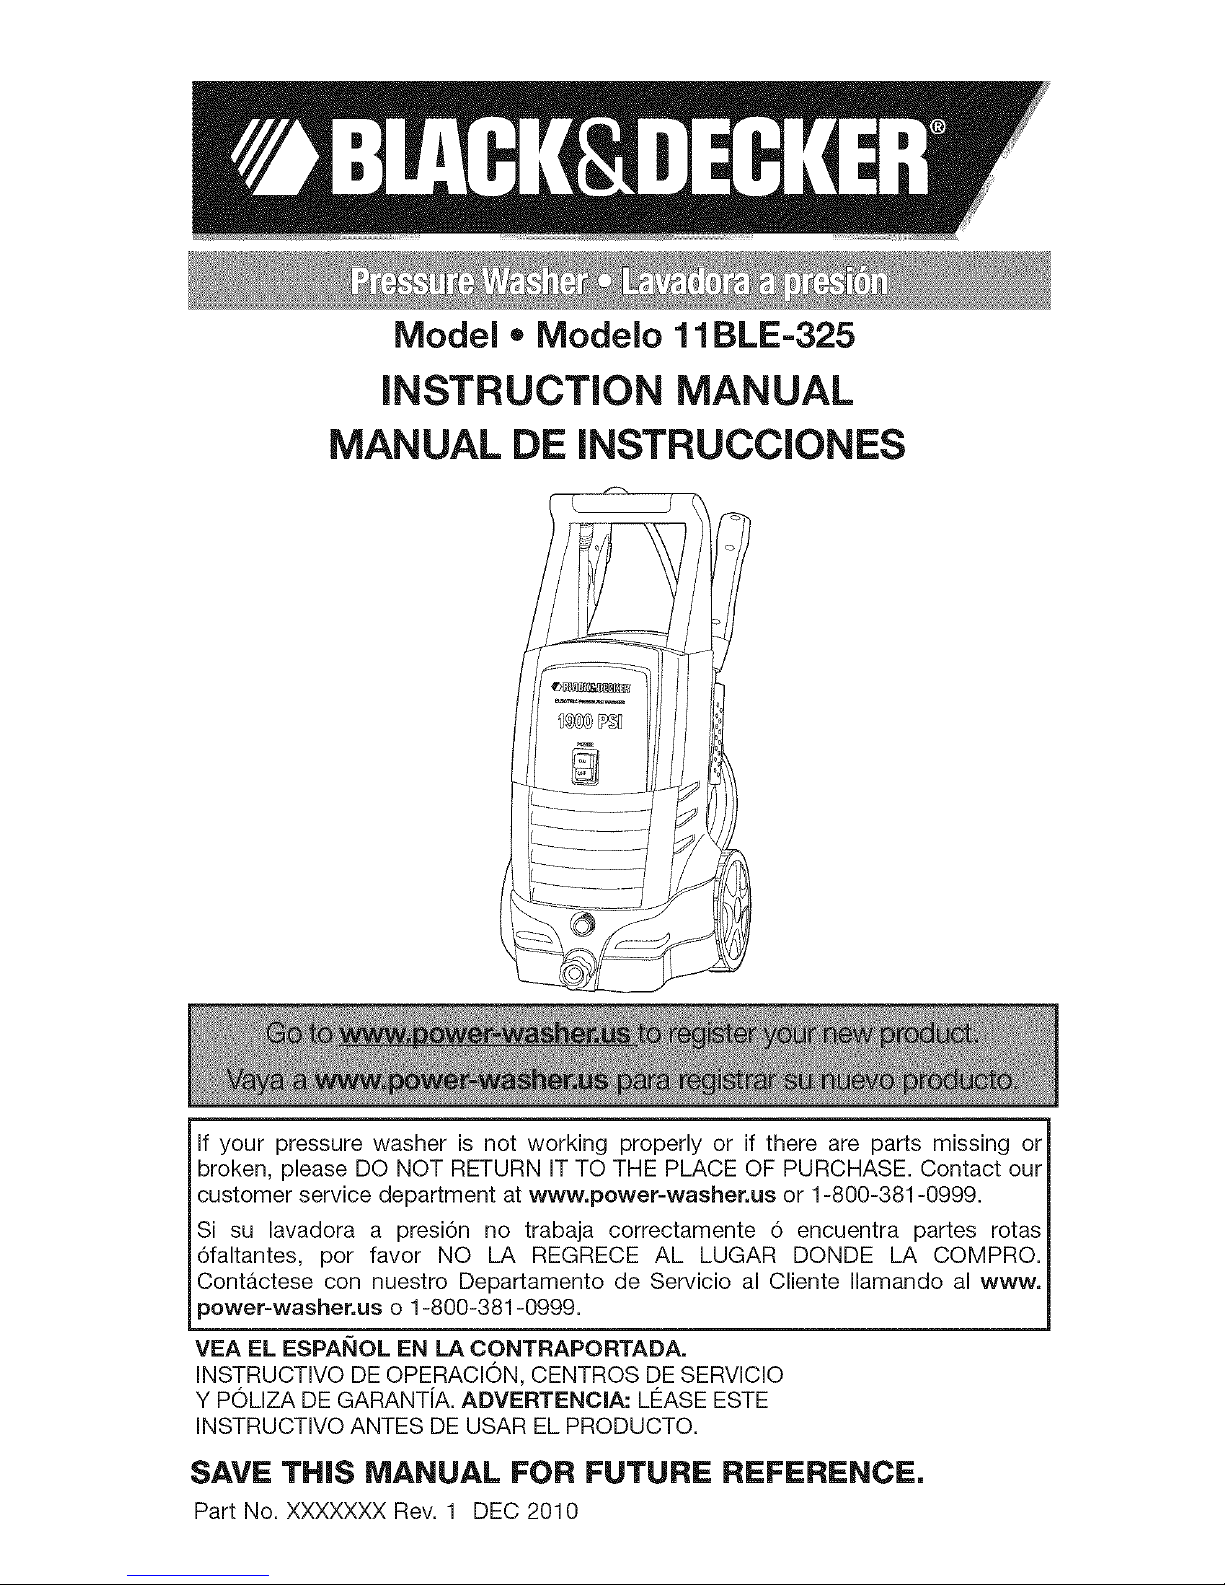
Model o Modelo 11BLE-325
iNSTRUCTiON MANUAL
MANUAL DE INSTRUCCIONES
If your pressure washer is not working properly or if there are parts missing or
broken, please DO NOT RETURN IT TO THE PLACE OF PURCHASE. Contact our
customer service department at wwwopower-washerous or 1-800-381-0999.
Si su lavadora a presi6n no trabaja correctamente 6 encuentra partes rotas
6faltantes, pot favor NO LA REGRECE AL LUGAR DONDE LA COMPRO.
Contactese con nuestro Departamento de Servicio al Cliente Ilamando al www.
_ower=washer.us o 1-800-381-0999.
VEA EL ESPA_JOL EN LA CONTRAPORTADA.
INSTRUCTIVO DE OPERACION, CENTROS DE SERVICIO
Y POLIZA DE GARANT{A. ADVERTENCIA: LFtASE ESTE
INSTRUCTIVO ANTES DE USAR EL PRODUCTO.
SAVE THIS MANUAL FOR FUTURE REFERENCE,
Part No. XXXXXXX Rev. 1 DEC 2010
Page 2
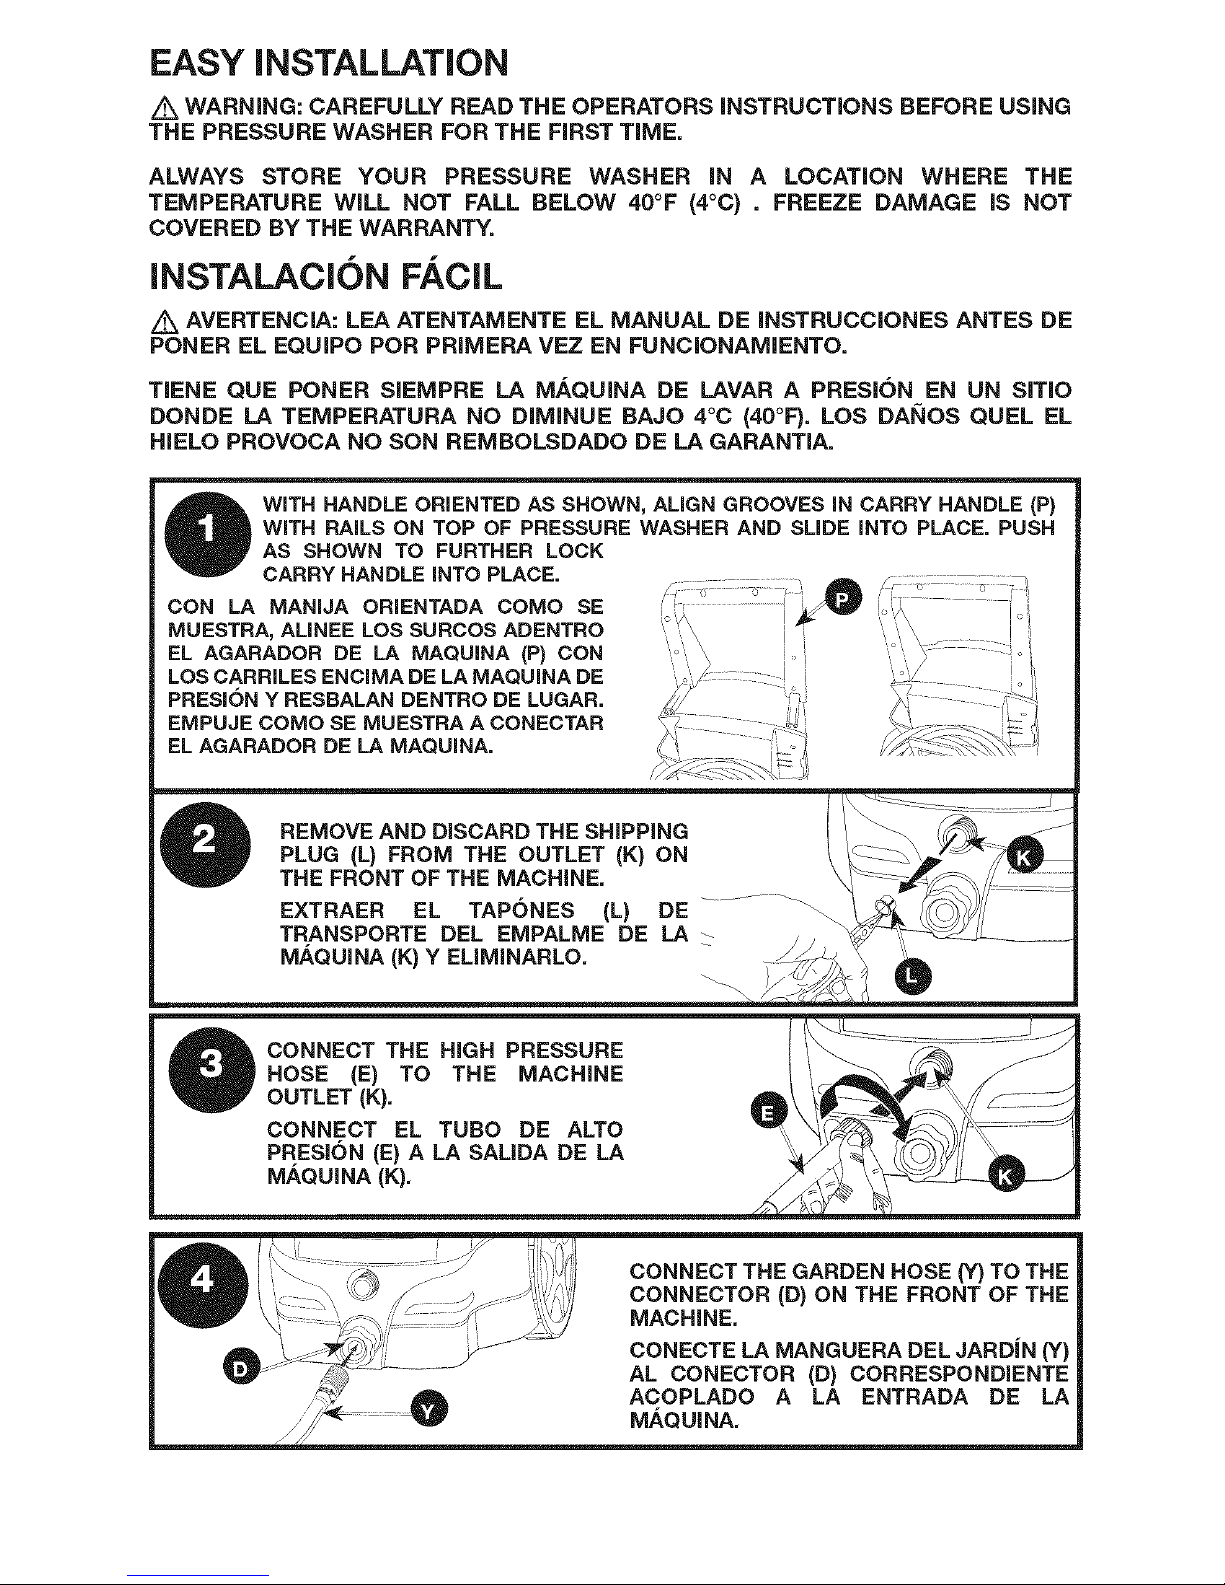
EASY iNSTALLATiON
Z_ WARNING: CAREFULLY READ THE OPERATORS iNSTRUCTiONS BEFORE USING
THE PRESSURE WASHER FOR THE FIRST TIME.
ALWAYS STORE YOUR PRESSURE WASHER IN A LOCATION WHERE THE
TEMPERATURE WILL NOT FALL BELOW 40°F (4°C) . FREEZE DAMAGE IS NOT
COVERED BY THE WARRANTY.
INSTALACION FACIL
A AVERTENCIA: LEA ATENTAMENTE EL MANUAL DE INSTRUCCIONES ANTES DE
PONER EL EQUIPO POR PRIMERA VEZ EN FUNCIONAMIENTO.
TIENE QUE PONER SIEMPRE LA MAQUINA DE LAVAR A PRESION EN UN SITIO
DONDE LA TEMPERATURA NO DIMINUE 8AJO 4°C {40°F'). LOS DAhIOS QUEL EL
HIELO PROVOCA NO SON REMBOLSDADO DE LA GARANTIA.
WiTH HANDLE ORIENTED AS SHOWN, ALIGN GROOVES iN CARRY HANDLE (P}
WiTH RAILS ON TOP OF PRESSURE WASHER AND SLIDE iNTO PLACE. PUSH
AS SHOWN TO FURTHER LOCK
CARRY HANDLE INTO PLACE.
CON LA MANIJA ORIENTADA COMO SE
MUESTRA, ALINEE LOS SURCOS ADENTRO
EL AGARADOR DE LA MAQUINA {P} CON
LOS CARRILES ENCIMA DE LA MAQUINA DE
PRESION Y RESBALAN DENTRO DE LUGAR.
EMPUJE COMO SE MUESTRA A CONECTAR
EL AGARADOR DE LA MAQUINA.
to',¸ _ '/'_ i<_I
k,,,¸¸¸¸ I
...."'" i i ......",/ i_
::::::::: ?
PLUG {L) FROM THE OUTLET (K) ON
THE FRONT OF THE MACHINE. _............
E×TRAER EL TAPONES {L) DE-- _/__k/
TRANSPORTEDELEMPALMEDE
MAQU NAIK)YEUM NARLO.....
CONNECT THE HIGH PRESSURE
HOSE (E) TO THE MACHINE
OUTLET (K).
CONNECT EL TU80 DE ALTO
PRESION (E) A LA SALiDA DE LA
MAQUINA (K).
/ _- ............,4_ ......::: :,/'i:/i!i CONNECT THE GARDEN HOSE (Y)TO THE
__: :_ "_ _" ....//._ :s_l:,7"i,',ij CONNECTOR (D) ON THE FRONT OF THE
'_ .i_\_:J MACHINE.
__'_;/ _-_ CONECTE LA MANGUERA DEL JARDJN (Y)
..... ---_ AL CONECTOR (D) CORRESPONDIENTE
...._ Ah, ACOPLADO A LA ENTRADA DE LA
/,'/// ................_ MAQUI HA.
Page 3
TRABAN EN LUGAR.
TURN INCOMING WATER ON.
NOTE: USE COLD WATER ONLY.
GIRE EL AGUA ENTRANTE.
NOTA: UTILIZAR SOLO AGUA FR|A
h. FULLYOPEN
ABRACOMPLETAMENTE
PLUG GFCI (C) iNTO POWER
RECEPTACLE. FIRMLY PRESS
AND RELEASE THE TEST
BUTTON (Z), THEN PRESS AND
RELEASE THE RESET BUTTON
(Y). THE LIGHT ON THE GFCI SHOULD
BE ILLUMINATED.
ENCHUFE EL GFCI (C)A UN TOMACORRIENTE. PRESIONE CON FIRMEZA Y SUELTE
EL BOTON DE PRUEBA (TEST) (X), Y LUEGO PRESIONE Y SUELTE EL BOTON DE
REINICIO (RESET) (Y). SE DEBE ENCENDER LA LUZ DEL GFCI.
_ _ SQUEEZE AND HOLD TRIGGER
UNTIL WATER FLOW IS STEADY.
RELEASE THE TRIGGER.
MANTENGA PULSADO EL
ACCIONADOR HASTA QUE EL CAUDAL DE
AGUA SE VUELVA CONSTANTE. SUELTE EL
ACCIONADOR.
_ i ITURN SWITCH TO ON POSITION (I) ANDo
SQUEEZE TRIGGER TO START MOTOR AND
WATER FLOW. NOTE: motor only runs when
trigger is depressed and water is spraying.
SITUAR EL INTERRUPTOR EN LA POSICION DE ON (I)
Y APRETAR EL GATILLO PARA PONER EN MARCHA EL
MOTOR Y EL FLUJO DE AGUA. NOTA: el motor funciona
solamente cuando se presiona el disparador y el agua esta
rociando.
Page 4
This manual contains information that is important for you to know and understand.
This information relates to protecting YOUR SAFETY and PREVENTING EQUIPMENT
PROBLEMS. To help you recognize this information, we use the symbols below.
Please read the manual and pay attention to these symbols.
Z_ DANGER: Indicates an imminently hazardous situation which, if not avoided,
will result indeath or serious injury.
_WARNING: Indicates a potentially hazardous situation which, if not avoided,
could result in death or serious injury.
z_CAUTION: Indicates a potentially hazardous situation which, if not avoided, may
result in minor or moderate injury.
NOTICE: Indicates a practice not related to personal injury which, if not avoided,
may result in property damage.
Z_ WARNING: This product contains chemicals known to the State of California
to cause cancer, and birth defects or other reproductive harm. In addition, some
cleaning products and dust contain chemicals know to the State of California to
cause cancer, and birth defects or other reproductive harm. Wash hands after
handling.
Z_ WARNING: Please read this z_WARNING: When using this product
entire manual before attempting basic precautions should always be
to assemble, operate or install the followed, including the following:
product. If you have any questions 1. Read all the instructions before
regarding the product, please contact using the product.
our customer service department
at www.power-washer.us or 2. To reduce the risk of injury, do not
1-800-381-0999. operate near children or animals.
Z_ WARNING: This unit was designed 3. Know how to stop the product
and bleed pressures quickly.
for specific applications. It should Be thoroughly familiar with the
not be modified and/or used for any controls.
application other than that which it was
designed. 4. Stay alert - watch what you are
doing.
NOTICE: Always store your pressure 5. Do not operate the product when
washer in a location where the fatigued or under the influence of
temperature will not fall below 40° F alcohol or drugs.
(4° C). freeze damage is not covered by
the warranty. 6. Keep operating area clear of all
persons.
READ AND SAVE THESE 7. Do not overreach or stand on
INSTRUCTIONS unstable support. Keep good
footing and balance at all times.
8. Followthe maintenance instructions
specified in the manual.
4- ENG
Page 5

9. This product is provided with a
Ground Fault Circuit Interrupter
built into the power cord plug. If
replacement of the plug or cord
is needed, use only identical
replacement parts.
10. Do not touch plug or outlet with
wet hands.
11. Avoid accidental starts. Move
switch on unit to OFF position
before connecting or disconnecting
cord to electrical outlets.
12. Water spray must never be
directed towards any electric
wiring or directly towards the
pressure washer machine itself or
fatal electric shock may occur.
13. Never carw your pressure washer
by the cord. Do not pull on the cord
to disconnect from the outlet.
14. To prevent damage, the cord
should not be crushed, placed next
to sharp objects or near a heat
source.
15. Check power cords before using.
Damaged cords can reduce
performance of pressure washer or
cause a fatal electrical shock.
16. The narrow pin point stream is very
powerful. It is not recommended
for use on painted surfaces, wood
surfaces or items attached with an
adhesive backing.
17. Keep operating area clear of all
persons and animals.
18. Always use both hands when
operating pressure washer to
maintain complete control of the
wand.
19. Do not touch nozzle or water spray
while operating. Never place hands
in front of nozzle.
20. Wear safety goggles while
operating. Wear protective clothing
and footwear to protect against
accidental spraying.
21. Disconnect power plug from the
outlet when not in use and prior to
the detaching of the high pressure
hose.
5- ENG
22. Never tie knots or kink the high
pressure hose as damage could
result. Inspect the high-pressure
hose regularly. Replace the hose
immediately if it is damaged, worn
or shows any signs of cracks,
bubbles, pinholes, or other leakage.
Never grasp a high-pressure hose
that is leaking or damaged.
23. Do not operate or store this product
in temperatures below 40° F (4° C).
Freeze damage is not covered by
the warranty.
24. Carefully observe all chemical
instructions and warnings
before using. Use only approved
pressure washer cleaners. Do
not use bleach, chlorine, or any
cleaners containing acids. Always
follow manufacturer's label
recommendations for proper use
of cleaners. Always protect eyes,
skin and respiratory system from
cleaners.
25. The pressure washer should not
be used in areas where gas vapors
may be present. An electric spark
could cause an explosion or fire.
26. To minimize the amount of water
getting into the pressure washer,
the unit should be placed as far
as possible from the cleaning site
during operation.
27. To prevent accidental discharge,
the spray gun should be secured
by locking the trigger when not in
use.
28. To allow free air circulation, the
pressure washer should NOT be
covered during operation.
29. Never touch, grasp or attempt to
cover a pinhole or similar water
leak on the high-pressure hose.
The stream of water IS under high
pressure and WILL penetrate skin.
30. Use only hoses and accessories
rated for pressure higher than
your pressure washer's psi. Never
use with any other manufacturer's
accessories or components.
Page 6
31.Neverdefeatthesafetyfeaturesof
thisproduct.
32.Do not operatemachinewith
missing,brokenor unauthorized
parts.
33.Neversprayflammableliquids
orusepressurewasherin areas
containingcombustibledust,
liquid,orvapors.
/!X WARNING: Risk of injection or
injury. Do not direct discharge stream
at persons.
SAVE THESE
iNSTRUCTiONS
SAFETY FEATURES
AUTOMATIC TOTAL STOF _
The pressure washer is equipped with
a stop device which will sense when
the trigger on the gun is released. It will
open the power circuit to the motor and
cause the pressure washer to stop.
Z_ WARNING: If Automatic Total Stop
fails to operate, DO NOT USE THE
MACHINE. Contact our customer
service department. Further use will
damage the machine and/or cause
personal injury.
Z_ WARNING: The pressure washer
is also equipped with a main power
ON/OFF switch located on the unit. It
should always be moved to the OFF
position when the pressure washer is
not being used to prevent possible
injury or damage.
MOTOR OVERLOAD
The electric motor inthis pressure washer
is equipped with an overload protection
device which will automatically shut off
the motor in the event the motor draws
excessive current or overheats. The
device will automatically reset itself and
resume normal operation after a short
period of time.
GROUND-FAULT CIRCUIT
INTERRUPTER PROTECTION
This pressure washer is provided with a
Ground-Fault Circuitqnterrupter (GFC0
built into the plug of the power supply
cord. This device provides additional
protection from the risk of electric
shock. Should replacement of the plug
or cord become necessary, use only
identical replacement parts that include
GFCI protection.
SERVICING A DOUBLE INSULATED
APPLIANCE
ln a double-insulated product,
two systems of insulation are
provided instead of grounding.
No grounding means is
provided on a double-insulated product,
nor should a means for grounding be
added to the pressure washer.
Servicing a double-insulated product
requires extreme care and knowledge
of the system, and should be done only
by qualified service personnel.
Replacement parts for a double-
insulated product must be identical to
the parts they replace.
A double-insulated product is marked
with the words "DOUBLE-INSULATION"
or "DOUBLE-INSULATED". The symbol
above may also be marked on the
product.
POWER SUPPLY AND
ELECTRICAL INFO
GROUND-FAULT CIRCUIT
INTERRUPTER PROTECTION
The pressure washer is factory-
equipped with an electrical cord and a
Ground Fault Circuit interrupter (GFCI)
power plug. This cord should only
be connected to an electrical outlet
installed in accordance with local safety
regulations.
NOTE: The power supply must be
120 V, 60 Hz and a minimum 15 amp
dedicated circuit.
6- ENG
Page 7
A. Inspect cord before using. Do not
use if cord is damaged.
B. Keep all connections dry and off
the ground.
C. Do not touch plug with wet hands.
D. The pressure washer is provided
with a ground fault circuit interrupter
built into the power plug.
If replacement of the plug or cord is
needed, use only identical replacement
parts. Contact customer service for
proper replacement parts.
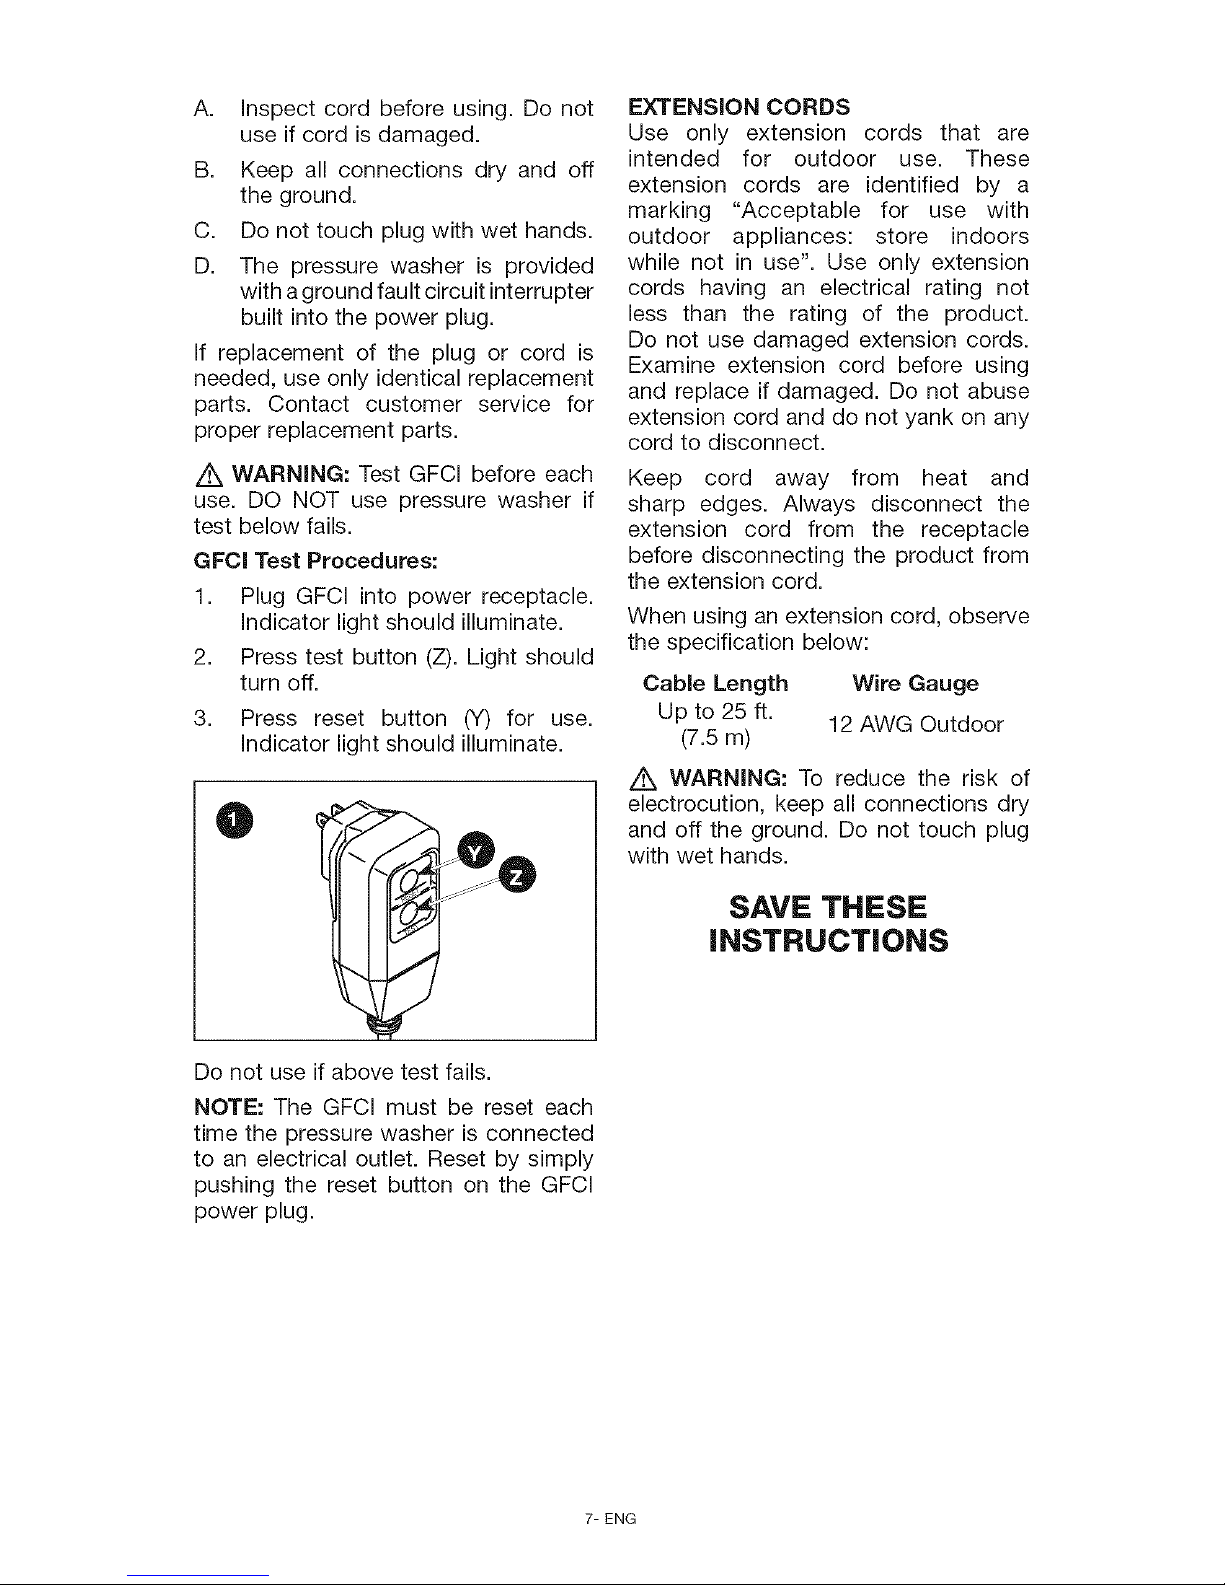
,4X WARNING: Test GFCI before each
use. DO NOT use pressure washer if
test below fails.
GFCI Test Procedures:
1. Plug GFCI into power receptacle.
Indicator light should illuminate.
2. Press test button (Z). Light should
turn off.
3. Press reset button (Y) for use.
Indicator light should illuminate.
O
EXTENSION CORDS
Use only extension cords that are
intended for outdoor use. These
extension cords are identified by a
marking "Acceptable for use with
outdoor appliances: store indoors
while not in use". Use only extension
cords having an electrical rating not
less than the rating of the product.
Do not use damaged extension cords.
Examine extension cord before using
and replace if damaged. Do not abuse
extension cord and do not yank on any
cord to disconnect.
Keep cord away from heat and
sharp edges. Always disconnect the
extension cord from the receptacle
before disconnecting the product from
the extension cord.
When using an extension cord, observe
the specification below:
Cable Length Wire Gauge
Up to 25 ft.
12 AWG Outdoor
(7.5 m)
Z_ WARNING: To reduce the risk of
electrocution, keep all connections dry
and off the ground. Do not touch plug
with wet hands.
SAVE THESE
iNSTRUCTiONS
Do not use if above test fails.
NOTE: The GFC[ must be reset each
time the pressure washer is connected
to an electrical outlet. Reset by simply
pushing the reset button on the GFC[
power plug.
7- ENG
Page 8
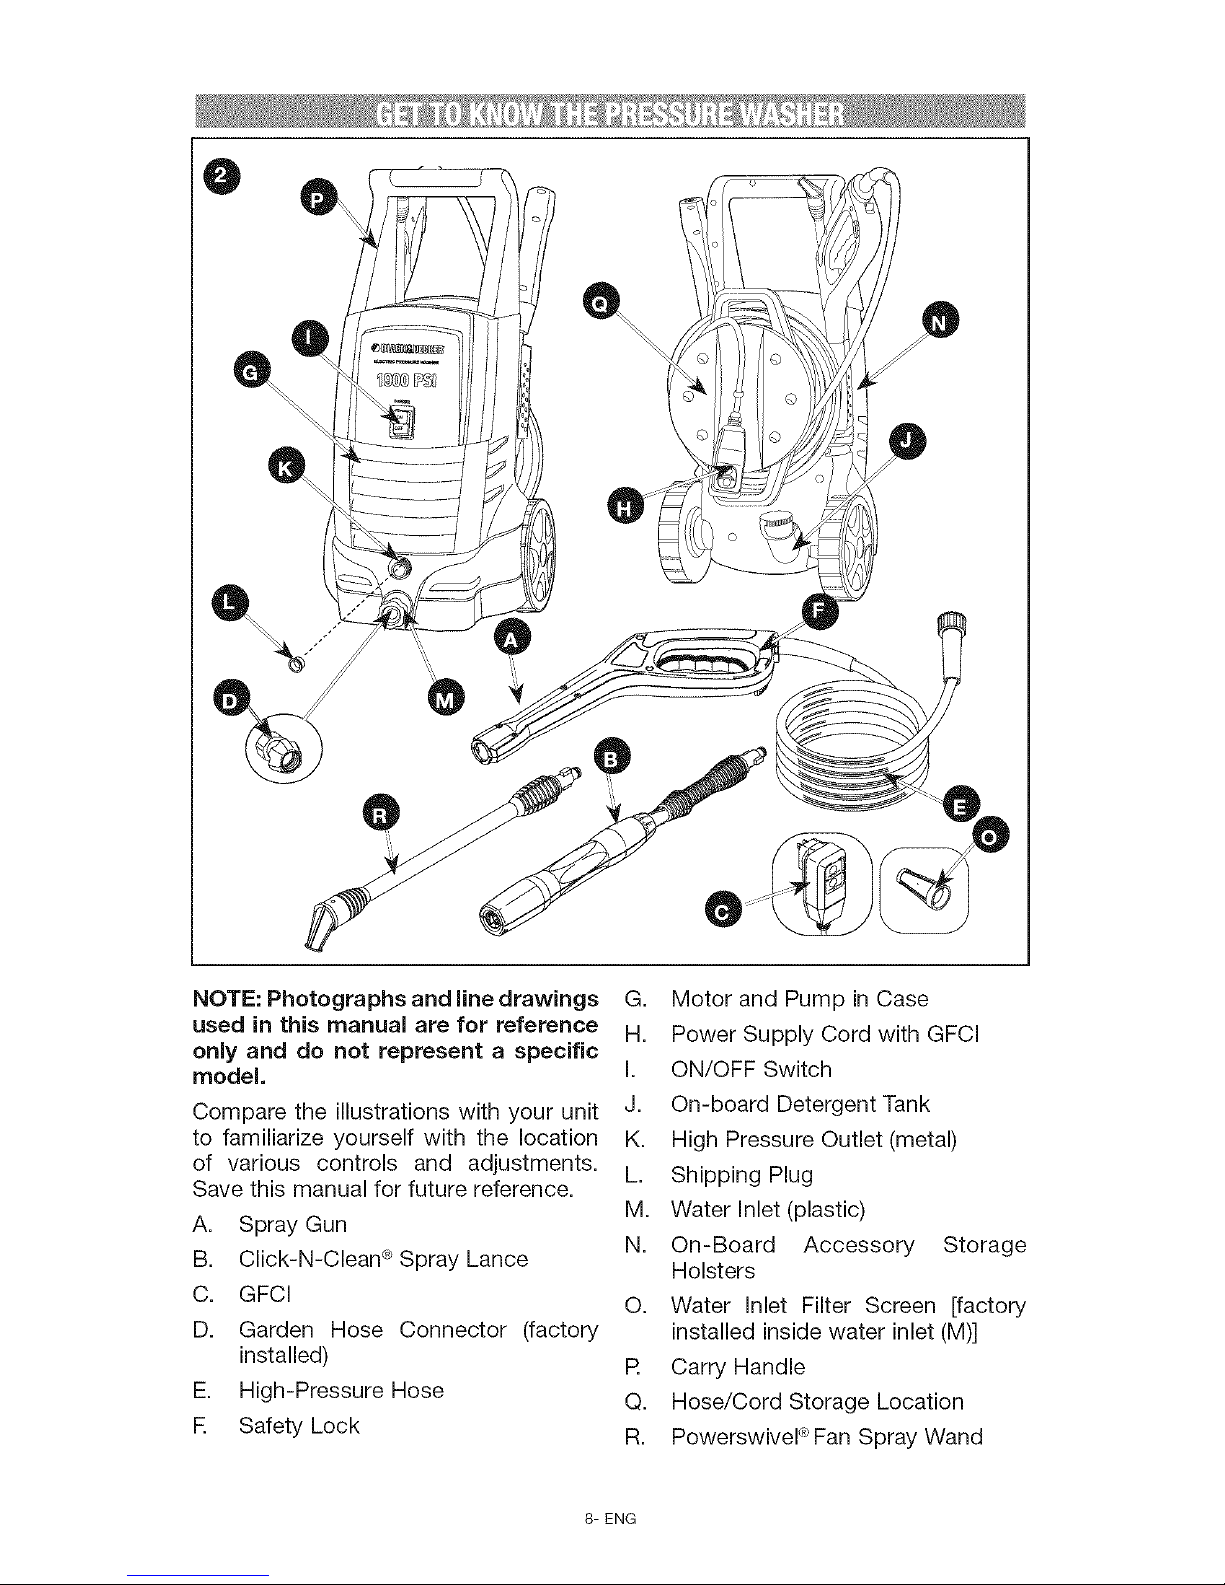
NOTE: Photographs and line drawings
used in this manual are for reference
only and do not represent a specific
model.
Compare the illustrations with your unit
to familiarize yourself with the location
of various controls and adjustments.
Save this manual for future reference.
A. Spray Gun
B. Click-N-Clean _'_*Spray Lance
C. GFCI
D. Garden Hose Connector (factory
installed)
E. High-Pressure Hose
R Safety Lock
G. Motor and Pump in Case
H. Power Supply Cord with GFCI
I. ON/OFF Switch
J. On-board Detergent Tank
K. High Pressure Outlet (metal)
L. Shipping Plug
M. Water Inlet (plastic)
N. On-Board Accessory Storage
Holsters
O. Water Inlet Filter Screen [factory
installed inside water inlet (M)]
R Carry Handle
Q. Hose/Cord Storage Location
R. PowerswivePFan Spray Wand
8- ENG
Page 9
1.
2.
3.
4.
Locate and remove all loose parts
from the carton.
With handle oriented as shown,
align grooves in carry handle (P)
with rails on top of pressure washer
and slide into place.
Push as shown to further lock carry
handle into place.
Remove and discard the shipping
plug (L) from the outlet (K) on the
front of the machine.
@
PRESSURE WASHER
TERMINOLOGY
PSi: Pounds per Square Inch. The
unit of measure for water pressure.
Also used for air pressure, hydraulic
pressure, etc.
GPM: Gallons Per Minute. The unit of
measure for the flow rate of water.
CU: Cleaning Units. GPM multiplied by
PSI. GPM x PSi = CU
Detergent Injection System: Mixes
cleaners or cleaning solvents with the
water to improve cleaning effectiveness.
Water Supply: All pressure washers
must have a source of water. The
minimum requirements for a water
supply are 20 psi and 5 gallons per
minute. If your water source is a well,
the garden hose length can only be 30
ft. (9 m) max.
Z_ WARNING: To reduce the
possibility of contamination always
protect against backflow when
connected to a potable water system.
DANGER: Risk of fluid injection
and laceration. When using the high=
pressure setting, DO NOT allow
the high-pressure spray to come in
contact with unprotected skin, eyes,
or with any pets or animals. Serious
injury will occur.
• Your washer operates at fluid
pressures and velocities high
enough to penetrate human and
animal flesh, which could result in
amputation or other serious injury.
Leaks caused by loose fittings or
worn or damaged hoses can result
in injection injuries. DO NOT TREAT
FLUID INJECTION AS A SIMPLE
CUT! See a physician immediately!
9- ENG
Page 10

PRESSURE WASHER
OPERATING FEATURES
CLICK=N-CLEAN + SPRAY LANCE
(Fig. 4)
Z_ WARNING: Do not move the nozzle
to adjust spray while the trigger is
squeezed.
The Click-N-Clean + 4 n 1 nozzle has
four spray settings. Turn the collar 90°
to the desired position.
S. _ The Low Pressure
Soap position is
intended for dispen-
sing detergent.
T. _ The High Pressure Jet
Stream position is
intended for cleaning
with high pressure.
U._lip The High Pressure
Wide Fan Spray
position is intended for
cleaning with high
pressure.
V. L3"_"3.__ The High Pressure
Oscillating Fanned
Turbo Spray position
is intended for optimal
cleaning.
NOTE: The pressure of the spray on
the surface you are cleaning increases
as you move the wand closer to the
surface.
NOTE: The pressure of the spray on
the surface you are cleaning increases
as you move the wand closer to the
surface.
CAUTION: The High Pressure
Jet Stream spray position is very
aggressive. We recommend that for
most cleaning applications a fan spray
pattern (U or V) be used to avoid
damage to the surface being sprayed.
POWERSWIVEL + FAN SPRAY WAND
(FIG. 5)
CAUTION: The red nozzle portion of
the lance pivots 360 °. This adjustment
can only be made when the gun trigger
is completely released. Do not attempt
to adjust the nozzle when the machine
is in operation. Failure to follow this
instruction could result in personal
injury.
The nozzle pivots 360° and delivers a
high pressure fan spray pattern to clean
the hard to reach areas.
O
USING DETERGENT (FIG. 6-7)
NOTICE: Use only approved pressure
washer cleaners. Do not use bleach,
chlorine, or any cleaners containing
acids.
NOTICE: Fill and flush the detergent
tank with clear water after use.
1. Insert the spray lance (B) into the
gun (A) by pushing firmly and
simultaneously twisting a 1/4 of a
turn counterclockwise until locked
into place.
0
10-ENG
Page 11
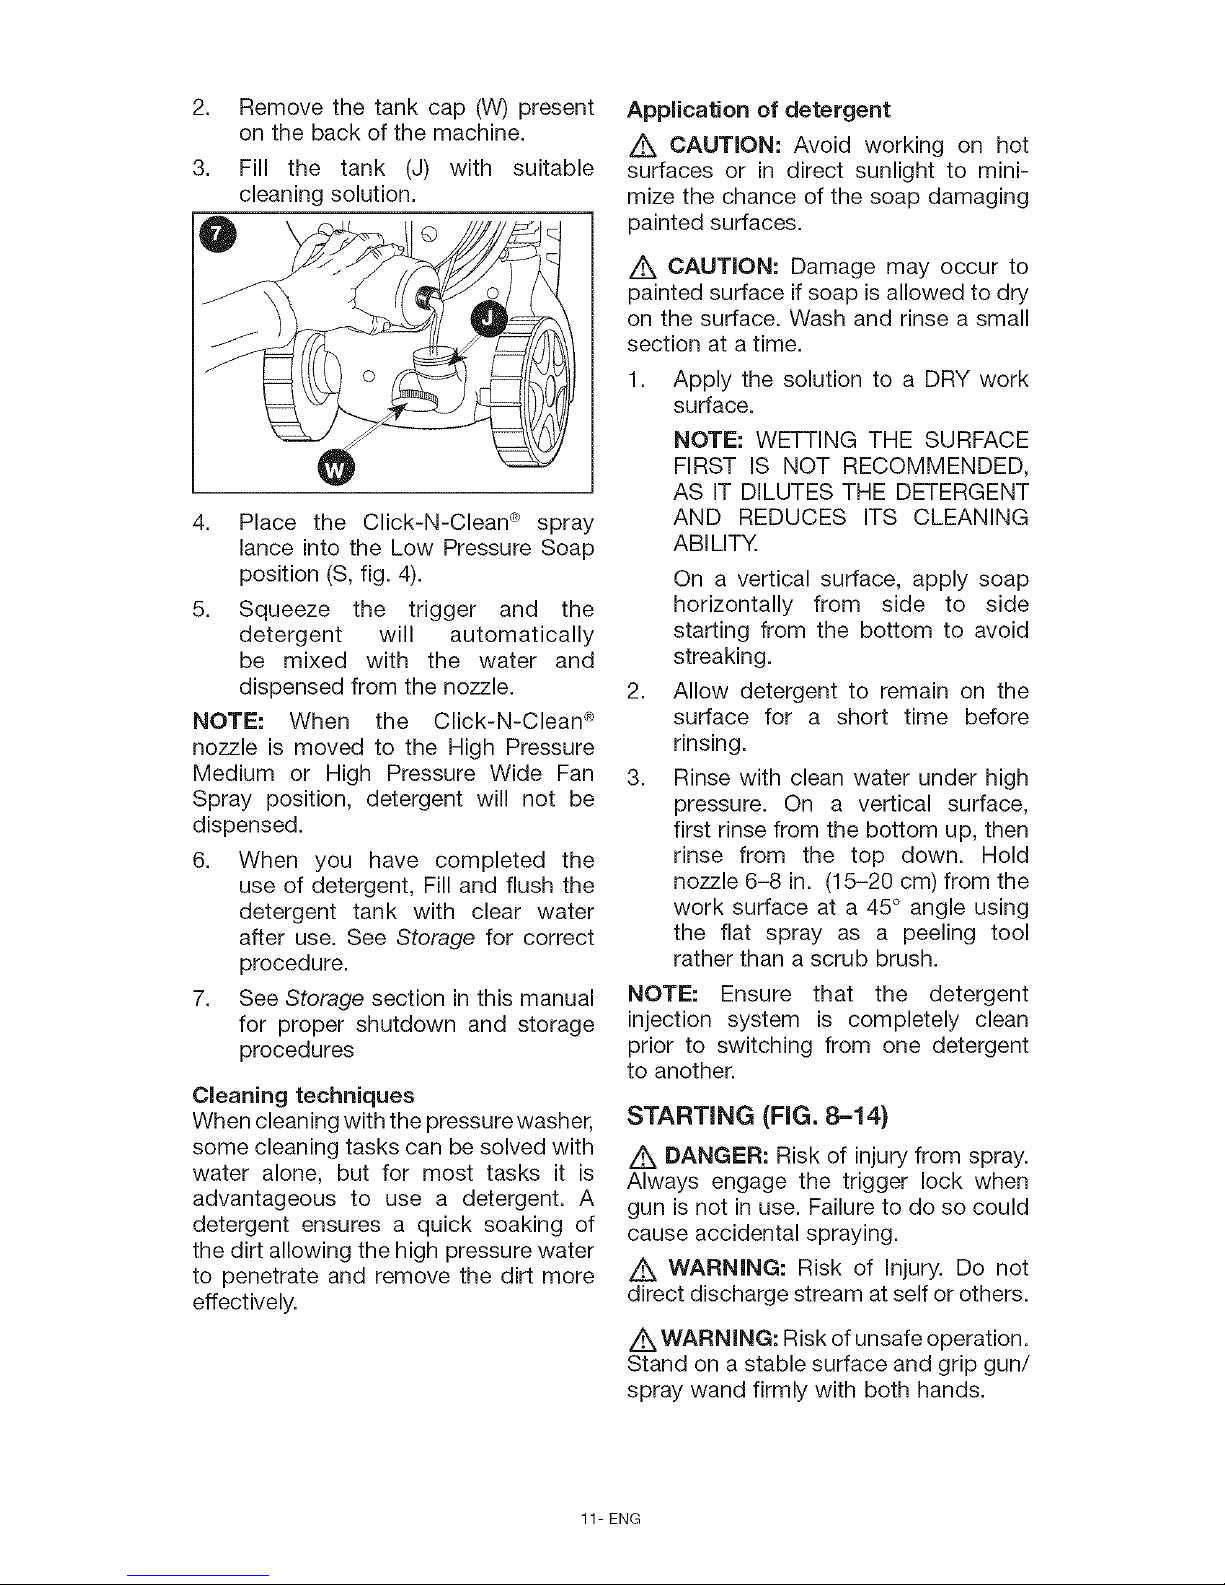
2. Remove the tank cap (W) present
on the back of the machine.
3. Fill the tank (J) with suitable
cleaning solution.
4. Place the Click-N-Clean _*_spray
lance into the Low Pressure Soap
position (S, fig. 4).
5. Squeeze the trigger and the
detergent will automatically
be mixed with the water and
dispensed from the nozzle.
NOTE: When the Click-N-Clean _
nozzle is moved to the High Pressure
Medium or High Pressure Wide Fan
Spray position, detergent will not be
dispensed.
6. When you have completed the
use of detergent, Fill and flush the
detergent tank with clear water
after use. See Storage for correct
procedure.
7. See Storage section in this manual
for proper shutdown and storage
procedures
Cleaning techniques
When cleaning with the pressure washer,
some cleaning tasks can be solved with
water alone, but for most tasks it is
advantageous to use a detergent. A
detergent ensures a quick soaking of
the dirt allowing the high pressure water
to penetrate and remove the dirt more
effectively.
Application of detergent
z_ CAUTION: Avoid working on hot
surfaces or in direct sunlight to mini-
mize the chance of the soap damaging
painted surfaces.
/tk CAUTION: Damage may occur to
painted surface if soap is allowed to dry
on the surface. Wash and rinse a small
section at a time.
1. Apply the solution to a DRY work
surface.
NOTE: WETTING THE SURFACE
FIRST IS NOT RECOMMENDED,
AS IT DILUTES THE DETERGENT
AND REDUCES ITS CLEANING
ABILITY.
On a vertical surface, apply soap
horizontally from side to side
starting from the bottom to avoid
streaking.
2. Allow detergent to remain on the
surface for a short time before
rinsing.
3. Rinse with clean water under high
pressure. On a vertical surface,
first rinse from the bottom up, then
rinse from the top down. Hold
nozzle 6-8 in. (15-20 cm) from the
work surface at a 45° angle using
the flat spray as a peeling tool
rather than a scrub brush.
NOTE: Ensure that the detergent
injection system is completely clean
prior to switching from one detergent
to another.
STARTING (FIG. 8=14)
DANGER: Risk of injury from spray.
Always engage the trigger lock when
gun is not in use. Failure to do so could
cause accidental spraying.
,4k WARNING: Risk of Injury. Do not
direct discharge stream at self or others.
Z_ WARNING: Risk of unsafe operation.
Stand on a stable surface and grip gun/
spray wand firmly with both hands.
11- ENG
Page 12

1.
Connect the high pressure hose (E)
to the machine outlet (K). Ensure
the threads are aligned properly
and the connection is secure.
4.
Turn incoming water on and fully
open valve to insure maximum
water flow to machine.
O
2.
Connect the garden hose (Y)to the
connector (D) on the front of the
machine. Before connecting, run
water through the garden hose (not
supplied) to flush out any foreign
matter.
NOTE: If your water source is a
well, the garden hose length can
only be 30 ft. maximum.
5.
Plug GFCI (C)into power receptacle.
Firmly press and release the TEST
button (Z), then press and release
the RESET button (Y). The light on
the GFCI should be illuminated.
3. Insert the spray lance (B, R) into
the gun (A) by pushing firmly and
simultaneously twisting a 1/4 of a
turn counterclockwise until locked
into place.
@
Z_ WARNING: If the lance is not
securely locked into place, it could
be ejected under high pressure during
operation, possibly causing injury or
damage.
6. Ensure the gun safety is unlocked
and squeeze the trigger until the air
has escaped and a steady flow of
low pressure water is coming from
the nozzle.
7.
12- ENG
Turn switch to ON position (I).Note
that the motor will momentarily
start then stop.
O
Page 13

8.
Squeeze the trigger to start motor
and begin pressure washing.
NOTE: The motor only runs when
the gun trigger is depressed and
water is spraying.
SHUTTING DOWN
See Storage section in this manual
for proper shutdown and storage
procedures.
Z_ WARNING: Risk of burn hazard.
When performing maintenance, you
may be exposed to hot surfaces,
water pressure or moving parts that
can cause serious injury or death.
To ensure efficient operation and longer
life of your pressure washer, a routine
maintenance schedule should be
prepared and followed, if the pressure
washer is used in unusual conditions,
such as high-temperatures or dusty
conditions, more frequent maintenance
checks will be required.
CONNECTIONS
Connections on pressure washer hoses,
gun and spray wand should be cleaned
regularly and lubricated with light oil or
lithium grease to prevent leakage and
damage to the o-rings.
NOZZLE
The adjustable spray nozzle should be
cleaned regularly.
Clogging of the nozzle causes
diminished performance and the pump
pressure to be too high and cleaning is
immediately required.
1. Remove the wand from the gun.
2. Clear the nozzle by forcing a stiff
wire or straightened out paper clip
(small size) through the center hole
of each nozzle.
3. Backflush the nozzle with water
from both ends.
4. Reconnect the wand to the gun.
Restart the pressure washer and
depress the trigger on the spray gun.
LUBRICATiON
The pressure washer is designed
with a permanent lubrication system.
Conventional oil checks and changes
are not necessary.
NOTE: [n case of oil leakage, contact
our customer service department at
www.power-washer.us or 1-800-381-
0999. A SMALL AMOUNT OF OIL
LEAKAGE IS NORMAL.
WATER SCREEN FILTER
The pressure washer is equipped with
a water inlet screen filter to protect
the pump. Never operate the pressure
washer without the screen filter in place.
Z_ CAUTION: [f the screen filter is
not kept clean, the flow of water to the
pressure washer will be restricted and
the pump may be damaged.
• To clean the inlet water screen filter,
remove garden hose connector (D)
and remove the screen filter from
the inlet.
Flush screen filter with warm water
to clean.
Replace screen filter, and garden
hose connector immediately to
prevent any foreign matter from
entering the pump.
CAUTION: Do not damage the
screen filter, while removing or cleaning.
Any foreign particles entering the pump
may damage the pump.
COOLING SYSTEM
The air vents, located in and around the
pressure washer, must be kept clean
and free of any obstructions to ensure
proper air cooling of the motor during
operation.
Z_ WARNING: Prevent water from
penetrating the vents of the pressure
washer to minimize the risk of damage
to the machine and to reduce the risk of
shock to the operator.
13-ENG
Page 14

Z_ CAUTION: Prior to moving the unit,
always disconnect the garden hose via
the garden hose connector.
Z_ CAUTION: Always store your
pressure washer in a location where
the temperature will not fall below 40° F
(4° C). The pump in this machine is
susceptible to permanent damage if
frozen. FREEZE DAMAGE IS NOT
COVERED BY THE WARRANTY.
END OF USE AND WINTER
STORAGE INSTRUCTIONS
1. When finished using the pressure
washer, you must first drain and
rinse the detergent tank.
2. Run the pressure washer in low
pressure until all of the soap is
drained from the detergent tank.
3. Pour clear water into the tank and
run it through on low pressure as
though it were detergent.
NOTICE: Failure to clean properly will
cause bottle or suction tube to become
clogged and inoperable.
4. Turn the machine OFF and squeeze
the trigger to release the trapped
pressure inside of the machine.
5. Remove both the garden hose and
high pressure hose from the unit.
6. Disconnect the lance from the gun.
7. Turn ON the machine and allow it
to run for 5 seconds. (This will clear
out most of the water trapped in
the pump).
8. Unplug machine.
9. Wrap high pressure hose and
power supply cord onto storage
rack and snap power supply cord
into place as shown.
10. Store the machine and accessories
in a dry, climate controlled
environment. Do not store the
machine or accessories in a place
where the temperature could drop
below 40° F (4° C).
z_ DANGER: Risk of fluid injection.
When using replacement lances or
guns with this pressure washer, DO
NOT use a lance and/or lance/gun
combination that is shorter in length
than what was provided with this
pressure washer as measured from
the nozzle end of the lance to the
gun trigger.
NOTICE: The use of any other
accessory not recommended for use
with this tool could be hazardous.
Use only accessories rated equal
to or greater than the rating of the
pressure washer.
14- ENG
Page 15

Model 11BLE-325
PSI Max* 1900 psi
GPM Max* 1.5 gpm
Electrical Requirements 120V,
15 A, 60 Hz
Electrical Cord 35 ft. (10.6 m)
High Pressure Hose 25 ft. (7.6 m)
Minimum Amp Source 15A
Presure of Inlet Water 20-100 psi
Inlet Water cold tap
Soap Consumption Rate 10% max
* Water flow and maximum pressure
ratings determined in accordance
with PWMA standard PW101.
Do not return this product to your
retailer. Please contact our customer
service department at www.power-
washer.us or 1-800-381-0999.
Limited Warranty
This product is warranted against
defects in material and workmanship for
a period of one year on all components
excluding the spray gun, high pressure
hose, lances, nozzles, and ground fault
circuit interrupter (GFCI) which are only
covered for 90 days; effective from
the date of retail purchase and is not
transferable.
This warranty excludes incidental/
consequential damages and failures
due to misuse, abuse or normal wear
and tear. This warranty applies only
to products used in consumer (home)
applications.
This warranty does not apply to
commercial or rental applications.
This warranty gives you specific rights,
and you may also have other rights,
which vary from state to state.
Please complete and return the
enclosed Customer Information Card.
Return of this card is not required to
validate this warranty. A store issued
receipt or credit card statement showing
the purchase date is an acceptable
warranty validation. Please retain one of
these documents in your records.
If you have any questions, please
contact our customer service
department at www.power-washer.us
or 1-800-381-0999.
What is covered: Replacement parts
and labor. Please note that we reserve
the right to repair or replace the product
as we deem appropriate.
What is not covered: This warranty
does not include such parts as
nozzles which must be replaced as
part of normal maintenance of the
equipment, rather than as the result
of a defect. Transportation charges to
warranty center for defective products.
Transportation charges to consumer for
repaired products. Damages caused
by abuse, accident, improper repair, or
failure to perform normal maintenance.
Use of improper chemicals or
noncompliance with the operator
manual's instructions. Sales outside
of the United States or Canada. Any
other expense including consequential
damages, incidental damages, or
incidental expenses, including damage
to property. Some states do not allow
the exclusion or limitation of incidental
or consequential damages, so the
above limitation or exclusion may not
apply to you. This warranty does not
cover damage resulting from failure to
observe any of the following conditions:
1) The inlet water pressure must be
between 20 and 100 p.s.i.
2) The inlet water temperature must
not exceed 90°F (32°C).
3) The unit should not be stored in
areas where temperatures may
drop below 40° F (4° C).
15-ENG
Page 16

Implied Warranties
Any implied warranties, including the
implied warranties of merchantability
and fitness for a particular purpose, are
limited in duration to one year on all
components excluding the spray gun,
high pressure hose, lance, and ground
fault circuit interrupter (GFCI) which are
only covered for 90 days; effective from
the date of retail purchase and is not
transferable. This warranty excludes
incidental/consequential damages and
failures due to misuse, abuse or normal
wear and tear. This warranty applies
only to products used in consumer
(home) applications. This warranty
does not apply to commercial or rental
applications. This warranty gives you
specific rights, and you may also have
other rights, which vary from state to
state.
16-ENG
Page 17

Detergent is
not dispensing
Detergent to
Water ratio
Circuit breaker
trips or fuse
blown in
fuse box
Detergent is not
pressure washer
approved
The suction
tube has
become
disconnected,
clogged or
kinked
Detergent nozzle
is clogged
with debris
The Click-
N-Clean (B)
spray lance
is not in the
Low Pressure
Soap position.
Circuit overload
Extension cord
too long or wire
gauge too small
Nozzle partially
blocked
Use only detergents, degreasers, waxes and
other cleaning solutions, that are designed
specifically for pressure washers. Cleaners
in this category will clearly state on the
label that they are meant for use in pressure
washers. Do NOT use any other type of
cleaning solution in your pressure washer.
Never use bleach, ammonia, any type of
acid, or hot water in your machine!
Ensure the clear suction tube is not damaged
and is properly connected to the detergent
nozzle. Reconnect, clean or replace the tube
as needed.
Clean the nozzle according to the instructions
_rovided in the Nozzle paragraph under the
Maintenance section of this manual.
Follow to the instructions provided in the
Using Detergent paragraph under the
Operation Instructions section of this manual.
The pressure washer draws detergent at
a maximum 10:1 water to detergent ratio.
Most pressure washer detergents are
concentrated within this range. If you feel you
are using more detergent than is required for
the application, you can dilute the detergent
with regular tap water.
Verify that the circuit is rated at 15 amps or
greater. Ensure no other appliance is drawing
3ower from the same circuit (dedicated
circuit).
We do not recommend the use of extension
cords with your pressure washer. If you
must use an extension cord, verify that it
meets the minimum requirements listed in the
Extension Cord paragraph under the Power
Supply & Electrical Info in this manual.
Clean the nozzle according to the instructions
3rovided in the Nozzle paragraph under the
Maintenance section of this manual.
17-ENG
Page 18

GFCI Plug
Malfunction
Spray gun,
lance or high
pressure hose
leaking water
Low / surging
pressure or
motor does
not stop when
spray gun trigger
is released
NOTE: The
Pressure washer
is NOT receiving
a full volume of
incoming water
The machine
requires a
pressurized
water source
capable of
sustaining a
minimum of
20 psi at 5 gpm.
improperly
connected
accessory
Leaking oil/
water from
pump
Faucet is not
fully open
Garden hose
is too long or
it is kinked /
restricted
Water inlet
filter screen
is clogged
Extension cord
is too long or
wire gauge
is too small
For GFC[ reset procedure see Ground=fault
Circuit Interrupter Protection paragraph
under Power Supply & Electrical Info in
this manual. To order a replacement GFC[
or for GFC[ installation instructions, please
contact our customer service department at
www.power-washer.us or by calling
1-800-381-0999.
Verify all components (gun, lance, high
pressure hose) are properly connected
according to instructions provided in this
manual.
NOTE: A small amount of leakage is normal.
if oil/water leakage from pump is excessive,
please locate the specific source of the leak
and contact our customer service department.
Contact our customer service department at
www.power-washer.us or 1-800-381-0999.
NOTE: Have the pressure washer present
when calling with this issue.
Verify incoming water supply faucet is open
at the maximum setting.
Use a maximum garden hose length of
50 ft. (15.2 m) (city water) or 25 ft. (7.5 m)
(well water). Ensure the garden hose is laid
out flat and does not have any kinks or
leaks. Unwrap garden hose from reel or
hook (if applicable). Replace garden hose if
necessary.
Remove the filter screen (0) from the water
inlet (M) and clean it thoroughly. Replace the
filter screen.
We do not recommend the use of extension
cords with your pressure washer, if you
must use an extension cord, verify that it
meets the minimum requirements listed in the
Extension Cord paragraph under the Power
Supply & Electrical Info in this manual.
18- ENG
Page 19

No water Nozzle is
coming out clogged
of nozzle
Spray Gun
Trigger will
NOT Move
Unit will
NOT start
NOTE: Unit will
only start and
run when trigger
is depressed
and water is
spraying!
Motor stops
working during
normal operation
NOTE: Motor's
thermal overload
switch tripping
because
the motor is
overheated
Allow the motor
to cool for 20
minutes before
troubleshooting
and the switch
will automatically
reset.
Water inlet
filter screen
is clogged
Kink in the
garden hose
or hose is
wrapped on a
storage wheel
Gun safety lock
is engaged
Unit is not
turned ON
GFCI Plug is
not reset
Extension cord
is too long or
wire gauge
is too small
Nozzle is
clogged
Defective
Spray Gun
Clean the nozzle according to the instructions
_rovided in the Nozzle paragraph under
Maintenance section of this manual.
Remove the filter screen (O) from the water
inlet (M) and clean it thoroughly. Replace the
filter screen.
Use a maximum garden hose length of
50 ft. (15.2 m) (city water) or 25 ft. (7.5 m)
(well water). Ensure the garden hose is laid
out flat and does not have any kinks or
leaks. Unwrap garden hose from reel or
hook (if applicable). Replace garden hose if
necessary.
Release safety lock according to instructions
3rovided in the Starting paragraph under
Operation in this manual.
Verify that the On/Off Switch (I) is fully
engaged in the ON position.
Confirm the GFCI plug isreset and functioning
according to instructions provided in Ground-
Fault Circuit Interrupter Protection
paragraph under Power Supply & Electrical
info in this manual.
We do not recommend the use of extension
cords with your pressure washer. If you
must use an extension cord, verify that it
meets the minimum requirements listed in the
Extension Cord paragraph under the Power
Supply & Electrical Info in this manual.
Clean the nozzle according to the instructions
3rovided in the Nozzle paragraph under
Maintenance section of this manual.
Turn unit OFF, disconnect incoming water
from unit, and remove the gun and hose
assembly. Aim pressure washer away from
the electrical outlet, reconnect incoming
water, and switch the unit into the ON
3osition. If the motor starts and water flows
steadily out of the front (and you have
verified that the nozzle is not clogged), the
spray gun may be malfunctioning and need
to be replaced. Please contact our customer
service department at www.power-washer.
us or by calling 1-800-381-0999.
19-ENG
Page 20

Connecting and
Disconnecting
the Spray Lance
NOTE: Due
to the high
ipressures
iproduced by
your pressure
washer, the
lance must
seal tightly to
the gun. As
the result of
normal operation
the lance can
ibecome difficult
ito attach or
iremove and
this process
may require
considerable
force.
To attach the Lance - apply steady downward
3ressure on the lance (In the direction of the
trigger) while simultaneously twisting the
lance 90° counterclockwise. It may help if
you set the gun vertically on a flat surface
with the lance pointing upwards. The two
tabs on the end of the lance must be fully
inserted in the gun before the lance will twist
and lock. If this does not work then remove
the bayonet o-ring from the end of the lance
and attach the lance to the gun without the
o-ring in place. If the lance attaches to the
gun without the o-ring in place you will need
to replace the o-ring. Please contact our
customer service department at www.power-
washer.us or by calling 1-800-381-0999.
To remove the Lance - release any trapped
3ressure in the gun / hose by turning the unit
OFF and squeezing the gun trigger. Apply
steady downward pressure on the lance (Inthe
direction of the trigger) while simultaneously
twisting the lance 90° clockwise. It may help
if you set the gun vertically on a flat surface
with the lance pointing upwards.
20- ENG
Page 21

Este manual contiene importante informaci6n para que usted sepa y comprenda.
Esta informaci6n se relaciona con la protecci6n de SU SEGURIDAD Y LA
PREVENCION DE PROBLEMAS AL EQUIPO. Para ayudarlo a reconocer esa
informaci6n, utilizamos los simbolos indicados mas abajo. Sirvase leer el manual
y prestar atenci6n a dichos simbolos.
Z_PELIGRO: Indica una situaci6n de peligro inminente que, si no se evita,
provocar_ la muerte o lesiones graves.
_ADVERTENOIA: Indica una situaci6n de peligro potencial que, si no se evita,
podr{a provocar la muerte o lesiones graves.
Z_ATENCI6N: Indica una situaci6n de peligro potencial que, si no se evita,
posiblemente provocaria lesiones leves o moderadas.
AVISO: Se refiere a una practica no relacionada a lesiones corporales que de
no evitarse puede resultar en daSos a la propiedad.
Z_ ADVERTENClA: Este producto contiene quimicos conocidos en el Estado
de California como causantes de cancer y defectos de nacimiento u otros daSos
reproductivos. Ademas, algunos productos de limpieza y para el polvo contienen
quimicos conocidos en el Estado de California como causantes de cancer y
defectos de nacimiento u otros daSos reproductivos. Lbvese las manos despu6s
de su manejo.
Z_ ADVERTENCIA: Lea y comprenda
completamente este manual antes
de intentar ensamblar, usar o instalar
el producto. Si tiene alguna consulta
acerca del producto, cont_ctese con
nuestro Departamento de Servicio
al Cliente Ilamando al www.power-
washer.us o 1-800-381-0999.
Z_ ADVERTENOIA: Esta unidad
ha sido diseSada para aplicaciones
especificas. No se deberia modificar
y/o utilizar para aplicaciones diferentes
de aquellas para las cuales ha sido
pensada.
AVlSO: Guarde siempre el equipo de
lavado con agua a presi6n en un lugar
cuya temperatura no sea inferior a 4 °C
(40 °F). Los daSos por congelaci6n no
estan cubiertos pot la garantia.
LEA Y CONSERVE ESTAS
INSTRUCCIONES
z_ ADVERTENCIA: Cuando el
equipo es utilizado, hay que seguir
precauciones b&sicas, entre las cuales
se encuen-tran las siguientes.
1. Lea todas las instrucciones antes
de utilizar el equipo.
2. Para reducir el riesgo de lesiones,
es necesario prestar mucha
atenci6n cuando se utilice un
producto cerca de niSos pequeSos
ni animales.
3. Aprenda a detener el producto
y purgar la presi6n r&pidamente.
Familiaricese con los controles.
4. Est6 siempre atento: preste
atenci6n a Io que est& haciendo.
5. No utilice el equipo si se encuentra
fatigado, ha bebido alcohol o ha
consumido drogas.
6. Mantenga la zona de trabajo
despejada de personas.
21- SP
Page 22

7. No se extralimite ni se coloque
sobre un soporte inestable.
Adopte siempre una posici6n de
estabilidad y equilibrio.
8. Respete las instrucciones de
mantenimiento que se detallan en
este manual.
9. Este producto es suministrado
con un interruptor de circuito con
conexi6n a tierra insertado en el
enchufe del cable de alimentaci6n.
Si fuera necesario cambiar el
enchufe o el cable, utilicen piezas
de repuesto del mismo tipo.
10. No toque el enchufe o la toma con
las manos mojadas.
11. Eviten encendidos accidentales.
Coloque el interru ptor en APAGADO
antes de conectar o desconectar el
cable el6ctrico a una toma.
12. No dirija nunca el chorro del agua
sobre instalaciones el6ctricas o
sobre la misma maquina de lavar
a presi6n, con el fin de evitar
descarga el6ctrica.
13. No utilice el cable para mover la
maquina de lavar a presi6n. No
tire del cable para desconectar el
equipo de la toma.
14. Con el fin de evitar da_os, el cable
no debe ser aplastado, no debe
ser colocado cerca de objetos
cortantes ni de fuentes de calor.
15. Antes del uso revise los cables
el6ctricos. Los cables da_ados no
s61o reducen los rendimiento de la
maquina de lavar a presi6n, sino
que pueden provocar descargas
el6ctricas.
16. El peque_o chorro de punta de
alfiler es muy potente. No se
aconseja su uso sobre superficies
pintadas, sobre superficies de
madera o sobre objetos con
revestimiento adhesivo.
17. Aleje alas personas y animals del
area de trabajo.
18. Use siempre ambas manos cuando
se utiliza la maquina de lavar a
presi6n, con el fin de mantener un
completo control del tubo/de la
manguera.
19. No toque el boquilla o el
chorro de agua cuando esta en
funcionamiento. Nunca coloque
las manos frente a la boquilla.
20. Durante el uso, utilice gafas de
protecci6n. Lleve ropa y calzado
protectores para proteger contra
rociar accidental.
21. Desconecte el enchufe el6ctrico de
la toma cuando no esta en uso e,
igualmente, antes de desconectar
la manguera de alta presi6n.
22. Nunca anude o doble la manguera
de alta presi6n ya que podria
da_arla. Inspeccione la manguera
de alta presi6n peri6dicamente.
Reemplace la manguera de
inmediato siesta da_ada, gastada
o evidencia signos de grietas,
burbujas, agujeros u otros tipos
de p6rdida. Nunca tome una
manguera de alta presi6n que
tenga una p6rdida o est6 da_ada.
23. No hagan funcionar este producto
a temperaturas inferiores a 4 ° C
(40° F). Los da_os provocados por
el hielo no estan cubiertos por la
garantia.
24. Siga cuidadosamente todas
las instrucciones con respecto
a productos quimicos y las
advertencias antes del uso. Utilice
Qnicamente limpiadores aprobados
para equipos de lavado con agua
a presi6n. No use blanqueador,
cloro ni cualquier otro limpiador
que contenga acidos. Siempre
siga las recomendaciones en la
etiqueta del fabricante para el uso
adecuado de limpiadores. Siempre
proteja los ojos, piel y sistema
respiratorio de los limpiadores.
25. No hay que utilizar la maquina de
lavar a presi6n en areas donde
hayan vapores gaseosos. Una
22- SP
Page 23

eventual chispa el6ctrica podria
provocar una explosi6n o un
incendio.
26. Para reducir al maximo la cantidad
de agua que podria entrar en
la maquina de lavar a presi6n,
durante el uso, col6quela Io mas
lejos posible de la zona que debe
ser limpiada.
27. Con el fin de evitar escapes
accidentales, cuando no esta en
uso, la pistola rociadora debe estar
asegurada.
28. Durante el uso, NO cubra la
maquina de lavar a presi6n con
el fin de permitir una ventilaci6n
adecuada.
29. Nunca toque, tome nitrate de cubrir
un agujero o causa de p6rdida de
agua similar en la manguera de alta
presi6n. El flujo de agua EST', a
alta presi6n y PENETRARA la piel.
30. Utilice solamente limpiadores
recomendados especificamente
para lavadoras a alta presi6n.
Siga las recomendaciones de los
fabricantes. No use lejia de cloro
ni otro compuesto corrosivo. Ita
presi6n y penetrara la piel. Nunca
use con ningQn otro accesorio o
componente del fabricante.
31. Nunca anule las caracteristicas de
seguridad de este producto.
32. No opere la maquina si faltan
piezas, estan rotas o no son las
autorizadas.
33. Nunca rocie liquidos inflamables
ni use la lavadora de presi6n en
areas con polvo, liquidos o vapores
combustibles.
z_ ADVERTENCIA: Riesgo de
inyecci6n o de daSos. No orienten el
flujo contra las personas.
LEA Y CONSERVE ESTAS
INSTRUCCIONES
CARACTER|STICAS DE
SEGURIDAD
A LA SEGURIDAD AUTOMATIC
TOTAL STOP®
La maquina de lavar a presi6n
est& dotada de un dispositivo de
detenci6n que detecta cuando esta
desenganchado el gatillo de la pistola.
Abre el circuito el6ctrico al motor y
bloquea la maquina de lavar a presi6n.
z_ ADVERTENCIA: Si la opci6n de
Parada Automatica ® deja de funcionar,
NO UTILIZAR LA M_,QUINA. Contactar
con el Departamento de Atenci6n al
Cliente. Si, pot el contrario, continua
utilizandola, pueden resultar daSadas
personas o la propia maquina.
Z_ ADVERTENCIA: La maquina de
lavar a presi6n esta tambi6n dotada
de un interruptor el6ctrico principal
de encendido y apagado. Cuando la
hidrolimpiadora no est& en uso, es
necesario que dicho interruptor est6
colocado siempre en apagado para
prevenir posibles accidentes o daSos.
SOBRECARGA DEL MOTOR
El motor el6ctrico de la hidrolimpiadora
posee un dispositivo de protecci6n
contra la sobrecarga que bloquea
automaticamente el motor en el caso
de exceso de corriente o en el caso
de recalentamiento. El dispositivo
se reinicia autom&ticamente y
reactiva las condiciones normales de
funcionamiento despu6s de un breve
periodo.
INTERRUPTOR DE CIRCUITO CON
TOMA DE TIERRA
La m&quina de lavar a presi6n esta
dotada de un interruptor de circuito
con toma de tierra (GFCI) montado en
el enchufe del cable de alimentaci6n
el6ctrica. Dicho dispositivo suministra
una protecci6n adicional contra el
riesgo de descargas. Si fuere necesario
substituir el enchufe o el cable, utilicen
exclusivamente repuestos similares
provistos de protecci6n GFCI.
23- SP
Page 24

MANUTENCION DE UN EQUIPO
CON DOBLE AISLAMIENTO
_ Un equipo con doble
aislamiento est#_ dotado de
dos sistemas de aislamiento
en lugar de la puesta a tierra.
No es montada ninguna puesta a tierra
sobre un articulo de doble aislamiento,
ni puede ser a_adida a lahidrolim piadora.
La manutenci6n de este tipo de
instalaci6n requiere sumo cuidado, un
buen conocimiento del sistema y debe
ser efectuada solamente pot personal
cualificado. Las piezas de repuesto de
una instalaci6n de doble aislamiento
deben ser id6nticas alas piezas que
hay que cambiar. Estos equipos esta.n
identificados pot las palabras. "DOBLE
AISLAMIENTO" (DOUBLE-INSULATION
o DOUBLE-INSULATED). El equipo
puede estar identificado tambi6n con el
simbolo.
INFORMACION SOBRE
SUMINISTRO Y SISTEMA
ELC:CTRICOS
GROUND-FAULT CIRCUIT
INTERRUPTER PROTECTION
La maquina de lavar a presi6n esta
dotada de fabrica de un cable el6ctrico
y de un enchufe de alimentaci6n con
interruptor de circuito con toma de tierra
(GFCI). El cable debera set conectado
Onicamente a una toma corriente
el6ctrica instalada en conformidad con
las normativas locales de seguridad.
NOTA: La corriente el6ctrica debera ser
de 120V, 60 Hz con un circuito de por Io
menos 15 amperios. (Dedicado).
A. Revise el cable antes del uso. Si
esta da_ado, no Io utilice.
B. Mantenga secas y fuera de tierra
todas las conexiones
C. No toque el enchufe con las manos
mojadas
D. La md_quina de lavar a presi6n es
suministrada con un interruptor de
circuito con toma de tierra instalado
en el enchufe de alimentaci6n.
Si es necesario substituir el enchufe o
el cable, usen s61o piezas de repuesto
del mismo tipo. Para una substituci6n
correcta, contacte al servicio al cliente.
Z_ ADVERTENCIA: Controlen el
interruptor de circuito con toma de
tierra (GFCI) antes del uso. NO utilicen
la maquina de lavar a presi6n si el
control efectuado da un resultado
negativo.
Procedimientos de prueba del GFCI:
1. Enchufe el GFCI a la toma de
corriente. El indicador luminoso se
enciende.
2. Pulse el bot6n de prueba (test) (Z).
El indicador luminoso se apaga.
3. Pulse el bot6n de reinicio (reset) 00
para utilizar el equipo. El indicador
luminoso se enciende.
@
Si la prueba falla, no utilice el equipo.
NOTA: El GFCI debe reiniciarse
todas las veces que se conecta la
hidrolimpiadora a una toma el6ctrica.
Para reiniciarlo, bastara con presionar
el bot6n de reinicio del enchufe de
alimentaci6n del GFCI.
EXTENSION ES
Use exclusivamente extensiones para
uso exterior. Dichas extensiones estan
marcadas por la frase "Aptas para uso
exterior si no las utiliza, col6quelas
en un lugar cubierto". Use solamente
alargadores que tengan una potencia
el6ctrica igua o superior a la potencia
del producto. No utilice extensiones
daSadas. Antes del uso, revise la
extensi6n y si est& daSada sustitOyala.
24- SP
Page 25

Utilice el alargador correctamente y
no tire del cable para desconectar el
aparato. Mantenga las extensiones
lejos de fuentes de calory de angulos
cortantes.
Antes de desconectar el equipo de
la extensi6n, desconecte siempre esta
Qltima de la toma corriente.
Cuando se utilizan extensiones,
respeten las siguientes caracteristicas:
Longitud Calibres del
del cable cable
hasta 7,5 m 12 AWG Fuera
(25 pies)
Z_ ADVERTENCIA: Para reducir
la posibilidad de electrocuci6n,
mantengan la extensi6n seca y fuera
de tierra. No toquen el enchufe con las
manos mojadas.
LEA Y CONSERVE ESTAS
INSTRUCCIONES
25- SP
Page 26

NOTA: Las fotografias y los dibujos
lineales utilizados en este manual son
solo referencias y no representan un
modelo especffico
Compare las ilustraciones con su unidad
para familiarizarse con la ubicaci6n de
sus controles y regulaciones. Conserve
este manual para referencias futuras.
A. Pistola rociadora
B. Lanza de pulverizaci6n Click-N-
Clean_>
C. GFCI
D. Conector para la manguera del
jardin (instalaci6n de fabrica)
E. Manguera de alta presi6n
R Bloqueo de seguridad
G. Cuerpo motor y bomba
H. Cable de alimentaci6n el6ctrica con
GFCI
I. Interruptor (ON/OFF)
J. Tanque de detergente
K. Toma alta presi6n
h Tap6n para el agua
M. Entrada de agua
N. Fundas de accesorias a bordo del
almacenaje
O. Rejilla filtro de entrada de agua
(instalaci6n de fabrica)
R Agarador de la maquina
Q. Ubicaci6n de almacenamiento de
manguera/cable
R. Boquilla atomizadora PoweswiveP
1.
2.
Busque todas las partes sueltas de
la caja y retirelas.
Con la manija orientada como se
muestra, alinee los surcos adentro
el agarador de la maquina (P) con
los carriles encima de la maquina
de presi6n y resbalan dentro de
lugar.
\\\
3. Empuje como se muestra a
conectar el agarador de la maquina.
4. Extraer el tap6nes (L) de transporte
del empalme de la maquina (K) y
eliminarlo.
@
TERNIINOLOG|A DE LA
LAVADORA A PRESION
PSI: (Libras por pulgada cuadrada) Es
una unidad de medida para la presi6n
del agua. Tambi6n se usa para medir la
presi6n neumatica, presi6n hidr&ulica,
etc.
GPM: (Galones pot minuto) La unidad de
medida para la velocidad de circulaci6n
del agua.
26- SP
Page 27

CU: (Unidades de limpieza) GPM
multiplicadosporPSI. (GPM x PSI = CU)
Sistema de Inyecci6n de detergente:
Mezcla los limpiadores o los solventes
de limpieza con agua para mejorar la
efectividad de la limpieza.
Suministro de agua: Todas las lavadoras
a presi6n deben poseer una fuente de
agua. Los requisitos minimos que debe
satisfacer el suministro de agua son 20
psi y 5 galones pot minuto. Si la fuente de
agua es un pozo, la manguera de riego
no puede tener mas de 5-20 cm (30 ft.)
de largo.
Z_ AVERTENCIA: Para reducir
la posibilidad de contaminaci6n
proteja siempre el sistema contra la
contracorriente cuando realice una
conexi6n al sistema de agua potable.
Z_ PELIGRO: Riesgo de inyecci6n de
liquido y laceraci6n Cuando utilice
la configuraci6n de alta presi6n, NO
permita que el pulverizador entre en
contacto con personas, piel y ojos
desprotegidos, ni con animales o
mascotas. Se producir_n lesiones
graves.
• Su lavadora opera el liquido
con una presi6n y velocidad Io
suficientemente altas como
para penetrar la came humana
y animal, y esto podda provocar
una amputaci6n u otra lesi6n
grave. Las p6rdidas causadas por
accesorios sueltos o mangueras
daSadas pueden provocar lesiones
por inyecci6n. NO TRATE LA
INYECCION DE L[QUIDO COMO
SI FUERA UN SIMPLE CORTE.
Consulte a un m6dico de inmediato.
CARACTER|STICAS DE
OPERACION DE LA LAVADORA
A PRESl0N
LANZA DE PULVERIZACION
CLICK-N=CLEAN ® (FIG. 4)
z_ AVERTENCIA: No mueva la boquilla
para ajustar el chorro mientras est6
pulsado el accionador.
La boquilla Click-N-Clean® puede
ajustarse en cuatro posiciones. Gire el
cuello 90° para ajustar a la posici6n
que desee.
S.@_ La posici6n de
Chorro Jab6n de
Baja Presi6n esta
indicada para
suministrar
detergente.
T._ _; La posici6n de chorro
de alta presi6n esta
indicada para limpiar
con una presi6n alta.
U. immh,,_. La posici6n de chorro
en abanico ancho de
alta presi6n esta
indicada para limpiar
con una presi6n alta.
_,(_ La posici6n de chorro
en abanico oscilante
turbo de alta presi6n
esta prevista para una
limpieza 6ptima.
NOTA: La presi6n del chorro sobre
la superficie que estan limpiando
aumenta en proporci6n alacercamiento
del lanzador sobre la superficie misma.
@
Z_ATENCI6N: La posici6n de
vaporizaci6n con chorro de aNta
presi6n es muy agresiva. En la mayoria
de las aplicaciones de limpieza, se
recomienda utilizar el chorro en abanico
(U o V) para evitar daSar la superficie
vaporizada.
27- SP
Page 28

BOQUILLA ATOMIZADORA
POWESWIVEL ®(FIG. 5)
Z_ATENCI6N: La Boquilla se puede
regular a 360°; el ajuste solamente se
puede modificar con el accionador de
la pistola completamente soltado. No
intentar ajustar laboquilla de pl&stico rojo
cuando la maquina esta funcionando. El
no respeto de esta advertencia podria
provocar da_os personales.
La lanza gira sobre 360° y suministra
un chorro vaporizado de alta presi6n en
forma de abanico que permite limpiar
zonas dificiles de alcanzar.
0
3°oo O
USO DE DETERGENTE (Fig. 6-=-7)
AVISO: Utilice Qnicamente limpiadores
aprobados para equipos de lavado con
agua a presi6n. No use blanqueador,
cloro ni cualquier otto limpiador que
contenga acidos.
AVlSO: Limpie con agua clarificada
el estanque luego de haber utilizado
productos quimicos.
1. Inserte la lanza a la pistola
empujando firmemente y
simultaneamente torciendo un 1/4
de una vuelta a la izquierda hasta
que esta trabado en lugar.
0
2. Retire el tap6n del estanque (VV)
que se encuentra en la parte trasera
de la maquina.
3. Llene los dep6sitos (J) con la
soluci6n de limpieza ade-cuada.
4. Ajuste la lanza Click-N-
Clean ® a la posici6n de
Chorro Jab6n de Baja Presi6n
(S, fig. 4).
5. Apriete el gatillo y el detergente
se mezclara automaticamente con
el agua y se despachara per la
boquilla..
NOTA: Cuando la lanza Click-N-Clean Ce
se coloca en la posici6n del Chorro
en Abanico Medio de Alta Presi6n
o Chorro en Abanico Ancho de Alta
Presi6n, el detergente no sera aspirado
desde su estanque.
6. Cuando complete el uso de deter-
gente, Ilene y limpie el tanque de
detergente con agua limpia. Vea
Almacenaje para el procedimiento
correcto.
6. Vea Almacenaje secci6n en este
manual para los procedimientos
apropiados de la parada y del
almacenaje.
T_cnicas de limpieza
Cuando se procede a la limpieza con
la maquina de lavar a presi6n, se
pueden efectuar diferentes operaciones
s61o con el agua; en muchos cases,
sin embargo, es conveniente utilizar
tambi6n un detergente. El uso de un
detergente asegura un tratamiento
inmediato de la suciedad, permitiendo
al agua con alta presi6n penetrar y
eliminar eficazmente la suciedad.
28- SP
Page 29

Aplicaci6n de detergente
Z._ATENCl6N: Eviten trabajar sobre
superficies calientes o a la luz directa
del sol, para disminuir Io m&s posible
las posibilidades de que el jab6n daSe
las superficies pintadas.
Z_ATENCl6N: Si se deja secar el
jab6n, las superficies pintadas podrian
daSarse. Lave y seque una pequeSa
secci6n pot vez.
1. Aplique la soluci6n de jab6n de la
m&quina de lavar a presi6n sobre
una superficie de trabajo SECA.
NOTA: NO SE ACONSEJA MOJAR
LA SUPERFICIE ANTES, PUESTO
QUE DILUYE EL DETERGENTE
Y REDUCE SU CAPACIDAD DE
LIMPIEZA.
Ante la presencia de una
superficie vertical, aplique el jab6n
horizontalmente comenzando pot
la parte baja para evitar estriados.
2. Antes de enjuagar, dejen el
detergente sobre la superficie
durante un breve lapso de tiempo.
3. Enjuague con agua limpia y con
alta presi6n. Sobre las superficies
verticales, comience a enjuagar
antes desde la parte baja hacia
la parte alta y luego viceversa.
Tenga la boquilla a 15-20 cm (6-8
pulg.) de la superficie de trabajo
con un angulo de 45° utilizando
el chorro turbo como si fuera una
herramienta para pelar en lugar de
cepillo de acero.
NOTA: AsegQrese de que el sistema
de inyecci6n de detergente est6
completamente limpio antes de cambiar
detergente.
ARRANQUE {FIG. 8--14)
Z_ DANGER: Riesgo de lesi6n pot
pulverizaci6n. Trabe el bloqueador del
disparador cuando la pistola no est6
en uso, a fin de evitar la pulverizaci6n
accidental.
Z_ AVERTENClA: Riesgo de ingerirlo o
de lesiones. No dirija el chorro hacia si
mismo o hacia otras personas.
z_ AVERTENClA: Riesgo de operaci6n
insegura. Parese en una superficie
estable y agarre la pistola/varilla
firmemente con ambas manes.
1. Connect el tubo de alto presi6n
(E) a la salida de la maquina (K).
AsegQrese de que los conductos
estan correctamente alineados y
de que la conexi6n es segura.
@
2.
Conecte la manguera del jardin
al conector correspondiente
acoplado a la entrada de la
maquina. AsegQrese de que la
manguera del jardin (no incluido)
esta conectada a una toma de
agua que est6 activa.
NOTA: Si la fuente de agua es
un pozo, la manguera de riego no
puede tenet mas de 5-20 cm (30 ft.)
de largo.
3. Inserte la lanza del aerosol
(B, R) a la pistola (A) empujando
firmemente y simultaneamente
torciendo un 1/4 de una vuelta a la
izquierda hasta que esta
29- SP
Page 30

@
Z_ AVERTENClA: Si la lanza no
se traba con seguridad, podria ser
expulsada con alta presi6n durante la
operaci6n, posiblemente estropeando
lesion.
4. Prende la agua entrante a la v&lvula
encendido y completamente
abierta para asegurar corriente
maxima para trabajar a maquina.
0
5.
6.
Enchufe el GFCI (C) a un
tomacorriente. Presione con
firmeza y suelte el bot6n de prueba
(TEST) (Z), y luego presione y suelte
el bot6n de reinicio (RESET) (Y). Se
debe encender la luz del GFCI.
Asegure la seguridad de la pistola
se abre y exprimen el disparador
hasta que el aire se ha escapado
y un flujo constante del agua de
la presi6n baja esta viniendo las
boquilla.
7.
0
8.
Situar el interruptor en la posici6n de
on (I).Tenga en cuenta que el motor
se encendera momentaneamente
y luego se apagar&
Presione el gatillo para arrancar el
motor y comenzar con el lavado a
presi6n.
NOTA: El motor funciona
solamente cuando se presiona el
disparador de la pistola y la agua
est& rociando.
APAGADO
Vea Almacenaje secci6n en este manual
para los procedimientos apropiados de
la parada y del almacenaje.
z_ ADVERTENCIA: Riesgo de
quemadura. Cuando realice el
mantenimiento, es posible que se
exponga a superficies calientes,
presi6n de agua o partes movibles,
que pueden causar lesiones graves
o la muerte.
Para asegurar el funcionamiento
eficiente y una larga vida de su lavadora
a presi6n, se debe preparar y seguir un
programa rutinario de mantenimiento.
30- SP
Page 31

Si la lavadora a presi6n se usa en
condiciones inusuales, como de alta
temperatura o polvo, se requiere un
mantenimiento mas frecuente.
CON EXION ES
Las conexiones en las mangueras de
la presi6n, la pistola y la varita del
aerosol se deben limpiar regularmente
y lubricar con la grasa ligera del aceite
o del litio para prevenir salida y da_o a
los anillos o.
BOQUILLA
La boquillade aerosol ajustable se debe
limpiar regularmente.
El estorbar las boquilla causa
funcionamiento disminuido y la presi6n
de la bomba de set tambi6n colmo y
limpieza se requiere inmediatamente.
1. Quite la varita de la pistola.
2. Despeje la boquilla forzando un
alambre tieso o un clip de papel
(peque_o) enderezado a trav6s
del agujero de centro de cada la
boquilla.
3. Lave la boquilla con agua de
ambos extremos.
4. Vuelva a conectar la varilla a la
pistola.
Reinicie arrancar nuevamente la
maquina de lavar a presi6n y oprimir el
gatillo de la pistola de chorro.
LUBRICACION
La arandela de la presi6n se dise_a con
un sistema lubricante permanente. El
aceite convencional comprueba y los
cambios no son necesarios.
NOTA: EN CASO DE PFtRDIDA DE
ACEITE, CONT_,CTESE CON NUESTRO
DEPARTAMENTO DE SERVICIO AL
CLIENTE LLAMANDO AL www.power-
washer.us O 1-800-381-0999. UNA
PEQUENA PFtRDIDA DE ACEITE ES
NORMAL.
FILTRO DE AGUA
La maquina de lavar a presi6n esta
dotada de un filtro de introducci6n de
agua para proteger la bomba.
Z_,CTENCl6N: Si no se mantiene
limpio el filtro, el flujo del agua hacia
la maquina de lavar a presi6n se ve
limitado y la bomba puede da_arse.
• Para limpiar el filtro de pantalla
del agua de la entrada, quite el
conectador de la manguera del
jardin (D) y quite el filtro de pantalla
de la entrada.
Filtro de pantalla rasante con agua
caliente a limpiar.
Reemplace de inmediato el filtro
y la uni6n rapida para evitar que
entre material extra_o en la bomba.
Z_ATENCI6N: No da_e el filtro cuando
Io Io extraiga y limpie. Cualquier
particula extra_a que pudiera entrar en
las bombas, podria da_arla.
SISTEMA DE REFRIGERACION
Los respiraderos de aire colocados
en la maquina de lavar a presi6n y a
su alrededor, deben ser mantenidos
limpios de cualquier obstuccion para
garantizar la refrigeraci6n del motor
con aire limpio durante el uso.
Z_ AVERTENCIA: Evite que el agua
penetre en los respiraderos de la
maquina de lavar a presi6n para que el
riesgo de da_ar la maquina sea minimo
y para reducir el peligro de sacudida
el6ctrica al usuario.
Z_ATENCl6N: Antes de mover
la unidad, desconecte siempre la
manguera del jardin via el conectador
de la manguera del jardin.
Z_ATENCI6N: Almacene la maquina
de lavar a presi6n en un local cuya
temperatura no descienda por debajo
de los 4° C (40° R). En el caso de
congelamiento, la bomba de este
equipo esta sujeta a da_o permanente.
LOS DANOS PROVOOADOS POR EL
HIELO NO ESTAN CUBIERTOS POR
LA GARANTJA.
31- SP
Page 32

INSTRUCCIONES DE ALMACENAJE
Y FINALIZACION DE USO
1. Despu6s de utilizar la lavadora a
presi6n, se deben vaciar y aclarar
los dos dep6sito de detergente.
2. Poner la lavadora a presi6n baja
hasta que se haya ido todo el
detergente de los dep6sito.
3. Vertir agua limpia en los dep6sito
y poner la maquina a presi6n baja,
como si Ilevara detergente.
AVISO: Si no se limpia adecuadamente
hara que la boquilla de detergente a
obstruirse ya inoperable
4. Poner la maquina en posici6n
apagado (OFF) y apretar el gatillo
para liberar la presi6n acumulada
dentro de la maquina.
5. Desconectar la manguera y la
manguera de alta presi6n de la
maquina.
6. Desconecte la lanza de la pistola.
7. Poner la m_,quina en posici6n
encendido (ON) y dejarla que
funcione durante 5 segundos.
(Esto va a permitir que se vacie el
agua atrapada en el dep6sito).
8. Desconectar la maquina
9. Envolva la manguera de presion,
y el cable de electricidad en el
almacenamiento, y fije el cable
de electrecidad en el lugar que se
muestra.
10. Guardar la maquina en un espacio
seco y con la temperatura
controlada. No guardar la maquina
o los acesorios en un espacio
donde la temperatura pueda
descender hasta 4°C (40°F)
PELIGRO: Riesgo de inyecci6n
de liquido. Cuando utilice las lanzas
o pistoias de repuesto con esta
lavadora a presi6n, NO utilice una
lanza o una combinaci6n de lanza/
pistola que sea m_s corta en Iongitud
que la que se suministr6 con esta
lavadora a presi6n. Esta Iongitud se
mide desde el extremo de la boquilia
de la lanza hasta el disparador de la
pistola.
AVlSO: El uso de accesorios no
recomendados con esta herramienta
puede resultar peligroso. Use
solamente accesorios de marca ya
que tienen una capacidad nominal
igual o mayor que la capacidad
nominal de la lavadora a presi6n.
Modelo 11BLE=325
PSI Max* 1900 psi
GPM Max* 1,5 gpm
Requisitos el6ctricos 120V,
15 A, 60 Hz
Cable el6ctrico 10,6 m (35 pies)
Manguera de
alta presi6n
Amperaje minimo de
la fuente de energiae
Presi6n del agua
de entrada
Agua de entrada
32- SP
7,6 m (25 pies)
15A
20-100 psi
Llave de
agua fria
fndice de consumo
de jab6n 10% max
* *Valores maximos de flujo y presi6n
de agua determinados de acuerdo
con la norma PW101 de la PWMA
(Asociaci6n de fabricantes de
lavadoras a presi6n).
Page 33

Noregrese este producto al vendedor.
Cont&ctese con nuestro Departamento
de servicio al cliente Ilamando al www.
power-washer.us o 1-800-381-0999.
Garantia limitada
Este producto se autoriza contra defec-
tos en material y la ejecuci6n pot un
periodo de un aSo en todos los com-
ponentes excepto la pistola de aerosol,
la manguera de alta presi6n, las lanzas,
las boquillas, y el interruptor del circuito
de la averia de la tierra (GFCI) que se
cubran solamente pot 90 dias; eficaz
a partir de la fecha de la compra al pot
menor y no es tranferible.
Esta garantia excluye los daSos
resultantes o accidentales, y las fallas
debidas al mal uso, abuso, o uso y
desgaste normales. Esta garantia se
aplica s61o a productos utilizados para
aplicaciones dom6sticas del cliente.
Esta garantia no se aplica a los productos
utilizados con fines comerciales o de
alquiler.
Esta garantia le otorga derechos
especificos, pero podria tenet tambi6n
otros derechos que varian segOn el
estado.
Complete y envienos la Tarjeta de
informaci6n del cliente que se adjunta.
El envio de esta tarjeta no es necesario
para validar la garantia. Un almac6n
public6 el recibo o la declaraci6n de
la tarjeta de cr6dito que demuestra la
fecha de la compra es una validaci6n
aceptable de la garantia. Conserve pot
favor uno de estos documentos en sus
expedientes.
Si tiene alguna consulta acerca,
contactese con nuestro Departamento
de Servicio al Cliente Ilamando al www.
power-washer.us o 1-800-381-0999.
La garantia cubre: piezas de repuesto
y mano de obra. Tenga en cuenta que
nos reservamos el derecho de decidir si
reparar o reemplazar el producto segOn
Io consideremos pertinente.
La garantia no cubre: Esta garant[a no
cubre las piezas, como las boquillas,
que deben reemplazarse como parte
del mantenimiento normal del equipo,
mas que como el resultado de un
defecto. Cargos de transporte de
productos defectuosos al centro de
garantia. Cargos de transporte de
productos reparados al cliente. DaSos
ocasionados pot abuso, accidente,
reparaci6n inadecuada o incum plimiento
de tareas de mantenimiento normal.
Uso de productos quimicos o del
noncompliance incorrectos con las
instrucciones del manual del operador.
Uso de sustancias qu[micas indebidas
o incumplimiento de las instrucciones
del manual de operaci6n. Ventas fuera
de los Estados Unidos o Canad&
Cualquier otto gasto, incluidos
los daSos resultantes, los daSos
accidentales, los gastos accidentales
y los daSos a la propiedad. Algunos
estados no permiten la exclusi6n o
limitaci6n de los daSos accidentales o
resultantes, de modo que la exclusi6n
o limitaci6n anterior puede que no se
aplique en su caso. Esta garant[a no
cubre los daSos producidos por el
incumplimiento de cualquiera de las
siguientes condiciones:
1) La presi6n del agua de entrada
debe ser de 20 a 100 psi.
2) La temperatura del agua de entrada
no debe superar los 32 °C (90 °F).
3) La unidad no debe almacenarse en
lugares cuya temperatura pueda
ser inferior a 4° C (40 °F).
Garantias implicitas
Cualquier garant[a implicada,
incluyendo las garant[as implicadas del
merchantability y de la aptitud para
un prop6sito particular, se limita en
la duraci6n a un aSo en todos los
componentes excepto el arma de
aerosol, la manguera de alta presi6n, la
lanza, y el interruptor del circuito de la
aver[a de la tierra (GFCI) que se cubran
solamente pot 90 d[as; eficaz a partir
de lafecha de la compra al por menor y
no es tranferible. Esta garant[a excluye
33- SP
Page 34

los da_os resultantes o accidentales, y
las fallas debidas al mal uso, abuso, o
uso y desgaste normales. Esta garantia
se aplica s61o a productos utilizados
para aplicaciones dom6sticas del
cliente. Esta garantia no se aplica
a los productos utilizados con fines
comerciales o de alquiler. Esta garantia
le otorga derechos especificos, pero
podria tener tambi6n otros derechos
que varian segQn el estado.
PROBLEMA
El detergente no
esta dispensando
Detergente para
regar cociente
CAUSA _ CORRECCION
El detergente Utilice solamente los detergentes,
no es aprobado los desengrasadores, las ceras y otras
para la maquina soluciones de la limpieza, que se dise_an
especificamente para las arandelas de la
presi6n. Los limpiadores en esta categoria
indicaran claramente en la etiqueta que
los significan para el uso en arandelas de
la presi6n. NO utilice ningQn otto tipo de
soluci6n de la limpieza en su arandela de
la presi6n, iNunca utilice el blanqueador,
el amoniaco, cualquier tipo de acido, o la
agua caliente en su maquina!
Asegure el tubo claro de la succi6n no se
da_a y est#_conectado correctamente con
la boquilla detergente. Vuelva a conectar,
limpie o substituya el tube segQn Io
necesitado.
Limpie la boquilla segQn las instrucciones
proporcionadas en el parrafo las boquilla
bajo secci6n del mantenimiento de este
manual.
SegQn las instrucciones proporcionadas
en el parrafo de Uso de Detergente bajo
secci6n del Instrucciones de operacidn de
este manual.
El tubo de la
succi6n se ha
desconectado,
estorbado
o torcido
La boquilla
detergente
se estorba
con ruina
La lanza Click-
N-Clean _ (B) no
puede ajustarse
en la posici6n
Chorro
detergente de
baja presi6n.
La arandela de presi6n dibuja el detergente
en un agua maxima de 10:1 al cociente
detergente. La mayoria de los detergentes
de la arandela de la presi6n se concentran
dentro de esta gama. Si usted se siente
que usted esta utilizando mas detergente
que se requiere para el use, usted puede
diluir el detergente con el agua del grifo
regular.
34- SP
Page 35

PROBLEMA
Viajes o fusible del
interruptor soplados
en caja del fusible
Mal funcionamiento
de el Enchufe
Pistola de aerosol,
lanza o agua
que se escapa
de la manguera
de alta presi6n
CAUSA I ............. CORRECCION
Circuito
sobrecargado
Cuerda de
la extensi6n
demasiado
larga o galga
del alambre
demasiado
peque_a
Boquilla
Obstruida
Accesorio
mal puesto
Fugas de aceite
de la bomba
Verifique que el circuito sea clasificado en
15 amperios o mayor. No asegure ninguna
otra aplicaci6n esta dibujando energia del
mismo circuito (circuito dedicado).
No recomendamos el uso de las cuerdas
de la extensi6n con su arandela de la
presi6n. Si usted debe utilizar una cuerda
de la extensi6n, verifique que resuelva
los requisitos minimos enumerados en el
parrafo de la cuerda de la Extensiones
bajo Informacidn sobre suministro y
sistema el6ctricos en este manual.
Limpie la boquilla segOn las instrucciones
proporcionadas en el parrafo las Boquilla
bajo secci6n del Mantenimiento de este
manual.
Para el procedimiento del reajuste de
GFCI vea el parrafo de la protecci6n del
Protecci6n de interruptor de circuito de
detecci6n de falla conectado a tierra
bajo Informacidn sobre suministro y sistema
el#ctricos en este manual. Para pedir un
reemplazo GFCI o para las instrucciones
de instalaci6n de GFCI, entre en contacto
con pot favor nuestro departamento de
servicio de cliente en www.power-washer.
us o Ilamando 1-800-381-0999.
Verifique que todos los componentes
(arma, lanza, manguera de alta presi6n)
est6n conectados correctamente segQn
las instrucciones proporcionadas en este
manual.
NOTA: Una cantidad pequeSa de salida es
normal. Si la salida del agua del aceite de
la bomba es excesiva, Iocalice por favor
la fuente especifica del escape y entre
en contacto con nuestro departamento
de servicio de cliente. Entre en contacto
con nuestro departamento de servicio
de cliente en www.power-washer.us o
1-800-381-0999. NOTA: Tenga el presente
de la arandela de la presi6n al Ilamar con
esta edici6n.
35- SP
Page 36

PROBLEMA
La presi6n baja/que
se afloja o el motor
no para cuando
el disparador del
arma de aerosol
es NOTA lanzada:
La arandela de la
presi6n NO esta
recibiendo un
volumen completo
de agua entrante
que la maquina
requiere una
fuente de agua
presurizada capaz
de sostener un
minimo de 20
PSI en 5 gpm.
Ninguna agua que
sale de la boquiolla
El disparador de la
pistola de aerosol
no se movera
CAUSA ' CORRECClON
El grifo no esta
completamente
abierto
La manguera
del jardin es
demasiado larga
o se enrosca/
restricto
Se estorba la
pantalla de filtro
de la entrada
del agua
La cuerda de
la extensi6n
es demasiado
larga o la galga
del alambre
es demasiado
peque_
Boquilla esta
obstruida
Se estorba la
pantalla de filtro
de la entrada
del agua
La torcedura
en la manguera
del jardin o la
manguera se
envuelve en
una rueda del
almacenaje
Se contrata
la cerradura
de seguridad
de la pistola
Verifique que el grifo entrante del
abastecimiento de agua est6 abierto en el
ajuste maximo.
Utilice una Iongitud maxima de la
manguera del jardin de. 15,2 m (50 pies)
(agua de la ciudad) o. 7,5 m (25 pies)
(agua bien). Asegure la manguera del
iardin se presenta completamente y no
tiene ningunas torceduras o escapes.
Desempaquete la manguera del jardin del
carrete o enganchela (si fuera aplicable).
Substituya la manguera del jardin en caso
de necesidad.
Quite la pantalla de filtro (O) de la entrada
del agua (M) y limpiela a fondo. Substituya
la pantalla de filtro.
No recomendamos el uso de las cuerdas
de la extensi6n con su arandela de la
presi6n. Si usted debe utilizar una cuerda
de la extensi6n, verifique que resuelva
los requisitos minimos enumerados en el
p&rrafo de la cuerda de la Extensiones
bajo energfa Informacidn sobre suministro
y sistema el6ctricos en este manual.
Limpie la boquHla segQn las instrucciones
proporcionadas en el p&rrafo las BoquilJa
bajo secci6n del Mantenimiento de este
manual.
Quite la pantalla de filtro (O) de la entrada
del agua (M) y limpiela a fondo. Substituya
la pantalla de filtro.
Utilice una Iongitud m_.xima de la
manguera del jardin de 15,2 m (50 pies)
(agua de la ciudad) o 7,5 m (25 pies)
(agua bien). Asegure la manguera del
iardin se presenta completamente y no
tiene ningunas torceduras o escapes.
Desempaquete la manguera del jardin del
carrete o enganchela (si fuera aplicable).
Substituya la manguera del jardin en caso
de necesidad.
La cerradura de seguridad del lanzamiento
segQn Arranque instrucciones propor-
ciona en el parrafo que comenzaba bajo
Operacidn en este manual.
36- SP
Page 37

PROBLEMA
La unidad no
comenzarb, la
nora: iLa unidad
comenzara
y funcionarb.
solamente cuando
se presiona el
disparador y el
agua est& rociando!
El motor para el
trabajar durante
NOTA: de
la operaci6n
normal: Viajaron
en autom6vili
el interruptor
termal de la
sobrecarga que
disparaba porque
se recalienta el
motor permite
que el motor se
refresque por 20
minutos antes de
Iocalizar averias
y el interruptor
reajustara
automaticamente.
CAUSA
La unidad no
se priende
El enchufe
de GFCi no
se reajusta
La cuerda de
la extensi6n
es demasiado
larga o la galga
del alambre
es demasiado
pequeSa
Boquilla esta
obstruida
Pistola
defectuosa
OORRECClON
Verifique que el interruptor con./desc.
(I) est6 contratado completamente a la
3osici6n de trabajo.
Confirme el enchufe de GFCI es
reajustado y de funcionamiento segOn
las instrucciones proporcionadas en
3arrafo de la protecci6n del interruptor
del ProteccJ6n de interruptor de circuito
de detecci6n de falla conectado a
tierra bajo Informacidn sobre suministro y
sistema el6ctricos en este manual.
No recomendamos el uso de las cuerdas
de la extensi6n con su arandela de la
3resi6n. Si usted debe utilizar una cuerda
de la extensi6n, verifique que resuelva
los requisitos minimos enumerados en el
3_,rrafo de la Cuerda de la Extensiones
bajo Informacidn sobre suministro y
sistema el6ctricos en este manual.
Limpie la boquillla segOn las instrucciones
proporcionadas en el parrafo las Boquilla
bajo secci6n del Mantenimiento.
Extraer la pistola y la manguera de la
3arte frontal de la unidad. Conectar la
unidad en posici6n ON y no dirigir el
chorro de agua hacia ninguna fuente
de corriente el6ctrica. Si la unidad se
Done en marcha y sale agua de la parte
frontal, hay que cambiar la pistola.
Contacte con nosotros via e-mail en:
customerservice@hdpowerwasher.
com. Tambi6n puede hacer un pedido
directamente en: www.power-washer.
us o Ilamando 1-800-381-0999.
37- SP
Page 38

PROBLEMA
Conectando y
desconectando
ila NOTA de la
lanza del aerosol:
Debido alas altas
presiones produjo
ipor su arandela
de la presi6n, la
ilanza debe sellar
ifirmemente al arma.
iComo resultado la
operaci6n normal
la lanza puede
Ilegar a ser dificil
de unit o de quitar
iY este proceso
puede requerir
considerable fuerza.
CAUSA ' CORRECCION
Para unit lalanza =aplique constantemente
la presi6n hacia abajo en la lanza (en la
direcci6n del disparador) mientras que
simult&neamente tuerce la lanza 90° a la
izquierda. Puede ayudar si usted fija el
arma verticalmente en una superficie plana
con la lanza que seSala hacia arriba. Las
dos lengQetas en el extremo de la lanza se
deben insertar completamente en el arma
antes de que la lanza tuerza y se trabe. Si
esto entonces no trabaja quita el anillo o
de la bayoneta del extremo de la lanza y
una la lanza al arma sin el anillo o en lugar.
Si las fijaciones de la lanza al arma sin
el anillo o en lugar que usted necesitara
substituir el anillo o. Entre en contacto
con pot favor nuestro departamento de
servicio de cliente en www.power-washer.
us o Ilamando 1-800-381-0999.
Para quitar la lanza - libre cualquier
presi6n atrapada en el arma/la manguera
dando vuelta a la unidad APAGADO y
exprimiendo el disparador del arma.
Aplique constantemente la presi6n hacia
abajo en la lanza (en la direcci6n del
disparador) mientras que simultaneamente
tuerce la lanza 90° a la derecha. Puede
ayudar si usted fija el arma verticalmente
en una superficie plana con la lanza que
seSala hacia arriba.
38- SP
Page 39

Black & Decker and the Black & Decker logo are trademarks of The Black & Decker
Corporation and are used under license. All rights reserved.
Orange & Black is a trademark of The Black & Decker Corporation.
Product in this box may differ slightly from that pictured.
Not all accessories shown in photography are included in this package.
in a continued commitment to improve quality, the manufacturer reserves the right to make
component changes or design changes when necessaw.
This product is covered by US patents and other international patents.
Copyright. All Rights Reserved.
Black & Decker y el Iogotipo de Black & Decker son marcas comerciales de The Black &
Decker Corporation y se usan con licencia. Todos los derechos reservados.
El uso de los colores anaranjado y negro es una marca comercial por Black & Decker
Corporation.
Con el fin de perfeccionar el nivel cualitativo, el fabricante se reserve el derecho de efectuar
las modificaciones a los proyectos, en el caso que Io considere oportuno.
Este producto se encuentra cubierto pot patentes de EE.UU. y otras internacionales.
Copyright. Todos los Derechos Reservados.
The FNA GROUP
Elk Grove Village, IL 60007
1-800-381-0999
www. power-wash er.us
Printed in China • Impreso en China
 Loading...