

Page 1

VC-HD8
Manual v2
July 2016
Page 2

VC-HD8 Manual v2 July 2016
3
Contents
1. What is the VC-HD8? ..................................................................... 4
2. Supported Media Formats ............................................................. 4
3. In the Box ....................................................................................... 5
4. Setup Instructions .......................................................................... 6
5. Remote Control ............................................................................. 8
6. Settings Options ............................................................................. 9
7. Additional Video & Slideshow Options ........................................ 12
8. Content Activation Options ......................................................... 14
9. Programming Content ................................................................. 15
Looping ........................................................................................ 15
8 Button Activation ...................................................................... 18
PIR Activation ............................................................................... 26
Page 3
VC-HD8 Manual v2 July 2016
4
Thank you for purchasing the VideoClip-HD8
The VC-HD8 is one of a range of products we offer specific to the
heritage marketplace. We are confident that we have other
products you will find useful and look forward to hearing from you
again soon.
T: +44 (0)1639 767007 | W: www.blackboxav.co.uk
1. What is the VC-HD8?
VideoClip HD8 is a compact, stand-alone, high definition digital
media player. It can be used to display and distribute videos, images
and audio over a screen/monitor that is connected to the device via
HDMI input. The VC-HD supports a wide range of digital media files
which can be stored on a SD card or USB stick. A remote is also
supplied for easy player control and access to settings.
2. Supported Media Formats
Video Codecs Supported
MPEG1/2/4,
H.264, AVC, VC1, WMV,
RM/RMVB, DivX3/4/5/6, Xvid3/4/5/6
Video Formats Supported
RM/RMVB, AVI, TS, M2TS, MTS, MKV, MOV,
FLV, DVD
-ISO, BD-ISO, VOB, MPG, DAT, ASF,
TP, TRP, WMV, IFO, SWF, 3GP, EVO,
DIVX, MP4, OGM
Audio Codecs Supported
HE, LPCM, AC3,
DTS, DTS-HD M (DTS output
can be down
-mixed), Dolby Digital AC3 5.1
stereo
Page 4
VC-HD8 Manual v2 July 2016
5
Audio Formats Supported
MP3, WMA, WAV, OGG, FLAC, AAC, LC
-AAC,
APE
(Under 128KHz)
Image Formats Supported
JPEG, BMP, GIF, PNG, TIFF
If you need to reformat any files we recommend ‘Format Factory’.
This can be downloaded for free here:
http://www.pcfreetime.com/
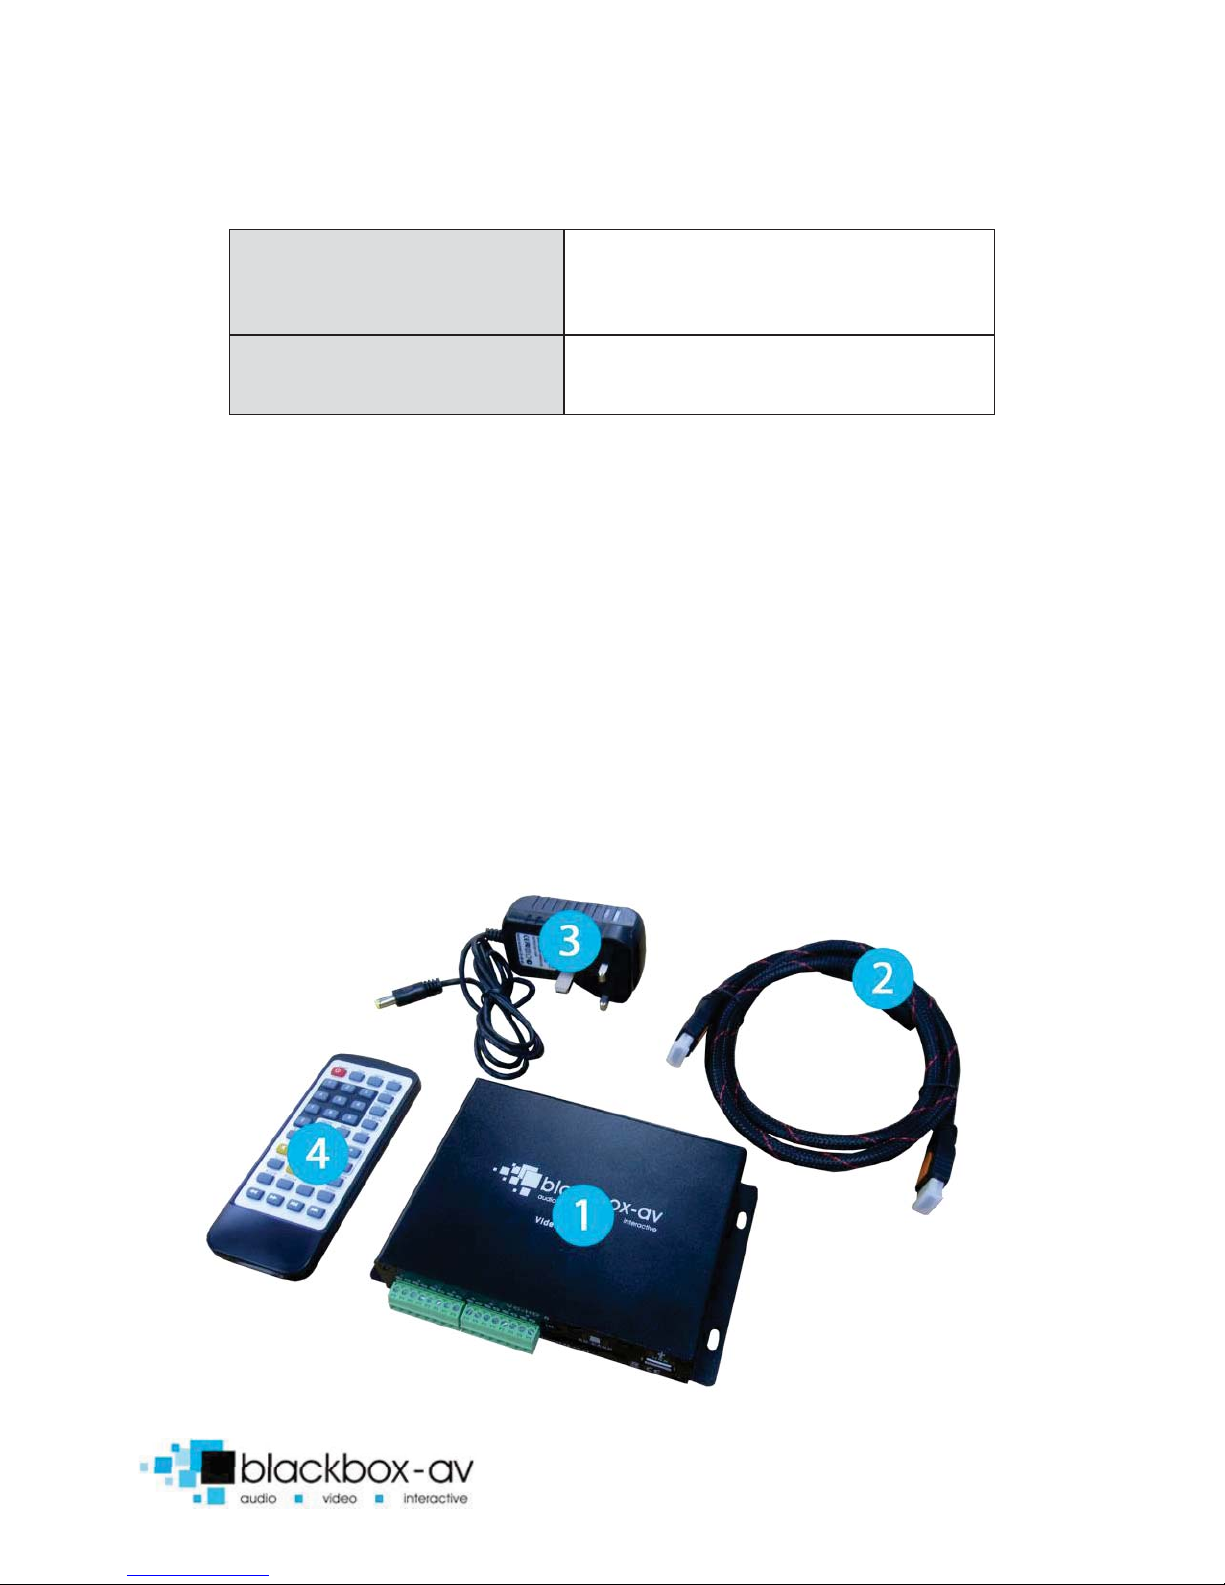
3. In the Box
Page 5

VC-HD8 Manual v2 July 2016
6
1. VideoClip HD8 Player / 8 button terminal blocks
2. HDMI Cable
3. Power Supply
4. Remote Control
5. SDHC Card (not pictured)
4. Setup Instructions
Connecting your VC-HD8 is simple and straight forward. You will
need the following:
x The VideoClip HD8 Player
x 12V DC Power Adapter
x HDMI Cable
x HDMI Compatible Monitor or TV (not included)
x SDHC Card or USB Stick (not included)
x Buttons (not included / not required for looping playback)
FRONT VIEW
Page 6
VC-HD8 Manual v2 July 2016
7
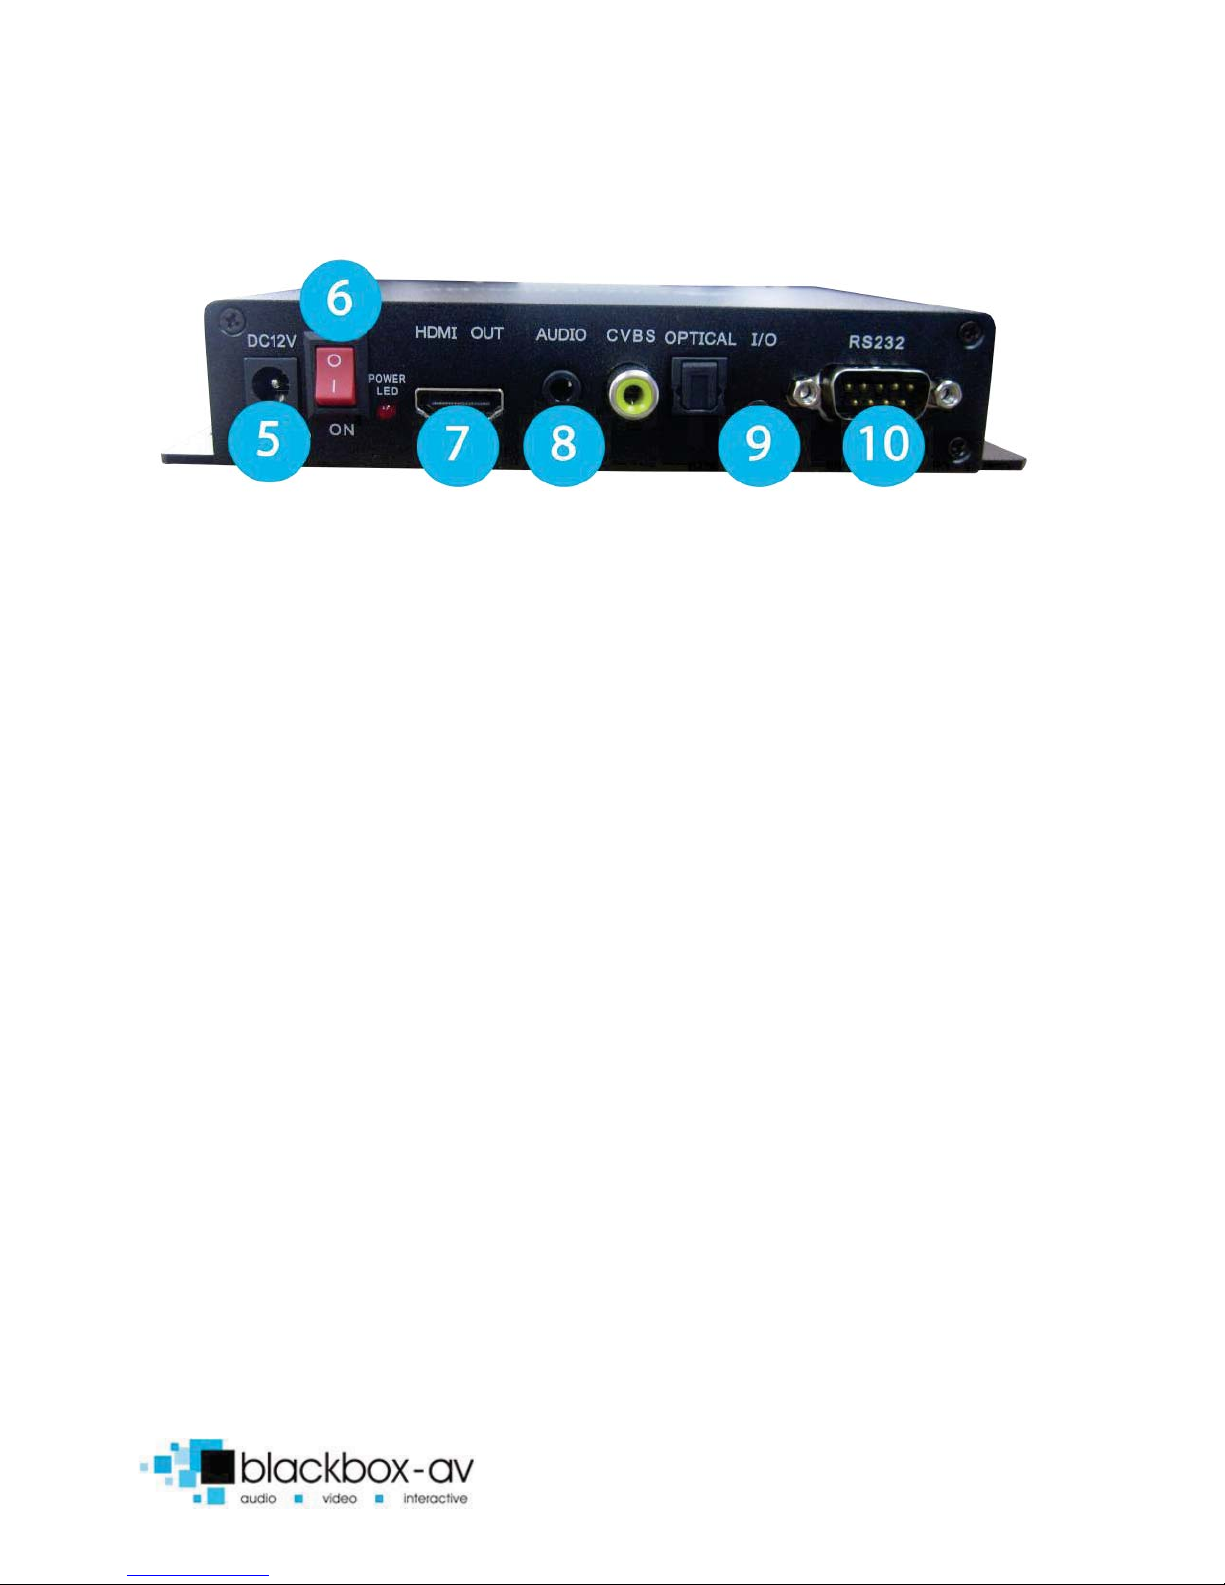
REAR VIEW
1. Button 1-8 input (with connector blocks)
2. Remote IR sensor
3. SDHC Card Slot
4. USB Slot
5. 12v DC in
6. Power on/off
7. HDMI Out (HD TV)
8. 3.5mm Audio
9. I/O
10. RS323 Control
Note: The CVBS (Video Out (TV)) has been disabled on this model.
1.Powering Your VC-HD8
Connect the supplied 12V DC Adapter to the ‘12V DC in’ to give
power to the device.
2.Connecting Your VC-HD8 to a TV or Monitor
Connect one end of the HDMI cable to the ‘HDMI out’ on the back
of your VC-HD8, connect the remaining end to the HDMI slot of
your device.
3.Connect Buttons (not required for looping playback)
Page 7
VC-HD8 Manual v2 July 2016
8
Attach needed number of buttons to terminal blocks 1-8 as
required.
4. Insert Content
View ‘9.Programming Content’ section for programming
instructions. Insert either an SDHC card or USB stick with uploaded
content into USB or SDHC slot.
5. Power On
Power on your displa, then power on your VC-HD8. The VC-HD8 will
automatically play any attracter screen video/images on boot up.
Button activated content will play when appropriate button is
pushed.
5. Remote Control
INFO
MUTE
REPEAT
TIME SEEK
TV MODE
HOME
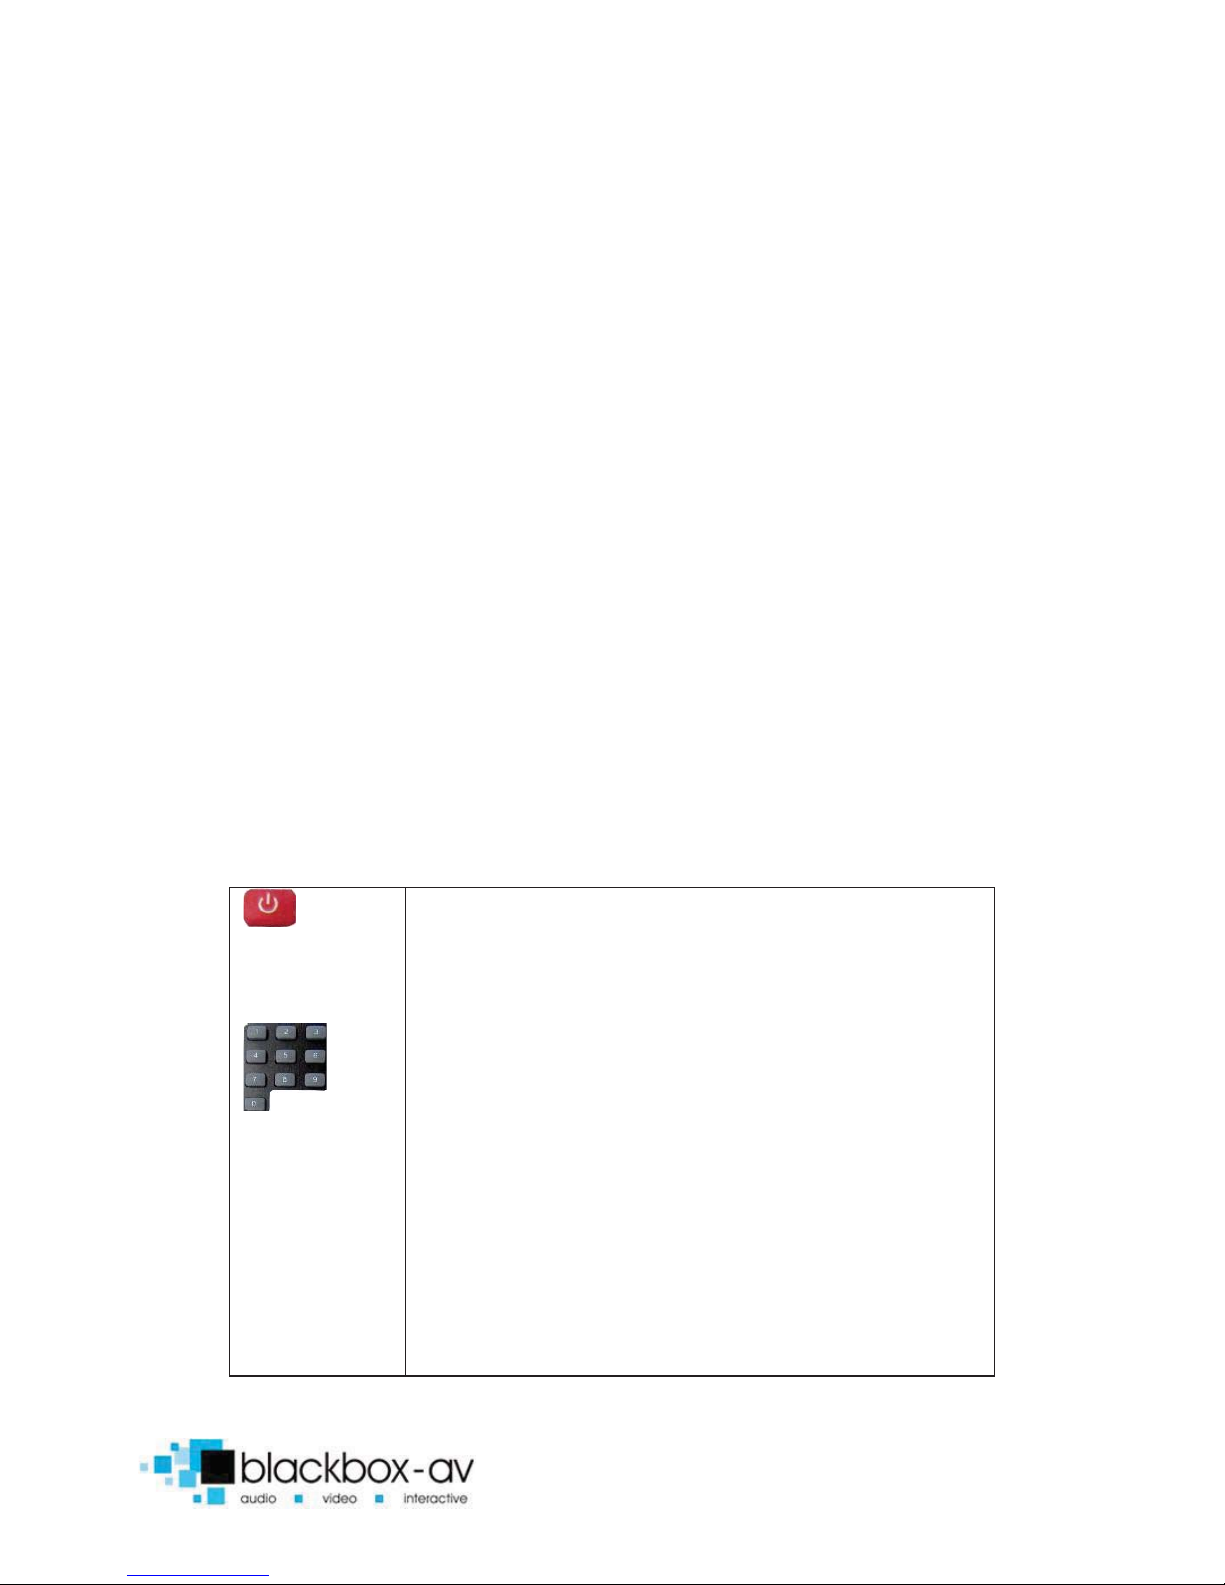
Power: Press to power VC-HD8 on/off.
Press
to view information for content currently
playing.
Press
to mute audio output, press to unmute.
Press
to play content in corresponding folder
(folder 1, 2, 3 etc.)
Press
while video file is playing to select repeat
opti
ons, repeat all, repeat title, repeat off
Press
to jump to specific time point on video.
Press
to switch between NTSC Interlaced, NTSC
Progressive, PAL Interlaced and PAL Progressive.
Press to open main menu and access File Manager,
Movies, Music, Photo and System Setup.
Page 8
VC-HD8 Manual v2 July 2016
9
MENU
SLOW
SETUP
ZOOM
VOL +/
-
AUDIO
SUBTITLE
RESUME
ANGLE
PAUSE
RETURN
STOP
<< >>
|<< >>|
Press to access filetype menu setings, i.e when
video plays you access video settings, when images
are playing you access slide options.
This
button has been disabled for the VC-HD
Press
this to access core system settings -
System,
Audio,
Video, Misc.
Press to zoom in/out when playing photos or video
Navigation:
Press to navigate menus
Press
to increase/decrease volume levels
Press
to display video audio track information
Press
to activate subtitles if available
Press
to resume play
Thi
s button is disabled on the VC-HD
Press
to pause playback
Press
to return to previous navigation menu
Press
to stop playback
Press
to fast forward or rewind current file
Press
for previous or next file in list
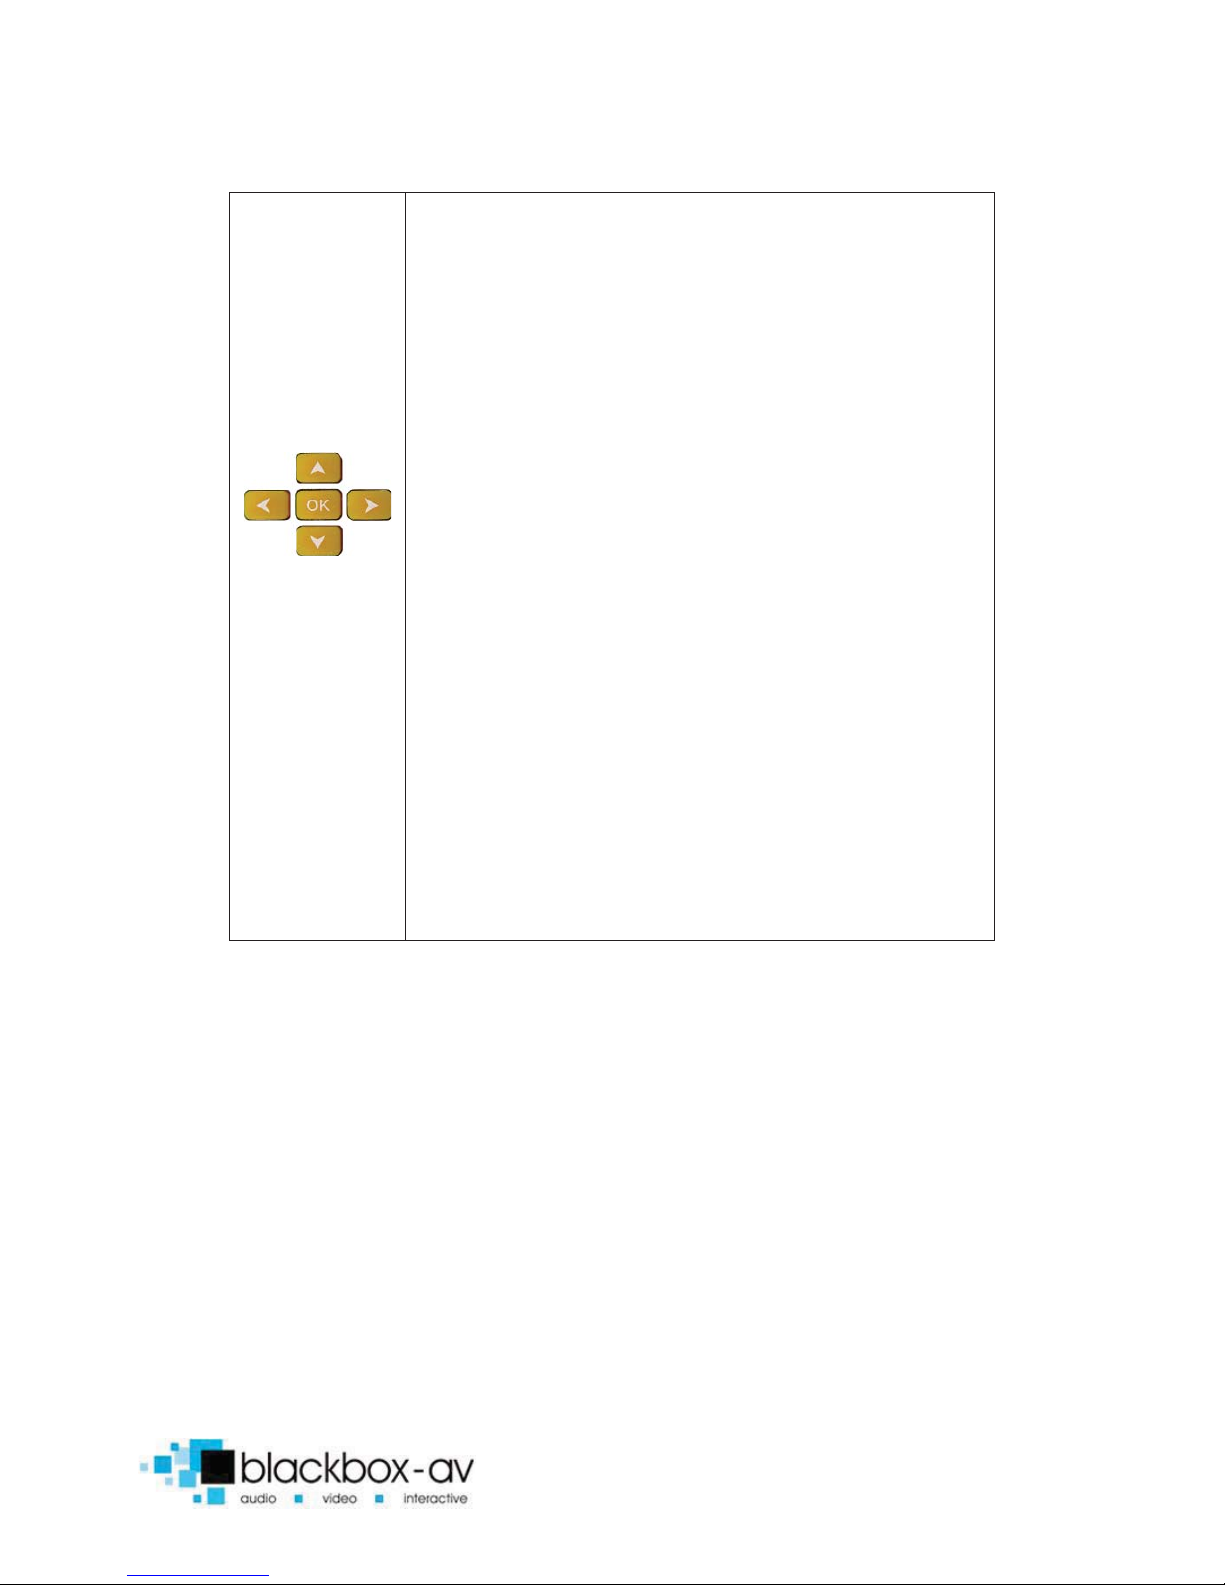
6. Settings Options
Using the Remote Control you can access a number of settings
options for the VC-HD8 by pressing the ‘Setup’ button. Here you
have access to ‘System, Audio, Video and Misc’ settings. Navigate
between options using the ‘< ^ > v ok’ buttons.
Page 9

VC-HD8 Manual v2 July 2016
10
SYSTEM
Page 10

VC-HD8 Manual v2 July 2016
11
AUDIO
VIDEO
Page 11

VC-HD8 Manual v2 July 2016
12
MISC
7. Additional Video & Slideshow Options
To access additional Video & Slideshow options the player must be
currently playing either a video (for video options) or image (for
slideshow and image options). Whilst playing either a video or
image press the ‘Menu’ button.
SLIDESHOW
Here you can access slideshow options including repeat, transition
and timing;
Repeat - Set repeat mode: Off/all/shuffle
Slide Timing - Set length of time each slide is displayed: 2/5/10/30
seconds
Page 12

VC-HD8 Manual v2 July 2016
13
Slide Transition - Set transition mode: Shuffle all / flip / quartet /
slide / centre extend / 2D 3D expand / dissolve / fade in out / cross
fade kenburn
VIDEO
Here you can access video options, including subtitle, audio, repeat
options and video settings;
Repeat - Set repeat mode: All/off/title (Title repeats first video in
folder only)
Video Settings - Set video brightness/contrast/saturation/hue
NOTE: These settings will be saved on your SD card or USB stick in a
‘.part’ file and ‘.Theatre’ folder created by the VC-HD8. If this file is
deleted or new content is added these settings will be reset.
Page 13

VC-HD8 Manual v2 July 2016
14
8. Content Activation Options
The VC-HD8 can play video, audio and image file types. These can
be set to play in a looping fashion (requiring no user input) or can
be button activated in a number of ways;
LOOPING
The VC-HD can be set to play a slideshow or video(s) in a constant
looping fashion; this requires no user input or button activation it
will simply loop through content upon startup.
BUTTON ACTIVATION
The VC-HD8 can play video, images or audio upon button activation.
This is achieved by programming the button to perform a number
of actions;
Page 14

VC-HD8 Manual v2 July 2016
15
Play file / play folder / next / previous / volume up / volume down /
mute
Inputs are programmed via a text file in conjunction with content
placed into specific folders; see the programming section for more
information.
PIR
Within this mode the playing is able to play a loop video/images
then on activation of the sensor the player will switch to play the
activation video.
9. Programming Content
The VideoClip HD8 is a High Definition content player, video and
images should be in HD with a resolution of 1920x1080.
It has been designed to make programming easy whilst offering
flexibility in activation options. To program your VC-HD8 you will
need;
1) SDHC card or USB stick (formatted to FAT32)
2) Content in a supported file format (see 2. SUPPORTED
MEDIA FORMATS)
3) A PC or laptop with Windows OS
Looping
The VC-HD8 plays content stored in the root of the storage device
on a constant loop as standard. Content is played in name order i.e
01 -> 02 -> 03.
Page 15

VC-HD8 Manual v2 July 2016
16
The VC-HD8 can loop video, images or audio if there is a mixture of
content it will play in file order in order of alphabet name.
LOOPING EXAMPLE 1: LOOPING VIDEO
With this configuration the player will loop constantly through all
videos in the following order: 1 Welcome Video -> 2 Battle of the
Somme -> 3 Evolution of the Tank -> 1 Welcome Video.... and so on.
Page 16

VC-HD8 Manual v2 July 2016
17
LOOPING EXAMPLE 2: LOOPING VIDEO & IMAGES
With this configuration the player will loop constantly through the
images first then play the videos in the following order: -> 01 -> 02 -
> 03 -> 04 -> 1 Welcome Video-> 2 Battle of the Somme-> 3
Evolution of the Tank -> 01 -> 02 -> 03 ... and so on.
Page 17

VC-HD8 Manual v2 July 2016
18
LOOPING EXAMPLE 3: IMAGES WITH AUDIO
With this configuration the player will loop constantly through all
images, it will also play the audio file located in the folder ‘audio’ as
background music. The audio will restart with the slideshow (i.e
after the final slide is shown and the slideshow begins again).
For more slideshow options view ‘5.Additional Slideshow and Video
Options’
8 Button Activation
The VC-HD8 can be programmed to play content upon button
activation in a number of different ways, the looping function also
allows the creation of an attracter screen which will loop until a
button is activated. The available button options are;
Page 18

VC-HD8 Manual v2 July 2016
19
1) Push to play single file
2) Push to play folder (a collection of files in order)
3) Push for next file
4) Push for previous file
5) Push to put volume up
6) Push to put volume down
7) Push to mute volume
8) Uninterruptible or interruptible playback (unable to trigger
again during play)
Buttons are programmed using an ‘autoplay.txt’ file that is added to
the SDHC or USB storage device along with your content. There are
templates available under ‘Test Content’ on our support page at:
www.blackboxav.co.uk/support
A configuration file will appear as follows (create a .txt file by right
clicking on desktop > new > text document):
irmode=1 (puts the VC-HD8 in button mode)
01=01/ (button 1 plays all files in folder ‘01’)
02[n]=02/video1.mpg (button 2 plays specific video in folder
‘02’)
NEXT=3 (button 3 plays next file)
PREV=4 (button 4 plays previous file)
vol_plus=5 (button 5 puts volume up)
vol_minus=6 (button 6 puts volume down)
MUTE=7 (button 7 mutes volume)
Note: The [n] in ‘02n=02/video1.mpg’ makes that activation
unintteruptible.
Page 19

VC-HD8 Manual v2 July 2016
20
BUTTON EXAMPLE 1: 6 BUTTON - VIDEOS & ATTRACTA VIDEOS
The above content will loop through 2 videos ‘AttractaVideo1’ and
‘AttractaVideo2’ until a button is pressed, the following
‘Autoplay.txt’ file assigns actions to 6 buttons;
Puts the VC-HD in button
mode
Button 1 plays folder ‘01’
Button 2 plays folder ‘02’
Button 3 plays folder ‘03
Button 4 plays folder ‘04’
Button 5 plays folder ‘05’
Button 6 plays folder ‘06’
01, 03, and 05 are
uninterruptible [n].
irmode=1
01[n]=01/
02=02/
03[n]=03/
04=04/
05[n]=05/
06=06
Page 20

VC-HD8 Manual v2 July 2016
21
The above ‘Autoplay.txt’ allows each button to play all files in
assigned folder. Folders ‘01, 02, 03, 04, 06’ contain a single video
file i.e ‘1Evolution-of-the-Tank’ pressing button 1 will play this file
then return to the attracta screen videos.
Folder ‘05’ has two video files ‘1The-Battle-of-Britain’ and ‘2D-DayLandings’, pressing button 2 will play both files before returning to
attracter screen videos.
BUTTON EXAMPLE 2: 4 BUTTON - 2 FOLDERS + NEXT/PREV
CONTROL
Page 21

VC-HD8 Manual v2 July 2016
22
The above content will display a single image ‘Attractaimage1’ until
a button is pressed, the following ‘Autoplay.txt’ file assigns actions
to 4 buttons;
Puts the VC-HD in button
mode
Button 1 plays folder ‘01’
Button 2 plays folder ‘02’
Button 3 plays next file
Button 4 plays previous file
02 is uninterruptible
Folder ‘01’ and folder ‘02’ both contain 6 video files each. The
above ‘Autoplay.txt’ assigns button 1 to folder ‘01’ and button 2 to
folder ‘02’.
Once buttons 1 or 2 are pressed the first video file in the
corresponding folder will play. Pressing button 3 will cycle to the
next video, button 4 will cycle to the previous. Once the final video
in the folder has been played the VC-HD8 will return to the
attracter image.
irmode=1
01=01/
02[n]=02/
NEXT=3
PREV=4
Page 22

VC-HD8 Manual v2 July 2016
23
BUTTON EXAMPLE 3 - 5 BUTTON, VIDEOS ON CONSTANT LOOP
WITH NEXT/PREV/VOL+/VOL-/MUTE
This content will loop
constantly through
each video file ’01 08’ unless ‘next/prev’
button is pressed;
Puts the VC-HD in button
mode
Button 1 plays next file
Button 2 plays previous file
Button 3 increases volume
Button 4 decreases volume
Button 5 mutes volume
This ‘Autoplay.txt’ assigns ‘NEXT’ and ‘PREVIOUS’ commands to
button 1 and 2. The VC-HD will continually loop through each video
until these buttons are pressed.
irmode=1
NEXT=1
PREV=2
vol_plus=3
vol_minus=4
mute=5
Page 23

VC-HD8 Manual v2 July 2016
24
Button 3 and 4 adjust the volume while button 5 will mute and
unmute the player.
BUTTON EXAMPLE 4: PLAY ALL / 5 INDIVIDUAL FILES
The above content will display a single image ‘AttractaImage1’ until
a button is pressed, the following ‘Autoplay.txt’ file assigns actions
to 5 buttons;
Puts the VC-HD in button mode
1 plays all files in folder ‘01’
2 plays file ‘01’ in folder ‘01’
3 plays file ‘02’ in folder ‘01’
4 plays file ‘03’ in folder ‘01’
5 plays file ‘04’ in folder ‘01’
6 plays file ‘05’ in folder ‘01’
irmode=1
01[n]=01/
02=01/01.mpg
03=01/02.mpg
04=01/03.mpg
05=01/04.mpg
06=01/05.mpg
Page 24

VC-HD8 Manual v2 July 2016
25
01 is uninterruptible, once pressed all content will play before
another button can be used.
This ‘Autoplay.txt’ assigns folder ‘01’ to button 1, essentially
becoming a ‘PLAY ALL’ button, when pressed the player will display
each video in sequence then return to the attracter screen.
Buttons 2 - 6 have been assigned to specific video files within folder
‘01’, when pressed only that video will play before the VC-HD
returns to the attracter screen.
NOTE: When assigning specific files to a button the full filename
including filetype must be used i.e ‘video1.mp4’ not simply ‘video1’.
Page 25

VC-HD8 Manual v2 July 2016
26
PIR Activation
The VC-HD8 can be programmed to play content upon PIR
activation.
A single PIR can be connected via the I/O input and used to activate
a folder of content; this can include video, audio or image files.
A looping display can be utilised in PIR mode just as in the previous
modes, this means the VC-HD8 can display video or images in a
looping fashion until the PIR activates folder 01 and the content
found within.
PIR EXAMPLE: FOLDER ACTIVATION WITH LOOPING SLIDESHOW
The above content will loop through 3 images ‘01’, ‘02’ and ‘03’
until the PIR is activated it will then play the video located in folder
‘01’ before returning to the looping slideshow awaiting another PIR
Page 26

VC-HD8 Manual v2 July 2016
27
activation, the following ‘Autoplay.txt’ file places the VC-HD8 into
PIR mode.
NOTE: The PIR is sold separately and must be connected via the I/O
port, once connected the VC-HD is set to uninterruptible playback
which means any files located in folder ‘01’ will be played through in
their entirety before the PIR can be activated again.
VC-HD placed in PIR MODE
PIR plays folder ‘01’
Volume set to 15
This ‘Autoplay.txt’ assigns folder ‘01’ to PIR activation, essentially
becoming a ‘PLAY ALL’ button, when movement is sensed the
player will display each video in sequence then return to the
attracta screen (in this example it is a single video).
Programming templates are available from our support page under
‘Test Content’:
www.blackboxav.co.uk/support
For additional help please contact us:
www.blackboxav.co.uk/support
Tel: +44 (0)1639 874 100
Email: sales@blackboxav.co.uk
 Loading...