

Page 1

CUSTOMER
SUPPORT
INFORMATION
Order toll-free in the U.S.: Call 877-877-BBOX (outside U.S. call 724-746-5500)
FREE technical support 24 hours a day, 7 days a week: Call 724-746-5500 or fax 724-746-0746
Mailing address: Black Box Corporation, 1000 Park Drive, Lawrence, PA 15055-1018
Web site: www.blackbox.com • E-mail: info@blackbox.com
APRIL 2002
TE130A
TE131
Mobile Digital Dictation Recorder
POWER
FOLDER
MIC
MENU
DELETE
RECORD
INSERT
PAUSE
Page 2

1
FCC AND IC RFI STATEMENTS
FEDERAL COMMUNICATIONS COMMISSION AND INDUSTRY CANADA
RADIO-FREQUENCY INTERFERENCE STATEMENTS
This equipment generates, uses, and can radiate radio-frequency energy, and if not
installed and used properly, that is, in strict accordance with the manufacturer’s
instructions, may cause interference to radio communication. It has been tested
and found to comply with the limits for a Class A computing device in accordance
with the specifications in Subpart B of Part 15 of FCC rules, which are designed to
provide reasonable protection against such interference when the equipment is
operated in a commercial environment. Operation of this equipment in a
residential area is likely to cause interference, in which case the user at his own
expense will be required to take whatever measures may be necessary to correct
the interference.
Changes or modifications not expressly approved by the party responsible
for compliance could void the user’s authority to operate the equipment.
This digital apparatus does not exceed the Class A limits for radio noise emission from
digital apparatus set out in the Radio Interference Regulation of Industry Canada.
Le présent appareil numérique n’émet pas de bruits radioélectriques dépassant les limites
applicables aux appareils numériques de la classe A prescrites dans le Règlement sur le
brouillage radioélectrique publié par Industrie Canada.
Page 3

2
MOBILE DIGITAL DICTATION RECORDER
NORMAS OFICIALES MEXICANAS (NOM)
ELECTRICAL SAFETY STATEMENT
INSTRUCCIONES DE SEGURIDAD
1. Todas las instrucciones de seguridad y operación deberán ser leídas antes de
que el aparato eléctrico sea operado.
2. Las instrucciones de seguridad y operación deberán ser guardadas para
referencia futura.
3. Todas las advertencias en el aparato eléctrico y en sus instrucciones de
operación deben ser respetadas.
4. Todas las instrucciones de operación y uso deben ser seguidas.
5. El aparato eléctrico no deberá ser usado cerca del agua—por ejemplo, cerca
de la tina de baño, lavabo, sótano mojado o cerca de una alberca, etc..
6. El aparato eléctrico debe ser usado únicamente con carritos o pedestales que
sean recomendados por el fabricante.
7. El aparato eléctrico debe ser montado a la pared o al techo sólo como sea
recomendado por el fabricante.
8. Servicio—El usuario no debe intentar dar servicio al equipo eléctrico más allá
a lo descrito en las instrucciones de operación. Todo otro servicio deberá ser
referido a personal de servicio calificado.
9. El aparato eléctrico debe ser situado de tal manera que su posición no
interfiera su uso. La colocación del aparato eléctrico sobre una cama, sofá,
alfombra o superficie similar puede bloquea la ventilación, no se debe colocar
en libreros o gabinetes que impidan el flujo de aire por los orificios de
ventilación.
10. El equipo eléctrico deber ser situado fuera del alcance de fuentes de calor
como radiadores, registros de calor, estufas u otros aparatos (incluyendo
amplificadores) que producen calor.
11. El aparato eléctrico deberá ser connectado a una fuente de poder sólo del
tipo descrito en el instructivo de operación, o como se indique en el aparato.
Page 4

3
NOM STATEMENT
12. Precaución debe ser tomada de tal manera que la tierra fisica y la polarización
del equipo no sea eliminada.
13. Los cables de la fuente de poder deben ser guiados de tal manera que no
sean pisados ni pellizcados por objetos colocados sobre o contra ellos,
poniendo particular atención a los contactos y receptáculos donde salen del
aparato.
14. El equipo eléctrico debe ser limpiado únicamente de acuerdo a las
recomendaciones del fabricante.
15. En caso de existir, una antena externa deberá ser localizada lejos de las lineas
de energia.
16. El cable de corriente deberá ser desconectado del cuando el equipo no sea
usado por un largo periodo de tiempo.
17. Cuidado debe ser tomado de tal manera que objectos liquidos no sean
derramados sobre la cubierta u orificios de ventilación.
18. Servicio por personal calificado deberá ser provisto cuando:
A: El cable de poder o el contacto ha sido dañado; u
B: Objectos han caído o líquido ha sido derramado dentro del aparato; o
C: El aparato ha sido expuesto a la lluvia; o
D: El aparato parece no operar normalmente o muestra un cambio en su
desempeño; o
E: El aparato ha sido tirado o su cubierta ha sido dañada.
Page 5

4
MOBILE DIGITAL DICTATION RECORDER
TRADEMARKS USED IN THIS MANUAL
Pentium®is a registered trademark of Intel Corporation.
SoundBlaster
®
is a registered trademark of Creative Labs, Inc.
Windows
®
is a registered trademark of Microsoft Corporation.
Any other trademarks mentioned in this manual are acknowledged to be the property of the
trademark owners.
Page 6

5
CONTENTS
Contents
Chapter Page
1.Overview . . . . . . . . . . . . . . . . . . . . . . . . . . . . . . . . . . . . . . . . . . . . . . . . . . . . 7
1.1 Basic Features and Functions . . . . . . . . . . . . . . . . . . . . . . . . . . . . . . . . . . 8
1.2 Display Overview . . . . . . . . . . . . . . . . . . . . . . . . . . . . . . . . . . . . . . . . . . . . 9
2.Getting Started. . . . . . . . . . . . . . . . . . . . . . . . . . . . . . . . . . . . . . . . . . . . . . . . . . 10
2.1 Loading the Batteries and Starting the Recorder the First Time . . . . 10
2.2 Setting the Clock the First Time. . . . . . . . . . . . . . . . . . . . . . . . . . . . . . . 10
2.3 Recording. . . . . . . . . . . . . . . . . . . . . . . . . . . . . . . . . . . . . . . . . . . . . . . . . 11
2.3.1 Making a New Recording . . . . . . . . . . . . . . . . . . . . . . . . . . . . . . 11
2.3.2 Pausing During a Recording . . . . . . . . . . . . . . . . . . . . . . . . . . . 12
2.3.3 Using a Remote Microphone. . . . . . . . . . . . . . . . . . . . . . . . . . . 13
2.4 Playback . . . . . . . . . . . . . . . . . . . . . . . . . . . . . . . . . . . . . . . . . . . . . . . . . . 13
2.4.1 Playing a Recording. . . . . . . . . . . . . . . . . . . . . . . . . . . . . . . . . . . 13
2.4.2 Pausing During Playback . . . . . . . . . . . . . . . . . . . . . . . . . . . . . . 13
2.4.3 Stopping a Recording That is Playing . . . . . . . . . . . . . . . . . . . . 13
2.4.4 Playing a Recording Faster . . . . . . . . . . . . . . . . . . . . . . . . . . . . . 13
2.4.5 Playing a Recording Slower . . . . . . . . . . . . . . . . . . . . . . . . . . . . 13
2.4.6 Scrolling Through a Recording . . . . . . . . . . . . . . . . . . . . . . . . . 14
2.4.7 Playing Recordings Continuously . . . . . . . . . . . . . . . . . . . . . . . 14
2.5 Inserting and Deleting . . . . . . . . . . . . . . . . . . . . . . . . . . . . . . . . . . . . . . 14
2.5.1 Adding Comments to the End of a Recording . . . . . . . . . . . . . 14
2.5.2 Inserting Comments . . . . . . . . . . . . . . . . . . . . . . . . . . . . . . . . . . 14
2.5.3 Deleting Comments . . . . . . . . . . . . . . . . . . . . . . . . . . . . . . . . . . 15
2.5.4 Deleting Comments from the End of a Recording. . . . . . . . . . 17
2.5.5 Deleting Entire Recordings . . . . . . . . . . . . . . . . . . . . . . . . . . . . 17
2.5.6 Deleting All the Files in a Folder . . . . . . . . . . . . . . . . . . . . . . . . 18
2.5.7 Removing a Folder . . . . . . . . . . . . . . . . . . . . . . . . . . . . . . . . . . . 19
2.5.8 Deleting All the Files in a Memory. . . . . . . . . . . . . . . . . . . . . . . 19
2.6 Indexing Comments . . . . . . . . . . . . . . . . . . . . . . . . . . . . . . . . . . . . . . . . 21
2.6.1 Indexing Comments . . . . . . . . . . . . . . . . . . . . . . . . . . . . . . . . . . 21
2.6.2 Finding Indexed Comments. . . . . . . . . . . . . . . . . . . . . . . . . . . . 21
2.6.3 Using the Folder Button. . . . . . . . . . . . . . . . . . . . . . . . . . . . . . . 22
Page 7

6
MOBILE DIGITAL DICTATION RECORDER
Chapter Page
3.Settings and Basic Functions. . . . . . . . . . . . . . . . . . . . . . . . . . . . . . . . . . . . . . . 23
3.1 Turning the Recorder On and Off . . . . . . . . . . . . . . . . . . . . . . . . . . . . 23
3.2 Using the Menu Button . . . . . . . . . . . . . . . . . . . . . . . . . . . . . . . . . . . . . 23
3.3 About Recording Speeds. . . . . . . . . . . . . . . . . . . . . . . . . . . . . . . . . . . . . 23
3.4 Adjusting the Recording Speed . . . . . . . . . . . . . . . . . . . . . . . . . . . . . . . 24
3.5 Setting the Microphone Sensitivity . . . . . . . . . . . . . . . . . . . . . . . . . . . . 24
3.6 Setting the Recorder for Voice-to-Text . . . . . . . . . . . . . . . . . . . . . . . . . 25
3.7 Turning Beeps On and Off. . . . . . . . . . . . . . . . . . . . . . . . . . . . . . . . . . . 25
3.8 Creating New Folders . . . . . . . . . . . . . . . . . . . . . . . . . . . . . . . . . . . . . . . 26
3.9 Reviewing Information on Recordings . . . . . . . . . . . . . . . . . . . . . . . . . 27
3.10 Moving Files from Folder to Folder . . . . . . . . . . . . . . . . . . . . . . . . . . . . 28
3.11 Monitoring the Battery Level . . . . . . . . . . . . . . . . . . . . . . . . . . . . . . . . . 29
3.12 Monitoring the Memory Level . . . . . . . . . . . . . . . . . . . . . . . . . . . . . . . . 29
3.13 Checking the Exact Amount of Memory Remaining . . . . . . . . . . . . . . 30
3.14 When a Folder is Full . . . . . . . . . . . . . . . . . . . . . . . . . . . . . . . . . . . . . . . 31
3.15 Working with Memory Cards . . . . . . . . . . . . . . . . . . . . . . . . . . . . . . . . . 31
3.15.1 About Memory Cards . . . . . . . . . . . . . . . . . . . . . . . . . . . . . . . . . 31
3.15.2 Using New Cards the First Time. . . . . . . . . . . . . . . . . . . . . . . . . 32
3.15.3 Protecting Recordings on Cards . . . . . . . . . . . . . . . . . . . . . . . . 33
3.15.4 Removing Write Protection . . . . . . . . . . . . . . . . . . . . . . . . . . . . 34
4.Using Link Software . . . . . . . . . . . . . . . . . . . . . . . . . . . . . . . . . . . . . . . . . . . . . 35
4.1 About the Link Software. . . . . . . . . . . . . . . . . . . . . . . . . . . . . . . . . . . . . 35
4.2 System Requirements for the Link Software . . . . . . . . . . . . . . . . . . . . . 35
4.3 Setting Up the Link Software . . . . . . . . . . . . . . . . . . . . . . . . . . . . . . . . . 35
4.4 Using the Link Software . . . . . . . . . . . . . . . . . . . . . . . . . . . . . . . . . . . . . 36
4.5 Connecting Your Recorder to a PC . . . . . . . . . . . . . . . . . . . . . . . . . . . . 36
5.Maintaining Your Recorder . . . . . . . . . . . . . . . . . . . . . . . . . . . . . . . . . . . . . . . 37
5.1 Heat, Moisture, and Static Electricity. . . . . . . . . . . . . . . . . . . . . . . . . . . 37
5.2 Replacing the Batteries . . . . . . . . . . . . . . . . . . . . . . . . . . . . . . . . . . . . . . 37
6.Troubleshooting . . . . . . . . . . . . . . . . . . . . . . . . . . . . . . . . . . . . . . . . . . . . . . . . 38
6.1 Problems and Solutions . . . . . . . . . . . . . . . . . . . . . . . . . . . . . . . . . . . . . 38
6.2 Calling Black Box. . . . . . . . . . . . . . . . . . . . . . . . . . . . . . . . . . . . . . . . . . . 40
6.3 Shipping and Packaging . . . . . . . . . . . . . . . . . . . . . . . . . . . . . . . . . . . . . 41
Appendix. Software License Agreement/Warranty . . . . . . . . . . . . . . . . . . . . . . 42
Page 8

7
CHAPTER 1: Overview
1. Overview
1.1 Basic Features and Functions
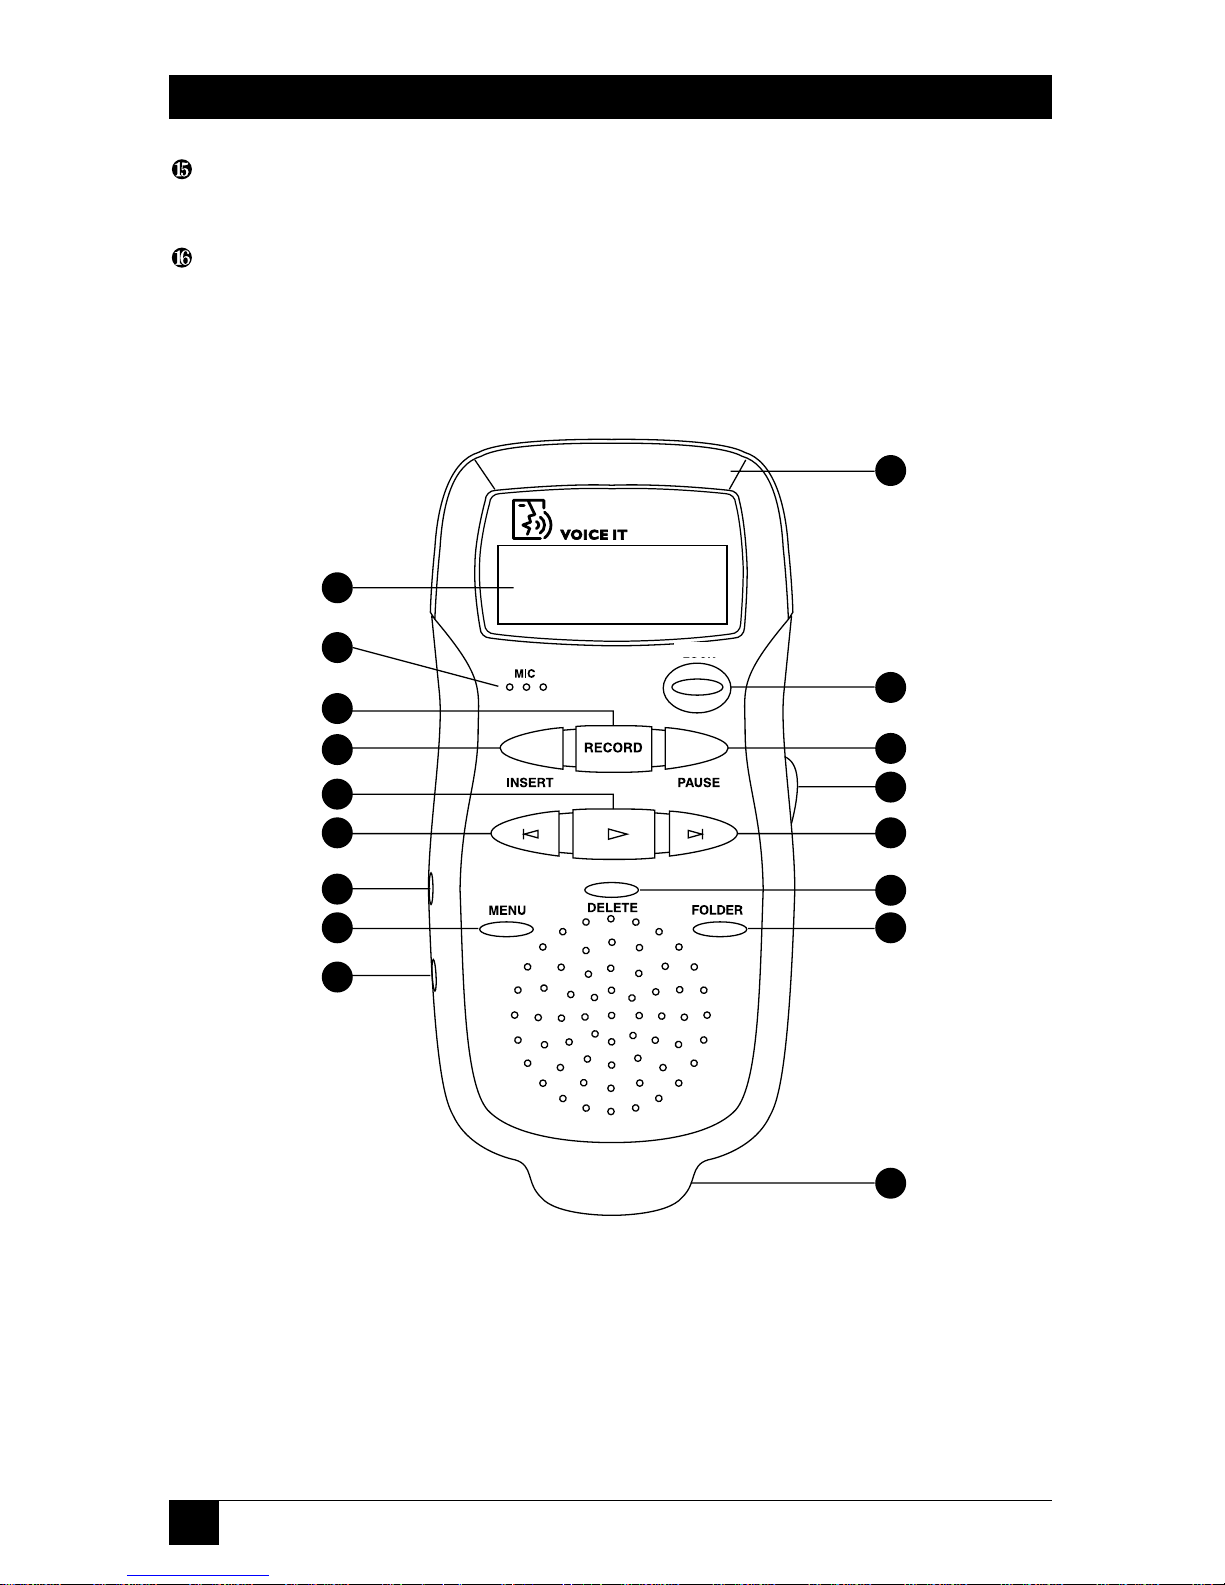
Refer to Figure 1-1 on the next page to identify these features on the Recorder.
❶ Backlit Display—Shows folders, functions, memory, and battery gauges. Includes
indicators for speed and memory card.
❷ Microphone—For voice-to-text recording, the microphone should be about 2
inches away from the speaker’s mouth.
❸ Record—Starts and stops recording.
❹ Insert—Inserts comments within recordings and inserts new recordings between
other recordings.
❺ Play—Starts and stops playback of recordings.
❻ Rewind/Fast Forward—Moves you from recording to recording; speeds up and
slows down playback within a recording; rewinds and fast forwards within a
recording.
❼ Microphone Jack—Connects the unit to an external microphone.
❽ Menu—Accesses adjustments for the clock, recording speed, beeps, microphone
mode, and number of folders; also used to view information on files, move files,
and set or find index marks in recordings.
❾ Earphone Jack—Connects the unit to an earphone or headsets.
❿ Memory Card Door and Connector—Receives cards that expand the Recorder’s
recording and storage capacity.
Power—Turns the Recorder on and off; displays the time and date when pressed
briefly.
Pause—Pauses during recording or playback; also used to jump quickly to the
end of a recording.
Volume Control—Turns the playback volume up or down.
Delete—Deletes recordings and sections of recordings marked for deletion.
Page 9
8
MOBILE DIGITAL DICTATION RECORDER
Folder—Moves you from folder to folder and from the internal memory to a
memory card.
Serial PC Link Connector—Connects the unit to a PC through a serial port.
Figure 1-1. Buttons on the Recorder
1
2
3
4
5
6
7
8
9
10
11
12
13
6
14
15
16
Page 10
9
CHAPTER 1: Overview
1.2 Display Overview
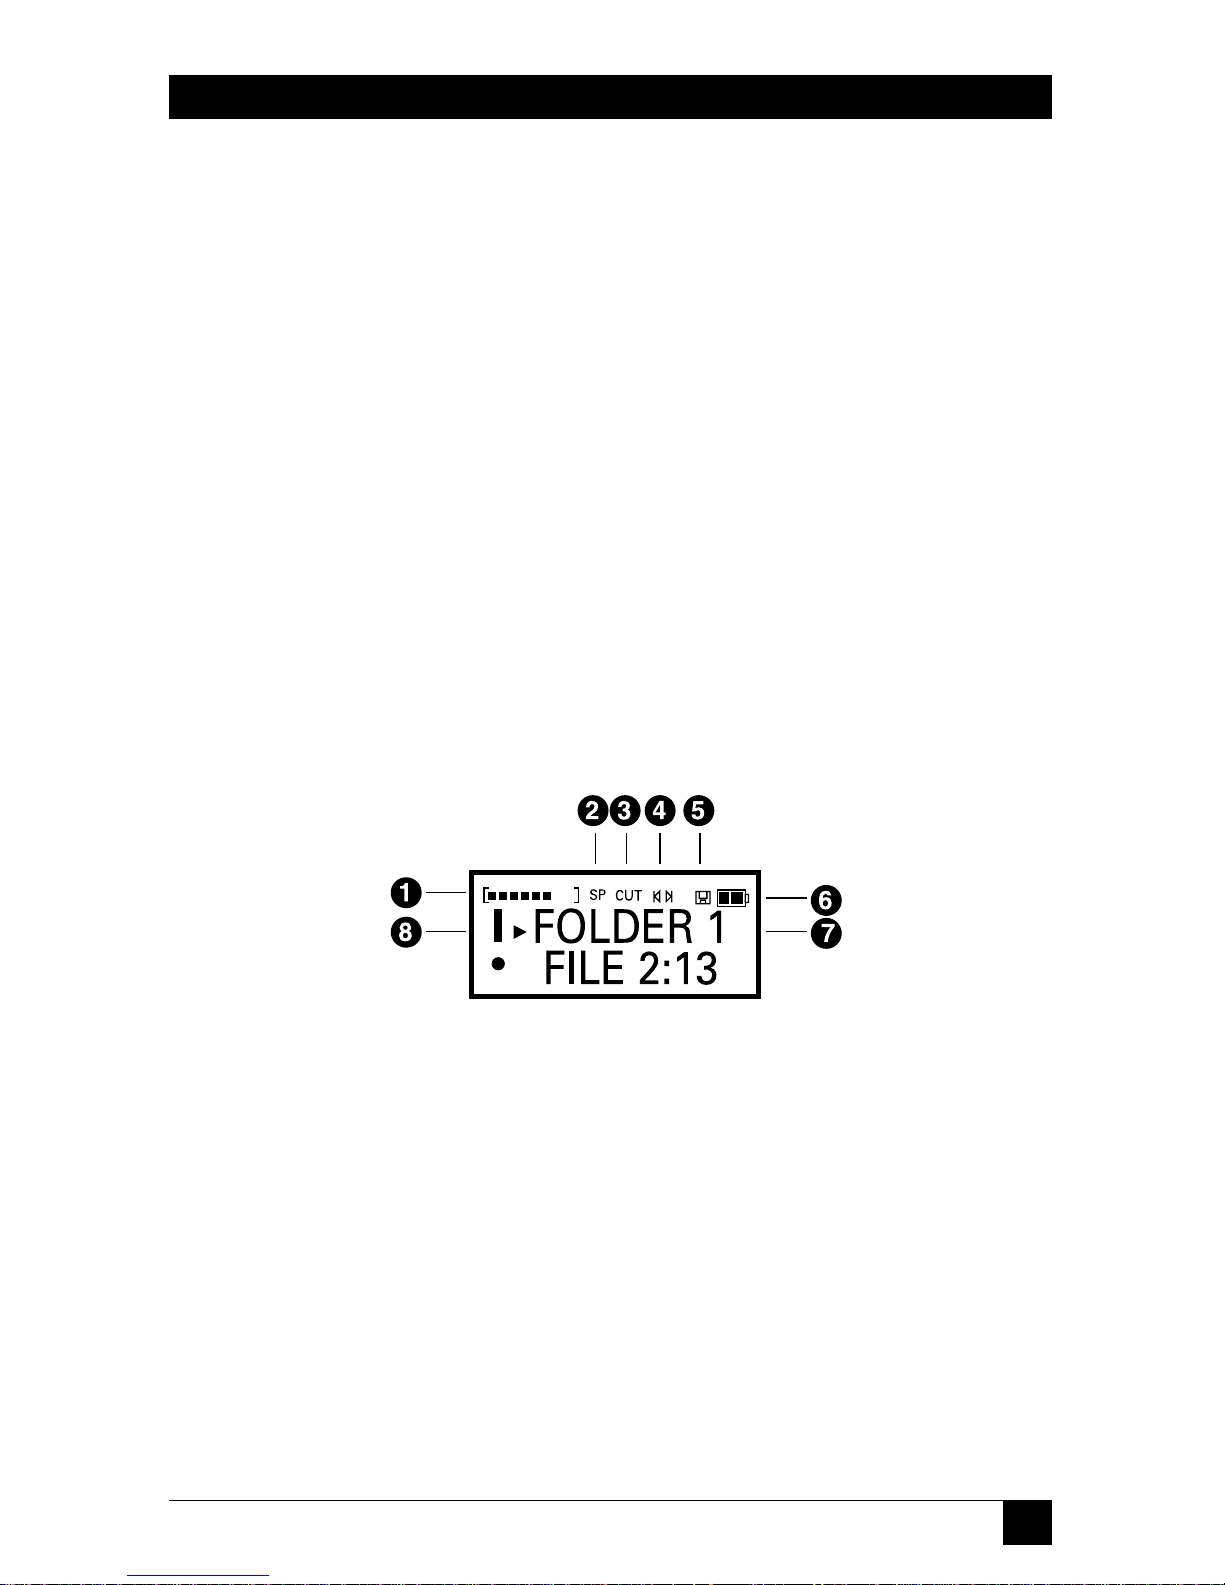
❶ Memory Bar—Indicates how full the memory is.
❷ Speeds—Shows whether SP (standard play) or LP (long play) is in use. If neither
appear, VT (Voice-to-Text) is the current speed.
❸ Cut Icon—Indicates that a deletion process is under way.
❹ Pointer Icons—Indicates that a recording file is being moved.
❺ Memory Card Icon—Appears if a memory card is inserted.
❻ Battery Level—Shows the life remaining on the batteries.
❼ Text Area—Shows information on the current use of the recorder; identifies
recordings; gives information about recordings.
❽ Message Indicator—Shows the beginning or end of a message.
Figure 1-2. Display.
Page 11
10
MOBILE DIGITAL DICTATION RECORDER
2. Getting Started
2.1 Loading the Batteries and Starting the Recorder the First Time
• Remove the battery door on the back of the recorder. (See Section 5.2.)
• Install two AAA batteries. Note the orientation of the batteries shown on the
inside of the battery compartment.
• Replace the battery door.
• The unit will flash “START” and a downward-pointing arrow will direct you to
the Power button. Press and release the Power button to continue startup.
• The unit will go to the Clock Set screen.
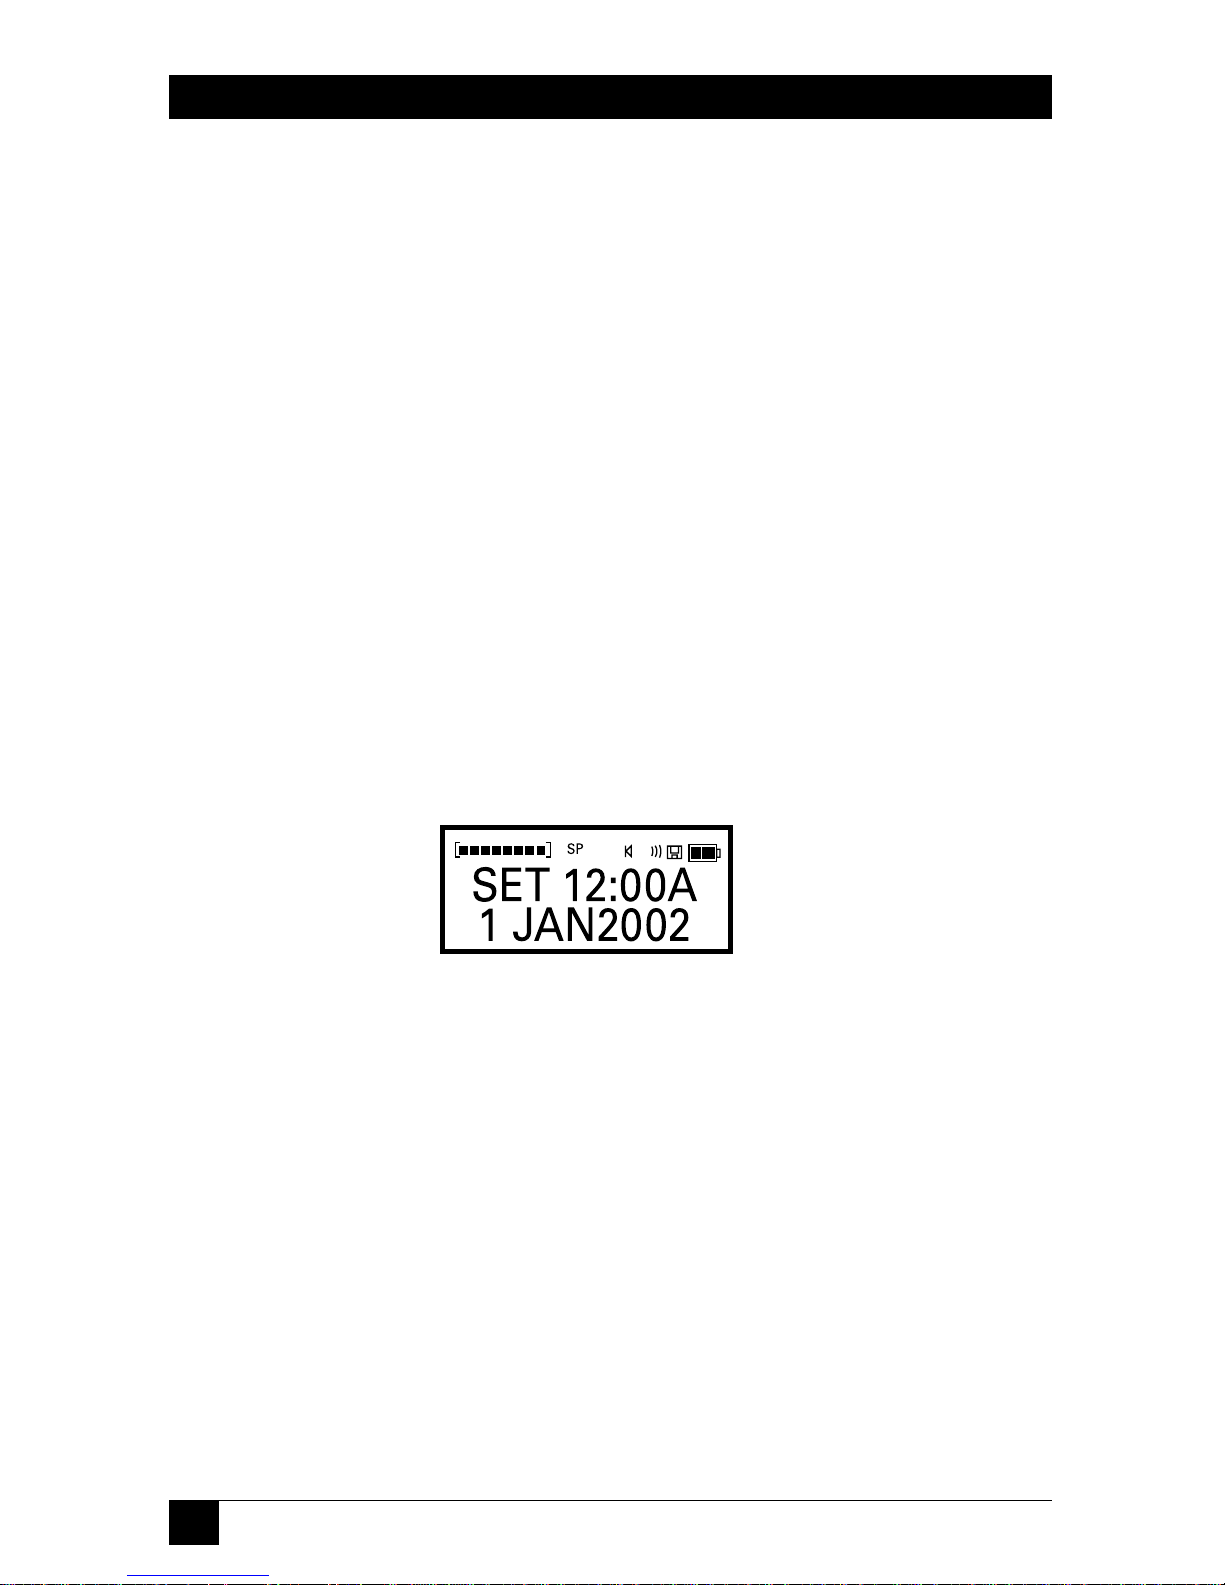
2.2 Setting the Clock the First Time
The first item to be set will be blinking.
Figure 2-1. Setting the clock screen.
• Press the Rewind and Fast Forward buttons to set the clock to the correct time.
• Press Play to move from one setting to another.
• Continue in this manner until the clock shows the correct time and date.
• Press Delete or Power to exit the clock-setting mode.
NOTE
Be sure to set the clock before using the Recorder. The clock is used to
put a time and date stamp on recordings, which will help you identify
them if you download them to a PC. Also, you may want to set a user ID
for yourself, which will attach your name to your recordings. This is
done via the Voice It Link software (see Chapter 4).
Page 12
11
CHAPTER 2: Getting Started
To select military time, press the Folder button any time while in the time-setting
mode. To set seconds to zero, press Pause.
NOTE
When adjusting the time or date, holding down the Rewind or Fast
Forward button will speed up the process. If you press Record instead
of Play, you will move backwards through the fields.
CAUTION
Heat, moisture, and static electricity can damage your recorder. Keep
the device out of the sun and away from places in which it might get wet
or be subjected to excessive static electricity.
2.3 Recording
2.3.1 M
AKING ANEWRECORDING
• Press Folder to select a folder to hold your recording. Press Folder multiple
times to scroll through the folders on the internal memory (marked with an
“I”) or, if one is in use, on a memory card (marked with a “C”).
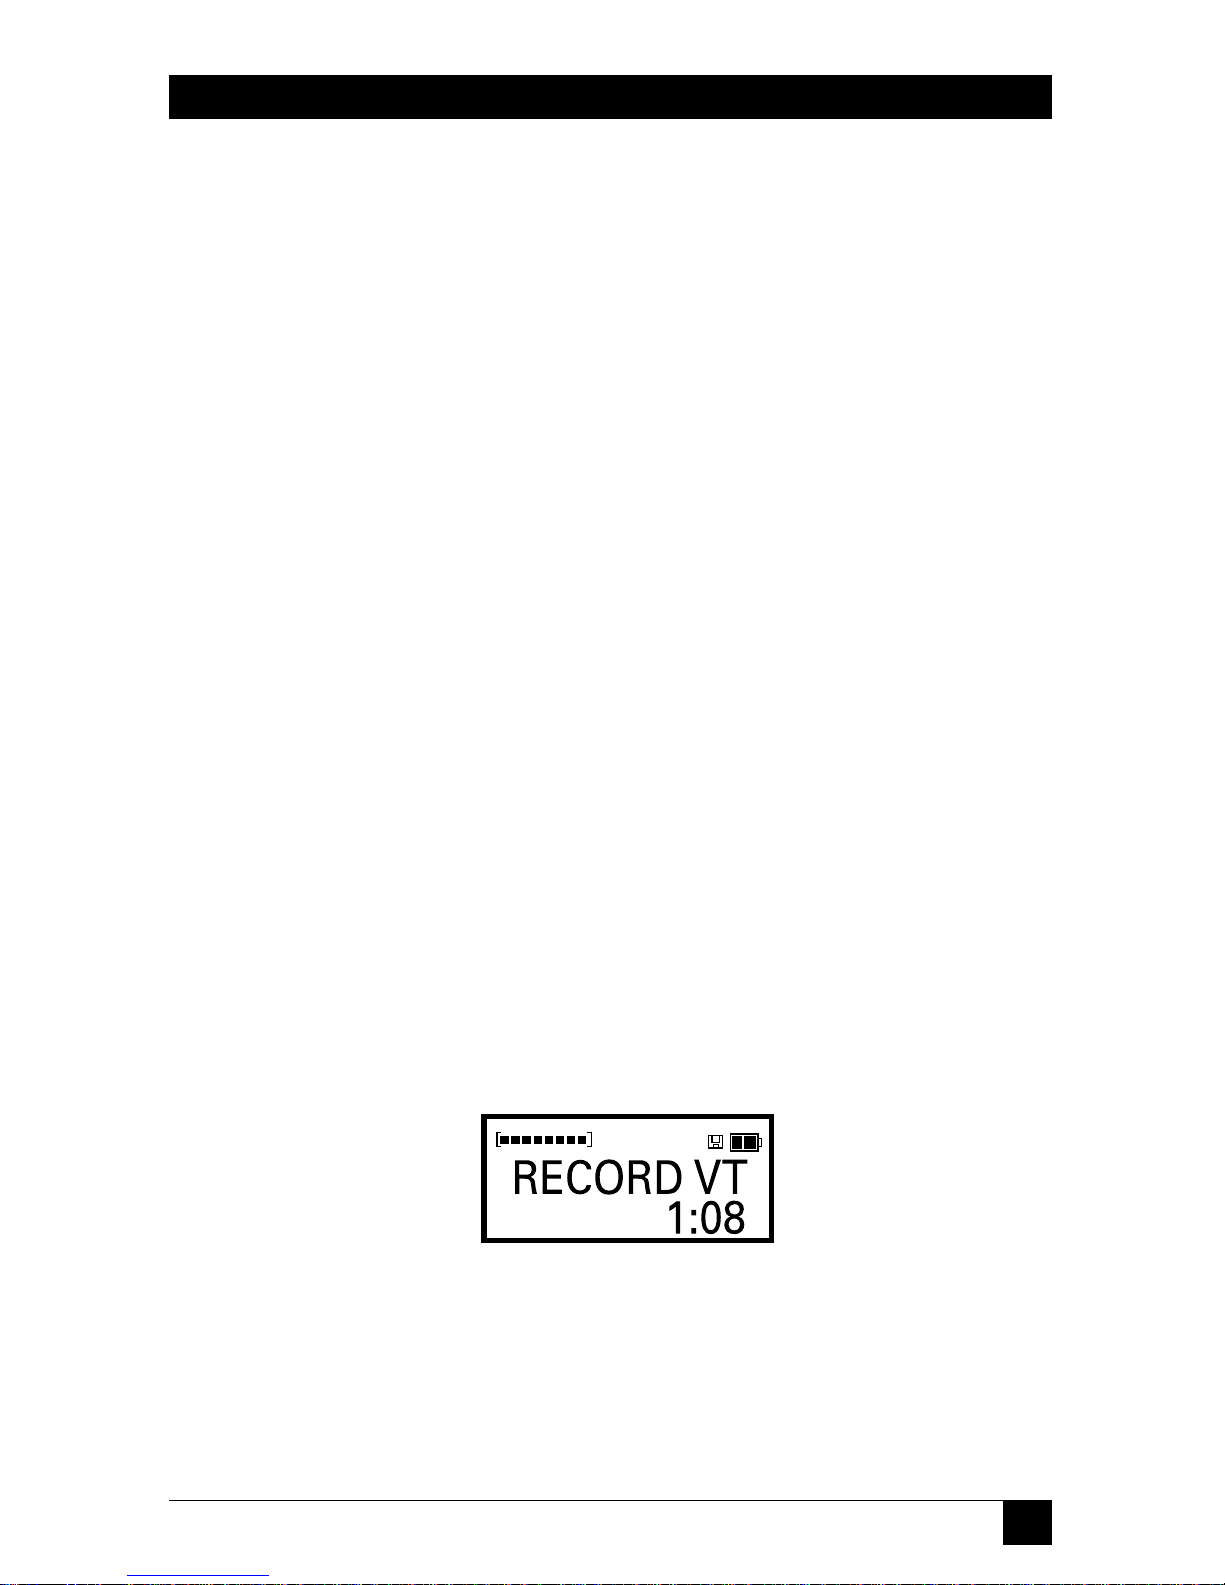
• Press and release Record to begin recording. The elapsed time of your
recording appears on the display while you are recording. “CONFERENCE”
flashes in conference mode.
NOTE
Recording does not start until you release the Record button. After
recording has stopped, if you want to listen to what you have recorded,
simply press Play. Your recording will immediately begin playing back
from the beginning.
Figure 2-2. Record screen.
Page 13
12
MOBILE DIGITAL DICTATION RECORDER
• Press and release Record to stop recording. The display will show the folder
that holds your recording and the number of the recording. If you want to
create a recording between two existing recordings, use the Fast
Forward/Rewind buttons to locate the spot to create the new recording.
NOTE
To review the recording leading to the point where you paused, press
and hold Rewind. As you hold Rewind, the recording will rewind. Press
Play to hear what you just recorded. Press Record to resume recording.
Figure 2-3. Folder screen.
• Press Insert and you will create a new recording before or after the current
file, depending on whether the dot (•) is before or after the name. The files
will automatically be renumbered accordingly.
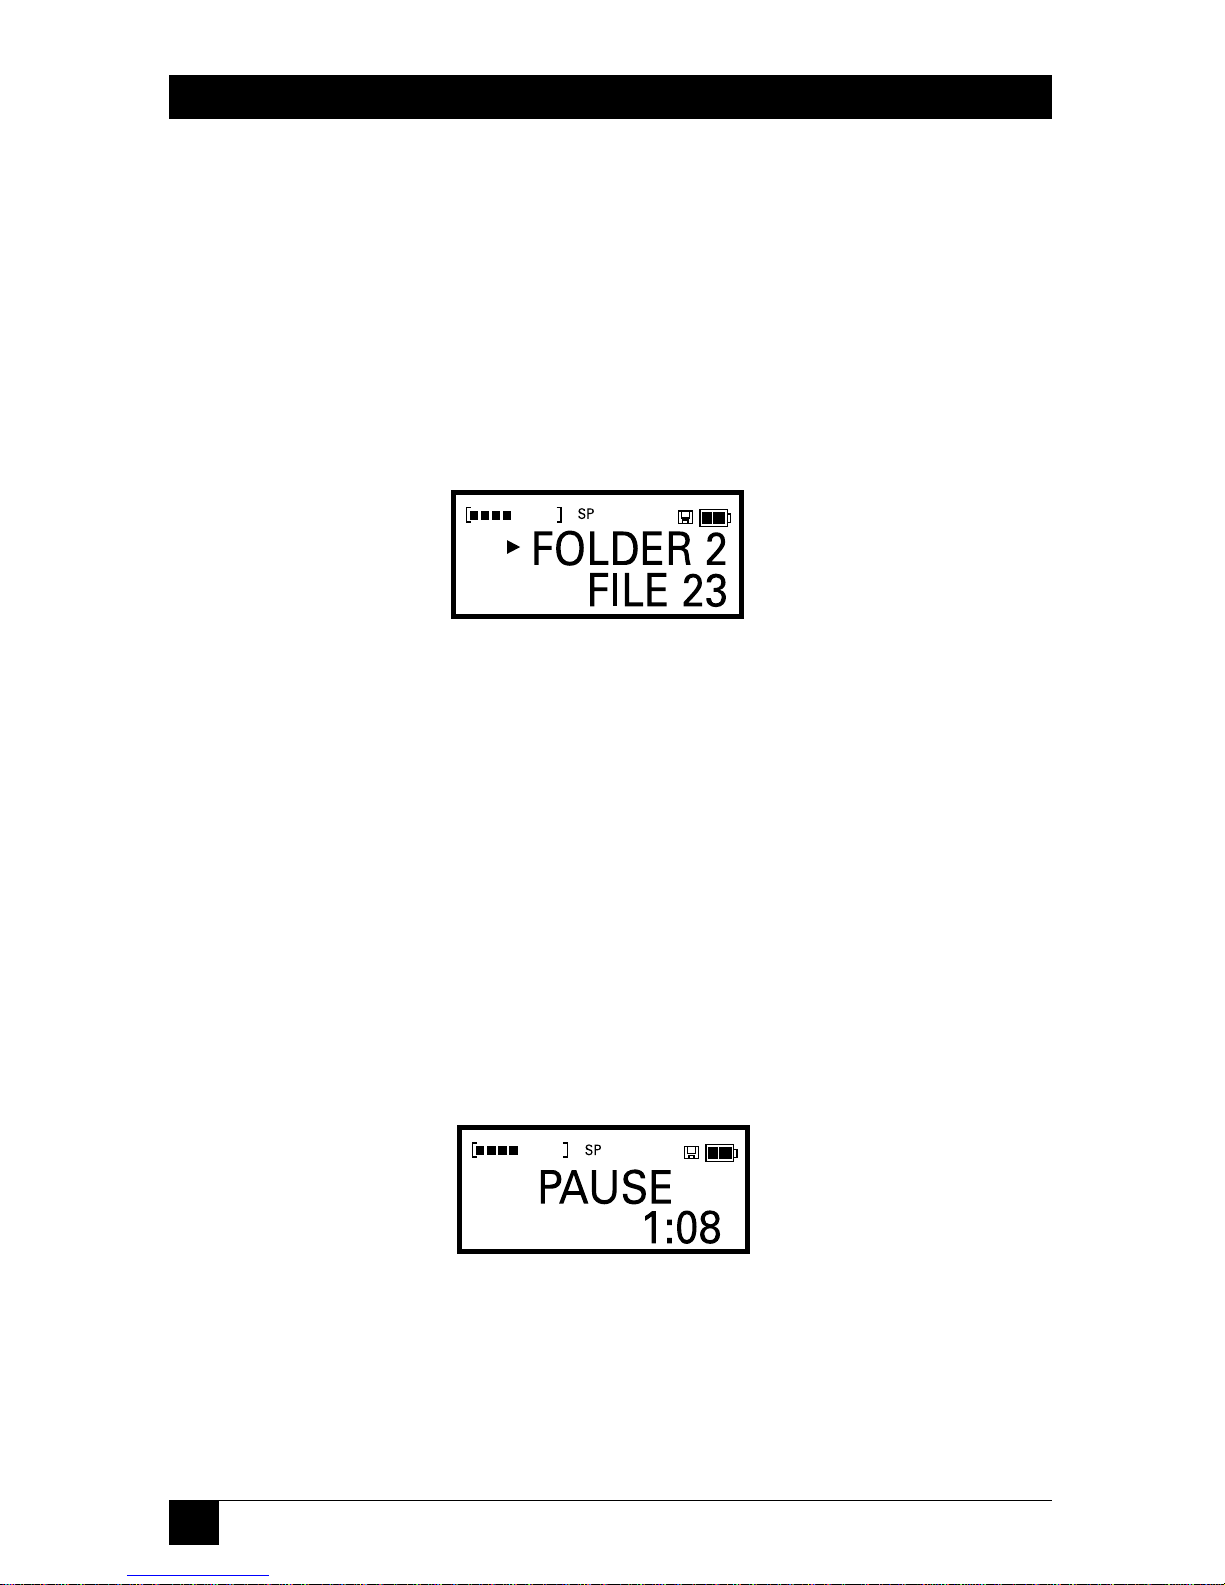
2.3.2 P
AUSINGDURING ARECORDING
• Press Pause. The display will blink while you are paused. After about five
minutes in pause, the unit will exit Pause and go into standby.
• Press Pause or Record to resume recording.
Figure 2-4. Pause screen.
Page 14

13
CHAPTER 2: Getting Started
2.3.3 U
SING A
R
EMOTEMICROPHONE
An external microphone can be used with your Recorder for settings where an
extendable microphone is needed.
• Plug the external microphone into the jack on the side of the recorder. The
microphone should be an Electret type with an impedance of about 2.2 kOhm.
The internal microphone will automatically disconnect when an external
microphone is plugged in.
2.4 Playback
2.4.1 P
LAYING A
R
ECORDING
• Press Folder to find the folder that holds the recording.
• Press Rewind or Fast Forward to find the recording you want to play.
• Press and release Play.
NOTE
To play all the recordings in a folder, use the Rewind button to find the
first recording, then press and hold Play for about two seconds.
2.4.2 P
AUSINGDURINGPLAYBACK
• Press Pause. After five minutes in Pause Mode automatic exiting occurs. (Pause
is terminated and playback is stopped.) This saves battery power.
• To resume playback when paused, press either Pause or Play.
2.4.3 S
TOPPING ARECORDINGTHAT ISPLAYING
• Press and release Play. This will take you to the end of the recording.
2.4.4 P
LAYING ARECORDINGFASTER
• While playing a recording, briefly tap Fast Forward. This will cause the
recording to play twice as fast.
• To return to the normal speed, briefly tap Fast Forward again.
2.4.5 P
LAYING ARECORDINGSLOWER
• While playing a recording, briefly tap Rewind. This will cause the recording to
play at a slower speed.
Page 15

14
MOBILE DIGITAL DICTATION RECORDER
• To return to the normal speed, briefly tap Rewind again.
NOTE
Earphones or headphones can be used with your Recorder. These let
you listen to recordings in private. The speaker on the Recorder
automatically disconnects when a compatible set of earphones or
headphones are plugged into the unit. If stereo headphones are used,
the sound will emanate from just one speaker unless a special adapter
jack is used.
2.4.6 S
CROLLINGTHROUGH ARECORDING
• While playing a recording, press and hold down Fast Forward to scroll forward;
press Rewind to scroll backward. If you hear a low beep while scrolling forward
or backward, you have reached the end or the beginning of the recording. At
this point, the recorder will be in pause mode.
2.4.7 P
LAYINGRECORDINGSCONTINUOUSLY
• Press and hold the Play button for about two seconds. This causes all the
recordings in the current folder to play continuously from your current
position.
2.5 Inserting and Deleting
NOTE
Slowing down playback can make it easier to find the exact spot where
you want to insert or delete comments. To make a recording play at half
speed, briefly tap Rewind during playback. To speed up play, briefly tap
Fast Forward.
2.5.1 A
DDINGCOMMENTS TO THEEND OF ARECORDING
You can use either of two methods:
• Begin playback, then press Pause. Press and release Record. You will jump to
the end of the recording and your comments will be added there.
• Begin playback. Press and hold Fast Forward until the end of the message is
reached, then press Pause. Press and release Record.
2.5.2 I
NSERTINGCOMMENTS
• Locate the point at which you want to begin inserting.
• Press Pause.
Page 16

15
CHAPTER 2: Getting Started
• Press Insert to begin.
• To stop the insertion process, press either Record or Insert. The recorder will
be in pause mode.
Figure 2-5. Insert screen.
NOTE
To jump quickly to the end of a recording you are in the midst of
playing, press Play. To jump quickly to the start of a recording, press
Play and then Rewind.
2.5.3 D
ELETINGCOMMENTS
• While playing a recording, locate the point at which you want to begin
deleting.
• Press Pause. You can also begin your cut by simply pressing Delete.
• Press and release Delete. The display will show “START CUT” briefly, then the
word “CUT” will blink on the top at the display. (Be careful here: If you press
and hold Delete, you will see “CUT TO END?” (see Figure 2-7). If you
continue to hold Delete after you see that message, you will cut from the
current location to the end of the recording.)
Figure 2-6. Start cut screen.
Page 17

16
MOBILE DIGITAL DICTATION RECORDER
Figure 2-7. Cut to end screen.
• Listen to the recording until you reach the end of the comments that you want
to cut.
• Press Pause.
• Press and hold Delete to complete the cut. The words “DELETE? SEGMENT”
will blink on the screen. Continue holding down Delete for about a second
until you hear a double beep and the display reads “DELETED SEGMENT.”
The cut is then final.
NOTE
Change your mind? To cancel a deletion that is in progress, press and
quickly release the Delete button. No change will be made in the
recording.
Figure 2-8. Delete segment screen.
Page 18

17
CHAPTER 2: Getting Started
Figure 2-9. Deleted segment screen.
2.5.4 D
ELETINGCOMMENTS FROM THEEND OF ARECORDING
• At the end of a recording, press Pause. This places the recorder in the
playback mode.
• Press and release Delete.
• Press the Rewind button to scroll backward.
• Press and hold Delete to complete the cut.
NOTE
To protect your recordings, your recorder won’t let you write over
recordings. Instead of overwriting, you simply delete the comments you
want to erase and insert the new comments, using the procedures for
inserting and deleting.
2.5.5 D
ELETINGENTIRERECORDINGS
• Locate the recording to be deleted.
• Press and hold Delete for about one second—but no longer. You will first see
“DELETE?” and then the file name. After the deletion is final, the display will
momentarily flash the word “DELETED” and the name of the deleted
recording.
Figure 2-10. Delete file screen.
Page 19

18
MOBILE DIGITAL DICTATION RECORDER
Figure 2-11. Deleted file screen.
2.5.6 D
ELETINGALL THEFILES IN AFOLDER
• Press Folder until the desired folder is located.
• Press and hold Delete for about four seconds—but no longer. You will first see
“EMPTY” and the folder name. After the deletion is final, the display will
momentarily flash the word “EMPTIED” and the name of the folder that was
cleaned out.
Figure 2-12. Empty folder screen.
Figure 2-13. Emptied folder screen.
Page 20

19
CHAPTER 2: Getting Started
2.5.7 R
EMOVING A
F
OLDER
• Press Folder until the desired folder is located.
• Press and hold Delete until you see “REMOVE?” and the folder name.
• After the remove is completed, you will see the word “REMOVED” and the
name of the folder.
Figure 2-14. Remove folder screen.
Figure 2-15. Removed folder screen.
2.5.8 D
ELETINGALL THEFILES IN AMEMORY
This procedure cleans out an entire memory, including all files in all folders and
all the names of folders.
• Press Folder until the desired memory is located; it will be marked “I” if it’s in
internal memory or “C” if it’s in the memory of an external card.
• Press and hold Delete for about ten seconds. This will take you through the
process of deleting a recording, a folder, and then an entire memory. You will
hear a series of beeps and see “DELETE” and “EMPTY.” You will then see
“ERASE INT MEMORY” or “ERASE CARD,” depending on the memory you
are using.
• After this is complete, you will have four unnamed, empty boxes.
Page 21

20
MOBILE DIGITAL DICTATION RECORDER
Figure 2-16. Erase int memory screen.
Figure 2-17. Erased int memory screen.
Figure 2-18. Erase card screen.
Figure 2-19. Erased card screen.
Page 22

21
CHAPTER 2: Getting Started
2.6 Indexing Comments
Your Recorder has an index function that allows you to put bookmarks in
recordings to make comments easier to find later on. You can drop in an index
mark while you are recording or while you are listening to a recording by using the
following procedures.
2.6.1 I
NDEXINGCOMMENTS
• During playback, press and hold Menu until the display shows “INDEX SET,”
then release the button. While recording, press and release the Menu button
quickly, then continue recording.
Figure 2-20. Index set screen.
2.6.2 F
INDINGINDEXEDCOMMENTS
• While listening to a recording or while paused in a recording, press and
release Menu. The display will show “INDEX SCAN,” and arrows will appear.
Figure 2-21. Index scan screen.
• Press either Rewind or Fast Forward to move immediately to the next index
mark.
Page 23

22
MOBILE DIGITAL DICTATION RECORDER
2.6.3 U
SING THE
F
OLDERBUTTON
Folders are used to organize and store your recordings. Different types of
recordings can be placed in different folders. Your Recorder is preset with four
unnamed folders, but you can create more. Your Recorder can accommodate up
to 99 folders on its internal memory. You can also establish folders on memory
cards.
• Press and release Folder to move from folder to folder and to move back and
forth between internal memory and a memory card.
• Press and hold Folder to move to the first folder of the next memory.
NOTE
Folders can be given a name on a PC. If you have entered names via the
Recorder link software, they will appear on the display when you press
Folder or move from folder to folder. Otherwise, folders will be
numbered.
Page 24

23
CHAPTER 3: Settings and Basic Functions
3. Settings and Basic Functions
3.1 Turning the Recorder On and Off
Press the Power button and hold it for about a second. When the unit is turned on
the user name that was set with the Voice It Link software will show briefly.
NOTE
The time and date can be seen briefly while the recorder is idle by
pressing and quickly releasing the Power button.
3.2 Using the Menu Button
Pressing and releasing the Menu button will allow you to access information on
your recording files, move files from one folder to another, and use setup controls
for speeds, microphone sensitivity, beeps, number of folders, and date/time.
• Press and release Menu to enter the Menu function.
• Press and release Menu to cycle through the four menu sections. The sections
are labeled FILE INFO, MOVE FILE, SETUP, and CLOCK SET.
NOTE
You will not see FILE INFO or MOVE FILE if the current folder is empty.
• Press Play to enter a section.
• Press Rewind and Fast Forward to change settings or to scroll through notes
attached to recordings.
• Press Delete or Power to exit the Menu function and save any changes you
have made.
3.3 About Recording Speeds
Your Recorder gives you three speeds for recording. When using the 4-MB internal
memory, recording times are approximately 40 minutes at voice-to-text speed
(VT), 55 minutes at standard play (SP), and 74 minutes at long play (LP). For
voice-to-text recording and for the best sound quality, always select VT speed. To
stretch out your recording time, select SP or LP. SP provides better sound quality
than LP.
Page 25

24
MOBILE DIGITAL DICTATION RECORDER
3.4 Adjusting the Recording Speed
• Press and release Menu to enter the menu, and continue to press and release
it until you see “SETUP.”
• Press and release Play to bring up the speed function. The display will show
the selected speed, the memory you are using (I for internal, C for a card),
and the remaining recording time for the selected speed.
• Press Rewind or Fast Forward to change the speed.
• Press Delete or Power to exit and save changes, or press Play to continue to the
next setup item.
NOTE
Want to see your remaining recording time at different speeds? When
you access the speed setup function, the Recorder’s display shows the
available time remaining on the currently selected memory at the speed
you have chosen. It also shows which memory you are on—I for the
internal memory or C for the memory card.
3.5 Setting the Microphone Sensitivity
Your Recorder gives you a choice of two microphone sensitivity settings: Dictation
and Conference. For voice-to-text recording, you must set the microphone to
Dictation mode. For recording at greater distances, use the Conference mode.
• Press and release Menu until you see “SETUP PRESS.”
Figure 3-1. Setup press screen.
Page 26

25
CHAPTER 3: Settings and Basic Functions
• Press and release Play to bring up the microphone function. The display will
show the current microphone mode—either Dictation or Conference.
Figure 3-2. Mic mode dictation screen.
• Press Rewind or Fast Forward to switch from one microphone mode to
another.
• Press Delete or Power to exit and save changes or press Play to continue to the
next setup item.
3.6 Setting the Recorder for Voice-to-Text
• Set the recorder to VT speed.
• Set the microphone sensitivity to Dictation mode.
• Hold the microphone about two inches away from the speaker’s mouth.
NOTE
For voice-to-text translation, always hold the microphone about two
inches from and slightly off to the side of the speaker’s mouth. The
microphone is located at the top-left of the front side of the recorder.
3.7 Turning Beeps On and Off
Your Recorder is programmed to beep in conjunction with certain functions.
Generally, low beeps indicate functions that cannot be attempted. Higher beeps
confirm actions. These beeps can be turned on or off.
• Press and release Menu until you see “SETUP PRESS.”
Page 27

26
MOBILE DIGITAL DICTATION RECORDER
Figure 3-3. Setup press screen.
• Press Play until the beeps option appears.
• Press Rewind and Fast Forward to turn the beeps on and off.
• Press Delete or Power to exit the menu function.
Figure 3-4. Beeps on screen.
3.8 Creating New Folders
You can easily add or remove folders to organize your recording files. Your
recorder will accommodate up to 99 folders on its internal memory or card
memory.
• Press and release Menu until the display shows “SETUP.”
• Press Play to enter the Setup section and find the Folders function. The display
will show the word “FOLDERS.” It will also indicate whether you are using the
internal memory (I) or a card (C), and it shows the number of folders you
have.
Page 28

27
CHAPTER 3: Settings and Basic Functions
Figure 3-5. Folders screen.
• Press Rewind or Fast Forward to change the number of folders. New folders
are placed at the end. The recorder will allow you to reduce the number of
folders to those that are in use, but not below that number. Also, the Folders
cannot be reduced if the last Folder is in use.
• Press Delete or Power to exit and save the changes you have made.
3.9 Reviewing Information on Recordings
Your recorder keeps track of basic information on each of your recording files,
including its length, the time and date it was created, and the time and date it was
last modified. In addition, you can attach written notes to recordings via the
software. A note is text information up to 128 characters that is assigned only from
the PC.
• Press and release Menu until you see “FILE INFO PRESS.”
Figure 3-6. File info screen.
• Press Play to see the note for the current recording (if a note exists).
• Press Rewind and Fast Forward to scroll through the note.
• Press Play to advance to the next piece of information.
Page 29

28
MOBILE DIGITAL DICTATION RECORDER
• Press Delete or Power to exit the menu and save any changes you have made.
3.10 Moving Files from Folder to Folder
You can easily move files within a folder or from one folder to another. If you are
working within a single memory (Internal or Card), the file simply moves from one
position to another. If you move a file from one memory to another, the recorder
makes a copy of the file.
• When the file you want to move is displayed, press and release Menu until you
see “MOVE FILE.”
• Press Play to select the current file as the one to be moved. The icon at the top
of the display will start blinking to show a move is in progress. The following
instructions will appear on the display.
Figure 3-7. To finish move screen.
Figure 3-8. Go to dest press menu screen.
• Locate the destination folder and the position within a folder. The file will be
inserted before or after the current recording, depending on whether the
dot (•) is before or after the name.
• Press Menu to place the file in the new location.
Page 30

29
CHAPTER 3: Settings and Basic Functions
• If you change your mind and do not want to move the recording, press and
quickly release Delete; the move will be canceled.
3.11 Monitoring the Battery Level
The battery-level icon, which appears on the upper right side of the display, shows
how much life remains on the recorder’s batteries.
When the battery is at full strength, the two black boxes are full. When the battery
is at half strength, only one black box appears. When the battery supply is nearly
empty, only the outline appears. Batteries should be replaced at this time. When
the empty battery outline flashes, your recorder will not record until new batteries
are installed.
NOTE
Loss of battery power won’t cause you to lose your recordings. Your
recorder uses a technology (called Flash Memory) that protects your
stored data even when the unit is without power.
NOTE
Your recorder has an Auto Power Off feature to conserve battery life. If
no activity has occurred for 15 minutes, the unit will automatically shut
off.
3.12 Monitoring the Memory Level
The memory bar, which appears on the upper left side of the display, shows how
much memory has been used on the recorder’s internal memory or the memory
card that you inserted.
Figure 3-9. Memory bar.
Page 31

30
MOBILE DIGITAL DICTATION RECORDER
The memory bar consists of 8 boxes and 2 brackets. When empty, only the two
brackets show. The black boxes appear as the memory fills. When nearly full, the
boxes will begin flashing. This warns you that your remaining memory is down to
about a minute or less.
When the unit runs out of memory during a recording, it beeps and the recording
stops. The display will read either “CARD FULL” or “INT MEMORY FULL,”
depending on the memory you are currently using.
Figure 3-10. Int memory full screen.
Figure 3-11. Card full screen.
3.13 Checking the Exact Amount of Memory Remaining
Press and release the Menu button until you see “SETUP.” The time left on the
memory you are using shows on the display (see Figure 3-12). Press Play to re-enter
SETUP.
Page 32

31
CHAPTER 3: Settings and Basic Functions
Figure 3-12. Speed: SP screen.
3.14 When a Folder is Full
Each folder can hold up to 99 recordings (60 recordings for 2-MB cards). If you
have many brief recordings, you could encounter a full folder. When a folder is
full, the display will give you a “FOLDER FULL” message. This doesn’t mean that
you are out of memory. It means only that the particular folder you are using
cannot hold any more recordings. To continue recording, simply move to another
folder or create a new folder.
Figure 3-13. File limit folder screen.
3.15 Working with Memory Cards
3.15.1 A
BOUTMEMORYCARDS
Use of memory cards expands the capacity of your Recorder. It will accommodate
industry-standard 2-MB, 4-MB, and 8-MB cards. When a card is inserted, it works
just like the recorder’s internal memory. As with the internal memory, the cards
provide multiple folders to hold recordings.
The recording time for a memory card will depend on its size and the speed at
which you are recording—voice-to-text (VT), standard play (SP), or long play (LP).
(See Section 3.4 for information on setting recording speeds).
Page 33

32
MOBILE DIGITAL DICTATION RECORDER
Table 3-1. Recording times for memory cards.
Speed 4-MB Internal Card 8-MB Card (TE131)
VT 40 minutes 81 minutes
SP 55 minutes 112 minutes
LP 74 minutes 149 minutes
Recordings stored on cards are accessed in the same manner as recordings stored
on the Recorder’s internal memory. The display will indicate the memory you are
using: an I indicates that you are using the internal memory, and a C indicates that
you are using a memory card.
Because the cards use non-volatile flash memory technology, they will continue to
store recordings after they are removed from the recorder—as long as they are
handled with care. To protect your recordings, make sure the unit is turned off
before inserting or removing a card. Otherwise, treat them as you would treat a
computer floppy disk. Avoid bending or subjecting cards to sudden impact. Keep
them dry and away from dust, dirt, and liquids. For your protection, back up
important data.
3.15.2 U
SINGNEWCARDS THEFIRSTTIME
• Press Power to turn off the recorder.
• Carefully slide the card door open.
• Insert the card and replace the door.
• If the words “UNKNOWN CARD,” “PRESS DELETE,” and “FOR 5 SEC TO
ERASE” appear, the card needs to be formatted for use in the recorder. Press
and hold Delete for approximately five seconds until you see the words
“ERASE? CARD,” “ERASING CARD,” and “ERASED CARD.” This will erase all
contents and format the card.
Figure 3-14. Unknown card screen.
Page 34

33
CHAPTER 3: Settings and Basic Functions
Figure 3-15. Press delete screen.
Figure 3-16. For 5 sec to erase screen.
3.15.3 P
ROTECTINGRECORDINGS ONCARDS
Write protection helps ensure that you won’t erase or write over a recording that
you want to keep. You can still listen to recordings on a write-protected card.
To prevent recording on a card, place the card’s special round sticker in the
recessed area on the top of the card. The recorder will not let you record on such
cards until the sticker is removed.
Figure 3-17. Write-protected card.
Label area
Connectors
Card front
Card back
Write
protection
Page 35

34
MOBILE DIGITAL DICTATION RECORDER
NOTE
The format introduced to the memory card by the recorder will make the
card incompatible with most other applications (for instance, digital
cameras, games, etc.).
3.15.4 R
EMOVINGWRITEPROTECTION
If you see the message “CARD READ ONLY” when you try to record on a card,
write protection is active. The recorder won’t allow you to store new recordings on
the card unless you disable write protection. Remove the round sticker from the
recessed ares. This will remove write protection and allow you to record on the
card.
Figure 3-18. Card read only screen.
Figure 3-19. Wrong type of card screen.
NOTE
If the display shows the message WRONG TYPE OF CARD, the memory
card cannot be used by your recorder. Try another type of card. Your
recorder uses 3.3V memory cards (SSFDC type) in 4-MB and 8-MB
(TE131) sizes. If you have trouble locating cards, call Black Box
Technical Support at 724-746-5500.
Page 36

35
CHAPTER 4: Using Link Software
4. Using Link Software
4.1 About the Link Software
Voice It Link software allows your recorder to work in tandem with your PC. Using
this software, you can move a recording file from your recorder to your PC or from
your PC to your recorder. This same software program allows you to name files and
folders and to easily sort and organize your files. Your Voice It Link software serves
as your bridge to voice-to-text software, which converts voice files to text files
(speech recognition software sold separately).
4.2 System Requirements for the Link Software
• Windows®95 operating system.
• A Pentium
®
compatible processor running at a minimum of 100 MHz with 16
MB of RAM for basic functions; typically a 166-MHz Pentium MMX processor
and 32 MB of RAM for voice-to-text functions.
• 10 MB of free space on your hard disk for basic functions; 100 MB for voice-totext functions.
• An available serial port with a DB9 connection. If you have a DB25 connection,
you will need a DB25-to-DB9 adapter.
• An industry-standard sound adapter, such as SoundBlaster
®
, that permits
playback of audio files.
4.3 Setting Up the Link Software
• Insert the Voice It Link software CD into your CD-ROM drive. Its setup
program will run automatically.
• Follow the prompts from your Voice It Link software. The software will guide
you through the installation process.
Page 37

36
MOBILE DIGITAL DICTATION RECORDER
4.4 Using the Link Software
Your Voice It Link software includes a comprehensive help system. This system
explains how to use the software in conjunction with your recorder.
4.5 Connecting Your Recorder to a PC
To use Voice It Link software with your recorder, you need to connect the recorder
to your PC. Here’s how:
• Turn off the recorder. The Power button turns the recorder off and on.
• Plug the supplied cable into your recorder.
• Plug the cable into a free serial port on your PC. You may have to disconnect
another peripheral, such as an external modem, to free up an appropriate port.
Figure 4-1. Connecting the Recorder to your PC.
Recorder
back
Serial port
on PC
Cable end
Cord
Page 38

37
5. Maintaining Your Recorder
5.1 Heat, Moisture, and Static Electricity
Heat, moisture, and static electricity can damage your recorder. Keep the recorder
out of the sun and away from places where it might get wet or be subject to
excessive static electricity.
5.2 Replacing the Batteries
CAUTION
Be sure to turn off the unit when replacing batteries. Recordings could
be lost or the unit could be damaged if the power remains on during this
process.
• Turn the unit off. The power button turns the recorder on and off.
• Remove the battery door on the back of the recorder.
• Install two AAA batteries as shown on the inside of the battery compartment.
• Replace the battery door.
• The unit will flash “START” and a downward-pointing arrow will direct you to
the Power button. Press and release the Power button to continue startup.
• Be sure to set the clock for accurate date stamping of your recordings. See
Section 2.2 for instructions on setting the clock.
CHAPTER 5: Maintaining Your Recorder
Page 39

38
MOBILE DIGITAL DICTATION RECORDER
6. Troubleshooting
6.1 Problems and Solutions
Problem: The unit will not operate.
Solutions:
• Check to see if you have battery power. If the battery icon in the upper right
corner of the display is blinking, the batteries need to be replaced.
• If you are using a memory card, check to see if it is properly inserted. The
recorder won’t operate if a card is partially inserted.
• Try removing the batteries. Wait 30 seconds and then re-insert them.
Problem: The unit will not record.
Solutions:
• Check to see if you have battery power. If the battery icon in the upper right
corner of the display is blinking, the batteries must be replaced.
• Check to see if the memory is full. If the memory bar in the upper left corner
of the display is solid black, the memory is full. To continue to record, delete
stored recordings or insert a memory card.
Problem: The unit locks up.
Solution: Your recorder can be reset entirely if it locks up or experiences some
other malfunction. Resetting the unit will not affect your recordings.
• Remove the batteries, wait 30 seconds, then reinstall them or install new ones.
• Follow the usual procedures for setting the clock and other menu items.
Page 40

39
CHAPTER 6: Troubleshooting
Problem: The display reads “CARD READ ONLY.”
Solutions: This indicates that write protection is active on the card you have
inserted. Write protection prevents a user from deleting or changing recordings.
• To use the card for new recordings, remove the round sticker from the
recessed area on the card. This cancels write protection.
• This condition occurs when the memory card has been improperly formatted.
Return to Section 3.15.2 and follow the directions on how to format/erase the
card.
Problem: The display reads “WRONG TYPE OF CARD.”
Solution: This indicates that the memory card you have inserted isn’t compatible
with your Recorder. It may be compatible with some other digital product. Try
another card.
Problem: The unit indicates corrupted memory on startup.
Solution: If your unit indicates that memory is corrupted when you install new
batteries (display reads “INT MEMORY ERROR F”, it is possible that an unusual
circumstance has occurred. This may happen when the batteries were being
installed, or perhaps if the batteries were removed while within a procedure. In this
case, pressing Delete will restart the unit; pressing Play will allow you to continue
using your unit. If this fails to correct the problem, press Play to Start. Copy all your
files onto your PC, then press and hold Delete to completely erase internal
memory. Restore files from your PC.
Problem: The unit loses a folder.
Solution: A folder can be lost if batteries are inserted or removed during certain
operations. In this case, the folder will be skipped with a double beep occurring
during folder scrolling (if beeps are on) when the missing folder is passed. To
correct this problem, use the Voice It Link software to delete the folder, referring
to the instructions in the help system.
Page 41

40
MOBILE DIGITAL DICTATION RECORDER
Problem: Recording is missing.
Solutions:
• Make sure that the memory you have active is the same as the memory the file
was recorded on. A file recorded on a card won’t appear on the internal
memory and vice versa.
• Make sure you are in the same folder that the recording was stored in.
Recordings can be filed in any of four folders on the internal memory and
four folders on each memory card. To move from folder to folder, press the
Folder button.
Problem: A card doesn’t fit right in the recorder.
Solutions:
• Don’t force the card. It may be a type of card that is incompatible with your
recorder.
• Check to make sure you are using the correct type (SSFDC) of memory card,
and that it is marked “3.3 V”.
6.2 Calling Black Box
If you determine that your recorder is malfunctioning, do not attempt to alter or
repair the unit. It contains no user-serviceable parts. Contact Black Box at 724-746-
5500.
Before you do, make a record of the history of the problem. We will be able to
provide more efficient and accurate assistance if you have a complete description,
including:
• the nature and duration of the problem.
• when the problem occurs.
• the components involved in the problem.
• any particular application that, when used, appears to create the problem or
make it worse.
Page 42

41
6.3 Shipping and Packaging
If you need to transport or ship your recorder:
• Package it carefully. We recommend that you use the original container.
• If you are shipping the recorder for repair, make sure you include everything
that came in the original package. Before you ship, contact Black Box to get a
Return Authorization (RA) number.
CHAPTER 6: Troubleshooting
Page 43

42
MOBILE DIGITAL DICTATION RECORDER
Appendix. Software License
Agreement/Warranty
Software License Agreement
THIS IS A CONTRACT BETWEEN Black Box (“Black Box”) or its Licensors AND
YOU (either an individual or single entity). BY INSTALLING, COPYING OR
OTHERWISE USING THE SOFTWARE ACCOMPANYING THIS AGREEMENT
(THE “SOFTWARE”), YOU AGREE TO BE BOUND BY ALL THE TERMS AND
CONDITIONS OF THIS END-USER LICENSE AGREEMENT (“EULA”). If you do
not agree with such terms and conditions, you may not install or use this Software
and you must return the disk, CD-ROM, or other media containing the Software or
documentation related to the Software, to Black Box or the location where you
obtained them for a full refund.
Black Box provides this Software and licenses its use to you. Black Box or its
licensors retain ownership of all rights in the Software and of all proprietary
technology embodied therein.
LICENSE
The license granted under this EULA permits you and your employees (if
applicable) who agree to be bound by the terms and conditions of this EULA
to:
• Allow each user for which a license is purchased to use and install the
Software in a single location on a single computer. (The Software is
considered used when loaded into temporary memory or installed into
permanent memory.) Each user may also install the Software on one
home or portable computer. However, the Software may not be used on
the secondary computer by another person at the same time the Software
on the primary computer is being used.
• If the Software is configured for network use and Licensee has acquired
the appropriate license from Black Box, install and use the Software on a
single file server for use on a single local area network for either (but not
both) of the following purposes:
1) Permanent installation onto a hard disk or other storage device for up to the
licensed number of users; or 2) Use of the Software over such network,
provided the number of different users on which the software is used does not
exceed the licensed number of users. For example, if there are 100 computers
connected to the server, with no more than 15 computers ever using the
Page 44

43
software concurrently, but the Software will be used by 25 different Users at
various times, the number of users for which you need a license are 25.
Backup Copies. You may make that number of backup copies of the Software
equal to the licensed number of users, provided such backup copies are not
installed or used on any computer. You may not rent, lease, sublicense, lend or
transfer versions or copies of the Software you do not use, or Software
contained on any unused media, except as part of the permanent transfer of
all Software and Documentation as described below.
Upgrades. If the Software is licensed as an upgrade, you must be properly
licensed by Black Box to use the product identified by Black Box as being
eligible for the upgrade in order to use the Software. A Software product
labeled as an upgrade replaces and/or supplements the product that formed
the basis for your eligibility for the upgrade. You may use the resulting
upgraded product only in accordance with the terms of this EULA.
LIMITED WARRANTY
The software media is warranted to be free of defects for a period of 1 year from
date of purchase. If you discover defects in the media on which the Software is
distributed or in the documentation, Black Box will replace the media or
documentation for a period of 1 year after purchase. You must return the original
disk or documentation to Black Box within the warranty period accompanied by
your proof of purchase receipt. This warranty does not apply to defects due to
misuse, abuse, negligence, repairs, or alterations made by the customer.
EXCEPT AS PROVIDED IN THE PRECEDING PARAGRAPH, THE SOFTWARE
AND ANY DOCUMENTATION ARE PROVIDED ON AN “AS IS” BASIS. BLACK
BOX DISCLAIMS ALL OTHER WARRANTIES, WHETHER EXPRESS OR
IMPLIED, WRITTEN OR ORAL, WITH RESPECT TO THE SOFTWARE AND
ANY DOCUMENTATION, INCLUDING ALL WARRANTIES OF TITLE AND
IMPLIED WARRANTIES OF MERCHANTABILITY AND FITNESS FOR A
PARTICULAR PURPOSE. THE LIABILITY OF BLACK BOX AND ITS
LICENSORS FOR DAMAGES TO THE LICENSEE FOR ANY CAUSE
WHATSOEVER, REGARDLESS OF THE FORM OF ANY CLAIM OR ACTION,
SHALL NOT EXCEED THE TOTAL LICENSE FEE PAID BY THE LICENSEE
FOR THE LICENSE TO USE THE SOFTWARE UNDER THIS EULA. BLACK
BOX AND ITS LICENSORS SHALL IN NO EVENT BE LIABLE FOR ANY
DAMAGES RESULTING FROM LOSS OF DATA, PROFITS OR USE OF
EQUIPMENT, OR FOR ANY SPECIAL, INCIDENTAL, CONSEQUENTIAL, OR
OTHER INDIRECT DAMAGES ARISING OUT OF OR IN CONNECTION WITH
THE USE OR PERFORMANCE OF THE SOFTWARE.
APPENDIX: Software License Agreement/Warranty
Page 45

44
MOBILE DIGITAL DICTATION RECORDER
This EULA gives you specific legal rights, and you may also have other rights that
vary from jurisdiction to jurisdiction. Some jurisdictions do not allow the exclusion
or limitation of implied warranties, so the above exclusion may not apply to you. In
that event, such warranties are limited in duration to the warranty period. Some
jurisdictions do not allow the exclusion or limitation of incidental or consequential
damages, so the above limitation may not apply to you.
COPYRIGHT
Black Box or its licensors own the copyright and other relevant intellectual
property rights in the Software, its structure, organization and code, which contain
valuable trade secrets of Black Box or its licensors. The Software is also protected
by copyright laws and international treaty provisions. You must treat the Software
just as you would any other copyrighted material. You may not copy the Software,
or the Documentation, except as set forth herein. Any copies that you are
permitted to make pursuant to this Agreement must contain the same copyright
and other proprietary notices that appear on or in the Software. You agree not to
modify, adapt, translate, reverse engineer, decompile, disassemble, or otherwise
attempt to discover the source code of the Software. You acknowledge that the
unauthorized distribution or use of the Software or documentation received from
Black Box will cause material damage to Black Box and/or its licensors.
TRANSFER
You may not rent, lease, sublicense, or lend the Software or Documentation. You
may, however, transfer all your rights to use the Software to another person or
legal entity provided that you transfer this Agreement, the Software, including all
copies, updates, and prior versions, and all Documentation to such person or
entity and that you retain no copies, including copies stored on a computer.
TERM
The license is effective until terminated. You may terminate the license at any time
by destroying the programs along with any copies, modifications and merged
portions in any form. It will also terminate upon conditions set forth elsewhere in
this EULA or if you fail to comply with any term or condition of this EULA. You
agree upon such termination to destroy the programs together with all copies,
modifications and merged portions in any form.
Page 46

45
RESTRICTED RIGHTS LEGEND
Use, duplication, or disclosure by the Government is subject to restrictions as set
forth in subparagraph (c)(1)(ii) of the Rights in Technical Data and Computer
Software clause at DFARS 252.227-7013 or subparagraphs (c) (1) and (2) of the
Commercial Computer Software-Restricted Rights at 48 CFR 52.227.19, as
applicable. Manufactured under license from VXI Corporation, One Front Street,
P.O. Box 490 Rollinsford, NH 03869. www.vxicorp.com
GOVERNING LAW AND MISCELLANEOUS PROVISIONS
This EULA will be governed by the laws of the State of New Hampshire excluding
application of its conflicts of law rules, and the courts of which shall have exclusive
jurisdiction over any disputes or actions arising here under. If any part of this
Agreement is found void and unenforceable, it will not affect the validity of the
balance of the Agreement, which shall remain valid and enforceable according to
its terms. If the Software is acquired outside the United States, then local law may
apply.
APPENDIX: Software License Agreement/Warranty
Page 47

NOTES
Page 48

1000 Park Drive • Lawrence, PA 15055-1018 • 724-746-5500 • Fax 724-746-0746
© Copyright 2002. Black Box Corporation. All rights reserved.
 Loading...