

Page 1

Page 2

Page 3

FEDERAL COMMUNICATIONS COMMISSION
AND
INDUSTRY CANADA
RADIO FREQUENCY INTERFERENCE STATEMENTS
This equipment generates, uses, and can radiate radio frequency
energy and if not installed and used properly, that is, in strict
accordance with the manufacturer’s instructions, may cause
interference to radio communication. It has been tested and found
to comply with the limits for a Class A computing device in
accordance with the specifications in Subpart J of Part 15 of FCC
rules, which are designed to provide reasonable protection against
such interference when the equipment is operated in a commercial
environment. Operation of this equipment in a residential area is
likely to cause interference, in which case the user at his own
expense will be required to take whatever measures may be
necessary to correct the interference.
Changes or modifications not expressly approved by the party
responsible for compliance could void the user’s authority to
operate the equipment.
This digital apparatus does not exceed the Class A limits for radio noise
emission from digital apparatus set out in the Radio Interference
Regulation of Industry Canada.
Le présent appareil numérique n’émet pas de bruits radioélectriques
dépassant les limites applicables aux appareils numériques de
classe A prescrites dans le Règlement sur le brouillage radioélectrique
publié par Industrie Canada.
TRADEMARKS USED IN THIS MANUAL
AT and IBM are registered trademarks, and PC/XT is a trademark,
of International Business Machines Corporation.
Any other trademarks mentioned in this manual are acknowledged to be
the property of the trademark owners.
FCC AND IC STATEMENTS, TRADEMARKS
1
Page 4

POW-R-SWITCHES 1M, 1S
NORMAS OFICIALES MEXICANAS (NOM) ELECTRICAL SAFETY STATEMENT
INSTRUCCIONES DE SEGURIDAD
1. Todas las instrucciones de seguridad y operación deberán ser leídas antes
de que el aparato eléctrico sea operado.
2. Las instrucciones de seguridad y operación deberán ser guardadas para
referencia futura.
3. Todas las advertencias en el aparato eléctrico y en sus instrucciones
de operación deben ser respetadas.
4. Todas las instrucciones de operación y uso deben ser seguidas.
5. El aparato eléctrico no deberá ser usado cerca del agua—por ejemplo,
cerca de la tina de baño, lavabo, sótano mojado o cerca de una alberca,
etc.
6. El aparato eléctrico debe ser usado únicamente con carritos o pedestales
que sean recomendados por el fabricante.
7. El aparato eléctrico debe ser montado a la pared o al techo sólo como
sea recomendado por el fabricante.
8. Servicio—El usuario no debe intentar dar servicio al equipo eléctrico más
allá a lo descrito en las instrucciones de operación. Todo otro servicio
deberá ser referido a personal de servicio calificado.
9. El aparato eléctrico debe ser situado de tal manera que su posición no
interfiera su uso. La colocación del aparato eléctrico sobre una cama,
sofá, alfombra o superficie similar puede bloquea la ventilación, no se
debe colocar en libreros o gabinetes que impidan el flujo de aire por los
orificios de ventilación.
10. El equipo eléctrico deber ser situado fuera del alcance de fuentes de
calor como radiadores, registros de calor, estufas u otros aparatos
(incluyendo amplificadores) que producen calor.
11. El aparato eléctrico deberá ser connectado a una fuente de poder sólo
del tipo descrito en el instructivo de operación, o como se indique en
el aparato.
2
Page 5

NOM STATEMENT
12. Precaución debe ser tomada de tal manera que la tierra fisica y la
polarización del equipo no sea eliminada.
13. Los cables de la fuente de poder deben ser guiados de tal manera que
no sean pisados ni pellizcados por objetos colocados sobre o contra ellos,
poniendo particular atención a los contactos y receptáculos donde salen
del aparato.
14. El equipo eléctrico debe ser limpiado únicamente de acuerdo a las
recomendaciones del fabricante.
15. En caso de existir, una antena externa deberá ser localizada lejos de las
lineas de energia.
16. El cable de corriente deberá ser desconectado del cuando el equipo
no sea usado por un largo periodo de tiempo.
17. Cuidado debe ser tomado de tal manera que objectos liquidos no sean
derramados sobre la cubierta u orificios de ventilación.
18. Servicio por personal calificado deberá ser provisto cuando:
A: El cable de poder o el contacto ha sido dañado; u
B: Objectos han caído o líquido ha sido derramado dentro del
aparato; o
C: El aparato ha sido expuesto a la lluvia; o
D: El aparato parece no operar normalmente o muestra un cambio
en su desempeño; o
E: El aparato ha sido tirado o su cubierta ha sido dañada.
3
Page 6

POW-R-SWITCHES 1M, 1S
Contents
Chapter Page
1. Specifications ............................................................................................. 5
1.1 Specs for Pow-R-Switch (SWI030, SWI031) Units ............................. 5
1.2 Specs for Rack Tray (SWI032) ........................................................... 7
2. Introduction ............................................................................................... 8
2.1 General Overview ................................................................................ 8
2.2 Features ............................................................................................... 8
2.3 Applications ......................................................................................... 9
2.4 The Pow-R-Switches 1M and 1S Illustrated ..................................... 10
3. Installation ................................................................................................ 12
3.1 Selecting the Address ........................................................................ 12
3.2 Setting the Configuration Switch ..................................................... 13
3.3 Linking the Modules ......................................................................... 14
3.4 Making the Control-Port Connection
(Pow-R-Switch 1M Only) ................................................................ 15
3.5 Making the Power Connections ....................................................... 16
3.6 Testing for Proper Installation ......................................................... 16
4. Operation ................................................................................................. 18
5. Troubleshooting ...................................................................................... 21
5.1 Calling Your Supplier ....................................................................... 21
5.2 Shipping and Packaging ................................................................... 21
Appendix A: Accessories ................................................................................ 22
A.1 The Rack Tray (SWI032) .................................................................. 22
A.2 Modular Adapters ............................................................................. 23
Appendix B: Pinouts ....................................................................................... 24
4
Page 7

5
CHAPTER 1: Specifications
1.1 Specs for Pow-R-Switch (SWI030, SWI031) Units:
Compliance — FCC Class A, IC Class/classe A
Interfaces — All models: Serial EIA RS-485;
Pow-R-Switch 1M (SWI030) models only: Serial EIA
RS-232 (DTE), IBM AT implementation
Protocol — Asynchronous
Code Set — ASCII
Data Format — 8 data bits, no parity, 1 stop bit (fixed)
Flow Control — None
Data Rate — 2400 or 9600 bps, user-selectable
Maximum
Distance — RS-232 (Control) side: 50 ft. (15.2 m);
RS-485 (Link) side: 2000 ft. (609.6 m) to farthest
Pow-R-Switch 1S (SWI031) module
User Controls — Keyboard commands;
(2) Rear mounted: (1) Rotary dial for addressing and
(1) 4-position DIP switch for data rate, toggle delay,
and default outlet state
Indicators — (3) Front-mounted LEDs: AC ON, LINK, and RDY
(ready)
1. Specifications
Page 8

6
POW-R-SWITCHES 1M, 1S
Connectors — All rear-mounted:
Data:
All models: (2) RJ-11 female (for RS-485);
Pow-R-Switch 1M (SWI030) units only: (1) DB9
male (for RS-232);
AC Power:
120-VAC models (SWI030A, SWI031A) only:
Input: (1) North American standard NEMA
5-15P plug (on power cord);
Output: (1) North American standard NEMA
5-15R outlet;
230-VAC models (SWI030AE, SWI031AE) only:
Input: (1) International standard IEC 320 male
inlet;
Output: (1) International standard IEC 320
female outlet
Leads/Signals
Supported — 1, 2, 3, 4, 5, and 7 (RLSD [DCD], TD, RD, DTR,
SGND, and RTS respectively); see Appendix A
Power — 120-VAC models (SWI030A, SWI031A):
Input and Output: 120 VAC, 60 Hz, up to
10 amps;
Consumption (Standby, No Load): 0.5 amps;
230-VAC models (SWI030AE, SWI031AE):
Input and Output: 230 VAC , 50 Hz, up to
5 amps
Consumption (Standby, No Load): 0.25 amps
Temperature
Tolerance — 32 to 122˚F (0 to 50˚C)
Humidity
Tolerance — 20 to 80% noncondensing
Enclosure — Steel
Page 9

7
CHAPTER 1: Specifications
Size — 1.7"H x 5.5"W x 5"D (4.2 x 14 x 12.7 cm)
Weight — 2 lb. (0.9 kg)
1.2 Specs for Rack Tray (SWI032)
Configuration — Holds three Pow-R-Switch modules side by side
Material — Steel
Size — With Pow-R-Switch modules installed:
1.75" (1U) H x 19"W x 5.5"D (4.4 x 48.3 x 14 cm)
Weight — 15 lb. (6.8 kg)
Page 10

8
POW-R-SWITCHES 1M, 1S
2.1 General Overview
Network devices sometimes lock up, so that communicating with them is
impossible. On command, a Pow-R-Switch 1M can switch AC power at up
to ten individual Pow-R-Switch 1S modules located throughout your facility.
This serves to boot, shut down, or reboot the devices plugged into the
Pow-R-Switches 1S.
Each addressable Pow-R-Switch 1S module can be switched ON, switched
OFF, or toggled OFF and then back ON. You can link individual modules
together across a total end-to-end RS-485 distance of up to 2,000 feet (609.6
m) using 4-wire RJ-11 cable. One Pow-R-Switch 1M module serves as the
control unit (address 0) while as many as nine Pow-R-Switches 1S (addresses 1
through 9) serve as satellites.
The Pow-R-Switch 1M’s RS-232 Control Port, which can be connected to a
modem, a PC, or one of our Port Manager Switches (product codes SW545A
and SW546A), accepts command strings of ASCII characters. Use these
command strings to operate the desired Pow-R-Switch 1S module, or send
a status command to cause the master unit to display the ON/OFF condition
of all modules on the link.
2.2 Features
•
Through the Pow-R-Switch 1M’s RS-232 Control Port (DB25 connector),
control your Pow-R-Switch system by modem or directly from a PC.
• Interlink and control up to ten Pow-R-Switches through their RS-485
Link Ports (RJ-11 connectors).
• Build a chain of Pow-R-Switches up to 2000 ft. (609.6 m) long.
• Switch up to 10 amps of AC power on each Pow-R-Switch (5 amps for
230V models).
• Send the units ON, OFF, or Toggle commands.
• Choose the data rate and reboot-cycle duration you want.
2. Introduction
Page 11

9
CHAPTER 2: Introduction
2.3 Applications
• Remote network management
• Rebooting data-communications equipment
• Taking equipment out of service
• PC-based control of AC power: You can switch any AC-powered device
ON or OFF using ASCII commands sent across modem links
2.4 The Pow-R-Switches 1M and 1S Illustrated
2.4.1 THEF
RONTPANELS
The front panels of the Pow-R-Switches 1M and 1S both look as illustrated
in Figure 2-1 below. They have three LED indicators, whose functions are
described beneath the picture.
Figure 2-1. The Pow-R-Switches’ front panel.
• AC ON: Lights when power to the Pow-R-Switch module’s switched AC
outlet is ON.
• LINK: Flashes when command data is received by the module.
• RDY: Lights to indicate that the Pow-R-Switch is receiving power and is
ready to receive commands. (Note that the RDY LED does not indicate
the ON/OFF condition of the Switch’s switched AC outlet.)
Pow-R-Switch 1M
Page 12

10
POW-R-SWITCHES 1M, 1S
2.4.2 THER
EARPANELS
The rear panels of the Pow-R-Switches (shown in Figures 2-2 and 2-3 below)
include a switched AC outlet, Link Ports for Pow-R-Switch interconnection,
and controls you can use to configure each Switch module.
Figure 2-2. The rear panel of the 120-VAC Pow-R Switches (SWI030A
and SWI031A).
Figure 2-3. The rear panel of the 230-VAC Pow-R Switches (SWI030AE
and SWI031AE).
SWITCHED AC LINK ADRS SETUP
210-240V AC
50HZ 5A MAX
5
A
M
P
1
2
3
4
5
6
7
8
9
0
SWITCHED AC LINK ADRS SETUP
120V AC 60HZ
10 AMPS MAX
10
A
M
P
1
2
3
4
5
6
7
8
9
0
➀
➁
➂ ➃
➆
➅
➄
➀
➁
➂ ➃
➆
➅
➄
Page 13

11
CHAPTER 2: Introduction
➀ Power-Input Plug: On SWI030A and SWI031A models, this is a
NEMA 5-15P plug (on the end of a power cord) that you can plug
into a
working 120-VAC outlet. On SWI030AE and SWI031AE models,
this is an
IEC 320 male inlet to which you can attach a country-specific power cord
for plugging into a working 230-VAC outlet.
➁ Circuit Breaker: A 10-amp circuit breaker on 120V models, a 5-amp
circuit breaker on 230V models. If the Pow-R-Switch is overloaded, this
breaker will blow; you will have to reduce the load on the Switch and
reset the breaker by pushing it until it clicks.
➂ Switched AC Outlet: On SWI030A and SWI031A models, this is a
NEMA 5-15R socket into which you can plug a 115-VAC device that you
want to switch. On SWI030AE and SWI031AE models, this is an IEC 320
female outlet into which you can plug a 230-VAC device that you want to
switch. The maximum load that can be attached to this outlet is 10 amps.
➃ RS-232 Control Port (Pow-R-Switch 1M only): A male DB9 connector
from which you can run cable to your modem or local control device.
(On the Pow-R-Switch 1S, there is only a blank panel here.)
➄ Setup Switch: A 4-position DIP switch with which you can set the data
rate, toggle delay, and other features as described in Section 3.2.
➅ Address-Selection Switch: A rotary dial switch with which you can select
the address for each Pow-R-Switch module.
➆ Link Ports: Two RJ-11 jacks that are used to interconnect Pow-R-Switch
modules. Switching commands and status reports are relayed through
the Link Ports.
Page 14

12
POW-R-SWITCHES 1M, 1S
Installing the Pow-R-Switch 1M and 1S is simple. Briefly, the installation
procedure consists of the steps listed below. For more information, please
refer to the section identified in each step.
1. Set the address for each module as described in Section 3.1.
2. Set the configuration DIP switch as described in Section 3.2.
3. Use RJ-11 cables to link the Pow-R-Switch modules as described in
Section 3.3.
4. Connect your modem or local PC or terminal to the control port on
the rear panel of the Pow-R-Switch 1M as described in Section 3.4.
5. Connect each device you want to switch to an AC outlet on a Pow-RSwitch 1M or 1S, and connect each Switch to an AC power source, as
described in Section 3.5.
6. Test the Switch as described in Section 3.6.
3.1 Selecting the Address
Use the rotary dial on the rear panel of each Pow-R-Switch 1M or 1S module
(refer to Figure 2-3 on page 12) to set that module’s address. Make certain
that the module is powered OFF (its power cord is unplugged), then turn
the dial to select the desired address for the module.
NOTES
The address for the Pow-R-Switch 1M (Master) module must always be
set to “0” (zero).
The address for each Pow-R-Switch 1S (Satellite) module must
always be set to a number from 1 to 9.
Each module in the link must be assigned its own unique address. Do
not assign duplicate addresses.
You don’t have to set the addresses of your Pow-R-Switch 1S
modules
in consecutive numerical order (the one attached to the Pow-RSwitch 1M as address 1, the next one as address 2, etc.). You can assign
any of the nine satellite addresses to any Pow-R-Switch 1S.
3. Installation
Page 15

13
CHAPTER 3: Installation
If you need to change the address setting of a Pow-R-Switch 1M or 1S after
installing the Switch, unplug the Switch module from the AC power source,
then turn the dial to select the new address, then plug the Switch back in.
The Switch will not recognize a new address setting until you power it OFF
and back ON again.
3.2 Setting the Configuration Switch
Now set the Pow-R-Switch 1M’s or 1S’s SETUP DIP switch according to the
requirements of your application:
Switch Function Up Down
Position
1 Data Rate 2400 bps 9600 bps
2 Toggle Delay 10 sec 5 sec.
3 Power-Up Default ON Last setting
4 (Reserved)
• Position 1 (Data Rate): Used to set the data rate (communication speed)
for ASCII transmissions between the Pow-R-Switch 1M and the PC or
other control device, as well as between the Pow-R-Switch 1M and each
Pow-R-Switch 1S module.
NOTE
The data rate set for each Pow-R-Switch 1S must match that set for the
Pow-R-Switch 1M.
• Position 2 (Toggle Delay): Used to set the length of time the Switch
will keep power OFF when a you send it a toggle command.
• Position 3 (Power-Up Default): Used to define how each switched
AC outlet will react after an interruption in AC power to the Switch.
When position 3 is set to Up, the Switch will always supply power at
the outlet (the outlet will “turn ON” or “go live”) when power is restored
to the Switch module.
Page 16

14
POW-R-SWITCHES 1M, 1S
When position 3 is set to Down, the outlet will return to the state that it
was in prior to the power interruption. For example, if the outlet was OFF
before the power interruption, the outlet will still be OFF after power is
restored.
• Position 4: Reserved for future use.
NOTE
If you need to change DIP-switch settings later, it is not necessary
to power the module OFF in order for the new settings to take effect.
3.3 Linking the Modules
After you set addresses and set all of the modules’ SETUP switches, you can
install the link cabling. Run straight-through-pinned twisted-pair or flat-
satin
cables between the Switches’ Link Ports to interlink the Pow-R-Switch 1M
and
the Pow-R-Switches 1S as shown in Figure 3-1 below. (This system follows
the EIA RS-485 specification for multipoint connections.)
Figure 3-1. Cabling layout for a Pow-R-Switch 1M/1S system.
Pow-R-
Switch 1M
(Address 0)
AC Power
Cord
Switched Device
(Up to 10 Amps)
Up to 7
other
Pow-R-
Switch 1S
Modules
(Addr’s 3
through 9)
Modem
or PC
Modular Link
Cable
Link Ports
Control
Port
Pow-R-
Switch 1S
(Address 1)
Pow-R-
Switch 1S
(Address 2)
Page 17

15
CHAPTER 3: Installation
NOTES
The total length of cabling between the first Switch module in the
link and the last Switch in the link must not exceed 2,000 feet (609.6 m).
Each Switch has two interchangeable Link Ports. One port should be
connected to the previous Switch in line and the other should be
connected to the next Switch (it doesn’t matter which port is connected
to which Switch).
Run straight-through-pinned twisted-pair or flat-satin cable with
RJ-11 connectors between Link Ports to interconnect the Switches. Do
not use cross-pinned cable for this purpose.
3.4 Making the Control-Port Connection (Pow-R-Switch 1M Only)
The RS-232 Control Port, located on the rear panel of the Pow-R-Switch 1M,
is shown in Figure 3-2 below. It is a DB9 male connector wired in a DTE
configuration, similar to the serial port on an IBM®AT®computer. We offer
modular adapter kits that you can put together, attach to the Switch’s
Control
Port and to the control device, and run twisted-pair or flat-satin cable
between.
Please refer to Section A.2 in Appendix A for more information.
Figure 3-3. Schematic for the Pow-R-Switch 1M’s Control Port.
1
2
3
4
5
6
7
8
9
DB9
DCD
RXD
TXD
DTR
GND
RTS + 10 VDC
READY
CARRIER
DATA IN
DATA OUT
Page 18

16
POW-R-SWITCHES 1M, 1S
3.5 Making the Power Connections
The next step is to plug in all power cords and power up the system.
1. Plug the AC-powered device that you want to switch into the AC outlet
on the rear panel of the Pow-R-Switch 1M or 1S. Repeat this step for
every device/Switch pair in your system.
NOTE
The total load on each Switch must not exceed 10 amps.
2. 230-VAC versions of the Pow-R-Switches 1M and 1S (product codes SWI030AE
and SWI031AE) only: Plug the outlet ends of country-specific power cords
(not included) into the Switches’ IEC 320 male inlets.
3. Plug the Switches’ power cords into a working AC outlet.
4. Make certain that any power switches on any of the devices you’ll be
switching are set to the “ON” position. All of the devices you’ll be
switching should now be powered up and operating.
3.6 Testing for Proper Installation
Lastly, you should perform the following test to make certain the Pow-RSwitch 1M and all of the Pow-R-Switches 1S are operating correctly.
1. Establish a connection with the Pow-R-Switch 1M.
a) If your PC or other control device will be communicating with the
Pow-R-Switch 1M across a modem link, make sure the modem directly
connected to the Pow-R-Switch 1M’s Control Port is set to the
same
data rate as the Switch (see Section 3.2).
The modem should also be
set to receive 8 data bits and no parity.
When both modems are ready to go, start your terminal-emulation
software and dial the number for the modem connected to the PowR-Switch 1M. After approximately eight seconds, the Pow-R-Switch 1M
should send the “PRS READY” message.
Page 19

17
CHAPTER 3: Installation
b) If the control device is connected directly to the Pow-R-Switch 1M’s Control
Port, start your terminal-emulation software. Make sure that the
terminal-emulation software is set to the same data rate as the Switch
(see Section 3.2). The software should also be set to receive
8 data bits and no parity.
2. Once the connection has been made, send a few SPACE characters to
the Switch. (If the control device is a PC, do this by tapping the spacebar
on its keyboard several times.) When the spacebar is pressed, the LINK
indicator on the Pow-R-Switch 1M and on each Pow-R-Switch 1S should
flash briefly. If the LINK LED on any linked Switch module in the system
does not flash, check the following:
a) Make certain that all of the Switches are plugged into a working AC
outlet.
b) Make certain that the cables you have run between the Switches are
pinned straight-through and are firmly seated in the Switches’ Link
Ports.
c) Make certain that the data-rate settings of the Pow-R-Switch 1M (see
Section 3.2), the device connected to its Control Port, and all of the
Pow-R-Switches 1S match.
d) Make certain that the same address has not been assigned to two or
more Switches. Each module must have its own unique address (see
Section 3.1).
Page 20

18
POW-R-SWITCHES 1M, 1S
After you have installed and tested your Pow-R-Switch system, it should be
ready for operation. (Note that the PC, modem, or other control device must
send ASCII characters at the same data rate as the Pow-R-Switches. Also, the
Pow-R-Switches can receive data with any type of parity, but will always transmit
data using 8 bits, no parity.)
The command character-string that you will use to control the Pow-R-Switch
consists of nine contiguous (not separated by spaces) ASCII characters. The
first six characters are ASCII control codes that constitute a “fixed password”
that restricts access to the Pow-R-Switch system. The seventh character is the
specific or wild-card address of the Switch(es) that will receive the command,
and the eighth character is the code for the operation (what you want the
Switch to do). The last character in the command string is an ASCII carriage
return (“^M”).
1. Establish a connection to the Pow-R-Switch 1M. If you are contacting it
across a modem link, the Pow-R-Switch 1M will wait for eight seconds
after the attached modem raises Carrier Detect, then respond with the
“PRS READY” message.
2. Send the ASCII command string for what you want the Pow-R-Switch
system to do. The command string must be in this format:
^B^X^X^B^X^Xac^M
Where:
^B^X^X^B^X^X is the Pow-R-Switch’s fixed password.
“^B” is an abbreviation for the [CTRL] [B]
character (the ASCII control code [STX]
that you can generate by pressing the
[CTRL] and [B] keys simultaneously).
“^X” is an abbreviation for the [CTRL] [X]
character (the ASCII control code [CAN]
that you can generate by pressing the
[CTRL] and [X] keys simultaneously).
4. Operation
Page 21

19
CHAPTER 4: Operation
a is the address of the Switch(es) that you are
sending the command to:
If you enter a number from 0 to 9 for the a
value, only the specific Switch that you have
selected will receive the command.
If you enter “*” (an asterisk) for the a
value, all of the Switches will receive the
command.
c is the operation code:
If you enter “0” (zero) for the c value, the
Pow-R-Switch(es) that receive the command
will turn OFF power to their AC outlets.
If you enter “1” (one) for the c value, the
Pow-R-Switch(es) that receive the command
will turn ON power to their AC outlets.
If you enter “T” for the c value, the Pow-R-
Switch(es) that receive the command will
toggle power (turn power OFF, wait a few
seconds, then turn it back ON) to their AC
outlets. This command is case-sensitive—you
must enter an uppercase “T,” not a
lowercase “t.”
If you enter “?” for the c value, the Pow-R-
Switch(es) that receive the command will
return ASCII character strings indicating the
status of their AC outlets.
^M is an abbreviation for the [CTRL] [M]
character (the ASCII carriage return, [CR]),
which you can generate by pressing the
[ENTER] or [RETURN] key.
Page 22

20
POW-R-SWITCHES 1M, 1S
Examples:
• To toggle the switched AC outlet on the Pow-R-Switch 1S at address 3,
send the command ^B^X^X^B^X^X3T^M.
• To display the status of all linked Pow-R-Switch modules, send the
command ^B^X^X^B^X^X*?^M.
NOTE
The Pow-R-Switch 1M will not accept additional commands until it has
finished executing the current command.
Page 23

21
CHAPTER 5: Troubleshooting
5.1 Calling BLACK BOX
If you determine that your Pow-R-Switch is malfunctioning, do not attempt
to alter or repair it. Contact Black Box Technical Support at 724-746-5500.
The problem might be solvable over the phone.
Before you do, make a record of the history of the problem. We will be
able to provide more efficient and accurate assistance if you have a complete
description, including:
• The nature and duration of the problem.
• When the problem occurs.
• The components involved in the problem.
• Any particular application that, when used, appears to create the problem
or make it worse.
5.2 Shipping and Packaging
If you need to transport or ship your Pow-R-Switch:
• Package it carefully. We recommend that you use the original container.
• Before you ship a unit for repair or return, contact Black Box to get a
Return Authorization (RA) number, and make sure you include
everything you received with the unit when you ship it.
5. Troubleshooting
Page 24
22
POW-R-SWITCHES 1M, 1S
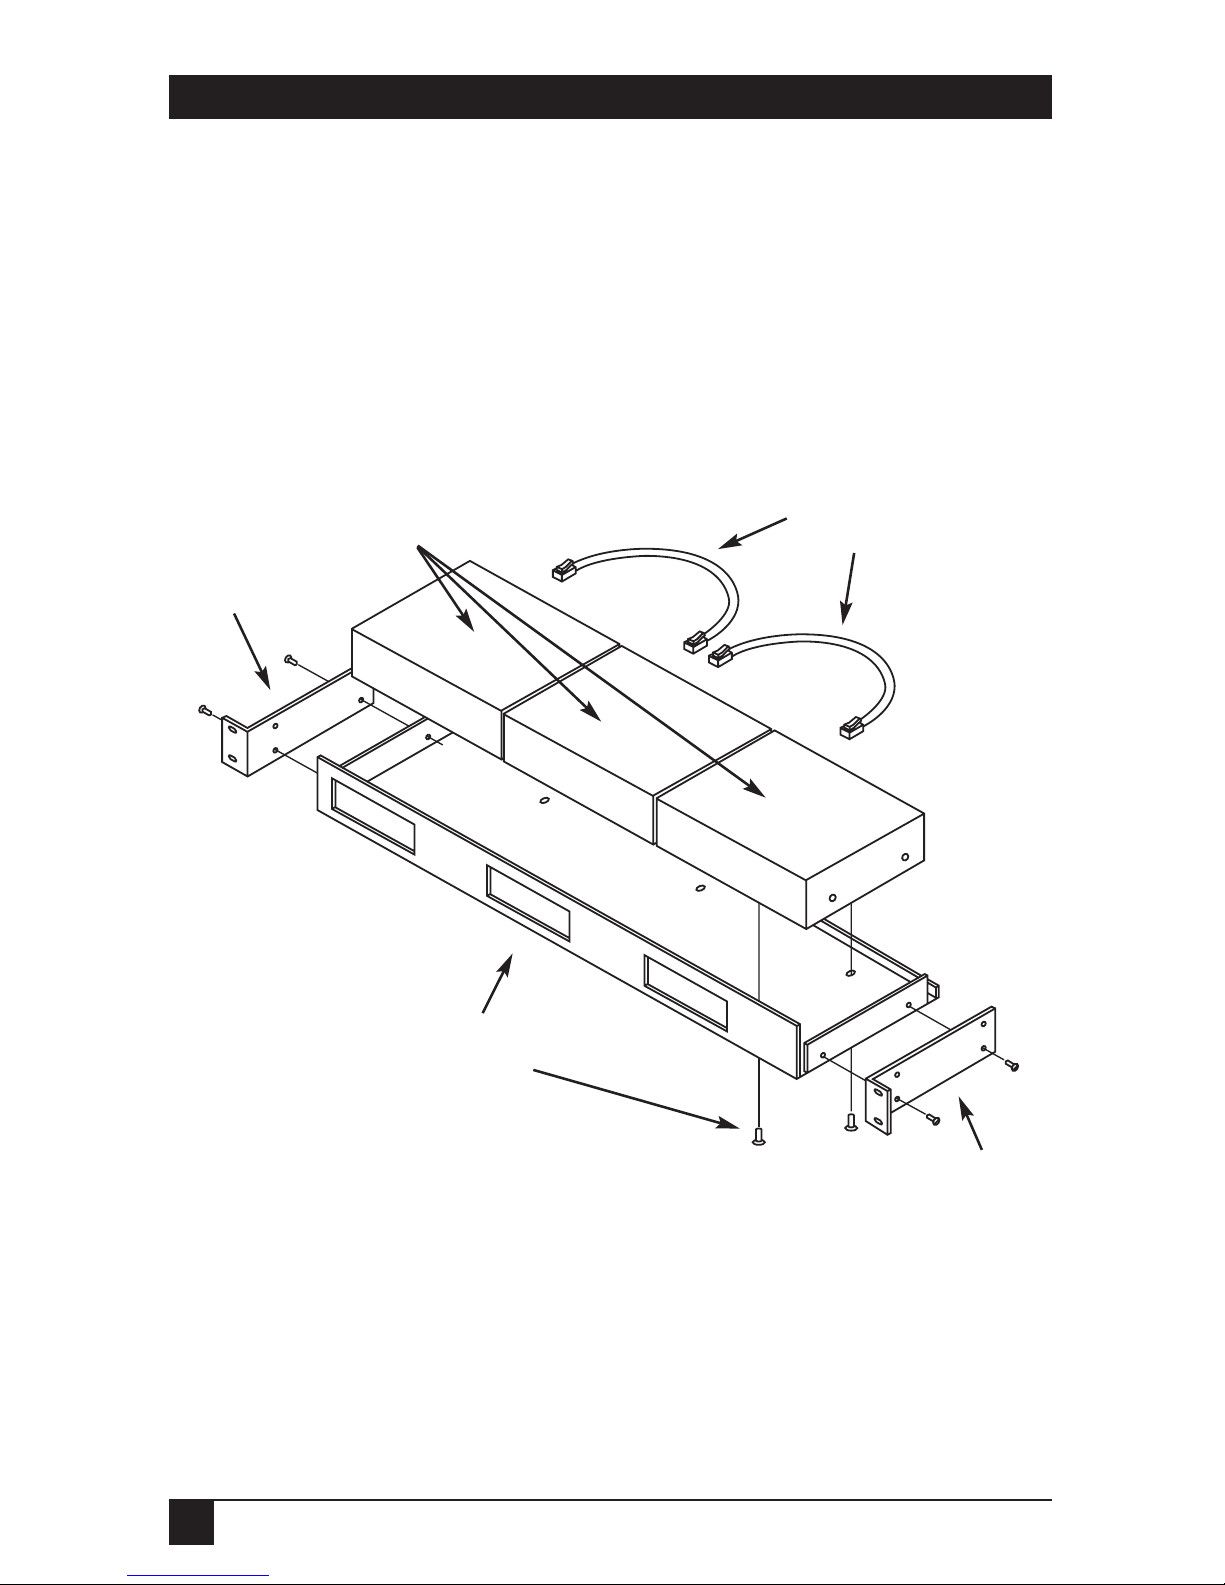
A.1 The Rack Tray (SWI032)
This optional accessory will hold three Pow-R-Switch modules, set side by side,
as shown in Figure A-1 below. The Rack Tray is designed to fit most standard
instrument racks.
Figure A-1. Installing Pow-R-Switches in the Rack Tray.
Appendix A: Accessories
Modular flat-satin or
twisted-pair cables
(not included)
Rack bracket
and 2 screws
(included)
Pow-R-Switch 1M
or 1S units
(not included)
Rack Tray
and 2 screws
for each Switch
(included)
Rack bracket
and 2 screws
(included)
Page 25
23
APPENDIX A: Accessories
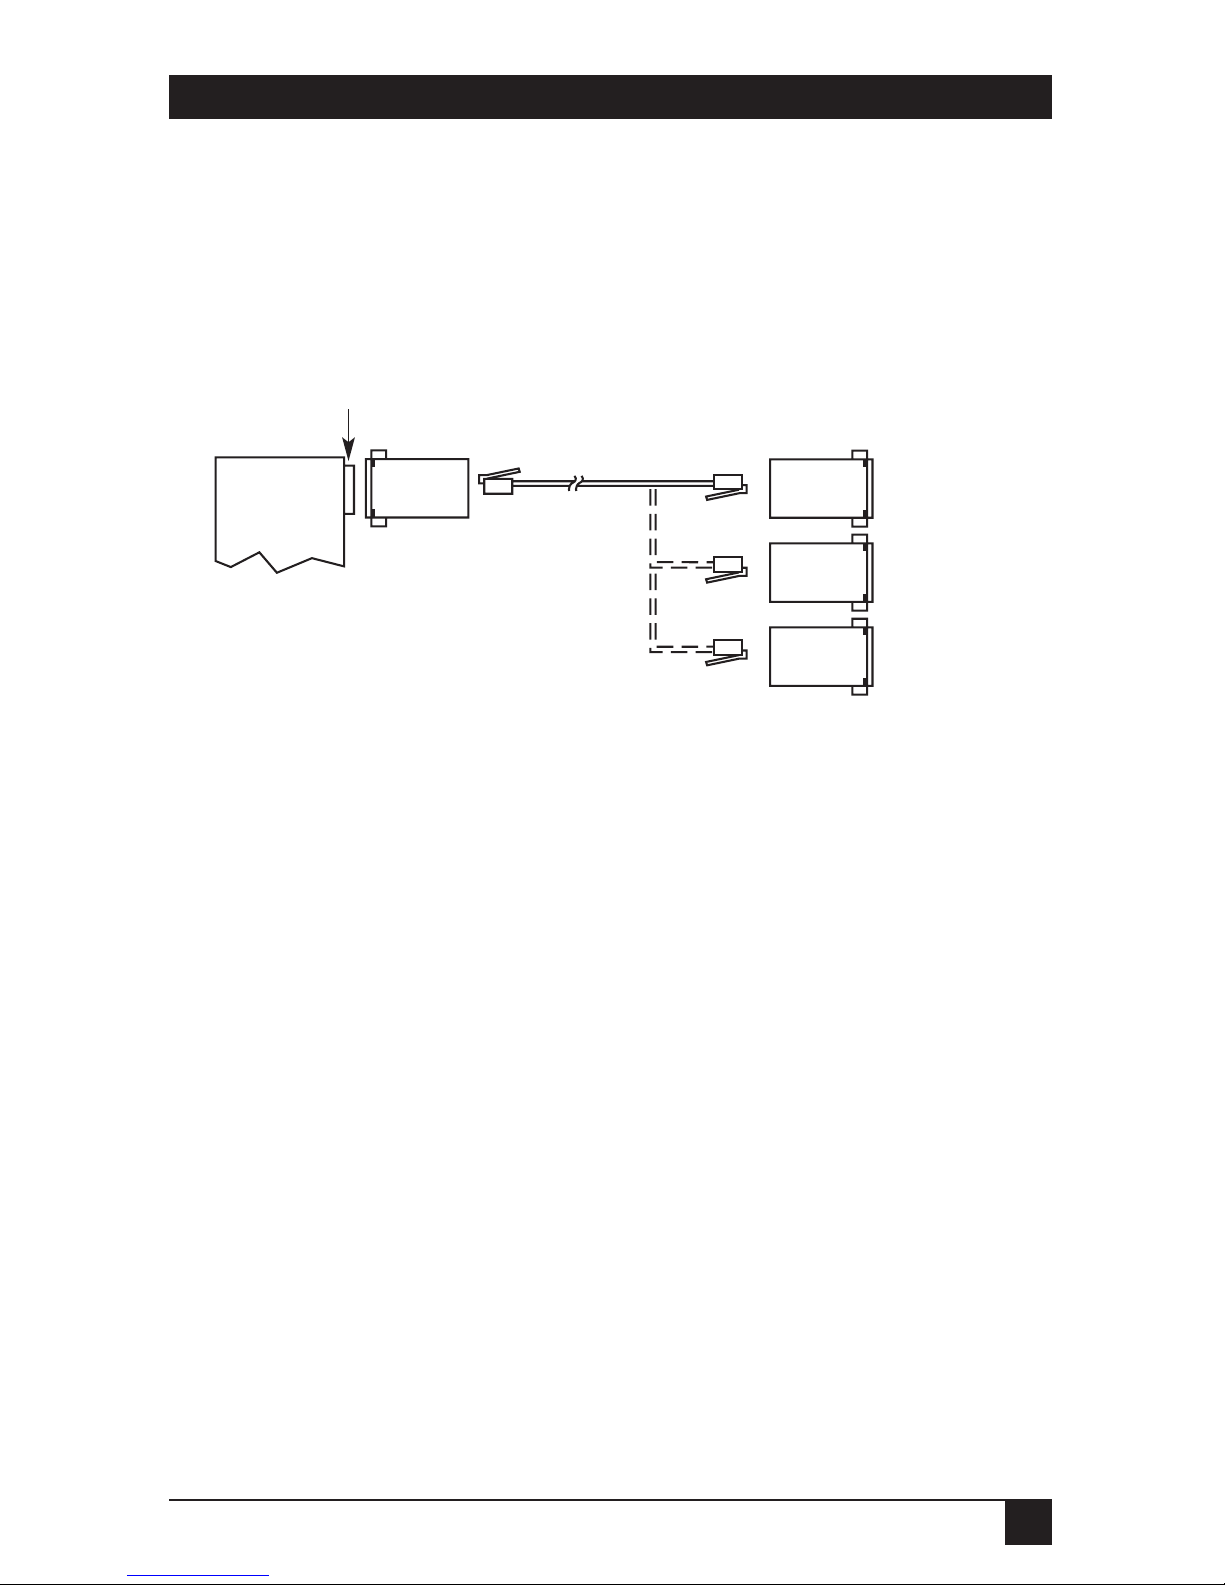
A.2 Modular Adapters
We offer a complete selection of modular adapter kits and cables designed
to simplify connecting the Pow-R-Switch 1M to your modem or PC. These
adapter kits and cables are shown in Figure A-2 below; the necessary pinouts
are described in Appendix B.
Figure A-2. Possible connections using modular adapters.
Pow-R-
Switch 1M
Control Port
(DB9 male)
Straight-Through-Pinned Six-Wire
RJ-11 Modular Flat-Satin (EL06MS) or
Twisted-Pair (EYN725MS) Cable
(150 ft. [45.7 m] maximum length)
To Modem
(DCE)
To Terminal or
IBM PC/XT
compatible PC
(DTE)
To IBM AT
compatible PC
(DTE)
DB9 male↔
RJ-45 female
(FA066)*
*We do not currently carry DB9↔RJ-11 adapter kits as a stock item. The RJ-45
connectors on the kits shown are 100% backward-compatible with RJ-11.
DB25 male↔
RJ-11 female
(FA024)
DB25 female↔
RJ-11 female
(FA026)
DB9 female↔
RJ-45 female
(FA065)*
Page 26

24
POW-R-SWITCHES 1M, 1S
End-to-End Pinning, Pow-R-Switch 1M Control Port to Modem
Pow-R-Switch Modem
(DB9 male) (DB25 female)
Signal Pin No. Pin No. Signal
Abbrev. Abbrev.
RLSD (DCD) 1 8 RLSD (DCD)
RD 2 3 TD
TD 3 2 RD
DTR 4 20 DTR
SGND 5 7 SGND
RTS 7 4 RTS
End-to-End Pinning, Pow-R-Switch 1M Control Port to
Serial Port of AT Compatible Computer
Pow-R-Switch Computer
(DB9 male) (DB9 male)
Signal Pin No. Pin No. Signal
Abbrev. Abbrev.
RLSD (DCD) 1 4 DTR
RD 2 3 TD
TD 3 2 RD
DTR 4 8 CTS
SGND 5 5 SGND
RTS 7 7 DSR
Appendix B: Pinouts
Page 27

25
APPENDIX B: Pinouts
End-to-End Pinning, Pow-R-Switch 1M Control Port to
Serial Port of Terminal or PC/XT™ Compatible Computer
Pow-R-Switch Terminal or Computer
(DB9 male) (DB25 male)
Signal Pin No. Pin No. Signal
Abbrev. Abbrev.
RLSD (DCD) 1 20 DTR
RD 2 2 TD
TD 3 3 RD
DTR 4 5 CTS
SGND 5 7 SGND
RTS 7 6 DSR
Page 28

NOTES
Page 29

NOTES
Page 30

NOTES
Page 31

Page 32

 Loading...