

Page 1
SETUP GUIDE: GOOGLE APPS FOR WORK (GSUITE)
RS-TOUCH SERIES
IN-SESSION
ROOM
SCHEDULER
24/7 TECHNICAL SUPPORT AT 1.877.877.2269 OR BLACKBOX.COM
Page 2

NEED HELP?
LEAV E TH E TEC H TO US
LIVE 24/7
TABLE OF CONTENTS
TECHNICAL
SUPPORT
1. 8 7 7. 8 7 7. 2 2 6 9
1. INTRODUCTION ........................................................................................................................................................................................ 3
1.1 Description ........................................................................................................................................................................................................... 3
1.2 Requirements ...................................................................................................................................................................................................... 3
1.3 Settings ................................................................................................................................................................................................................ 3
2. ACCOUNT SETTING ................................................................................................................................................................................. 4
2.1 Introduction .......................................................................................................................................................................................................... 4
2.2 Creating a Project ............................................................................................................................................................................................... 4
2.3 Setup of the Project Credentials in Your Domain ........................................................................................................................................... 12
2.4 Setup of Calendar Sharing ............................................................................................................................................................................... 14
2.5 Creating a User Account ................................................................................................................................................................................... 17
2.6 Creating Resource Calendars .......................................................................................................................................................................... 19
3. PANELS ................................................................................................................................................................................................... 26
3.1 First Panel Setting ............................................................................................................................................................................................. 26
3.2 Adding More Panels .......................................................................................................................................................................................... 30
2
Page 3

NEED HELP?
LEAV E TH E TEC H TO US
LIVE 24/7
CHAPTER 1: INTRODUCTION
TECHNICAL
SUPPORT
1. 8 7 7. 8 7 7. 2 2 6 9
1.1 DESCRIPTION
THIS DOCUMENT IS INTENDED FOR USERS OF GOOGLE APPS FOR WORK SUNSCRIPTION. IT DESCRIBES THE PROCESS OF SETTING UP
ACCOUNTS IN THE GOOGLE APPS FOR WORK AND SETTINGS OF IN-SESSION 7” AND 12” ROOM SCHEDULER PANELS WORKING
WITH THIS SUBSCRIPTION.
Before you start, read IN-SESSION 7” and 12” Room Scheduler - Setup Guide - Common Settings. There you will find basic information
on the IN-SESSION 7” and 12” Room Scheduler reservation system and a description of the common settings of the panels.
1.2 REQUIREMENTS
FOR PROPER OPER ATION OF THE IN-SESSION 7” AND 12” ROOM SCHEDULER RESERVATION SYSTEM, MAKE SURE YOU HAVE
THE FOLLOWING:
Google Apps for Work subscription (Google Apps Free edition, also known as Standard edition, is not supported)
User account: You need one user account for the IN-SESSION Room Scheduler reservation system. The reservation system
uses this user account to enable to IN-SESSION Room Scheduler panels to send various information emails.
1.3 S E T TIN GS
TO SE T THE IN-SESSION 7” AND 12” ROOM SCHEDU LER SYSTEM, YOU NEED TO:
1. Create a project, a service account and certificate, room calendar accounts, and a user account in Google admin web.
2. Configure the IN-SESSION 7” and 12” Room Scheduler panels.
3
Page 4
NEED HELP?
LEAV E TH E TEC H TO US
LIVE 24/7
CHAPTER 2: ACCOUNT SETTING
TECHNICAL
SUPPORT
1. 8 7 7. 8 7 7. 2 2 6 9
2.1 INTRODUCTION
SET THE FOLLOWING ACCOUNTS IN GOOGLE A PPS FOR WORK:
Project: This enables you to create API for communication with Google servers to read and write room calendar data.
Service account and certificate: Use this for secure communication with Google servers. A service account requires you to have
read-and-write access to the calendars of rooms accounts. The IN-SESSION Room Scheduler system uses the service account
to access the room calendars.
Room accounts: There is a calendar resource account for room scheduling in Google Apps for Work. The IN-SESSION Room Scheduler
system uses the calendar of this account for arranging meetings in the particular room.
User account: This is a typical user email. Use this account to send various emails from the IN-SESSION reservation system.
2.2 CREATING A PROJECT
TO CREATE ACCOUNTS, YOU NEED ADMINISTR ATOR ACCE SS TO GOOGLE APPS FOR WORK SETTINGS.
1. Go to https://console.developers.google.com/project and log in to your Google Apps for Work administrator account.
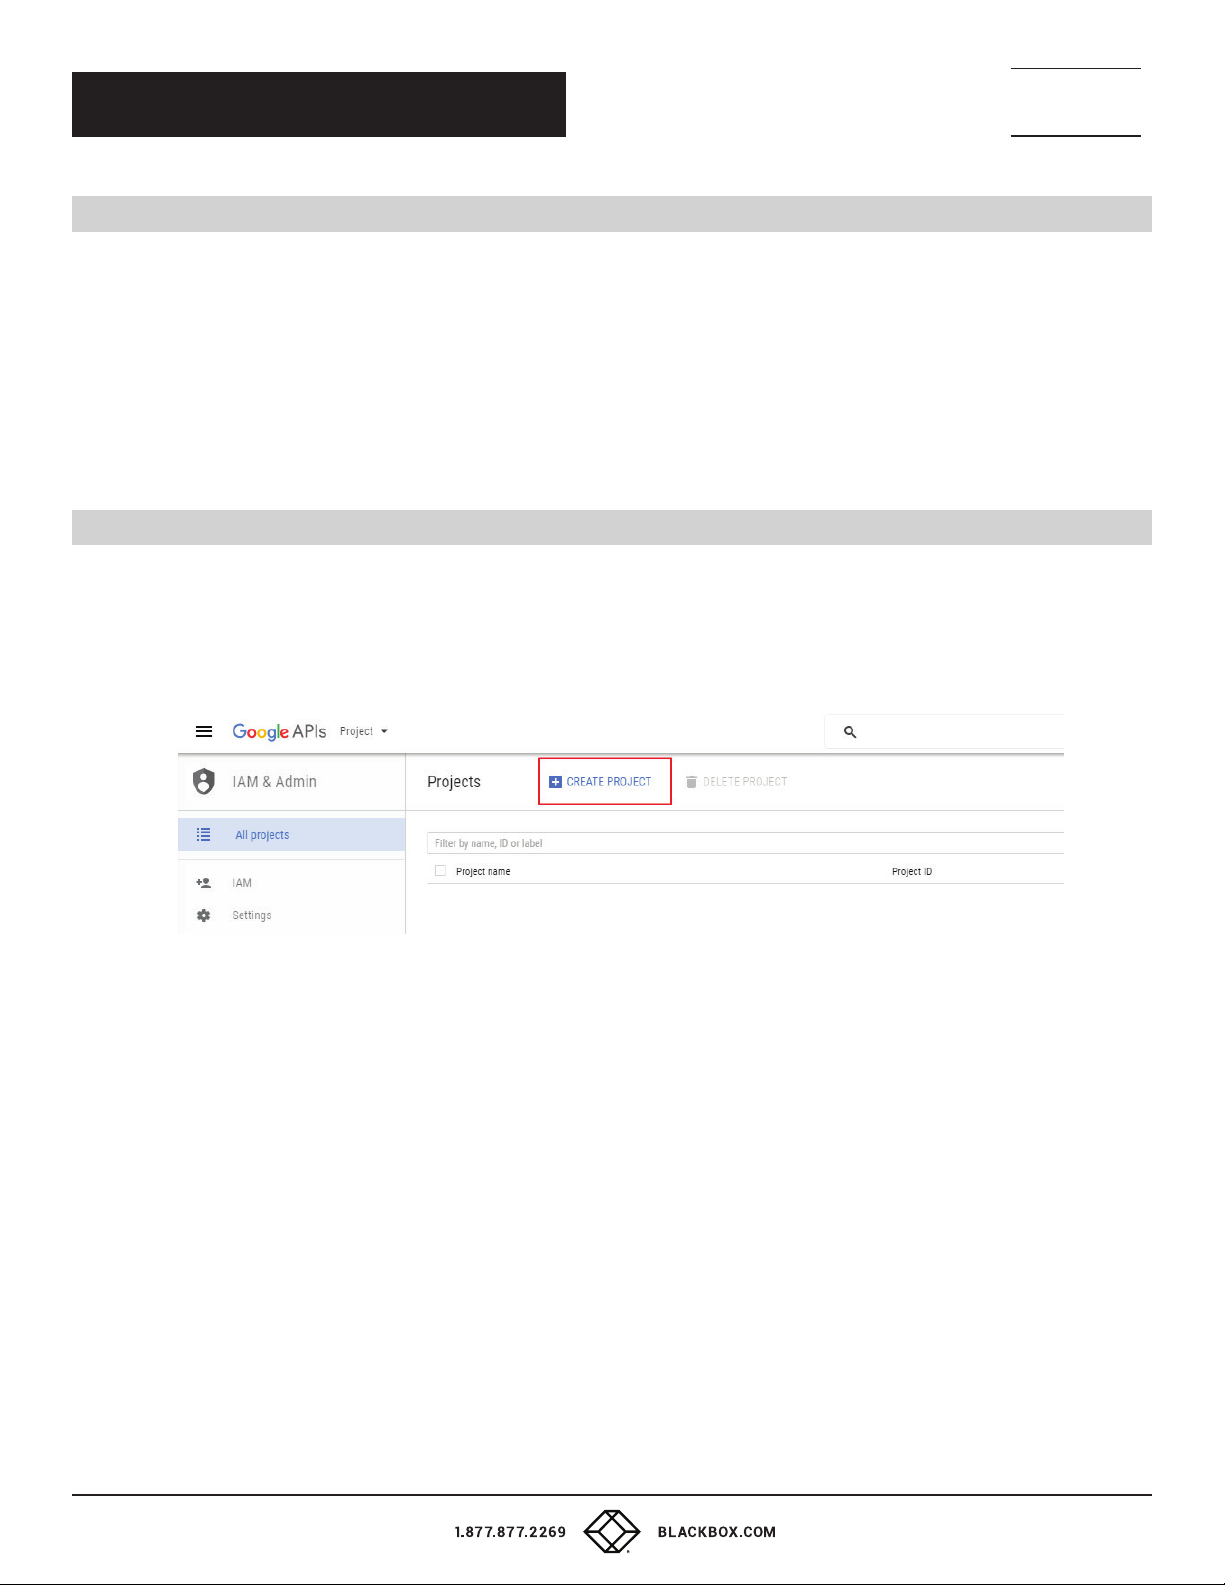
2. Tap on “CREATE PROJECT.”
FIGURE 2-1. CREATE PROJECT SCREEN
4
Page 5
NEED HELP?
LEAV E TH E TEC H TO US
LIVE 24/7
CHAPTER 2: ACCOUNT SETTING
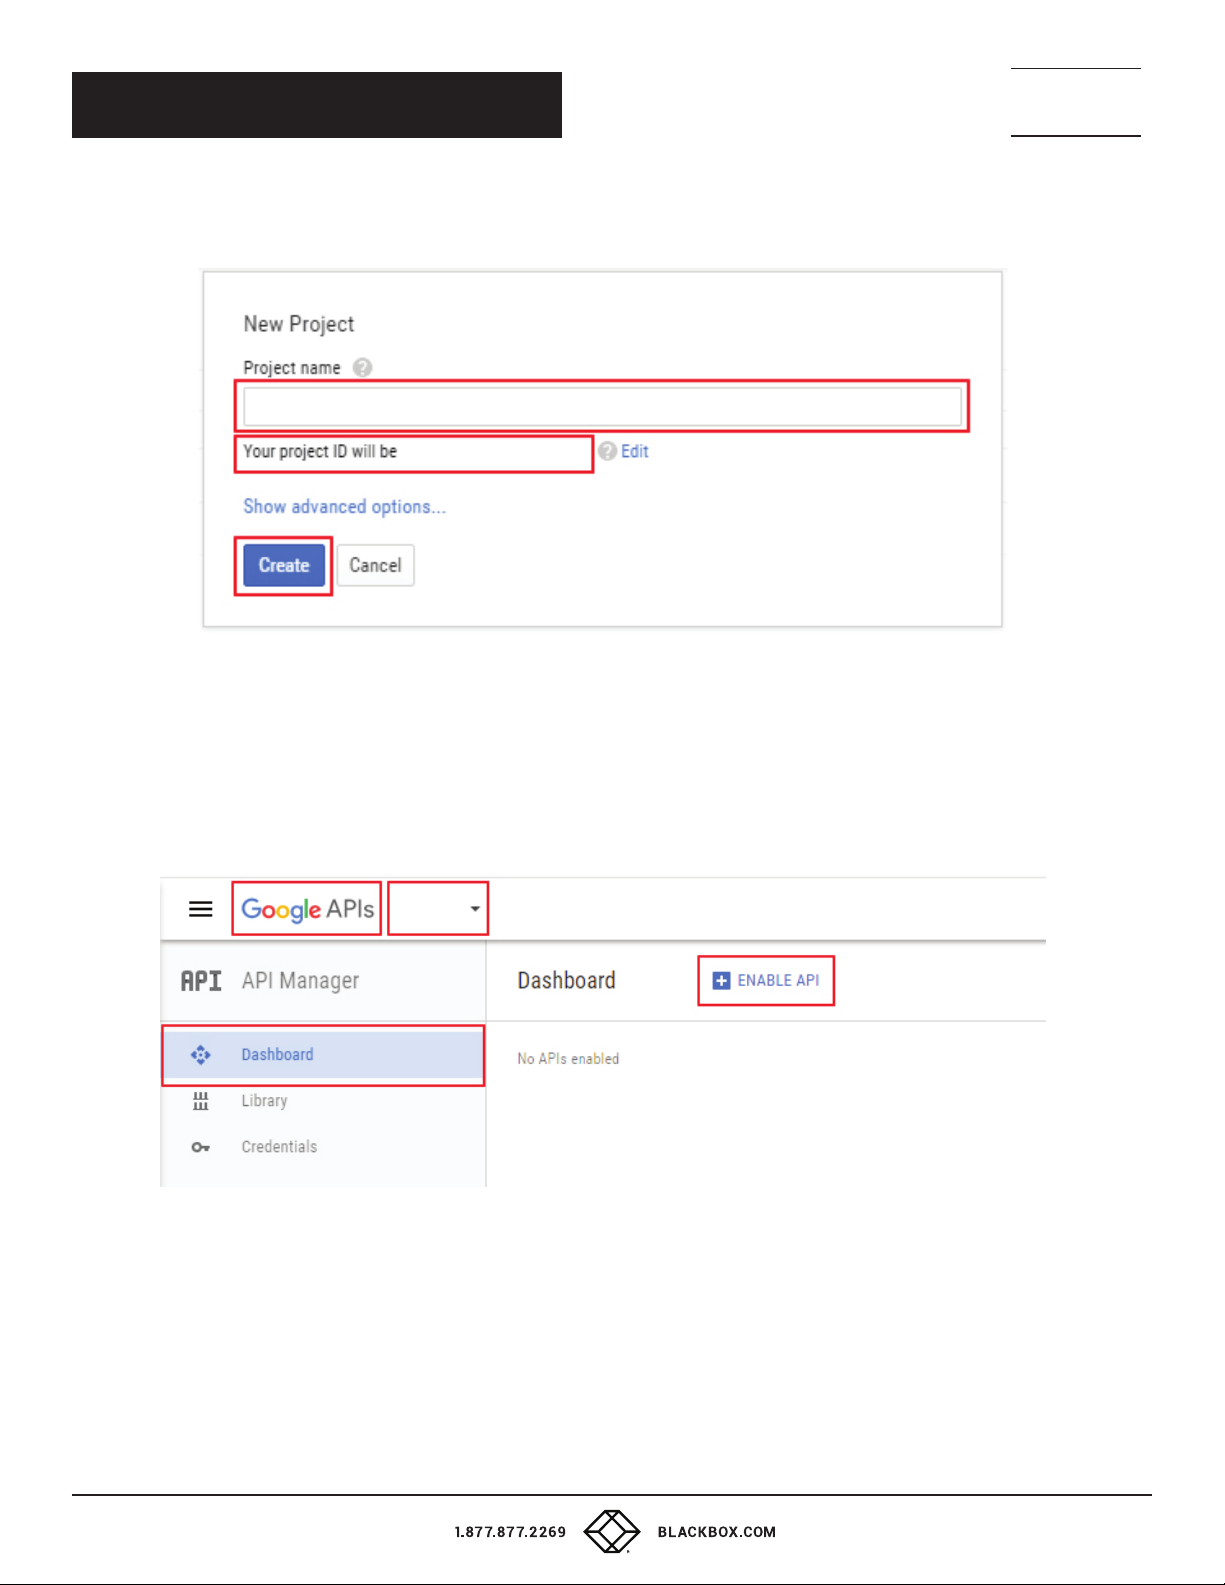
3. Choose the name of your project, for example, “IN-SESSION. Note the ID of your project, which is generated automatically.
Click on the “Create“ button.
TECHNICAL
SUPPORT
1. 8 7 7. 8 7 7. 2 2 6 9
FIGURE 2-2 NAME THE PROJECT SCREEN
4. Wait while your project is being created.
5. Check if the name of your project is selected in the left-top-corner drop-down list box. Tap “Google APIs.“ Click on “Dashboard“
in the left-side menu and tap “ENABLE API.”
FIGURE 2-3. SELECT DASHBOARD SCREEN
5
Page 6
CHAPTER 2: ACCOUNT SETTING
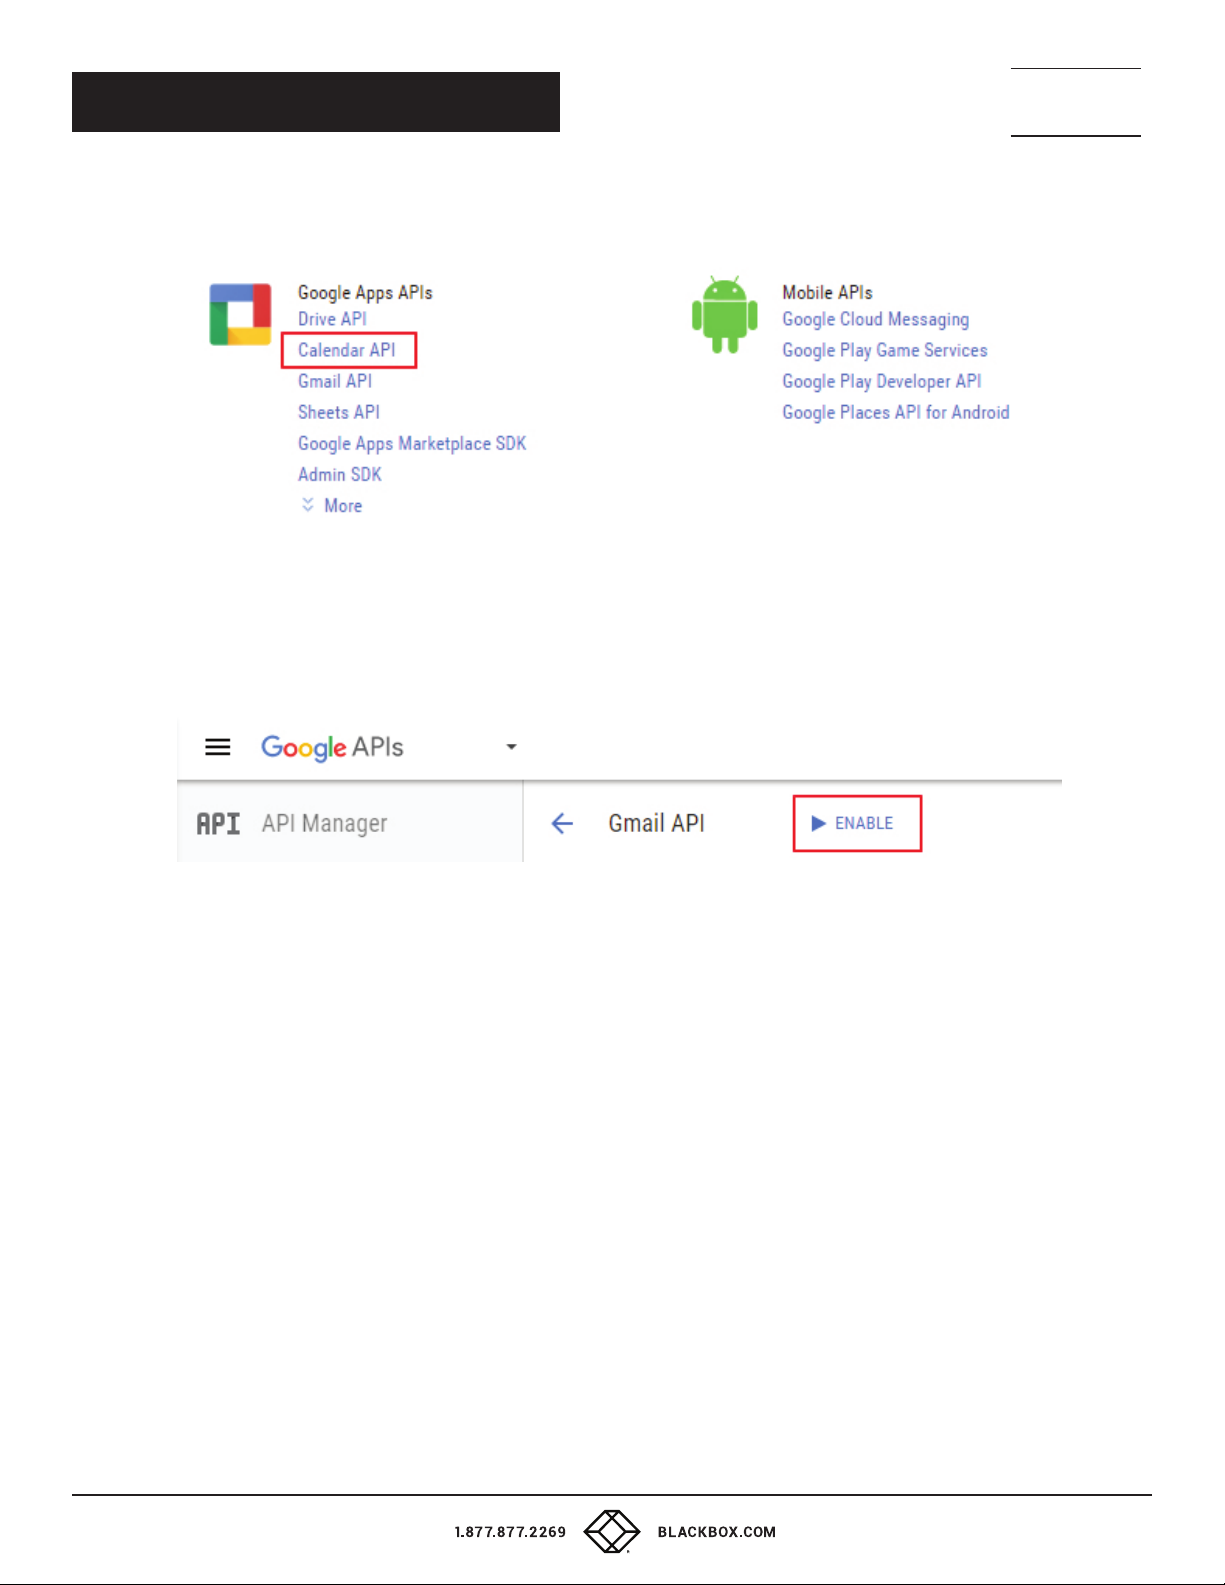
6. Click on “Calendar API“ in the “Google Apps APIs” list.
FIGURE 2-4. SELECT CALENDAR API
NEED HELP?
LEAV E TH E TEC H TO US
LIVE 24/7
TECHNICAL
SUPPORT
1. 8 7 7. 8 7 7. 2 2 6 9
7. Tap on “ENABLE.”
FIGURE 2-5. CLICK ON ENABLE
6
Page 7
CHAPTER 2: ACCOUNT SETTING
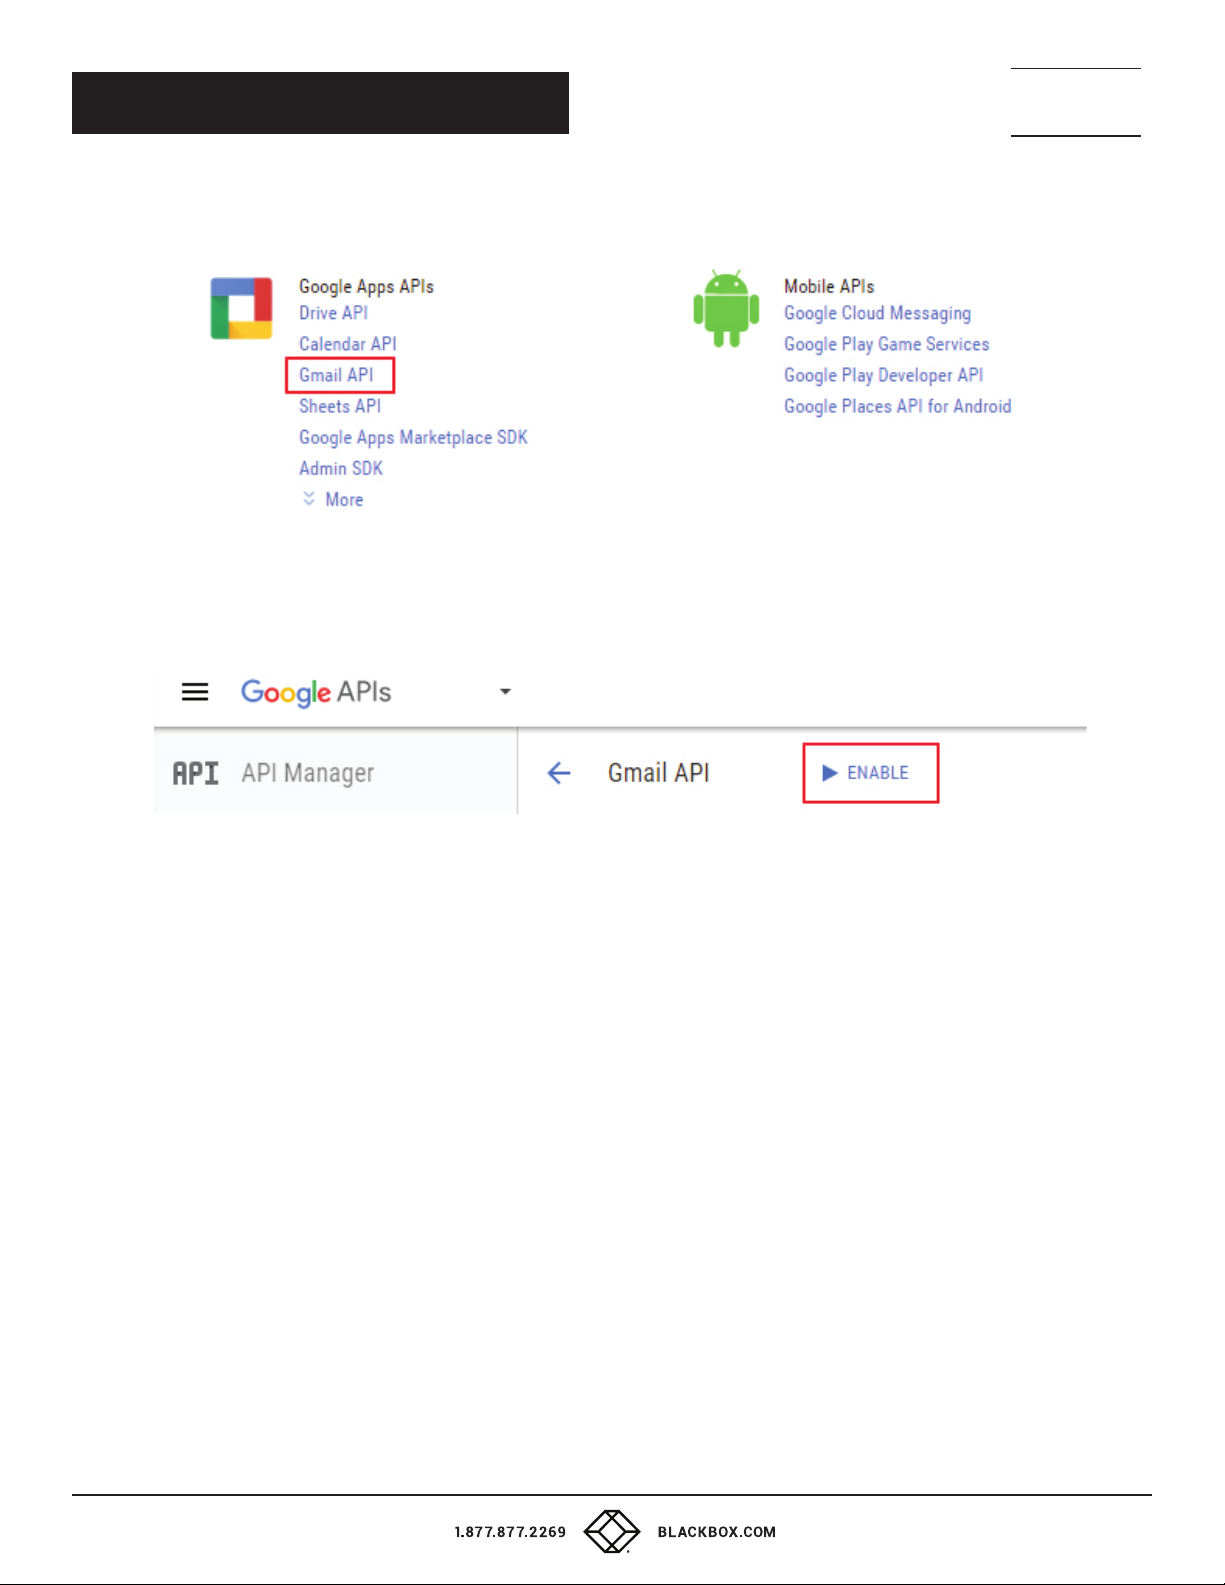
8. Go back to the “Google Apps APIs“ page and select “Gmail API.“
FIGURE 2-6. SELECT GMAIL API SCREEN
9. Tap on “ENABLE.“
NEED HELP?
LEAV E TH E TEC H TO US
LIVE 24/7
TECHNICAL
SUPPORT
1. 8 7 7. 8 7 7. 2 2 6 9
FIGURE 2-7. CLICK ON ENABLE
7
Page 8
CHAPTER 2: ACCOUNT SETTING
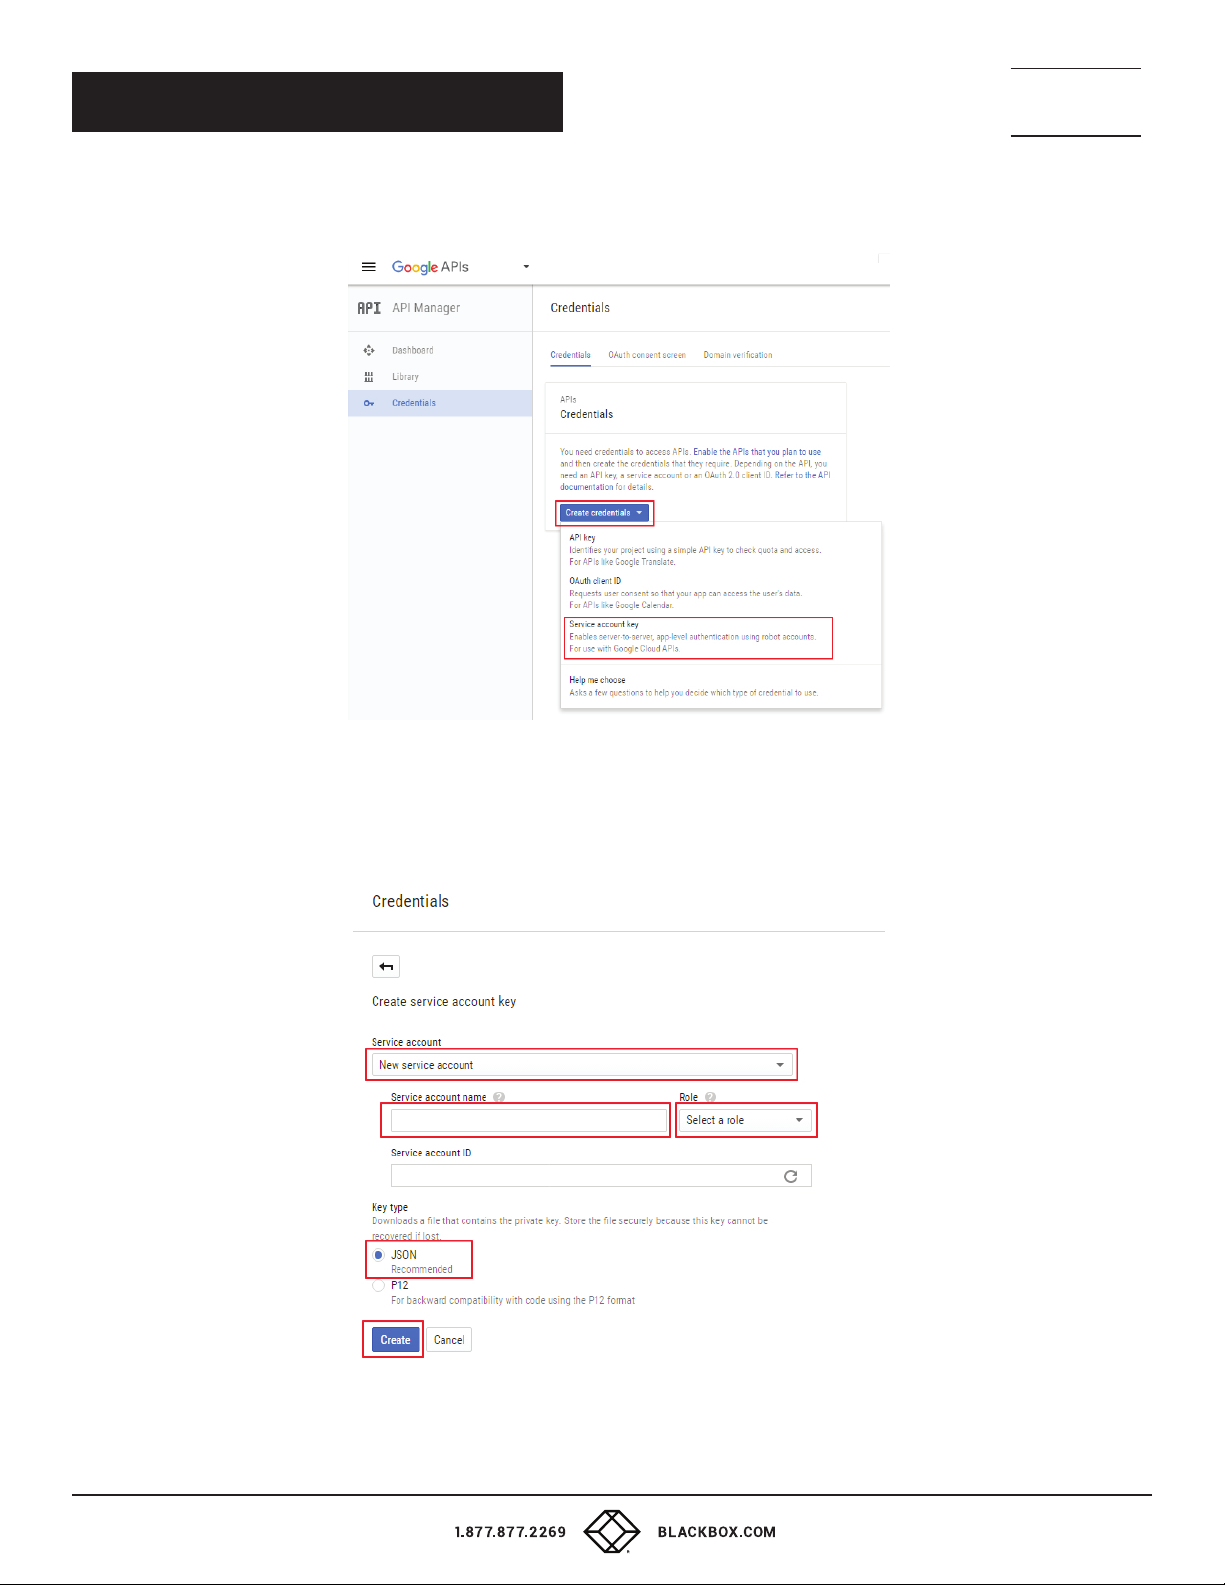
10. Select “Credentials” in the left-side menu and click on “Create credentials.“ Then select “Service account key.“
NEED HELP?
LEAV E TH E TEC H TO US
LIVE 24/7
TECHNICAL
SUPPORT
1. 8 7 7. 8 7 7. 2 2 6 9
FIGURE 2-7. CREATE CREDENTIALS SCREEN
11. In the item “Service accounts,“ select “New service account.“ Then select the name of your service account and enter it
into the “Service account name“ field. In the item “Role,“ select “Project / Service Account Actor.“ In the item “Key type,“ select “JSON.“
Then tap on “Create.“ Now the certificate file with credentials to access Google Apps for Work servers is created.
FIGURE 2-8. NE W SERVICE ACCOUNT SCREEN
8
Page 9
NEED HELP?
LEAV E TH E TEC H TO US
LIVE 24/7
CHAPTER 2: ACCOUNT SETTING
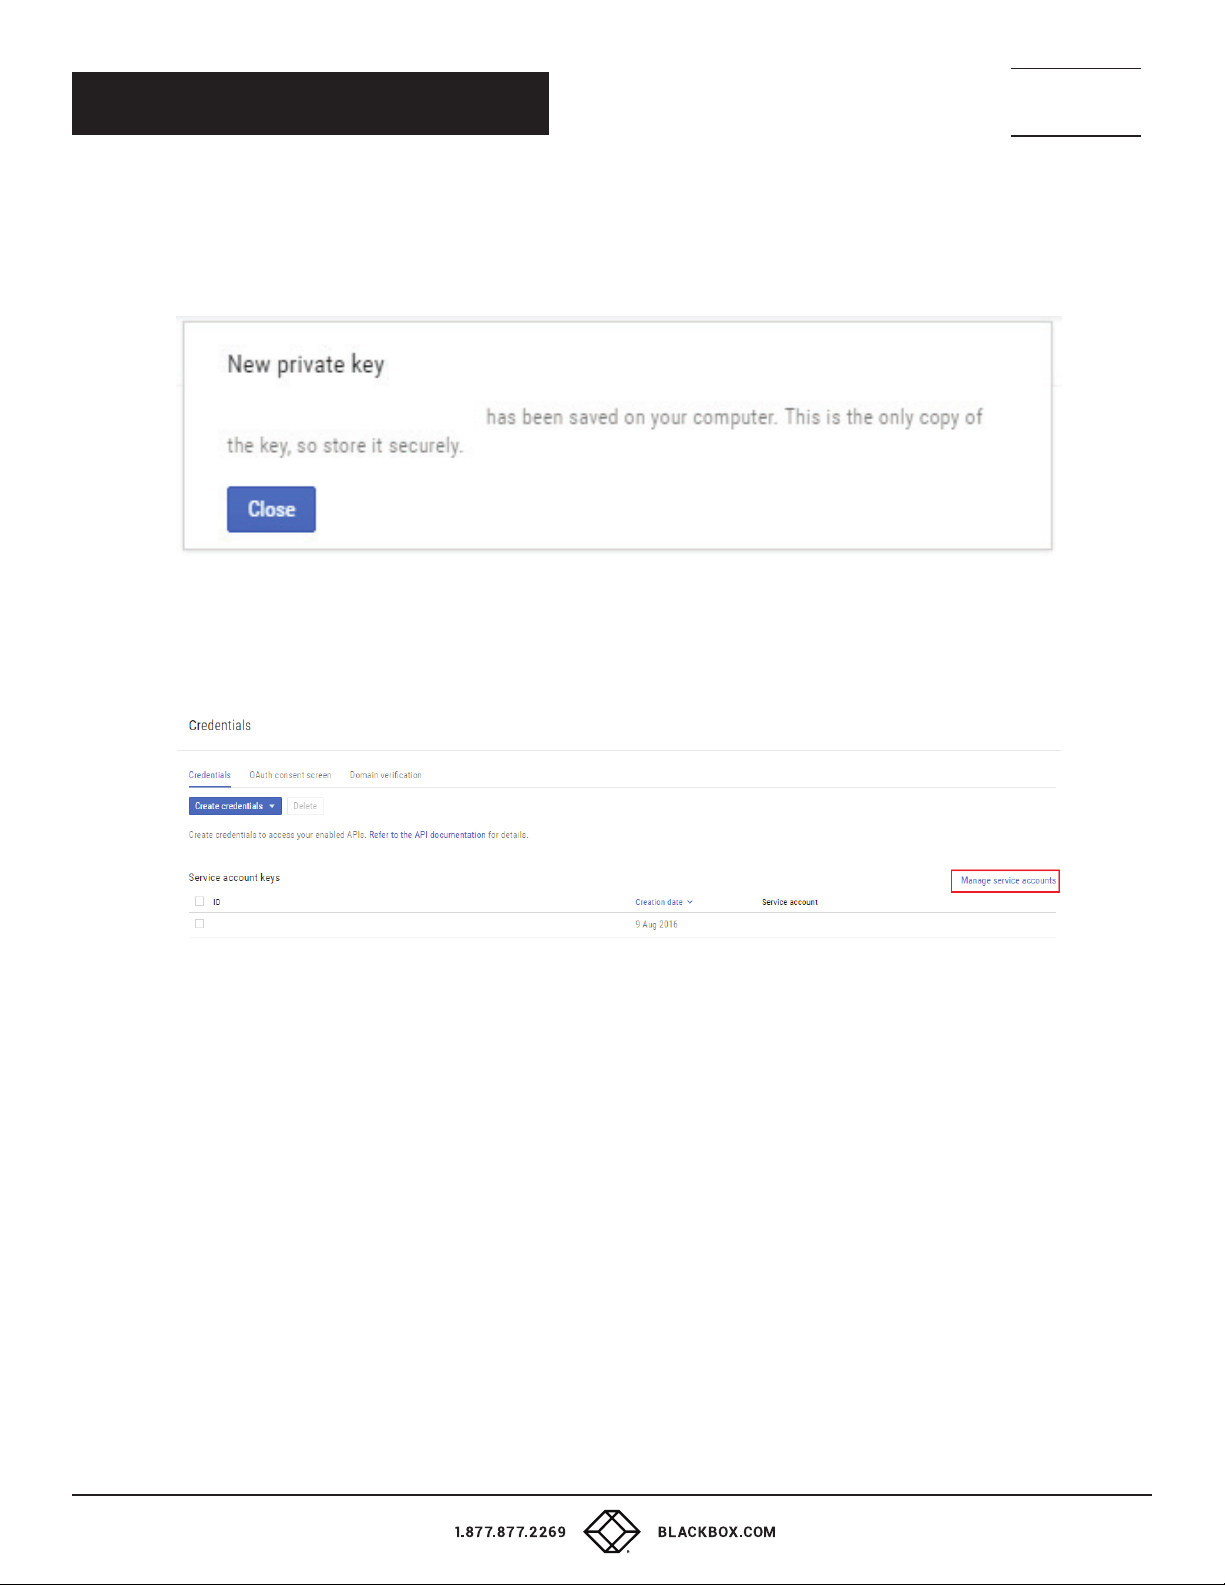
12. When the certificate file is created, it is automatically downloaded to your computer and saved in your “Downloads“ folder.
The format of the file name is “NameOfTheProject_***.json“. This file contains the private key for secure communications
with Google Apps for Work servers, so store it in a safe place. You will need it later for IN-SESSION Room Scheduler panels configuration.
You will see the following dialog box on the screen.
FIGURE 2-9. NEW PRIVATE KEY SCREEN
TECHNICAL
SUPPORT
1. 8 7 7. 8 7 7. 2 2 6 9
13. Now you need to set up the service account. Tap on “Manage service accounts.”
FIGURE 2-10. MANAGE SERVICE ACCOUNTS SCREEN
9
Page 10
NEED HELP?
LEAV E TH E TEC H TO US
LIVE 24/7
CHAPTER 2: ACCOUNT SETTING
TECHNICAL
SUPPORT
1. 8 7 7. 8 7 7. 2 2 6 9
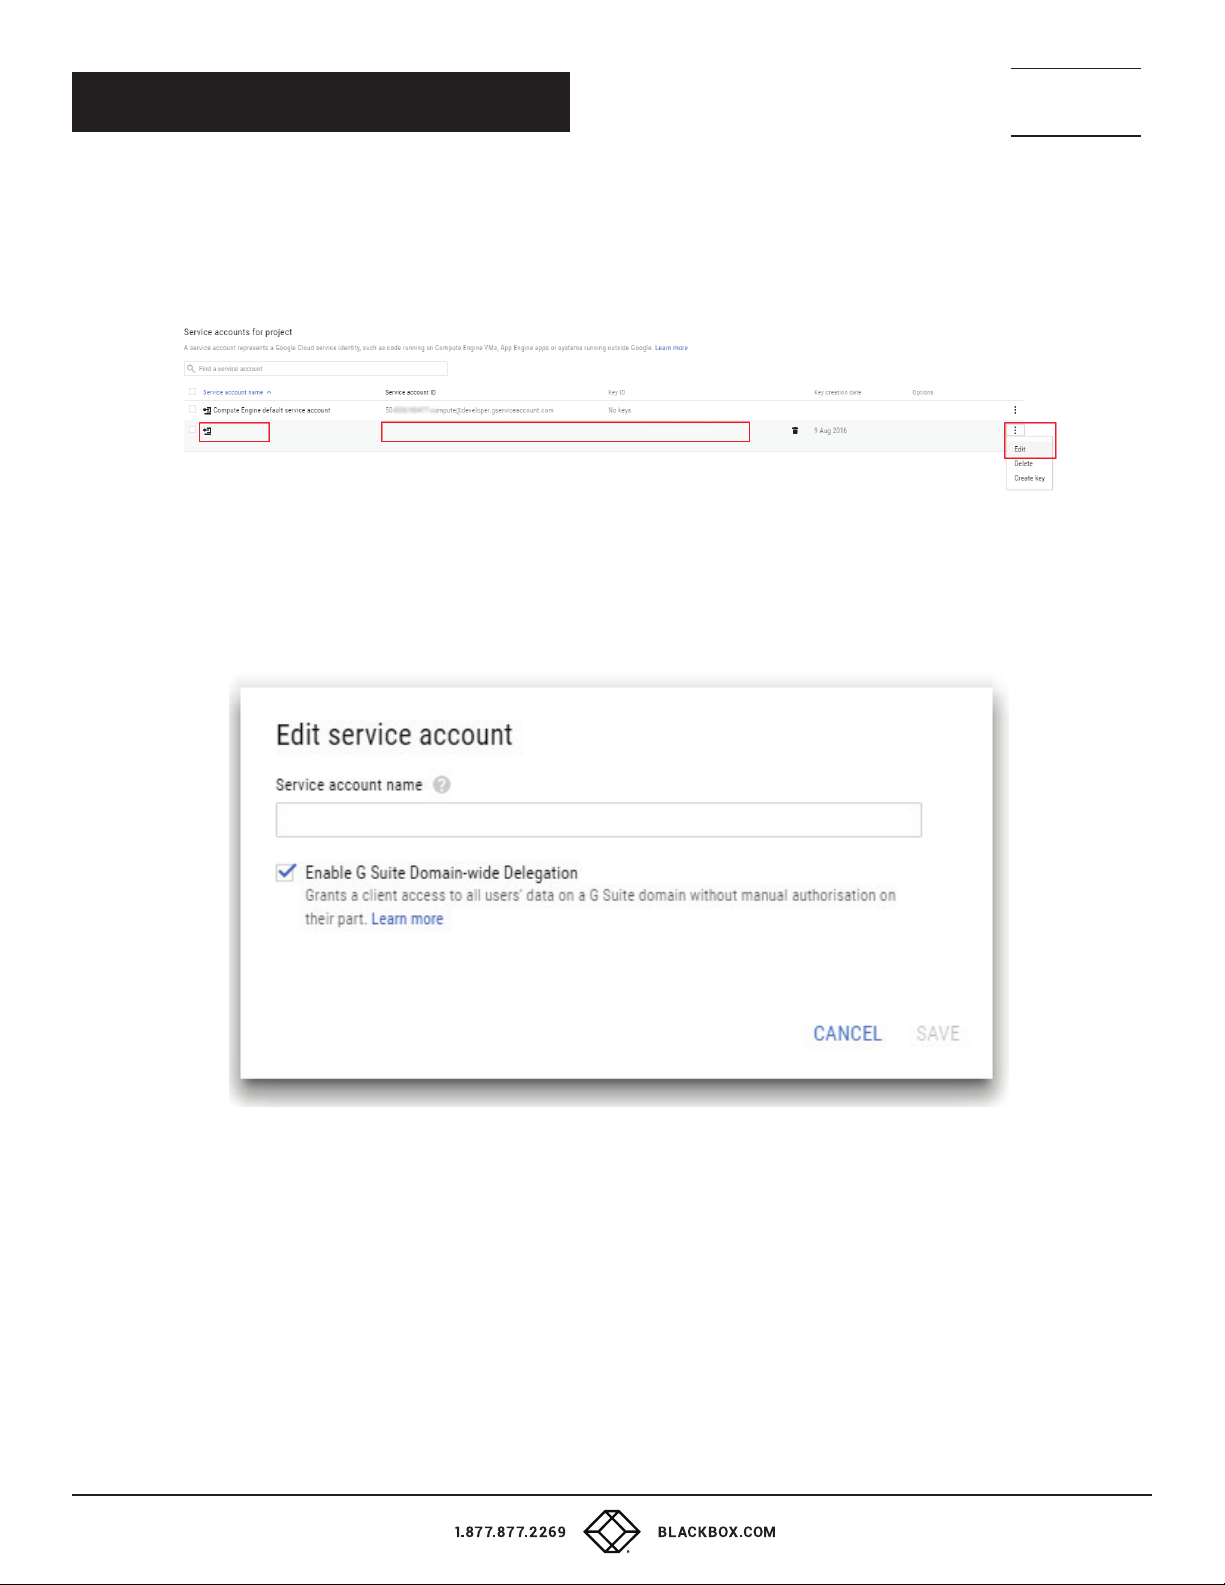
14. Click on the “Options / Edit“ in the line with your service account. Note the email address of the service account; you will need it later.
If you need to manage the certificates (delete, create new one etc.) later, you can do it in this page.
FIGURE 2-11. OPTIONS/EDIT SCREEN
15. Check “Enable Google Apps Domain-wide Delegation“ and confirm it by tapping “Save.“
FIGURE 2-12. EDIT SERVICE ACCOUNT SCREEN
10
Page 11
NEED HELP?
LEAV E TH E TEC H TO US
LIVE 24/7
CHAPTER 2: ACCOUNT SETTING
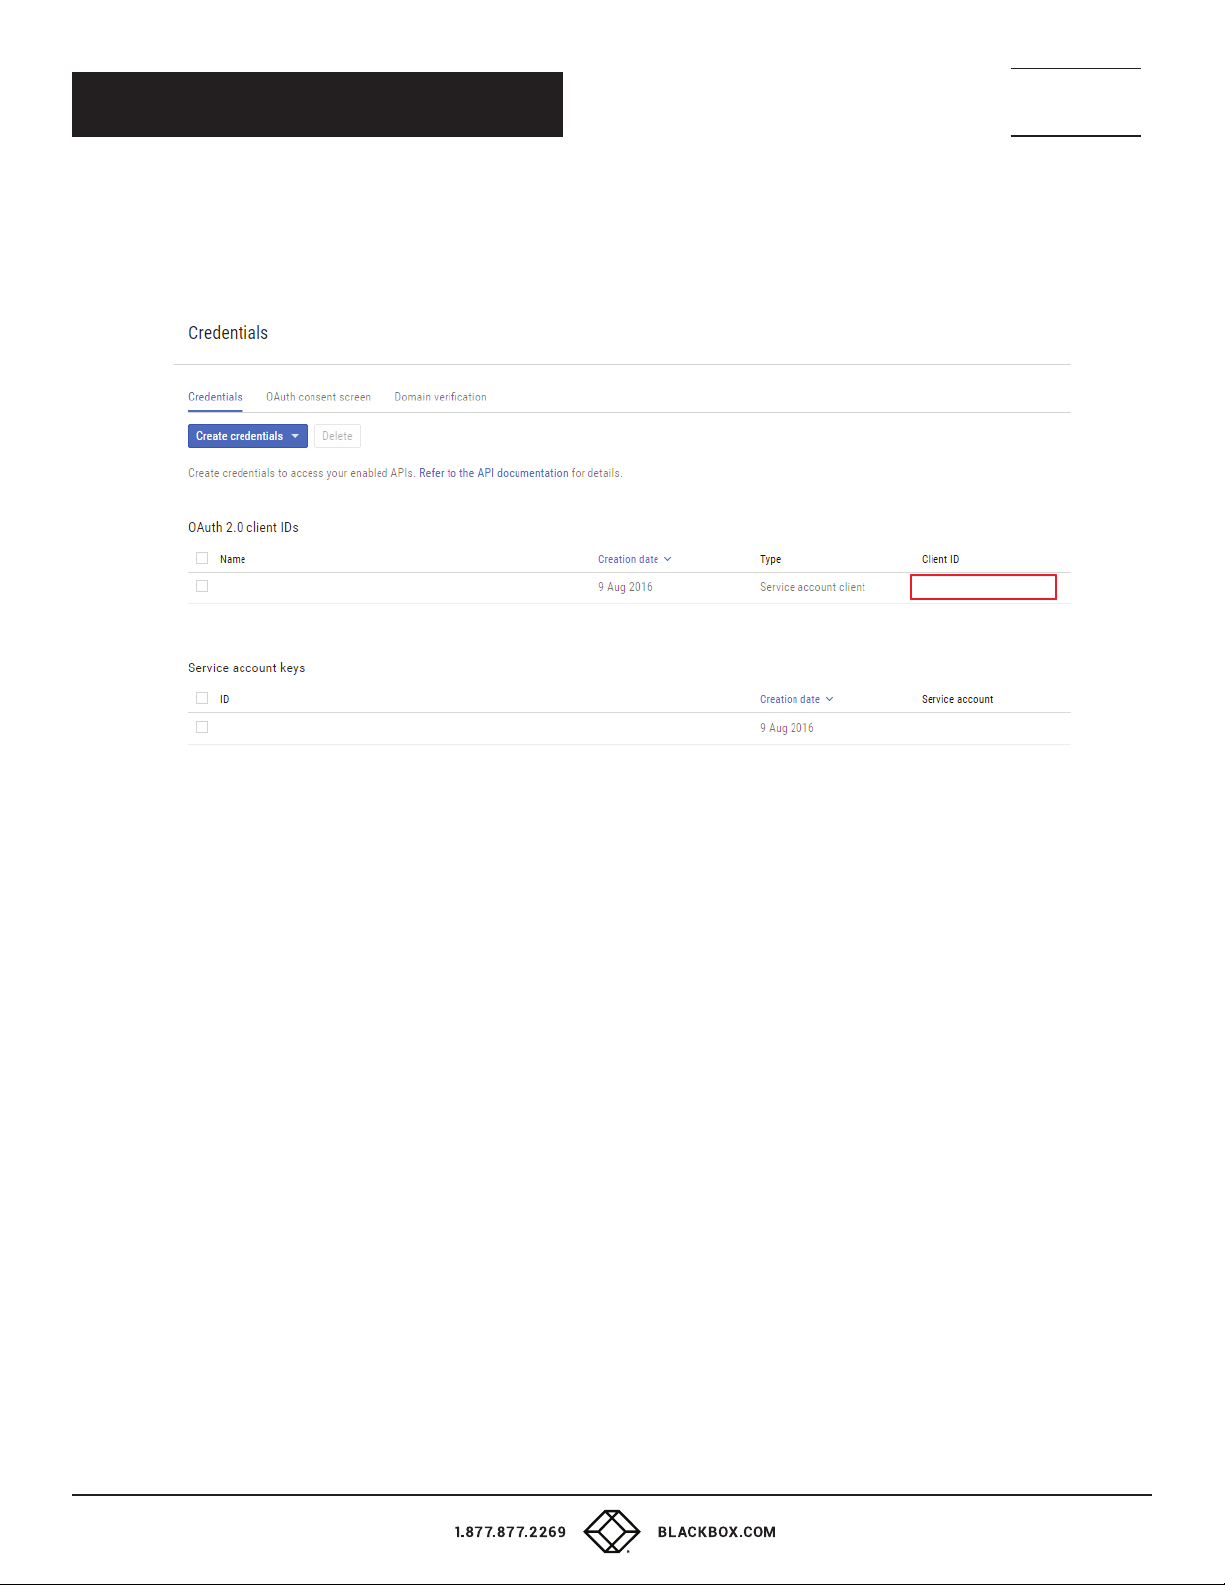
16. Now a new item appears in the “Credentials” list: “OAuth 2.0 client IDs“. Note the “Client ID“ in the line “Client for YourServiceAccount“;
you will need it later.
TECHNICAL
SUPPORT
1. 8 7 7. 8 7 7. 2 2 6 9
FIGURE 2-13. CREDENTIALS LIST
11
Page 12
CHAPTER 2: ACCOUNT SETTING
2.3 SETTING UP THE PROJECT CREDENTIALS IN YOUR DOMAIN
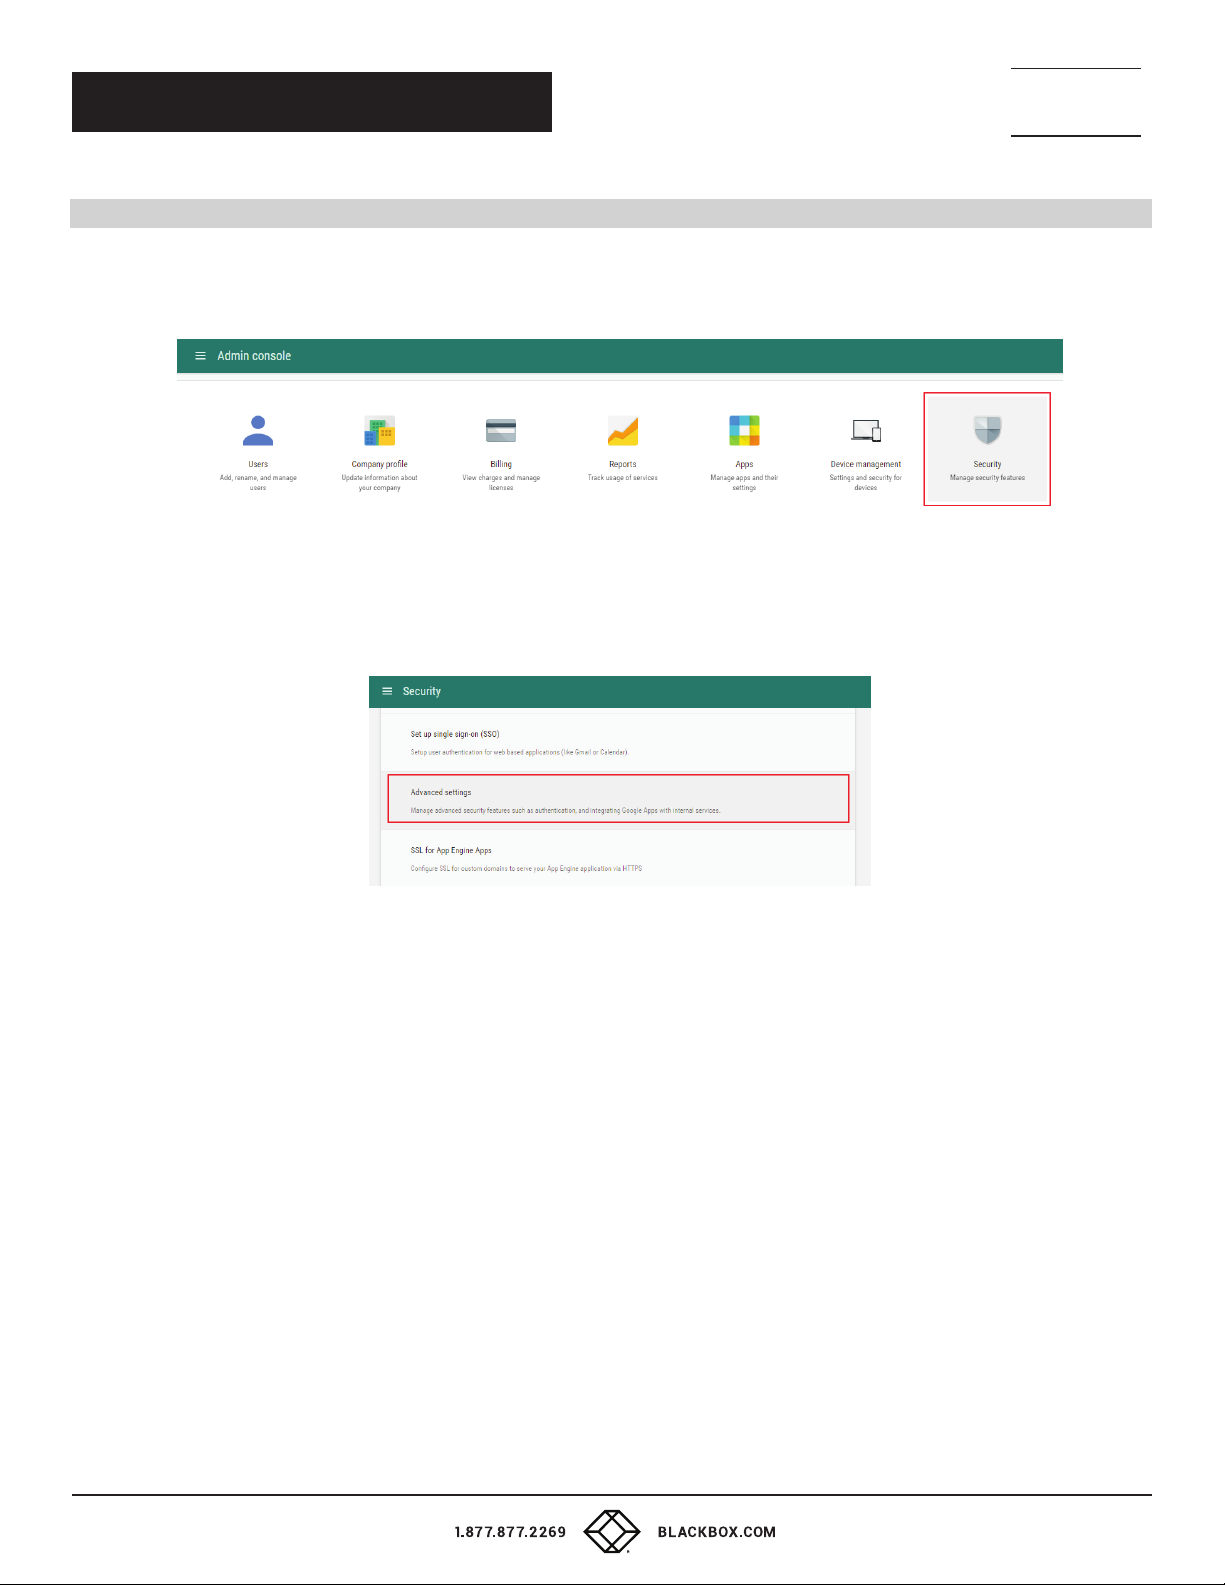
1. Go to https://admin.google.com and log in to your Google Apps for Work administrator account. Then select “Security.
FIGURE 2-14. SECURITY SCREEN
2. Now select “Show more“ and “Advanced settings.“
NEED HELP?
LEAV E TH E TEC H TO US
LIVE 24/7
TECHNICAL
SUPPORT
1. 8 7 7. 8 7 7. 2 2 6 9
FIGURE 2-15. ADVANCED SE TTINGS SCREEN
12
Page 13
CHAPTER 2: ACCOUNT SETTING
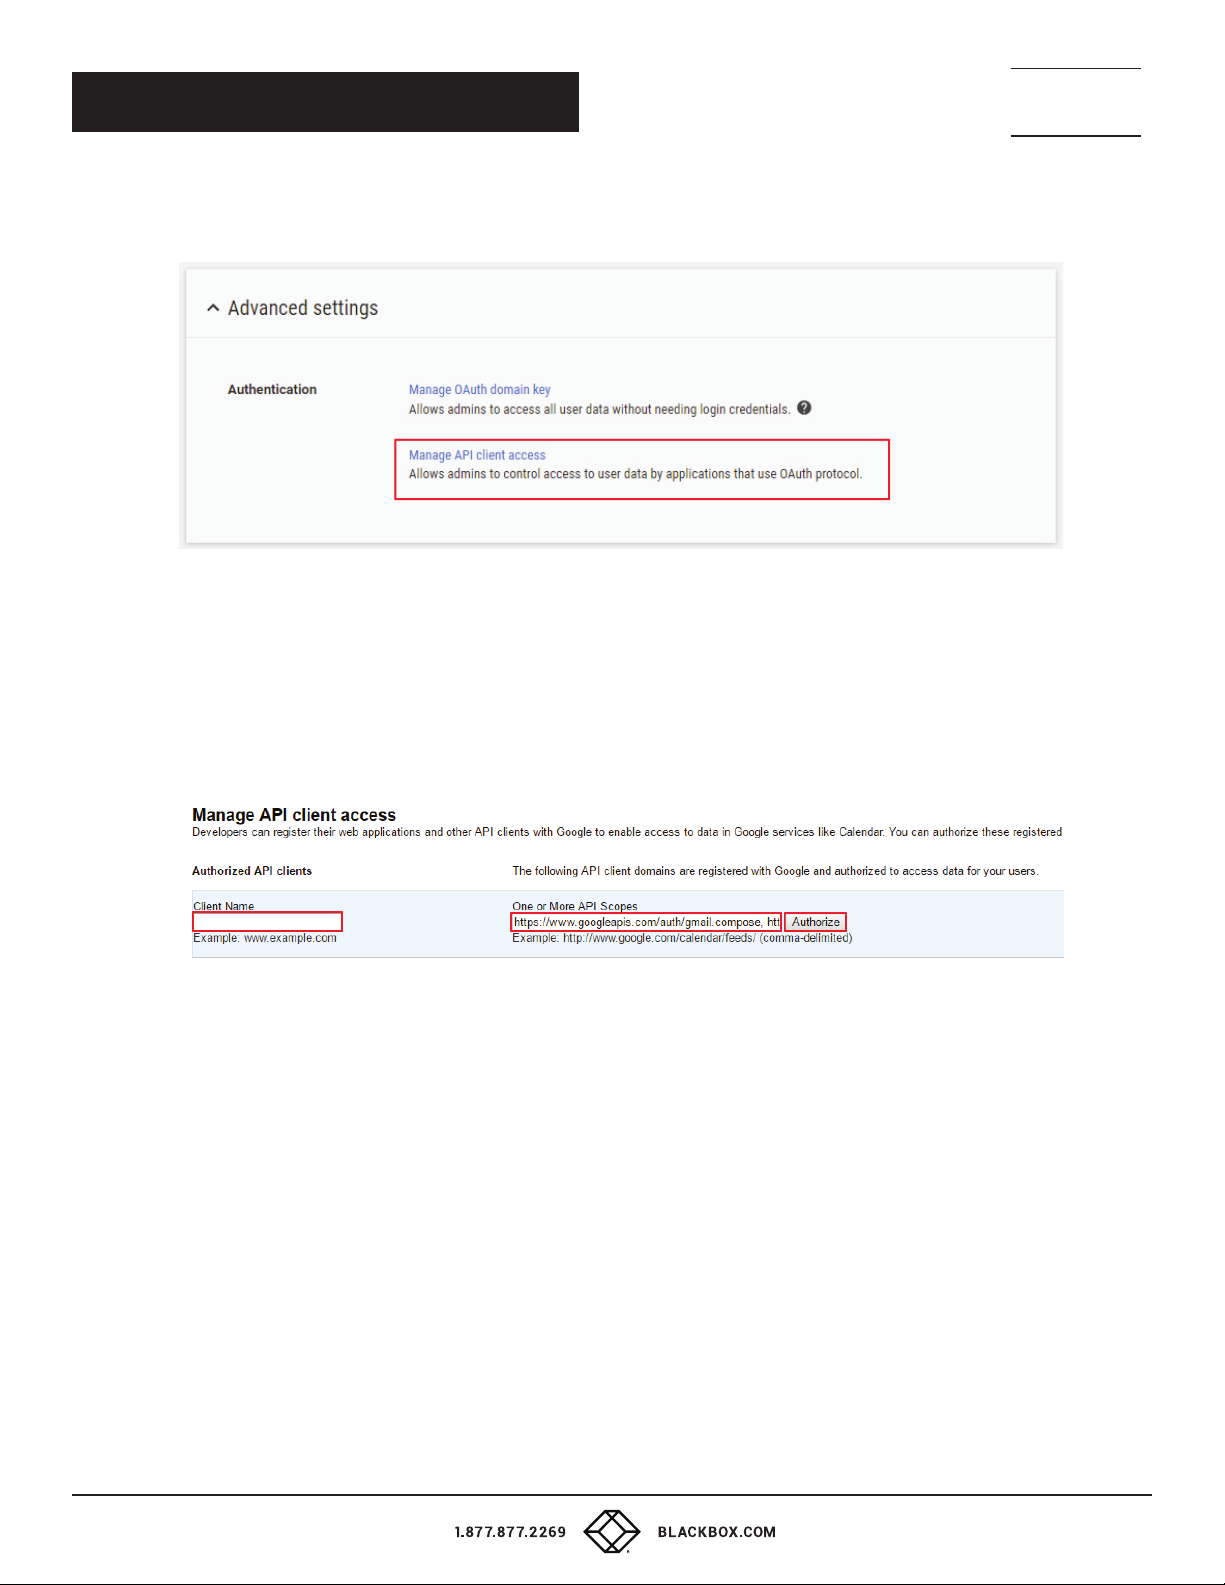
3. In the “Authentication“ section, click on “Manage API client access.“
FIGURE 2-16. MANAGE API CLIENT ACCESS SCREEN
NEED HELP?
LEAV E TH E TEC H TO US
LIVE 24/7
TECHNICAL
SUPPORT
1. 8 7 7. 8 7 7. 2 2 6 9
4. Enter “Client ID” (see the Creating a Project chapter, step 16), in the“Client name“ box. Copy and paste the following text
to the One or More API Scopes” input box:
https://www.googleapis.com/auth/gmail.compose, https://www.googleapis.com/auth/calendar
CLICK ON THE “AUTHORIZE“ BUTTON. AU THORIZATION CAN TAKE UP TO 24 HOURS.
FIGURE 2-17. AUTHORIZ ATION IN PROCESS SCREEN
13
Page 14
NEED HELP?
LEAV E TH E TEC H TO US
LIVE 24/7
CHAPTER 2: ACCOUNT SETTING
2.4 SETTING UP CALENDAR SHARING
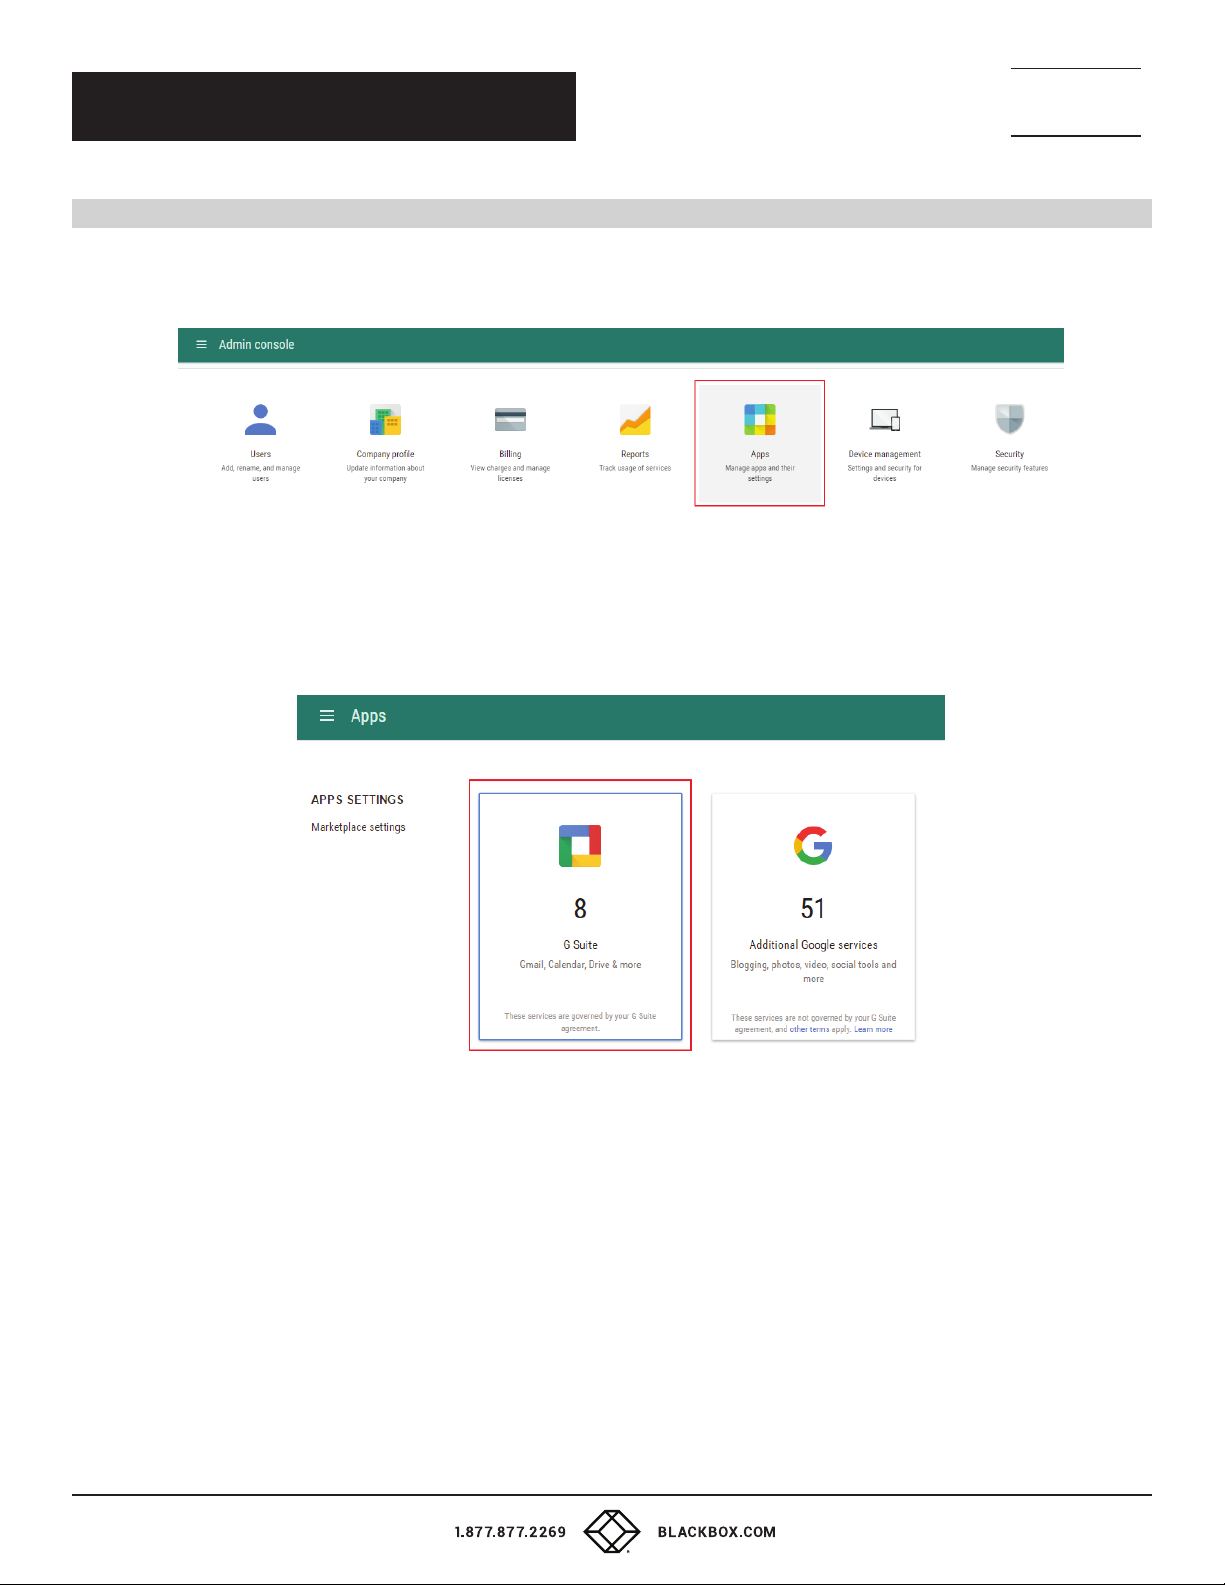
1. Go to https://admin.google.com and log in to your Google Apps for Work administrator account. Then select the item “Apps.“
FIGURE 2-18. SELECT APPS
TECHNICAL
SUPPORT
1. 8 7 7. 8 7 7. 2 2 6 9
2. Tap “Google Apps” on the next page.
FIGURE 2-19. SELECT GOOGLE APPS
14
Page 15
CHAPTER 2: ACCOUNT SETTING
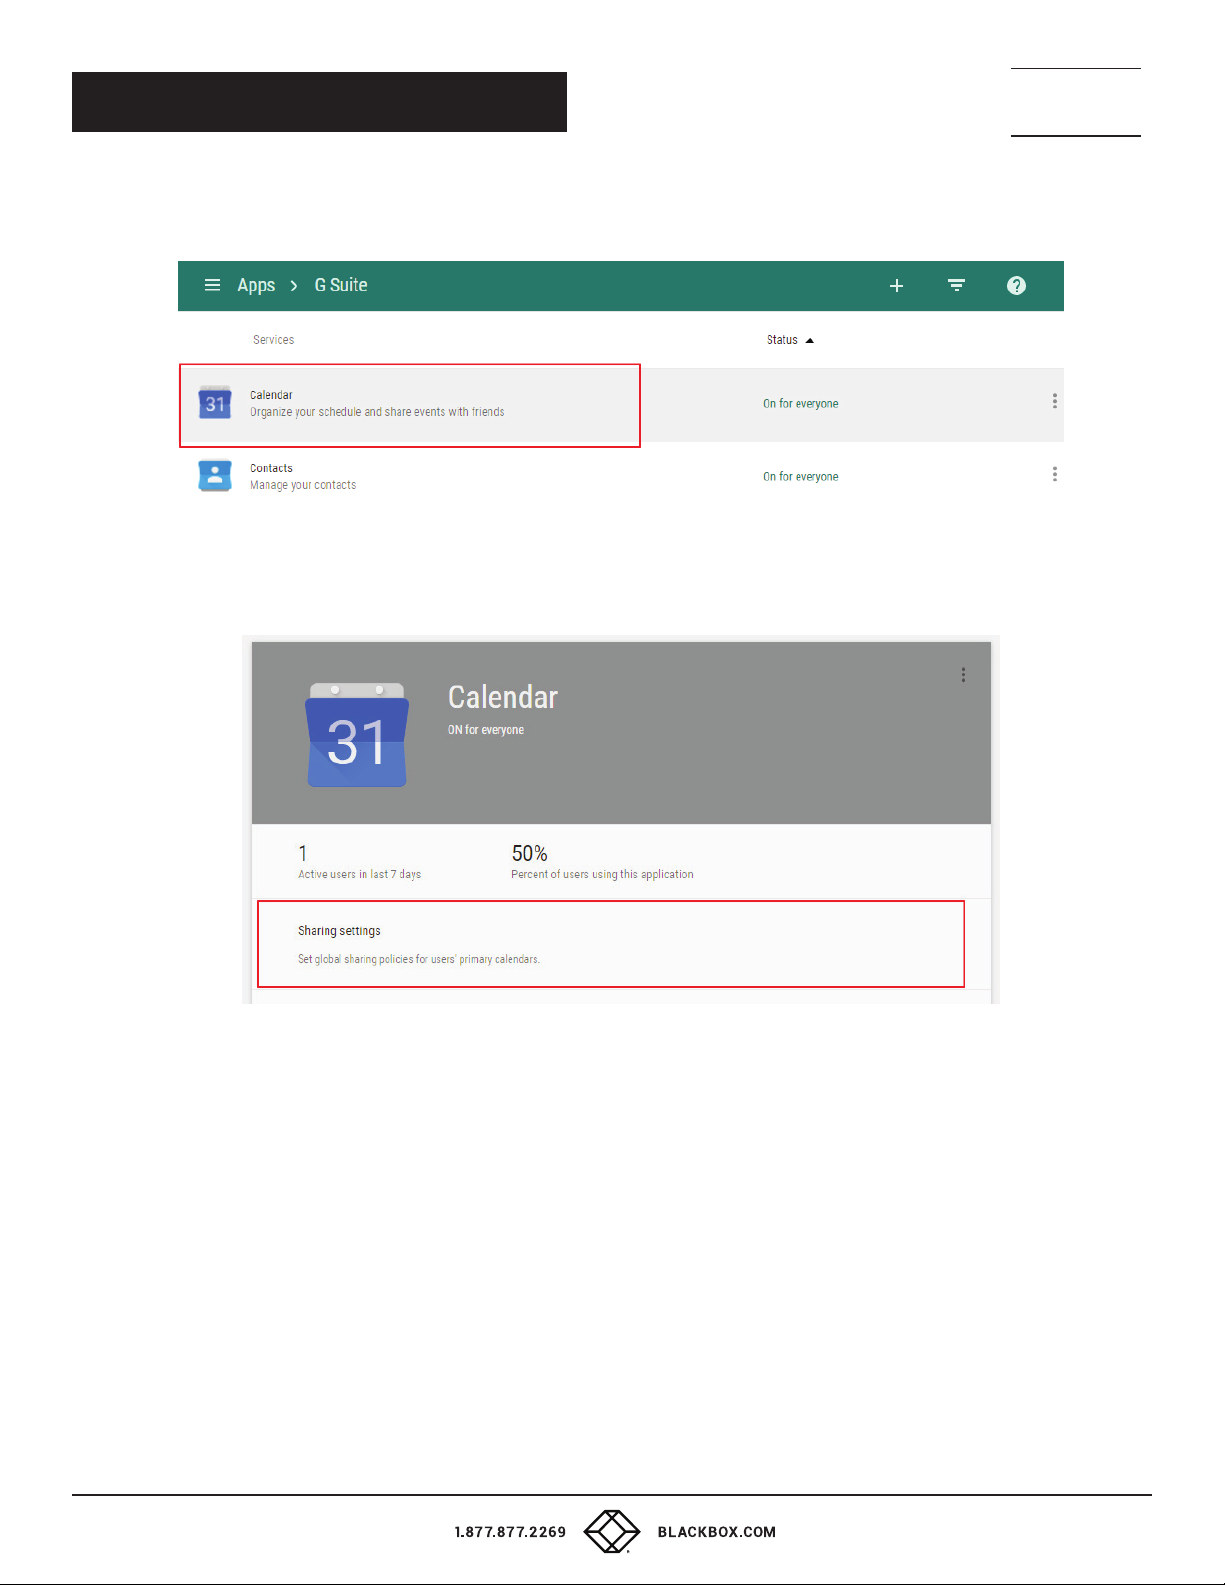
3. Select “Calendar.“
FIGURE 2-20. CHOOSE CALENDAR
4. Click on “Sharing settings.“
NEED HELP?
LEAV E TH E TEC H TO US
LIVE 24/7
TECHNICAL
SUPPORT
1. 8 7 7. 8 7 7. 2 2 6 9
FIGURE 2-21. SELECT SHARING SET TINGS
15
Page 16
NEED HELP?
LEAV E TH E TEC H TO US
LIVE 24/7
CHAPTER 2: ACCOUNT SETTING
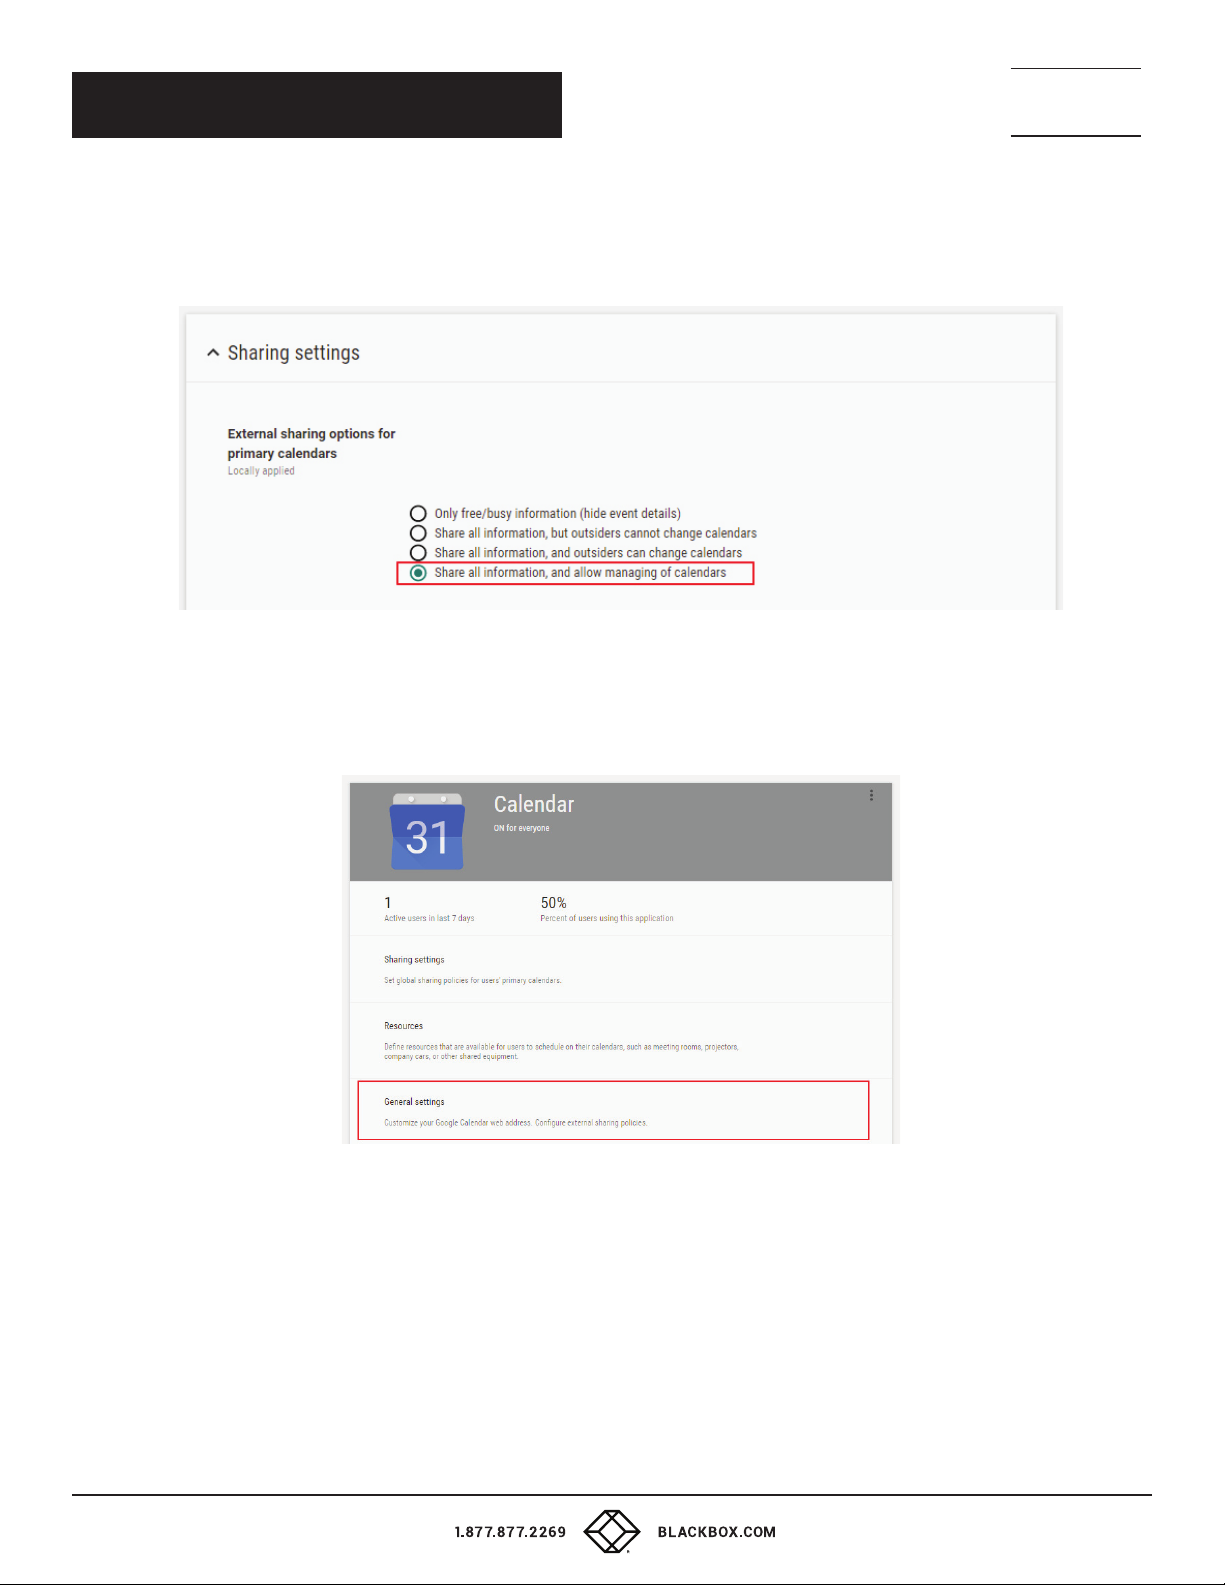
5. Make sure, that “Share all information, and allow managing of calendars“ is selected in the item “External sharing options
for primary calendars.“
TECHNICAL
SUPPORT
1. 8 7 7. 8 7 7. 2 2 6 9
FIGURE 2-22. CHECK SHARING INFORMATION
6. Go back to the page “Calendar settings“ and select “General settings.“
FIGURE 2-23. SELECT GENERAL SE TTINGS
16
Page 17
NEED HELP?
LEAV E TH E TEC H TO US
LIVE 24/7
CHAPTER 2: ACCOUNT SETTING
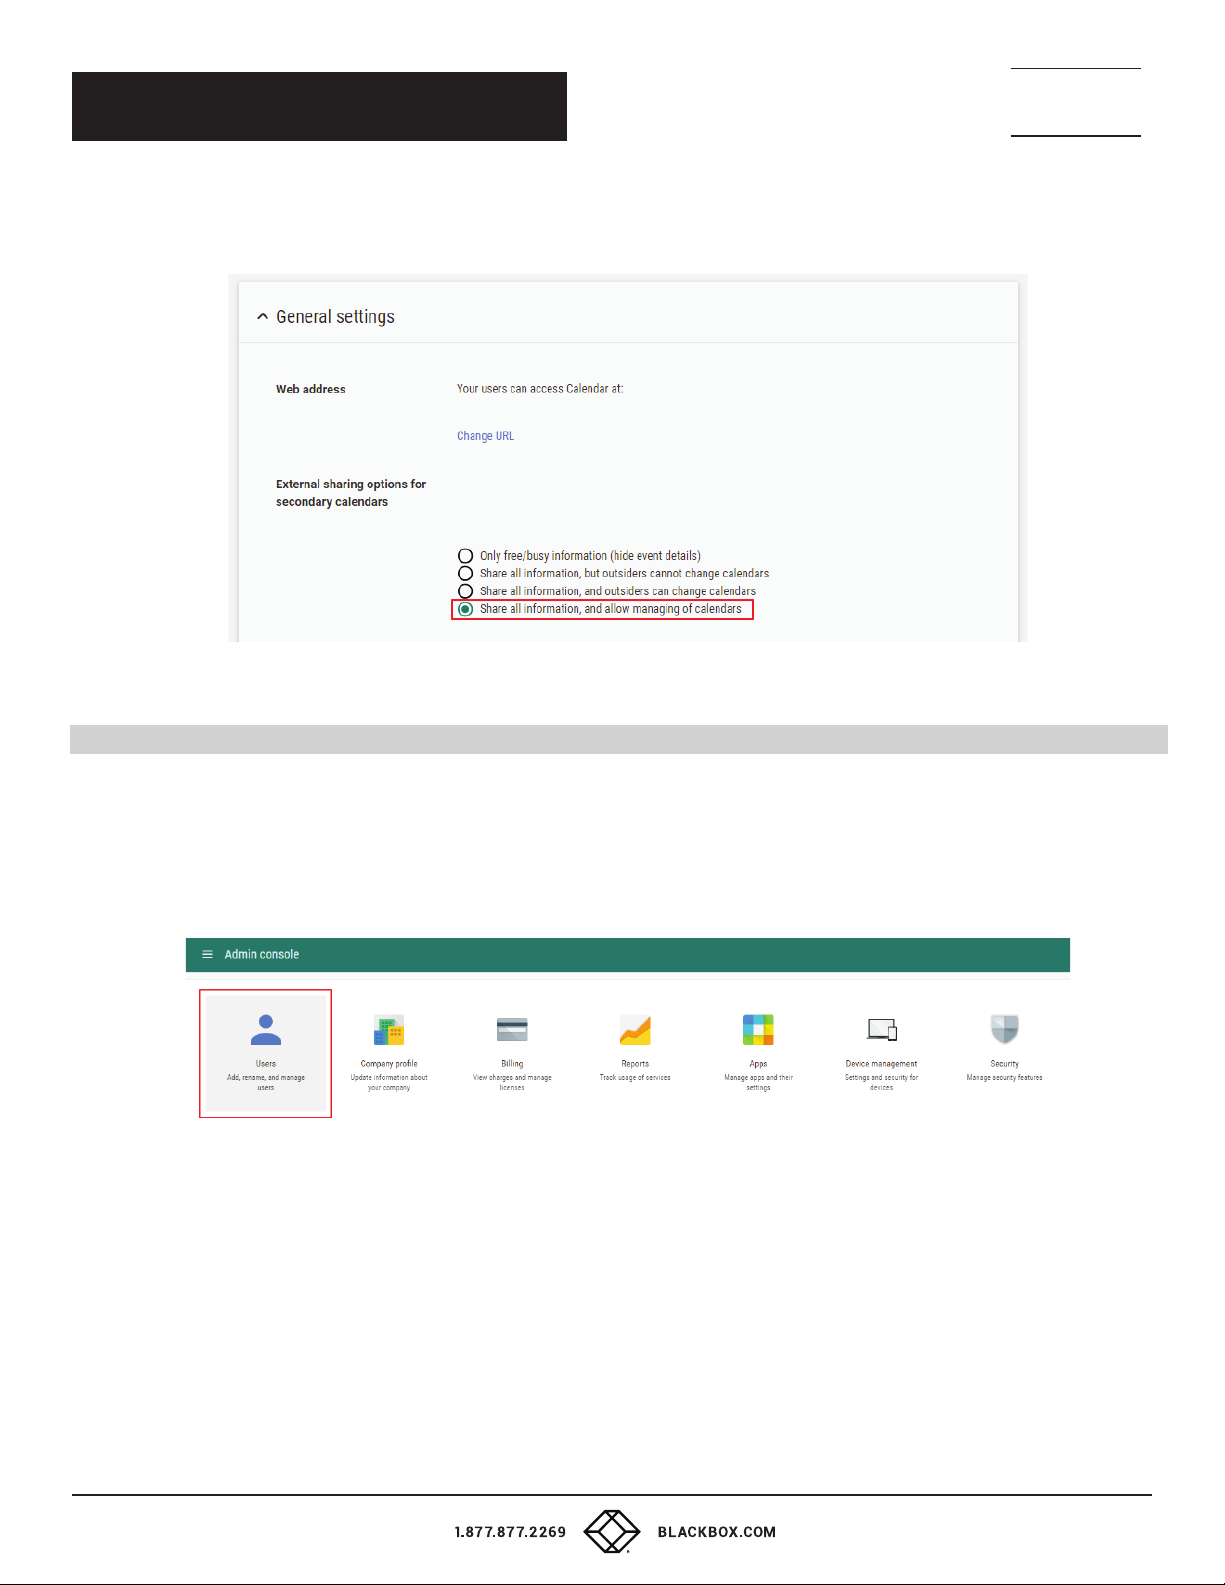
7. Make sure, that “Share all information, and allow managing of calendars“ is selected in the item “External sharing options
for primary calendars.“
TECHNICAL
SUPPORT
1. 8 7 7. 8 7 7. 2 2 6 9
FIGURE 2-24. EXTERNAL SHARING OPTIONS FOR SECONDARY CALENDARS
2.5 CREATING A USER ACCOUNT
THE RESERVATION SYSTEM NEEDS ONE USER ACCOUNT ENABLE IN-SESSION PANELS TO SEND VARIOUS INFORMATION EMAILS.
YOU NEED TO CRE ATE ONE USER ACCOUNT WITH AN EMAIL ADDRESS, FOR EX AMPLE “[email protected] M.”
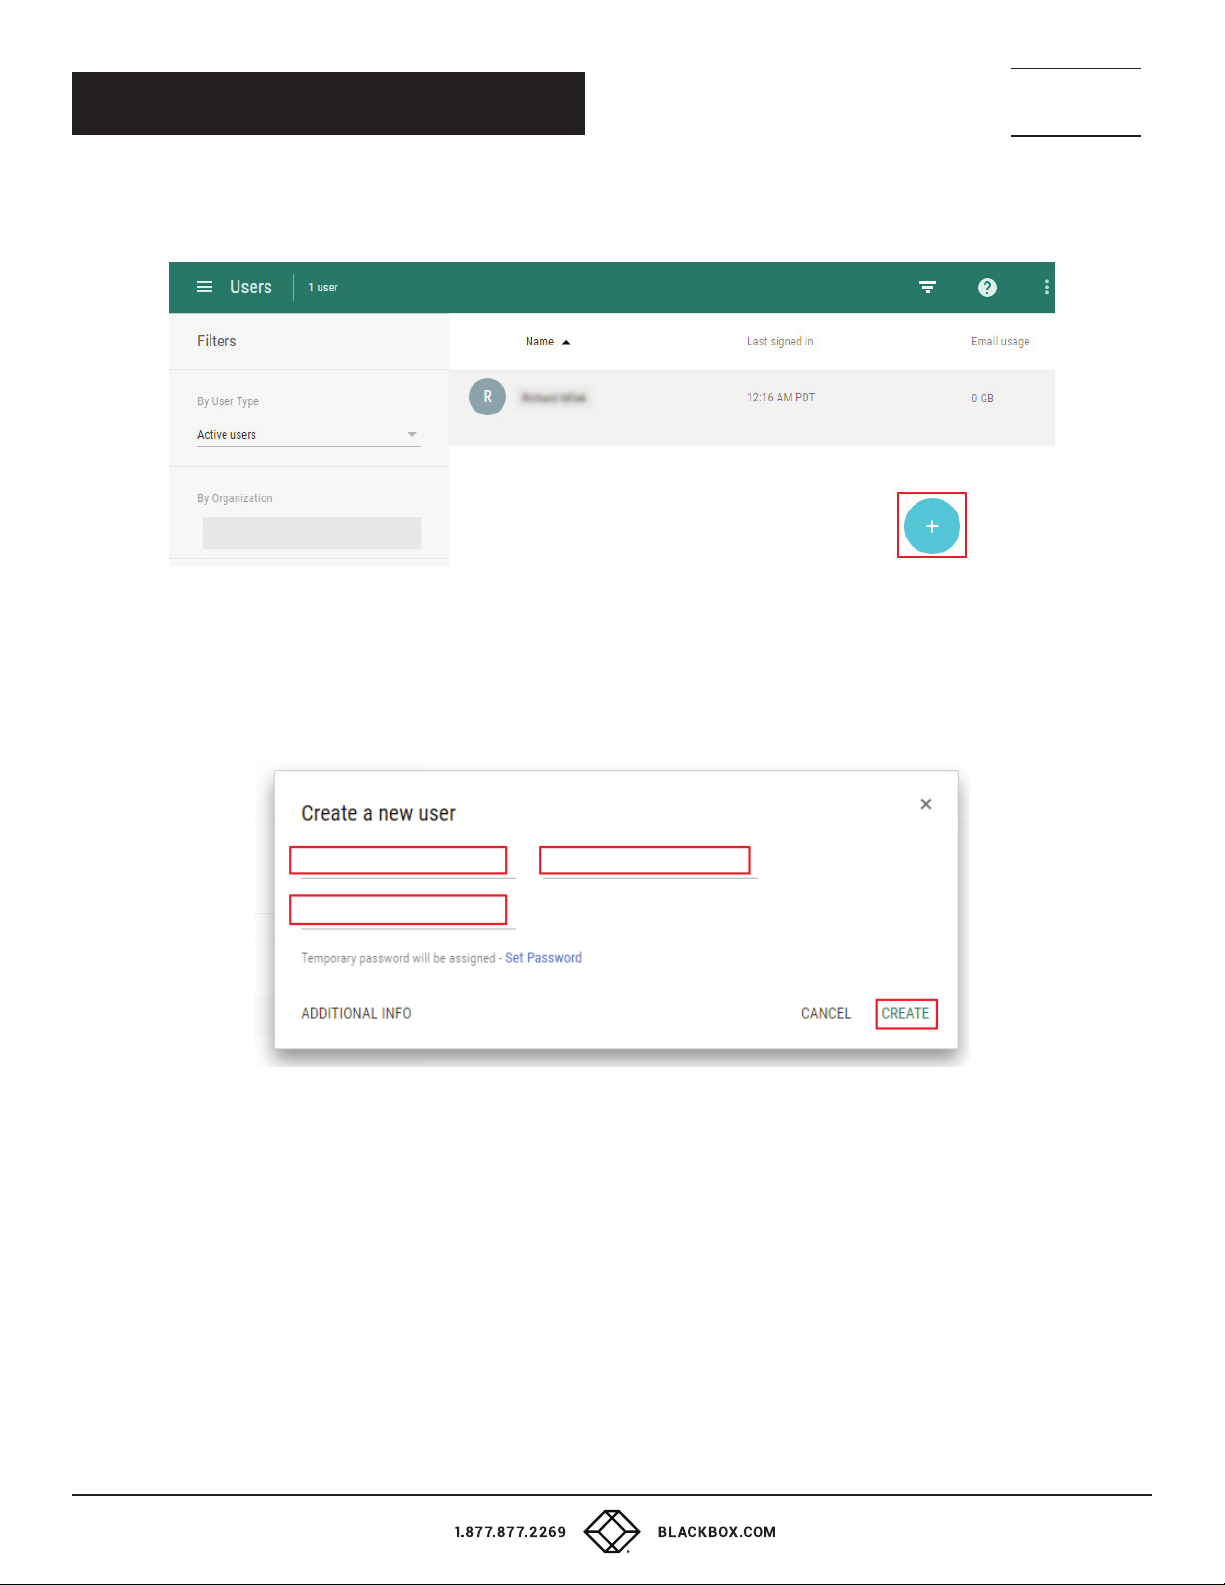
1. Go to https://admin.google.com and log in to your Google Apps for Work administrator account. Then select the item “Users.”
FIGURE 2-25. SELECT USER
17
Page 18
CHAPTER 2: ACCOUNT SETTING
2. Click on “Add user” in the bottom right corner.
FIGURE 2-26. ADD USER
NEED HELP?
LEAV E TH E TEC H TO US
LIVE 24/7
TECHNICAL
SUPPORT
1. 8 7 7. 8 7 7. 2 2 6 9
3. Enter the first name and surname for the user account (for example “IN-SESSION”) and set the primary email address
to “[email protected].” Tap “CREATE.”
FIGURE 2-27. CREATE A NEW USER SCREEN
18
Page 19
CHAPTER 2: ACCOUNT SETTING
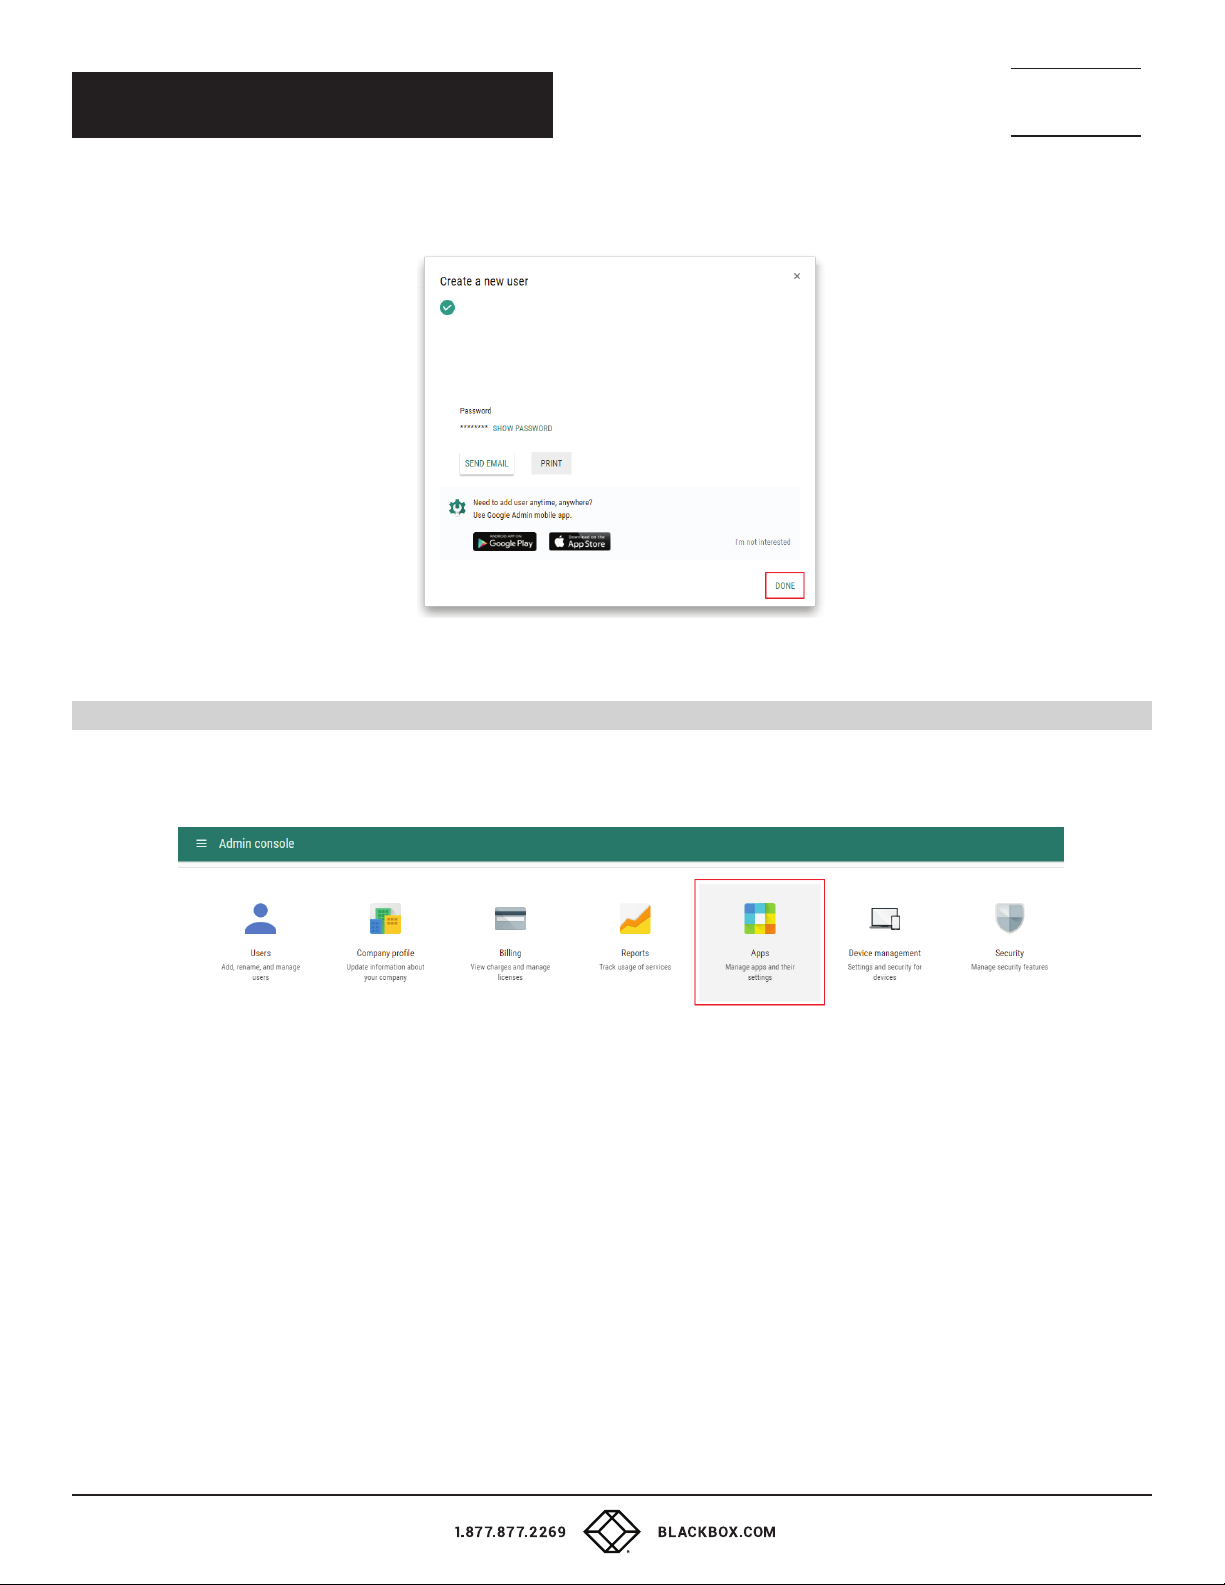
4. Finish the creation of the user account with “DONE“ button on the next page.
NEED HELP?
LEAV E TH E TEC H TO US
LIVE 24/7
TECHNICAL
SUPPORT
1. 8 7 7. 8 7 7. 2 2 6 9
FIGURE 2-28. DONE BUTTON
2.6 CREATING RESOURCE CALENDARS
1. Go to https://admin.google.com and log in to your Google Apps for Work administrator account. Then select the item “Apps.”
FIGURE 2-29. SELECT APPS
19
Page 20
CHAPTER 2: ACCOUNT SETTING
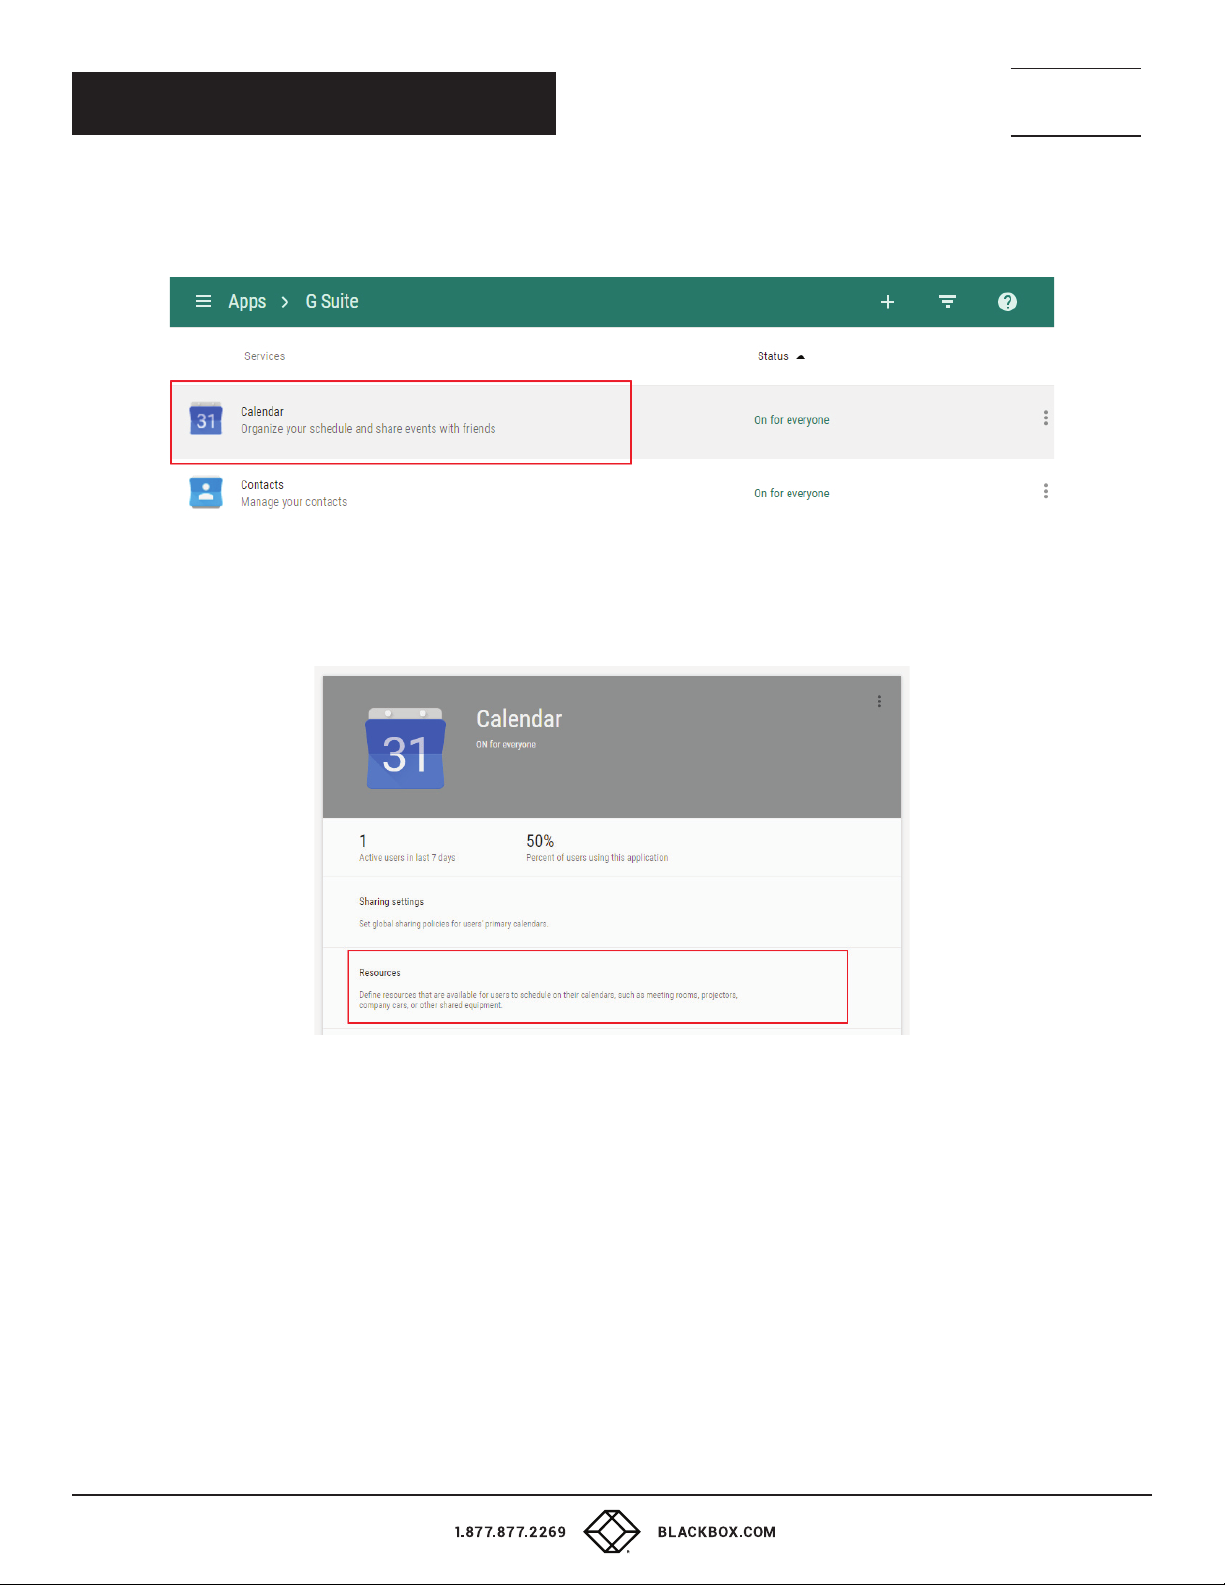
2. Tap “Google Apps” on the next page and then select “Calendar.“
FIGURE 2-30. CLICK ON CALENDAR
NEED HELP?
LEAV E TH E TEC H TO US
LIVE 24/7
TECHNICAL
SUPPORT
1. 8 7 7. 8 7 7. 2 2 6 9
3. Click on “Resources.“
FIGURE 2-31. RESOURCES OPTION
20
Page 21
NEED HELP?
LEAV E TH E TEC H TO US
LIVE 24/7
CHAPTER 2: ACCOUNT SETTING
TECHNICAL
SUPPORT
1. 8 7 7. 8 7 7. 2 2 6 9
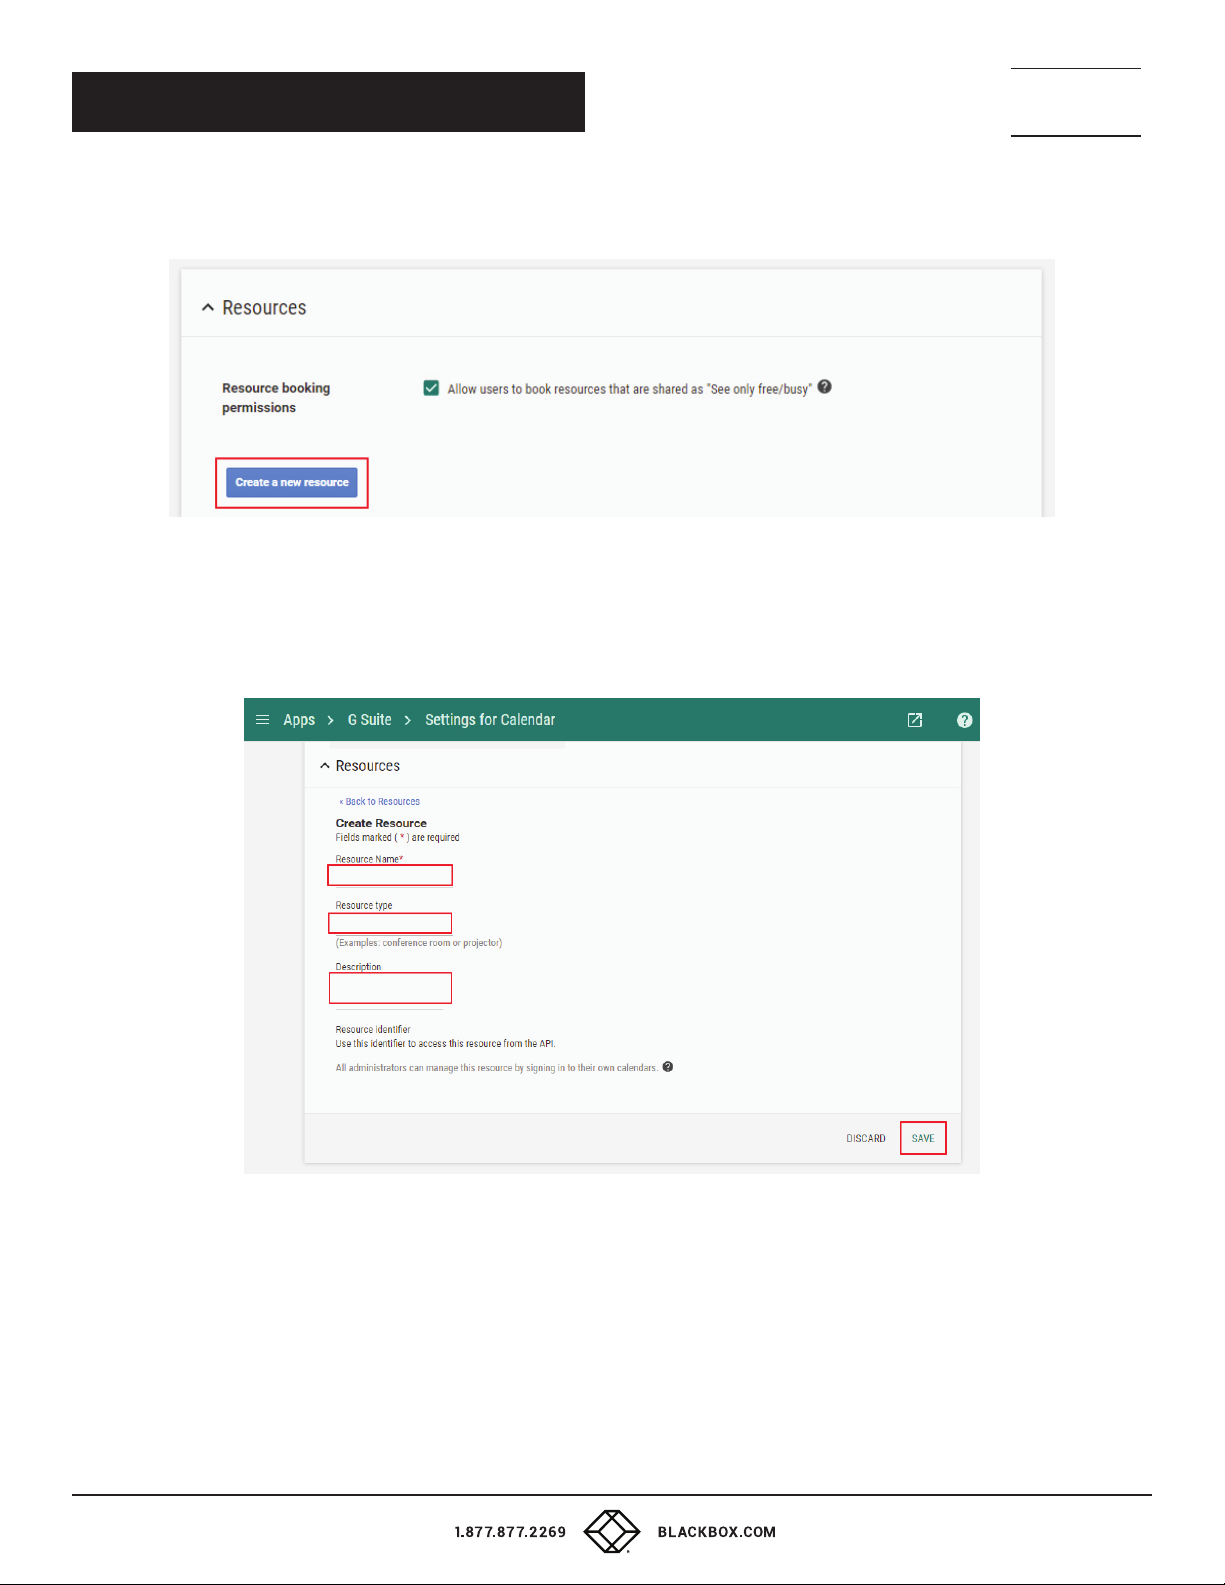
4. Tap “Create a new resource.”
FIGURE 2-32. CREATE A NEW RESOURCE SCREEN
5. Enter the room name to the item “Resource name.“. You can add a detailed description to the item “Description“ and room type
to the item “Resource type.“ Then confirm the room account creation with the “SAVE“ button. We recommend that you reload the page
in the browser to update the room list.
FIGURE 2-33. CREATE ROOM
21
Page 22
CHAPTER 2: ACCOUNT SETTING
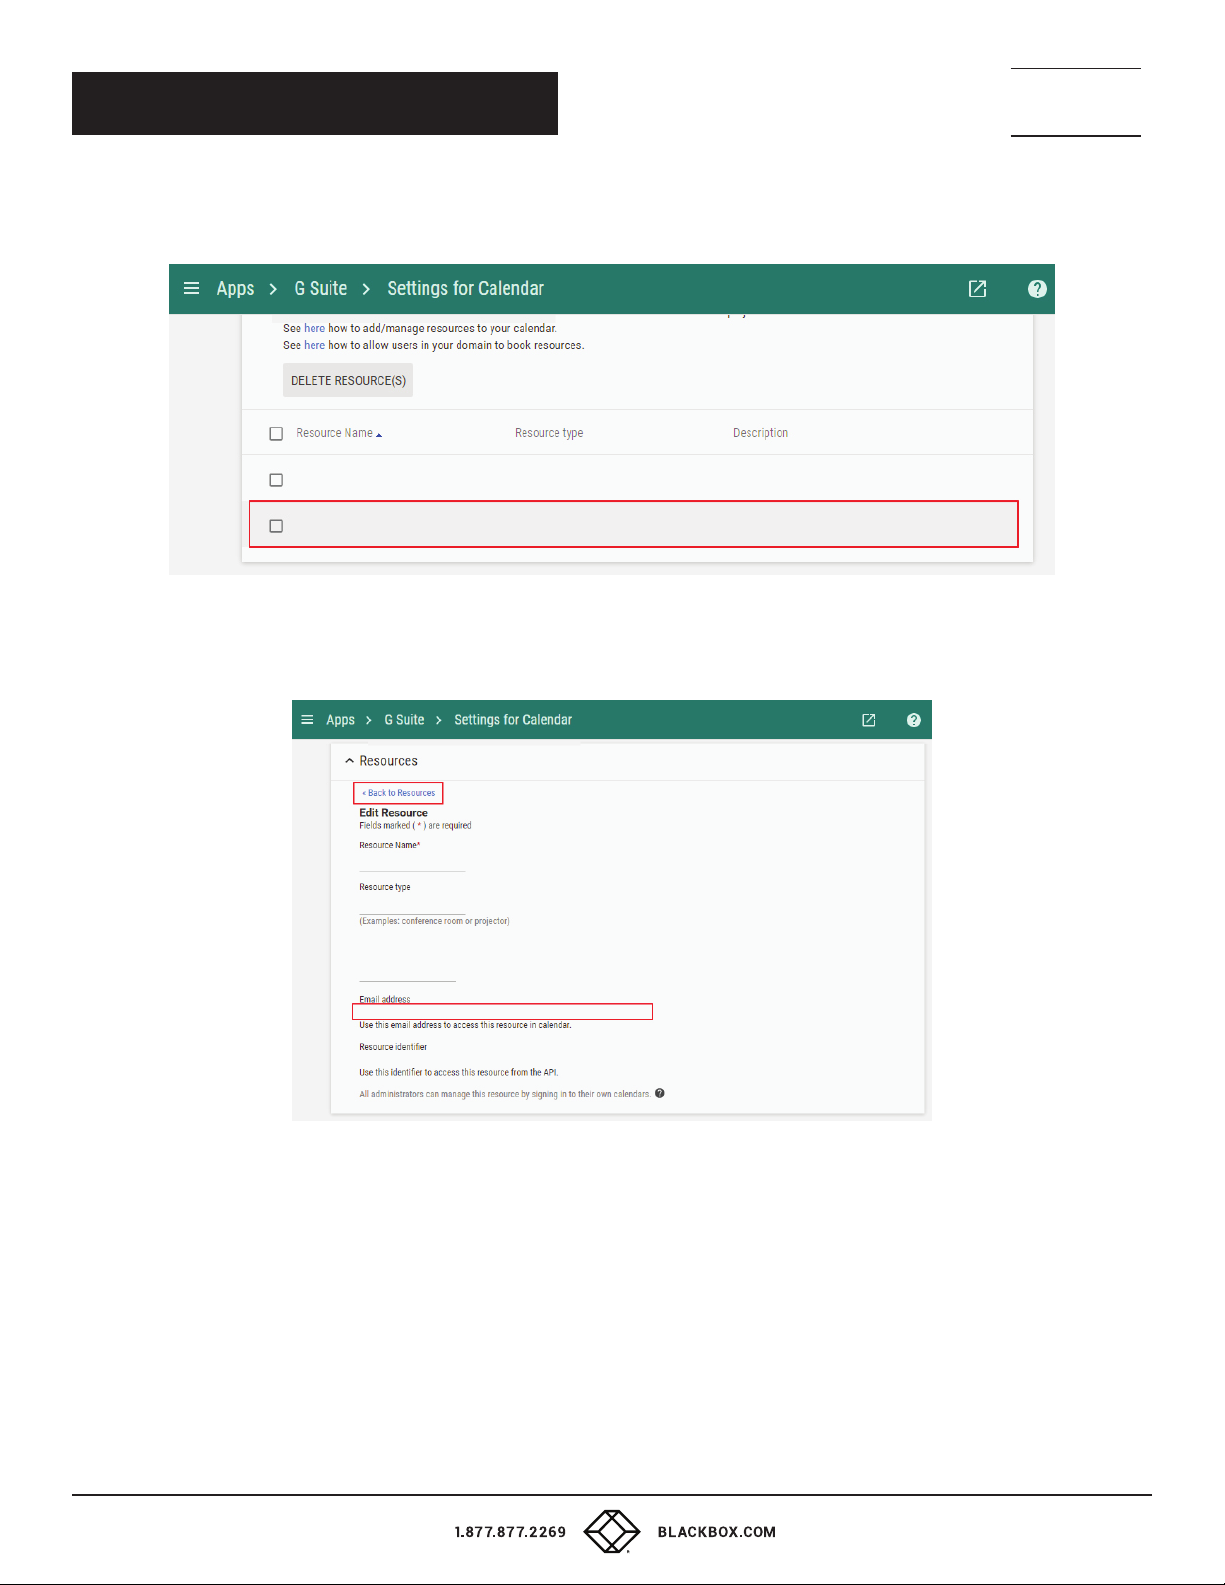
6. In the room list, click on the new room to open the “Edit resource“ window.
FIGURE 2-34. EDIT ROOM
NEED HELP?
LEAV E TH E TEC H TO US
LIVE 24/7
TECHNICAL
SUPPORT
1. 8 7 7. 8 7 7. 2 2 6 9
7. Note the email address of the room; you will need it later for the configuration of IN-SESSION panels.
FIGURE 2-35. EMAIL ADDRESS OF THE ROOM
8. If you need more rooms, repeat steps 5–7.
22
Page 23
NEED HELP?
LEAV E TH E TEC H TO US
LIVE 24/7
CHAPTER 2: ACCOUNT SETTING
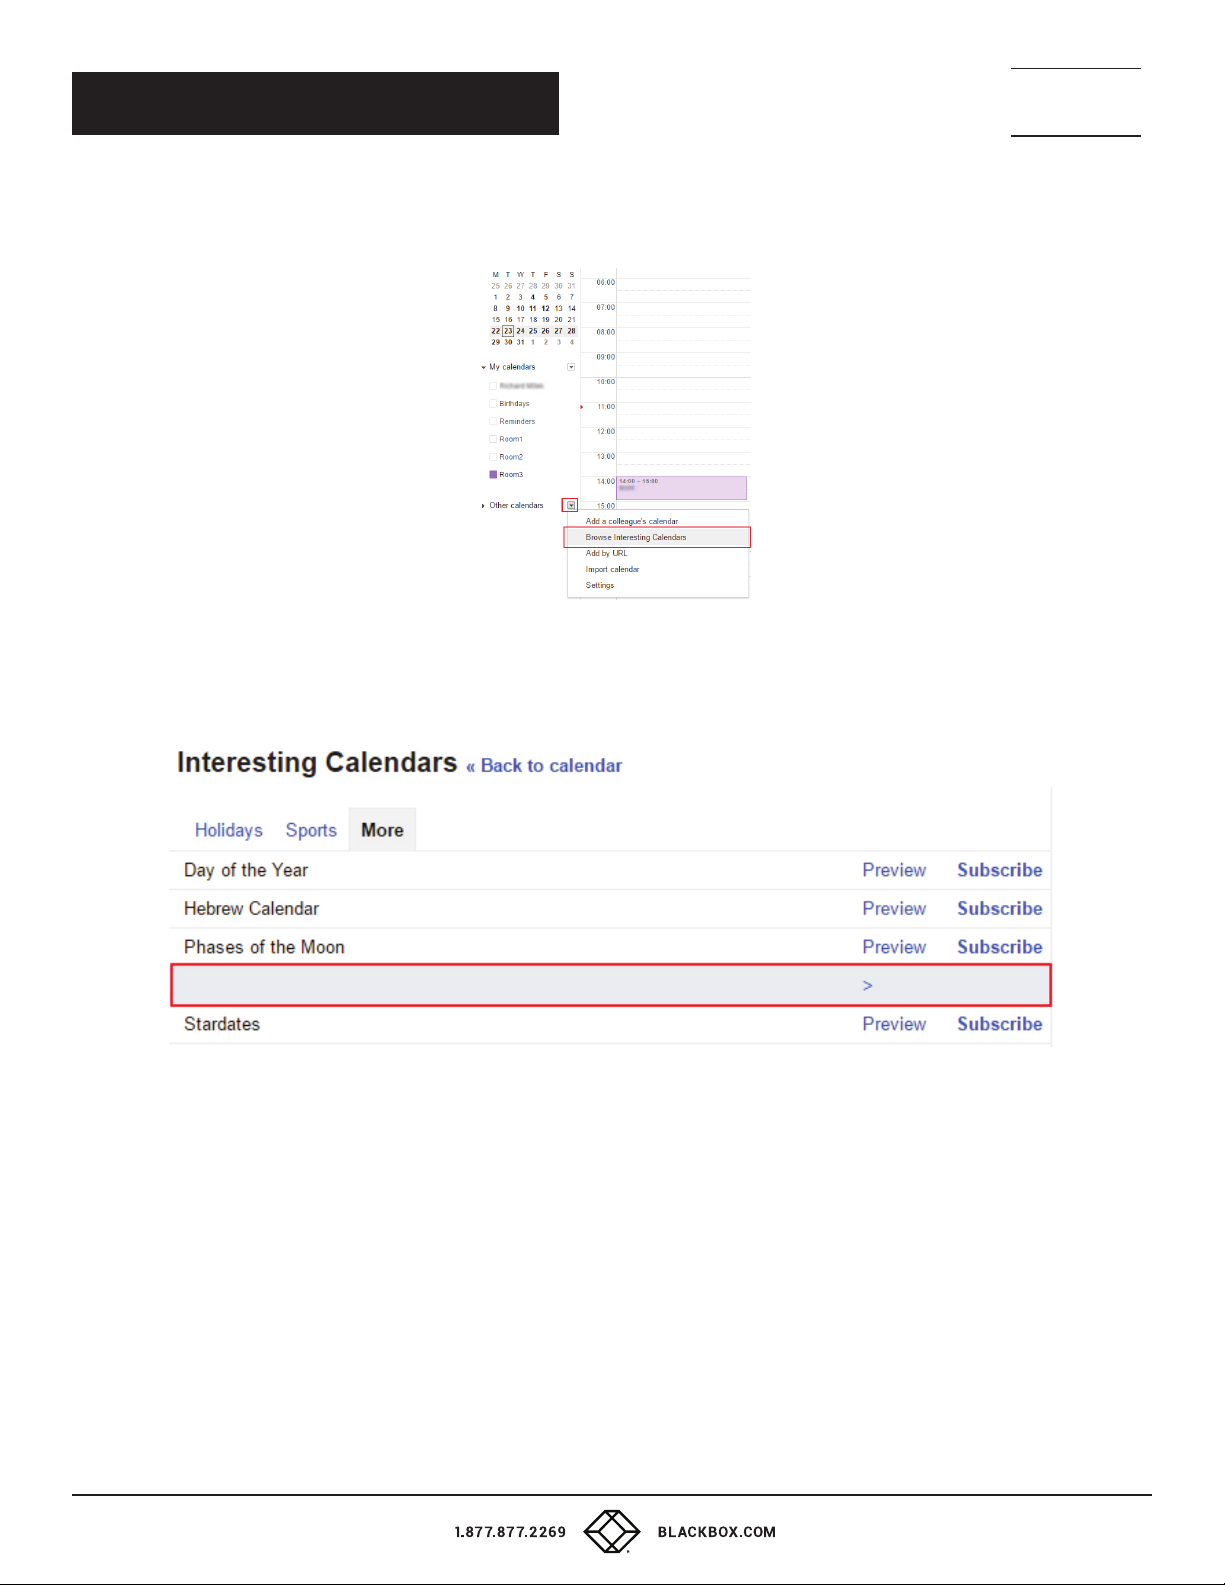
9. Go to the page https://www.google.com/calendar, in the left-side menu select “Other calendars / Browse interesting calendars.“
TECHNICAL
SUPPORT
1. 8 7 7. 8 7 7. 2 2 6 9
FIGURE 2-36. ROOMS CALENDAR
10. Tap “More“ and click on “Resources for yourdomain.“
FIGURE 2-37. SELECT RESOURCES
23
Page 24
NEED HELP?
LEAV E TH E TEC H TO US
LIVE 24/7
CHAPTER 2: ACCOUNT SETTING
TECHNICAL
SUPPORT
1. 8 7 7. 8 7 7. 2 2 6 9
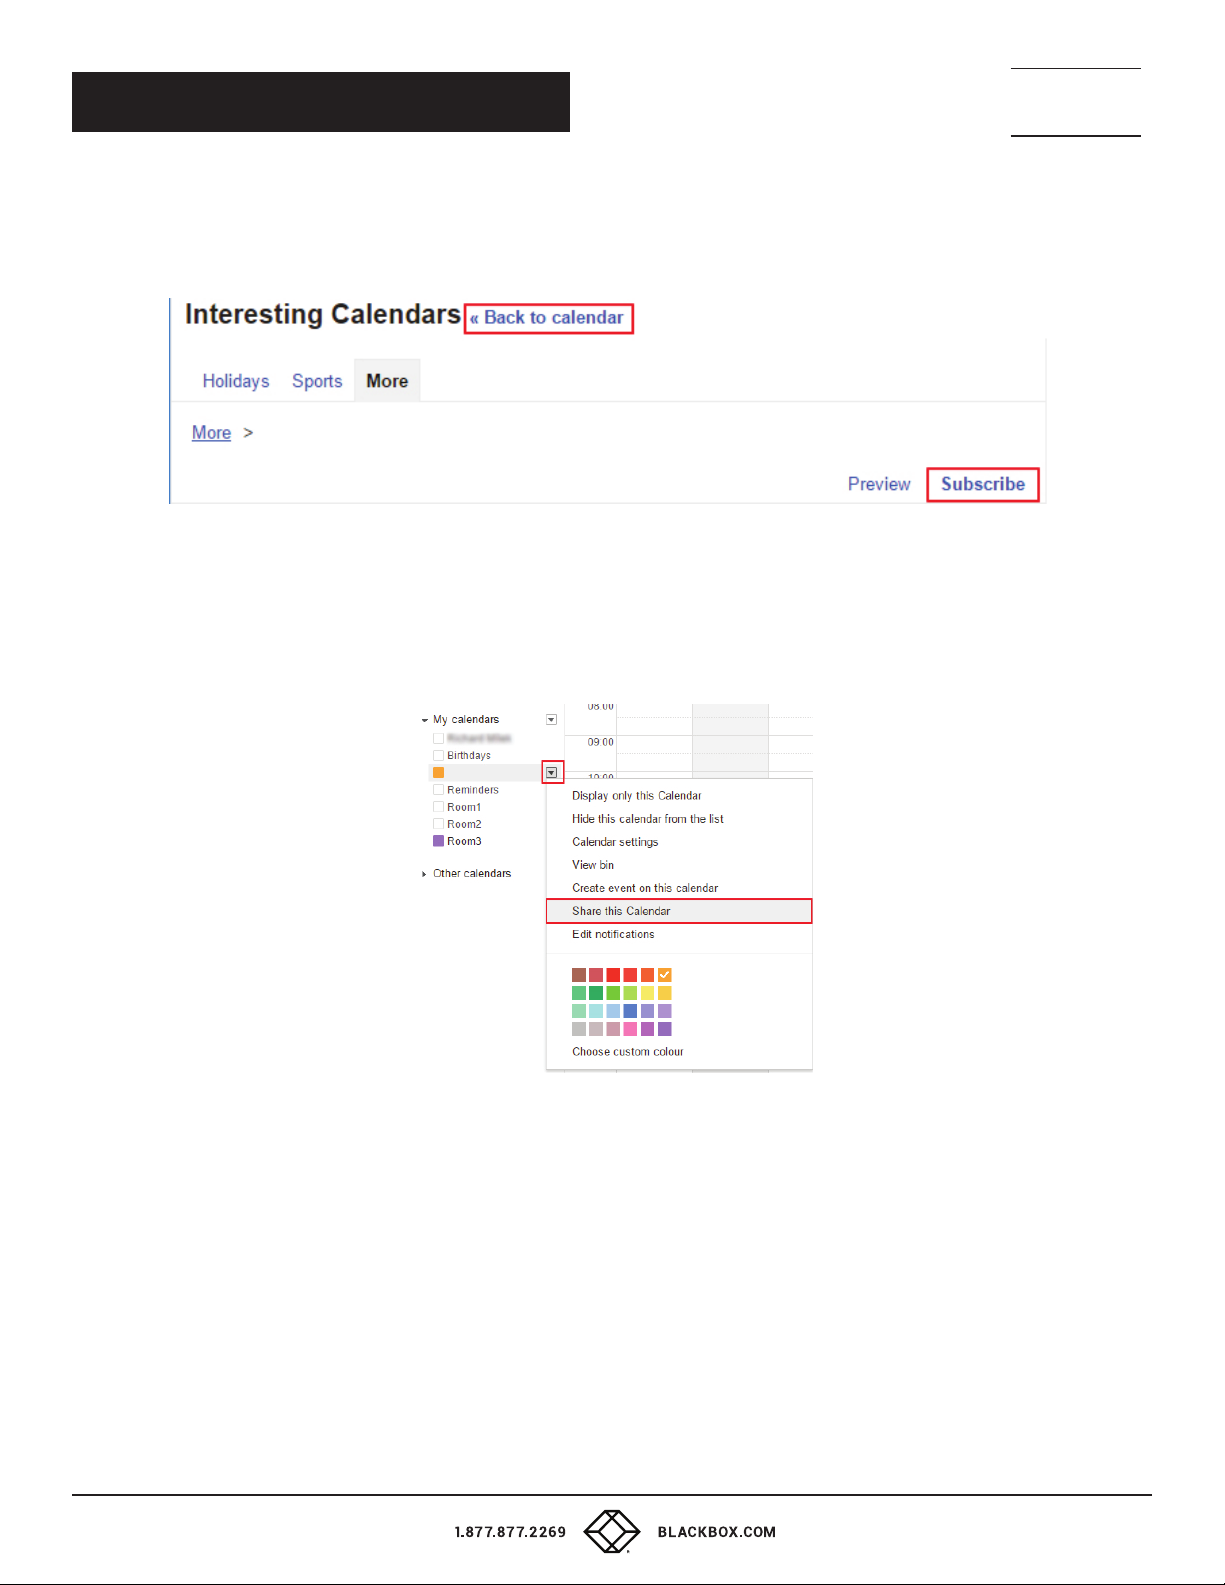
11. Select “Subscribe“ for all rooms managed with the IN-SESSION reservation system. It can take a couple of minutes
before room calendars are updated and displayed. Then you can go back with the button “Back to calendar.”
FIGURE 2-38. UPDATE AND DISPL AY ROOM CALENDARS
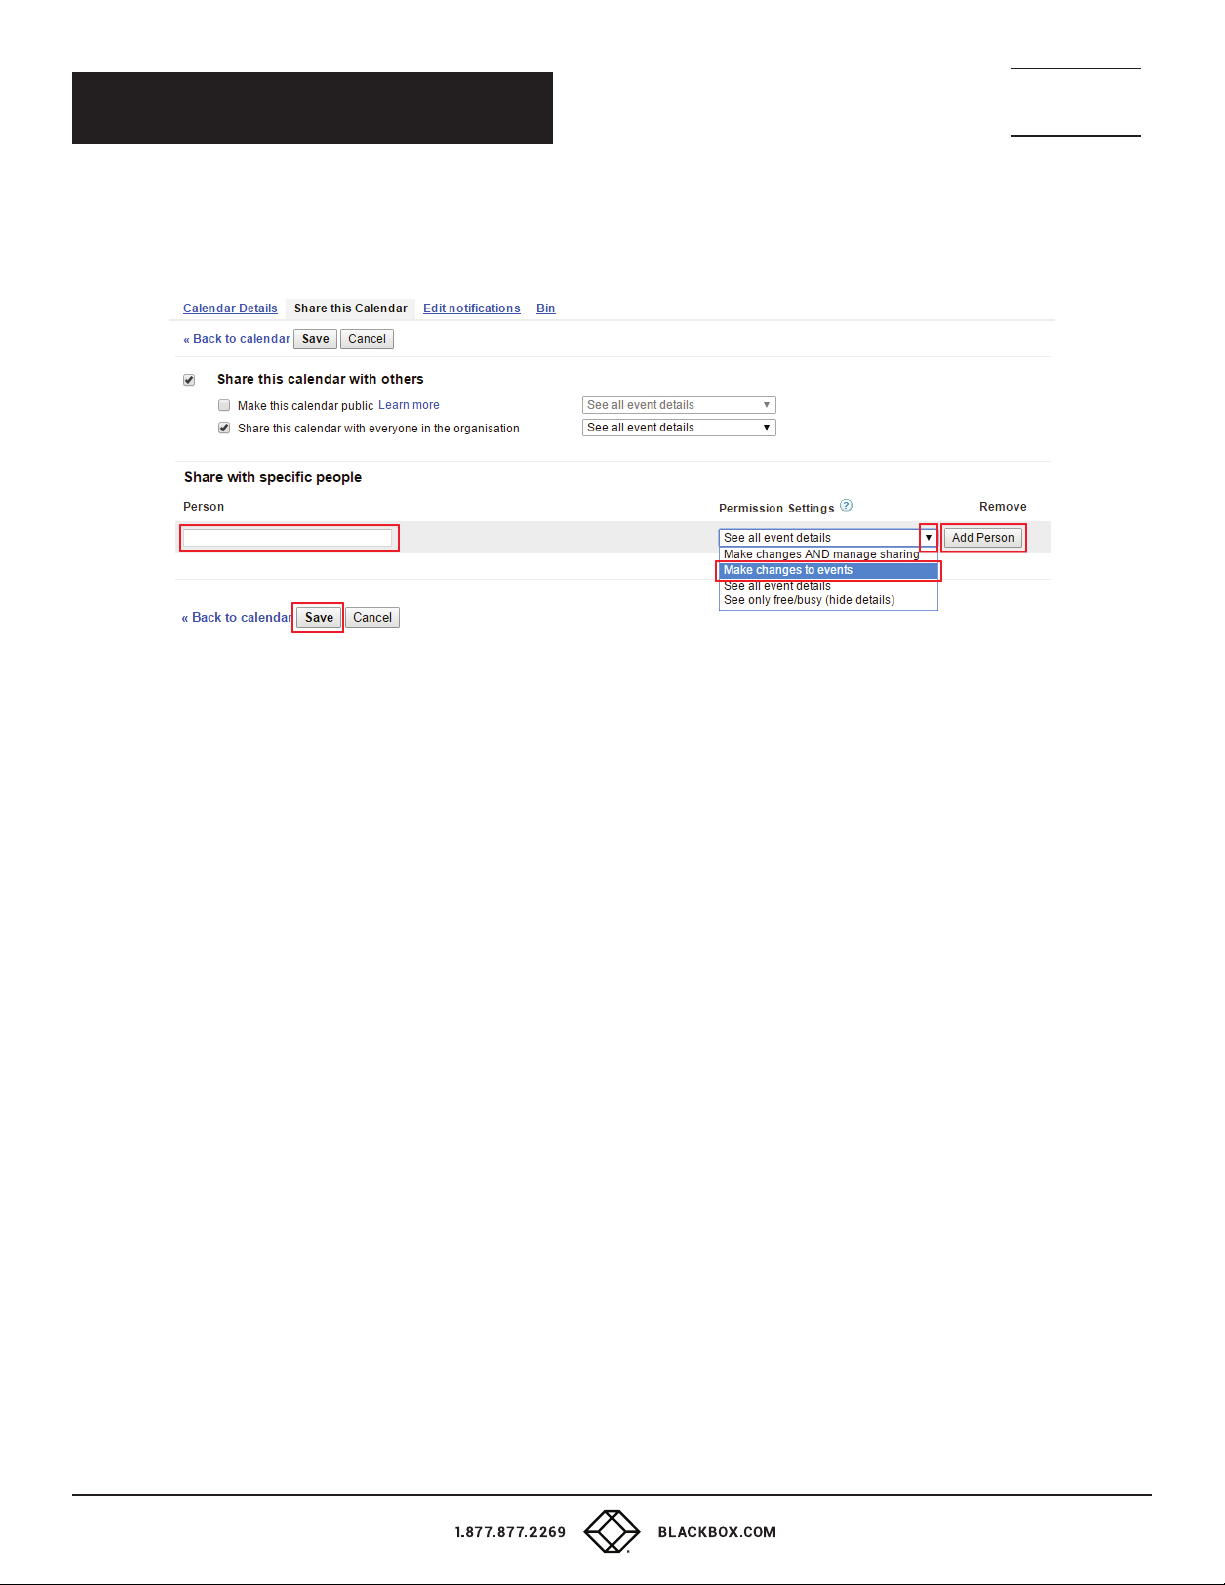
12. Now you will see room calendars in the folder “My calendars.“ Next, set the sharing of all rooms involved in the IN-SESSION system.
It is described in this and the next step. Click on the drop-down arrow on the right side of the calendar. It will expand the list of options.
Select “Share this calendar.“
24
FIGURE 2-39. SHARE THE CALENDAR
Page 25
NEED HELP?
LEAV E TH E TEC H TO US
LIVE 24/7
CHAPTER 2: ACCOUNT SETTING
13. Enter the email address of the service account (see the Creating a project chapter, step 14) to the item “Share with specific people / person.“
Select “Make changes to events“ in the item “Permission settings,” and then tap on “Add Person.“ Confirm changes with the “Save“ button.
TECHNICAL
SUPPORT
1. 8 7 7. 8 7 7. 2 2 6 9
FIGURE 2-40. ADD PERSON TO SHARE CALENDAR
14. Tap the “OK” button in the next dialog window to confirm changes of calendar settings.
25
Page 26
CHAPTER 3: PANELS
3.1 FIRST PANEL SETTING
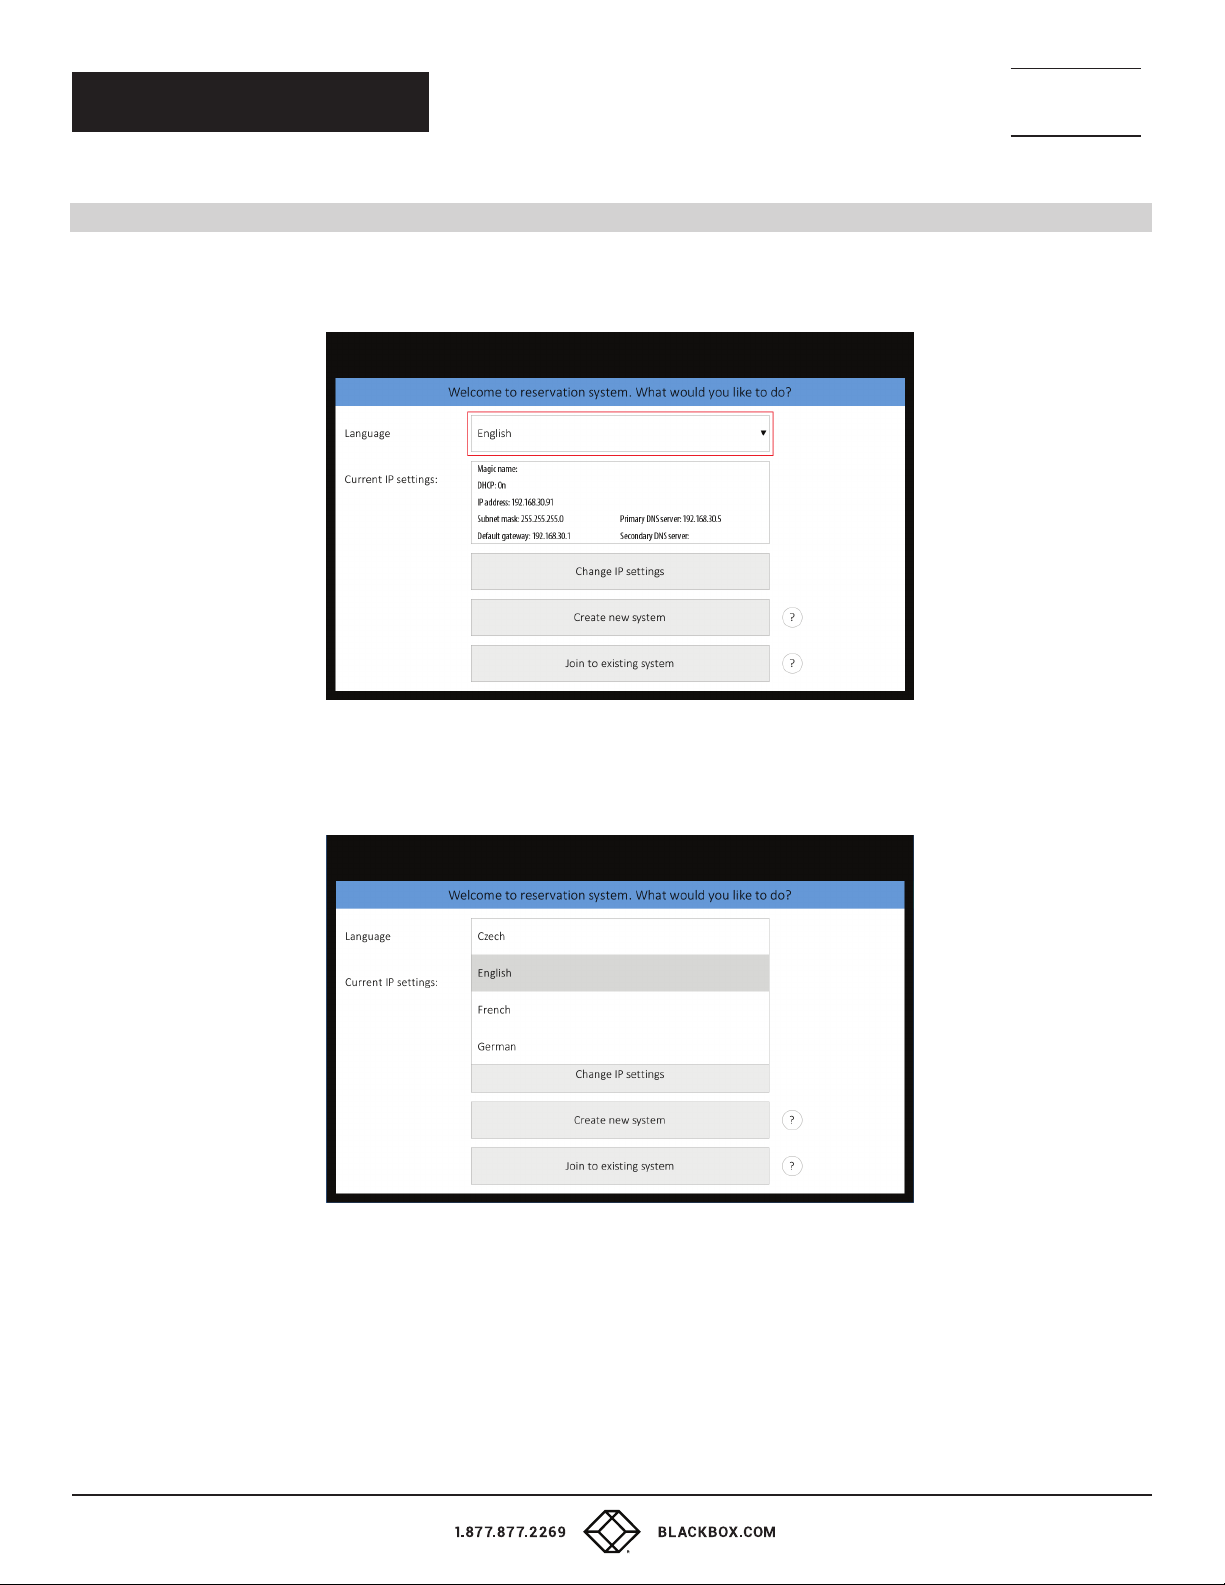
After switching on the first IN-SESSION Room Scheduler system panel, the following screen will appear:
NEED HELP?
LEAV E TH E TEC H TO US
LIVE 24/7
TECHNICAL
SUPPORT
1. 8 7 7. 8 7 7. 2 2 6 9
FIGURE 3-1. FIRST SCREEN THAT APPEARS
You can change the user interface language of the panel in “Language.” Touch the red-marked field and a list
of available languages appears. Choose your preferred language.
FIGURE 3-2. CHOOSE LANGUAGE SCREEN
26
Page 27
NEED HELP?
LEAV E TH E TEC H TO US
LIVE 24/7
CHAPTER 3: PANELS
TECHNICAL
SUPPORT
1. 8 7 7. 8 7 7. 2 2 6 9
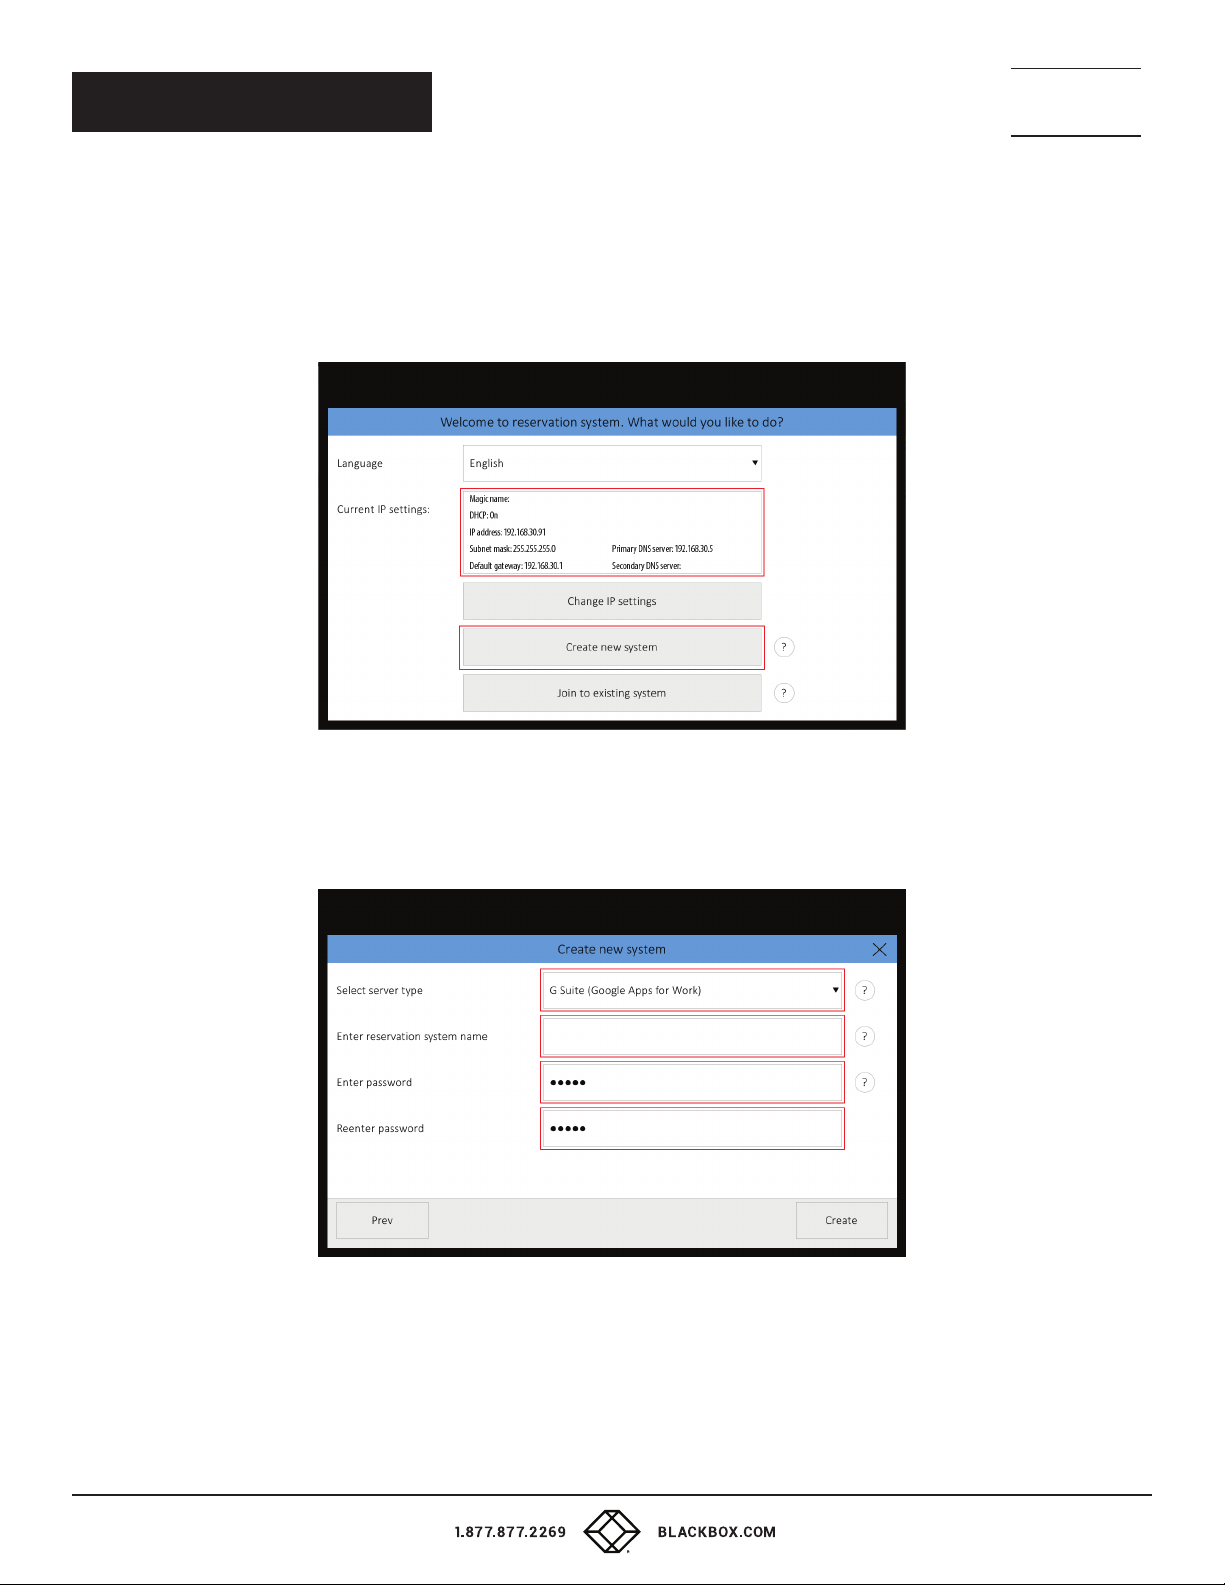
In the default setting, the panel is enabled to obtain the IP address and DNS servers using your network’s DHCP. Under the item “Current IP
settings,” you can check whether the assigned addresses correspond with your network. If this setting does not meet your requirements,
you can change it according to the instructions in IN-SESSION - Setup Guide - Common Settings, the IP settings chapter.
Note the IP address; you will need it in the next step. At this point there is no need to change the item “Magic name”;
its function is also explained in the above-mentioned chapter. Create a new reservation system just by tapping on “Create new system.”
FIGURE 3-3. CREATE NEW RESERVATION SYSTEM
Panels connected to the same reservation system share their settings, e.g. if you need to change the user account or certificate, y
ou can just do it on one panel and all the other ones within the same reservation system will adopt the change automatically.
The reservation system name and password serve for mutual identification of panels. The password is also used
for accessing the panels’ settings. First, touch the “Select server type“ field, and select “Google Apps for Work.“
FIGURE 3-4. SELECT GOOGLE APPS FOR WORK
27
Page 28
NEED HELP?
LEAV E TH E TEC H TO US
LIVE 24/7
CHAPTER 3: PANELS
TECHNICAL
SUPPORT
1. 8 7 7. 8 7 7. 2 2 6 9
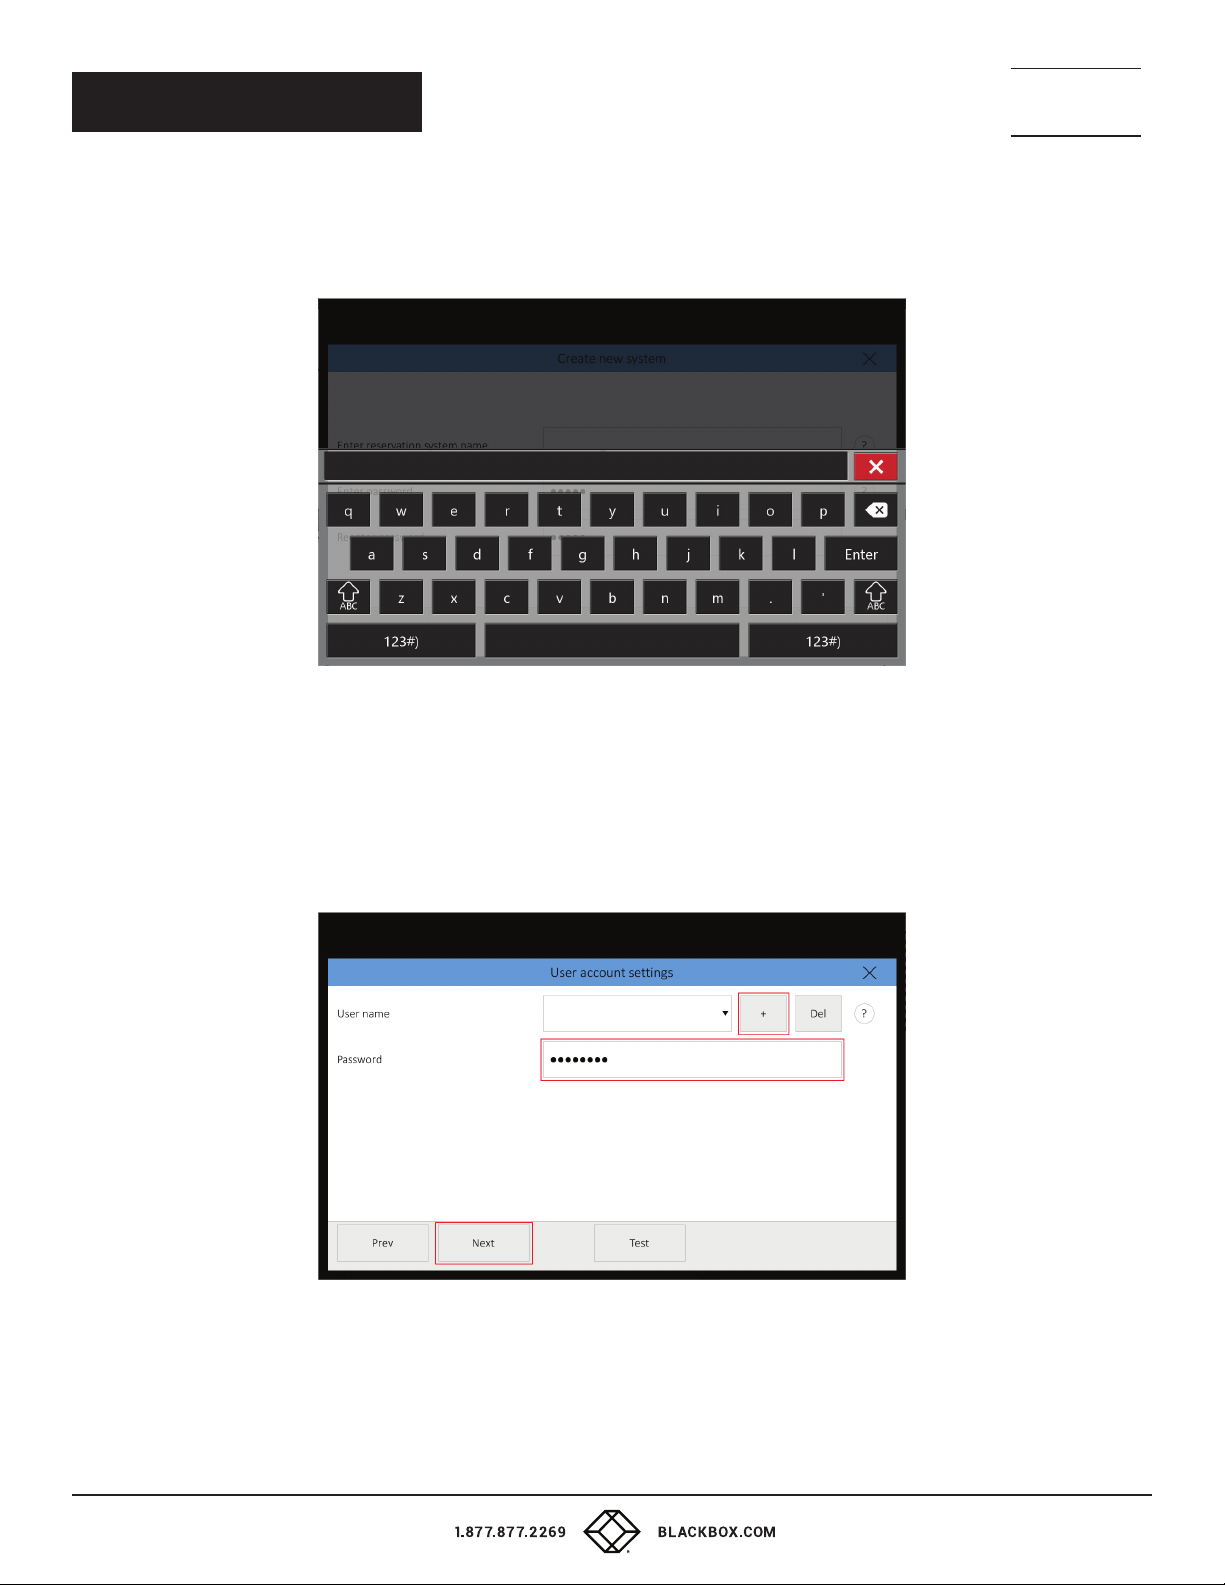
Enter the reservation system name and password. Confirm the password by entering it twice (“Enter Password”
and “Reenter Password”). The entered passwords must be identical. A keyboard appears after tapping any of the red-marked fields.
When you enter the name or password, press Enter on the keyboard. Confirm the creation of the new account by tapping “Create.”
FIGURE 3-5. KEYBOARD
A window will pop up in which you can set the room account. Upload the Google certificate file (see the Creating a Project chapter, step 12)
to the panel. You can do it with the IN-SESSION panel’s Admin Web. You need a computer with an internet browser. The computer
must be connected to the same LAN as the IN-SESSION panels. Run the Internet browser on your PC and type in the IN-SESSION panel
IP address. You have to log in first to operate your IN-SESSION panel via these Admin Web pages. Enter your reservation system password
into the “Password” box and click the “Login” button. Remember that the password is case-sensitive. After entering the password,
you will be in the setup pages of Admin Web.
28
FIGURE 3-6. LOGIN SCREEN
Page 29
NEED HELP?
LEAV E TH E TEC H TO US
LIVE 24/7
CHAPTER 3: PANELS
TECHNICAL
SUPPORT
1. 8 7 7. 8 7 7. 2 2 6 9
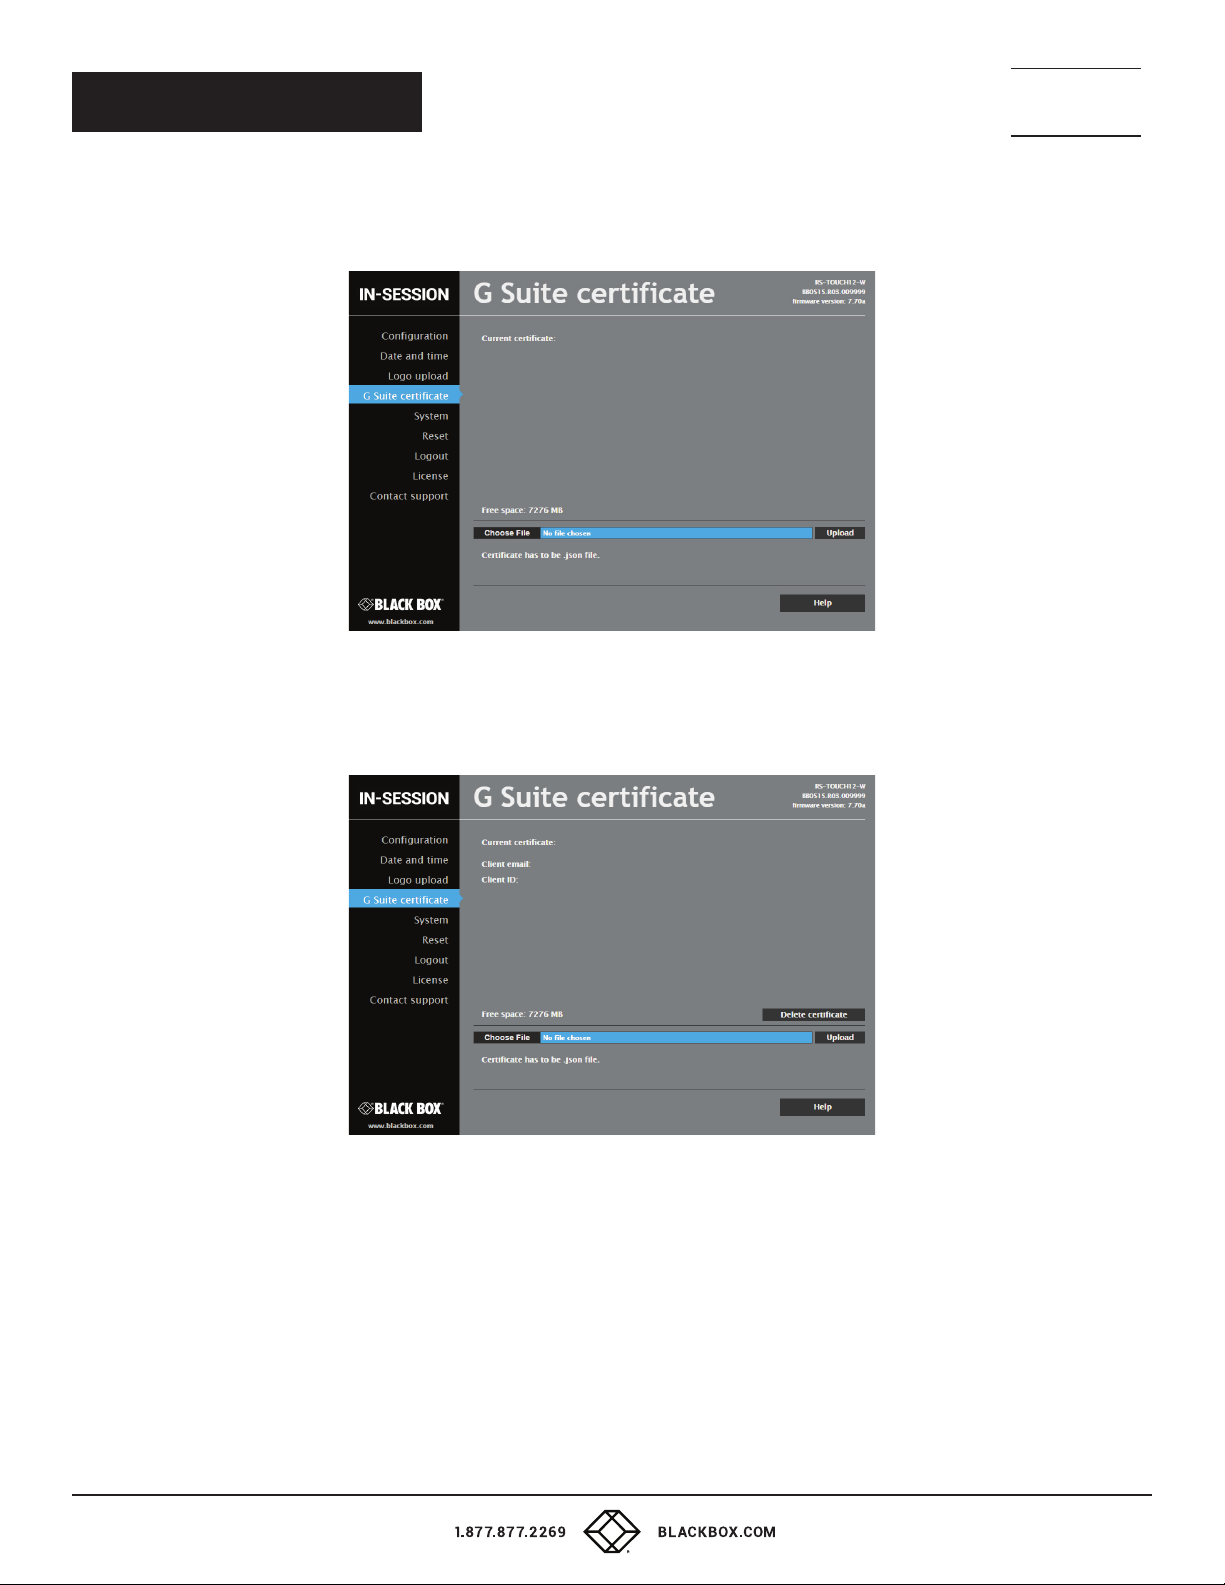
Select the item “Google certificate” in the left column and then click on “Choose file”. The standard dialog window for the opening of files
will come up. In your computer, select a JSON file with the certificate. Then click the “Upload” button.
FIGURE 3-7. GOOGLE CERTIFICATE SCREEN
After the certificate is uploaded, the following screen is shown. Here you can check the certificate. If you want to delete the certificate,
click “Delete certificate.” If you want to change the certificate, upload the new certificate in the manner described above.
FIGURE 3-8. CHECK OR DELETE THE CERTIFICATE
29
Page 30
NEED HELP?
LEAV E TH E TEC H TO US
LIVE 24/7
CHAPTER 3: PANELS
TECHNICAL
SUPPORT
1. 8 7 7. 8 7 7. 2 2 6 9
NOW YOU CAN LEAVE THE ADMIN WEB PAGES AND PROCEED WITH THE SETUP OF THE ROOM ACCOU NT ON THE PANELS.
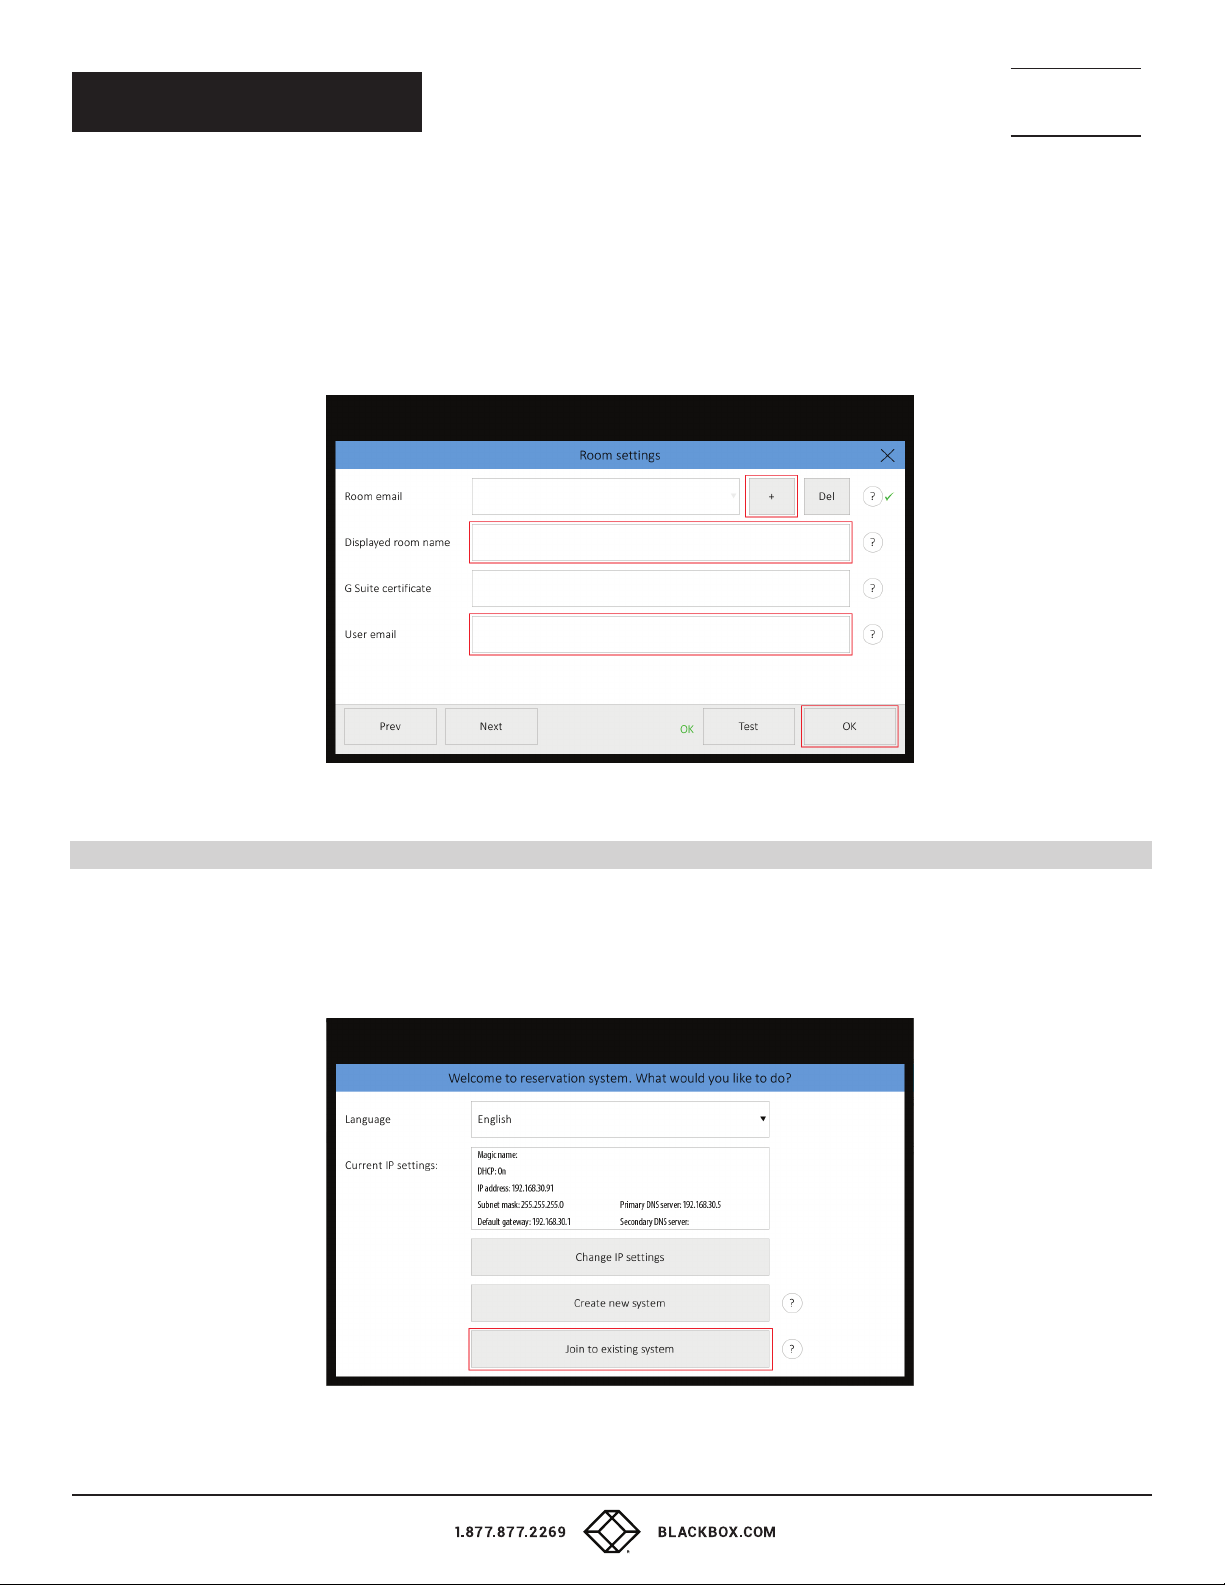
A window with room settings is displayed on the touch panel. A keyboard will appear when you tap “+”, so that you can enter the room
email (see the Creating resource calendars chapter, step 7). In the field “Room displayed name” you can enter the room name,
which will be shown in the upper left-hand corner of the IN-SESSION panel. Now enter the user email (see the Creating a user account
chapter, step 3) and you can test the configuration via the “Test” button. You can now save the configuration by tapping “OK”
and start using the IN-SESSION panel. To change other detailed settings of the panel, tap “Next.” For further information,
see the IN-SESSION Room Scheduler - Setup Guide - Common Settings, Detailed IN-SESSION panel settings chapter.
FIGURE 3-9. ROOM SET TINGS WINDOW
3.2 ADDING MORE PANELS
Once you have set the first panel and created a new reservation system, you may add more panels to this system. Connect another panel
to your network. The opening screen will appear on the panel. Identically, as when setting the first panel, you can change the language
and IP settings. Then tap “Join to existing system.”
NOTE: To join a panel to an existing reservation system, at least one other panel connected to this system must be switched on.
30
FIGURE 3-10. OPENING SCREEN
Page 31
NEED HELP?
LEAV E TH E TEC H TO US
LIVE 24/7
CHAPTER 3: PANELS
TECHNICAL
SUPPORT
1. 8 7 7. 8 7 7. 2 2 6 9
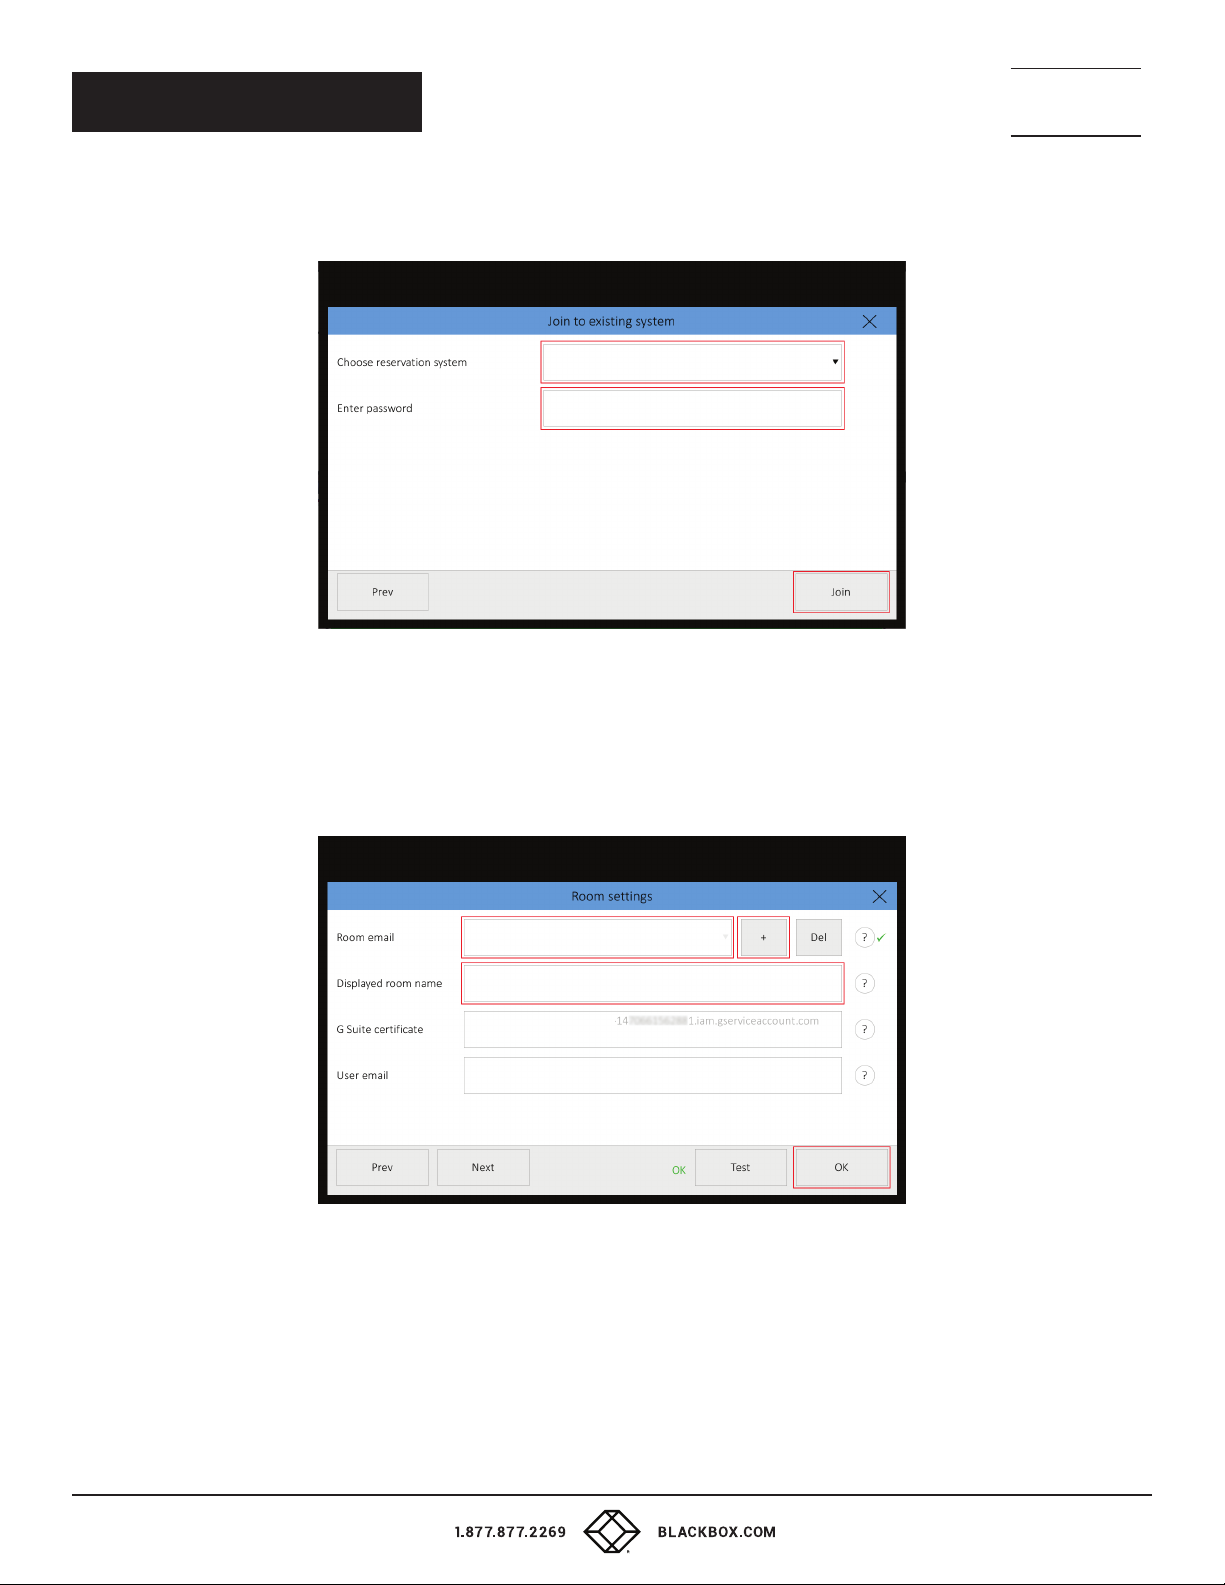
On the next screen, choose which reservation system you want to join to, in case you manage more of them (“Choose reservation system”
item), and enter the password (“Enter password” item) you have chosen during the creation of the system. Continue by tapping “Join.”
FIGURE 3-11. CHOOSE RESERVATION SYSTEM TO JOIN
NOTE: This is the only way to join an existing system. Even if you create a new reservation system with the same name and password,
it will be considered a different one.
The next screen (“Room settings”) allows you to add another room account email address (“+” button) or choose from existing rooms
(by tapping “Room email,” a list of earlier-defined rooms expands). In the field “Room displayed name” you can enter the room name,
which will be shown in the upper left corner of the IN-SESSION panel.
FIGURE 3-12. ROOM SETTINGS SCREEN
31
Page 32

NEED HELP?
LEAV E TH E TEC H TO US
LIVE 24/7
CHAPTER 3: PANELS
TECHNICAL
SUPPORT
1. 8 7 7. 8 7 7. 2 2 6 9
You can test the room account by tapping “Test.”.Finish setting the panel by tapping “OK,” or proceed to detailed panel settings
by tapping “Next.” You can find the description of detailed panel settings in the IN-SESSION Room Scheduler - Setup Guide -
Common Settings, Detailed IN-SESSION panel settings chapter.
NOTE: The user email and Google certificate file is common for all rooms and IN-SESSION panels involved in one reservation system.
If you change the certificate and/or the user email, it will be automatically changed in all panels and for all room accounts.
If you need to change the configuration of a panel that is already set, connected to the reservation system, and in normal operation,
tap and hold the upper left corner (where the room name is) for about 5 seconds until keyboard appears along with the “Enter password”
notice. Enter the password you have chosen during the creation of the reservation system. You will then enter the settings pages.
For further information see the IN-SESSION - Setup Guide - Common Settings, Detailed IN-SESSION panel settings chapter.
32
Page 33

NOTES
__________________________________________________________________________________________________
__________________________________________________________________________________________________
__________________________________________________________________________________________________
__________________________________________________________________________________________________
__________________________________________________________________________________________________
__________________________________________________________________________________________________
NEED HELP?
LEAV E TH E TEC H TO US
LIVE 24/7
TECHNICAL
SUPPORT
1. 8 7 7. 8 7 7. 2 2 6 9
__________________________________________________________________________________________________
__________________________________________________________________________________________________
_
_________________________________________________________________________________________________
__________________________________________________________________________________________________
__________________________________________________________________________________________________\
__________________________________________________________________________________________________
__________________________________________________________________________________________________
__________________________________________________________________________________________________
__________________________________________________________________________________________________
__________________________________________________________________________________________________
__________________________________________________________________________________________________
33
Page 34

NOTES
__________________________________________________________________________________________________
__________________________________________________________________________________________________
__________________________________________________________________________________________________
__________________________________________________________________________________________________
__________________________________________________________________________________________________
__________________________________________________________________________________________________
NEED HELP?
LEAV E TH E TEC H TO US
LIVE 24/7
TECHNICAL
SUPPORT
1. 8 7 7. 8 7 7. 2 2 6 9
__________________________________________________________________________________________________
_
_________________________________________________________________________________________________
__________________________________________________________________________________________________
__________________________________________________________________________________________________\
__________________________________________________________________________________________________
__________________________________________________________________________________________________
__________________________________________________________________________________________________
__________________________________________________________________________________________________
_________________________________________________________________________________________________
34
__________________________________________________________________________________________________
__________________________________________________________________________________________________
__________________________________________________________________________________________________
Page 35

NOTES
__________________________________________________________________________________________________
__________________________________________________________________________________________________
__________________________________________________________________________________________________
__________________________________________________________________________________________________
__________________________________________________________________________________________________
__________________________________________________________________________________________________
NEED HELP?
LEAV E TH E TEC H TO US
LIVE 24/7
TECHNICAL
SUPPORT
1. 8 7 7. 8 7 7. 2 2 6 9
__________________________________________________________________________________________________
_
_________________________________________________________________________________________________
__________________________________________________________________________________________________
__________________________________________________________________________________________________\
__________________________________________________________________________________________________
__________________________________________________________________________________________________
__________________________________________________________________________________________________
__________________________________________________________________________________________________
_________________________________________________________________________________________________
__________________________________________________________________________________________________
__________________________________________________________________________________________________
__________________________________________________________________________________________________
35
Page 36

NEED HELP?
LEAVE THE TECH TO US
LIVE 24/7
TECHNICAL
SUPPORT
1.8 7 7. 8 7 7. 22 6 9
© Copyright 2016 BLACK BOX corporation. All rights reserved.
 Loading...