

Page 1
USER MANUAL
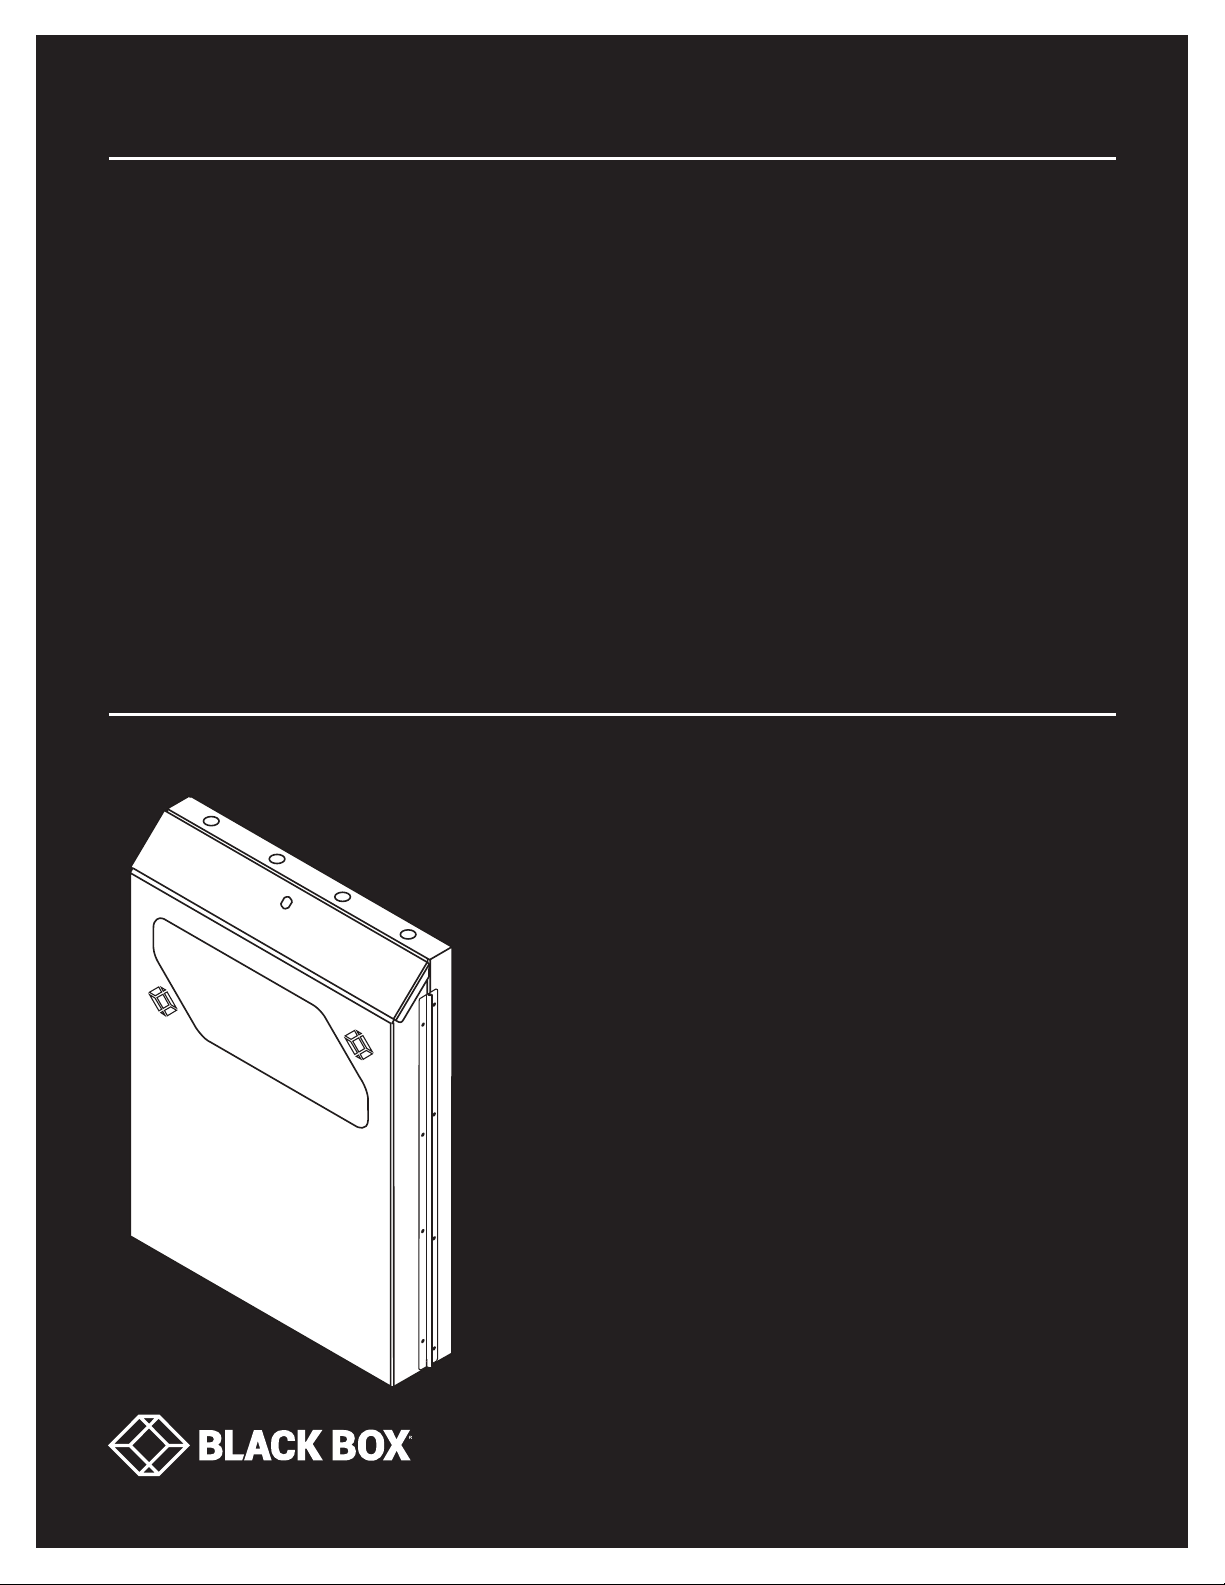
RMT35X S ERIES
LOW-PROFILE
WALLMOUNT
CABINETS
24/7 TECHNICA L SUPPORT AT 1.877.877.2269 OR VISIT BL ACKBOX.COM
Page 2
NEED HELP?
LEAV E THE T ECH T O US
LIVE 24/7
TABLE OF CONTENTS
TECHNICAL
SUPPORT
1. 8 7 7. 877. 22 69
SAFETY INFORMATION ............................................................................................................................................................................... 3
Receiving, Unpacking, and Removing the Low-Profile Wallmount Cabinet from the Pallet ............................................................................... 3
1. SPECIFICATIONS ...................................................................................................................................................................................... 4
2. OV ER VIE W ................................................................................................................................................................................................. 5
2.1 Introduction .......................................................................................................................................................................................................... 5
2.2 Features ............................................................................................................................................................................................................... 5
2.3 What’s Included ................................................................................................................................................................................................... 6
2.3.1 RMT351A ..........................................................................................................................................................................................................................6
2.3.2 RM T351L A .......................................................................................................................................................................................................................7
2.3.3 RMT352A-R3 ...................................................................................................................................................................................................................8
2.3.4 RMT352LA .......................................................................................................................................................................................................................9
2.3.5 RMT353A-R3 .................................................................................................................................................................................................................10
2.3.6 RMT353LA ..................................................................................................................................................................................................................... 11
2.4 Hardware Description ....................................................................................................................................................................................... 12
2.4.1 RMT351A ........................................................................................................................................................................................................................13
2.4.2 RMT351LA .....................................................................................................................................................................................................................14
2.4.3 RMT352A-R3 .................................................................................................................................................................................................................15
2.4.4 RMT352LA .....................................................................................................................................................................................................................16
2.4.5 RMT353A-R3 .................................................................................................................................................................................................................17
2.4.6 RMT353LA .....................................................................................................................................................................................................................18
3. I N S TALL ATI O N ....................................................................................................................................................................................... 19
3.1 Wallmounting Instructions ............................................................................................................................................................................... 19
3.1.1 Tools List .........................................................................................................................................................................................................................19
3.1.2 Instructions .....................................................................................................................................................................................................................19
3.2 Inside Mounting Bracket Adjustment Instructions ........................................................................................................................................ 20
3.2.1 Tools List .........................................................................................................................................................................................................................20
3.2.2 Instructions ....................................................................................................................................................................................................................20
3.3 Door Hinge Side Change Instructions ............................................................................................................................................................. 21
3.3.1 Tools List .........................................................................................................................................................................................................................21
3.3.2 Instructions ....................................................................................................................................................................................................................21
2
1. 8 7 7. 8 7 7. 2 2 6 9 BLACKBOX.COM
Page 3

NEED HELP?
LEAV E THE T ECH T O US
LIVE 24/7
SAFETY INFORMATION
TECHNICAL
SUPPORT
1. 8 7 7. 877. 22 69
RECEIVING, UNPACKING, AND REMOVING THE LOW-PROFILE WALLMOUNT CABINET FROM THE
PALLET
Inspect for damage and report damage if there is damage before receiving. Unpack the rack by carefully removing the corrugated
carton and corners. Avoid damaging the enclosure when removing packaging.
WARNING: Only trained service personnel should be used to remove the Low-Profile Wallmount Cabinet from the carton.
Please know the weight of what you are picking up.
WARNING: When installing a Low-Profile Wallmount Cabinet to materials such as wood, cinder block, concrete, etc., consider
the load capacity of the wallmount enclosure, and be sure to check with local authorities to determine the appropiriate hardware
requirements for your conditions.
Black Box recommends that you consult an experienced maintenance and/or technical person regarding the proper wallmounting
hardware and procedures to be used for the anticipated load capacity of the wallmount cabinet.
RATED OR MAXIMUM LOAD CAPACIT Y FOR THE LOW-PROFILE WALLMOUNT CABINET DEPENDS ON THE MODEL NUMBER.
SEE THE TABLE BELOW.
TABLE 2-1. AVAILABLE MODELS
PRODUCT CODE PRODUCT NAME MAXIMUM LOAD CAPACITY
RMT351A 2U Low-Profile Vertical Wallmount Cabinet - 24"D 200 lb. (90.9 kg)
RMT3 51L A 2U Low-Profile Vertical Wallmount Cabinet - 36"D 200 lb. (90.9 kg)
RMT352A-R3 4U Low-Profile Vertical Wallmount Cabinet - 24"D 200 lb. (90.9 kg)
RMT352LA 4U Low-Profile Vertical Wallmount Cabinet - 36"D 200 lb. (90.9 kg)
RMT353A-R3 6U Low-Profile Vertical Wallmount Cabinet - 24"D 200 lb. (90.9 kg)
RMT353LA 6U Low-Profile Vertical Wallmount Cabinet - 36"D 200 lb. (90.9 kg)
1. 8 7 7. 8 7 7. 2 2 6 9 BLACKBOX.COM
3
Page 4
NEED HELP?
LEAV E THE T ECH T O US
LIVE 24/7
CHAPTER 1: SPECIFICATIONS
TABLE 1-1. SPECIFICATIONS
SPECIFICATION RM T351A RM T 351L A RM T352A-R3 RM T352L A RMT353A-R 3 RM T353L A
FInish
Construction
Outside Height 29.44" (74.77 cm) 41.44" (105.26 cm) 29.44" (74.77 cm) 41.46” (105.31 cm) 29.44” (74.77 cm)" 41.47” (105.34 cm
Outside Width 22.42" (56.94 cm) 22.42" (56.94 cm) 22.42" (56.94 cm) 22.42" (56.94 cm) 22.42" (56.94 cm) 22.42" (56.94 cm)
Outside Depth 5.25" (13.34 cm) 5.25" (13.34 cm) 8.75" (22.23 cm) 8.75" (22.23 cm) 12.25" (31.12 cm) 12. 25 " (31.12 cm)
Rack Units (U) 2U 2U 4U 4U 6U 6U
Racking Depth 24" (60.9 cm) 36" (91.4 cm) 24” (60.9 cm) 36” (91.4 cm) 24” (60.9 cm) 36” (91.4 cm)
Environmental Indoor Indoor Indoor Indoor Indoor Indoor
Load Capacity 200 lb. (90.9 kg) 200 lb. (90.9 kg) 200 lb. (90.9 kg) 200 lb. (90.9 kg) 200 lb. (90.9 kg) 200 lb. (90.9 kg)
Weight EIGHT 33 lb. (15.0 kg) 38 lb. (17.2 kg) 39 lb. (17.7 kg) 45 lb. (20.4 kg) 45 lb. (20.4 kg) 51 lb. (23.2 kg)
Powder Coat,
Pantone 2U, 2X
Welded Steel,
1.2 mm (18 ga.) to
2.0 mm (14 ga.)
Powder Coat,
Pantone 2U, 2X
Welded Steel,
1.2 mm (18 ga.) to
2.0 mm (14 ga.)
Powder Coat,
Pantone 2U, 2X
Welded Steel,
1.2 mm (18 ga.) to
2.0 mm (14 ga.)
Powder Coat,
Pantone 2U, 2X
Welded Steel,
1.2 mm (18 ga.) to
2.0 mm (14 ga.)
Powder Coat,
Pantone 2U, 2X
Welded Steel,
1.2 mm (18 ga.)
to 2.0 mm (14 ga.)
TECHNICAL
SUPPORT
1. 8 7 7. 877. 22 69
Powder Coat,
Pantone 2U, 2X
Welded Steel,
1.2 mm (18 ga.)
to 2.0 mm (14 ga.)
4
1. 8 7 7. 8 7 7. 2 2 6 9 BLACKBOX.COM
Page 5

NEED HELP?
LEAV E THE T ECH T O US
LIVE 24/7
CHAPTER 2: OVERVIEW
TECHNICAL
SUPPORT
1. 8 7 7. 877. 22 69
2.1 INTRODUCTION
Low-Profile Wallmount Cabinets are a dependable choice for tight networking environments and security-sensitive applications. Unique
vertical racking keeps your equipment out of the way while connectors stay easily accessible.
Durable steel construction makes these models a good choice for industrial spaces and expanding businesses.
2.2 FEATURES
Space-saving vertical mounting for network devices.
Mount out of the way on nearly any wall or vertical surface.
Models with 2U, 4U, or 6U of rack space.
Heavy-duty steel construction.
2U, 4U, or 6U of 19" EIA-310 square hole rails.
2-point equipment mounting, 24" or 36" equipment depth.
Mounting rails have 4” of vertical adjustment inside cabinet.
200 lb. (90.9 kg) equipment capacity.
Top door for monitoring access.
Front door for maintenance access.
16" C/C and 19" C/C mounting holes (4-point mounting for both widths).
Mesh on doors allows for secure cooling.
Piano hinges on front and top doors ensure secure / strong door-to-body connection.
Up to (4) top and (4) bottom 1" (2.5 cm) conduit knock-outs.
Reversible front door allows for L or R opening.
Front and top door have positive retention locks ensuring doors to open when unlocked unless activated.
Secure models have fan mounts and vented bottom for heat reduction.
EIA compliant.
1. 8 7 7. 8 7 7. 2 2 6 9 BLACKBOX.COM
5
Page 6

NEED HELP?
LEAV E THE T ECH T O US
LIVE 24/7
CHAPTER 2: OVERVIEW
TECHNICAL
SUPPORT
1. 8 7 7. 877. 22 69
2.3 WHAT’S INCLUDED
Your package should include the following items. If anything is missing or damaged, contact Black Box Technical Support
at 877-877-2269 or [email protected].
2.3.1 RMT351A
(1) 24” Deep 2U Wallmount Cabinet including the following:
(1) 2U Cabinet Back Assembly
(1) 2U Cabinet Door Assembly
(2) 2U square hole rail
(1) Front Door Lock (Tai-Sam DKS-3)
(1) Top Door Lock (Tai-Sam MS-657-24)
(8) M6 x 12mm Machine Screw
(8) M6 Flange nut
(4) 1/4”-20 1/2” Carriage Bolt
(4) 1/4”-20 Flange nut
(6) M3 x 8-mm Machine Screw
(1) Piano Hinge for Front Door
(4) Rubber Door Bumper
(4) 1/4”-10 x 2” Lag Screw for Wood
(4) 1/4” Flat Washer
(4) 1/4” Lock Washer
(8) M5 Machine Screw
(8) M5 Cage Nut
(1) Pair of Top Lock Keys
(1) Pair of Side Lock Keys
6
1. 8 7 7. 8 7 7. 2 2 6 9 BLACKBOX.COM
Page 7

CHAPTER 2: OVERVIEW
2.3.2 RMT351LA
(1) 36” Deep 2U Wallmount Cabinet including the following:
(1) 2U Cabinet Back Assembly
(1) 2U Cabinet Door Assembly
(2) 2U square hole rail
(1) Front Door Lock (Tai-Sam DKS-3)
(1) Top Door Lock (Tai-Sam MS-657-24)
(12) M6 x 12mm Machine Screw
(12) M6 Flange nut
(4) 1/4”-20 1/2” Carriage Bolt
(4) 1/4”-20 Flange nut
(6) M3 x 8-mm Machine Screw
(1) Piano Hinge for Front Door
(4) Rubber Door Bumper
(4) 1/4”-10 x 2” Lag Screw for Wood
(4) 1/4” Flat Washer
(4) 1/4” Lock Washer
(8) M5 Machine Screw
(8) M5 Cage Nut
(1) Pair of Top Lock Keys
(1) Pair of Side Lock Keys
NEED HELP?
LEAV E THE T ECH T O US
LIVE 24/7
TECHNICAL
SUPPORT
1. 8 7 7. 877. 22 69
1. 8 7 7. 8 7 7. 2 2 6 9 BLACKBOX.COM
7
Page 8

CHAPTER 2: OVERVIEW
2.3.3 RMT352A-R3
(1) 24” Deep 4U Wallmount Cabinet including the following:
(1) 4U Cabinet Back Assembly
(1) 4U Cabinet Door Assembly
(2) 4U square hole rail
(1) Front Door Lock (Tai-Sam DKS-3)
(1) Top Door Lock (Tai-Sam MS-657-24)
(8) M6 x 12mm Machine Screw
(8) M6 Flange nut
(4) 1/4”-20 1/2” Carriage Bolt
(4) 1/4”-20 Flange nut
(6) M3 x 8-mm Machine Screw
(1) Piano Hinge for Front Door
(4) Rubber Door Bumper
(4) 1/4”-10 x 2” Lag Screw for Wood
(4) 1/4” Flat Washer
(4) 1/4” Lock Washer
(16) M5 Machine Screw
(16) M5 Cage Nut
(1) Pair of Top Lock Keys
(1) Pair of Side Lock Keys
NEED HELP?
LEAV E THE T ECH T O US
LIVE 24/7
TECHNICAL
SUPPORT
1. 8 7 7. 877. 22 69
8
1. 8 7 7. 8 7 7. 2 2 6 9 BLACKBOX.COM
Page 9

CHAPTER 2: OVERVIEW
2.3.4 RMT352L A
(1) 36" Deep 4U Wallmount Cabinet including the following:
(1) 4U Cabinet Back Assembly
(1) 4U Cabinet Door Assembly
(2) 4U square hole rail
(1) Front Door Lock (Tai-Sam DKS-3)
(1) Top Door Lock (Tai-Sam MS-657-24)
(12) M6 x 12mm Machine Screw
(12) M6 Flange nut
(4) 1/4”-20 1/2” Carriage Bolt
(4) 1/4”-20 Flange nut
(6) M3 x 8-mm Machine Screw
(1) Piano Hinge for Front Door
(4) Rubber Door Bumper
(4) 1/4”-10 x 2” Lag Screw for Wood
(4) 1/4” Flat Washer
(4) 1/4” Lock Washer
(16) M5 Machine Screw
(16) M5 Cage Nut
(1) Pair of Top Lock Keys
(1) Pair of Side Lock Keys
NEED HELP?
LEAV E THE T ECH T O US
LIVE 24/7
TECHNICAL
SUPPORT
1. 8 7 7. 877. 22 69
1. 8 7 7. 8 7 7. 2 2 6 9 BLACKBOX.COM
9
Page 10

CHAPTER 2: OVERVIEW
2.3.5 RMT353A-R3
(1) 24” Deep 6U Wallmount Cabinet including the following:
(1) 6U Cabinet Back Assembly
(1) 6U Cabinet Door Assembly
(2) 6U square hole rail
(1) Front Door Lock (Tai-Sam DKS-3)
(1) Top Door Lock (Tai-Sam MS-657-24)
(8) M6 x 12-mm Machine Screw
(8) M6 Flange nut
(4) 1/4”-20 1/2” Carriage Bolt
(4) 1/4”-20 Flange nut
(6) M3 x 8-mm Machine Screw
(1) Piano Hinge for Front Door
(4) Rubber Door Bumper
(4) 1/4”-10 x 2” Lag Screw for Wood
(4) 1/4” Flat Washer
(4) 1/4” Lock Washer
(24) M5 Machine Screw
(24) M5 Cage Nut
(1) Pair of Top Lock Keys
(1) Pair of Side Lock Keys
NEED HELP?
LEAV E THE T ECH T O US
LIVE 24/7
TECHNICAL
SUPPORT
1. 8 7 7. 877. 22 69
10
1. 8 7 7. 8 7 7. 2 2 6 9 BLACKBOX.COM
Page 11

CHAPTER 2: OVERVIEW
2.3.6 RMT353LA
(1) 36" Deep 6U Wallmount Cabinet including the following:
(1) 6U Cabinet Back Assembly
(1) 6U Cabinet Door Assembly
(2) 6U square hole rail
(1) Front Door Lock (Tai-Sam DKS-3)
(1) Top Door Lock (Tai-Sam MS-657-24)
(12) M6 x 12mm Machine Screw
(12) M6 Flange nut
(4) 1/4”-20 1/2” Carriage Bolt
(4) 1/4”-20 Flange nut
(6) M3 x 8-mm Machine Screw
(1) Piano Hinge for Front Door
(4) Rubber Door Bumper
(4) 1/4”-10 x 2” Lag Screw for Wood
(4) 1/4” Flat Washer
(4) 1/4” Lock Washer
(24) M5 Machine Screw
(24) M5 Cage Nut
(1) Pair of Top Lock Keys
(1) Pair of Side Lock Keys
NEED HELP?
LEAV E THE T ECH T O US
LIVE 24/7
TECHNICAL
SUPPORT
1. 8 7 7. 877. 22 69
1. 8 7 7. 8 7 7. 2 2 6 9 BLACKBOX.COM
11
Page 12
NEED HELP?
LEAV E THE T ECH T O US
LIVE 24/7
CHAPTER 2: OVERVIEW
TECHNICAL
SUPPORT
1. 8 7 7. 877. 22 69
2.4 HARDWARE DESCRIPTION
Six models of the Low-Profile Wallmount Cabinets are available. The table below lists the models, and the illustrations that follow
show each cabinet in detail.
TABLE 2-1. AVAILABLE MODELS
PRODUCT CODE PRODUCT NAME
RMT351A 2U Low-Profile Vertical Wallmount Cabinet - 24"D
RMT3 51L A 2U Low-Profile Vertical Wallmount Cabinet - 36"D
RMT352A-R3 4U Low-Profile Vertical Wallmount Cabinet - 24"D
RMT352LA 4U Low-Profile Vertical Wallmount Cabinet - 36"D
RMT353A-R3 6U Low-Profile Vertical Wallmount Cabinet - 24"D
RMT353LA 6U Low-Profile Vertical Wallmount Cabinet - 36"D
12
1. 8 7 7. 8 7 7. 2 2 6 9 BLACKBOX.COM
Page 13
CHAPTER 2: OVERVIEW
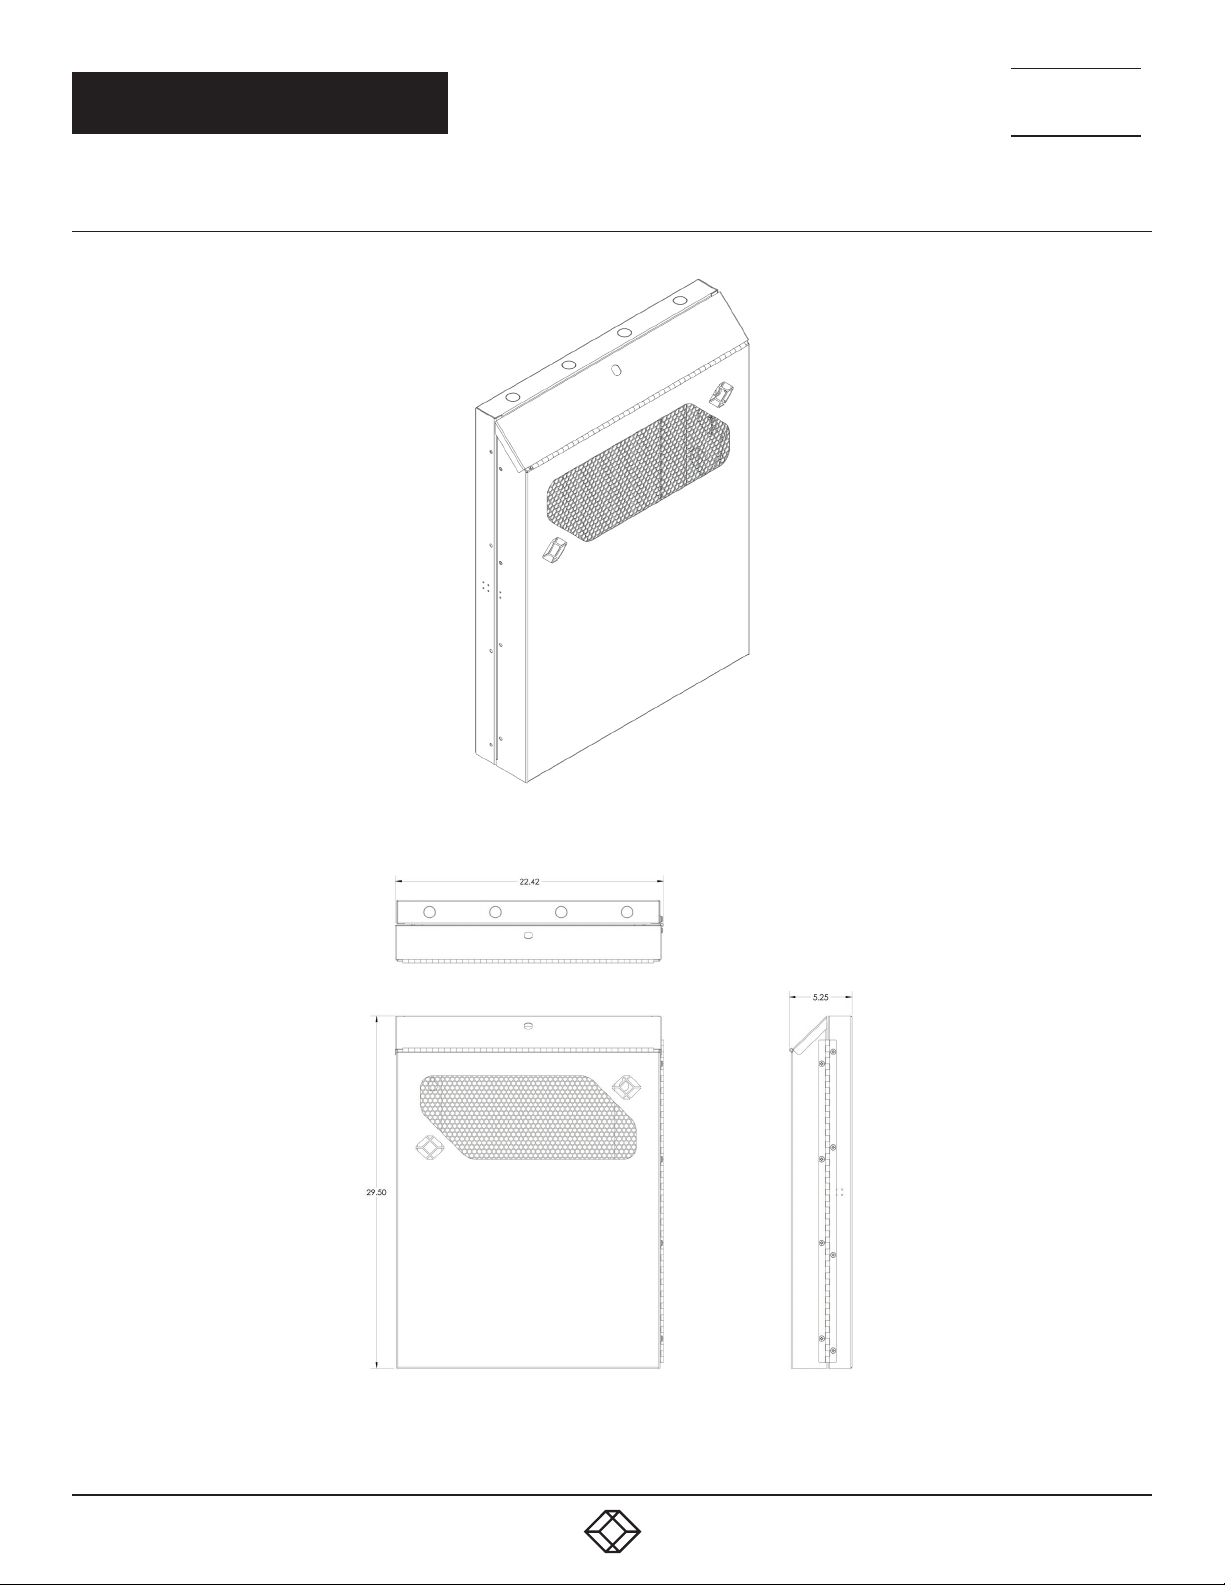
2.4.1 R M T 3 51A
Figure 2-1 illustrates the 2U Low-Profile Vertical Wallmount Cabinet - 24"D. Figure 2-2 shows its dimensions.
NEED HELP?
LEAV E THE T ECH T O US
LIVE 24/7
TECHNICAL
SUPPORT
1. 8 7 7. 877. 22 69
FIGURE 2-1. RMT351A
FIGURE 2-2. RMT351A DIMENSIONS
1. 8 7 7. 8 7 7. 2 2 6 9 BLACKBOX.COM
13
Page 14
CHAPTER 2: OVERVIEW
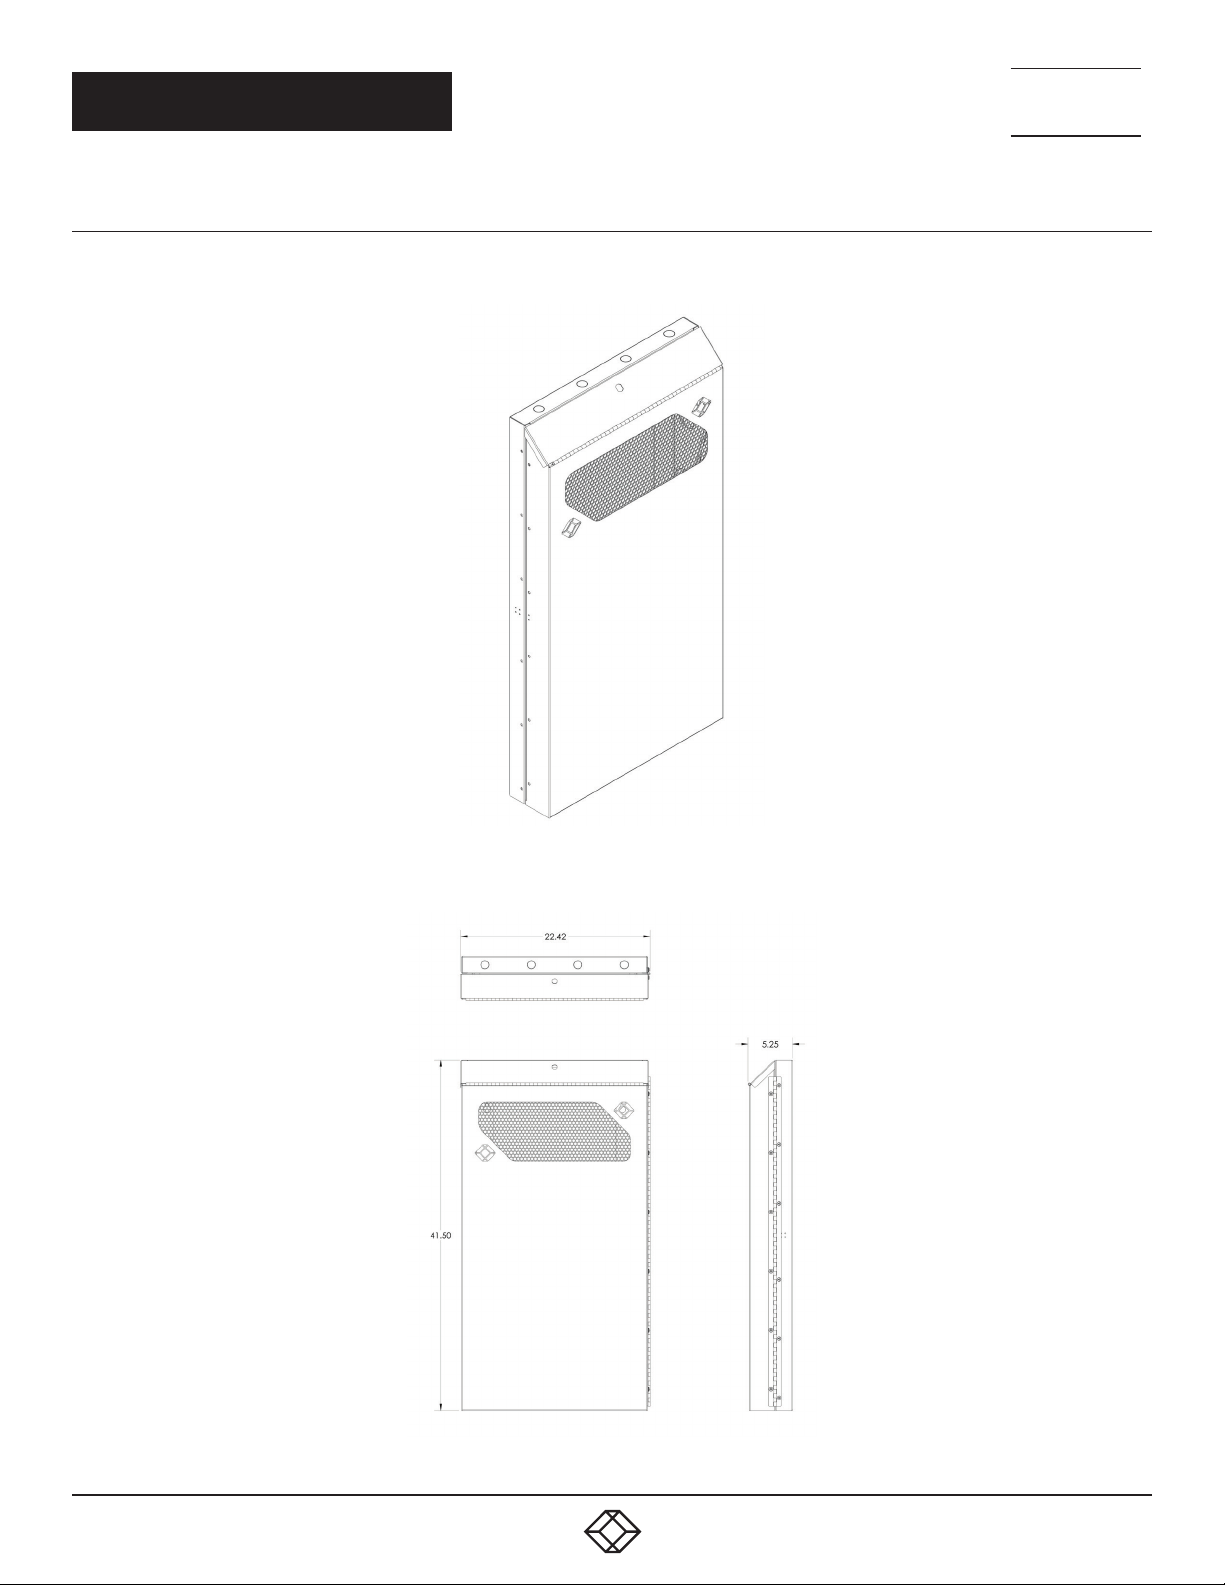
2.4.2 RMT351L A
Figure 2-3 illustrates the 2U Low-Profile Vertical Wallmount Cabinet - 36”D. Figure 2-4 shows its dimensions.
NEED HELP?
LEAV E THE T ECH T O US
LIVE 24/7
TECHNICAL
SUPPORT
1. 8 7 7. 877. 22 69
FIGURE 2-3. RMT351LA
14
FIGURE 2-4. RMT351LA DIMENSIONS
1. 8 7 7. 8 7 7. 2 2 6 9 BLACKBOX.COM
Page 15
CHAPTER 2: OVERVIEW
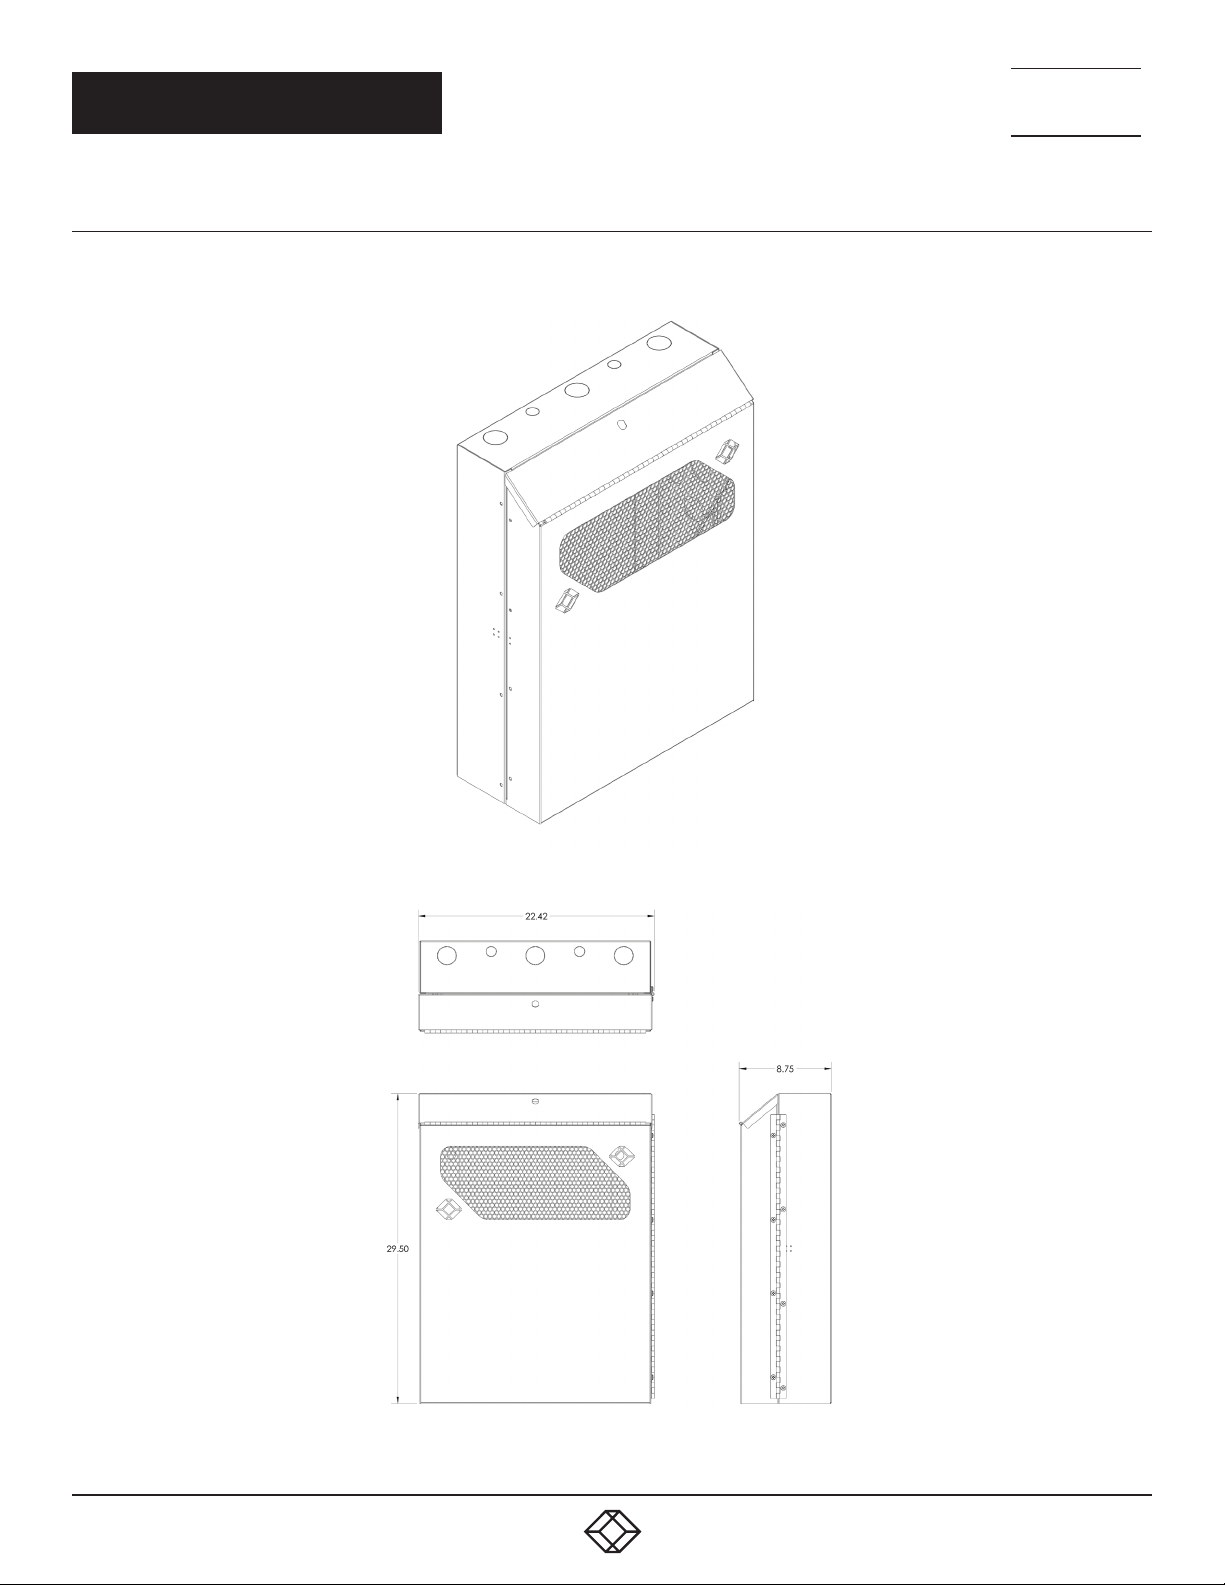
2.4.3 RMT352A-R3
Figure 2-5 illustrates the 4U Low-Profile Vertical Wallmount Cabinet - 24”D. Figure 2-6 shows its dimensions.
NEED HELP?
LEAV E THE T ECH T O US
LIVE 24/7
TECHNICAL
SUPPORT
1. 8 7 7. 877. 22 69
FIGURE 2-5. RMT352A-R3
FIGURE 2-6. RMT352A-R3 DIMENSIONS
1. 8 7 7. 8 7 7. 2 2 6 9 BLACKBOX.COM
15
Page 16
CHAPTER 2: OVERVIEW
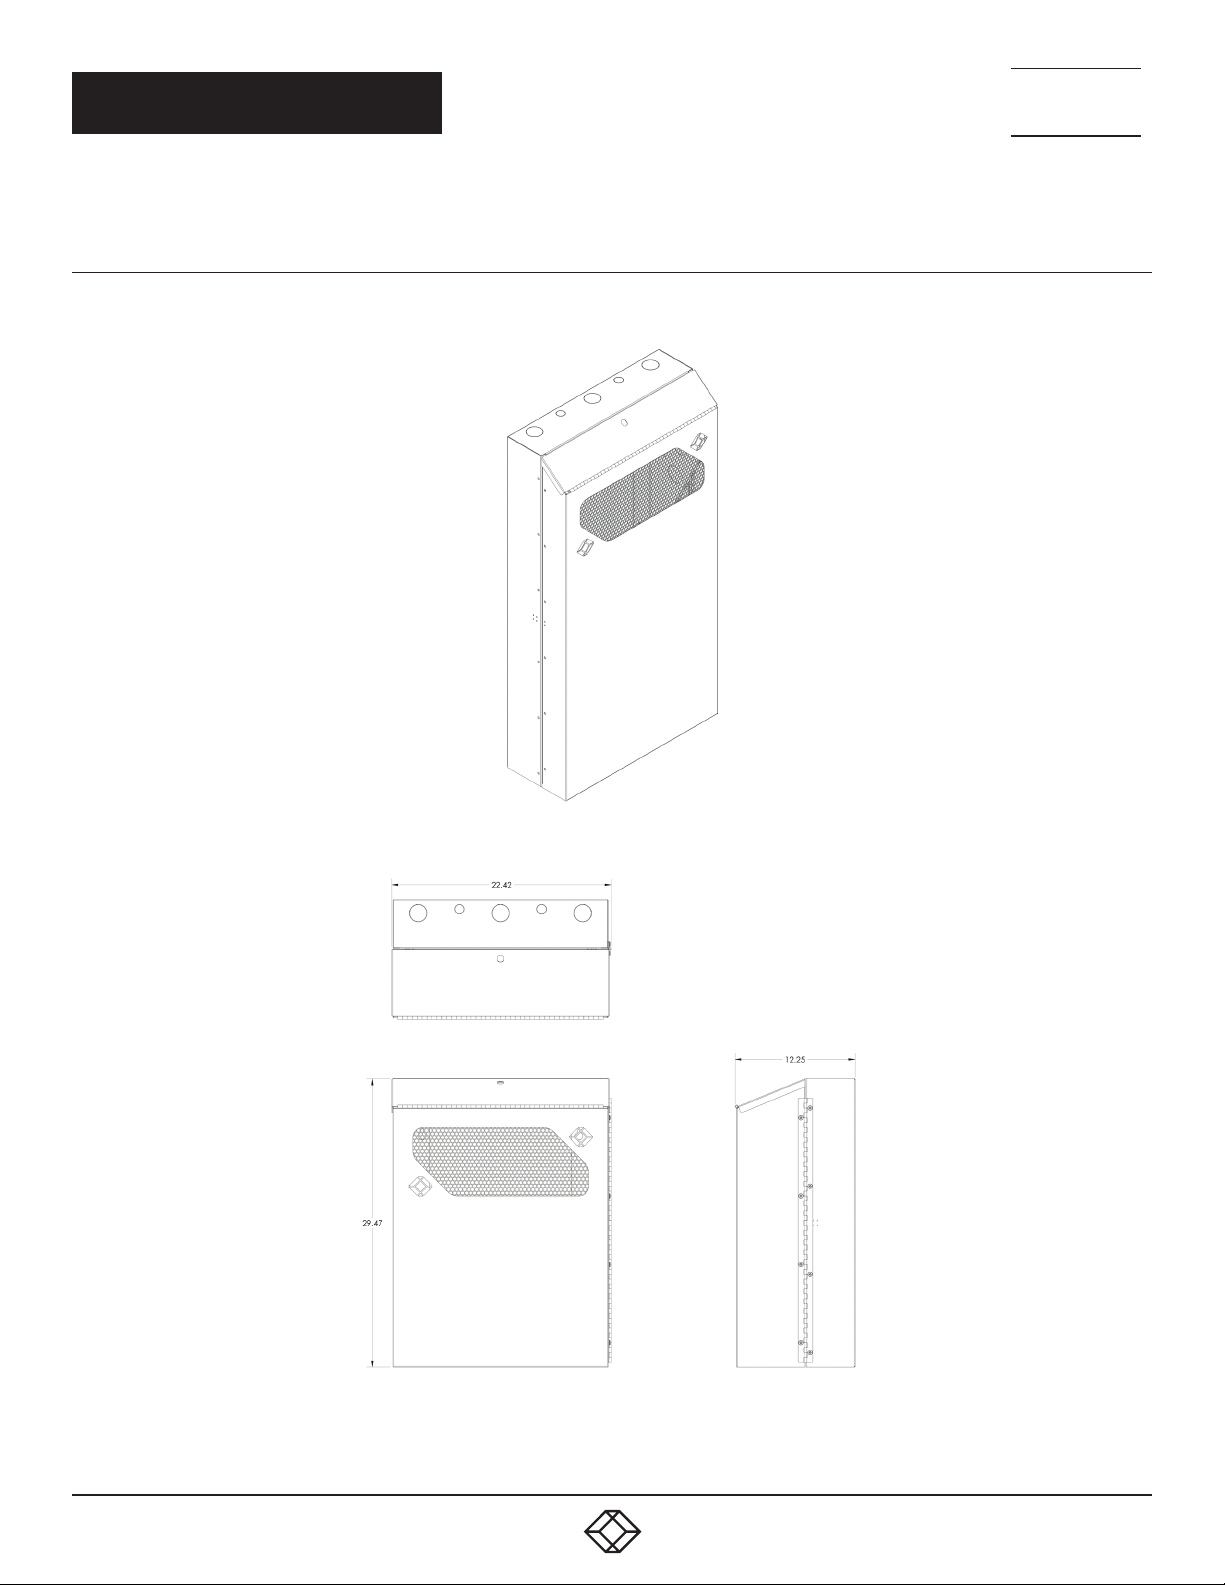
2.4.4 RMT352LA
Figure 2-7 illustrates the 4U Low-Profile Vertical Wallmount Cabinet - 36”D. Figure 2-6 shows its dimensions.
NEED HELP?
LEAV E THE T ECH T O US
LIVE 24/7
TECHNICAL
SUPPORT
1. 8 7 7. 877. 22 69
FIGURE 2-7. RMT352LA
16
FIGURE 2-8. RMT352LA DIMENSIONS
1. 8 7 7. 8 7 7. 2 2 6 9 BLACKBOX.COM
Page 17
CHAPTER 2: OVERVIEW
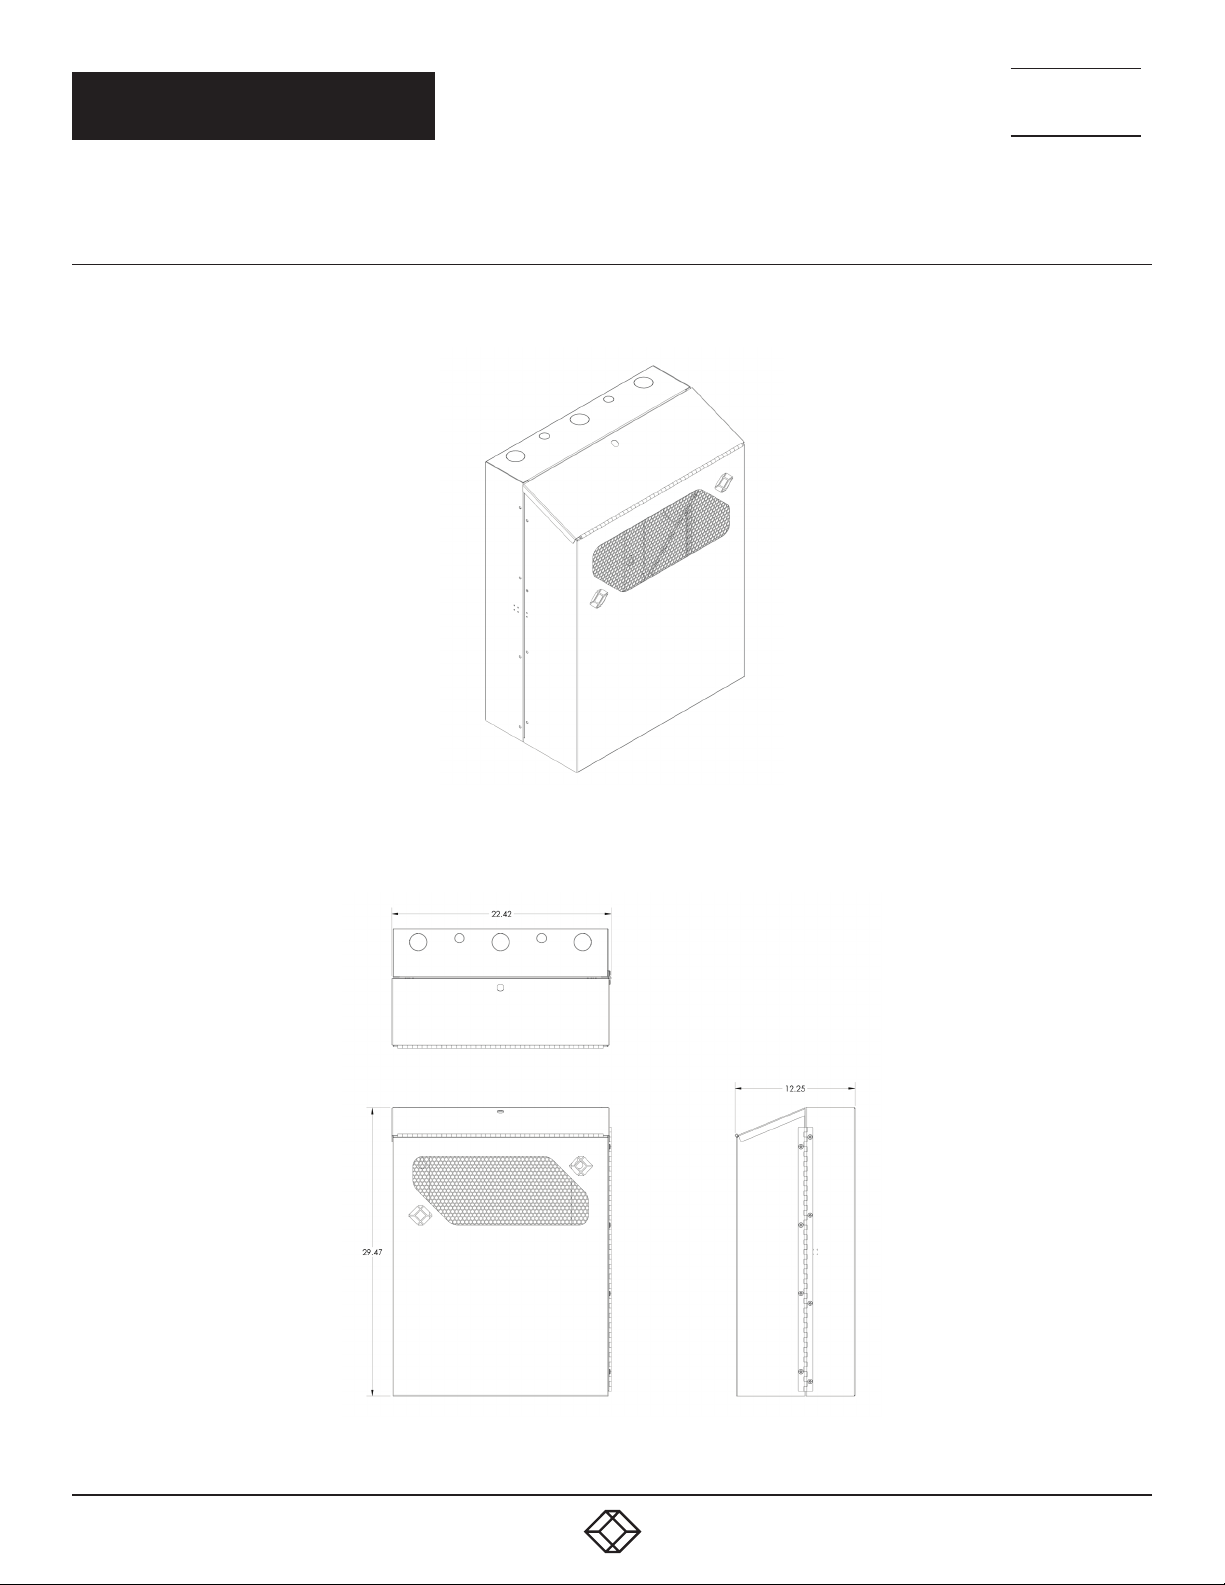
2.4.5 RMT353A-R3
Figure 2-9 illustrates the 6U Low-Profile Vertical Wallmount Cabinet - 24”D. Figure 2-10 shows its dimensions.
NEED HELP?
LEAV E THE T ECH T O US
LIVE 24/7
TECHNICAL
SUPPORT
1. 8 7 7. 877. 22 69
FIGURE 2-9. RMT353A-R3
FIGURE 2-10. RMT353A-R3 DIMENSIONS
1. 8 7 7. 8 7 7. 2 2 6 9 BLACKBOX.COM
17
Page 18
CHAPTER 2: OVERVIEW
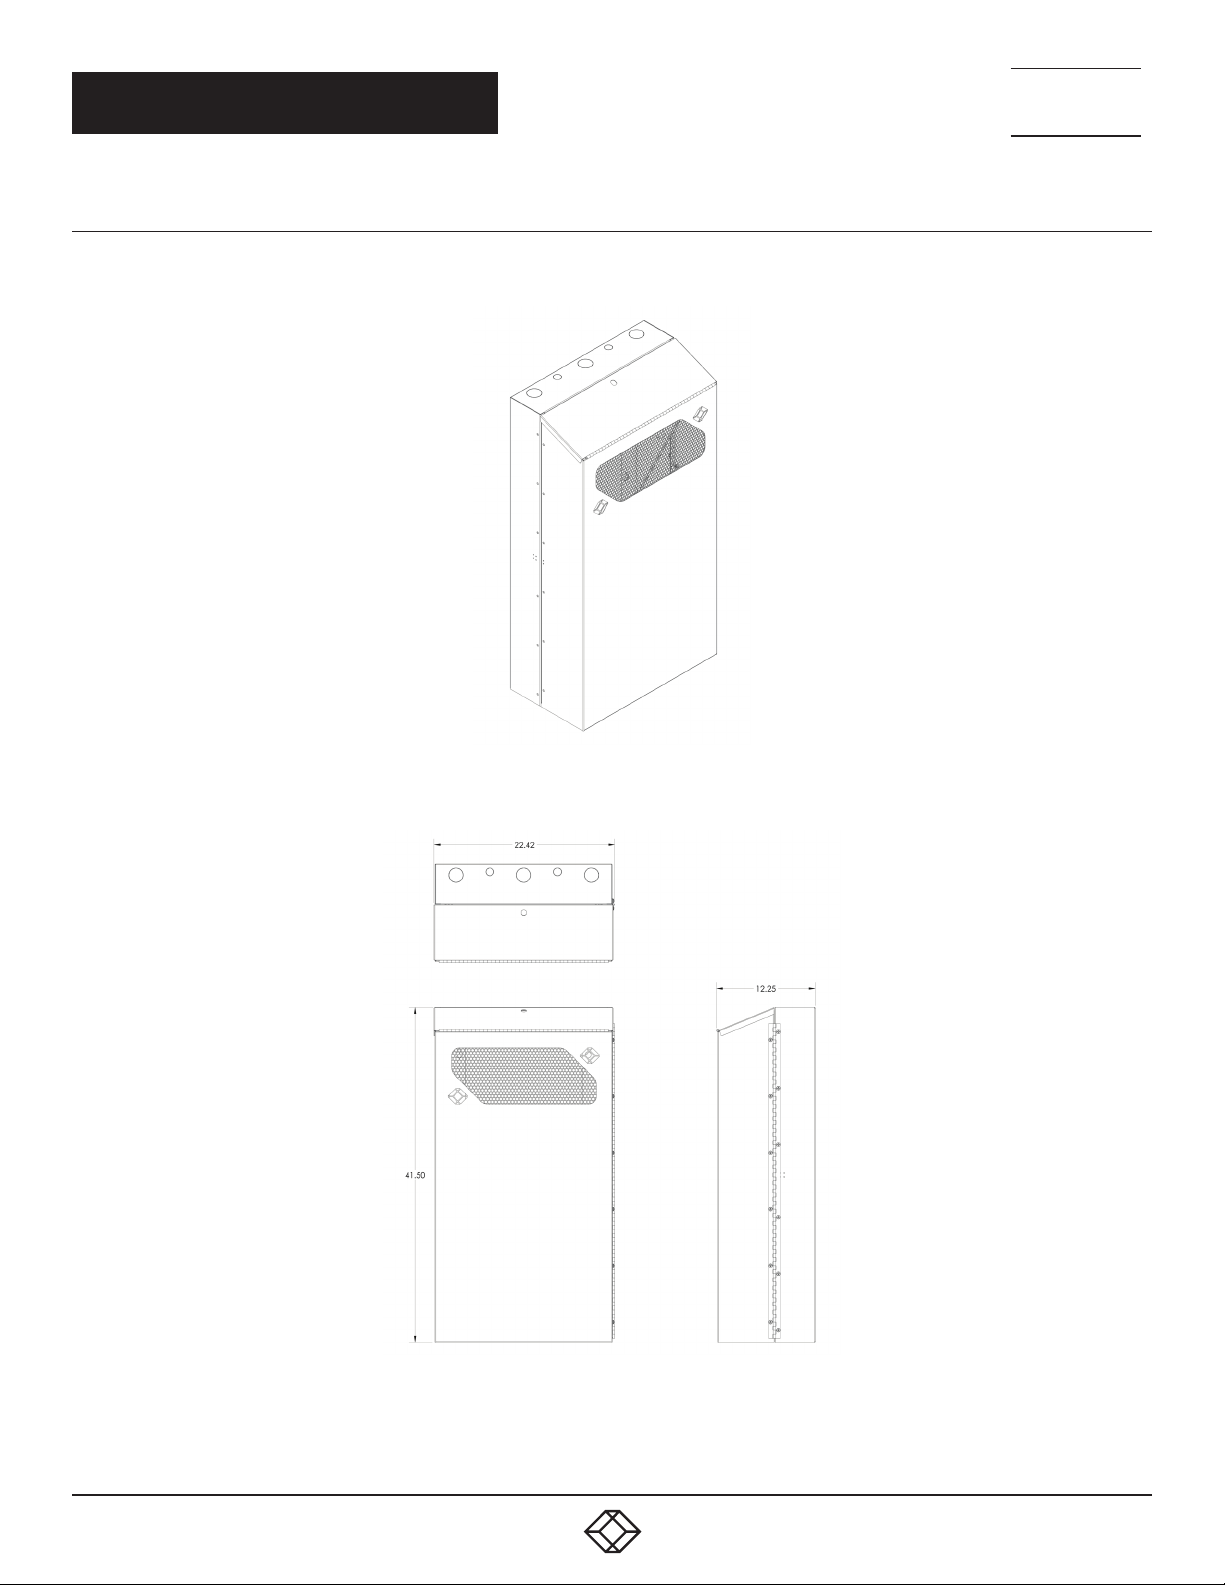
2.4.6 RMT353LA
Figure 2-11 illustrates the 6U Low-Profile Vertical Wallmount Cabinet - 36”D. Figure 2-12 shows its dimensions.
NEED HELP?
LEAV E THE T ECH T O US
LIVE 24/7
TECHNICAL
SUPPORT
1. 8 7 7. 877. 22 69
FIGURE 2-11. RMT353LA
18
FIGURE 2-12. RMT353LA DIMENSIONS
1. 8 7 7. 8 7 7. 2 2 6 9 BLACKBOX.COM
Page 19
NEED HELP?
LEAV E THE T ECH T O US
LIVE 24/7
CH A PTE R 3: I NS TAL L ATI ON
TECHNICAL
SUPPORT
1. 8 7 7. 877. 22 69
3.1 WALLMOUNTING INSTRUCTIONS
3.1.1 TO O L S L I S T
Power Drill with 7/16” Socket
Level
Stud-Finder (optional)
3.1.2 INSTRUCTIONS
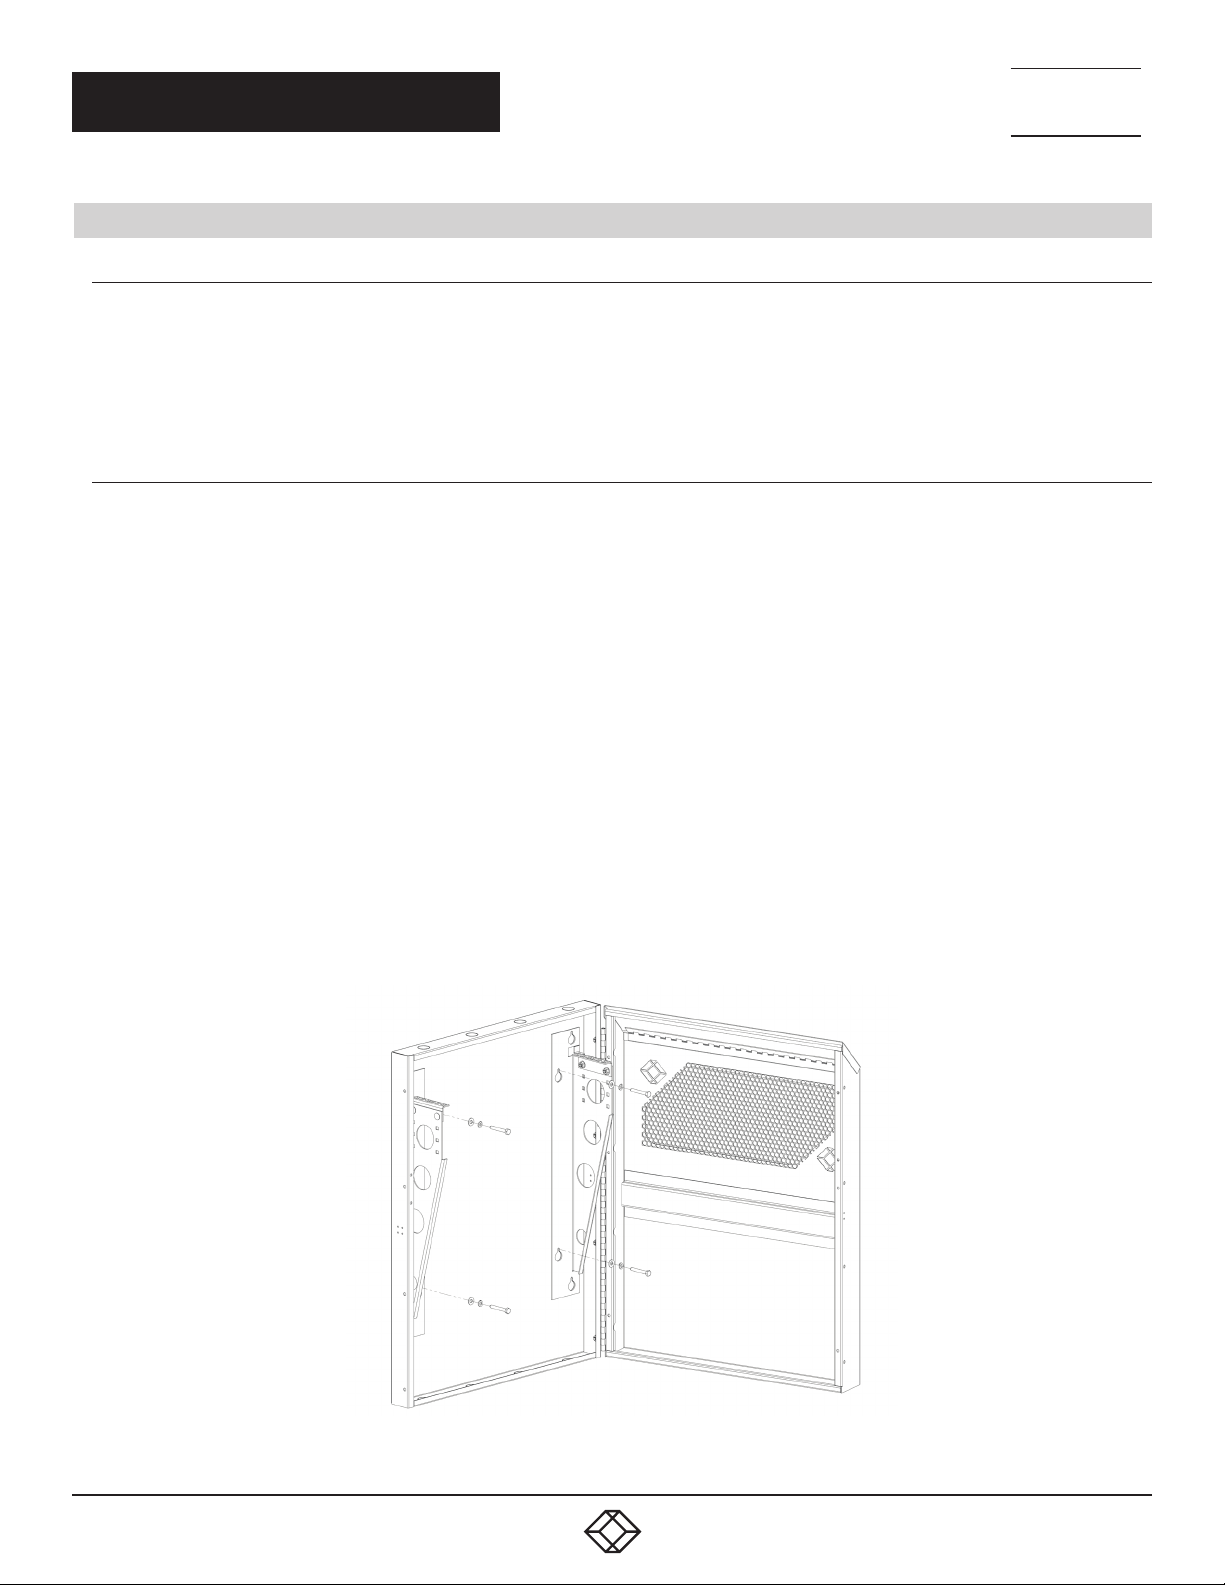
STEP 1: Locate wall studs for mounting low profile wallmount cabinet and determine if they are spaced 16” or 19” apart
to determine the correct mounting holes to use.
STEP 2: Mark mounting hole placement on wall for the top mounting holes in the cabinet. Cabinet should be mounted
into the middle of wall studs – mounting holes will be either 16” or 19” apart depending on the spacing of the wall studs.
Use the level to make sure the holes will be at the same height.
STEP 3: Use the drill to drive ONE (1) ¼”-10 X 2” LAG SCREW FOR WOOD with ONE (1) ¼” LOCK WASHER and ONE (1) ¼” FLAT
WASHER approximately ¾ of the way into the first marked mounting hole.
STEP 4: Repeat step (3), driving ONE (1) ¼”-10 X 2” LAG SCREW FOR WOOD with ONE (1) ¼” LOCK WASHER and ONE (1) ¼” FLAT
WASHER approximately ¾ of the way into the second marked mounting hole.
STEP 5: Place low profile wallmount cabinet onto these TWO (2) mounting screws. The ¼” FLAT WASHER and ¼” LOCK WASHER
should be inside the cabinet (see picture). Make sure the cabinet rests all the way down with the mounting screws sitting
in the narrow part of both the top mounting holes. Check that cabinet is level before tightening top mounting screws
STEP 6: Once cabinet is positioned correctly on the top TWO (2) mounting screws and is level, use the drill to tighten
both mounting screws into the wall.
STEP 7: Complete wall mounting the low profile cabinet by driving the remaining TWO (2) ¼”-10 X 2” LAG SCREWS FOR WOOD,
TWO (2) ¼” LOCK WASHERS, and TWO (2) ¼” FLAT WASHERS into the correctly spaced bottom mounting holes in the cabinet.
NOTE: Instructions for mounting
the cabinet on the wall
are the same for all models.
FIGURE 3-1. MOUNTING THE RMT351A CABINET ON THE WALL
1. 8 7 7. 8 7 7. 2 2 6 9 BLACKBOX.COM
19
Page 20
NEED HELP?
LEAV E THE T ECH T O US
LIVE 24/7
CH A PTE R 3: I NS TAL L ATI ON
TECHNICAL
SUPPORT
1. 8 7 7. 877. 22 69
3.2 INSIDE MOUNTING BRACKET ADJUSTMENT INSTRUCTIONS
3.2.1 TOOLS LIST
7/16” Wrench
3.2.2 INSTRUCTIONS
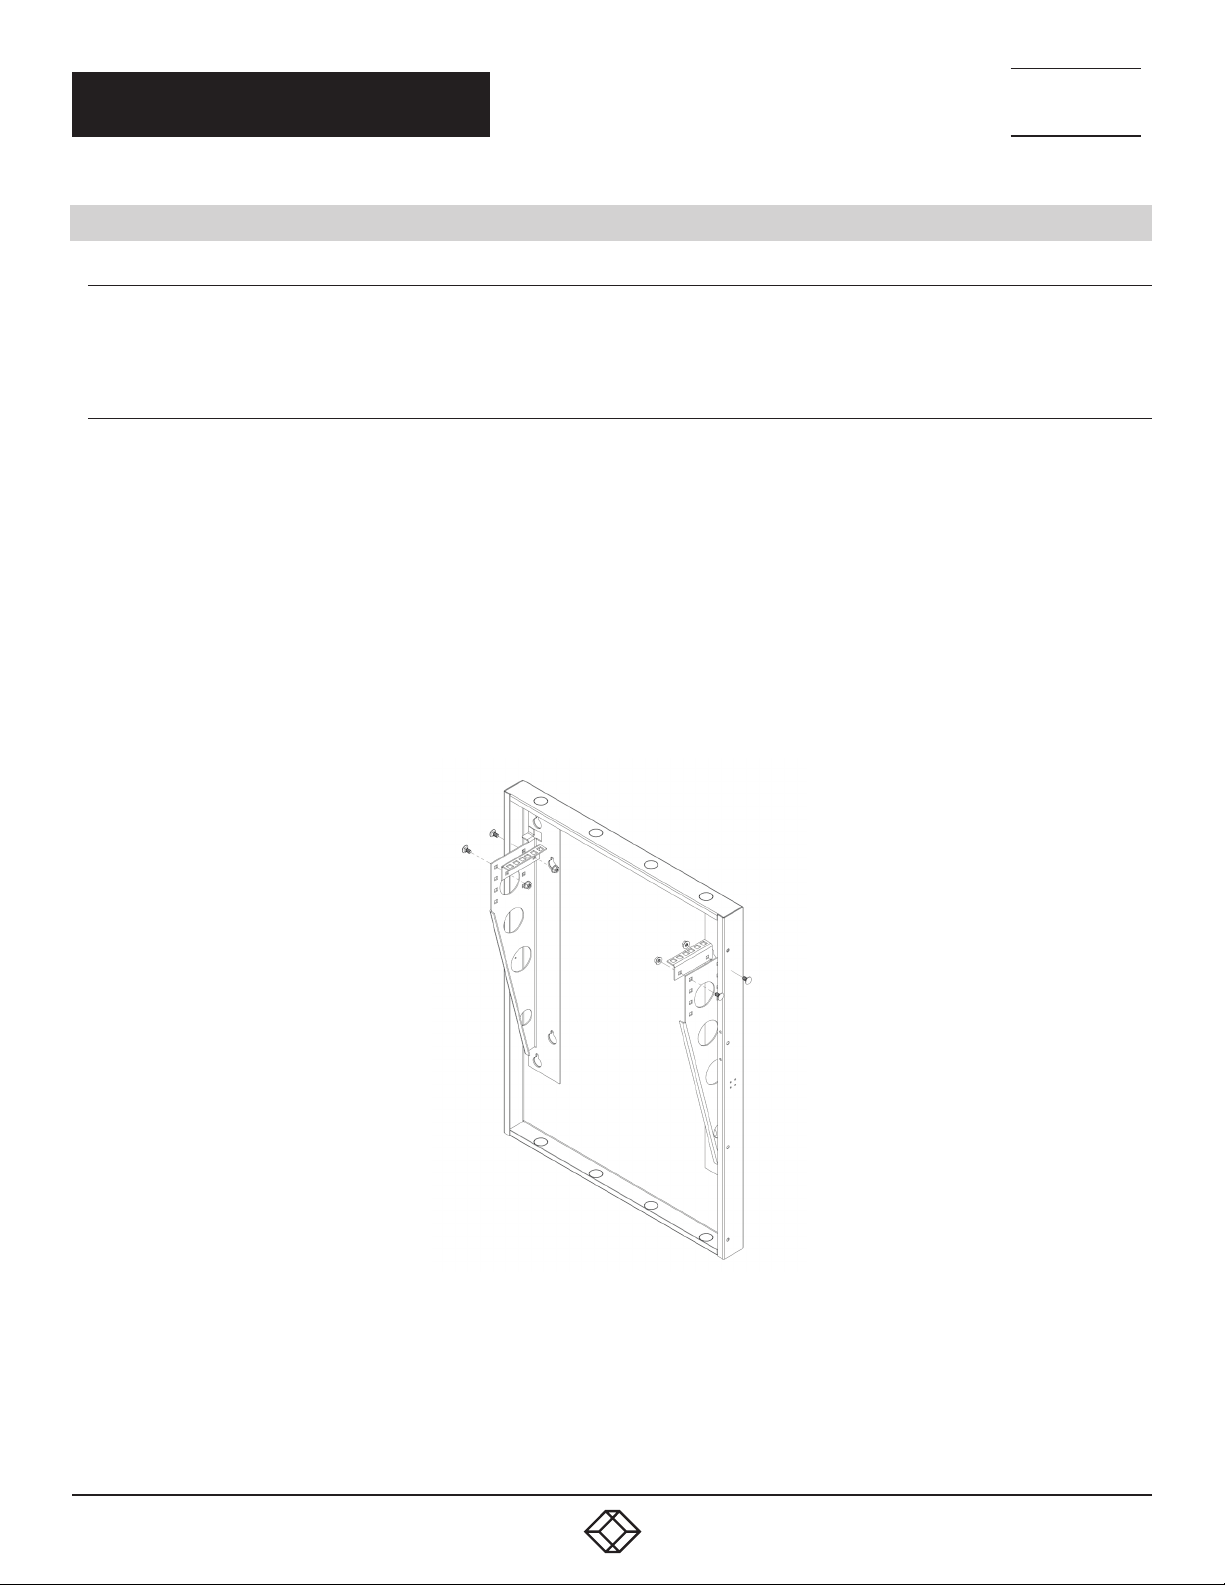
STEP 1: Use the 7/16” wrench to remove the TWO (2) ¼”-20 FLANGE NUTS holding on the SQUARE HOLE MOUNTING BRACKET
STEP 2: Remove SQUARE HOLE MOUNTING BRACKET and TWO (2) ¼”-20 X ½” SQUARE NECK CARRIAGE BOLTS from the inside
mounting bracket in the low profile wallmount cabinet
STEP 3: Locate the square mounting holes at the desired mounting height and place the TWO (2) ¼”-20 X ½” SQUARE NECK
CARRIAGE BOLTS in these holes. Carriage bolts should be facing in, with the heads on the outside of the mounting brackets
STEP 4: Place SQUARE HOLE MOUNTING BRACKET on these TWO (2) ¼”-20 X ½” SQUARE NECK CARRIAGE BOLTS and secure
with the TWO (2) ¼”-20 FLANGE NUTS. Tighten the ¼”-20 FLANGE NUTS with the 7/16” wrench
STEP 5: Repeat steps (1) – (4) to adjust the height of the second SQUARE HOLE MOUNTING BRACKET. Make sure that SQUARE
HOLE MOUNTING BRACKETS are at the same height.
FIGURE 3-2. ADJUSTING THE INSIDE MOUNTING BRACKE TS ON THE RMT351A
NOTE: Instructions for adjusting the inside mounting brackets are the same for all models.
20
1. 8 7 7. 8 7 7. 2 2 6 9 BLACKBOX.COM
Page 21

NEED HELP?
LEAV E THE T ECH T O US
LIVE 24/7
CH A PTE R 3: I NS TAL L ATI ON
TECHNICAL
SUPPORT
1. 8 7 7. 877. 22 69
3.3 DOOR HINGE SIDE CHANGE INSTRUCTIONS
3.3.1 TOOLS LIST
Phillips Screwdriver
10MM (OR 7/16”) WRENCH
3.3.2 INSTRUCTIONS
STEP 1: Use the screwdriver to remove the FOUR (4) M3 X 0.5MM X 6MM FLAT HEAD PHILLIPS MACHINE SCREWS holding on the
side lock. The lock must be lifted forward as if to open cabinet to access these screws. Once screws are removed, remove the side
lock from the cabinet.
STEP 2: Use the screwdriver to remove the TWO (2) M3 X 0.5MM X 6MM FLAT HEAD PHILLIPS MACHINE SCREWS holding the
side lock latch onto the front door and remove the side latch.
STEP 3: Remove the FOUR (4) (for RMT351A, RMT352A-R3, and RMT353A-R3) or SIX (6) (for RMT351LA, RMT352LA, and
RMT353LA) M6 X 1MM X 12MM PAN HEAD PHILLIPS MACHINE SCREWS holding the side hinge onto the front door of the low
profile wallmount cabinet using the screwdriver. If necessary, use the 10MM wrench to hold the M6 X 1MM FLANGE NUTS in place
while removing these screws.
STEP 4: Remove the remaining the FOUR (4) (for RMT351A, RMT352A-R3, and RMT353A-R3) or SIX (6) (for RMT351LA,
RMT352LA, and RMT353LA) M6 X 1MM X 12MM PAN HEAD PHILLIPS MACHINE SCREWS holding the side hinge to the main
cabinet body in the same way.
STEP 5: Position side hinge on the other side of the cabinet so that the front door will open in the other direction. Make sure that
hinge is positioned in the correct orientation so that all mounting holes align.
STEP 6: Attach the hinge to the main cabinet body using FOUR (4) (for RMT351A, RMT352A-R3, and RMT353A-R3) or SIX (6)
(for RMT351LA, RMT352LA, and RMT353LA) M6 X 1MM X 12MM PAN HEAD PHILLIPS MACHINE SCREWS and FOUR (4) (for
RMT351A, RMT352A-R3, and RMT353A-R3) or SIX (6) (for RMT351LA, RMT352LA, and RMT353LA) M6 X 1MM FLANGE NUTS. If
necessary, use the 10MM wrench to hold the M6 X 1MM FLANGE NUTS in place while tightening. Make sure all screws are tight
before attaching the front door to the hinge.
STEP 7: Attach the front door of the low profile wallmount cabinet to the side hinge using FOUR (4) (for RMT351A, RMT352A-R3,
and RMT353A-R3) or SIX (6) (for RMT351LA, RMT352LA, and RMT353LA) M6 X 1MM X 12MM PAN HEAD PHILLIPS MACHINE
SCREWS and FOUR (4) (for RMT351A, RMT352A-R3, and RMT353A-R3) or SIX (6) (for RMT351LA, RMT352LA, and RMT353LA) M6
X 1MM FLANGE NUTS using the same method as step (6).
STEP 8: Attach the side lock latch to the side of the front door opposite the hinge using TWO (2) M3 X 0.5MM X 6MM FLAT HEAD
PHILLIPS MACHINE SCREWS and TWO (2) M3 X 0.5MM LOCKNUTS WITH EXTERNAL-TOOTH LOCK WASHERS. Make sure screws
are tight.
STEP 9: Attach the side lock to the main low profile wallmount cabinet body using FOUR (4) M3 X 0.5MM X 6MM FLAT HEAD
PHILLIPS MACHINE SCREWS and FOUR (4) M3 X 0.5MM LOCKNUTS WITH EXTERNAL-TOOTH LOCK WASHERS. It may be helpful
to use needle-nose pliers to hold locknuts in place while tightening the screws
ST EP 10: Hinge switch is complete. Close and lock cabinet to make sure the side lock and side lock latch align correctly.
1. 8 7 7. 8 7 7. 2 2 6 9 BLACKBOX.COM
21
Page 22
NEED HELP?
LEAV E THE T ECH T O US
LIVE 24/7
CH A PTE R 3: I NS TAL L ATI ON
TECHNICAL
SUPPORT
1. 8 7 7. 877. 22 69
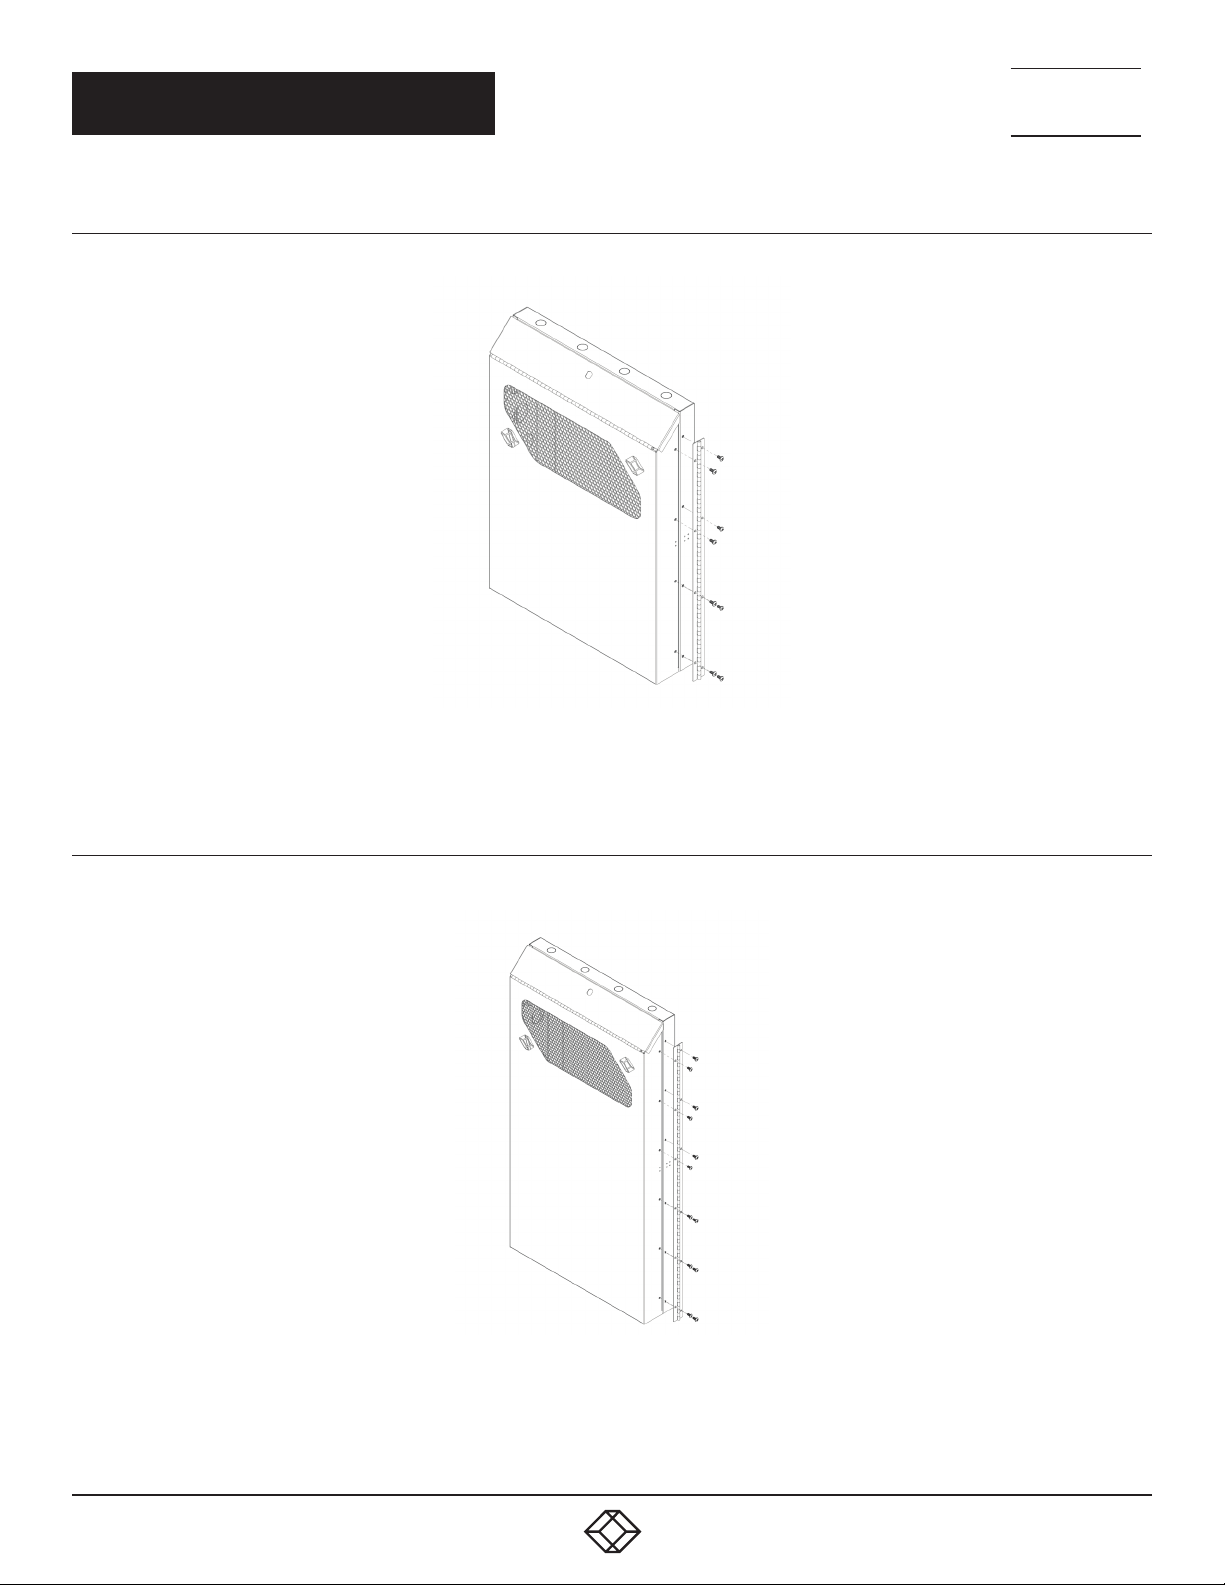
RMT351A
Figure 3-3 shows the RMT351A. Follow Steps 1–10 in the previous section to move the hinge to the other side of the cabinet.
FIGURE 3-3. HINGE SIDE CHANGE ON THE RMT351A
RMT351LA
Figure 3-4 shows the RMT351LA. Follow Steps 1–10 in the previous section to move the hinge to the other side of the cabinet.
22
FIGURE 3-4. HINGE SIDE CHANGE ON THE RMT351LA
1. 8 7 7. 8 7 7. 2 2 6 9 BLACKBOX.COM
Page 23
NEED HELP?
LEAV E THE T ECH T O US
LIVE 24/7
CH A PTE R 3: I NS TAL L ATI ON
TECHNICAL
SUPPORT
1. 8 7 7. 877. 22 69
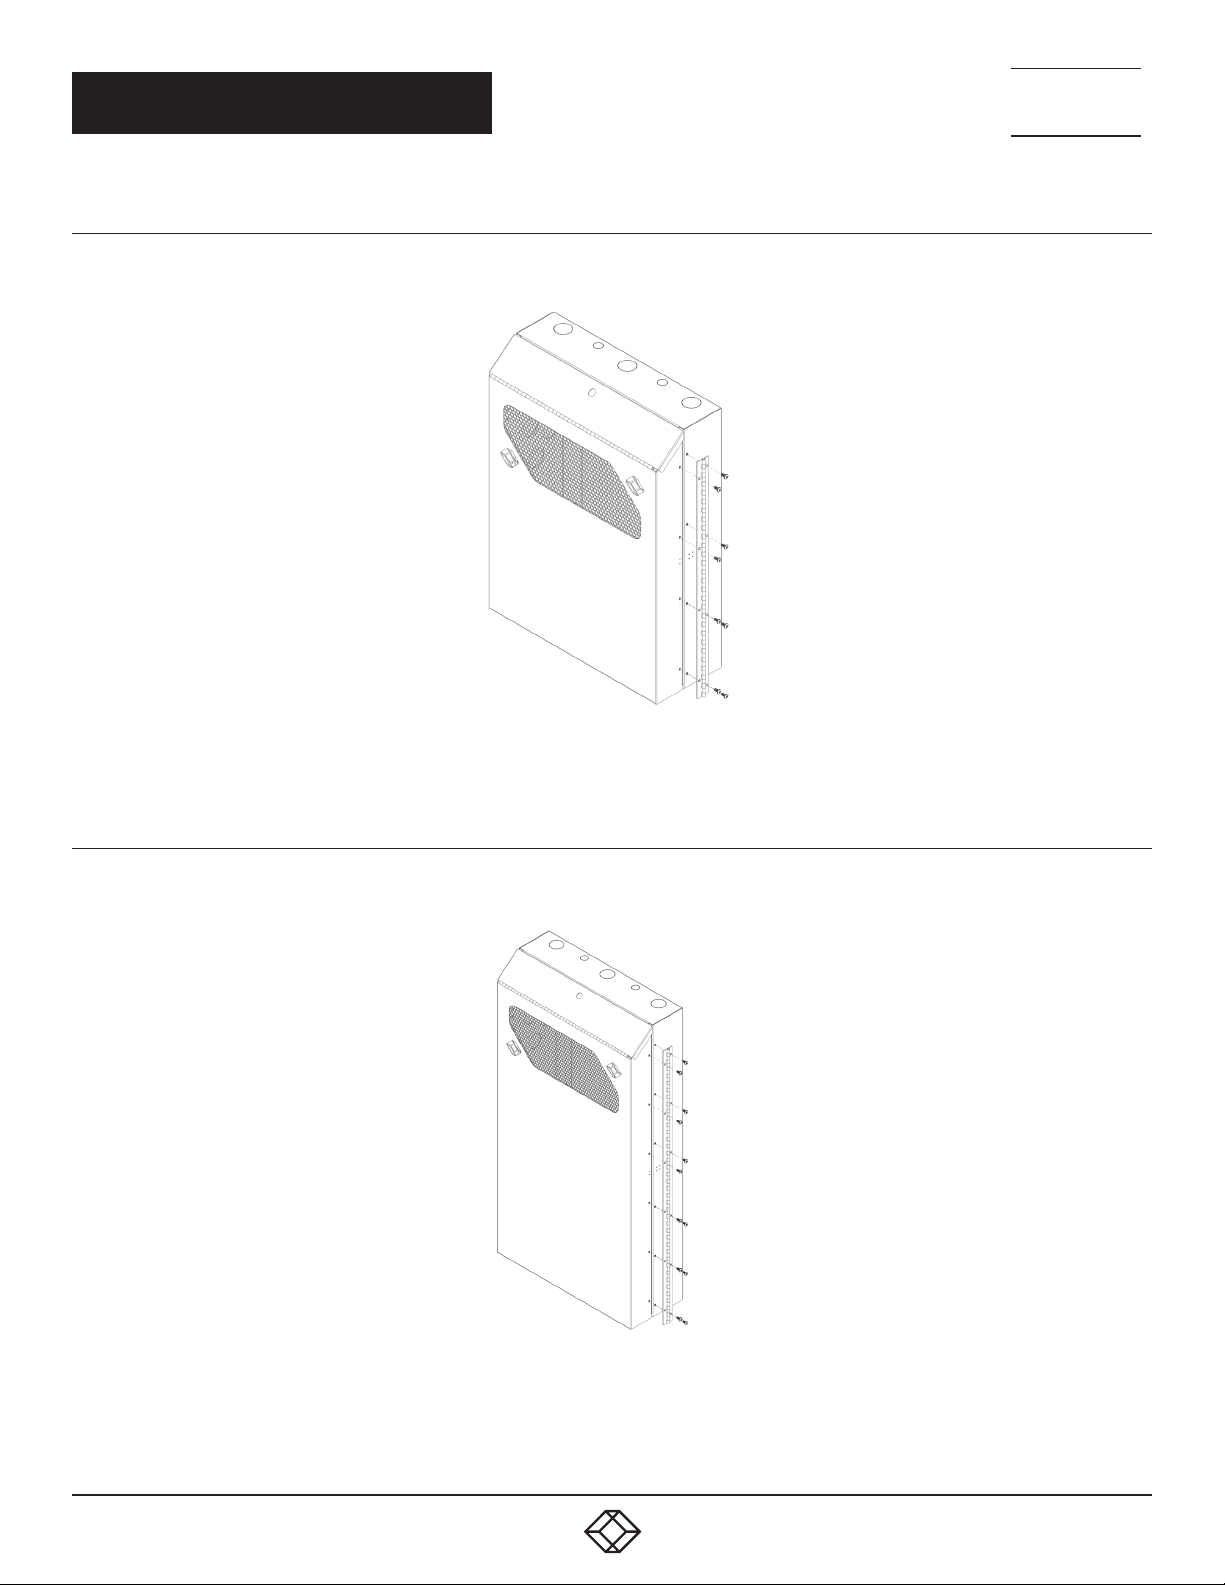
RMT352A-R3
Figure 3-5 shows the RMT352A-R3. Follow Steps 1–10 in the previous section to move the hinge to the other side of the cabinet.
FIGURE 3-5. HINGE SIDE CHANGE ON THE RMT352A-R3
RMT352LA
Figure 3-6 shows the RMT352LA. Follow Steps 1–10 in the previous section to move the hinge to the other side of the cabinet.
FIGURE 3-6. HINGE SIDE CHANGE ON THE RMT352LA
1. 8 7 7. 8 7 7. 2 2 6 9 BLACKBOX.COM
23
Page 24
NEED HELP?
LEAV E THE T ECH T O US
LIVE 24/7
CH A PTE R 3: I NS TAL L ATI ON
TECHNICAL
SUPPORT
1. 8 7 7. 877. 22 69
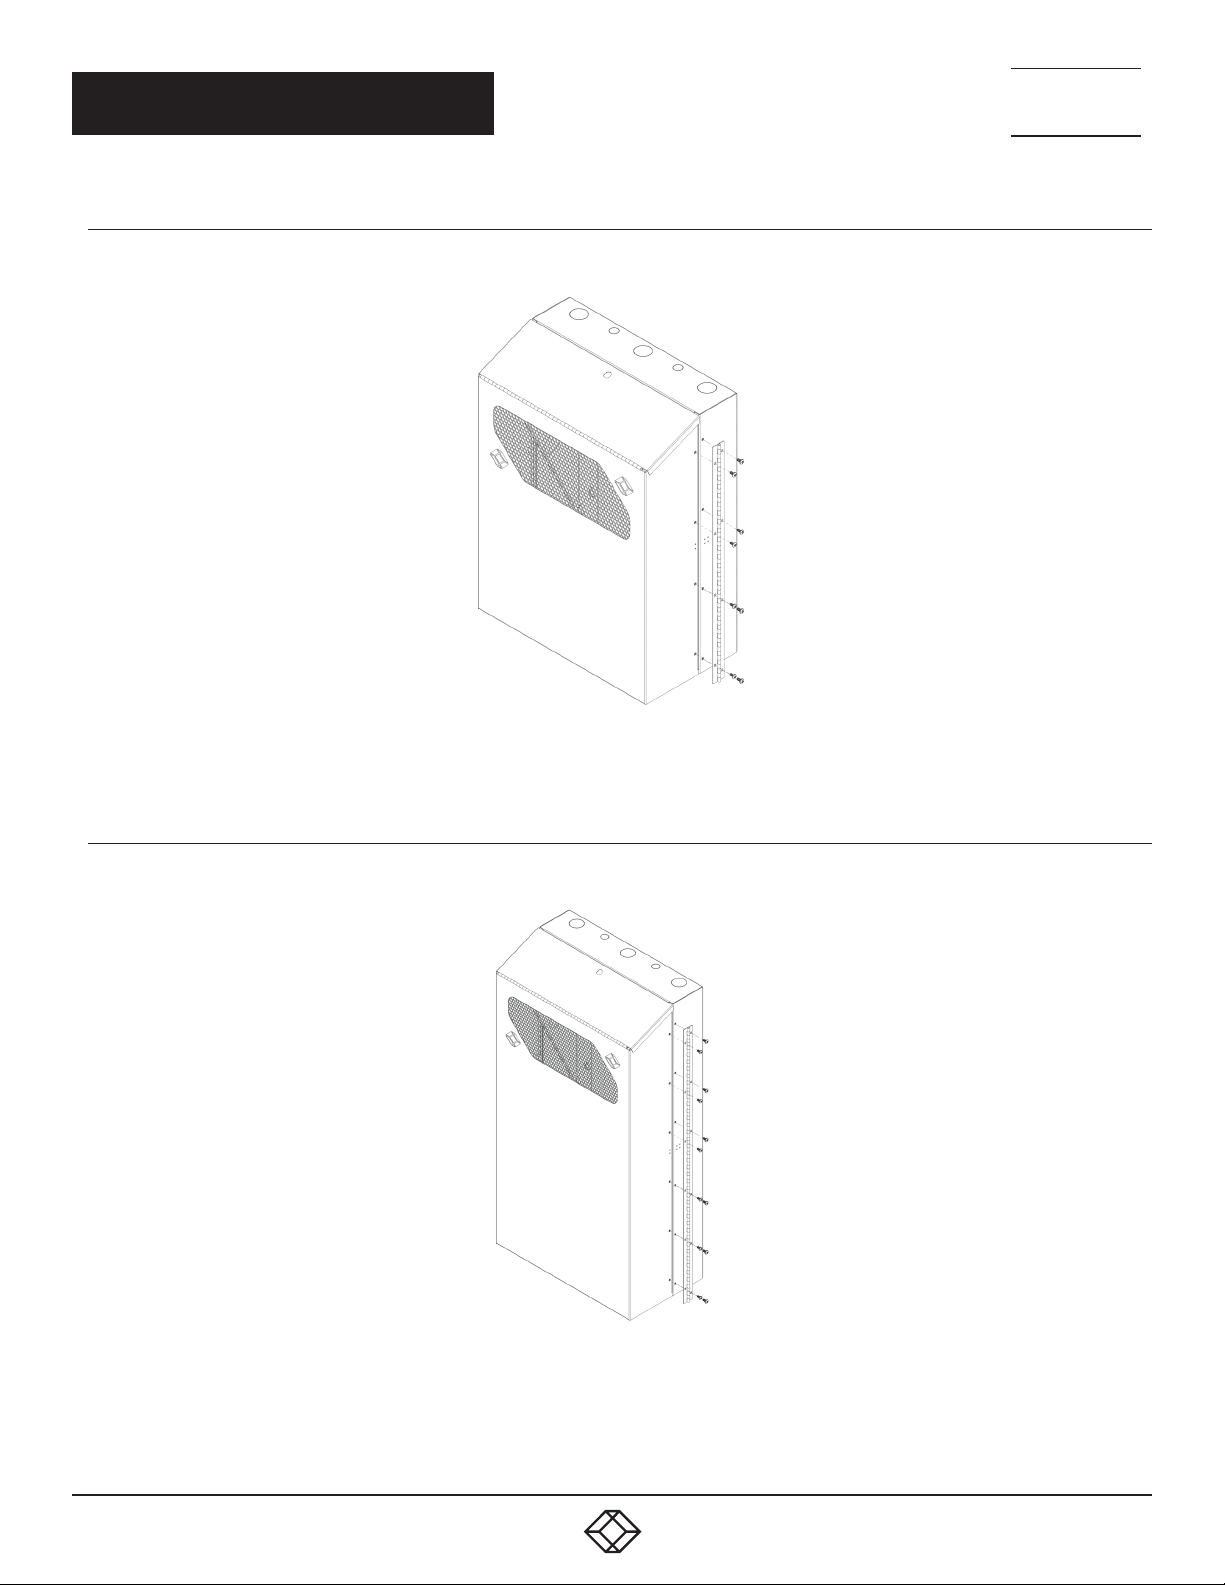
RMT353A-R3
Figure 3-7 shows the RMT353A-R3. Follow Steps 1–10 in the previous section to move the hinge to the other side of the cabinet.
FIGURE 3-7. HINGE SIDE CHANGE ON THE RMT353A-R3
RMT353L A
Figure 3-8 shows the RMT353LA. Follow Steps 1–10 in the previous section to move the hinge to the other side of the cabinet.
24
FIGURE 3-8. HINGE SIDE CHANGE ON THE RMT353L A
1. 8 7 7. 8 7 7. 2 2 6 9 BLACKBOX.COM
Page 25

NOTES
__________________________________________________________________________________________________
__________________________________________________________________________________________________\
__________________________________________________________________________________________________
__________________________________________________________________________________________________
__________________________________________________________________________________________________
__________________________________________________________________________________________________
NEED HELP?
LEAV E THE T ECH T O US
LIVE 24/7
TECHNICAL
SUPPORT
1. 8 7 7. 877. 22 69
_________________________________________________________________________________________________
__________________________________________________________________________________________________
__________________________________________________________________________________________________
__________________________________________________________________________________________________
__________________________________________________________________________________________________
__________________________________________________________________________________________________
__________________________________________________________________________________________________
__________________________________________________________________________________________________
__________________________________________________________________________________________________
__________________________________________________________________________________________________
_
_________________________________________________________________________________________________
__________________________________________________________________________________________________
1. 8 7 7. 8 7 7. 2 2 6 9 BLACKBOX.COM
25
Page 26

NOTES
__________________________________________________________________________________________________
__________________________________________________________________________________________________\
__________________________________________________________________________________________________
__________________________________________________________________________________________________
__________________________________________________________________________________________________
__________________________________________________________________________________________________
NEED HELP?
LEAV E THE T ECH T O US
LIVE 24/7
TECHNICAL
SUPPORT
1. 8 7 7. 877. 22 69
_________________________________________________________________________________________________
__________________________________________________________________________________________________
__________________________________________________________________________________________________
__________________________________________________________________________________________________
__________________________________________________________________________________________________
__________________________________________________________________________________________________
__________________________________________________________________________________________________
__________________________________________________________________________________________________
__________________________________________________________________________________________________\
26
__________________________________________________________________________________________________
__________________________________________________________________________________________________
__________________________________________________________________________________________________
1. 8 7 7. 8 7 7. 2 2 6 9 BLACKBOX.COM
Page 27

NOTES
__________________________________________________________________________________________________
_________________________________________________________________________________________________
__________________________________________________________________________________________________
__________________________________________________________________________________________________
__________________________________________________________________________________________________
__________________________________________________________________________________________________
NEED HELP?
LEAV E THE T ECH T O US
LIVE 24/7
TECHNICAL
SUPPORT
1. 8 7 7. 877. 22 69
__________________________________________________________________________________________________
__________________________________________________________________________________________________
__________________________________________________________________________________________________
__________________________________________________________________________________________________
_________________________________________________________________________________________________
__________________________________________________________________________________________________
__________________________________________________________________________________________________
_________________________________________________________________________________________________
__________________________________________________________________________________________________
__________________________________________________________________________________________________
1. 8 7 7. 8 7 7. 2 2 6 9 BLACKBOX.COM
27
Page 28

NEED HELP?
LEAVE THE TECH TO US
LIVE 24/7
TECHNICAL
SUPPORT
1.8 77.87 7. 2 2 6 9
© COPYRIGHT 2016 BLACK BOX CORPORATION. ALL RIGHTS RESERVED.
 Loading...