

Page 1
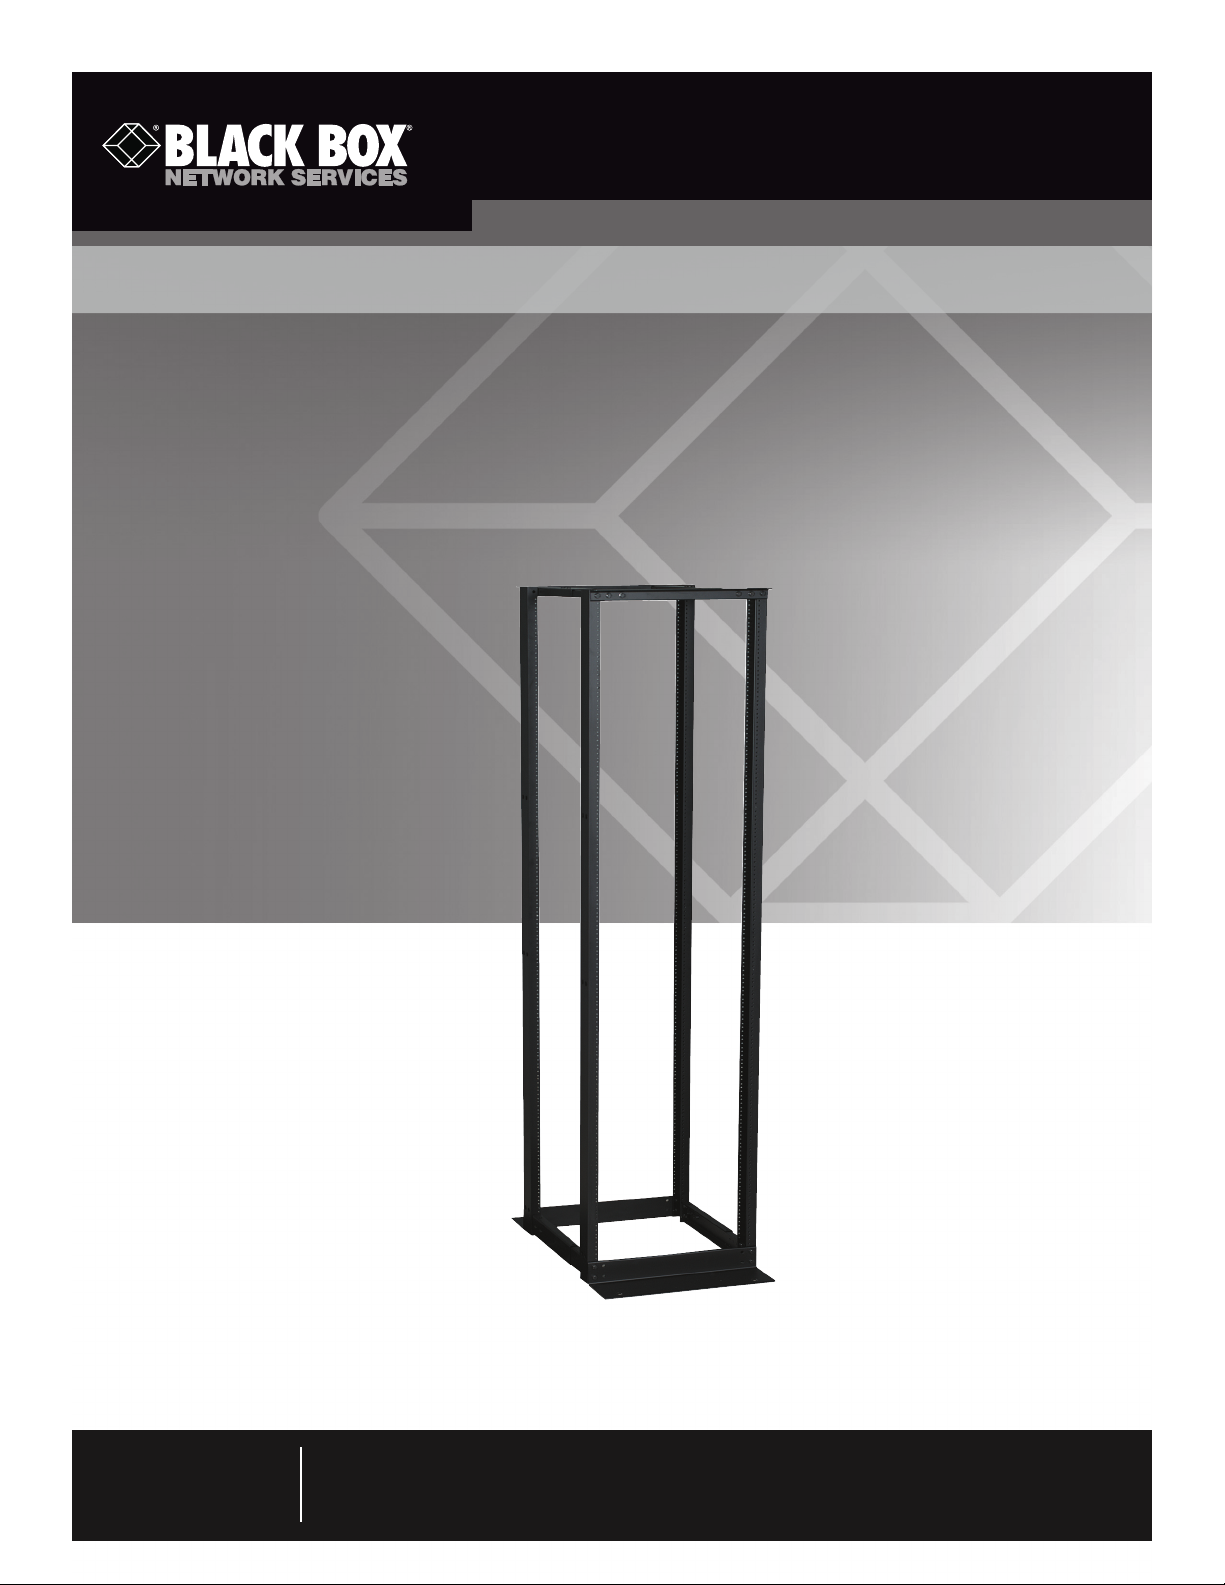
RM082A RM088A
RM084A RM089A
RM086A
Freedom Rack Plus
Freedom and flexibility in an adjustable rack
with 12-24 rails.
RM082A
Customer
Support
Information
Order toll-free in the U.S.: Call 877-877-BBOX (outside U.S. call 724-746-5500)
FREE technical support 24 hours a day, 7 days a week: Call 724-746-5500 or fax 724-746-0746
Mailing address: Black Box Corporation, 1000 Park Drive, Lawrence, PA 15055-1018
Web site: w ww.blackbox.com • E-mail: info @blackbox.com
Page 2

Trademarks Used in this Manual
Trademarks Used in this Manual
Black Box and the Double Diamond logo are registered trademarks of BB Technologies, Inc.
Any other trademarks mentioned in this manual are acknowledged to be the property of the trademark owners.
Page 2
We‘re here to help! If you have any questions about your application
or our products, contact Black Box Tech Support at 724-746 -550 0
or go to blackbox.com and click on “Talk to Black Box.”
You’ll be live with one of our technical experts in less than 20 seconds.
724-746-5500 | blackbox.com
RM082A
Page 3

Chapter 1: Specifications/Chapter 2: Overview
1. Specifications
Size: RM082A: 72"H (35U) x 20.25"W x 17.7 to 41.3"D (182.9 x 51.4 x 45 to 104.9 cm);
RM084A, RM088A: 84"H (45U) x 20.25"W x 17.7 to 41.3"D (213.4 x 51.4 x 45 to 104.9 cm);
RM086A: 96"H (51U) x 20.25"W x 17.7 to 41.3"D (243.8 x 51.4 x 45 to 104.9 cm)
RM089A: 84"H (45U) x 24.25"W x 17.7 to 41.3"D (213.4 x 61.6 x 45 to 104.9 cm)
Weight: RM082A: 66 lb. (29.9 kg); RM084A, RM088A: 70 lb. (31.8 kg); RM086A: 75 lb. (34 kg);
RM089A: 80 lb. (36.2 kg)
2. Overview
The Freedom Rack Plus neatly houses computer equipment. It’s available in five models: three tapped (round-hole) models and
two untapped (square [M6]-hole) models. The part numbers for each model are listed below.
• Freedom Rack Plus 19" Rackmount, 35U, tapped (RM082A)
• Freedom Rack Plus 19" Rackmount, 45U, tapped (RM084A)
• Freedom Rack Plus 19" Rackmount, 51U, tapped (RM086A)
• Freedom Rack Plus 19" Rackmount, 45U, untapped (RM088A)
• Freedom Rack Plus 23" Rackmount, 45U, untapped (RM089A)
What’s Included
Your package should include the following items. If anything is missing or damaged, please contact Black Box at 724-746-5500.
• (4) vertical rails
• (2) sets of sliding top horizontal rails, (3) pieces per set
• (2) sets of sliding bottom horizontal rails, (3) pieces per set
• (2) top L-shaped horizontal bars
• (2) bottom L-shaped horizontal bars
• (20) 1⁄4-20 x 0.75" bolts (only 16 are used, 4 are extra)
• (20) 1⁄4-20 nuts (only 16 are used, 4 are extra)
• (32) 3⁄8-16 x 1" screws (only 28 are used, 4 are extra)
• (32) 3⁄8 lockwashers (only 28 are used, 4 are extra)
• (32) 3⁄8-16 nuts (only 28 are used, 4 are extra)
• This user's manual
RM082A
Page 3
Page 4
Chapter 3: Assembly
3. Assembly
The Freedom Rack Plus ships unassembled. Follow the instructions in this section to assemble it.
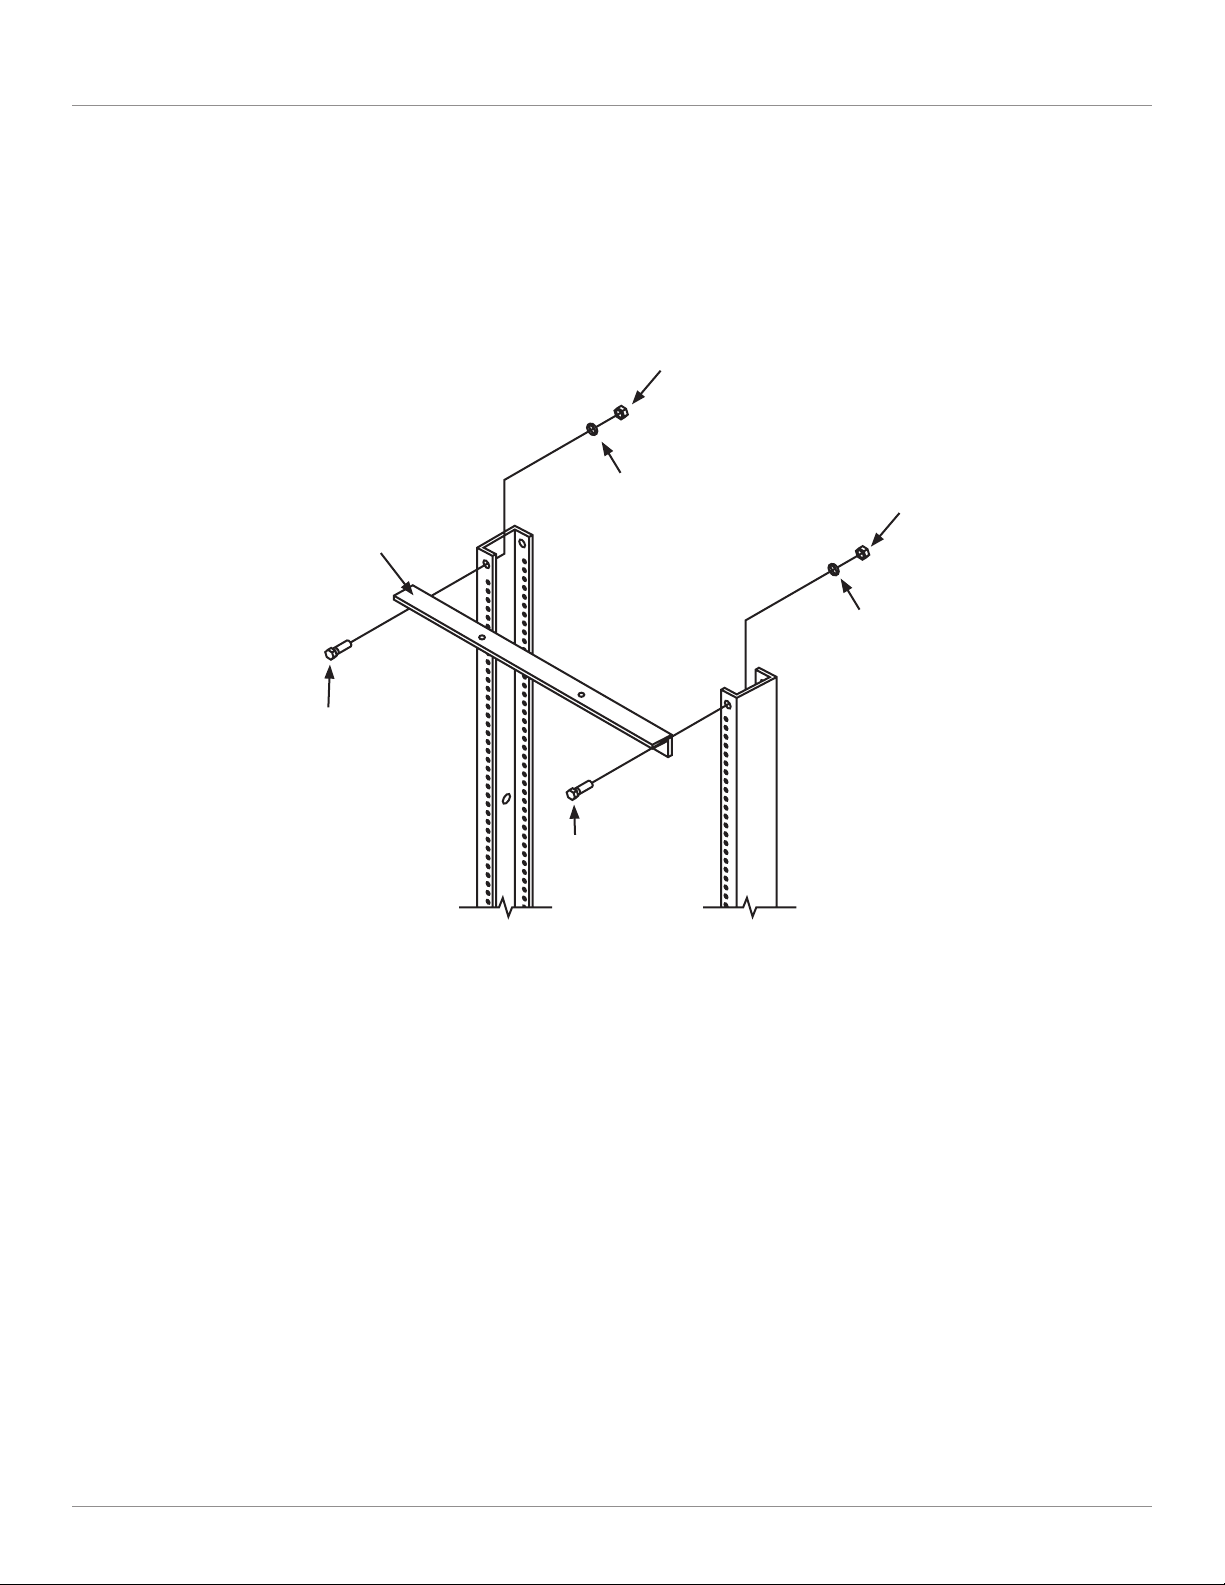
1. Using (2) 3⁄8-16 x 1" screws, (2) 3⁄8 lockwashers, and (2) 3⁄8-16 nuts, connect the flat horizontal bar to the front side of the first
pair of vertical rails. See Figure 1.
3
⁄8-16 nut
3
⁄8 lockwasher
Horizontal bar
3
⁄8-16 nut
3
⁄8 lockwasher
3
⁄8-16 x 1" screw
Vertical rail
3
⁄8-16 x 1" screw
Vertical rail
Figure 1. Attaching the horizontal bar to the vertical rails.
Page 4
724-746-5500 | blackbox.com
RM082A
Page 5
Chapter 3: Assembly
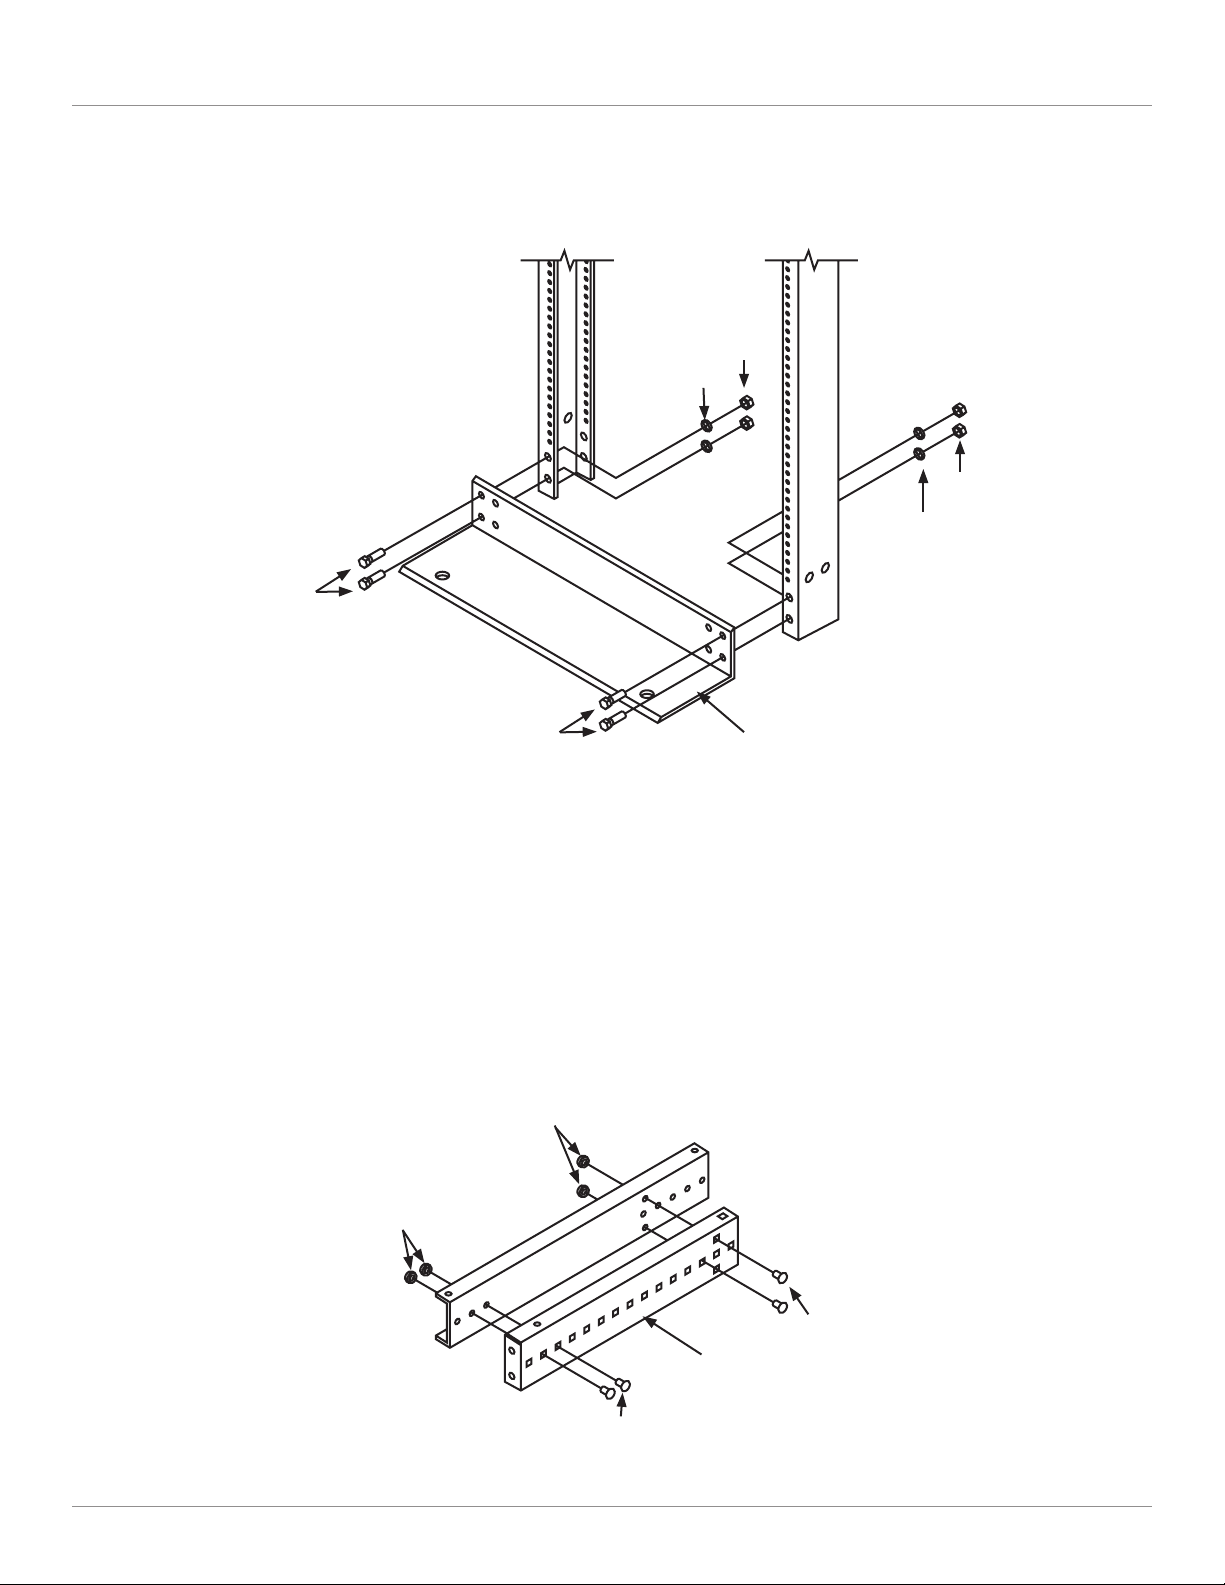
2. As shown in Figure 2, using (4) 3⁄8-16 x 1" screws, (4) 3⁄8 lockwashers, and (4) 3⁄8-16 nuts, attach the bottom L-shaped horizontal
bar to the bottom front side of the first pair of vertical rails.
Vertical rail
3
⁄8-16 x 1" screws
3
⁄8-16 x 1" screws
Figure 2. Connecting the L-shaped horizontal bar to the vertical rails.
3. Repeat steps 1 and 2 for the remaining pair of vertical rails.
3
⁄8-16 nut s
3
⁄8 lockwashers
L-shaped horizontal bar
Vertical rail
3
⁄8 lockwashers
3
⁄8-16 nut s
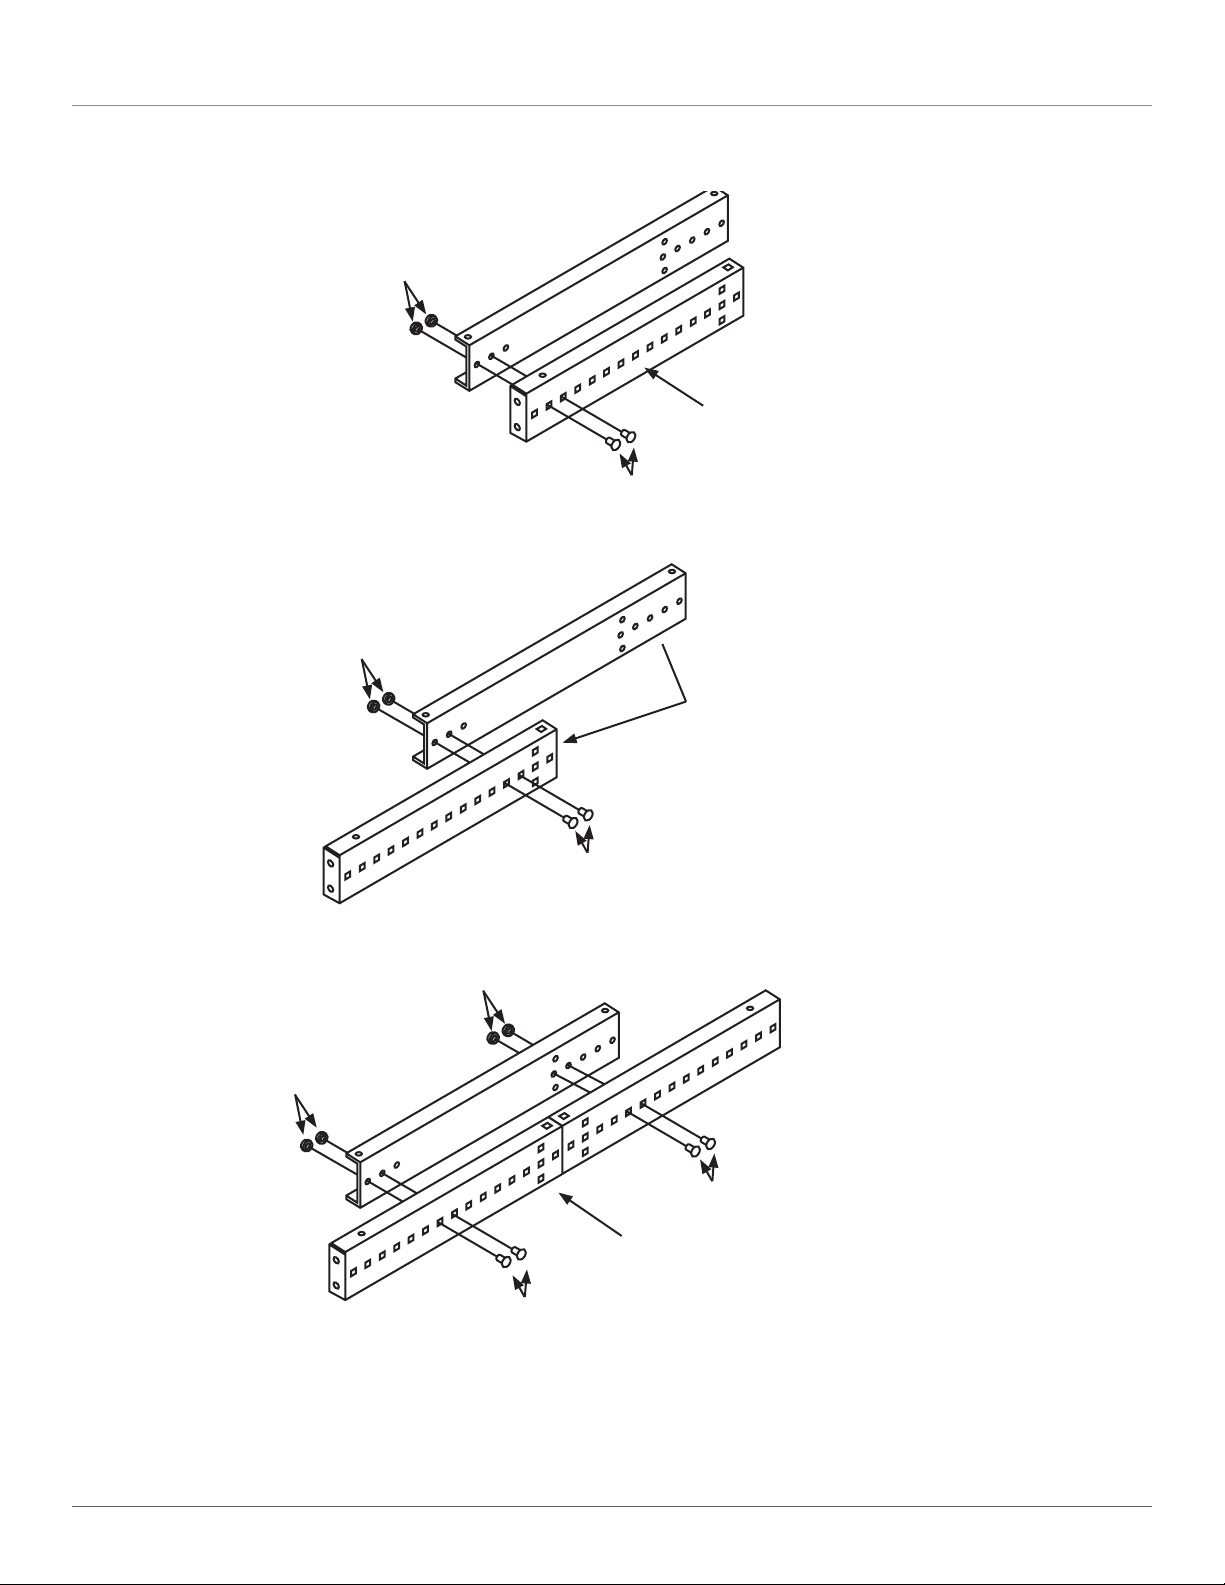
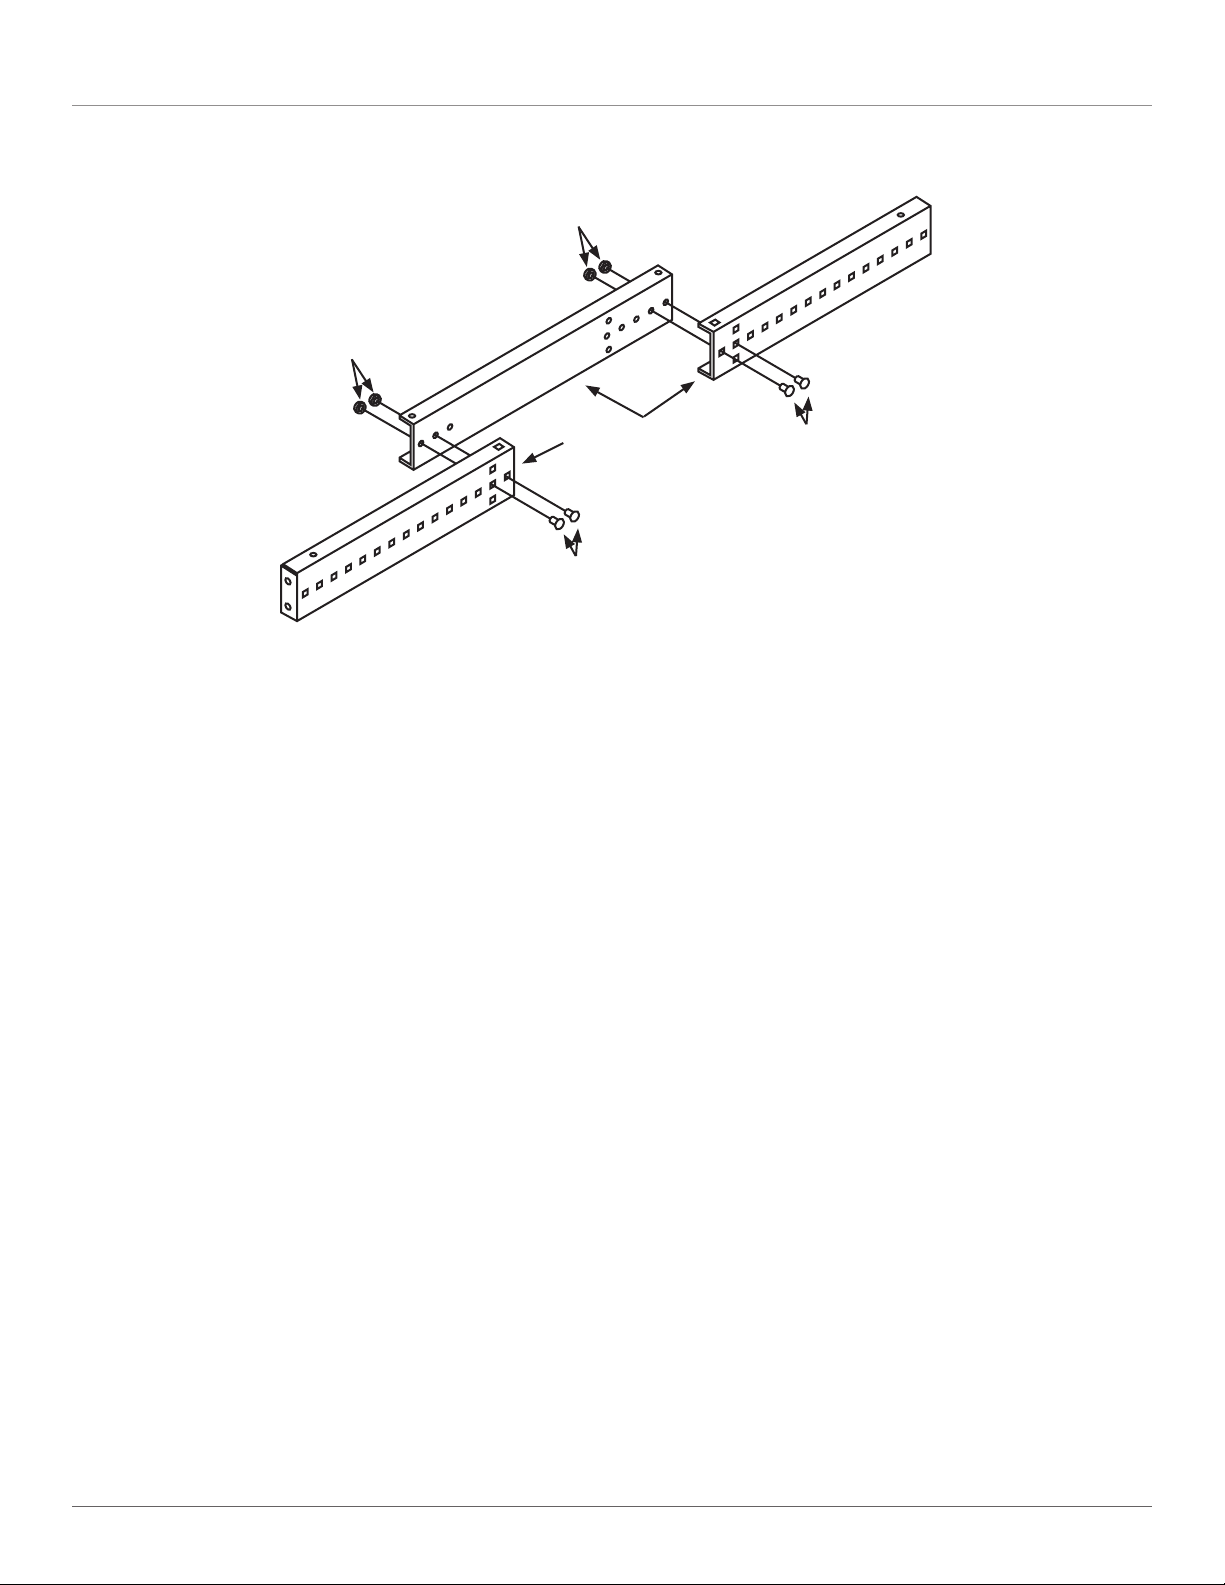
4. The rack’s depth can be adjusted in 1" (2.5-cm) increments. Connect the first set of sliding top horizontal rails together using
(4) 1⁄4-20 x 0.75" bolts and (4) 1⁄4-20 nuts. Using (4) more 1⁄4-20 x 0.75" bolts and 1⁄4-20 nuts, connect the second set of
sliding top horizontal rails together.
Next, connect the first set of sliding bottom horizontal rails together using (4) 1⁄4-20 x 0.75" bolts and (4) 1⁄4-20 nuts. Repeat
this for the remaining set of sliding bottom horizontal rails (you’ll use (4) 1⁄4-20 x 0.75" bolts and (4) 1⁄4-20 nuts). Figures 3
through 7 show five possible depth adjustments for these rails.
1
⁄4-20 nuts
1
⁄4-20 nuts
1
⁄4-20 x 0.75" bolts
Sliding top horizontal rails
1
⁄4-20 x 0.75" bolts
Figure 3. Horizontal rails adjusted to 17.75" (45.1 cm) deep.
RM082A
Page 5
Page 6
Chapter 3: Assembly
1
⁄4-20 nuts
1
⁄4-20 nuts
Sliding top horizontal rails
1
⁄4-20 x 0.75" bolts
Figure 4. Horizontal rails adjusted to 18.75" (47.6 cm) deep.
1
⁄4-20 nuts
Sliding top horizontal rails
1
⁄4-20 x 0.75" bolts
Figure 5. Horizontal rails adjusted to 28.5" (72.4 cm) deep.
1
⁄4-20 nuts
Sliding top horizontal rails
1
⁄4-20 x 0.75" bolts
Sliding bottom horizontal rails
Page 6
1
⁄4-20 x 0.75" bolts
Figure 6. Horizontal rails adjusted to 29.5" (74.9 cm) deep.
724-746-5500 | blackbox.com
RM082A
Page 7
1
⁄4-20 nuts
1
⁄4-20 nuts
Sliding bottom
horizontal rails
1
⁄4-20 x 0.75" bolts
1
⁄4-20 x 0.75" bolts
Chapter 3: Assembly
Figure 7. Horizontal rails adjusted to 41" (104.1 cm) deep.
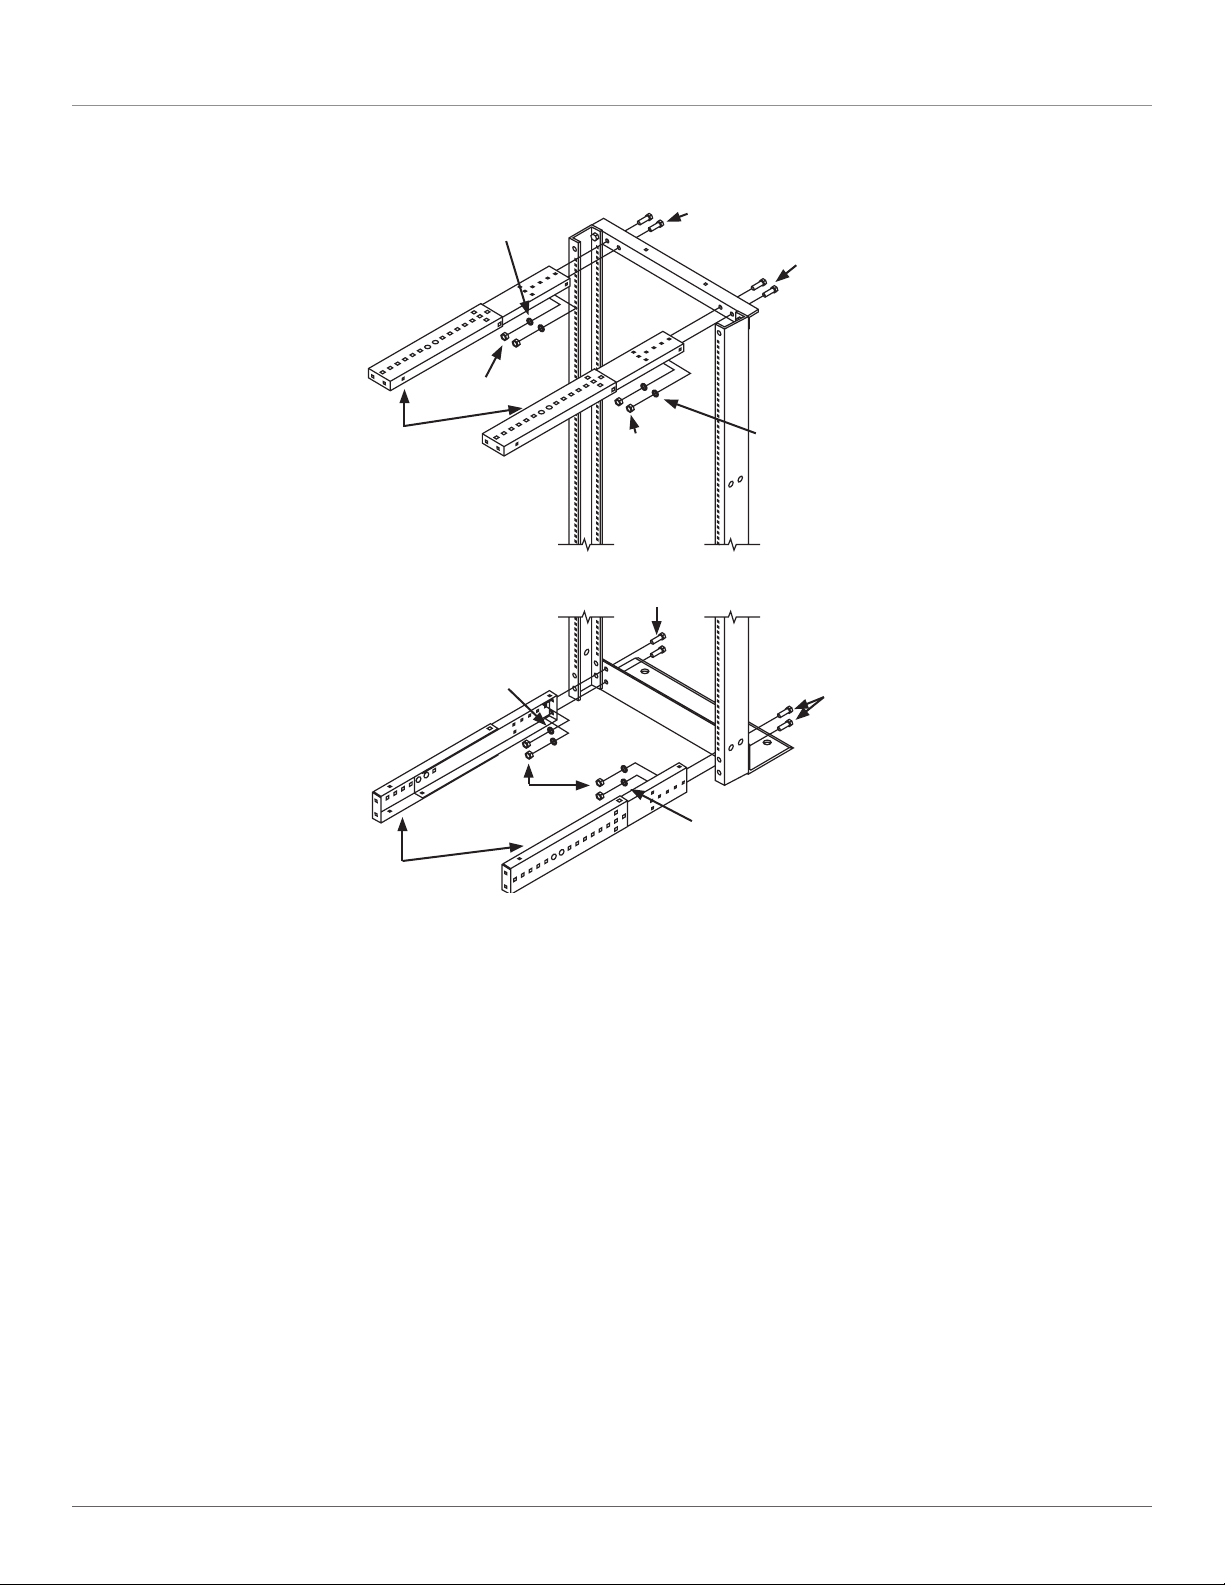
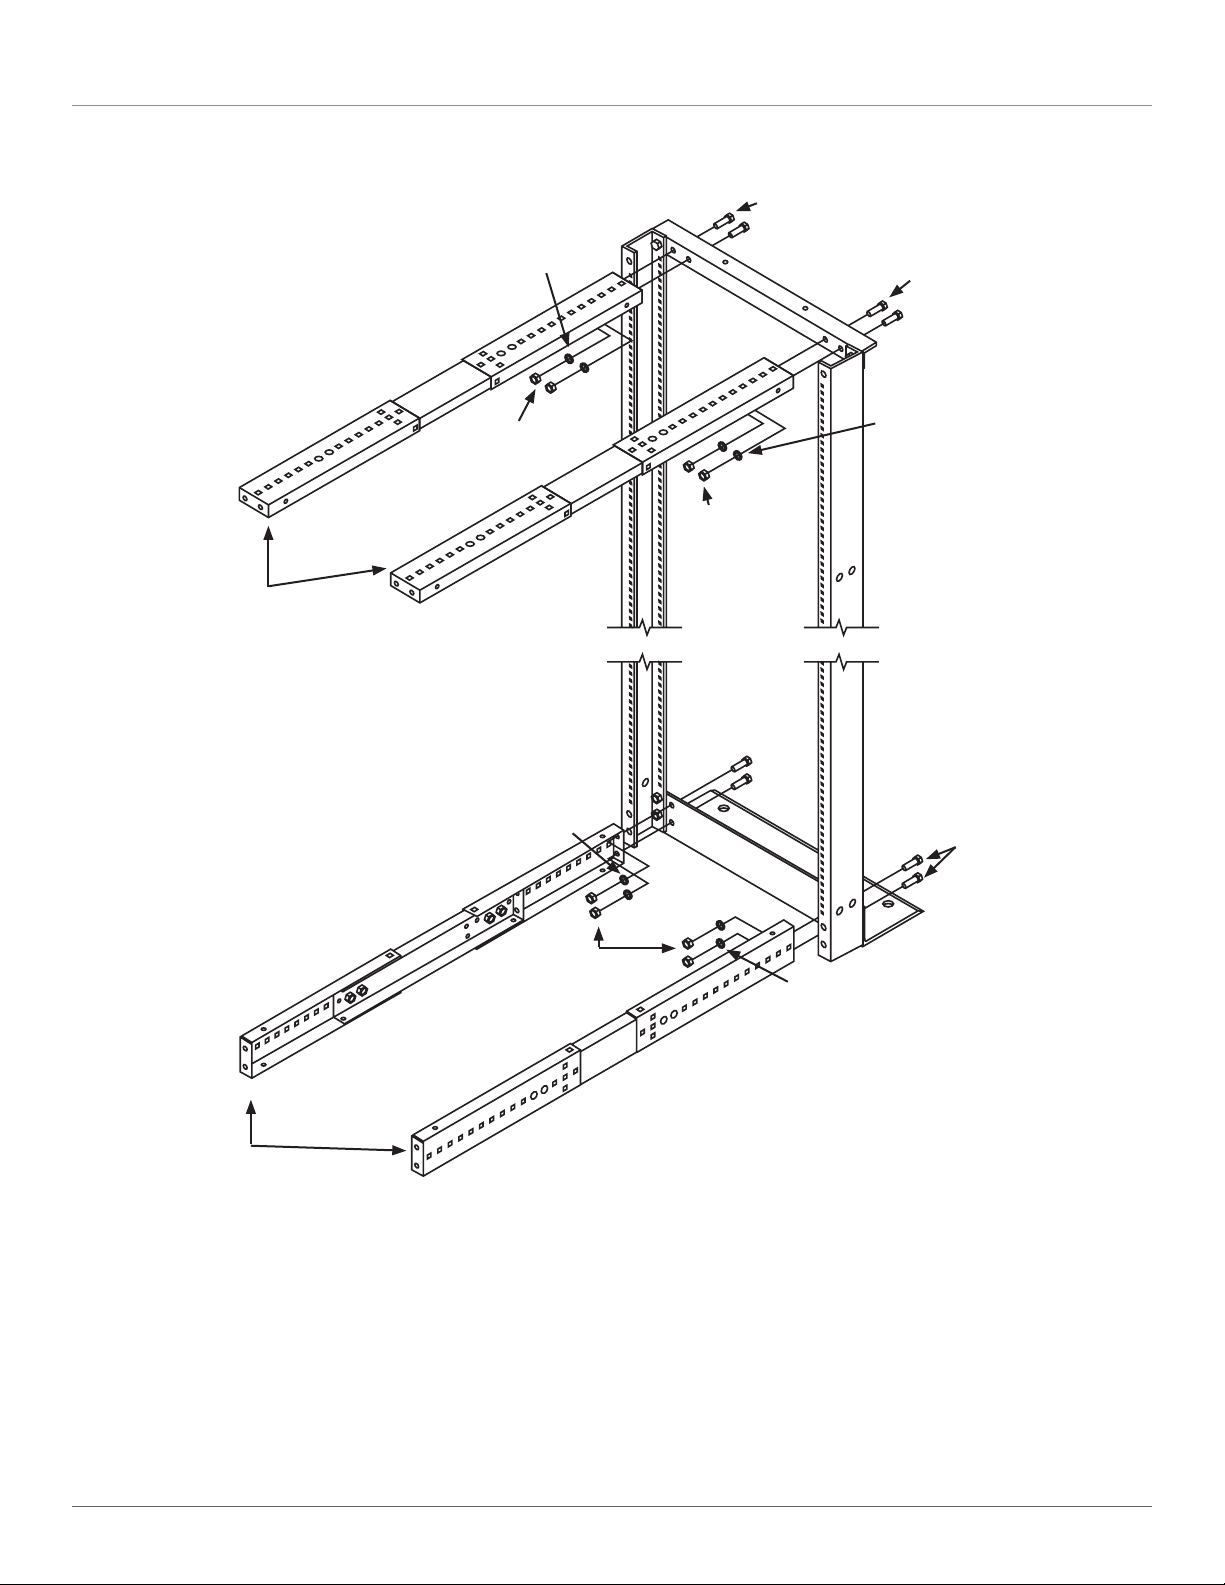
5. Once the sliding top and bottom horizontal rails are assembled, you’re ready to connect them to the rack’s vertical rails. Use (8)
3
⁄8-16 x 1" screws, (8) 3⁄8 lockwashers, and (8) 3⁄8-16 nuts. Figures 8 and 9 show the installation for two depth ranges.
RM082A
Page 7
Page 8
Chapter 3: Assembly
3
⁄8-16 lockwashers
Sliding top
horizontal rails
3
⁄8-16 nut s
3
⁄8-16 nut s
3
⁄8-16 x 1" screws
3
⁄8-16 x 1" screws
3
⁄8-16 lockwashers
Vertical rail
Vertical rail
3
⁄8-16 lockwashers
3
⁄8-16 nut s
3
⁄8-16 x 1" screws
3
⁄8-16 lockwashers
Vertical rail
Vertical rail
3
⁄8-16 x 1" screws
Sliding bottom
horizontal rails
Figure 8. Connecting the top and bottom horizontal rails to the rack’s vertical rails
(17.75" to 28.5"D [45.1 to 72.4 cm] in one-inch [2.5-cm] increments).
Page 8
724-746-5500 | blackbox.com
RM082A
Page 9
3
⁄8-16 lockwashers
3
⁄8-16 nut s
3
⁄8-16 x 1" screws
3
⁄8-16 x 1" screws
Chapter 3: Assembly
3
⁄8-16 lockwashers
Top
horizontal rails
Vertical rail
Vertical rail
3
⁄8-16 lockwashers
3
⁄8-16 nut s
3
⁄8-16 nut s
Vertical rail
Vertical rail
3
⁄8-16 lockwashers
3
⁄8-16 x 1" screws
RM082A
Bottom
horizontal rails
Figure 9. Connecting the top and bottom horizontal rails to the rack’s vertical rails
(29.5 to 41" D [74.9 to 104.1 cm] in one-inch [2.5-cm] increments).
Page 9
Page 10
Chapter 3: Assembly
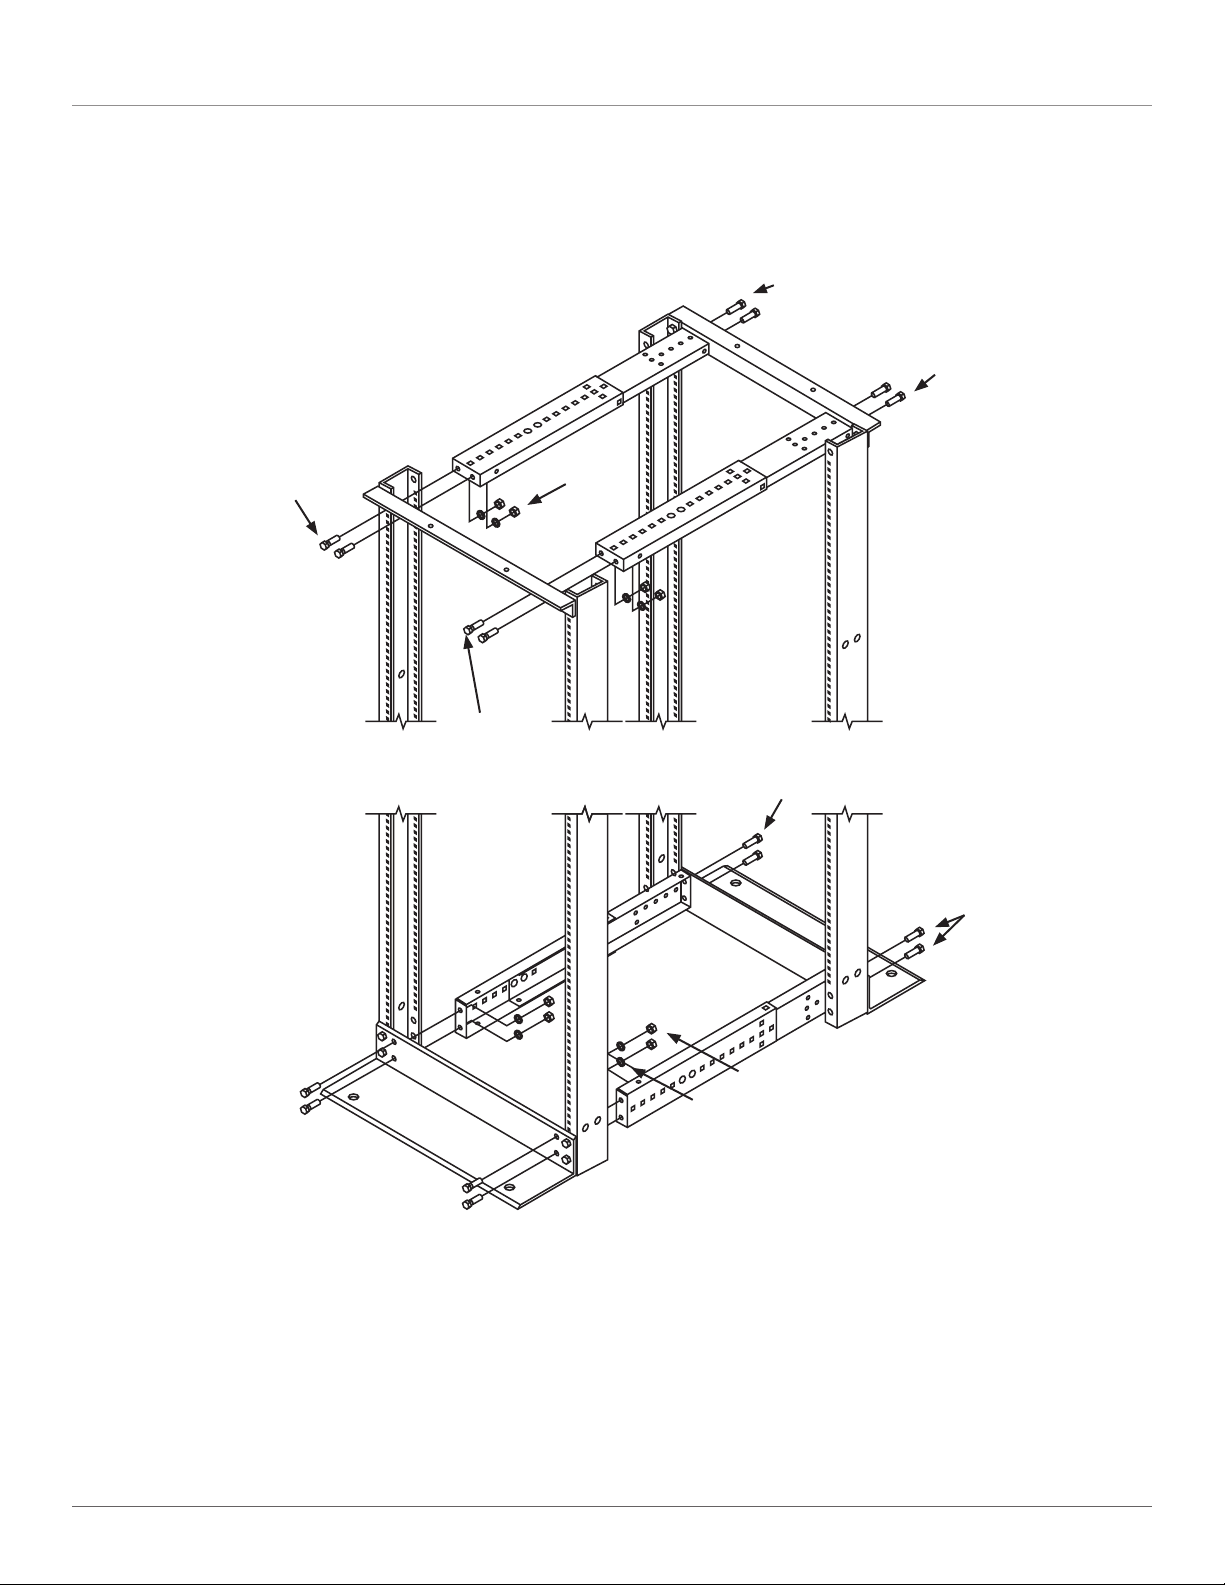
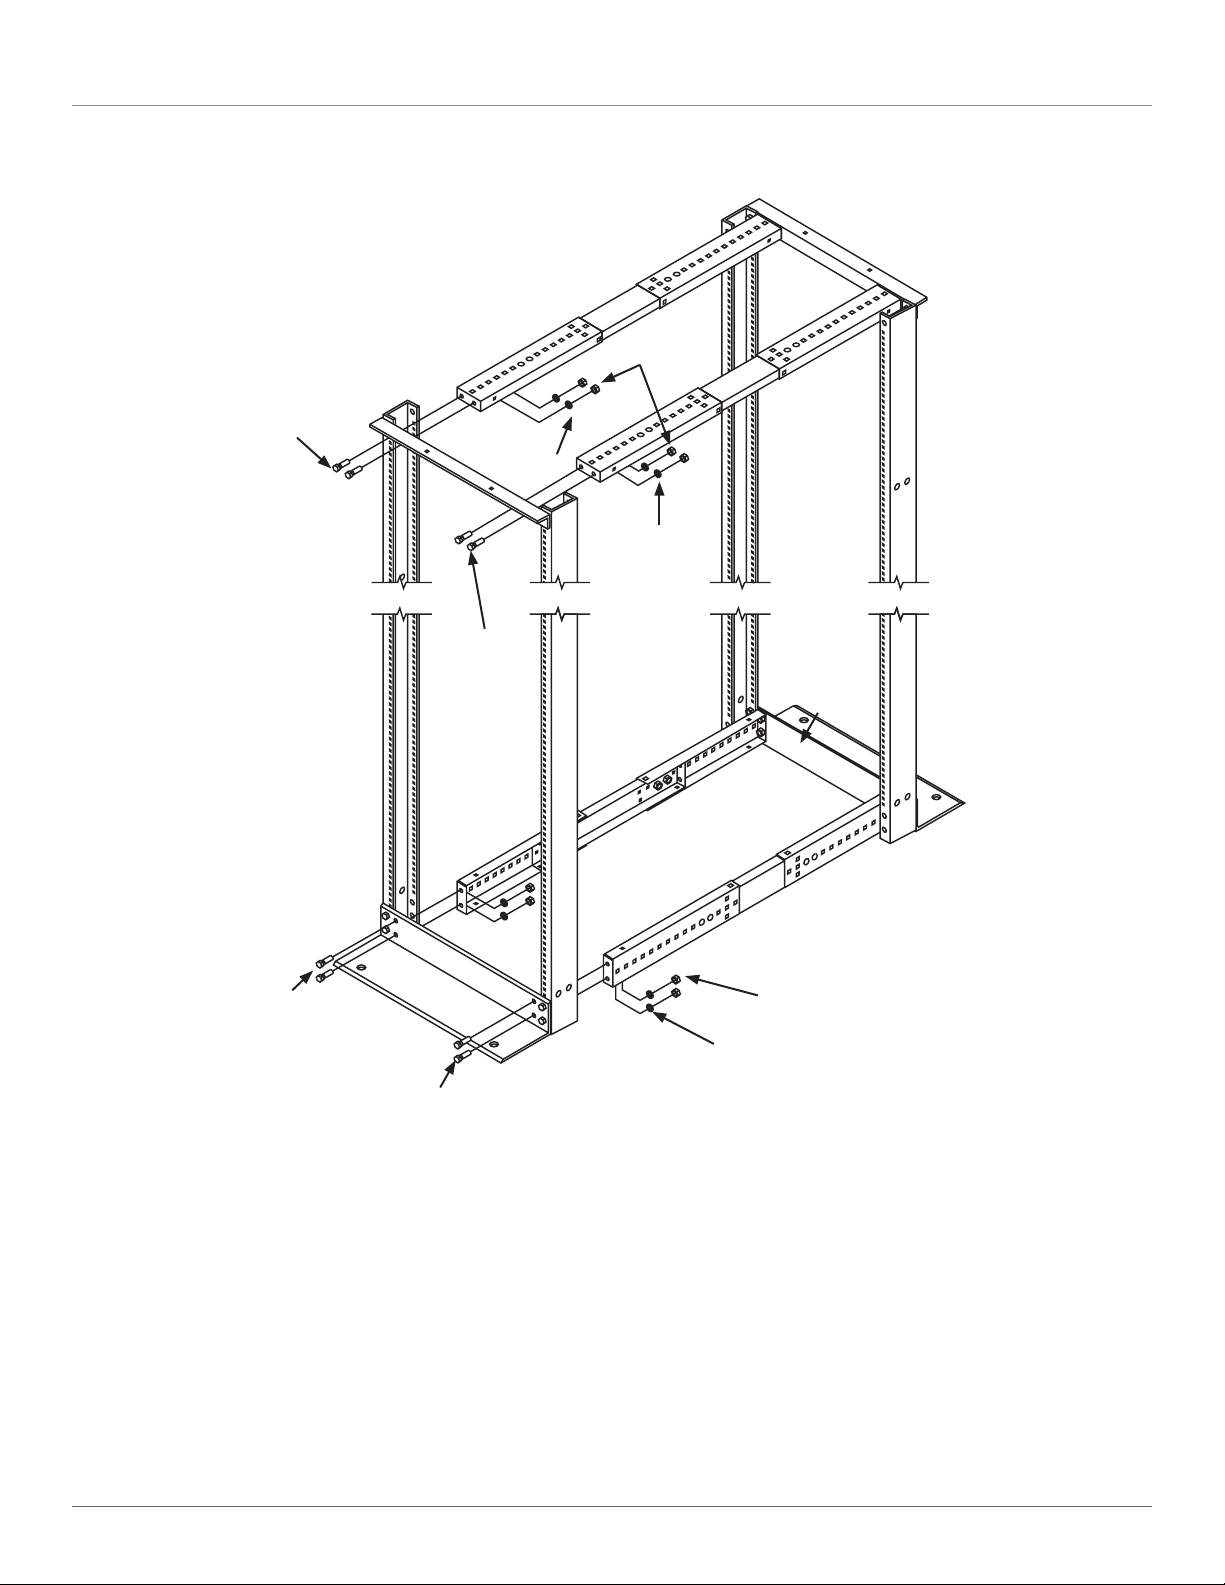
6. In step 3, you connected the horizontal bars to the remaining pair of vertical rails. Now, connect these two vertical rails to the
rack assembly, as shown in Figures 10 and 11. You’ll need (8) 3⁄8-16 x 1" screws, (8) 3⁄8 lockwashers, and (8) 3⁄8-16 nut s.
3
⁄8-16 x 1" screws
3
⁄8-16 x 1" screws
3
3
⁄8-16 x 1" screws
⁄8-16 nut s
Rack assembly
Vertical rail
Vertical rail
3
⁄8-16 x 1" screws
3
⁄8-16 x 1" screws
Vertical
3
⁄8-16 x 1"
screws
Vertical rail
rail
3
⁄8-16 x 1" screws
3
⁄8-16 nut s
3
⁄8-16 lockwashers
Rack assembly
3
⁄8-16 x 1" screws
Page 10
Figure 10. Attaching the rack’s front two vertical rails to the rack assembly,
rails adjusted to 17.75" to 28.5" D (45.1 to 72.4 cm) in one-inch (2.5-cm) increments.
724-746-5500 | blackbox.com
RM082A
Page 11
3
⁄8-16 nut s
Chapter 3: Assembly
3
⁄8-16 x 1" screws
Vertical rail
Vertical rail
3
⁄8-16 l o ck-
washers
3
⁄8-16 x 1"
screws
Vertical rail
3
⁄8-16 l o ck-
washers
3
⁄8-16 x 1" screws
Rack assembly
Rack assembly
3
⁄8-16 x 1" screws
Assembly is complete.
RM082A
3
⁄8-16 nut s
3
⁄8-16 lockwashers
3
⁄8-16 x 1" screws
Figure 11. Attaching the rack’s front two vertical rails to the rack assembly,
rails adjusted to 29.5 to 41"D (74.9 to 104.1 cm) in one-inch (2.5-cm) increments.
Page 11
Page 12

Black Box Tech Support: FREE! Live. 24/7.
Tech support the
way it should be.
Great tech support is just 20 seconds away at 724-746-5500 or blackbox.com.
About Black Box
Black Box Network Services is your source for more than 118,000 networking and infrastructure products. You’ll find everything
from cabinets and racks and power and surge protection products to media converters and Ethernet switches all supported by
free, live 24/7 Tech support available in 20 seconds or less.
©
Copyright 2010. All rights reserved.
RM082A, rev. 2
724-746-5500 | blackbox.com
 Loading...