

Page 1

MDS931C-1
MDS931C-2
MDS931AE-2
SUBSCRIBER ACCESS EQUIPMENT
MDSL MODEM
U
SER MANUAL
Version 1.0
© Copyright ©2002 by BLACK BOX Network Services AG. The contents of this publication may not be
reproduced in any part or as a whole, transcribed, stored in a retrieval system, translated into any language,
or transmitted in any form or by any means, electronic, mechanical, magnetic, optical, chemical,
photocopying, manual, or otherwise, without the prior written permission of BLACK BOX Network Services
AG. Published BLACK BOX Network Services AG. All rights reserved.
Date 17.03.04 page 2 of 29
Page 2

CONTENTS
CONTENTS 3
VERSION CONTROL 4
1. INTRODUCTION 5
2. GENERAL INFORMATION 6
3. DESCRIPTION OF THE DEVICE 7
3.1. Exterior design 7
3.2. Rules of connection settings 10
4. RULES OF SWITCHING 10
4.1. The delivery set 10
4.2. Connection rules 10
4.3. Communication parameters of the terminal configuration 11
5. THE COMMAND SYSTEM 13
5.1. Basic rules 13
5.2. The main menu 13
5.3. Performance management submenu 14
5.3.1. TRACETIME command 14
5.3.2. LINE command 15
5.3.3. ETH command 15
5.3.4. MAC command 16
5.3.5. RESET command 16
5.4. Fault and maintenance management submenu 17
5.4.1. TRACETIME command 17
5.4.2. SQ command 18
5.4.3. STATUS command 18
5.4.4. ALARM command 19
5.5. Configuration management submenu 19
5.5.1. TRACETIME command 19
5.5.2. CONFIG command 20
5.5.3. RESET command 20
5.5.4. MASTER command 20
5.5.5. LINERATE command 21
5.5.6. ADAPTIVE command 21
5.5.7. ESPEED command 22
5.5.8. EMODE command 23
5.5.9. PORT command 24
5.5.10. OPERATE command (only for MDS931C-1 / MDS931C-2 / MDS931AE-2) 24
5.5.11. TELNET command 24
5.5.12. IP, NETMASK, GATEWAY commands 25
5.6. Security management submenu 26
6. TECHNICAL SPECIFICATIONS 26
7. STORAGE CONDITIONS 27
8. GUARANTEE 27
9. TERMS TO TRANSPORT 28
10. CONNECTOR’S DESCRIPTION 29
11. DESCRIPTION OF INTERFACE CABLES 30
Date 17.03.04 page 3 of 29
Page 3

Version control
Version number Date Content of changes
0.0 01.05.2002
Initial version of the manual corresponding to version 1.31 of the
device microprogram
0.1 07.02.2002 Added
- telnet
- remote statistics via secondary channel
- 4.6Mbit operate mode
0.2 09.30.2002 IEEE 802.1Q target packet support
1.0 20.11.2002 The official version
Date 17.03.04 page 4 of 29
Page 4

Introduction
The Black Box DSL Discovery device is targeted at the organization of high-rate access to Internet or at the
integration of LANs. The 2B1Q line encoding is used to transmit information over a twisted pair. The Black
Box DSL Discovery device ensures organization of communication over one or two twisted pairs. The device
provides transmission rates in the range from 192 Kbit/s to 4640 Kbit/s. The parameters of the device are
stored in the NVRAM with the help of a PC. The 10/100Base-T interface is used as a user’s interface. The
device can operate in the transparent bridge mode with the dynamic accumulation of MAC addresses.
The device is designed to organize a digital channel at the central office side and to connect this channel
with the Black Box DSL Discovery external unit installed on the customer premises side. It is also possible to
interconnect two stand-alone modems, for example, for the organization of communication between LANs.
The modems support uploading of new firmware versions using the Monitor port.
Date 17.03.04 page 5 of 29
Page 5

General information
• High-speed symmetrical data transmission over one or two physical copper
twisted pairs with the 135 Ohm impedance according to ETSI TS 101 135.
• 2B1Q line encoding.
• Line rate in the range from 192 Kbit/s to 2320 Kbit/s over every pair, up to 4.6M over two pairs.
• Manual or automatic mode of line-speed adjustment.
• Ethernet 10/100Base-T interface, Full/Half duplex.
• Transmition of VLAN packet ( IEEE-802.1q ).
• Dynamic table formation of MAC addresses.
• Accumulation of up to 1024 MAC addresses.
• Supported hot reserving DSL function
• Granting of 95% of the digital channel band to the user.
• In-built functions of diagnostics and self-testing.
• Low power consumption, easy-to-use applications.
• Console port for the local management.
• -48V power feeding
• ~220 V power feeding. (only for MDS931AE-2 model)
Date 17.03.04 page 6 of 29
Page 6

Description of the device
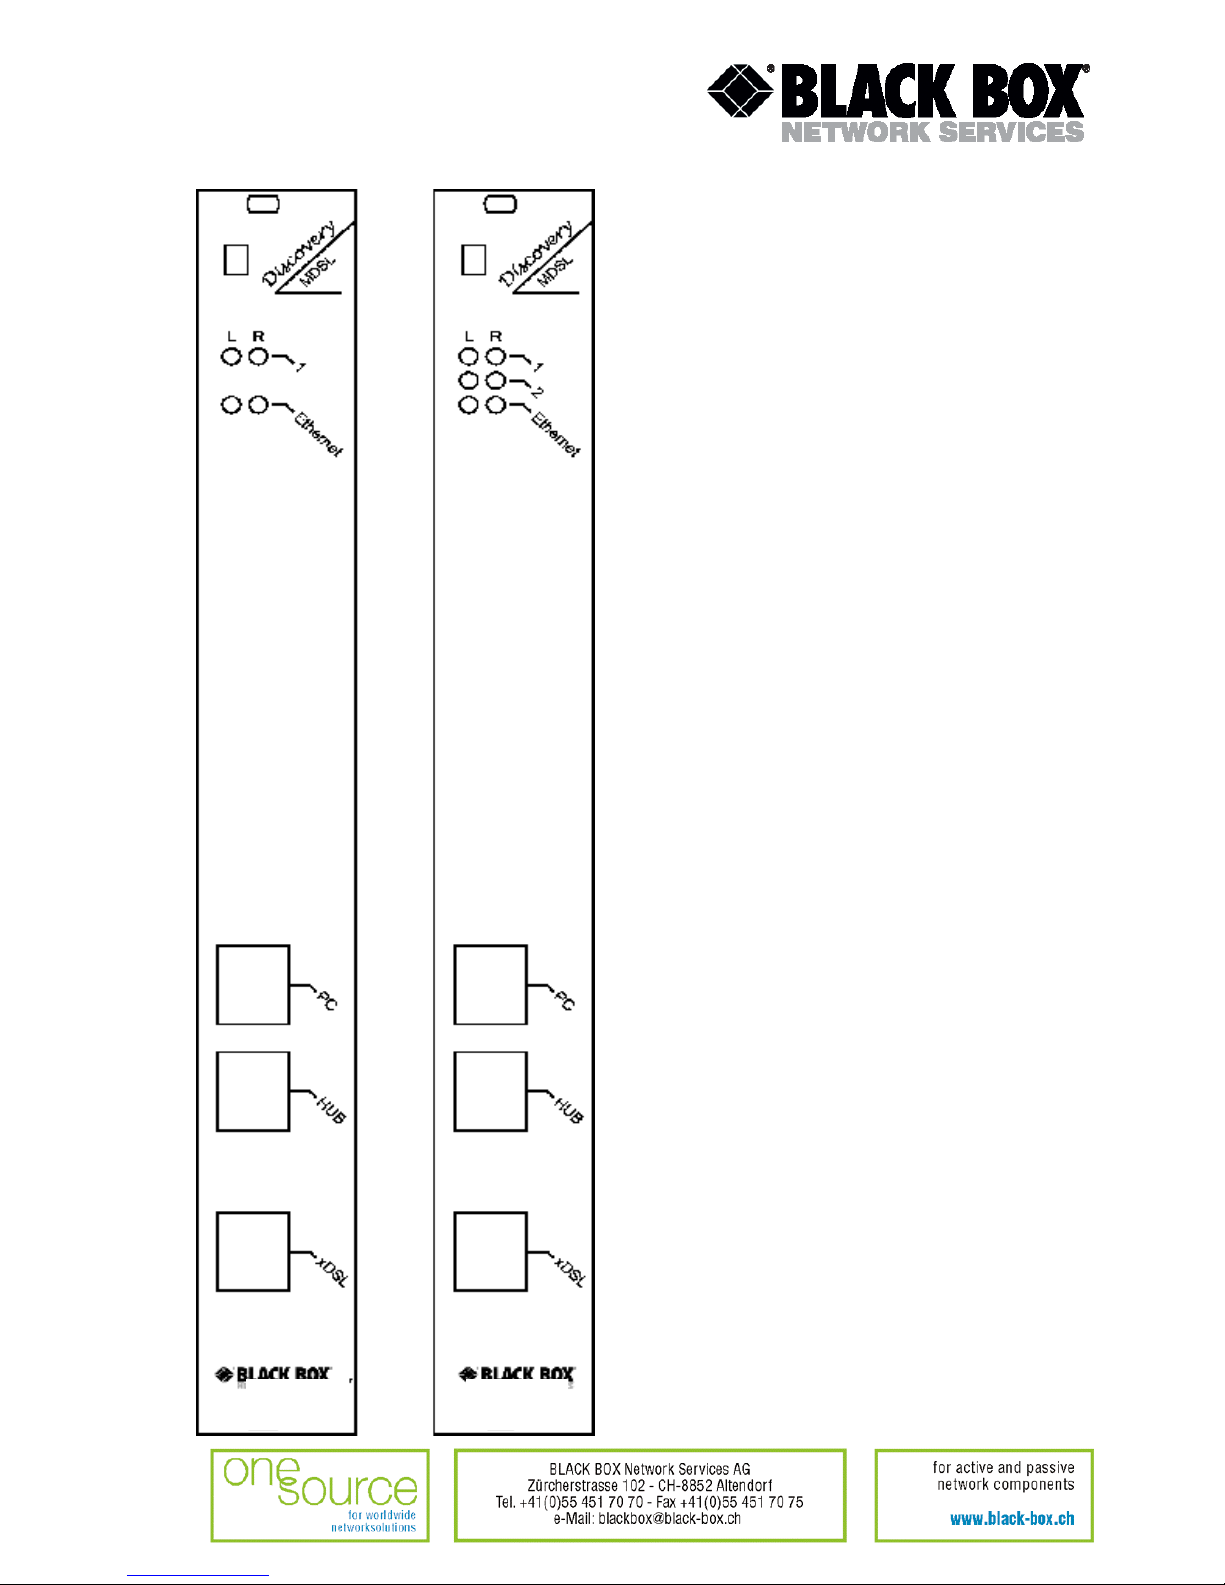
Exterior design
Exterior design of external model (MDS931AE-2) is introduced at the picture
The front panel of the device has six LEDs:
Date 17.03.04 page 7 of 29
Page 7
Date 17.03.04 page 8 of 29
Exterior design of Rack Mount models MDS931C-1, MDS931C-2 is introduced at the picture
Page 8

LOCAL(L)
informs the user about the status of the local device. The following four statuses are
possible
«blinking red»
informs the user about malfunctioning of the modem’s hardware and
software. In this case, the modem is out of order and should be submitted to
the service center for being repaired.
«red»
informs the user about an urgent alarm. An abruption of the connection, the
correspondence of the signal-to-noise ratio which does not allow transmitting
information and a great number of errored blocks can cause an urgent alarm.
See the “Command menu” chapter for detail.
«amber»
informs the user about non-urgent alarms. An abruption of connection over
the user’s interface can cause non-urgent alarms.
«green» absence of alarms. Normal functioning of the device.
REMOTE(R)
informs the user about the status of the remote device. At the time being the remote
configuring of modems is not provided.
Ethernet The LED is lit upon an incorrect connection to the LAN, blink when it is active
The LED is lit upon the connection to the LAN at 100 Mbit/s.
The front panel of the external modem has:
• The “-48VDC” power connector. The connection of the modem to the 220 V power supply is
implemented using an external power supply unit;
• the “Monitor” connector to control the modem and store statistics;
• “PC” and “HUB” connectors to connect the modem to the LAN using a straight Patch Cord (to the PC
or HUB, respectively);
• the “DSL” connector to connect the modem to the leased physical line.
Date 17.03.04 page 9 of 29
Page 9

Rules of connection settings
It is necessary to stick to the following rules while configuring the modems:
• One modem should be set in the “MASTER” mode and the other should have this mode disabled.
Usually the “MASTER” mode is enabled on the provider or central office side because in this mode
the modem can affect the connection parameters.
• The value of “ADAPTIVE” parameters should be equal on both modems.
• For 4,6M connection, the value of “OPERATE” parameters must be set to “Transparent” on both
modems.
The time of connections in ADAPTIVE mode depends on the current line conditional and can be up to 5
minutes.
Examples of the modem configuration (for every line).
Parameters Modem 1 Modem 2
MASTER ON OFF
ADAPTIVE OFF OFF
LINERATE 2320 2320
The connection is established at a speed of 2320 Kbit/s.
Parameters Modem 1 Modem 2
MASTER ON OFF
ADAPTIVE OFF OFF
LINERATE 192 192
The connection is established at a speed of 192 Kbit/s.
Rules of switching
Open the package and make sure that the delivery set is complete.
The delivery set
The delivery set includes:
• the subscriber access device (a modem);
• the power supply source (an AC adapter); (for MDS931AE-2)
• the cable for the connection to the line;
• Patch Cord UTP5
• User manual.
If any problems occur, address to the vendor.
Connection rules
During the connection of the modem stick to the following rules:
For external models
• connect the modem using the “straight” Patch Cord cable to the hub
through the HUB connector or to the PC through the PC connector. Only one device can be
connected to modem jack at same time.
• connect the modem, if necessary, to the serial port of the PC through
the “MONITOR” connector using the “straight” modem cable;
• connect the modem to the line using the “DSL” connector;
• connect the power supply unit to the AC power system;
• connect the modem to the power adapter using the “-48VDC” connector;
Date 17.03.04 page 10 of 29
Page 10

• launch the hyper-terminal operation program on the PC.
For Rack Mount models
• insert modem card to shelf
• connect the modem using the “straight” Patch Cord cable to the hub
through the HUB connector or to the PC through the PC connector. Only one device can be
connected to modem jack at same time.
• connect the modem, if necessary, to the serial port of the PC through
the “MONITOR” shelf connector using the “straight” modem cable;
• connect the modem to the line using the “DSL” connector;
Communication parameters of the terminal configuration
Management of devices of Rack Mount type
The device rear panel contains the TTL management bus, organized according to the “point/multipoint”
scheme. The TTL-RS232 layer translator is on the rear panel of the device. The socket for the connection
to the terminal is on the rear panel as well. If ACU and CMU are installed in Sub-Rack, the management
socket is on the front panel.
To connect the terminal, it is necessary to use RS232 cable. While attaching the cable to the computer
COM-port, make sure the port is not occupied by the other device drivers (for example, mouse).
The terminal must be configured in the following way:
• Transmission rate: 9600 kbit/s;
• Transmission format: 8-N-1;
• Flow management: XON/XOFF;
• Terminal type: VT100.
At any one time only one device in the shelf can be logically connected to the management interface. The
device is chosen in accordance with the slot number, in which it is mounted. To choose the necessary
device, type <%SN>, where SN is the slot number.
Example: to select the modem, mounted in slot 3, type:
%03
The unit in the shelf displays %SN after the ECHO command is entered, where SN is the slot number.
After typing “ECHO”, the operator will receive a response from LTU devices, as it is shown below:
ECHO
%01 %02 %08 %10 %11 %12
Management of devices of Stand Alone type
The management terminal is connected to the MONITOR socket (DB9 type), which is on rear panels. The
requirements to the terminal configuration are analogous to those of Rack Mount devices. After the power
is on, the computer displays information about the device firmware loading. It is necessary to set the
following parameters to monitor the modem:
• transmission rate – 9600;
• data bits – 8;
• parity – none;
• number of stop bits – 1;
• flow control – XON/XOFF.
Date 17.03.04 page 11 of 29
Page 11

To update the information on the screen use the “Enter” key. The following menu will appear on the screen.
Black Box MDSL
Ethernet Monitor V1.41
+------------------------+
| Main Menu |
+------------------------+
1. Performance management (PM)
2. Fault and maintenance management (FMM)
3. Configuration management (CM)
4. Security management (SM)
NTU> Select [1..4]:
The modem is ready to be configured.
Date 17.03.04 page 12 of 29
Page 12

The command system
Basic rules
After the command is typed, press <enter>.
The <Backspace> key is used to edit commands.
Some commands have the parameter <C> to update the information on the screen. This mode starts acting
after the command is entered. To exit from the mode press any key.
Each command has the (H)elp command to help the user and the (M)ain command to return to the main
menu.
The main menu
The main menu is the following:
Black Box MDSL
Ethernet Monitor V1.21
+------------------------+
| Main Menu |
+------------------------+
1. Performance management (PM)
2. Fault and maintenance management (FMM)
3. Configuration management (CM)
4. Security management (SM)
NTU> Select [1..4]:
The menu consists of four submenus. To choose the needed submenu, it is necessary to type its
number and press “Enter”. The main menu also contains information about the current version of
the firmware. It is important that you inform the service center about it when being consulted.
Date 17.03.04 page 13 of 29
Page 13

Performance management submenu
Upon activation of the performance management submenu the following message will be displayed.
00:28:10 Performance management activated
Enter <M> to return to MAIN, or <H> for HELP information
NTU_PM_S09_P1>
Press <H> to see all available commands with their brief description.
00:28:10 Performance management activated
Enter <M> to return to MAIN, or <H> for HELP information
NTU_PM>H
~~~~~~~~~~~~~~~~~~~~~~~~~~~~~~~~~~~~~~~~~~~~~~~~~~~~~~~~~~~~~~~~~~
LINE Display Line statistic
LINE C Display Line statistic continuously
ETH Display Ethernet statistic
ETH C Display Ethernet statistic continuously
MAC Display MAC table
RESET A Reset All statistics
RESET L Reset Line statistics
RESET E Reset Ethernet statistics
RESET M Reset MAC table statistics
TRACETIME [5..20] Change trace time (5..20 seconds)
M(AIN) Return to main menu
~~~~~~~~~~~~~~~~~~~~~~~~~~~~~~~~~~~~~~~~~~~~~~~~~~~~~~~~~~~~~~~~~~
NTU_PM_S09_P1>
TRACETIME command
The TRACETIME command allows the user to change the time interval of updating the information on the
screen (5…20 seconds):
NTU_PM>TRACETIME 10
NTU_PM_S09_P1>
Date 17.03.04 page 14 of 29
Page 14

LINE command
The LINE command informs the user about the status of the connection over the physical line. Upon
entering the <C> parameter, the updating of the information on the screen will occur automatically with the
interval of 5…20 seconds according to the parameter set by the TRACETIME command:
Line Port Statistics
LOCAL REMOTE
------------------------------------------------------------------------ 5 sec Total 5 sec Total
Transmit Packets 0 0 0 0
Receive Packets 0 0 0 0
Receive Error Packets 0 0 0 0
Error Packet Rate, % 0.00 0.00 0.00 0.00
Receive Bytes 0 0 0 0
Transmit Bytes 0 0 0 0
Average Speed, kBps 0 0 0 0
------------------------------------------------------------------------Software Version 1.2
Link Down Down
Line Speed, kBps 272 272
Signal Level, dBm 0.0 0.0 0.0
Far-End Level, dBm 63.0 63.0 0.0
Noise Level, dBm -16.0 -16.0 0.0
NTU_PM_S09_P1>
ETH command
The ETH command informs the user about the status of the connection over the Ethernet port. Upon
entering the <C> parameter, the updating of the information on the screen will occur automatically with the
interval of 5…20 seconds according to the parameter set by the TRACETIME command:
Ethernet Port Statistics
Speed 100M Duplex Mode Full
Link State Link Up
Input Output
5 sec Total 5 sec Total
Octets 180 3810 0 0
Ucast Packets 0 0 0 0
NUcast Packets 2 33 0 0
Discards Pckts 1 6 0 0
Errors 0 0 0 0
NTU_PM_S09_P1>
Date 17.03.04 page 15 of 29
Page 15

MAC command
The MAC command displays the table of MAC addresses on the screen
LOCAL
00:48:54:6c:5e:08 2 00:90:27:1c:78:70 2 00:09:b7:02:66:91 2 00:c0:df:06:03:4d 2
00:60:08:76:61:c2 2 00:c0:26:31:66:c0 2 00:60:08:76:62:08 2 00:c0:26:a3:8c:df 2
00:60:52:0b:f8:01 2 00:30:48:10:7f:46 2 00:c0:26:aa:a7:1a 2 XX:XX:XX:XX:XX:XX
XX:XX:XX:XX:XX:XX XX:XX:XX:XX:XX:XX XX:XX:XX:XX:XX:XX XX:XX:XX:XX:XX:XX
XX:XX:XX:XX:XX:XX XX:XX:XX:XX:XX:XX XX:XX:XX:XX:XX:XX XX:XX:XX:XX:XX:XX
XX:XX:XX:XX:XX:XX XX:XX:XX:XX:XX:XX XX:XX:XX:XX:XX:XX XX:XX:XX:XX:XX:XX
XX:XX:XX:XX:XX:XX XX:XX:XX:XX:XX:XX XX:XX:XX:XX:XX:XX XX:XX:XX:XX:XX:XX
XX:XX:XX:XX:XX:XX XX:XX:XX:XX:XX:XX XX:XX:XX:XX:XX:XX XX:XX:XX:XX:XX:XX
XX:XX:XX:XX:XX:XX XX:XX:XX:XX:XX:XX XX:XX:XX:XX:XX:XX XX:XX:XX:XX:XX:XX
XX:XX:XX:XX:XX:XX XX:XX:XX:XX:XX:XX XX:XX:XX:XX:XX:XX XX:XX:XX:XX:XX:XX
NTU_PM_S09_P1>
RESET command
The modem continuously stores statistics about its operation. The RESET command is used to reset all the
statistics. The following parameters are available:
• “A” to reset all the statistics;
• “L” to reset the line statistics;
• “E” to reset the Ethernet port statistics;
• “M” to reset the MAC table statistics.
NTU_PM_S09_P1>RESET A
01:23:57 All modem statistics cleared
NTU_PM_S09_P1>RESET L
01:24:07 Line statistics cleared
NTU_PM_S09_P1>RESET E
01:24:15 Ethernet port statistics cleared
NTU_PM_S09_P1>RESET M
01:24:22 MAC table statistics cleared
NTU_PM_S09_P1>
Date 17.03.04 page 16 of 29
Page 16

Fault and maintenance management submenu
Upon activation of the fault and maintenance management submenu the following message will be
displayed.
01:37:30 Fault and maintenance management activated
Enter <M> to return to MAIN, or <H> for HELP information
NTU_FMM_S09_P1>
Press <H> to see all available commands with their brief description.
01:37:30 Fault and maintenance management activated
Enter <M> to return to MAIN, or <H> for HELP information
NTU_FMM_S09_P1>H
~~~~~~~~~~~~~~~~~~~~~~~~~~~~~~~~~~~~~~~~~~~~~~~~~~~~~~~~~~~~~~~~~~
SQ Display Signal Quality
SQ C Display Signal Quality continuously
STATUS Display System Status
STATUS C Display System Status continuously
ALARM Display Alarm
ALARM C Display Alarm continuously
TRACETIME [5..20] Change trace time (5..20 seconds)
M(AIN) Return to main menu
~~~~~~~~~~~~~~~~~~~~~~~~~~~~~~~~~~~~~~~~~~~~~~~~~~~~~~~~~~~~~~~~~~
NTU_FMM_S09_P1>
TRACETIME command
The TRACETIME command allows the user to change the time interval of updating the information on the
screen (5…20 seconds):
NTU_PM_S09_P1>TRACETIME 10
NTU_PM_S09_P1>
Date 17.03.04 page 17 of 29
Page 17

SQ command
The SQ command informs the user about the status of the connection over the physical line. Upon entering
the <C> parameter, the updating of the information on the screen will occur automatically with the interval
of 5…20 seconds according to the parameter set by the TRACETIME command. It is very convenient to
create a text file about the connection status for further analysis.
NTU_FMM_S09_P1>SQ
-----Levels, dBm -------------------------------------------------------------Time Signal FarEnd Noise R.Pckts T.Pckts E.Pckts EPR%
------------------------------------------------------------------------------01:39:13 49.0 50.0 -16.0 0 0 0 0.00
NTU_FMM_S09_P1>
Use this command to store the information about the quality of the connection in log files.
NTU_FMM_S09_P1>SQ C
-----Levels, dBm -------------------------------------------------------------Time Signal FarEnd Noise R.Pckts T.Pckts E.Pckts EPR%
------------------------------------------------------------------------------01:40:43 48.0 50.0 -16.0 0 0 0 0.00
01:40:53 49.0 50.0 -16.0 0 0 0 0.00
01:41:03 49.0 49.0 -16.0 0 0 0 0.00
01:41:13 49.0 50.0 -16.0 0 0 0 0.00
01:41:23 49.0 50.0 -16.0 0 0 0 0.00
NTU_FMM_S09_P1>
STATUS command
The STATUS command informs the user about the modem status. Upon entering the <C> parameter, the
updating of the information on the screen will occur automatically with the interval of 5…20 seconds
according to the parameter set by the TRACETIME command:
Modem Status
Startup time 6332 sec ( 0 days 01:44:32)
Line Ethernet
Link Down Link Down
Master ON Duplex Half
Speed, kBps 272 Speed, Mbps 10
Unavailable time 1225 Unavailable time 1217
Available time 0 Available time 0
Statistic time 1225 Statistic time 1217
Link Loss 0
NTU_FMM>
Date 17.03.04 page 18 of 29
Page 18

ALARM command
The ALARM command informs the user about urgent and non-urgent alarms. Upon entering the <C>
parameter, the updating of the information on the screen will occur automatically with the interval of 5…20
seconds according to the parameter set by the TRACETIME command:
Alarm Status
Urgent: LossSync - ON HiEPR - OFF
Not-urgent: Link - OFF LoEPR - OFF SQ - OFF
NTU_FMM_S09_P1>
Configuration management submenu
Upon activation of the configuration management submenu the following message will be displayed.
01:47:50 Configuration management activated
Enter <M> to return to MAIN, or <H> for HELP information
NTU_CM_S09_P1>
Press <H> to see all available commands with their brief description.
NTU_CM_S09_P1>H
~~~~~~~~~~~~~~~~~~~~~~~~~~~~~~~~~~~~~~~~~~~~~~~~~~~~~~~~~~~~~~~~~~
CONFIG Display local configuration
RESET System Reset
TELNET ON|OFF Set telnet mode to ON/OFF
IP XXX.XXX.XXX.XXX Set IP Address for this card (where XXX = 0..255)
NETMASK XXX.XXX.XXX.XXX Set Network Mask for this card (where XXX = 0..255)
GATEWAY XXX.XXX.XXX.XXX Set Default Gateway for this card (where XXX = 0..255)
MASTER ON|OFF Set xDSL master/slave mode (similar to CO/RT)
LINERATE [1..16] Select line rate
ADAPTIVE ON|OFF Set adaptive mode to ON/OFF ( only for slave mode)
DEFAULT [0..1] Set default configuration
ESPEED [AUTO|10|100] Set speed of Ethernet port
EMODE [AUTO|HALF|FULL] Set Duplex mode of Ethernet port
TRACETIME [5..20] Change trace time (5..20 seconds)
PORT [1..2] Change port number (1..2)
OPERATE [1..2] Change operation mode (1..2)
M(AIN) Return to main menu
~~~~~~~~~~~~~~~~~~~~~~~~~~~~~~~~~~~~~~~~~~~~~~~~~~~~~~~~~~~~~~~~~~
NTU_CM_S09_P1>
TRACETIME command
The TRACETIME command allows the user to change the time interval of updating the information on the
screen (5…20 seconds):
NTU_CM_S09_P1>TRACETIME 10
Date 17.03.04 page 19 of 29
Page 19

NTU_CM_S09_P1>
CONFIG command
The CONFIG command informs the user about the configured parameters.
NTU_CM_S09_P1>CONFIG
~~~~~~~~~~~~~~~~~~~~~~~~~~~~~~~~~~~~~~~~~~~~~~~~~~~~~~~~~~~~~~~~~~
xDSL
Line Rate,kbit/s : 2320
Master/Slave : Slave
Adaptive mode : ON
Operation mode : Transparent
Ethernet
Speed : AUTO
Duplex mode : AUTO
Telnet mode : ON
IP Address : 10.7.1.1
Subnet mask : 255.0.0.0
Default gateway : 10.27.66.1
~~~~~~~~~~~~~~~~~~~~~~~~~~~~~~~~~~~~~~~~~~~~~~~~~~~~~~~~~~~~~~~~~~
NTU_CM_S09_P1>
RESET command
The RESET command restarts the modem.
NTU_CM_S09_P1>RESET
01:55:02 system reset
MASTER command
The MASTER command sets the modem either in the maser or slave modes.
NTU_CM_S09_P1>MASTER ON
~~~~~~~~~~~~~~~~~~~~~~~~~~~~~~~~~~~~~~~~~~~~~~~~~~~~~~~~~~~~~~~~~~
xDSL
Line Rate,kbit/s : 2320
Master/Slave : Master
Adaptive mode : ON
Operation mode : Transparent
Ethernet
Speed : AUTO
Duplex mode : AUTO
Telnet mode : ON
IP Address : 10.7.1.1
Subnet mask : 255.0.0.0
Default gateway : 10.27.66.1
~~~~~~~~~~~~~~~~~~~~~~~~~~~~~~~~~~~~~~~~~~~~~~~~~~~~~~~~~~~~~~~~~~
NTU_CM_S09_P1>
Date 17.03.04 page 20 of 29
Page 20

LINERATE command
The LINERATE command determines the modem connection rate over the line. The number parameters
from 1 to 16 determine the connection rate.
NTU_CM_S09_P1>LINERATE 12
~~~~~~~~~~~~~~~~~~~~~~~~~~~~~~~~~~~~~~~~~~~~~~~~~~~~~~~~~~~~~~~~~~
xDSL
Line Rate,kbit/s : 1296
Master/Slave : Master
Adaptive mode : ON
Operation mode : Transparent
Ethernet
Speed : AUTO
Duplex mode : AUTO
Telnet mode : ON
IP Address : 10.7.1.1
Subnet mask : 255.0.0.0
Default gateway : 10.27.66.1
~~~~~~~~~~~~~~~~~~~~~~~~~~~~~~~~~~~~~~~~~~~~~~~~~~~~~~~~~~~~~~~~~~
NTU_CM_S09_P1>
ADAPTIVE command
The ADAPTIVE command adjusts the line rate of the slave modem to the line rate of the master modem.
The line rates should be set equal on both modems.
NTU_CM_S09_P1>ADAPTIVE ON
~~~~~~~~~~~~~~~~~~~~~~~~~~~~~~~~~~~~~~~~~~~~~~~~~~~~~~~~~~~~~~~~~~
xDSL
Line Rate,kbit/s : 1296
Master/Slave : Master
Adaptive mode : ON
Operation mode : Transparent
Ethernet
Speed : AUTO
Duplex mode : AUTO
Telnet mode : ON
IP Address : 10.7.1.1
Subnet mask : 255.0.0.0
Default gateway : 10.27.66.1
~~~~~~~~~~~~~~~~~~~~~~~~~~~~~~~~~~~~~~~~~~~~~~~~~~~~~~~~~~~~~~~~~~
NTU_CM_S09_P1>
Date 17.03.04 page 21 of 29
Page 21

ESPEED command
The ESPEED command determines the operating speed over the Ethernet port.
NTU_CM_S09_P1>ESPEED AUTO
~~~~~~~~~~~~~~~~~~~~~~~~~~~~~~~~~~~~~~~~~~~~~~~~~~~~~~~~~~~~~~~~~~
xDSL
Line Rate,kbit/s : 1296
Master/Slave : Master
Adaptive mode : ON
Operation mode : Transparent
Ethernet
Speed : AUTO
Duplex mode : AUTO
Telnet mode : ON
IP Address : 10.7.1.1
Subnet mask : 255.0.0.0
Default gateway : 10.27.66.1
~~~~~~~~~~~~~~~~~~~~~~~~~~~~~~~~~~~~~~~~~~~~~~~~~~~~~~~~~~~~~~~~~~
NTU_CM_S09_P1>
Date 17.03.04 page 22 of 29
Page 22

EMODE command
The EMODE command sets the operation mode over the Ethernet port.
NTU_CM_S09_P1>EMODE AUTO
~~~~~~~~~~~~~~~~~~~~~~~~~~~~~~~~~~~~~~~~~~~~~~~~~~~~~~~~~~~~~~~~~~
xDSL
Line Rate,kbit/s : 1296
Master/Slave : Master
Adaptive mode : ON
Operation mode : Transparent
Ethernet
Speed : AUTO
Duplex mode : AUTO
Telnet mode : ON
IP Address : 10.7.1.1
Subnet mask : 255.0.0.0
Default gateway : 10.27.66.1
~~~~~~~~~~~~~~~~~~~~~~~~~~~~~~~~~~~~~~~~~~~~~~~~~~~~~~~~~~~~~~~~~~
NTU_CM_S09_P1>EMODE HALF
~~~~~~~~~~~~~~~~~~~~~~~~~~~~~~~~~~~~~~~~~~~~~~~~~~~~~~~~~~~~~~~~~~
xDSL
Line Rate,kbit/s : 1296
Master/Slave : Master
Adaptive mode : ON
Operation mode : Transparent
Ethernet
Speed : 100
Duplex mode : HALF
Telnet mode : ON
IP Address : 10.7.1.1
Subnet mask : 255.0.0.0
Default gateway : 10.27.66.1
~~~~~~~~~~~~~~~~~~~~~~~~~~~~~~~~~~~~~~~~~~~~~~~~~~~~~~~~~~~~~~~~~~
NTU_CM_S09_P1>EMODE FULL
~~~~~~~~~~~~~~~~~~~~~~~~~~~~~~~~~~~~~~~~~~~~~~~~~~~~~~~~~~~~~~~~~~
xDSL
Line Rate,kbit/s : 1296
Master/Slave : Master
Adaptive mode : ON
Operation mode : Transparent
Ethernet
Speed : 100
Duplex mode : FULL
Telnet mode : ON
IP Address : 10.7.1.1
Subnet mask : 255.0.0.0
Default gateway : 10.27.66.1
~~~~~~~~~~~~~~~~~~~~~~~~~~~~~~~~~~~~~~~~~~~~~~~~~~~~~~~~~~~~~~~~~~
NTU_CM_S09_P1>
Date 17.03.04 page 23 of 29
Page 23

PORT command
The PORT command sets the current port for management or configuration. Information about current
active port is display in prompt.
NTU_CM_S09_P1>PORT 1
NTU_CM_S09_P1>PORT 2
NTU_CM_S09_P2>
OPERATE command (only for MDS931C-2, MDS931AE-2 models)
The OPERATE command depend the 2 Mbits ( Bridge) or 4 Mbits (Transparent) operation mode. When
the value will be changed, it is necessary to sets MASTER, ADAPTIVE LINERATE parameters every
ports.
NTU_CM_S09_P2>OPERATE 1
~~~~~~~~~~~~~~~~~~~~~~~~~~~~~~~~~~~~~~~~~~~~~~~~~~~~~~~~~~~~~~~~~~
xDSL
Line Rate,kbit/s : 1296
Master/Slave : Master
Adaptive mode : ON
Operation mode : Transparent
Ethernet
Speed : 100
Duplex mode : FULL
Telnet mode : ON
IP Address : 10.7.1.1
Subnet mask : 255.0.0.0
Default gateway : 10.27.66.1
~~~~~~~~~~~~~~~~~~~~~~~~~~~~~~~~~~~~~~~~~~~~~~~~~~~~~~~~~~~~~~~~~~
01:05:06 system reset
TELNET command
The TELNET command enables or disables of TCP/IP packets. You can manage only local modem via
telnet session.
NTU_CM_S09_P1>TELNET OFF
~~~~~~~~~~~~~~~~~~~~~~~~~~~~~~~~~~~~~~~~~~~~~~~~~~~~~~~~~~~~~~~~~~
xDSL
Line Rate,kbit/s : 1296
Master/Slave : Master
Adaptive mode : ON
Operation mode : Transparent
Ethernet
Speed : 100
Duplex mode : FULL
Telnet mode : OFF
IP Address : 10.7.1.1
Subnet mask : 255.0.0.0
Default gateway : 10.27.66.1
~~~~~~~~~~~~~~~~~~~~~~~~~~~~~~~~~~~~~~~~~~~~~~~~~~~~~~~~~~~~~~~~~~
Date 17.03.04 page 24 of 29
00:11:43 system reset
Page 24

IP, NETMASK, GATEWAY commands
The IP, NETMASK, GATEWAY commands set the TCP/IP parameters for telnet management.
NTU_CM_S09_P1>IP 10.0.0.1
~~~~~~~~~~~~~~~~~~~~~~~~~~~~~~~~~~~~~~~~~~~~~~~~~~~~~~~~~~~~~~~~~~
xDSL
Line Rate,kbit/s : 1296
Master/Slave : Master
Adaptive mode : ON
Operation mode : Transparent
Ethernet
Speed : 100
Duplex mode : FULL
Telnet mode : OFF
IP Address : 10.0.0.1
Subnet mask : 255.0.0.0
Default gateway : 10.27.66.1
~~~~~~~~~~~~~~~~~~~~~~~~~~~~~~~~~~~~~~~~~~~~~~~~~~~~~~~~~~~~~~~~~~
Please reset the system, and the change will be take effect
NTU_CM_S09_P1>NETMASK 255.0.0.0
~~~~~~~~~~~~~~~~~~~~~~~~~~~~~~~~~~~~~~~~~~~~~~~~~~~~~~~~~~~~~~~~~~
xDSL
Line Rate,kbit/s : 1296
Master/Slave : Master
Adaptive mode : ON
Operation mode : Transparent
Ethernet
Speed : 100
Duplex mode : FULL
Telnet mode : OFF
IP Address : 10.0.0.1
IP Address : 255.0.0.0
Default gateway : 10.27.66.1
~~~~~~~~~~~~~~~~~~~~~~~~~~~~~~~~~~~~~~~~~~~~~~~~~~~~~~~~~~~~~~~~~~
Please reset the system, and the change will be take effect
NTU_CM_S09_P1>GATEWAY 10.0.1.1
~~~~~~~~~~~~~~~~~~~~~~~~~~~~~~~~~~~~~~~~~~~~~~~~~~~~~~~~~~~~~~~~~~
xDSL
Line Rate,kbit/s : 1296
Master/Slave : Master
Adaptive mode : ON
Operation mode : Transparent
Ethernet
Speed : 100
Duplex mode : FULL
Telnet mode : OFF
IP Address : 10.0.0.1
Subnet mask : 255.0.0.0
Default gateway : 10.0.1.1
~~~~~~~~~~~~~~~~~~~~~~~~~~~~~~~~~~~~~~~~~~~~~~~~~~~~~~~~~~~~~~~~~~
Please reset the system, and the change will be take effect
Date 17.03.04 page 25 of 29
Page 25

Security management submenu
Upon activation of the security management submenu the following message will be displayed.
00:18:02 Security management activated
Enter <M> to return to MAIN, or <H> for HELP information
NTU_SM_S09_P1>
It is reserved for further developments.
Technical specifications
The main technical specifications of modems of the Black Box DSL family are presented below in the table.
Line interface.
Standard ETSI 101 135
Number of pairs 1 or 2
Line rate (every pais) 192 – 2320 Kbit/s
Communication range for cables with the
wire diameter of
144 Kbit/s
2320 Kbit/s
0.5 mm:
7.7 km
3.4 km
1.2 mm:
31 km
13.7 km
Line code 2B1Q
Input impedance of the physical line 135 Ohm
Output signal level 7.8 – 14.8 dBm
Transmission spectrum from 0…96 kHz to 0…1160 kHz
User’s interface
Standard: IEEE-802.3
IEE-802.1Q
Interface type: Ethernet 10/100Base-T, Full/Half Duplex
Connector: RJ-45
Management
Monitoring VT100
Telnet
Power supply
Supply voltage:
~220 V ± 10%; 50 Hz
-48VDC
Power consumption: No more than 5 W for Mds931C-1
No more than 5 W for MDS931C-2 / MDS931AE-2
Grounding resistance No more than 10 Ohm
Protection
Conforms to the requirements of the GOST (State Standard) 12.
2
85, GOST 7153-85,
GOST Р.50033-92 and Norm 9-93
Climatic conditions
Temperature range -5о С ….+45о С
Relative humidity of air 5%…85%
Date 17.03.04 page 26 of 29
Page 26

Storage conditions
The equipment of the Black Box DSL family while being packed should withstand all means of transport at
a temperature in the range form -50
о
С to +50о С and the relative humidity of air up to 100% at 25о С. The
equipment can also withstand air-transport at a low air pressure of 12 kPa (90 Torr) at -50
о
С.
The packed equipment of the Black Box DSL family can be stored within 12 months (from the date of
transshipment including transporting time) in storage rooms without heating
at -50о С - +50о С and the mean monthly value of the air humidity of 80%
at 20о С; short-term increases of air humidity up to 98% (no more than a month a year) at a temperature
not exceeding 25о С without moisture condensation is admissible.
The equipment should be stored in storage buildings, which protect the devices from atmospheric
precipitations. The equipment should be kept on shelves or in factory packages in the absence of vapors of
acids, alkali and other atmospheric impurities.
Guarantee
The mean time before failure is no less 30000 hours.
The manufacturer guarantees that the equipment are in all respects in accordance with
the requirements of technical conditions when the customer follows the rules and
conditions of storage, transporting and maintenance.
The guarantee period (no less than 12 months after putting the equipment into operation)
is specified upon drawing the Contract for the sale of the equipment.
Should the equipment prove defective during the guarantee period, the manufacturer
undertakes to remedy the defects or replace the faulty equipment. If the defects appear
due to incompetent storage, maintenance and transporting, the guarantee does not cover
such defects.
After the guarantee period expires, the manufacture provides paid delivery of spare parts.
The list of spare parts and terms of their delivery during the operating lifetime of the
equipment should be specified in the Contract.
Date 17.03.04 page 27 of 29
Page 27

Terms to transport
The equipment of the Black Box DSL family should be packed and transported by:
• motor transport with an enclosed truck body;
• enclosed railroad cars;
• unpressurized airplanes and helicopters (up to 10000 m at an air pressure of
170 Torr);
• river transport (in holds).
The equipment of the Black Box DSL family should withstand transportation when being packed under the
following conditions:
• temperature from -50
о
С to +50о С;
• relative air humidity up to 100% at 25
о
С (within 10 days).
The equipment of the Black Box DSL family should be packed and withstand transportation by:
• motor transport with the number of transshipments no more than four:
• along the asphalt-concrete and cement-concrete roads at a distance
of 200 – 1000 km;
• earth roads at a distance of 50 – 250 km at a speed of 40 km/hour;
• different means of transport (airplanes, railway transport in combination with motor transport along the
asphalt-concrete and cement-concrete roads at a distance of 200 km) with the number of
transshipments from three to four;
• water transport (excluding sea transport) in combination with motor transport along the asphaltconcrete and cement-concrete roads at a distance of 200 km with the number of transshipments no
more than four.
During transportation the packages with the equipment should be fixed so that to exclude their moving,
collision and collision against the transport bodies.
Date 17.03.04 page 28 of 29
Page 28

Connector’s description
DSL connector
Type: RJ-45, 8 pin
Number Signal Assignment
1 Line 2,a tip
2 Line 2,b ring
3 Ground -
4 NC
5 Ground -
6 NC
7 Line 1,a tip
8 Line 1,b ring
18
............
RJ45
Monitor connector
(MDS931AE-2)
Type: Sub-D9, female
Number Signal Assignment
NC -
2 TXD Transmit data
3 RXD Receive data
4 DTR Data terminal ready
5 SGND Signal ground
6 NC -
7 NC -
8 NC -
9 NC -
DB9
female
1
5
6
9
Date 17.03.04 page 29 of 29
Page 29

PC and Hub connectors
Type: RJ-45
Number PC assignment HUB assignment
1 Tx+ Rx+
2 Tx- Rx-
3 Rx+ Tx+
4 NC NC
5 NC NC
6 Rx- Tx-
7 NC NC
8 NC NC
18
............
RJ-45
Description of interface cables
«Straight» Ethernet cable
Side А Color of wire Side B
1 white/green 1
2 green/white 2
3 white/orange 3
4 blue/white 4
5 white/blue 5
6 orange/white 6
7 white/brown. 7
8 brown/white 8
«Straight» modem cable
The device side The PC side
DB9M DB9F DB25F
2 2 3
3 3 2
5 5 7
4 4 20
 Loading...