

Page 1

MDR29x Wireless 900 MHz Modem
User’s Manual
Version 1.5
1000 Park Drive - Lawrence, PA 15055-1018
Website: www.blackbox.com Email: info@blackbox.com
Order Toll Free in the US: Call 877-877-BBOX (Outside the US call 724-746-5500)
Page 2

DOCUMENT INFORMATION
Copyright © 2006 Black Box, Inc. All rights reserved.
The information contained in this manual and the accompanying software programs are copyrighted and all rights are
reserved by Black Box, Inc. Black Box, Inc. reserves the right to make periodic modifications of this product without
obligation to notify any person or entity of such revision. Copying, duplicating, selling, or otherwise distributing any
part of this product or accompanying documentation/software without the prior consent of an authorized
representative of Black Box, Inc. is strictly prohibited.
All brands and product names in this publication are registered trademarks or trademarks of their respective holders.
This material is preliminary
Information furnished by Black Box in this specification is believed to be accurate. Devices sold by Black Box are
covered by the warranty and patent indemnification provisions appearing in its Terms of Sale only. Black Box makes
no warranty, express, statutory, and implied or by description, regarding the information set forth herein. Black Box
reserves the right to change specifications at any time and without notice.
Black Box’s products are intended for use in normal commercial and industrial applications. Applications requiring
unusual environmental requirements such as military, medical life-support or life-sustaining equipment are specifically
not recommended without additional testing for such application.
Limited Warranty, Disclaimer, Limitation of Liability
For a period of one (1) year from the date of purchase by the OEM customer, Black Box warrants the OEM transceiver
against defects in materials and workmanship. Black Box will not honor this warranty (and this warranty will be
automatically void) if there has been any (1) tampering, signs of tampering; 2) repair or attempt to repair by anyone
other than an Black Box authorized technician.
This warranty does not cover and Black Box will not be liable for, any damage or failure caused by misuse, abuse,
acts of God, accidents, electrical irregularity, or other causes beyond Black Box’s control, or claim by other than the
original purchaser.
In no event shall Black Box be responsible or liable for any damages arising: From the use of product; From the loss
of use, revenue or profit of the product; or As a result of any event, circumstance, action, or abuse beyond the control
of Black Box, whether such damages be direct, indirect, consequential, special or otherwise and whether such
damages are incurred by the person to whom this warranty extends or third party.
If, after inspection, Black Box determines that there is a defect, Black Box will repair or replace the OEM transceiver at
their discretion. If the product is replaced, it may be a new or refurbished product.
Page 3

1
MDR29X RF TRANSCEIVER 1
The MDR29x transceiver is a Frequency-Hopping Spread Spectrum (FHSS) radio designed for license-free
operation in the 900 MHz ISM band. The radio sustains a standard asynchronous serial data stream
between two or more radios out of the box. Housed in a compact and rugged die-cast enclosure, the radio
is equipped to replace miles of serial cable using an RS232, RS485, or USB interface.
MDR29X FEATURES
NETWORKING AND SECURITY
• Retries and Acknowledgements
• API Commands to control packet routing and acknowledgement on a packet-by-packet basis
• Frequency Hopping Spread Spectrum for security and interference rejection
• Customizable RF Channel number and system ID
• Dynamic link analysis, remote radio discovery
• Low latency and high throughput
EASY TO USE
• Continuous 76.8 kbps RF data stream
• Software selectable interface baud rates from 1200 bps to 115.2 kbps
• Advanced configuration available using AT commands
OVERVIEW
The MDR29x uses Frequency Hoppin g Spre ad Sp ec trum modulation, where the uni ts "hop" from frequency
to frequency many times per second using a specific hop pattern applied to all the transceivers in the same
network. A distinct hopping pattern is provided for each Channel Number, thereby allowing multiple
networks to co-exist in the same area without interference.
MDR29x transceivers operate in a Point-to-Point or Point-to-Multipoint, Client-Server architecture. One
transceiver is configured as a Server and there can be one or many Clients. To establish co mmunication
between transceivers, the Server emits a beacon and upon detecting a beacon, RF link is established with
the Client(s).
MDR29x’s implement a proprietary communication protocol to provide secure data transmissions. The use
of FHSS technology ensures data reliability over long distances. Use of li cense free frequency bands ensu re
that the units are ready for use with no further certification requirements.
Each unit is small and easily portable for use in mobile and temporary settings as well as for fixed
installations. The Black Box MDR29x configuration software enables custom configurations based on unique
application requirements.
1-877-877-2269
www.blackbox.com
Page 4

CHAPTER 1 - MDR29X RF TRANSCEIVER
This document contains information about the hardware and software interface between an Black Box
MDR29x transceiver and an OEM Host. Information includes the theory of operation, specifications,
interface definition, configuration information and mechanical drawings. The OEM is responsible for
ensuring the final product meets all appropriate regulatory agency requirements listed herein before selling
any product.
Note: MDR29x modules will be referred to as the “radio” or “t ransceiv er”. Individual naming is used
to differentiate product specific features. The host (PC, Microcontroller, or any device to which the
MDR29x is connected) will be referred to as “OEM Host”.
2
1-877-877-2269
www.blackbox.com
Page 5

2
SPECIFICATIONS 2
TABLE 1: MDR29X SPECIFICATIONS
INTERFACE
Serial Interface Connector DB-9 Male (RS-232), Terminal Block (RS-485), Type B USB (USB)
RF Connector RPSMA Jack
Serial Interface Data Rate Baud rates from 1200 bps to 115,200 bps
Power Consumption (typical) 400 mA @ 12VDC
Channels 32 (USA); 7 (Australia)
Supported Network Topologies Point-to-Point, Point-to-Multipoint
Security One byte System ID. 56-bit DES encryption key.
Interface Buffer Size Input/Output: 256 bytes each
OPERATIONAL
Frequency Band 902 – 928 MHz (USA); 915-928 MHz (Australia)
RF Data Rate 76.8 kbps fixed
RF Technology Frequency Hopping Spread Spectrum
Output Power Conducted (no antenna) EIRP (3dBi gain antenna)
Supply Voltage MDR292/4A: 7-18VDC
Sensitivity -100dBm typical @ 76.8kbps RF Data Rate
Range, Line of Site (based on
3dBi gain antenna)
Temperature (Operating) -40°C to 80°C
Temperature (Storage) -50°C to +85°C
Dimensions 4.4 x 2.7 x 1.4 inches
Weight 6 oz (170 g)
FCC Part 15.247 MDR291A: KQLAC4490-100
Industry Canada (IC) MDR291A: 2268C-AC4490
MDR292/4A: 743mW typical 1486mW typical
MDR291A: 100mW typical 200mW typical
MDR291A: USB Supplied 5V
MDR291A: Up to 4 miles
MDR292/4A: Up to 20 miles
ENVIRONMENTAL
PHYSICAL
CERTIFICATIONS
MDR292/4A: KQLAC4490
MDR292/4A: 2268C-AC44901000
1-877-877-2269
www.blackbox.com
Page 6

3
SERIAL INTERFACE 3
The MDR29x supports RS232, RS485, and USB protocols (seper ate pro ducts). Blac k Box wirel ess solutio ns
are not subject to the cabling restrictions for distance, and either interface is available when ordering.
Figure 1: MDR29x Status LEDs
Status LEDs
Pwr Link Rx Tx
RPSMA Antenna Connector
TABLE 2: STATUS LEDS
LED COLOR DESCRIPTION
Pwr Green On indicates that the unit is powered up.
Link Red On indicates that the Client unit(s) and Server unit are in range of
RXD Green When flashing, indicates that the MDR29x is receiving data.
TXD Red When flashing, indicates that the MDR29x is transmitting data.
each other. Client units activate the Link LED when in Range of the
Server unit. Always lit on a Server unit.
Figure 2: MDR292A Figure 3: MDR294A
Terminal Block
Power ConnectorDB9 Male Connector
Power Connector
15
69
Figure 4: MDR291A
USB Type B
connector
1-877-877-2269
www.blackbox.com
Page 7
CHAPTER 3 - SERIAL INTERFACE
RS232 - MDR292A
RS232 is a single-ended data transmission protocol. The RS232 signals are represented by voltage levels
with respect to a system common (power/logic ground). The “idle” stat e (MARK) has the signal level
negative with respect to common, and the “active” state (SPACE) has the signal level positive with respect
to common.
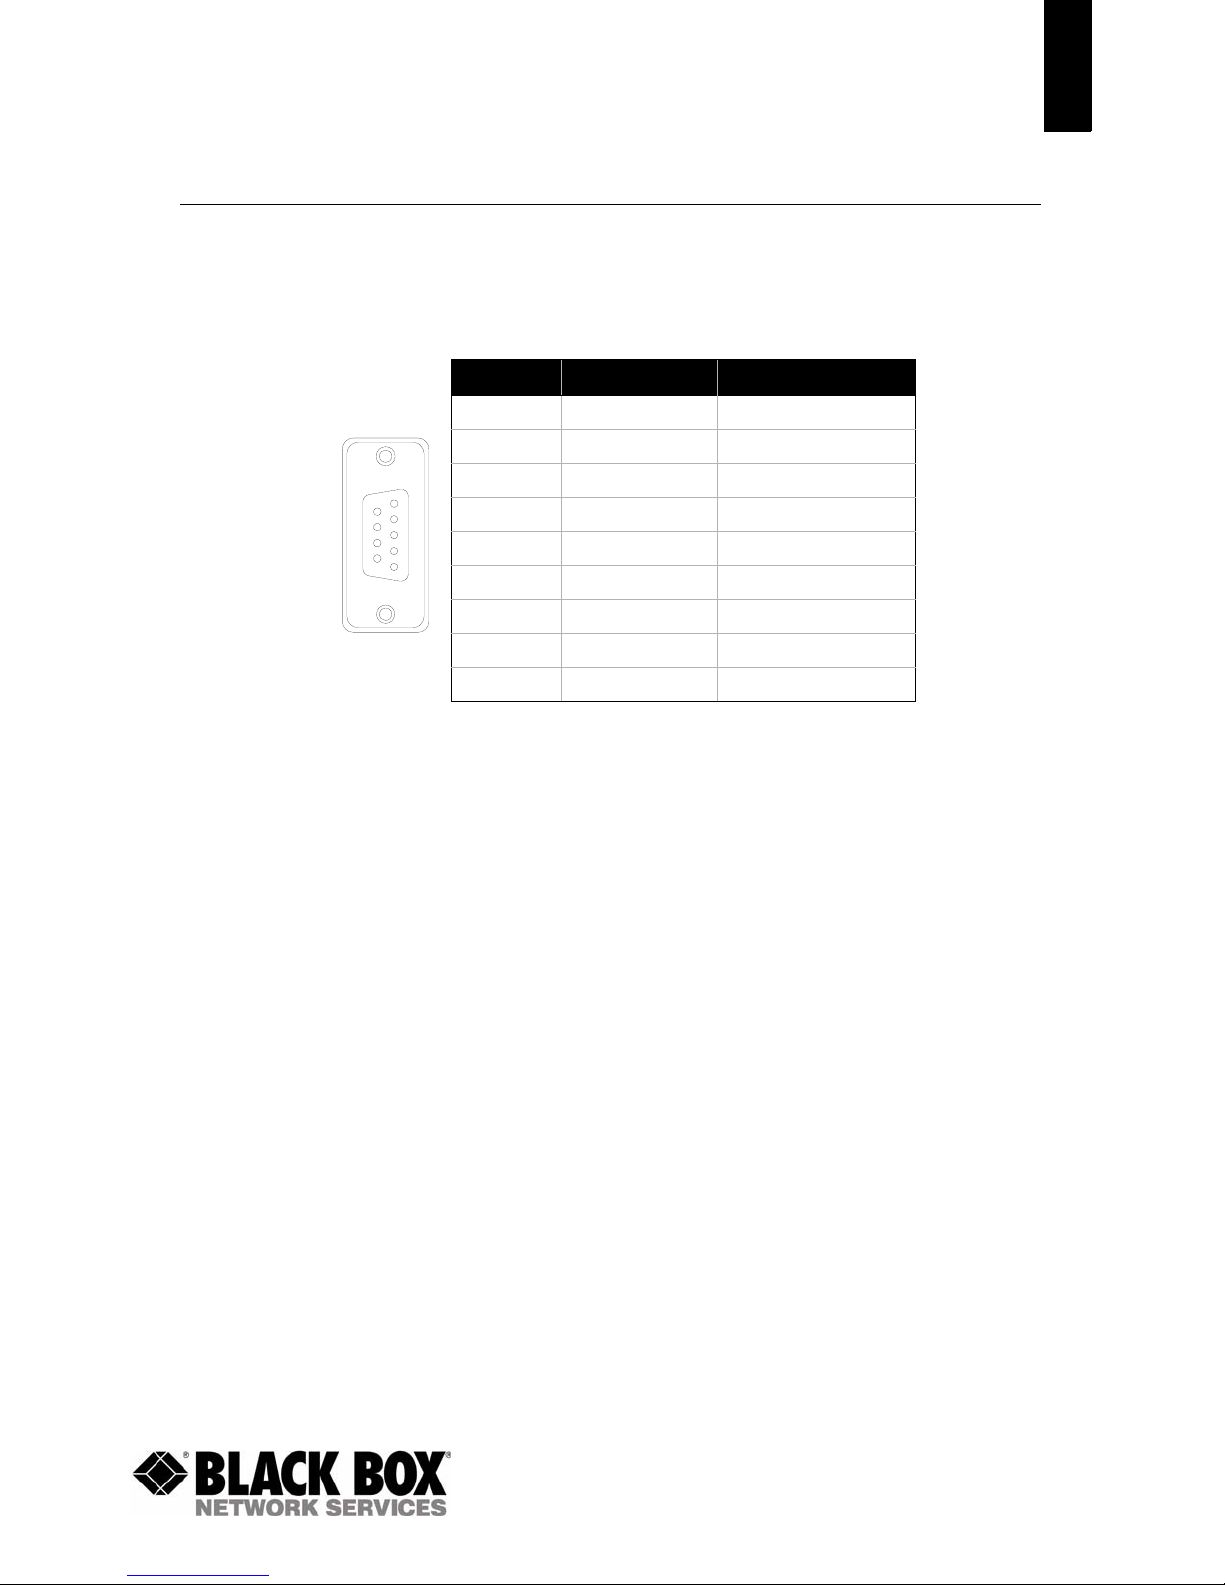
TABLE 3: MDR29X DB9 MALE CONNECTOR PINOUT
DB9 PIN SIGNAL NAME DESCRIPTION
1 DCD Data Carrier Detect
2 RXD Received Data
1
6
9
5
3 TXD Transmitted Data
4 DSR Data Set Ready
5 GND Ground
6 DTR Data Terminal Ready
7 CTS Clear To Send
8 RTS Request To Send
9 RI Ring Indicator
5
INTERFACING TO OTHER RS232 EQUIPMENT
The MDR292A is a DCE (Data Communications Equipement) device. Typically devices like PC’s are
considered DTE (Data Terminal Equipment) devices while periphial devices are classified as DCE. A DCE
device can be interfaced to a DTE device using a straight through serial cable. When interfacing two DCE or
1-877-877-2269
www.blackbox.com
Page 8

CHAPTER 3 - SERIAL INTERFACE
two DTE devices together, a null modem cable is required to swap the pins and convert the signals
accordingly.
Figure 5: DTE to DCE Interface Figure 6: DCE to DCE Interface
6
CTS
RTS
TXD
RXD
GND
DCD
DTR
DSR
RI
J1 J2 SIGNAL
1 1 DCD
2 2 RXD
3 3 TXD
4 4 DTR
5 5 GND
6 6 DSR
7 7 RTS
8 8 CTS
MDR292A Modem (DCE)RS232 Device (DTE)
CTS
RTS
TXD
RXD
GND
DCD
DTR
DSR
CTS
RTS
TXD
RXD
GND
DCD
NC NC
DTR
DSR
RI
RI
NC NC
MDR292A Modem (DCE)RS232 Device (DTE)
CTS
RTS
TXD
RXD
GND
DCD
DTR
DSR
RI
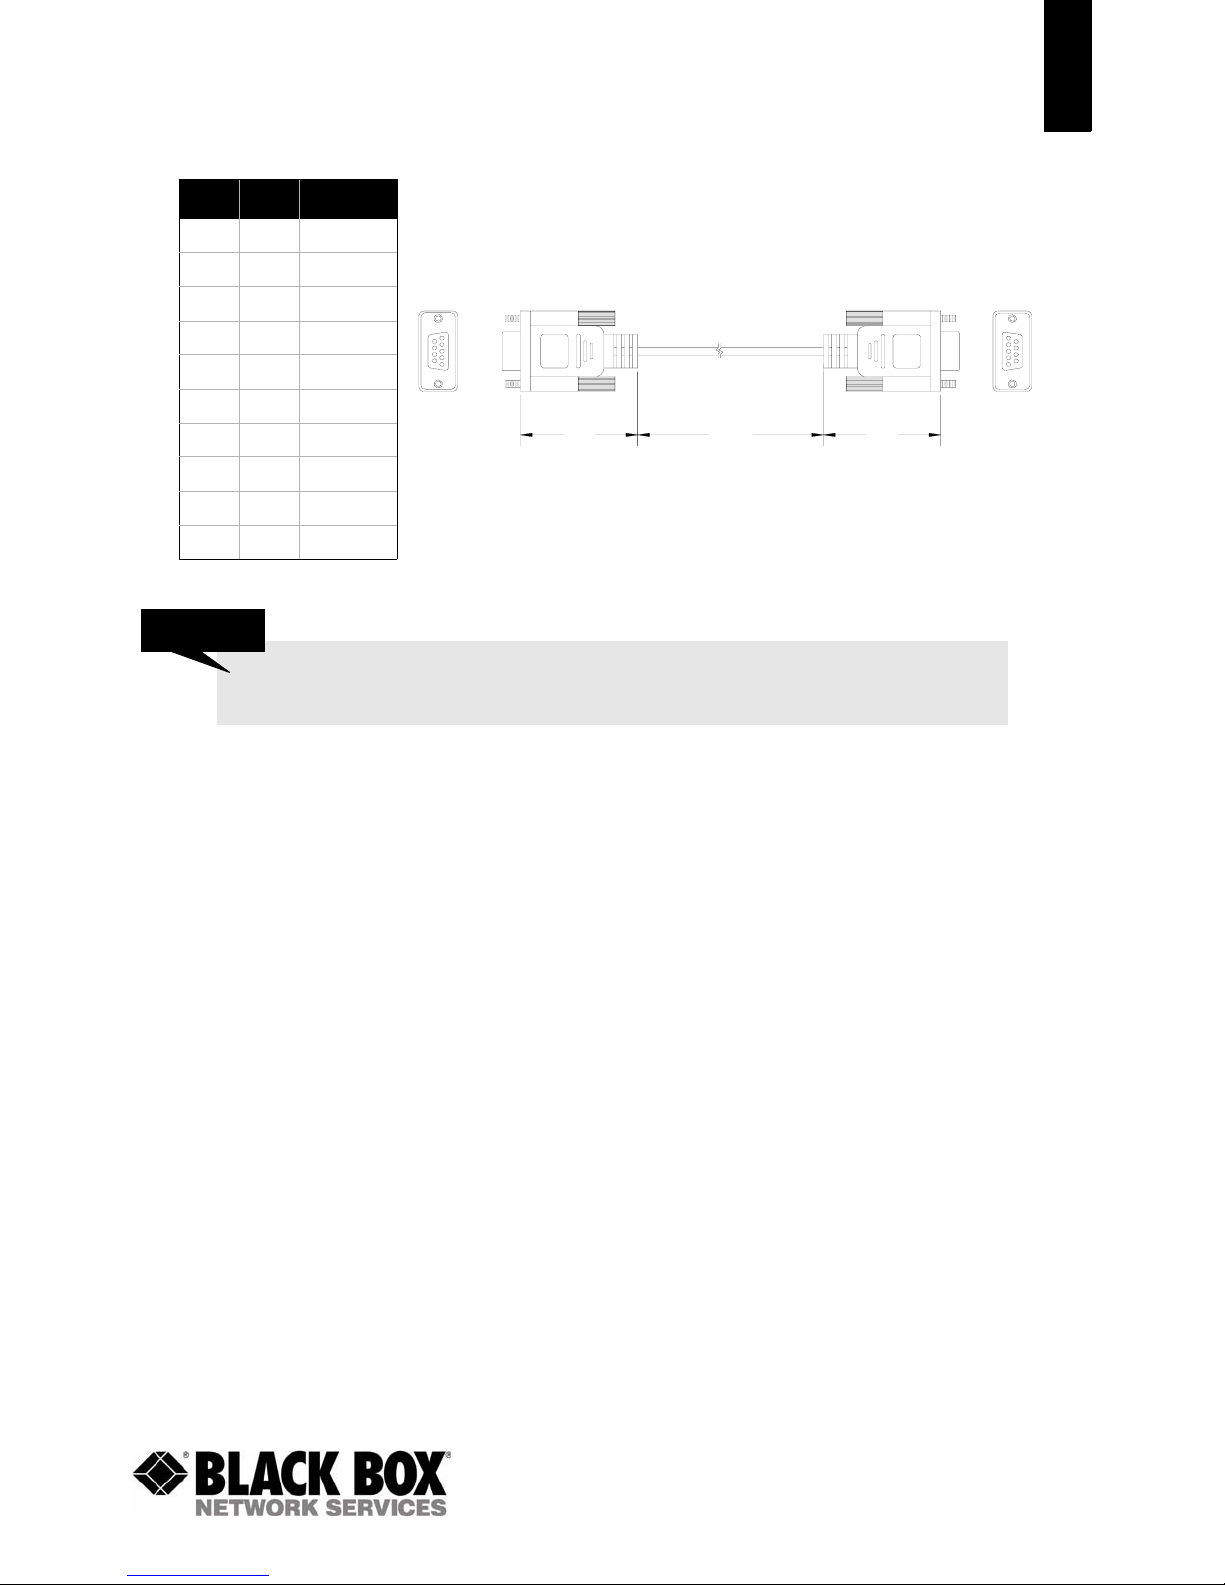
Figure 7: DB9F to DB9F Straight Through Cable
J1
5
9
6
1
1.70
72.00
1.70
J2
1
6
9
5
9 9 RI
Shell Shell GND
1-877-877-2269
www.blackbox.com
Page 9
CHAPTER 3 - SERIAL INTERFACE
7
J1 J2 SIGNAL
1 N/C DCD
2 3 RXD
3 2 TXD
4 6 DTR
5 5 GND
6 4 DSR
7 8 RTS
8 7 CTS
9 N/C RI
Shell Shell GND
DESIGN TIP
If you previously used a straight through cable to connect your PC to your device , you’ll
need to use a null modem cable or adapter to connect the MDR292A to that device.
Figure 8: DB9M to DB9 Female Null Modem Cable
J1
5
9
6
1
1.70
72.00
1.70
J2
1
5
6
9
1-877-877-2269
www.blackbox.com
Page 10

CHAPTER 3 - SERIAL INTERFACE
RS485 - MDR294A
The RS-485 interface uses a Differential Data Transmission that can help nullify the effects of ground shifts
and induced noise signals that can appear as common mode voltages on a network.
The MDR294A implements a RS-485 (2-wire Half Duplex) multi- drop interface. Typically, a RS-485 bus will
consist of a master and several slaves. The nodes will have unique addresses and can send addressed
packets to specific nodes. Because the bus is half duplex, no two nodes should try to talk at the same ti me.
The MDR294A does not have a RS-485 address, therefore, it will transmit all RS-485 traffic over the RF.
Conversely, as soon as a MDR294A receives a packet over the RF, it will transmit the packet over the RS485 bus.
TABLE 4: MDR29X TERMINAL BLOCK PINOUT
8
TERMINAL
BLOCK PIN
1 VCC 6-18V (1.3A required)
16
2 485 - 485B
3 N/C No Connect
4 N/C No Connect
5 485 + 485A
6 GND Ground
SIGNAL NAME DESCRIPTION
Note: When using RS485 (2-wire Half Duplex), a RS 485 to RS232 converter is required to configure the
unit.
Figure 9: RS232-485 Converter
MDR294A
RS232-485 Converter
RS232
RS485
+5V
GND
B-
A+
Terminal Block
16
485 -
485 +
Power Connector
DESIGN TIP
Many simple 2 or 4-wire converters do not provide hardware flow control capabilities and
therefore require Handshaking to be disabled in the Black Box Configuration Utility to
configure the radio. Check with y our co nv erte r Manufacturer for an y specific requirements.
1-877-877-2269
www.blackbox.com
Page 11

CHAPTER 3 - SERIAL INTERFACE
USB - MDR291A
Universal Serial Bus (USB) is a connectivity specification developed by Intel and other technology industry
leaders. USB provides ease of use, expandability, and speed for the end user.
The USB bus supplies 5V DC regulated power (maximum 500mA) through each port on pins 1 and 4. Lowpower devices that might normally require a separate AC adapter can therefore be powered via the USB
cable, eliminating the need for associated AC adaptors. The MDR291A draws all of its power directly from
the USB bus and requires no external power supply.
TABLE 5: MDR291A USB TYPE B PINOUT
9
TERMINAL
BLOCK PIN
12
43
SIGNAL NAME DESCRIPTION
1 V
2 D- Transmit/Receive Data White
3 D+ Transmit/Receive Data Green
4 GND Ground Black
BUS
4.75 - 5.25V @ 500mA Red
CABLE
COLOR
USB DEVICE TYPES
There are two types of USB devices; Masters & Slaves. A USB Master device i s essentially a host device
(i.e. PC) that supplies the USB drivers. A USB Slave device (peripheral devices such as a keyboard, mouse,
etc.) gets connected to a USB Master device and uses the USB driver supplied by the Host.
When a USB Slave device gets connected to the Host (i.e. PC), the Host prompts the device for the
appropriate USB driver. Once the driver has been located, the Host loads and retains it for all subsequent
connections of the Slave device. Note: The MDR291A is a USB Slave device (peripheral) and cannot be
connected to another USB Slave device.
USB DRIVER
The MDR291A is a stand-alone RF module that interfaces to a USB port on the Host device. It uses a
Virtual COM Port driver that causes the device to appear as an additional COM Port on the PC. Application
software can then access the USB device in the same manner as it would access a standard COM Port.
The MDR291A is a plug-and-play device that will automatically be detected by the PC upon connection.
Once detected, the PC starts the Add New Hardware wizard and installs the USB driver.
DESIGN TIP
The Black Box USB Driver is installed automat ically with the OEM Configuration Util ity. It
can also be installed manually using the procedure below:
1 Con nect the M DR291A device to the PC using a USB cable
2 Insert the Black Box Tools & Literature Disk into the CD drive.
3 Select Install from a specific location and then press the Next button.
4 Select Search for the best driver option.
5 Ch eck the S earc h remo vabl e media (CD-ROM) box and then press Next.
6 If a Windows logo testing dialog appears, select Continue anyway.
7 Select Finish and reboot if prompted.
1-877-877-2269
www.blackbox.com
Page 12

CHAPTER 3 - SERIAL INTERFACE
HARDWARE FLOW CONTROL
Flow control refers to the control of data flow between the host and the MDR29x. It is the method used to
handle data in the transmit/rec eive buffer of the M DR29x interface, and determines how data flow between
the host and the MDR29x is throttled. Often in serial communication, one device is capable of sending data
much faster than the other can receive. Flow control allows the slower device to tell the faster device to
pause and resume data transmission. (Flow control CTS and RTS are used by the MDR29x and its Host,
locally - NOT over the air. Therefore, one MDR29x cannot tell the other to slow down or speed up as is
mentioned above in the paragraph).
When the RTS Enable option is selected on the Configuration Utility, the transceivers use hardware flow
control to regulate data flow. While using hardware flow control, the transceiver that is ready to receive
data sends a Clear To Send signal to its host (or the device it is connected to). On the other hand, when a
transceiver has something it w ants to se nd to its h ost, it che cks the state of R eady To Send and if it is logic
low, will send data to its host. If RTS is logic high, it will not send data to its host. These signals are sent
apart from the data itself on separate wires. Note: CTS is always enabled by default. RS-485
Interface does not support Hardware flow control.
DESIGN TIP
Can I implement a design using just Txd, Rxd and Gnd (Three-wire Interface)?
Yes. However, it is strongly recommended that your hardware monitor the CTS pin of the
radio. CTS is taken High by the radio when its interface buffer is getting full. Your
hardware should stop sending at this po int to avoid a buffer overrun (and subsequent loss
of data).
You can perform a successful design without monitoring CTS. However, you need to take
into account the amount of latency the radio adds to the system, any additional latency
caused by Transmit Retries or Broadcast Attempts, how often you send data, non-delivery
network timeouts and interface data rate. Polled type networks, where the Server host
requests data from the Client host and the Client host responds, are good candidates for
avoiding the use of CTS. This is because no one transceiver can monopolize the RF link.
Asynchronous type networks, where any radio can send to another radio at any point in
time, are much more difficult to implement without the use of CTS.
10
1-877-877-2269
www.blackbox.com
Page 13

4
THEORY OF OPERATION 4
RF ARCHITECTURE
The MDR29x utilizes a Serv er-Cl ient network wher e all Clients synchroni ze their h opping to the S erver. The
Server transmits a beacon during the first 1 ms of every hop (20 ms). The Client transcei vers listen for thi s
beacon and upon hearing it assert their In_Range Low and synchronize their hopping with the Server.
Each network should consist of only one Server and there should never be two servers on the same RF
Channel number in the same coverage area as the interference between the two servers will severely
hinder RF communications.
MODES OF OPERATION
The MDR29x has three different operating modes; Receive, Transmit, & Command Mode. If the transceiver
is not communicating with another radio, it wi ll be in Receive Mode actively li st ening for a beacon from the
Server. If the Client determines that the beacon is from a server operating on the same RF Channel and
System ID, it will respond by asserting In_Range Low. A transceiver will enter Transmit or Command mode
when the OEM Host sends data over the serial interface.
TRANSMIT MODE
All packets sent over the RF are either Addressed or Broadcast packets. Broadcast and Addressed delivery
can be controlled dynamically with the API Control byte and corresponding on-the-fly commands. To
prohibit transceivers from receiving broadcast packets, Unicast only can be enabled.
ADDRESSED PACKETS
When sending an addressed packet, the RF packet is sent only to the receiver specified in destination
address. To increase the odds of successful delivery, Transmit retries are utilized. transparent to the OEM
Host; the sending radio will sen d the RF packet to the intended recei ver. If the receiver receives the pac ket
free of errors, it will return an RF acknowledge within the same 20 ms hop. If a receive acknowledgement
is not received, the radio will use a transmit retry to resend the packet. The radio will continue sending the
packet until either (1) an acknowledgement is received or (2) all transmit retries have been used. The
received packet will only be sent to the OEM Host if and when it is received free of errors.
BROADCAST PACKETS
When sending a broadcast packet, the RF packet is sent out to every eligible transceiver on the network.
To increase the odds of successful delivery, Broadcast attempts are utilized. Transparent to the OEM Host,
the sending radio will send the RF packet to the intended receiver(s).
Unlike transmit retries, all broadcast attempts are used; regardless of when the RF packet is actually
received and without RF acknowledgements. If the packet is received on the first attempt, the receiver will
ignore the remaining broadcast attempts. The received packet will only be sent to the OEM Host if and
when it is received free of errors.
RECEIVE MODE
When a transceiver is not in Transmit or Command mode, it will be in Receive Mode listening for data.
While in Receive Mode, subsequent data of up to 80 bytes can be received every hop (20 ms) .
1-877-877-2269
www.blackbox.com
Page 14

CHAPTER 4 - THEORY OF OPERATION
COMMAND MODE
A radio will enter Command Mode when data is received over the serial interface from the OEM Hostand
contains the “A T+++” (Enter A T Command Mode) command . Once in Command Mode, all data received by
the radio is interpreted as command data. Command Data can be either EEPROM Configuration or On-TheFly commands.
FIGURE 10: PENDING RF AND DATA IN BUFFER FLOW
12
Discard Packet
Yes
Send Packet over
Receive full
packet and
check CRC
Yes
Duplicate
Packet
RF
Yes
Receive Mode
Pending RF
Received
Broadcast
Packet
Send Packet over
Addressed Packet
RF
Matching
Destination
MAC
Yes
Validate CRC
Yes
Duplicate
Packet
Discard Packet
Yes
Send RF
Acknowledge
Receive Mode
Data in Buffer
Command/Data
YES
YES
Mode
Broadcast Packet Addressed Packet
Transmit Packet Transmit Packet
Decrement
Broadcast
Attempts
Broadcast
Attempts = 0
AT+++
RF Data
Receive ACK
Decrement
Transmit Attempts
YES
YES
Transmit
Attempts = 0
1-877-877-2269
www.blackbox.com
Page 15

CHAPTER 4 - THEORY OF OPERATION
NETWORK TOPOLOGIES
Topology refers to the shape of a network, or the network's layout. How different nodes in a network are
connected to each other and how they communicate, is determined by the network's topology. The
MDR29xs support a Point-to-Point and a Point-to-Multipoint network topology.
POINT-TO-POINT
A point-to-point network consists of a single Server and Client pair. Sometimes referred to as a wireless
bridge, a point-to-point link replaces a single communications cable.
13
OEM
Host
Server
Client
OEM
Host
POINT-TO-MULTIPOINT
Point-to-Mul tipoint systems ha ve one base stati on, or access point, that controls communications with all of
the other wireless nodes in the network. This allows for the creation of a wireless network consisting of
multiple nodes. By programming each MDR29x with a network specific Channel Number and System ID
multiple networks can be created.
ClientClient
Client
Client
Client
Client
Server
Channel: 0x10
System ID: 0x01
ClientClient
Client
Client
Client
Server
Client
Channel: 0x15
System ID: 0x05
1-877-877-2269
www.blackbox.com
Page 16

5
MDR29X SETTINGS 5
SETTINGS
1) Client/Server: Designates MDR29x type. In each network, there must be only one Server. All other
MDR29x units must be programmed as Clients. The number of Clients in the network is not limited;
however, if performance diminishes, consider additional RF Networks.
2) Interface Baud Rate: This defines the baud rate used for communicating with the MDR29x over the
serial interface. The RF baud rate is fixed at 76.8 K bps and is independent of the Interface Baud Rate. Th e
default baud rate setting is 57600 bps unless the units have been pre-configured by Black Box. The
Interface Baud Rate setting of the MDR29x must match the Baud Rate setting of its host device.
3) Channel Number: A number that designates an independent network of MDR29x units. Up to 32
independent networks can be created. The valid range of values for this field is 16 to 47
4) Max Transmit Retries (For Clients and Servers in Point-to-Point networks only): This value
represents the maximum number of times a particular data packet will be transmitted unsuccessfully, or
without an acknowledgement, before the MDR29x discards the packet. The default value is 16 attempts. If
communication is lost and the Client's Link LED is on, try increasing this value in small increments until
communication is reestablished.
Note: This value is always associated to Client radios and Server radios in Point to Point Mode. The valid
range of values for this field is 1 to 255.
.
5) Broadcast Attempts (For Servers in Point-to-Multipoint networks only): This value represents
the number of times a data packet will be transmitted by the Server MDR29x. The default value is 4
attempts. If communication is lost and the Clients' Link LED is on, try in creasing this value in small
increments until communication is reestablished. The valid range of values for this field is 1 to 255.
6) System Identification: A number from 0 to 256 that provides added security to each independent
network of MDR29x units. The System ID is used in conjunction with the Channel Number and serves as an
RF password to maintain secure trans fers of data. The combination of the Channel Number and S ystem ID
must be unique to each network of MDR29xs to establish communication. Multiple Servers in the same
coverage area must be programmed with different Channel Numbers to prevent inoperability of the
networks. The System ID will not prevent inoperability that occurs from locating multiple Servers with the
same Channel Number in the same coverage area.
Note: Separate Collocated MDR29x networks must operate on different Channel Numbers. All units in a
given MDR29x network must have identical Channel Numbers and System IDs.
7) Data Encryption Key: Encryption is the process of encoding an information bit stream to secure the
data content. The DES algorithm is a common, simple and well-established encryption routine. An
encryption key of 56 bits is used to encrypt the packet. The receiver must use the exact same key to
decrypt the packet; otherwise garbled data will be produced.
8) Destination Address: The MAC Address of the remote MDR29x in a Point-to-Point network. Used to
optimize Point-to-P oi nt communications by utilizing RF Acknowledgement.
9) Firmware Version: Displays the MDR29x's firmware version.
10) MAC Address: A unique 6 Byte, IEEE 802.3 Ethernet address assigned by Black Box to each MDR29x.
1-877-877-2269
www.blackbox.com
Page 17

CHAPTER 5 - MDR29X SETTINGS
RADIO FEATURES
1) Data Encryption: Enables the Data Encryption Key. All MDR29xs in the same network must have the
same encryption setting.
2) RTS Enable: Enables the Request T o Send control line. When enabled, enables Hardware Flow Control.
3) Parity: Needs to be enabled if host requires even or odd parity and 8 data bits. This is considered as
9-bit mode. Note: Enabling Parity cuts the overall throughput into half.
4) Full Duplex: This mode restricts Client radios to transmitting on odd numbered frequency hop bins and
the Server to even numbered frequency hop bins. Though the RF hardware is still technically half duplex, it
makes the transceiver seem full duplex. This can cause overall throughputs to be cut in half. Note: All
transceivers on the same network must have the same setting for Full Duplex.
5) Modem Mode: Full modem handshaking is supported by the transceivers when Modem Mode is
enabled. Modem Mode is incompatible with RS-485 Interface. Enables DCD, DTR, DSR and Ring Indicator
control lines.
PROGRAMMING THE MDR29X RADIO
1 Conne ct a MDR29x unit to the serial communications port on the PC.
2 Connect th e power supply to the MDR29x unit. Make sure the Pwr LED is on.
3 Start the Black Box Configuration Utility.
4 Select the COM Port that is connected to the MDR29x unit on the PC Settings page.
5 Select the Interface Baud Rate of the MDR29x unit. All MDR29x units are shipped with a default
rate of 57600 (unless units have been pre-configured to match specific serial settings). If the
Interface Baud Rate of the MDR29x unit is changed, the PC Setting Baud Rate must be set to the
same Baud Rate to allow proper programming of the units.
6 Select Read Radio to display the current settings of the MDR29x unit.
7 Chan ge desired settings.
8 After all changes have been made, select Write Radio to save the changes.
9 Cycle Power to the unit after all changes has been saved. This will set the MDR 29x unit to its
normal mode of operation.
Note: The Show Defaults button can be used to display the default Radio settings.
15
DESIGN TIP
The Black Box Configuration utility automatically programs the mode (point-to-point or pointto-multipoint) based on the radio’s current settings:
1 If the Destination Address field is set to any value other than FF FF FF FF FF FF, the
radio will send data only to the radio whose MAC matches that specified in the
Destination Address field (point-to-point).
2 If the Destination Address field is set to FF FF FF FF FF FF on a client radio, it will be set
to auto destination mode & transmit to the radio whom it last received a packet from.
3 If the Destination Address field is set to FF FF FF FF FF FF on a server radio, it will be
set to Broadcast mode & transmit to all available clients (point-to-multipoint).
1-877-877-2269
www.blackbox.com
Page 18

6
CONFIGURATION UTILITY 6
OVERVIEW
Black Box provides an easy to use Configuration utility to program and test the MDR29x. The GUI based
software is compatible with Microsoft® Windows 95, 98, 2000, ME, NT, & XP. The MDR29x is a plug and
play device which requires minimal or no configuration.
SOFTWARE INSTALLATION
Locate the OEM software folder on the Black Box Tools & Literature CD and install the development kit
software. To install the software, run Setup.exe and follow the installation prompts. During the
installation, the software will prompt the user to install the Black Box USB Driver. It is recommended that
the user installs the driver at the same time as the software.
The installer will notify the user when the software has successfully been installed. The user may be
prompted to reboot the PC to complete the inst allation.
Click OK to complete the installation. By default, the software is stored in the following location on the
Start Menu:
Start -> All Programs -> Black Box Network Services -> Black Box Config
The software will attempt to open COM1 of the PC. If there is a conflict or the port does not exist, the
software will show the port as unavailable. This has occurred for one of the following reasons:
1 There is other software running that has control over the COM1 port. Locate this software and
shut it down while running “Black Box Config” software.
2 The PC eith er does not have a COM1 port or the port has been disabled.
PC SETTINGS PAGE
The PC Settings page is shown below, as it will appear the first time the program is run.
Select the correct product in the Product pull-do w n menu. Doing this will automatically select the default
baud rate for that particular transceiver. If the COM port is listed as unavailable, a different COM port can
be selected in the Port pull-down menu. The software can use two serial ports if the Enabled: box is
checked.
1-877-877-2269
www.blackbox.com
Page 19

CHAPTER 6 - CONFIGURATION UTILITY
17
PORT1/PORT2 OPTIONS
The software can control up to (2) COM ports including virtual COM ports, which physically map to USB or
Ethernet ports. The Port pull-down menu allows selection of COM1 through COM16. An error message will
be displayed if a port is selected that is either nonexistent or already occupied by another software
program. When a port selection is made, the software will attempt to open the port and list its status as;
Unavailable, Open or Closed. Although menus are shown for Data Bits, Parity and Stop Bits, only the Parity
menu selection can be changed.
FIND PORTS BUTTON
If the available COM ports are unknown, the Find Ports button can be pressed to update the COM Port pulldown menu with all available COM ports.
HANDSHAKING
By default the OEM utility will use hardware handshaking and monitor the CTS/RTS lines. For cases where
these lines are not readily available such as RS-485 communications, the handshaking can be disabled by
selecting “None” from the dropdown box.
OTHER OPTIONS
These are additional options that can be enabled.
1-877-877-2269
www.blackbox.com
Page 20

CHAPTER 6 - CONFIGURATION UTILITY
SAVE SETTINGS ON EXIT
When enabled, all changes made to the Settings page will be automatically loaded the next time the
software is run. Otherwise, the changes will be discarded.
READ/WRITE WITH AT COMMANDS
When enabled, the software will use AT Commands for its read/write EEPROM functions instead of the
standard configuration commands. This box should be checked at all times unless Pin 15 (CMD/DATA) is
pulled Logic Low or the Program/Normal switch is set to Program Mode.
AUTO BAUD
When enabled, the software will scan all available COM Ports using the most common baud rates, until a
radio is found. If no radio is found or the softw are cannot open the port, an error message will be reported.
The software will only use Auto Baud when prompted by the user after an unsuccessful write process. To
cancel the Auto Baud process, press the ESC key.
AUTO ARCHIVE
When enabled, the software will archive the EEPROM settings for each radio after a successful write
process. Although not required, the software will prompt the user to type a description of the changes
made. Auto Archive can be used to restore the radio to a previously known working configuration. The first
time that a radio is read with Auto Archive enabled will be stored as the “Original Configuration Settings”
with the date and time the record was created.
18
STATUS BAR
Located at the bottom of the software, the status bar gives the state of Port 1, R TS P ort 1, CT S P ort 1, P ort
2, RTS Port 2, and CTS Port 2 lines. When the text appears black, the current state will be shown. When
the text appears gray , the current state will not be shown. The text shown in the bottom status bar gives a
simplified status of the current, pending software process. The software has no pending process when
“Communications Idle” is shown.
ABOUT BUTTON
The About button can be pressed to determine the revision number of the software and the contact
information for Black Box. Please include the software revision number in any correspondence with
Technical Support.
CONFIGURE PAGE
The Configure page is a GUI representation of the 256 byte EEPROM contents wit h in the radio. The same
data is shown in a full hexadecimal dump of the EEPRO M in the EEPROM Editor View. The Configure page is
shown below, as it will appear until a radio is successfully read:
1-877-877-2269
www.blackbox.com
Page 21

CHAPTER 6 - CONFIGURATION UTILITY
19
There are five sections on the Configure page; Radio Interface, Radio RF, Radio Features, Radio Other, and
Info Center. The fields displayed in these sect ions vary depending on the Product Mode. The Info Center
provides a quick description of each setting/mode. For detailed decriptions of the individual settings,
please refer to the OEM Module user’s manual.
READ RADIO BUTTON
To update the Configure and EEPROM Editor View pages with the EEPROM contents of a radio currently
connected to the proper port on the PC, click the Read Radio button. An example of the Configure page
after a transceiver has successfully been read is shown below:
1-877-877-2269
www.blackbox.com
Page 22

CHAPTER 6 - CONFIGURATION UTILITY
20
WRITE RADIO BUTTON
After making changes to the controls on the Configure page, the Write Radio button can be pressed to save
those changes to the radio EEPROM. The user will be notified of a successful write with a “Write successful”
prompt. If Auto Archive is enabled, the software will prompt the user to type a description of the changes
made.
SHOW DEFAULTS BUTTON
When the Show Defualts button is pressed, the GUI view will be updated with the default settings for the
selected product. This feature is only available on the GUI Page and will not work when using the EEPROM
Editor View.
PAIRING BUTTON
The pairing button can be used to pair (address) two radios together. The two radios must both be
connected to the PC and to the Po rts specif ied on the PC Settings page. The pairing function sets one r adio
as a Server and the other as a Client and programs each radio’s Destination Address with the other radio’s
MAC Address.
LOAD / SAVE TO FILE BUTTONS
A file previously created by this software can be loaded to restore an EEPROM to a former state. Files of
type *.TXT and *.EE can be loaded.
1-877-877-2269
www.blackbox.com
Page 23

CHAPTER 6 - CONFIGURATION UTILITY
An EEPROM can be saved to a file using the Save to File button. This allows for the current state of the
EEPROM to be restored at a later time.
PORT 1/PORT 2 BUTTONS
When Port 1 is depressed, the Write Radio and R ead Radio buttons communicate through Port 1. When P ort
2 is depressed, the Write Radio and Read Radio buttons communicate through Port 2.
CALC BAUD BUTTON
The Baud pull-down menu includes all standard PC baud rates. To select a non-standard baud rate, the
Calc Baud button can be pressed. This will bring up the following window:
To calculate the settings for a particular baud rate, type that baud rate into the Desired Baud Rate window
and click the Calculate button. If the baud rate is not supported by the radio, an error message will be
displayed. Otherwise, the information will be filled in and the Update button will be enabled. An example is
shown below:
21
Clicking the Save button will cause the baud rate shown in the Actual Baud Rate window to be displayed in
the Baud window on the Configure page of the software. Clicking Cancel will ignore these changes. The
Actual Baud Rate will not always match the Desired Baud Rate. However, the program verifies that the
Desired Baud Rate is within 3% of the Actual Baud Rate (as required by the radio).
HEX/DECIMAL BUTTON
All of the text entry type boxes found on the Configure page have a button located to the right of the box.
When pressed a menu will be shown which allows the selection of either Hexadecimal or Decimal
numbering format for that particular text box. When the program is restarted, all text boxes will revert
back to Hexadecimal.
TERMINAL/CHAT PAGE
The Terminal/Chat page is a terminal emulator (simular to HyperTerminal) used to send small data packets
between two COM ports. As data is received it is appended to the appropriate Port window. An example of
the Terminal/Chat page is shown below.
1-877-877-2269
www.blackbox.com
Page 24

CHAPTER 6 - CONFIGURATION UTILITY
22
SEND BUTTON
This button sends the data in the textbox out the selected port(s). The current user’s Windows username
is also sent over the RF with the data.
HEXADECIMAL / ASCII DISPLAY
New received data will be displayed in ASCII or Hexadecimal format; depending on the current setting.
1-877-877-2269
www.blackbox.com
Page 25

CHAPTER 6 - CONFIGURATION UTILITY
RANGE TEST PAGE
The Range Test page allows packets of data to be sent between two radios and reports the numbers of
successes and errors.
23
TEST SELECTION
There are six test options that can be selected. There are three typical hardware setups.
1 One radio is plugged into a serial or USB port on a PC. The second radio is plugged into a separate
power supply with a loopback adapter connected.
2 One radio is plugged into a serial or USB port on a PC. The other radio is plugged into a different
serial or USB port on the same computer.
3 One radio is plugged into a serial or USB port on a PC. The other radio is connected to a serial or
USB port on another PC.
If using two PCs for the test, the software run on both sides should have the second COM port disabled on
the settings page.
1-877-877-2269
www.blackbox.com
Page 26

CHAPTER 6 - CONFIGURATION UTILITY
TABLE 6: TEST SELECTION SETTINGS
TEST SELECTION PORT 1 ACTION PORT 2 ACTION HARDWARE SETUP
Port 1 -> Port 2 TX RX 2
Port 2 -> Port 1 RX TX 2
Port 1 <-> Port 2 TX/RX TX/RX 2
Port 1 Send Only TX N/A 3
Port 1 Receive Only RX N/A 3
Port 1 Loopback TX/RX N/A 1
TRANSMIT PACKET SELECTION
This section allows you to select the data packet used to perform the Range Test. You may either create
data of a specified byte length or load your own text or configuration file.
TEST TYPE
The test type allows you to select how long the test will be performed.
24
TABLE 7: TEST TYPE
TEST TYPE DESCRIPTION
Continuous Test will run until stopped.
Timed Test will run for a specified time period
Number of Runs Test will run for a specified number of runs
Single Step Test will run for a single step.
Break on Error Test will run until an error occurs
RECEIVE PACKET DISPLAY
This section allows you to sele ct how the receiv ed packet s will be displa yed. R eceived pack ets can either be
displayed in ASCII or Hexadecimal format, marked with a time stamp, and show only when an error has
occurred.
1-877-877-2269
www.blackbox.com
Page 27

7
A
0
5
p
MECHANICAL 7
Figure 11: MDR29x Mechanical
1.170
0.536
0.060
0.000
2.750
2.375
D-Connector
Ante
SM
Side View
Label Recess, 3.5w x 2.0h
0.1
(4)
2.
J3
Status
0 dia. pin and
, pin is PWR.
0.375
0.000
Rx Tx
J4
Link
Pwr
Top View
0.250
0.565
4.500
4.185
www.blackbox.com
4.750
1-877-877-2269
0.000
 Loading...