

Page 1
CUSTOMER
SUPPORT
INFORMATION
Order toll-free in the U.S.: Call 877-877-BBOX (outside U.S. call 724-746-5500)
FREE technical support 24 hours a day, 7 days a week: Call 724-746-5500 or fax 724-746-0746
Mailing address: Black Box Corporation, 1000 Park Drive, Lawrence, PA 15055-1018
Web site: www.blackbox.com • E-mail: info@blackbox.com
OCTOBER 1995
LE3810A-R2 LE3840A
LE3810AE-R2 LE3840AE
LE3820A LE3845A
LE3820AE LE3845AE
LT310A
LT310AE
Ethernet Print Server High Speed
Ethernet Print Server 4-Port
Ethernet Print Server
Ethernet Print Server
Page 2

1
FCC AND IC RFI STATEMENT
FEDERAL COMMUNICATIONS COMMISSION
AND
INDUSTRY CANADA
RADIO FREQUENCY INTERFERENCE STATEMENTS
This equipment generates, uses, and can radiate radio frequency energy and if not
installed and used properly, that is, in strict accordance with the manufacturer’s
instructions, may cause interference to radio communication. It has been tested
and found to comply with the limits for a Class A computing device in accordance
with the specifications in Subpart J of Part 15 of FCC rules, which are designed to
provide reasonable protection against such interference when the equipment is
operated in a commercial environment. Operation of this equipment in a
residential area is likely to cause interference, in which case the user at his own
expense will be required to take whatever measures may be necessary to correct
the interference.
Changes or modifications not expressly approved by the party responsible
for compliance could void the user’s authority to operate the equipment.
This digital apparatus does not exceed the Class A limits for radio noise emission from
digital apparatus set out in the Radio Interference Regulation of Industry Canada.
Le présent appareil numérique n’émet pas de bruits radioélectriques dépassant les limites
applicables aux appareils numériques de la classe A prescrites dans le Règlement sur le
brouillage radioélectrique publié par Industrie Canada.
TRADEMARKS USED IN THIS MANUAL
Any trademarks mentioned in this manual are acknowledged to be the property of the
trademark owners.
Page 3

2
ETHERNET PRINT SERVERS HIGH SPEED AND 4-PORT
NORMAS OFICIALES MEXICANAS (NOM)
ELECTRICAL SAFETY STATEMENT
INSTRUCCIONES DE SEGURIDAD
1. Todas las instrucciones de seguridad y operación deberán ser leídas antes de
que el aparato eléctrico sea operado.
2. Las instrucciones de seguridad y operación deberán ser guardadas para
referencia futura.
3. Todas las advertencias en el aparato eléctrico y en sus instrucciones de
operación deben ser respetadas.
4. Todas las instrucciones de operación y uso deben ser seguidas.
5. El aparato eléctrico no deberá ser usado cerca del agua—por ejemplo, cerca
de la tina de baño, lavabo, sótano mojado o cerca de una alberca, etc..
6. El aparato eléctrico debe ser usado únicamente con carritos o pedestales que
sean recomendados por el fabricante.
7. El aparato eléctrico debe ser montado a la pared o al techo sólo como sea
recomendado por el fabricante.
8. Servicio—El usuario no debe intentar dar servicio al equipo eléctrico más allá
a lo descrito en las instrucciones de operación. Todo otro servicio deberá ser
referido a personal de servicio calificado.
9. El aparato eléctrico debe ser situado de tal manera que su posición no
interfiera su uso. La colocación del aparato eléctrico sobre una cama, sofá,
alfombra o superficie similar puede bloquea la ventilación, no se debe colocar
en libreros o gabinetes que impidan el flujo de aire por los orificios de
ventilación.
10. El equipo eléctrico deber ser situado fuera del alcance de fuentes de calor
como radiadores, registros de calor, estufas u otros aparatos (incluyendo
amplificadores) que producen calor.
11. El aparato eléctrico deberá ser connectado a una fuente de poder sólo del
tipo descrito en el instructivo de operación, o como se indique en el aparato.
Page 4

3
NOM STATEMENT
12. Precaución debe ser tomada de tal manera que la tierra fisica y la polarización
del equipo no sea eliminada.
13. Los cables de la fuente de poder deben ser guiados de tal manera que no
sean pisados ni pellizcados por objetos colocados sobre o contra ellos,
poniendo particular atención a los contactos y receptáculos donde salen del
aparato.
14. El equipo eléctrico debe ser limpiado únicamente de acuerdo a las
recomendaciones del fabricante.
15. En caso de existir, una antena externa deberá ser localizada lejos de las lineas
de energia.
16. El cable de corriente deberá ser desconectado del cuando el equipo no sea
usado por un largo periodo de tiempo.
17. Cuidado debe ser tomado de tal manera que objectos liquidos no sean
derramados sobre la cubierta u orificios de ventilación.
18. Servicio por personal calificado deberá ser provisto cuando:
A: El cable de poder o el contacto ha sido dañado; u
B: Objectos han caído o líquido ha sido derramado dentro del aparato; o
C: El aparato ha sido expuesto a la lluvia; o
D: El aparato parece no operar normalmente o muestra un cambio en su
desempeño; o
E: El aparato ha sido tirado o su cubierta ha sido dañada.
Page 5

4
ETHERNET PRINT SERVERS HIGH SPEED AND 4-PORT
Contents
Chapter
Page
1. Specifications..................................................................................................8
2. Introduction ...................................................................................................9
2.1 How to Configure Networks ................................................................9
2.2 Benefits................................................................................................10
2.3 About the Ethernet Print Server Troubleshooting
Software for Workstations .................................................................10
2.4 What’s in Your Package......................................................................10
2.5 Hardware/NetWare Requirements ...................................................11
3. Installation....................................................................................................12
3.1 Hardware Description ........................................................................12
3.2 Status Light .........................................................................................12
3.3 Back Panel...........................................................................................12
3.4 Hardware Installation.........................................................................14
3.5 Next Step.............................................................................................23
4. Novell Configuration and NIMANAGE Utility...........................................25
4.1 Introduction........................................................................................25
4.2 Configuration—Using PCONSOLE: Before You Begin..................25
4.2.1 When You Don’t Define a Primary File Server ......................25
4.2.2 What is a Primary File Server?.................................................26
4.2.3 When the Print Server Finds a Primary File
Server........................................................................................26
4.2.4 Your Choices ............................................................................26
4.2.5 Summary...................................................................................26
4.3 Configuration—Using NetWare 2.15, 3.10, and Later.....................31
4.3.1 Encrypted Passwords................................................................31
4.3.2 PCONSOLE Version................................................................31
4.4 Using NetWare 4.0..............................................................................41
4.4.1 Confirming Bindery Context with Novell
NetWare 4.0 .............................................................................42
4.4.2 Configuring in Bindery Mode with PCONSOLE...................43
4.5 Introduction to NIMANAGE .............................................................50
4.6 How to Install......................................................................................50
Page 6

5
ETHERNET PRINT SERVERS HIGH SPEED AND 4-PORT
Chapter Page
4.7 NIMANAGE: Choose the Print Server .............................................51
4.8 NIMANAGE: Print Server Utility Menu ...........................................52
4.9 A: Troubleshoot Option....................................................................53
4.9.1 A: Test Printer Ports Option ..................................................54
4.9.2 B: Read Error Log...................................................................59
4.9.3 C: Report Print Server Status .................................................60
4.10 Using the NetWare Utilities/Making Changes................................64
4.10.1 Introduction...........................................................................64
4.10.2 Novell NetWare Utilities........................................................64
4.10.3 File Server Functions .............................................................65
4.10.4 Print Queue Functions ..........................................................66
4.10.5 How to Set Up NOTIFY.........................................................67
4.10.6 How to Make Changes to the Print Server ...........................68
5. AppleTalk Configuration and Administration Program ...........................70
5.1 Introduction........................................................................................70
5.2 Enable the AppleTalk Protocol .........................................................70
5.3 Configuration—AppleTalk ................................................................70
5.4 Using the AppleTalk Adminstration Program..................................73
6. UNIX Printing Through TCP/IP................................................................82
6.1 Introduction........................................................................................82
6.2 How to Set Up.....................................................................................82
6.3 Printing with lpd.................................................................................85
6.4 Installing TCP/IP for the Ethernet Print Server if Not
Running lpd .......................................................................................91
6.5 Introduction to BSD Printing ............................................................92
6.6 Installing and Printing on Ver. 1 Sol. and OSF1 Systems ................93
6.7 Introduction to System V Release 4 Printing....................................97
6.8 Installing and Printing on an HP/UX System..................................98
6.9 Installing and Printing on a System V (Solaris Ver. 2)/
System V Rel. 4 386-based Machine..................................................99
6.10 Installing and Printing on an SCO UNIX System ........................101
6.11 Installing and Printing on an AIX RISC System/6000.................103
Page 7

6
ETHERNET PRINT SERVERS HIGH SPEED AND 4-PORT
Chapter Page
7. Troubleshooting.........................................................................................107
7.1 How to Use This Chapter.................................................................107
7.2 How to Diagnose Problems..............................................................107
7.3 Ethernet Print Server Status Light ..................................................107
7.4 Status and Error Pages .....................................................................109
7.5 How to Determine the Cause of a Problem....................................113
7.6 Troubleshooting: Printer and Network Connections ...................114
7.7 Troubleshooting: Ethernet Print Server Unit................................115
7.8 Troubleshooting: Novell Protocol..................................................116
7.9 Troubleshooting: AppleTalk Protocol ...........................................120
7.10 Troubleshooting: TCP/IP Protocol .............................................121
Appendix A: Cable Specifications .................................................................122
A.1 Introduction .....................................................................................122
A.2 Uniport Cables and Plugs................................................................122
A.3 Serial Cables and Plugs (for the Uniport Connection).................122
A.4 Parallel Cables and Plugs.................................................................123
A.5 Serial Cable Pinning ........................................................................124
A.6 Parallel Cable Pin Signal Descriptions............................................127
A,7 Parallel Interface Cables for Printers and Other Devices..............128
Appendix B: Glossary .....................................................................................131
Appendix C: Assigning Multiple File Servers to a Novell Print
Server........................................................................................................134
C.1 Introduction.....................................................................................134
C.2 How to Assign Multiple File Servers ...............................................134
C.3 Using Passwords When Multiple File Servers are
Assigned to the Ethernet Print Server ............................................135
Page 8

7
ETHERNET PRINT SERVERS HIGH SPEED AND 4-PORT
Chapter Page
Appendix D: Placing Delays Between Print Jobs..........................................136
D.1 Introduction.....................................................................................136
D.1.1 Printers that Have Multiple Ports ........................................136
D.1.2 Printers that Have Multi-Emulation.....................................136
D.1.3 Printing Raster Graphics ......................................................137
D.2 How to Place Delays.........................................................................137
D.3 Examples ..........................................................................................137
Page 9

8
ETHERNET PRINT SERVERS HIGH SPEED AND 4-PORT
1. Specifications
Indicators—(1) green LED for power and status
Connectors—LE3810A-R2, LE3810AE-R2: Network: (1) RJ-45 female
(10BASE-T), (1) DB25 female (parallel);
LE3820A, LE3820AE: (1) RJ-45 female (10BASE-T), (1) BNC female,
(1) RJ-45 Uniport, (1) DB25 female (parallel);
LE3840A, LE3840AE, LE3845A, LE3845AE: Network: (1) RJ-45 female
(10BASE-T), (1) BNC female (10BASE2), (3) DB25 female (parallel),
(1) RJ-45 female (Uniport)
All units: 5-pin DIN female to external power supply
Temperature—32 to 122° F (0 to 50° C)
Humidity—5 to 80%; non-condensing
Printer Ports—
Parallel (All units)—Speed: 625 Kbps;
Word Size: 8 bits Strobe: 1 microsecond (can be set to 0.5, 1, 5,
or 10)
Flow Control: Ready/Busy Serial/Uniport (LE3840A, LE3840AE only)—
Speed: 9600 baud (can be set to 19,200)
Word Size: 8 (can be set to 5, 6, 7, or 8)
Parity: None (can be set to None, Even, Odd, Mark, Space)
Stop Bits: None (can be set to None, Even, Odd, Mark, Space)
Flow Control: Ready/Busy
Power—LE3810A: 115 VAC, 5 VDC 1 A output, 12V at 200 MA, external
transformer, power consumption 20 VA;
LE3810AE, LE3840A, LE3840AE: 115/230 VAC auto-sensing in-line
power supply 2/ IEC 950 connector
Size—2"H x 7"W x 4"D (5.1 x 17.8 x 10.1 cm)
Weight—1.2 lb. (0.6 kg)
Page 10

9
CHAPTER 2: Introduction
2. Introduction
The Ethernet Print Server High Speed (LE3810A-R2, LE3810AE-R2) provides
a high-speed parallel port for your parallel printer and a connection for your
twisted-pair Ethernet interface. It also provides support for Novell NetWare
and UNIX protocols.
The Ethernet Print Server (LE3820A, LE3820AE) provides a high-speed
parallel port for your parallel printer, and connections for an RJ-45 Uniport
and your Ethernet interface (thin or twisted-pair). It also provides support
for Novell NetWare, UNIX, and Apple protocols.
The Ethernet Print Server 4-Port (LE3840A, LE3840AE) provides three
high speed parallel ports and an RJ-45 Uniport to let you connect up to 4
printers, and a connection for your Ethernet interface (thin or twisted pair).
It supports the Novell protocol only.
The Ethernet Print Server 4-Port (LE3845A, LE3845AE) provides three
high speed parallel ports and an RJ-45 Uniport to let you connect up to 4
printers, and a connection for your Ethernet interface (thin or twisted pair).
It supports Novell NetWare, UNIX, and Apple protocols.
NOTE
The Uniport is serial by default. To use the Uniport as a parallel port, you
need a parallel port adapter (LT310A).
Both models of the Ethernet Print Server support Novell NetWare®versions
2.15 or 3.10 and higher and 4.00, AppleTalk®, and TCP/IP for Sun (Solaris
®
1.1, 2.1), BSD System V Rel. 4, and DEC™ (ULTRIX™ 4.3) and HP®UNIX
®
systems.
2.1 How to Configure Networks
• For Novell, use NetWare PCONSOLE to do the configuration.
• For AppleTalk, if you connect a PostScript®printer to parallel port #1, you
do not even need to configure. But if you have different requirements,
you can use the AppleTalk Administration program to configure the
Ethernet Print Server.
• For TCP/IP, use the Install script to set up your UNIX version to work
with Etherent Print Server printers.
Page 11

10
ETHERNET PRINT SERVERS HIGH SPEED AND 4-PORT
2.2 Benefits
With each network protocol, the Ethernet Print Servers give you these
benefits:
• High performance—send data as fast as your printer can receive the data.
• Easy installation—install the Ethernet Print Server quickly in three easy
steps: configure and activate each network protocol, plug in the devices,
and plug in the power supply.
• Full print-server support—supports all print-server features defined for
Novell, AppleTalk, and TCP/IP.
• Put printers anywhere—Directly connect up to four printers, or three
printers and one input device.
• Versatility—The Ethernet Print Server incorporates Streams, a UNIX
technology, to provide a common interface for error handling, operating
system and hardware interfacing normally done differently by each NOS.
So printing can be performed simultaneously and concurrently using
different protocols on the same or different printers.
2.3 About the Ethernet Print Server Troubleshooting Software for
Workstations
The Ethernet Print Server provides the following troubleshooting tools for
each NOS:
• For Novell, NIMANAGE lets users troubleshoot problems by sending test
prints or viewing status reports or error logs on the Ethernet Print Server,
check or modify any configuration option not directly tied to the print
server, and change the print server name, the printer ports it uses, and
the password it uses to log in.
• For AppleTalk, the AppleTalk Administration Program provides functions
that let you reset the Ethernet Print Server, view the Ethernet Print Server
configuration or an error log, and change the printer setup.
• For TCP/IP, the software provides error messages and a status page to
alert you to data that was incorrectly input.
2.4 What’s in Your Package
The Print Server package contains the following:
• (1) Ethernet Print Server High Speed or Ethernet Print Server 4-Port
• Power adapter
Page 12

11
CHAPTER 2: Introduction
• This user manual
• (3) Utility and diagnostics diskettes
2.5 Hardware/NetWare Requirements
The Ethernet Print Server hardware, software, and installation programs
require the following:
• NOS Version Supported: Novell NetWare version 2.15, 3.10, or 4.0
and above, any AppleTalk version (EtherTalk Phase II only), TCP/IP
compatible with Sun (Solaris 1.1, 2.1), BSD System V Rel. 4, DEC
(ULTRIX 4.3) and HP UNIX systems.
• Software requirements: NIMANAGE requires any IBM PC or compatible
with 512 KB of available random-access memory (RAM), one floppy drive
(for the Ethernet Print Server software), PC-DOS or MS-DOS®version
3.3x or later; AppleTalk Administration Program requires any Macintosh
computer with a disk drive; TCP/IP requires that the Ethernet Print
Server host software be installed on every host that spools directly to the
Print Server.
• Hardware connections: The Ethernet Print Server parallel ports connect
to any printer that has a Centronics parallel port, requiring a Centronics
male to Centronics female or DB25 male cable; the Ethernet Print Server
network connection supports 10-Mbps Ethernet networks that use either
ThinNet (10BASE2) or 10BASE-T hardware; the Ethernet Print Server
Uniport is compatible with the RS-232C standard supporting baud rates
of up to 19.2 kbps for input devices, and up to 115 kbps for output devices
using the UNIPORT-OUT adapter. (If you don’t use the adapter, output
devices will support baud rates of up to 19.2 kbps.)
Page 13

12
ETHERNET PRINT SERVERS HIGH SPEED AND 4-PORT
3. Installation
3.1 Hardware Description
The Ethernet Print Server High Speed or 4-Port is a small unit that you can
attach to the side of your printer, or let it stand freely next to the printer.
The hardware allows users on an Ethernet network running Novell NetWare
versions 2.15 or 3.10 and above and 4.00 to access a parallel printer located
anywhere on the network.
3.2 Status Light Indicator
The status light indicator (the green LED) on the front of the Ethernet
Print Server unit lets you see the power-on status or diagnose problems.
See Chapter 7, Troubleshooting, for details.
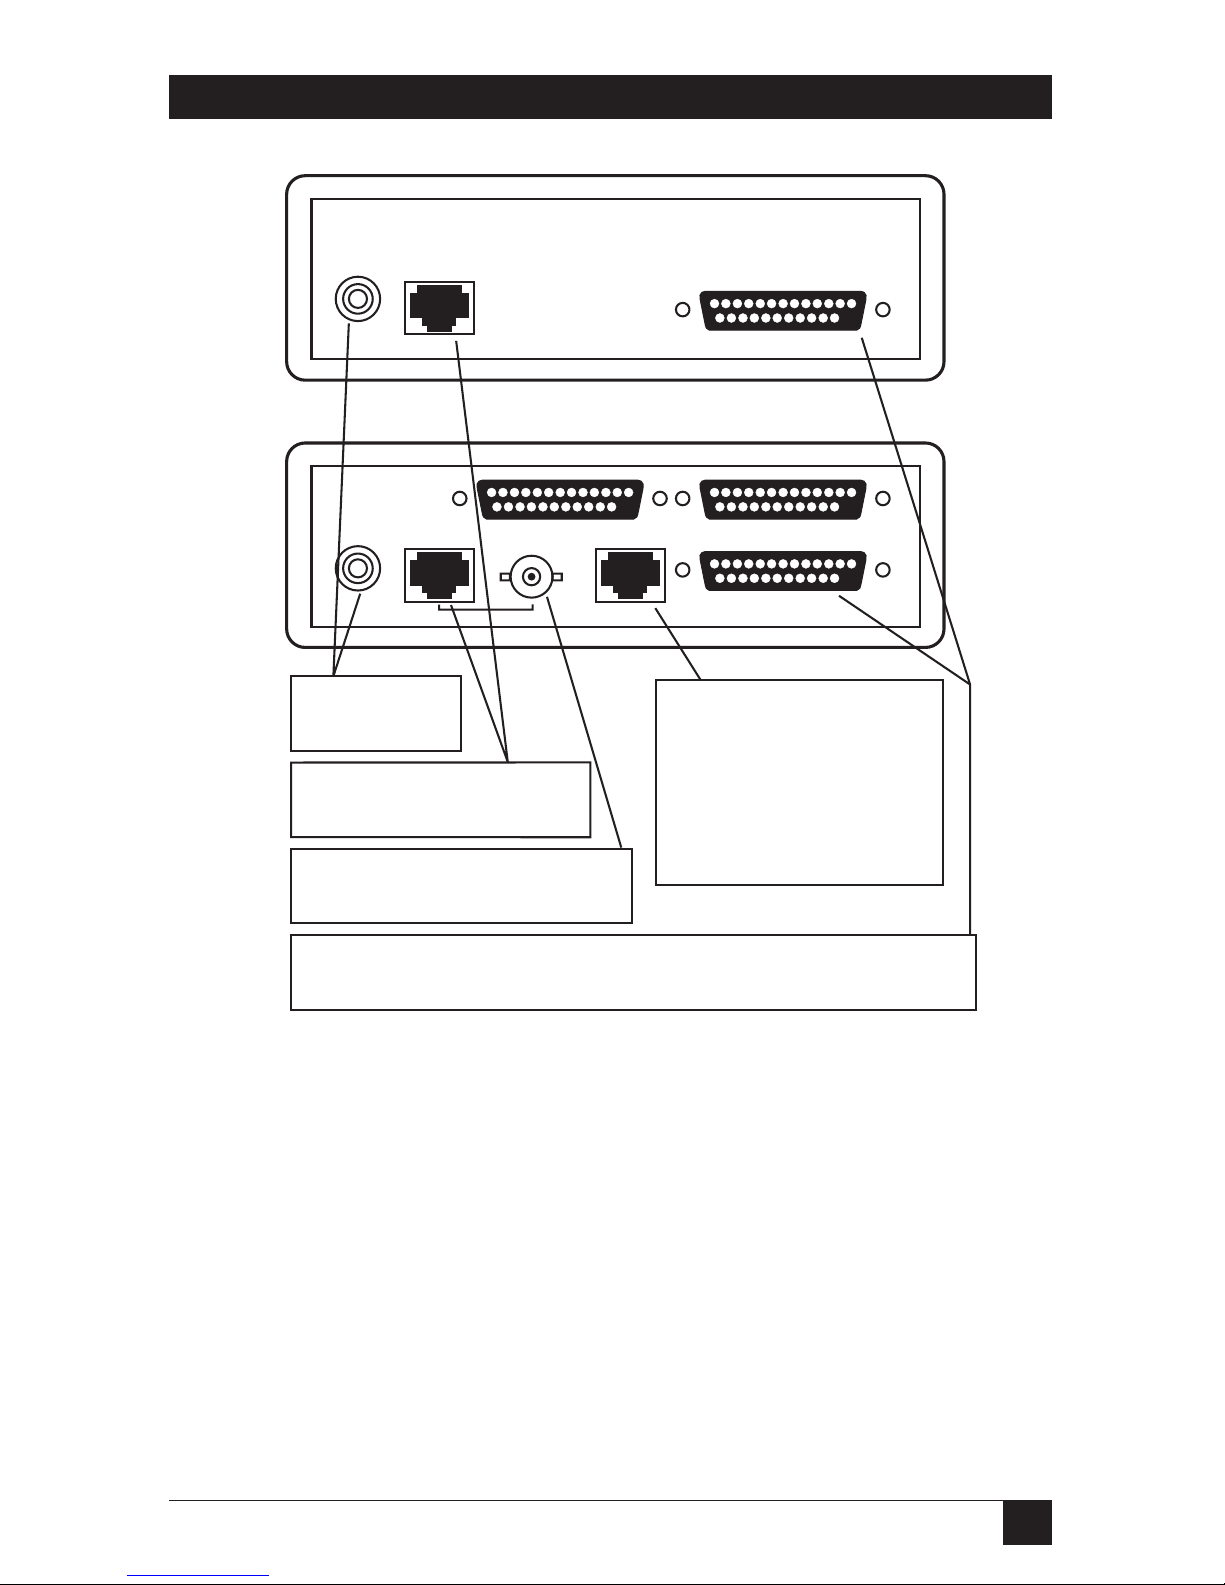
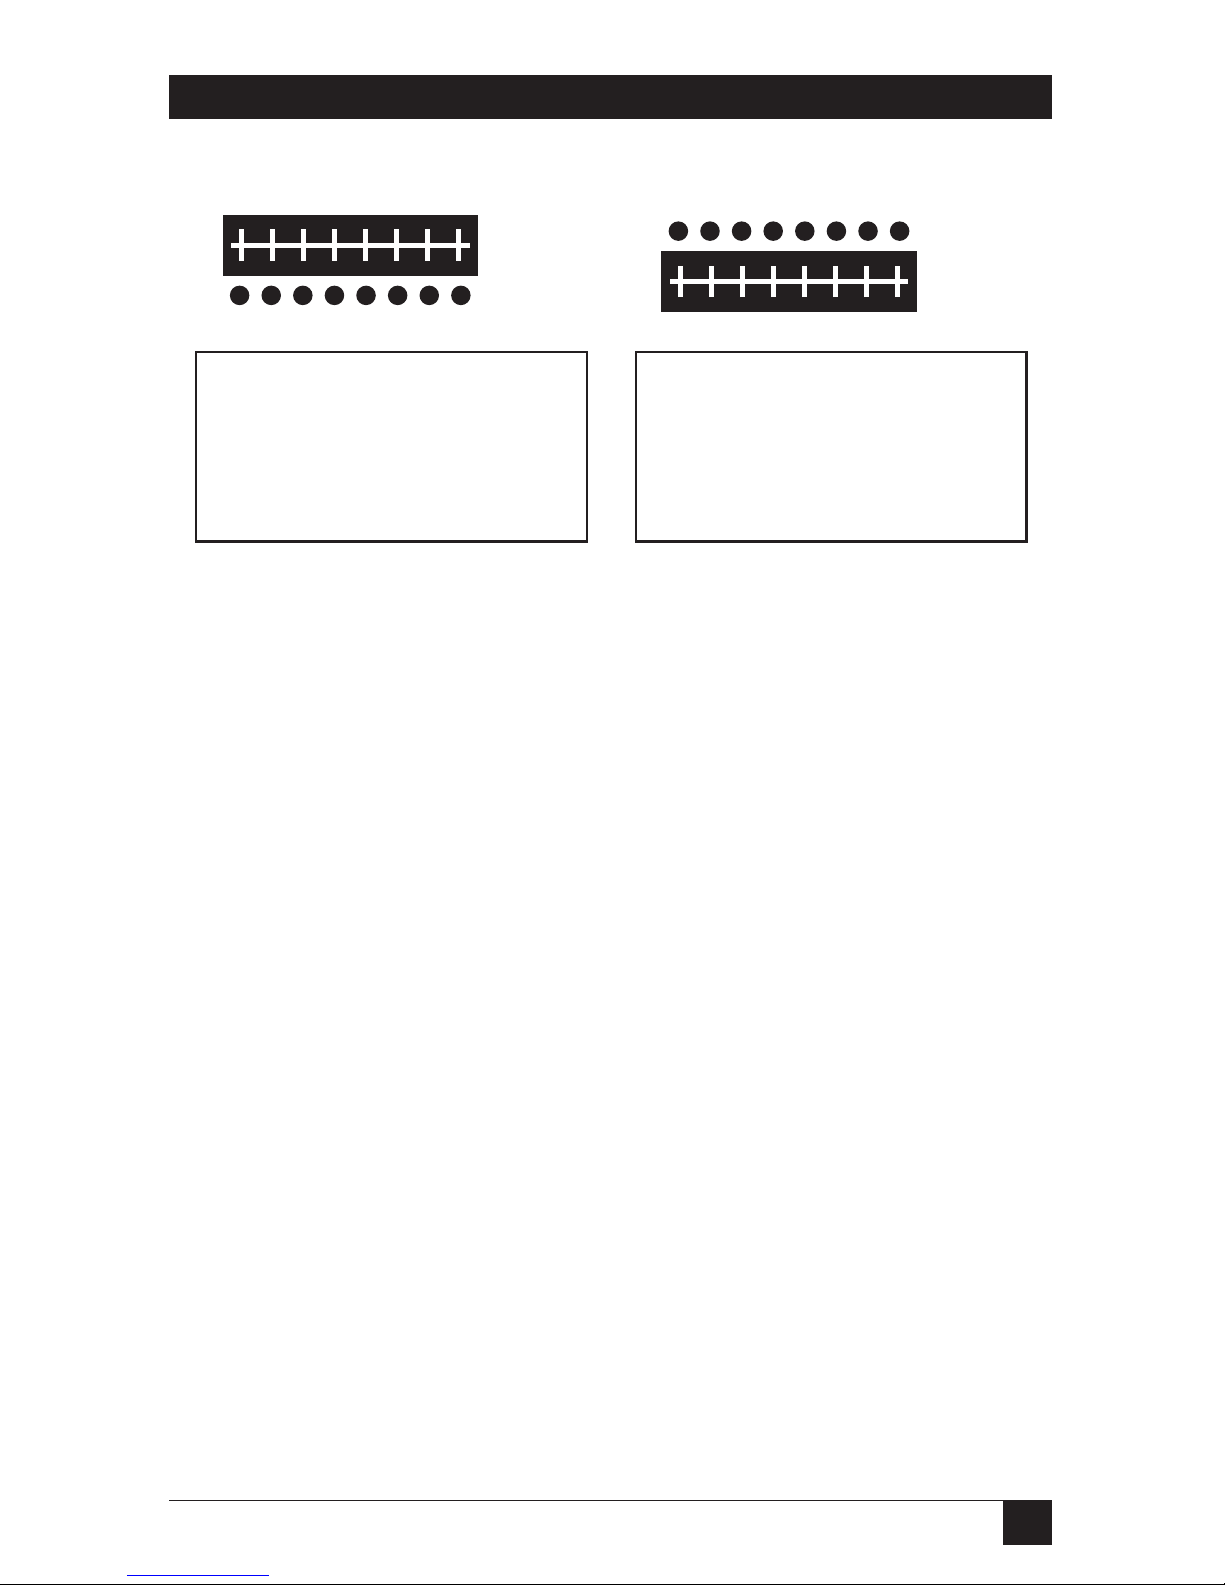
3.3 Ethernet Print Server Back Panel
The back panel of the Ethernet Print Server High Speed has three connectors
and the Ethernet Print Server 4-Port has seven connectors. One connector is
for the power supply, and the remaining connectors are for the network or
printer and other devices to attach.
Page 14
13
CHAPTER 3: Installation
Fig. 3-1. Ethernet Print Server Back Panel.
Ethernet
10BASE-T
POWER
10BASE-T
PARALLEL PRINTER
PARALLEL PRINTER
1
2
UNIPORT
PARALLEL
PRINTER 3
NETWORK
POWER
Thinnet
Plug the power
supply into this
connection.
10BASE-T Ethernet connection
uses an RJ45 twisted pair
cable to connect to the network.
Thin Ethernet connection uses a
BNC T-connector to connect to the
coaxial cable from the network.
Parallel connector for printer. Attaches the parallel printer to the Ethernet
Print Server High Speed. The Ethernet Print Server 4-Port series has two
additional parallel ports on the top row.
The Uniport connection
allows you to connect
any serial output device
using RJ 8-wire cable, or,
as any parallel output device
using a parallel adapter, or,
use as a host input port
connecting devices such as
minicomputers, hosts, or PCs.
Page 15

14
ETHERNET PRINT SERVERS HIGH SPEED AND 4-PORT
3.4 Hardware Installation
Use the following steps to connect the network and devices, such as printers,
plotters, or minicomputers, to the Ethernet Print Server.
1. Connect the Ethernet Print Server to the network.
2. Connect the parallel printer(s).
3. Connect devices to the Uniport.
Do not connect the Ethernet Print Server’s power supply until ALL
hardware installation and software configuration steps are completed.
S
TEP
1: C
ONNECT THENETWORK TO THEETHERNETPRINTSERVER
You can connect the network in one of two ways:
• Using the 10BASE-T Ethernet interface. The 10BASE-T network
connection uses a
4-wire twisted pair RJ cable to plug into the RJ-45 network connector
(marked 10BASE-T on the back panel) on the Ethernet Print Server.
Once you make the connection, you are finished with this step.
Go to Step 2.
Fig. 3-2. 10BASE-T Connection.
10BASE-T
Page 16
15
CHAPTER 3: Installation
ThinNet Interface: Change Jumper First
You need to change a jumper inside the Ethernet Print Server unit before
you can print using the ThinNet Ethernet interface.
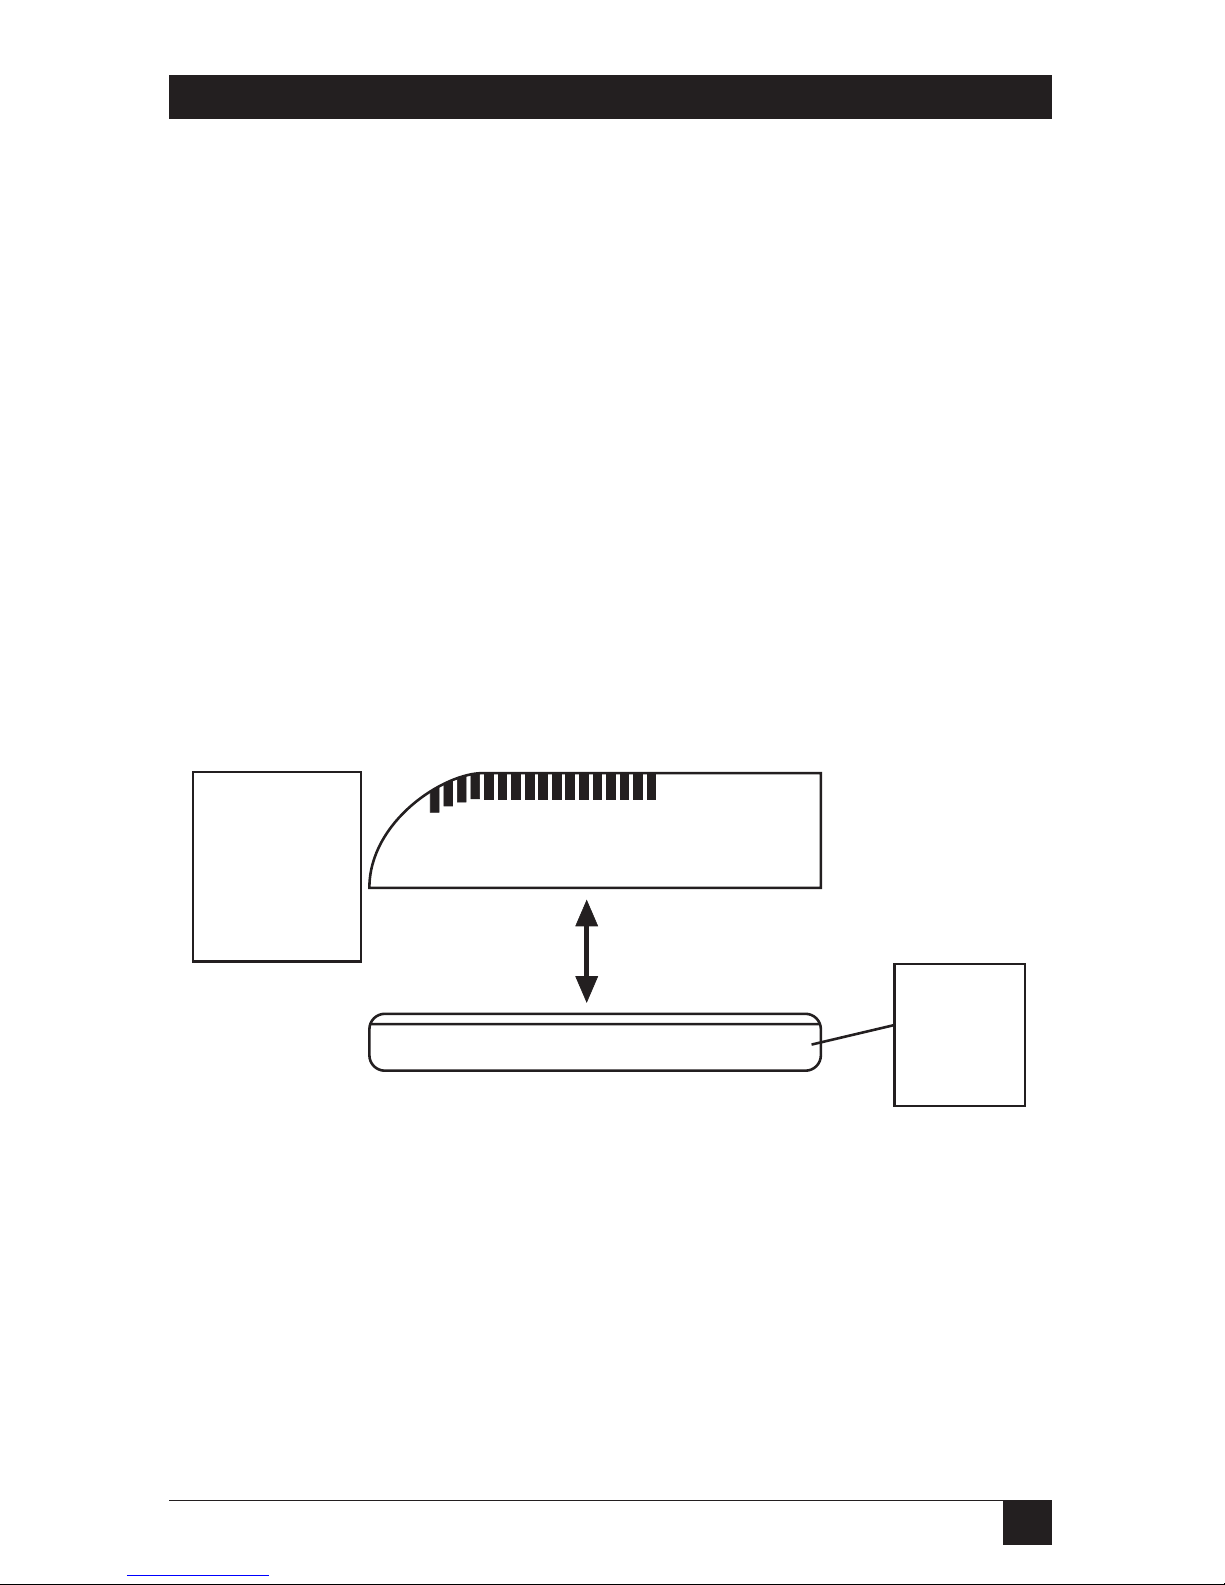
How to Change the Ethernet Print Server Jumper
The Ethernet Print Server is designed to withstand minor bumps and bangs
without accidentally opening. Follow the steps in this section to open the
plastic unit if you need to change the jumpers from the Ethernet 10BASE-T
interface to the ThinNet interface. The default is the 10BASE-T interface.
1. Make sure you do not have the Ethernet Print Server unit plugged into a
wall outlet. If it is, unplug the power cord before you open the unit.
2. Hold the side of the unit against your body. Grab the side that is the
farthest away from your body and press the bottom half of the unit inward
toward you. Pull the two halves apart, as shown in Fig. 3-2.
Fig. 3-3. Opening the Unit.
Press the top
cover inward
toward you,
and, pull the
two halves
apart.
Push the
bottom
cover in
and lift up.
Page 17
16
ETHERNET PRINT SERVERS HIGH SPEED AND 4-PORT
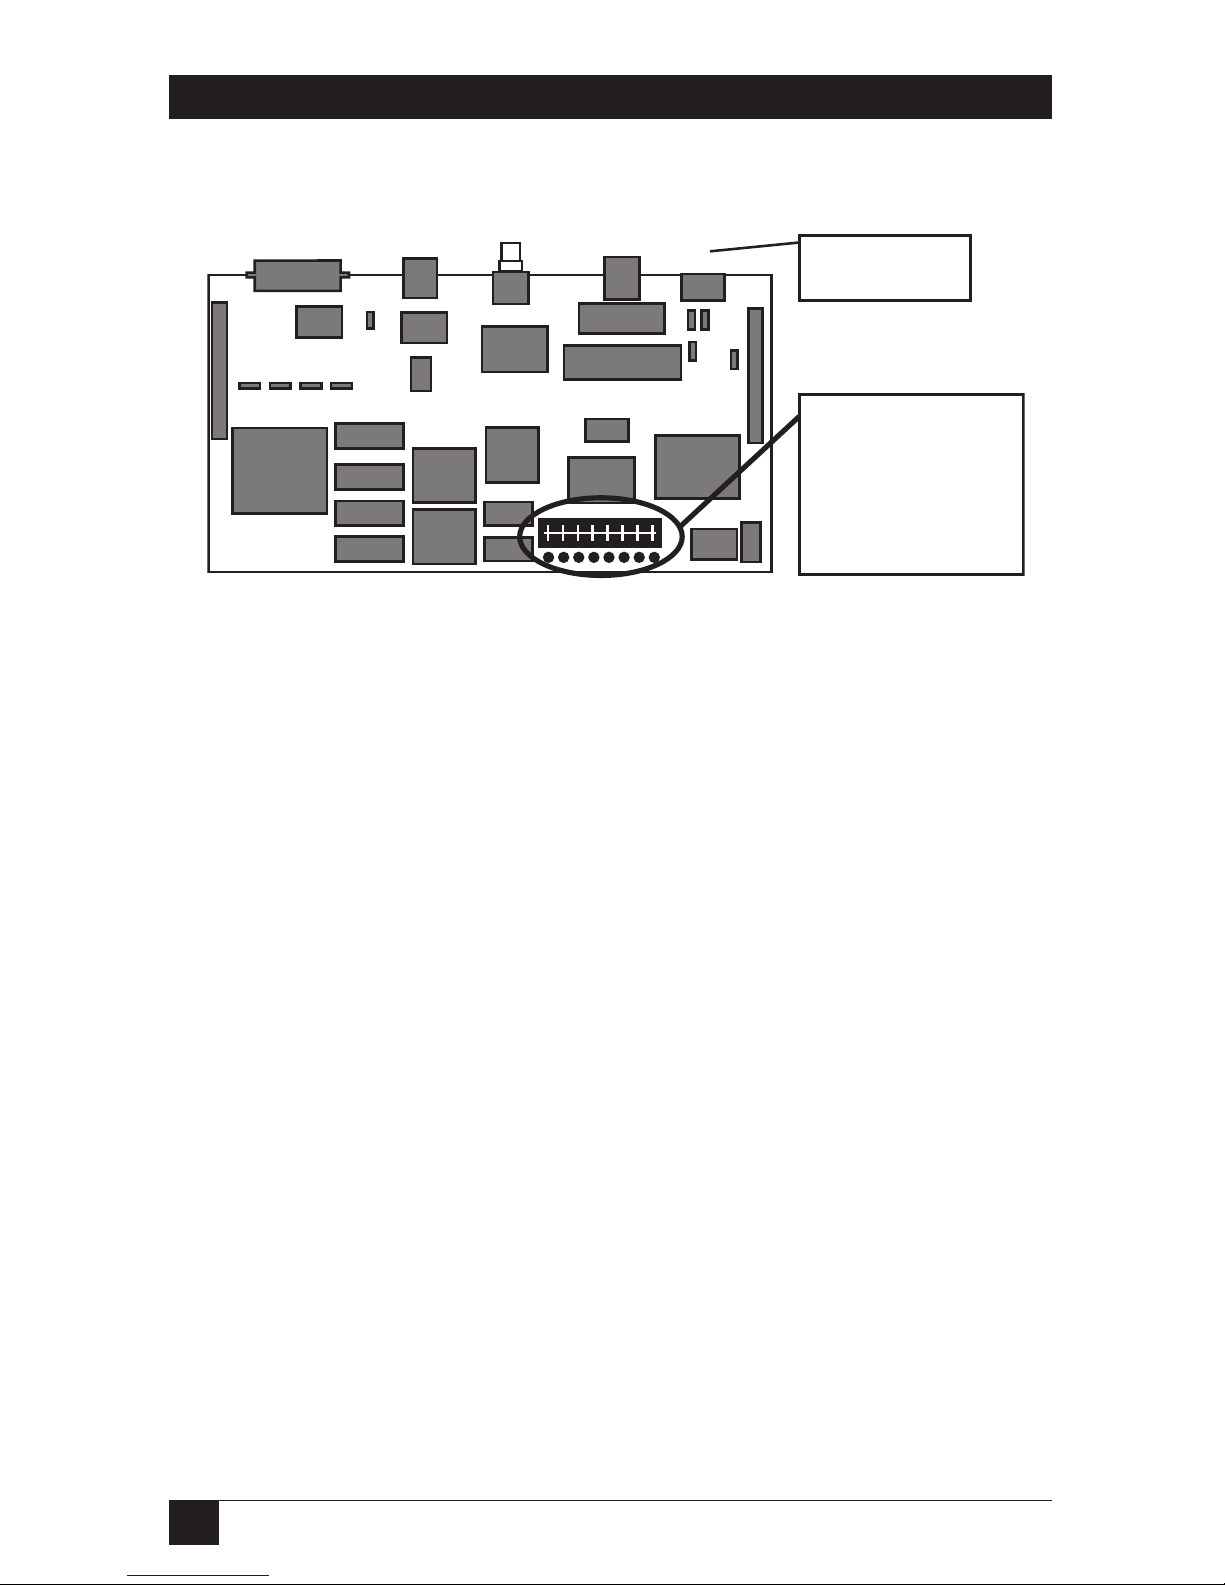
3. Locate the jumper on the component side of the board.
Fig. 3-4. Jumper Location.
4. To change the default jumper from 10BASE-T to ThinNet, move the
jumper from its present setting TP (on one side of the jumper) to the
jumper setting marked THIN.
Jumper is located
here to the front of
the unit. The
default setting
shown here is for
10BASE-T.
Rear panel is
shown here.
Page 18
17
CHAPTER 3: Installation
Fig. 3-5. Changing the Jumper.
5. Put the top cover of the unit back in place by snapping the two plastic
pieces together. Make sure you line up the back panel, which contains
all the connections into its slots on the bottom and top units.
TP
THIN
TP
THIN
This is the default setting for the
Ethernet Print Server. Move the
jumper from the pins labled TP
to the pins labled THIN. Always
cover the middle row of pins for
either setting.
Once you change the jumper, it
should look like the illustration
above. You can then use your
Thinnet interface for your
network connection.
Page 19
18
ETHERNET PRINT SERVERS HIGH SPEED AND 4-PORT
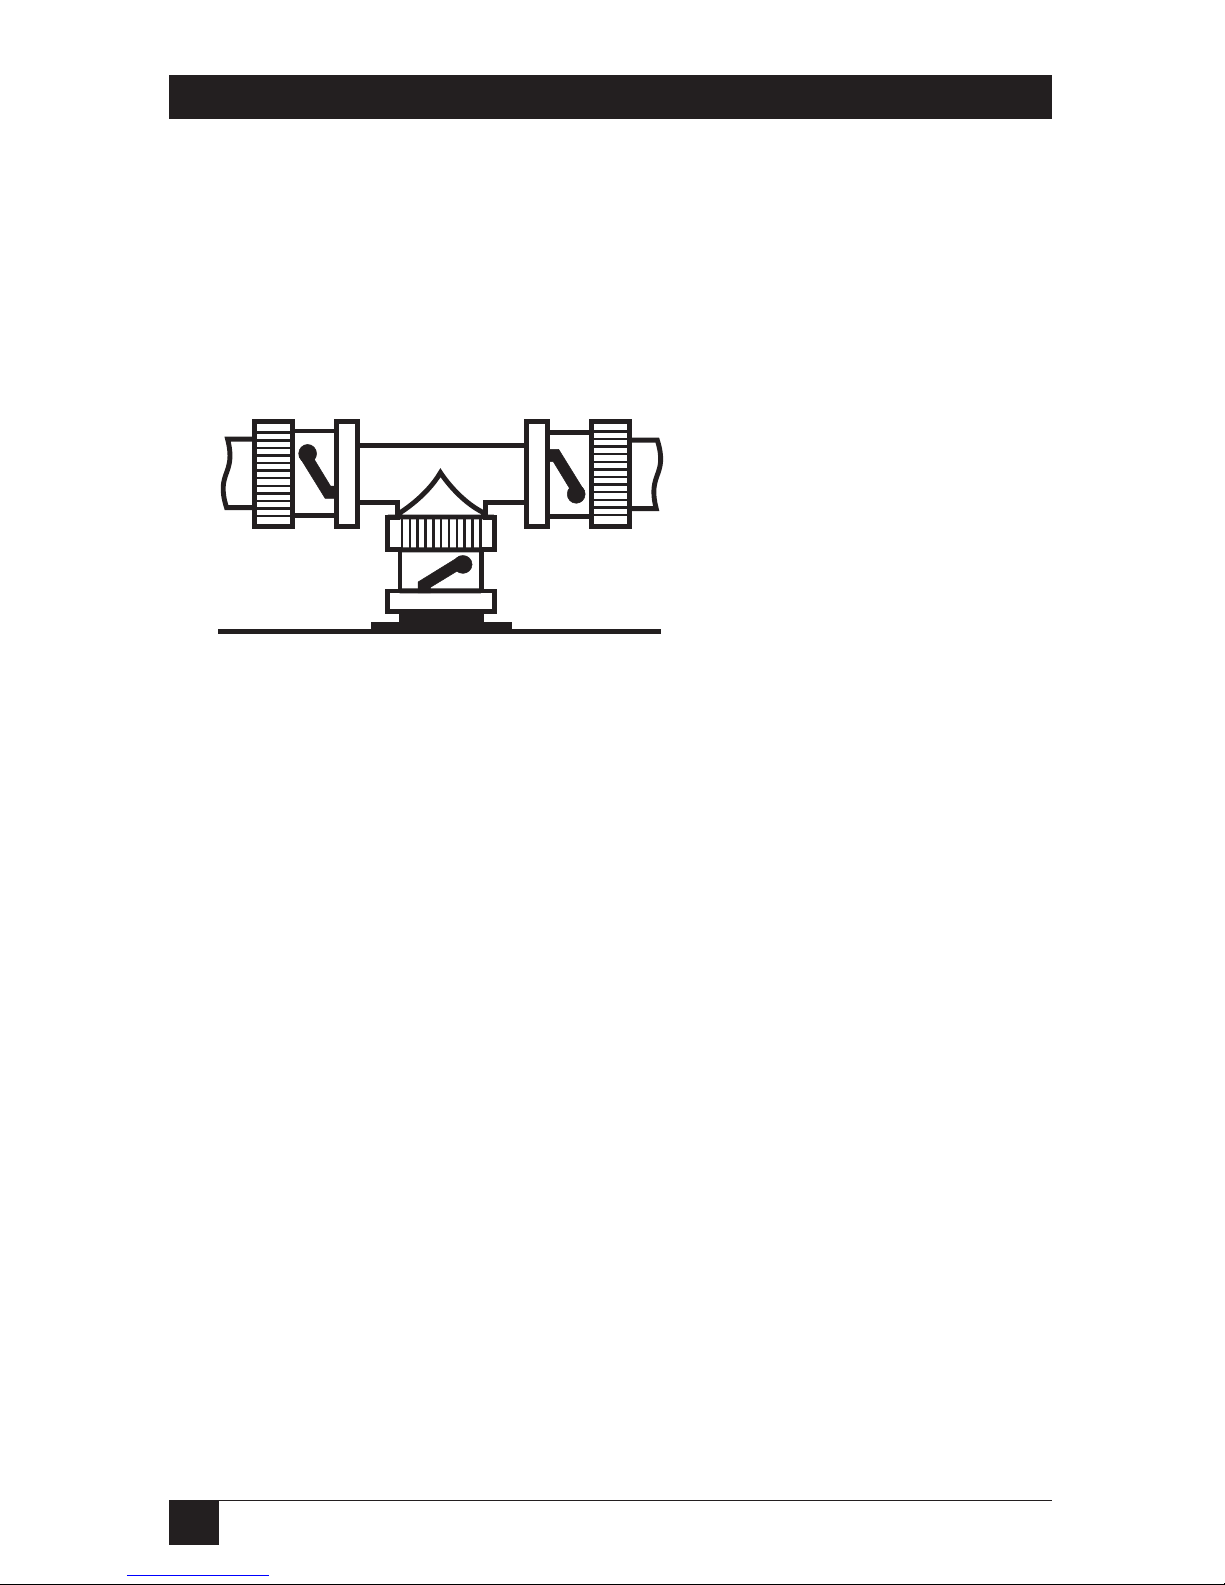
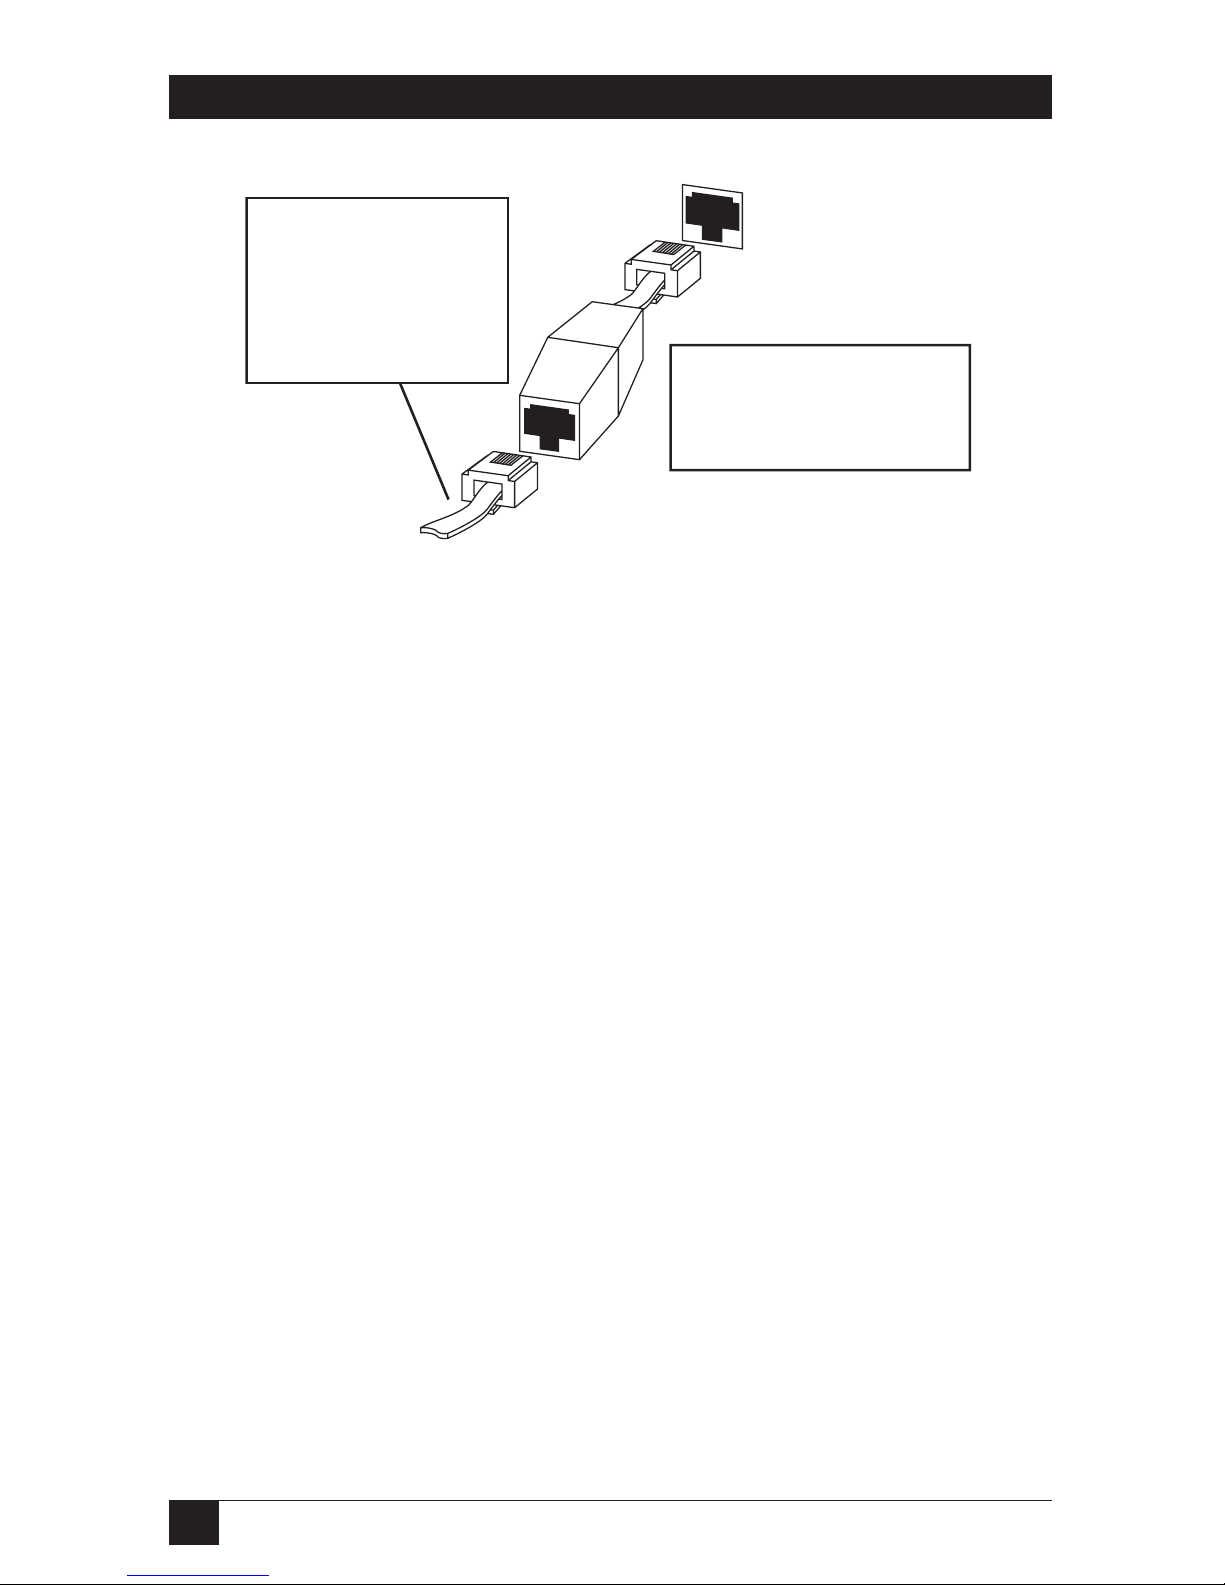
• Using a ThinNet Ethernet interface. The ThinNet Ethernet wires use
a BNC T-connector (not included) to plug into the BNC port on the
Ethernet Print Server (marked ThinNet on the back panel). Thin
Ethernet cable is a quarter-inch coaxial cable (usually RG-58/U) that
uses the cylindrical BNC T-connector to attach to the BNC port.
Fig. 3-6. ThinNet Interface.
Connect a BNC T-connector
directly to the Ethernet Print
Server BNC port as shown in
the picture to the left. Any
other type of connection will
not work with the Ethernet
Print Server.
Ethernet Print Server Unit
Page 20
19
CHAPTER 3: Installation
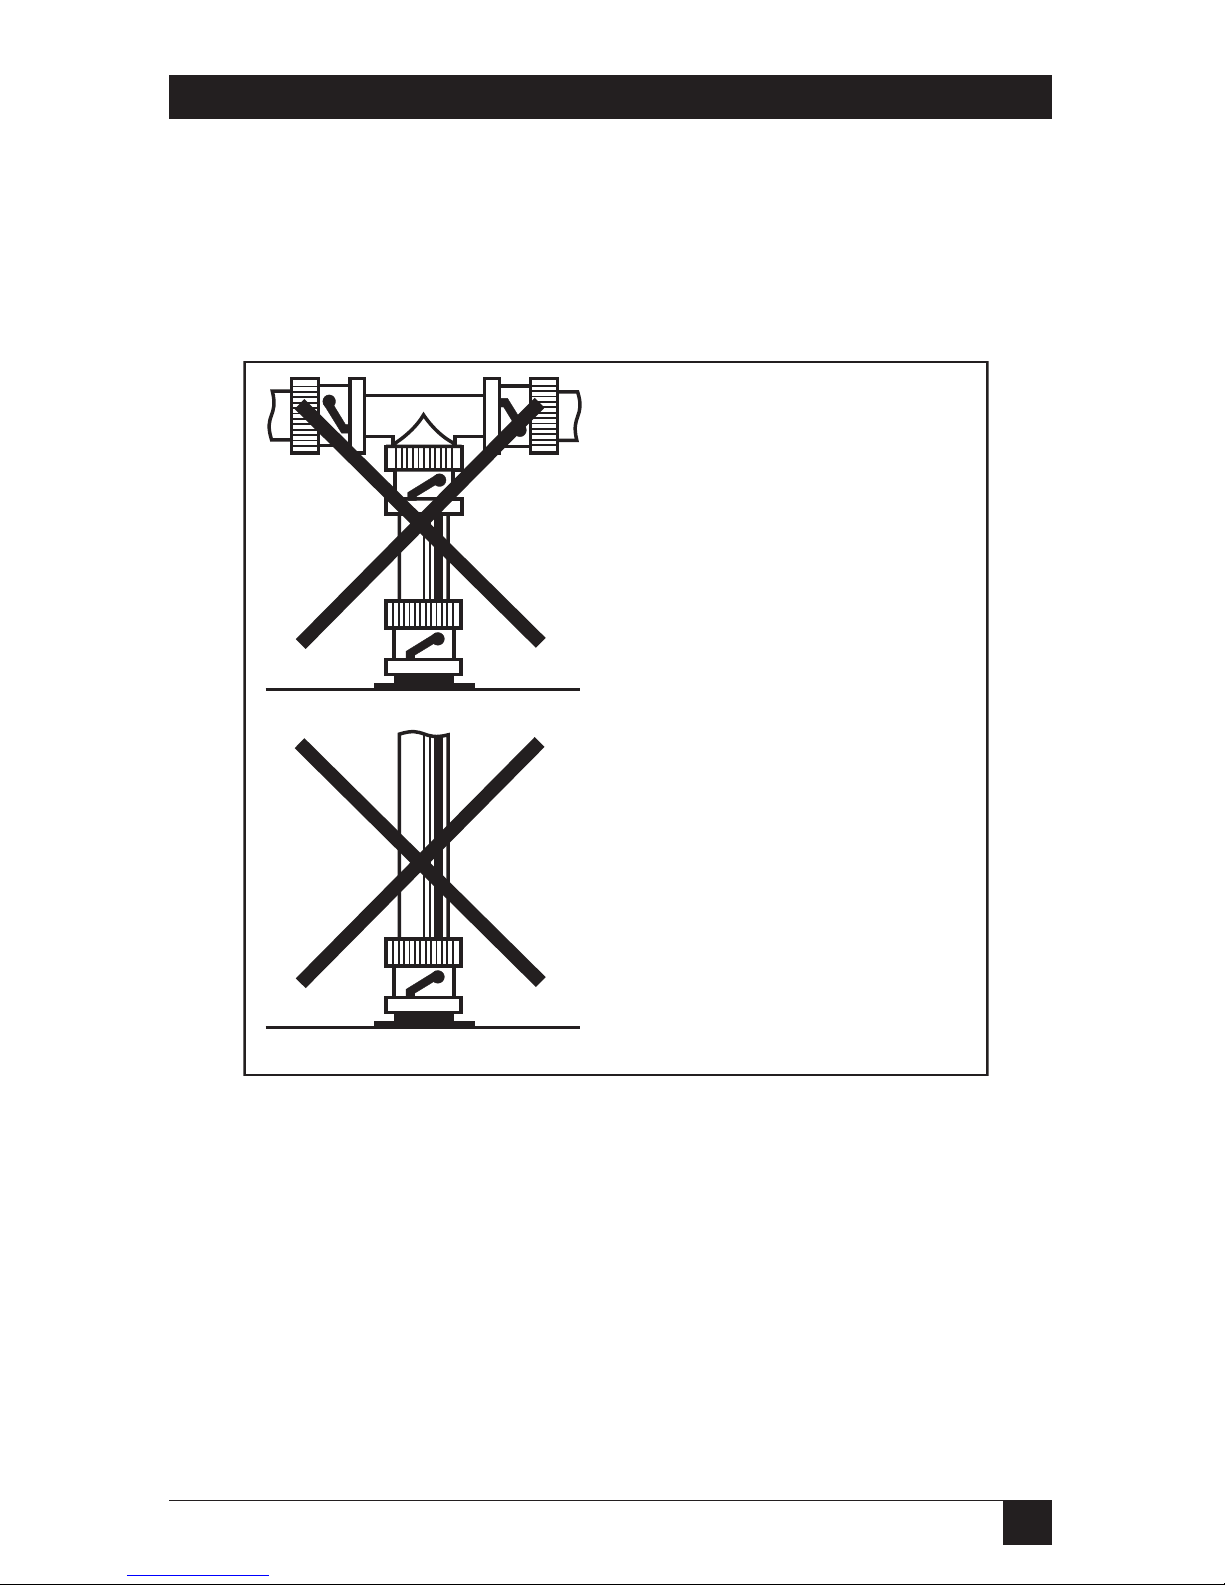
Wrong BNC Connections to the Ethernet Print Server
Fig. 3-6 shows two incorrect ways to make the BNC connection. You
must always make your BNC connection using a T-connector (which is
not provided with your Ethernet Print Server) directly connected to the
port marked ThinNet.
Fig. 3-7. Wrong Connections.
This connection is wrong because
the T-connector is not directly
connected to the Ethernet Print
Server. The cable between the
T-connector and the Ethernet
Print Server BNC connector forms
another branch on the network
—which is not allowed with the
Ethernet Print Server.
Ethernet Print Server
Ethernet Print Server
This connection is wrong because
a T-connector is not used.
Page 21

20
ETHERNET PRINT SERVERS HIGH SPEED AND 4-PORT
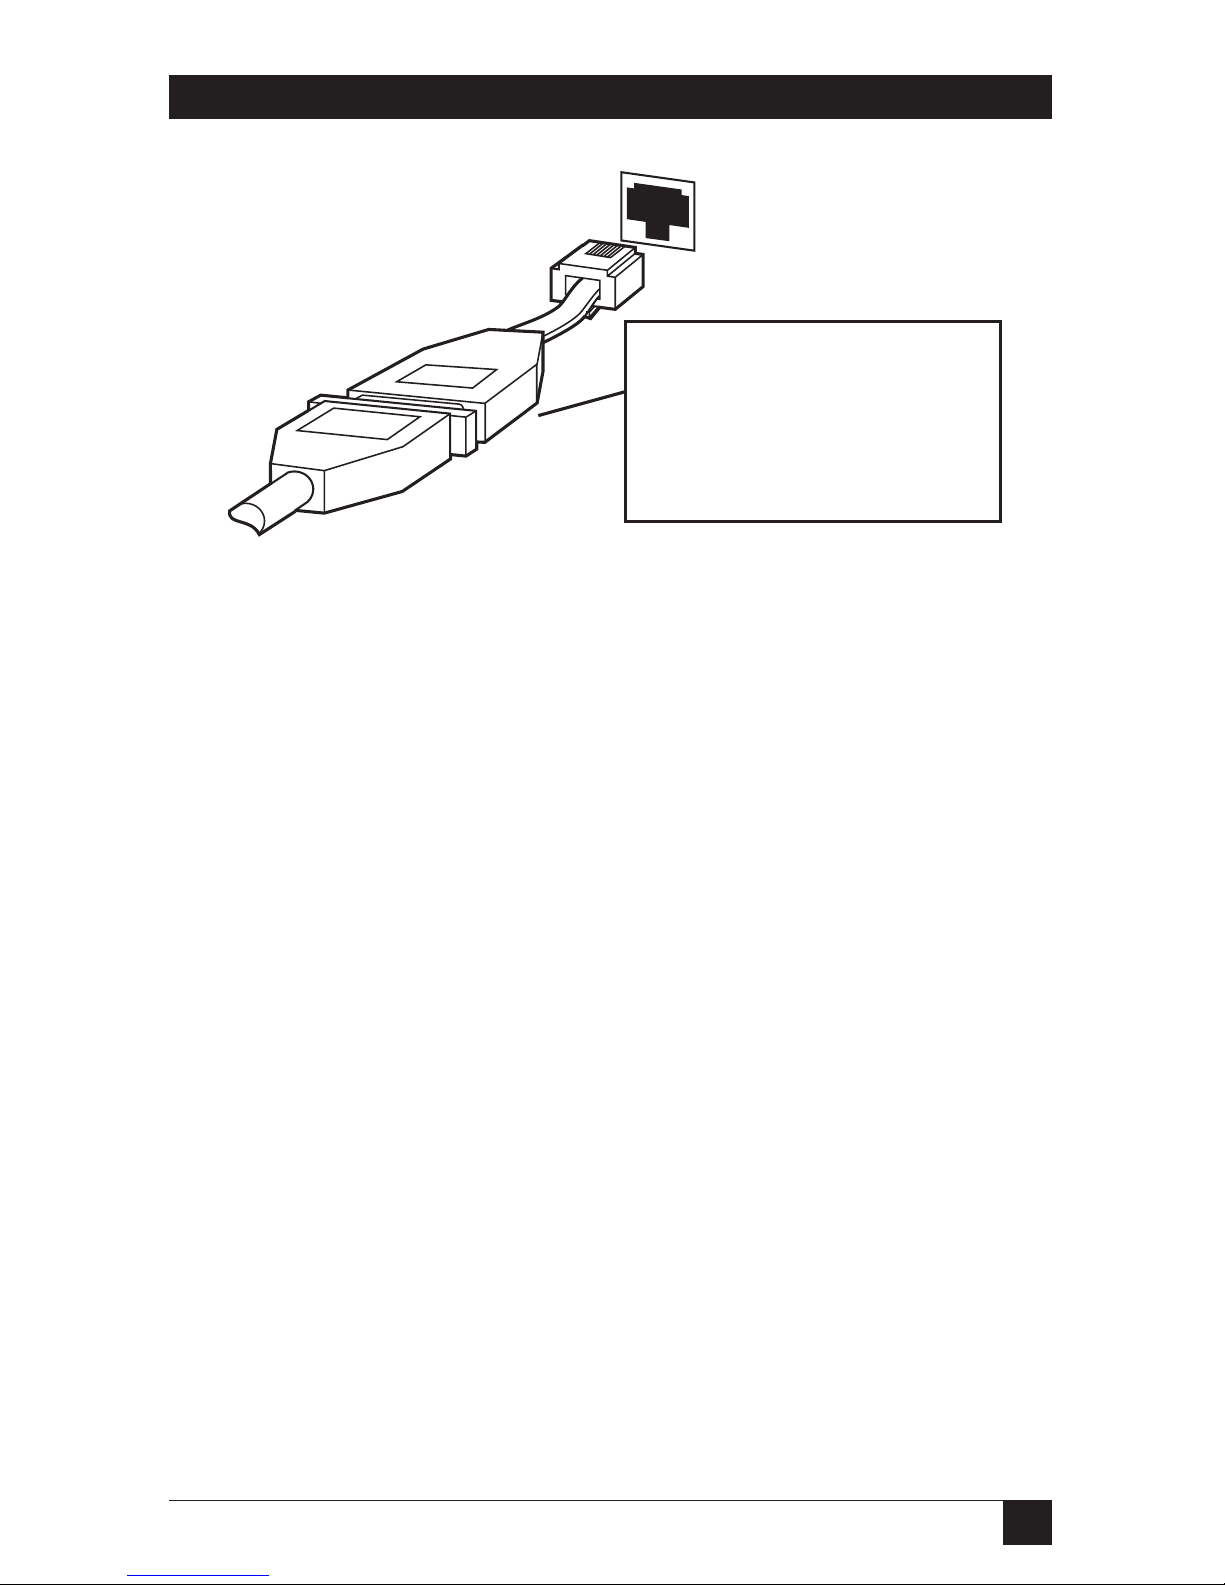
S
TEP
2: C
ONNECT THEPARALLELPRINTER(S
)
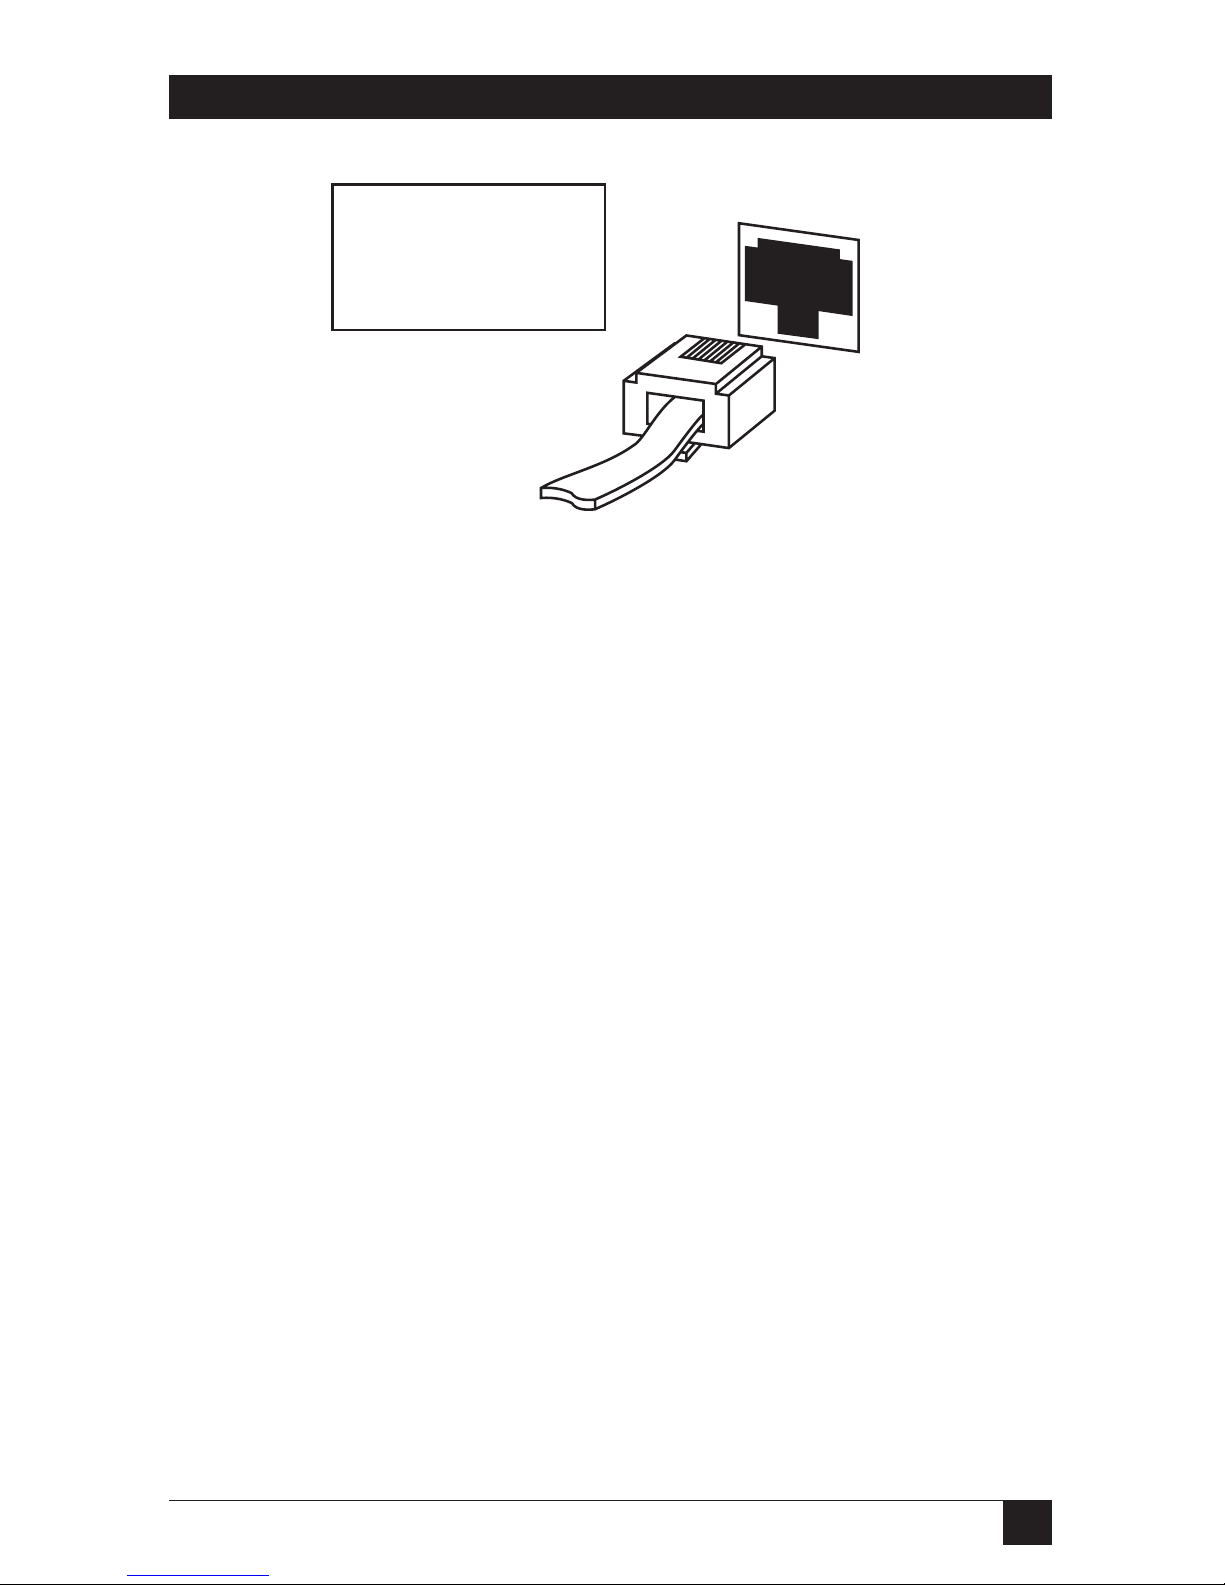
Connect the parallel printer(s) to the Ethernet DB25 female plug.
Use a parallel cable with a DB25 male plug for the Ethernet Print Server
connection. See Fig. 3-8.
Fig. 3-8. Connecting the Parallel Port.
S
TEP
3: C
ONNECT ADEVICE TOUNIPORT
Connect serial devices to the 8-wire RJ Uniport connector, such as printers,
plotters, or minicomputers. Using the Uniport adapters, you can convert a
Uniport to a long-distance, high-speed parallel output port.
Uniport: Serial Output Devices and Input Devices
For serial output devices such as serial printers or plotters, or input devices
such as minicomputers, use a straight 8-wire RJ cable to plug into the
Ethernet Print Server back panel (marked Uniport). You can use baud rates
of up to 19200 for this type of Uniport connection. See Fig. 3-9.
Plug the parallel cable
into the Ethernet Print
Server High Speed
port marked
PARALLEL. For the
Ethernet Print Server
4-Port, all parallel
ports are numbered,
such as Parallel
Port 1, etc.
PARALLEL PORT
CPIBM
Page 22
21
CHAPTER 3: Installation
Fig. 3-9. Connecting a Device to Uniport.
Uniport: High Speed Output Devices
For output devices only, use a Uniport adapter (UNIPORT-OUT) to make the
Uniport a high speed parallel connection for your printer or plotter. Fig. 3-8
shows you how to connect the Uniport parallel adapter to the Uniport plug
on the Ethernet Print Server. Data will be sent to the attached printer or
plotter at a rate of 115 kbps.
UNIPORT
Plug the RJ45 cable into
the Uniport connector.
Attach the other end of
the cable to your
serial device.
Page 23
22
ETHERNET PRINT SERVERS HIGH SPEED AND 4-PORT
Fig. 3-10. Uniport-OUT Adapter.
For both standard serial and Uniport connections, you can also convert the
Uniport plug on the Ethernet Print Server back panel to a DB25 plug using
the DB25 adapter. See Fig. 3-11 to make the connection.
UNIPORT
Plug a cable into the
UNIPORT-OUT
adapter and the other
end into the distance
extender connected
to the printer.
Use the UNIPORT-OUT
to make high-speed
parallel connections to a
printer or plotter.
Page 24
23
CHAPTER 3: Installation
Fig. 3-11. Uniport: DB25 Adapter.
The UNIPORT-DB has
an RJ45 connector which
plugs into NETPrint. The
DB25 plug attaches to
the printer cable.
Page 25

24
ETHERNET PRINT SERVERS HIGH SPEED AND 4-PORT
3.5 Next Step
Do not plug your power supply into the Ethernet Print Server or a wall outlet.
You need to configure the Ethernet Print Server for each network protocol
before you power the Ethernet Print Server on.
Configure the Ethernet Print Server Protocols
To continue installation, you must configure and activate each network
protocol to work with the Ethernet Print Server. Each protocol has its own
chapter; go to the Configuration section for each protocol you will configure.
• Chapter 4—Novell configuration steps. We recommend that you do this
first, since Novell is always active.
• Chapter 5—AppleTalk configuration steps.
• Chapter 6—TCP/IP configuration steps.
Page 26

25
CHAPTER 4: Novell NetWare Configuration and NIMANAGE Utility
4. Novell NetWare Configuration
and NIMANAGE Utility
4.1 Introduction
This chapter is divided into four topics:
• Section 4.2, Configuration: Before You Begin, is for users who have a very
large network tied into many different sites. This topic explains how to
set up a primary file server.
• Section 4.3, Configuration: Using NetWare 2.15 or 3.10 and Later, lets
you configure the Ethernet Print Server. Use PCONSOLE to set up all
your Ethernet Print Server printers so that users can print.
• Section 4.4, Configuration: Using NetWare 4.00, lets you configure the
Ethernet Print Server. Use PCONSOLE to set up all your Ethernet Print
Server printers so that users can print.
• Section 4.5, Using the NIMANAGE Utility, describes the PC-based
program that lets you activate network protocols, configure the print
server and printer ports, reset the Ethernet Print Server remotely, and
troubleshoot problems.
• Section 4.6, Using NetWare Utilities/Making Changes to the Ethernet
Print Server, explains how to use Novell NetWare utilities with the
Ethernet Print Server.
NOTE
To configure the Ethernet Print Server for Novell NetWare users, you
must follow the steps in Section 4.3 or 4.4 before you print.
4.2 Configuration—Using PCONSOLE: Before You Begin
Ethernet Print Server 4-Port users only: If you have a very large network tied
into many different sites, you should read the following about primary file
servers. If you don’t have such a network, go to the PCONSOLE explanation
for your NetWare version Section 4.3 or 4.4).
Page 27

26
ETHERNET PRINT SERVERS HIGH SPEED AND 4-PORT
4.2.1 W
HENYOUDON’TDEFINE APRIMARYFILESERVER
When a primary file server is not defined, the print server searches for file
servers as follows:
• File servers that are no more than 4 hops away. A hop is a step in the data
transmission from one node (a workstation or server) through an
intermediate node. The four hops that the print server searches are the
four LAN segments directly connected to the first workstation or server.
• File servers that have no more than 1/4 second propagation delay. This
delay is the amount of time it takes a packet to go from the print server
unit to the file server.
• The print server has a maximum limit of 16 file servers.
4.2.2 W
HAT IS APRIMARYFILESERVER
?
A primary file server is set up in PCONSOLE from the File Servers to be
Serviced option. You need to place a minimum of two file servers on this file
server list. These servers must be no more than 4 hops away with a
propagation delay (the time it takes a packet of data to go to the print server
unit from the file server) of no more than 1/4 second.
The print server searches for the primary server starting with the servers
that are closest (0 hops) and works its way outwards to a maximum of 4 hops.
4.2.3 W
HEN THEPRINTSERVERFINDS APRIMARYFILESERVER
When the print server finds a primary server, it
• stops searching for other servers.
• reads the list of servers set up in NetWare’s PCONSOLE.
• attempts to attach to every server in the list no matter where it is.
4.2.4 Y
OURCHOICES
• If you do not want to define a primary file server for the print server and
want to search up to four LAN segments for file servers to be used by the
print server, then go to Section 4.3 or 4.4.
• If you want to define a primary file server, use this section for instructions
on how to use the PCONSOLE to do so.
4.2.5 S
UMMARY
Following is a summary of steps you will perform in order to define a primary
file server:
Page 28
27
CHAPTER 4: Novell NetWare Configuration and NIMANAGE Utility
1. Start PCONSOLE
2. Choose “Print Server Information” on the Available Options menu.
3. Choose the print server you want to configure and then choose “Print
Server Configuration” on the Print Server Information menu. Choose
“File Servers to be Serviced” on the Print Server Configuration menu.
4. Choose the file server. To add additional file servers to the list, press the
<Ins> key. A list of Available File Servers appears.
5. Escape back to the Print Servers list and then go to Step 2 of
Configuration Using PCONSOLE, Section 4.7 or 4.8, for your version of
NetWare.
S
TEP
1: S
TART
PCONSOLE
S
UPERVISOR/ADMINISTRATORRIGHTS
You must have supervisor/
administrator rights BEFORE you use PCONSOLE. You need
supervisor/administrator rights in order to complete this process.
a. Log into the network as supervisor/administrator.
b. Type PCONSOLE and press <Enter>.
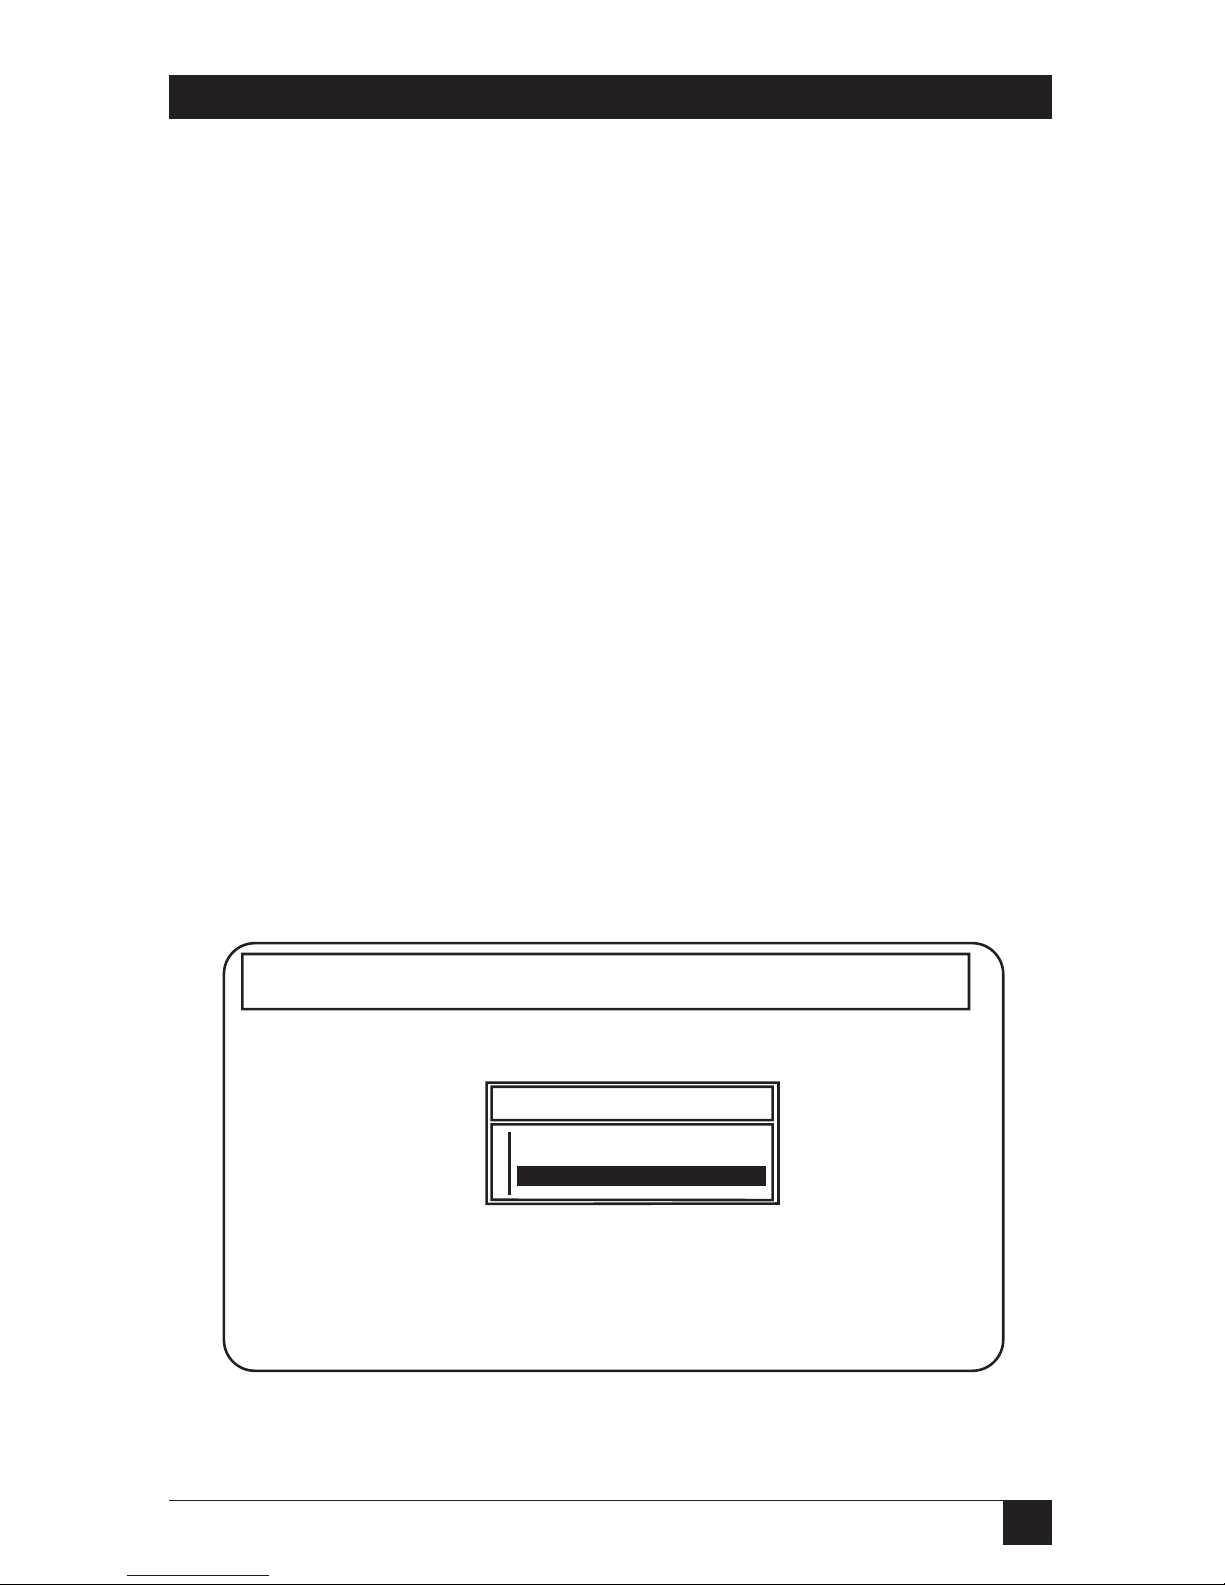
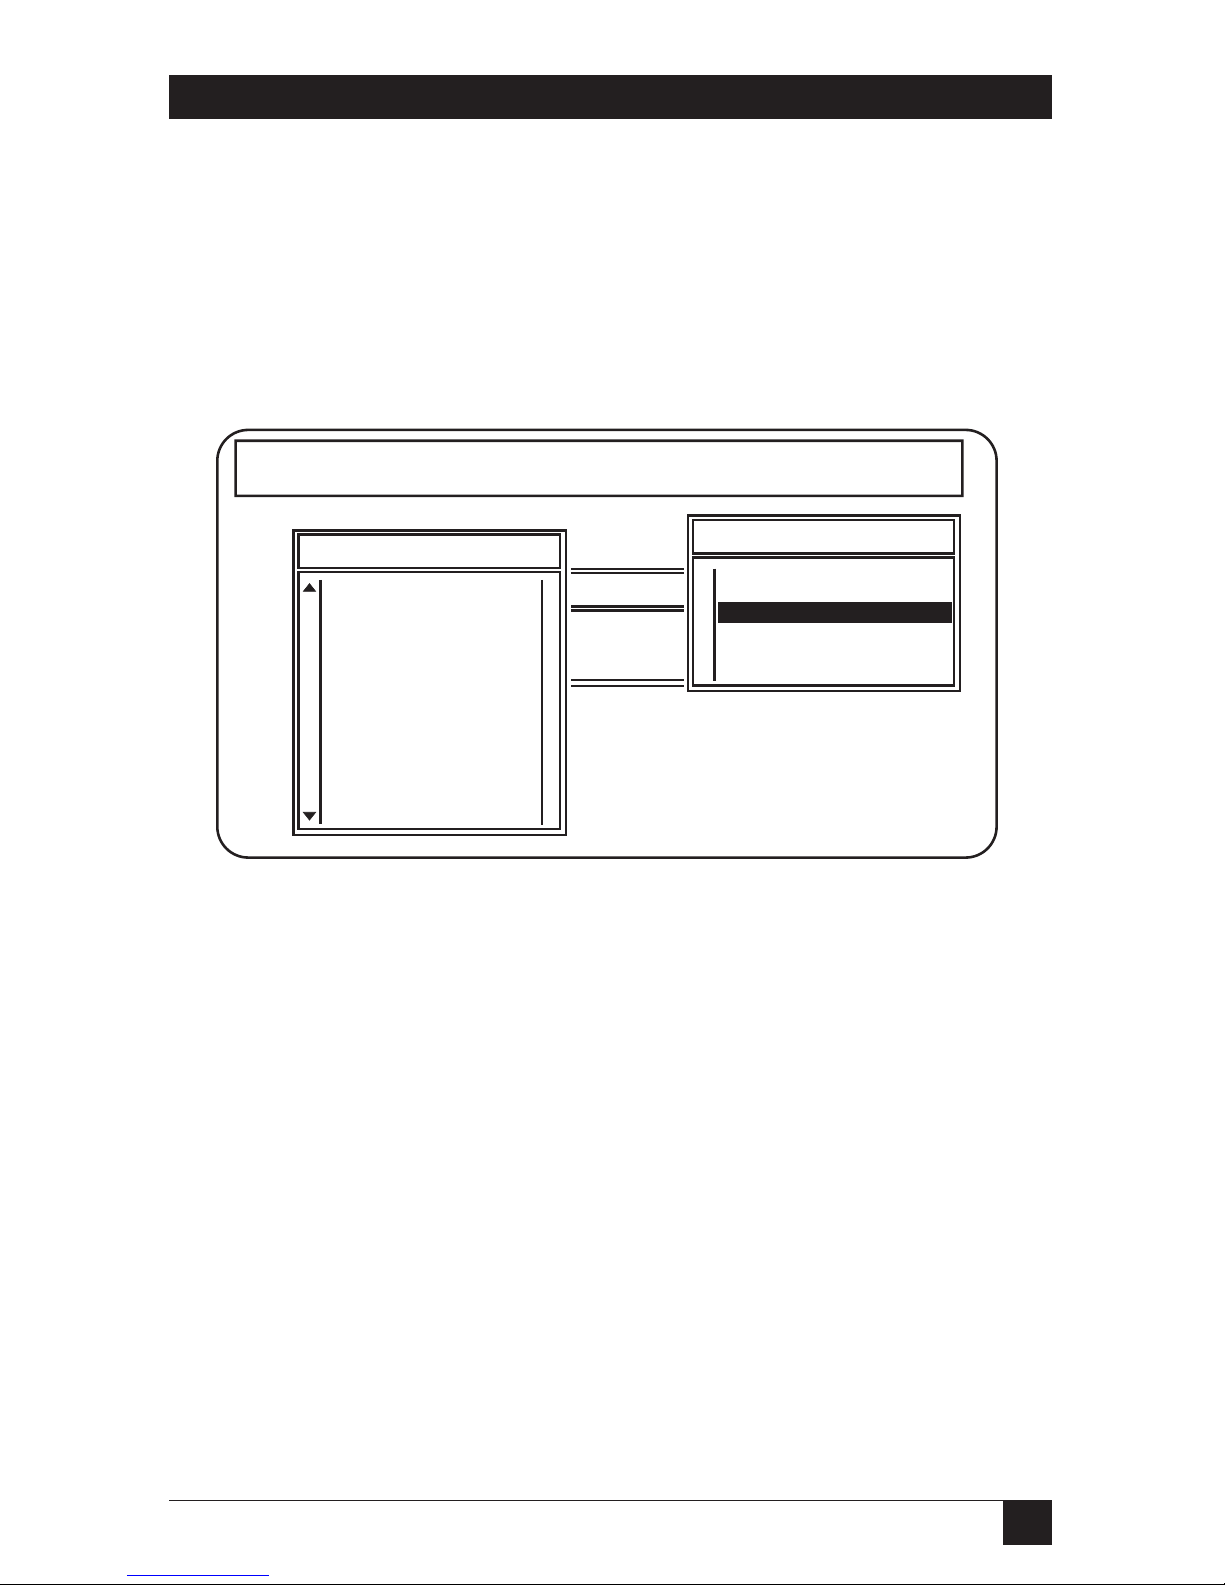
c. Choose “Print Server Information” on the Available Options menu. See
Fig. 4-1.
Fig. 4-1. Available Options Menu.
Available Options
Change Current File Server
Print Queue Information
Print Server Information
NetWare Print Console V1.51 Thursday October 14, 1993 8:43 am
User JCT On File Server ENGINEERING Connection 6
Page 29
28
ETHERNET PRINT SERVERS HIGH SPEED AND 4-PORT
Result: The Print Servers menu appears.
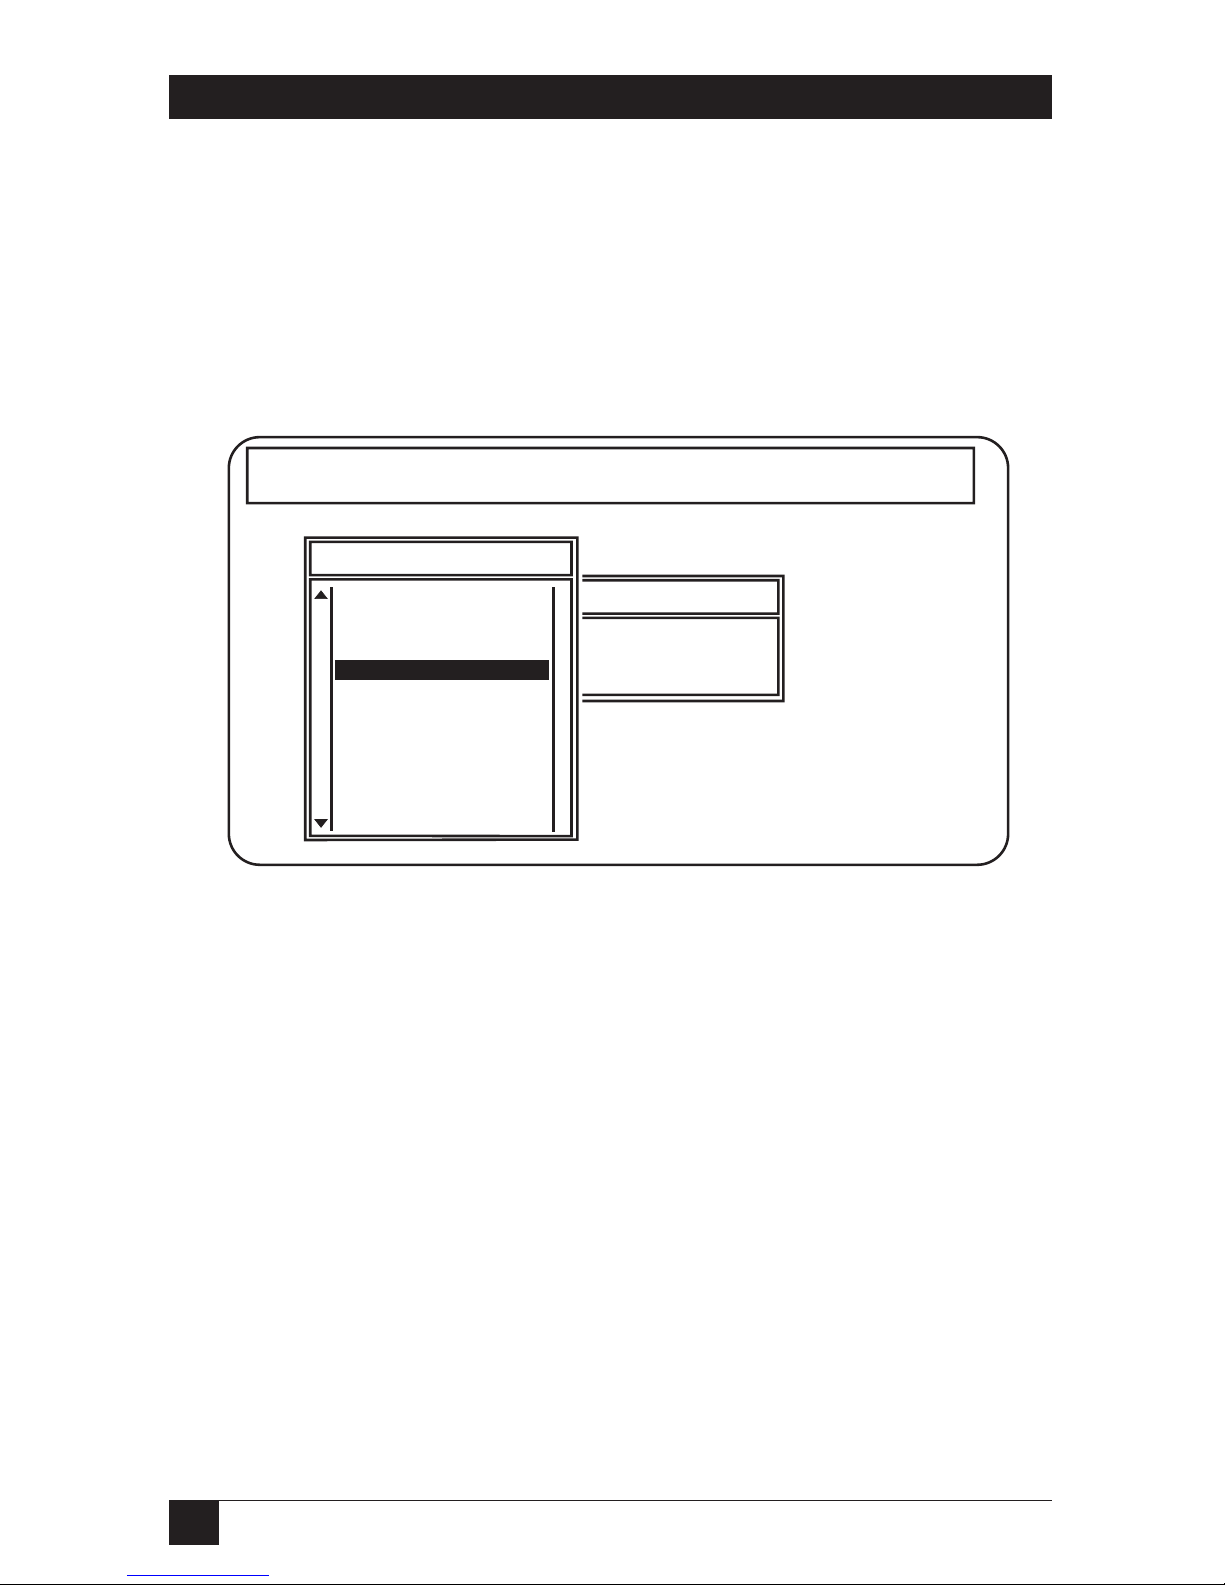
S
TEP
2: C
HOOSE THEPRINTSERVERYOUWANT TOCONFIGURE
When the list of Print Servers appears, find the serial number for the Print
Server you are configuring. The serial number is located on the bottom of
the unit. If it is not listed, make sure the Print Server is powered on and then
restart PCONSOLE. See Fig. 4-2.
Fig. 4-2. Configure Print Server.
vailable Options
Print Servers
ge Current File Server
t Queue Information
t Server Information
NPS_020841
NPS_021329
NPS_030100
NPS_070001
NPS_090202
NPS_0AFFB0
NPS_100101
NPS_100111
NPS_110213
NPS_110227
NPS_110229
NPS_110230
NPS_110244
NetWare Print Console V1.51 Friday October 15, 1993 11:23 am
User SUPERVISOR On File Server ENGINEERING Connection 26
Page 30
29
CHAPTER 4: Novell NetWare Configuration and NIMANAGE Utility
Result: Once you choose the Print Server you want to configure, the Print
Server information menu appears.
S
TEP
3: C
HOOSEPRINTSERVERCONFIGURATION
, T
HENFILESERVERS TOBESERVICED
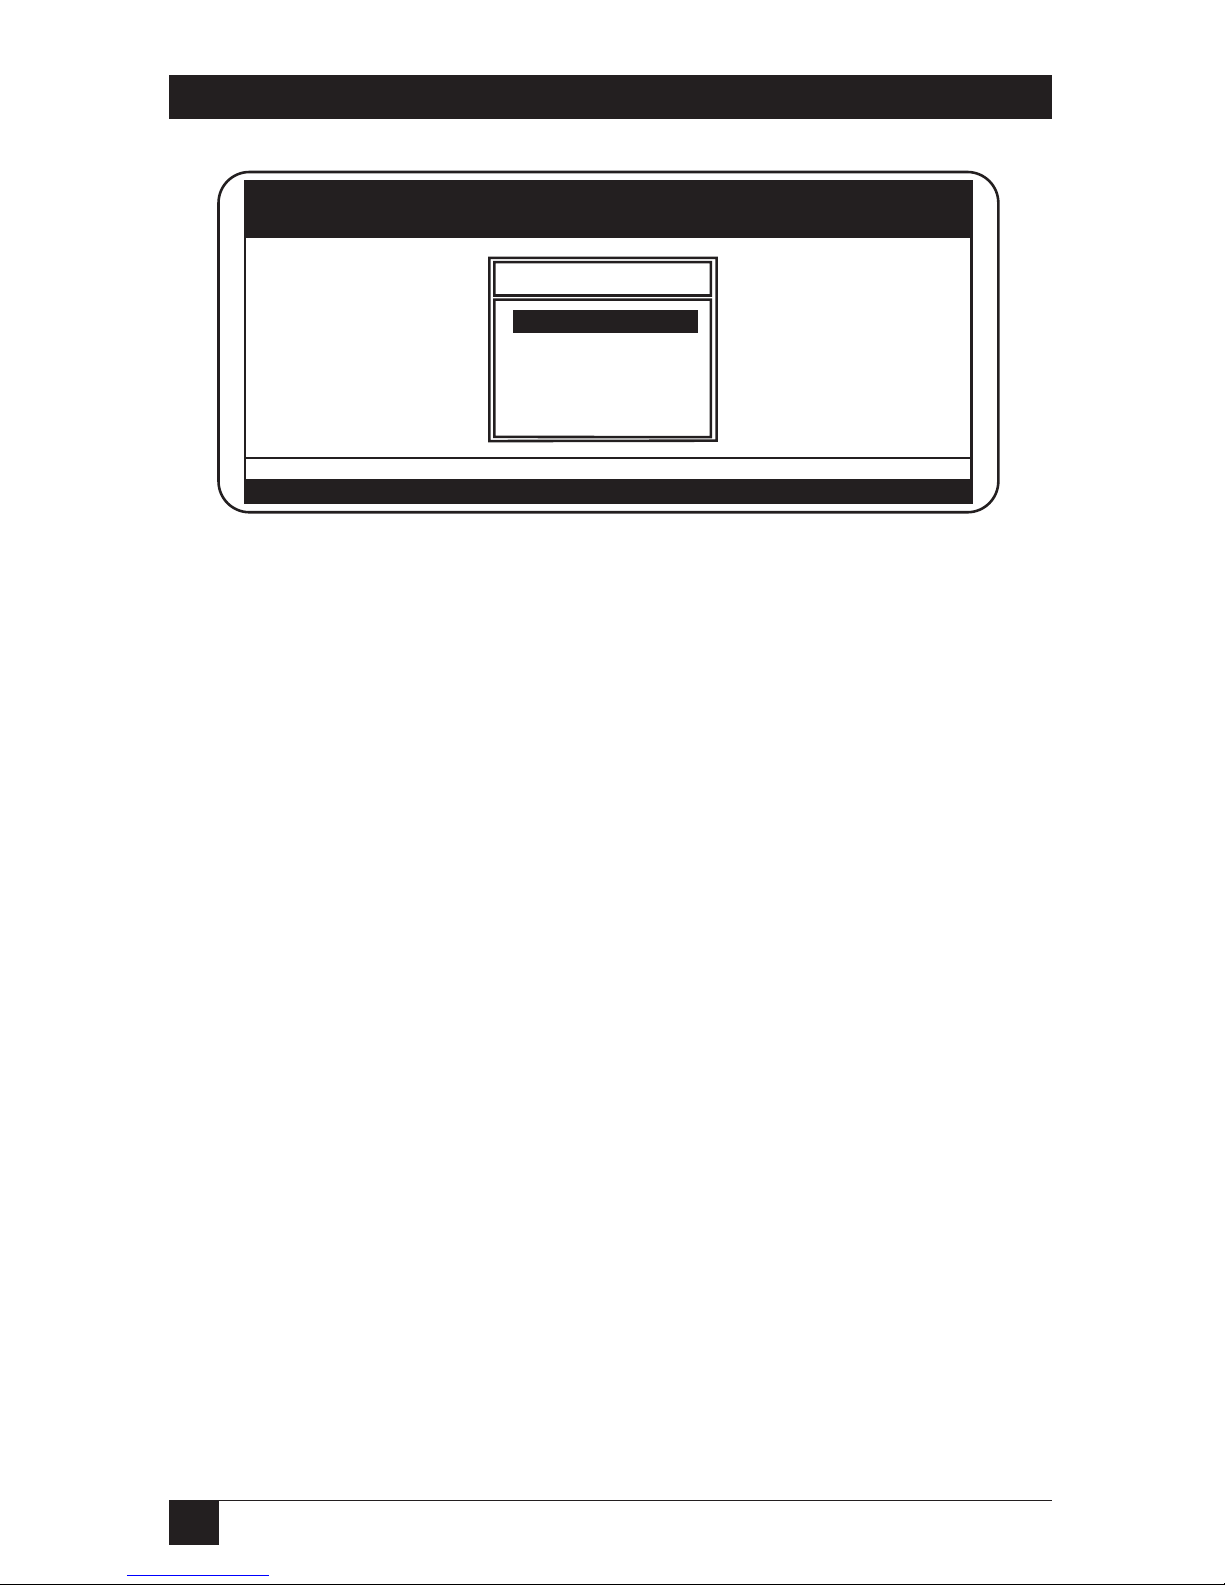
When the Print Server Information menu appears, select “Print Server
Configuration” and press <Enter>. Then choose “File Servers to Be Serviced”
and press <Enter>.
Fig. 4-3. Choose Print Server Configuration.
vailable Opt
Print Servers
ge Current Fil
t Queue Infor
t Server Infor
NPS_001122
NPS_011219
NPS_016422
NPS_020012
NPS_020841
NPS_021329
NPS_030100
NPS_070001
NPS_090202
NPS_0AFFB0
NPS_100101
NPS_100111
NPS_110213
NetWare Print Console V1.51 Thursday October 14, 1993 5:12 pm
Print Server Information
Change Password
Full Name
Print Server Configuration
Print Server ID
Print Server Operators
Print Server Users
User SUPERVISOR On File Server ENGINEERING Connection 4
Page 31

30
ETHERNET PRINT SERVERS HIGH SPEED AND 4-PORT
Fig. 4-4. Choose File Servers to Be Serviced.
Result: A list of File Servers to Be Serviced appears.
S
TEP
4: S
ELECT APRIMARYFILESERVER
When the File Servers to Be Serviced menu appears, select the file server you
want as the primary file server. Press the <Ins> key to display a list of all
available file servers.
NOTE
If the file servers (minimum of 2) displayed under the File Servers to Be
Serviced menu are the ones that you want to access, then you do not
need to do anything else—go to Step 5.
Result: Once you have chosen your file servers, you are ready to configure the
Print Server.
S
TEP
5: S
TART THEPRINT-SERVERCONFIGURATION
NetWare 2.15 or 3.10 and above users, go to Section 4.3 to configure the Print
Server.
NetWare 4.00 users, go to Section 4.4 to configure the Print Server.
vailable O
Print Servers
ge Current
t Queue Inf
t Server Inf
NPS_001122
NPS_011219
NPS_016422
NPS_020012
NPS_020841
NPS_021329
NPS_030100
NPS_070001
NPS_090202
NPS_0AFFB0
NPS_100101
NPS_100111
NPS_110213
NetWare Print Console V1.51 Thursday October 14, 1993 5:17 pm
Print Server Information
User SUPERVISOR On File Server ENGINEERING Connection 4
Print Server Configuration Menu
File Servers To Be Serviced
Notify List For Printer
Printer Configuration
Queues Serviced By Printer
Page 32

31
CHAPTER 4: Novell NetWare Configuration and NIMANAGE Utility
4.3 Configuration—Using NetWare 2.15, 3.10 and Later
Follow these steps to configure the Print Server with PCONSOLE.
1. Log into the network as Supervisor and start PCONSOLE.
2. Create a new print server and enter the Print Server name.
3. Configure the Print Server.
4. Assign print queues to the printer.
5. Set up NOTIFY options for the printer (optional).
6. Ethernet Print Server High Speed users only: If you are using NetWare
3.10 or later, set unencrypted passwords to ON.
4.3.1 E
NCRYPTEDPASSWORDS
The Print Server 4-Port supports encrypted passwords. The Print Server High
Speed does not support encrypted passwords.
4.3.2 PCONSOLE V
ERSION
Make sure you have a version of PCONSOLE other than version 1.0. You
cannot configure the Print Server with version 1.0. If you have this version,
contact Novell for a PCONSOLE upgrade.
S
TEP
1: S
TART
PCONSOLE
Make sure you have supervisor rights before you begin, or you will not be able
to configure the Print Server devices. After you log into the network, type
PCONSOLE and press <Enter>.
Choose “Print Server Information” from the Available Options menu. See
Fig. 4-5.
Page 33

32
ETHERNET PRINT SERVERS HIGH SPEED AND 4-PORT
Fig. 4-5. Print Server Information.
Result: The Print Servers menu appears.
S
TEP
2: E
NTER THEPRINTSERVERNAME
A print server takes the print jobs from queues and sends them to a Print
Server printer. You need to create a Print Server name for the Print Server.
• When the Print Servers menu displays, press the <Ins> key to display the
New Print Server Name entry box.
• Type the name of the Print Server into the entry box. First type NPS,
followed by an underscore, then type in the 6-digit serial number printed
on the label on the bottom of the unit, like this: NPS_<serial_number>.
The screen example shows how you would enter the Print Server name if
you had a serial number of 991354.
Available Options
Change Current File Server
Print Queue Information
Print Server Information
Page 34

33
CHAPTER 4: Novell NetWare Configuration and NIMANAGE Utility
Fig. 4-6. Print Server Name.
Configure the Print Server
The configuration tells the Print Server which printers the print server
supports.
1. Press <Enter> once you have added the Print Server name to the Print
Servers list. The Print Server Information menu appears. Choose “Print
Server Configuration” on that menu, then choose the Print Server name
you assigned in Step 2. See Fig. 4-7.
vailable Options
Print Servers
ge Current File Server
t Queue Information
New Print Server Name: NPS_991354
HPIIISI_ETHERNET PRINT SERVER
HP4_ETHERNET PRINT SERVER
HPLASER_ETHERNET PRINT SERVER
NPS_ENGINEERING
NPS_020210
NPS_020211
NPS_020213
NPS_6
NPS_990000
NPS_990001
NPS_990002
NPS_990003
TECHPUB_JP
NetWare Print Console V1.32
Type in the
name of the
Ethernet
Print Server
by using the
serial
number.
Tuesday February 2, 1993 3:15 pm
User SUPERVISOR On File Server 55SX Connection 5
Use the Ethernet Print Server Utilities to change the Ethernet
Print Server name from the one assigned here to a userdefined name, such as the names used in this screen
example. See Chapter 4: NSDOCTOR Utility for details.
Page 35

34
ETHERNET PRINT SERVERS HIGH SPEED AND 4-PORT
Fig. 4-7. Print Server Information.
2. Choose “Printer Configuration” on the Print Server Configuration Menu.
The Configured Printers menu appears. Assign the Print Server
printer(s) as follows:
• Print Server High Speed parallel port and Print Server
4-Port to Printer 0.
• Print Server 4-Port Parallel Port #2 to Printer 1.
• Print Server 4-Port Parallel Port #3 to Printer 2.
• Print Server 4-Port Uniport to Printer 3. If you use the Uniport as a
printer port, then you MUST assign it to Printer 3—even if you do not use
all the parallel ports.
NOTE
Make sure you assign the correct number to your printer. Choose
Remote Other/Unknown as TYPE. You DO NOT need to make changes to
any other items on the screen.
vailable Opt
Print Servers
HPIIISI_ETHERNET PRINT SERVER
HP4_ETHERNET PRINT SERVER
HPLASER_ETHERNET PRINT SERVER
NPS_ENGINEERING
NPS_MANUFACTURING
NPS_990051
NPS_990053
NPS_990062
NPS_991354
NPS_999999
NPS_PS
TEMP
TEST
NetWare Print Console V1.32 Tuesday February 2, 1993 3:18 pm
User SUPERVISOR On File Server 55SX Connection 5
Choose the Ethernet Print
Server name from the menu and
the Print Server information menu
appears.
Print Server Information
Change Password
Full Name
Print Server Configuration
Print Server ID
Print Server Operators
Print Server Users
ge Current F
t Queue Info
t Server Inf
Page 36

35
CHAPTER 4: Novell NetWare Configuration and NIMANAGE Utility
The screen example in Fig. 4-10 shows the printer setup for a printer
attached to the Print Server High Speed parallel port or Print Server 4-Port
parallel port #1.
Assigning Names
On the Printer Configuration screen, you can use the NAME field to identify
your printer(s). However, you should not make any other changes unless you
have the knowledge to do so.
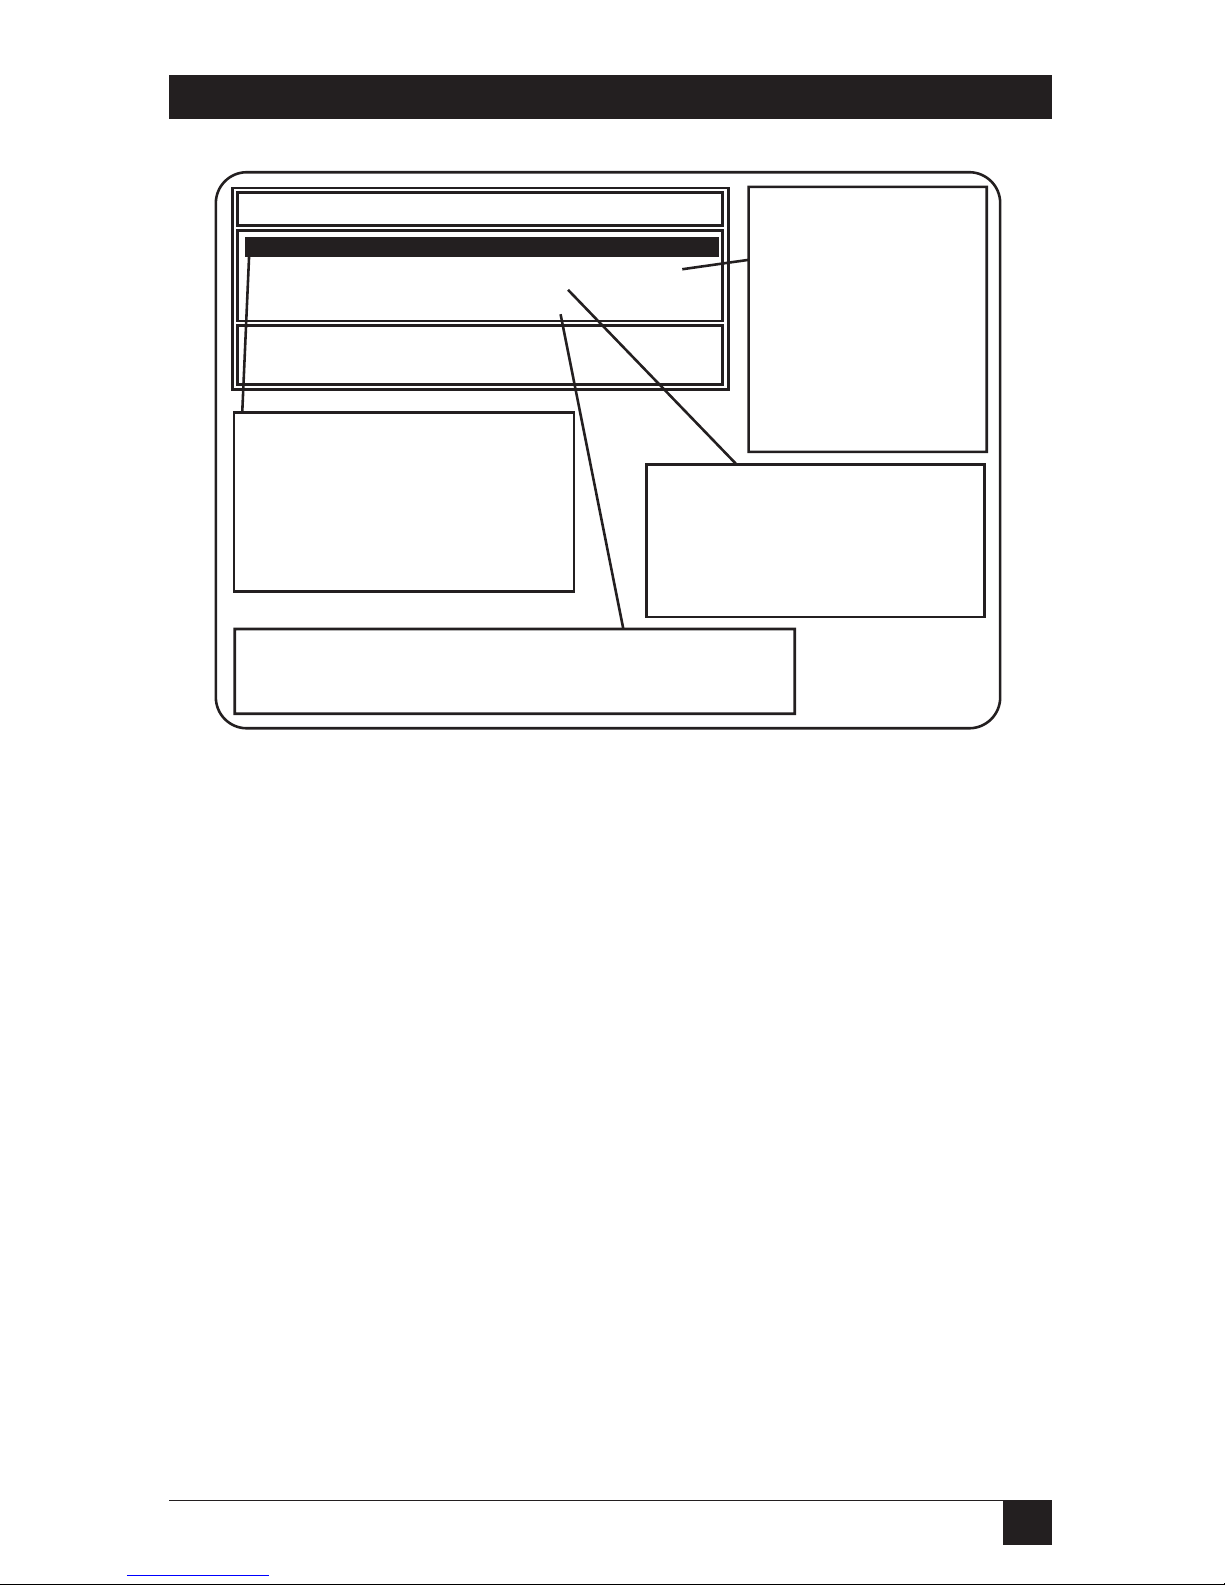
Fig. 4-8. Printer Configuration Screen.
Co
Not In
Not In
Not In
Not In
Not In
Not In
Not In
Not In
Not In
Not In
Not In
Not In
Not In
Not In
Not In
NetWare Print Console V1.32 Tuesday February 2, 1993 3:20 pm
User SUPERVISOR On File Server 55SX Connection 5
Assign the Ethernet Print Server High Speed parallel port and Ethernet
Print Server 4-Port parallel port #1 printer to Printer 0; Ethernet Print
Server 4-Port parallel port #2 printer to Printer 1; Ethernet Print Server
4-Port parallel port #3 printer to Printer 2, and, always assign the
Ethernet Print Server 4-Port Uniport printer to Printer 3 (whether you
install all three parallel printers or not).
Printer 0 configuration
Name: HPLASERIIISI
Type: Remote Other/Unknown
Use interrupts: Yes
IRQ: 7
Buffer size in K: 3
Starting form: 0
Queue service mode: Change forms as needed
Baud rate:
Data bits:
Stop bits:
Parity:
ion
on Menu
iced
ter
Page 37

36
ETHERNET PRINT SERVERS HIGH SPEED AND 4-PORT
3. When you have finished configuring each printer, then press <Esc> to
exit and choose Yes when you are prompted to save changes. Make sure
you return to the Print Server Configuration Menu.
S
TEP
4: A
SSIGNPRINTQUEUES TOPRINTSERVERPRINTERS
When you assign queues to the defined printers, you authorize the Print
Server to service these queues.
NOTE
Assign queues only to the Print Server. Do not assign one queue to two
different print servers. If a queue is assigned to multiple print servers,
print jobs may not go to the Print Server printer(s).
1. Choose “Queues Serviced by Printer” from the Server Configuration
Menu.
2. Select the appropriate printer from the list of Defined Printers. A screen
(which should be blank for the initial installation) appears. Press the
<Ins> key to bring up a list of Available Queues for the Print Server
printer. See Fig. 4-9.
Page 38

37
CHAPTER 4: Novell NetWare Configuration and NIMANAGE Utility
Fig. 4-9. Available Queues.
3. Choose a queue and assign a priority level (from 1 to 10) to the queue.
Accept the default priority level displayed on the screen. Press <Enter>
and the queue appears on the list for the selected printer. Press <Ins>
to enter additional queues. See Fig. 4-10.
vailable O
Print Servers
Q1_ETHERNET PRINT SERVER
HPIIISI_ETHERNET PRINT SERVER
HP4_ETHERNET PRINT SERVER
NPS_ENGINEERING
NPS_MANUFACTURING
NPS_990051
NPS_990053
NPS_990062
NPS_991354
NPS_999999
NPS_PS
TEMP
TEST
Press the key once
you choose the printer
to which you want to
assign queues.
Print Server Configuration Menu
File Servers To Be Serviced
Notify List for Printer
Printer Configuration
Queues Serviced by Printer
ge Curren
t Queue I
t Server I
Print Server Information
Defined Printers
HPLASERIIISI 0
INS
Page 39

38
ETHERNET PRINT SERVERS HIGH SPEED AND 4-PORT
Fig. 4-10. Priority Screen.
4. When you have finished assigning the queues, press <Esc> and then
choose Yes to save changes. Continue to <Esc> back to the Print Server
Configuration Menu.
If you do not want to set up notify functions, then continue to <Esc>
and choose Yes to save changes. Print Server High Speed users:
NetWare 3.10 and above users should go to Step 6.
Available Queues
Q1_ETHERNET PRINT SERVER
HPIIISI_ETHERNET PRINT SERVER
HP4_ETHERNET PRINT SERVER
Q990062_A
Q990062_B
SERIAL_Q
SERVER_Q
SPECIAL
TECHPUBS_ETHERNET PRINT SERVER
TEST_Q
Select an available queue, or, create a new queue.
Then assign a priority number for the queue.
enu
ue Priority
Priority: 1
TEST
Page 40

39
CHAPTER 4: Novell NetWare Configuration and NIMANAGE Utility
S
TEP
5: (O
PTIONAL
) SETUPN
OTIFYOPTIONS FOR THEPRINTERS
To notify users or user groups if a problem occurs with a print job, you
need to set up the Notify functions. The Print Server supports the enhanced
NOTIFY features for printers, including informing users when the printer
is off-line, jammed, opened, out of paper, in need of a reset, low on toner,
or waiting for a manual paper feed, or when the printer has the wrong form
loaded, a memory error, an engine failure, or a higher-priority print job
from another source.
1. Choose “Notify List for Printer” on the Print Server Configuration Menu.
2. Select a printer from the Defined Printers list. The notification screen
appears (which should be blank for the initial installation). Press <Ins>
to view a list of Notify Candidates.
Fig. 4-11. Notify Candidates.
Notify Candidates
(Job Owner)
CHG
DAS
DXL
EVERYONE
JCT
GUEST
ETHERNET PRINT SERVER
SUPERVISOR
TEST
Select the
candidates who
should be notified
if there is a
problem with a
print job sent to an
Ethernet Print
Server printer.
(Unknown Type)
(User)
(User)
(User)
(Group)
(User)
(User)
(Group)
(User)
(Group)
Page 41

40
ETHERNET PRINT SERVERS HIGH SPEED AND 4-PORT
3. Select the user or group from the Notify Candidates list. Set the first and
next intervals in the Notify Intervals screen. Use the defaults. The first
and next intervals are how many seconds the network will wait before it
notifies candidates about a print-job problem. The intervals specify how
often after the first notification candidates will be notified. Type in a
number in seconds (not minutes) for each interval and press <Enter>.
Fig. 4-12. Notify Intervals.
Notify Intervals
First: 30
Next: 60
Specify how long the network
should wait before alerting
users of a problem and how
often the alerts should occur.
Page 42

41
CHAPTER 4: Novell NetWare Configuration and NIMANAGE Utility
4. Press <Esc> to exit the program and select Yes when prompted to save
changes. You can then exit the PCONSOLE function or make changes
to your configuration.
S
TEP
6: E
THERNETPRINTSERVERHIGHSPEEDUSERS
: SETU
NENCRYPTEDPASSWORDS
TO
ON (NETW
ARE3.X AND ABOVE
)
You need to enable encrypted passwords by adding the statement below to
your AUTOEXEC.NCF file on the server using either the NetWare
INSTALL.NLM utility on the server or the NetWare SYSCON utility on a
workstation when logged in as supervisor. You can also type the statement
below at the server console (but when typed at the server console, it is not
permanent).
SET ALLOW UNENCRYPTED PASSWORDS=ON
Encrypted passwords do not work with the Print Server High Speed.
However, encrypted passwords are supported in the Print Server 4-Port.
Supporting Multiple File Servers
See Appendix D for information on supporting multiple file servers. This
includes information on passwords for multiple file servers assigned to the
print server.
When You Finish
Once you complete your PCONSOLE installation, go to the Hardware
Installation in Section 4.9.
4.4 Configuration—Using
NetWare 4.0
Novell NetWare 4.0 operates in two modes, Directory Services and Bindery
Services. You need to use Bindery mode for your Print Server configuration.
Directory Services mode allows users to log onto one server in a multi-server
network and access all servers on the network transparently. Unlike earlier
NetWare versions 2.x and 3.x which did not offer Directory Services, you need
only log onto the network once to access all servers.
However, in order for the Print Server to function properly with NetWare
4.0, it must be configured in PCONSOLE to use Bindery Services mode.
Once this is done, the Print Server will run as a Novell Print Server with all the
additional functionality of NetWare 4.0, since both modes run simultaneously
and transparently to each other.
Page 43

42
ETHERNET PRINT SERVERS HIGH SPEED AND 4-PORT
NOTE
If the Print Server is connected to a NetWare 4.0 server and you suspect
that Bindery Services mode is not running, the Print Server will confirm
that condition by producing a status page stating no active file servers
could be found. The status page, in effect, tells you that you are running
Novell with the Directory Services version of PCONSOLE and must
instead use the Bindery Services version of PCONSOLE.
4.4.1 C
ONFIRMINGBINDERYCONTEXTWITHNOVELLNETWARE
4.0
Before the Print Server can be installed on a Novell NetWare 4.0 server,
confirm that the server has a Bindery Context (name for server under Bindery
Services mode). If the server has no Bindery Context, the Novell
administrator must either execute a SET command from the console prompt,
or modify the AUTOEXEC.NCF file to include the proper SET command and
re-start the server.
To confirm the server has a Bindery Context, perform the following steps:
1. Log into the server as ADMIN.
2. At the prompt, perform a DOS TYPE of Z:\SYSTEM\AUTOEXEC.NCF.
3. When the file appears, look for a statement that is similar to:
SET BINDERY CONTEXT=0=Name
How to Use Name
Name is the designation for the Server Context, and can be obtained by
starting PCONSOLE. At the upper left corner of the screen displaying
the Available Options menu, the Context is shown. For example,
0=DIGITAL PROD
4. If you see no such statement in the screen, then you must add that
statement for the Print Server to work. Exit from PCONSOLE and use a
DOS text editor to add the following statement to the AUTOEXEC.NCF
file:
SET BINDERY CONTEXT=0=
DIGITAL_PROD
Print Server High Speed users should go to Step 5 below.
5. Print Server High Speed users: The Print Server does not support
encrypted password. Since you are changing your AUTOEXEC.NCF file,
include the following statement in the AUTOEXEC.NCF file:
SET ALLOW UNENCRYPTED PASSWORDS=ON
Page 44

43
CHAPTER 4: Novell NetWare Configuration and NIMANAGE Utility
6. Now that you have added statements to the AUTOEXEC.NCF file, you
must power down the server and restart it for the changes to take effect.
If you don’t want to make permanent changes to your AUTOEXEC.NCF
file, you can type the SET command at the Server console to make
changes. Any changes will be in effect until the server is powered down
and restarted again.
4.4.2 C
ONFIGURING INBINDERYMODE WITH
PCONSOLE
One enhancement over earlier NetWare versions is the use of function keys,
displayed at the bottom of the screen. You will use these keys to configure the
Print Server on PCONSOLE.
Once you are sure you have installed the Bindery Context, you can
configure the Print Server on NetWare 4.0 by performing these steps:
1. Start PCONSOLE.
2. Select Bindery Mode.
3. Select the Quick Setup option.
4. Enter Print Server, Printer, and Queue names.
5. Enter printer TYPE name.
6. Add to Print Server and Queue lists.
If you encounter any errors during installation, try logging out and logging
in again.
S
TEP
1: S
TART
PCONSOLE
Before you begin, log into the network as ADMIN. After you log in, type
PCONSOLE and press <Enter>. The screen below appears.
Page 45
44
ETHERNET PRINT SERVERS HIGH SPEED AND 4-PORT
Fig. 4-13. Start PCONSOLE Screen.
S
TEP
2: S
ELECTBINDERYMODE
When the Available Options screen appears, press the <F4> key (for Bindery
Mode).
NOTE
If you receive a message asking you to log into a server with Bindery
connections, the server you are attached to does not have Bindery Mode
enabled. Follow the previously listed steps to add Bindery Services or
log onto a server with Bindery Services activated.
Available Options
Print Queues
Printers
Print Drivers
Quick Setup
Change Context
NetWare Print Console V4.00 Friday July 2, 1992 2:56 PM
Context: 0
Enter=Select F4=Bindery Mode Esc=Exit
Press <Enter> to View, Create, or Choose Available Print Queues
F1=Help
Page 46

45
CHAPTER 4: Novell NetWare Configuration and NIMANAGE Utility
S
TEP
3: S
ELECTQUICKSETUPOPTION
When the Available Options screen appears, select Quick Setup and press
<Enter>. See the screen example in Fig. 4-14.
NOTE
Use Quick Setup to connect your print server, print queue and printer
correctly. If you need to modify these items later, see Step 6.
Fig. 4-14. Quick Setup Option.
Available Options
Print Queues
Printer Services
Quick Setup
Change Current NetWare Server
NetWare Print Console V4.00 Friday July 2, 1992 2:56 PM
User ADMIN on NetWare Server ENG SVR Connection 1
Enter=Select F4=Directory Services Mode Esc=Exit
Press <Enter> to View, Create, or Choose Available Print Queues
F1=Help
Page 47

46
ETHERNET PRINT SERVERS HIGH SPEED AND 4-PORT
S
TEP
4: E
NTERPRINTSERVER
, P
RINTER, ANDQUEUENAMES
1. When Print Services Quick Setup window appears, enter the print server
name by using the <F3> (Modify) key.
2. Type in the name using the format NPS_XXXXXX, where XXXXXX is
the Print Server serial number.
3. Press <Enter>. The serial number is stamped on the bracket of the board.
Next, tab down to the New Printer field, enter a name, and press <Enter>,
then tab to the New Print Queue field, enter a name, and press <Enter>.
Fig. 4-15. Enter Print Server, Printer, and Queue Names.
Print Services Quick Setup
NPS_990434
F1
Q1
NetWare Print Console V4.00 Friday July 2, 1992 2:56 PM
User ADMIN on NetWare Server ENG SVR Connection 1
Enter=Select F10=Save Changes F3=Modify Esc=Exit
Specify the print server that will service the new printer and print queue.
Press <Enter> to list available print servers
F1=Help
Print Server:
New Printer:
New Print Queue:
TextBanner Type:
Parallel
Auto Load (Local)
None (polled mode)
LPT1
Printer Type:
Location:
Interrupt:
Port:
Page 48

47
CHAPTER 4: Novell NetWare Configuration and NIMANAGE Utility
S
TEP
5: E
NTERPRINTERTYPENAME
Tab down to the Printer Type field and press <Enter>. When the pop-up
window appears, select the Other/Unknown option. Press <Enter> to select
your choice. With all your choices now selected, press the <F10> key (Save
Changes) to save your configuration.
Follow steps 1 through 5 to configure all servers connected to your Print
Server units on the network.
S
TEP
6: A
DD TO
P
RINTSERVER ANDQUEUELISTS
If you need to view, add, delete, or modify print servers or print queues after
your initial setup, select either the Print Queues or Print Servers options from
the Available Options screen.
Selecting either Print Queues or Print Servers will call up information
screens from which you can view or modify more choices.
• On the Print Queues Information screen, you can select Print Jobs, Status,
Attached Print Servers, Information, Users, Operators, and Print Servers.
• On the Print Server Information screen, you can select Printers,
Information and Status, Users, Operators, Description, Password, and
Audit.
S
TEP
7: P
LUG IN THEPOWERSUPPLY
Once you have finished configuring the Ethernet Print Server with
PCONSOLE, you can plug the power supply into the Ethernet Print Server
and into a wall outlet.
The front-panel green LED should do the following:
• Go on when the unit first powers up. The Ethernet Print Server does a
series of self-tests. If a problem is found, the light blinks in a particular
pattern to identify the problem. See Chapter 7, Troubleshooting for
details.
• When the Ethernet Print Server passes the self-tests, the light blinks three
times and stays on solid. The Ethernet Print Server then sends a status
page to the printer attached to parallel port #1.
• The network software initializes. This takes about 15 seconds. You are
now ready to print.
If the green LED does not go on at any time, try plugging the power cord
into another wall outlet. If it still does no power on, call for technical
support.
Page 49

48
ETHERNET PRINT SERVERS HIGH SPEED AND 4-PORT
Supporting Multiple File Servers
See Appendix C for information on supporting multiple file servers.
This includes information on passwords for multiple file servers assigned
to the Ethernet Print Server.
Status Page Examples
Fig. 4-16 shows an example of the status page. This page will print after
the self-tests, and any time you power up the Ethernet Print Server.
PostScript Format
The status page is formatted for PostScript printers. For text-based printers
such as HP Lasers, the status page prints the information shown on in
Fig. 4-16, as well as any PostScript codes. If after the self-tests the Ethernet
Print Server cannot log into the file server or find a password, a status page
prints detailing the problem and listing a solution.
Page 50

49
CHAPTER 4: Novell NetWare Configuration and NIMANAGE Utility
Unit Serial No.: 020012 Version: 0.400
Network Address: 00:40:at:02:71:60 Connector: 10BASE-T
Network Topology: Ethernet
Network Speed: 10 Mbps
Novell Network Information
Novell Print Server Name: NPS_020012 Password Defined: Yes
Frame Type: Novell 802.3
AppleTalk Network Information
Frame Type: 802.2 SNAP on 802.3
Protocol Address: Net Number 10 Node Number 151 Socket Number128
AppleTalk Zone: Ether A1
-----------------------------------------------------------------------------------------------------
TCP/IP Network Information
Frame Type: Ethernet II Subnet Mask: 255.0.0.0
Protocol Address: 192.9.200.231
Port Number: 1 Port Type: Parallel
Novell Connection Information
Printer Name: Printer 0
File Server: ENGINEERING
Queue: 12_2 Priority: 1 Attached: Yes
Queue: 12_1 Priority: 1 Attached: Yes
Notify: EPG First: 30Repeater: 2000
Notify: SUPERVISOR First: 30 Repeat: 60
File Server: 55SX
Queue: 62_2 Priority: 5 Attached: Yes
Queue: 62_1 Priority: 3 Attached: Yes
Notify: GDF First: 30 Repeat: 60
Notify: SUPERVISOR First: 30 Repeat: 60
AppleTalk Connection Information
AppleTalk Printer Name: NP125 LaserWriter 1
TCP/IP Connection Information
Port Number: 10002
Novell Connection Information
Fig. 4-16. Status Page Example.
Page 51

50
ETHERNET PRINT SERVERS HIGH SPEED AND 4-PORT
4.5 Introduction to NIMANAGE
The Print Server program NIMANAGE is a PC-based program that includes
the following functions or utilities:
• Configure the Novell Print Server, Uniport Input Print Server, or printer
port.
• Reset the Print Server unit remotely.
• Help to troubleshoot problems on the Print Server.
Use the utilities to make changes to your Print Server setup or to update
your Print Server firmware with a new release.
4.6 How to Install
To install the Print Server software, you must do the following:
NOTE
We recommend that you install the program on the file server, since the
utilities require communication across the network. Make sure you are
logged onto the network as SUPERVISOR (NetWare 2.15 or 3.10 and
above) or ADMIN (NetWare 4.0) before you begin.
1. Place the Print Server Utility and Diagnostics Program diskette into the
floppy drive of a workstation. If you are not installing the software on the
file server, then make sure you are using the workstation on which you
want to install the software.
2. Type A: (or B:) and press <Enter>. Type INSTALL and press <Enter>.
An information screen appears. Read the screen and press any key to
continue.
3. Accept or change the path where the Print Server Utility and Diagnostics
Programs will be placed. The default choice is SYS:\PUBLIC, shown on
the screen in Fig. 4-17. If you want to change it, use the arrow keys to
delete the default choice and type in a new path.
Page 52

51
CHAPTER 4: Novell NetWare Configuration and NIMANAGE Utility
Ethernet Print Server High Speed/4-Port
Directory to load Software: SYS:\PUBLIC____________
If you wish to load to a different server, please exit and log
into the correct file server. To load to a different drive, simply
type the new drive letter as part of your directory.
<ENTER> Accept and continue. Use arrow keys to move
cursor.
<ESC> Exit install.
<F1> Additional help.
Fig. 4-17. Changing the Path.
4. Follow the prompts you receive on the screen and remove the installation
diskette from the workstation drive when finished.
If you have installed the Print Server Utility on the file server, then you
initiate the program as follows:
• Log into the server as SUPERVISOR or ADMIN. Type NIMANAGE and
press <Enter> at the prompt. The NIMANAGE Main Menu appears.
If you have installed NIMANAGE on the hard drive of a workstation, then
you initiate the program as follows:
• Go to the directory on the hard drive where you have installed the Print
Server software.
• Type NIMANAGE and press <Enter>. The NIMANAGE Main Menu
appears.
4.7 NIMANAGE: Choose the Print Server
Choose the Print Server that you want to connect to. If you cannot
connect to the chosen Print Server for any reason, you receive an error
message. See Fig. 4-18.
Page 53

52
ETHERNET PRINT SERVERS HIGH SPEED AND 4-PORT
Fig. 4-18. NIMANAGE: Choose the Print Server.
4.8 NIMANAGE: Print Server Utility Menu
After you choose a Print Server unit, the Print Server Utility Main Menu
appears. See Fig. 4-19.
Select an Ethernet Print Server unit.
A: NPS_981354
B: NPS_980001
C: NPS_020445
D: NPS_020882
E: NPS_980005
F: NPS_980006
G: NPS_980007
H: NPS_062887
I: NPS_960009
J: NPS_980010
In this screen
example, multiple
Ethernet Print
Server units were
found on the
network. Choose
the Ethernet
Print Server unit
you want to
connect to and
press .
[Enter] = Make Selection
[Esc] = Quit [F1] = Help
ENTER
Page 54
53
CHAPTER 4: Novell NetWare Configuration and NIMANAGE Utility
Fig. 4-19. NIMANAGE: Print Server Utility Menu.
4.9 A: Troubleshoot Option
When you choose A: Troubleshoot, a sub-menu displays the troubleshooting
functions.
B: General Ethernet
Print Server Setup
Options checks or
modifies any configuration option not directly
tied to a specific print
server. This includes
configuring the printer
or updating the
Ethernet Print Server
firmware.
Ethernet Print Server utilities for NPS_991354.
A: Troubleshoot.
B: General Ethernet Print Server Setup Options.
C: Novell Print Server Setup.
D: Uniport Input Print Server Setup.
[Enter] = Make Selection
[Esc] = Quit [F1] = Help
A: Troubleshoot tests the printer
port to make sure you can print.
If you cannot print, a status list
appears indicating how to correct
the problem. Users may also
have to reset Ethernet Print
Server to correct a problem.
C: Novell Print Server Setup
lets you configure the Novell print
server by changing the print
server's name, the printer port it
uses, and the passwords it uses
to login.
D: Uniport Input Print Server (150 model only) lets you
send data from the Ethernet Print Server Uniport to the
Ethernet Print Server parallel printer.
Page 55

54
ETHERNET PRINT SERVERS HIGH SPEED AND 4-PORT
Fig. 4-20. A: Troubleshoot Option.
4.9.1 A: T
ESTPRINTERPORTSOPTION
Test Printer Ports sends a test print to one of the Print Server printer ports.
You must first select the printer port. See Fig. 4-21.
B: Read Error Log reports any
problems it encounters with the
Ethernet Print Server to an error
logging module. This retrieves
the messages from the unit's
error log.
Ethernet Print Server Diagnostics for NPS_991354.
A: Test Printer Ports.
B: Read Error Log.
C: Report Print Server Status.
D: Reset Unit.
[Enter] = Make Selection
[Esc] = Quit [F1] = Help
A: Test Printer
Ports sends a test
print out to one of
the Ethernet Print
Server units'
printer ports.
D: Reset Unit lets you reset the
Ethernet Print Server in order to
clear an error condition which
prevents users from printing.
C: Report Print Server Status
displays a status report for the
Ethernet Print Server.
Page 56

55
CHAPTER 4: Novell NetWare Configuration and NIMANAGE Utility
Fig. 4-21. Test Printer Ports Option.
PostScript or PCL-based Printers
Next select the type of print job you want to send—a PostScript print job
(for PostScript printers only) or text, for PCL compatible printers like the
HP LaserJet. Once you answer this prompt, a print job is sent to the selected
printer port. If the port is being used by a print server for a print job, then
you receive the appropriate error message. Try to print again after the other
job has printed. See
Fig. 4-22.
B: Read Error Log reports any
problems it encounters with the
Ethernet Print Server to an error
logging module. This retrieves
the messages from the unit's
error log.
Ethernet Print Server Diagnostics for NPS_991354.
A: Test Printer Ports.
B: Read Error Log.
C: Report Print Server Status.
D: Reset Unit.
[Enter] = Make Selection
[Esc] = Quit [F1] = Help
A: Test Printer
Ports sends a test
print out to one of
the Ethernet Print
Server units'
printer ports.
D: Reset Unit lets you reset the
Ethernet Print Server in order to
clear an error condition which
prevents users from printing.
C: Report Print Server Status
displays a status report for the
Ethernet Print Server.
Page 57

56
ETHERNET PRINT SERVERS HIGH SPEED AND 4-PORT
Fig. 4-22. PostScript or PCL-Based Printers.
A test page will print on the selected printer. For examples of the test print,
see Figures 4-23 and 4-24.
Fig. 4-23 shows a copy of the PostScript test print job. This prints to a
PostScript printer when you type Y for the screen shown on the previous page.
Test Print For NPS_011354.
Is this a PostScript printer (Y/N)?
[Y] = Use postscript test print
[N] = Use text test print.
Y sends a PostScript test
print to the selected port.
N sends a
PCL-compatible test
print to the selected port.
[Esc] = Quit [F1] = Help
Page 58

57
CHAPTER 4: Novell NetWare Configuration and NIMANAGE Utility
EthernetPrintServerNPS_011364PARALLELPort#1PostscriptTesting
EthernetPrintServerNPS_011364PARALLELPort#1PostscriptTesting
EthernetPrintServerNPS_011364PARALLELPort#1PostscriptTesting
EthernetPrintServerNPS_011364PARALLELPort#1PostscriptTesting
EthernetPrintServerNPS_011364PARALLELPort#1PostscriptTesting
EthernetPrintServerNPS_011364PARALLELPort#1PostscriptTesting
EthernetPrintServerNPS_011364PARALLELPort#1PostscriptTesting
EthernetPrintServerNPS_011364PARALLELPort#1PostscriptTesting
EthernetPrintServerNPS_011364PARALLELPort#1PostscriptTesting
EthernetPrintServerNPS_011364PARALLELPort#1PostscriptTesting
EthernetPrintServerNPS_011364PARALLELPort#1PostscriptTesting
EthernetPrintServerNPS_011364PARALLELPort#1PostscriptTesting
EthernetPrintServerNPS_011364PARALLELPort#1PostscriptTesting
EthernetPrintServerNPS_011364PARALLELPort#1PostscriptTesting
EthernetPrintServerNPS_011364PARALLELPort#1PostscriptTesting
EthernetPrintServerNPS_011364PARALLELPort#1PostscriptTesting
EthernetPrintServerNPS_011364PARALLELPort#1PostscriptTesting
EthernetPrintServerNPS_011364PARALLELPort#1PostscriptTesting
EthernetPrintServerNPS_011364PARALLELPort#1PostscriptTesting
EthernetPrintServerNPS_011364PARALLELPort#1PostscriptTesting
Fig. 4-23. PostScript Test.
Figure 4-24 is a copy of the text test print job (for PCL-compatible printers,
such as the HP LaserJet). This prints to a text printer when you type N for
the screen shown in Fig. 4-22.
Page 59

58
ETHERNET PRINT SERVERS HIGH SPEED AND 4-PORT
*****************************************************************************************
Ethernet Print Server NPS_011364 Port #1 Text Test Print
*****************************************************************************************
ABCDEFGHIJKLMNOPQRSTUVWXYZabcdefghijklmnopqrstuvwxyz!@#$%^&*()01234667890
0ABCDEFGHIJKLMNOPQRSTUVWXYZabcdefghijklmnopqrstuvwxyz!@#$%^&*()0123466789
90ABCDEFGHIJKLMNOPQRSTUVWXYZabcdefghijklmnopqrstuvwxyz!@#$%^&*()012346678
890ABCDEFGHIJKLMNOPQRSTUVWXYZabcdefghijklmnopqrstuvwxyz!@#$%^&*()01234667
7890ABCDEFGHIJKLMNOPQRSTUVWXYZabcdefghijklmnopqrstuvwxyz!@#$%^&*()0123466
67890ABCDEFGHIJKLMNOPQRSTUVWXYZabcdefghijklmnopqrstuvwxyz!@#$%^&*()012346
667890ABCDEFGHIJKLMNOPQRSTUVWXYZabcdefghijklmnopqrstuvwxyz!@#$%^&*()01234
4667890ABCDEFGHIJKLMNOPQRSTUVWXYZabcdefghijklmnopqrstuvwxyz!@#$%^&*()0123
34667890ABCDEFGHIJKLMNOPQRSTUVWXYZabcdefghijklmnopqrstuvwxyz!@#$%^&*()012
234667890ABCDEFGHIJKLMNOPQRSTUVWXYZabcdefghijklmnopqrstuvwxyz!@#$%^&*()01
1234667890ABCDEFGHIJKLMNOPQRSTUVWXYZabcdefghijklmnopqrstuvwxyz!@#$%^&*()0
*****************************************************************************************
Ethernet Print Server NPS_011364 Port #1 Text Test Print
*****************************************************************************************
If you can read these messages, then your Ethernet Print Server/MIO unit and printer are working
properly. Be sure to read all of these messages carefully.
*****************************************************************************************
Ethernet Print Server NPS_011364 Port #1 Text Test Print
*****************************************************************************************
Congratulations on your purchase of the Ethernet Print Server NPS_011364
*****************************************************************************************
Ethernet Print Server NPS_011364 Port #1 Text Test Print
*****************************************************************************************
*****************************************************************************************
Ethernet Print Server NPS_011364 Port #1 Text Test Print
*****************************************************************************************
Ethernet Print Server: Every printer on the LAN needs one!
*****************************************************************************************
Ethernet Print Server NPS_011364 Port #1 Text Test Print
*****************************************************************************************
*****************************************************************************************
Ethernet Print Server NPS_011364 Port #1 Text Test Print
*****************************************************************************************
Ethernet Print Server: The LAN print server
*****************************************************************************************
Ethernet Print Server NPS_011364 Port #1 Text Test Print
*****************************************************************************************
Fig. 4-24. Text Test Print Job.
Page 60

59
CHAPTER 4: Novell NetWare Configuration and NIMANAGE Utility
4.9.2 B: R
EADERRORLOG
The Error Log contains messages from the Print Server’s error log. See Fig. 4-
25. The <PgUp><PgDn> keys can be used to scroll through the error log.
NOTE
Use this screen when you are experiencing a problem. Technical
Support will use this screen to help you diagnose any problems. This
screen is not intended for inexperienced users.
Fig. 4-25. Error Log.
Error Log in Ethernet Print Server unit NPS_991354
Module Name
[Home] / [End] / [PgUp] / [PgDn] / [↑] / [↓] = View
[Esc] = Quit [F1] = Help
The module where
the error occurred.
NVL_PS
NVL_PS
Error #
6
2
Description
prt <0>: Unable to login to print server
[NPS_990011]
Printer [0]: Unable to attach to file server
[DPI_CORP]
Line1/4 *** top of list ***
The number
assigned to the
error message.
A description of each error
message. Use this description
to diagnose any error condition
or problem.
Page 61

60
ETHERNET PRINT SERVERS HIGH SPEED AND 4-PORT
4.9.3 C: R
EPORTPRINTSERVERSTATUS
Two Status Types
This function displays a status report for the selected print server. Choose the
print server you want to see the status for, and the status screen appears.
“Novell Print Server” (which is the module that services print jobs from your
Novell network) is for the parallel printer port(s) and “Uniport Input Print
Server” (which is the module that routes print jobs received from the Uniport
to the parallel port—when this option is used—for Print Server 4-Port models
only) is for the Uniport.
Fig. 4-26. Report Print Server Status.
Select NPS_011354 Print Server.
A: Novell Print Server.
B: Uniport Input Print Server.
[Enter] = Make Selection
[Esc] = Quit [F1] = Help
Page 62

61
CHAPTER 4: Novell NetWare Configuration and NIMANAGE Utility
Once you make the above selection, you then need to choose the printer
port and type of status report you want to see.
Fig. 4-27. Select Printer Port.
Select Printer Port from NPS_011354.
A: Parallel Port 1
B: Parallel Port 2
C: Parallel Port 3
D: Uniport Port 1
[Enter] = Make Selection
[Esc] = Quit [F1] = Help
Page 63

62
ETHERNET PRINT SERVERS HIGH SPEED AND 4-PORT
Select the printer port for which you want to view status messages. You can
view messages for the status of either the parallel ports or Uniport (4-Port
model only). Make sure you choose the correct port. Once you make your
selection, the screen shown in Fig. 4-28 appears.
Fig. 4-28. Status Message.
Ethernet Print Server NPS_991354 Parallel Port #1 Novell Print Server Status.
A: File Server Status.
B: Queue Status.
[Enter] = Make Selection
[Esc] = Quit [F1] = Help
Page 64

63
CHAPTER 4: Novell NetWare Configuration and NIMANAGE Utility
Select the type of status message that you want. Choose A: File Server
Status for the currently logged in file servers, or B: Queue Status for the
queues assigned to the Print Servers. See Fig. 4-29.
Fig. 4-29 Print Server Status.
Queue Status of Ethernet Print Server NPS_991354 Port #1
Server Name
[Home] / [End] / [PgUp] / [PgDn] / [↑] / [↓] = View
[Esc] = Quit [F1] = Help
This is the Queue Server status message for the Ethernet Print Servers,
depending on whether you choose Novell or Uniport Input Print Server
(Uniport is on Ethernet Print Server 4-Port model only). Use the status
message to correct any problem or error condition.
DPI_CORP
DPI_CORP
Queue Name
HP_IIISI_MAC
HP_III_SI
Status
Attached
Attached
Line1/2
Page 65

64
ETHERNET PRINT SERVERS HIGH SPEED AND 4-PORT
4.10 Using the NetWare Utilities/Making Changes
4.10.1 I
NTRODUCTION
This section explains how to use Novell NetWare utilities to do the following
with the Print Server unit:
• Attach and select a file server.
• Select or delete queues for the Print Server.
• Set up NOTIFY functions.
• Use CAPTURE and NPRINT
Use this information whenever you want to make changes to your original
PCONSOLE configuration (completed as part of Section 4.3 or 4.4).
This chapter also explains how to make changes to the Print Server.
4.10.2 N
OVELLNETWAREUTILITIES
You should see your Novell NetWare documentation for detailed information
on the utilities listed starting on the next page. Each Print Server utility is
found in the NetWare Print Server manual. The table lists what you can do
with the Print Server when using these utilities.
• PCONSOLE—Use this to set up the Print Server and to set the print
queues for the Print Server printers. PCONSOLE helps to control
network printing and allows you to view information about network
printing. You can do the following under PCONSOLE:
- File Server—Attach to or log out of file servers, select the currently used
file server, or change your username on the file server.
- Print Queue—Create queues, assign operators and users, authorize print
servers, handle print jobs, and view print-queue information.
- Print Server—Set up, delete, or down print servers, attach to file servers,
define and control printers; service queues; assign operators and users,
and view information on print jobs.
• PRINTDEF—Use to set up a database of printer definitions. Define device
drivers for network printers, plotters, and other devices. The information
defined with the utility is then used by CAPTURE, NPRINT, PCONSOLE,
and PRINTCON.
• PRINTCON—Use to define the preferred print options and set the
options up as standard configurations. PRINTCON serves as a database
for printing with CAPTURE, NPRINT, and PCONSOLE.
Page 66

65
CHAPTER 4: Novell NetWare Configuration and NIMANAGE Utility
The tasks include edit print job configurations, select default print job
configurations, and copy print job configurations from one user to
another.
• CAPTURE—Use to print screen displays, save data to a network file, and
print to a network printer from a non-network software application.
• NPRINT—Use to print files from outside an application to a network
printer. The files must be DOS text files or files that are formatted by the
application for a specific printer type (HP LaserJet, for example).
4.10.3 F
ILESERVERFUNCTIONS
How to Attach to a File Server
You must be attached to a file server and have Supervisor rights to perform
these PCONSOLE functions. You use PCONSOLE for most of the tasks
explained in this chapter. Follow these steps:
1. Start the PCONSOLE utility. Select “Change Current File Server” from
the Available Options menu. A list of file servers you are attached to
appears.
2. Press <Ins> to display the available file servers.
3. Select the file server you want to use from the Other File Servers screen.
5. Type your user name in the User Name screen and then press <Enter>.
NOTE
The Password screen appears if the user name you enter has a password
attached to it. Type in the password and press <Enter>.
How to Select a Current File Server
You must select your current file server before you can perform any
PCONSOLE tasks for that file server. Follow these steps:
1. Start the PCONSOLE utility. Select Change Current File Server from the
Available Options menu. A list of file servers you are attached to appears.
2. Select the current file server from the File Server/User Name screen.
Page 67

66
ETHERNET PRINT SERVERS HIGH SPEED AND 4-PORT
4.10.4 P
RINTQUEUEFUNCTIONS
How to Select Print Queues
When you send a print job, each job is sent to a print queue. The print queue
then sends the job to a specified printer. If a print server is servicing queues
on multiple file servers, you must assign queues to printers on each file server.
Follow the steps below to assign queues to Print Server printers.
1. Start the PCONSOLE utility. Select “Print Server Information” from the
Available Options menu.
2. Select the Print Server from the Print Servers list.
3. Select “Print Server Configuration” from the Print Server Information
menu.
4. Select “Queues Serviced by Printer” from the Print Server Configuration
menu.
5. Select a printer from the Defined Printers list.
6. Press <Ins> at the File Server/Queue/Priority screen. The Available
Queues list appears.
7. Select a queue from the Available Queues list.
8. Press <Enter> at the Priority screen to leave the priority setting at 1.
Repeat steps 6 and 7 to assign additional queues to the printer.
NOTE
Press <Enter> at the File Server/Queue/Priority screen to display the
Priority setting screen. To change the priority settings, press the
<BACKSPACE> key to delete the current setting. Type a new number
from 1 to 10 and press <Enter>. 1 is the first queue serviced by the print
server, and 10 is the last.
9. Press <Esc> and save all changes.
How to Remove Queues
To remove queues assigned to the Print Server, you need to do the following:
1. Start the PCONSOLE utility. Select “Print Server Information” from the
Available Options menu.
2. Select the Print Server from the Print Servers list.
3. Select “Print Server Configuration” from the Print Server Information
menu.
Page 68

67
CHAPTER 4: Novell NetWare Configuration and NIMANAGE Utility
5. Select “Queues Serviced by Printer” from the Print Server Configuration
menu.
5. Select a printer from the Defined Printers list.
6. Highlight a queue on the File Server/Queue/Priority screen.
7. Press <Del> to remove the queue.
8. Repeat steps 6 and 7 to delete additional queues.
NOTE
To simply change the priority setting for a queue, press <Enter> at the
File Server/Queue/Priority screen to display the Priority setting screen.
Press the <Backspace> key to delete the current setting. Type a new
number from 1 to 10 and press <Enter>. 1 is the first queue serviced by
the print server, and 10 is the last.
9. Press <Esc> and save all changes.
4.10.5 H
OW TOSETUP
NOTIFY
You can specify users or groups of users that are notified if a problem occurs
with a print job sent to the Print Server printer. If the Print Server is servicing
queues on multiple file servers, you must set a NOTIFY list for each file server.
Follow these steps:
1. Start the PCONSOLE function. Select “Print Server Information” from
the Available Options menu.
2. Select the Print Server from the Print Servers menu.
3. Select “Print Server Configuration” from the Print Server Information
menu.
4. Select Notify List for Printer from the Print Server Configuration menu.
5. Select the Print Server printer from the Defined Printers menu.
6. Press <Ins> at the File Server/Notify Name/Notify Type/First/Next
screen. The Notify Candidates screen appears.
7. Select the user or user group from the Notify Candidates screen. The
Notify Intervals screen displays.
8. Set the First and Next intervals for notifying users about Print Server
printer problems. First is how long after the problem first occurs that
users should be notified, and Next specifies how long after the first
notification that users should be notified.
Page 69

68
ETHERNET PRINT SERVERS HIGH SPEED AND 4-PORT
9. Press <Esc>, and the Save Changes screen appears. Select Yes and press
<Enter>. Press <Esc> until you receive the prompt to Exit PCONSOLE;
then select Yes and press <Enter> to exit.
4.10.6 H
OW TOMAKECHANGES TO THEPRINTSERVER
Use Table 4-1 when making changes to the Print Server unit.
Table 4-1. Making Change to the Print Server Unit.
When you want to... Then you must...
move the unit and printer move the Print Server and printer to their
to another location on the same new location and make the hardware
network connections as explained in Chapter 3.
You do not need to configure the unit with
PCONSOLE.
move the unit and printer follow the hardware installation and software
from their current network to a configuration instructions in Chapter 3.
new network
attach new file servers to use the PCONSOLE utility. See Appendix
the Print Server unit C for instructions.
remove a file server attached use the PCONSOLE utility. See Appendix
to the Print Server unit C for instructions.
add new queues to the Print use the PCONSOLE utility. See Section
Server unit. 4.10.4.
remove queues from the Print use the PCONSOLE utility. See Section
Server unit 4.10.4.
Page 70

69
CHAPTER 4: Novell NetWare Configuration and NIMANAGE Utility
Table 4-1. Making Change to the Print Server Unit (continued).
When you want to... Then you must...
change printers remove the current printer from its
connection and place the new printer on the
parallel port connection. Make any changes
necessary for the printer configuration using
PCONSOLE. NOTE: If you are changing
printer types (PCL to PostScript or vice
versa), use NIMANAGE to change the
status report.
change the Print Server name Use the NIMANAGE program, which is on
the Utility and Diagnostics diskette. See
Section 4.8 for details.
Page 71

70
ETHERNET PRINT SERVERS HIGH SPEED AND 4-PORT
5. AppleTalk Configuration
and Administration Program
5.1 Introduction
This chapter explains how to configure and use the AppleTalk Administration
Program.
• If you are configuring your AppleTalk network for the Ethernet Print
Server/MIO, then first read Section 5.3.
• If you want to use the AppleTalk Administration Program, go to
Section 5.4.
5.2 Enable the AppleTalk Protocol
Make sure the AppleTalk protocol is enabled, or you will not be able to print.
Use NIMANAGE to check or to enable the AppleTalk protocol.
5.3 Configuration—For AppleTalk
NOTE
Attach a PostScript printer to the Ethernet Print Server’s parallel port #1
and you do not need to do anything else to configure the Print Server.
Macintosh computers can print to any PostScript Ethernet Print Server
printer by using Chooser to select your network and printer (Ethernet
Print Server #<serial_number> 1), where 1 stands for the Ethernet Print
Server parallel port #1). Once selected, print as you normally would. If
you do not attach a PostScript printer to parallel port #1 (and do not plan
to connect one), you must install and use the AppleTalk Administration
Program (included in your package) to configure the Ethernet Print
Server for AppleTalk users.
How to Configure
• If you have a PostScript printer connected to the Ethernet Print Server
parallel port #1, then all you need to do is choose a printer. Go to
Choosing the Printer in this section.
• If you have more than one printer you want to print to, then you need to
set up the Ethernet Print Server for each printer. Go to Section 5.4.
Page 72

71
CHAPTER 5: AppleTalk Configuration and Administration Program
NOTE
The AppleTalk Administra-tion program also lets you select a Zone and
assign a printer name. See Section 5.4, Using the Administration
Program for information.
Choosing the Printer
Choose a printer on AppleTalk exactly the same way you choose a printer for
any printer job. Do the following:
1. Pull down the menu and select Control Panel.
2. Click on Networks and choose EtherTalk (or its equivalent) as the
AppleTalk connection. See Fig. 5-1.
Fig. 5-1. Select AppleTalk Connection.
Select an AppleTalk connection:
Network
LocalTalk
Built-In
EtherTalk
Page 73

72
ETHERNET PRINT SERVERS HIGH SPEED AND 4-PORT
3. Go back to the menu and select Chooser.
4. Select LaserWriter from the display panel on the left (see Fig. 5-2).
Fig. 5-2. Chooser.
5. Choose Print Server #123456 1 from the list.
NOTE
If you want to use a printer other than the one attached to parallel port
#1, simply choose the printer name that identifies the other printer you
want to use.
Select a LsaerWriter:
Chooser
7.0
Background Printing: On Off
AppleTalk
Active
Inactive
Autographix
Laser Writer
AppleTalk... Ge Writer
LQ Apple T...Ge Writer
AppleShare
Paint Jet XL300
Image Writer
LQ
LQ Image Writer
Personal Writer SC Personal LW LS
LS
LQ
HP4_PETE
HP4_SALES
HP_III
JETXPrint (123456)
NS200 LaserWriter 1
NW DEClaser 1152
NW QMS-PS 800
QMS-PS 800
Page 74

73
CHAPTER 5: AppleTalk Configuration and Administration Program
5.4 Using the AppleTalk Administration Program
W
HEN TOUSE ANDHOW TOINITIATE
The Administration program is used for three purposes:
• To configure the Ethernet Print Server when you do not have a PostScript
printer attached to parallel port #1, or when you have PostScript printers
attached to more than one parallel port and/or the Uniport.
• To change the network zone and/or change printer names for the
Ethernet Print Server printer.
• To help technical support diagnose problems. Functions included are:
view the configuration, error log, and printer setup.
To access the Administration program, do the following:
1. Copy the files from the program’s diskette (supplied with the Ethernet
Print Server) to a folder. For example, place the program in a folder
called Utility.
2. Double-click on the Administration program icon when it appears on the
desktop. The Zone and Ethernet Print Server Device Dialog menu
appears as shown below.
Fig. 5-3. Choose the Zone and the Ethernet Print Server/MIO Device.
Zone:
EtherTalk Users
Ethernet
Ethernet Print Server Device:
Ethernet Print Server
Cancel Select
Page 75

74
ETHERNET PRINT SERVERS HIGH SPEED AND 4-PORT
If your network has no zones, choose only from the Ethernet Print Server
Device field. No Zone field appears.
3. Select the Zone that has the Ethernet Print Server device you want to
administer, and the available print server devices on that Zone appear in
the Ethernet Print Server Device field.
4. Select the Ethernet Print Server device. “LAN Print Server” appears in
the menu bar at the top of your screen. See the menu-bar example
below.
Fig. 5-4. Menu Bar.
LAN Print Server
Reset
Configuration...
Error Log
Printer Setup...
Protocol Setup...
Options...
Serial Port...
Page 76

75
CHAPTER 5: AppleTalk Configuration and Administration Program
How to Configure Ethernet Print Server
Use Printer Setup to configure your Ethernet Print Server for PostScript
printers.
Each menu item is explained on the pages that follow. Reset and Serial
Port options are unavailable.
Reset
Reset cannot be used by the Ethernet Print Server unit. If you want to reset
the Ethernet Print Server, do so through the front panel of your printer or
simply by turning the printer off and on. This item is grayed out on the
Ethernet Print Server menu.
Configuration
Configuration allows you to change the Ethernet Print Server device name,
the AppleTalk Zone name, and view the configuration features of the
Ethernet Print Server board. The Ethernet Print Server creates a default
name you can change so it is more significant for you. For example, NP
ACCOUNTING, etc. Be sure to power the printer off and on to accept
changes made. Changes will not occur if the Ethernet Print Server is not
recycled. When you choose this item on the Ethernet Print Server menu, the
screen in Fig. 5-5 appears.
Page 77

76
ETHERNET PRINT SERVERS HIGH SPEED AND 4-PORT
Fig. 5-5. Configuration Screen.
Error Log
The Error Log is used to view the log of errors that the Ethernet Print Server
board has registered. This screen can display normal operational diagnostics
as well as errors. Technical Support uses this screen if your Ethernet Print
Server encounters problems.
When you select Error Log on the Ethernet Print Server menu, an error-log
screen appears. Figure
5-6is an example of an error log.
Device Type:
Serial Number: 10204
Unit Name:
AppleTalk Zone:
Ethernet Print Server #10204
DPI_CORP
Cancel OK
Configuration
Page 78

77
CHAPTER 5: AppleTalk Configuration and Administration Program
Fig. 5-6. Error Log.
You can print the Error Log contents by using the print option under the
File menu. To save the contents of the Error Log, do one of the following:
• Use the Save As option from the File menu to save the entire log file.
• Use the Edit option to cut, copy, and paste some or all of the log file
contents.
Printer Setup
Printer Setup is used to configure the Ethernet Print Server when a PostScript
printer is configured. Printers without PostScript cannot be used by
AppleTalk users.
After you make your choices, be sure that you power the printer off and on
to accept the selections made. Changes will not occur if the Ethernet Print
Server is not recycled.
When you choose this item on the Ethernet Print Server menu, the
following screen appears:
AppleTalk: (106): AppleTalk Startup.
Error Log
Page 79
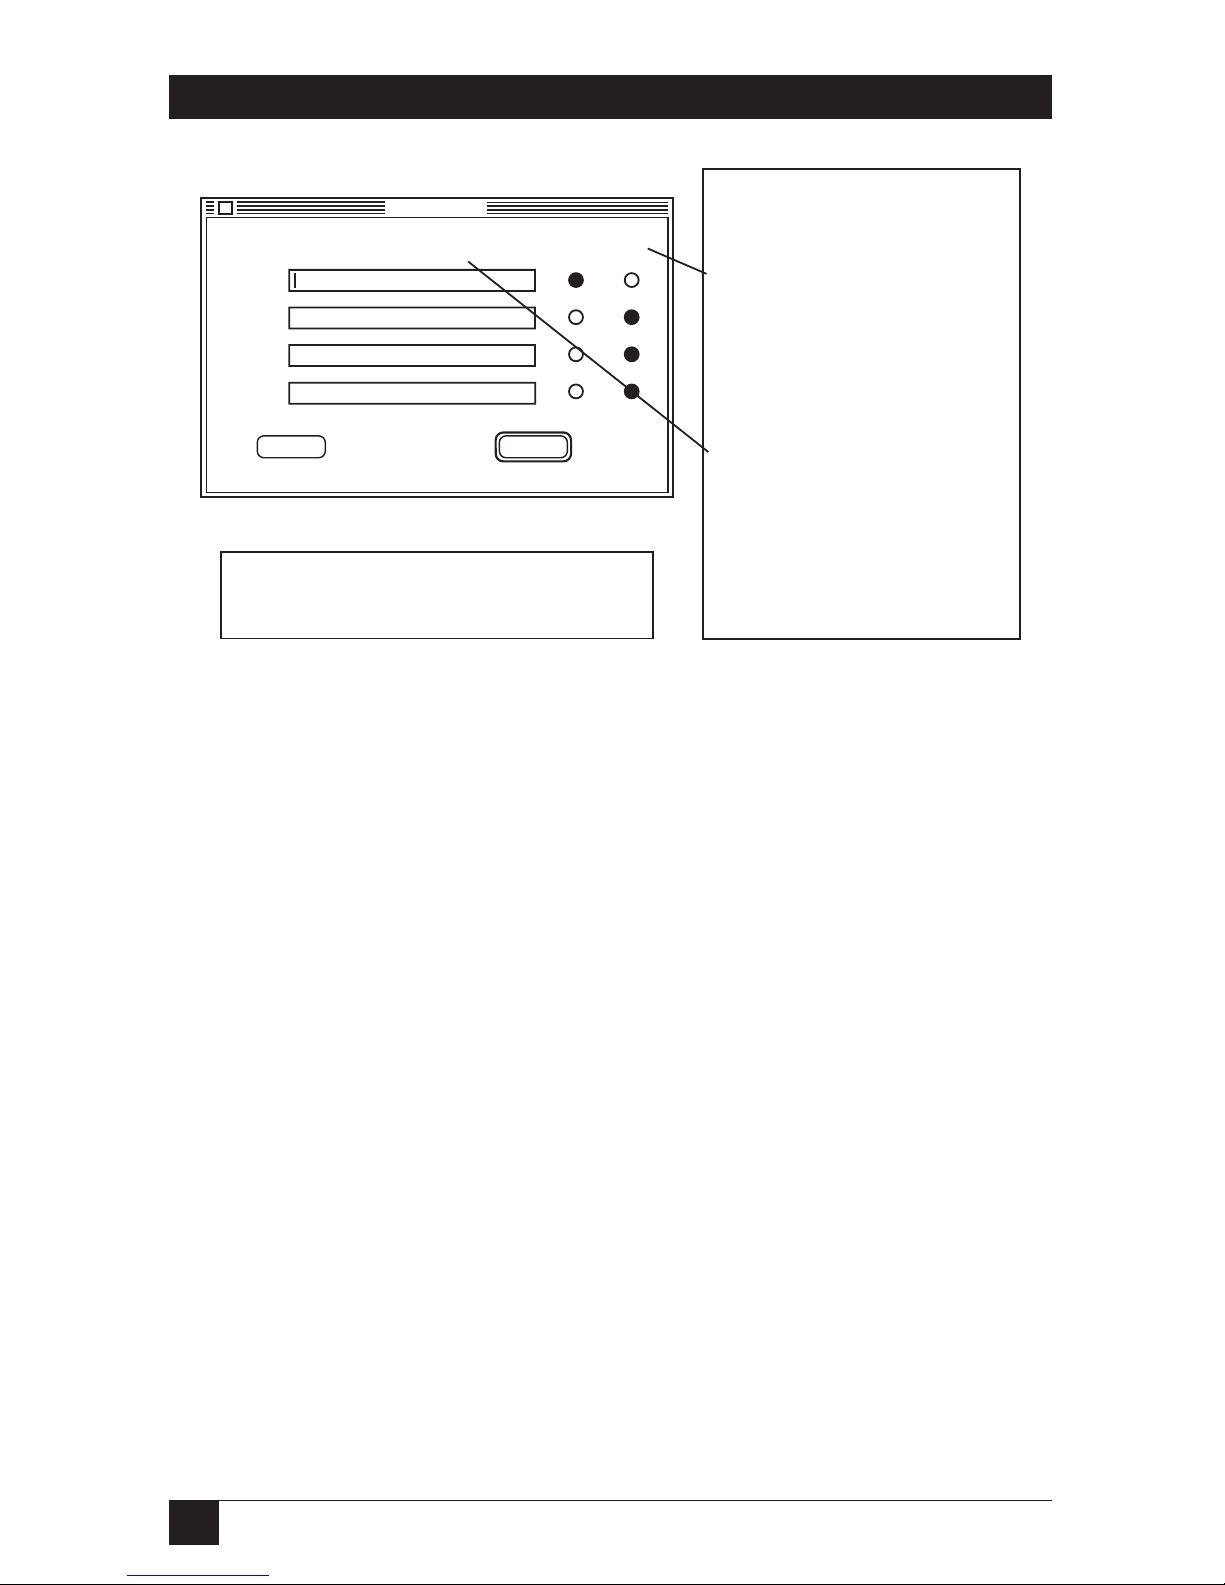
78
ETHERNET PRINT SERVERS HIGH SPEED AND 4-PORT
Fig. 5-7. Printer Setup.
Protocol Setup
Protocol Setup is used to set up the protocols on the unit when you do not
have access to a Novell NetWare server or workstation and/or when TCP/IP
users do not have access to a rarp server.
Ethernet Print Server users are limited to 2 protocols. Be sure to turn off
protocols that you are not going to use. TCP/IP users also must enter the IP
address, Subnet Mask, and Default Gateway.
TCP/IP Users
If the Ethernet Print Server does not have an IP address and Subnet Mask
established when you bring up this screen, the information in the IP address
and Subnet Mask fields will be incorrect. You must enter the correct IP
address and Subnet Mask values now. If you supply erroneous values, TCP/IP
will not be enabled and you will not be alerted by an error message.
Port
number
1
2
3
Uniport
Printer Setup
Ethernet Print Server #123456 1
This Port Not Available
This Port Not Available
This Port Not Available
Cancel
OK
PostScript
Yes No
Port Number identifies the
Ethernet Print Server port.
Only port 1 (MIO) is usable.
PostScript identifies wether the
printer connected to the port is
PostScript or not. If the printer is
PostScript, YES is chosen. Only
PostScript printers will appear in
Chooser. Non-PostScript printers
cannot be used by AppleTalk
users.
Printer Name is the name assigned
to the Ethernet Print Server printer.
If there is no entry or if you want to
change the name, then click on the
box and type in the printer name.
Click on OK when you are done
viewing the configuration or
making changes to it.
The Ethernet Print Server attached printer will
appear as shown above. You can change the
name if you want to. The name shown above
contains the Ethernet Print Server serial number.
Printer Name
Page 80

79
CHAPTER 5: AppleTalk Configuration and Administration Program
When you choose this item on the Ethernet Print Server menu, the
following screen appears:
Fig. 5-8. Protocol Setup.
NOTE
After you select your protocols, be sure that you power the printer off
and on to accept the selections made. Changes will not occur if the
Ethernet Print Server is not recycled.
Options
Options is used to enable or disable displaying the Power-on Status Page
when you do not have access to Novell NetWare. When enabled, the
power-on status page prints after the printer attached to the Ethernet
Print Server is turned on. The default is the on position.
Protocol
Netware
TCP/IP
Vines
DEC Lat
Protocol Setup
Cancel
OK
Enter the value for the Default Gateway. This value enables
Ethernet Print Server to communicate with other Subnets.
On Off IP Address:
Subnet Mask:
Default Gateway:
Turn on protocols
you want to use
(Ethernet Print
Server users are
limited to 2). Turn
off protocols not in
use.
Enter the IP
Address and
Subnet Mask
values for TCP/IP.
You must do this if
you could not
configure TCP/IP
to a rarp server.
Page 81

80
ETHERNET PRINT SERVERS HIGH SPEED AND 4-PORT
When you choose this item on the Ethernet Print Server menu, the
following screen appears:
Fig. 5-9. Control Options.
Serial Port
The Serial Port option is used to configure the Uniport as a serial port to a
printer. The settings are identical to those set by NIMANAGE under Novell.
Factory-default settings are indicated in Fig. 5-10.
Status Sheets:
Control Options
Cancel
OK
Enable Powerup
Disable Display
Page 82

81
CHAPTER 5: AppleTalk Configuration and Administration Program
Fig. 5-10. Serial Port.
Serial Port
Baud Rate:
Baud Rate can be set to
1200, 2400, 4800, 9600 and
19200 for input devices and
output devices (not using the
UNIPORT-OUT).
Data Bits can be set to 5, 6, 7
or 8.
Stop Bits can be set to 1, 1.5
or 2.
Ready/Busy (hardware
handshake) manages the
signals that are constantly
sent over your cable between
devices.
Xon/Xoff (software handshake)
manages data flow between
two devices so that data does
not overflow the buffer and
become lost.
Parity
can be set
to None,
Odd or
Even.
1200
9600
2400
19200
4800
Data Bits: 5
6
7
8
Ready/Busy: Enabled
Disabled
Xon/Xoff: Enabled
Disabled
Stop Bits: 1
1.5
2
Parity: None
Odd
Even
Cancel OK
Page 83

82
ETHERNET PRINT SERVERS HIGH SPEED AND 4-PORT
6. UNIX Printing through TCP/IP
6.1 Introduction
UNIX systems offer various ways to print data via TCP/IP, some easy, others
more complicated. The Ethernet Print Server supports the same variety of
printing options under different UNIX versions, all requiring simple system
setup before you can print. This chapter divides UNIX printing via TCP/IP
into three parts:
• Part A describes UNIX system setup, including configuring your host and
Ethernet Print Server through these options: NIMANAGE, bootp or ping.
In any UNIX system, you must name an IP address (subnet mask and
gateway address optional).
• Part B describes alternative printing methods: lpd and host-side printing.
lpd lets you print directly from the Ethernet Print Server without
installing Ethernet Print Server software on your host. It is the easiest
method and we recommend it highly. We also offer host-side printing for
users who require broader filtering and banner options.
• Part C describes nsconfig, a TCP/IP configuration utility.
The Ethernet Print Server supports:
• All UNIX systems that support lpd
• Sun Solaris Ver. 1 and Ver. 2.x
• System V Rel. 4 (on 386 platforms)
• HP/UX Series 700 and 800
• SCO UNIX
• OSF1/ALPHA
• IBM AIX
• DEC ULTRIX 4.2 RISC
Part A: UNIX System Setup Options
6.2 How to Set up
Complete the following two steps to setup your UNIX system to print through
TCP/IP.
Page 84

83
CHAPTER 6: UNIX Printing through TCP/IP
S
TEP
1: C
ONFIGURING THEHOST
You must add a node name and assigned IP address to the local hosts
database for each host that will spool jobs directly to the Ethernet Print
Server. Usually, this involves adding the Ethernet Print Server node name
and IP address to the /etc/hosts file or configuring through Network
Information Service (NIS) or Domain Name System (DNS). Call up the
/etc/hosts file and type, for example:
192.9.200.200 DPIfast
The hosts file now has an IP address for an Ethernet Print Server unit
named DPIfast. Go to Step 2.
S
TEP
2: C
ONFIGURING THEETHERNETPRINTSERVER’S
IP A
DDRESS
There are several ways to give the Ethernet Print Server its IP address. If you
have a Novell server on this network, you can configure the IP and gateway
addresses, and the subnet mask, through the NIMANAGE for Windows utility.
See Chapter 4 for details. If you do not have a Novell server, there are other
TCP/IP configuration options:
• bootp • ping
CAUTION
You must enable TCP/IP with NIMANAGE before configuring the Print
Server. You must first run NIMANAGE to activate TCP/IP (and disable
other protocols) on the Ethernet Print Server. Otherwise, TCP/IP will not
work.
Configuring the IP Address through bootp
The bootp (Internet Boot Protocol) daemon is a native TCP/IP option for
configuring the IP address of a diskless network device. To run the bootp
daemon, first edit the /etc/bootptab file to include parameters for the
Ethernet Print Server. To configure the Ethernet Print Server’s IP address
for a SUN/BSD system, take the following steps. For other systems, the
sequence of steps varies. See your UNIX manual.
1. Edit the /etc/bootptab file. For example:
lpd:\
:ht=ether:\
:ha=0040AF03AF6E:\
:lp=192.9.200.10:\
:sm=255.0.0.0:\
:gw=192.0.200.219:
In the example above, :ha is the Ethernet address, :ip is the IP address, :sm
is the subnet mask, and :gw is the gateway address.
Page 85

84
ETHERNET PRINT SERVERS HIGH SPEED AND 4-PORT
2. Invoke the bootp daemon by typing:
bootpd -s
NOTE
Once you have created an IP address (and you are running TCP/IP only),
using bootp or nsconfig is the only way to change the IP address.
You are finished configuring the Ethernet Print Server’s IP address and
other parameters. Skip to Section 6.3, Printing with lpd. If you prefer hostside printing, go to Section 6.4, Installing TCP/IP for Ethernet Print Server if
Not Running lpd.
Configuring the IP Address with ping
You can use ping to give the Ethernet Print Server its IP address. To do so,
you must add an entry to the arp (Address Resolution Protocol) cache to let
the host map the IP address to the Ethernet address (printed on the bottom
of the Ethernet Print Server unit). The arp command is:
arp -s 192.9.200.200
00:40:af:03:ae:20
Now connect the Ethernet Print Server to its Ethernet drop and ping it
either by name or by its IP address. For example, type:
ping dpifast
or
ping 192.9.200.200
The Ethernet Print Server should read its IP address from the ping packets.
The ping command will return, “no answer from dpifast.” When the unit has
read its IP address, it will reset. Wait a few minutes and try to ping the
Ethernet Print Server again. Ping should respond with a confirmation
message.
NOTE
Once you have created an IP address (and you are running TCP/IP only),
using bootp or nsconfig are the only ways to change the IP address—
ping cannot be used to do this.
Configuration is done, go to the next page or, for host-side printing, see
Section 6.4, Installing TCP/IP for Ethernet Print Server if not Running lpd.
Page 86

85
CHAPTER 6: UNIX Printing through TCP/IP
Part B: lpd and Host-side Printing Options
6.3 Printing with lpd
lpd is our implementation of the standard UNIX line printer daemon that lets
you print across a TCP/IP network without installing software on your host—
with all filtering and banners done by the Ethernet Print Server. Remote
printing uses the same commands (lpr, lpq, lpc) as local printing.
The process begins when lpd finds a printer on a remote system by looking
at the remote (rm) entry in the /etc/printcap file for that printer.
lpd handles a print job for a remote printer by opening a connection with
the lpd process on the remote system and sending the data file (followed by
the control file containing control information for this job) to the remote
system. lpd then filters the data and prints the job according to information
contained in the control file and its own printcap file.
lpd recognizes the format of a certain data type and filters the data, if
possible, so it can be printed on the type of printer you specify. You can
instruct lpd what type of printer is attached to the Ethernet Print Server port
one of two ways. First, you can run the nsconfig utility from a UNIX host.
Second, you can accept the default port settings (PCL on ports 1 and 2,
and PostScript on ports 3 and 4).
You also have the option to configure the port for both PCL and PostScript
data. This feature is useful if you have an emulation-sensing printer that
prints both data types.
Intelligent Queue
lpd provides an intelligent queue (IQ) feature that can route an incoming job
to an idle printer. IQ provides load balancing by eliminating the chance that
a job will have to wait at one port when another is available.
When to Use IQ
For example, if you have four PCL printers in a printer room attached to an
Ethernet Print Server, you should define on local printer and specify IQPORT
as the remote printer name. Performance is improved because multiple jobs
do not queue up waiting for a printer while another sits idle.
If a printer runs out of paper or requires service, only the job currently
being printed is delayed. Incoming jobs are automatically routed to an open
printer. IQ simplifies setup even more by stipulating that one logical printer
be used to filter and print automatically all types of jobs. And you need only
one short printcap entry per Ethernet Print Server.
Page 87

86
ETHERNET PRINT SERVERS HIGH SPEED AND 4-PORT
IQ provides automatic switching for jobs with different formats. For
example, if you define one IQPORT entry and you have a PostScript printer
and 3 PCL printers, IQ will automatically perform emulation sensing and
route jobs to an appropriate idle printer.
But, if the PostScript printer runs out of paper, jobs could queue up,
eventually seizing all available connections and freezing PCL jobs out until
the PostScript printer is brought back on line. In such a situation, it would be
better to define an IQPORT printer for the PCL jobs and a PORTx printer for
the PostScript printer.
When Not to Use IQ
If you have printers in different areas, it is best to name one printer per port.
When printers are scattered, using IQ would only confuse users since they
wouldn’t know where their jobs were going.
Data Formats
lpd maintains a list of data formats supported by the printer attached to each
port. When data is received from a remote lpd, the unit senses whether the
data is ASCII, PCL, PostScript, or Other.
If the data is destined for a specific port (printer name PORTx), and there
is a filter that can convert the data to a format supported by that port (or if no
filter is needed), then the job will be printed. If no filter can be found, the
job is pulled from the network and discarded.
Port configurations can be changed from their default settings by using
nsconfig.
Currently supported filters can provide CR/LF expansion, which allows
ASCII files to be printed by a PCL printer, and ASCII-to-PostScript
conversion. So a port that supports PostScript or PCL can also print ASCII
files.
CAUTION
lpd does not support queue status.
To implement lpd on BSD systems, see the next section. For AIX remote
printing, go to
Section 6.11. For HP/UX remote printing, go to Section 6.8.
Setting Up a BSD Remote Printer to Use lpd
Set up a remote printer on the host that sends jobs to the Ethernet Print
Server using lpd. You will add an entry to the /etc/printcap file on your host
for each printer you use. The steps are described below.
Page 88

87
CHAPTER 6: UNIX Printing through TCP/IP
1. Open the etc/printcap file. Make an entry naming the Ethernet Print
Server as the remote host and a particular port as the remote printer
name: PORT1. Choosing PORT1 sends jobs queued on a local host
to a specific Ethernet Print Server port.
A typical printcap entry is shown below.
<printer_name>|DPI printer:\
:lp=:\
:rm=<remote_host>:\
:rp=PORT1:\
:sd=/usr/spool/lpd/<printer_
name>:
This entry will send a job spooled to the printer you designate
(printer_name) to be printed at port 1 of the Ethernet Print Server
you designate.
2. Create the spooling directory. For example, type:
mkdir/usr/spool/lpd/<printer_
name>
3. To print via the spooler, use the lpr command. Type:
lpr -P <printer_name> <file_name>
Installation and testing is done. You are ready to print.
Setting Up an AIX Remote Printer to Use lpd
Set up a remote printer on the host that sends jobs to the Ethernet Print
Server using lpd. To do this:
1. At the prompt, type: #smit spooler <cr>
2. When a window appears, select “Manage Remote Printers.”
3. When a menu appears, select “Client Services.”
4. Another menu appears. Select “Remote Printer Queues.”
5. Another menu appears. Select “Add a Remote Queue.”
6. When a window appears, change the values shown to configure your
Ethernet Print Server. The values displayed are default values. You
must replace short and long form filter values with the values shown
in Table 6-1.
Page 89

88
ETHERNET PRINT SERVERS HIGH SPEED AND 4-PORT
Table 6-1. Configuring Your Ethernet Print Server.
Requested Information Example Description of Inputted Data
Name of queue to add print 1 Name of local printer queue
Destination Host PrintFast IP hostname
Short Form Filter /usr/lpd/bsdshort Required value
Long Form Filter /usr/lpd/bsdlong Required value
Name of remote PORT1-PORT4 or Port on Ethernet Print Server
printer queue IQPORT
Name of device to add print1 Name of local queue
7. After you have supplied all values, press <Enter>. You are now prepared
to print.
Setting Up an HP/UX Remote Printer to Use lpd
Set up a remote printer on the host that sends jobs to the Ethernet Print
Server using lpd. To do this:
1. At the prompt, type: #sam <cr>
2. When a window appears, select “Printer/Plotter Manager.”
3. When the menu appears, select “List printer and plotters.”
4. When a list appears, select Actions in the title bar.
5. From the pull-down menu, select “Add Remote Printer.”
6. When a window appears, add values to configure the “Ethernet Print
Server.”
7. At the bottom of the screen, select “Remote Printer is on BSD system”
from the three choices available.
Table 6-2.
Requested Information Example Description of Inputted Data
Printer name <print queue name> add print queue name here
Remote System Name <IP hostname> add hostname
Remote Printer Name <PORT1-PORT4 or add lpd queue name
IQPORT>
Page 90

89
CHAPTER 6: UNIX Printing through TCP/IP
8. Click on the OK button.
9. Ping the unit to test communications. Type:
ping <your IP address>
10. Ping should confirm your IP address with the message:
<your IP address> is alive
11. If the connection is confirmed, you can print.
Setting Up a DEC ULTRIX 4.3 RISC or OSF1/ALPHGA Remote Printer to use lpd
Set up a remote printer on the host that sends jobs to the Ethernet Print
Server using lpd. To do this, type:
1. At the prompt, type: lprsetup
2. Select add and press return.
3. Enter a name for your printer and press return.
4. You are asked if you want more information on specific printer types.
Press return.
5. A list of printers supported by ULTRIX appears. Type “remote” and
press return.
6. Enter a printer synonym (alias) and press return.
7. Designate a spooler directory and press return or accept the default
spooler directory displayed and press return.
8. Designate a remote system name and press return.
9. Designate a remote system printer name. Press return. Type, for
example: “PORT1”
10. You are asked to enter the name of a printcap symbol from a displayed
list. Type Q and press return.
11. Your configuration is displayed. You are asked whether these values are
final. Type Y or N and press return. An example is shown below.
Page 91

90
ETHERNET PRINT SERVERS HIGH SPEED AND 4-PORT
Printer #7
Symbol type value
lp STR
rm STR netprint_host
rp STR PORT1
sd STR /usr/spool/lpd7
Fig. 6-1. Printer Example.
In the example above, lp is the line printer, rm is the remote host,
rp is the remote printer, and sd is the spooler directory.
12. You are asked to add comments to the printcap file. For example,
you can type the following and press return:
larry’s printer down the hall
13. Select exit to save your configuration and press return.
You are now prepared to print.
Setting Up a SCO UNIX Remote Printer to Use lpd
Set up a remote printer on the host that sends jobs to the Ethernet Print
Server using lpd. To do this:
1. At the prompt, type: mkdev rlp
2. You will now be asked a series of questions. Do you want to install
or remove a remote printer? Type Y.
3. Do you want to change printer description file /etc/printcap? Type Y.
4. Write a printer name. For example, type: HPlaser1
5. Is HPlaser1 a remote printer or a local printer? Type R.
6. Enter a name for the remote host that HPlaser1 is attached to. For
example, type: Ethernet Print Server.
7. Confirm that you want to attach HPlaser1 to the Ethernet Print Server.
Type Y.
8. Confirm the preceding connection as your system default. Type Y.
9. You are returned to the beginning of the setup to enter another printer
name or quit. Type Q.
Page 92

91
CHAPTER 6: UNIX Printing through TCP/IP
10. Do you want to start the remote daemon now? Type Y.
11. Using a line editor of your choice, edit the /etc/printcap file by
changing the :rp=entry to reflect the name of the port you are connected
to. For example, type: “PORT1.” A sample printcap file is shown below:
printer1:\
:lp=:rm=NETPrint:rp=PORT1:sd=/usr/spool/lpd/printer1:
lp= is used to specify the device name for a local printer; this field must
be empty. rm= specifies the remote machine name or network name of the
print server. rp= is the remote printer name or the name of the print server.
sd= is the name of the spool directory on the client.
6.4 Installing TCP/IP for the Ethernet Print Server if Not Running lpd
Using the Install Script
This section describes how to quickly and easily install TCP/IP for the
Ethernet Print Server on your ULTRIX 4.3 RISC, System V Rel. 4, Solaris
(Ver. 1.x, 2.x), SCO UNIX, OSF1/ALPHA, IBM AIX, or HP/UX operating
system.
To install TCP/IP:
1. Log in as superuser onto a UNIX system, which will spool directly
to the Ethernet Print Server.
2. Load the Ethernet Print Server diskette in a host drive.
3. Go to (or create) the directory in which you want to install TCP/IP.
For example, type:
mkdir/usr/my_install
cd/usr/my_install
4. Use the tar command to load the software from the diskette. Choose
your UNIX version example from the following list:
• For UNIX version BSD/ULTRIX/AIX, an example is “tar -xvf/dev/rfd0”
• For UNIX version System V, an example is “tar -xvf /dev/rdsk/f13ht”
NOTE
The device name varies depending on the type of computer you use and
its peripheral designations. The first BSD floppy device is usually called
rfd0.
Page 93

92
ETHERNET PRINT SERVERS HIGH SPEED AND 4-PORT
After performing the tar, the system will display a list of files copied via the
tar for BSD/ULTRIX users.
5. Run the installation script. For example, type:
tcpinst
The script automatically downloads the correct utilities for your particular
system and prompts you for information as needed. See the choices below,
read the introductory section on BSD, System V or AIX system printing, and
continue installation.
6.5 Introduction to BSD Printing
A BSD system printer is configured through the /etc/printcap (printer
capability) file that contains a full description of the printer including:
printer name, device name, spooling directory, input/output filters. To add a
new printer, you must add an entry to the printcap file.
Printing on a BSD system is controlled by the lpr command along with the
line printer daemon (lpd), which controls the spooling area for each printer.
When a file is spooled for printing through lpr, the system creates a control
file for the job along with a copy of (or link to) the file itself in the spool
directory for the target printer. lpd is then notified that there is a job ready
for that printer. lpd reads the control file and sends the data file(s) to the
printer using the configuration information in /etc/printcap.
The input filter specified in the printcap file provides format conversions or
any processing desired on the input data. For example, an input filter called
psfilter translates ASCII data to PostScript and passes PostScript data through
untouched. Example printcap entries are provided for each supported BSD
system.
Here are a few of the most important print commands, along with some
salient features. Refer to your system documentation for detailed
descriptions.
Print Commands
• lpr—The lpr command spools named files to the spool area for printer
printer_name and notifies lpd that a job is waiting.
lpr -P <printer_name><file1><file2>...
• lpq—The lpq command reports the status of queued jobs for printer
printer_name.
lpq -P <printer_name>
Page 94

93
CHAPTER 6: UNIX Printing through TCP/IP
• lprm—The lprm command removes a job from the queue for printer
printer_name. Job_num can be obtained from the lpq command.
lprm -P <printer_name> <job_num>
• lpc—The lpc command provided Line Printer Control functions
including and exceeding the basic commands listed above. Refer to your
system’s documentation for more detail.
6.6 Installing and Printing on Ver. 1 Sol. and OSF1 Systems
Continue installation begin in Section 6-4.
6. What is the node name of the Ethernet Print Server unit? For example,
type the following and press return:
DPIfast
7. What is the printer name for the printer attached to the Ethernet Print
Server? Type a printer name and press return.
8. What type of Ethernet Print Server are you installing? Select one of the
following choices:
• 1) Ethernet Print Server High Speed
• 2) Ethernet Print Server 4-Port
Type 1 or 2 and press <Return>.
9. Which port do you want your printer attached to? The screen will display
a list of ports available on this Ethernet Print Server. Select one and press
return.
For example, type 1 and pres return.
10. Your screen will now display the information you provided the install
script. For example:
Type of the Ethernet Print Server: Ethernet Print Server
Node name of the Ethernet Print Server: DPIfast
Printer name to be used by this printer: <printer_name>
The printer is attached on: port 1
You are asked to accept this configuration. Type “yes” or “no” and press
return.
Page 95

94
ETHERNET PRINT SERVERS HIGH SPEED AND 4-PORT
11. Is this printer PostScript? Type “yes” or “no.” Pres <Return>.
12. The script creates a printcap entry for the printer just configured.
The screen displays the entry and asks if you want the script to append
it to your /etc/printcap file. See the next page to perform manual edits.
NOTE
In your /etc/printcap file, be sure not to change the name of the device
given the Ethernet Print Server in Step 7. You must reference the same
lp: entry you wrote on the lp command line of the printcap file. For
example:
<printer_name> |Ethernet Print Server printer:\
:lp=/dev/dpi/<printer_name>:\
:if=/sur/dpi/infilter:\
:sd=/usr/spool/<printer_name>:
NOTE
All printcap entries must be prefaced with a tab except for the entry on
the first line.
13. The script creates a spool directory in /usr/spool and starts the daemon
for the newly configured printer. It also displays the path used if you ever
need to restart the daemon. See example below.
/usr/dpi/dpi_print/dev/dpi/<printer_name> DPIfast 10001 &
The example reflects names you provide the script.
14. Installation for the system is done. You are not prompted to configure
any more printers. Type “yes” or “no” and press return. We also suggest
you ping the Ethernet Print Server to test communications.
PostScript Printing
When you configure a printer for the Ethernet Print Server, the TCP/IP
installation script can create an entry in the /etc/printcap file for your
printer.
If you answered no to Step 10, the install script uses an input filter (infilter)
that supplies CR/LF translation to print ASCII files on a PCL printer. If you
answered yes, your printcap file will reference psfilter (described below).
Proprietary and public domain filters are available for broader filtering
capabilities.
An input filter called psfilter provides a simple ASCII-to-PostScript
conversion. Normal PostScript format files will not be affected.
Page 96

95
CHAPTER 6: UNIX Printing through TCP/IP
The output filter psbanner prints PostScript banners.
If you wish to use these filters, you must change infilter and outfilter entries
in the /etc/printcap file. A sample printcap entry that uses these filters is
shown below:
<printer_name>|Ethernet Print Server printer:\
:lp=/dev/dpi/<printer_name>:\
:if=/usr/dpi/psfilter:\
:of=/usr/dpi/psbanner:\
:sd=/usr/spool/<printer_name>:
Continue the installation begun in Section 6.4 by following the steps below:
6. What is the node name of the Ethernet Print Server unit? Type the node
name and press return.
7. What is the printer name for this Ethernet Print Server-linked printer?
Type a printer name and press return.
8. What type of Ethernet Print Server are you installing? Select one from
the following choices:
1) Ethernet Print Server High Speed
2) Ethernet Print Server 4-Port
Type 1 or 2 and press <Return>.
9. Which port do you want your printer attached to? The screen displays a
list of ports available on this Ethernet Print Server. Select one and press
<Return>.
For example, type 1 and press <Return>.
10. Your screen will now display the information you provided the install
script. For example:
Type of Ethernet Print Server: Ethernet Print Server 4-Port
Node name of the Ethernet Print Server: DPIfast
Printer name to be used by this printer: <printer_name>
The printer is attached on: port 1
You are asked to accept this configuration. Type “yes” or “no” and press
<Return>.
11. Is this printer PostScript? Type yes or no. Press <Return>.
Page 97

96
ETHERNET PRINT SERVERS HIGH SPEED AND 4-PORT
12. The script creates a printcap entry for the printer just configured. The
screen displays an entry and asks if you want the script to append it to
your /etc/printcap file. The next page shows a sample printcap file.
NOTE
All printcap entries must begin with a tab except for the entry on the first
line.
Like all BSD systems, ULTRIX uses the /etc/printcap file to configure a
printer. The interface to the installation script is the same for all BSD
systems, however, the printcap entry is different.
If you use the printcap entry generated automatically by the installation
script, this will be transparent to you.
ULTRIX uses dpifilter, a network-direct filter that sends standard input
directly to the Ethernet Print Server. Since ULTRIX accepts pipelines and
command-line arguments in the printcap input filter entry, this can be down
with no loss of flexibility. The input filter for an Ethernet Print Server on
ULTRIX must be piped into dpifilter. The arguments to dpifilter are the
Ethernet Print Server name and port number entered during installation.
The installation script generates the example shown below for a printer
connected to the Ethernet Print Server unit named DPIfast.
NOTE
Any filter that works for a local ULTRIX printer can be used in place of
the infilter program.
<printer_name>|Ethernet Print Server printer:\
:lp=/dev/null:\
:if=/usr/dpi/infilter|usr/dpi/dpifilter DPIfast 10001:\
:of=/usr/dpi/outfilter:\
:sd=/usr/spool/spool/
<printer_name>:
PostScript Printing
When you configure an Ethernet Print Server printer, the TCP/IP install
script can create a printer entry in the /etc/printcap file. This default entry
uses the input filter supplied on the install diskette. With this entry, you can
print ASCII and PCL format files on PCL printers and PostScript format files
without banners on PostScript printers.
Most PostScript printers will not print an ASCII file. You must convert it to
PostScript format first. There are a variety of filters that can accomplish this,
both proprietary and public-domain.
An input filter called psfilter provides a simple ASCII-to-PostScript
conversion. Normal PostScript format files will not be affected. An output
Page 98

97
CHAPTER 6: UNIX Printing through TCP/IP
filter, psbanner, will generate PostScript banners. To use these files, simply
edit the printcap entry created during installation. See the sample printcap
entry using these filters below:
<printer_name>|Ethernet Print Server printer:\
:lp=/dev/null:\
:if=/usr/dpi/psfilter|usr/dpi/
dpifilter DPIfast 10001:\
:of=/usr/dpi/psbanner:\
:sd=/usr/spool/<printer_name>:
6.7 Introduction to System V Release 4 Printing
The lp system provides printer support on System V Rel. 4 systems. You can
easily configure and use a printer from a small set of commands that will work
on any SVR4 system. Some systems (HP, AIX) provide sophisticated system
management tools that produce the same results. You can use these instead
of lp tools when convenient.
Simply put, the lp system works by passing output data through an interface
program that is usually a shell script. The interface script generates a banner
page, sets up the output device (using stty), and writes the data to the printer.
By default, the system uses an interface file called “standard.” However, you
can configure a printer to use a specific interface file designed for a particular
type of printer. The sophistication and flexibility of the interface script plays
a large role in determining the difficulty involved in adding a remote printer
to an SVR4 system.
The lp system classifies both files and printers by content-type, or format.
For example, if a printer is configured to support a content-type of PostScript,
then PostScript files can be printed directly. However, an ASCII file must be
converted before it can be printed.
The filter subsystem automatically provides format conversions—in this
case, ASCII to PostScript. Use the lpfilter command to list, modify, or add
filters. You can identify a file as a given content-type when it is printed by
using the -t (for type) option with the lp command.
Here are a few of the most important commands, along with some salient
features. Refer to your system documentation for more detailed descriptions.
P
RINTCOMMANDS
lpadmin—The lpadmin command configures a printer (printer_name)
and associates it with a given device and interface program (there is no
/etc/printcap file). The -i option tells lpadmin to use the interface file
customized for this printer. Lpadmin uses the standard interface file if
you don’t use -i option. See the example below:
Page 99

98
ETHERNET PRINT SERVERS HIGH SPEED AND 4-PORT
lpadmin -p <printer_name>
-v/dev/null
-i/usr/dpi/<interface_file>
accept enable—After you run the accept command, you can queue print
requests for the named printer. Jobs will not print until you run the enabled
command. If the lp system detects a problem, it automatically disables the
printer. You must enable the printer manually when it is fixed. Check
printer status via lpstat. See examples on the next page.
accept <printer_name>
enable <printer_name>
lpstat—lpstat outputs a complete status of the entire printer system. Use the d printer_name option to obtain the status of a given printer. See example
below:
lpstat -t
lp prints the named files on printer printer_name. If you specify a contenttype and the printer does not support that content-type, the lp system tries to
find a filter that can convert the file to the correct format. If you don’t specify
a content-type, the printer tries to recognize the file type and convert it (if
necessary) on its own. See below:
lp -d<printer_name>-T<content-type><file1><file2>...
6.8 Installing and Printing on an HP/UX System
Continue the installation begun in Section 6.4 by following the steps below.
6. What is the node name of the Ethernet Print Server? For example, type
the following and press return:
DPIfast
7. What is the printer name for this Ethernet Print Server-linked printer?
Type a printer name and press return.
8. What type of Ethernet Print Server are you installing? Select from the
following choices:
1) Ethernet Print Server High Speed
2) Ethernet Print Server 4-Port
9. Which port do you want your printer attached to? The screen displays a
list of ports available on this Ethernet Print Server. Select one and press
return.
Page 100

99
CHAPTER 6: UNIX Printing through TCP/IP
For example, type 1 and press return.
10. Your screen will now display the information you provided the install
script. For example:
Type of Print Server: Ethernet Print Server
Node name of the Print Server: DPIfast
Printer name to be used by this printer: <printer_name>
The printer is attached on: port 1
Do you want to accept this configuration? Type “yes” or “no” and press
return.
11. Is this printer PostScript? Type “yes” or “no.” Press <Return>.
12. The script starts the daemon for the newly configured printer
automatically. It also displays the path used in case you ever need to
restart the daemon. In the following example, the path would be:
/usr/dpi/dpi_print/dev/dpi/printer_name DPIfast 10001 &
This example reflects names supplied the script earlier.
When the installation script is complete, you must still configure the printer
and make it known to the lp system.
The HP/UX lp system uses the lpadmin maintenance command to
configure a printer (there is no /etc/printcap file). The specific commands
to do this are:
lpadmin -p printer_name -v dev/dpi/printer_name
enable printer_name
accept printer_name
You can also use other options for the lpadmin command. See your system
documentation for details. Note that the printer name must be the same as
the one you entered during the Ethernet Print Server installation. HP
supplies the sam program as an alternative to configure the printer.
When using sam, specify everything as if the printer were directly connected
to /dev/dpi/printer_name.
The software installed with your HP system can satisfy most of your printing
needs. HP supplies ASCII-to-PostScript filters and the system will invoke them
automatically if you define the content type of the printer as PostScript. The
HP/UX lp system also supplies interface scripts that produce PostScript
banners. Use the lpfilter command to define new filters and content types if
necessary. The full power and flexibility of the lp print service is now
available to you: printing across the network is completely transparent.
 Loading...