

Page 1
Control 1, 8, or 16 servers from a single ServTray
(KVT41xA-R2 or KVT51xA).
1-, 8-, and 16-Port ServSwitch EC with IP KVM Switch Modules
Order toll-free in the U.S.: Call 877-877-BBOX (outside U.S. call 724-746-5500)
FREE technical support 24 hours a day, 7 days a week: Call 724-746-5500 or fax
724-746-0746 • Mailing address: Black Box Corporation, 1000 Park Drive, Lawrence,
PA 15055-1018 • Web site: www.blackbox.com • E-mail: info@blackbox.com
Customer
Support
Information
June 2010
KV T1IP1UV
KV T1IP8UV
KV T1IP16UV
Page 2

Page 2
724-746-5500 | blackbox.com
1-, 8-, and 16-Port ServSwitch EC with IP KVM Switch Modules
FEDERAL COMMUNICATIONS COMMISSION AND
INDUSTRY CANADA RADIO FREQUENCY INTERFERENCE STATEMENTS
This equipment generates, uses, and can radiate radio-frequency energy,
and if not installed and used properly, that is, in strict accordance with the
manufacturer’s instructions, may cause inter ference to radio communication.
It has been tested and found to comply with the limits for a Class A computing
device in accordance with the specifications in Subpart J of Part 15 of FCC rules,
which are designed to provide reasonable protection against such interference
when the equipment is operated in a commercial environment. Operation of
this equipment in a residential area is likely to cause interference, in which case
the user at his own expense will be required to take whatever measures may be
necessary to correct the interference.
Changes or modifications not expressly approved by the party responsible
for compliance could void the user’s authority to operate the equipment.
This digital apparatus does not exceed the Class A limits for radio noise
emis sion from digital apparatus set out in the Radio Interference Regulation
of Industry Canada.
Le présent appareil numérique n’émet pas de bruits radioélectriques dépassant les
limites applicables aux appareils numériques de la classe A prescrites dans le
Règlement sur le brouillage radioélectrique publié par Industrie Canada.
Page 3

Page 3
724-746-5500 | blackbox.com
Normas Oficiales Mexicanas (NOM)
Electrical Safety Statement
INSTRUCCIONES DE SEGURIDAD
1. Todas las instrucciones de seguridad y operación deberán ser leídas antes
de que el aparato eléctrico sea operado.
2. Las instrucciones de seguridad y operación deberán ser guardadas para
referencia futura.
3. Todas las advertencias en el aparato eléctrico y en sus instrucciones de
operación deben ser respetadas.
4. Todas las instrucciones de operación y uso deben ser seguidas.
5. El aparato eléctrico no deberá ser usado cerca del agua—por ejemplo,
cerca de la tina de baño, lavabo, sótano mojado o cerca de una alberca, etc.
6. El aparato eléctrico debe ser usado únicamente con carritos o pedestales que
sean recomendados por el fabricante.
7. El aparato eléctrico debe ser montado a la pared o al techo sólo como sea
recomendado por el fabricante.
8. Servicio—El usuario no debe intentar dar servicio al equipo eléctrico más allá
lo descrito en las instrucciones de operación. Todo otro servicio deberá ser
referido a personal de servicio calificado.
9. El aparato eléctrico debe ser situado de tal manera que su posición no
interfiera su uso. La colocación del aparato eléctrico sobre una cama, sofá,
alfombra o superficie similar puede bloquea la ventilación, no se debe
colocar en libreros o gabinetes que impidan el flujo de aire por los orificios
de ventilación.
10. El equipo eléctrico deber ser situado fuera del alcance de fuentes de calor
como radiadores, registros de calor, estufas u otros aparatos (incluyendo
amplificadores) que producen calor.
11. El aparato eléctrico deberá ser connectado a una fuente de poder sólo del
tipo descrito en el instructivo de operación, o como se indique en el aparato.
12. Precaución debe ser tomada de tal manera que la tierra fisica y la polarización
del equipo no sea eliminada.
NOM Statement
Page 4

Page 4
724-746-5500 | blackbox.com
1-, 8-, and 16-Port ServSwitch EC with IP KVM Switch Modules
13. Los cables de la fuente de poder deben ser guiados de tal manera que no
sean pisados ni pellizcados por objetos colocados sobre o contra ellos,
poniendo particular atención a los contactos y receptáculos donde salen
del aparato.
14. El equipo eléctrico debe ser limpiado únicamente de acuerdo a las
recomendaciones del fabricante.
15. En caso de existir, una antena externa deberá ser localizada lejos de las
lineas de energia.
16. El cable de corriente deberá ser desconectado del cuando el equipo no sea
usado por un largo periodo de tiempo.
17. Cuidado debe ser tomado de tal manera que objectos liquidos no sean
derramados sobre la cubierta u orificios de ventilación.
18. Servicio por personal calificado deberá ser provisto cuando:
A: El cable de poder o el contacto ha sido dañado; u
B: Objectos han caído o líquido ha sido derramado dentro del aparato; o
C: El aparato ha sido expuesto a la lluvia; o
D: El aparato parece no operar normalmente o muestra un cambio en su
desempeño; o
E: El aparato ha sido tirado o su cubierta ha sido dañada.
Page 5

Page 5
724-746-5500 | blackbox.com
Trademarks Used in This Manual
Trademarks Used in This Manual
Black Box and the Double Diamond logo are registered trademarks, and
ServSwitch and ServTray are trademarks of BB Technologies, Inc.
Mac is a registered trademark of Apple Computers, Inc.
Centronics is a registered trademark of Centronics Corporation.
Hayes is a registered trademark of Hayes Microcomputer Products, Inc.
Linux is a registered trademark of Linus Torvalds.
IntelliMouse, Microsoft, Windows, and Windows Vista are either registered trademarks or trademarks of Microsoft Corporation in the United States and/or other
countries.
UL is a registered trademark of Underwriters’ Laboratories, Inc.
UNIX is a registered trademark of UNIX System Laboratories, Inc. (or USL).
Any other trademarks mentioned in this manual are acknowledged to be the
property of the trademark owners.
Page 6

Page 6
724-746-5500 | blackbox.com
1-, 8-, and 16-Port ServSwitch EC with IP KVM Switch Modules
Table of Contents
Chapter Page
1. Specifications ............................................................................................. 9
2. Overview ............................................................................................... 10
2.1 Introduction ...................................................................................... 10
2.2 Components ..................................................................................... 10
2.2.1 Front Panel ............................................................................. 10
2.2.2 Rear Panel .............................................................................. 11
2.3 What’s Included ................................................................................ 12
2.4 Additional Items You Need ............................................................... 12
2.5 Typical Application ............................................................................ 13
3. Installation ............................................................................................... 14
3.1 Module/ServTray Placement .............................................................. 14
3.2 Hardware Installation ........................................................................ 14
3.2.1 Powering On the Module ....................................................... 14
3.2.2 Connecting the Computers .................................................... 14
3.3 Quick Start Guide.............................................................................. 15
3.3.1 Using the IP-OSD Step-by-Step Menu (Recommended) ......... 15
3.3.2 Using the HyperTerminal via a Serial Port ............................... 17
3.4 Disabling the Mouse Acceleration on the Computers ....................... 21
3.4.1 WIndows 98 and Windows 2000 .......................................... 21
3.4.2 Windows XP and Windows Server 2003 ................................ 21
3.4.3 Linux, UNIX, and X-Windows ................................................. 22
3.4.4 Sun Solaris .............................................................................. 22
3.5 How to Connect Your ServSwitch Module ....................................... 22
3.6 Access Your ServSwitch Module and Remotely Control the Host
Computer(s) ...................................................................................... 24
4. Operation ............................................................................................... 26
4.1 Powering Up the System ................................................................... 26
4.2 Selecting Computers Using On-Screen Display (OSD) ....................... 26
4.3 Selecting Computers Using Keyboard Hotkey Commands ................ 30
4.4 Switching Computers Using Monitor Controls .................................. 31
4.5 Control Selection............................................................................... 33
5. Advanced Operations...............................................................................35
5.1 How to Log in to the ServSwitch Module (the Home Screen) ..........35
5.2 Home Menu Options ........................................................................37
Page 7

Page 7
724-746-5500 | blackbox.com
Table of Contents
Table of Contents (continued)
Chapter Page
5.2.1 Preferences ............................................................................. 37
5.2.2 Snapshots ............................................................................... 38
5.2.3 Logout .................................................................................... 38
5.3 VNC Menu Options ..........................................................................38
5.3.1 Connect.................................................................................. 39
5.3.2 Disconnect .............................................................................. 39
5.4 Admin Menu Options ....................................................................... 40
5.4.1 Network Config ......................................................................40
5.4.2 User Accounts ........................................................................43
5.4.3 System Ident ........................................................................... 45
5.4.4 Security...................................................................................46
5.4.5 Compatibility .......................................................................... 50
5.4.6 SNMP ..................................................................................... 51
5.4.7 R ADIUS .................................................................................. 53
5.4.8 Serial Ports.............................................................................. 55
5.4.9 Time /Date .............................................................................. 55
5.4.10 Firmware ................................................................................56
5.5 Info Menu Options ............................................................................ 60
5.5.1 Status .....................................................................................60
5.5.2 Port Numbers ......................................................................... 61
5.5.3 Help ........................................................................................ 61
5.5.4 Site Map ................................................................................. 61
5.5.5 Copyright ............................................................................... 61
5.6 How to Speed Up Your ServSwitch Module .....................................62
6. Accessing ServSwitch Module Features .................................................... 64
6.1 Cascade Configuration ...................................................................... 64
6.2 Selecting Computers Using On-Screen Display (OSD) ....................... 66
7. How to Remotely Control the Host Computer(s) ..................................... 73
7.1 Accessing the VNC Interface ............................................................. 73
7.1.1 Web Inte rface ......................................................................... 73
7.1.2 Native VNC Client................................................................... 74
7.1.3 SSH Tunnel (with Native VNC Client) ...................................... 75
7.2 Using the VNC Menu ........................................................................ 75
7.3 How to Use the Bribar ...................................................................... 76
7.4 How to Use the Main Menu ............................................................. 78
7.5 How to Use the VirtKeys Menu ........................................................ 81
Page 8

Page 8
724-746-5500 | blackbox.com
1-, 8-, and 16-Port ServSwitch EC with IP KVM Switch Modules
Table of Contents (continued)
Chapter Page
7.6 How to Use the Video Tuning Menu ................................................ 82
Appendix A. Troubleshooting ......................................................................... 85
A.1 Problems/Possible Causes/Solutions .................................................. 85
A.2 Contacting Black Box ........................................................................ 87
A.3 Shipping and Packaging .................................................................... 88
Appendix B. Supported Protocols....................................................................89
Appendix C. About Security Certificate Warnings ........................................... 90
C.1 Frequently Asked Questions ..............................................................90
C.2 Installing the New Certificate ............................................................ 90
Appendix D. Using an Optional Serial Access Unit (IPMI Supported) with the
R-Port ............................................................................................... 92
D.1 Background ....................................................................................... 92
D.2 Connecting the Serial Access Unit to the ServSwitch ........................ 92
D.3 Configuring/Viewing the Serial Access Unit through
the Web Interface ............................................................................. 92
D.4 Advanced Configuration Using the Integrated SSH Shell................... 93
D.5 Remote Login via SSH ....................................................................... 94
D.6 Intelligent Platform Management Interface (IPMI) Function .............. 95
D.6.1 Background ............................................................................ 95
D.6.2 Host Computer Requirements ................................................ 95
D.6.3 If the Host Computer Does Not Support IPMI ........................96
D.6.4 Activating the IPMI Option ..................................................... 96
D.6.5 Configuring IPMI on the ServSwitch ....................................... 96
D.6.6 Accessing the Status Screen ...................................................98
D.6.7 Accessing IPMI Controls ....................................................... 101
Appendix E. Using the Optional Modem Feature .......................................... 103
E.1 Background ..................................................................................... 103
E.2 Connecting a Modem ..................................................................... 103
E.2.1 Configuring a Modem Connection on the ServSwitch ........ 104
E.2.2 Configuring the Remote Connection .................................... 105
E.2.3 Accessing the Web Interface ................................................ 106
E.3 Performance Notes.......................................................................... 106
Page 9

Page 9
724-746-5500 | blackbox.com
Chapter 1: Specifications
1. Specifications
Color Depth Adjustments: 8, 12, 16 bits selectable
Color Depth (Maximum): 16 bits
Resolution (Maximum): 2048 x 1152
Supported Operating Systems: Windows® 98/Me/2000/XP/7, Windows NT,
Windows Vista®, Linux®, and Mac® OS X
Supported Video Mode (Maximum): Local: 1600 x 1200 @ 85 Hz;
Remote: 1280 x 1024 @ 85 Hz (16-bit color)
User Controls: (1) IP Setup button, (1) dual-function Reset button (Power Reset,
Restore to Factory Defaults)
Connectors: All: (1) barrel connector for power, (1) 8-pin mini DIN female
(reserved for future use), (1) DB9 COM/RS-232 male (DTE), (1) HD15
for console video, (1) RJ-45 LAN, (2) 6-pin mini DIN female for console
keyboard and mouse, (1) Centronics® 36-pin female for ServTray;
KVT1IP1UV: (1) HD15 female integrated KVM cable input;
KVT1IP8UV: (8) HD15 female integrated KVM cable input, (1) R-port (for serial
device management with KV9-SRL);
KVT1IP16UV: (16) HD15 female integrated KVM cable input, (1) R-port (for serial
device management with KV9-SRL)
Indicators: (4) LEDs: (1) LAN Activity, (1) System Status, (1) Eth Act, (1) Sys OK
Temperature Tolerance: Operating: +32 to +104° F (0 to +40° C);
Storage: -4 to +140° F (-20 to +60° C)
Relative Humidity: Up to 80%, noncondensing
Power: 12-VDC power supply; maximum power consumption: 18 watts
Size: 1.7"H x 15.9"W x 8.7"D (4.3 x 40.4 x 22.1 cm)
Page 10

Page 10
724-746-5500 | blackbox.com
1-, 8-, and 16-Port ServSwitch EC with IP KVM Switch Modules
2. Overview
2.1 Introduction
The 1-, 8-, or 16-Port ServSwitch™ EC with IP KVM Module enables you
to use the Internet or your TCP/IP-enabled network to remotely monitor
and control critical PC servers and workstations using an industry-standard Web
browser or VNC client. You can also use on-screen display (OSD) or hotkeys to
manage the switch.
The module is not designed to be used by itself. It functions in the same way as a
ServSwitch™ EC IP KVM Switch (KV93xxA-R2) does when used with a ServTray™.
The RoHS-compliant ServSwitch supports industry-standard networking and
management protocols such as TCP/IP and SNMP. It offers secure management
options including SSL encryption, SSH tunneling, and RADIUS. The ServSwitch is
platform-independent and can be managed using any Java™ enabled Web
browser.
The ServSwitch also features 16 bits of color depth that supports up to 65,536
colors.
2.2 Components
2.2.1 Front Panel
Figure 2-1 shows the IP KVM Switch Module’s front view. The Centronics connector links directly to the ServTray.
Centronics
connector
Figure 2-1. The IP KVM Switch Module’s front-panel view.
Page 11

Page 11
724-746-5500 | blackbox.com
Chapter 2: Overview
2.2.2 Rear Panel
Figure 2-2 shows the IP KVM Switch Module’s rear view. Table 2-1 describes the
components numbered in the illustration.
6
7 8 9 10 11 12
1 2 3 4 5
Figure 2-2. The IP KVM Switch Module’s rear-panel view.
Table 2-1. Rear-panel components.
Number Component Description
1 R-port (KVT1IP8UV and For serial device management
KVT1IP16UV only) with KV9-SRL.
2 Reset button This dual-function button selects Power
Reset or Restore Factory Defaults.
3 RJ-45 connector Links to the LAN.
4 Sys OK LED Lights when the network is on.
5 6-pin mini DIN connectors Connect to the shared console
keyboard and mouse ports.
6 HD15 connectors Functions as a 3-in-1 connector to link
to 1, 8, or 16 servers, mice, and
keyboards.
7 Barrel connector Connects to a 12-VDC external power
adapter.
8 8-pin mini DIN connector Reserved for future use.
9 IP Setup button Press this button with a paper clip or
pen to bring up the IP-OSD menu.
10 DB9 COM/RS-232 connector Connects to a PC for initial setup only.
11 Eth Act LED Lights when the network is active.
12 HD15 connector Connect to the shared console monitor.
Page 12

Page 12
724-746-5500 | blackbox.com
1-, 8-, and 16-Port ServSwitch EC with IP KVM Switch Modules
2.3 What’s Included
The package should contain the following items. If anything is missing or
damaged, contact Black Box at 724-746-5500 or info@blackbox.com.
• (1) 1-, 8-, or 16-Port ServSwitch EC Series IP KVM Switch Module
• (1) 19" rackmount kit (not required if module is mounted in rear of tray)
• (10) 19" x 0.43" (0.5 x 1.1 cm) screws (KVT1IP8UV and KVT1IP16UV only)
• (10) 12" x 0.24" (0.3 x 0.6 cm) screws (KVT1IP8UV and KVT1IP16UV only)
• (1) DB9 RS-232 null modem serial cable
• This user’s manual
2.4 Additonal Items You May Need
• (1) KVT41xA-R2 or KVT51xA ServTray
• (1) KV9-SRL serial module (KVT1IP8UV and KVT1IP16UV only)
• Computer cables, see below.
ServSwitch 3-in-1 Cable (EHN70001-0006, EHN70001-0010, EHN9000P-0015,
or EHN9000P-0030): These cables connect to PCs that have an HD15 monitor
connector and PS/2® keyboard and mouse connectors. The cables are available
in 6-, 10-, 15-, and 30-foot (1.8-, 3-, 4.5-, and 9.1-m) versions.
ServSwitch 2-in-1 Cable (EHN9000U-0006, EHN9000U-0010, or EHN9000U-0015):
These cables connect to PCs that have HD15 monitor and USB keyboard
and mouse connectors. The cables are available in 6-, 10-, and 15-foot (1.8-, 3-,
and 4.5-m) versions.
Page 13
Page 13
724-746-5500 | blackbox.com
Chapter 2: Overview
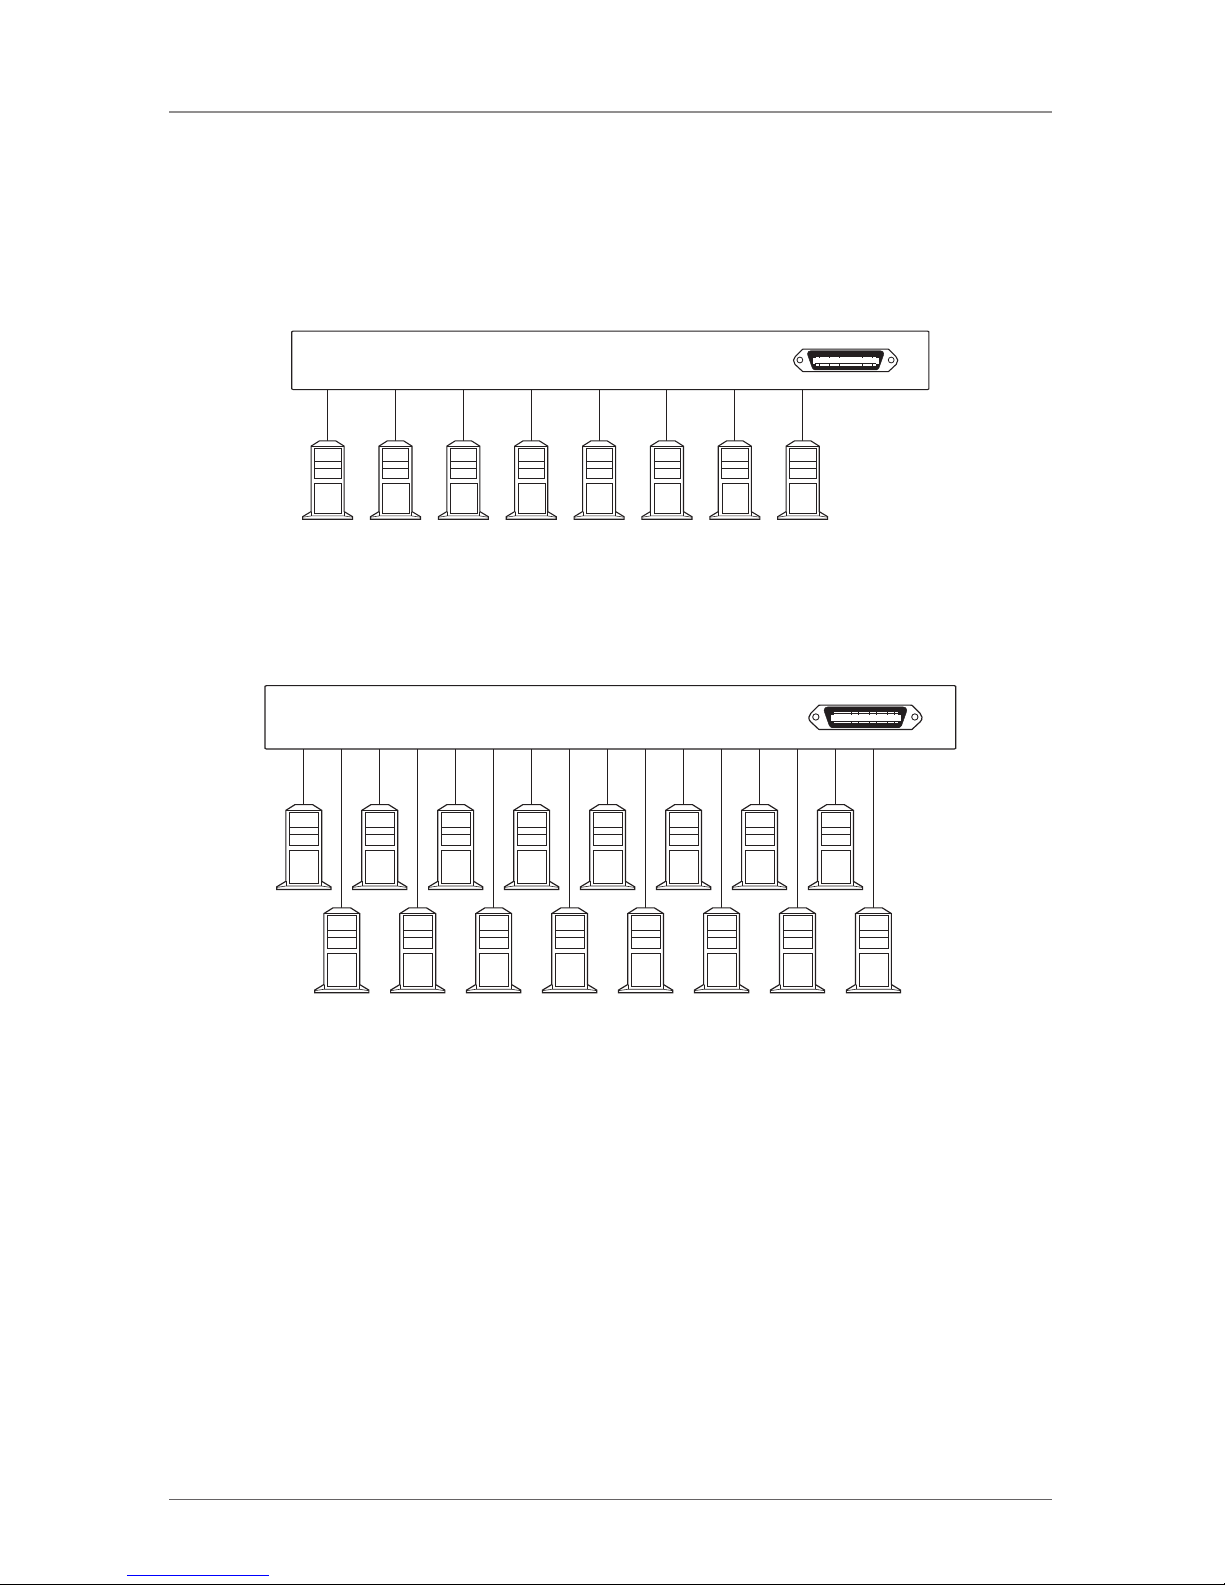
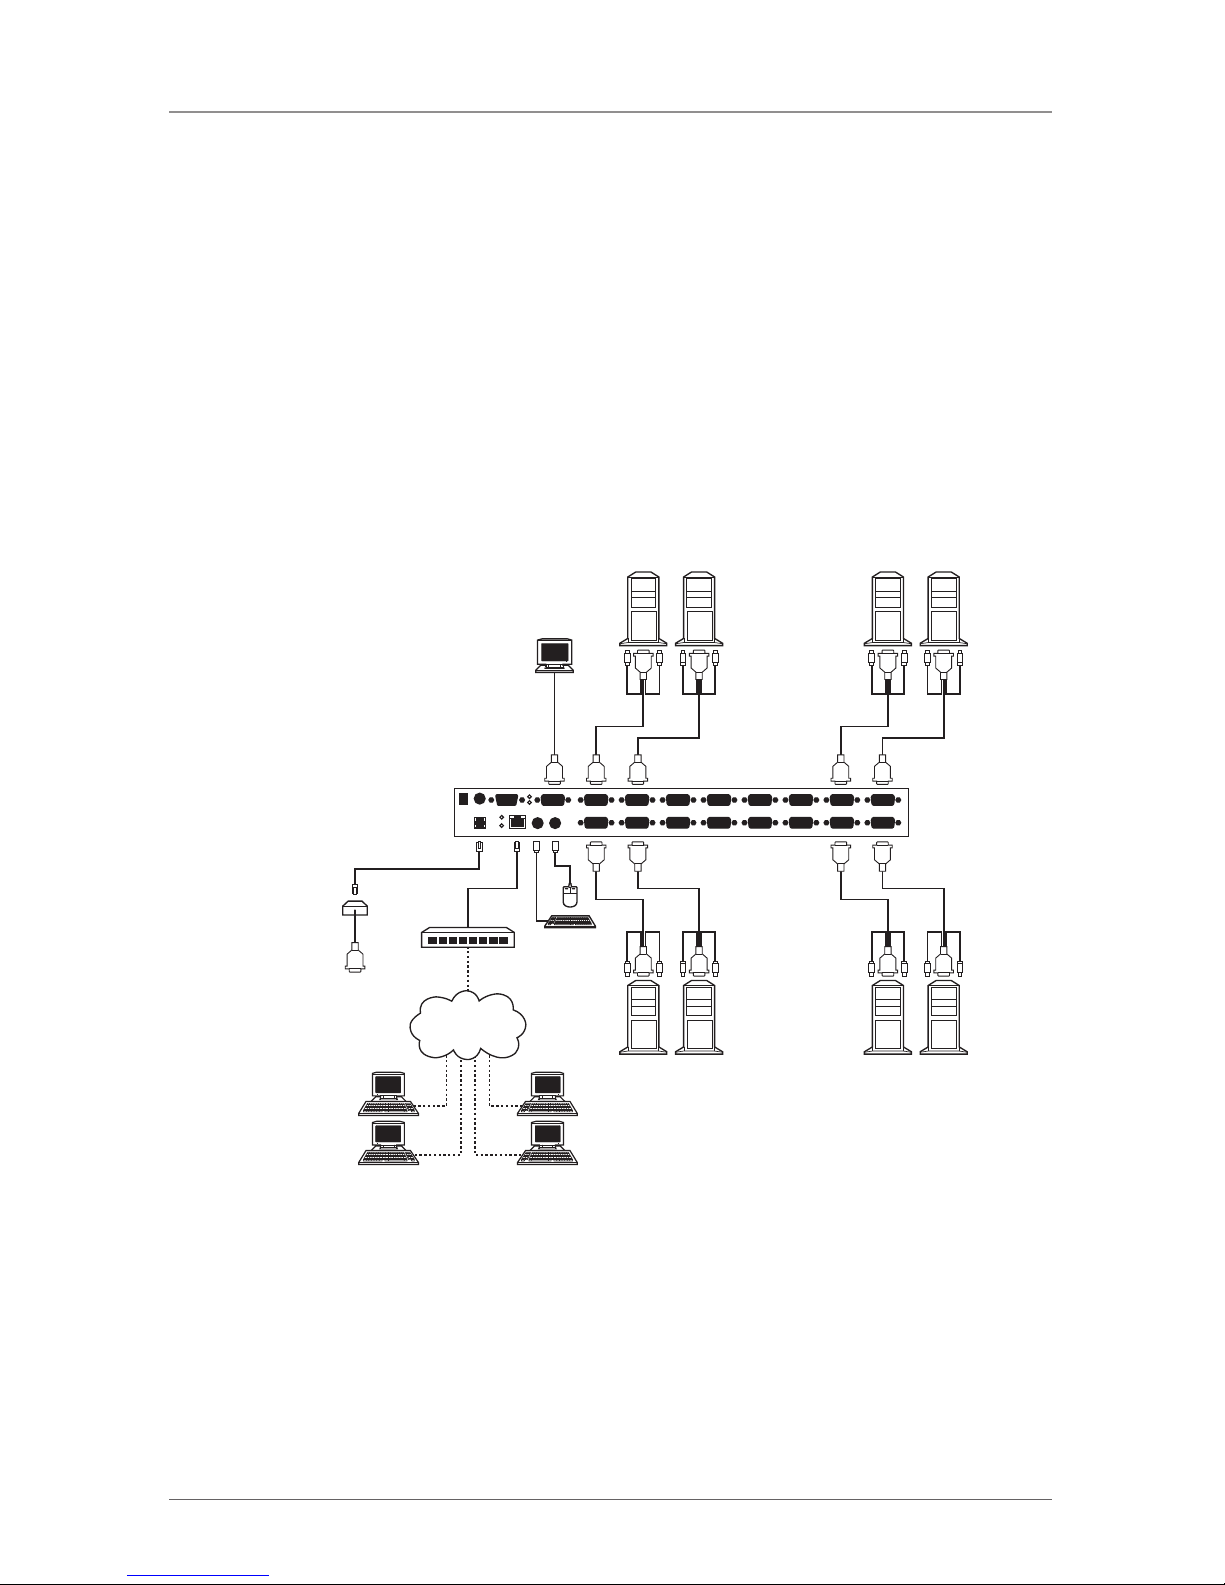
2.5 Typical Application
The 8-Port IP KVM Module can be used to enable one KVT41xA-R2 or KVT51xA
to manage eight servers or computers that support PS/2 or USB keyboards and
mice along with VGA video. See Figures 2-3 and 2-4.
Figure 2-3. Typical KVM 8-port switch module configuration.
Figure 2-4. Typical KVM 16-port module configuration.
Page 14

Page 14
724-746-5500 | blackbox.com
1-, 8-, and 16-Port ServSwitch EC with IP KVM Switch Modules
3. Installation
3.1 Module/ServTray Placement
The HD15 USB Module units are 1U high and are designed to fit in a KVT41xA-R2
or KVT51xA ServTray. When deciding where to put the module (attached to a
ServTray), consider the following questions:
• Where are the computers you want to connect to the ServTray with module?
• How long are the cables you want to use to connect your computers to the
ServSwitch?
CAUTION: Do not place cables near machines that create electrical noise such as
fluorescent lighting, air conditioning equipment, etc.
3.2 Hardware Installation
This section provides instructions for the basic hardware setup of the module.
CAUTION: Before you begin, make sure that power to all the devices that you will
be connecting is turned off.
To prevent damage caused by ground potential differences, make sure
that all devices are properly grounded. If you don’t follow these
instructions, your computers, the ServTray, and/or the module could be
damaged.
3.2.1 Powering On the Module
Connect the 12-VDC, 4.0-amp power adapter’s barrel connector to the power
jack on the rear of the module. Then plug the power adapter cable into an
available power outlet.
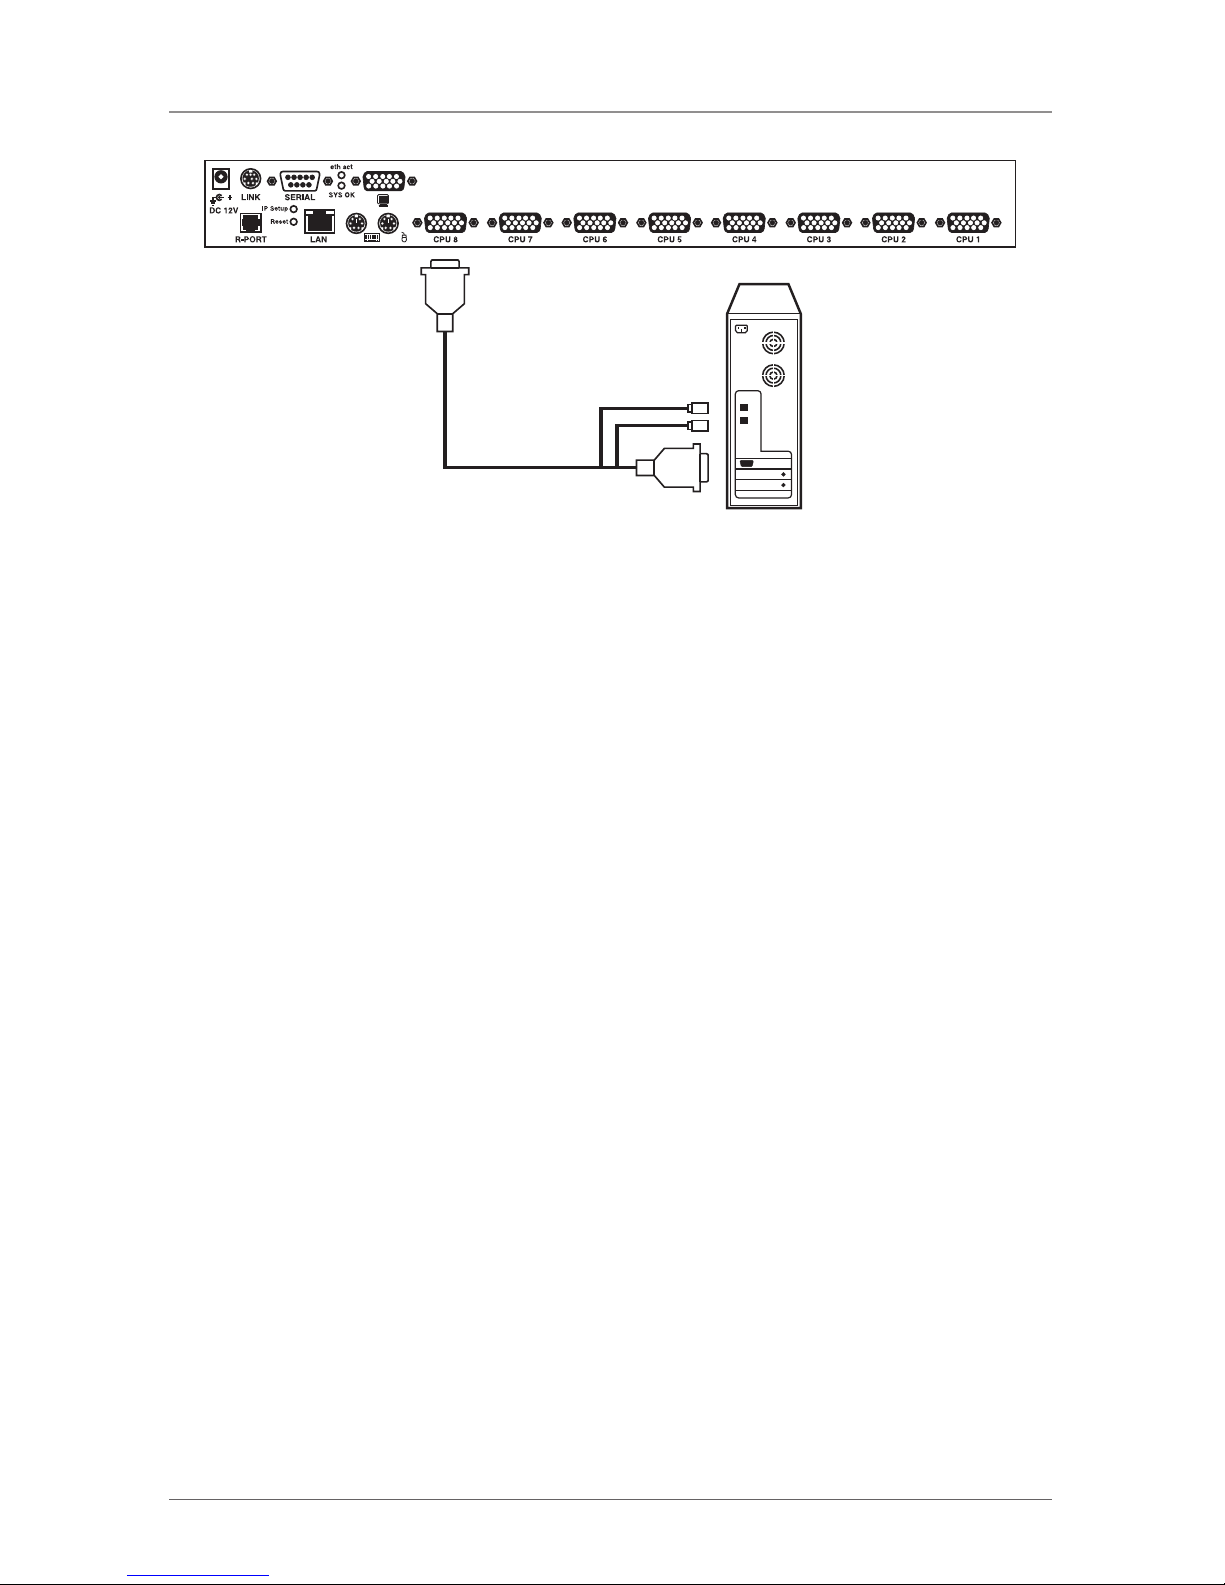
3.2.2 Connecting the Computers
1. Connect the ServSwitch 2-in-1 USB cable (EHN900024U-0006,
EHN900024U-0010, or EHN900024U-0015) to the computer’s USB port, and
the computer’s VGA monitor port.
2. Connect the other end of the 2-in-1 cable to the module’s HD15 connector.
Page 15
Page 15
724-746-5500 | blackbox.com
Chapter 3: Installation
VGA monitor
connection
PS/2 keyboard
HD15 connection
PS/2 mouse
Figure 3-1. 3-in-1 PS/2 cable connections.
3. Repeat Steps 1 and 2 for all computers that you want to connect to the
module.
4. Power on all computers that are attached to the module.
3.3 Quick Start Guide
This quick start guide describes two different ways to quickly set up your
ServSwitch module. These are described in Sections 3.3.1 and 3.3.2.
Before doing the initial setting:
1. Record your original computer settings, such as TCP/IP, in case you would like
to use this computer for other tasks.
2. Make sure you have the latest Java software downloaded from http://www.
java.com.
3. Disable mouse acceleration on the host computer(s) and client computer. See
Section 3.4 for details.
3.3.1 Using the IP-OSD Step-by-Step Menu (Recommended)
Hardware needed:
Option 1:
• (1) ServTray with 1-, 8-, or 16-Port ServSwitch EC with IP KVM Switch Module
with a power adapter
• (1) CAT5 cable with RJ-45 connector
Page 16
Option 2: (Follow Steps 1 to 3 next.)
• 1-, 8-, or 16-Port ServSwitch EC with IP KVM switch module with PS/2
keyboard, mouse, and monitor
• (1) CAT5 cable with R-45 connectors
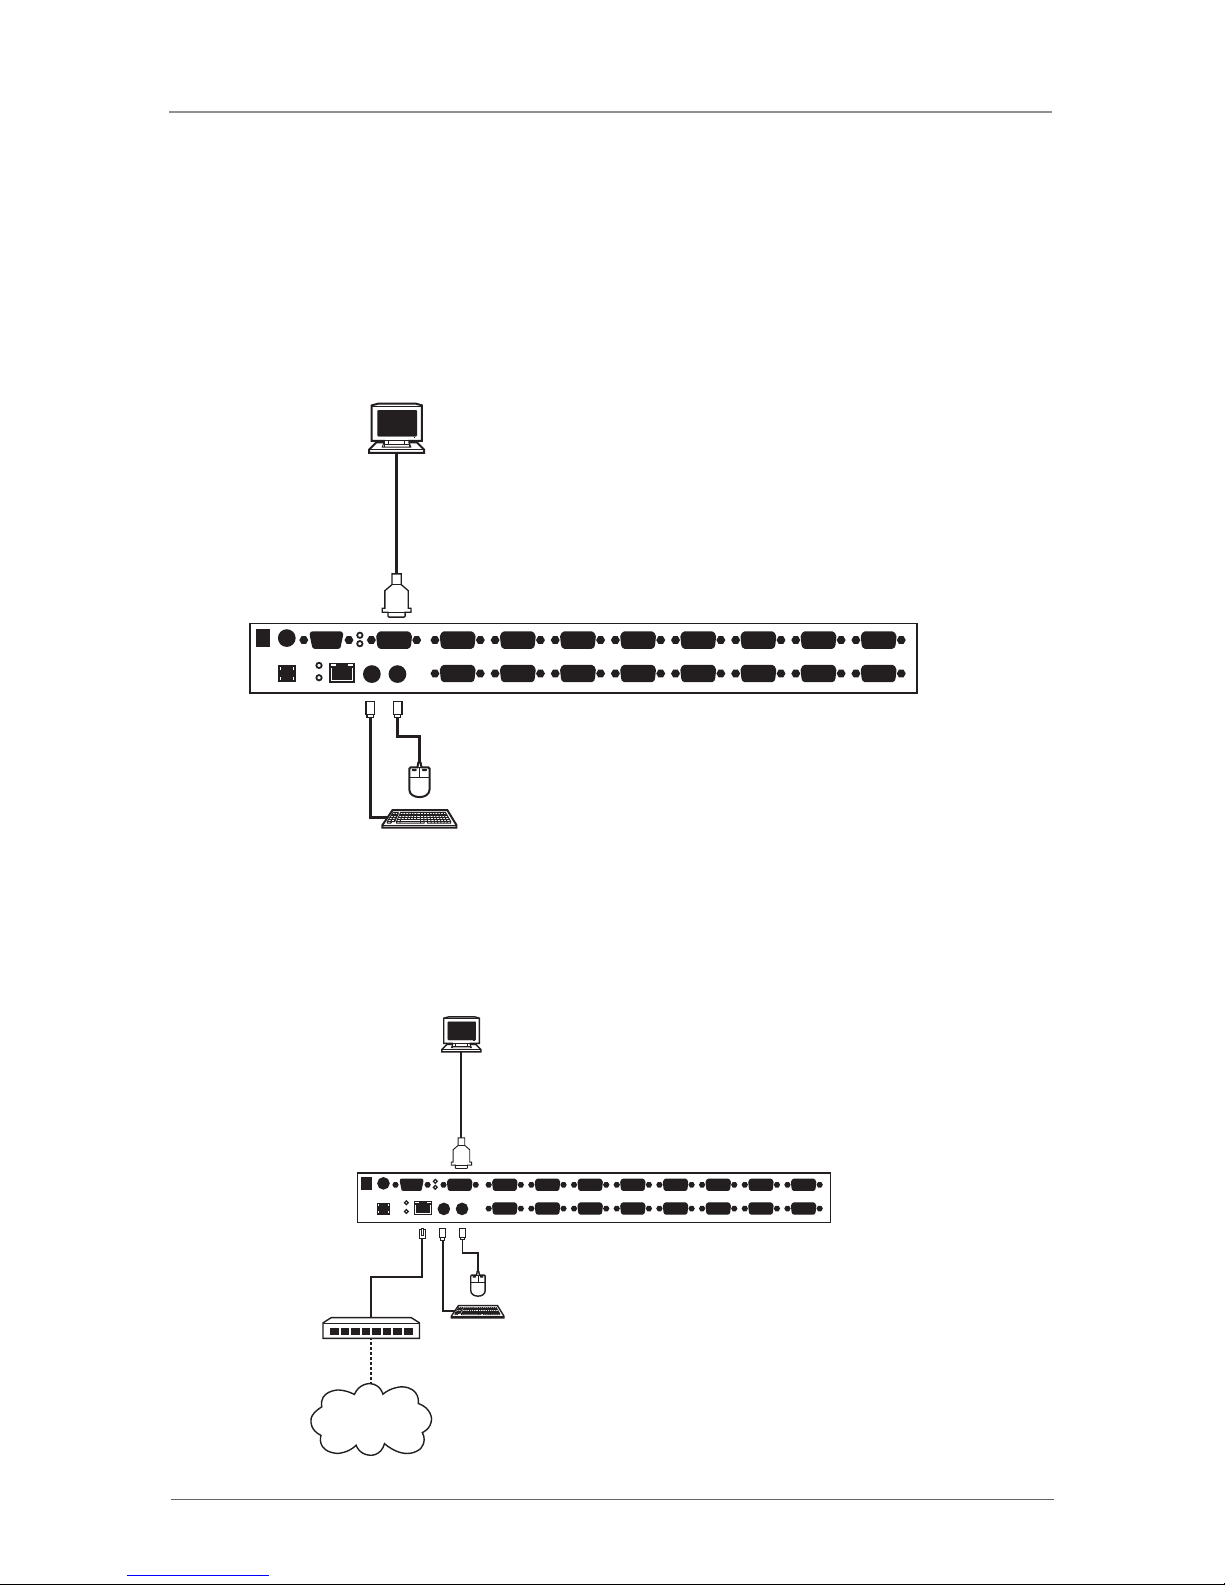
1. Connect a PS/2 keyboard and mouse, and VGA monitor to the ServSwitch
module’s local port.
PS/2 keyboard
16-Port ServSwitch EC with IP
KVM Switch Module
(KVT1IP16UV)
PS/2 mouse
VGA monitor
Figure 3-2. Connecting a PS/2 keyboard, mouse, and monitor
to the ServSwitch module.
2. Connect a CAT5 cable to the ServSwitch module’s LAN port. Connect the
other end of the cable to an Ethernet switch.
PS/2 keyboard
VGA monitor
Internet
Ethernet
switch
16-Port ServSwitch EC with IP
KVM Switch Module
(KVT1IP16UV)
PS/2 mouse
Figure 3-3. Connecting the ServSwitch module to the local area network.
1-, 8-, and 16-Port ServSwitch EC with IP KVM Switch Modules
Page 16
724-746-5500 | blackbox.com
Page 17
3. Power on the monitor and then the ServSwitch. Using a paper clip or pen,
press the IP Setup button located on the ServSwitch unit’s back panel. Simply
follow the step-by-step instructions on the console monitor to finish the initial
setup.
PS/2
keyboard
VGA monitor
Internet
or LAN
Ethernet
switch
16-Port ServSwitch EC with IP
KVM Switch Module
(KVT1IP16UV)
To power adapter
PS/2 mouse
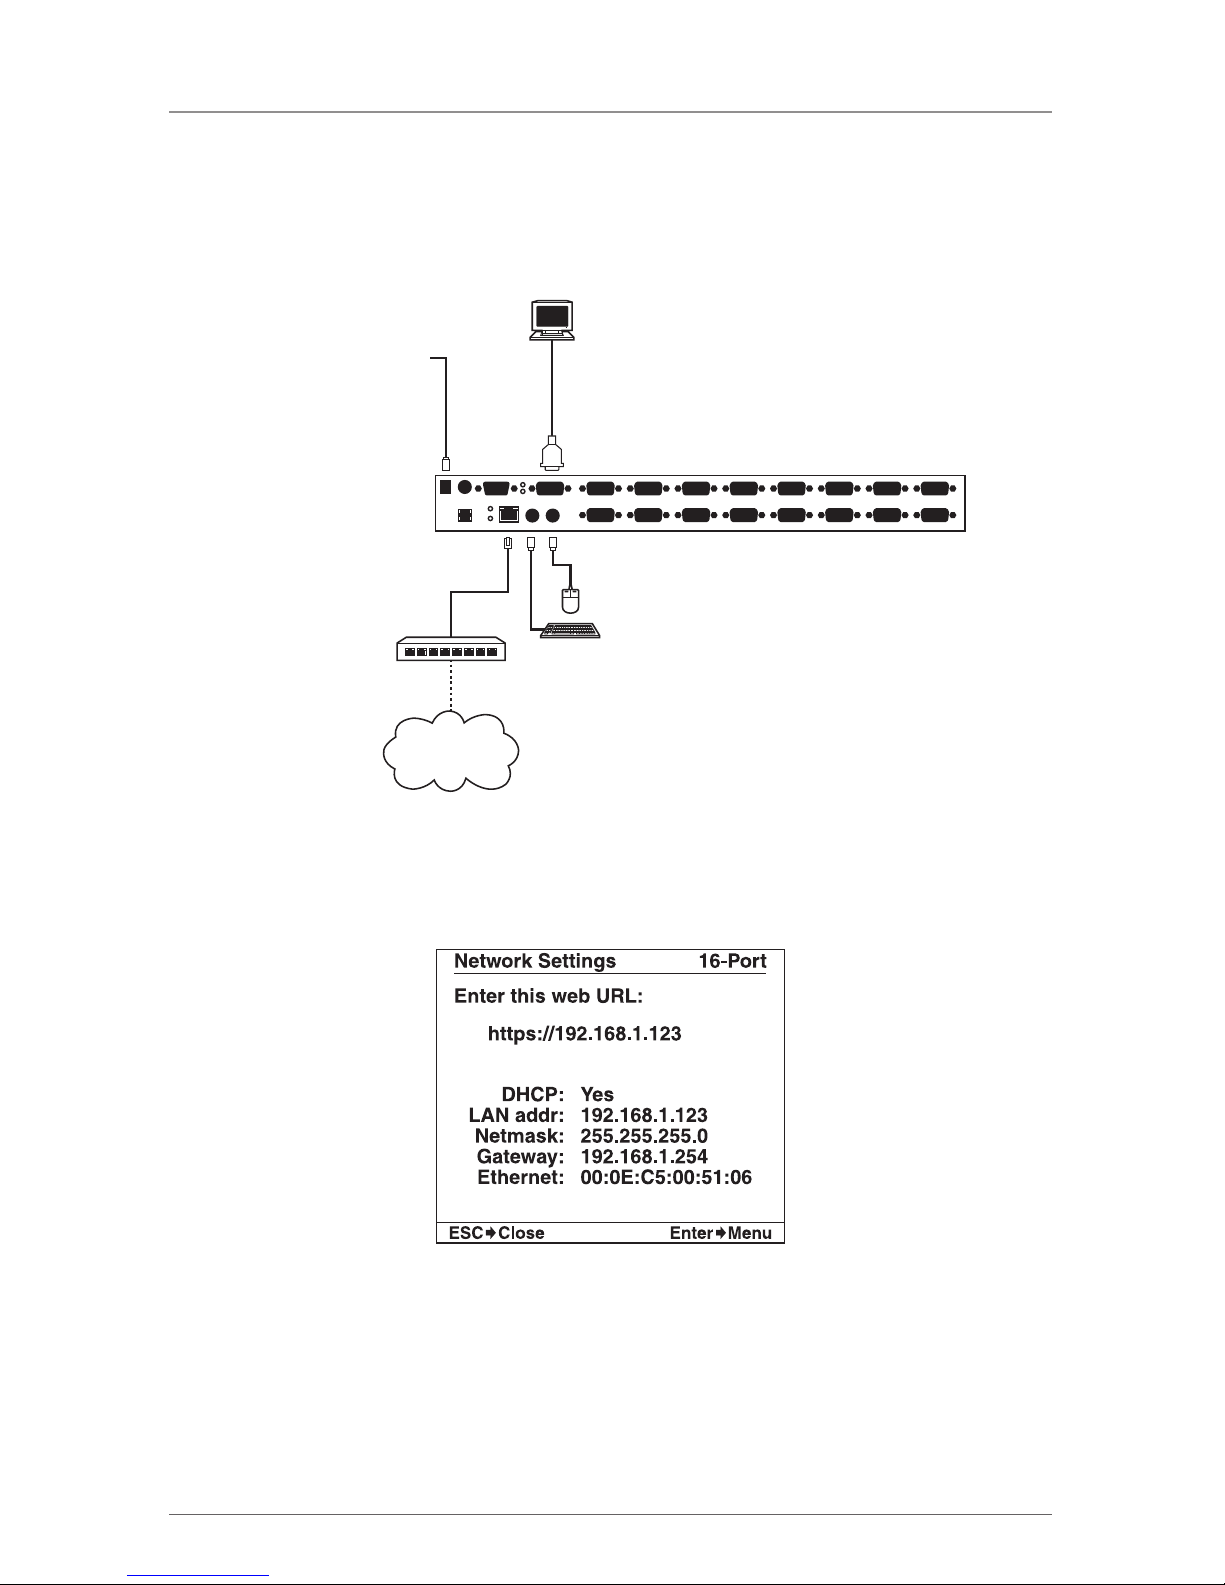
Figure 3-4. Connecting the power.
The Network Settings screen appears as shown in Figure 3-5.
Figure 3-5. Network Settings screen.
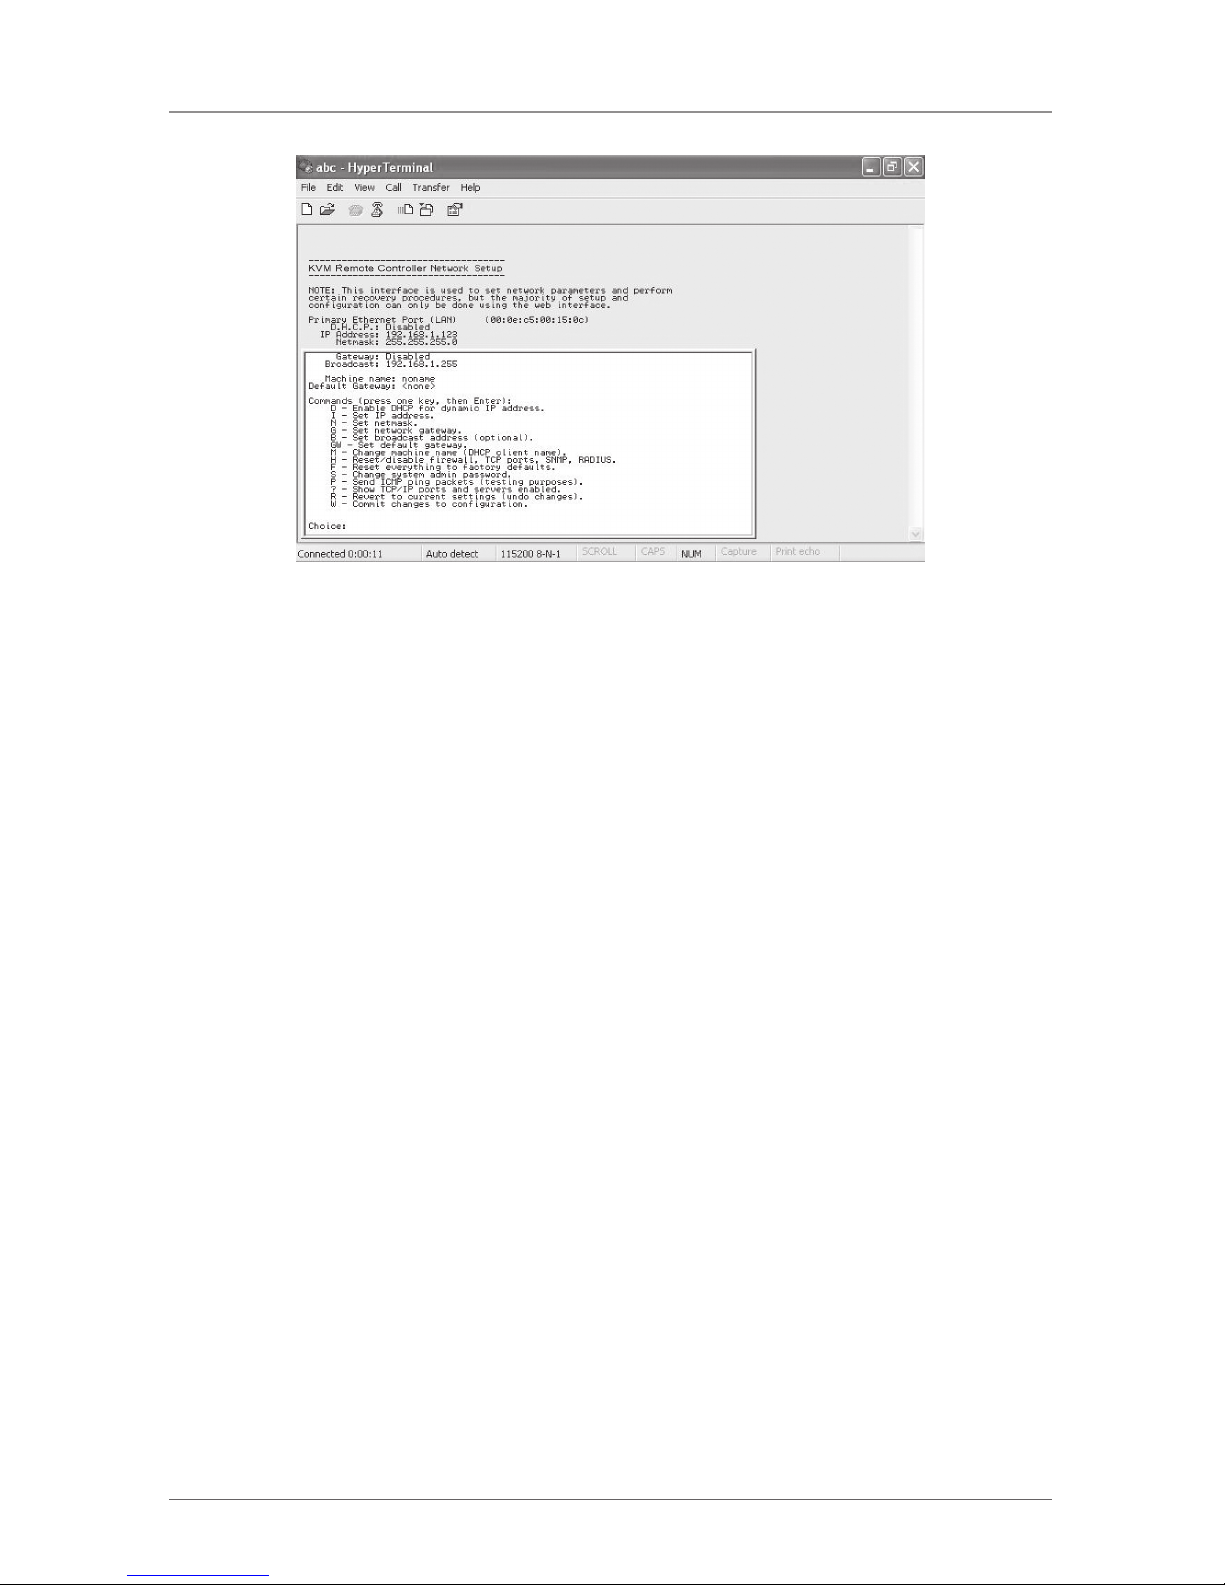
3.3.2 Using the HyperTerminal via a Serial Port
Hardware needed:
• (1) 1-, 8-, or 16-Port ServSwitch IP KVM Switch module with a power adapter
• (1) computer with a keyboard, mouse, and monitor
Chapter 3: Installation
Page 17
724-746-5500 | blackbox.com
Page 18
• (1) DB9 RS-232 null-modem serial cable (included)
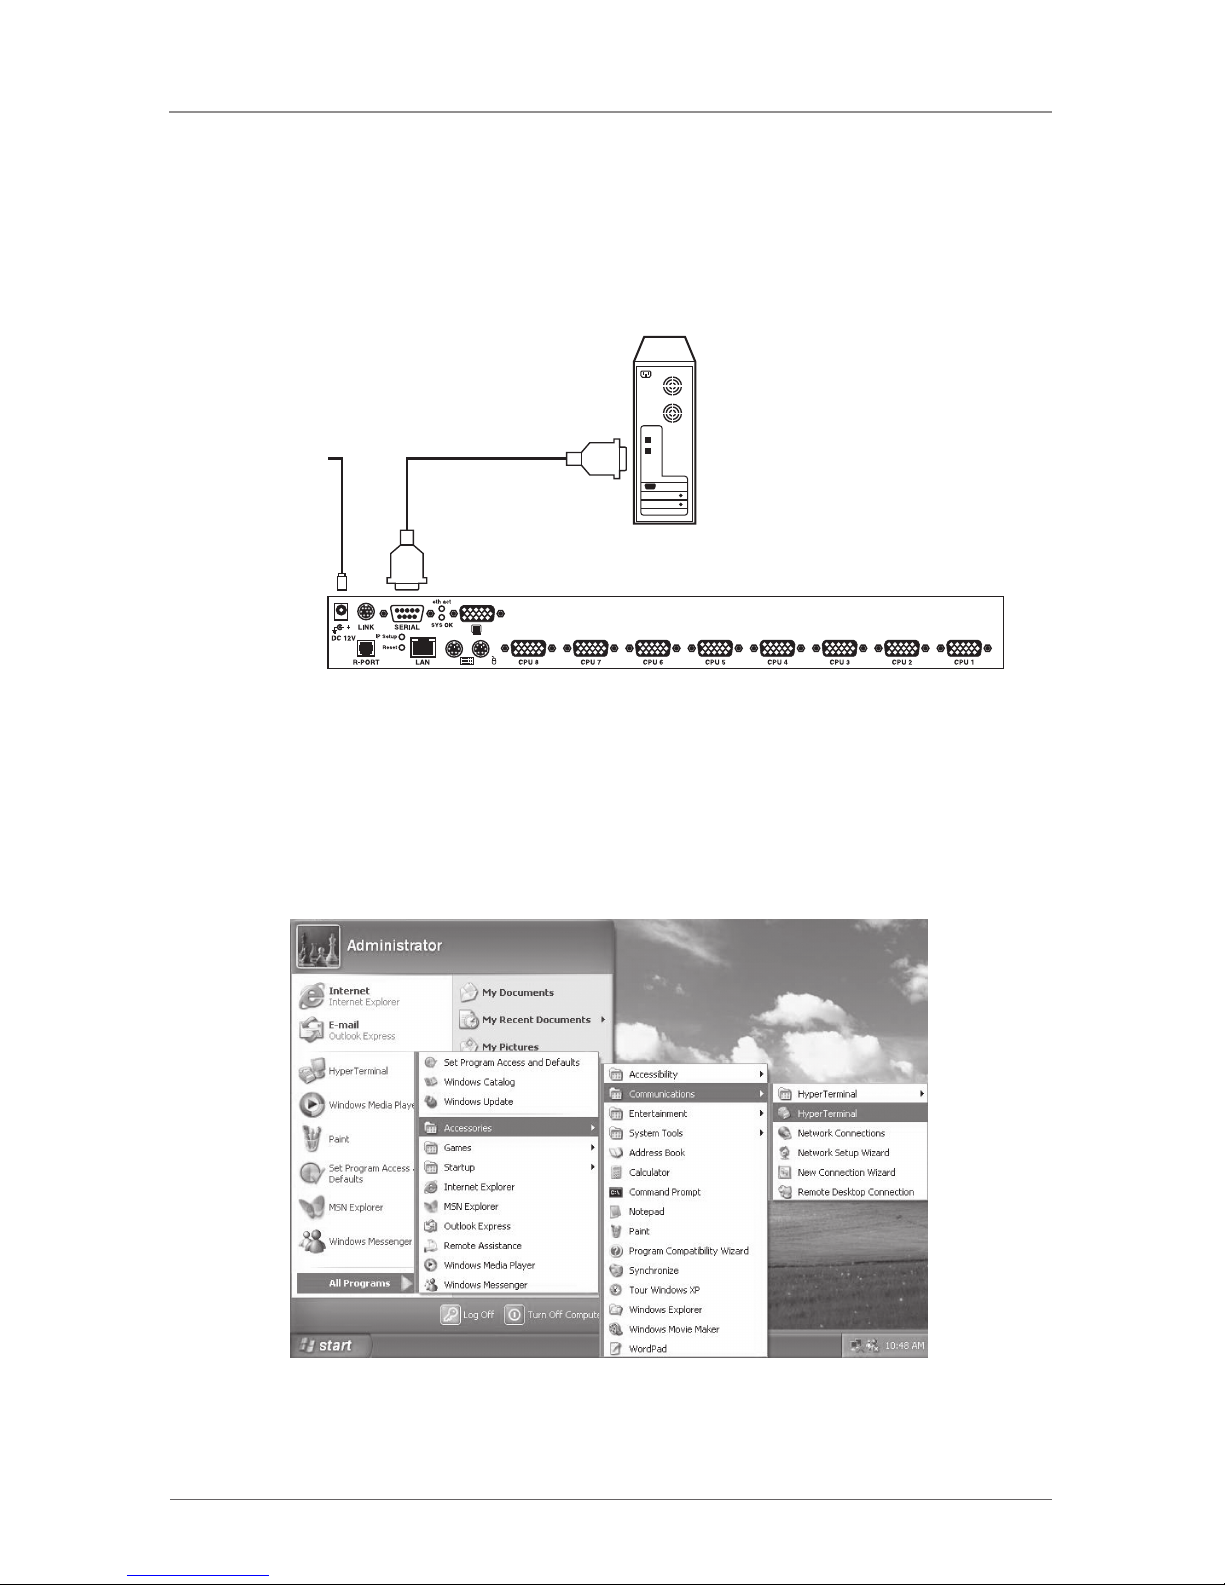
1. Connect the DB9 RS-232 null-modem serial cable to the serial port on the
ServSwitch unit’s rear panel. Connect the opposite end of the cable to the
computer’s serial port (COM1, COM2, etc.). See Figure 3-6.
Computer
8-Port ServSwitch EC with IP
KVM Switch Module
(KVT1IP8UV )
Serial port
To power
adapter
Figure 3-6. Connecting a computer to the ServSwitch unit’s serial port.
2. From your computer’s Administrator screen in Windows XP, select All Programs,
Accessories, Communications, and HyperTerminal. See Figure 3-7.
Figure 3-7. Administrator screen.
1-, 8-, and 16-Port ServSwitch EC with IP KVM Switch Modules
Page 18
724-746-5500 | blackbox.com
Page 19
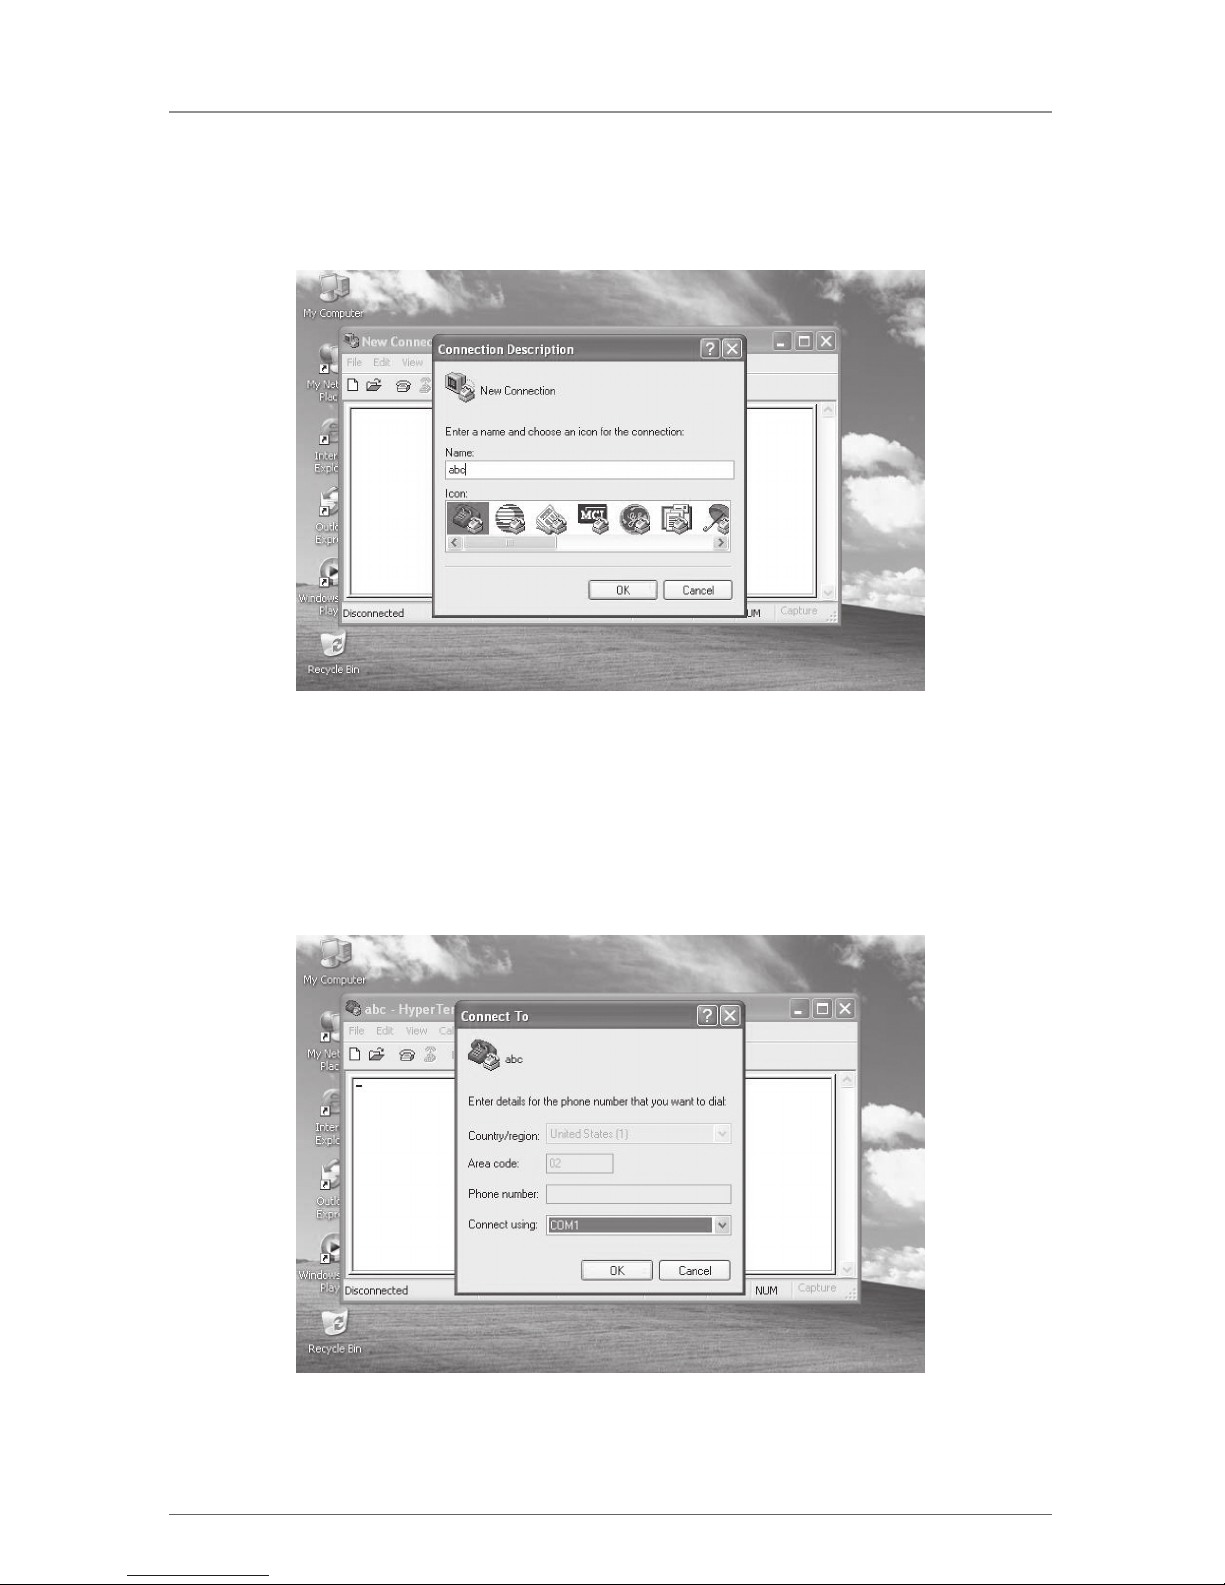
3. If you’ve never set up your HyperTerminal before, it will ask you to enter your
phone area code. Enter this, then click on “OK.” The screen shown in Figure
3-8 appears.
Figure 3-8. Connecting to HyperTerminal.
4. In the Name field, type in a name (for example, abc). Next, click on an icon to
correspond to the chosen name. Then click on “OK,” or click on “Cancel” to
type in a different name and/or select a different icon. If you click on “OK,”
Figure 3-9 appears.
Figure 3-9. Selecting the port.
Chapter 3: Installation
Page 19
724-746-5500 | blackbox.com
Page 20
Page 20
724-746-5500 | blackbox.com
1-, 8-, and 16-Port ServSwitch EC with IP KVM Switch Modules
5. From the Connect using drop-down menu, select the serial port that you want
to connect (for example, COM1). Click on “OK” to save or Cancel to cancel.
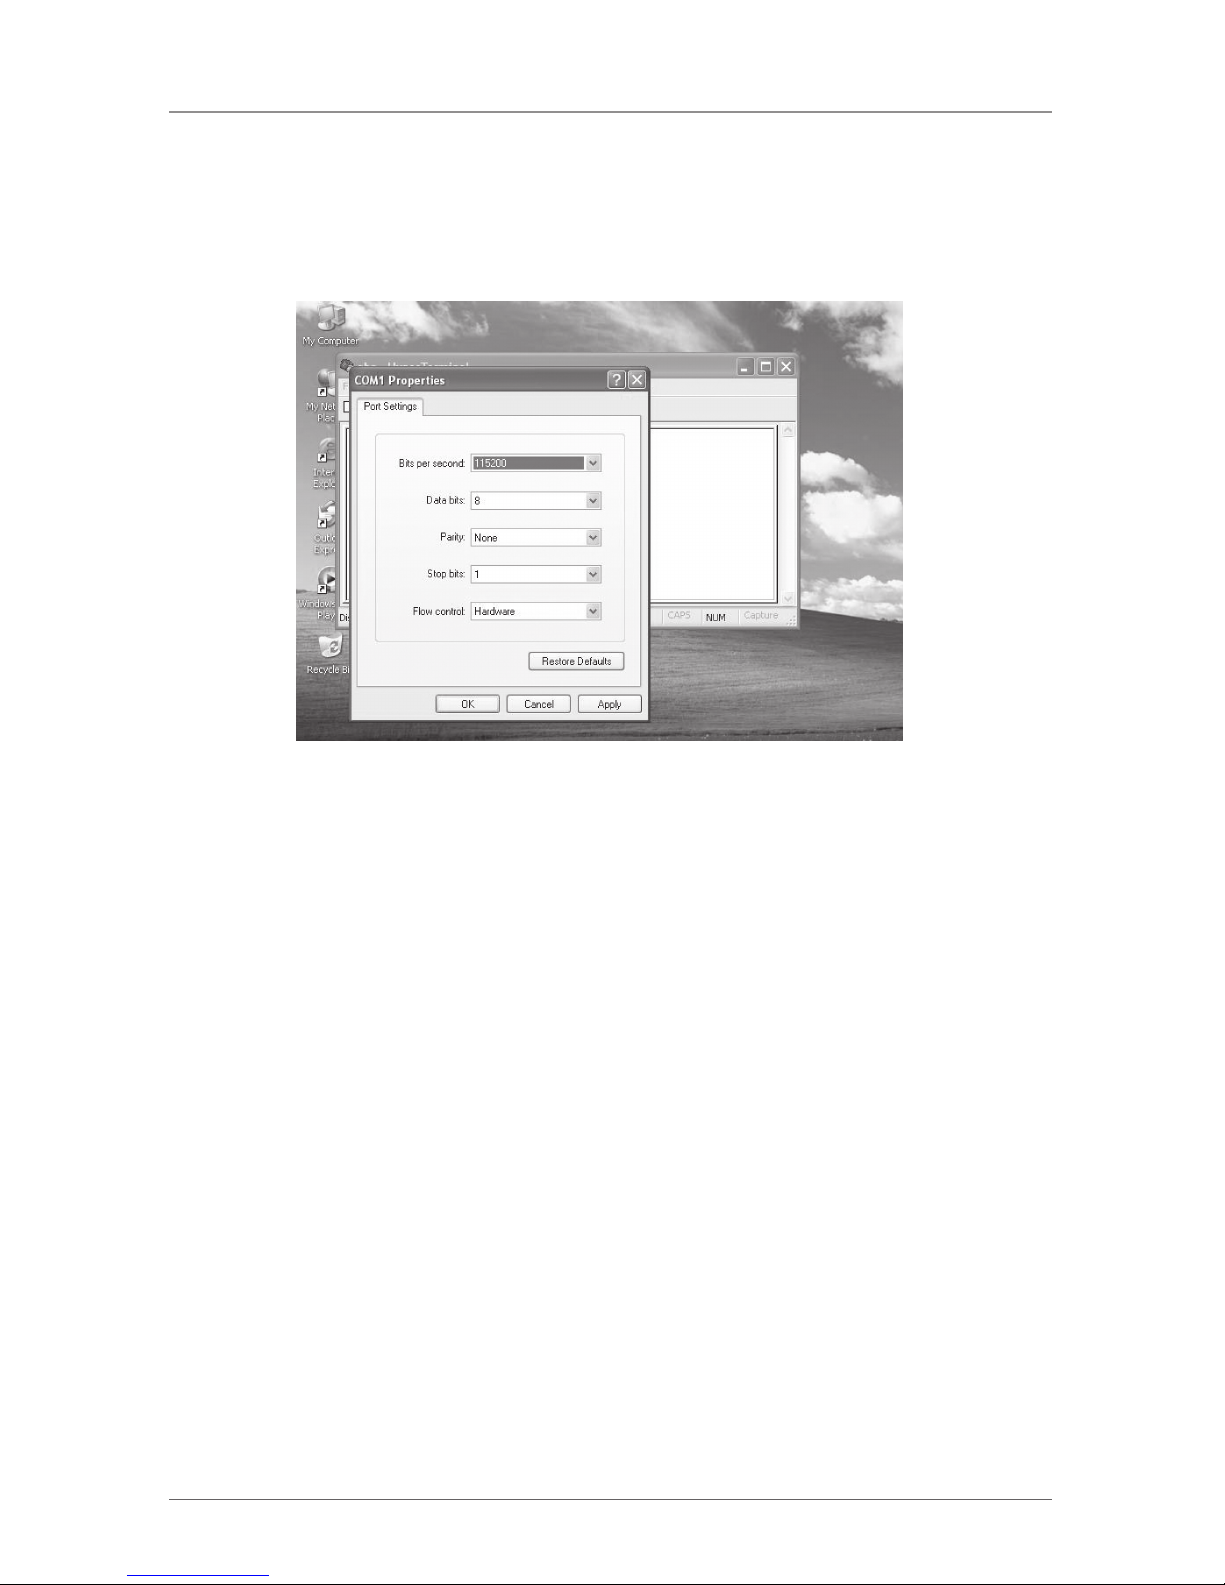
6. If you click on “OK” in Figure 3-9, the screen shown in Figure 3-10 appears.
Figure 3-10. Port Settings screen.
7. From the Bits per second drop-down menu, select 115200. Choose settings for
data bits, parity, stop bits, and flow control from their respective drop-down
menus. The default values are:
Data bits: 8
Parity: None
Stop bits: 1
Flow control: Hardware
If you change any of these values, you can click on “Restore Defaults” to return
to these values.
Click “Cancel” to cancel the changes, “Apply” to apply the changes, or “OK”
to save the changes.
8. If you click on “OK” in Figure 3-10, the screen shown in Figure 3-11 appears.
Page 21
Page 21
724-746-5500 | blackbox.com
Chapter 3: Installation
Figure 3-11. HyperTerminal screen.
9. Follow the instructions on the screen. For example, simply type I to set your IP
address, type F to reset everything back to factory defaults, and so on.
NOTE: Remember to type W after you make any changes.
3.4 Disabling the Mouse Acceleration on the Computers
Many operating systems offer a feature called mouse acceleration that allows
the user to adjust the responsiveness of the cursor on the screen to physical
movements of the mouse. While this is usually a beneficial interface enhancement,
it can interfere with the ServSwitch unit’s operation and should be disabled
on the managed computers before you attempt a remote session. Follow the
instructions in Sections 3.4.1 through 3.4.4, depending on your operating system,
to disable mouse acceleration for the operating system installed on each managed
computer.
3.4.1 Windows 98 and Windows 2000
1. From the Control Panel, click on “Mouse.”
2. From Mouse Properties, click on the “Motion” tab.
3. Make sure that the Pointer speed bar is centered and Acceleration is set to
None.
3.4.2 Windows XP and Windows Server 2003
1. From the Control Panel, click on “Mouse.”
2. Go to Pointer Options and turn off Enhance Pointer Precision.
3. Make sure that the Pointer speed bar is centered.
Page 22
Page 22
724-746-5500 | blackbox.com
1-, 8-, and 16-Port ServSwitch EC with IP KVM Switch Modules
NOTE: For Windows 7, there are many options. Go to the Internet for more
information.
3.4.3 Linux®, UNIX®, and X-Windows
Add this command to your xinitrc, xsession or other startup script: xset m 0/0 0
3.4.4 Sun® Solaris
®
Add this command to your xinitrc, xsession or other startup script: xset m 1/1 0
3.5 How to Connect Your ServSwitch Module
A typical example of a ServSwitch setup is shown in Figure 3-12. Refer to this
diagram and follow the instructions discussed next when installing the ServSwitch.
Local
monitor
PC H PC G PC B
PC A
To power
adapter
PC 2 PC 1
Local
mouse
and
keyboard
Serial Access
Unit
(KV9-SRL)
Remote user
A (New York)
Remote user B
(London)
Remote user D
(Tok yo)
Remote user C
(Taipei)
Figure 3-12. Sample setup using a 16-port ServSwitch module (KVT1IP16UV).
NOTE: Only one remote user session can be used at a time, not simultaneously.
NOTE: The restrictions on functions such as cascading and the assignment
of master and slave units apply to all ServSwitch versions.
Internet
Page 23
Page 23
724-746-5500 | blackbox.com
Chapter 3: Installation
1. Make sure that the ServSwitch and the computers to be managed are powered
off.
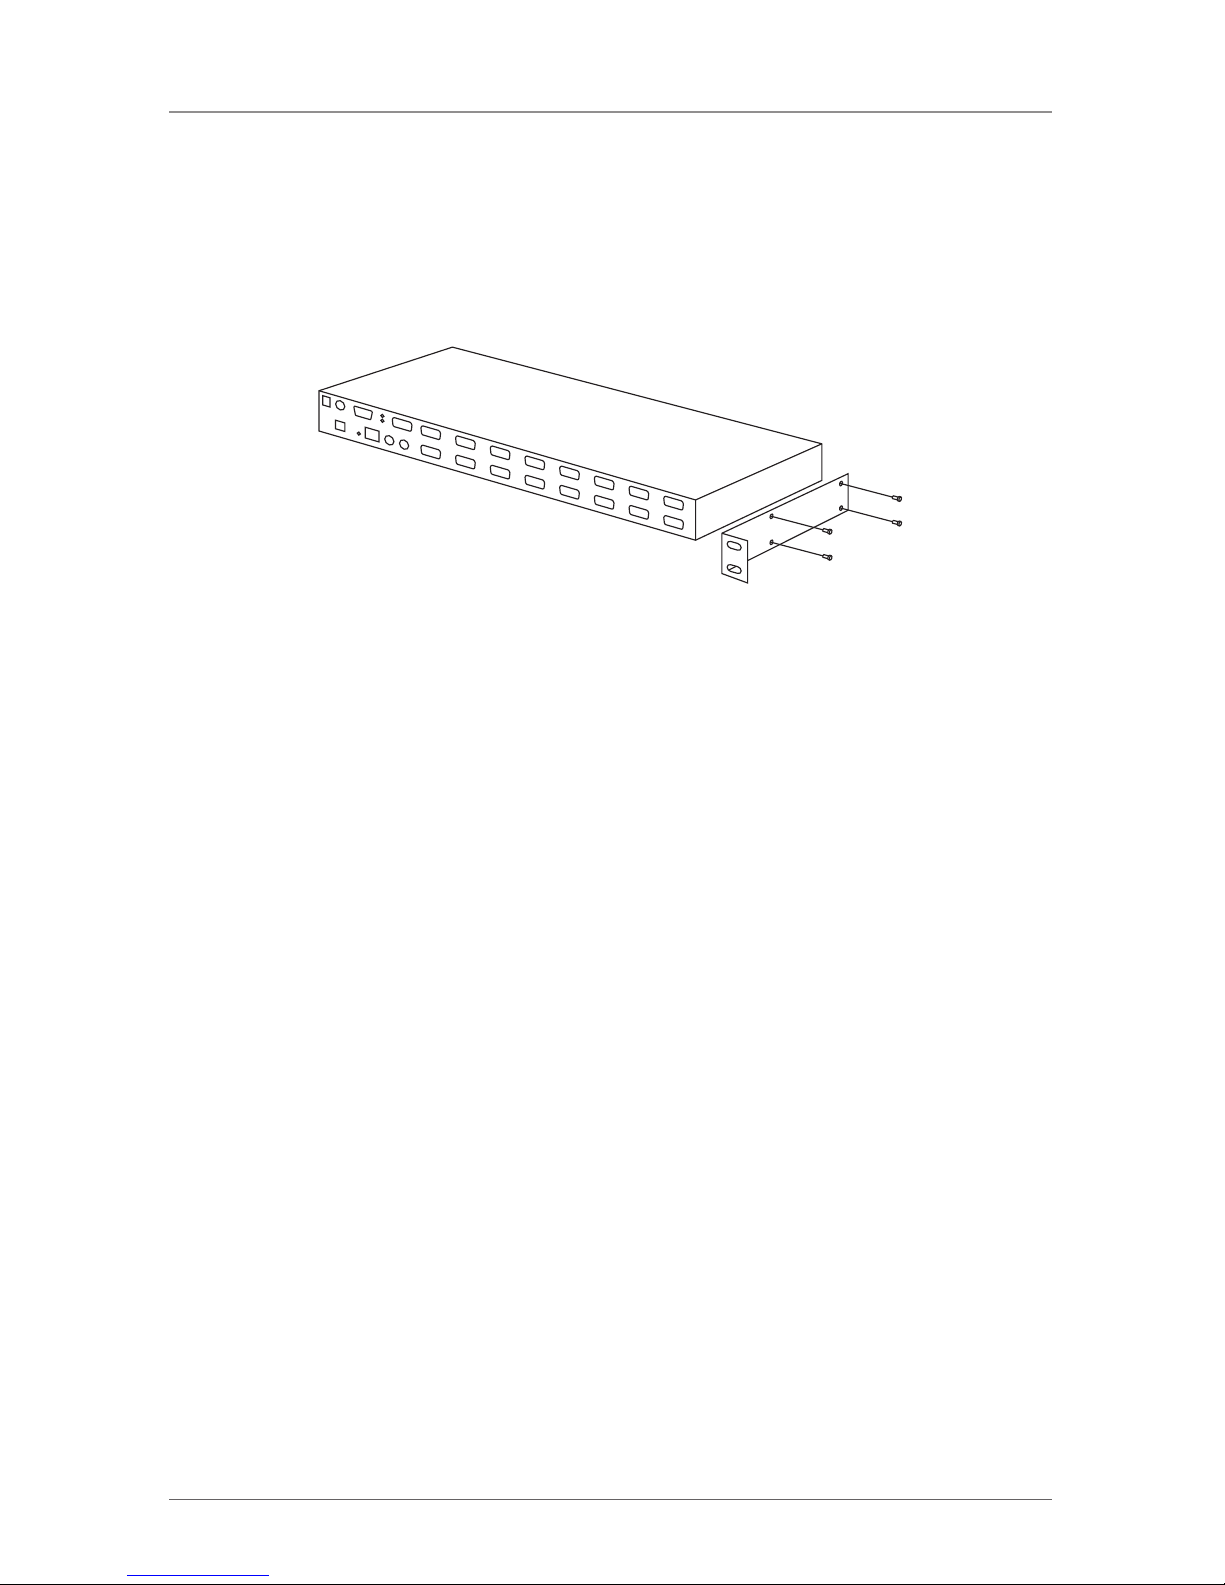
2. Mount the 1-, 8-, or 16-Port ServSwitch Module (KVT1IP1UV, KVT1IP8UV or
KVT1IP16UV) in a ServTray. Use the included rackmount brackets and screws.
See Figure 3-13.
Figure 3-13. Rackmounting the ServSwitch.
3. Connect a straight-through Ethernet patch cable to the LAN port on the
ServSwitch module’s rear panel.
4. Connect the opposite end of the cable to your network hub, switch, or termi-
nated wall outlet.
5. If you want to use the ServSwitch module as a local console, connect a
standard PS/2 keyboard (following the PC99 standard color codes) and PS/2
mouse (also following the PC99 standard) as marked on the ServSwitch unit’s
rear panel.
6. Connect a VGA monitor to the video out port on the ServSwitch unit’s rear
panel.
7. If your managed computers (the computers are often servers or critical systems)
have PS/2 connections, attach one end of a 3-in-1 Cable (EHN70001-0006,
EHN70001-0010, EHN9000P-0015, or EHN9000P-0030) to the computer’s
available keyboard, mouse, and VGA out ports. Connect the opposite end of
the cable (with a single HD15 VGA connector) to one of the PC 1–8 or PC A–H
ports on the ServSwitch unit’s rear panel. Repeat this procedure for each PS/2
enabled managed computer.
Page 24

Page 24
724-746-5500 | blackbox.com
1-, 8-, and 16-Port ServSwitch EC with IP KVM Switch Modules
NOTE: The ServSwitch emulates the keyboard and mouse on the servers. If the
cables are disconnected or the switch is powered off, you will need to
reboot the critical servers. To avoid this issue, use the USB interfaced computer cables
(EHN90000U-XXXX) because the USB ports on computers are “plug-andplay.”
8. If your managed computers (the computers are often servers or other critical
systems) have USB connections, attach one end of a 2-in-1 Cable
(EHN9000U-0006, EHN9000U-0010, or EHN9000U-0015) to the computer’s
available USB port and video out port. Connect the opposite end of the cable
(with a single HD15 VGA connector) to one of the PC 1–8 or PC A–H ports on
the ServSwitch unit’s rear panel. Repeat this procedure for each USB-enabled
managed computer.
9. If you are using 1 to 16 optional Serial Access Units, connect the RJ-14
cable(s) (included with the Serial Access Unit[s], KV9-SRL) to the R-port on the
ServSwitch unit(s).
10. Power on the ServSwitch by connecting the AC adapter to a suitable power
outlet and the opposite end of the power cord to the 12-VDC port on the
ServSwitch unit’s rear panel.
11. Power on each of the managed computers, observing normal startup
procedures.
NOTES:
1. You can choose to mix managed computers connected via PS/2 and USB
connections as necessary with no impact on features or function.
2. Steps 5 and 6 are required only if you want to manage the ServSwitch and its
computers locally (that is, not over the Internet or a LAN). While not required,
we recommend adding these devices for easier administration.
3. You can cascade multiple ServSwitch units to increase the total number
of possible managed computers. To take advantage of this feature, refer to
Section 5.1.
3.6 Access Your ServSwitch Module and Remotely Control the Host
Computer(s)
As soon as you finish the settings and connections described in Sections 3.1
through 3.5, you are ready to remotely control the host computer(s). Simply open
the Web browser and type in the IP you already set up in Section 3.3.1, then type
Page 25
Page 25
724-746-5500 | blackbox.com
Chapter 3: Installation
in the correct username and password. Once you type the username and password, Figure 3-14 appears.
NOTE: If you did not change the original factory settings, you can enter an IP
address of “https://192.168.1.123” in your browser. The default username
is “admin” and the default password is “admin.”
Figure 3-14. Home screen.
Double-click on the small rectangle window in the middle of the screen shown in
Figure 3-14. You’ll get the VNC screen, which is the host computer’s screen.
NOTE: You may need to upgrade or download your Java (http://www.java.com)
support in your browser before using the VNC screen to remotely control
the host computer(s). However, most modern browsers come with
a version of Java that’s compatible with this application.
From the VNC (host computer’s) screen, you can control the host computer
remotely just like you could if you were physically present at the host computer’s
location.
To log out, simply click on the Logout icon at the top of the screen.
Page 26
Page 26
724-746-5500 | blackbox.com
1-, 8-, and 16-Port ServSwitch EC with IP KVM Switch Modules
4. Operation
4.1 Powering Up the System
Once all cables have been connected and all computers have been powered on,
the module emulates mouse and keyboard signals on each port, allowing your
computer to boot normally. The module is now ready for use. You can configure
the module in two ways: by activating the On-Screen Display (OSD) window or by
using hotkey commands.
4.2 Selecting Computers Using On-Screen Display (OSD)
The module can operate via an on-screen display (OSD). To use this option, press
the Left-Ctrl key twice within two seconds to see the hotkey menu (an OSD
option) if it is enabled. Press the Left-Ctrl key three times within two seconds, and
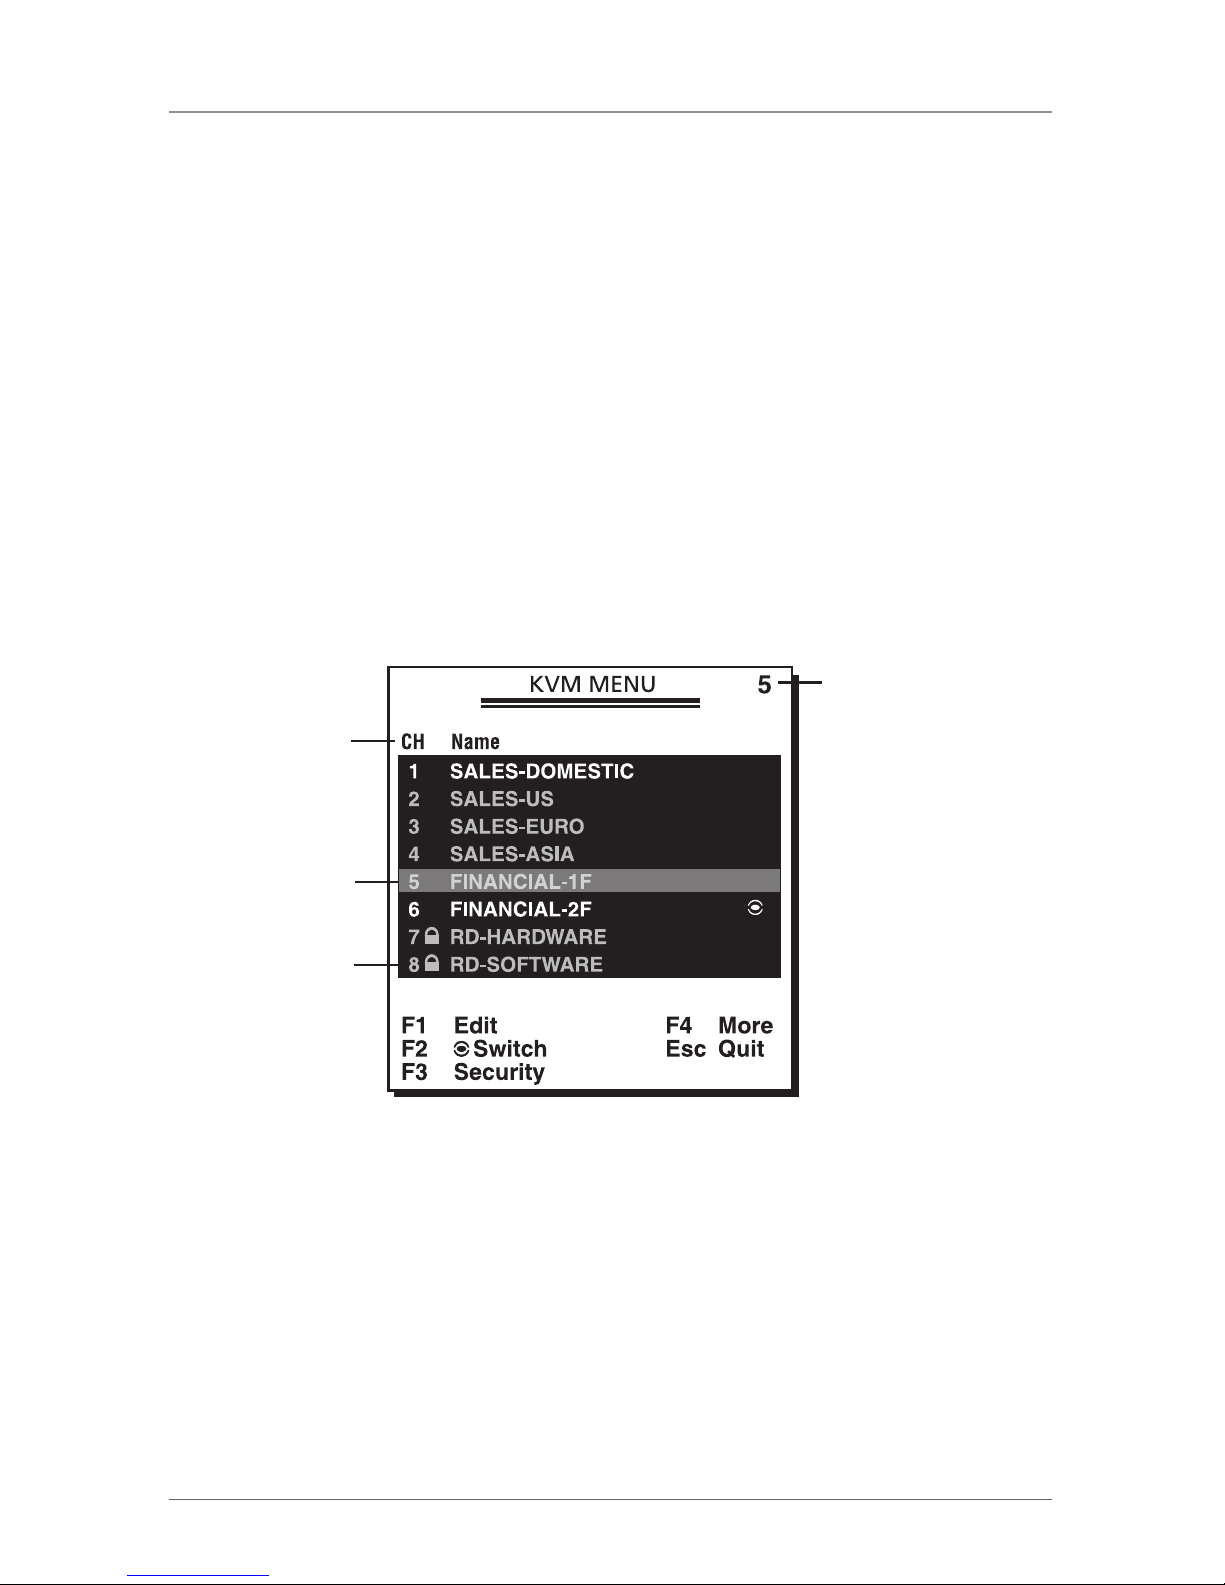
a ServSwitch menu screen appears showing a list of the computers with corresponding port numbers, names, and statuses. See Figure 4-1.
Currently selected
channel address
Press Enter to go
to the slave screen
FINANCIAL-1F (the
highlighted information) shown in
Figure 4-2.
Port channel
address
Highlighed by
arrow keys
Security
enabled port
Figure 4-1. OSD screen.
Note also that the short-form Hotkey menu can be turned on as an OSD function.
Just press the F4 key to select More, then select Hotkey menu. See Table 4-1 for
Hotkey commands.
Page 27

Page 27
724-746-5500 | blackbox.com
Chapter 4: Operation
Figure 4-2. OSD slave screen.
In Figures 4-1 and 4-2, the color of a device name is green if it has power and is
ready for operation, or the color is white if it has no power. The OSD menu
updates the color when the device’s power is activated.
Press the up-arrow, down-arrow, or 1–8 keys to highlight a computer, then press
the Enter key to select it. To remove the OSD menu from the display, press Esc to
exit the OSD. The status window then returns to the display and indicates the
currently selected computer or operating status.
An eyemark to the right of a name (see Figure 4-2) indicates that computer is
selected and monitored in Scan mode. In the OSD, this mark can be switched on
or off by pressing the F2 key.
Press the Esc key to exit OSD and to return to the port/PC screen that you were
previously connected to.
The Function and Escape keys work as follows:
The F1 key enables you to edit a computer or slave’s name entry with up to 14
characters. First highlight a port, then press F1 and type the name. Valid characters are A–Z, 0–9, and the dash character. If you type lowercase letters, they will
be converted to uppercase ones. Press the Backspace key to delete one letter at a
time. Non-volatile memory stores all name entries until you change them, even if
the unit is powered down.
Page 28

Page 28
724-746-5500 | blackbox.com
1-, 8-, and 16-Port ServSwitch EC with IP KVM Switch Modules
The F2 key enables you to switch a computer’s eyemark on or off. First, use the
up-arrow and down-arrow keys to highlight a computer, then press F2 to switch
its eyemark on or off. If Scan Type (described on the following page) is Ready PC
+ eyemark, only the powered-on and eyemark-selected computers will be displayed sequentially in Scan mode. If Scan Type is Eyemark only, only the eyemarkselected computers will be displayed sequentially in Scan mode.
The F3 key enables you to lock a computer to prevent unauthorized access by
highlighting it and then pressing F3. Now, for the new password, type in up to
four characters (A–Z, 0–9, and “-”) and press the Enter key. A security-enabled
computer is marked with a lock symbol following its port number. To permanently
disable the security function from a locked computer, highlight it, press F3 and
then type in the password.
If you want to access the locked computer temporarily, simply highlight it and
press the Enter key (instead of the F3 key), then the OSD will ask you for the password. After typing in the correct password, you are allowed to use the computer.
This computer is automatically re-locked once you switch to another port. During
Scan mode, the OSD skips the password-protected computers.
The F4 key enables more functions, including AutoScan, Manual Scan, Scan Type,
Scan Rate, Hotkey Menu, CH Display, and Position. A new screen pops up displaying these functions as described on the next two pages. Most of them are
marked with a triangle, indicating there are options to choose from. Use the uparrow or down-arrow key to select the functions, and then press the Enter key.
Available options will be shown in the middle of the screen. Again, use the uparrow or down-arrow keys to view each option, and then press the Enter key to
select it.
Press the Esc key to exit the OSD at any time and return to the port/PC screen
that you were previously connected to.
AutoScan
In this mode, the module automatically switches from one powered-on computer
to the next one, sequentially in a fixed interval. During AutoScan mode, the OSD
displays the name of the selected computer. When AutoScan detects any keyboard or mouse activity, it suspends the scanning until activity stops; it then
resumes with the next computer in sequence. To abort the AutoScan mode, press
the left Ctrl key twice, or press any front-panel button. Scan Type and Scan Rate
set the scan pattern. Scan Type (press F4, then select More\Scan Type) determines
if scanned computers must also be eyemark selected. Scan Rate (press F4, then
select More\Scan Rate) sets the duration a computer is displayed before selecting
the next one.
Page 29

Page 29
724-746-5500 | blackbox.com
Chapter 4: Operation
Manual Scan
Scan through powered-on computers one by one using the keyboard control. You
can press F4, then select More\Scan Type to determine if scanned computers
must also be eyemark selected. Press the up-arrow key to select the previous computer and the down-arrow key to select the next computer. Press any other key to
abort the Manual Scan mode.
Scan Type
Ready PC (the powered PC) + eyemark: In Scan mode, scan through powered-on
and eyemark-selected computers. Only powered PC and eyemark-selected
computers will be scanned.
Ready PC (the powered PC): In Scan mode, scan through powered-on computers.
Only powered-on computers will be scanned.
Eyemark only: In Scan mode, scan through any eyemark-selected computer
regardless of computer power status.
The non-volatile memory stores the Scan Type setting.
Scan Rate
Sets the duration a computer is displayed in Auto Scan mode. The options are 3
seconds, 8 seconds, 15 seconds, and 30 seconds. The non-volatile memory stores
the Scan Rate setting.
Hotkey Menu
When you press the Left-Ctrl key twice within two seconds, the Hotkey menu
appears, displaying a list of hotkey commands if the option is On. The Hotkey
menu can be turned Off if you prefer not to see it when you press the Left-Ctrl
key twice. The non-volatile memory stores the Hotkey menu setting.
The hotkey menu On/Off option is within the OSD. Simply enter OSD, press F4,
select hotkey, then select On or Off.
CH Display
Auto Off: After you select a computer, the port number and name of the computer will appear on the screen for three seconds then disappear automatically.
Always On: The port number and name of a selected computer and/or OSD status is displayed on the screen continuously. The non-volatile memory stores the
CH Display setting.
Page 30

Page 30
724-746-5500 | blackbox.com
1-, 8-, and 16-Port ServSwitch EC with IP KVM Switch Modules
Position
The actual display position of the selected computer and/or OSD shifts because of
different video resolution; the higher the resolution, the higher the display position. Use the F4 key (More/Position) to select the position of the OSD menu on
the screen. Choose from five options: upper-left (UL), upper-right (UR), lower-left
(LL), lower-right (LR), or middle (M). The non-volatile memory stores the position
setting.
4.3 Selecting Computers Using Keyboard Hotkey Commands
Each computer is assigned a numeric ID. To directly switch the KVM control to any
computer via a simple keyboard command sequence, do the following:
1. To invoke the hotkey mode, press the Left-Ctrl key twice within two seconds.
The switch will beep to indicate that it’s in hotkey mode.
2. Enter your desired switch port number (1–8). For example, if you press Left-Ctrl,
Left-Ctrl, 2, you’ll select the computer on Port 2.
Or, do the following:
1. To invoke the hotkey mode, press the <Left-Ctrl> key twice within two
seconds. The switch will beep to indicate that it’s in hotkey mode.
Table 4-1 lists the hotkey commands.
Table 4-1. Hotkey commands.
Command Description
<Left-Ctrl><Left-Ctrl> X Switch to PC “X” master port (X=1–8).
<Left-Ctrl><Left-Ctrl> F1 Begin AutoScan. The AutoScan feature allows
you to monitor the activity of the connected
computers so that you can monitor the
computer activity without having to press
the front-panel buttons.
<Left-Ctrl><Left-Ctrl> Stop AutoScan.
<Left-Ctrl><Left-Ctrl> F2 Begin Manual Scan.
<Left-Ctrl><Left-Ctrl> F3 Adjust scan rate. The module beeps one to
four times to indicate scan intervals of 3, 8, 15,
and 30 seconds.
X = 1–8
F1–F3 = Function keys
Page 31

Page 31
724-746-5500 | blackbox.com
Chapter 4: Operation
4.4 Switching Computers Using Monitor Controls (KVT517A-WIDE)
When using the KVM module with a ServView V Tray (KVT517A-WIDE), you can
switch computers via monitor controls. These controls are shown in Figure 4-3
and described in Table 4-2.
1
Figure 4-3. Front panel of the KVT517A-WIDE.
Table 4-2. Monitor controls on the KVT517A-WIDE and their functions.
Button or Description Function
LED
1 Computer selection button Press one of these push
(lower) buttons to select a computer port.
Figure 4-4 illustrates and Table 4-3 describes the KVT517A-WIDE LCD monitor
function buttons.
6 5 4 3
2
Figure 4-4. LCD monitor function buttons on the KVT517A-WIDE.
Page 32

Page 32
724-746-5500 | blackbox.com
1-, 8-, and 16-Port ServSwitch EC with IP KVM Switch Modules
Table 4-2. LCD monitor function buttons.
Button or Function Description
LED
2 LCD power button Press this button to turn on
power. When power is on, the
LCD lights.
3 Auto key Press this dual-function button to
automatically adjust the best setting for the current display signal.
When using the OSD menu, press
the Auto key to exit.
When the unit is operating, turn
on the OSD menu to set the LCD
panel as an ordinary LCD monitor.
4 + key When using the OSD submenu,
press this dual-function key to
increase the value.
When using the OSD menu, press
this dual-function key to move to
the next item.
5 - key When using the OSD submenu,
press this dual-function key to
decrease the value.
When using the OSD menu, press
this dual-function key to move to
the previous item.
6 Enter key Press this dual-function key to start
the OSD function.
When using the OSD menu, press
this dual-function key to enter the
OSD submenu.
Page 33

Page 33
724-746-5500 | blackbox.com
Chapter 4: Operation
4.5 Control Selection
The KVM module supports most current wireless keyboards and mice, extends
your keyboard and mouse control without obstructive cable, is free to move
where you want, and controls and manages all your servers in a cabinet within
the range of a couple of meters.
While using the wireless mouse (or wireless keyboard and mouse combo), users
can disable the touch pad function to prevent interfering with the mouse cursor.
To apply the wireless control and disable the touch pad function:
You can connect the wireless receiver to an extra keyboard/mouse. The selector
enables users to switch the touch pad function ON/OFF. Push and lift the lid to
see the hidden bin as shown in Figure 4-4.
Touchpad and Scroll
function selection
Figure 4-4. Connecting the wireless receiver to an extra keyboard/mouse.
Page 34

Page 34
724-746-5500 | blackbox.com
1-, 8-, and 16-Port ServSwitch EC with IP KVM Switch Modules
Plug the keyboard/mouse into the USB Type A connector on the side edge of the
drawer as shown in Figure 4-5.
Plug USB (KB/MS) here
Figure 4-5. Plugging in the keyboard/mouse.
Page 35

Page 35
724-746-5500 | blackbox.com
Chapter 5: Advanced Operations
5. Advanced Operations
The Web interface is the most intuitive way to configure the ServSwitch. It also
offers a Java based VNC client that you can use to control the managed computers from a remote location. The ServSwitch supports any industry-standard HTML
Web browser. To access the Web interface, open your Web browser and type in
the IP address of the unit you wish to access/configure. The IP address will be
either:
a) the address assigned for the LAN port by your DHCP server as identified in
Chapter 3,
or
b) the fixed IP address you set up (see Section 3.1 for more information). Again,
the default IP address for the ServSwitch unit’s LAN port is
htt ps :/ /192.168.1.123.
5.1 How to Log in to the ServSwitch (the Home Screen)
1. Before you can access the Web configuration interface, you must type in a
username and password. The default username and password as shipped from
the factory is username admin with a password of admin. See Figure 5-1.
NOTE: Before the login screen appears, your Web browser may display a warning
about an invalid security certificate. This does not affect the security of
your data in any way. Whenever you are prompted about a certificate
security problem by your browser or the Java VNC client, always choose
the option to continue.
Figure 5-1. Login screen.
Page 36

Page 36
724-746-5500 | blackbox.com
1-, 8-, and 16-Port ServSwitch EC with IP KVM Switch Modules
2. Once you type in the username and password, click on the Login button to
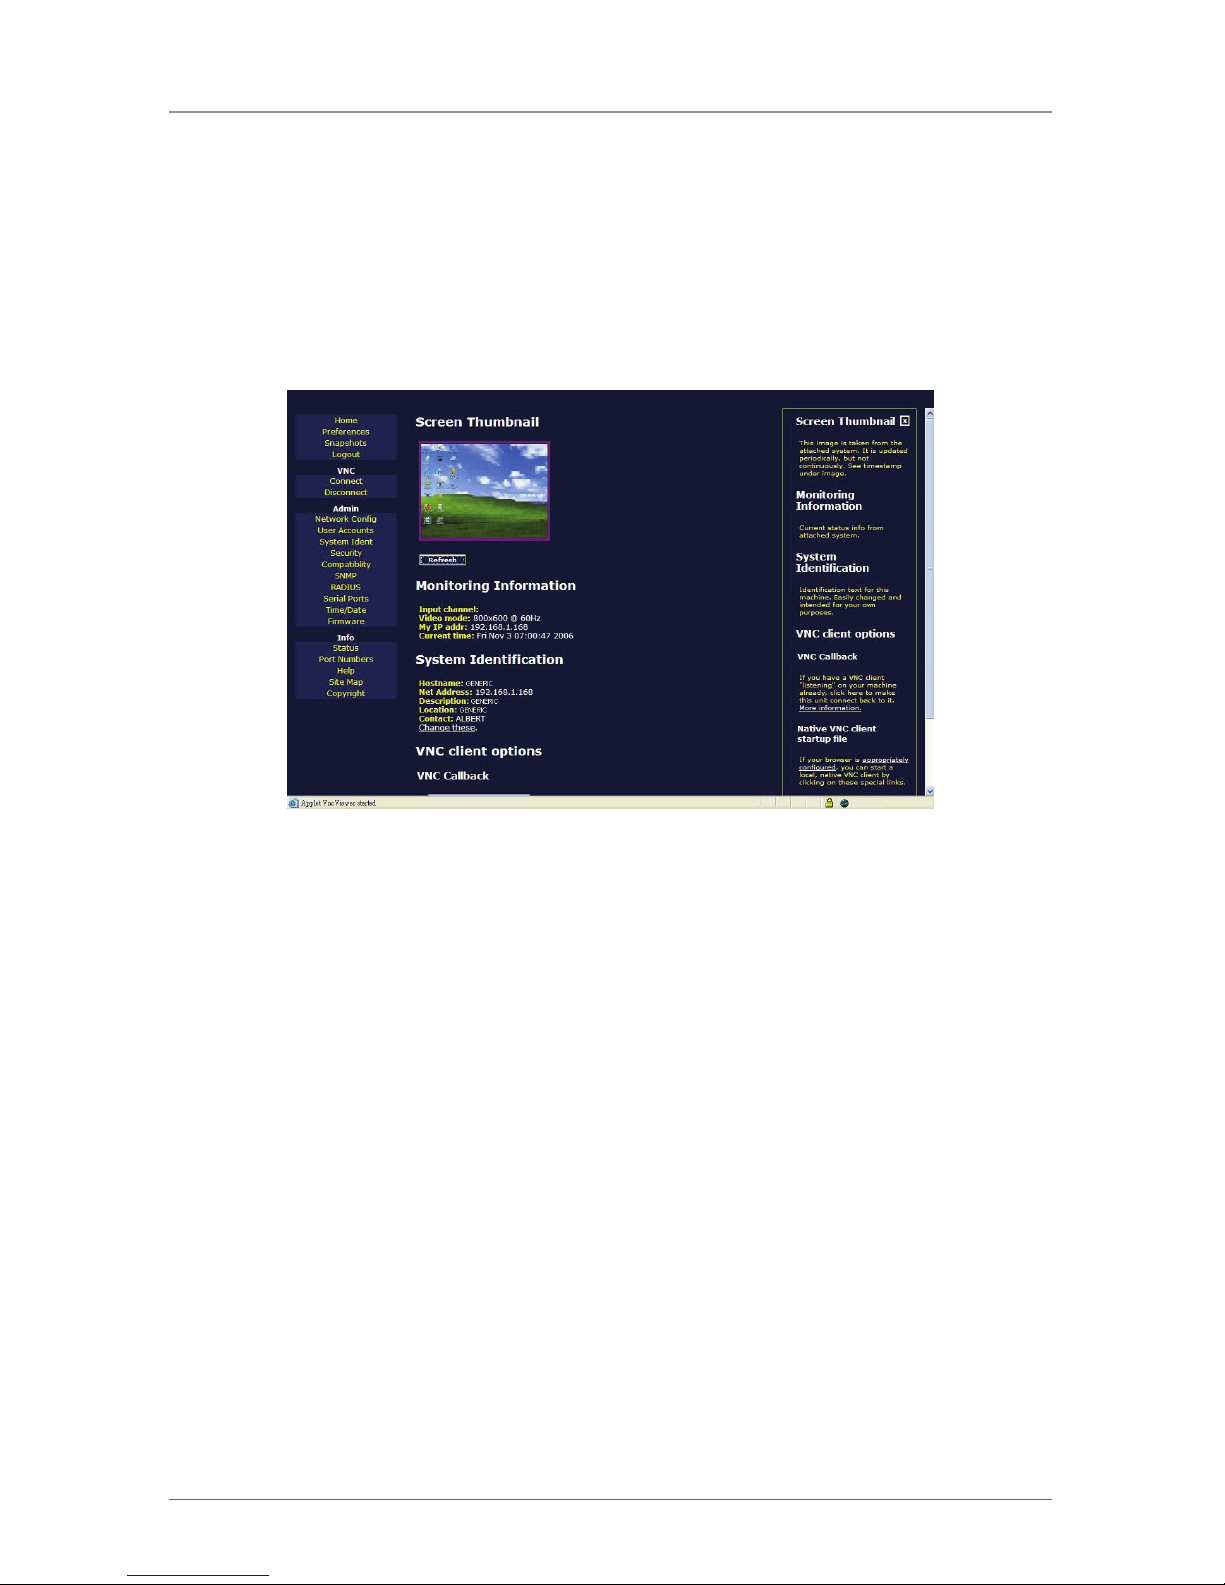
continue. Figure 5-2 appears.
Figure 5-2. The Home screen.
3. The Home screen (Figure 5-2) serves two functions. First, it is a place to check
the ServSwitch unit’s status, view essential system information, and capture
screen shots from the managed computers. Second, it is where you can start
the integrated Java VNC client interaction with the managed computers by
clicking on the large screen shot or choosing one of the VNC client links. To
refresh the screen, click on the Refresh button.
The menu on the Home screen’s left side has 4 categories: Home, VNC, Admin,
and Info. Home menu options include Preferences, Snapshots, and Logout. VNC
menu options include Connect and Disconnect. Admin menu options include
Network Config, User Accounts, System Ident, Security, Compatibility, SNMP,
RADIUS, Serial Ports, Time/Date, and Firmware. Info menu options include
Status, Port Numbers, Help, Site Map, and Copyright.
These options are described in Sections 5.2 through 5.5.
Page 37

Page 37
724-746-5500 | blackbox.com
Chapter 5: Advanced Operations
5.2 Home Menu Options
5.2.1 Preferences
Different user accounts may have different personal preferences. For example, you
might have a login account for local access and a different one for remote access.
The local account would select 16-bit color, maximum bandwidth, and so on. The
remote account would select 8-bit color, low bandwidth, and no splash screen.
Plus, the remote account may require encryption. Current user preferences are
shown in Figure 5-3.
Figure 5-3. User Preferences screen.
Page 38

Page 38
724-746-5500 | blackbox.com
1-, 8-, and 16-Port ServSwitch EC with IP KVM Switch Modules
5.2.2 Snapshots
You can view the screen as full-size, 1⁄2-size, 1⁄4-size, 1⁄8th-size, or 1⁄16th-size. Select
the appropriate size from the screen shown in Figure 5-4.
Figure 5-4. Snapshots screen.
5.2.3 Logout
Click on this option to log out.
5.3 VNC Menu Options
You can control the host computers from the VNC menu in the Home screen.
Page 39

Page 39
724-746-5500 | blackbox.com
Chapter 5: Advanced Operations
5.3.1 Connect
Click on “Connect” from the VNC menu in the Home screen. Figure 5-5 appears.
From here, you can control the host computer as if you were physically sitting in
front of it.
Figure 5-5. The host computer’s screen.
5.3.2 Disconnect
To disconnect from the host computer, click on “Disconnect.”
Page 40

Page 40
724-746-5500 | blackbox.com
1-, 8-, and 16-Port ServSwitch EC with IP KVM Switch Modules
5.4 Admin Menu Options
5.4.1 Network Config
From the Home screen, click on “Network Config.” The screen shown in Figure
5-6 appears.
Figure 5-6. Network Configuration screen.
The options shown in Figure 5-6 are described in Table 5-1.
Table 5-1. Network Configuration screen options.
Parameter Description
Network Configuration Click on view/debug current network setup
values here. Figure 5-7 appears.
Dynamic Host Configuration Select Enabled or Disabled from the drop Protocol (DHCP) down menu. This feature applies to the LAN
port on the rear panel and is Enabled by
default. When enabled, the unit will automatically configure itself with an IP address when
a DHCP server is present. When disabled,
the LAN port will use the values assigned to it
on the IP Addresses and Routing table
at the bottom of Figure 5-6.
Page 41

Page 41
724-746-5500 | blackbox.com
Chapter 5: Advanced Operations
Table 5-1 (continued). Network Configuration screen options.
Parameter Description
IP Addresses and Routing This table enables you to assign IP information
for the LAN port. If you are using DHCP, the
values for the LAN port will be filled in automatically, and any changes made will not affect
the setup.
Port: The port is automatically identified as LAN.
IP Address: Type in the IP address for the
ServSwitch.
Subnet Mask: Type in the subnet mask for the
ServSwitch.
Gateway (or 0.0.0.0 for none): Type in the
ServSwitch unit’s default gateway.
Broadcast (or leave blank): Type in the broad-
cast address, or leave this field blank.
Domain Name Server This section allows you to specify DNS servers
and the default DNS domain suffix in use on
the network. If DHCP is enabled, some of these
values may be supplied automatically.
Commit Network Changes Click on the Commit button to apply any
changes made on the page to the
configuration.
The new changes do not take effect until the
next time the unit restarts.
Page 42

Page 42
724-746-5500 | blackbox.com
1-, 8-, and 16-Port ServSwitch EC with IP KVM Switch Modules
View/debug current network setup values here
When you click on this option in the Network Configuration screen (Figure 5-6),
the screen shown in Figure 5-7 appears. This screen enables you to monitor the
records about current login users, current connection, recent system log entries,
and so on.
Figure 5-7. Current Users screen.
Table 5-2. Current Users screen options.
Parameter Description
Current Users Create a new user by filling in the form values
and choosing the appropriate button below.
#: This is the number assigned to the corre-
sponding user.
Username: A list of current usernames appears
in this field. (Only one username is shown in
Figure 5-7.)
From: The ServSwitch unit’s IP address.
Service: Indicates a Web connection.
Login Method: Indicates a login method.
Login Time: The time that the user logged into
the system.
Page 43

Page 43
724-746-5500 | blackbox.com
Chapter 5: Advanced Operations
Table 5-2 (continued). Current Users screen options.
Parameter Description
Current Users (continued) Last Active: This is the user that was most
recently active.
Disconnect all VNC users button: Click on this
button to disconnect.
Current Connection Lists the HTTPS IP address connection.
Recent system log entries Lists recent system activity.
(syslog)
Download syslog here: Click on this button to
download a log entry.
Clear Log button: Click on this button to clear
all settings.
5.4.2 User Accounts
From the Home screen, click on “User Accounts.” Figure 5-8 appears.
Figure 5-8. Users and Passwords screen.
This screen enables you to add accounts other than admin to the system. These
accounts will not have the authority to change settings, but can access the Web
interface and log in the VNC console.
Page 44

Page 44
724-746-5500 | blackbox.com
1-, 8-, and 16-Port ServSwitch EC with IP KVM Switch Modules
Table 5-3. Users and Passwords screen options.
Parameter Description
Users and Passwords Create a new user by filling in the form values
#, username, and password.
#: This is the number assigned to the
corresponding user.
Username: This is the name assigned to the
user.
Password: The current password is indicated by
a row of asterisks.
Delete user: Click on the Delete button to
permanently remove the displayed user from
the system.
Edit User Details Select a username from the above list (click on
its name), then edit the values shown in this
form. Leave the password field empty if you do
not want to change the password.
Username: If you click on a username in the
Username field in the Users and Passwords
section of the screen, that name will appear in
this field. Or, type a new username into this
field (or edit an existing username).
Password: To keep the password for the select-
ed user the same, leave this field blank.
To change the password, type in the new
password twice.
Record changes button: Click on this button to
save your changes.
Page 45

Page 45
724-746-5500 | blackbox.com
Chapter 5: Advanced Operations
5.4.3 System Ident
From the Admin menu in the Home screen, click on “System Ident.” The Change
System Identification screen (Figure 5-9) appears.
Figure 5-9. Change System Identification screen.
The screen options include machine name, location, contact name, network
address, and description. These details are useful for DHCP servers, SNMP agents,
and VNC clients. Although these values do not affect the ServSwitch unit’s operation, they make it easier to manage PCs or servers on the network. To change any
options, type in the changes in the appropriate fields. Then click on “Commit
Changes” to save the changes.
Page 46

Page 46
724-746-5500 | blackbox.com
1-, 8-, and 16-Port ServSwitch EC with IP KVM Switch Modules
5.4.4 Security
From the Home screen, click on “Security.” The Security Profile screen (Figure
5-10) appears.
Figure 5-10. Security Profile screen.
Table 5-4. Security Profile screen options.
Parameter Description
Administrator Password The administrator can change the default pass-
word for admin (recommended). Read and
consider the comments and instructions on this
menu before making any changes, as changing
these features could make the unit inaccessible
through Web configuration (that is, because of
firewall filtering). To prevent the chance for
error, you must type in the password twice.
Set admin password button: Click on this
button to save the new password.
Page 47

Page 47
724-746-5500 | blackbox.com
Chapter 5: Advanced Operations
Table 5-4. (continued) Security Profile screen options.
Parameter Description
Idle Session Timeout When a login session is left unused for some
time, disconnect the user. This applies to Web
login sessions (via cookies) and SSH logins.
Disable this feature by setting the value to zero.
Commit Change button: Click on this option to
save the changes.
Internal Firewall Setup Use this parameter to set up the internal fire-
wall. See the description on the next page.
Disabled—Ignore source IP address (default):
Select this option from the drop-down menu
to disable the IP address.
Enabled—Type in a source IP address: Select
the IP address to accept or reject.
Accept: Type in the desired IP address.
Reject: Type in an address you want to disable.
Commit Changes button: Click on this button
to save the changes. See more information on
the next page.
VNC Password Policy See the description on the next page.
Trust SSH Tunnels See the description on the next page.
Access Sharing Policy See the description on the page 49.
Local User Lockout See the description on page 49.
Page 48

Page 48
724-746-5500 | blackbox.com
1-, 8-, and 16-Port ServSwitch EC with IP KVM Switch Modules
The Security menu allows you to configure a number of settings, including:
Internal Firewall Setup
As an additional layer of protection, the ServSwitch can use an internal firewall.
When this feature is enabled, connections will only be accepted from listed hosts.
For example, the administrator can type in 10.1.0.1/240 in the “Accept” field.
The IP of the client’s computer between 10.1.0.1 and 10.1.0.240 allows accessing
the ServSwitch with the right username and password. On the other hand, the
user can type in 192.168.1.0/20 (for example) in the “Reject” field. The IP of the
client’s computer between 192.168.1.0 and 192.168.1.20 will be rejected to access
the ServSwitch. This makes the ServSwitch invisible to them.
There are three ways to type in the IP addresses:
1. Specific IP addresses (for example, 10.1.0.1, 10.1.0.5, etc.).
2. Net Range (for example, 10.1.0.1/240).
3. Host Names (for example, yahoo.com, google.com, etc.).
CAUTION: Be careful NOT to lock yourself out! Be certain that your IP will be
accepted by your filter.
VNC Password Policy
When a new VNC connection is established, the remote user must be authenticated. Standard VNC protocol does not support username; it only supports passwords. As long as all users have unique passwords, you can determine which user
is connecting based on the password provided. Or, you may enable a second
login screen that will require a valid username and password. You must first
establish a VNC connection using menus and prompts generated by the firmware.
If it is enabled, a second login screen will be required from Java VNC clients as
well. This is unfortunate because the one-time password scheme cannot be used,
and Java VNC clients have already logged into the Web server securely. Also, VNC
normally encrypts passwords and uses a challenge/hashed response system
that is more secure than the second login method. This isn’t a concern if the
entire connection is encrypted with SSH or SSL, however.
Trust SSH Tunnels
If the incoming VNC connection is coming in over an SSH tunnel, the SSH user/
password combination is used and no password is required. Disable this behavior
if you suspect that your SSH client machine is not secure and you are concerned
that your SSH tunnels may be used by other people.
Page 49

Page 49
724-746-5500 | blackbox.com
Chapter 5: Advanced Operations
Access Sharing Policy
There are three modes available:
1. Disables—Use regular give/take method (default). By default, all users can take
keyboard and mouse control of the system (after connecting via VNC) using a
single mouse click.
2. Enforce single-user access policy (visible screen). Some circumstances require
more strict control of this capability, so the admin user can select this mode for
the highest priority access. With a single-user access policy, only one user may
control the host computer(s). New connections are permitted, but they will be
able to view the screen only, but not control the host computer(s). Once the
first user disconnects (or otherwise gives up control), the second user will be
able to access the system immediately.
3. Enforce single-user access policy (blank screen contents). Some circumstances
require more strict control of this capability. The admin user can select this
mode for the highest privacy; no one can see what the admin user is doing
from the VNC screen. That is, the admin user can blank the screen contents
when another user is connected but not controlling the keyboard and mouse.
With a single-user access policy, only one user may control the system. New
connections are permitted, but they will NOT be able to see or even control the
host computer(s). Once the first user disconnects (or otherwise gives up control), the second user will be able to access the system immediately. Only the
admin user can see or control the host computer(s).
Local User Lockout
There are 2 modes available:
1. Disabled—Local user always has access (default). Under this mode, the local
user has the access right to control the host computer(s).
2. Enabled—Network user given priority. Under this mode, the local user has NO
right to control the host computer(s). And on the screen, an IP-OSD menu pops
up as the following image shown. The local user can’t see or do anything; he
can only view the IP-OSD menu shown on the screen. That is, the admin user
can select this mode to lock out the local user. Please keep in mind that the
local user has no way to take control from the network user, so an unattended
VNC session can cause a problem. Under this situation, if you are locked out of
the system because someone has left a VNC session connected and cannot be
reached though other means, the admin user may close all VNC connections.
See the Status page (see Section 5.5.1) to access this feature.
Page 50

Page 50
724-746-5500 | blackbox.com
1-, 8-, and 16-Port ServSwitch EC with IP KVM Switch Modules
5.4.5 Compatibility
From the Admin menu in the Home screen, click on “Compatibility.” The screen
shown in Figure 5-11 appears.
Figure 5-11. Compatibility screen.
The options shown in Figure 5-11 are described in Table 5-5.
Table 5-5. Compatibility screen options.
Parameter Description
Keyboard mapping In many parts of the world, the keyboard has
extra keys and/or a different layout to better
suit the local language than the default U.S./
English. If your host OS is expecting a keyboard of a special type, select it from the
Select Keyboard Layout drop-down menu.
If the wrong value is used here, special language keys will not work, and some basic symbols (such as “) may not even work correctly.
The key layout of the remote keyboard must
match the key layout of the local keyboard
defined here.
Page 51

Page 51
724-746-5500 | blackbox.com
Chapter 5: Advanced Operations
Table 5-5 (continued). Compatibility screen options.
Parameter Description
External power bar Connect a remote power control device via a
straight-through cable to the serial port, and
choose the model from the drop-down menu.
You must use the DB9 serial port (DTE pinout)
on the back of the ServSwitch. Once enabled,
a status and control window appears.
Individual ports can then be power controlled
and monitored.
5.4.6 SNMP
From the Admin menu in the Home screen, click on “SNMP.” The menu that
appears (Figure 5-12) enables you to configure the ServSwitch so it can be recognized and managed using industry-standard Simple Network Management
Protocol (SNMP) software.
Figure 5-12. SNMP Agent Configuration screen.
Page 52

Page 52
724-746-5500 | blackbox.com
1-, 8-, and 16-Port ServSwitch EC with IP KVM Switch Modules
Table 5-6. SNMP Agent Configuration screen options.
Parameter Description
Communities Set these options to control the ServSwitch.
Read-only Community: This community is
allowed to read any value and is not allowed
to write or change anything. To disable read
access, set this string to nothing (empty). The
default value is public.
Read-write Community: The community is
allowed to read and change any value. You
should make this value unique and keep it
confidential for security reasons. Anyone who
knows this string can control this device and
all systems attached to it. Leave the string empty
to disable SNMP write access.
Agent Identification This option sets the location and contact name.
Location: This string is sent as the system.sysLoca-
tion value. It should describe the location of this
device.
Contact Name: This string is sent as the system.
sysContact value. It should describe who to
contact regarding this machine. Typically, it
includes an e-mail address.
Traps This option sets the trap settings for the unit.
Trap/Inform Community: When trap messages are
sent, they are sent using this community. This
should be a community that exists on your trap
server.
Trap Sink 1 (primary): This host will be the target
for any traps/inform messages sent. These
addresses must be specified numerically. Leave
blank if not needed.
Page 53

Page 53
724-746-5500 | blackbox.com
Chapter 5: Advanced Operations
5.4.7 RADIUS
From the Admin menu in the Home screen, click on RADIUS. The screen shown in
Figure 5-13 appears.
Figure 5-13. RADIUS Configuration screen.
The RADIUS server requires the IP address, the UDP port number (1812, default or
1645) and the shared secret. The shared secret is used to encrypt communications
and corresponds to a shared password for the RADIUS server and the client
machine. Two additional servers may be defined for backup purposes. Each server
will be tried in order, using the indicated number of retries and timeout period,
which are configurable on the same page. Remember to enable RADIUS after
configuring it. While RADIUS authentication is enabled, the locally defined IP
module accounts on the ServSwitch will not be used, except for the SSH login.
However, if a username of the form “name.local” is given at the RADIUS prompt,
the system will use “name”; check the password locally, and skip RADIUS authentication. Delete all local accounts to avoid this behavior. When connecting via
VNC, a login screen is generated that asks for a RADIUS username and password.
Table 5-7 describes the options in Figure 5-13.
Table 5-7. RADIUS Configuration screen options.
Parameter Description
Use RADIUS for login Select Disabled or Enabled from the drop-
down menu.
Page 54

Page 54
724-746-5500 | blackbox.com
1-, 8-, and 16-Port ServSwitch EC with IP KVM Switch Modules
Table 5-7 (continued). RADIUS Configuration screen options.
Parameter Description
Servers Priority: Assigns a priority reference number for
each server.
Server IP Address: Type the IP address into this
field.
Port: Type in the UDP port number.
Shared Secret: This is used to encrypt commu-
nications and corresponds to a shared password for the RADIUS server and the client
machine. Two additional servers may be
defined for backup purposes. Each server will
be tried in order, using the indicated number
of retries and timeout period, which can be
configured on the same page.
New Secret: Type in a new value. Type it in a
second time.
Request timeout period (seconds): Type in the
timeout period in seconds. This is the amount
of time that the ServSwitch will allow to elapse
between login retries.
Number of retries (per server): This is the num-
ber of times that the ServSwitch will try to log
in.
Click here to save your RADIUS changes and
apply them: Click the Commit button to save
and apply your changes.
Page 55

Page 55
724-746-5500 | blackbox.com
Chapter 5: Advanced Operations
5.4.8 Serial Ports
From the Admin menu in the Home screen, click on “Serial Ports.” Figure 5-14
appears.
Figure 5-14. Serial Consoles screen.
There are two ways that the ServSwitch can control the serial devices (power bar,
router, printer, and so on). The first way is to connect the serial devices with the
ServSwitch unit’s DTE serial port or DCE serial port. The second way is to attach a
Serial Access Unit (KV9-SRL) to the ServSwitch unit’s R-port. Once you select the
ServSwitch in the Name/Description field in Figure 5-14, click on the Commit
Changes button to save your selection. To refresh the screen, click on the Refresh
button.
5.4.9 Time/Date
From the Admin menu in the Home screen, click on “Time/Date.” The screen that
appears (Figure 5-15) allows you to set the ServSwitch to Local Time or Universal
Coordinated Time (Greenwich Mean Time [GMT]). Date and time from different
computers is stored without consideration for time zone. If you are controlling
multiple sites in different time zones, we recommend you use GMT for all
machines.
Page 56

Page 56
724-746-5500 | blackbox.com
1-, 8-, and 16-Port ServSwitch EC with IP KVM Switch Modules
Figure 5-15. Set Date and Time screen.
5.4.10 Firmware
From the Admin menu in the Home screen, click on Firmware. A firmware
upgrade screen (Figure 5-16) appears.
Page 57

Page 57
724-746-5500 | blackbox.com
Chapter 5: Advanced Operations
Figure 5-16. Firmware upgrade screen.
Table 5-8. Firmware upgrade screen options.
Parameter Description
Version Numbers These fields list the firmware version numbers.
Unit Numbers These fields list the ServSwitch parameters.
Page 58

Page 58
724-746-5500 | blackbox.com
1-, 8-, and 16-Port ServSwitch EC with IP KVM Switch Modules
Table 5-8 (continued). Firmware upgrade screen options.
Parameter Description
Auto Self Upgrade The ServSwitch includes an innovative feature
allowing the unit to upgrade itself over the
Internet. Simply click on the button labeled
“Upgrade to latest” and the unit will go to the
Internet and download the latest version of the
system firmware and then install it. If the unit
cannot access the Internet directly (perhaps
because of a Web proxy or other firewalls),
then a page will be shown that causes your
browser to download the required file. Save
this file to disk and then upload it as described
in Manual Upload below and on the next page.
If you have multiple units to upgrade, you may
choose the Get latest version button that will
not attempt to upgrade the unit directly, but
will instead fetch the required file. This file can
be uploaded to multiple units manually.
Upload New Firmware Click on the Upload firmware button to upload
the firmware.
System Reboot Click on the Reboot Myself button to restart
the ServSwitch.
Purchase Options Use this option to customize your software.
Custom Certificate Upload Select a custom certificate from the drop-
down menu, or click on the Browse button to
view available certificates. Click on the Upload
Certificate button to upload the selected certificate.
Manual Upload
Enter the name of the firmware file that you just downloaded from the
ServSwitch Web site into the field provided in the Firmware upgrade screen (or
use the Browse button). Press “Upload Firmware” and wait until a successful
upload message is shown.
Page 59

Page 59
724-746-5500 | blackbox.com
Chapter 5: Advanced Operations
NOTES:
Remember the following during the firmware upgrade.
Do NOT turn off power to unit before this operation completes successfully. It
may take several minutes to write to flash memory.
The unit will sometimes reboot as part of the upgrade procedure, depending on
which system component is upgraded. You will have to reconnect and re-login
in those cases.
Wait at least two minutes after pressing Start. Do not assume the upload did
not work. There is no status indicator bar to show the progress of the upload.
The upload could simply be slow.
Each file that is distributed upgrades a different component of the system.
Therefore, be sure to apply all files you are given as part of an upgrade. The system knows what to do with each file you give it, and they are checked for validity before being applied.
How to Upload a Custom Certificate
To upload your own certificate to replace the factory-supplied SSL certificate, scroll
down to the bottom of the Firmware upgrade screen (Figure 5-16).
The ServSwitch requires an RSA private key and corresponding public certificate to
be combined into one PEM file. There should be no encryption on the private key
and it must be first in the file. Therefore, the ServSwitch expects a text file in this
format:
-----BEGIN RSA PRIVATE KEY-----
[based64 encoded key]
-----END RSA PRIVATE KEY-----
-----BEGIN CERTIFICATE-----
[based64 encoded certificate]
-----END CERTIFICATE-----
[end of file]
Uploading the root CA public certificate is optional and only affects the link on
the login page. It does not affect operation otherwise. It’s just an X.509 PEM file
holding a public certificate.
Page 60

Page 60
724-746-5500 | blackbox.com
1-, 8-, and 16-Port ServSwitch EC with IP KVM Switch Modules
5.5 Info Menu Options
5.5.1 Status
From the Info menu on the Home screen, click on Status and Figure 5-17 appears.
Figure 5-17. The Status screen.
This menu shows your ServSwitch system status as follows:
• Current Users: Shows the users currently logged in.
• Disconnect all VNC users: In case the users are locked out of the system
because someone has left a VNC session connected and cannot be reached
through other means, the admin user can close all VNC connections.
• Current Connection: Shows the current IP and what encryption you are using to
log in to the ServSwitch.
• Recent System Log Entries (syslog): Records every log entry, including what time
the user logged in, what identification the user logged in, and so forth.
• Network Config: These tables enable you to debug network configuration
problems by giving you a view into the current setup of a machine. To get to
these tables, click on Network Config on the right side of the Status screen.
• Click on “Download syslog” here to download the syslog.
• To clear the log, click on the Clear Log button.
Page 61

Page 61
724-746-5500 | blackbox.com
Chapter 5: Advanced Operations
5.5.2 Port Numbers
From the Info menu on the Home screen, click on “Port Numbers” and Figure
5-18 appears.
Figure 5-18. The Port Numbers screen.
The Port Numbers screen shows data about network servers and their port numbers. This data includes LAN: Main Ethernet Port settings and Localhost settings.
To apply any changes upon reboot that you make to the LAN: Main Ethernet Port,
click on the Commit Changes button. To save your changes and restart all servers,
click on the Restart Servers button.
5.5.3 Help
From the Info menu in the Home screen, click on “Help” to view help screens.
5.5.4 Site Map
From the Info menu in the Home screen, click on “Site Map” to view information
about the site.
5.5.5 Copyright
From the Info menu in the Home screen, click on “Copyright” to view copyright
information for the ServSwitch.
Page 62

Page 62
724-746-5500 | blackbox.com
1-, 8-, and 16-Port ServSwitch EC with IP KVM Switch Modules
5.6 How to Speed Up Your ServSwitch
Click on “Preferences” on the Home screen and Figure 5-19 appears.
Figure 5-19. The User Preferences screen.
From this screen, select bandwidth control. There are four modes available: Min,
Avg, Max, and Auto. If you choose Min, Avg, or Max, you will override the
default, Auto. The automatic mode measures actual network performance. You
may see the current mode switch from Min to Avg or Max. The different modes
indicate more time spent on compression versus more bandwidth. There is no
visual difference between the modes, but there can be a noticeable difference in
speed and smoothness.
From Force bandwidth mode, you can select the proper bandwidth corresponding
to your network environment. We recommend selecting Max for LAN users and
Min for WAN users.
Page 63

Page 63
724-746-5500 | blackbox.com
Chapter 5: Advanced Operations
Click on Open VNC connection immediately on web login to get the VNC screen
(the host computer(s) screen) (Figure 5-20).
Figure 5-20. The VNC screen.
NOTE: You may need to upgrade or download your Java (http://www.java.com)
support in your browser before using the VNC screen to remotely control
the host computer(s). However, most modern browsers come with
a version of Java that’s compatible with this application.
Page 64

Page 64
724-746-5500 | blackbox.com
1-, 8-, and 16-Port ServSwitch EC with IP KVM Switch Modules
6. Accessing ServSwitch Features
Once you access and configure the ServSwitch unit’s networking component, you
can use it to select and control the managed computers connected to it. This section describes how to add ServSwitch units to the master unit for greater flexibility
and how to use the on-screen display (OSD) system to manage your computers.
Once you have established a VNC session with the ServSwitch, you can access the
KVM features as though you were at a local console.
6.1 Cascade Configuration
You can connect a second level of ServSwitch units to one or more of your
ServSwitch units via its PC 1–8 ports. The ServSwitch units connected to the first
ServSwitch (the master switch) are known as slaves. Once connected, the units
will automatically configure themselves as either masters or slaves. You can only
connect an equal or a smaller ServSwitch to the master: a 16-port master switch
can have both 16-port and 8-port slave ServSwitch units, an 8-port master switch
can have 8-port and 4-port slaves, and so on.
For example, the 16-port unit can support 136 computers, with 8 units of 16-port
slave ServSwitch units, each connected to 16 computers. The slave ServSwitch
units must be connected to the PC 1–8 ports, not the PC A–H ports.
To cascade your ServSwitch units, use a 3-in-1 ServSwitch cable (EHN700010006, EHN70001-0010, EHN9000P-0015, or EHN9000P-0030) to connect one of
your master switch’s PC 1–8 ports to the slave ServSwitch unit’s console port.
When turning on your cascaded switches, turn on the master switch before turning on any of the others.
Figure 6-1 shows a typical cascade configuration.
Page 65

Page 65
724-746-5500 | blackbox.com
Chapter 6: Accessing ServSwitch Features
To power
adapter
Local
monitor
PC H PC G PC B PC A
PC 2 PC 1
PC 8 PC 7
Master ServSwitch
module
(K VT1IP16UV)
Slave
ServSwitch
(K V91xxA )
Local
mouse and
keyboard
Internet or
Intranet
Serial
Access Unit
(KV9-SRL)
Remote
user B
(London)
Remote
user A
(New
York)
Remote
user C
(To kyo)
Remote
user D
(Taipei)
Figure 6-1. Cascade application.
NOTE: An IP-based module must be at the top of the cascade. You cannot
configure an IP-supported module as a slave.
NOTE: When creating a cascade, the master switch must be rebooted in the
correct sequence. During this procedure, any PS/2-based critical servers
may also need to be rebooted because the ServSwitch emulates a
keyboard and mouse on all targets.
Page 66

Page 66
724-746-5500 | blackbox.com
1-, 8-, and 16-Port ServSwitch EC with IP KVM Switch Modules
6.2 Selecting Computers Using On-Screen Display (OSD)
The ServSwitch can operate via an on-screen display (OSD). To use this option,
press the Ctrl key twice within two seconds to see the hotkey menu (an OSD
option) if it is enabled. Press the Left-Ctrl key three times within two seconds, and
a ServSwitch menu screen appears showing a list of the computers with corresponding port numbers, names, and statuses. See Figure 6-2.
Currently selected
channel address
To a 16-port slave
To an 8-port slave
Eye-mark enabled
Port channel
address
Highlighted
by arrow keys
Security-
enabled port
Press “Enter” to go
to the slave screen
FINANCIAL-1F shown
in Figure 6-3.
Figure 6-2. OSD screen.
Note also that the short form hotkey menu can be turned on as an OSD function.
Just press the F4 key, then select More, then Hotkey menu. See Table 6-1 for
hotkey commands.
The port number of the currently selected computer is displayed in red, just like
the front indicator, at the upper-right corner of the OSD menu.
In Figure 6-2, the color of a device name is green if it has power and is ready for
operation, or the color is white if it has no power. The OSD menu updates the
color when the device’s power is activated. For 16-port models, press the PageUp
and PageDown keys to view eight other computers.
Press the up-arrow, down-arrow, 1–8, or A–H keys (depending on the ServSwitch
model) to highlight a computer, then press the Enter key to select it. Or, press Esc
to exit OSD and remove the OSD menu from the display. The status window then
returns to the display and indicates the currently selected computer or operating
status.
Page 67

Page 67
724-746-5500 | blackbox.com
Chapter 6: Accessing ServSwitch Features
A triangle mark to the right of a name (see Figure 6-2) indicates the port is cascaded to a slave; the number at the left of the triangle mark shows the number of
ports the slave has. Pressing the Enter key brings you one level down and another
screen (Figure 6-3) pops up listing the names of the computers on that slave. The
name of the slave will be shown at the upper right corner of the OSD menu.
Master port name
(group name)
Eye-mark enabled
User input
port names
White as
power off
Green as
power on
Figure 6-3. Slave OSD screen.
An eye mark to the right of a name (see Figure 6-3) indicates that computer is
selected and monitored in Scan mode. In the OSD, this mark can be switched on
or off by pressing function key F2.
Press the Esc key to exit OSD and to return to the port/PC screen that you were
previously connected to.
The Function and Escape keys work as follows:
Function-key F1 allows you to edit a computer or slave’s name entry with up to
14 characters. First highlight a port, then press F1 and type the name. Valid characters are A–Z, 0–9, and the dash character. If you type lowercase letters, they
will be converted to uppercase ones. Press the Backspace key to delete a letter
one at a time. Nonvolatile memory stores all name entries until you change them,
even if the unit is powered down.
Function-key F2 allows you to switch a computer’s eye mark on or off. First, use
the up-arrow and down-arrow keys to highlight a computer, then press F2 to
switch its eye mark on or off. If Scan Type (described on the next page) is Ready
PC, only the power-on and eye-mark selected computers will be displayed
sequentially in Scan mode.
Page 68

Page 68
724-746-5500 | blackbox.com
1-, 8-, and 16-Port ServSwitch EC with IP KVM Switch Modules
Function-key F3 enables you to lock a computer to prevent unauthorized access.
To lock a computer, highlight it and then press F3. Now, for the new password,
type in up to four characters (A–Z, 0–9) and press the Enter key. A securityenabled computer is marked with a lock symbol following its port number. To
permanently disable the security function from a locked computer, highlight it,
press F3 and then type in the password.
If you want to access the locked computer temporarily, simply highlight it and
press the Enter key, then the OSD will ask you for the password. After typing in
the correct password, you are allowed to use the computer. This computer is
automatically re-locked once you switch to another port. During Scan mode, the
OSD skips the password-protected computers.
Function-key F4 enables more functions, including AutoScan, Manual Scan, Scan
Type, Scan Rate, Keyboard Speed, Hotkey Menu, CH Display, Position, Country
Code for Sun, and Max. Resolution. A new screen pops up displaying these functions as described on the next two pages. Most of them are marked with a triangle, indicating there are options to choose from. Use the up-arrow or down-arrow
key to select the functions, and then press the Enter key. Available options will be
shown in the middle of the screen. Again, use the up-arrow or down-arrow keys
to view each option, and then press the Enter key to select it.
Function-key F5 (KVT1IP8UV and KVT1IP16UV only) switches a port’s Sun mark
on or off to indicate if the computer is a Sun server. Sun servers have more keys
on the keyboard than a PC. When you select a Sun marked port, the ServSwitch
translates the keys from a PS/2 keyboard to a Sun keyboard. See Keyboard mapping in Section 5.4.5 for details.
Press the Esc key to exit the OSD at any time and return to the port/PC screen
that you were previously connected to.
The following functions are what you may choose from when you select the F4
key.
AutoScan
In this mode, the ServSwitch automatically switches from one powered-on computer to the next one, sequentially in a fixed interval. During AutoScan mode, the
OSD displays the name of the selected computer. When AutoScan detects any
keyboard or mouse activity, it suspends the scanning until activity stops; it then
resumes with the next computer in sequence. To abort the AutoScan mode, press
the left Ctrl key twice, or press any front-panel button. Scan Type and Scan Rate
set the scan pattern. Scan Type (press F4, then select More\Scan Type) determines
Page 69

Page 69
724-746-5500 | blackbox.com
Chapter 6: Accessing ServSwitch Features
if scanned computers must also be eye-mark selected. Scan Rate (press F4, then
select More\Scan Rate) sets the duration a computer is displayed before selecting
the next one.
Manual Scan
Scan through powered-on computers one by one using the keyboard control. You
can press F4, then select More\Scan Type to determine if scanned computers
must also be eye-mark selected. Press the up-arrow key to select the previous
computer and the down-arrow key to select the next computer. Press any other
key to abort the Manual Scan mode.
Scan Type
Ready PC (the powered PC) + eye mark: In Scan mode, scan through powered-on
and eye-mark selected computers. Only powered PC and eye-mark selected computers will be scanned.
Ready PC (the powered PC): In Scan mode, scan through powered-on computers.
Only powered-on computers will be scanned.
Eye mark only: In Scan mode, scan through any eye-mark selected computer
regardless of computer power status. The nonvolatile memory stores the Scan
Type setting.
Scan Rate
Sets the duration a computer is displayed in AutoScan mode. The options are 3
seconds, 8 seconds, 15 seconds, and 30 seconds. The nonvolatile memory stores
the Scan Rate setting.
Keyboard Speed
The ServSwitch offers a keyboard typematic setting that overrides the similar settings in BIOS and in Windows. Available speed options are Low, Middle, Fast, and
Faster at 10, 15, 20, and 30 characters/sec respectively. The nonvolatile memory
stores the keyboard speed setting.
Hotkey Menu
When you press the Left-Ctrl key twice within two seconds, the Hotkey menu
appears, displaying a list of hotkey commands if the option is On. The Hotkey
menu can be turned Off if you prefer not to see it when you press the Left-Ctrl
key twice. The nonvolatile memory stores the Hotkey menu setting.
Page 70

Page 70
724-746-5500 | blackbox.com
1-, 8-, and 16-Port ServSwitch EC with IP KVM Switch Modules
CH Display
Auto Off: After you select a computer, the port number and name of the
computer will appear on the screen for 3 seconds then disappear automatically.
Always On: The port number and name of a selected computer and/or OSD status displayed on the screen continually. The nonvolatile memory stores the CH
Display setting.
Position
The actual display position of the selected computer and/or OSD shifts because of
different video resolution; the higher the resolution, the higher the display position. Use the F4 key (More/Position) to select the position of the OSD menu on
the screen. Choose from five options: upper-left (UL), upper-right (UR), lower-left
(LL), lower-right (LR), or middle (M). The nonvolatile memory stores the position
setting.
Country Code for Sun (KVT1IP8UV and KVT1IP16UV only)
Sun keyboards that use different languages have different layouts. The ServSwitch
can emulate a Sun keyboard for a specific language or country, such as Arabic,
Belgian, U.S., and others. Select the proper country code that matches all your
Sun computers.
Max. Resolution
You can adjust the local monitor resolution under this sub-menu. Select 1024 x
768, 1280 x 1024, or 1600 x 1200 for the local monitor. The remote monitor can
only have one setting: 1024 x 768.
6.3 Selecting Computers Using Keyboard Hotkey Commands
Each computer is assigned a numeric ID. To directly switch the KVM control to any
computer via a simple keyboard command sequence, do the following:
1. To invoke the hotkey mode, press the Left-Ctrl key twice within two seconds.
The switch will beep to indicate that it’s in hotkey mode.
2. Enter your desired switch port number (1–4). For example, if you press
Left-Ctrl Left-Ctrl 2, you’ll select the computer on Port 2.
Or, do the following:
1. To invoke the hotkey mode, press the Left-Ctrl key twice within two seconds.
The switch will beep to indicate that it’s in hotkey mode.
Page 71

Page 71
724-746-5500 | blackbox.com
Chapter 6: Accessing ServSwitch Features
2. Press the up-arrow or down-arrow keys to switch to the previous or next port,
respectively.
Table 6-1 lists the hotkey commands.
Table 6-1. Hotkey commands.
Command Description
<Left-Ctrl><Left-Ctrl> X Switch to PC “X” master port.
<Left-Ctrl><Left-Ctrl> X C Switch PC “X” slave port.
<Left-Ctrl><Left-Ctrl> F1 Begin AutoScan. The AutoScan
feature allows you to monitor the
activity of the connected computers at regular ten-second intervals
so that you can monitor the computer activity without having to
press the front-panel push buttons.
This time interval cannot be
changed.
<Left-Ctrl><Left-Ctrl> Stop AutoScan.
<Left-Ctrl><Left-Ctrl> F2 Begin Manual Scan.
<Left-Ctrl><Left-Ctrl> <up-arrow> Switch to previous active PC.
<Left-Ctrl><Left-Ctrl> <down-arrow> Switch to next active PC.
<Left-Ctrl><Left-Ctrl> F3 Adjust scan rate. The ServSwitch
beeps one to three times to indicate scan intervals of 3, 8, 15, and
30 seconds.
<Left-Ctrl><Left-Ctrl> F4 Adjust keyboard typematic rate
(characters per second). The
ServSwitch beeps 1 to 4 times to
indicate 10, 15, 20, and 30 characters per second. This setting overrides any BIOS or operating system
setting.
X = 1–8 or A–H; C = Slave port number; F1–F4 = Function keys
Page 72

Page 72
724-746-5500 | blackbox.com
1-, 8-, and 16-Port ServSwitch EC with IP KVM Switch Modules
Changing Your Configuration
After the initial power on, any device (either a ServSwitch or a PC) can be added
or removed from a PC port on the ServSwitch without having to power off the
master switch. Make sure that devices are powered off before connecting them to
the master switch.
NOTE: After changing your configuration, the OSD will automatically update to
reflect the new configuration.
Page 73

Page 73
724-746-5500 | blackbox.com
Chapter 7: How to Remotely Control the Host Computer(s)
7. How to Remotely Control the Host Computer(s)
7.1 Accessing the VNC Interface
There are three ways to communicate with the ServSwitch to control the host
computer(s):
1. Web interface: The integrated Web server includes a Java based VNC client.
This allows easy browser-based remote control.
2. Native VNC client: There are several third-party software programs that use the
standard VNC protocol, available in open source and commercial VNC clients.
3. SSH Tunnel: By default, there is a standard SSH server running on Port 22 (the
standard SSH port). Once connected via SSH, the VNC traffic is tunneled
through the SSH connection and encrypts the VNC session. Each method is discussed briefly in the following section. The type of encryption method or client
used is not critical.
7.1.1 Web Interface
The Java based VNC client that is integrated into the ServSwitch requires a browser with cookies and JavaScript® enabled. To start the Java VNC client, log in to the
Web configuration interface and click on the thumbnail of the desktop on the
Home screen, or follow one of the two links on that page. See Figure 7-1.
Figure 7-1. The Home screen.
Page 74

Page 74
724-746-5500 | blackbox.com
1-, 8-, and 16-Port ServSwitch EC with IP KVM Switch Modules
Click on one of the following options (scroll down in the Home screen to see
these Java options):
Java VNC with no encryption (faster).
Java VNC with SSL encryption (more secure).
Click on the Refresh button to refresh the screen.
NOTE: You may need to upgrade or download your Java (http://www.java.com)
support in your browser before using the VNC screen to remotely control
the host computer(s). However, most modern browsers come with a version of Java that’s compatible with this application.
The Java VNC client makes a connection back to the ServSwitch over Port 5900
(by default) or 15900, if encrypted. The encrypted connection is a standard SSL
(Secure Socket Layer) encrypted link that encrypts all data from the session,
including the actual video pictures.
Because Java is considered a “safe” programming language, the Java VNC client
has some limitations. Certain special keystrokes cannot be sent, such as Scroll Lock
on the keyboard.
This client software requires the use of Java 2 (JRE 1.4) to enable features like
wheel mouse support. The Sun Microsystems® Java site, www.java.com, is an
excellent resource to ensure your browser and operating system are up-to-date.
7.1.2 Native VNC Client
This system implements the VNC protocol, so any off-the-shelf VNC client can be
used. There are more than 17 different VNC clients available and they should all
work with this system. This system automatically detects and makes use of certain
extensions to the basic RFB protocol that is provided by the better VNC clients.
The best client currently is TightVNC (www.tightvnc.com). Binaries are available
for Windows, Linux, Mac OS®, and many versions of UNIX. Source code for all
clients is available there, too. This version of VNC is being actively developed.
The authoritative version of VNC is available from RealVNC (www.realvnc.com).
This source base is the original version of VNC, maintained by the original
developers of the standard.
For a commercial, supported version of VNC, you should consider TridiaVNC
(www.tridiavnc.com). Their version of VNC is a superset of TightVNC and contains
a number of enhancements for use in a larger corporate environment.
Page 75

Page 75
724-746-5500 | blackbox.com
Chapter 7: How to Remotely Control the Host Computer(s)
NOTE: Some native VNC clients may require a flag or setting indicating they
should use BGR233 encoding by default. If this flag is not set, you may see
a garbled picture and the client will fail. The UNIX versions of VNC require
the flag -bgr233. For examples on using this flag, see the commands in
Section 6.1.3.
7.1.3 SSH Tunnel (with Native VNC Client)
If you are using open SSH, here is the appropriate UNIX command to use, based
on the default settings on a machine at 192.168.1.124:
ssh -f -l admin -L 15900:127.0.0.1:5900192.168.1.124 sleep 60
v n cv ie we r -b g r 233 127.0.0.1::15900
NOTES: A copy of these commands, with appropriate values filled in for your cur-
rent system setting, is provided in the on-line help page. This enables you
to cut and paste the required commands accordingly.
You have 60 seconds to type the second command before the SSH
connection will be terminated.
The port number 15900 is arbitrary in the above example and can be any
number (1025...65535). It is the port number used on your client machine
to connect your local SSH instance with the VNC client. If you want to
tunnel two or more systems, you will need to use a unique number for
each instance on the same SSH client machine.
Some UNIX versions of the VNC client have integrated SSH tunneling sup-
port. Some clients require your local user ID to be the same as the user ID
on the system.
Use a command like this:
v n c vie we r -b gr 233 -tu n n el192.168.1.124:22
7.2 Using the VNC Menu
One of the ServSwitch unit’s unique features is the VNC menu system. Whenever
you see a window with a dark blue background and gray edges, this window has
been inserted into the VNC data stream so that it is effectively laid over the existing video. These menus enable you to control the ServSwitch unit’s many features
without using the Web interface or a custom client.
To initially connect to the system, double-click on one of the VNC options in the
Home screen (Figure 7-1). A window similar to the one shown in Figure 7-2
appears.
Page 76

Page 76
724-746-5500 | blackbox.com
1-, 8-, and 16-Port ServSwitch EC with IP KVM Switch Modules
Figure 7-2. VNC menu welcome screen.
This tells you which system you are controlling, what encryption algorithm was
used, and what key strength is currently in effect. Click anywhere inside the window to clear it or wait ten seconds.
7.3 How to Use the Bribar
Along the bottom of the VNC screen is a dark blue bar with various buttons. We
call this feature “the bribar.” Its purpose is to show a number of critical status values and to provide shortcuts to commonly used features.
Figure 7-3 shows a snapshot of what it may look like. There will be slight differences based on optional features and system configuration. Starting from the left
side of the bribar, each feature and its function is outlined on the next two pages.
Figure 7-3. A sample bribar.
Page 77

Page 77
724-746-5500 | blackbox.com
Chapter 7: How to Remotely Control the Host Computer(s)
Figure 7-4. Main menu.
Bandwidth: Indicates the current average bandwidth coming out of the
ServSwitch. The second number measures round trip time (RTT) of the connection
when it was first established.
Resync: Re-aligns the remote and local mouse points so they are on top of each
other.
Redraw: Redraws the entire screen contents; occurs immediately.
Video Adjust: Adjusts the video phase automatically. (This is an option, even
though it doesn’t appear in the example shown in Figure 7-3.)
PS/2 Reset: Resets the PS/2 keyboard and mouse emulation. Use this to recover
failed mouse and/or keyboard connections in PS/2 mode.
÷4, ÷8: Switches to thumbnail mode, at the indicated size.
Ctrl-Alt-Del: Sends this key sequence to the host. It works immediately.
Alt-F4: Sends the key sequence to host (closes windows).
KVM: Calls up the KVM menu; refer to Section 6.2 for more information.
1–8, A–H: Select a specific port simply by clicking once on the number or letter.
Page 78

Page 78
724-746-5500 | blackbox.com
1-, 8-, and 16-Port ServSwitch EC with IP KVM Switch Modules
Menu: Shows the Main menu; refer to Section 7.4 for more information.
Video: Shows the Video Tuning menu where the picture quality can be adjusted;
refer to Section 7.6 for more information.
Keys: Shows the VirtKeys menu, which enables you to simulate pressing special
keys such as the Windows key or complex multikey sequences; refer to Section 7.5
for more information.
Auto Bandwidth: Allows you to select the proper bandwidth that corresponds to
the network environment. We recommend that you select Max for the LAN users
and Min for the WAN users.
PS/2: This area will show PS/2 (as in this example) to indicate if keyboard and
mouse are PS/2 signals. If Autosync appears beneath this indicator, the mouse
pointers on the local mouse and the VNC session will be synchronized automatically.
[1][A][S]: These flags show the state of the keyboard lights, NumLock, ShiftLock,
and ScrollLock respectively.
Other items: If the server’s screen resolution is larger than 1024 x 768, additional
buttons will be shown to the right of the above listed items. These are all keyboard shortcuts and are duplicated in the Keys menu.
7.4 How to Use the Main Menu
To access the Main menu, press the F7 key twice within one second, as described
in Section 7.2. If you press it once or too slowly, then the ServSwitch will not recognize this command. Pressing the F7 key twice quickly is the only way to get into
the menu system if the bribar is disabled. Figure 7-5 shows the Main menu for a
typical system.
Page 79

Page 79
724-746-5500 | blackbox.com
Chapter 7: How to Remotely Control the Host Computer(s)
Figure 7-5. The Main menu.
The Main menu window may be moved by clicking and dragging on the title bar.
It can be closed by pressing Escape or by clicking on the red X in the top right corner.
Click on the Bribar button (located in the Main menu screen’s lower right corner)
to enable or disable the bribar. Press the F7 key twice to start the Main menu,
then click on the bribar to restore the feature.
Various fields from the Main menu are outlined in the text below and on the next
page. Most of the functions operate immediately. Other functions require a
response to a confirmation prompt first before performing the requested function.
Identification
Fixed text label that is defined by the user in the Web interface. This does not
affect the operation of the system and is intended to assist with administration.
Status
Current status of the attached system and the status of the module.
Page 80

Page 80
724-746-5500 | blackbox.com
1-, 8-, and 16-Port ServSwitch EC with IP KVM Switch Modules
B/W: Min/Avg/Max/Auto (bandwidth control)
The white button is the mode in which the system is currently operating. If you
choose Min, Avg, or Max then you will override the default, Auto. Because the
automatic mode measures actual network performance, you may see the current
mode switch from Min to Avg or Max. The different modes indicate more time
spent on compression versus more bandwidth. There is no visual difference
between the modes, but there can be a noticeable difference in speed and
smoothness.
Mouse Resync button
Click on this button to resynchronize the mouse pointer so that the local and
remote mouse pointers are on top of each other.
PS/2 Reset button
Click on this button to reset the PS/2 emulation going to the host and to the
attached PS/2 devices. This can be used if the mouse stops responding or the
PS/2 keyboard isn’t working.
Video Reset button
Click on this button to reset the input video. When you click on this button, the
entire VNC screen refreshes.
Thumbnails
Switch to smaller thumbnail size screen images (click anywhere on thumbnail to
restore it). Each button corresponds to a different sized image, from half size to
one-sixteenth.
Take Control button
When multiple users are connected to the same system, click on this button to
take control from another user. Only one user may control the keyboard and
mouse at any time. All users see the same picture.
Logout button
Click on this button to end the VNC session and disconnect.
Video Tuning
Click on this button to access a submenu with video adjustments, if automatic
picture adjustment does not provide a good quality picture (see Section 7.6).
Page 81

Page 81
724-746-5500 | blackbox.com
Chapter 7: How to Remotely Control the Host Computer(s)
VirtKeys button
Click on this button to access the virtual keyboard. Virtual keyboard provides a
menu with special keys that are often hard to generate but needed by the remote
system. The most common key sequence is the Ctrl–Alt–Del (see Section 7.5).
KVM Menu button
Click on this button to generate the key sequence used to access the on-screen
menu for an enterprise-class ServSwitch or other KVM switch. When these conventional KVM switches are combined with the ServSwitch units described in this
manual, this key makes accessing their built-in menu easier, especially from the
Java client. This button will only be shown when an external KVM has been
enabled via the Web interface.
Bribar button
Click on this button to close or reopen the bribar window at the bottom of the
screen.
7.5 How to Use the VirtKeys Menu
Figure 7-6 shows the Virtual Keys window. To get to this screen, click on the
VirtKeys button in Figure 7-5.
Figure 7-6. VirtKeys screen.
Page 82

Page 82
724-746-5500 | blackbox.com
1-, 8-, and 16-Port ServSwitch EC with IP KVM Switch Modules
Clicking any button in the top half of the window simulates pressing and releasing
the indicated key. In the bottom area of the screen, the Toggles section, clicking
will also simulate the indicated key being pressed. You may then click in the top
part to send another key and release the key at the same time. Alternatively, you
may move the mouse outside this window, press the regular key, and then click
on the Reset button to release all depressed keys.
The VirtKeys menu can be left open while using the host system. You can then
click the required button at the suitable time and still interact with the host in a
normal fashion.
Examples:
<Ctrl> <Alt> <F4> : Use L- Ctrl then L- Alt in the Toggles area. Then click on F4.
To bring up the Start menu under Windows: Click the L-Windows button at the
top left of the above window.
7.6 How to Use the Video Tuning Menu
This menu (Figure 7-7) is used to fine-tune the video picture. To get to this screen,
click on the Video Tuning button in Figure 7-5.
Figure 7-7. Video Tuning menu.
The text on the next two pages describes the Video Tuning menu options.
Page 83

Page 83
724-746-5500 | blackbox.com
Chapter 7: How to Remotely Control the Host Computer(s)
Auto Everything
Press this button to automatically fine-tune all three adjustments. If the test pattern for Color Offset calibration is not present on the screen, then the Color
Offset adjustment is skipped.
Changes/frame
Press this button to indicate the number of 16 x 16 blocks of video that are being
sent, on average, for every frame of video. With a static image being displayed by
the server, this number will be zero (shown as -nil-). Moving the mouse, for example, will cause the number to jump to about 2 or 3. You may use this number to
judge the picture quality as you adjust the controls on this menu.
Picture Positioning
This option affects the image position on your screen. If you see a black line on
either side of your screen, or at the top or bottom, you can use the arrow buttons
to shift the image in that direction. Pressing Auto does the same thing for you
automatically. Use Save to save the changes you have made manually. Since this
adjustment depends on the video mode, separate values are stored for each video
mode.
Color Offset & Gain
This is a fine-tuning adjustment that requires the use of a test pattern. There is a
copy of the test pattern available on the Help menu of the integrated Web server.
Download that image to the host computer(s). Do not allow scaling, cropping or
any other changes to that image. Press the Auto button and the system will calibrate color for the best possible picture in approximately one minute. If the system
cannot find the test pattern on the screen, it will say so. Check that the pattern
isn’t scaled or covered up. It’s important to do this operation in 24-bit or 32-bit
color video mode (that is, true color). Although the algorithm may work in 16-bit
or 8-bit color video modes, the results will not be optimum and usually it won't
be able to recognize the test pattern.
Advanced
Press this button to open the Advanced Video Tuning menu. While the vast
majority of users will not need to adjust these settings, it offers a high degree of
control of the video settings of your VNC sessions.
Page 84

Page 84
724-746-5500 | blackbox.com
1-, 8-, and 16-Port ServSwitch EC with IP KVM Switch Modules
Sampling Phase
This option does not normally need to be used since the ServSwitch tunes the
sampling phase whenever the video mode changes. This button does not require
a test pattern, but will perform optimally when used with the ServSwitch unit’s
standard test pattern. For your reference, the sampling phase number is shown to
the right of the Filtering button.
Noise Filter
This controls the ServSwitch unit’s advanced video filtering feature. Unlike other
filtering algorithms, the ServSwitch unit’s noise filter will only remove noise. It
does not degrade the signal quality or readability of small text. You may turn it on
and off using the indicated button, or set it to other values using the arrows.
Higher numbers cause more filtering and may cause artifacts when moving windows. The most common visual artifact is a vertical line dropping when moving
windows horizontally. You may use the Redraw button to correct these or use a
lower filter number. This value must be greater than two.
Page 85

Page 85
724-746-5500 | blackbox.com
Appendix A: Troubleshooting
Appendix A. Troubleshooting
A.1 Problems/Possible Causes/Solutions
Problem: The mouse does not work.
Possible Cause #1: Too many mouse drivers are installed in the computer.
Solution #1: Make sure there is only one mouse driver installed in each computer.
Possible Cause #2: The wrong mouse driver is installed.
Solution #2: Use a Microsoft® mouse driver.
Problem: The monitor works fine, but the keyboard and mouse do not work.
Possible Cause #1: Cables might be swapped.
Solution #1: Connect the cables according to the PC99 standard keyboard and
mouse icons on the connectors.
Possible Cause #2: Incorrect cables are used.
Solution #2: Use only USB compatible cables.
Possible Cause #3: Cable is installed backwards.
Solution #3: Install the 3-1 cable the correct way. The standalone HD15 end
should be connected to the switch module.
Problem: The video image is not clear.
Possible Cause: You’re using poor-quality video cables.
Solution: Use UL® 2919 rated, double-shielded video cables.
Problem: No screen image appears or no OSD menu appears.
Possible Cause: The selected computer is not powered on.
Solution: Power on a computer and select it using the front-panel buttons.
Page 86

Page 86
724-746-5500 | blackbox.com
1-, 8-, and 16-Port ServSwitch EC with IP KVM Switch Modules
Problem: A keyboard error appears when you power on the ServSwitch.
Possible Cause: The keyboard cable connection is loose.
Solution: Make sure that the keyboard cable connections are secure.
Problem: Alphabet symbols on the computer’s monitor are blue or have
shadows.
Possible Cause: Resolution settings are incorrect.
Solution: Under Windows Control Panel, set the computer’s video output to
match the highest resolution for the monitor with a large font for best
performance.
Problem: AutoScan does not switch PCs, and the ServSwitch beeps from time to
time while a red indicator flashes.
Possible Cause #1: All PCs are powered off or only one PC is powered on. Scan
mode works only for powered-on computers.
Solution #1: Power on all computers. To abort AutoScan, press the Left-Ctrl key
twice. Or, press any front-panel button to select a PC (this also stops AutoScan).
Possible Cause #2: Scan type is eyemark selected, but no PC is eyemark selected
in OSD.
Solution #2: Set proper scan type in OSD and determine which PCs are eyemark
selected. To abort AutoScan, press the Left-Ctrl key twice. Or, press any frontpanel button to select a PC (this also stops AutoScan).
Problem: The up-arrow and down-arrow keys do not work in Manual Scan
mode.
Possible Cause #1: All PCs are powered off or only one PC is powered on. Scan
mode works for powered-on computers only.
Solution #1: Power on all computers.
Page 87

Page 87
724-746-5500 | blackbox.com
Appendix A: Troubleshooting
Possible Cause #2: Scan type is eyemark-selected, but no PC is eyemark-selected.
Solution #2: Set the proper scan type in OSD and determine which PCs are eye-
mark-selected.
Problem: The OSD menu is not at the proper position.
Possible Cause: The OSD menu has a fixed resolution and its size varies as
computer video resolution changes.
Solution: Use the F4 function key (More/Position) to select the position of the
OSD menu on the screen. Choose from five options: upper-left (UL), upper-right
(UR), lower-left (LL), lower-right (LR), or middle (M).
Problem: Keyboard strokes are shifted.
Possible Cause: The computer was in the shifted state when last switched.
Solution: Press both Shift keys on the keyboard.
Problem: I forgot the password.
Solution: Contact Black Box Technical Support at 724-746-5500
or info@blackbox.com.
Problem: The keyboard-mouse-monitor does not work.
Possible Cause: The keyboard-mouse-monitor connectors at the local port
on the module are not active when the unit is connected to a ServTray with its
Centronics connector.
Solution: Disconnect the Centronics connector from the tray, and the unit will
function as a standalone KVM module.
A.2 Contacting Black Box
If you determine that your 1-, 8-, or 16-Port EC with IP KVM Module is malfunctioning, do not attempt to alter or repair the unit. It contains no user-serviceable
parts. Contact Black Box at 724-746-5500 or info@blackbox.com.
Page 88

Page 88
724-746-5500 | blackbox.com
1-, 8-, and 16-Port ServSwitch EC with IP KVM Switch Modules
Before you do, make a record of the history of the problem. We will be able to
provide more efficient and accurate assistance if you have a complete description,
including:
• the nature and duration of the problem.
• when the problem occurs.
• the components involved in the problem.
• any particular application that, when used, appears to create the problem or
make it worse.
A.3 Shipping and Packaging
If you need to transport or ship your 1-, 8-, or 16-Port ServSwitch EC with IP KVM
Module:
• Package it carefully. We recommend that you use the original container.
• If you are shipping the 1-, 8-, or 16-Port ServSwitch EC with IP KVM Module for
repair, make sure you include everything that came in the original package.
Before you ship, contact Black Box to get a Return Authorization (RA) number.
Page 89

Page 89
724-746-5500 | blackbox.com
Appendix B: Supported Protocols
Appendix B. Supported Protocols
Service Description Benefits
SSH Secure Shell May be used to securely tunnel VNC and HTTP
protocols.
HTTP Web redirector Convenience server to redirect all Web
(to HTTPS) traffic to an encrypted port.
Clear-text HTTP is not supported.
SNMP SNMP Agent (UDP) Allows integration with existing SNMP network
management systems.
HTTPS SSLTLS Encrypted Secure control and management of the Web
control device and attached system. Screen
snapshots may be downloaded. Integrated Java
VNC client (with or without encryption) allows
control from any Java enabled browser.
Password protected.
VNC VNC/RFB Protocol Standardized real-time KVM network
Server protocol. Compatible with existing VNC client
software.
VNCS SSL-tunneled VNC VNC protocol tunneled via SSL TLS encryption.
Used for secure real-time server control over
public networks.
DHCP Dynamic IP Setup Eases network setup by fetching IP address
Config and other network settings from a centralized
server.
RADIUS Centralized Allows integration with existing RADIUS
authentication servers, so that user management can be
centralized. Supports challenge-response
authentication using hardware tokens (like
SecurID) and conventional passwords.
SYSLOG System event MIT-LCS UDP protocol. Must be configured
logging to another via DHCP option.
system
DNS Domain Name Converts text name into IP address. Only
Service used in the URL specification needed to
emulate a CD-ROM. Using this is optional.
Page 90

Page 90
724-746-5500 | blackbox.com
1-, 8-, and 16-Port ServSwitch EC with IP KVM Switch Modules
Appendix C. About Security Certificate Warnings
C.1 Frequently Asked Questions
Question: What is a security certificate?
Answer: Sites that use secure TCP/IP (Internet) connections include a certificate
that confirms that users are connecting to a legitimate site and are not being
redirected without their knowledge. Certificates are issued by trusted third parties
called Certificate Authorities (CAs) and contain essential details about a site that
must match the information supplied to your Web browser.
Question: Why do I receive a warning when I access the login screen on the
ServSwitch?
Answer: As it redirects you to a secure (SSL) session by default, the login screen
may generate a warning from your Web browser or the VNC Java client for two
different reasons. First, the CA that has issued the certificate may not yet be
recognized as a trusted source by the computer you are using to access the
ServSwitch. Second, since the unit could be configured in a number of different
ways, it is impossible to supply a generic certificate that will match your exact
network settings.
Question: Is my data safe?
Answer: Yes. The security certificate does not affect encryption effectiveness in
any way, nor does it make the ServSwitch any more vulnerable to outside attacks.
Question: Can I prevent the warning from occurring?
Answer: Yes. You have two options that may prevent the warning from occurring.
First, if the Web browser you are using offers the option to ignore the warning for
future visits, the browser will no longer generate a warning if that option is selected. Second, if you install the certificate from the ServSwitch onto the remote computer and if the unit is configured with a domain name ending in .com, .net, .org,
.gov, .edu, .us, .ca, .uk, .jp, or .tw (for example, remotecontrol.mydomain.net),
then the warning should no longer occur.
C.2 Installing the New Certificate
The following instructions detail how to install the certificate from the ServSwitch
onto your local computer (in this case, running Windows XP and Internet
Explorer).
1. Open your Web browser and go to the ServSwitch login screen. Click the
update security certificate link.
2. When prompted, choose Open.
Page 91

Page 91
724-746-5500 | blackbox.com
Appendix C: About Security Certificate Warnings
3. A Window will appear that offers information about the certificate. Click on
Install Certificate.
4. The Certificate Import Wizard will appear. Select “Automatically select the
certificate store… (default)” and click “Next.” When the next window appears,
click “Finish.”
5. A confirmation dialog will appear asking you if you wish to install the certifi-
cate. Click “Yes.”
6. A message should appear saying the import was successful. Click “OK.”
Page 92

Page 92
724-746-5500 | blackbox.com
1-, 8-, and 16-Port ServSwitch EC with IP KVM Switch Modules
Appendix D. Using an Optional Serial Access Unit (IPMI Supported) with
the R-Port
D.1 Background
Using the R-Port on the ServSwitch unit’s rear panel, you can add up to 16 serial
access units using a specialized daisychain technology. The ServSwitch includes
integrated control functionality that allows you to monitor and configure the
devices with the RS-232 serial port using the interactive Web interface. To minimize space and infrastructure requirements, the serial access unit uses a single
RJ-14 cable (included with the Serial Access Unit, KV9-SRL) to carry both power
and the data signal. All configuration settings are stored separately in each
attached Serial Access Unit in nonvolatile memory so that they will not be lost in
case of a power outage or disconnection.
D.2 Connecting the Serial Access Unit to the ServSwitch
The RJ-14 cable for attaching the Serial Access Unit (KV9-SRL) via daisychain is
similar to a phone cable. For the first computer, connect the RJ-14 cable to the
R-port on the ServSwitch unit’s rear panel. Then, connect the opposite end of the
RJ-14 cable to the Serial Access Unit’s RJ-14 port. There are two RJ-14 ports on
the Serial Access Unit; choose either one of them. Once you have added the first
computer to the ServSwitch by using the Serial Access Unit, you can connect the
second computer by using the second Serial Access Unit. Use the second RJ-14
cable to link the first Serial Access Unit and the second one. Then, you can link up
to 16 computers.
D.3 Configuring/Viewing the Serial Access Unit through the Web Interface
Once you have one or more Serial Access Units connected, you will able to configure and manage them through the Web interface. You may need to modify the
default settings on the ServSwitch to match your various Serial Access Units’
default configuration. Consult the documentation that came with your Serial
Access Unit to determine if you need to modify the default settings to complete
the installation. To be able to configure your Serial Access Unit, you must be
logged in as admin. Other users will be able to view which devices are active but
cannot configure them.
Once you are logged in, choose Serial Ports from the Admin menu on the Home
screen in the Web interface. You will be presented with the Serial Consoles
Attached menu, and a table with the following headings:
#: You can assign a value (1–99) to each attached serial device to identify the
devices so you can manage them. This does not affect the device’s configuration
or operation in any way.
Page 93

Page 93
724-746-5500 | blackbox.com
Appendix D: Using an Optional Serial Access Unit with the R-Port
Name/Description: An identifier for the Serial Access Unit. It’s used for
administration only.
Baud (bps): This is the device’s communication speed. Its setting must match the
setting on the device itself. The Serial Access Unit supports all common baud rates
between 300 and 115,200 bps.
Mode: Sets the character framing scheme that the ServSwitch will use with the
Serial Access Unit. You can choose from the following selections:
• 8N1: Eight bits, no parity, one stop bit (default and most common)
• 7N1/7O1/7E1/7M1/7S1: Seven bits, (none/odd/even/mark/space) parity, one
stop bit
• 8N1/8O1/8E1/8M1/8S1: Eight bits, (none/odd/even/mark/space) parity, one stop
bit
• 8N2: Eight bits, no parity, two stop bits
Force DCD: Forces the Carrier Detect signal to be active at all times. Normally,
DCD becomes active when a new user connects and is dropped when the last
user disconnects (a response that is similar to many modems). When active, the
device will log out and reset itself if the carrier signal is lost, increasing security.
This may not work with all devices and could impair proper operation in some
circumstances. The default setting is Off.
Console Log: Clicking this link will open a separate Web page that will display
the last 200 characters committed to that device’s console log. Existing data is
overwritten automatically when the 200-character limit is reached.
Connect…: Click on this link to connect to the corresponding device (see Section
D.4).
You can make as many changes as needed on this menu at one time before
applying your changes. Once you are satisfied with the changes you have made,
click “Commit changes” to apply the new settings. Click “Refresh” at any time to
see an updated list of attached Serial Access Units.
D.4 Advanced Configuration Using the Integrated SSH Shell
In most cases, configuring the ServSwitch to the same settings as the Serial Access
Units you are connecting should allow the devices to work with a minimum
amount of configuration. However, you can also change the default settings on
each Serial Access Unit to fit your preferences and application needs.
Page 94

Page 94
724-746-5500 | blackbox.com
1-, 8-, and 16-Port ServSwitch EC with IP KVM Switch Modules
If you click the Connect… button next to the device you want to configure, two
new windows will appear. The smaller window is a login screen; the other is a
SSH terminal window. Click on the login window and sign in as admin (using the
same password as the Web interface) to activate the terminal window. You will
see a welcome banner similar to the following:
Baud rate: 115200 bps, 8N1
Connected to #1: (none)... (Press Ctrl + Shift + Space for menu).
You are now connected to the Serial Access Unit. Commands you type will be
echoed on the terminal screen. This simple menu system allows you to change its
configuration settings. To access the menu, press “Ctrl + Shift + Space” (in the
example below, an underscore represents a space) on the keyboard to access the
menu. It will be similar to the following:
RS-232 Menu (#1: (none), 115200 bps, 8N1)
Q - Disconnect
# - Send break
H - Hangup line (drop DCD)
E - Send Ctrl-Shift- _
L - Low log entries (line buffer)
1 - Show last 10 log entries
other - Return to connection
Press key ->
To execute the desired command, simply press the corresponding key on the keyboard. You can also execute the command and avoid the menu by pressing the
Ctrl + Shift + Space key combination quickly and pressing the command’s letter.
To quit the menu, press Q on the keyboard when the menu is active.
D.5 Remote Login via SSH
You can also use a standard SSH client to access the Serial Access Unit options if
you don’t want to use the Java based SSH client in the Web interface. Simply use
your SSH client (several freeware packages are available for download, along with
commercial applications) and connect to the ServSwitch unit’s IP address using
Port 22 (default).
Page 95

Page 95
724-746-5500 | blackbox.com
Appendix D: Using an Optional Serial Access Unit with the R-Port
Log into the SSH session as admin using the same password as the Web interface.
At the command prompt, type connect x (where x is the Serial Access Unit’s
device number). Or, you can enter command connect -l to see a list of active
devices.
Operating Notes
• Hardware handshaking (CTS/RTS) is required for speeds exceeding 9600 bps. It
is enabled by default on the ServSwitch but may need to be enabled on the
other end of the connection. For UNIX systems, the command is:
stty -crtscts < /dev/[serial port]
• Serial Access Units use a simple RS-485 multidrop network running at 115,200
bps. Every Serial Access Unit will not be inputting/outputting data at the same
rate at all times. However, since these devices use interactive logins, it is unlikely
that all channels would be busy at any one time. Hardware handshaking is used
to limit the individual channels’ output rates.
• Up to four users may simultaneously log into the same device. All users may
type commands at any time, and all users will see the same output.
NOTES: All users have equal access to all channels.
Up to 16 Serial Access Units can be connected at any time.
Plug in and unplug any Serial Access Unit at any time. When reconnected, it will
automatically become available after a 15-second initialization period. The Serial
Access Unit will retain any log entries while deactivated, but it will not be available
to users until you reinitialize it.
D.6 Intelligent Platform Management Interface (IPMI) Function
D.6.1 Background
An optional power management feature lets you remotely restart hardware and
power the host computer on and off. You can use this feature if the computer
supports IPMI (Intelligent Platform Management Interface).
D.6.2 Host Computer Requirements
The host computer must support the IPMI standard version 1.5 to use this option.
Most popular server motherboards now support the IPMI standard. To determine
if your computer supports this IPMI, consult its documentation for more information.
Page 96

Page 96
724-746-5500 | blackbox.com
1-, 8-, and 16-Port ServSwitch EC with IP KVM Switch Modules
IPMI lets you configure and control a device on the motherboard called the BMC
(Baseboard Management Controller) using a dedicated serial port. Once the
computer is configured for IPMI management, the serial port on the host
computer is normally reserved by the BIOS solely for that purpose and cannot be
accessed or recognized by the operating system. It is therefore unlikely that a serial
port provided by an add-in card will be able to act as an IPMI port, so you must
use a serial port integrated on the managed computer’s motherboard. If the computer you are managing only has a single serial port, you must add an additional
port (or ports) via an add-in card if you need a serial port for other purposes (for
example, modem). Enabling IPMI support usually requires enabling options in the
host computer’s BIOS setup software, and the instructions will vary considerably
from model to model. Normally, a password will be created by the BIOS that
allows you to access the IPMI feature; this password is exclusive to the IPMI
feature and does not correspond to a password or account in the host computer’s
operating system.
D.6.3 If the Host Computer Does Not Support IPMI
If the host computer you are managing with the ServSwitch does not support
IPMI, you will need to supply a non-IPMI solution that also works via the serial
port and acts as a power concentrator and a power management device.
D.6.4 Activating the IPMI Option
The Serial Access Unit (KV9-SRL) contains the necessary software to use IPMI with
the ServSwitch.
You can use either serial port on the ServSwitch to send IPMI access; your choice
will dictate the cable type you will use to make the connection. The DTE serial
port on the front panel requires a null-modem serial cable.
Connect a serial cable’s female end to the serial port that’s configured for IPMI
access on the host computer. Connect the opposite end to the ServSwitch unit’s
DTE serial port.
D.6.5 Configuring IPMI on the ServSwitch
Once you have connected the IPMI-configured serial port to the ServSwitch and
enabled the software option, you can begin to configure IPMI settings through
the Web interface.
Log into the Web interface as admin. Choose Serial Ports from the Admin menu
on the Home screen in the Web interface, then select IPMI/IPMB setup (Intelligent
Platform Management).
Page 97

Page 97
724-746-5500 | blackbox.com
Appendix D: Using an Optional Serial Access Unit with the R-Port
The screen shown in Figure D-1 appears.
Figure D-1. IPMI Status screen.
Make the following changes to enable IPMI:
• Enable IPMI (Intelligent Platform Management Interface) via the serial port:
select “Enabled” from the drop-down menu in Figure D-1.
• From the drop-down menu in Figure D-1, select which serial port to use: select
“Front serial port (DTE pinout)” since the ServSwitch has DTE serial port only.
• Select the baud rate between 9600 bps and 115,200 bps based on the
configuration on the host computer’s IPMI settings.
• BMC Password: Enter the password twice assigned to the BMC in the host
computer’s BIOS setup software.
NOTE: The selected baud rate should match the host computer’s setting. Problems
with the BMC password (as well as any other error information) will be
recorded in the ServSwitch unit’s system log on the Web interface’s Status
page. If the host computer’s BIOS setup allows for multiple levels of security for the BMC, make sure the password you enter on the menu offers sufficient authority to control chassis power and monitor fan status.
Once you have made the necessary changes on this screen, click “Commit” to
activate IPMI with the settings you entered.
Page 98

Page 98
724-746-5500 | blackbox.com
1-, 8-, and 16-Port ServSwitch EC with IP KVM Switch Modules
NOTE: Clicking “Commit” will cause any active VNC sessions to fail and you will
need to re-establish them.
D.6.6 Accessing the Status Screen
The ServSwitch enables you to monitor the host computer’s status via IPMI using
either the Web interface or the VNC client. The information you will be able to
view using the Status screen will depend on the model of host computer being
managed. Since IPMI implementations vary widely across manufacturers, the information you are able to see on your status screen may differ from the examples.
NOTE: The Status screen will not allow you to make any configuration changes.
It’s used for monitoring purposes only.
To access the Status (IPMI Sensor Report) screen:
From the Web interface: click “View IMPI sensor report” next to the thumbnail
image on the Home screen.
From the VNC interface: click “IMPI” from the bribar at the bottom of the VNC
window. Figure D-2 or Figure D-3 appears.
Page 99

Page 99
724-746-5500 | blackbox.com
Appendix D: Using an Optional Serial Access Unit with the R-Port
Examples:
Figure D-2. VNC status report example #1.
Page 100

Page 100
724-746-5500 | blackbox.com
1-, 8-, and 16-Port ServSwitch EC with IP KVM Switch Modules
Figure D-3. VNC status report example #2.
 Loading...