

Page 1
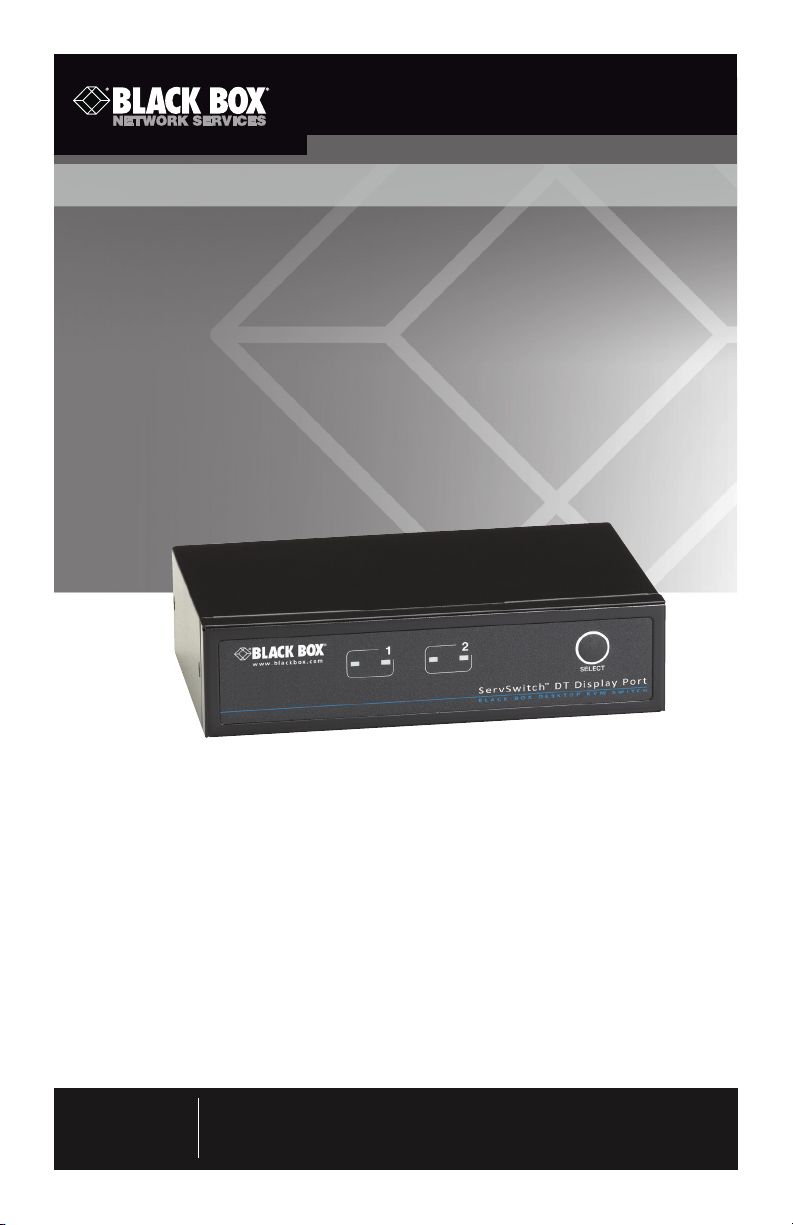
ServSwitch DT DisplayPort KVM with USB and Audio
Combines DisplayPort with USB peripheral
sharing in one unit.
2- and 4-port models are available.
KV9702A
KV9704A
Customer
Support
Information
Order toll-free in the U.S.: Call 877-877-BBOX (outside U.S. c all 724-746-550 0)
FREE technical support 24 hours a day, 7 days a week: Call 724-746-5500 or fax
724-746-0746 • Mailing address : Black Box Corporation, 10 00 Park Drive, Lawrence,
PA 15055-1018 • Web site: www.blackbox.com • E-mail : info @blackbox .com
Page 2

FCC and IC RFI Statements
FEDERAL COMMUNICATIONS COMMISSION AND
INDUSTRY CANADA RADIO FREQUENCY INTERFERENCE STATEMENTS
This equipment generates, uses, and can radiate radio-frequency energy,
and if not installed and used properly, that is, in strict accordance with the
manufacturer’s instructions, may cause inter ference to radio communication.
It has been tested and found to comply with the limits for a Class A computing
device in accordance with the specifications in Subpart B of Part 15 of FCC rules,
which are designed to provide reasonable protection against such interference
when the equipment is operated in a commercial environment. Operation of
this equipment in a residential area is likely to cause interference, in which case
the user at his own expense will be required to take whatever measures may be
necessary to correct the interference.
Changes or modifications not expressly approved by the party responsible
for compliance could void the user’s authority to operate the equipment.
This digital apparatus does not exceed the Class A limits for radio noise
emis sion from digital apparatus set out in the Radio Interference Regulation
of Industry Canada.
Le présent appareil numérique n’émet pas de bruits radioélectriques dépassant les
limites applicables aux appareils numériques de la classe A prescrites dans le
Règlement sur le brouillage radioélectrique publié par Industrie Canada.
Normas Oficiales Mexicanas (NOM)
Electrical Safety Statement
INSTRUCCIONES DE SEGURIDAD
1. Todas las instrucciones de seguridad y operación deberán ser leídas antes
de que el aparato eléctrico sea operado.
2. Las instrucciones de seguridad y operación deberán ser guardadas para
referencia futura.
3. Todas las advertencias en el aparato eléctrico y en sus instrucciones de
operación deben ser respetadas.
Page 2
724-746-5500 | blackbox.com
Page 3

NOM Statement
4. Todas las instrucciones de operación y uso deben ser seguidas.
5. El aparato eléctrico no deberá ser usado cerca del agua—por ejemplo,
cerca de la tina de baño, lavabo, sótano mojado o cerca de una alberca,
etc..
6. El aparato eléctrico debe ser usado únicamente con carritos o pedestales
que sean recomendados por el fabricante.
7. El aparato eléctrico debe ser montado a la pared o al techo sólo como sea
recomendado por el fabricante.
8. Servicio—El usuario no debe intentar dar servicio al equipo eléctrico más allá
lo descrito en las instrucciones de operación. Todo otro servicio deberá ser
referido a personal de servicio calificado.
9. El aparato eléctrico debe ser situado de tal manera que su posición no
interfiera su uso. La colocación del aparato eléctrico sobre una cama, sofá,
alfombra o superficie similar puede bloquea la ventilación, no se debe
colocar en libreros o gabinetes que impidan el flujo de aire por los orificios
de ventilación.
10. El equipo eléctrico deber ser situado fuera del alcance de fuentes de calor
como radiadores, registros de calor, estufas u otros aparatos (incluyendo
amplificadores) que producen calor.
11. El aparato eléctrico deberá ser connectado a una fuente de poder sólo del
tipo descrito en el instructivo de operación, o como se indique en el
aparato.
12. Precaución debe ser tomada de tal manera que la tierra fisica y la
polarización del equipo no sea eliminada.
13. Los cables de la fuente de poder deben ser guiados de tal manera que no
sean pisados ni pellizcados por objetos colocados sobre o contra ellos,
poniendo particular atención a los contactos y receptáculos donde salen
del aparato.
14. El equipo eléctrico debe ser limpiado únicamente de acuerdo a las
recomendaciones del fabricante.
15. En caso de existir, una antena externa deberá ser localizada lejos de las
lineas de energia.
724-746-5500 | blackbox.com
Page 3
Page 4

NOM Statement
16. El cable de corriente deberá ser desconectado del cuando el equipo no sea
usado por un largo periodo de tiempo.
17. Cuidado debe ser tomado de tal manera que objectos liquidos no sean
derramados sobre la cubierta u orificios de ventilación.
18. Servicio por personal calificado deberá ser provisto cuando:
A: El cable de poder o el contacto ha sido dañado; u
B: Objectos han caído o líquido ha sido derramado dentro del aparato; o
C: El aparato ha sido expuesto a la lluvia; o
D: El aparato parece no operar normalmente o muestra un cambio en su
desempeño; o
E: El aparato ha sido tirado o su cubierta ha sido dañada.
Page 4
724-746-5500 | blackbox.com
Page 5

Trademarks Used in this Manual
Trademarks Used in this Manual
Black Box and the Double Diamond logo are registered trademarks, and
ServSwitch is a trademark, of BB Technologies, Inc.
Macintosh and Mac are registered trademarks of Apple, Inc.
Windows is a registered trademark of Microsoft Corporation.
Any other trademarks mentioned in this manual are acknowledged to be
the property of the trademark owners.
724-746-5500 | blackbox.com
Page 5
Page 6

Table of Contents
Table of Contents
Chapter Page
1. Specifications ............................................................................................7
2. Overview ............................................................................................8
2.1 Introduction ......................................................................................8
2.2 Features ............................................................................................8
2.3 What‘s Included ................................................................................9
2.4 Hardware Description .......................................................................9
2.4.1 KV9702A Front and Back Panels .........................................9
2.4.2 KV9704A Front and Back Panels .......................................10
2.5 System Requirements ......................................................................12
2.5.1 Console Side ......................................................................12
2.5.2 Computer Side ...................................................................12
2.5.3 Cables ................................................................................12
3. Installation ..........................................................................................13
3.1 PC BIOS Notice ...............................................................................13
3.2 Console Connection ........................................................................13
3.3 Computer Connection ....................................................................14
4. Operation ..........................................................................................16
4.1 Front Panel ......................................................................................16
4.1.1 L ED In di ca to rs ....................................................................16
4.1.2 Push Buttons ......................................................................16
4.1.3 Auto Scan ..........................................................................16
4.1.4 Scan Time ..........................................................................16
4.2 Hotkey Commands .........................................................................16
Appendix. Troubleshooting ..............................................................................20
A.1 Problems/Causes/Solutions .............................................................20
A.2 Contacting Black Box ..................................................................... 22
Page 6
724-746-5500 | blackbox.com
Page 7

Chapter 1: Specifications
1. Specifications
Automatic Scan Interval: 3, 8, 15, and 30 seconds
Cable Length (Maximum): 10 ft. (3 m) for USB
DDC2B Support: Yes
Hotkeys: Yes
On-Screen Display (OSD): No
Operation: Hot plug-and-play
Resolution (Maximum): UXGA (1600 x 1200), WUXGA: (1920 x 1200),
Full HD (1920 x 1080p), WQXGA (2560 x 1600)
User Controls: KV9702A: (1) front-panel push button;
KV9704A: (4) front-panel push buttons
Connectors: KV9702A: Console interface: (4) USB Type A ports, (1) USB
keyboard, (1) USB mouse, (1) DisplayPort monitor, (1) set of audio jacks
for speaker and microphone;
Computer interface: (2) USB Type B ports, (2) DisplayPorts for monitor,
(2) sets of audio jacks for speaker and microphone;
KV9704A: Console interface: (4) USB Type A ports, (1) USB keyboard,
(1) USB mouse, (1) DisplayPort monitor, (1) set of audio jacks for speaker
and microphone;
Computer interface: (4) USB Type B ports, (4) DisplayPorts for monitors,
(4) sets of audio jacks for speaker and microphone
Indicators: KV9702A: (4) LEDs: (2) Computer Online, (2) Computer Selected;
KV9704A: (8) LEDs: (4) Computer Online, (4) Computer Selected
Power: 9–12 V
Size: KV9702A: 1.6"H x 6.3"W x 3.9"D (4 x 16 x 10 cm);
KV9704A: 1.7"H x 8.7"W x 5.1"D (4.4 x 22 x 13 cm)
Weight: KV9702A: 1.3 lb. (0.6 kg);
KV9704A: 1.6 lb. (0.7 kg)
724-746-5500 | blackbox.com
Page 7
Page 8

Chapter 2: Overview
2. Overview
2.1 Introduction
The ServSwitch DT DisplayPort KVM with USB and Audio combines USB KVM,
keyboard/video/mouse switching and USB peripheral sharing in one device. Two
models are available: 2-port (KV9702A) and 4-port (KV9704A). You can easily
operate up to four PCs, G3/G4 Macintosh® computers, or Mac® Pros from a single
USB keyboard, USB mouse, and monitor, saving you space, time, equipment, and
money. Its peripheral sharing function enables you to share more USB peripherals
among all computers. The units also support bidirectional audio. Users can switch
among up to two or four KVM sources and control the systems using a USB keyboard and mouse, USB peripherals, and bidirectional audio, and view them with a
DisplayPort supported monitor.
Installation is as easy as connecting USB A-B cables between computers and the
ServSwitch DT DisplayPort KVM. To select a port, just press the front-panel
button(s). The built-in USB hub ensures smooth switching from one computer to
the other. It reduces redundant cables and encourages a neat and tidy working
environment.
2.2 Features
• Supports USB keyboards and mice.
• Supports high-resolution video up to UXGA (1600 x 1200)/Full HD (1920 x
1080)/WUXGA (1920 x 1200), WQXGA (2560 x 1600).
• 2–4 computers can share up to four different USB peripherals (KB + MS + USB
devices).
• A unique multilayered switching system enables the USB (or audio) devices to
operate independently.
• Front-panel push buttons and hotkeys make computer selection easy.
• Supports keyboard and mouse plug-n-play.
• Buzzer sound confirms computer switching.
• Front-panel buttons activate autoscan (KV9704A only).
• Scan time interval is selectable.
• Supports the DisplayPort monitor.
• No software is required.
Page 8
724-746-5500 | blackbox.com
Page 9
Chapter 2: Overview
• Supports Windows® and Mac host systems.
• Compatible with most of the popular screen resolutions, such as XGA, SXGA,
UXGA, WSXGA, up to Full HD, WUXGA, WQXGA.
2.3 What’s Included
• (1) 2- or 4-port KVM switch
• (1) external power supply with U.S. power cord
• This user’s manual
• (4) rubber feet
2.4 Hardware Description
2.4.1 KV9702A Front and Back Panels
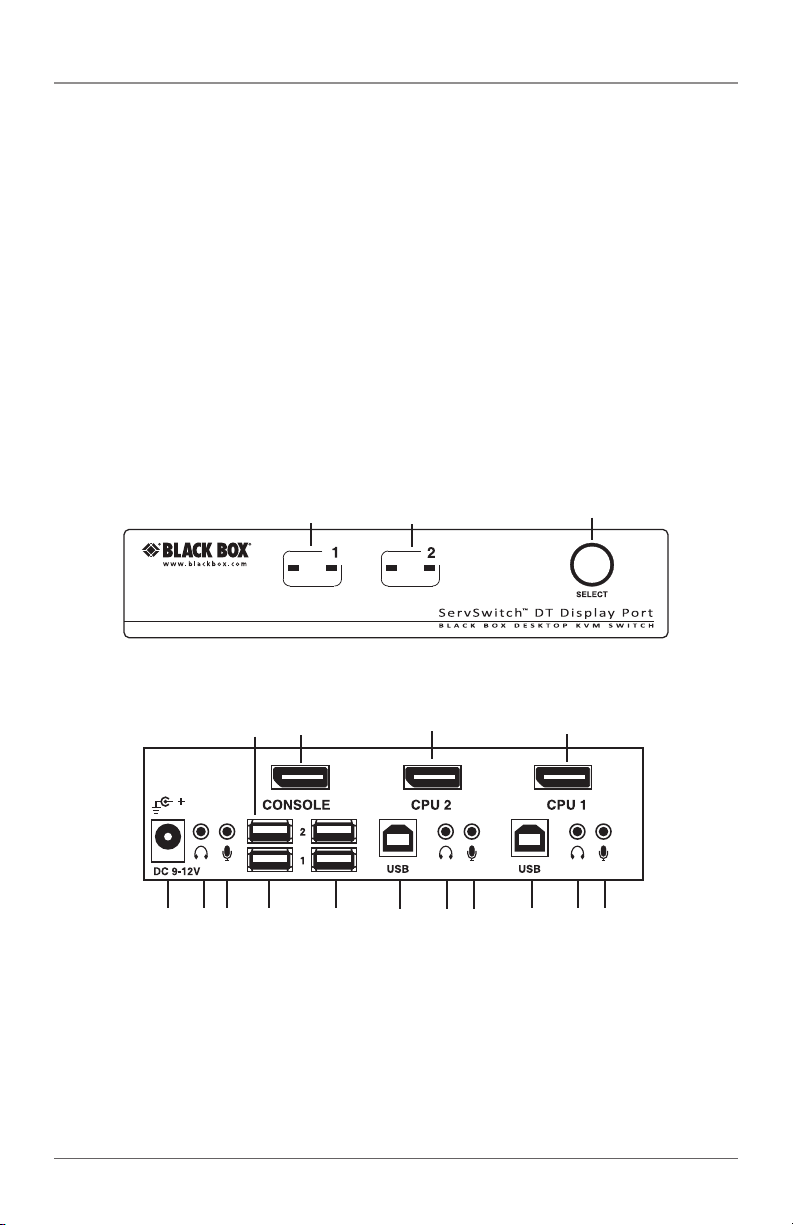
Figures 2-1 and 2-2 illustrate the front and back panels of the KV9702A. Table 2-1
describes its components.
1 2 3
Figure 2-1. KV9702A front panel.
8 16 17 18
4 5 6 7 9 10 11 12 13 14 15
Figure 2-2. KV9702A back panel.
724-746-5500 | blackbox.com
Page 9
Page 10
Chapter 2: Overview
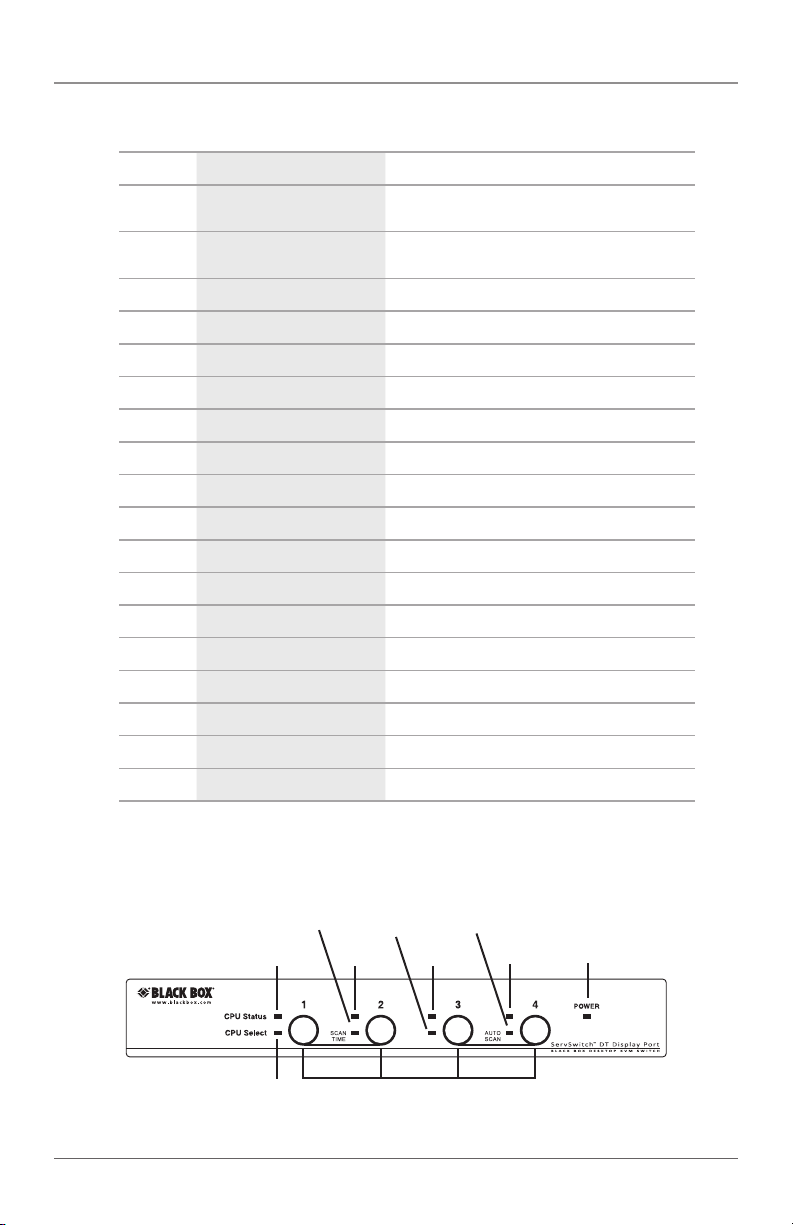
Table 2-1. KV9702A front and back panel components.
Number Component Description
1 (2) LEDs
2 (2) LEDs
3 Push button Toggles bet ween Computer 1 and Computer 2
4 Barrel connector Links to 9–12-VDC power
5 Audio connector Links to console headphones/speakers
6 Audio connector Links to console microphone
7 USB Type A connector Links to keyboard
8 USB Type A connector Links to mouse
9 (2) USB Type A connectors Links to USB peripherals
10 USB Type B connector Links to CPU 2
11 Audio connector Links to CPU 2 audio out
12 Audio connector Links to CPU 2 microphone out
13 USB Type B connector Links to CPU 1
14 Audio connector Links to CPU 1 audio out
15 Audio connector Links to CPU 1 microphone out
16 DisplayPort LInks to console monitor
17 DisplayPort Links to CPU 2 video card
18 DisplayPort Links to CPU 1 video card
(1) computer on-line, (1) computer selected for
Port 1
(1) computer on-line, (1) computer selected for
Port 2
2.4.2 KV9704A Front and Back Panels
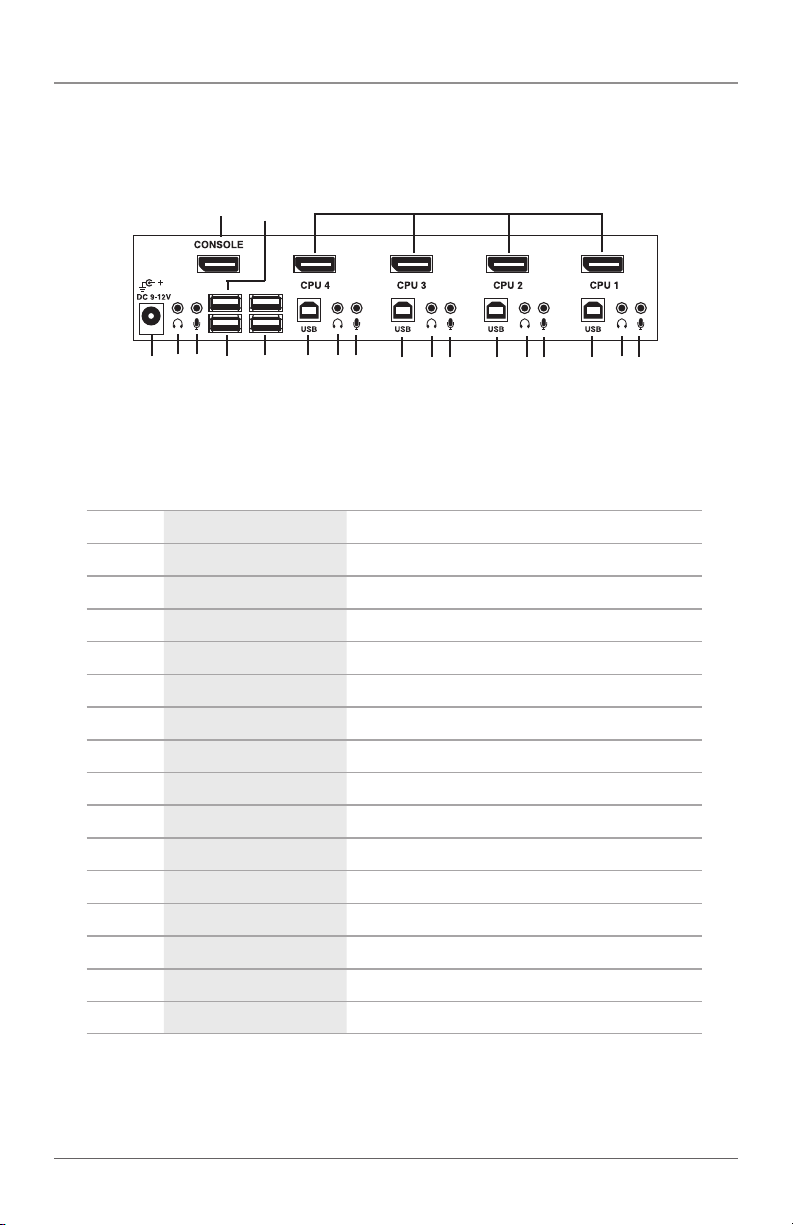
Figures 2-3 and 2-4 illustrate the front and back panels of the KV9704A. Table 2-2
describes its components.
2 2 2
1 1 1 1 3
2 4
Figure 2-3. KV9704A front panel.
Page 10
724-746-5500 | blackbox.com
Page 11
Chapter 2: Overview
14 9 15
5 6 7 8 10 11 12 13 11 12 13 11 12 13 11 12 13
Figure 2-4. KV9704A back panel.
Table 2-2. KV9704A front and back panel components.
Number Component Description
1 (4) LEDs Indicates which CPU is selected
2 (4) LEDs Lights when CPU is selected
3 (1) LED Lights when power to the unit is on
4 (4) push buttons Press to select computer 1, 2, 3, or 4
5 Barrel connector for power LInks to 9–12 VDC power
6 Audio connector Links to console headphones/speakers
7 Audio connector Links to console microphone
8 USB Type A connector Links to keyboard
9 USB Type A connector Links to mouse
10 (2) USB Type A connectors Links to USB peripherals
11 (4) USB Type B connectors Links to CPU 1, CPU 2, CPU 3, CPU 4 USB por ts
12 (4) Audio connectors Links to CPU 1, CPU 2, CPU 3, CPU 4 audio out
13 (4) Audio connectors Links to CPU 1, CPU 2, CPU 3, CPU 4 microphones out
14 (1) DisplayPort connector Links to console monitor
15 (4) DisplayPort connectors Links to CPU 1, CPU 2, CPU 3, CPU 4 video card
724-746-5500 | blackbox.com
Page 11
Page 12

Chapter 2: Overview
2.5 System Requirements
2.5.1 Console Side
• (1) DisplayPort monitor
• (1) USB keyboard
• (1) USB mouse
• (1) microphone and speaker (optional)
2.5.2 Computer Side
• (1) USB-enabled computer with DisplayPort video support
2.5.3 Cables
Each computer can interface with the KVM switch with:
• (1) DisplayPort video cable (EVNDP01-00xx-MM)
• (1) USB Type A-B cable (USB05-00xx)
• (1) Optional audio cable (EJ110-00xx)
Page 12
724-746-5500 | blackbox.com
Page 13

Chapter 3: Installation
3. Installation
Before installation, power off all devices that will be connected to this system.
• Make sure that all devices you will connect are properly grounded.
• Place cables away from fluorescent lights, air conditioners, and machines
that are likely to generate electrical noise.
• Make sure that the DisplayPort video drivers are installed correctly on all
computers.
3.1 PC BIOS Notice
The following BIOS setup changes are necessary for PC users and not necessary
for Mac users:
• In standard CMOS, set “Halt on Error” to “All but keyboard.”
• In PNP and PCI setup, set “PNP OS installed” to “YES” and set “USB IRQ” to
“En ab le d.”
NOTE: The ServSwitch DT DisplayPort KVM switches USB keyboard and USB
mouse from one computer to the other. If you plan to share other
peripherals such as a camera, printer, external storage device, or scanner,
shut down a computer’s driver before switching to another computer.
Port switching is equivalent to unplugging the USB cable from one
computer and plugging it to another. Some USB drivers check attached
USB peripherals constantly and do not support plug-n-play functionality.
3.2 Console Connection
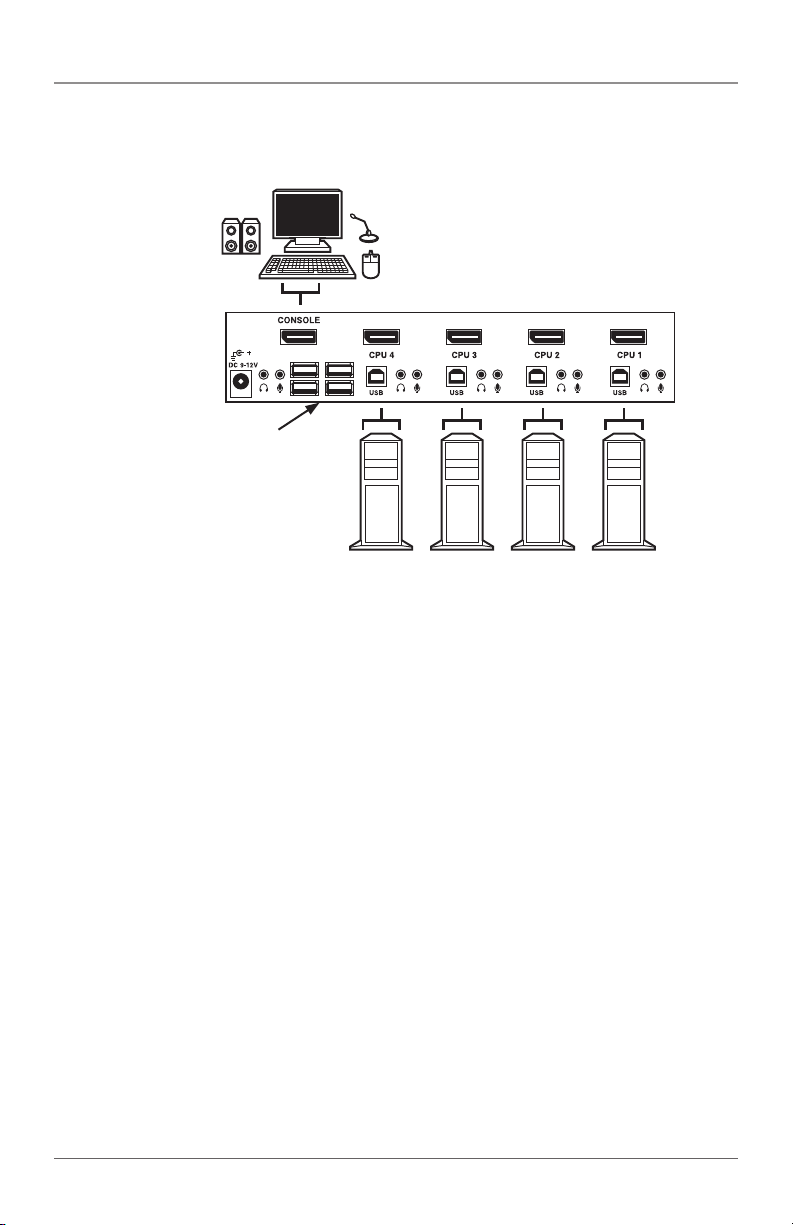
1. Plug a DisplayPort monitor into the console’s video port; plug a USB keyboard
and a USB mouse into the corresponding USB ports on the console.
2. To use the standard audio feature, plug a set of audio jacks from the speaker
and microphone to the console’s speaker port and microphone port
respectively,
724-746-5500 | blackbox.com
Page 13
Page 14
Chapter 3: Installation
3. Plug USB peripherals into the USB 1 and/or USB 2 ports on the console side if
needed.
DisplayPort monitor, USB
keyboard/mouse, audio
speaker, and microphone
KV9704A
Plug up to four USB
peripherals into these USB
Type A ports
Figure 3-1. Connecting the console.
3.3 Computer Connection
1. Use a DisplayPort male-to-male video cable to connect computer video to the
KVM switch.
2. Use a USB A–B cable to connect the unit’s USB port (B connector, square
connector) and the USB port on the corresponding computer (A connector,
flat connector).
3. Use a set of audio cables to connect the speaker port and the microphone port
between the computer side of the unit and the corresponding computer.
(Audio connection is optional.)
4. Plug the power adapter from an appropriate DC power source to the switch
power port.
Page 14
724-746-5500 | blackbox.com
Page 15
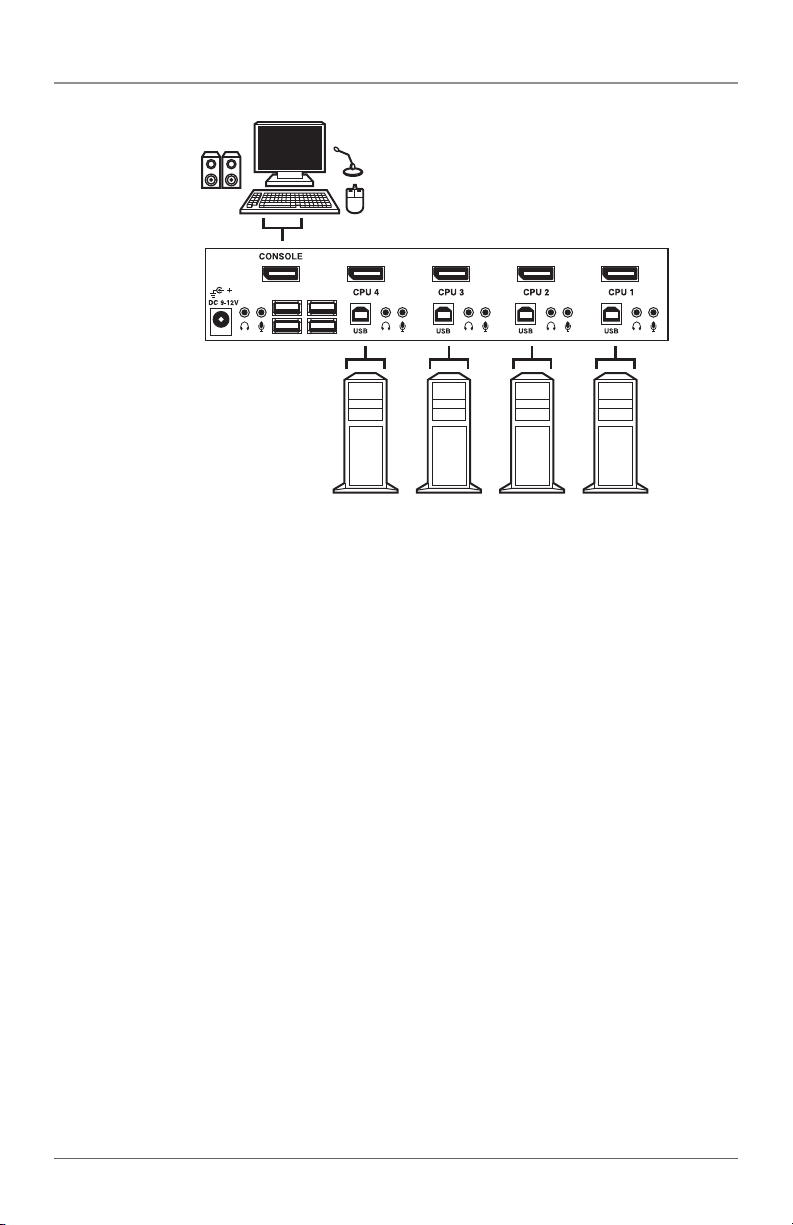
KV9704A
Each computer
connection uses (1) USB
Type A to B cable
Figure 3-2. Connecting the computer.
Chapter 3: Installation
724-746-5500 | blackbox.com
Page 15
Page 16

Chapter 4: Operation
4. Operation
4.1 Front Panel
4.1.1 LED Indicators
The LED turns green when the connected computer is powered on. Its
corresponding LED lights red when a connected computer is currently selected.
4.1.2 Push Buttons
For the KV9702A, press the “SELECT” button to switch PC port between the two
connected computers, and wait for 2–3 seconds after each PC port switching,
then you can press the button for switching PC port again.
For the KV9704A, each button on the front panel is associated with a connected
computer for selection. Press one of the buttons to select the connected
computer, and wait for 2–3 seconds after each port switching, then you can press
another button for switching PC port again.
4.1.3 Auto Scan
For the KV9704A model only, the system automatically scans through the active
computers in sequence with a fixed interval (see Scan Time in Section 4.1.4).
To activate Auto Scan, press front-panel push buttons “3” and “4"”simultaneously. The port LED flashes during Auto Scan. Auto Scan is effective for active computers only. To exit the Auto Scan mode, just tap any one of the push buttons.
4.1.4 Scan Time
Set the scan time duration to 3, 8, 15, or 30 seconds.
For the KV9704A model only, to change the Scan Time, press both front-panel
buttons “1” and “2” simultaneously. The unit responds with beep(s) 1, 2, 3, or 4
times for Scan Time of 3, 8, 15 or 30 seconds respectively.
NOTE: Scan Time is set to 3 seconds by default after blackout or reboot.
4.2 Hotkey Commands
A Hotkey command is a short keyboard sequence used to select a computer,
activate a computer scan, etc. The KVM switch interprets keystrokes for hotkeys
all the time. A hotkey sequence starts with two left Ctrl keystrokes (successively in
0.9 seconds) followed by one or two more keystrokes. A built-in buzzer generates
a high-pitched beep for a correct hotkey command; otherwise, one low-pitched
beep is generated for error, and the bad key sequence will not be forwarded to
the selected computer.
Page 16
724-746-5500 | blackbox.com
Page 17

Chapter 4: Operation
NOTE: Press and hold the Left Shift key and press the Num Lock key twice, then
release the Shift key followed by pressing the left Ctrl key once to enable/
disable the hotkey function.
To select a computer:
(Example: Selects the computer at Port 1.)
L-Ctrl + L-Ctrl + 1
(Example: Selects the computer at Port 2.)
L-Ctrl + L-Ctrl + 2
NOTE: Do not use the keypad at the right of the keyboard.
To start Auto Scan:
L-Ctrl + L-Ctrl + F1
To abort the Auto Scan mode, press the left Ctrl key twice. When Auto Scan
detects any keyboard or mouse activity, it suspends the scanning until the activity
stops; it then resumes with the next computer in sequence. The length of the
Auto Scan interval (Scan Rate) is adjustable, see below.
Manual Scan enables users to manually switch back and forth between active
computers.
L-Ctrl + L-Ctrl + F2
To select the previous or the next computer, press the up-arrow key or downarrow key in sequence.
To abort the Manual Scan, press any other key.
To adjust Scan Rate, set the scan time before switching to the next computer:
L-Ctrl + L-Ctrl + F3
The KVM Switch generates 1 to 4 beeps indicating scan times of 3, 8, 15, and 30
seconds respectively.
Audio Stick
There are two options for Audio Stick: ON and OFF. When set to “ON,” audio
selection follows computer selection. When set to “OFF,” audio selection stops
following computer selection. Use this to listen to a particular computer’s audio
signal while operating other computers.
724-746-5500 | blackbox.com
Page 17
Page 18

Chapter 4: Operation
L-Ctrl + L-Ctrl + F5
The KVM switch beeps once or twice corresponding to ON or OFF respectively.
Force the audio signal to follow with the selected computer by pressing
the following hotkey:
L-Ctrl + L-Ctrl + A
USB-Port Rule
There are two options for setting the rule of USB 1 and USB 2 on the Console
side:
When set to “ON,” USB-Port selection follows computer selection.
When set to “OFF,” USB-Port selection stops following computer selection.
USB port setting for 2-Port model (KV9702A):
Press the hotkey below to turn ON/OFF both the USB 1 and USB 2 port Rule
L-Ctrl + L-Ctrl + F7
USB port setting for 4-Port model KV9704A:
USB 1: Pressing the hotkey below will turn ON /OFF the USB-Port Rule
L-Ctrl + L-Ctrl + F7
USB 2: Pressing the hotkey below will turn ON/OFF the USB-Port Rule
L-Ctrl + L-Ctrl + F8
Force the USB signal to follow the selected computer by pressing the following
hotkey (applicable for both 2-Port [KV9702A] and 4-Port [KV9704A]):
L-Ctrl + L-Ctrl + U
NOTE: Make sure that the USB device is unlinked (safely removed) before
switching to the next computer.
Alternative Hotkey Commands
In addition to the Left-Ctrl + Left-Ctrl hotkeys, there are two alternative hotkey
sequences available.
1. For the following operations, users may press Scroll-Lock twice instead
of pressing Left-Ctrl twice.
Page 18
724-746-5500 | blackbox.com
Page 19

Chapter 4: Operation
To select a computer:
Scroll-Lock + Scroll-Lock + 1
(Example: Select the computer at port 1.)
Scroll-Lock + Scroll-Lock + 2
(Example: Select the computer at Port 2.)
NOTE: Do not use the keypad at the right of the keyboard.
2. For those keyboards that do not have or do not support Scroll Lock, press and
HOLD the Left-Shift and press Num-Lock twice instead of pressing Left-Ctrl
twice.
To select a computer:
Hold Left-Shift + Press Num-Lock + Press Num-Lock then release shift + Press 1
(Example: Select the computer at Port 1.)
Hold Left-Shift + Press Num-Lock + Press Num-Lock then release shift + Press 2
(Example: Select the computer at Port 2.)
NOTE: Do not use the keypad at the right of the keyboard.
724-746-5500 | blackbox.com
Page 19
Page 20

Appendix: Troubleshooting
Appendix. Troubleshooting
Make sure that all cables are well-seated and labeled associated with each
computer to avoid confusion when connected to the unit.
The unit has built-in power protection that works automatically when needed.
When it works, USB communication halts and the only way to restart the unit
properly is to remove all power sources (USB cables and power adapter), wait a
few seconds, then apply power sources, and start again.
A.1 Problems/Causes/Solutions
Symptom: Keyboard or mouse does not work.
Causes:
• In Auto Scan, keyboard and mouse are not operable.
• Too many keyboards or mouse drivers are installed.
Solutions:
• Press any front-panel button to select a computer, then use the keyboard and
mouse.
• Remove all unnecessary keyboards and mouse drivers.
Symptom: Newly-installed USB device does not work.
Causes:
• Improper device driver.
• Device consumes too much power.
• Device consumes too much power instantaneously.
• Improper device initialization.
• When the unit works under self-power (that is, no power supply is added), it
supports a maximum of 100 mA as per USB specifications.
Solutions:
• Re-install the device driver.
• The device should be self-powered. Add a power adapter to the device.
Page 20
724-746-5500 | blackbox.com
Page 21

Appendix: Troubleshooting
• If the device does not have a power jack, add a power adapter with 9–12 VDC
and less that 1-A current rating to the unit.
• Make sure the USB cable is well-seated for good communications.
• Remove all power sources to the unit by unplugging all USB A–B cables and the
power adapter; then start all over again.
• Select the computer by push button, restart the computer, and try again.
Symptom: Computer hangs up while switching computer.
Causes: Device initialization or enumeration takes too much time.
Solutions:
• Wait at least five seconds before computer switching to ensure proper USB
communication.
• Turn off the device driver (not the keyboard or the mouse) before computer
switching.
Symptom: Auto Scan does not switch PC automatically, and the unit beeps.
Causes: All PCs are off or only one PC is turned on. Scan mode works for
powered-on computers only.
Solution: Turn on computers.
Symptom: No video signal when users plug and unplug the DisplayPort
connector or switch from port to port.
Cause: Some DisplayPort video cards do not respond to the signal switch
simultaneously.
Solutions:
• Make sure that you have plugged a monitor to the console’s DisplayPort port
before plugging/unplugging the PC’s video connector(s).
• Wait for a few seconds.
724-746-5500 | blackbox.com
Page 21
Page 22

Appendix: Troubleshooting
Symptom: When switching between computer ports, the DisplayPort monitor
displays “No Signal.”
Cause: Computer has gone into sleep mode or was not booted up while the con-
sole was selected on that specific computer.
Solution: If the DisplayPort video drivers are not installed, or are installed
incorrectly, the computer cannot be brought out of sleep mode by
using the keyboard and mouse. Also, when booting up a computer,
the respective port needs to be selected until the OS has fully booted
up. DisplayPort technology requires knowing exactly what is connected
when it initializes its video signal.
A.2 Contacting Black Box
If you determine that your ServSwitch DT DisplayPort KVM with USB and Audio is
malfunctioning, do not attempt to alter or repair the unit. It contains no
user-serviceable parts. Contact Black Box Technical Support at 724-746-5500
or [email protected].
Before you do, make a record of the history of the problem. We will be able to
provide more efficient and accurate assistance if you have a complete description,
including:
• the nature and duration of the problem.
• when the problem occurs.
• the components involved in the problem.
• any particular application that, when used, appears to create the problem or
make it worse.
A.3 Shipping and Packaging
If you need to transport or ship your ServSwitch DT DisplayPort KVM with USB
and Audio:
• Package it carefully. We recommend that you use the original container.
• If you are returning the unit, make sure you include everything you received
with it. Before you ship for return or repair, contact Black Box to get a Return
Authorization (RA) number.
Page 22
724-746-5500 | blackbox.com
Page 23

NOTES
724-746-5500 | blackbox.com
Page 23
Page 24
Black Box Tech Support: FREE! Live. 24/7.
Tech support the
way it should be.
Great tech support is just 30 seconds away at
724-746-5500 or blackbox.com.
About Black Box
Black Box Network Services is your source for an extensive range of networking
and infrastructure products. You’ll find everything from cabinets and racks and
power and surge protection products to media converters and Ethernet switches
all supported by free, live 24/7 Tech support available in 30 seconds or less.
© Copyright 2011. Black Box Corporation. All rights reserved.
KV9702A, rev. 2
724-746-5500 | blackbox.com
 Loading...