

Page 1

NOVEMBER 2001
KV6EXT-R2
KV6EXTB-R2
Page 2

1
THE SERVSWITCH™ FAMILY
Welcome to the ServSwitch
TM
Family!
Thank you for purchasing a BLACK BOX®ServSwitch™Brand KVM-switch
accessory! We appreciate your business, and we think you’ll appreciate the many
ways that your new ServSwitch keyboard/video/mouse switch will save you money,
time, and effort.
That’s because our ServSwitch family is all about breaking away from the
traditional, expensive model of computer management. You know, the one-sizefits-all-even-if-it-doesn’t model that says, “One computer gets one user station, no
more, no less.” Why not a single user station (monitor, keyboard, and mouse) for
multiple computers—even computers of different platforms? Why not a pair of
user stations, each of which can control multiple computers? Why not multiple
user stations for the same computer?
With our ServSwitch products, there’s no reason why not. We carry a broad line
of robust solutions for all these applications. Do you have just two PCs, and need
an economical alternative to keeping two monitors, keyboards, and mice on your
desk? Or do you need to share dozens of computers, including a mix of IBM
®
PC,
RS/6000
®
, Apple®Macintosh®, Sun Microsystems®, and SGI®compatibles among
multiple users with different access levels? Does your switch have to sit solidly on a
worktable and use regular everyday cables? Or does it have to be mounted in an
equipment rack and use convenient many-to-one cables? No matter how large or
small your setup is, no matter how simple or how complex, we’re confident we
have a ServSwitch system that’s just right for you.
The ServSwitch
™
family from Black Box—the one-stop answer for all your KVM-
switching needs!
*
This manual will tell you all about your new ServSwitch™ Duo Extender,
including how to install, operate, and troubleshoot it. For an introduction to the
Extender, see Chapter 2. The Extender product codes covered in this manual are:
KV6EXT-R2
KV6EXTB-R2
This manual also includes information about the Extender’s Rackmount Kit, whose
product code is:
RMK19WX
Page 3

2
SERVSWITCH™DUO EXTENDER
TRADEMARKS USED IN THIS MANUAL
BLACK BOX and the logo are registered trademarks, and ServSwitch and
ServSwitch Wizard are trademarks, of Black Box Corporation.
Apple and Macintosh are registered trademarks of Apple Computer, Inc.
Hewlett-Packard is a registered trademark of Hewlett-Packard.
IBM, PC/AT, PS/2, RS/6000, and ThinkPad are registered trademarks, and
PC/XT is a trademark, of IBM Corporation.
Microsoft and Windows are registered trademarks, and IntelliMouse is a
trademark, of Microsoft Corporation.
Sun and Sun Microsystems are registered trademarks of Sun Microsystems, Inc. in
the United States and other countries.
Any other trademarks mentioned in this manual are acknowledged to be the property of the
trademark owners.
Page 4

3
FCC/IC STATEMENTS
FEDERAL COMMUNICATIONS COMMISSION AND INDUSTRY CANADA
RADIO-FREQUENCY INTERFERENCE STATEMENTS
This equipment generates, uses, and can radiate radio-frequency energy, and if not
installed and used properly, that is, in strict accordance with the manufacturer’s
instructions, may cause interference to radio communication. It has been tested
and found to comply with the limits for a Class A computing device in accordance
with the specifications in Subpart B of Part 15 of FCC rules, which are designed to
provide reasonable protection against such interference when the equipment is
operated in a commercial environment. Operation of this equipment in a
residential area is likely to cause interference, in which case the user at his own
expense will be required to take whatever measures may be necessary to correct the
interference.
Changes or modifications not expressly approved by the party responsible for
compliance could void the user’s authority to operate the equipment.
This digital apparatus does not exceed the Class A limits for radio noise emission from
digital apparatus set out in the Radio Interference Regulation of Industry Canada.
Le présent appareil numérique n’émet pas de bruits radioélectriques dépassant les limites
applicables aux appareils numériques de la classe A prescrites dans le Règlement sur le
brouillage radioélectrique publié par Industrie Canada.
Page 5

4
SERVSWITCH™DUO EXTENDER
EUROPEAN UNION DECLARATION OF CONFORMITY
This equipment has been tested and found to comply with the limits for a class A
computing device in accordance with the specifications in the European standard
EN55022. These limits are designed to provide reasonable protection against
harmful interference. This equipment generates, uses and can radiate radiofrequency energy, and if not installed and used in accordance with the
instructions, might cause harmful interference to radio or television reception.
However, there is no guarantee that harmful interference will not occur in a
particular installation. If this equipment does cause interference to radio or
television reception, which can be determined by turning the equipment on and
off, you can correct the interference with one or more of the following measures:
(a) Reorient or relocate the receiving antenna.
(b) Increase the separation between the equipment and the receiver.
(c) Connect the equipment to an outlet on a circuit different from that to which
the receiver is connected.
(d) Consult the supplier or an experienced radio/TV technician for help.
Shielded cables must be used to attach computer equipment to this device in order
to maintain compliance with radio-frequency energy-emission regulations and
ensure a suitably high level of immunity to electromagnetic disturbances.
Page 6

5
NOM STATEMENT
NORMAS OFICIALES MEXICANAS (NOM)
ELECTRICAL SAFETY STATEMENT
INSTRUCCIONES DE SEGURIDAD
1. Todas las instrucciones de seguridad y operación deberán ser leídas antes de
que el aparato eléctrico sea operado.
2. Las instrucciones de seguridad y operación deberán ser guardadas para
referencia futura.
3. Todas las advertencias en el aparato eléctrico y en sus instrucciones de
operación deben ser respetadas.
4. Todas las instrucciones de operación y uso deben ser seguidas.
5. El aparato eléctrico no deberá ser usado cerca del agua—por ejemplo, cerca
de la tina de baño, lavabo, sótano mojado o cerca de una alberca, etc.
6. El aparato eléctrico debe ser usado únicamente con carritos o pedestales que
sean recomendados por el fabricante.
7. El aparato eléctrico debe ser montado a la pared o al techo sólo como sea
recomendado por el fabricante.
8. Servicio—El usuario no debe intentar dar servicio al equipo eléctrico más allá
a lo descrito en las instrucciones de operación. Todo otro servicio deberá ser
referido a personal de servicio calificado.
9. El aparato eléctrico debe ser situado de tal manera que su posición no
interfiera su uso. La colocación del aparato eléctrico sobre una cama, sofá,
alfombra o superficie similar puede bloquea la ventilación, no se debe colocar
en libreros o gabinetes que impidan el flujo de aire por los orificios de
ventilación.
10. El equipo eléctrico deber ser situado fuera del alcance de fuentes de calor
como radiadores, registros de calor, estufas u otros aparatos (incluyendo
amplificadores) que producen calor.
11. El aparato eléctrico deberá ser connectado a una fuente de poder sólo del
tipo descrito en el instructivo de operación, o como se indique en el aparato.
Page 7

6
SERVSWITCH™DUO EXTENDER
12. Precaución debe ser tomada de tal manera que la tierra fisica y la polarización
del equipo no sea eliminada.
13. Los cables de la fuente de poder deben ser guiados de tal manera que no
sean pisados ni pellizcados por objetos colocados sobre o contra ellos,
poniendo particular atención a los contactos y receptáculos donde salen del
aparato.
14. El equipo eléctrico debe ser limpiado únicamente de acuerdo a las
recomendaciones del fabricante.
15. En caso de existir, una antena externa deberá ser localizada lejos de las lineas
de energia.
16. El cable de corriente deberá ser desconectado del cuando el equipo no sea
usado por un largo periodo de tiempo.
17. Cuidado debe ser tomado de tal manera que objectos liquidos no sean
derramados sobre la cubierta u orificios de ventilación.
18. Servicio por personal calificado deberá ser provisto cuando:
A: El cable de poder o el contacto ha sido dañado; u
B: Objectos han caído o líquido ha sido derramado dentro del aparato; o
C: El aparato ha sido expuesto a la lluvia; o
D: El aparato parece no operar normalmente o muestra un cambio en su
desempeño; o
E: El aparato ha sido tirado o su cubierta ha sido dañada.
Page 8

7
TABLE OF CONTENTS
Contents
Chapter Page
1. Specifications ............................................................................................. 9
2. Introduction ............................................................................................. 12
2.1 Features and Benefits of the Extender ............................................ 12
2.2 The Complete Extender Package .................................................... 13
2.3 The Extender Illustrated .................................................................. 14
2.4 Safety Concerns ................................................................................. 14
3. Installation ................................................................................................ 15
3.1 What You Will Need .......................................................................... 15
3.2 Placement .......................................................................................... 16
3.3 Connecting Your Devices ................................................................. 17
3.3.1 Connecting User Equipment ................................................. 17
3.3.2 Connecting a Local CPU (Optional, KV6EXT-R2 Only) ..... 17
3.4 Connecting the Extender to the Duo .............................................. 19
3.5 Powering the Extender and Attached Devices ................................ 20
4. Configuration ........................................................................................... 21
4.1 Configuring an Attached PC (KV6EXT-R2 Only) .......................... 21
4.2 Configuring the Extender ................................................................ 22
4.2.1 Setting the Hotkey ................................................................ 22
4.2.2 Using Configuration Mode .................................................. 24
4.2.2.A Setting the Video Compensation ........................... 24
4.2.2.B Issuing Other Configuration-Mode
Keyboard Commands ........................................... 26
4.3 Setting a Password for the Extender ................................................ 27
Page 9

8
SERVSWITCH™DUO EXTENDER
Contents (continued)
Chapter Page
5. Operation ................................................................................................. 29
5.1 Power-Up Status .............................................................................. 29
5.2 The Extender’s LEDs ..................................................................... 30
5.3 How the Extender Uses the Keyboard LEDs ................................ 31
5.4 Switching Between the Duo System and a Local CPU
(KV6EXT-R2 Only) ..................................................................... 33
5.5 Contending for Control of Duo-System CPUs .............................. 34
5.6 Things to Keep in Mind About the Keyboards and Mice ............ 35
5.7 Keyboard Control: Hotkey Commands ......................................... 36
5.8 Mouse Switching (KV6EXT-R2 with Local CPU Only) ................ 38
5.9 Hot-Plugging a PS/2 Mouse or Mouse Port into the Extender
or Re-Enabling a Disconnected PS/2 Mouse Port
(KV6EXT-R2 with Local CPU Only) .......................................... 39
6. Troubleshooting ...................................................................................... 41
6.1 Things to Try ..................................................................................... 41
6.2 Clearing the Extender’s Password ................................................... 43
6.3 Restoring the Extender to Its Factory-Default Configuration ........ 43
6.4 Displaying the Extender’s Firmware Revision ................................. 44
6.5 Calling Black Box .............................................................................. 44
6.6 Shipping and Packaging ................................................................... 45
Appendix A: Guidelines for Twisted-Pair Cabling ........................................ 46
Appendix B: Rackmounting ........................................................................... 48
Page 10

9
CHAPTER 1: Specifications
1. Specifications
Cable Required: Between the Duo and the Extender: Four-pair (eight-
wire) Category 5 or higher unshielded twisted-pair
(UTP); shielded twisted-pair (STP) can also be used at
shorter distances
Compliance: CE (EN55022 Class A); FCC Part 15 Subpart B Class A,
IC Class/classe A
Standards: VGA, SVGA, XGA, or XGA-2 video
Interfaces: Video: VGA;
Keyboard and mouse: IBM PS/2 compatible; with
appropriate adapters, both models can support IBM
PC/AT keyboards and the KV6EXT-R2 can support
PC/AT keyboard ports and EIA/TIA RS-232 serial
mouse ports;
Serial (nonfunctional): EIA/TIA RS-232, pinned
according to TIA-574, DCE;
KV6EXT-R2 only: Audio (nonfunctional): 3.5-mm stereo
Resolution and
Refresh Rate: At Duo-to-Extender distances to 65 m (210 ft.):
Up to 1600 x 1280 noninterlaced at up to 85 Hz;
At distances to 100 m (325 ft.): Up to 1600 x 1280
noninterlaced at up to 65 Hz;
At distances to 200 m (655 ft.): Up to 1024 x 768
noninterlaced at up to 65 Hz
Maximum
Distance: Between the Duo and the Extender: Up to 200 m
(655 ft.) of unshielded twisted-pair cable or 100 m
(325 ft.) of shielded twisted-pair cable;
From Extender to the attached keyboard, monitor, or
mouse: 10 m (32 ft.);
From Extender to any attached CPU: 20 m (65 ft.)
Page 11

10
SERVSWITCH™DUO EXTENDER
User Controls: Keyboard commands;
Mouse-click functions;
(1) Side-mounted 8-position DIP switch for hotkey
selection;
Extender users can also access the Duo’s on-screen
menus
Indicators: Both models: (2) Top-mounted LEDs: Power (green)
and Duo (red);
KV6EXT-R2 only: (1) Top-mounted Local CPU (red)
LED;
Both models also indicate compensation, control-
lockout, and password-lockout modes by flashing
various patterns on the Num Lock, Caps Lock, and
Scroll Lock LEDs of the attached keyboard
Connectors: All side-mounted;
Both models:
(1) HD15 female to monitor;
(2) 6-pin mini-DIN female: (1) to keyboard, (1) to
mouse;
(1) Barrel jack for power-supply attachment;
(1) DB9 female (nonfunctional);
KV6EXT-R2 only:
(1) HD15 female to CPU’s video port (optional);
(2) 6-pin mini-DIN female: (1) to CPU’s keyboard
port, (1) to CPU’s mouse port (both optional);
(4) 3.5-mm stereo jacks (nonfunctional)
Maximum
Altitude: 10,000 ft. (3048 m)
Temperature
Tolerance: 32 to 104˚F (0 to 40˚C)
Humidity
Tolerance: 5 to 60% noncondensing
Enclosure: Steel and aluminum
Page 12

11
CHAPTER 1: Specifications
Power: From utility-power (mains) outlet, through detachable
power cord and IEC 320 inlet, to external transformer:
Input: 100 to 240 VAC at 50 to 60 Hz;
Output: 5 VDC at up to 2.5 A from transformer to
Extender (Extender normally draws only 1.5 A);
Consumption: 7.5 watts typical
Size: 1.3"H x 6.5"W x 5.6"D (3.3 x 16.5 x 14.2 cm)
Weight: 1.1 lb. (0.5 kg)
Page 13

12
SERVSWITCH™DUO EXTENDER
2. Introduction
The ServSwitch™ Duo Extender is a high-performance IBM®PC compatible
keyboard-, monitor-, and mouse-extension device that you can use to connect a
distant user station to a ServSwitch™ Duo. The Extender is linked to the Duo with
twisted-pair cable, preferably rated Category 5.
The basic version of the Extender (product code KV6EXTB-R2) has only userstation (monitor, keyboard, and mouse) connectors plus a nonfunctional serial
connector, and only performs KVM extension. The full version of the Extender
(KV6EXT-R2) also has connectors for directly attaching an optional local CPU,
and can switch between this CPU and the CPUs in the Duo system. (It has a few
nonfunctional audio connectors as well.)
2.1 Features and Benefits of the Extender
Here are some of the useful features of both ServSwitch Duo Extender models and
some of the ways those features benefit you:
• Control your ServSwitch Duo system from a remote keyboard, monitor, and
mouse up to 200 meters (655 ft.) away.
• Uses a single Category 5 unshielded twisted-pair (UTP) cable to carry all
supported signals between the Extender and the Duo.
• Password protection prevents unauthorized use.
• Finely user-adjustable video compensation for the best possible video quality at
any supported cable length.
• Video compensation only needs to be done once, at installation time, because
the compensation setting is saved in EEPROM memory even when the
Extender is powered OFF.
• Supports high-bandwidth monitors at resolutions up to 1600 x 1280 pixels.
• Emulates the presence of a keyboard and mouse, so that any attached
computer can boot up automatically at any time.
• Supports keyboard modes 1, 2, and 3, as well as both “prompt” and “stream”
mouse modes, for maximum compatibility.
• Support for Microsoft
®
IntelliMouse®and other common “wheel” mice.
Page 14

13
CHAPTER 2: Introduction
• Automatically restores keyboard and mouse states when you switch between
CPUs.
• Keyboard-command hotkey is user-configurable.
• LEDs indicate power status, data activity, and (on the KV6EXT-R2) whether
the Duo or the local CPU is selected.
• Flashes keyboard LEDs to indicate compensation, control, and locked modes.
• Robust metal case ensures good shielding and video quality.
The full KV6EXT-R2 Extender has these additional features:
• Control a directly attached PC as well; this can be an IBM PS/2
®
, PC/AT®,
RS/6000
®
, or compatible computer.
• Switch between Duo and local CPUs with keyboard hotkey sequences or a
3-button or wheel mouse.
• Mouse-restoration functions to enable hot-plugging of certain systems as the
local CPU.
• Supports IBM ThinkPad
®
and its “Y” cables.
2.2 The Complete Extender Package
Along with your ServSwitch Duo Extender, you should have received:
• The Extender’s power supply.
• The power supply’s input cord.
• This manual.
If you didn’t receive everything, or if anything arrived damaged, contact Black Box
right away.
Page 15
14
SERVSWITCH™DUO EXTENDER
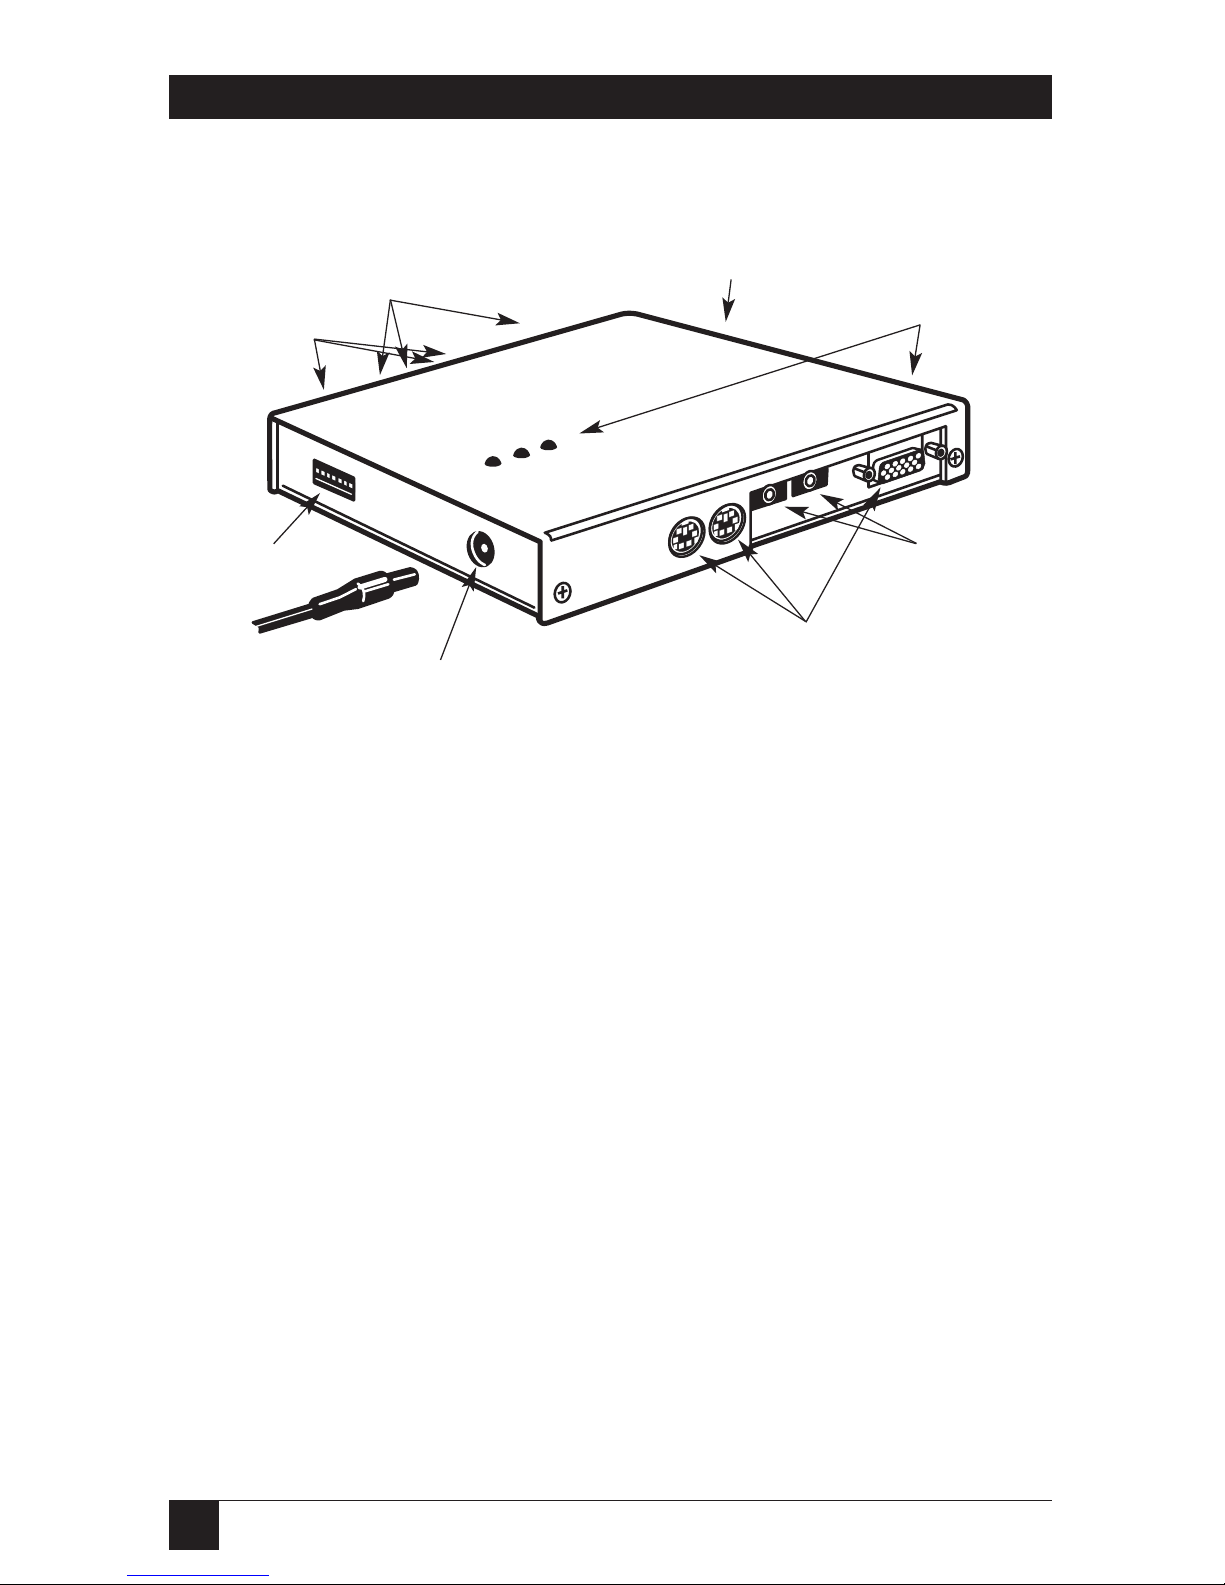
2.3 The Extender Illustrated
Figure 2-1. The Extender’s controls and connectors.
2.4 Safety Concerns
As you prepare to install the ServSwitch Duo Extender, please keep these things in
mind:
• The Extender is for use in dry, oil-free indoor environments only.
• Warning: The Extender’s power supply contains no user-serviceable parts, but
it does contain parts capable of delivering hazardous electric shocks. Do not
attempt to dismantle it!
• Plug the power supply into a socket outlet close to the Extender.
• Make sure that the rated current draw in amperes of all of the devices plugged
into the same outlet or circuit as the Extender does not exceed the outlet’s or
circuit’s rated current in amperes.
• Do not use the Extender’s power supply if its case becomes damaged, cracked,
or broken, or if you suspect that it is not operating properly.
• If the Extender’s power supply stops working, replace it with a manufacturerapproved adapter of the same type only.
KV6EXT-R2 only: Connectors for cables
running to the optional local CPU’s I/O ports:
From left to right, the mouse, keyboard, and
video ports
Connectors for cables running to the
user-station equipment:
From left to right, to a mouse, keyboard,
and monitor
KV6EXT-R2 only:
Nonfunctional audio
connectors
Main (top) and
auxiliary (side) LEDs:
Power (green) and Duo
(red); KV6EXT-R2 also
has Local CPU (red)
Connector for the
cable running to the
Duo
Nonfunctional
serial and (on
KV6EXT-R2
only) audio
connectors
Connector for power supply
(5 VDC, at least 1.5 A)
DIP switch for
hotkey selection
Page 16

15
CHAPTER 3: Installation
3. Installation
3.1 What You Will Need
These things must be in place before you can install your ServSwitch™ Duo
Extender:
• Four-pair (eight-wire) twisted-pair cabling rated to at least Category 5. This
should be long enough to reach from your Extender to the ServSwitch Duo,
up to a maximum of 200 meters (655 feet). Other specifications for this
cabling are given in Appendix A.
You can make use of any Category 5 structured-cabling systems that might
already be in place at your sites, but you should keep the number of cables and
connectors involved to a minimum in order to maximize signal quality.
• A monitor with a standard VGA/SVGA (HD15) connector that will work when
connected directly to each of your PCs. The Extender supports low- and highresolution monitors.
• A standard PC/AT or PS/2 style keyboard. If you are using a PC/AT keyboard
with a 5-pin DIN connector, you can connect it to the Extender using a
standard PC/AT to PS/2 keyboard adapter such as product code FA211.
• A PS/2 style two- or three-button Microsoft or Logitech
®
compatible mouse or
a Microsoft IntelliMouse compatible mouse. If you want to use the mouse to
switch CPUs, you will need a three-button mouse or an IntelliMouse. (The
Extender supports other “Internet mice” compatible with the IntelliMouse—
fitted with a wheel or other scrolling control, and sometimes additional
buttons—which are available from several manufacturers.)
Keep in mind that the Extender will operate without a mouse connected if
you don’t want to use one.
• A suitable mouse driver for your PCs. Supported types are:
- PS/2 or RS-232 two-button mouse driver by any manufacturer.
- Microsoft mouse drivers, including those for the IntelliMouse. (You might be
able to use other mouse drivers with IntelliMouse compatible data formats,
but these might or might not work—trial-and-error testing might be
necessary.)
- Logitech mouse drivers, including those for two-button, three-button, and
wheel mice.
The Extender will automatically configure its mouse output to match the type
requested by any supported driver.
Page 17

16
SERVSWITCH™DUO EXTENDER
• If you’re connecting a local CPU to the KV6EXT-R2 Extender, you’ll need
VGA and PS/2 extension cabling. We recommend our bonded three-to-three
extension cable EHN408, which has VGA and PS/2 keyboard and mouse
strands all in the same cable. However, you can also use separate VGA and
PS/2 extension cables such as EVNPS05 and EVNPS03.
To attach a CPU with a PC/AT keyboard port, you’ll need a PS/2 to PC/AT
keyboard-port adapter such as product code FA212.
To attach a CPU with a serial mouse port, you’ll need a PS/2 to serial mouse-
port adapter such as product code FA314.
For assistance figuring out which cables and adapters you’ll need, call Black
Box Technical Support.
• If you’ll be mounting the Extender on a wall or some other non-horizontal flat
surface, you’ll need adhesive mounting strips—preferably the two-part type
made with Velcro
®
or other hook-and-loop fasteners, so that after it’s mounted
you can detach and reattach the Extender as necessary.
If you’ll be mounting the Extender in a 19" equipment rack, you’ll need the
RMK19WX Rackmount Kit. Refer to Appendix B.
3.2 Placement
The ServSwitch Duo Extender was designed to be set on a desktop or some other
flat horizontal surface. To mount it on a non-horizontal surface such as a wall, use
a pair of double-sided adhesive strips, preferably the kind that have Velcro
®
or
some other hook-and-loop fastener between the adhesive sides. Peel the backing
away from one side of each of the two strips and press the strips firmly onto the
bottom of the unit (the wide flat area where there are no connectors and no
LEDs). Then peel the backing away from the other side of the strips and press the
bottom of the Extender firmly against the surface you want to mount the Extender
on.
You can also mount the Extender in a 19" rack using the RMK19WX Rackmount
Kit. Refer to Appendix B for the details of the rackmounting procedure.
Page 18

17
CHAPTER 3: Installation
3.3 Connecting Your Devices
First make sure the power supply is unplugged and disconnected from the
ServSwitch Duo Extender.
Also make sure that (if possible) all of the devices you want to attach to your
Extender system are turned off and unplugged. (If you have to “hot-plug” a
powered computer into the Extender, see Section 5.9.) You don’t have to connect
anything to ports on the Extender that you’re not using. Do not attach anything to
the Extender’s serial or audio connectors; these might be used in some future
implementation of the Extender, but they have no function in the current version.
3.3.1 C
ONNECTINGUSEREQUIPMENT
Plug a set of shared user equipment (keyboard, PS/2 mouse, and monitor) into
the connectors on the Extender marked with the corresponding icons in the
“CONTROL STATION” connector group on the Unit’s front panel. Refer to
Figure 3-1 on the next page.
3.3.2 C
ONNECTING ALOCAL
CPU (O
PTIONAL
, KV6EXT-R2 O
NLY
)
To attach an optional local computer to the KV6EXT-R2 Extender, run extension
cabling from the CPU’s keyboard, video, and mouse ports to the connectors on the
Extender marked with the corresponding icons in the “LOCAL COMPUTER”
group on the Unit’s rear panel. (The type of cabling you’ll use is discussed in the
bulleted paragraph at the top of the previous page.) Refer to Figure 3-1 on the
next page.
Page 19

18
SERVSWITCH™DUO EXTENDER
Figure 3-1. A fully installed Extender system, including all optional
attachments. (The full KV6EXT-R2 model is shown. For clarity, this
illustration uses a single line to show the keyboard, mouse, and video
connections to each CPU and station attached to the Duo.)
Extender’s user station
(mouse, keyboard, and
monitor)
Optional user station
directly attached to
the Duo’s user port #1
(shares access with
Extender station)
User station
directly
attached to
the Duo’s
user port #2
Input cord from
power supply
Optional local CPU
CPUs attached to the
Duo system
SERVSWITCH DUO
SERVSWITCH DUO
EXTENDER
VGA and
PS/2
extension
cabling
Category 5
interconnection
cable
Page 20

19
CHAPTER 3: Installation
3.4 Connecting the Extender to the Duo
NOTE
This “-R2” version of ServSwitch Duo Extender can’t be used with the
original (non-R2) ServSwitch Duo.
Attach all of your local equipment to the ServSwitch Duo as described in the
section titled “Systems with a Single Duo and Directly Attached User Stations” in
the Duo’s manual. Leave everything powered off, and make sure the ServSwitch
Duo Extender, your remote monitor, and any CPU attached to the Extender are
powered off as well.
Run eight-wire (four-pair) twisted-pair cabling from the RJ-45 jack in the
ServSwitch Duo’s user port #1 to the matching jack on the ServSwitch Duo
Extender. (Do not attach these jacks to a LAN; you could damage the Duo or
Extender and possibly the network as well.) Category 5 twisted pair will give the
best results in lengths up to 200 m (655 ft.), but you should be able to use
Category 3, 4, or 5e if you keep the distance short (not more than 100 m [325 ft.]).
Avoid using cabling rated as “Level 6,” “Level 7,” etc., for data rates above
155 Mbps; the large differences between the twist ratios of the wire pairs in these
cables cause the video signals from the Duo’s CPUs to get out of sync with each
other.
The twisted pair can be a single continuous length of cable if that’s the best
option. But this kind of cable is often already installed in buildings and terminated
at data-wiring sockets in various locations. If twisted-pair cable is preinstalled at
your site, you can run patch cables from the Duo and Duo Extender to these
sockets and set up a direct one-to-one connection between them using the patch
panels in your wiring closets, which will probably be much more convenient.
A sample system using a single Duo and Duo Extender is shown in Figure 3-1 on
the previous page.
CAUTION!
Even though the cabling and connectors might be the same, do not
connect a ServSwitch Duo or Duo Extender to your LAN. Doing so will
damage the Duo/Extender and might damage the network as well.
Page 21

20
SERVSWITCH™DUO EXTENDER
3.5 Powering the Extender and Attached Devices
Once you hook all of your devices to the ServSwitch Duo and ServSwitch Duo
Extender and connect the Extender to the Duo, power up the Duo as described in
the “Powering the Duo” section in your Duo manual. Then plug in and turn on
your remote monitor and any CPU you’ve attached to the Extender.
VERY IMPORTANT!
The picture on your monitor might look bad at this point. This is
because you must fine-tune the Extender’s video compensation before
you operate the Extender for the first time. See Section 4.2.2.A.
Now plug the output cord of the Extender’s included power supply into the
barrel jack on the side of the Extender. Then plug the power supply’s input cord
into the IEC 320 inlet on the supply’s transformer. Finally, plug the power supply’s
input cord into a working AC outlet. The Extender will begin operating
immediately; it has no ON/OFF switch.
Page 22

21
CHAPTER 4: Configuration
4. Configuration
To configure your ServSwitch™ Duo Extender system, first you’ll need to
configure any attached PC (if the Extender is a KV6EXT-R2), as directed in
Section 4.1. Then you’ll need to configure the Extender itself, as directed in the
rest of this chapter.
IMPORTANT NOTES
Before you operate the Extender for the first time, you must fine-tune its
video-compensation amplifiers—the picture will look awful unless you
do. See Section 4.2.2.A.
Throughout the rest of this manual, the [Enter] designation refers to
the main “enter” or “carriage-return” key (often labeled “↵”) on the main
section of the keyboard. Do not use the “Enter” key on the numeric
keypad or the extra “Enter” key found on the main section of some
specialized keyboards.
4.1 Configuring an Attached PC (KV6EXT-R2 Only)
If you’ve attached a PC to the full KV6EXT-R2 Extender, configure it in the same
way that you would if your keyboard, mouse, and monitor were all connected
directly to it, but keep these things in mind:
• The Extender emulates Microsoft compatible serial, IntelliMouse, and PS/2
mice, so make sure that your PC software is configured for a Microsoft mouse
of the correct type. Refer to the list of supported drivers in Section 3.1.
• The Extender supports VGA, SVGA, XGA, and XGA-2 type monitors, but does
not support the automatic detection features available with some Plug-and-Play
monitors and video cards. If you have this type of video card or monitor, you
should select the video mode manually instead of relying on the automatic
detection feature.
Page 23

22
SERVSWITCH™DUO EXTENDER
4.2 Configuring the Extender
The ServSwitch Duo Extender has a large number of configuration options. You’ll
set different options using one of two different methods:
• Which keyboard-character combination the Extender recognizes as a keyboard
command is controlled with the Extender’s eight-position DIP switch. See
Section 4.2.1.
• Video compensation and other advanced options are controlled with keyboard
commands after the Extender is placed in “configuration mode.” See
Section 4.2.2.
4.2.1 S
ETTING THEHOTKEY
You can use positions 6, 7, and 8 of the 8-position DIP switch on the side of the
Extender (shown in Figure 4-1 on the next page) to select the Extender’s hotkey
combination. (The hotkey combination is the combination of keyboard keys that
triggers the Extender to look for a keyboard command—see Section 5.7.) The
available options are [Ctrl] + [Alt] (the factory-default setting), [Ctrl] + [Shift],
[Alt] + [Shift], right [Alt] only, left [Alt] + right [Alt], left [Ctrl] + left [Alt], right
[Ctrl] + right [Alt], or hotkeys disabled. (While hotkeys are disabled, no hotkey
commands can be sent to the Extender, including the command to access
configuration mode. In this situation, configuration mode will not be available.)
Positions 1 through 5 of this DIP switch are reserved for future use and must
remain set to OFF.
Page 24

23
CHAPTER 4: Configuration
Figure 4-1. The Extender’s DIP switch.
1 2 3 4 5 6 7 8
ON
Top of
Extender
Bottom of
Extender
Possible Settings of DIP-Switch
Positions 6 through 8:
6 & 7 OFF, 8 ON:
Hotkeys = [Ctrl] + [Shift]
6 & 8 OFF, 7 ON:
Hotkeys = [Alt] + [Shift]
6 OFF, 7 & 8 ON:
Hotkey = Right [Alt]
6 ON, 7 & 8 OFF:
Hotkeys = Left [Alt] + Right [Alt]
6 & 8 ON, 7 OFF:
Hotkeys = Left [Ctrl] + Left [Alt]
6 & 7 ON, 8 OFF:
Hotkeys = Right [Ctrl] + Right [Alt]
All ON:
Hotkeys disabled
DIP-Switch Positions 1 through 5
are reserved for future use; leave
them set to OFF
ON
OFF
All OFF:
Hotkeys = [Ctrl] + [Alt] (default)
Page 25

24
SERVSWITCH™DUO EXTENDER
4.2.2 U
SINGCONFIGURATIONMODE
If hotkeys are currently enabled (see Section 4.2.1), you can put the Extender in
configuration mode by pressing the currently selected hotkeys along with the
[Enter] key. For example, if the currently selected hotkey combination is the
default pairing of [Ctrl] and [Alt], press [Ctrl] + [Alt] + [Enter] to activate
configuration mode. Once you do this, you will see the Num Lock, Caps Lock, and
Scroll Lock LEDs on your keyboard begin to flash one after another in a cycling
pattern, like this:
Figure 4-2. The configuration-mode LED pattern.
Once the Extender is in configuration mode, you can change its video
compensation (see Section 4.2.2.A) or set various other options (see
Section 4.2.2.B).
4.2.2.A Setting the Video Compensation
The Extender contains video-compensation equalizers that maximize the picture
quality for your system even though the video signal is being sent across twistedpair cable. But when you first plug in the Extender, you might notice that the
picture appears distorted or blurred or doesn’t appear at all. To fix this, take these
steps:
1. Go into configuration mode as described at the top of this page. Observe how
fast the Num Lock, Caps Lock, and Scroll Lock LEDs on your keyboard are
flashing; this indicates the level of compensation currently being applied. If
they’re flashing slowly (to a minimum of one cycle per second for zero
distance), the Extender is compensating at a low level suitable for shorter
runs of twisted-pair cable. If they’re flashing quickly (to a maximum at which
the cycling can no longer be distinguished and it looks like all the LEDs are
“half on” for 200 m [655 ft.]), the Extender is compensating at a high level
suitable for longer runs of twisted-pair cable.
2. Press the keyboard’s [Home] key to set video compensation to “none.” The
picture on the monitor will probably become fuzzy.
NUM
LOCK
CAPS
LOCK
SCROLL
LOCK
Page 26

25
CHAPTER 4: Configuration
3. Use any of these keys to “tune” the Extender’s video compensation:
[Home] sets video compensation to zero.
[Pg Up] increases the video compensation coarsely (in large increments).
[↑] (up-arrow) increases the video compensation finely (in small
increments).
[Pg Dn] decreases the video compensation coarsely (in large increments).
[↓] (down-arrow) decreases the video compensation finely (in small
increments).
As you change the video-compensation setting, you’ll see the sharpness of the
picture change (the Extender automatically recalculates the required
matching brightness). Adjust the video compensation until you get the best
picture. The longer your twisted-pair cable, the more compensation you’ll
need, but if you add too much compensation you might wash out the picture
altogether. (If this happens, just reduce your compensation, and the picture
will reappear.)
This might be the best technique for quickly finding the best
compensation setting: First, press [Pg Up] until you see white trailing edges
on the right-hand side of black text or graphics, as shown in Figure 4-3. Then
press and release [↓] until the trailing edges disappear. At that point,
compensation should be about as close to ideal as you can make it.
Figure 4-3. “Bleed” due to overcompensation.
4. When you find the best possible picture—and finish entering any other
configuration commands (see Section 4.2.2.B)—press [Enter] to save the
configuration setting and exit configuration mode. The compensation setting
is saved in EEPROM, so it will persist even if the Extender is powered off. For
this reason, unless you change your twisted-pair cabling, you shouldn’t need
to adjust this setting again.
Page 27

26
SERVSWITCH™DUO EXTENDER
4.2.2.B Issuing Other Configuration-Mode Keyboard Commands
While the Extender is in configuration mode, it is also possible to enter a number
of other keyboard commands that you can use to configure advanced options on
the Extender. (There are also commands for such functions as displaying the
Extender’s firmware revision, restoring a disconnected mouse port, and resetting
all of the keyboard-controlled configuration options to their factory-default states.)
Most of these commands consist of pressing a letter key, then a number, then
[Enter]. For example, to turn on mouse switching, type in [M], then [2], then
[Enter]. When you do this, the flashing Num Lock, Caps Lock, and Scroll Lock
LEDs on your keyboard—which normally flash in sequence during configuration
mode—will be affected this way:
1. After you press the first key of a command sequence, the Num Lock, Caps
Lock, and Scroll Lock LEDs will all be steadily lit. Any invalid character will be
ignored.
2. After you press the second key of the sequence, the Num Lock and Caps Lock
LEDs will remain lit and the Scroll Lock LED will go dark. Any invalid
character will be ignored.
3. After you press [Enter] to end the sequence, the command will be executed
(or rejected as incomplete if the second character was never entered) and the
LEDs will go back to flashing in sequence.
Here are the keyboard commands you can give the Extender in configuration
mode. (Letter keys are shown in uppercase, but the commands are not case
sensitive.) The settings are explained in greater detail in the indicated sections of
this manual.
• Enable/disable mouse switching (see Section 5.8):
[M] [1] [Enter] = Switching between CPUs with a 3-button mouse or
IntelliMouse is not supported (default)
[M] [2] [Enter] = You can switch between CPUs with a 3-button mouse or
IntelliMouse
• Restore mouse (see Section 5.9):
[M] [6] [Enter] = Restore regular mouse
[M] [7] [Enter] = Restore IntelliMouse
• Set/clear password (see Section 4.3):
[P] [Enter] (password) [Enter] = Sets the Extender’s password
[P] [Enter] [Enter] = Clears the Extender’s password
Page 28

27
CHAPTER 4: Configuration
• [F] [1] [Enter] = Display firmware version (see Section 6.4)
• [F] [8] [Enter] = Reset to factory defaults (see Section 6.3)
When you finish entering configuration commands and/or adjusting the
Extender’s video compensation (see Section 4.2.2.A), press [Enter] to quit
configuration mode and return to normal operation. The Num Lock, Caps Lock,
and Scroll Lock LEDs on your keyboard will stop flashing and will return to the
states they were in before.
4.3 Setting a Password for the Extender
There are many situations where access to corporate file servers or sensitive
information needs to be controlled. In such circumstances, the ServSwitch Duo
and the attached CPUs can be locked away in a secure room or cabinet and
controlled from the user station attached to the Extender.
The Extender also has a password that you can set to prevent unauthorized use.
After setting a password, you can “lock” (disable) the Extender at any time by
typing the hotkey sequence together with the letter “L” at the keyboard: [Ctrl] +
[Alt] + [L] if the hotkey sequence is set to its default value, for example. While the
Extender is locked, it doesn’t output video to the monitor or accept input from the
keyboard or mouse. The Unit indicates that it’s locked by alternately flashing the
Num Lock/Scroll Lock LED pair and the Caps Lock LED on the keyboard. It can
only be unlocked if a user types in the password followed by [Enter] at the
keyboard.
The password is not case-sensitive and can be any combination of keystrokes,
including function keys but excluding [Ctrl], [Alt], [Shift], and [Enter]. (For
example, the password [F4] [F] [R] [E] [D] [Home] would be valid.) The length
of the password can be from 1 to 40 characters, although for better security we
recommend that the password be at least four characters long.
To set the password, first get into configuration mode by typing in the current
hotkey sequence followed by [Enter] at the Extender’s keyboard: [Ctrl] + [Alt] +
[Enter] if the hotkey sequence is set to its default value, for example. Then type
[P], followed by [Enter], followed by the password characters, followed by another
[Enter] to save the password to nonvolatile memory. (This type of memory does
not depend on active power or even a battery backup, so it can persist indefinitely.)
For instance, to set the password to “open sesame”, you would type in [P] [Enter]
[O] [P] [E] [N] [Space] [S] [E] [S] [A] [M] [E] [Enter].
Page 29

28
SERVSWITCH™DUO EXTENDER
Don’t worry if you type the password incorrectly; you can always re-enter it, even
if you’ve exited and re-entered configuration mode. If you discover that you
messed up entering the password or that you can’t remember what the password is
only after someone locks the Extender, you can erase it by selecting “Clear UTP
Extender Password” in the Duo’s FUNCTIONS menu, as described in Section 6.2.
(You can erase the password and set all of the Extender’s keyboard-controlled
configuration options back to their factory defaults by issuing the [F] [8] [Enter]
command while the Extender’s in configuration mode, as described in
Section 6.3.)
If you want to remove the password after setting one, get into configuration
mode, type the letter “P”, and press the [Enter] key as before, but then press
[Enter] again without typing in any other characters. (If you try to lock the Switch
before you’ve set a password, or after you’ve removed the password, the Switch will
still blank the video, but it won’t prevent someone from selecting another CPU.)
Page 30

29
CHAPTER 5: Operation
5. Operation
This chapter explains the general operation of the ServSwitch™ Duo Extender. We
recommend that you read this chapter carefully before starting to use the
Extender; also make very sure you have read the important notes at the start of
Chapter 4.
5.1 Power-Up Status
Under normal circumstances, the ServSwitch Duo Extender is ready for use as soon
as it and the Duo are both powered up. How the Extender behaves at bootup when
both it and the Duo are properly powered will depend on whether you’ve set a
password for the Extender or not (see Section 4.3):
• If you haven’t set a password for the Extender, it will establish a connection to
the Duo and will light both its Power and Duo LEDs.
• If you have set a password for the Extender, it will light its Power LEDs only
and will not display any video. It will show that it’s expecting you to enter the
password by alternately flashing the Num Lock/Scroll Lock LED pair and the
Caps Lock LED on the attached keyboard. When you type in the password at
the keyboard and press [Enter], the Extender will “unlock,” stop flashing the
keyboard LEDs, and then do the normal “non-password” bootup procedures
(establish a connection to the Duo and light both its Power and Duo LEDs).
Page 31

30
SERVSWITCH™DUO EXTENDER
5.2 The Extender’s LEDs
The ServSwitch Duo Extender has two sets of two (KV6EXTB-R2) or three
(KV6EXT-R2) LEDs. The main set of LEDs is on the top panel of the Extender, so
they can be read easily when the Extender is installed on a desktop or surfacemounted with adhesive strips. The auxiliary set of LEDs, identical to the main set
but unlabeled, are on the same side of the Extender as the CAT5 cable jack, so
they can be read easily when the Extender is rackmounted.
Here’s how to interpret the LEDs on the Extender:
Name Color Status Means
Power Green ON The Extender is operating normally.
OFF The Extender isn’t powered.
Duo Red ON A CPU on the Duo is selected, but no keyboard or mouse
data is sent to it or received from it.
FLASHING A CPU on the Duo is selected, and keyboard or mouse
data is being sent to it or received from it.
OFF None of the Duo’s CPUs are selected.
Local CPU Red ON The local CPU (the one attached to the Extender) is
(KV6EXT-R2 selected, but no keyboard or mouse data is being sent
only) to it or received from it.
FLASHING The local CPU is selected, and keyboard or mouse data is
being sent to it or received from it.
OFF The local CPU is not selected.
Several things can cause the Extender’s Power LED to be dark or flashing. This can
be caused by (in decreasing order of likelihood) loose/undone power-supply
connections, AC outlet being turned OFF/not working, power supply being
broken, the Extender’s Power LEDs being defective, or the Extender’s main board
being defective. If you can’t determine the cause of this problem, call Black Box
for technical support.
Page 32

31
CHAPTER 5: Operation
5.3 How the Extender Uses the Keyboard LEDs
The ServSwitch Duo Extender also uses the LEDs on the attached keyboards to
indicate various conditions. It will light the Num Lock, Caps Lock, and Scroll Lock
LEDs in several different ways:
• Configuration-mode indication—rolling sequence. As shown in Figure 5-1, the
Extender flashes the Num Lock, Caps Lock, and Scroll Lock LEDs on the
attached keyboard in sequence to show that it’s in configuration mode (see
Section 4.2.2). Num Lock will light first while Caps Lock and Scroll Lock are
dark. Then Caps Lock only will be lit, then Scroll Lock only, and then Num
Lock again. The cycle repeats itself continuously until you exit configuration
mode, after which the LEDs will be placed back in the states they were in
before you went into configuration mode.
The speed of the cycle indicates how much video compensation the
Extender is applying (which is one of the things you can set in configuration
mode): A slow flash rate indicates low compensation suitable for shorter cable
distances, while a fast flash rate indicates high compensation suitable for
longer distances. For examples of actual rates and distances, see step 1 in
Section 4.2.2.A.
Figure 5-1. The configuration-mode LED pattern.
• Control-lockout indication—unison flashing. As shown in Figure 5-2, the
Extender flashes all three keyboard LEDs at the same time (all three ON, then
all three OFF, repeating indefinitely) to show that user station directly
attached to user port #1 of the Duo has keyboard and mouse control of
port #1. Once the Duo’s inactivity timeout expires (see the “User timeout”
section of your Duo manual) so that the Extender’s user can take control of
the CPU, these LEDs will stop flashing and return to their previous states.
Figure 5-2. The control-lockout LED pattern.
NUM
LOCK
CAPS
LOCK
SCROLL
LOCK
NUM
LOCK
CAPS
LOCK
SCROLL
LOCK
NUM
LOCK
CAPS
LOCK
SCROLL
LOCK
Page 33

32
SERVSWITCH™DUO EXTENDER
• Password-lockout indication—lightbar flashing. As shown in Figure 5-3, while
the Extender is locked and waiting for the user to enter a password (see
Sections 4.3 and 5.1), it alternately lights the Num Lock/Scroll Lock LED pair
and the Caps Lock LED on the keyboard. This pattern of flashing alternate
LEDs is similar to that of the lights in the lightbar of a police car. Once you
type in the correct password and press [Enter], these LEDs will stop flashing
and return to their previous states.
Figure 5-3. The password-lockout LED pattern.
NUM
LOCK
CAPS
LOCK
SCROLL
LOCK
NUM
LOCK
CAPS
LOCK
SCROLL
LOCK
Page 34

33
CHAPTER 5: Operation
5.4 Switching Between the Duo System and a Local CPU (KV6EXT-R2 Only)
If you haven’t attached a local CPU to the full KV6EXT-R2 ServSwitch Duo
Extender, you can keep the Extender switched to the Duo system at all times, and
use the Duo’s on-screen menu or other methods to switch between the Duo
system’s CPUs (see the “Selecting Computers...” sections and the “Keyboard
Hotkey Commands” section in your Duo manual).
If you have attached the optional local CPU to the Extender, you won’t be able to
switch to it through the Duo. Instead, you’ll have to use the Extender’s own
switching methods to switch back and forth between the local CPU and whichever
CPU is currently selected by the Duo system. You can do this with a hotkey
command (see Section 5.7) or—if you enable mouse switching—with your threebutton mouse or wheel mouse (see Section 5.8).
Depending on which CPU you have selected, the Extender’s “Local CPU” LED
pair will be steadily lit if you aren’t sending keyboard or mouse data or flashing if
you are. (These LEDs are red. The main LED is labeled and is on the Extender’s
top panel, while the auxiliary LED is unlabeled and is the rightmost LED on the
Extender’s right side.)
If a Duo user is controlling a Duo-system CPU, you can still switch to that CPU.
But although you might be able to see the video from that CPU, you won’t get
keyboard and mouse control until the Duo user relinquishes control, as described
in the next section.
You can always “switch to” the nonexistent “CPU zero” to blank the Extender’s
monitor and deselect your currently selected CPU (see Section 5.7). While CPU
zero is selected, all of the Extender’s CPU LEDs will be dark.
Page 35

34
SERVSWITCH™DUO EXTENDER
5.5 Contending for Control of the Duo-System CPUs
The user station at the ServSwitch Duo Extender contends with the user stations
directly attached to the Duo system for keyboard and mouse control of the Duo
system’s CPUs. While a user at one station is in control of a CPU, the Duo system
won’t accept keyboard or mouse data for that CPU. If the Extender’s user station is
“locked out” in this way, its keyboard’s Num Lock, Caps Lock, and Scroll Lock
LEDs will flash in unison (as shown in Figure 5-2 in Section 5.3) to show the user at
that station that he or she will have to wait to access the Duo-system CPU until the
other station is finished.
The Extender user can try to take keyboard and mouse control of a Duo-system
CPU by selecting it with a hotkey command (see Section 5.7) or—if you enable
mouse switching—with their three-button mouse or wheel mouse (see Section 5.8):
• If the Duo-system CPU is being controlled by another Duo user, these attempts
will fail, although the Extender user will be able to see the Duo-system CPU’s
video unless the Duo user has selected the CPU for “exclusive use” (see the
“Exclusive Use” and “Selecting Computers Using the On-Screen Menu”
sections of your Duo manual).
• If the Duo-system CPU is available (none of the Duo users are controlling it),
these attempts will succeed. The Extender user will see the Duo-system CPU’s
video and will have keyboard and mouse control. He or she will keep control
until he or she stops using the keyboard and mouse or selects the local CPU or
the nonexistent “CPU zero.” At that point, the Duo will begin counting down
toward its inactivity timeout (see the “User timeout” section of the Duo
manual). Until the timeout expires, the Extender user can reset the timeout by
reselecting the Duo-system CPU or by resuming activity at their idle keyboard
and mouse. Even after the timeout expires, the Extender user can reclaim
control if he or she is the first to select the Duo-system CPU. But if a Duo user
is the first to select that CPU after the timeout expires, the Extender user must
then wait until the Duo user relinquishes control.
Page 36

35
CHAPTER 5: Operation
5.6 Things To Keep in Mind About the Keyboards and Mice
PC bootup sequence: When your PC CPUs are powered on, they communicate
with any attached keyboards and mice and load the setup parameters required by
their particular operating systems. If you have a local CPU attached to the full
KV6EXT-R2 Extender, it is necessary for the Extender to be powered on during
this sequence so that it can give the CPU the required responses and keep track of
the modes and settings requested by the CPU.
Mouse characteristics: Do not unplug a PS/2 mouse connection from a CPU while
the CPU is on. Because of the way PS/2 mice communicate, the CPU will lose
mouse function and you will have to reboot the CPU to regain normal operation.
Unplugging a shared PS/2 mouse from the Extender will have no immediate
effect, but the selected PC will lose mouse function as soon as you plug the mouse
back in. (Mice can usually be freely unplugged and replugged from CPUs’ RS-232
mouse ports, provided that an RS-232 mouse was connected when the operating
system initially booted.) The Extender has a PS/2 mouse-recovery system which
allows you to disconnect and reconnect the mouse without powering down the
system, but we recommend using this only when absolutely necessary. See
Section 5.9 for details.
Keyboard- and mouse-mode handling during CPU switching: The Extender keeps a
log of the keyboard and mouse modes and resolution settings requested by each of
the Duo system’s CPUs, including the keyboard Num Lock, Caps Lock, and Scroll
Lock states. These settings are automatically restored to the keyboard and mouse
when you switch to a different CPU, as well as when the Extender is returned from
configuration, password-lockout, or control-lockout mode to normal operation,
ensuring maximum software compatibility.
Page 37

36
SERVSWITCH™DUO EXTENDER
5.7 Keyboard Control: Hotkey Commands
NOTE
On the basic KV6EXT-R2 Extender, or when the Duo-system CPU is
selected on the full KV6EXT-R2 Extender, you won’t use any of the
Extender’s own hotkey commands to switch to a different CPU in the
Duo system. Instead, you’ll use the Duo’s on-screen menu, or {Duo
Hotkeys} + [channel number]. See Section 5.5.
You can control several functions on the ServSwitch Duo Extender—including
CPU selection, screen blanking, locking, and entering configuration mode—from
the keyboard, using commands triggered with the Extender’s currently selected
hotkey combination. All of the hotkey-control commands are invoked by holding
down the one or two hotkeys and then pressing a command key. By default, the
two hotkeys are [Ctrl] and [Alt], but you can change to any of six other
combinations by setting positions 6 through 8 of the Extender’s DIP switch (see
Section 4.2.1).
Normally, when you send a hotkey command, you have to release the hotkeys
and the command key before you can send another one. The one exception to this
rule is {Hotkeys} + [Tab], the “switch to the other CPU” command; you can “tab
back and forth” between the CPUs by holding down the hotkeys and repeatedly
pressing [Tab].
The hotkey commands are summarized below. Note that to generate the
numeric digits in the commands that contain them, you need to press the number
keys on the top row of the main section of the keyboard, not the number keys on
the keypad; the Extender will not recognize keypad numbers.
• KV6EXT-R2 only: Use {Hotkeys} + [1] to switch from the local CPU to
whichever CPU you most recently selected on your Duo system. You simply get
normal access (governed by the Duo’s inactivity timeout—see the “User
timeout” section in the Duo manual) if that CPU is available, or video or no
access if it isn’t.
• KV6EXT-R2 only: Use {Hotkeys} + [2] to select any local CPU (if you have one
directly attached to the Extender).
• KV6EXT-R2 only: Use {Hotkeys} + [Tab] to switch from the Duo-system CPU to
the local CPU or vice versa.
Page 38

37
CHAPTER 5: Operation
• Use {Hotkeys} + [0] to select nonexistent “CPU zero.” This causes the Extender
to (a) stop lighting its CPU LEDs, (b) disable keyboard and mouse input to
any CPU (although Extender commands will still work), and (c) shut off the
video output to the attached monitor. (Be aware that this will cause some
monitors to go into standby mode or shut themselves off.) If you were
controlling a Duo-system CPU before you did this, the Duo starts counting
down toward its inactivity timeout; if it expires before you reselect the Duosystem CPU (which will reset the timer), that CPU will become available for
any Duo user station to select. You can re-enable video by selecting either the
local CPU or the Duo-system CPU with the keyboard hotkeys or with the
mouse (if mouse switching is enabled and the mouse is a 3-button or
IntelliMouse type—see Section 5.8). If the CPU you select is available, or if you
reselect the Duo-system CPU and the inactivity timeout hasn’t expired yet, you
will gain keyboard and mouse control as well.
• Use {Hotkeys} + [L] to lock the Extender. If no password has been set for the
Extender (see Section 4.3), this command is equivalent to the {Hotkeys} + [0]
command described above. If a password has been set, this command also
causes the Extender to (a) stop accepting keyboard and mouse input except
for password attempts until someone enters the password and (b) alternately
light the Num Lock/Scroll Lock LED pair and the Caps Lock LED on the
attached keyboard. Note that if anyone has tried to type something at the
Extender’s keyboard while the Extender is locked, you will have to press
[Enter] to clear those characters so that they won’t invalidate the password
when you proceed to type it in.
• Use {Hotkeys} + [Enter] to cause the Extender to go into configuration mode.
See Section 4.2.2.
Examples of common hotkey commands for a KV6EXT-R2 Extender (assuming
that the Duo’s hotkeys are [Ctrl] and [Alt] and that the Extender’s hotkeys have
been changed to [Alt] and [Shift]):
• To select the Duo-system CPU, then select Duo CPU 14:
Press and hold [Alt] and [Shift], press [1], release [Alt] and [Shift]. Then
press and hold [Ctrl] and [Alt], press and release [1], press and release [4],
release [Ctrl] and [Alt].
• To “tab back and forth” between the local CPU and the Duo-system CPU:
Press and hold [Alt] and [Shift], press and release [Tab] (repeat as many
times as necessary), release [Alt] and [Shift].
Page 39

38
SERVSWITCH™DUO EXTENDER
5.8 Mouse Switching (KV6EXT-R2 with Local CPU Only)
If you have a local CPU attached to your full KV6EXT-R2 ServSwitch Duo
Extender, another convenient way to switch between it and the Duo-system CPU is
by using a three-button mouse. Simply hold down the central mouse button or
“wheel” button, then click on the left-hand mouse button to switch from the local
CPU to the Duo-system CPU or vice versa.
If you want to do this, you’ll have to go into configuration mode (see
Section 4.2.2) and issue the [M] [2] [Enter] command to enable mouse switching.
(The Extender comes from the factory with mouse switching disabled.) To turn
mouse switching back off after you’ve enabled it, issue the [M] [1] [Enter]
command.
Be aware that if you enable mouse switching and use a regular three-button
mouse to do it, you won’t be able to use the mouse’s center button for any
application functions or other non-switching purposes. In fact, the Extender will
tell the CPU that it has a 2-button mouse attached to it in this situation. (The wheel
button on IntelliMouse and similar mice is not disabled this way.)
Page 40

39
CHAPTER 5: Operation
5.9 Hot-Plugging a PS/2 Mouse or Mouse Port into the Extender or
Re-Enabling a Disconnected PS/2 Mouse Port (KV6EXT-R2 with Local CPU
Only)
It is advisable to switch off any local computer that you’re going to connect to the
full KV6EXT-R2 ServSwitch Duo Extender before you install it. However, even if
this is not possible, most systems can be “hot-plugged” (connected to the Extender
while they are powered and operating); the PS/2 mouse-port malfunctions this
usually causes can often be overcome by using the Extender’s mouse-restoration
functions. (The keyboard connection will normally restore itself automatically.)
Let’s take this from the top: On many PCs, mouse movement will be lost if the
PS/2 mouse is unplugged and plugged back in while the PC is running. Mouse
movement can then be restored only by rebooting the PC. This is because the
mouse drivers only set up and enable the mouse when the PC is initially booted.
If you have powered down your Extender, or if you are attempting to hot-plug a
CPU into it, you might be able to restore lost mouse movement using the
Extender’s mouse-restoration functions. These should be used with caution,
because unpredictable results might occur if you select the wrong mouse type. If in
doubt, restore the mouse by rebooting the PC normally.
Standard PS/2 mouse data is formatted differently than IntelliMouse data, so
two reset functions are provided on the Extender. The type of data format
expected by the PC depends on the driver and the type of mouse that was
connected when the driver was booted. You can use the following table as a guide;
note that the mouse-reset functions predict the likely mouse resolution settings but
might not restore the speed or sensitivity of the mouse to exactly what they were
when the PC originally booted:
Type of mouse/ Driver type: Probable Suggested
system connected expected restoration
at bootup: data format: command:
PS/2 PS/2 only PS/2 PS/2—type [M] [6]
PS/2 IntelliMouse PS/2 PS/2—type [M] [6]
IntelliMouse PS/2 only PS/2 PS/2—type [M] [6]
IntelliMouse IntelliMouse IntelliMouse IntelliMouse—type [M] [7]
Page 41

40
SERVSWITCH™DUO EXTENDER
To restore lost mouse movement on a local CPU directly connected to the
Extender:
1. If you’re working with the Duo-system CPU, select the local CPU instead.
2. Enter configuration mode (see Section 4.2.2) by pressing the hotkeys
followed by [Enter].
3. To restore a PS/2 mouse connection, issue the [M] [6] [Enter] command.
Or, to restore an IntelliMouse connection, issue the [M] [7] [Enter]
command.
4. Press [Enter] again to exit configuration mode.
5. Move the mouse a short distance to make sure that the connection has been
restored properly.
Page 42

41
CHAPTER 6: Troubleshooting
6. Troubleshooting
If you have difficulty with your ServSwitch™ Duo Extender, see if the problem is
listed in Section 6.1 and, if so, try the suggested remedies. If you’ve forgotten your
password, see Section 6.2. If you need to reset the Extender to its factory defaults,
see Section 6.3. If nothing seems to help, get the Extender’s firmware-revision level
as described in Section 6.4 if possible, then call Black Box Technical Support as
directed in Section 6.5. If you need to ship your Extender, see Section 6.6.
6.1 Things To Try
Problem:
Poor video quality with smearing, fuzziness, or rippling.
Possible Solution:
Make sure that the video compensation has been set for your system, as described
in Section 4.2.2.A. Make sure your Category 5 cable is pinned and paired properly;
see Appendix A. Also, make sure any cables you’re using to make your monitor/
CPU video connections are shielded or screened coaxial video cables.
Problem:
Your mouse does not move the cursor/pointer.
Possible Solutions:
1. Watch the Extender’s red Control LEDs while you move the mouse. If you
move the mouse and these LEDs don’t flash, then the Extender is not
receiving data from the mouse—proceed with the next few steps.
2. Check the mouse’s connection to the Extender and the CAT5 cabling
between the Extender and the Duo; if the cable connections are OK, try
removing and restoring power to the Extender.
3. If you are attempting to connect the mouse to a PS/2 mouse port on a Duo
CPU that has not been powered down, you will need to use the Duo’s mouserestoration function (see the “Hot-Plugging Devices Into the ServSwitch
Duo...” section in the Duo manual). If you’re attempting to connect the
mouse to a non-powered-down local CPU on a KV6EXT-R2 Extender, use the
Extender’s mouse-restoration function (see Section 5.9 of this manual).
4. Make sure that you have an appropriate mouse driver loaded and that your
computer’s software is configured to accept a supported mouse of the type
that you have connected. See the relevant paragraphs in Section 3.1.
Page 43

42
SERVSWITCH™DUO EXTENDER
5. Make sure that (a) the mouse and computer were both connected to the
Extender before any part of the system was powered up, and (b) the Extender
was powered ON before the attached computer. If you’re not sure whether
this was the case, then (if it’s possible to do so) power everything down, make
sure all cable connections are correct and secure, power up the Extender,
then power up all attached computers.
Problem:
Your keyboard does not function or functions only intermittently. The Num Lock
LED does not always light when the Num Lock key is pressed.
Possible Solution:
Some older keyboards were designed for use with specific computers and are not
truly PC/AT or PS/2 compatible. These are not common, but if you’re having
problems like this and you’re using an old keyboard, try a newer keyboard.
Problem:
I’m stuck at a blank screen and don’t seem to have any keyboard or mouse control.
Possible Solutions:
You might have tried to switch to a CPU channel on the Duo system that some
other user has exclusive use of (see the “Exclusive Use” and “Selecting Computers
Using the On-Screen Menu” sections of your Duo manual); if this is the case,
switch to a different CPU until the exclusive user has finished.
Another possibility on the full KV6EXT-R2 Extender is that you’ve selected the
directly attached local CPU, but the local CPU is not installed or isn’t working.
Check the local CPU and make sure it is working properly and is attached securely
to the Extender. If you have no local CPU installed but you switched to its port
accidentally, type in {Hotkeys} + [1] to switch back to the Duo system.
Problem (KV6EXT--R2 only):
Just using your mouse in a normal way causes the Extender to unexpectedly switch
between the Duo system and either the local CPU (if you have a working local CPU
installed) or a blank screen (if you don’t).
Possible Solutions:
Some cheaper mice are not fully compatible with the Extender and can lose data,
which—if mouse switching is enabled (see Section 5.8)—sometimes causes the
Extender to interpret a data stream as a CPU-change request. Try using a
Microsoft, Logitech, IBM, Compaq, or Hewlett-Packard
®
mouse instead.
Make sure that you are using a Microsoft compatible mouse driver on your PC.
Some drivers by other manufacturers can cause the mouse to use proprietary
mouse-data formats that the Extender doesn’t support. If you have unplugged and
reconnected a mouse to the Extender—especially if the mouse is an
IntelliMouse—use the mouse-restoration function (see Section 5.9).
Page 44

43
CHAPTER 6: Troubleshooting
Problem:
Compaq MX11800 model integrated keyboard and mouse only: The mouse consistently
fails to boot when the Extender is connected to a PC running Windows NT 4.0
through its PS/2 style mouse port.
Possible Solutions:
There are three possible solutions to this problem:
1. Use a different type of mouse.
2. Connect the Extender to your NT 4.0 PCs through an adapter and one of the
PC’s serial ports rather than through its PS/2 port.
3. Select “CPU zero,” or another CPU if you have another PC connected that
isn’t running NT 4.0, while NT is booting. You should be able to use the
system normally once the logon screen appears.
6.2 Clearing the Extender’s Password
If you ever forget a password you’ve set for the ServSwitch Duo Extender, you can
use the Duo to erase it. With the Duo system selected (as opposed to the local
CPU), press {Duo Hotkeys} + [Enter] to get into the Duo’s menu system, then press
the [F1] function key and select “FUNCTIONS” to bring up the FUNCTIONS
menu. Admin users will see an option in this menu to “Clear UTP Extender
Password.” Select this, then confirm it by pressing the [F8] function key. A message
that the password has been cleared will appear on screen.
If you want to restore the Extender to its factory-default configuration as well as
to erase the password, use the procedure described in Section 6.3.
6.3 Restoring the Extender to Its Factory-Default Configuration
If your ServSwitch Duo Extender has become misconfigured, or if you’re swapping
in a new (and very different) local CPU, etc., you can set all of the Extender’s
keyboard-controlled configuration options back to their factory defaults. First go
into configuration mode, then issue the [F] [8] [Enter] command. (“[F] [8]” is
the letter “F” followed by the number “8”, not the [F8] function key.) This will also
clear any password you’ve set, but it will have no effect on the Extender’s video
compensation, CPU selection, or locked/unlocked state, nor will it change the
hotkey setting, which is controlled with the Extender’s DIP switch.
If you only want to erase the Extender’s password without resetting its
configuration options to their factory-default values, you can select “Clear UTP
Extender Password” in the Duo’s FUNCTIONS menu, as described in Section 6.2.
Page 45

44
SERVSWITCH™DUO EXTENDER
6.4 Displaying the Extender’s Firmware Revision
For technical-support purposes, it might be necessary to find out the firmwarerelease version of your ServSwitch Duo Extender. To do this, select a CPU that is
showing a DOS prompt or is running a text editor, word processor, etc.—it doesn’t
matter what software is running, as long as it displays characters typed in at the
keyboard on the screen. Then refer to Section 4.2.2 as you take these steps:
1. Go into configuration mode by pressing the hotkeys followed by [Enter] at
the keyboard.
2. Get the Extender to report its firmware revision by issuing the [F] [1] [Enter]
command. (“[F] [1]” is the letter “F” followed by the number “1”, not the
[F1] function key.)
3. Press [Enter] again to exit configuration mode.
The version number will be reported on the CPU screen as the letter “V” followed
by three numbers, the first of which is the major revision level and the other two of
which are the minor revision level. For example, if the Extender reports “V118”,
the firmware version is 1.18.
6.5 Calling Black Box
If you determine that your ServSwitch Duo Extender is malfunctioning, do not
attempt to alter or repair the unit. It contains no user-serviceable parts. Contact Black
Box Technical Support at 724-746-5500.
Before you do, make a record of the history of the problem. We will be able to
provide more efficient and accurate assistance if you have a complete description,
including:
• the nature and duration of the problem;
• when the problem occurs;
• the components involved in the problem—that is, which Unit(s), what type of
cable, what types of computers, what type of keyboard, brand of mouse, make
and model of monitor, etc.;
• any particular application that, when used, appears to create the problem or
make it worse; and
• the results of any testing you’ve already done.
Page 46

45
CHAPTER 6: Troubleshooting
6.6 Shipping and Packaging
If you need to transport or ship your ServSwitch Duo Extender:
• Package it carefully. We recommend that you use the original container.
• Before you ship the unit back to Black Box for repair or return, contact us to
get a Return Authorization (RA) number.
Page 47

46
SERVSWITCH™DUO EXTENDER
Appendix A:
Guidelines for Twisted-Pair Cabling
To connect your ServSwitch™ Duo Extender to a ServSwitch Duo, you can use
either shielded twisted-pair (STP) or unshielded twisted-pair (UTP) cable. It should
be pinned straight-through and paired according to the TIA-568A or (preferred)
-568B specification, as shown in Figure A-1 on the next page. Category 5 cable will
give the best results for distances up to 200 m (655 ft.), but you should be able to
use Category 3, 4, or 5e if you keep the distance short (not more than 100 m
[325 ft.]). Avoid using cabling rated as “Level 6,” “Level 7,” etc., for data rates above
155 Mbps; the large differences between the twist ratios of the wire pairs in these
cables cause the video signals from the Duo’s CPUs to get out of sync with each
other.
CAUTION!
Do not use cables paired according to the USOC specification—Pin 1
with 2, 3 with 4, 5 with 6, and 7 with 8. These will work badly and will
yield a horrible picture.
We recommend a solid-core CAT5 cable such as product codes EYN737MS
(preterminated) or EYN840A (unterminated bulk); specify the length you’d like when
you order. Terminate any unterminated cable with high-quality shielded RJ-45
plugs such as those in our FM732 (unshielded) and FM733 (shielded) 25-packs.
CAUTION!
Keep in mind that if you use shielded twisted-pair cable, the maximum
distance at which the Extender will operate will be cut at least in half, to
no farther than 100 m (325 ft.).
All twisted-pair cables are built in such a way that each of the twisted pairs has a
slightly different twist ratio. This is done to reduce the electrical crosstalk between
signals carried on adjacent pairs. Because of this, the wire distance that an
electrical signal has to travel is different for the different pairs. This does not
normally cause a noticeable problem—in fact, the twist differences have no effect
at all on digital signals such as network data. But if you’re sending higher video
resolutions (which are analog signals) across long cables, you might start to see
color separation caused by the red, blue, and green signals arriving at the Extender
at slightly different times.
If this happens, you might be able to improve your video by reterminating your
cable so that the video signals are on the pairs whose twist ratios are the closest to
each other. Most network-quality cables have one pair that’s much more tightly
Page 48

47
APPENDIX A: Guidelines for Twisted-Pair Cabling
twisted than the other three; this pair should be avoided. Unfortunately, different
manufacturers—and even different cable types by the same manufacturer—use
different pairs for the “tight pair,” so call your cable supplier. If they can’t tell you
which pair to avoid, cut a short section off the end of the cable, open it up, and
look at the pairs; the tight pair is usually quite obvious.
Cable Pinning: Straight-through (Pin 1 to Pin 1, 2 to 2, etc.)
Cable Pairing:
Pair 1: Pins 4 and 5 (differential green video and vertical sync)
Pair 2: Pins 1 and 2 (differential blue video)
Pair 3: Pins 3 and 6 (differential red video and horizontal sync)
Pair 4: Pins 7 and 8 (keyboard and mouse data)
Figure A-1. Twisted-pair cable specifications.
1 2 3 4 5 6 7 8
PR1
PR3
PR2 PR4
RJ-45
Socket
Page 49

48
SERVSWITCH™DUO EXTENDER
Appendix B: Rackmounting
We offer a Rackmount Kit (our product code RMK19WX) for mounting a
ServSwitch™ Duo Extender in 1U of vertical space in a 19" rack. It consists of a
front-paneled rack shelf and a pair of countersunk screws. To use this Kit to mount
an Extender, take these steps, referring to Figure B-1:
1. Place the Extender on the Kit shelf so that the RJ-45 jack and auxiliary LEDs
on its side are facing forward and are aligned with the cutouts in the shelf’s
front panel. In this position, the two screwholes on the bottom of the Unit
should be lined up with the matching holes on the bottom of the shelf.
2. Screw the two screws included with the Kit through the holes in the shelf, into
the bottom of the Extender.
3. Once you’ve attached the Extender to the shelf, match the holes at the ends
of the shelf’s front panel to an appropriate set of matching holes on your
equipment rack. Screw the Extender assembly to the rack using your own
screws, bolts, cage nuts, etc. (not included).
Figure B-1. Rackmounting an Extender.
Page 50

49
LEGAL INFORMATION
DISCLAIMERS
While every precaution has been taken in the preparation of this manual, the
manufacturer and its authorized agents assume no responsibility for errors or
omissions. Neither do they assume any liability for damages resulting from the use
of the information contained herein. They reserve the right to change the
specifications, functions, or circuitry of the product without notice.
Neither the manufacturer nor its authorized agents can accept liability for
damage due to misuse of the product or due to other circumstances outside their
control. And they will not be responsible for any loss, damage, or injury arising
directly or indirectly from the use of this product.
Page 51

NOTES
Page 52

NOTES
Page 53

NOTES
 Loading...