

Black Box KV5016FA-R2, KV5002MA-R2, KV5008SA-R2, KV5008FA-R2, KV5004SA-R2 Quick Install Manual
...Page 1
MAY 2000
KV5002MA-R2 KV5004SA-R2
KV5008SA-R2 KV5008FA-R2
KV5012FA-R2 KV5016FA-R2
Step-By-Step Quick Install Guide for the
ServSwitch™ Ultra
1. Introduction
This guide is designed to quickly show you how to attach cables and
equipment in order to install a ServSwitch Ultra system. For just the basics,
look over the diagram on the next two pages. More detailed instructions begin
on page 4.
Power
1
5
9
13
2
6
10
14
3
7
11
15
4
8
12
16
Page 2
2
SERVSWITCH™ ULTRA QUICK INSTALL GUIDE
RS-232
POWER
MONITOR/KEYBOARD/MOUSE
CPU 5 CPU 6CPU 7 CPU 8
CPU 2CPU 1CPU 4CPU 3
Labeled "MOUSE"
Unlabeled
ServSwitch Ultra
MONITOR/KEYBOARD/MOUSE
CPU 1
CPU 1
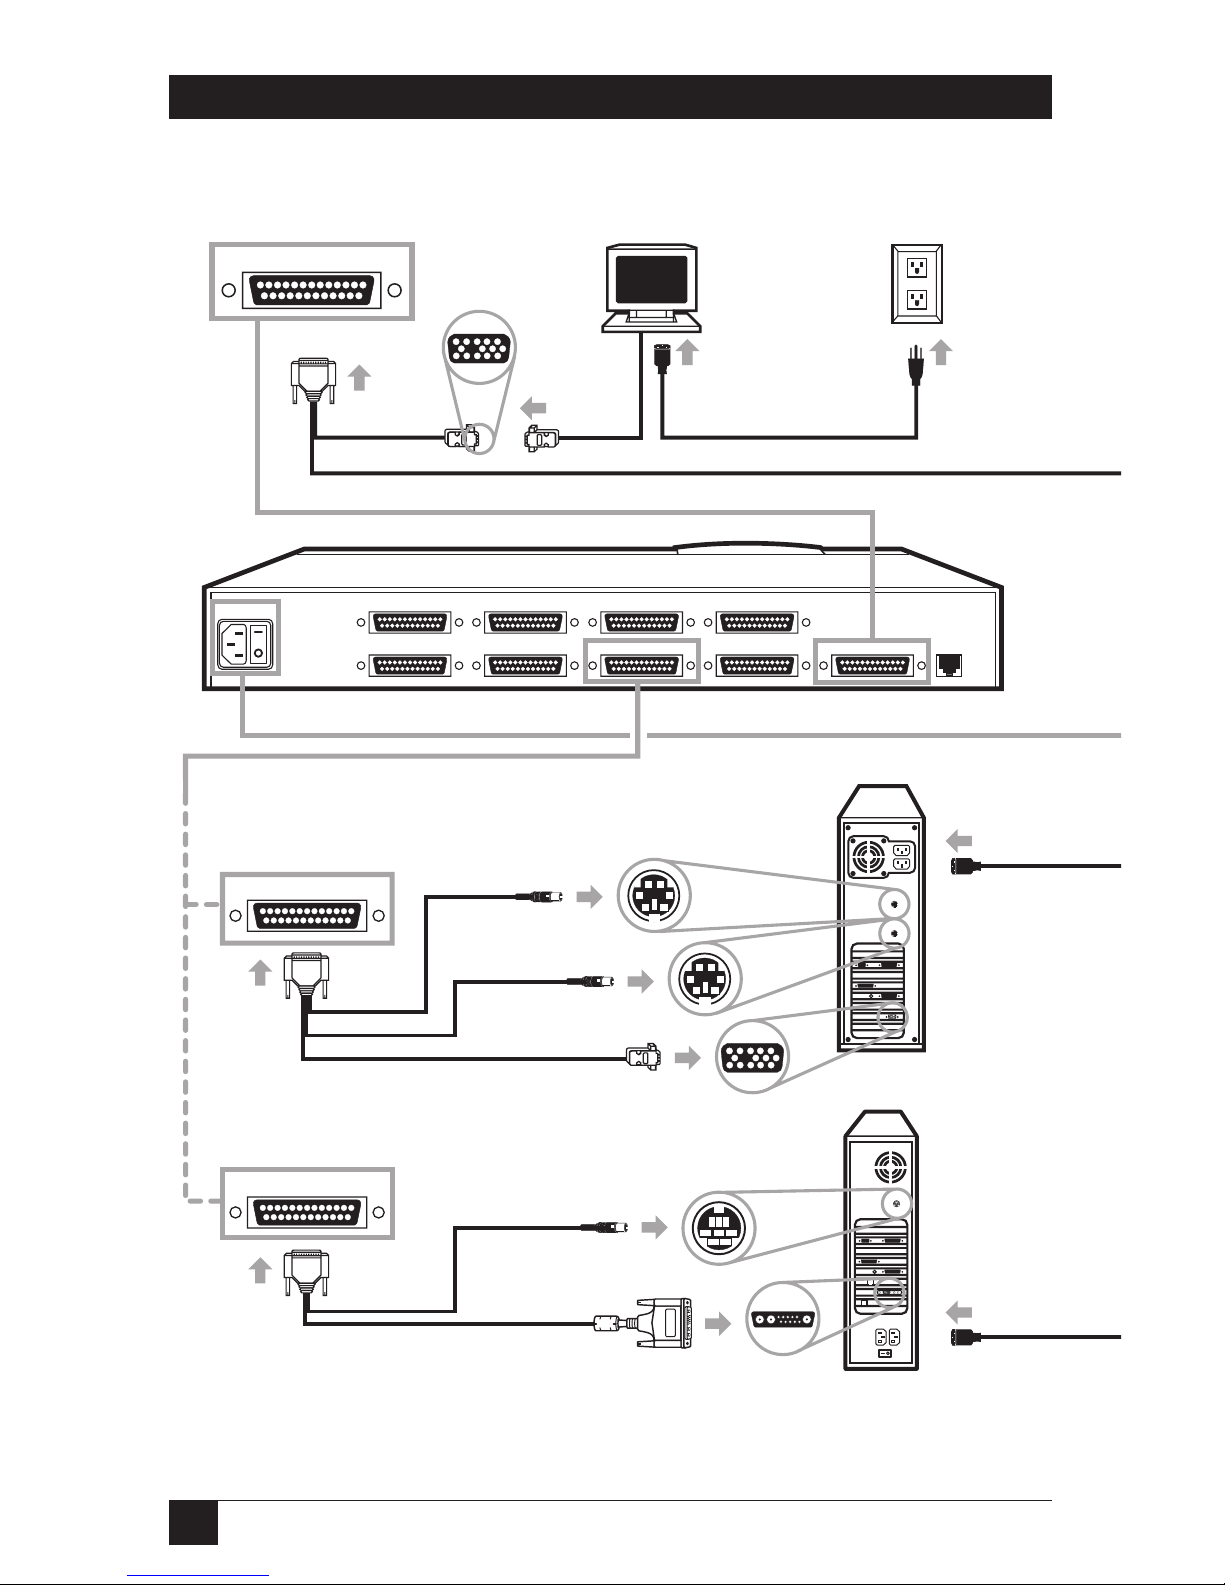
1
Attach User Adapter Cable.
2
Attach monitor
(VGA type shown).
3
Plug in monitor.
5a
If a CPU has separate keyboard and mouse ports, use
CPU Adapter Cable to attach it this way (PS/2 CPU shown):
5b
If a CPU has a single keyboard / mouse port, use
CPU Adapter Cable to attach it this way (Sun CPU shown):
HD15 Video.eps
HD15 Video.eps
Page 3
3
SERVSWITCH™ ULTRA QUICK INSTALL GUIDE
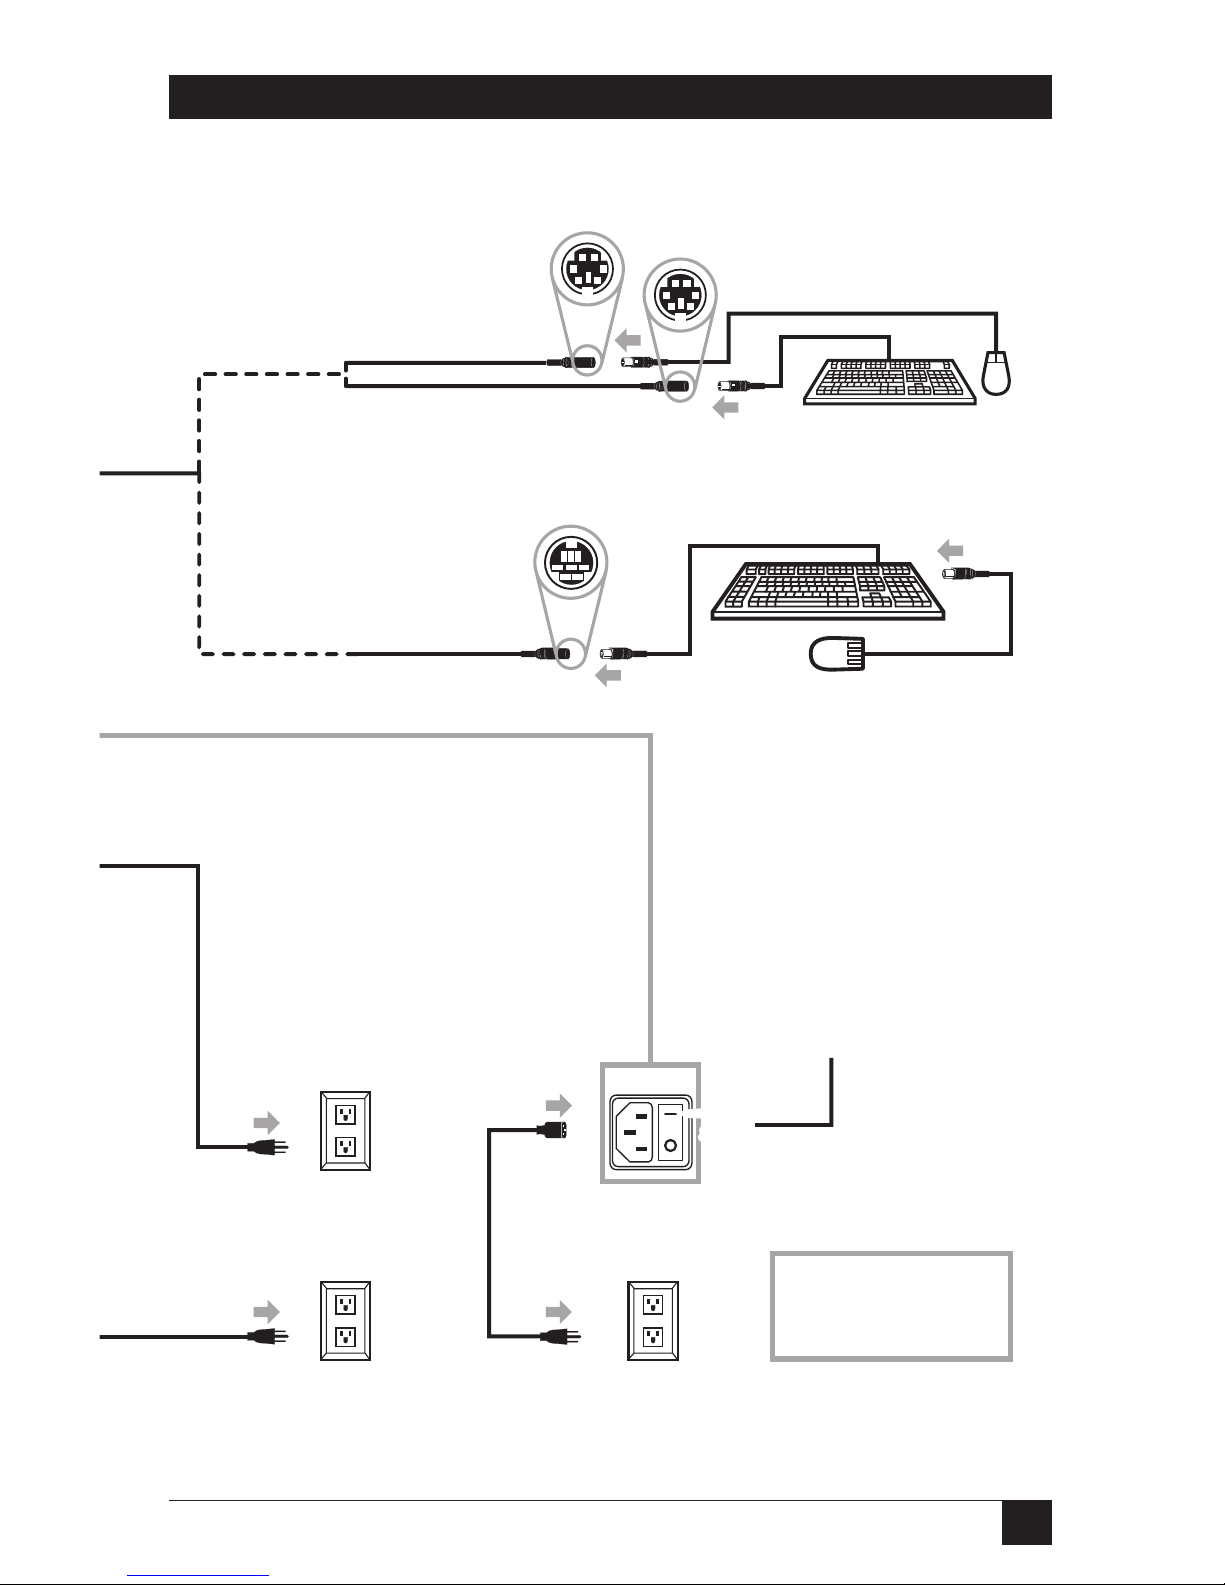
4b
If your keyboard and mouse are Mac or Sun compatible,
attach them this way (Sun equipment shown):
4a
If your keyboard and mouse are IBM compatible,
attach them this way (PS/2 equipment shown):
POWER
6
Plug in CPU.
7
Plug in
ServSwitch.
8
Turn on
ServSwitch.
☞
Labeled "MOUSE"
Unlabeled
9
Turn on monitor
and all CPUs.
Page 4
4
SERVSWITCH™ ULTRA QUICK INSTALL GUIDE
The rest of this guide is divided into five sections, one for each connection type:
Figure 1. Connection sequence.
Required: Section 2, User-Station Connections (see page 5).
Optional: Section 3, Cascade Connections (see page 14).
Required: Section 4, CPU Connections (see page 15).
Optional: Section 5, The RS-232 Connection (see page 26).
Required: Section 6, The Power Connection (see page 28).
RS-232
POWER
MONITOR/KEYBOARD/MOUSE
CPU 5 CPU 6CPU 7 CPU 8
CPU 2CPU 1CPU 4CPU 3
Power
UserCPU
Cascade
RS-232
Page 5

5
SERVSWITCH™ ULTRA QUICK INSTALL GUIDE
2. User-Station Connections
Which cables you use for these and how you connect them to the ServSwitch
Ultra and to your user-station equipment will depend on what type of
equipment you’re using:
If your keyboard And if your Refer to this section
and mouse are monitor is this (on this page):
this type (with this type (with this
connector): connector):
IBM®PS/2®, RS/6000®, VGA/multisync Section 2.1 (page 6)
or SGI®(6-pin mini-DIN) (HD15)
IBM PC/AT®keyboard, VGA/multisync Section 2.2 (page 7)
(5-pin DIN), RS-232 (HD15)
serial mouse (DB9)
IBM PS/2 or RS/6000 RS/6000 (13W3) Section 2.3 (page 8)
(6-pin mini-DIN)
IBM PS/2 or SGI SGI (13W3) Section 2.4 (page 9)
(6-pin mini-DIN)
Sun Microsystems
®
Sun®(13W3) Section 2.5 (page 10)
(8-pin mini-DIN)
Sun Microsystems VGA/multisync Section 2.6 (page 11)
(8-pin mini-DIN) (HD15)
Apple®Macintosh
®
Mac®(DB15) Section 2.7 (page 12)
(4-pin mini-DIN)
Apple Macintosh VGA/multisync Section 2.8 (page 13)
(4-pin mini-DIN) (HD15)
Page 6
6
SERVSWITCH™ ULTRA QUICK INSTALL GUIDE
2.1 IBM PS/2 C
OMPATIBLEKEYBOARD ANDMOUSE
, VGA/M
ULTISYNCMONITOR
If your keyboard and mouse are IBM PS/2 compatible (which includes current
RS/6000 and SGIkeyboards and mice, as well as the Microsoft®IntelliMouse®),
and your monitor is a VGA, SVGA, XGA, or multisync type with an HD15 video
connector, first choose your Monitor/Keyboard/Mouse Adapter Cable (User
Cable):
• If your video resolution is not higher than 1024 x 768 pixels, and if your
equipment is within 20 ft. (6.1 m) of the Switch, you can use the standard
(non-coaxial) cable with the product code EHN054.
• If your video resolution is higher than 1024 x 768, or if your equipment is
farther than 20 ft. (6.1 m) from the Switch, you should use the coaxial
cable with the product code EHN283.
When you have the correct cable, hook it up to the ServSwitch Ultra and your
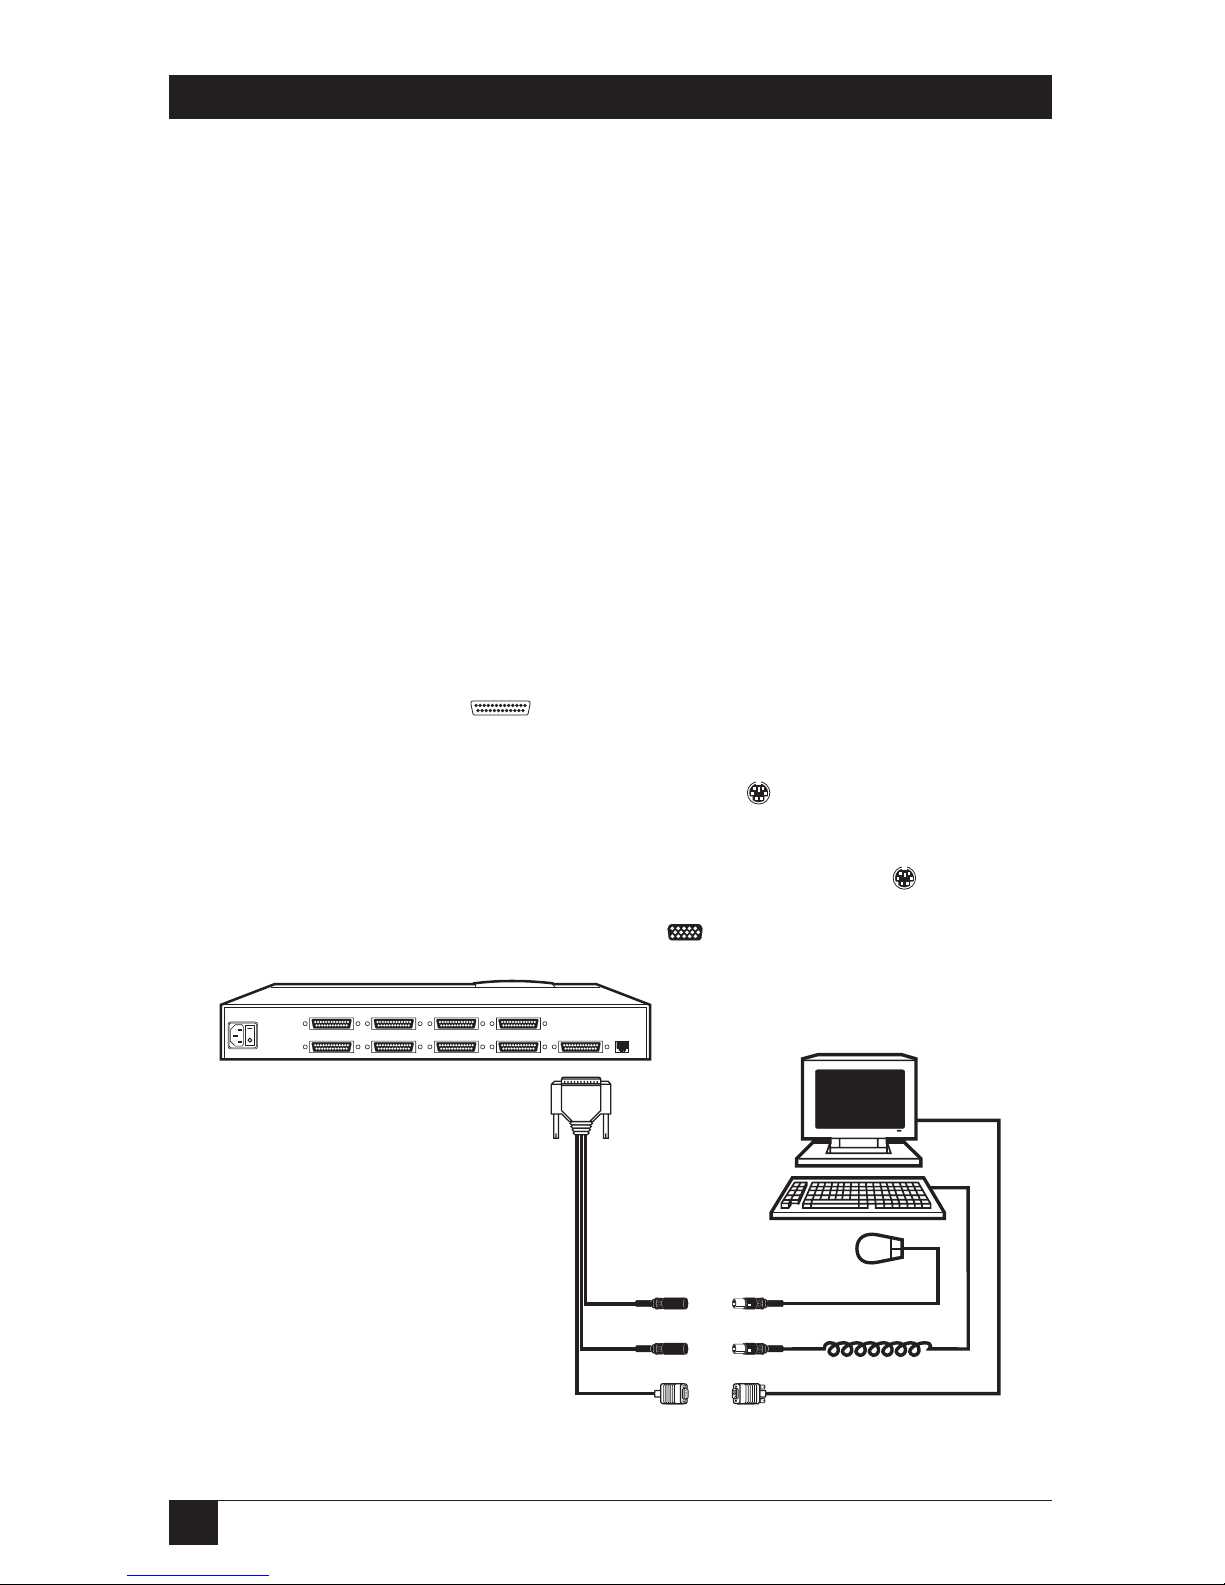
equipment this way, as shown in Figure 2:
• Plug the cable’s DB25 connector into the Switch’s MONITOR/
KEYBOARD/MOUSE port.
• Plug the mouse into the cable’s 6-pin mini-DIN connector with the
“MOUSE” label on it.
• Plug the keyboard into the cable’s unlabeled 6-pin mini-DIN connector.
• Plug the monitor into the cable’s HD15 connector.
Figure 2. PS/2 type user-station connections.
RS-232
POWER
MONITOR/KEYBOARD/MOUSE
CPU 5 CPU 6CPU 7 CPU 8
CPU 2CPU 1CPU 4CPU 3
EHN054 or
EHN283
Page 7

7
SERVSWITCH™ ULTRA QUICK INSTALL GUIDE
2.2 IBM PC/AT C
OMPATIBLEKEYBOARD
, RS-232 S
ERIALMOUSE
, VGA/M
ULTISYNCMONITOR
If your keyboard is PC/AT compatible, your mouse is an RS-232 serial type,
and your monitor is a VGA, SVGA, XGA, or multisync type with an HD15 video
connector, first choose your Monitor/Keyboard/Mouse Adapter Cable (User
Cable):
• If your video resolution is not higher than 1024 x 768 pixels, and if your
equipment is within 20 ft. (6.1 m) of the Switch, you can use the standard
(non-coaxial) cable with the product code EHN052.
• If your video resolution is higher than 1024 x 768, or if your equipment is
farther than 20 ft. (6.1 m) from the Switch, you should use the coaxial
cable with the product code EHN270.
When you have the correct cable, hook it up to the ServSwitch Ultra and your
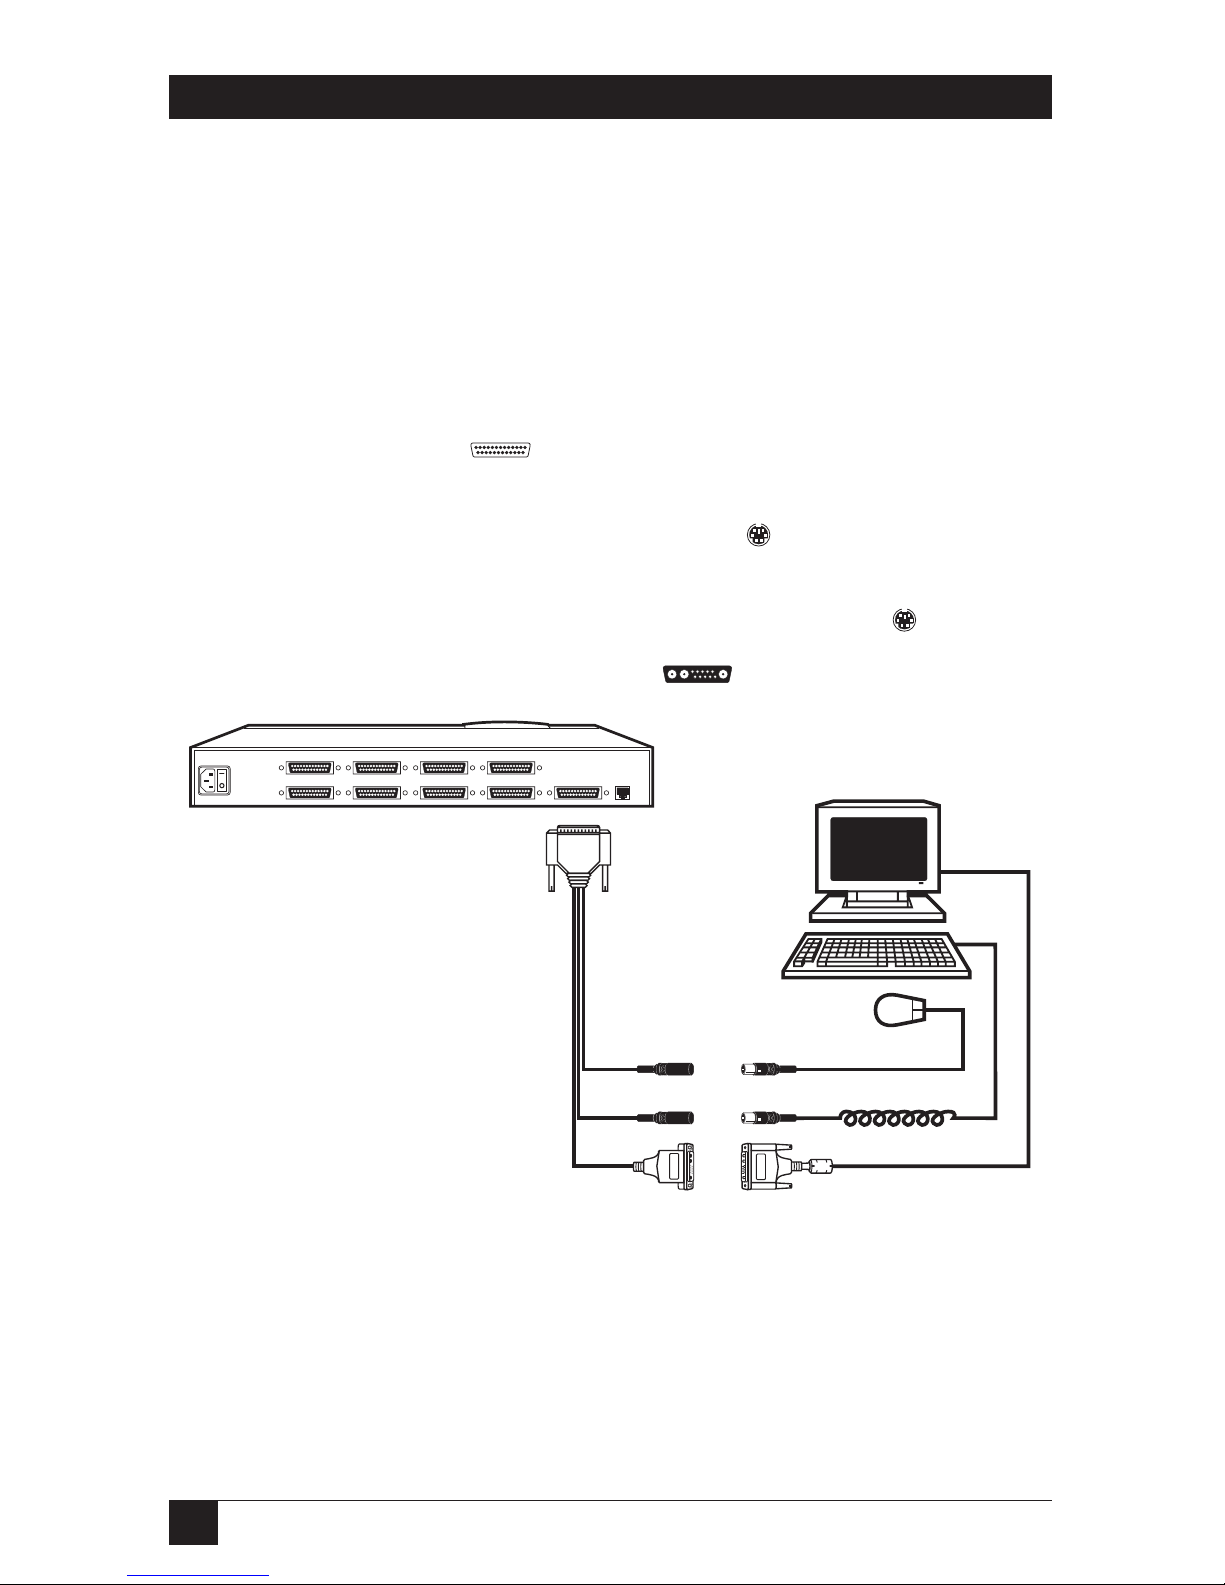
equipment this way, as shown in Figure 3:
• Plug the cable’s DB25 connector into the Switch’s MONITOR/
KEYBOARD/MOUSE port.
• Plug the mouse into the cable’s DB9 connector.
• Plug the keyboard into the cable’s 5-pin DIN connector.
• Plug the monitor into the cable’s HD15 connector.
Figure 3. PC/AT type user-station connections.
RS-232
POWER
MONITOR/KEYBOARD/MOUSE
CPU 5 CPU 6CPU 7 CPU 8
CPU 2CPU 1CPU 4CPU 3
EHN052 or
EHN270
Page 8
8
SERVSWITCH™ ULTRA QUICK INSTALL GUIDE
2.3 IBM PS/2 C
OMPATIBLEKEYBOARD ANDMOUSE
, RS/6000 M
ONITOR
If your keyboard and mouse are IBM PS/2 compatible (which includes current
RS/6000 keyboards and mice, as well as the Microsoft IntelliMouse), and your
monitor is an RS/6000 type with a 13W3 video connector, use the coaxial
Monitor/Keyboard/Mouse Adapter Cable (User Cable) with the product code
EHN521-0001. (Note that this cable is available as a stock item only in a 1-ft.
[0.3-m] length; call for a quote if you need a longer version.) Hook this cable
up to the ServSwitch Ultra and your equipment this way, as shown in Figure 4:
• Plug the cable’s DB25 connector into the Switch’s MONITOR/
KEYBOARD/MOUSE port.
• Plug the mouse into the cable’s 6-pin mini-DIN connector with the
“MOUSE” label on it.
• Plug the keyboard into the cable’s unlabeled 6-pin mini-DIN connector.
• Plug the monitor into the cable’s 13W3 connector.
Figure 4. RS/6000 type user-station connections.
RS-232
POWER
MONITOR/KEYBOARD/MOUSE
CPU 5 CPU 6CPU 7 CPU 8
CPU 2CPU 1CPU 4CPU 3
EHN521-0001
Page 9
9
SERVSWITCH™ ULTRA QUICK INSTALL GUIDE
2.4 IBM PS/2 C
OMPATIBLEKEYBOARD ANDMOUSE
, SGI M
ONITOR
If your keyboard and mouse are IBM PS/2 compatible (which includes current
SGI keyboards and mice, as well as the Microsoft IntelliMouse), and your
monitor is an SGI type with a 13W3 video connector, use the coaxial Monitor/
Keyboard/Mouse Adapter Cable (User Cable) with the product code
EHN501-0001. (Note that this cable is available as a stock item only in a 1-ft.
[0.3-m] length; call for a quote if you need a longer version.) Hook this cable
up to the ServSwitch Ultra and your equipment this way, as shown in Figure 5:
• Plug the cable’s DB25 connector into the Switch’s MONITOR/
KEYBOARD/MOUSE port.
• Plug the mouse into the cable’s 6-pin mini-DIN connector with the
“MOUSE” label on it.
• Plug the keyboard into the cable’s unlabeled 6-pin mini-DIN connector.
• Plug the monitor into the cable’s 13W3 connector.
Figure 5. SGI type user-station connections.
RS-232
POWER
MONITOR/KEYBOARD/MOUSE
CPU 5 CPU 6CPU 7 CPU 8
CPU 2CPU 1CPU 4CPU 3
EHN501-0001
Page 10

10
SERVSWITCH™ ULTRA QUICK INSTALL GUIDE
2.5 SUNC
OMPATIBLEKEYBOARD ANDMOUSE
, SUNM
ONITOR
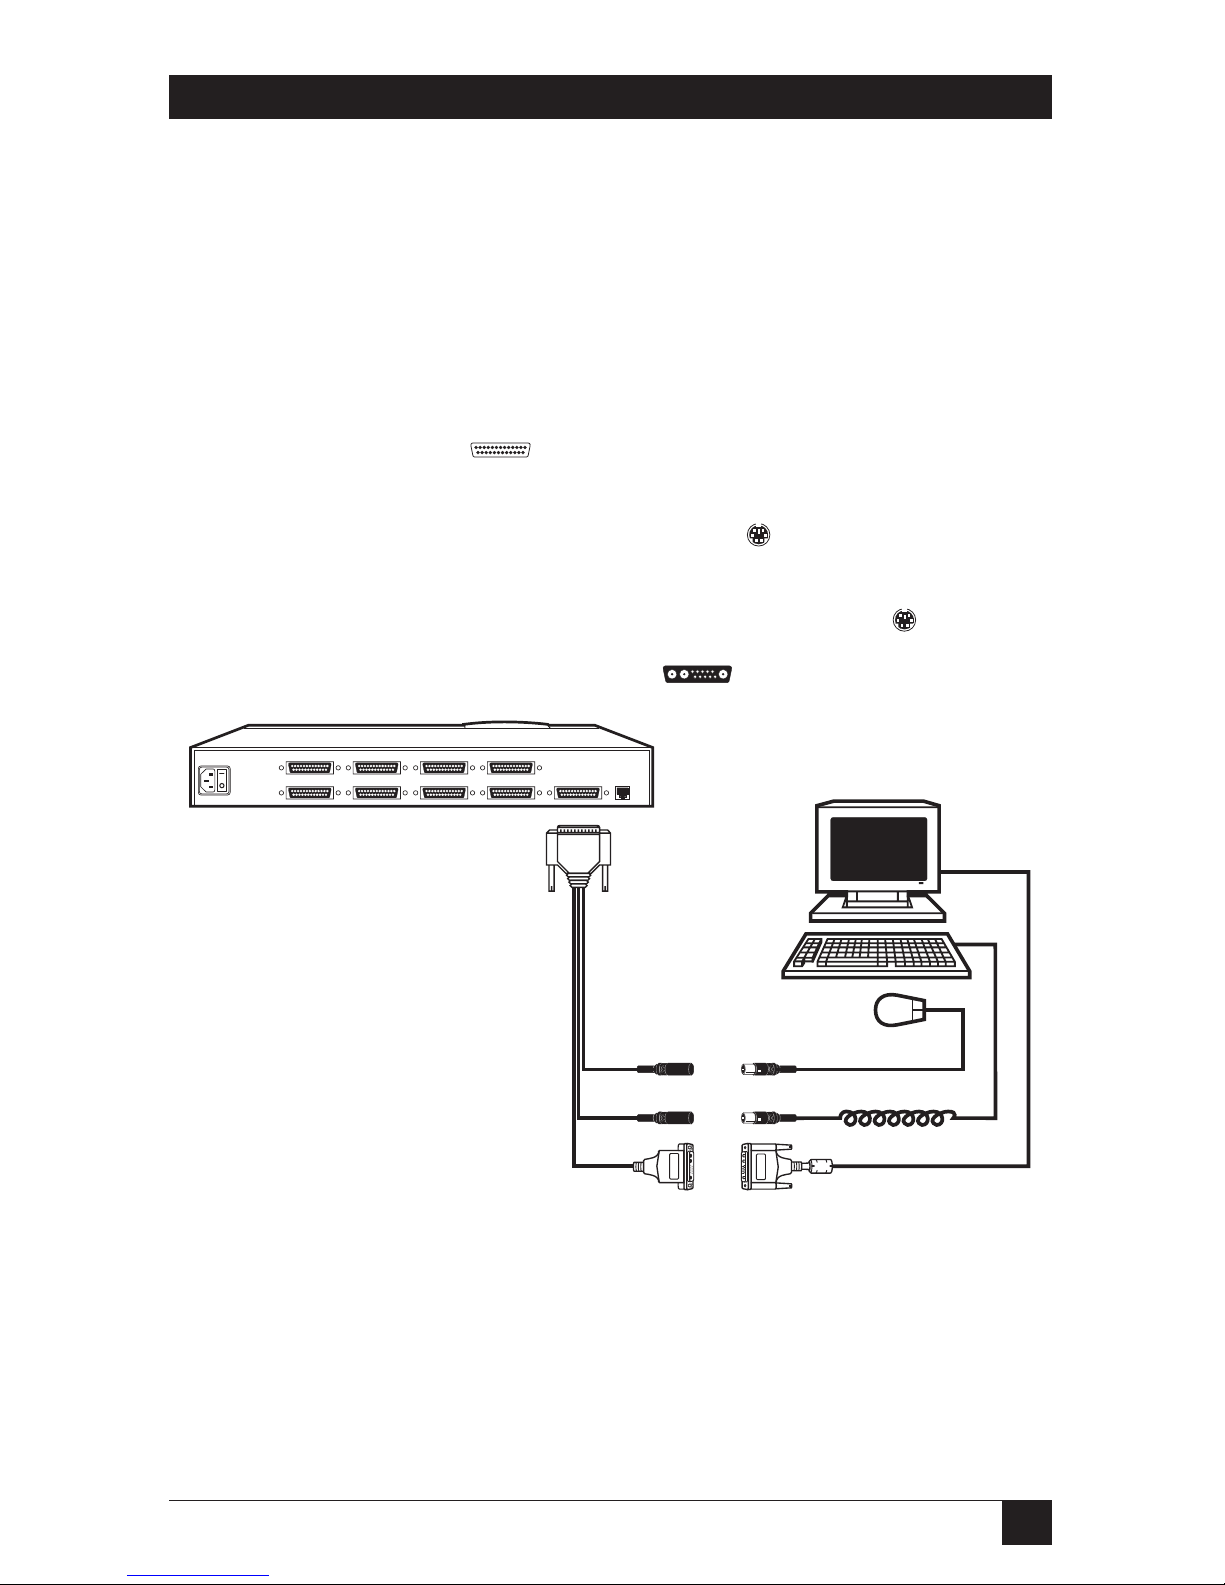
If your keyboard and mouse are Sun Microsystems compatible, and your
monitor is a Sun type with a 13W3 video connector, use the coaxial Monitor/
Keyboard/Mouse Adapter Cable (User Cable) with the product code EHN201.
Hook this cable up to the ServSwitch Ultra and your equipment this way, as
shown in Figure 6:
• Plug the cable’s DB25 connector into the Switch’s MONITOR/
KEYBOARD/MOUSE port.
• Plug the mouse into the keyboard.
• Plug the keyboard into the cable’s 8-pin mini-DIN connector.
• Plug the monitor into the cable’s 13W3 connector.
Figure 6. Sun type user-station connections (Sun monitor).
RS-232
POWER
MONITOR/KEYBOARD/MOUSE
CPU 5 CPU 6CPU 7 CPU 8
CPU 2CPU 1CPU 4CPU 3
EHN201
Page 11

11
SERVSWITCH™ ULTRA QUICK INSTALL GUIDE
2.6 SUNC
OMPATIBLEKEYBOARD ANDMOUSE
, VGA/M
ULTISYNCMONITOR
If your keyboard and mouse are Sun Microsystems compatible, and your
monitor is a multisync type with an HD15 video connector, first choose your
Monitor/Keyboard/Mouse Adapter Cable (User Cable):
• If your video resolution is not higher than 1024 x 768 pixels, and if your
equipment is within 20 ft. (6.1 m) of the Switch, you can use the standard
(non-coaxial) cable with the product code EHN059.
• If your video resolution is higher than 1024 x 768, or if your equipment is
farther than 20 ft. (6.1 m) from the Switch, you should use the coaxial
cable with the product code EHN225.
When you have the correct cable, hook it up to the ServSwitch Ultra and your
equipment this way, as shown in Figure 7:
• Plug the cable’s DB25 connector into the Switch’s MONITOR/
KEYBOARD/MOUSE port.
• Plug the mouse into the keyboard.
• Plug the keyboard into the cable’s 8-pin mini-DIN connector.
• Plug the monitor into the cable’s HD15 connector.
Figure 7. Sun type user-station connections (multisync monitor).
RS-232
POWER
MONITOR/KEYBOARD/MOUSE
CPU 5 CPU 6CPU 7 CPU 8
CPU 2CPU 1CPU 4CPU 3
EHN059 or
EHN225
Page 12

12
SERVSWITCH™ ULTRA QUICK INSTALL GUIDE
2.7 MACC
OMPATIBLEKEYBOARD ANDMOUSE
, MACM
ONITOR
If your keyboard and mouse are Apple Macintosh compatible, and your
monitor is a Mac type with a DB15 video connector, first choose your Monitor/
Keyboard/Mouse Adapter Cable (User Cable):
• If your video resolution is not higher than 1024 x 768 pixels, and if your
equipment is within 20 ft. (6.1 m) of the Switch, you can use the standard
(non-coaxial) cable with the product code EHN210.
• If your video resolution is higher than 1024 x 768, or if your equipment is
farther than 20 ft. (6.1 m) from the Switch, you should use the coaxial
cable with the product code EHN203.
When you have the correct cable, hook it up to the ServSwitch Ultra and your
equipment this way, as shown in Figure 8:
• Plug the cable’s DB25 connector into the Switch’s MONITOR/
KEYBOARD/MOUSE port.
• Plug the mouse into the keyboard.
• Plug the keyboard into the cable’s 4-pin mini-DIN connector.
• Plug the monitor into the cable’s DB15 connector.
Figure 8. Mac type user-station connections (Mac monitor).
RS-232
POWER
MONITOR/KEYBOARD/MOUSE
CPU 5 CPU 6CPU 7 CPU 8
CPU 2CPU 1CPU 4CPU 3
EHN210 or
EHN203
Page 13

13
SERVSWITCH™ ULTRA QUICK INSTALL GUIDE
2.8 MACC
OMPATIBLEKEYBOARD ANDMOUSE
, VGA/M
ULTISYNCMONITOR
If your keyboard and mouse are Apple Macintosh compatible, and your
monitor is a multisync type with an HD15 video connector, first choose your
Monitor/Keyboard/Mouse Adapter Cable (User Cable):
• If your video resolution is not higher than 1024 x 768 pixels, and if your
equipment is within 20 ft. (6.1 m) of the Switch, you can use the standard
(non-coaxial) cable with the product code EHN532.
• If your video resolution is higher than 1024 x 768, or if your equipment is
farther than 20 ft. (6.1 m) from the Switch, you should use the coaxial
cable with the product code EHN540.
When you have the correct cable, hook it up to the ServSwitch Ultra and your
equipment this way, as shown in Figure 9:
• Plug the cable’s DB25 connector into the Switch’s MONITOR/
KEYBOARD/MOUSE port.
• Plug the mouse into the keyboard.
• Plug the keyboard into the cable’s 4-pin mini-DIN connector.
• Plug the monitor into the cable’s HD15 connector.
Figure 9. Mac type user-station connections (multisync monitor).
RS-232
POWER
MONITOR/KEYBOARD/MOUSE
CPU 5 CPU 6CPU 7 CPU 8
CPU 2CPU 1CPU 4CPU 3
EHN532 or
EHN540
Page 14

14
SERVSWITCH™ ULTRA QUICK INSTALL GUIDE
3. Cascade Connections (Optional)
If you want to connect submaster (slave) ServSwitch Ultra units to your master
unit, use the coaxial Expansion Cable EHN284. Plug one end of this cable (it
doesn’t matter which end) into the submaster unit’s MONITOR/KEYBOARD/
MOUSE port. If this is the first submaster, plug the other end of the cable into
the master Switch’s CPU 1 port. If this is the second submaster, plug the other
end into the master Switch’s CPU 2 port, and so on. See Figure 10. (For more
information about cascading, refer to Section 3.3 of your ServSwitch Ultra
manual.)
Figure 10. A cascade connection.
RS-232
POWER
MONITOR/KEYBOARD/MOUSE
CPU 5 CPU 6CPU 7 CPU 8
CPU 2CPU 1CPU 4CPU 3
RS-232
POWER
MONITOR/KEYBOARD/MOUSE
CPU 5 CPU 6CPU 7 CPU 8
CPU 2CPU 1CPU 4CPU 3
Master Unit
Submaster Unit
EHN284
Page 15

15
SERVSWITCH™ ULTRA QUICK INSTALL GUIDE
4. CPU Connections
Which cables you use and how you connect them will depend on what type of
equipment you’re using:
If your CPU’s keyboard And if your CPU’s Refer to this section
and mouse ports are video port is this (on this page):
this type (with this type (with this
connector): connector):
IBM PS/2 type VGA etc. (HD15) Section 4.1 (page 16)
(6-pin mini-DIN)
IBM PC/AT keyboard VGA etc. (HD15) Section 4.2 (page 18)
(5-pin DIN), RS-232
serial mouse (DB9)
IBM RS/6000 (PS/2 type, RS/6000 (13W3) Section 4.3 (page 20)
6-pin mini-DIN)
SGI (PS/2 type, SGI (13W3) Section 4.4 (page 21)
6-pin mini-DIN)
Sun Microsystems Sun (13W3) Section 4.5 (page 22)
(8-pin mini-DIN)
Sun Microsystems VGA etc. (HD15) Section 4.6 (page 23)
(8-pin mini-DIN)
Apple Macintosh Mac (DB15) Section 4.7 (page 24)
(4-pin mini-DIN)
Apple Macintosh Mac G3 (HD15) Section 4.8 (page 25)
(4-pin mini-DIN)
Page 16

16
SERVSWITCH™ ULTRA QUICK INSTALL GUIDE
4.1 IBM PS/2 C
OMPATIBLEKEYBOARD ANDMOUSEPORTS
, VGA T
YPEVIDEOPORTS
If a CPU’s keyboard and mouse ports are IBM PS/2 compatible (which
includes current RS/6000 and SGI CPUs), and its video port is a VGA, SVGA,
XGA, or a compatible type with an HD15 connector, first choose your CPU
Adapter Cable:
• If your video resolution is not higher than 1024 x 768 pixels, and if the
CPU is within 20 ft. (6.1 m) of the Switch, you can use the standard (non-
coaxial) cable with the product code EHN051.
• If your video resolution is higher than 1024 x 768, or if the CPU is farther
than 20 ft. (6.1 m) from the Switch, you should use the coaxial cable with
the product code EHN282. (This cable will come with keyboard and
mouse adapters that you will not use.)
When you have the correct cable, hook it up to the ServSwitch Ultra and the
CPU this way, as shown in Figure 11 on the next page:
• Plug the cable’s DB25 connector into one of the Switch’s numbered
CPU ports.
• Plug the cable’s 6-pin mini-DIN connector with the “MOUSE” label on
it into the CPU’s mouse port.
• Plug the cable’s unlabeled 6-pin mini-DIN connector into the CPU’s
keyboard port.
• Plug the cable’s HD15 connector into the CPU’s video port.
Page 17

17
SERVSWITCH™ ULTRA QUICK INSTALL GUIDE
Figure 11. PS/2 type CPU connections.
RS-232
POWER
MONITOR/KEYBOARD/MOUSE
CPU 5 CPU 6CPU 7 CPU 8
CPU 2CPU 1CPU 4CPU 3
EHN051 or
EHN282
To kbd port
To mouse port
To video port
Page 18

18
SERVSWITCH™ ULTRA QUICK INSTALL GUIDE
4.2 IBM PC/AT C
OMPATIBLEKEYBOARDPORT
, RS-232 S
ERIALMOUSEPORT
, VGA T
YPE
V
IDEOPORT
If a CPU’s keyboard port is PC/AT compatible, its mouse port is an RS-232
serial type, and its video port is a VGA, SVGA, XGA, or compatible type with an
HD15 connector, first choose your CPU Adapter Cable:
• If your video resolution is not higher than 1024 x 768 pixels, and if the
CPU is within 20 ft. (6.1 m) of the Switch, you can use the standard (non-
coaxial) cable with the product code EHN048.
• If your video resolution is higher than 1024 x 768, or if the CPU is farther
than 20 ft. (6.1 m) from the Switch, you should use the coaxial cable with
the product code EHN282, including the adapters that come with it.
If you use the EHN048, hook it up to the ServSwitch Ultra and the CPU this
way, as shown in Figure 12 on the next page:
• Plug the cable’s DB25 connector into one of the Switch’s numbered
CPU ports.
• Plug the cable’s DB9 connector into the CPU’s mouse port.
• Plug the cable’s 5-pin DIN connector into the CPU’s keyboard port.
• Plug the cable’s HD15 connector into the CPU’s video port.
If you use the EHN282, hook it up to the ServSwitch Ultra and the CPU this
way, as shown in Figure 13 on the next page:
• Plug the cable’s DB25 connector into one of the Switch’s numbered
CPU ports.
• Plug the cable’s 6-pin mini-DIN connector with the “MOUSE” label on
it into the 6-pin mini-DIN end of the included mouse adapter. Then plug
the DB9 end of the adapter into the CPU’s mouse port.
• Plug the cable’s unlabeled 6-pin mini-DIN connector into the 6-pin
mini-DIN end of the included keyboard adapter. Then plug the 5-pin DIN
end of the adapter into the CPU’s keyboard port.
• Plug the cable’s HD15 connector into the CPU’s video port.
Page 19

19
SERVSWITCH™ ULTRA QUICK INSTALL GUIDE
Figure 12. PC/AT type CPU connections (standard cable).
Figure 13. PC/AT type CPU connections (coaxial cable).
RS-232
POWER
MONITOR/KEYBOARD/MOUSE
CPU 5 CPU 6CPU 7 CPU 8
CPU 2CPU 1CPU 4CPU 3
RS-232
POWER
MONITOR/KEYBOARD/MOUSE
CPU 5 CPU 6CPU 7 CPU 8
CPU 2CPU 1CPU 4CPU 3
EHN048
To kbd port
To mouse port
To video port
EHN282
To kbd port
Adapters
To mouse port
To video port
Page 20

20
SERVSWITCH™ ULTRA QUICK INSTALL GUIDE
4.3 IBM PS/2 C
OMPATIBLEKEYBOARD ANDMOUSEPORTS
, RS/6000 V
IDEOPORT
If a CPU’s keyboard and mouse ports are IBM PS/2 compatible (which
includes current RS/6000 CPUs), and its video port is an RS/6000 type with a
13W3 connector, use the coaxial CPU Adapter Cable EHN520. Hook this cable
up to the ServSwitch Ultra and the CPU this way, as shown in Figure 14:
• Plug the cable’s DB25 connector into one of the Switch’s numbered
CPU ports.
• Plug the cable’s 6-pin mini-DIN connector with the “MOUSE” label on
it into the CPU’s mouse port.
• Plug the cable’s unlabeled 6-pin mini-DIN connector into the CPU’s
keyboard port.
• Plug the cable’s 13W3 connector into the CPU’s video port.
Figure 14. RS/6000 type CPU connections.
RS-232
POWER
MONITOR/KEYBOARD/MOUSE
CPU 5 CPU 6CPU 7 CPU 8
CPU 2CPU 1CPU 4CPU 3
EHN520
To kbd port
To mouse port
To video port
Page 21

21
SERVSWITCH™ ULTRA QUICK INSTALL GUIDE
4.4 IBM PS/2 C
OMPATIBLEKEYBOARD ANDMOUSEPORTS
, SGI V
IDEOPORT
If a CPU’s keyboard and mouse ports are IBM PS/2 compatible (which
includes current SGI CPUs), and its video port is an SGI type with a 13W3
connector, use the coaxial CPU Adapter Cable EHN500. Hook this cable up to
the ServSwitch Ultra and your equipment this way, as shown in Figure 15:
• Plug the cable’s DB25 connector into one of the Switch’s numbered
CPU ports.
• Plug the cable’s 6-pin mini-DIN connector with the “MOUSE” label on
it into the CPU’s mouse port.
• Plug the cable’s unlabeled 6-pin mini-DIN connector into the CPU’s
keyboard port.
• Plug the cable’s 13W3 connector into the CPU’s video port.
Figure 15. SGI type CPU connections.
RS-232
POWER
MONITOR/KEYBOARD/MOUSE
CPU 5 CPU 6CPU 7 CPU 8
CPU 2CPU 1CPU 4CPU 3
EHN500
To kbd port
To mouse port
To video port
Page 22

22
SERVSWITCH™ ULTRA QUICK INSTALL GUIDE
4.5 SUNC
OMPATIBLEKEYBOARD
, M
OUSE, ANDVIDEOPORTS
If a CPU’s keyboard and mouse ports are Sun Microsystems compatible, and its
video port is an Sun type with a 13W3 connector, use the coaxial CPU Adapter
Cable EHN206. Hook this cable up to the ServSwitch Ultra and your
equipment this way, as shown in Figure 16:
• Plug the cable’s DB25 connector into one of the Switch’s numbered
CPU ports.
•
Plug the cable’s 8-pin mini-DIN connector into the CPU’s keyboard port.
• Plug the cable’s 13W3 connector into the CPU’s video port.
Figure 16. Sun type CPU connections (Sun video).
RS-232
POWER
MONITOR/KEYBOARD/MOUSE
CPU 5 CPU 6CPU 7 CPU 8
CPU 2CPU 1CPU 4CPU 3
EHN206
To kbd/
mouse port
To video port
Page 23

23
SERVSWITCH™ ULTRA QUICK INSTALL GUIDE
4.6 SUNC
OMPATIBLEKEYBOARD ANDMOUSEPORTS
, VGA T
YPEVIDEOPORT
If a CPU’s keyboard and mouse ports are Sun Microsystems compatible, and its
video port is a VGA, SVGA, XGA, or compatible type with an HD15 connector,
use the coaxial CPU Adapter Cable EHN515. Hook this cable up to the
ServSwitch Ultra and your equipment this way, as shown in Figure 17:
• Plug the cable’s DB25 connector into one of the Switch’s numbered
CPU ports.
•
Plug the cable’s 8-pin mini-DIN connector into the CPU’s keyboard port.
• Plug the cable’s HD15 connector into the CPU’s video port.
Figure 17. Sun type CPU connections (VGA video).
RS-232
POWER
MONITOR/KEYBOARD/MOUSE
CPU 5 CPU 6CPU 7 CPU 8
CPU 2CPU 1CPU 4CPU 3
EHN515
To kbd/
mouse port
To video port
Page 24

24
SERVSWITCH™ ULTRA QUICK INSTALL GUIDE
4.7 NON-G3 MACC
OMPATIBLEKEYBOARD
, M
OUSE, ANDVIDEOPORTS
If a CPU’s keyboard and mouse ports are both Apple Macintosh compatible,
and its video port is a non-G3 Mac type with a DB15 connector, first choose
your CPU Adapter Cable:
• If your video resolution is not higher than 1024 x 768 pixels, and if the
CPU is within 20 ft. (6.1 m) of the Switch, you can use the standard (non-
coaxial) cable with the product code EHN215.
• If your video resolution is higher than 1024 x 768, or if the CPU is farther
than 20 ft. (6.1 m) from the Switch, you should use the coaxial cable with
the product code EHN208.
When you have the correct cable, hook it up to the ServSwitch Ultra and the
CPU this way, as shown in Figure 18:
• Plug the cable’s DB25 connector into one of the Switch’s numbered
CPU ports.
•
Plug the cable’s 4-pin mini-DIN connector into the CPU’s keyboard port.
• Plug the cable’s DB15 connector into the CPU’s video port.
Figure 18. Non-G3 Mac type CPU connections.
RS-232
POWER
MONITOR/KEYBOARD/MOUSE
CPU 5 CPU 6CPU 7 CPU 8
CPU 2CPU 1CPU 4CPU 3
EHN215 or
EHN208
To kbd/
mouse port
To video
port
Page 25

25
SERVSWITCH™ ULTRA QUICK INSTALL GUIDE
4.8 MACG3 C
OMPATIBLEKEYBOARD
, M
OUSE, ANDVIDEOPORTS
If a CPU’s keyboard and mouse ports are both Apple Macintosh compatible,
and its video port is a Mac G3 type with an HD15 connector, first choose your
CPU Adapter Cable:
• If your video resolution is not higher than 1024 x 768 pixels, and if the
CPU is within 20 ft. (6.1 m) of the Switch, you can use the standard (non-
coaxial) cable with the product code EHN550.
• If your video resolution is higher than 1024 x 768, or if the CPU is farther
than 20 ft. (6.1 m) from the Switch, you should use the coaxial cable with
the product code EHN560.
When you have the correct cable, hook it up to the ServSwitch Ultra and the
CPU this way, as shown in Figure 19:
• Plug the cable’s DB25 connector into one of the Switch’s numbered
CPU ports.
•
Plug the cable’s 4-pin mini-DIN connector into the CPU’s keyboard port.
• Plug the cable’s HD15 connector into the CPU’s video port.
Figure 19. Mac G3 type CPU connections.
RS-232
POWER
MONITOR/KEYBOARD/MOUSE
CPU 5 CPU 6CPU 7 CPU 8
CPU 2CPU 1CPU 4CPU 3
EHN550 or
EHN560
To kbd/
mouse port
To video port
Page 26

26
SERVSWITCH™ ULTRA QUICK INSTALL GUIDE
5. The RS-232 Connection (Required for Upgrading Firmware,
Optional Otherwise)
To attach the ServSwitch Ultra’s RS-232 port to the RS-232 serial port of a PC
or modem for upgrading firmware (required) or for out-of-band port
switching and diagnostics (optional), you will need a 4- or 6-wire flat-satin
modular cable and a modular adapter:
• If you are connecting the Switch directly to a DB9 male computer
serial port, use the 4-wire cable and the DB9 female adapter that came with
the Switch, as shown in Figure 20. (If you lose the cable, you can replace it
with our product code EL04MS. If you lose the adapter, you can replace it
with our product code FA043.)
Figure 20. RS-232 connection to DB9 male computer port.
• If you are connecting the Switch directly to a DB25 male computer
serial port, use the 4-wire cable that came with the Switch and the DB25
female adapter FA044, as shown in Figure 21. (If you lose the cable, you
can replace it with our product code EL04MS.)
Figure 21. RS-232 connection to DB25 male computer port.
RS-232
POWER
MONITOR/KEYBOARD/MOUSE
CPU 5 CPU 6CPU 7 CPU 8
CPU 2CPU 1CPU 4CPU 3
RS-232
POWER
MONITOR/KEYBOARD/MOUSE
CPU 5 CPU 6CPU 7 CPU 8
CPU 2CPU 1CPU 4CPU 3
Included 4-wire
cable or EL04MS
Modular
adapter
FA044
Included 4-wire
cable or EL04MS
Included
adapter
or FA043
Page 27

27
SERVSWITCH™ ULTRA QUICK INSTALL GUIDE
• If you are connecting the Switch to a computer at another site through a
modem with a DB25 female serial port, use the 6-wire cable
EL06MS and the DB25 male adapter FA042, as shown in Figure 22.
Figure 22. RS-232 connection to DB25 male computer port.
RS-232
POWER
MONITOR/KEYBOARD/MOUSE
CPU 5 CPU 6CPU 7 CPU 8
CPU 2CPU 1CPU 4CPU 3
6-wire cable
EL06MS
Modem
To phone
network
Modular
adapter
FA042
Page 28

28
SERVSWITCH™ ULTRA QUICK INSTALL GUIDE
6. The Power Connection
Attach the outlet end of the included power cord into the Switch. Attach the
plug end of the cord to a wall outlet. See Figure 23.
Figure 23. The power connection.
RS-232
POWER
MONITOR/KEYBOARD/MOUSE
CPU 5 CPU 6CPU 7 CPU 8
CPU 2CPU 1CPU 4CPU 3
Included
power
cord
Page 29

NOTES
Page 30

CUSTOMER
SUPPORT
INFORMATION
Order toll-free in the U.S. 24 hours, 7 A.M. Monday to midnight Friday: 877-877-BBOX
FREE technical support, 24 hours a day, 7 days a week: Call 724-746-5500 or fax 724-746-0746
Mail order: Black Box Corporation, 1000 Park Drive, Lawrence, PA 15055-1018
Web site: www.blackbox.com • E-mail: info@blackbox.com
© Copyright 2000. Black Box Corporation. All rights reserved.
BLACK BOX and the logo are registered trademarks, and ServSwitch and ServSwitch Ultra are trademarks, of Black
Box Corporation.
Apple, Mac, and Macintosh are registered trademarks of Apple Computer, Inc.
IBM, PC/AT, PS/2, and RS/6000 are registered trademarks of International Business Machines Corporation.
Microsoft and IntelliMouse are trademarks or registered trademarks of Microsoft Corporation in the United States and/or
other countries.
SGI is a registered trademark of SGI.
Sun and Sun Microsystems are registered trademarks of Sun Microsystems, Inc. in the United States and other countries.
Any other trademarks mentioned in this document are acknowledged to be the property of the trademark owners.
 Loading...