

Page 1
FREE tech support 24 hours a day, 7 days a week: Call 724-746-5500 or fax 724-746-0746.
Mailing address: Black Box Corporation, 1000 Park Dr., Lawrence, PA 15055-1018
World-Wide Web: www.blackbox.com • E-mail: info@blackbox.com
© Copyright 2000. Black Box Corporation. All rights reserved.
Customer Support Information:
Doc. No. 590-054-001 Rev. B
SEPTEMBER 2000
SERIAL MOUSE
SERIAL PORT
VGA
PS/2 MOUSE
MAC
SUN
PS/2
KEYBOARD
SPEAKERS
MIC
BLACK BOX
724- 746-5500
F
L
K
J
I
H
G
E
D
C
B
A
POWERFAIL
SELECTED
POWER
ABCDEFGH I JKLMN
KV150A-R2
KV155A
KV160A-R2
KV162A
KV170RA
System
Page 2

THE SERVSWITCH™ FAMILY
1
Welcome to the ServSwitch Family!
Thank you for purchasing a BLACK BOX®ServSwitch™Brand KVM switch! We appreciate your
business, and we think you’ll appreciate the many ways that your new ServSwitch
keyboard/video/mouse switch will save you money, time, and effort.
*
Our ServSwitch family is all about breaking away from the traditional, expensive model of
computer management and display. You know, the one-size-fits-all-even-if-it-doesn’t model that
says, “One computer gets one dedicated monitor or user station, no more, no less.” Why not a
single user station (monitor, keyboard, and mouse) for multiple computers—even computers of
different platforms? Why not a pair of user stations, each of which can control multiple
computers? Why not many monitors or user stations for the same computer? Why not access or
display any of your computers, anywhere in the world, with any of your monitors or user stations?
With our ServSwitch products, there’s no reason why not. We carry a broad line of robust
solutions for all these applications:
• Do you have just two PCs, and need an economical alternative to keeping two monitors,
keyboards, and mice on your desk? Or do you need to share dozens of computers, including a
mix of IBM
®
PC, RS/6000®, Apple®Macintosh®, Sun Microsystems®, and SGI®compatibles
among multiple users with different access levels?
• Do you have to send video from one computer to two different local monitors? Or do you
need to send video from multiple computers to dozens of monitors both near and far?
• Does your switch have to sit solidly on a worktable and use regular everyday cables? Or does it
have to be mounted in an equipment rack and use convenient many-to-one cables?
No matter how large or small your setup is, no matter how simple or how complex, we’re
confident we have a ServSwitch system that’s just right for you.
The ServSwitch™ family from Black Box—the one-stop answer for all your KVM-switching
needs!
*
(continued on next page)
Page 3

SERVSWITCH™ MULTI
2
This manual will tell you all about your new ServSwitch Multi™, including how to install,
operate, and troubleshoot it. For an introduction to the ServSwitch Multi, see Chapter 2. The
ServSwitch Multi product codes covered in this manual are:
KV150A-R2
KV155A
KV160A-R2
KV162RA
KV170RA
This manual also includes information about the accessories with these product codes (each
comes with its own installation guide if ordered separately):
KV1601C KV1608C-R2 KV2500C
KV1602C KV1609C KV2550C-R2
KV1603C KV1701C RMK19L
KV1604C KV1702C RMK19LE
KV2000C
TRADEMARKS USED IN THIS MANUAL
BLACK BOX and the logo are registered trademarks, and ServSwitch and ServSwitch Multi are trademarks,
of Black Box Corporation.
Apple, ImageWriter, LaserWriter, Mac, and Macintosh are registered trademarks of Apple Computer, Inc.
IBM, PC/AT, PS/2, RISC System/6000, and RS/6000 are registered trademarks, and PC/XT is a trademark, of
International Business Machines Corporation.
Microsoft, HyperTerminal, IntelliMouse, and Windows are registered trademarks or trademarks of Microsoft
Corporation in the United States and/or other countries.
Sun and Sun Microsystems are registered trademarks of Sun Microsystems, Inc. in the United States and other
countries.
Any other trademarks mentioned in this manual are acknowledged to be the property of the trademark owners.
Page 4

FCC, IC, AND NOM STATEMENTS
3
FEDERAL COMMUNICATIONS COMMISSION AND INDUSTRY CANADA
RADIO-FREQUENCY INTERFERENCE STATEMENTS
This equipment generates, uses, and can radiate radio frequency energy and if not installed and used properly,
that is, in strict accordance with the manufacturer’s instructions, may cause interference to radio
communication. It has been tested and found to comply with the limits for a Class A computing device in
accordance with the specifications in Subpart J of Part 15 of FCC rules, which are designed to provide
reasonable protection against such interference when the equipment is operated in a commercial
environment. Operation of this equipment in a residential area is likely to cause interference, in which case the
user at his own expense will be required to take whatever measures may be necessary to correct the
interference.
Changes or modifications not expressly approved by the party responsible for compliance could void the user’s
authority to operate the equipment.
This digital apparatus does not exceed the Class A limits for radio noise emission from digital apparatus set out in the Radio
Interference Regulation of Industry Canada.
Le présent appareil numérique n’émet pas de bruits radioélectriques dépassant les limites applicables aux appareils numériques
de la classe A prescrites dans le Règlement sur le brouillage radioélectrique publié par Industrie Canada.
INSTRUCCIONES DE SEGURIDAD (Normas Oficiales Mexicanas Electrical-Safety Statement)
1. Todas las instrucciones de seguridad y operación deberán ser leídas antes de que el aparato eléctrico sea
operado.
2. Las instrucciones de seguridad y operación deberán ser guardadas para referencia futura.
3. Todas las advertencias en el aparato eléctrico y en sus instrucciones de operación deben ser respetadas.
4. Todas las instrucciones de operación y uso deben ser seguidas.
5. El aparato eléctrico no deberá ser usado cerca del agua—por ejemplo, cerca de la tina de baño, lavabo,
sótano mojado o cerca de una alberca, etc..
6. El aparato eléctrico debe ser usado únicamente con carritos o pedestales que sean recomendados por el
fabricante.
7. El aparato eléctrico debe ser montado a la pared o al techo sólo como sea recomendado por el fabricante.
8. Servicio—El usuario no debe intentar dar servicio al equipo eléctrico más allá a lo descrito en las
instrucciones de operación. Todo otro servicio deberá ser referido a personal de servicio calificado.
9. El aparato eléctrico debe ser situado de tal manera que su posición no interfiera su uso. La colocación del
aparato eléctrico sobre una cama, sofá, alfombra o superficie similar puede bloquea la ventilación, no se
debe colocar en libreros o gabinetes que impidan el flujo de aire por los orificios de ventilación.
10. El equipo eléctrico deber ser situado fuera del alcance de fuentes de calor como radiadores, registros de
calor, estufas u otros aparatos (incluyendo amplificadores) que producen calor.
11. El aparato eléctrico deberá ser connectado a una fuente de poder sólo del tipo descrito en el instructivo de
operación, o como se indique en el aparato.
Page 5

SERVSWITCH™ MULTI
4
12. Precaución debe ser tomada de tal manera que la tierra fisica y la polarización del equipo no sea
eliminada.
13. Los cables de la fuente de poder deben ser guiados de tal manera que no sean pisados ni pellizcados por
objetos colocados sobre o contra ellos, poniendo particular atención a los contactos y receptáculos donde
salen del aparato.
14. El equipo eléctrico debe ser limpiado únicamente de acuerdo a las recomendaciones del fabricante.
15. En caso de existir, una antena externa deberá ser localizada lejos de las lineas de energia.
16. El cable de corriente deberá ser desconectado del cuando el equipo no sea usado por un largo periodo de
tiempo.
17. Cuidado debe ser tomado de tal manera que objectos liquidos no sean derramados sobre la cubierta u
orificios de ventilación.
18. Servicio por personal calificado deberá ser provisto cuando:
A: El cable de poder o el contacto ha sido dañado; u
B: Objectos han caído o líquido ha sido derramado dentro del aparato; o
C: El aparato ha sido expuesto a la lluvia; o
D: El aparato parece no operar normalmente o muestra un cambio en su desempeño; o
E: El aparato ha sido tirado o su cubierta ha sido dañada.
Page 6

TABLE OF CONTENTS
5
Contents
Chapter Page
1. Specifications .......................................................................................................................................... 10
2. Introduction ........................................................................................................................................... 14
2.1 Overview .......................................................................................................................................... 14
2.2 Features and Benefits ...................................................................................................................... 15
2.3 A Typical Application ...................................................................................................................... 16
2.4 Limitations and Restrictions ........................................................................................................... 17
2.5 Safety Precautions ........................................................................................................................... 18
2.6 The System and Its Components ................................................................................................... 18
2.6.1 The Complete ServSwitch Multi Package and Other Components You’ll Need .............. 18
2.6.2 Rackmounting the ServSwitch Multi (Optional) ............................................................... 19
2.6.3 Descriptions of the ServSwitch Multi Base Unit and MX and Their Components .......... 20
2.6.4 Descriptions of the ServSwitch Multi EXP and SB and Their Components ..................... 23
2.6.5 Descriptions of the ServSwitch Multi Hub and Its Components ....................................... 26
3. Installing User-Interface Cards, User Cables, and Console Devices ................................................... 27
3.1 Connecting Local-Console Equipment to a Base Unit or MX ..................................................... 27
3.2 Installing User-Interface Cards in a ServSwitch Multi ................................................................. 28
3.3 Connecting User Cables and Console Equipment to Your User Cards ....................................... 30
3.3.1 For IBM Style Keyboard and Mouse .................................................................................... 31
3.3.2 For Apple Macintosh Style Keyboard and Mouse ............................................................... 32
3.3.3 For Sun Microsystems Keyboard and Mouse ...................................................................... 33
3.3.4 Connecting Non-Multisync Monitors .................................................................................. 34
3.3.5 Connecting Dual Monitors (UICD Only) ........................................................................... 35
4. Installing CPU-Interface Cards, Server Cables, and Computers ......................................................... 37
4.1 Setting the Jumpers to Configure the Video-Output Type .......................................................... 37
4.2 Setting the DIP Switch .................................................................................................................... 39
4.2.1 Configuring Video Options .................................................................................................39
4.2.2 Setting the Keyboard/Mouse-Inactivity Timeout ............................................................... 40
4.2.3 Setting the Keyboard Translation (Mapping) for Macintosh Computers ........................ 40
4.3 Installing CPU-Interface Cards in a ServSwitch Multi .................................................................. 41
4.4 Connecting the Server Cables and Computer Equipment .......................................................... 43
4.4.1 For IBM PS/2 or PC/AT Compatible Computers .............................................................. 44
4.4.2 For Apple Macintosh Compatible Computers .................................................................... 45
4.4.3 For Sun Microsystems Compatible Computers .................................................................. 46
4.4.4 For RS/6000 and SGI Compatible Computers ................................................................... 47
Page 7

SERVSWITCH™ MULTI
6
Contents (cont’d)
Chapter Page
5. Installing Management and Serial Control Cards and Associated Equipment .................................. 48
5.1 Overview of the Cards ..................................................................................................................... 48
5.2 The Cards and Cables Illustrated ................................................................................................... 49
5.3 Installing the Cards ......................................................................................................................... 50
5.4 Attaching Terminals to the Serial Control Card ........................................................................... 51
6. Planning and Installing an Expanded System (Optional) .................................................................. 52
6.1 Placing the ServSwitch Multi .......................................................................................................... 54
6.2 Determining Where to Install Cards and Attach Equipment ...................................................... 56
6.3 Configuring Your Expansion Cards ............................................................................................... 58
6.3.1 Setting the Transmit Card’s Unit-Address DIP Switch ....................................................... 58
6.3.2 Setting the Distance Jumpers on the Transmit and Receive Cards ................................... 60
6.4 Installing Your Expansion Cards .................................................................................................... 62
6.5 Installing Your Expansion Cables .................................................................................................. 63
6.6 Inspecting Your Expanded System ................................................................................................. 63
7. The ServSwitch Multi Hub ..................................................................................................................... 64
7.1 Overview .......................................................................................................................................... 64
7.2 Features and Benefits ...................................................................................................................... 66
7.3 Installing the Hub ........................................................................................................................... 66
7.4 The Functions of the Hub’s LEDs .................................................................................................. 70
7.5 The Functions of the Hub’s LCD Panel and Pushbuttons ........................................................... 71
7.5.1 The Idle Display Screen ....................................................................................................... 71
7.5.2 The Contrast Screen ............................................................................................................. 72
7.5.3 The Chassis ID and Change ID Screens .............................................................................. 72
7.5.4 The Installed Modules and Module Details Screens .......................................................... 73
7.5.5 The System Status and Status Details Screens .................................................................... 73
7.5.6 The Serial Port and Edit Mode Screens .............................................................................. 74
7.5.7 The Link Status, Select Slot, and Select Port Screens ........................................................ 74
7.5.8 The Language and Change Language Screens .................................................................. 75
7.6 Flash Upgrading .............................................................................................................................. 75
7.7 Sample System Configurations ....................................................................................................... 76
7.7.1 A 16 x 128 Matrix ................................................................................................................. 76
7.7.2 A 16 x 384 Matrix ................................................................................................................. 77
7.7.3 A 32 x 256 Matrix ................................................................................................................. 78
Page 8

TABLE OF CONTENTS
7
Chapter Page
8. Operation ............................................................................................................................................... 79
8.1 Basic Operation ............................................................................................................................. 79
8.2 Keyboard Control .......................................................................................................................... 81
8.2.1 Keystroke Notation ............................................................................................................. 81
8.2.2 Keyboard-Based Switching ..................................................................................................81
8.3 Multiuser Operation ...................................................................................................................... 82
8.4 Multiplatform Keyboard Mapping (Character Translation) ...................................................... 84
8.5 Audio and Serial Functions (Audio Cables Only) ....................................................................... 89
8.6 Channel Scanning ......................................................................................................................... 90
8.7 Broadcast Mode ............................................................................................................................. 91
8.8 Follow Mode ................................................................................................................................... 92
8.9 Swap Mode...................................................................................................................................... 92
8.10 Privacy Mode .................................................................................................................................. 92
8.11 Command Forwarding .................................................................................................................. 93
8.12 Choosing an Alternate Command-Mode Hotkey ........................................................................ 93
8.13 Upgrading Card/Module Firmware Through Consoles’ Serial Ports ....................................... 94
8.14 Overriding the Settings of a CPU-Interface Card’s DIP Switches ............................................... 98
8.15 Other Commands: System Control and Maintenance ................................................................ 99
9. Using the On-Screen Display (UICD Consoles Only) ....................................................................... 101
9.1 Display Overview .......................................................................................................................... 101
9.1.1 Features .............................................................................................................................. 101
9.1.2 Logging In and Out of the System ................................................................................... 101
9.2 The On-Screen Menus ................................................................................................................ 102
9.2.1 The Channel-List Menu .................................................................................................... 102
9.2.2 The User-List Menu (Administrator Only) ..................................................................... 103
9.2.3 The User/Administrator-Controls Menu ........................................................................ 104
9.2.3.A Scanning ............................................................................................................... 104
9.2.3.B Menu Activation ................................................................................................... 104
9.2.3.C Switch Alt. User Module ...................................................................................... 105
9.2.3.D Control Alt. User Module ................................................................................... 105
9.2.4 The Command-Line Entry Window .................................................................................. 106
9.3 Administrator Functions in the Channel-List and User-List Menus (Administrator Only) ..... 107
9.3.1 Channel-List Menu Functions ........................................................................................... 107
9.3.1.A Adding New Computer-Channel Configurations ............................................... 107
9.3.1.B Editing Computer-Channel Configurations ........................................................ 108
9.3.1.C Deleting Computer-Channel Configurations ..................................................... 108
9.3.2 User-List Menu Functions .................................................................................................. 110
9.3.2.A Administrator Setup ............................................................................................. 110
9.3.2.B Adding New User Profiles .................................................................................... 110
9.3.2.C Editing User Profiles ............................................................................................. 110
9.3.2.D Deleting User Profiles .......................................................................................... 110
9.3.2.E Setting Users’ Access Privileges ............................................................................ 111
Page 9

SERVSWITCH™ MULTI
8
Contents (cont’d)
Chapter Page
9. Using the On-Screen Display (continued)
9.4 Administrator Controls (Administrator Only) .......................................................................... 112
9.4.1 Broadcasting (Enable/Disable Broadcast Mode) ........................................................... 112
9.4.2 Confirm Deletes (Enable/Disable Delete Confirmation) .............................................. 112
9.4.3 System Configuration (Configure System Functions) .................................................... 112
9.4.3.A Chassis Number ................................................................................................... 112
9.4.3.B Command Key Sequence .................................................................................... 113
9.4.3.C Menu Activation Key Sequence .......................................................................... 113
9.4.3.D Remote Commands ............................................................................................. 113
9.4.3.E Remap Windows Keys .......................................................................................... 113
9.4.3.F Standalone RSP .................................................................................................... 113
9.4.3.G Follow/Swap Feature Status ............................................................................... 113
9.4.3.H Card Address for Dual-Monitor Support............................................................ 113
9.4.4 Configuration Control (Transfer Configuration Settings) ............................................. 114
9.5 Using the On-Screen Display with a Non-Multisync Monitor ................................................... 114
10. Using Management and Serial Control Cards .................................................................................... 115
10.1 Addressing Terminals on the Serial Control Card ................................................................... 115
10.2 Getting Started: The Options Screen ........................................................................................ 116
10.3 The Main On-Screen Menus ..................................................................................................... 117
10.3.1 The Channel-List Menu ................................................................................................. 117
10.3.1.A Functions ........................................................................................................ 117
10.3.1.B Searching the Channel List ........................................................................... 118
10.3.1.C Crossloading the Channel List ...................................................................... 118
10.3.2 The Administrator-Controls Menu ............................................................................... 118
10.3.3 The Open-Session Menu ............................................................................................... 119
10.3.3.A What Is “Opening a Session”? ........................................................................ 119
10.3.3.B How to Open a Session .................................................................................. 119
10.3.3.C
How To Make Your Session Persistent and Scrollable (Using History Mode)
.. 120
10.3.3.D How to Close a Session .................................................................................. 120
10.4 Using the System Management Tools ....................................................................................... 121
10.4.1 Display Chassis Configuration ....................................................................................... 122
10.4.2 Display Flash ROM Status .............................................................................................. 123
10.4.3 Download Local to Remote Flash ROM (Crossload Firmware Between Cards) ........ 124
10.4.4 Download Serial Port to Flash ROM (Download Firmware to a Card) ...................... 125
10.4.5 Search for Connected Chassis ....................................................................................... 126
10.4.6 Set Date and Time ......................................................................................................... 126
10.4.7 Transfer Security Log ..................................................................................................... 127
10.4.8 Transfer Channel List .................................................................................................... 128
10.4.9 Main Menu Serial Port Enable/Disable ....................................................................... 128
10.5 Using the Security Monitor ....................................................................................................... 129
10.5.1 The Active User List ....................................................................................................... 130
10.5.2 The Alert Message Window ........................................................................................... 130
10.5.3 The Log Window ............................................................................................................ 131
Page 10

TABLE OF CONTENTS
9
Chapter Page
11. Troubleshooting ................................................................................................................................... 132
11.1 Common Problems .................................................................................................................... 132
11.1.1 A ServSwitch Multi’s Front-Panel LEDs Are Blinking ................................................ 132
11.1.2 The LEDs for a Transmit-Card or Receive-Card Channel Do Not Light .................. 132
11.1.3 A Channel Cannot Be Selected ................................................................................... 132
11.1.4 A Computer Channel Can Be Selected, But You’re Not Getting
Any Video From the Computer ................................................................................ 133
11.1.5 Computer Video Can Be Seen But Is Distorted, Discolored, Out of Sync, or
Otherwise Degraded ................................................................................................... 133
11.1.6 Video Can Be Seen But Is Superimposed on Another Computer’s Video ............... 134
11.1.7 Video Blanks Out Unexpectedly ................................................................................. 134
11.1.8 The On-Screen Display Doesn’t Appear ..................................................................... 134
11.1.9 An RS/6000 Keyboard Is Not Responding ................................................................. 134
11.1.10 A Keyboard Doesn’t Work ............................................................................................ 134
11.1.11 A Mouse Doesn’t Work ................................................................................................. 135
11.1.12 A Serial Device Doesn’t Work ...................................................................................... 135
11.1.13 A Pair of Speakers/Headphones Doesn’t Work ......................................................... 136
11.1.14 A Microphone Doesn’t Work ....................................................................................... 136
11.2 Calling Black Box ....................................................................................................................... 137
11.3 Shipping and Packaging ............................................................................................................ 137
Appendix A: Configuration Charts ............................................................................................................. 138
Appendix B: Problem Report ..................................................................................................................... 146
Appendix C: DIP-Switch Settings and Their Numeric Equivalents .......................................................... 147
Appendix D: Cables ..................................................................................................................................... 149
D.1 CPU (Server) Cables ................................................................................................................... 149
D.2 User Cables .................................................................................................................................. 150
D.3 Adapters ....................................................................................................................................... 151
Appendix E: Making Nonstandard Serial Connections ............................................................................ 152
Appendix F: Rackmounting the Base Unit or EXP ................................................................................... 153
Page 11

SERVSWITCH™ MULTI
10
1. Specifications
Compliance — FCC Part 15 Subpart J Class A, IC Class/classe A
Standards — VGA, SVGA, XGA, XGA-2, Macintosh, or Sun video; can also carry
RS/6000, SGI, or RGsB-on-BNC video with the proper adapters
Interfaces — Base Unit (KV150A-R2) and MX (KV155A) only: On front panel:
Serial port and serial mouse port: EIA/TIA RS-232 pinned to TIA-574;
VGA port: VGA;
PS/2 keyboard and PS/2 mouse ports: IBM PS/2 peripheral input;
Mac port: ADB;
Sun port: Sun peripheral input;
Mic port: Standard mono audio input;
Speakers port: Standard stereo audio output;
Hub (KV170RA) only:
Front-mounted serial port (not currently enabled): EIA/TIA RS-232
proprietarily pinned on RJ-45;
On CPU-Interface, User-Interface, and Expansion Cards:
Proprietary composites of:
• IBM PC/AT, IBM PS/2, ADB, or Sun keyboard;
• RS-232, PS/2, ADB, or Sun mouse;
• Video (standards listed above);
• Mono audio; and
• Stereo audio
Resolution — At up to 90 Hz: Up to 1280 x 1024 noninterlaced;
At up to 60 Hz: Up to 1600 x 1280 noninterlaced;
Maximum video bandwidth is 155 MHz
Protocol — RS-232: Asynchronous
Data Format — RS-232 connections to CPU and User Cards: Transparent to data format;
RS-232 connections to Serial Control Cards: 7 or 8 data bits; even, odd, or
no parity; 1 or 2 stop bits (user-selectable)
Data Rate — RS-232 connections to CPU and User Cards: Transparent to data rates
up to 9600 bps with hardware flow control or up to 115.2 kbps with
software flow control;
RS-232 connections to Serial Control Cards: 19,200, 9600, 4800, 2400, or
1200 bps (user-selectable)
Flow Control — RS-232: Hardware (RTS/CTS), software (X-ON/X-OFF), or none:
Connections to CPU and User Cards: Autosensed;
Connections to Serial Control Cards: User-selectable
Audio Response — Microphone input and stereo output: From 20 Hz to 20 kHz at ±3 dB
Page 12

CHAPTER 1: Specifications
11
Maximum Distance — 20 ft. (6.1 m) to any attached keyboard, monitor, and mouse;
30 ft. (9.1 m) to any attached CPU;
500 ft. (152.4 m) of total cabling between the highest-level cascaded
ServSwitch Multi (the one to which the monitor/keyboard/mouse
stations are attached) and the lowest-level ServSwitch Multi (the one to
which the CPUs are attached)
User Controls — For Hub (KV170RA):
(4) Front-mounted menu-control pushbuttons;
(1) Rear-mounted ON/OFF rocker switches (one for each of the two
power-supply modules);
On Transmit Modules (KV1701C): (3) 6-position distance DIP
switches;
On Receive Modules (KV1702C): (3) 2-position distance DIP switches;
For all other models:
Keyboard commands;
(1) Rear-mounted ON/OFF rocker switch;
With KV2550C-R2 installed: On-screen menus;
With KV1608C-R2 installed: Serial management menu;
On Base Unit (KV150A-R2): (12) Port-selection pushbuttons (1 for
each port);
On MX (KV155A): (4) Port-selection pushbuttons (1 for each port);
On CPU-interface cards:
(6) Jumpers for video type;
(1) 8-position DIP switch for various options
Indicators — All front-mounted on all models;
On Base Unit (KV150A-R2):
(1) 2-character display panel (5-x-9-pixel area for each character);
(12) Selected-port LEDs (one for each port);
On MX (KV155A):
(6) LEDs:
(1) Power;
(1) Fail;
(4) Selected port (one for each port);
On EXP (KV160A-R2) and SB (KV162RA):
(30) LEDs:
(1) Power;
(1) Fail;
(14) Selected port (one for each port);
(14) On-line (one for each port);
On Hub (KV170RA):
(1) 4-x-20-character LCD panel;
(2) LEDs: Power and Fail
Page 13

SERVSWITCH™ MULTI
12
Connectors on Chassis — All models have internal card-edge connectors in each of their Card/
Module slots, as well as an IEC 320 male power inlet (KV170RA Hub
has two of these);
Base Unit (KV150A-R2) and MX (KV155A) also have dedicated front-
mounted “local user station” connectors:
(2) DB9 male (one for serial mouse, one for other serial devices);
(1) HD15 female for video;
(2) 6-pin mini-DIN female (one for PS/2 keyboard, one for PS/2
mouse);
(1) 4-pin mini-DIN female for ADB keyboard/mouse;
(1) 8-pin mini-DIN female for Sun keyboard/mouse;
(2) RCA female (one for microphone, one for speakers/headphones);
Hub (KV170RA) also has front-mounted serial port that will be enabled by
future versions of firmware
Cards and Modules — All Cards and Modules have rear-mounted card-edge connectors;
On CPU-Interface Cards (KV2000C): (1) HD44 female;
On User-Interface Cards (KV2500C and KV2550C-R2): (1) HD62 female;
On regular Expansion Cards (KV1601C and KV1602C): (2) HD26 (both
male on KV1601C, both female on KV1602C);
On CAT5 Expansion Cards (KV1603C and KV1604C): (6) RJ-45 female;
On Management Cards (KV1608C-R2): (1) DB9 male;
On Serial Control Cards (KV1609C):(4) RJ-45 female;
On Transmit and Receive Modules for Hub (KV1701C and KV1702C):
(32) RJ-45 female: (16) for video, (16) for keyboard and mouse
Connectors on Cables — See Appendix D
Thermal Dissipation — MX (KV155A): 41 BTU per hour (nominal);
Hub (KV170RA): 1020 BTU per hour (nominal);
All other models: 92 BTU per hour (nominal)
MTBF — 135,000 powered-on-hours (POH)
Maximum Altitude — 12,000 ft. (3657 m)
Temperature Tolerance — Operating: 41 to 104˚F (5 to 40˚C);
Storage: –4 to +122˚F (–20 to +50˚C)
Humidity Tolerance — Up to 90% noncondensing
Enclosure — Steel
Page 14

CHAPTER 1: Specifications
13
Power — Input: 90 to 240 VAC at 47 to 63 Hz from utility-power (mains) outlet,
through included detachable power cord and IEC 320 male inlet, to
internal transformer:
Hub (KV170RA): Dual redundant input (load is balanced between
power supplies);
All other models: Single input;
Consumption:
MX (KV155A): 12 watts (nominal);
Hub (KV170RA): 300 watts (nominal);
All other models: 27 watts (nominal)
Size — MX (KV155A): 5.5"H x 8.2"W x 13.6"D (14 x 20.8 x 34.5 cm);
Hub (KV170RA): 15.75"H (9U) x 19"W x 13.5"D (40 x 48.3 x 34.3 cm);
All other models: 5.25"H (3U) x 17.1"W x 13.6"D (13.3 x 43.4 x 34.5 cm)
Weight — Otherwise empty enclosures with only power supply/supplies installed:
MX (KV155A): 13.2 lb. (6 kg);
Hub (KV170RA): 55 lb. (25 kg);
All other models: 18.5 lb. (8.4 kg);
For all models except the Hub, each extra Interface Card, Management
Card, or Serial Control Card adds 0.6 lb. (0.3 kg);
For all models except the Hub, each extra Expansion Card adds 1 lb.
(0.5 kg);
For the Hub, each extra Transmit or Receive Module adds 2.5 lb. (1.1 kg)
Page 15

SERVSWITCH™ MULTI
14
2. Introduction
2.1 Overview
With the ServSwitch Multi™, multiple users at your site can operate sets of IBM®PC compatible, Apple
®
Macintosh®, Sun Microsystems®, and other computers at the same time. Each ServSwitch Multi Expansion
Chassis (product code KV160A-R2)—the preferred “starting” model for mid- to large-scale applications—
supports as many as 14 external connections through plug-in cards. You can connect computers,
keyboard/monitor/mouse/etc. user stations, terminals, and other ServSwitch Multi units to the system through
those cards. Front-panel LEDs show which of the Chassis’ card slots is “on line” (has a card installed that is
connected to powered equipment) and, of these, which slots are currently selected by system users.
ServSwitch Multi Base Units (KV150A-R2) are like the Expansion Chassis, but are more suited for use in
small-scale applications such as those involving a single Multi unit that doesn’t require frequent
reconfiguration. In the Base Units, one of the plug-in card slots is replaced with a “local console module,” a
user-station port with dedicated front-panel connectors for a nearby keyboard, monitor, mouse, and other
peripherals. (Unfortunately, the ServSwitch Multi’s on-screen display menus can’t be used with this local
console.) The Base Unit has front-panel pushbuttons for card-slot selection, LEDs that show which slots are
currently selected by system users, and a two-character alphanumeric display that shows which port is currently
selected by the local console.
The ServSwitch Multi MX (KV155A) is a smaller version of the Base Unit with four card slots plus a local
console, without the alphanumeric display. It only supports two video/control pathways instead of the usual
four. It’s intended for desk- or countertop use only in individual or local-cluster applications.
The ServSwitch Multi SB (KV162RA) is virtually identical to the Expansion Chassis, except that it supports
eight video/control pathways instead of the usual four, so that users can independently access as many as eight
of the attached computers.
The ServSwitch Multi Hub (KV170RA) is designed to be a centerpiece for the very biggest applications. It has
nine slots exclusively for special concentrated Transmit and Receive Modules (KV1701C and KV1702C
respectively) that have 16 ports each. Using the Hub can greatly reduce the number of regular Expansion
Cards and expansion cables needed for Multi systems with large numbers of computers and users. The Hub can
be controlled with front-mounted pushbuttons and a 4-x-20-character display.
Page 16

CHAPTER 2: Introduction
15
2.2 Features and Benefits
Here are some of the ServSwitch Multi’s features:
• Automatic booting of all attached computers. ServSwitch Multi’s AutoBoot feature boots all of your
attached computers during initial power-up or after a power failure. All computers are booted transparently
and simultaneously, eliminating the need for operator intervention. Computers may be powered up one at
a time or all at once.
• Built-in computer-port scanning. You can use the ServSwitch Multi’s built-in scanning feature to
automatically monitor or scan all of your attached computer channels sequentially without intervention.
When the ServSwitch Multi detects keyboard or mouse activity, scanning is suspended until all activity stops.
Scanning then resumes with the next computer in sequence. The “dwell time” (the length of time each
computer channel’s video output remains on the screen) is configurable and can be changed at any time.
• Multiplatform support. The ServSwitch Multi adds multiplatform capabilities to your system by
simultaneously supporting any combination of IBM PC compatible, Mac
®
, Sun®, IBM RISC System/6000
®
(RS/6000®), Silicon Graphics®(SGI®), or Hewlett-Packard®(HP®) computers. Now you can switch easily
among your PCs, Mac
®
computers, and workstations with the push of a button. Use any type of keyboard
and mouse to access any computer in the system. For example, a PC keyboard and mouse can operate a Sun
workstation almost as easily as a Sun keyboard and mouse will operate an attached PC.
• Multiuser support. Instead of just one user having access to the attached computers, the ServSwitch Multi
allows up to two, four, or eight users simultaneous access to different computers in the system. If two or
more users need access to the same computer, they can “share” access to it through the switch. “Sharing”
means that multiple users can switch to the same computer at the same time. Everyone can see that
computer’s video, but only one can enter data at any given moment; a timeout scheme is used to arbitrate
user contention for keyboard and mouse control.
• Expansion capability. You can manage even large numbers of computers from a limited number of user
stations by installing expansion transmit and receive cards in multiple ServSwitch Multis, then cabling those
cards together to form a cascaded system. In fact, such a system with one master user station can control
literally thousands of computers this way.
• Multimedia and serial-communication support. With the proper peripheral equipment and cabling, every
user in a ServSwitch Multi system can access and control the attached computer equipment not only
through their dedicated keyboard, mouse, and monitor, but also through a dedicated microphone, stereo
speakers, and/or RS-232 serial port. Modems, serial printers and scanners, and other serial devices are
accessible through the serial port; if you attach a PC to this port, you can view the Switch’s system
configuration or firmware-revision level, or download upgraded firmware into the Switch.
• On-screen management and multilevel security. If you install User Cards with On-Screen Display (our
product code KV2550C-R2) in your system, you can use a variety of functions through on-screen windows:
Name your servers for easy recognition, then select them from a pop-up menu; edit channel names and
addresses; scan; broadcast; or even implement password-based security. With the security options, you can
assign video only, video/keyboard/mouse, or full access privileges to users, as well as setting an inactivity
timeout.
• Modules “Keep Alive” with interface power. The ServSwitch Multi’s CPU-Interface Card modules have
“Keep Alive” circuitry through which they can draw power from the attached computers if they become
detached from the ServSwitch Multi or if the ServSwitch Multi loses power. Because the modules remain
powered in such an emergency, your computers don’t lock up needlessly.
Page 17

SERVSWITCH™ MULTI
16
• Modules are hot-swappable. Because the ServSwitch Multi is a component-based switch, all of its modules
are field-replaceable plug-in boards which can be added or replaced without disassembling or even
powering down the system. This “hot-swap” or “hot-plug” capability makes installing, configuring, and
maintaining the unit much simpler.
• Firmware is flash-upgradable. You can update the Switch’s firmware without having to power down the
Switch or remove any installed Cards. The latest firmware is always available through our Web site,
www.blackbox.com.
• Rackmountable. All ServSwitch Multi models except the MX can be mounted in a standard 19" equipment
rack. The SB and Hub models ship ready to mount; the Base Unit and EXP models can be mounted with
our optional RMK19L and RMK19LE rackmount kits respectively (see Appendix F).
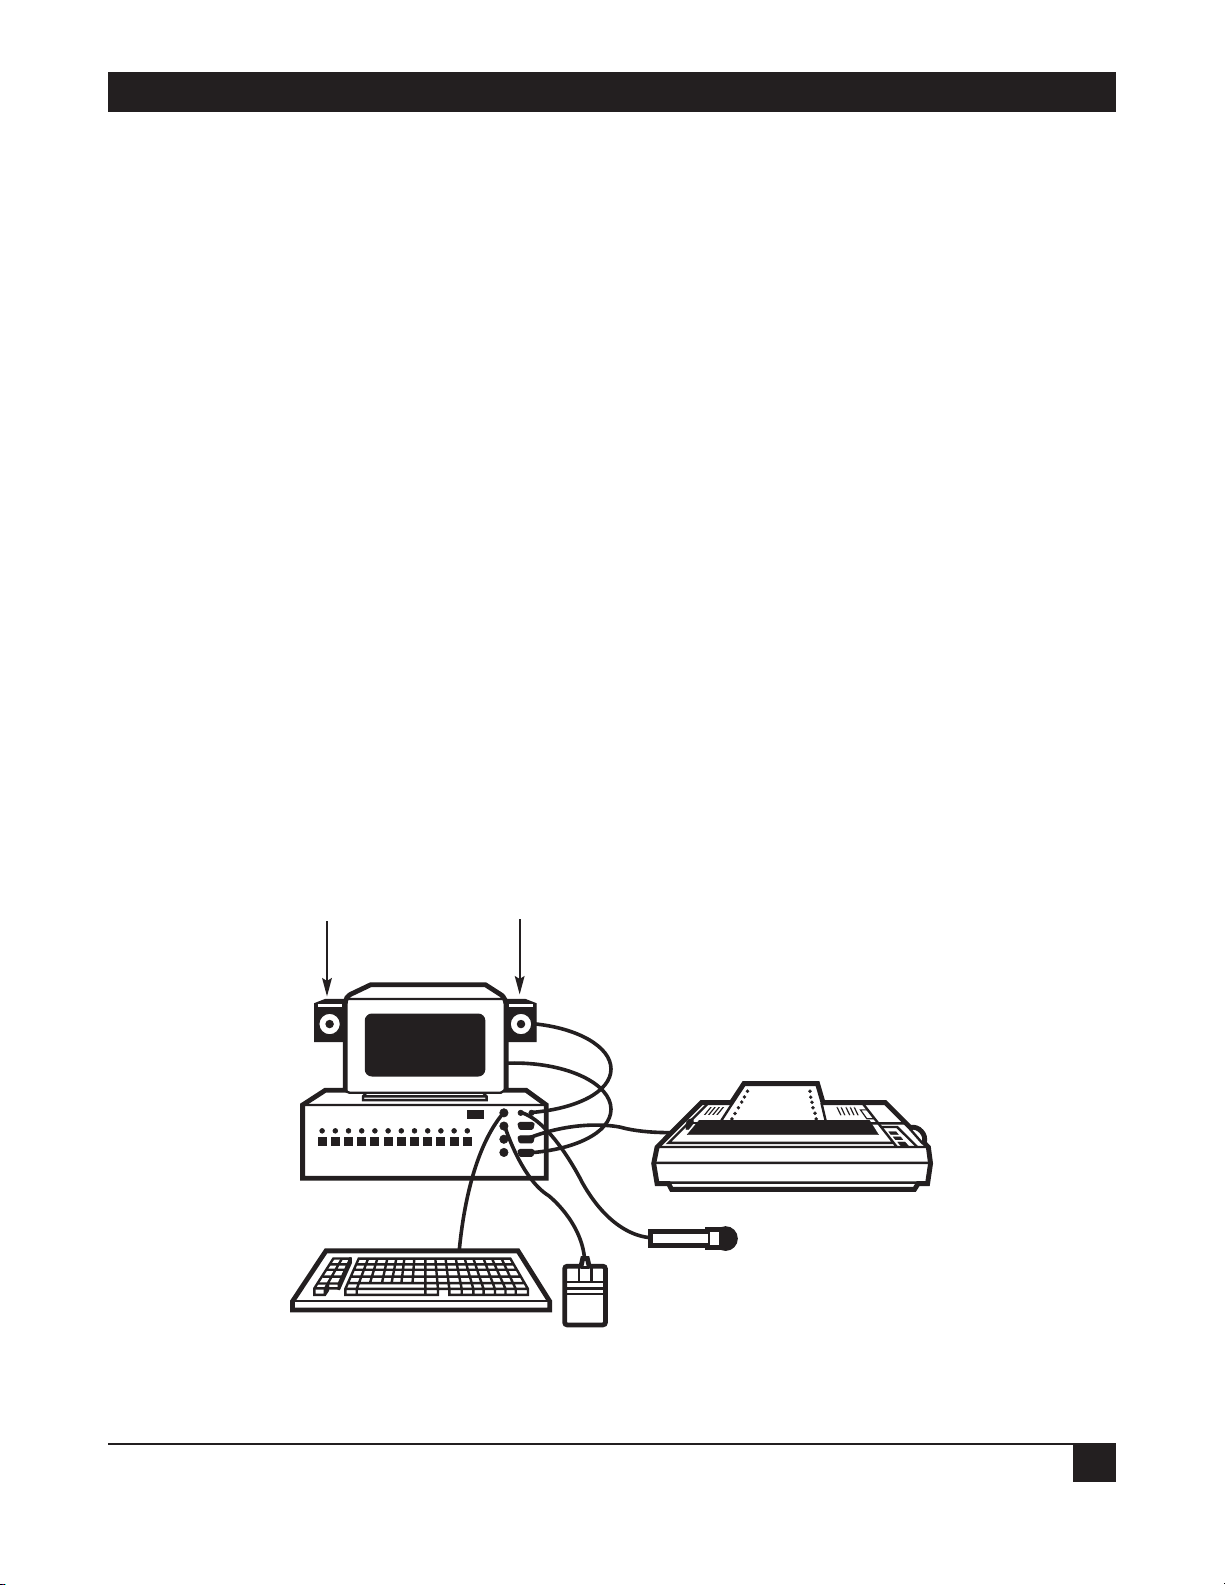
2.3 A Typical Application
Figure 2-1 shows a very basic but typical application for the ServSwitch Multi (a Base Unit, in this case):
Figure 2-1. A three-computer, three-user-station ServSwitch Multi system.
* All monitors are multisync types because each shared monitor in a ServSwitch Multi system must be capable of
synchronizing with the video output of any attached computer.
† If you use Macintosh console equipment in a multiplatform system, you must use a PC-style serial mouse. This is
because, although the remapping functions of the ServSwitch Multi (see Section 8.4) make it possible for a Mac
keyboard attached to the Switch to emulate the functions of a PC or Sun keyboard, at the time of this writing there is
no way for a one-button Apple mouse attached to the Switch to emulate a mouse with more buttons.
Secondary
consoles
(user
stations)
Have access to
each attached
computer
Wall
plug
Local console (user station)
This primary console not only has access to
each attached computer, but also has control
over the Base Unit’s front-panel pushbuttons.
Mac† keyboard, mouse, multisync*
monitor, and external modem
Sun keyboard, mouse, multisync* monitor,
microphone, speakers, and serial printer
PC keyboard, mouse, multisync*
monitor, microphone, and headphones
Channel A:
IBM compatible PC
Channel C: Sun
workstation or server
Channel B: Macintosh
compatible computer
ServSwitch
Multi Base
Unit (rear
panel
shown)
Page 18

CHAPTER 2: Introduction
17
2.4 Limitations and Restrictions
Keep these things in mind as you plan, design, install, and operate your ServSwitch Multi system:
• The ServSwitch Multi supports these models of mice:
– Microsoft serial or PS/2 mouse (including the IntelliMouse
®
);
– Microsoft OEM style serial mouse;
– Logitech
®
Mouseman®and Trackman®;
– IBM PS/2 style mouse;
– Kensington
®
PS/2 or ADB mouse;
– Mouse Systems (PC Mouse);
– Sun Microsystems Laser mouse; and
– Apple ADB mouse.
Other manufacturers’ mice generally operate with the ServSwitch Multi, but we cannot guarantee that any
given mouse will. If you experience problems using an untested mouse, contact Black Box Technical
Support with the manufacturer and model number of the mouse.
• Monitors at all user stations must be capable of synchronizing with any attached computer’s video rate. If
you are unsure whether your monitors have multisync capability, consult the monitor documentation or
contact your dealer.
• Use only Black Box supplied cable with the ServSwitch Multi. Poorly constructed or miswired cabling will
diminish video quality and could possibly damage your equipment.
• The ServSwitch Multi supports all externally powered speakers that use 3.5-mm miniplugs. We recommend
that you use powered speakers with the ServSwitch Multi for best performance.
• Use “mono” microphones with 3.5-mm miniplugs with the ServSwitch Multi. Powered microphones are not
recommended; if a computer channel is selected that supplies power to the microphones, the microphone
volume might be muted on that channel.
• The ServSwitch Multi’s CPU and User Cards autosense EIA/TIA RS-232 serial devices using any data format
and hardware, software (“inband”), or no flow control: hardware flow control up to 9600 bps, software or
no flow control up to 115,200 bps. The ServSwitch Multi’s Serial Control Cards support user-configurable
RS-232 connections from 1200 to 19,200 bps using 7 or 8 data bits; even, odd, or no parity; 1 or 2 stop bits;
and hardware, software, or no flow control.
Page 19

SERVSWITCH™ MULTI
18
2.5 Safety Precautions
To avoid potential video or keyboard problems with the ServSwitch Multi, take these precautions:
• If the site has 3-phase AC power, make sure that each ServSwitch Multi and all of the computers and
monitors attached to it are on the same phase. For best results, they should be on the same circuit.
• Use adapter cables supplied by Black Box only.
To avoid potentially fatal shock and possible damage to equipment, take these precautions as well:
• Do not use 2-wire extension cords with the ServSwitch Multi.
• Test the AC outlets that the monitors and computers are plugged into for proper polarity and grounding.
• Plug the ServSwitch Multi and all monitors and computers into grounded outlets only. If you are plugging
the Switch and any attached equipment into a backup power supply (BPS) or uninterruptible power supply
(UPS), you should plug the Switch, monitor, and computers into the same supply if at all possible.
• With the exception of adding or removing Cards, you should power down the ServSwitch Multi and all
attached computers before you service the unit in any way. Always disconnect the power cord from the unit
when you power it down.
Note that the AC inlet is the ServSwitch Multi’s main disconnect.
All ServSwitch Multi models are rated for input voltages of 110 to 240 VAC and input frequency of 50 or
60 Hz. The ServSwitch Multi Hub (KV170RA) is rated for total load-balanced input current of 7 amps: When
only one power supply is functioning, it will provide all 7 amps, but when both supplies are working, they will
share the load. All other ServSwitch Multi models are rated for 1.6 amps.
2.6 The System and Its Components
2.6.1 THE COMPLETE SERVSWITCH MULTI PACKAGE AND OTHER COMPONENTS YOU’LL NEED
• Each ServSwitch Multi Base Unit (KV150A-R2) and ServSwitch Multi MX (KV155A) is shipped from the
factory with an embedded local-console module, a power cord, and a copy of this manual.
• Each ServSwitch Multi EXP (Expansion Chassis, KV160A-R2) and ServSwitch Multi SB (KV162RA) comes
from the factory with a power cord and a copy of this manual.
• Each ServSwitch Multi Hub (KV170RA) comes from the factory with its two power-supply modules and two
fan assemblies uninstalled. It also comes with two power cords and a copy of this manual.
If you didn’t receive everything, or if anything arrived damaged, call Black Box right away.
In addition, you’ll need other components to build a complete ServSwitch Multi system (contact Black Box
Technical Support if you’re not sure what you’ll need for your application). With the Base Unit, MX, EXP, or
SB, you’ll need some combination of:
• One or more Autosensing CPU-Interface Cards (KV2000C) and one or more 8-foot (2.4-m), 20-foot
(6.1-m), or 30-foot (9.1-m) CPU (Server) Cables to attach servers or other computers to the Switch.
Page 20

CHAPTER 2: Introduction
19
• To attach user stations to the Switch, 1-foot (0.3-m), 10-foot (3-m), or 20-foot (6.1-m) User Cables attached
to additional Universal User-Interface Cards (KV2500C) or User-Interface Cards with On-Screen Display
(KV2550C-R2) as necessary—up to a maximum of:
– one into an MX whose Local Console you’re using;
– two into an MX whose Local Console you’re not using;
– three into a Base Unit whose Local Console you’re using;
– four into an EXP or into a Base Unit whose Local Console you’re not using; or
– eight into an SB.
• In a cascaded multi-Switch system, expansion cables as necessary to connect Switches to each other: KV1600
for 10-foot [3-m] regular expansion cable, KV1600100 for 100-ft. (30.5-m) regular cable, or EYN737MS-MM
for Category 5 expansion cable.
• In order to attach terminals, hubs, routers, or other serially accessed control devices to the Switch, you’ll
need one Serial Control Card (KV1609C) and four Category 5 patch cables (EVMSL05) for every four such
machines, plus a single Management Card (KV1608C-R2) and a DB9 null-modem cable (EYN257H) to
hook up a PC to manage the Serial Control Cards with.
With the Hub you’ll need:
• Several Transmit Modules (KV1701C) and Receive Modules (KV1702C), plus Category 5 expansion cables
(EYN737MS-MM) to connect the Hub to the other Switches in your system.
2.6.2 R
ACKMOUNTING THE SERVSWITCH MULTI (OPTIONAL)
The ServSwitch Multi SB and ServSwitch Multi Hub can be mounted in a standard 19" equipment rack without
any additional hardware. Just match the holes in the protruding ends of the Switch’s faceplate to an
appropriate set of matching holes on your equipment rack, then fasten the assembly to the rack using your own
screws, bolts, or cage nuts (not included).
If you want to mount a ServSwitch Multi Base Unit, you’ll need a ServSwitch Multi Rackmounting Kit
(RMK19L); to mount a ServSwitch Multi EXP, you’ll need the RMK19LE Kit. See Appendix F for instructions
on how to rackmount either of these models.
The ServSwitch Multi MX is not designed to be rackmounted.
Page 21

SERVSWITCH™ MULTI
20
2.6.3 DESCRIPTIONS OF THE SERVSWITCH MULTI BASE UNIT AND MX AND THEIR COMPONENTS
The front panel of a ServSwitch Multi Base Unit (KV150A-R2) or ServSwitch Multi MX (KV155A) has nine
connectors (shown in Figure 2-2), one for each of these peripheral types:
• PS/2 keyboard
• PS/2 mouse
• Serial mouse
• Macintosh (Apple Desktop Bus) mouse and keyboard
• Sun mouse and keyboard
• VGA video
• RS-232 serial-port device
• Microphone
• Speakers
You can use these connectors to attach a keyboard, monitor, and mouse (and optionally a microphone,
speakers, and serial device) to the Switch’s front panel. Any peripherals attached to the front of a Base Unit or
MX together constitute its local console (user station). Through these peripherals, you can access every
computer attached to the Switch. (However, the local console has no on-screen display.)
Figure 2-2. Front panels of the Base Unit (top) and MX (bottom), featuring the local-console connectors.
A B C D E F G H I J K L
A B C D
PS/2
KEYBOARD
PS/2 MOUSE
MAC
MIC SPEAKERS
SERIAL MOUSE
SERIAL PORT
VGASUN
Page 22

CHAPTER 2: Introduction
21
The front panel of the Base Unit has twelve pushbuttons labeled A through L. The front panel of the MX has
four pushbuttons labeled A through D. You can use these buttons to select the active computer for the local
console. The indicator lights (LEDs) over the pushbuttons reflect the type of activity, if any, that is taking place
on each attached computer. The alphanumeric display, located in the upper right-hand corner of the front
panel on the Base Unit only, shows which computer channel is currently selected by the local console. The local
console is the only user station affected by the pushbuttons or whose channel is indicated by the Base Unit’s
alphanumeric display. At Card consoles, which connect to the Base Units and MXs through their rear panels,
you must use either the console keyboard or an on-screen display to select computer channels. As many as one
(on the MX) or three (on the Base Unit) Card consoles can have access, as the local console does, to every
computer on that Switch. (It can be two or four Card consoles if you don’t use the local console at all.) See
Section 8.3 for details.
The first slot on the far left end of the rear panels of the ServSwitch Multi Base Unit and MX (shown in
Figure 2-3) contains the local console’s module; this slot is referred to as “channel N” on the Base Unit and
“channel E” on the MX. On the Base Unit only, there’s an “option slot” next to the local console’s module,
referred to as “channel M.” There is no front-panel LED or pushbutton associated with this slot, and it is best
used for a secondary console or an expansion card. All other slots in either unit may be configured as needed.
Figure 2-3. Rear panels of the Base Unit (top) and MX (bottom) as shipped from the factory.
Local console
module
Option slot
Slots corresponding to lettered channels
Local console
module
Slots corresponding to lettered channels
Page 23
SERVSWITCH™ MULTI
22
Each Base Unit and MX comes with the local console module preinstalled. You will also need at least one
Autosensing CPU-Interface Card (our product code KV2000C) for each computer you plan to attach to the
Switch, as well as one Universal User-Interface Card (KV2500C) or User-Interface Card with On-Screen Display
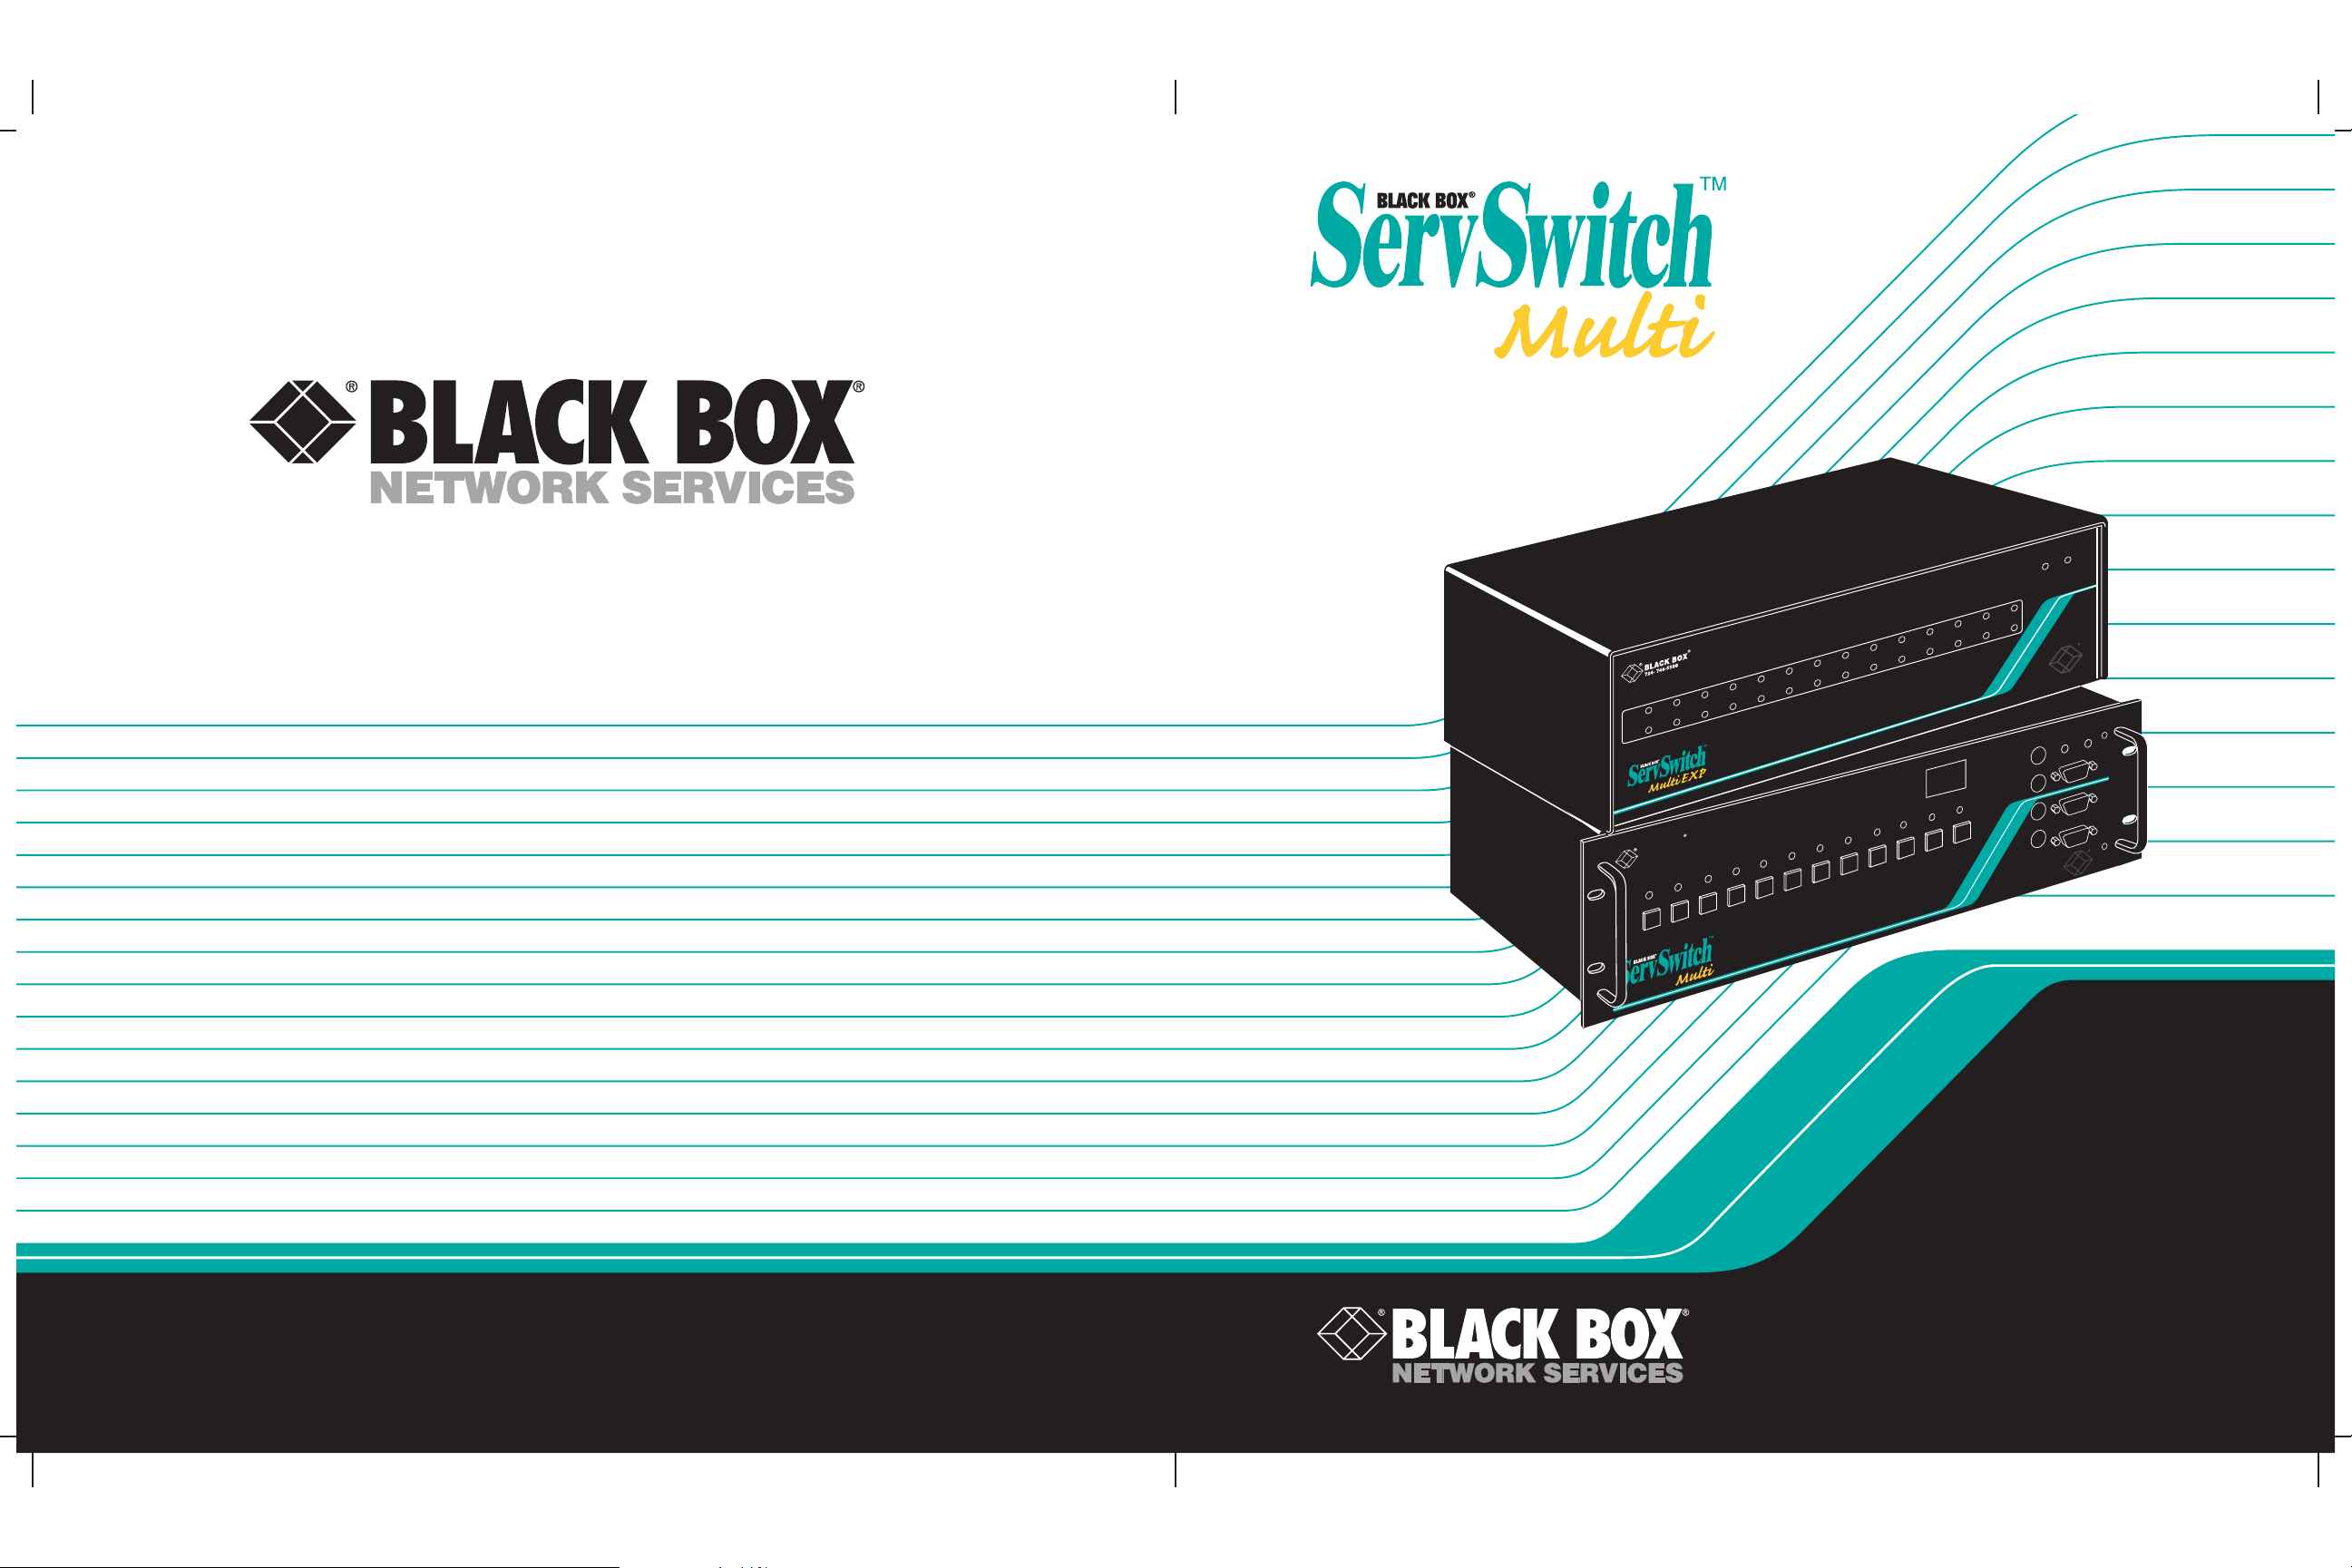
(KV2550C-R2) for each secondary console. The CPU-Interface Card, shown in Figure 2-4, has an HD44 female
connector as a single composite interface for all I/O to and from the attached computer. The User-Interface
Cards, also shown in Figure 2-4, have an HD62 female connector as a single composite interface for all I/O to
and from the attached user station.
Figure 2-4. The ServSwitch Multi’s Interface Cards.
You’ll run an 8-foot (2.4-m), 20-foot (6.1-m), or 30-foot (9.1-m) Server Cable (shown in Figure 2-5) from the
CPU-Interface Card to the attached computer. You’ll run a 1-foot (0.3-m), 10-foot (3-m), or 20-foot (6.1-m)
User Cable (shown in Figure 2-6) from the User-Interface Card to the attached user station. Both Server and
User Cables are available with or without audio and serial components.
Figure 2-5. PC type Server Cable Figure 2-6. PS/2 type User Cable
(KV2040-R2, 8' with audio, shown). (KV2540, 10' with audio, shown).
Besides the regular interfaces, if you’re attaching serially accessed control devices such as terminals, hubs,
bridges, or routers, you’ll need a Management Card (KV1608C-R2) and one or more Serial Control Cards
(KV1609C); see Chapter 5.
Autosensing CPU-
Interface Card
Universal User-
Interface Card
User-Interface Card with
On-Screen Display
Front of
ServSwitch Multi
Rear of
ServSwitch Multi
HD44
female
HD62
female
HD62
female
Page 24

CHAPTER 2: Introduction
23
2.6.4 DESCRIPTIONS OF THE SERVSWITCH MULTI EXP AND SB AND THEIR COMPONENTS
The front panel of a ServSwitch Multi EXP (Expansion Chassis, KV160A-R2) or a ServSwitch Multi SB
(KV162RA), shown in Figure 2-7, has fourteen pairs of channel LEDs, each of which corresponds to a channel
slot in which you can install any kind of ServSwitch Multi Card. The Switch’s front panel also has POWER and
FAIL LEDs.
Figure 2-7. The front panel of an EXP or SB.
There are no pushbuttons and no display on the front panel, because EXPs and SBs do not have local consoles;
they are geared more to be subsidiary expansion units than standalone units, although with a User-Interface
Card installed they can easily perform all of the same keyboard-activated switching and command functions
that Base Units and MXs can.
The rear panels of the ServSwitch Multi EXP and ServSwitch Multi SB look identical to that of the Base Unit
(shown in Figure 2-3 in Section 2.6.3). However, instead of their leftmost slot containing the local module and
their next-to-leftmost slot having no corresponding front-panel indicator, all fourteen of the EXP’s and SB’s
slots are empty, and all of them have a corresponding pair of LEDs on the front panel.
You will need at least one Autosensing CPU-Interface Card (product code KV2000C) for each computer you
plan to attach to the EXP or SB, as well as one Universal User-Interface Card (KV2500C) or User-Interface Card
with On-Screen Display (KV2550C-R2) for each console. These cards and their cables are described in Section
2.6.3 and are shown in Figures 2-4 through 2-6 on the previous page. You will also need at least one regular
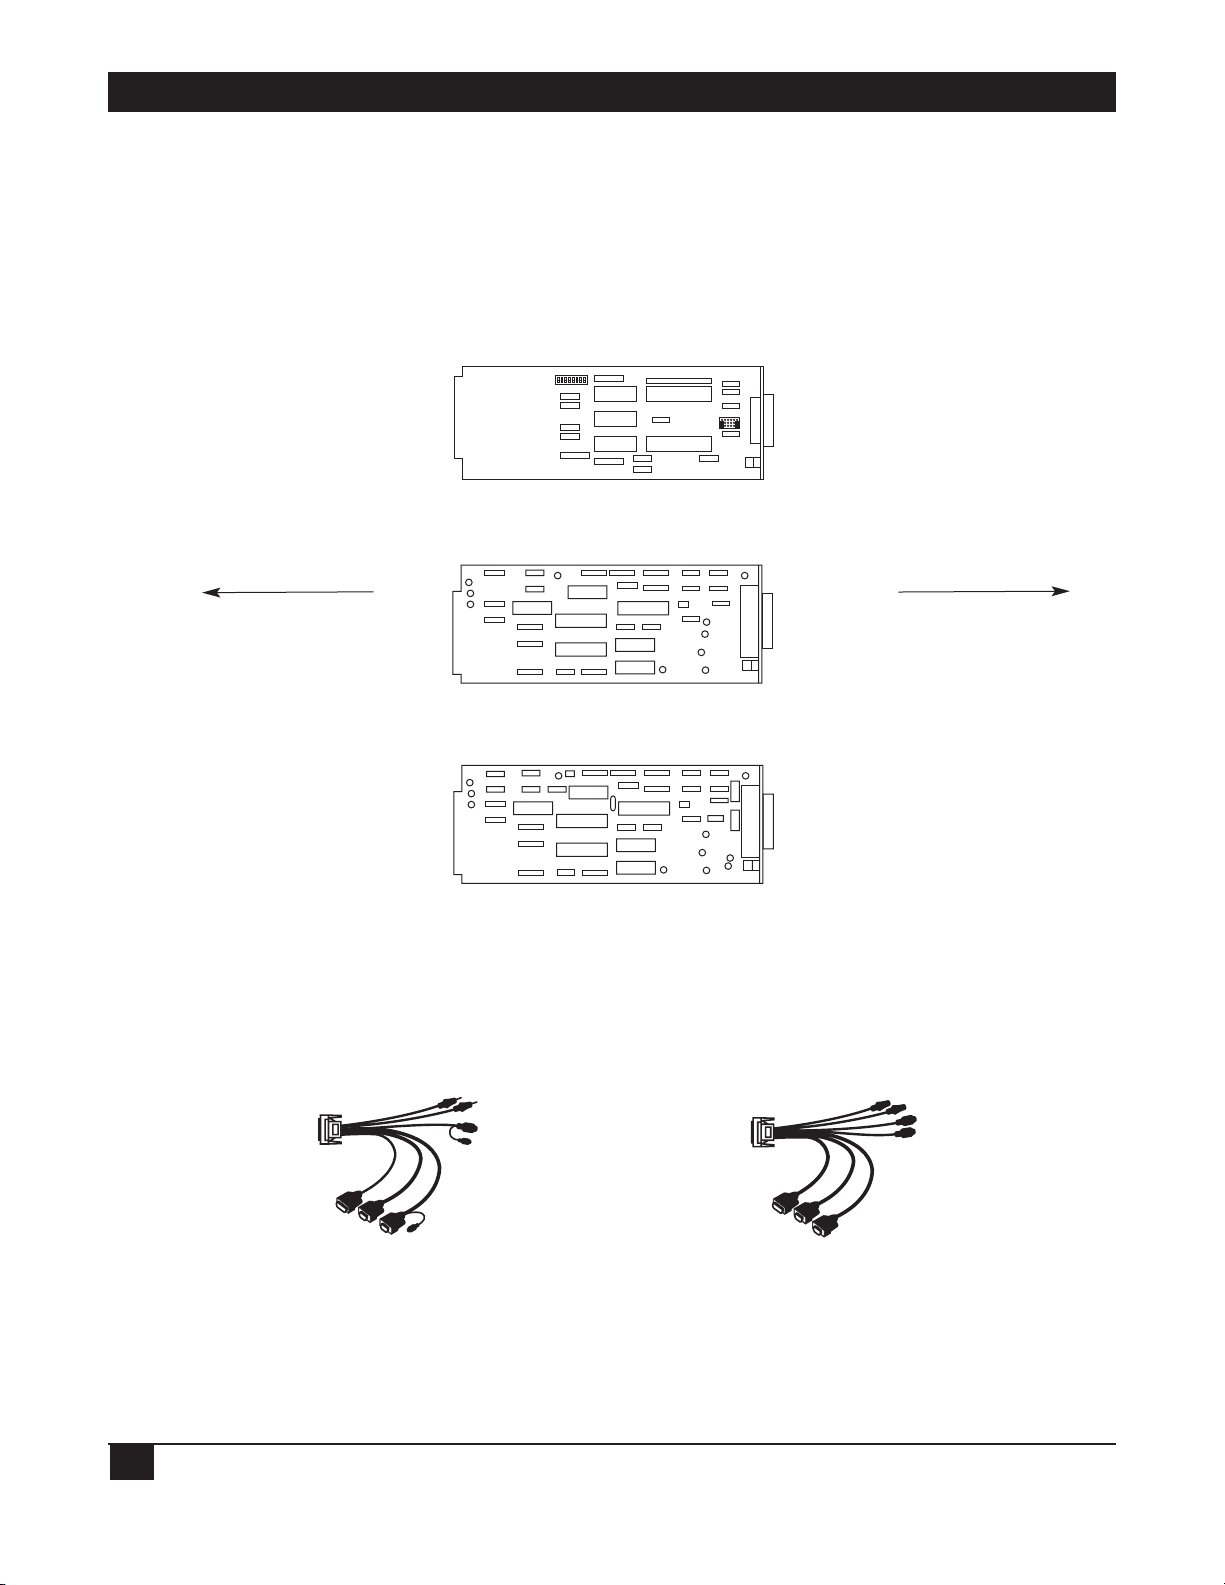
Expansion Transmit Card (our product code KV1601C) or CAT5 Expansion Transmit Card (KV1603C), shown
in Figure 2-8 on the next page, if you want consoles on another ServSwitch Multi unit to be able to access
computers on the EXP. And you will need at least one Expansion Receive Card (KV1602C) or CAT5 Expansion
Receive Card (KV1604C), also shown in Figure 2-8, if you want consoles on the EXP to be able to access
computers attached to other ServSwitch Multis. To connect serially accessed control devices such as terminals
and routers, you’ll need a Management Card (KV1608C-R2) and one or more Serial Control Cards (KV1609C);
see Chapter 5.
FAIL POWER
SELECTED
ON-LINE
B C D E F G H I J K L M N
A
Page 25
SERVSWITCH™ MULTI
24
Figure 2-8. The ServSwitch Multi’s Expansion Cards.
Each regular Expansion Card has two HD26 ports on it (male on the Transmit Card, female on the Receive
Card); each of these is an endpoint for an independent expansion link. For example, if you run cables from
both of the ports on a Transmit Card to the corresponding ports on a Receive Card in another unit, two
different user stations on the other unit will be able to access different computers on the Transmit Card’s unit
at the same time. Alternatively, you can run a cable from each of the ports on a Transmit Card to a matching
port on two different Receive Cards, even if they are installed in different ServSwitch Multi units.
Regular Expansion
Transmit Card
CAT5 Expansion
Transmit Card
Regular Expansion
Receive Card
CAT5 Expansion
Receive Card
Front of
ServSwitch Multi
Rear of
ServSwitch Multi
Two
HD26
male
Two
HD26
female
Six
RJ-45
female
Six
RJ-45
female
Page 26
CHAPTER 2: Introduction
25
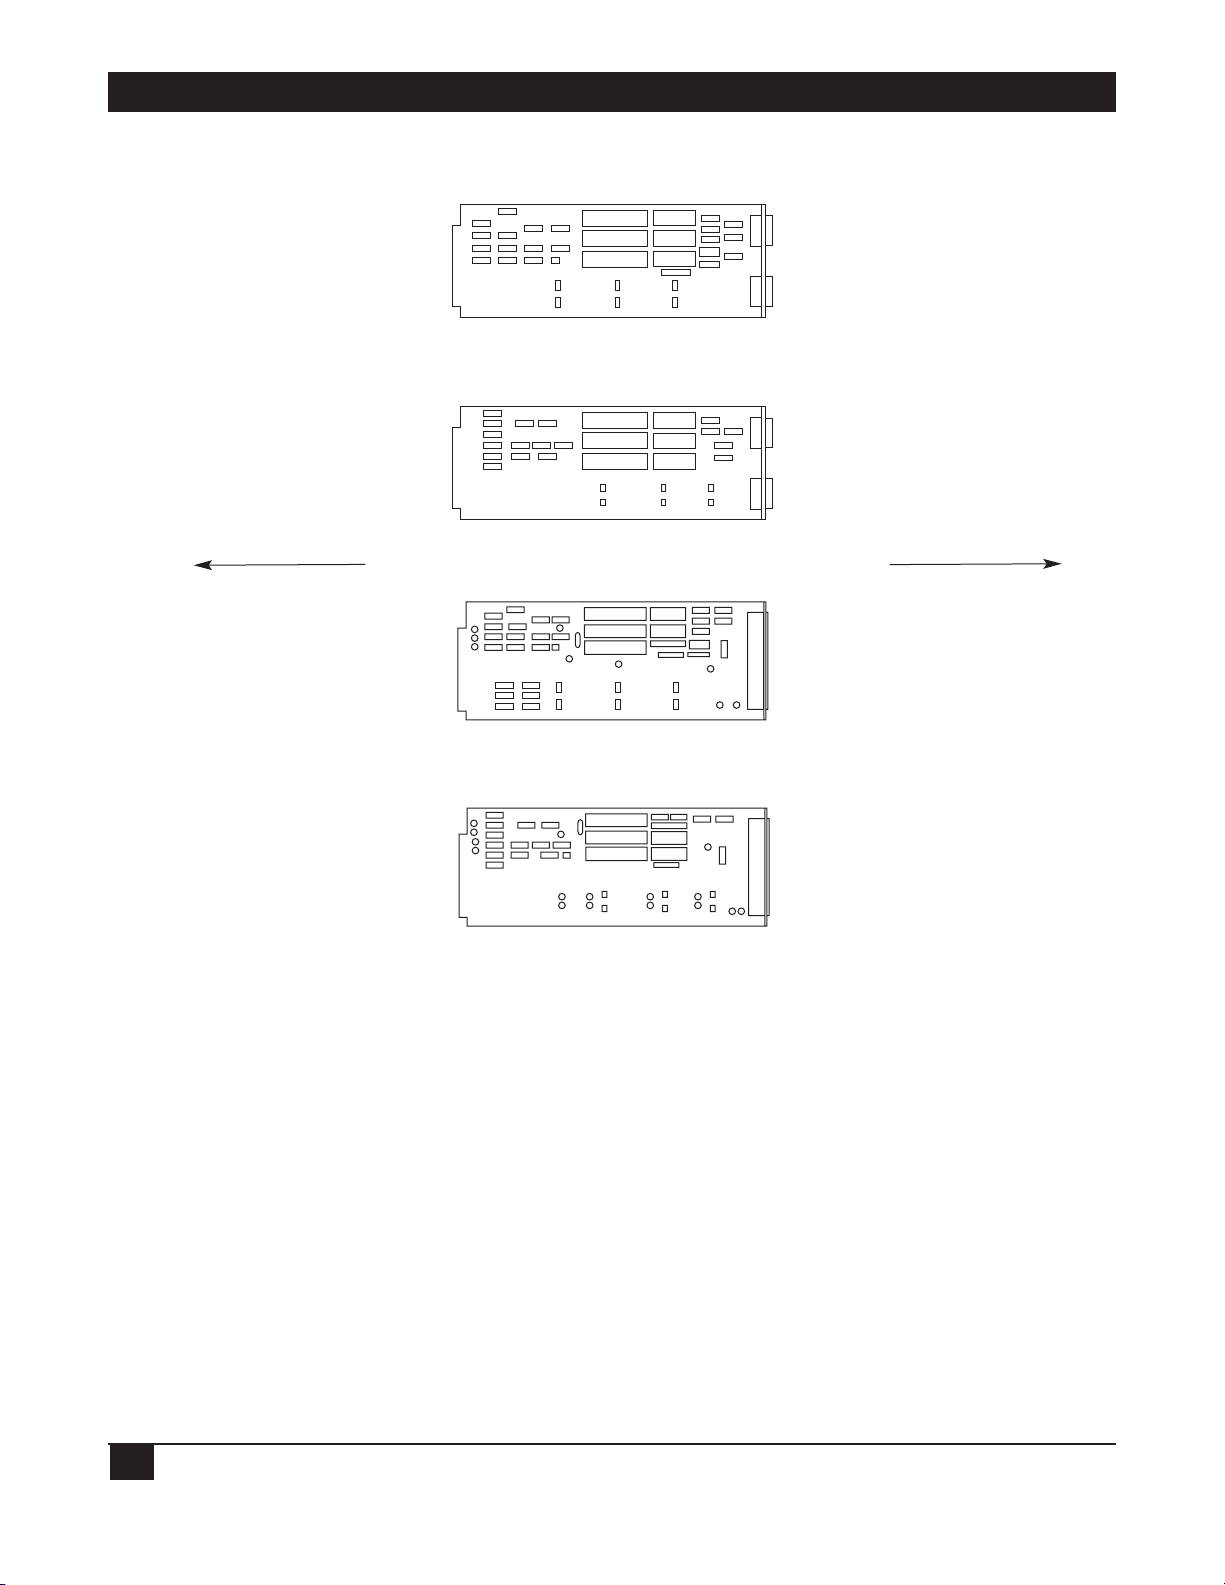
Instead of single connectors, the two ports on CAT5 Expansion Cards consist of three RJ-45 sockets each,
because three 4-pair cables are required to carry all of the signals necessary for expansion. The ports of the
regular Cards and the CAT5 Cards are shown in Figures 2-9 and 2-10; the pairing of the CAT5 RJ-45 connectors
is shown in Figure 2-11.
Figure 2-9. Ports Figure 2-10. Ports
on regular on CAT5
Expansion Cards. Expansion Cards.
Figure 2-11. Pinning and
pairing of CAT5 Cards’
RJ-45 connectors.
If you are using regular Expansion Transmit and Receive Cards, you will run a regular Expansion Cable
(shown in Figure 2-12) between a Transmit/Receive Card pair. This cable is available in stock lengths of 10 feet
(3 m, product code KV1600), 25 feet (7.6 m, KV160025), 50 feet (15.2 m, KV160050), and 100 feet (30.5 m,
KV160100). If you are using CAT5 Expansion Transmit and Receive Cards, you will run three four-pair, straightthrough-pinned, solid-conductor CAT5 twisted-pair cables (product code EYN737MS-MM, shown in
Figure 2-13) between a Transmit/Receive Card pair. This CAT5 cable is available in stock lengths of 10 feet
(3 m), 50 feet (15.2 m), 100 feet (30.5 m), or 250 feet (76.2 m), or you can order it in custom lengths.
Figure 2-12. Regular Expansion Figure 2-13. CAT5 Expansion
Cable (KV160xxx). Cable (EYN737MS-MM).
Port 2
Multimedia
Kybd/Mouse
Video
Multimedia
Kybd/Mouse
Video
Port 1
Port 2
Port 1
Pr 1: Pins 5 (wht/blu) & 4 (blu/wht)
Pr 2: Pins 1 (wht/org) & 2 (org/wht)
Pr 3: Pins 3 (wht/grn) & 6 (grn/wht)
Pr 4: Pins 7 (wht/brn) & 8 (brn/wht)
PR3
PR1
PR2 PR4
1 2 3 4 5 6 7 8
Page 27
SERVSWITCH™ MULTI
26
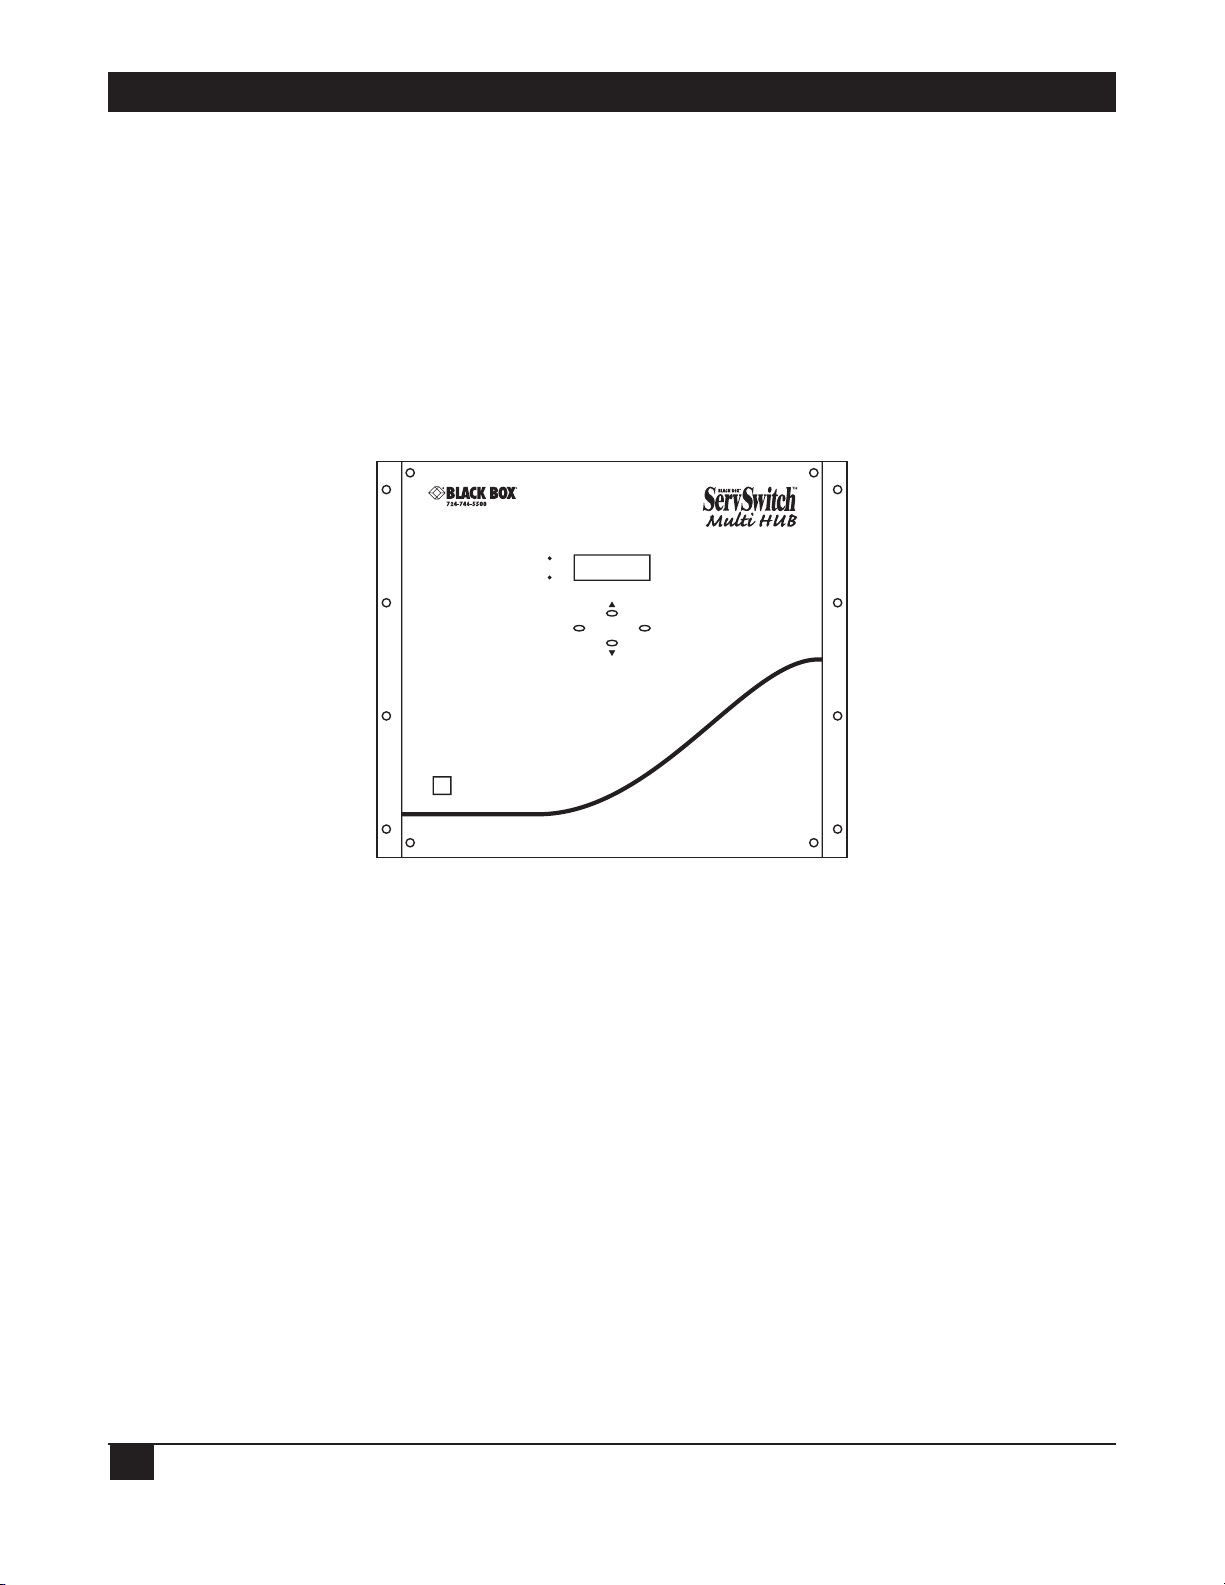
2.6.5 DESCRIPTION OF THE SERVSWITCH MULTI HUB AND ITS COMPONENTS
The ServSwitch Multi Hub (KV170RA) is a cube that fits in 9U (15.75", 40 cm) of vertical rack space. Internally,
it will contain two power supplies and two fan assemblies (for redundancy) once you install them—they’re
shipped uninstalled to lessen the chance that they might be damaged in transit. The most prominent features
of the Hub’s front panel, as shown in Figure 2-14, are a 4-x-20-character LCD panel and four associated buttons
with which you can control and configure the Hub through an internal menu system. The Hub’s front panel
also has POWER and FAIL LEDs, as well as an RJ-45 serial port that currently has no function but might be
enabled with future firmware upgrades. The front panel is controlled by a special internal Front-Panel Element.
The Hub’s nine plug-in Module slots are “channel A” through “channel I.” For Flash-upgrading purposes only,
the Front-Panel Element is “channel J”; that channel can’t be selected and is not recognized for any other
purpose.
Figure 2-14. The front panel of a Hub.
The Hub isn’t like the other ServSwitch Multi models. No computers or user-station consoles can be directly
attached to it. It’s not designed to accept Interface Cards, regular Expansion Cards, or any other type of Card
that the other models support. Instead, it functions as a central housing for as many as nine Transmit or
Receive Modules (KV1701C or KV1702C respectively), which each channel up to 16 sets of keyboard, monitor,
and mouse signals between cascaded ServSwitch Multi units. You’ll run two CAT5 cables from the two ports of a
CAT5 Expansion Card in some other ServSwitch Multi model to two of the ports on one of the Hub’s Modules.
This centralized distribution through the Hub makes it possible to assemble very large KVM-switching systems
using fewer Expansion Cards, fewer cables, and often fewer Switch units. For more information, see Chapter 7.
POWER
ESCAPE ENTER
Page 28
CHAPTER 3: Installing User-Interface Cards, User Cables, and Console Devices
27
3. Installing User-Interface Cards,
User Cables, and Console Devices
IMPORTANT NOTE
If you are installing a cascaded ServSwitch Multi system, you should make sure your
Expansion Cards and Cables are installed properly before you begin installing other
types of Cards or attaching devices to the system. Refer to Chapter 6 and (if your
cascaded system includes any ServSwitch Multi Hubs) Chapter 7.
3.1 Connecting Local-Console Equipment to a Base Unit or MX
As shown in Figure 3-1, the ServSwitch Multi Base Unit and ServSwitch Multi MX have a group of connectors
on their front panels to which you can directly connect (without needing extra cables) a local console (user
station). This console can include a keyboard, monitor, and mouse, as well as a serial device, speakers, and/or
microphone.
You can independently plug a single keyboard and a single mouse (each belonging to any platform the
ServSwitch supports, in any combination) into the local console. However, do not connect more than one
keyboard, monitor, or mouse to the local console. For example, you may use a Sun mouse and a Mac keyboard
at the local console at the same time, but you must not connect two keyboards or two mice to the front of the
unit simultaneously. This could cause your computers to behave unpredictably or even crash.
The local console operates as if it were connected to a Universal User-Interface Card (KV2500C) rather than
a User-Interface Card with On-Screen Display (KV2550C-R2)—no on-screen menus are available.
Figure 3-1. Local-console connections.
Speakers (attached to the SPEAKERS port)
Monitor (attached
to the VGA port)
Mouse (attached to
the PS/2 MOUSE port)
Keyboard (attached to the
PS/2 KEYBOARD port)
Microphone (attached
to the MIC port)
ServSwitch Multi
Base Unit
(KV150A-R2)
Serial printer
(attached to the
port labeled
SERIAL PORT)
Page 29
SERVSWITCH™ MULTI
28
3.2 Installing User-Interface Cards in a ServSwitch Multi
To install a Universal User-Interface Card (“UUIC” for short, our product code KV2500C) or User-Interface
Card with On-Screen Display (“UICD” for short, our product code KV2550C-R2) in a ServSwitch Multi Base
Unit, MX, EXP, or SB, take these steps:
1. Position the ServSwitch Multi so that its rear panel is facing you, as shown in Figure 3-3 on the next page.
Choose an available slot. In most cases, any slot that is covered with a blank (connectorless) panel will be
available. However, note that on the Base Unit and MX, the local-console module on the far left end of the
Switch’s rear panel is covered by a blank panel but is not an available slot; no ServSwitch Multi Card of any
type can be installed in that slot. Remember that the option slot (the slot just to the right of the localconsole module, which has no corresponding front-panel LED or pushbutton) is an available slot and
should preferably host a User-Interface Card, Expansion Card, etc., rather than a CPU-Interface Card.
2. Once you’ve chosen the slot, write down the letter of the corresponding channel in the “Channe Letterl”
field of this Card’s record in a copy of the User-Interface Cards pages of the System-Configuration Chart
(see Appendix A). At this time you should also write down what appears on the Card’s label (just to the
right of the HD62 connector if you look at the connector from the rear) in the Chart’s “Card-Label
Information” field, and (if the ServSwitch Multi unit is part of a cascaded system) you should write down
the Switch’s address in the “Switch Address” field as well.
3. Remove the panel covering the available slot by unscrewing the two Phillips-head screws that hold it in
place. (Save these screws; you’ll be replacing them momentarily.)
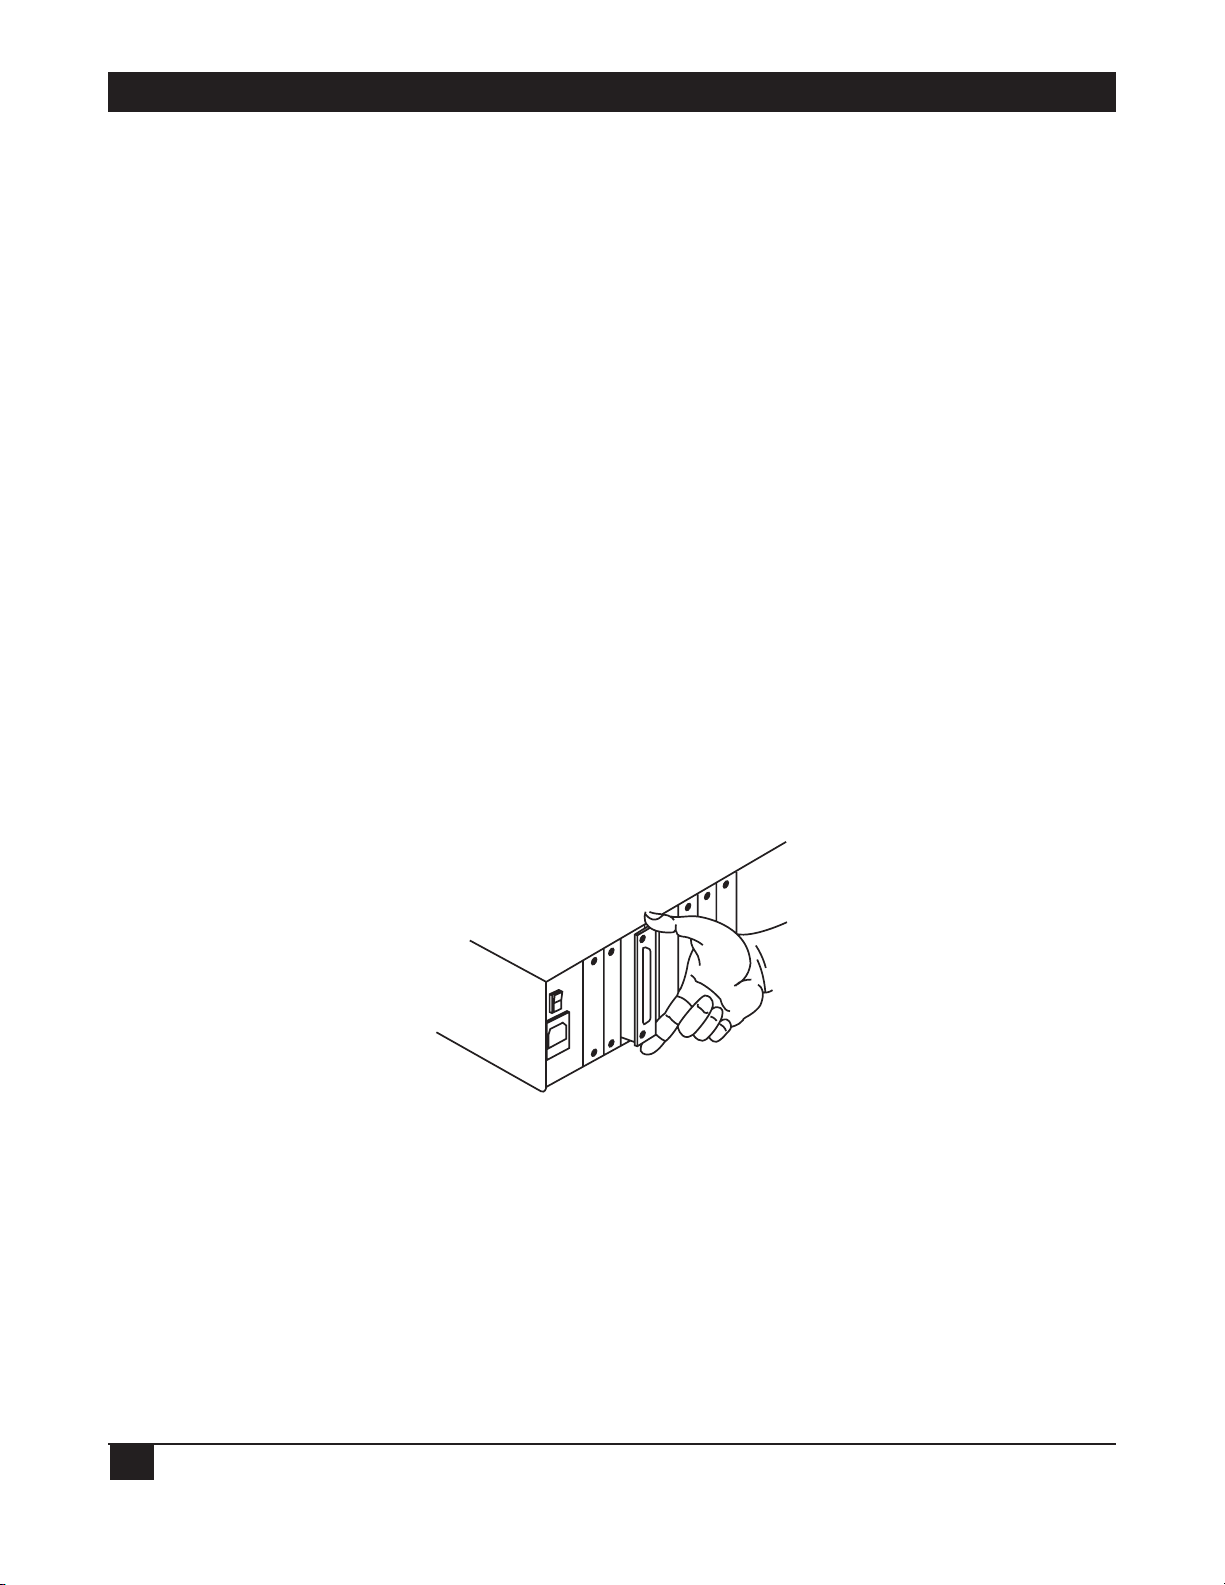
4. If you look into the open slot on the Switch, you will see “guide tracks” that the top and bottom of the Card
should slide along when you install it. Slide new User-Interface Card gently into the slot along these tracks,
until the Card’s HD62 connector lines up flush with the back of the unit, as shown in Figure 3-2.
Figure 3-2. Inserting a User-Interface Card in the Switch.
5. Secure the Card in the Switch with the screws you removed in step 3. Retighten the screws completely, but
do not overtighten them.
Repeat the above procedure for every User-Interface Card in your system.
The UUIC and the UICD share the same basic features, but the UICD has a set of on-screen display features
that the UUIC lacks. For descriptions of these features and how to use them, see Chapter 9.
Page 30

CHAPTER 3: Installing User-Interface Cards, User Cables, and Console Devices
29
Figure 3-3. The ServSwitch Multi rear panels (as shipped from the factory).
BASE UNIT:
Local console
module (not
available)
Local console
module (not
available)
Option slot
(available)
Slots corresponding to lettered
channels (all available)
Slots corresponding to lettered
channels (all available)
Slots corresponding to lettered channels (all available)
MX:
EXP and SB:
Page 31

SERVSWITCH™ MULTI
30
3.3 Connecting User Cables and Console Equipment to Your User Cards
Except for the local consoles on the Base Unit and MX, you’ll use User Cables to connect your consoles to the
User Cards installed in your ServSwitch Multi. You will need one of these cables for each User-Card console in
your system. These cables are 1 foot (0.3 m), 10 feet (3 m), or 20 feet (6.1 m) long and have an HD62 male
connector on one end. They have different numbers of connectors on the other end, depending on the
options you ordered (see Table 3-1 below and the corresponding subsections on the following pages). In order
to connect a non-multisync monitor, you’ll also need a special adapter; see Section 3.3.4.
Things to be aware of when you make User-Cable connections of any type:
• As you attach the console equipment to each User-Interface Card, finish filling out the Card’s record in the
System-Configuration Chart (see Appendix A).
• The Cable’s audio-strand connectors are very similar to each other, but the microphone strand has a blue
band around it so that you can tell the two apart.
• Similarly, on some versions of the Cable, the mouse-strand connector is the same as the connector on the
keyboard strand or serial-device strand, so the mouse strand has a yellow band around it so you can tell it
apart.
• Some speakers, headphones, and microphones have plugs and jacks different from the type that the
ServSwitch Multi’s audio cables are designed for. If this is the situation with your audio equipment, you will
need adapters to connect your equipment to the ServSwitch Multi system. These adapters are commonly
available; call your local electronics-supply store for more information.
• For serial connections, if you want to connect an Apple device or a serial device with a connector other than
a DB9 female, see Appendix E.
Table 3-1. Product codes for User Cables.
Platform Product Codes
1' (0.3-m) 1' (0.3-m) 10' (3-m) 20' (6.1-m)
Standard w/ Audio w/ Audio w/ Audio
IBM PS/2 or PC/AT (Section 3.3.1) KV2505 KV2515 KV2545 KV2585
Apple Macintosh (Section 3.3.2) KV2700 KV2710 KV2740 N/A
Sun Microsystems (Section 3.3.3) KV2800 KV2810 KV2840 KV2880
Page 32

CHAPTER 3: Installing User-Interface Cards, User Cables, and Console Devices
31
3.3.1 FOR IBM STYLE KEYBOARD AND MOUSE
If you are using an IBM PS/2 or PC/AT style keyboard and a PS/2 or serial mouse at a given console, the User
Cable you’ll need will be labeled KV2505, KV2515, KV2545, or KV2585 depending on the options you ordered
(see Table 3-1 at the start of Section 3.3). The cable will have these console-end connectors:
KV2505 Cable KV2515, KV2545, and KV2585 Cables
will have: will have:
HD15 Female 5-Pin DIN Female HD15 Female 5-Pin DIN Female
to VGA Monitor to PC/AT Keyboard to VGA Monitor to PC/AT Keyboard
6-Pin Mini-DIN Female 6-Pin Mini-DIN Female 6-Pin Mini-DIN Female 6-Pin Mini-DIN Female
to PS/2 Keyboard to PS/2 Mouse to Keyboard to PS/2 Mouse
(yellow band) (yellow band)
DB9 Female DB9 Male DB9 Male
to Serial Mouse to Serial Mouse to Other
(yellow band) Serial Device
RCA Female (Mono) RCA Female (Stereo)
to Microphone to Speakers
(blue band) or Headphones
To install your cabling and console equipment at each IBM type secondary console, first plug the User Cable’s
HD62 connector into the matching connector on the User-Interface Card. When you’re sure the connection is
firmly seated, secure it by tightening the associated thumbscrews.
Now plug the cables from your keyboard, mouse, and monitor into the matching connectors on the User
Cable. (You might be able to use your non-multisync RS/6000, SGI, or HP monitor instead of a VGA monitor;
see Section 3.3.4.) If the User Cable is an audio type, it will have three additional connectors: two RCA
®
jacks
for a mono microphone and stereo speakers or headphones, and a DB9 male connector for a serial device.
Attach any appropriate equipment as desired.
Page 33

SERVSWITCH™ MULTI
32
3.3.2 FOR APPLE MACINTOSH STYLE KEYBOARD AND MOUSE
If you are using an Apple Macintosh style (ADB, Apple Desktop Bus) keyboard and an ADB or RS-232 mouse at
a given console, the User Cable you’ll need will be labeled KV2700, KV2710, or KV2740 depending on the
options you ordered (see Table 3-1 at the start of Section 3.3; the audio cable comes in 1-ft. [0.3-m] and 10-ft.
[3-m] lengths only). The cable will have these console-end connectors:
KV2700 Cable KV2710 and KV2740 Cables
will have: will have:
HD15 Female HD15 Female 4-Pin Mini-DIN Female
to Multisync Monitor to Multisync to ADB Keyboard
Monitor and Mouse
4-Pin Mini-DIN Female DB9 Male DB9 Male
to ADB Keyboard to Serial Mouse to Other
and Mouse (yellow band) Serial Device
DB9 Male RCA Female (Mono) RCA Female (Stereo)
to Serial Mouse to Microphone to Speakers
(blue band) or Headphones
To install your cabling and console equipment at each Mac type secondary console, first plug the User Cable’s
HD62 connector into the matching connector on the User-Interface Card. When you’re sure the connection is
firmly seated, secure it by tightening the associated thumbscrews.
Now plug the cables from your ADB keyboard and mouse and from your multisync monitor into the
matching connectors on the User Cable. (In a multiplatform application, you’ll have to plug a PC-type RS-232
serial mouse into the Cable’s serial-mouse connector and use that instead of the ADB mouse. This is because
one-button Apple mice can’t perform all of the functions of two- or three-button mice. Also, note that the stock
cable is designed to connect to a multisync monitor rather than an Apple monitor; a multisync monitor will be
necessary in most situations, because most people who have Apple computers in their system have PCs as well.
However, if your Mac monitor is capable of syncing to and displaying the video output of all of your computers,
you can use the KV16MAC adapter to connect it to the system; see Section 3.3.4.)
If the User Cable is an audio type, it will have three additional connectors: two RCA jacks for a mono
microphone and stereo speakers or headphones, and a DB9 male connector for an RS-232 serial device. Attach
any appropriate equipment as desired.
Page 34

CHAPTER 3: Installing User-Interface Cards, User Cables, and Console Devices
33
3.3.3 FOR SUN MICROSYSTEMS STYLE KEYBOARD AND MOUSE
If you are using a Sun Microsystems style keyboard and mouse at a given console, the User Cable you’ll need
will be labeled KV2800, KV2810, KV2840, or KV2880 depending on the options you ordered (see Table 3-1 at
the start of Section 3.3). The cable will have these console-end connectors:
KV2800 Cable KV2810, KV2840, and KV2880 Cables
will have: will have:
HD15 Female HD15 Female 8-Pin Mini-DIN Female
to Multisync Monitor to Multisync to Sun Keyboard
Monitor and Mouse
8-Pin Mini-DIN Female DB9 Male DB9 Male
to Sun Keyboard to Serial Mouse to Other
and Mouse (yellow band) Serial Device
DB9 Male RCA Female (Mono) RCA Female (Stereo)
to Serial Mouse to Microphone to Speakers
(blue band) or Headphones
To install your cabling and console equipment at each Sun type secondary console, first plug the User Cable’s
HD62 connector into the matching connector on the User-Interface Card. When you’re sure the connection is
firmly seated, secure it by tightening the associated thumbscrews.
Now plug the cables from your Sun keyboard, your Sun or serial mouse, and your multisync monitor into the
matching connectors on the User Cable. (Note that the stock cable is designed to connect to a multisync
monitor rather than a Sun monitor; a multisync monitor will be necessary in most situations, because most
people who have Sun computers in their system have PCs as well. However, if your Sun monitor is capable of
syncing to and displaying the video output of all of your computers, you can use the KV16SUN adapter to
connect it to the system; see Section 3.3.4.)
If the User Cable is a multimedia type, it will have three additional connectors: two RCA jacks for a mono
microphone and stereo speakers or headphones, and a DB9 male connector for a serial device. Attach any
appropriate equipment as desired.
Page 35

SERVSWITCH™ MULTI
34
3.3.4 CONNECTING NON-MULTISYNC MONITORS
Most ServSwitch Multi applications that involve more than one hardware platform will require multisync
monitors for all user stations, because PC, Mac, and Sun computers typically use sets of resolutions and refresh
rates that differ greatly from one another. But if all of your computers are from the same platform, or if your
platform-dedicated non-multisync monitor is nonetheless able to handle the video output of all your
computers, we offer various adapters that will let you connect your monitor to the ServSwitch Multi. (Be aware
that, in order to use a UICD’s on-screen display with a non-multisync monitor, you’ll probably have to change
the display’s default synchronization. See Section 9.5.)
To use a Mac monitor: Connect your user equipment as directed in Section 3.3.2, with this exception: Plug the
HD15 male side of a KV16MAC adapter into the HD15 female end of the video strand of your KV27x0 cable,
then plug the DB15 male end of your Mac monitor’s input cable into the adapter’s DB15 female side.
To use a Sun monitor: Connect your user equipment as directed in Section 3.3.3, with this exception: Plug the
HD15 male side of a KV16SUN adapter into the HD15 female end of the video strand of your KV28x0 cable,
then plug the 13W3 male end of your Sun monitor’s input cable into the adapter’s 13W3 female side.
To use an RS/6000 monitor with 13W3 connectors, an RS/6000 or other monitor with 3C3 connectors, an SGI monitor, or
an HP or other monitor with three BNC connectors: Connect your user equipment as directed in Section 3.3.1, with
this exception: Plug the HD15 male side of the appropriate adapter into the HD15 female end of the video
strand of your KV25x5 cable, then plug the monitor cable into the adapter’s female side:
• KV16RS6-1 for RS/6000 (HD15 M to 13W3 F);
• KV163C3-1 for RS/6000 etc. (HD15 M to 3C3 F);
• KV16SGI-1 for SGI (HD15 M to 13W3 F); or
• KV16BNC for HP etc. (HD15 M to triple BNC F).
Page 36

CHAPTER 3: Installing User-Interface Cards, User Cables, and Console Devices
35
3.3.5 CONNECTING DUAL MONITORS (UICD ONLY)
If your computer supports dual video outputs (dual monitors), you can use the User-Interface Card with OnScreen Display (UICD) to run video to the second monitor through the ServSwitch Multi. You must be logged
on as the administrator (see Section 9.1.2) to configure this option (see Sections 9.3.1.A and 9.4.3.H). Here are
the ServSwitch Multi components that you’ll need:
• Two Autosensing CPU-Interface Cards (KV2000C), one to handle the computer’s primary video stream and
one to handle the secondary video. These Cards must be installed side by side in the Switch chassis, with the
Card that will be handling the secondary video having the higher address. For example, if the computer’s
primary video output is going to a CPU Card installed in channel 1B, the CPU Card handling the secondary
video must be installed in channel 1C. For directions on installing CPU-Interface Cards, see Section 4.3.
• One User-Interface Card with On-Screen Display (KV2550C-R2) to send output to the primary monitor and
one Universal User-Interface Card (UUIC, KV2500C) to send output to the secondary monitor. These two
Cards don’t have to be next to each other, but they should be installed in the same Switch chassis. For
directions on installing User-Interface Cards, see Section 3.2.
• Two each of the appropriate Server Cables and User Cables for your platform and application.
• If you’re running a PC type Server Cable (KV20xx or KV20xx-R2; see Section 4.4) between the computer’s
secondary video output and the secondary CPU-Interface Card, you’ll also need a Loopback Mouse Adapter
(product code KV16LOOP). This Adapter makes it possible for the ServSwitch Multi to recognize the
secondary video connection as a valid CPU channel.
Once you have the Cards and cabling installed, here’s how to make the dual monitor connections (refer to
Figure 3-4 on the next page):
1. Use your first Server Cable to connect your computer to the primary CPU-Interface Card as you would
connect any other computer (see Section 4.4), but make sure you attach the Server Cable to the
computer’s primary video-output port.
2. Run your second Server Cable from the computer’s secondary video-output port to the second CPUInterface Card: Attach the Cable’s HD44 male end to the Card’s HD44 female port, but at the computer
end, attach only one strand of the Cable—the one that plugs into the secondary video port—to the
computer. (If the cable is a KV20x0-R2 PC type, attach the Loopback Mouse Adapter to the mouse strand
of this cable.)
3. Run your first User Cable from your UICD to your primary monitor and other user equipment as you
would connect any other user station (see the rest of Section 3.3).
4. Run your second User Cable from your UUIC to the secondary monitor: Attach the Cable’s HD62 male
end to the Card’s HD62 female port, then plug the secondary monitor’s video-input cable into the video
strand at the other end of the cable; leave all of the other strands unattached.
Page 37

SERVSWITCH™ MULTI
36
Figure 3-4. A Dual-Monitor ServSwitch Multi system.
Once you have all of the components of your entire ServSwitch Multi system installed, you will need to use the
UICD to enable the dual-monitor setup. Here’s how to do so:
1. If you haven’t yet added the dual-monitor computer to the Switch’s on-screen configuration records,
follow the instructions for doing so in Section 9.3.1.A.
If you have previously entered the computer into the on-screen configuration, follow the instructions
for editing that computer’s record in Section 9.3.1.B.
In either case, when you reach the “Dual Video” feature, press the space bar to enable it.
2. Enter the Administrator-Controls Menu (see Section 9.4) and select the “System Configuration” option.
Page down and highlight the “Dual Monitor Support Card Address” field (see Section 9.4.3.H). Enter the
address of the UUIC that the secondary monitor is attached to. Until you enter a value in this field, dualmonitor support is still disabled regardless of what you did in step 1.
Sun computer with
dual video output
User station with
primary monitor
Secondary
monitor
ServSwitch Multi with two
CPU-Interface Cards, a
UICD, and a UUIC installed
Page 38

CHAPTER 4: Installing CPU-Interface Cards, Server Cables, and Computers
37
4. Installing CPU-Interface Cards,
Server Cables, and Computers
IMPORTANT NOTE
If you are installing a cascaded ServSwitch Multi system, you should make sure your
Expansion Cards and Cables are installed properly before you begin installing other
types of Cards or attaching devices to the system. Refer to Chapter 6 and (if your
cascaded system includes any ServSwitch Multi Hubs) Chapter 7.
Before you can connect your computers to your ServSwitch Multi system, you will need to configure and install
Autosensing CPU-Interface Cards (our product code KV2000C) for each computer. These Cards have a set of
jumpers that determine the type of video input from the computer (see Section 4.1) and an eight-position DIP
switch that determines three other things: how the ServSwitch Multi handles the video signal and sync from that
computer (see Section 4.2.1), how long that computer’s inactivity timeout is (see Section 4.2.2), and how the
Switch maps certain keyboard keys if the computer is a Macintosh model (see Section 4.2.3).
4.1 Setting the Jumpers to Configure the Video-Output Type
If you hold an Autosensing CPU-Interface Card so that its HD44 connector is to the right, as shown in
Figure 4-1, you will see a block of six jumpers labeled “JP1” through “JP6” in the lower right-hand corner of the
Card’s circuit board. The settings of these jumpers determine what basic type of video signals the ServSwitch
Multi should expect from the attached computer. The factory-default setting is for VGA/SVGA video. If the
computer you’ll be attaching to any given CPU-Interface Card always outputs VGA/SVGA video, you don’t
need to change the jumper settings for that Card.
Autosensing CPU-Interface Card (KV2000C) Video Jumpers
(Default IBM VGA/
SVGA setting)
Figure 4-1. The CPU-Interface Card’s video jumpers.
Refer to the configuration diagrams in Figure 4-2 on the next page for all of the possible settings of these
jumpers. On each Card, set the jumpers appropriately for the computer you will be attaching, then add this
information to the Card’s record in the System-Configuration Chart (see Appendix A). You might want to
consult the manual(s) for your computers, video cards, and/or monitor to make sure which of the possible
settings is the best for any given computer in your system.
DIP
Switch
1
2
3
4
5
6
1 2 3
Page 39

SERVSWITCH™ MULTI
38
Figure 4-2. The possible settings of the Card’s video jumpers.
IBM VGA/SVGA IBM XGA IBM XGA-2 Apple Std. VGA Apple Std. VGA
(Horizontal and (Composite
Vertical Sync) Sync)
Apple HiRes Apple HiRes Apple 21" Apple Color RGB Apple Color RGB
(Horizontal and (Composite (Horizontal and (Composite
Vertical Sync) Sync) Vertical Sync) Sync)
Apple Portrait Apple 19" Color Apple 19" Color Apple 16" Color Apple 16" Color
(Horizontal and (Composite (Horizontal and (Composite
Vertical Sync) Sync) Vertical Sync) Sync)
Sun 1152 x 900 Sun 1152 x 900 Sun 1152 x 900 Sun 1280 x 1024 Sun 1600 x 1280
@ 66 Hz @ 76 Hz* @ 76 Hz* @ 76 Hz @ 76 Hz
*There are two jumper settings for Sun 1152 x 900/76-Hz displays, because some will
require one of these jumper settings and some will require the other—there is no way to
tell which other than by trial and error.
1 2 3
1
2
3
4
5
6
1 2 3
1
2
3
4
5
6
1 2 3
1
2
3
4
5
6
1 2 3
1
2
3
4
5
6
1 2 3
1
2
3
4
5
6
1 2 3
1
2
3
4
5
6
1 2 3
1
2
3
4
5
6
1 2 3
1
2
3
4
5
6
1 2 3
1
2
3
4
5
6
1 2 3
1
2
3
4
5
6
1 2 3
1
2
3
4
5
6
1 2 3
1
2
3
4
5
6
1 2 3
1
2
3
4
5
6
1 2 3
1
2
3
4
5
6
1 2 3
1
2
3
4
5
6
1 2 3
1
2
3
4
5
6
1 2 3
1
2
3
4
5
6
1 2 3
1
2
3
4
5
6
1 2 3
1
2
3
4
5
6
1 2 3
1
2
3
4
5
6
Page 40

CHAPTER 4: Installing CPU-Interface Cards, Server Cables, and Computers
39
4.2 Setting the DIP Switch
You can use the Autosensing CPU-Interface Card’s eight-position DIP switch to configure three different
features: video-synchronization handling, keyboard/mouse timeout, and keyboard translation (mapping)
options for Mac computers. Figure 4-3 shows this DIP switch, including the positions used to configure each
feature and their default settings. Note that, even after you’ve installed the Card, you can change any of its DIPswitch settings from a console keyboard with a simple hotkey sequence; see Section 8.14. As you set each Card’s
DIP switch, add this info to the Card’s record in the System-Configuration Chart (see Appendix A).
Figure 4-3. The Autosensing CPU-Interface Card’s DIP switch.
4.2.1 C
ONFIGURING VIDEO OPTIONS
Your Autosensing CPU-Interface Card is factory-preset to pass the video signal from the attached computer
through to any console that selects the computer’s channel. No changes are needed to DIP-switch positions 1
through 3 unless (a) the CPU that will be attached to the Card does not output the standard video
synchronization for its platform (separate horizontal and vertical sync for IBM PC compatible computers,
composite sync for Apple or Sun computers), (b) not all of your console monitors will support the attached
computer’s video sync(as will often be true for RS/6000, SGI, and HP machines that output sync on green), or
(c) you want to fully disable the display of video signals from that computer (see the next paragraph).
By default, a computer’s video will be displayed to users at any console that switches to the computer’s
channel. By setting DIP-switch positions 1 through 3 all ON, you can disable the display of a computer’s video
for security purposes, or if you are switching only keyboard and mouse through the ServSwitch Multi and
handling video independently, or for any other reason.
Table 4-1 shows the possible settings of DIP-switch positions 1 through 3. If you’re not sure what sort of
synchronization a particular computer uses for its video output, consult the manual for the computer or its
video card.
Table 4-1. The possible settings of DIP-switch positions 1 through 3 (the Card’s video options).
Pos. 1 Pos. 2 Pos. 3 The Card:
OFF OFF OFF Passes through video from attached computer unaltered (default setting)
ON OFF OFF Strips sync on green
OFF ON OFF Uses composite sync to generate horizontal and vertical sync
ON ON OFF Uses composite sync and strips sync on green to generate horizontal and vertical sync
OFF OFF ON Uses sync on green to generate horizontal and vertical sync
ON ON ON Disable display of video from attached computer
Reserved
Mapping
Video
Keyboard/Mouse Timeout
O
N
8 7 6 5 4 3 2 1
Page 41

SERVSWITCH™ MULTI
40
4.2.2 SETTING THE KEYBOARD/MOUSE-INACTIVITY TIMEOUT
While multiple consoles can view a computer’s video at the same time, only one of them can have keyboard and
mouse control over a computer at any given time. The amount of time that a console’s keyboard and mouse
must be inactive before another console can take control is called the timeout. You can choose a 1-second
timeout by setting DIP-switch position 4 to OFF; this is also the factory-default timeout setting. Alternatively, you
can choose a 10-second timeout by setting DIP-switch position 4 to ON.
4.2.3 S
ETTING THE KEYBOARD TRANSLATION (MAPPING) FOR MACINTOSH COMPUTERS
When you have an Apple Macintosh compatible computer attached to the ServSwitch Multi through a CPUInterface Card, any user with a PC keyboard who selects that Mac can turn on Scroll Lock to have the
ServSwitch Multi remap (translate) some of the PC keys, so that they can perform Mac functions not normally
accessible through the PC keyboard.
In this mode (while Scroll Lock is ON), the Switch always maps the PC’s [F11] key to the Macintosh
(Power) key. If the PC keyboard is a Windows 104-/105-key type, it will also normally always try to remap the
Windows Start key to the Mac (Command) key—but see the Caution notice below.
Here’s where position 5 of the CPU-Interface Card’s DIP switch comes in: By default (position 5 set to OFF),
the Switch also maps the PC’s [F12] key to the Mac (Command) key and the PC’s [Alt] key to the Mac
[Option (Alt)] key. To use the PC’s [F12] key as the Mac [Option (Alt)] key and the PC’s [Alt] key as the
Mac (Command) key instead, set DIP-switch position 5 to ON.
While Scroll Lock is OFF, the PC keyboard’s [F11], [F12], and [Alt] keys function normally. For more
information, see Section 8.4.
CAUTION!
This remapping is intended for input from older 101-/102-key keyboards that don’t
have the Windows keys. If you use 104/105-key keyboards that include these keys in
your ServSwitch Multi system, we recommend that you install UICDs for those
consoles and enable the UICDs’ Remap WIN95 Keys option instead (see
Section 9.4.3.E). Do not activate both types of remapping at the same time.
Page 42

CHAPTER 4: Installing CPU-Interface Cards, Server Cables, and Computers
41
4.3 Installing CPU-Interface Cards in a ServSwitch Multi
To install an Autosensing CPU-Interface Card in a ServSwitch Multi, take these steps:
1. Position the ServSwitch Multi so that its rear panel is facing you, as shown in Figure 4-4. Choose an
available slot. In most cases, any slot that is covered with a blank (connectorless) panel will be available.
However, note that on the Base Unit and MX, the local-console module on the far left end of the Switch’s
rear panel is covered by a blank panel but is not an available slot; no ServSwitch Multi Card of any type can
be installed in that slot. Remember that the option slot (the slot just to the right of the local-console
module, which has no corresponding front-panel LED or pushbutton) is an available slot but should not
be used to host a CPU-Interface Card except in systems with one user and 13 computers.
Figure 4-4. The ServSwitch Multi rear panels (as shipped from the factory).
BASE UNIT:
Local console
module (not
available)
Local console
module (not
available)
Option slot
(available but not
recommended)
Slots corresponding to lettered
channels (all available)
Slots corresponding to lettered
channels (all available)
Slots corresponding to lettered channels (all available)
MX:
EXP and SB:
Page 43

SERVSWITCH™ MULTI
42
2. Once you’ve chosen the slot, write down the letter of the corresponding channel in the “Channel Letter”
field of this Card’s record in a copy of the CPU-Interface Card pages of the System-Configuration Chart
(see Appendix A). At this time you should also write down what appears on the Card’s label (just to the
right of the HD44 connector if you look at the connector from the rear) in the Chart’s “Card-Label
Information” field, and (if the ServSwitch Multi unit is part of a cascaded system) you should write down
the Switch’s address in the “Switch Address” field as well.
3. Remove the panel covering the available slot by unscrewing the two Phillips-head screws that hold it in
place. (Save these screws; you’ll be replacing them momentarily.)
4. If you look into the open slot on the Switch, you will see “guide tracks” that the top and bottom of the
Card should slide along when you install it. Slide the Card gently into the slot along these tracks, until the
Card’s HD44 connector lines up flush with the back of the unit, as shown in Figure 4-5.
Figure 4-5. Inserting a CPU-Interface Card in the Switch.
5. Secure the Card in the Switch with the screws you removed in step 3. Retighten the screws completely, but
do not overtighten them.
Repeat the above procedure for every Autosensing CPU-Interface Card in your system.
Page 44

CHAPTER 4: Installing CPU-Interface Cards, Server Cables, and Computers
43
4.4 Connecting the Server Cables and Computer Equipment
Server Cables connect your computers to the ServSwitch Multi. You will need a set for each computer in your
system. These cables are 8 feet (2.4 m), 20 feet (6.1 m), or 30 feet (9.1 m) long and have an HD44 (high-density
44-pin D-subminiature) male connector on one end. They have different numbers of connectors on the other
end, depending on the options you ordered (see Table 4-2 below and the corresponding subsections on the
following pages). In order to connect RS/6000 or SGI workstations, you’ll also need a special adapter; see
Section 4.4.4. (It is also possible to connect HP
®
workstations; please call Black Box Technical Support if you
need to do this.)
Things to be aware of when you make Server-Cable connections of any type:
• As you attach the console equipment to each CPU-Interface Card, finish filling out the Card’s record in the
System-Configuration Chart (see Appendix A).
• The Cable’s audio-strand connectors are very similar to each other, but the audio-in strand has a blue band
around it so that you can tell the two apart.
• Similarly, on some versions of the Cable, the mouse-port-strand connector is the same as the connector on
the keyboard-port strand or serial-port strand. On these Cable versions, the mouse-port strand has a yellow
band around it so you can tell it apart.
• Some speakers, headphones, and microphones have plugs and jacks different from the type that the
ServSwitch Multi’s audio cables are designed for. If this is the situation with your audio equipment, you will
need adapters to connect your equipment to the ServSwitch Multi system. These adapters are commonly
available; call your local electronics-supply store for more information.
• For serial connections, if you want to connect an Apple serial port or a serial port with a connector other
than a DB9 female, see Appendix E.
Table 4-2. Product codes for Server Cables.
Platform Product Codes
8' (2.4-m) 20' (6.1-m) 30' (9.1-m) 8' (2.4-m) 20' (6.1-m) 30' (9.1-m)
Standard Standard Standard with Audio with Audio with Audio
IBM PS/2 or PC/AT KV2020-R2 KV2025 KV2030 KV2040-R2 KV2060-R2 KV2080-R2
(Section 4.4.1)
Apple Mac with Apple KV2220 KV2225 KV2230 KV2240 KV2260 KV2280
video (Section 4.4.2)
Apple Mac with VGA video KV2920 KV2925 KV2930 KV2940 KV2960 KV2980
(Section 4.4.2)
Sun Microsystems with KV2320 KV2325 KV2330 KV2340 KV2360 KV2380
Sun video (Section 4.4.3)
Sun Microsystems with KV2420 KV2425 KV2430 KV2440 KV2460 KV2480
VGA video (Section 4.4.3)
Page 45

SERVSWITCH™ MULTI
44
4.4.1 FOR IBM PS/2 OR PC/AT COMPATIBLE COMPUTERS
If you are using an IBM PS/2 or PC/AT compatible computer on a given channel, the Server Cable you’ll need
will be labeled KV2020-R2, KV2025, KV2030, KV2040-R2, KV2060-R2, or KV2080-R2 depending on the options
you ordered (see Table 4-2 on the previous page). The cable will have these computer-end connectors:
KV2020-R2, KV2025, and KV2040-R2, KV2060-R2 and
KV2030 Cable will have: KV2080-R2 Cables will have:
HD15 Male HD15 Male 5-Pin DIN Male
to VGA Video Port to VGA Video Port to PC/AT Kbd. Port
5-Pin DIN Male to PC/AT 6-Pin Mini-DIN Male 6-Pin Mini-DIN Male 6-Pin Mini-DIN Male
Keyboard Port to PS/2 Keyboard to PS/2 Keyboard to PS/2 Mouse Port
Port Port (yellow band)
6-Pin Mini-DIN Female DB9 Female DB9 Female
to PS/2 Mouse Port to Serial Mouse Port to Other Serial Port
(yellow band) (yellow band)
DB9 Female RCA Male (Mono) RCA Male (Stereo)
to Serial Mouse Port to Audio In Port to Audio Out Port
(blue band)
To install your cable and computer at each chosen computer channel, first plug the Server Cable’s HD44
connector into the matching connector on the CPU-Interface Card. When you’re sure the connection is firmly
seated, secure it by tightening the associated thumbscrews.
Now power down the computer and plug the matching connectors at the end of the universal IBM style
Server Cable’s video-port, keyboard-port, and mouse-port strands into the appropriate ports on your PC: If it’s a
PC/AT compatible, use the 5-pin DIN PC/AT keyboard connector and the DB9 female serial mouse-port
connector; if it’s a PS/2, use the 6-pin mini-DIN PS/2 keyboard and mouse connectors. If the Server Cable is an
audio type, it will have three additional connectors: two RCA plugs for a mono audio input and stereo output,
and a DB9 female connector to attach to another serial port. Attach these to any appropriate audio or serial
ports or equipment as desired.
Page 46

CHAPTER 4: Installing CPU-Interface Cards, Server Cables, and Computers
45
4.4.2 FOR APPLE MACINTOSH COMPATIBLE COMPUTERS
For an Apple Macintosh compatible computer outputting Apple type video on a DB15 connector, the Server
Cable you’ll need will be labeled KV2220, KV2225, KV2230, KV2240, KV2260, or KV2280 depending on the
options you ordered (see Table 4-2 at the start of Section 4.4). The cable will have these computer-end
connectors:
KV2220, KV2225, and KV2240, KV2260 and
KV2230 Cables will have: KV2280 Cables will have:
DB15 Male DB15 Male 4-Pin Mini-DIN Male
to Mac Video Port to Mac Video Port to ADB Port
4-Pin Mini-DIN Male RCA Male (Mono) RCA Male (Stereo)
to ADB Port to Audio In Port to Audio Out Port
(blue band)
For a newer Mac compatible computer outputting VGA type video on an HD15 connector, the Server Cable
you’ll need will be labeled KV2920, KV2925, etc., instead of KV2220, KV2225, etc. (see Table 4-2). Rather than a
DB15 male connector as shown above, the cable will have an HD15 male VGA connector as shown in
Section 4.4.1. (Otherwise, the two types of cable are identical.)
To install your cable and computer at each chosen computer channel, first plug the Server Cable’s HD44
connector into the matching connector on the CPU-Interface Card. When you’re sure the connection is firmly
seated, secure it by tightening the associated thumbscrews.
Now power down the computer and plug the connectors at the end of the Mac style Server Cable’s video-port
and ADB port strands into the appropriate ports on your Mac compatible computer. If the Server Cable is an
audio type, it will have two additional connectors: RCA plugs for a mono audio input and stereo output. Attach
these to any appropriate audio ports or equipment as desired.
Page 47

SERVSWITCH™ MULTI
46
4.4.3 FOR SUN MICROSYSTEMS COMPATIBLE COMPUTERS
For a Sun Microsystems compatible computer outputting Sun type video on a 13W3 connector, the Server
Cable you’ll need will be labeled KV2320, KV2325, KV2330, KV2340, KV2360, or KV2380 depending on the
options you ordered (see Table 4-2 at the start of Section 4.4). The cable will have these computer-end
connectors:
KV2320, KV2325, and KV2340, KV2360 and
KV2330 Cables will have: KV2380 Cables will have:
13W3 Male 13W3 Male 8-Pin Mini-DIN Male
to Sun Video Port to Sun Video Port to Kbd/Mouse Port
8-Pin Mini-DIN Male RCA Male (Mono) RCA Male (Stereo)
to Kbd/Mouse Port to Audio In Port to Audio Out Port
(blue band)
For a newer Sun compatible computer outputting VGA type video on an HD15 connector, the Server Cable
you’ll need will be labeled KV2420, KV2425, etc., instead of KV2320, KV2325, etc. (see Table 4-2). Rather than a
13W3 male connector as shown above, the cable will have an HD15 male VGA connector as shown in
Section 4.4.1. (Otherwise, the two types of cable are identical.)
To install your cable and computer at each chosen computer channel, first plug the Server Cable’s HD44
connector into the matching connector on the CPU-Interface Card. When you’re sure the connection is firmly
seated, secure it by tightening the associated thumbscrews.
Now power down the computer and plug the connectors at the end of the Sun style Server Cable’s video-port
and keyboard/mouse-port strands into the appropriate ports on your Sun compatible computer. If the Server
Cable is an audio type, it will have two additional connectors: RCA plugs for a mono audio input and stereo
output. Attach these to any appropriate audio ports or equipment as desired.
Page 48

CHAPTER 4: Installing CPU-Interface Cards, Server Cables, and Computers
47
4.4.4 FOR RS/6000 AND SGI COMPATIBLE COMPUTERS
If on a given channel you are using an RS/6000 compatible workstation computer that supports standard VGA
video, use the same equipment and procedures as you would to install a PS/2 compatible machine—see
Section 4.4.1.
If you are using an RS/6000 compatible workstation that outputs its video on 13W3 or 3C3 connectors, or if
you are using an SGI (Silicon Graphics) compatible workstation, connect your computer equipment as directed
in Section 4.4.1, with this exception: Plug the male side of the appropriate adapter into the workstation’s video
port, then plug the video strand of your KV20x0 cable into the adapter’s HD15 female side:
• KV16RS6-2 for RS/6000 (HD15 F to 13W3 M);
• KV163C3-2 for RS/6000 etc. (HD15 F to 3C3 M); or
• KV16SGI-2 for SGI (HD15 F to 13W3 F).
If the workstation outputs sync on green (as will always be the case if it has a 3C3 video port), and your
monitors do not all support sync on green, be sure to set positions 1 through 3 of the CPU-Interface Card’s DIP
switch to OFF OFF ON, the setting that causes the Card to generate horizontal and vertical sync from sync on
green (see Section 4.2).
Be aware that, in order to use a UICD’s on-screen display with a non-multisync monitor, you’ll probably have
to change the display’s default synchronization. See Section 9.5.
Page 49

SERVSWITCH™ MULTI
48
5. Installing Management and
Serial Control Cards and
Associated Equipment
IMPORTANT NOTE
If you are installing a cascaded ServSwitch Multi system, you should make sure your
Expansion Cards and Cables are installed properly before you begin installing other
types of Cards or attaching devices to the system. Refer to Chapter 6 and (if your
cascaded system includes any ServSwitch Multi Hubs) Chapter 7.
5.1 Overview of the Cards
The Management Card (our product code KV1608C-R2) and the Serial Control Card (our product code
KV1609C) work together to enable you to connect terminal-based file servers, network hubs, routers, and other
serial server-room equipment to the ServSwitch Multi and control them using one keyboard, monitor, and
mouse. This “terminal switching” requires at least one Management Card and one Serial Control Card in the
system. The Management Card provides the menuing and advanced control features. Serial Control Cards
provide four ports each for attaching equipment to the ServSwitch Multi system. From your Management Card,
you may select any terminal in the system, regardless of which Serial Control Card it is attached to.
The Management Card functions similarly to an CPU-Interface Card (KV2000C) in that you switch directly to
it from your keyboard or with the ServSwitch Multi’s on-screen menus or front-panel pushbuttons. Once you’ve
switched to the Management Card, on-screen menus allow you to name and select the attached terminals in
your ServSwitch Multi system. You can also configure data rate, data bits, stop bits, parity, and flow control for
each terminal through the menus.
The Management Card has an onboard microprocessor that handles the Card’s “Security-Monitoring System”
and “System-Management Tools.” With the Security-Monitoring System, administrators can track all switching
activity through a simple on-screen menu. Immediate feedback on logging and switching history is available for
every system user. With the System Management Tools, network managers can display their ServSwitch Multi
system configurations for easy troubleshooting. This menu-driven system shows the type of Card installed in
each port and the current firmware and hardware revision of each. Information on the type of computer
attached to each CPU-Interface Card is also available.
The Management and Serial Control Cards are field-installable and Flash-upgradable. Cards can be added or
replaced without disassembling or powering down the system. This makes installation, configuration, and
maintenance much easier.
Page 50

CHAPTER 5: Installing Management and Serial Control Cards and Associated Equipment
49
5.2 The Cards and Cables Illustrated
The Management Card and Serial Control Card are shown in Figure 5-1. The Management Card has a DB9
male connector that functions as an EIA/TIA RS-232 serial interface (pinned out according to TIA-574, like the
serial ports of an IBM PC/AT or PS/2 computer) so that you can upload security logs from the Card (see
Section 10.4.7) or download firmware upgrades to the Card (see Section 10.4.4).
The Serial Control Card has four RJ-45 female connectors. These function as proprietarily pinned EIA/TIA
RS-232 serial interfaces for connection to, and communication with, your servers, hubs, routers, etc.
Figure 5-1. The Management Card (top) and Serial Control Card (bottom).
Figure 5-2 shows the cables you’ll attach to these Cards. You can run a PC/AT (DB9) null-modem cable from
the Management Card to a PC running a terminal emulator.
You can run a Category 5 twisted-pair patch cable from any port on the Serial Control Card to the serial ports
on your equipment. (Connecting this cable to your equipment will require a modular adapter; see Section 5.4.)
Figure 5-2. PC/AT null-modem cable (EYN257H, left) and CAT5 stranded patch cable (EVMSL05, right).
Front of the
ServSwitch Multi
Rear of the
ServSwitch Multi
DB9
male
(4) RJ-45
female
Page 51

SERVSWITCH™ MULTI
50
5.3 Installing the Cards
To install a Management Card or Serial Control Card in a ServSwitch Multi, take these steps:
1. Position the ServSwitch Multi so that its rear panel is facing you, as shown in Figure 3-3 in Section 3.2.
Choose an available slot. In most cases, any slot that is covered with a blank (connectorless) panel will be
available. However, note that on the Base Unit and MX, the local-console module on the far left end of the
Switch’s rear panel is covered by a blank panel but is not an available slot; no ServSwitch Multi Card of any
type can be installed in that slot. Remember that the option slot (the slot just to the right of the localconsole module, which has no corresponding front-panel LED or pushbutton) is an available slot and can
host any card other than a CPU-Interface Card.
2. Once you’ve chosen the slot, write down the letter of the corresponding channel in the “Channel Letter”
field of this Card’s record in a copy of the Management/Control Cards pages of the System-Configuration
Chart (see Appendix A). At this time you should also write down what appears on the Card’s label (just to
the right of the DB9 connector or RJ-45 connectors if you look at them from the rear) in the Chart’s
“Card-Label Information” field, and (if the ServSwitch Multi unit is part of a cascaded system) you should
write down the Switch’s address in the “Switch Address” field as well.
3. Remove the panel covering the available slot by unscrewing the two Phillips-head screws that hold it in
place. (Save these screws; you’ll be replacing them momentarily.)
4. If you look into the open slot on the Switch, you will see “guide tracks” that the top and bottom of the
Card should slide along when you install it. Slide the new Management Card or Serial Control Card gently
into the slot along these tracks, until the Card’s connector or connectors line up flush with the back of the
unit, as shown in Figure 5-3.
Figure 5-3. Inserting a Card in the Switch (Management Card shown at left, Serial Control Card shown at right).
5. Secure the Card in the Switch with the screws you removed in step 3. Retighten the screws completely, but
do not overtighten them.
Repeat the above procedure for every Management Card or Serial Control Card in your system.
Page 52

CHAPTER 5: Installing Management and Serial Control Cards and Associated Equipment
51
5.4 Attaching Terminals to the Serial Control Card
The Serial Control Card has four ports available for attaching terminals, hubs, routers, and other serial
equipment. To attach your devices to these ports, you will need:
• Category 5 UTP cables. We provide these cables, terminated with RJ-45 plugs, in many stock lengths from
1 to 100 feet (0.3 to 30.5 m) and in just about any custom length you might want.
• Modular adapters to patch the RJ-45 plugs to your devices. We have these types available:
RJ-45 female to: Pinned as*: Product Code:
DB9 male DCE FA062M-DCE
DB9 male DTE FA062M-DTE
DB9 female DCE FA062F-DCE
DB9 female DTE FA062F-DTE
DB25 male DCE FA085M-DCE
DB25 male DTE FA085M-DTE
DB25 female DCE FA085F-DCE
DB25 female DTE FA085F-DTE
* This column shows how the DB connector on the adapter is pinned out. Adapters pinned as DCE are
designed to be connected to DTE devices such as PCs, terminals, etc. Adapters pinned as DTE are designed
to be connected to DCE devices such as modems and most bridges and routers.
To attach a serial device to the ServSwitch Multi system, take these steps:
1. Attach the appropriate adapter to the serial port of your device.
2. Plug one end of your CAT5 cable into the RJ-45 socket on the adapter.
3. Plug the other end of the cable into the first available port on the rear of your Serial Control Card.
Repeat steps 1 through 3 for each device you want to connect to the Serial Control Card.
Once you have finished installing these Cards and their cabling and attached devices, and have familiarized
yourself with the general operation of the ServSwitch Multi itself as described in Chapter 8, you can proceed
with operating the Cards and attached devices as described in Chapter 10.
Page 53

SERVSWITCH™ MULTI
52
6. Planning and Installing an
Expanded System (Optional)
If you are going to be setting up a keyboard/video/mouse-switching system that involves interconnecting
multiple ServSwitch Multi units, you should follow the instructions in this chapter to design the layout of this
system and install your Switch-to-Switch links (including Expansion Cards and expansion cables) before you
install any Interface, Management, or Serial Cards in, or attach any computer or peripheral equipment to, any
individual Switch.
This chapter will focus on the basic principles of ServSwitch Multi expansion, on installing expansion
hardware, and on possible designs for expanded layouts that involve only the ServSwitch Multi EXP and SB
(and, if absolutely necessary, the Base Unit and MX). For information about the ServSwitch Multi Hub
(including how to install it and its modules) and on designs for expanded layouts including the Hub, refer to
Chapter 7.
CAUTION!
Systems involving a large number of ServSwitch Multi units can be very tricky to set
up, and if they are wrongly configured, it can be difficult to figure out where the
problem is. Read this chapter carefully; if there’s anything you’re not clear about or
not confident about, please call Black Box Technical Support before you proceed, and
consult with our technicians for added assurance that your configuration will be
correct the first time.
To expand your ServSwitch Multi system beyond the confines of a single unit, you will need to add Expansion
Transmit and Receive Cards to your system. Connecting a Transmit Card in one Switch to a Receive Card in
another melds those two Switches into one larger switching matrix; see Figure 6-1 on the next page. If you
install Transmit Cards in the same ServSwitch Multi as a set of computers, those computers can communicate
with consoles (user stations) attached to other Switches. Conversely, if you install Receive Cards in the same
ServSwitch Multi as one or more consoles, those consoles can communicate with computers attached to other
Switches. Regardless of whether or not any Expansion Cards are installed in a ServSwitch Multi, the console(s)
attached to that unit can always access any computer attached to the same unit.
You will use one or more Expansion Cables to connect your Transmit Cards to your Receive Cards. Each of
these cables can be up to 250 feet (76.2 m) long (although total cable length between a console and a
computer can’t be more than 500 ft. [152.4 m]). Two ports are available on each Transmit and Receive Card for
Expansion-Cable connections.
Refer to Section 2.6.4 for descriptions and illustrations of the ServSwitch Multi EXP and the Expansion Cards
and Cables.
Page 54

CHAPTER 6: Planning and Installing an Expanded System (Optional)
53
Figure 6-1. A two-unit ServSwitch Multi system.
To successfully configure and install your expanded ServSwitch Multi system, you will need to figure out all of
these things:
1. Where to put your ServSwitch Multi units and how to interconnect them (see Section 6.1—also Chapter 7
if your system includes any ServSwitch Multi Hub).
2. How you are going to distribute your Expansion Cards and your computers, console equipment, serial
control devices, and associated Interface, Serial Control, and Management Cards among the Switches (see
Section 6.2).
3. What addresses and distance you’re going to configure your Expansion Cards for, and how you will do this
(see Section 6.3).
4. How to install your Expansion Cards (see Section 6.4) and Cables (see Section 6.5) and visually inspect
your system-in-progress (see Section 6.6).
5. Lastly, of course, how to install your User-Interface Cards (see Chapter 3), your CPU-Interface Cards (see
Chapter 4), and, if any, your Management and Serial Cards (see Chapter 5).
X
M
T
R
C
V
C
P
U
U
S
R
R
C
V
X
M
T
U
S
R
C
P
U
Page 55

SERVSWITCH™ MULTI
54
6.1 Placing the ServSwitch Multi
NOTE
Here and elsewhere in this chapter you will see diagrams in which ServSwitch Multis
units are identified as “Switch 0.” You will notice that all such Switches have Receive
Cards installed in them, but no Transmit Cards. Do not set the address of any unit with
a Transmit Card installed in it to zero; your system will not work. The address zero is
reserved as the operating address for all ServSwitch Multis in which no Transmit
Cards are installed—unless a firmware upgrade has to be done (see Section 8.13 and
the entry for “CHASSIS=n” in Section 8.15).
There are two basic types of expansion configurations for the ServSwitch Multi: the “star” and the “daisychain.”
In the star configuration, additional Switches are all attached to a central “hub” ServSwitch Multi, as shown in
Figure 6-2. In the daisychain configuration, additional Switches are attached in a line: The first Switch is
connected to the second, which in turn is connected to the third, and so on, as shown in Figure 6-3. (Note that
in both Figure 6-2 and Figure 6-3, the users on Switch 0 can access any computer attached to any of the four
Switches in the system.) The star configuration is the more common of these two approaches and is the
recommended setup for most applications.
Figure 6-2. A sample “star” configuration.
Figure 6-3. A sample “daisychain.”
SWITCH 0
SWITCH 1
SWITCH 2
SWITCH 3
SWITCH 0
SWITCH 1
SWITCH 2
SWITCH 3
U
X
S
R
U
M
S
T
R
X
M
T
U
S
R
U
U
S
S
R
R
X
U
U
M
S
T
R
U
S
S
R
R
R
R
U
C
C
C
V
V
R
S
P
C
R
U
V
C
X
P
M
U
C
P
M
U
X
M
T
C
P
U
C
P
T
U
X
T
C
P
U
R
U
C
S
V
R
C
P
U
C
P
U
C
P
U
Page 56

CHAPTER 6: Planning and Installing an Expanded System (Optional)
55
For systems that (a) will have to reach more than sixty computers or (b) can’t be efficiently laid out in a straight
line but will be operating across computer-to-console distances greater than 250 feet (76.2 m), we recommend a
combination star/daisychain configuration, as shown in Figure 6-4. This combination is usually the most
flexible way to manage large numbers of computers, especially if you will be frequently adding, moving, or
removing them.
Figure 6-4. A hybrid expanded configuration.
As you configure your own system, keep the following considerations in mind:
1. The maximum cabling distance between any user and any accessible computer in the system is 500 feet
(152.4 m). If this maximum distance is exceeded, video quality will be severely degraded.
2. The maximum number of ServSwitch Multis between any user and any accessible computer is four,
including the Switches attached to the user’s console and the computer. If a user attempts to switch to a
computer more than four Switches away (that is, a computer that would have to send its video signal
through more than four Switches to reach the user), the command will be ignored; the system will remain
on the current channel until the user selects a closer channel.
SWITCH 0
SWITCH 1
SWITCH 2 SWITCH 4
KEY
CPU =
CPU-Interface Card (KV2000C)
USR = User-Interface Card
(KV2500C or KV2550C-R2)
XMT = Expansion Transmit Card
(KV1601C or KV1603C)
RCV = Expansion Receive Card
(KV1602C or KV1604C)
SWITCH 5
SWITCH 3
U
U
X
C
C
S
S
M
P
P
R
R
T
U
U
X
M
T
X
C
M
P
T
U
C
R
P
C
U
V
U
U
C
U
S
S
P
S
R
R
U
R
C
R
U
P
C
S
U
V
R
X
U
R
C
U
U
U
C
U
C
C
C
U
P
U
U
S
R
U
P
P
S
S
U
U
R
R
R
C
C
U
C
P
P
S
V
U
U
R
M
S
C
P
T
S
R
V
U
R
C
S
S
P
S
P
R
R
U
R
U
X
C
U
C
C
U
U
C
M
P
S
P
T
U
R
U
U
P
S
S
P
S
U
R
R
U
R
U
U
R
C
C
S
S
C
P
P
R
R
V
U
U
Page 57

SERVSWITCH™ MULTI
56
6.2 Determining Where to Install Cards and Attach Equipment
Once you’ve chosen the best placements and system configuration for your ServSwitch Multis, you’ll need to
determine (a) which Expansion Cards to install in which Switches, (b) where to put your computers and user
equipment (which will determine where you install your CPU and User-Interface Cards), and (c) where to put
your terminals, routers, etc. if you’re connecting any to the system (which will determine where you install your
Management and Serial Control Cards).
As you plan, here’s what you need to keep in mind about how the Expansion Cards work:
1. In order for a computer attached to a ServSwitch Multi to transmit its video signal to consoles attached to
other Switches in the system, you must install at least one Transmit Card in the computer’s Switch. Refer to
Figure 6-5.
2. In order for a console attached to a ServSwitch Multi to receive signals from computers attached to other
Switches in the system, you must install at least one Receive Card in the console’s Switch. Refer to
Figure 6-5.
Figure 6-5. An expanded system that illustrates the Transmit/Receive mechanism.
In this example, users on Switch 2 have
access to the local computers (the ones
attached to their own Switch) only, because
there is no Receive Card installed in Switch 2.
Users on Switch 1 can not only access the
local computers, they can also access the
computers attached to Switch 2, because a
Transmit Card is installed in Switch 2 and a
Receive Card is installed in Switch 1. But they
cannot reach the computers on Switch 0
because no Transmit Card is installed in
Switch 0.
Users on Switch 0 have access to all
computers in the system—the local computers
plus the computers on Switches 1 and 2—
because the Transmit Cards installed in
Switches 1 and 2 are connected (directly in
Switch 1’s case, indirectly in Switch 2’s) to the
Receive Card installed in Switch 0.
SWITCH 0
SWITCH 1
SWITCH 2
X
M
T
R
X
C
M
V
T
R
C
V
C
C
P
P
U
U
C
C
P
P
U
U
C
C
P
P
U
U
C
P
U
C
P
U
U
S
R
U
S
R
C
U
P
S
U
R
Page 58

CHAPTER 6: Planning and Installing an Expanded System (Optional)
57
3. There are several independent data pathways available to carry transmissions through any ServSwitch
Multi: eight pathways for the SB model, four pathways for the EXP and Base Unit models, and only two for
the MX model. Each expansion-port link between two ServSwitch Multis through a pair of Transmit and
Receive Cards is going to require the use of one of these pathways through each of the two Switches every
time signals are transmitted across the link. Whenever all of the pathways in a given Switch are active
(carrying data) at the same time, any attempt by any other user in the system to independently select a
computer channel on that Switch will be ignored.
Refer to Figure 6-6; let’s examine what happens if all of these Switches are ServSwitch Multi EXPs. Say
the user on Switch 0 wants to access computer 1H. A Transmit Card on Switch 1 is connected to a Receive
Card on Switch 0, so this would work if there were fewer users on Switch 1. But because there are four
users on Switch 1, and all of them will be using at least one of Switch 1’s data pathways at all times, Switch 1
has no available pathways left. Therefore the user on Switch 0 can’t establish an independent connection
to computer 1H (although he or she can share access to that computer—see Section 8.3.) However, as
long as the user on Switch 2 has computer 2B selected, the user on Switch 0 can access computer 2K
independently, because the user on Switch 2 is only occupying one of the four pathways through Switch 2.
If all of the switches in Figure 6-6 are ServSwitch Multi SBs, the user on Switch 0 has no problem
independently accessing computer 1H. This connection would only be the fifth for Switch 1, which would
still have three free data pathways available.
Figure 6-6. An expanded system that shows the importance of data-pathway availability.
SWITCH 1
SWITCH 0
SWITCH 2
C
C
C
C
X
M
T
C
U
U
U
P
P
P
P
U
U
U
U
I
H
G
F
U
P
S
S
S
S
U
R
R
R
R
E
C
U
P
S
U
R
K
C
X
P
M
U
T
B
R
U
C
S
V
R
Page 59

SERVSWITCH™ MULTI
58
6.3 Configuring Your Expansion Cards
You will need to configure your Transmit and Receive Cards before you install them in your ServSwitch Multi
system. There are two steps to this process:
1. Setting the DIP switch on each Transmit Card for the proper ServSwitch Multi unit address.
2. Setting the jumpers on each Transmit and Receive Card for the length of Expansion Cable that will be
attached to each of the Card’s two ports.
6.3.1 S
ETTING THE TRANSMIT CARD’S UNIT-ADDRESS DIP SWITCH
All ServSwitch Multis that contain Transmit Cards must be given a unique unit address that you determine. Unit
addresses are numeric, and may be any value from 1 to 254 (addresses “0” and “255” are reserved). Make sure
to set every Transmit Card that you’ll be installing in a given ServSwitch Multi to the same unit address; if a
Switch detects that it contains Transmit Cards with different addresses, it will not operate at all. Make very sure
not to set Transmit Cards installed in different Switch units to the same address; otherwise your system will
operate, but it will malfunction, and finding and fixing the problem could be tough.
To set the unit-address DIP switch on your Transmit Cards, take these steps:
1. Gather together all of the Transmit Cards that you will be installing in a particular ServSwitch Multi.
2. Orient your first Transmit Card as shown in Figure 6-7, and find its colored DIP-switch assembly.
Figure 6-7. The Transmit Cards’ DIP switch.
Regular Transmit Card
(KV1601C)
CAT5 Transmit Card
(KV1603C)
O
8 7 6 5 4 3 2 1
N
Page 60

CHAPTER 6: Planning and Installing an Expanded System (Optional)
59
3. Choose a unique unit address and set the DIP switch for that address; refer to Table 6-1 for addresses up to
16 decimal or Appendix C for higher addresses.
Table 6-1. DIP-switch settings for unit addresses.
Unit Settings* of Unit Settings* of
Address Switch Positions Address Switch Positions
8 7 6 5 4 3 2 1 8 7 6 5 4 3 2 1
1 0 0 0 0 0 0 0 1 9 0 0 0 0 1 0 0 1
2 0 0 0 0 0 0 1 0 10 0 0 0 0 1 0 1 0
3 0 0 0 0 0 0 1 1 11 0 0 0 0 1 0 1 1
4 0 0 0 0 0 1 0 0 12 0 0 0 0 1 1 0 0
5 0 0 0 0 0 1 0 1 13 0 0 0 0 1 1 0 1
6 0 0 0 0 0 1 1 0 14 0 0 0 0 1 1 1 0
7 0 0 0 0 0 1 1 1 15 0 0 0 0 1 1 1 1
8 0 0 0 0 1 0 0 0 16 0 0 0 1 0 0 0 0
*“0” = OFF, “1” = ON.
4. Configure the rest of the Transmit Cards you’ll be installing in this specific ServSwitch Multi unit with the
same address.
5. Set these Transmit Cards beside their ServSwitch Multi unit. Gather together all of the Transmit Cards that
will be installed in the next ServSwitch Multi unit, and repeat steps 2 through 5 until you have reached the
last ServSwitch Multi unit in your system.
Page 61

SERVSWITCH™ MULTI
60
6.3.2 SETTING THE DISTANCE JUMPERS ON THE TRANSMIT AND RECEIVE CARDS
Every pair of Transmit and Receive Cards that will be communicating with each other through one of their
ports must be configured for the length of the Expansion Cable(s) that will connect them together. This
involves setting a series of “distance jumpers” for each port on each card. (Remember that, should you decide
to connect the two ports of an Transmit Card to ports on two different Receive Cards, or vice versa, you will
need to set the ports’ jumpers differently.)
Take these steps for each such pairing of Transmit and Receive Cards in your system:
1. Orient a pair of Transmit and Receive Cards as shown in Figure 6-8. (Because of the way its components
are labeled, it’s easier to read the regular Receive Card if you hold it with its port connectors to the left.)
Figure 6-8. Expansion-card orientation.
2. Choose which port on the Transmit and Receive Cards you will be connecting your Expansion Cable(s) to:
the lower one (#1) or the upper one (#2). You may use either, but if you choose Port 1 on one Card, the
cable(s) attached to it must run to Port 1 on the other Card; likewise Port 2 must be connected to the
other Card’s Port 2.
3. Referring to Tables 6-2 through 6-4 on the next two pages, set the appropriate jumpers on each Card
according to the port chosen and the length of the Expansion Cable that will connect them. As you
configure each Card, fill out a record for it on a copy of the Transmit- or Receive-Card SystemConfiguration Chart (Chart A-3 or A-4 respectively in Appendix A).
After all of the Cards have been configured, they are ready to be installed. Follow the directions for doing this
in Section 6.4.
Expansion Transmit Cards Expansion Receive Cards
Page 62

CHAPTER 6: Planning and Installing an Expanded System (Optional)
61
Table 6-2. Jumper settings for Transmit Cards.*
Table 6-3. Jumper settings for the regular Receive Card (KV1602C).*
Table 6-4. Jumper settings for the CAT5 Receive Card (KV1604C).*
*The default setting in each of these tables is the topmost (3' to 25' for
the Transmit Cards, 3' to 100' for the Receive Cards); 1' (one foot) =
30.5 cm.
3' to
25'
50'
100'
150'
200'
to
250'
Expansion Port 1 Expansion Port 2Dist.
JP25
JP12
JP11
JP10
JP9
JP12
JP11
JP10
JP9
JP12
JP11
JP10
JP9
JP12
JP11
JP10
JP9
JP12
JP11
JP10
JP9
JP8
JP7
JP6
JP5
JP8
JP7
JP6
JP5
JP8
JP7
JP6
JP5
JP8
JP7
JP6
JP5
JP8
JP7
JP6
JP5
JP25
JP25
JP25
JP25
JP4
JP3
JP2
JP1
JP4
JP3
JP2
JP1
JP4
JP3
JP2
JP1
JP4
JP3
JP2
JP1
JP4
JP3
JP2
JP1
JP24
JP23
JP22
JP21
JP24
JP23
JP22
JP21
JP24
JP23
JP22
JP21
JP24
JP23
JP22
JP21
JP24
JP23
JP22
JP21
JP20
JP19
JP18
JP17
JP26
JP20
JP19
JP18
JP17
JP26
JP20
JP19
JP18
JP17
JP26
JP20
JP19
JP18
JP17
JP26
JP20
JP19
JP18
JP17
JP26
JP16
JP15
JP14
JP13
JP16
JP15
JP14
JP13
JP16
JP15
JP14
JP13
JP16
JP15
JP14
JP13
JP16
JP15
JP14
JP13
Expansion Port 1 Expansion Port 2Dist.
3' to
100'
150'
to
200'
250'
JP1
JP1
JP1
1
1
1
1
1
1
JP2
JP2
JP2
JP3
JP3
JP3
1
1
1
1
1
1
JP4
JP4
JP4
JP5
JP5
JP5
1
1
JP6
1
1
JP6
1
1
JP6
JP8
JP8
JP8
JP7
1
1
JP7
1
1
JP7
1
1
1
1
JP10
1
1
JP10
1
1
JP10
JP9
JP9
JP9
1
1
JP12
1
1
JP12
1
1
JP12
JP11
JP11
JP11
Expansion Port 1 Expansion Port 2Dist.
3' to
100'
150'
to
200'
250'
JP6
JP6
JP6
JP4
1
JP5
1
JP4
1
JP5
1
JP4
1
JP5
1
JP2
1
JP3
1
1
JP3
1
1
JP3
1
JP2
JP2
1
JP1
1
1
JP1
1
1
JP1
1
JP11
JP11
JP11
1
1
1
1
1
1
JP12
JP12
JP12
JP9
JP9
JP9
1
1
1
1
1
1
JP10
JP10
JP10
JP7
JP7
JP7
1
1
1
1
1
1
JP8
JP8
JP8
Page 63

SERVSWITCH™ MULTI
62
6.4 Installing Your Expansion Cards
To install a Transmit or Receive Expansion Card in a ServSwitch Multi Base Unit or Expansion Chassis, take
these steps:
1. Position the ServSwitch Multi so that its rear panel is facing you, as shown in Figure 3-3 in Section 3.2.
(While the Base Unit, MX, EXP, and SB models are all shown in that illustration, we recommend that
where possible you use only EXP and SB units in cascaded ServSwitch Multi systems.)
2. Choose an available slot. In most cases, any slot that is covered with a blank (connectorless) panel will be
available. However, note that on the Base Unit and MX (if you must use any of these), the local-console
module on the far left end of the Switch’s rear panel is covered by a blank panel but is not an available
slot; no ServSwitch Multi Card of any type can be installed in that slot. Remember that the option slot (the
slot just to the right of the local-console module, which has no corresponding front-panel LED or
pushbutton) is an available slot and should preferably host an Expansion Card, User-Interface Card, etc.,
rather than a CPU-Interface Card.
3. Remove the blank panel covering the available slot by unscrewing the two Phillips-head screws that hold
the panel in place.
4. Find the two Phillips-head screws on the Transmit or Receive Card, located above and below the two
connectors. Back these screws out slightly until they are flush with the Card’s cover plate.
5. If you look into the open slot on the Switch, you will see “guide tracks” that the top and bottom of the
Card should slide along when you install it. Slide the Card gently into the slot along these tracks, until the
Card’s two HD26 connectors or six RJ-45 connectors line up flush with the back of the unit, as shown in
Figure 6-9.
Figure 6-9. Inserting a regular (left) or CAT5 (right) Expansion Card.
6. Retighten the holding screws completely. Do not overtighten.
Repeat the above procedure for every Transmit Card and Receive Card in your system.
Page 64

CHAPTER 6: Planning and Installing an Expanded System (Optional)
63
6.5 Installing Your Expansion Cables
To connect your Expansion Cables to the Expansion Cards, take these steps:
1. Get Expansion Cable(s) whose length matches the jumper settings of the chosen port on your first
communicating pair of Transmit and Receive Cards.
2A. Regular Expansion Cards: Connect the Expansion Cable’s single female HD26 connector to the chosen port
(male HD26 connector) on the Transmit Card. Run the cable to the matching port on the Receive Card.
Tighten the thumbscrews on the connectors at each end of the cable.
2B. CAT5 Expansion Cards: Connect the RJ-45 plugs of your three Expansion Cables to the chosen port (three
RJ-45 sockets) on the Transmit Card. Run the cables to the matching port on the Receive Card.
Repeat the above procedure for every communicating pair of ports in your system.
6.6 Inspecting Your Expanded System
You can find out whether or not your Expansion Cards and Cables are properly installed by observing the LEDs
on the front panels of the ServSwitch Multis that you’ve installed the Cards in. One by one, plug the ServSwitch
Multi units in and turn them on long enough to look at their front panels.
On a ServSwitch Multi EXP, an Expansion Card is installed correctly in a given channel, and the cabling
(single Cable for regular Cards, three Cables for CAT5 Cards) is installed correctly on that Card’s Port 2, when
that channel’s upper (amber) LED is lit. The Card is OK, and the cabling is installed correctly on that Card’s
Port 1, when that channel’s lower (green) LED is lit. However, if you’ve installed Transmit Cards with
conflicting unit addresses in the same ServSwitch Multi EXP, the amber and green LEDs for the Transmit
Cards’ channels will flash back and forth.
On a ServSwitch Multi Base Unit, an Expansion Card is installed correctly in a given channel, and the cabling
(single Cable for regular Cards, three Cables for CAT5 Cards) is installed correctly on either of that Card’s
ports, if that channel’s green LED is lit. Similarly to the EXP, if you have Transmit Cards in the same Base Unit
with conflicting unit addresses, the green LEDs for the Transmit Cards’ channels will flash.
(For more information about the operating functions of the LEDs, see Section 8.1.)
If everything looks good, proceed with the steps called for in Chapters 3 through 5. If you have problems
installing or operating your cascaded ServSwitch Multi system, see Section 11.1.
Page 65

SERVSWITCH™ MULTI
64
7. The ServSwitch Multi Hub
7.1 Overview
The ServSwitch Multi Hub is designed to make configuring and installing large, complex cascaded ServSwitch
Multi systems as efficient and economical as possible. By channeling the expansion signals that pass between
other ServSwitch Multi units through a “central switching station,” the Hub streamlines your configuration and
can greatly reduce the number of ServSwitch Multi units, Expansion Transmit and Receive Cards, and
expansion cables in the system.
Figure 7-1 shows a simple 16 x 16 matrix of 4-User units configured with and without the Hub. All users in
this system can access any computer at any time.
Figure 7-1. A 16-user, 16-computer ServSwitch Multi system without a Hub (above) and with one (below).
Using only ServSwitch
Multi EXP units, connecting
16 users to 16 computers
so that all of the users have
independent access to all
of the computers requires
eight EXPs, 32 CAT5
Transmit Cards, 32 CAT5
Receive Cards, and
128 CAT5 expansion
cables. In this picture, each
of the lines between the
EXP units represents eight
cables.
If you use a Hub with one
Transmit Module and one
Receive Module installed,
you’ll still need eight EXP
units, but only eight CAT5
Transmit Cards, eight CAT5
Receive Cards, and
64 expansion cables—
a significant savings. In this
picture, each line between
the EXP units and the Hub
represents four cables.
Page 66

CHAPTER 7: The ServSwitch Multi Hub
65
The Hub, shown in Figure 7-2, is a rackmountable chassis that’s 9U (15.75", 40 cm) high. It contains two power
supplies, two fan assemblies, and as many as nine total Transmit Modules and Receive Modules. The power
supplies are fully redundant and hot-swappable, so you can replace one at any time without powering down the
system. Fan assemblies are also hot-swappable, but both are needed to cool a fully loaded Hub chassis.
Each Transmit or Receive Module contains 16 pairs of RJ-45 female connectors. One RJ-45 of each pair
accepts the Category 5 video cable from the video (bottom) RJ-45 connector of an expansion port on a CAT5
Expansion Card installed in a ServSwitch Multi EXP, SB, Base Unit, or MX. The other RJ-45 of each pair accepts
the Category 5 keyboard/mouse cable from the same expansion port’s keyboard/mouse (middle) RJ-45
connector. (The ServSwitch Multi Hub doesn’t support connections involving the multimedia [serial and audio,
top] RJ-45 connector of these expansion ports; ServSwitch Multi systems that use Hubs carry keyboard, video,
and mouse signals only.)
Figure 7-2. A fully loaded ServSwitch Multi Hub.
Power/fan
modules
Transmit and Receive
modules
Page 67

SERVSWITCH™ MULTI
66
7.2 Features and Benefits
• Liquid crystal display. The Hub has a front-panel LCD for easy configuration and identification. You can
see system-connection information, check the hardware and firmware revisions of your modules, or
troubleshoot system errors, all from an easy-to-use set of screens.
• Front-panel LEDs. LEDs on the Hub ’s front panel let you monitor system power and error status at a
glance. The green Power LED will remain continuously lit while the Hub is receiving AC power from either
of its power supplies. The red Fail LED blinks when a problem is detected, then becomes solidly lit when
the problem is acknowledged. The LED will remain lit until the problem is resolved, or begin blinking
again if a new problem is discovered.
• Flash upgrade capability. The Hub’s Modules, including the Front-Panel Element that controls the
components mounted on its front panel, are Flash-upgradable. Flash-memory technology allows you to
upgrade the Modules’ firmware without removing Modules or powering down the system. New firmware
revisions can be uploaded into the Modules through serial connections to other ServSwitch Multi models in
your system (see Section 8.13).
• Hot-swappable components. The power supplies, fan assemblies, and the Transmit/Receive Modules in the
Hub are all hot swappable. You can remove or replace these components without powering down the
system or the attached servers, so maintenance can be performed at any time without interrupting system
users.
7.3 Installing the Hub
Take these steps to install a ServSwitch Multi Hub:
1. First—before you do anything else—plan your layout. You’ll want to connect each of the two ports on each
of the CAT5 Transmit and Receive Cards in your ServSwitch Multi system to one of the ports on a Hub’s
Receive or Transmit Module respectively. Refer to the sample layouts in Section 7.7. If you still have any
questions, please call Black Box Technical Support. (We strongly encourage you to call Black Box Tech
Support anyway, to discuss your application, before you perform any large or complex ServSwitch Multi
installation.)
2. When you have your physical installation planned out, install the Hub’s fan assemblies and power supplies
in its chassis (these are shipped uninstalled to minimize the risk of them being damaged in transit):
a. Make sure that the power supplies are not connected to any AC outlet and that their power switches are
in the “OFF” position.
b. Gently slide the power supplies into their mounting brackets on the left side of the Hub. (It doesn’t
matter which supply you put in which bracket.)
c. Connect a power cord to the IEC 320 inlet on each of the power supplies. Plug the other end of each
power cord into a working AC outlet. Switch on both of the power supplies and verify that the fan
modules work—the fans should start running right away.
Page 68

CHAPTER 7: The ServSwitch Multi Hub
67
NOTE
If it will be easier for you to configure your Modules while you’re looking at cables
you’ve already installed, feel free to attach your expansion cables to any given Module
(refer to step 6) before you do steps 3 through 5.
3. Next you will need to configure the DIP switches on your Transmit Modules. Each of these Modules has
sixteen dual-RJ-45 Transmit ports on it, numbered 1 through 16 from left to right, as shown in Figure 7-5
on the next page. Each port has three six-position DIP switches that you need to set for the length of the
Category 5 cable that will be attached to the port. The locations of these DIP switches are shown in
Figure 7-3 below, and their possible settings are shown in Figure 7-4 on the next page. For any given
Transmit port, leave all of the switch positions set to OFF if the cable you’ll be attaching to that port isn’t
more than 25 ft. (7.6 m) long. If the cable is longer, move a position of each switch to ON for each 50 ft.
(15.2 m) longer, starting with the leftmost position and working toward the right. For example, set the
leftmost position ON if the cable is between 25 and 75 ft. (7.6 and 22.9 m) long; set the two leftmost
positions ON if the cable is between 75 and 125 ft. (22.9 and 38.1 m) long; and so on, up to a maximum of
250 ft. (76.2 m), which is the greatest length of CAT5 expansion cable that the ServSwitch Multi system can
support.
Figure 7-3. The DIP-switch areas on the Transmit Module’s circuit board.
PORT 1
DIP-Switch Area
PORT 3
DIP-Switch Area
PORT 5
DIP-Switch Area
PORT 7
DIP-Switch Area
PORT 9
DIP-Switch Area
PORT 11
DIP-Switch Area
PORT 13
DIP-Switch Area
PORT 15
DIP-Switch Area
PORT 2
DIP-Switch Area
PORT 4
DIP-Switch Area
PORT 6
DIP-Switch Area
PORT 8
DIP-Switch Area
PORT 10
DIP-Switch Area
PORT 12
DIP-Switch Area
PORT 14
DIP-Switch Area
PORT 16
DIP-Switch Area
Page 69

SERVSWITCH™ MULTI
68
Figure 7-4. The Transmit Module’s possible DIP-switch settings.
Figure 7-5. The port layout of the Transmit and Receive Modules.
Video
Keyboard/
Mouse
Up to 25 ft.
(7.6 m)
From over
25 ft. (7.6 m) to
75 ft. (22.9 m)
From over
75 ft. (22.9 m) to
125 ft. (38.1 m)
From over
125 ft. (38.1 m) to
175 ft. (53.3 m)
From over
175 ft. (53.3 m) to
225 ft. (68.6 m)
From over
225 ft. (68.6 m) to
250 ft. (76.2 m)
ON
123 4 5 6
ON
123 4 5 6
ON
123 4 5 6
ON
123 4 5 6
ON
1 2 3 4 5 6
ON
1 2 3 4 5 6
ON
1 2 3 4 5 6
ON
1 2 3 4 5 6
ON
1 2 3 4 5 6
ON
1 2 3 4 5 6
ON
1 2 3 4 5 6
ON
1 2 3 4 5 6
ON
123 4 5 6
ON
123 4 5 6
1 2 3 4 5 6
1 2 3 4 5 6
ON
1 2 3 4 5 6
ON
1 2 3 4 5 6
ON
ON
Page 70

CHAPTER 7: The ServSwitch Multi Hub
69
4. Now configure the DIP switches on your Receive Modules. Like the Transmit Modules, each of the Receive
Modules has sixteen dual-RJ-45 transmit ports on it, numbered 1 through 16 from left to right, as shown in
Figure 7-5 on the previous page. Each port has three two-position DIP switches that you need to set for the
length of the Category 5 cable that will be attached to the port. The locations of these DIP switches are
shown in Figure 7-6, and their possible settings are shown in Figure 7-7. For any given Receive port, leave
all of the switch positions set to OFF if the cable you’ll be attaching to that port isn’t more than 125 ft.
(38.1 m) long. If the cable is longer than 125 ft. (38.1 m) but not more than 225 ft. (68.6 m), move the lefthand position in each switch to ON. If the cable is longer than 225 ft. (68.6 m), up to the Switch’s
maximum supported CAT5 expansion-cable length of 250 ft. (76.2 m), move all of the switch positions to
ON.
Figure 7-6. The DIP-switch areas on the Receive Module’s circuit board.
Figure 7-7. The Receive Module’s possible DIP-switch settings.
Up to 125 ft. (38.1 m)
From over 125 ft. (38.1 m)
to 225 ft. (68.6 m)
From over 225 ft. (68.6 m)
to 250 ft. (76.2 m)
PORT 1
DIP-Switch Area
PORT 3
DIP-Switch Area
PORT 5
DIP-Switch Area
PORT 7
DIP-Switch Area
PORT 9
DIP-Switch Area
PORT 11
DIP-Switch Area
PORT 13
DIP-Switch Area
PORT 15
DIP-Switch Area
PORT 2
DIP-Switch Area
PORT 4
DIP-Switch Area
PORT 6
DIP-Switch Area
PORT 8
DIP-Switch Area
PORT 10
DIP-Switch Area
PORT 12
DIP-Switch Area
PORT 14
DIP-Switch Area
PORT 16
DIP-Switch Area
ON
12ON12ON12
ON
12ON12ON12
ON
12ON12ON12
Page 71

SERVSWITCH™ MULTI
70
5. Remove the blanking plates on the Hub’s rear panel that cover the slots you want to install your Transmit
and Receive Modules in. Gently slide your Modules into the Hub’s chassis and tighten the retaining screws.
6. Use the Hub’s LCD to set the Hub’s chassis number. When you turned ON the Hub’s power supplies in
step 2, the Idle Display screen (refer to Section 7.5.1) should have appeared on its LCD panel. Press the
Down button on the Hub’s front panel to get from this screen to the Chassis ID screen (refer to
Section 7.5.3). To set a new Hub’s ID (or to change the ID of a Hub you’ve moved to a new system or
location), press the Hub’s Enter button. This screen will appear:
Chassis ID
->new ID ###
old ID ###
****EDIT MODE****
The existing ID number is shown next to “old ID”; a new Hub will have the factory-default ID number 0.
This is not a valid ID; you need to change it to another number—different from that of any other Switch chassis in your
system—immediately. Press the Hub’s Up and Down buttons to set a new chassis ID for your Hub (the display
will scroll through the possible numbers from 1 to 254). When you’re done, press the Hub’s Enter button
to save the changes and return to the Chassis ID Menu, or press the Hub’s Escape button to cancel your
changes and return to the Chassis ID screen without saving them. If neither button is pressed within
5 seconds of your last change, your changes will be canceled and you will automatically be returned to the
Chassis ID screen.
7. Lastly, referring to the layout you should have planned in step 1, run Category 5 cables between the ports
on your Hub’s Transmit and Receive Modules and the ports on the CAT5 Expansion Cards in the other
ServSwitch Multis in your system. For each Module port/Card port pair that you want to interconnect, one
cable should connect the Module port’s video connector (the upper of its two RJ-45s) with the Card port’s
video connector (the lowest of its three RJ-45s); a second cable should connect the Module port’s
keyboard/mouse connector (the lower of its two RJ-45s) with the Card port’s keyboard/mouse connector
(the middle of its three RJ-45s). Don’t make any connections to the Card port’s multimedia (serial/audio)
connector (the uppermost of its three RJ-45s); the Hub doesn’t carry multimedia signals.
The ServSwitch Multi Hub should now be ready for continuous operation, as soon as you update the
configuration of the rest of your ServSwitch Multi system.
7.4 The Functions of the Hub’s LEDs
There are two LEDs on the Hub’s front panel, one green and one red. The green Power LED is continuously lit
while the Hub is power ON. The red Fail LED will begin blinking if the Hub detects a malfunction in one of its
fan modules or power supplies. The Fail LED will continue to blink until you look at the problem report in the
System Status screen in the Hub’s LCD panel (see Section 7.5.5). Once you do so, the Fail LED will remain
continuously lit until (a) the problem is resolved (the LED will go dark) or (b) another problem is detected
(the LED will start blinking again).
Page 72

CHAPTER 7: The ServSwitch Multi Hub
71
7.5 The Functions of the Hub’s LCD Panel and Pushbuttons
There is also a 4-line-by-20-character LCD panel on the Hub’s front panel. You can use this display and its four
associated pushbuttons (Up, Down, Escape, and Enter) to configure your Hub, view its status, etc.
7.5.1 T
HE IDLE DISPLAY SCREEN
As soon as you power on your Hub, the Idle Display screen appears:
---- KV170RA ---Chassis nnn
Serial nnnnnnnnnn
www.blackbox.com
This is the Hub’s “starting” screen. “Chassis nnn” is the Hub’s chassis number; as shipped from the factory, it
will be “000” and must be changed (see Section 7.5.3). “Serial nnn” is the Hub unit’s unique serial number,
which can’t be changed.
All of the Hub’s other screens (described in the following subsections) can be accessed from here by pressing
some combination of the Down button (shown here as “↓”) and the Enter button (shown as “→”):
Idle Display → Contrast
↓
Chassis ID → Change ID
↓
Installed Modules → Module Details
↓
System Status → Status Details
↓
Serial Port → Edit Mode
↓
Link Status → Select Slot → Select Port
↓
Language → Change Language
↓
[Back to Idle Display]
Page 73

SERVSWITCH™ MULTI
72
7.5.2 THE CONTRAST SCREEN
If the Hub’s display either is too bright or cannot easily be seen, press the Enter button at the Idle Display
screen to reach the Contrast screen:
DISPLAY CONTRAST
0 100%
****EDIT MODE****
Use the Hub’s Up and Down buttons to increase or decrease the contrast of your display. The black bar on the
line below 0 and 100% will widen or shrink to show the approximate percentage of current contrast. When
you’re done, press the Hub’s Enter button to save the changes and return to the Idle Display screen, or press
the Hub’s Escape button to cancel your changes and return to the Idle Display screen without saving them. If
neither button is pressed within 5 seconds of your last change, your changes will be canceled and you will
automatically be returned to the Idle Display screen.
7.5.3 T
HE CHASSIS ID AND CHANGE ID SCREENS
From the Idle Display screen, press the Down button to reach the Chassis ID screen.
Chassis ID
0
The Hub’s existing Chassis ID number will be displayed. The first time you power on your Hub unit, the Chassis
ID will be “0”. You must change this to a valid chassis ID before you attach the Hub to your other ServSwitch
Multi units.
To set or change your chassis ID, press the Enter button while the Chassis ID screen is displayed. The Change
ID screen appears:
Chassis ID
->new ID ###
old ID ###
****EDIT MODE****
The existing ID number is shown next to “old ID.” Press the Hub’s Up and Down buttons to set a new chassis ID
for your Hub (the display will scroll through the possible numbers from 1 to 254). When you’re done, press the
Hub’s Enter button to save the changes and return to the Chassis ID Menu, or press the Hub’s Escape button to
cancel your changes and return to the Chassis ID screen without saving them. If neither button is pressed
within 5 seconds of your last change, your changes will be canceled and you will automatically be returned to
the Chassis ID screen.
Page 74

CHAPTER 7: The ServSwitch Multi Hub
73
7.5.4 THE INSTALLED MODULES AND MODULE DETAILS SCREENS
Press the Hub’s Down button twice from the Idle Display screen, or once from the Chassis ID screen, to reach the
Installed Modules screen:
***Slot in Use***
A B C D E F G H I
R T T
Scan On
This screen displays the type of Module currently installed in each of the Hub’s nine Module slots, referred to
as slot “A” (the top slot) through slot “I” (the bottom slot). (Note that these letters do not appear on the chassis
itself.) An “R ”indicates a Receive Module is installed, a “T ”indicates a Transmit Module.
For more detailed information about your installed modules, press the Hub’s Enter button at this screen. The
Module Details screen appears:
Slot A: type
Hardware: ###
Firmware: ###
Ser. No #: ###
Hardware-revision, firmware-revision, and serial numbers are displayed for the Module installed in slot A. Press
the Up and Down buttons to cycle through the information for all nine slots. When you are finished viewing
this information, press the Hub’s Escape button to return to the Installed Modules screen.
7.5.5 T
HE SYSTEM STATUS AND STATUS DETAILS SCREENS
Press the Hub’s Down button three times from the Idle Display screen, or once from the Installed Modules screen,
to reach the System Status screen:
*** SYSTEM STATUS ***
FAN modules OK!
PSU1 : OK
PSU2 : OK
If the red Fail LED on your Hub ’s front panel is blinking, this screen will show you whether the problem lies
with one of the Hub’s fan modules, with PSU1 (its upper power supply), or with PSU2 (its lower power supply).
Once you leave this screen by pressing the Escape button, the LED will change from blinking to steadily lit until
either the problem is resolved (the LED will go dark) or another malfunction occurs (the LED will start
blinking again).
For more detailed information about the fan assemblies or the power supplies’ output voltages, press the
Enter button at the System Status screen. The Status Details screen appears:
+5V:ok +12V:ok
-5V:ok -12V:ok
D5V:ok AC:ok DC:ok
lower power supply
Press the Up and Down buttons to cycle through the information for the upper and lower power supplies and
fan assemblies. When you are finished viewing this information, press the Escape button to return to the System
Status screen.
Page 75

SERVSWITCH™ MULTI
74
7.5.6 THE SERIAL PORT AND EDIT MODE SCREENS
Press the Hub’s Down button four times from the Idle Display screen, or once from the System Status screen, to
reach the Serial Port screen. The Hub’s serial port doesn’t currently do anything, but when it is enabled by
future firmware advances, this is the screen you’ll use to configure it:
***Serial Port***
Baud Rate:57600
Data Bits:8
Parity:No Stop:1
This screen displays the settings that the serial port will require an attached PC to be configured for. Only the
baud rate (data rate) is user-configurable. To change the baud rate, press the Hub’s Enter button. The Edit
Mode screen appears:
***Edit Mode***
Baud Rate:57600
Data Bits:8
Parity:No Stop:1
Press the Up and Down buttons to toggle between the two available rates: 57,600 bps and 38,400 bps. When the
rate you want is displayed, press the Hub’s Enter button to switch to that rate and return to the Serial Port
screen, or press the Hub’s Escape button to return to the Serial Port screen without switching to the new rate.
7.5.7 T
HE LINK STATUS, SELECT SLOT, AND SELECT PORT SCREENS
Press the Hub’s Down button five times from the Idle Display screen, or once from the Serial Port screen, to
reach the Link Status screen, which displays connection information for one Hub port at a time. (The first time
you access this screen after the Hub is powered ON, the information for Port 1 of Slot A will be the first thing
shown. Afterward, until the Hub is powered OFF again, Link Status will begin by displaying the information for
whatever port was last displayed the previous time you accessed this screen.)
***Link Status***
Slot: A Port: 05
Link: 65-B-12
In this sample screen, Port 5 of the Module in the Hub’s Slot A is connected to Port 12 of a Module in Slot B of
another Hub unit with a chassis address of 65.
To view the connections of another Module and port, press the Enter button. The Select Slot screen appears:
Select Slot
-> Slot: A
Port: 05
Link: 65-B-12
Press the Up and Down buttons to select the Hub slot where the Module you want information about is
installed. When you’ve made your selection, press the Enter button again. The Select Port screen appears:
Select Port
Slot: A
-> Port: 05
Link: 65-B-12
Page 76

CHAPTER 7: The ServSwitch Multi Hub
75
Press the Up and Down buttons to select which of the Module’s 16 ports you want information about. When
you’ve made your selection, press the Escape button to return to the Link Status screen. The link information
for the requested Module and port will be displayed.
7.5.8 T
HE LANGUAGE AND CHANGE LANGUAGE SCREENS
Press the Hub’s Down button six times from the Idle Display screen, or once from the Link Status screen, to
reach the Language screen:
*** Language ***
- ENGLISH -
This screen shows the language that the Hub is currently using in its LCD screens. If you’d rather it display
information in a different language, press the Enter button. The Change Language screen appears:
Select Language
- English -
**** EDIT MODE****
The currently selected language is shown. Press the Up and Down buttons to toggle between the two available
languages: English and German. When the language you want is displayed, press the Hub’s Enter button to
switch to that language and return to the Language screen, or press the Hub’s Escape button to return to the
Language screen without switching to the new language.
7.6 Flash Upgrading
Like the Cards and Modules in all ServSwitch Multi models, the Hub’s Modules are Flash upgradable. Flash
technology allows you to upgrade the Modules’ firmware without removing Modules or powering down the
system. New firmware revisions can be uploaded into the Modules through standard serial connections to
attached ServSwitch Multi models. For more information on Flash upgrading the Hub (and the rest of your
ServSwitch Multi system), see Section 8.13.
Page 77
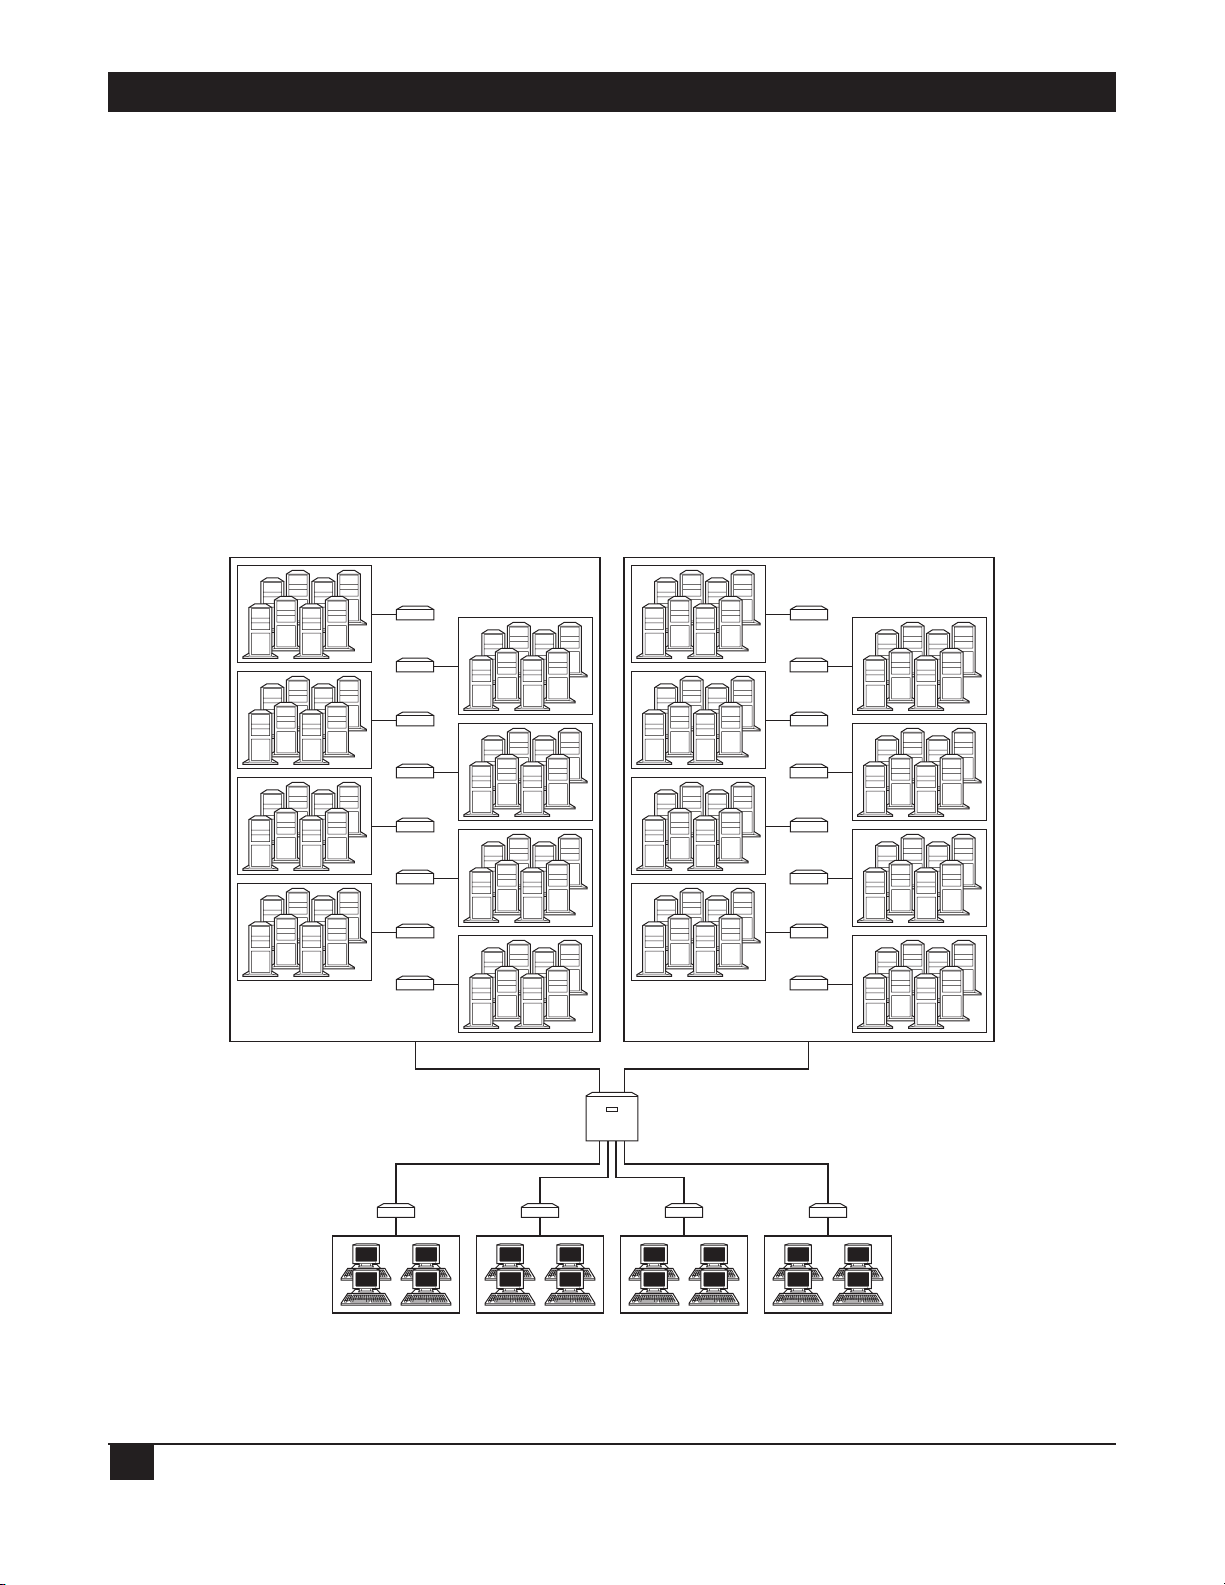
SERVSWITCH™ MULTI
76
7.7 Sample System Configurations
This section shows a few examples of money-saving cascaded ServSwitch Multi systems designed around
ServSwitch Multi Hubs. You can call Black Box Tech Support for help in determining whether your ServSwitch
Multi system would benefit from using Hubs and, if so, how best to design your Hub-centered system.
7.7.1 A 16
X 128 MATRIX
In this configuration, 16 users can simultaneously access 128 attached computers. Any user can connect to any
computer in the system without limitation or interference from another system user. Should two people need
access to the same computer at the same time, they can share access: Both users can view the computer’s video,
while one user at a time will have keyboard/mouse control (see Section 8.3).
This configuration uses one Hub, sixteen ServSwitch Multi SB chassis to connect computers to the system,
and four ServSwitch Multi EXP chassis to connect the users.
Figure 7-8. A 16-user, 128-computer Multi system using one Hub.
Hub with at least 4 Receive Modules and
1 Transmit Module installed
256 CAT5 cables
32 CAT5 cables
Sixteen SBs, each with at least four Transmit Cards and eight CPU Cards installed, and 128 CPUs
Four EXPs, each with at least two Receive Cards and four User Cards installed, and sixteen user stations
Page 78

CHAPTER 7: The ServSwitch Multi Hub
77
7.7.2 A 16 X 384 MATRIX
In this configuration, 16 users can simultaneously access 384 attached computers. Here 256 computers have
been added to the 16 x 128 matrix in Section 7.7.1, but any user can still freely connect to any computer.
This configuration uses three Hubs, 48 ServSwitch Multi SB chassis to connect computers to the system, and
four ServSwitch Multi EXP chassis to connect the users. With careful cabling, you could interconnect a 16 x 384
matrix using only two Hubs (each with six Receive Modules and two Transmit Modules installed), but this
would not leave much room for future growth.
Figure 7-9. A 16-user, 384-computer Multi system using one Hub.
Three Hubs, each with at
least 4 Receive Modules
and 1 Transmit Module
installed
768 CAT5 cables
between Hubs and SBs
96 CAT5 cables between
Hubs and EXPs
48 SBs, each with at least four Transmit Cards and eight CPU Cards installed, and 384 CPUs
Four EXPs, each with at least six Receive Cards and four User Cards installed, and sixteen user stations
Page 79

SERVSWITCH™ MULTI
78
7.7.3 A 32 X 256 MATRIX
In this configuration, 32 users can simultaneously access 256 attached computers. Here the 16 x 128 matrix in
Section 7.7.1 is effectively doubled, but any user can still freely connect to any computer. (There aren’t enough
dedicated signal paths from any one EXP to any one Hub, or from any one Hub to any one SB, to make this
work. But because each Hub has at least two paths to each EXP and at least two paths to each SB, there is always
at least one available pathway between each user and each computer.)
This configuration uses four Hubs, 32 ServSwitch Multi SB chassis to connect computers to the system, and
eight ServSwitch Multi EXP chassis to connect the users.
Figure 7-10. A 32-user, 256-computer Multi system using four Hubs.
Four Hubs,
each with
at least
4 Receive
Modules
and
2 Transmit
Modules
installed
512 CAT5
cables
between
Hubs and
SBs,
128 CAT5
cables
between
Hubs and
EXPs
32 SBs, each with at least four Transmit Cards and eight CPU Cards installed, and 256 CPUs
Eight EXPs, each with at least four Receive Cards and four User Cards installed, and 32 user stations
Page 80

CHAPTER 8: Operation
79
8. Operation
8.1 Basic Operation
You can power up the computers you’ve attached to your ServSwitch Multi system one at a time or all at once.
Operator intervention is not necessary during booting.
The first thing you should do after booting your system is to check the front-panel LEDs of all of your nonHub ServSwitch Multi s, because the LEDs provide your first indication of whether all system components are
installed correctly or not, as shown in Table 8-1 on the next page.
You can select a computer at the local console of a ServSwitch Multi Base Unit or MX by pressing the
pushbutton corresponding to that computer’s channel on the Switch’s front panel. On the Base Unit, the
channel letter will then be shown on the front-panel alphanumeric display. To select a computer channel from
any console (user station) attached to a User Card, you have to either use the Card’s on-screen display (see
Chapter 9) or type in a keystroke sequence from that console’s keyboard, as described in Section 8.2. The
indicator lights (LEDs) on the front panel of a non-Hub ServSwitch Multi unit will change depending on which
of the unit’s channels are selected. Again, refer to Table 8-1 on the next page.
Unless you use the on-screen display, in order to (a) switch channels from a console attached to a User Card
or (b) use the ServSwitch Multi’s channel-scanning feature (see Section 8.6), you must first place your system in
Command Mode by pressing and holding your keyboard’s [Num Lock] key, pressing and releasing the keypad
[–] (minus) key, and releasing [Num Lock]. As long as you are operating in Command Mode:
• whatever you type will be intercepted by ServSwitch Multi (none of your keystrokes will be forwarded to the
attached computer), and
• the Num Lock, Caps Lock, and Scroll Lock LEDs on your keyboard will blink.
You can exit Command Mode by pressing the [Enter] or [Escape] key on your keyboard. For more information
about Command Mode, see Section 8.2.
The ServSwitch Multi Base Unit has an alphanumeric display on its front panel. This display reflects the active
channel for the local user console. For units with an address between 1 and 9, the display will show the unit
address and the channel. For units with addresses higher than 9, the display will show an asterisk (“*”) in place
of a unit address. For example, if channel G in Switch 7 is the current active channel at the local console, the
display would show “7G”. If channel K in Switch 12 is active, it would show “*K”.
Page 81

SERVSWITCH™ MULTI
80
Table 8-1. Channel-LED states and what they mean.
Base Unit EXP and SB: Meaning:
and MX:
Green Amber Green
LED LED LED
Computer Channels
OFF OFF OFF The computer might or might not be connected properly, but it is
definitely not powered or selected.
ON LOW OFF ON The computer is connected and powered but not selected.
BLINKING ON OFF The computer is connected and has been
HIGH/OFF selected, but is not powered.
at 1 Hz
BLINKING ON ON The computer is connected, powered, and
HIGH/LOW selected.
at 1 Hz
Card-Console Channels
OFF OFF N/A The User-Interface Card is not installed correctly.
ON HIGH ON N/A The User-Interface Card is installed correctly and operating normally.
BLINKING BLINKING N/A The User-Interface Card is installed correctly
at 2 Hz and operating in Command Mode.
Expansion Channels
ON N/A N/A Base Unit/MX only: An Expansion Cable is installed correctly on
either Port 1 or Port 2 or both.
N/A ON ON EXP/SB only: Expansion Cables are installed correctly on both ports.
N/A OFF ON EXP/SB only: An Expansion Cable is installed correctly on Port 1
only.
N/A ON OFF EXP/SB only: An Expansion Cable is installed correctly on Port 2
only.
BLINKING BLINKING BLINKING Transmit-Card channels only: This Transmit Card has been set to an
address different from that of another Transmit Card in the same
ServSwitch Multi.
Page 82

CHAPTER 8: Operation
81
8.2 Keyboard Control
8.2.1 KEYSTROKE NOTATION
Throughout the rest of this chapter, we use some “shorthand” to abbreviate certain keystroke sequences and
variables you can use to control the ServSwitch Multi through console keyboards:
<CM> Enter Command Mode:
1. Press and hold down the keyboard’s [Num Lock] key.
2. Press and release the [–] (minus) key on the numeric keypad.
3. Release the [Num Lock] key.
Note: To choose an alternate hotkey sequence for entering Command Mode, see Section 8.12.
[Enter] Press the keyboard’s Enter or Return key. Doing so will cause the ServSwitch Multi to execute the
command you just typed in and then exit from Command Mode.
Addr The “address” of the computer you’re selecting.
In single-unit ServSwitch Multi systems, this address will correspond to the single letter designation
(“A” through “D” on an MX, “A” through “L” on a Base Unit, “A” through “N” on an EXP or SB) of
the channel port on the Switch that the computer is attached to.
In cascaded systems, this address will correspond to the numeric unit address (1 through 254) of the
ServSwitch Multi that the computer is attached to, followed by the single-letter designation of the
computer’s channel port. For example, to select unit the computer on channel C of unit 9, enter
“9C”.
[Esc] Press the keyboard’s Escape key. Doing so will cause the ServSwitch Multi to abort: It will exit from
Command Mode without executing any instruction.
8.2.2 KEYBOARD-BASED SWITCHING
Any user in a ServSwitch Multi system can issue a short sequence of keystrokes from their console keyboard to
switch between computer channels. This is called “keyboard switching” or “hotkey switching.” To keyboardswitch channels, take these steps:
1. The first set of keystrokes (see the description of <CM> in Section 8.2.1) places your system in Command
Mode. As long as you are operating in Command Mode, whatever you type will be interpreted as channelswitching commands until you press the Enter or Escape key to terminate Command Mode. None of the
keystrokes entered will be forwarded to the attached computer until you exit Command Mode.
2. Next, enter the address (“Addr”—see the description in Section 8.2.1) for the channel you wish to select.
3. Press [Enter] to accept the new channel.
All together, the proper format for keyboard switching to a new active channel through the keyboard is
“<CM>Addr[Enter]”. Below is a sample of a keyboard switching session for a single-unit system, with an
accompanying explanation for each step:
1. Type in “<CM>D[Enter]” to select channel D.
2. Type in “<CM>A[Enter]” to select channel A.
3. Typing in “<CM>G[Esc]” gets you out of Command Mode without any channel switch or other instruction
being executed. Channel A remains selected as the active channel.
Page 83

SERVSWITCH™ MULTI
82
And here’s a sample of a keyboard switching session for a cascaded system, with an accompanying explanation
for each step:
1. Type in “<CM>8C[Enter]” to select channel C on unit 8.
2. Type in “<CM>H[Enter]” to select channel H on the local unit (the unit that the console is attached to).
3. Type in “<CM>76K[Enter]” to select channel K on unit 76.
4. Typing in “<CM>112E[Esc]” gets you out of Command Mode without any channel switch or other
instruction being executed. Channel K on unit 76 remains selected as the active channel.
8.3 Multiuser Operation
If your ServSwitch Multi system only has a single console, you can skip this section and go on to Section 8.4. But
if users will be on the system simultaneously at multiple consoles, you need to be aware of how the ServSwitch
Multi handles multiuser access. When users are accessing different computers or expansion channels, they can
do so independently. When users try to access the same computer or expansion channel, they must share.
At any given time, users attached to the ServSwitch Multi system may independently select and operate as
many as (but not more than) eight different computers attached to the same ServSwitch Multi SB, or four
different computers attached to the same Base Unit or EXP, or two different computers attached to the same
MX. This is because there are only eight independent data pathways through each SB, only four independent
pathways through each Base Unit or EXP, and only two independent pathways through each MX; once all these
are carrying keyboard and mouse input from users to computers, no more independent connections can be
established.
Imagine a single Base Unit with computers attached to channels A through F. Through a single console
attached to this Base Unit, a user could have full access to any of these computers any time he or she wanted.
But say there are four users working with this Base Unit, one on the local console (user 1), the others on
channels K, L, and M (users 2, 3, and 4). These users all want independent access to one of the six computers,
so they each must select a different one: let’s say user 1 chooses computer A, 2 chooses B, 3 chooses C, and
4 chooses E. In this situation, the only computers that any of these users can select and still remain
independent are computers D and F.
Now let’s say that user 2 wants to use computer A. User 2 can switch to computer A, but until user 1 finishes
working with it, user 2 will only be able to see its video output, not send keyboard or mouse input. This is called
“shared access.” User 2 can’t have independent access to computer A until user 1 stops sending keyboard and
mouse data for the duration of computer A’s inactivity timeout (either one second or ten seconds; see
Section 4.2.2). Once this timeout expires, user 2 can begin typing or pointing and clicking at any time and the
ServSwitch Multi will immediately start passing that data through to computer A. At that point user 1 becomes
the “sharing” user, seeing computer A’s video but having no keyboard or mouse control until user 2 is finished.
Any user can share access to any computer with any other user in the system. There is no system limitation on
the number of users that can share access at the same time. All of the users in your ServSwitch Multi system can
share access to a set of your computers simultaneously—but only two, four, or eight users will be able to be
actively working at any given moment.
Page 84

CHAPTER 8: Operation
83
Of course, any time that more than the maximum independent number of users are trying to access
computers attached to a single ServSwitch Multi unit, two, four, or eight of them will have independent access
and the rest must share. Any attempt by a sharing user to connect to a third/fifth/ninth computer attached to
the same Switch will be ignored. Figure 8-1 below shows a “mandatory sharing” system with five consoles. The
users on consoles 3, 4, and 5 are using computers B through D respectively. They are working simultaneously
and independently of each other. Consoles 1 and 2 are sharing computer A. Both consoles display video from
computer A, but only one of the consoles can have actual control of the computer at any given moment.
Figure 8-1. Independent vs. shared access in a multiuser system.
In cascaded systems, the situation becomes more complicated. Each individual ServSwitch Multi still has two,
four, or eight data pathways, but when a user selects a computer on another Switch, one pathway in each Switch
between the user’s console and the computer will be occupied. For example, refer to Figure 6-4 in Section 6.1:
For a user on Switch 0 to establish an independent connection to a computer on Switch 5, it would require the
use of one data pathway in Switch 5 (from the CPU-Interface Card to the Transmit-Card port), one pathway in
Switch 4 (from Receive-Card port to Transmit-Card port), one in Switch 1 (Receive-Card port to Transmit-Card
port), and one in Switch 0 (Receive-Card port to local console or User-Interface Card).
When you need to figure out the dynamics of data-path usage in any local ServSwitch Multi in a cascaded
ServSwitch Multi system, just remember that each of these connections takes up one data path through the unit:
• Local console to local computer.
• Local console to remote computer through a port on a local Receive Card.
• Remote console to local computer through a port on a local Transmit Card.
• Remote console to remote computer through ports on local Transmit and Receive Cards.
In cascaded systems, shared access applies not only to computers but also to expansion connections. If one
ServSwitch Multi is attached to another by only a single link (from a Transmit-Card port on one Switch to a
Receive-Card port on the other), and an active user at a console on the Switch with the Receive Card selects a
computer on the Switch with the Transmit Card, other users on the Receive-Card switch can share access to that
computer, but they cannot establish an independent connection to any computer on the Transmit-Card Switch
until the active user selects a computer on a different Switch and relinquishes his or her “lock” on the
expansion connection.
Console 1
Console 2
Console 3Console 4
INDEPENDENT ACCESS
SHARED
ACCESS
Console 5
Computer D
Computer C
Computer B
Computer A
Com. A
Video
Com. B
Video
Com. C
Video
Com. A
Video
Com. D
Video
Page 85

SERVSWITCH™ MULTI
84
8.4 Multiplatform Keyboard Mapping (Character Translation)
With the ServSwitch Multi, you can use any type of keyboard to operate any type of attached computer.
However, when you “cross platforms” (operate a computer of one platform with a keyboard of a different
platform), the Switch has to “remap” certain keys (that is, substitute another character for the one they
normally generate) in order to provide all of the functions available on the keyboard native to the computer’s
platform. For example, if you access a Sun workstation with a Macintosh keyboard, you will notice that the
Macintosh does not have (among others) the [Stop] and [Again] keys that are on a true Sun keyboard. But
when you turn Scroll Lock on, the ServSwitch Multi remaps the [F1] and [F2] keys on the Macintosh keyboard
so that they function as the Sun [Stop] and [Again] keys. With Scroll Lock off, [F1] and [F2] function
normally.
Tables 8-2 through 8-5 on the following pages are the “translation tables” for PC, Macintosh and Sun
keyboards respectively. Where a key is listed in one of these tables as “undefined,” the ServSwitch Multi absorbs
the character generated by that key without transmitting any characters to the the computer. Where a key is
listed in one of these tables as “untranslated,” the Switch passes the character generated by that key directly
through to the computer without altering or substituting for it, regardless of the state of the Scroll Lock.
All of the key mappings listed in these tables are valid only when Scroll Lock is on, except for the special
[Alt]/[Start] “swap” (shown in Table 8-3) activated by the “Remap WIN95 Keys” System Configuration option
(see Section 9.4.3.E). This mapping is active for that console’s keyboard regardless of the state of Scroll Lock,
for as long as that remapping option is turned on, and takes effect whenever the user at that console selects a
computer channel with a Macintosh attached.
NOTE
If you use Macintosh console equipment in a multiplatform system, you must use a
serial mouse rather than an Apple mouse. This is because, while the remapping
functions discussed in this section make it possible for a Mac keyboard attached to
the Switch to emulate the functions of a PC or Sun keyboard, at the time of this writing
there is no way for a one-button Apple mouse attached to the Switch to emulate a
mouse with more buttons.
(text continues on page 89)
Page 86

CHAPTER 8: Operation
85
Table 8-2. Remapping of the 101/102-key PC keyboard.
When the It sends this It sends this It sends this
Switch character to character to character to
receives this the selected the selected Mac the selected Mac
key from the Sun computer: computer when computer when
PC keyboard: DIP-switch DIP-switch
translation translation
is enabled
1
: is disabled1:
[F1] [Stop] untranslated untranslated
[F2] [Again] untranslated untranslated
[F3] [Props] untranslated untranslated
[F4] [Undo] untranslated untranslated
[F5] [Front] untranslated untranslated
[F6] [Copy] untranslated untranslated
[F7] [Open] untranslated untranslated
[F8] [Paste] untranslated untranslated
[F9] [Find] untranslated untranslated
[F10] [Cut] untranslated untranslated
[F11]
| (power)
(power)
(power)
[F12]
◆ (command) [Option (Alt)] (command)
Keypad [*] [Compose] untranslated untranslated
[Num Lock] [Help] untranslated untranslated
Keypad [/] [Mute] untranslated untranslated
Keypad [–] [Vol –] untranslated untranslated
Keypad [+] [Vol +] untranslated untranslated
[Alt]
◆ (command) (command) [Option (Alt)]
[Ctrl] untranslated untranslated untranslated
1
See Section 4.2.3.
Page 87

SERVSWITCH™ MULTI
86
Table 8-3. Remapping of the 104/105-key “Windows ready” PC keyboard.
When the It sends this It sends this It sends this
Switch character to character to character to
receives this the selected the selected Mac the selected Mac
key from the Sun computer: computer when computer when
PC keyboard: WIN95 remapping WIN95 remapping
is enabled
1
: is disabled1:
[F1] [Stop] untranslated untranslated
[F2] [Again] untranslated untranslated
[F3] [Props] untranslated untranslated
[F4] [Undo] untranslated untranslated
[F5] [Front] untranslated untranslated
[F6] [Copy] untranslated untranslated
[F7] [Open] untranslated untranslated
[F8] [Paste] untranslated untranslated
[F9] [Find] untranslated untranslated
[F10] [Cut] untranslated untranslated
[F11]
| (power)
(power)
(power)
[F12]
◆ (command) (command) (command)
Keypad [*] [Compose] untranslated untranslated
[Num Lock] [Help] untranslated untranslated
Keypad [/] [Mute] untranslated untranslated
Keypad [–] [Vol –] untranslated untranslated
Keypad [+] [Vol +] untranslated untranslated
[Alt]
◆ (command) (command) [Option (Alt)]
(Win. Start)
3
◆ (command) [Option (Alt)] (command)
(Win. App)
3
undefined undefined undefined
[Ctrl] untranslated untranslated untranslated
1
See Section 9.4.3.E.
Page 88

CHAPTER 8: Operation
87
Table 8-4. Remapping of the Mac keyboard.
While Scroll Lock It sends this It sends this
is ON, when the character to character to
Switch receives the selected the selected PC:
this key from the Sun computer:
Mac keyboard:
[F1] [Stop] untranslated
[F2] [Again] untranslated
[F3] [Props] untranslated
[F4] [Undo] untranslated
[F5] [Front] untranslated
[F6] [Copy] untranslated
[F7] [Open] untranslated
[F8] [Paste] untranslated
[F9] [Find] untranslated
[F10] [Cut] untranslated
[F11] untranslated untranslated
[F12] untranslated untranslated
Keypad [*] [Compose] untranslated
[Num Lock] [Help] untranslated
Keypad [/] [Mute] untranslated
Keypad [–] [Vol –] untranslated
Keypad [+] [Vol +] untranslated
(power)
| (power) undefined
(command) ◆ (command) undefined
[Option (Alt)] untranslated [Alt]
[Control] untranslated untranslated
NOTE
While these remapping functions make it possible for a Mac keyboard attached to the
Switch to emulate the functions of a PC or Sun keyboard, at the time of this writing
there is no way for a one-button Apple mouse attached to the Switch to emulate a
mouse with more buttons. So if you use Macintosh console equipment in a
multiplatform system, you’ll need to use a serial mouse instead of an Apple mouse.
Page 89

SERVSWITCH™ MULTI
88
Table 8-5. Remapping of the Sun keyboard.
While Scroll Lock It sends this It sends this
is ON, when the character to character to
Switch receives the selected the selected PC:
this key from the Mac computer:
Sun keyboard:
[Stop] undefined undefined
[Again] undefined undefined
[Props] undefined undefined
[Undo] undefined undefined
[Front] undefined undefined
[Copy] undefined undefined
[Open] undefined undefined
[Paste] undefined undefined
[Find] undefined undefined
[Cut] undefined undefined
| (power)
(power) undefined
◆ (command) (command) undefined
[Compose] undefined undefined
[Help] undefined undefined
[Mute] undefined undefined
[Vol –] undefined undefined
[Vol +] undefined undefined
[Alt] [Option (Alt)] untranslated
[Alt Graph] undefined undefined
[Control] untranslated untranslated
Page 90

CHAPTER 8: Operation
89
8.5 Audio and Serial Functions (Audio Cables Only)
The ServSwitch Multi supports attaching speakers/headphones and a microphone to every console in the
system. If you have installed User Cables and Server Cables with audio capabilities, then you will have access to
these features. The speakers and/or microphone that you have connected to your console will work exactly as if
they were connected directly to your computer. When your console has independent keyboard/mouse control
for a computer channel, then you will also have audio.
For example, suppose that two consoles are sharing a computer: Console 1 has control and console 2 is just
“along for the ride.” The speakers and microphone at console 1 are active, but the headphones at console 2
aren’t; the user at console 2 can see the computer’s video signal, but that’s about it. When all keyboard and
mouse activity at console 1 stops for the duration of the inactivity timeout (see Section 4.2.2), the user at
console 2 may take control of the computer by simply moving the mouse or typing on the keyboard. Once
user 2 takes control, his or her headphones become active, and the speakers and microphone at console 1 go
dead.
When you are using audio-type User and Server Cables, the ServSwitch Multi also supports input/output
between computers’ RS-232 serial ports and any RS-232 serial peripheral that uses hardware (RTS/CTS) flow
control at data rates up to 9600 bps or software (inband, X-ON/X-OFF) flow control at data rates up to
115.2 kbps. Examples of such peripherals include most modems, serial printers, and serial touchscreens.
As with the audio devices, users will be able to conduct serial I/O with a computer only when they have
independent control over that computer. This means that while users in multiuser ServSwitch Multi systems are
transmitting files across the serial link, they might want to continue to move their mouse or tap non-disruptive
keys on their keyboard to prevent other users from taking control of that computer and accidentally breaking
the serial connection. For transmission of large files or any other extended serial-only activity, users should
establish Privacy-Mode connections (see Section 8.10).
NOTE
The ServSwitch Multi Hub does not carry the audio or serial signals. ServSwitch Multi
users connected to a computer through a Hub will have keyboard, mouse, and video
access only; they will not be able to establish audio or serial links with that computer.
Page 91

SERVSWITCH™ MULTI
90
8.6 Channel Scanning
Once you activate the ServSwitch Multi’s channel-scanning feature, the Switch will automatically sequentially
scan its channels without further intervention from you. When the Switch detects keyboard or mouse activity,
scanning is suspended—the computer currently being scanned is temporarily selected—until all activity stops.
Scanning then resumes with the next channel in sequence. You can change the “dwell time”—the length of
time the Switch pauses at each computer channel (keeping that channel’s video on screen) during a scan—
whenever you want to. Scanning is halted if you permanently select a computer channel or if you issue the Scan
Halt command.
You can control channel scanning with these keystroke-sequence commands:
• Issue the Keyboard-scan Dwell command (“<CM>KDnn[Enter]”) to set the dwell time, where nn=a one- or
two-digit number of seconds from 1 to 65. The default setting is “5” (5 seconds).
• Issue the Keyboard-scan Go command (“<CM>KG[Enter]”) to start a scan of the computer channels
beginning with the currently selected channel.
• Issue the Keyboard-scan Halt command (“<CM>KH[Enter]”) to stop a scan in progress.
• Cascaded systems only: Issue the Keyboard-scan Maximum command (“<CM>KMnnn[Enter]”) to indicate the
highest ServSwitch Multi unit address that should be scanned, where nnn = a one-, two-, or three-digit
decimal number from 1 to 254.
• Cascaded systems only: Issue the Keyboard-scan Local Reset command (“<CM>KM0[Enter]”) to force the
Switch to scan only its own local channels.
Here’s a sample of a channel-scanning session, with an accompanying explanation for each step:
1. Type in “<CM>KD10[Enter]” to set the dwell time to 10 seconds. During a scan, the ServSwitch Multi will
pause for 10 seconds at each scanned channel.
2. Type in “<CM>KG[Enter]” to start a scan. The Switch will display the currently selected channel for
10 seconds, then the next channel in sequence for 10 seconds, and so on.
3. Type in “<CM>KD3[Enter]” to set the dwell time to 3 seconds. The Switch will continue scanning, but will
begin pausing at each channel for only 3 seconds.
4. Type in “<CM>KH[Enter]” to end the scan. The channel that was being scanned when the command was
entered becomes the selected channel.
5. Type in “<CM>KG[Enter]” to start a new scan.
6. Type in “<CM>J[Enter]” to end the scan by selecting channel J on the local ServSwitch Multi.
Page 92

CHAPTER 8: Operation
91
8.7 Broadcast Mode
Using “Broadcast Mode,” each user on a ServSwitch Multi system can send commands to multiple computers in
the system at the same time. By creating your own customized “broadcast group,” you can designate which
computers you want to broadcast to. Once you enter Broadcast Mode, whatever you type is sent to all of the
computers in your group regardless of which channel is active. If you just want to quickly include a range of
channels in a broadcast group, it will not hurt anything to include other types of installed modules or Cards in
the group, but broadcasting only affects CPU-Interface Cards. Each CPU-Interface Card can belong to only one
console’s broadcast group at a time.
You can control Broadcast Mode with these keystroke-sequence commands:
• Issue the Broadcast Add command (“<CM>T+<channel list>[Enter]”) to add the channel(s) in <channel list>
to a broadcast group. <channel list> can be either a single channel address or a range of channel addresses,
entered in low-address-dash-high-address format (for example, “A-D” to indicate ports A through D of the
local unit or “4C-5F” to indicate channels C and higher of unit 4 and channels A through F of unit 5). If you
are in Broadcast Mode when you issue the command, the change in the broadcast group will not take effect
until you exit and re-enter Broadcast Mode.
• Issue the Broadcast Remove command (“<CM>T–<channel list>[Enter]”) to remove the channel(s) in
<channel list> (see above) from a broadcast group. If you are in Broadcast Mode when you issue the
command, the change in the broadcast group will not take effect until you exit and re-enter Broadcast
Mode. Any time you’re not sure which channels are currently in your console’s broadcast group, you should
issue a global Broadcast Remove command whose channel list includes every address in your system and
rebuild your broadcast group from scratch.
• Issue the Broadcast Go command (“<CM>TG[Enter]”) to enter Broadcast Mode; until you exit it, the
ServSwitch Multi will send everything you type to all of the computer channels in the broadcast group, even
if none of them are currently selected.
• Issue the Broadcast Halt command (“<CM>TH[Enter]”) to exit Broadcast Mode.
Here’s a typical broadcast session, with an accompanying explanation for each step:
1. Type in “<CM>T-A-L[Enter]” to remove channels A through L on the local unit from any broadcast group
you had previously established.
2. Type in “<CM>T+A-B[Enter]” to add channels A and B on the local unit to your new broadcast group.
3. Type in “<CM>TG[Enter]” to enter Broadcast Mode.
4. Type in the first message or data that you want both channels A and B on the local unit to receive.
5.
Type in “<CM>T-A[Enter]” to remove channel A on the local unit from the broadcast group; it will continue
to receive broadcast data for now, but will not be part of the group the next time you enter Broadcast Mode.
6. Type in “<CM>T+3F[Enter]” to add channel F on unit 3 to the broadcast group; it won’t receive any
broadcast data until the next time you enter Broadcast Mode.
7. Type in any other message or data that you want both channels A and B on the local unit to receive.
8.
Type in “<CM>TH[Enter]” to exit Broadcast Mode and stop broadcasting data to local-unit channels A and B.
9. Type in “<CM>TG[Enter]” to re-enter Broadcast Mode and start broadcasting to channel B on the local
unit and channel F on unit 3.
Page 93

SERVSWITCH™ MULTI
92
8.8 Follow Mode
In Follow Mode, a sharing user (see Section 8.3) can “follow” an independent user’s channel switching. For
example, suppose John and Melissa are users at different consoles in a ServSwitch Multi system. Melissa is
training John in server maintenance, so John is watching what she does at each computer. John wants to
automatically change channels along with Melissa, so he places his console in Follow Mode, setting Melissa’s
console as the leader. Now, when Melissa changes to a channel, John automatically switches to the same one.
You can control Follow Mode with these keystroke-sequence commands:
• Issue the Follow Leader command (“<CM>FOLLOWAddr[Enter]”) to identify a user channel as the leader
your console should follow when you are in Follow Mode.
• Enter the Save command (“<CM>SAVE[Enter]”) to save the Follow Leader setting in nonvolatile memory.
• Issue the Follow Go command (“<CM>FOLLOW+[Enter]”) to activate Follow Mode.
• Issue the Follow Halt command (“<CM>FOLLOW–[Enter]”) to quit Follow Mode.
8.9 Swap Mode
In Swap Mode, two users can automatically exchange a pair of computer channels whenever one switches to the
other’s channel. For example, suppose John and Melissa are users at different consoles in a ServSwitch Multi
system. When Melissa starts working on John’s computer, John wants to be automatically switched to Melissa’s
computer, and vice versa. John and Melissa both place their consoles in Swap Mode. Now, John and Melissa will
swap channels when either one switches to the other’s computer.
You can control Swap Mode with these keystroke-sequence commands:
• Issue the Swap Partner command (“<CM>SWAPAddr[Enter]”) to identify a user channel as the partner you
want to swap computer channels with when you are in Swap Mode.
• Enter the Save command (“<CM>SAVE[Enter]”) to save the Swap Partner setting in nonvolatile memory.
• Issue the Swap Go command (“<CM>SWAP+[Enter]”) to activate Swap Mode.
• Issue the Swap Halt command (“<CM>SWAP–[Enter]”) to quit Swap Mode.
8.10 Privacy Mode
When you select your computer channel in Privacy Mode by entering the “<CM>XAddr[Enter]” keystrokesequence command, no other console in the system can switch to your channel. If any other users try to select
your private channel, they will simply remain on their present channels instead. Take your channel out of
Privacy Mode by switching to another channel or reselecting your current channel normally (“<CM>Addr[Enter]”).
Page 94

CHAPTER 8: Operation
93
8.11 Command Forwarding
In the ServSwitch Multi system, one user can do “command forwarding” to send commands that affect another
user’s connection. For example, suppose Melissa and John are users at different consoles, and that Melissa is
training John and needs him to be in Follow Mode (see Section 8.8). No matter where she is relative to John’s
location, she can use command forwarding to put John in Follow Mode without any intervention on his part.
You can control Command Forwarding with these keystroke-sequence commands:
• Issue the forwarding sequence “<CM>FWDAddr=Command[Enter]” to send Command to the User-Interface
Card at Addr.
• Issue the Forwarding Enable command (“<CM>FWD+[Enter]”) to enable command forwarding.
• Issue the Forwarding Disable command (“<CM>FWD–[Enter]”) to disable command forwarding.
8.12 Choosing an Alternate Command-Mode Hotkey
If the standard <CM> Command-Mode hotkey sequence (press and hold Num Lock, press and release
keypad [–], release Num Lock) conflicts with any of your applications, you can choose a different sequence by
entering the “<CM>@n[Enter]” keystroke-sequence command, where n = the number designation, from 1 to 5,
of the alternate command-mode hotkey sequence:
Press-and- Press-andhold key: release key:
• Use <CM>@0[Enter] to select default: [Num Lock] Keypad [–] (minus)
• Use <CM>@1[Enter] to select alternate 1: [Num Lock] Keypad [*] (asterisk)
• Use <CM>@2[Enter] to select alternate 2: [Num Lock] Keypad [+] (plus)
• Use <CM>@3[Enter] to select alternate 3: [Num Lock] Keypad [/] (slash)
• Use <CM>@4[Enter] to select alternate 4: [Ctrl] [~] (tilde)
Page 95

SERVSWITCH™ MULTI
94
8.13 Upgrading Card/Module Firmware Through Consoles’ Serial Ports
When updated firmware is released for a ServSwitch Multi Interface Card, Expansion Card, Hub Module,
Management Card, Serial Control Card, or Local-Console Module, you can download the new firmware to all of
the affected components in your system through the serial-port connection of a local or secondary console. If a
Black Box Technical Support technician asks you to do so, you can access the ServSwitch Multi’s firmwareconfiguration display by following one of the procedures described below. If, based on the information
displayed, the technician determines that you need new firmware for a given component, he or she will tell you
how to receive the new firmware from us. Once you’ve done that, you can send that firmware to the Switch
components—again, by following one of the listed procedures.
NOTE
Cascaded systems only: In their factory-default state, all non-Hub ServSwitch Multis
without Transmit Cards installed in them will have unit address 0. In order for you to
be able to tell these Switches apart in the firmware-configuration display, and to
download firmware to a Card or Module in the correct Switch, you will need to use the
“<CM>CHASSIS=n[Enter]” command, where n is a number from 0 to 254, to assign
every non-Hub Switch in your cascade a unique unit address. See the entry for that
command in Section 8.15.
Access the ServSwitch Multi’s firmware menus/displays in any of these ways:
• If any of the computers attached to your ServSwitch Multi system through a CPU-Interface Card has an
RS-232 serial port and terminal-emulation software:
1. Store the new firmware files on that computer.
2. Attach the serial-port strand of that computer channel’s audio-type Server Cable to that computer’s serial
port. (If you’ve been using a standard Server Cable with that channel, either you’ll need to replace it with
an audio-type cable or you’ll need to use a different computer.)
3. Select that computer’s channel, in Privacy Mode (see Section 8.10), from your ServSwitch Multi console.
4. Run the terminal-emulation software.
5. Set the software to use the correct COM port and set its serial communication parameters: 1200 to
19,200 (but not 14,400) bps, no parity, 8 data bits, 1 stop bit, and no flow control.
6.
Use <CM>ZB[Enter] to access the firmware-configuration menu (see Figure 8-2 at the end of this section).
• If none of the computers attached to your ServSwitch Multi system through a User-Interface Card has both
an RS-232 serial port and terminal-emulation software, you’ll need to place a computer that does nearby.
Once you do, the question becomes whether or not you have a null-modem cable (such as our product
code EYN257H-0006-FF) handy. If you do:
1. Store the new firmware files on the terminal-capable computer.
2. Go to a monitor, keyboard, and mouse that are attached to either (a) a User-Interface Card with On-
Screen Display (UICD, our part number KV2550C-R2) or (b) the Local-Console Module of a Base Unit
or MX. (This procedure can’t be done from a console attached to a Universal User-Interface Card
[UUIC, our product code KV2500C].) If you choose to use a UICD console, run the null-modem cable
from the terminal-capable computer’s serial port to the serial-device (not serial-mouse) connector—the
one without a yellow band—on your console’s User Cable. If you choose to use a local console, run the
null-modem cable from the terminal-capable computer’s serial port to the local console’s “SERIAL
PORT” connector on the front panel of the Base Unit or MX.
Page 96

CHAPTER 8: Operation
95
3. Run the terminal-emulation software on the terminal-capable computer.
4. Set the software to use the correct COM port and set its serial communication parameters: 1200 to
19,200 (but not 14,400) bps, no parity, 8 data bits, 1 stop bit, and no flow control.
5.
Use <CM>ZF[Enter] to access the firmware-configuration menu (see Figure 8-2 at the end of this section).
• As above, if you don’t have a null-modem cable:
1. Store the new firmware files on the terminal-capable computer.
2. Attach the serial-mouse strand of your console’s User Cable to that computer’s serial port.
3. Run the terminal-emulation software on the terminal-capable computer.
4. Set the software to use the correct COM port and set its serial communication parameters: 1200 to
19,200 (but not 14,400) bps, no parity, 8 data bits, 1 stop bit, and no flow control.
5.
Use <CM>ZS[Enter] to access the firmware-configuration menu (see Figure 8-2 at the end of this section).
Once you’ve issued the appropriate command, the ServSwitch Multi will switch control to the terminal-capable
computer, autodetect the data rate the terminal is set for, and match it. Press [Enter] at the terminal PC’s
keyboard when the Switch prompts you to do so. The Switch should display the main firmware-configuration
menu on your terminal screen:
1) Display chassis configuration
2) Download local to remote Flash ROM
3) Download Serial Port to Flash ROM (you must choose this option to upgrade a Hub!)
Q) Quit
Your choice:
Choosing option 1 (by pressing “1” on your terminal keyboard) causes the Switch to prompt you for a unit
address; either enter one, or press [Enter] for the local Switch. The Switch displays the chosen unit’s firmware
configuration (as shown in Figure 8-2 at the end of this section) on the terminal screen, then waits for you to
press [Enter] and returns you to the firmware-configuration menu when you do so.
Choosing option 2 (by pressing “2” on your terminal keyboard) causes the Switch to copy the firmware from
one Card or Module to another of the same type. (Once you’ve downloaded revised firmware to one
component—see the paragraph for option 3 below—option 2 is quite useful for quickly disseminating the new
firmware to all of the components of the same type in your system.) The Switch will prompt you for the
addresses of the source Card/Module and the destination Card/Module, and will then copy the firmware from
source to destination. Once this process is successfully completed, you will be returned to the firmwareconfiguration menu, and the destination Card or Module will automatically reset itself and starting running
using its upgraded firmware. If, however, an error occurs during transmission, just try again; the destination
Card or Module will not attempt to execute the new firmware code, but will continue using the old firmware
until a successful transfer is made.
Choosing option 3 (by pressing “3” on your terminal keyboard)—which is necessary in order to upgrade a
Hub Module—causes the Switch to copy revised component firmware from the computer you’re using for the
terminal emulation to a Switch component that you want to upgrade. First the Switch will prompt you for the
address of the destination Card/Module. Then it will prompt you to start a transfer of the firmware file using
the XMODEM file-transfer protocol; when it does, have the terminal-emulation program perform an
XMODEM upload of the file. Once this process is successfully completed, you will be returned to the firmwareconfiguration menu, and the destination Card or Module will automatically reset itself and start running using
its upgraded firmware. If, however, an error occurs during transmission, just try again; the Card or Module will
Page 97

SERVSWITCH™ MULTI
96
not attempt to execute the new firmware code, but will continue using the old firmware until a successful
transfer is made.
Choosing option Q (by pressing “Q” on your terminal keyboard—it doesn’t matter whether it’s upper- or
lowercase) exits the firmware-configuration menu and transfers control from the terminal PC back to the user
console from which you originally issued the command to access the menu.
At any point that the terminal is at a prompt (when the Switch is idle, waiting for input from the terminal),
you can go back to the console from which you entered the command to access the firmware-configuration
menu; from there, you can send the Switch the <CM>ZQ[Enter] command to force the Switch out of firmwareupgrade mode and back into normal operation. This command can come in very handy if you access the menu
before realizing that your terminal-capable computer is not on, is not properly connected, isn’t running the
terminal software yet, etc. Once a firmware transfer has started, this command has no effect; you’ll have to wait
for the transfer to finish, then try again. If possible, you should exit from the firmware-configuration menu by
pressing Q at the menu prompt (see the previous paragraph) rather than sending <CM>ZQ[Enter].
Page 98

CHAPTER 8: Operation
97
EPROM FLASH
Chan. Card Type HW Rev FW Rev FW Rev Serial # Other Information
----- --------- ------ ------ ------ ---------- -----------------
3-A XPAC B03 * A-05 -NA- 0123456789 PC + PS/2 mouse
3-B XPAC C00 * B03C -NA- 1234567890 No cable attached
3-C Empty
3-D Empty
3-E Empty
3-F Empty
3-G Empty
3-H XPXT A00 XB84 * XF82 2345678901 Port 1=4
3-I XPXT A00 XB84 * XF82 3456789012 Port 1=4 Port 2=2
3-J XPLU C00 * B03C -NA- 4567890123
3-K XPDU D01 C01C * C04A 5678901234
3-L XPXR A00 XC15 * XG18 6789012345
3-M XPXR A00 XC15 * XG18 7890123456
3-N LCI C00 * B02B -NA- 8901234567
* - Indicates active device
Press Enter to continue
Figure 8-2. The firmware-configuration display.
NOTES
1. The “Chan.” column lists the channel address of each component (Card or Module). For Base Units, the
option slot will always be listed as channel “M,” and the Local-Console Module will always be listed as
channel “N.” For MXs, the Local-Console Module will always be listed as channel “E.” For Hubs, the FrontPanel Element will always be listed as channel “J”.
2. The “Card Type” column shows what type of component it is: “LCI”=Local-Console Module, “XPAC”=CPUInterface Card, “XPLU”=Universal User-Interface Card, “XPDU”=User-Interface Card with On-Screen Display,
“XPXT”=regular Transmit Card, “XPXR”=regular Receive Card, “XPST”=CAT5 Transmit Card, “XPSR”=CAT5
Receive Card, “XPIQ”=Management Card, and “XPSI”=Serial Control Card. (Current User-Card firmware can’t
recognize the codes that the Hub’s Modules and Front-Panel Element return, so “????” is reported for these.)
3. The “HW Rev.” column lists the revision level of the component’s hardware.
4. The “EPROM FW Rev.” column lists the revision level of the component’s original firmware (that is, the
firmware burned into its EPROMs at the factory).
5. The “EPROM FW Rev.” column lists the revision level of the most recent firmware (if any) that has been
downloaded to the component’s flash ROMs.
6. The “Serial #” column lists the component’s serial number. Unless the component is an eval, demo, or special
unit, the serial number should always be numeric.
7. The “Other Information” column shows the Switch’s best guess of what the component is attached to (if
anything) based on the states of the ground leads of the component’s connector(s).
8. What “* - Indicates active device” means is that the asterisk shows whether the component is running using
the firmware in its EPROMs or the firmware in its flash ROMs.
Page 99

SERVSWITCH™ MULTI
98
8.14 Overriding the Settings of a CPU-Interface Card’s DIP Switches
In addition to their physical DIP switch (see Section 4.2), the CPU-Interface Cards support a “virtual DIP
switch” that you can set with keyboard commands in order to override the physical DIP switch’s settings. (This
can be very convenient if the CPU-Interface Card in question is far away or otherwise hard to get at.) Any
changes to the virtual switch will remain in effect until you either change it again or you move the positions of
the physical DIP switch. (Whenever changes are made to the physical DIP switch, the virtual switch resets itself
to match the physical-switch settings.)
To override all of the DIP-switch positions at once, take these steps:
1. Referring to Section 4.2, determine how you want to set each DIP-switch position. Going left to right from
position 8 to position 1, write down a “1” for each position you want to be ON and a “0” for each position
you want to be OFF. When you finish, you should have an eight-digit binary code that corresponds to your
desired switch-position settings. (Positions 8, 7, and 6 are reserved for future use and should always be
OFF, so the first three digits of the code should be “0 0 0”.)
2. Convert the binary code you derived in step 1 into a decimal number (you can refer to Table C-1 in
Appendix C).
3. Select the computer channel whose physical DIP-switch settings you want to override.
4. Send the <CM>SW+[Enter] command to enable the override of the physical DIP switches on all of the
system’s CPU-Interface Cards.
5. Send the <CM>SW=x[Enter] command, where x is the decimal number you derived in step 2.
To override one DIP-switch position at a time, take these steps:
1. Referring to Section 5.2, determine how you want to set the DIP-switch position. Write down a “1” if you
want it to be ON or a “0” if you want it to be OFF.
2. Select the computer channel whose physical DIP-switch settings you want to override.
3. Send the <CM>SW+[Enter] command to enable the override of the physical DIP switches on the system’s
CPU-Interface Cards.
4. Send the <CM>SWn=b[Enter] command, where n is the switch-position number and b is either 1 (if you
want to turn the position ON) or 0 (if you want to turn the position OFF). For example, send
“<CM>SW4=1[Enter]” if you want to force a 10-second keyboard/mouse-inactivity timeout on that
channel.
To disable the use of virtual switches to override the physical DIP switches, send the <CM>SW–[Enter]
command.
Page 100

CHAPTER 8: Operation
99
8.15 Other Commands: System Control and Maintenance
The ServSwitch Multi supports a number of other keystroke-sequence commands for system control and
maintenance:
Command Function
<CM>CHASSIS=n[Enter] Cascaded systems only: Sets the unit address of the local ServSwitch Multi (the
one your console is attached to) to n (a number from 0 to 254). If you have
Transmit Cards installed in all of your Switches, you won’t need to issue this
command; the Switches’ unit addresses will be set on the Cards’ DIP switches
(see Section 6.3.1). If more than one of your Switches have only Receive Cards
installed
in them, however, you will have to issue this command
to set them to
unique addresses in order to view or update the firmware of Cards or localconsole modules installed in them (see Section 8.13). (This is because the
factory-default unit address of all ServSwitch Multis is zero, and it remains zero
for any given Switch—unless you install a Transmit Card in it—until you issue
this command.)
If you send this command to a Switch with any Transmit Cards installed in it,
and n does not match the address setting of those Cards, that Switch will
behave as if you’ve installed a Transmit Card with a non-matching address in it:
The LEDs of all Transmit Cards in that Switch will start blinking, and you’ll
have to either issue another CHASSIS=n command or physically change the
unit-address
settings of the Cards to get that Switch working again.
<CM>Kn[Enter] Sets the scan mode (n = 1, 2, or 3) of the keyboard signals the Switch should
send to the currently selected IBM PC compatible computer. Scan mode 2 is
used by the vast majority of CPUs, and is also the default state of all 101-key and
PS/2 keyboards. Mode 1 is used primarily by certain older PS/2 CPUs. Mode 3
is used by RS/6000 CPUs, some other PC type UNIX
®
based computers, and
certain specialized servers. Issue this command if your computer is behaving in
a way that seems to
indicate that it is misinterpreting what you’re typing.
<CM>M+[Enter] Re-enables your mouse for use with the currently selected channel. Issue this
command after you attach a different type of mouse to your console or after
you send the “RESET” or “RESETAddr” command (see below) to the currently
selected computer channel.
<CM>OFF[Enter] Logs you off of the system: Your console deselects your previously selected
computer channel—freeing up a data pathway through the switch if you were
an independent user—and your monitor screen goes blank. The monitor is not
reactivated again until a channel is selected from your console.
<CM>RESET[Enter] Resets your console’s User-Interface Card. You might have to enter the “M+”
command (see above) afterward to get your mouse working properly.
<CM>RESETAddr[Enter] Resets any User or CPU-Interface Card in the system.
<CM>SAVE[Enter] Saves your console’s Follow Leader and Swap Partner settings (if any; see
Sections 8.8 and 8.9) to the ServSwitch Multi’s nonvolatile memory. Unless
these settings are saved, they’ll be lost if the Switch loses power or is turned
OFF.
 Loading...