

Page 1
CUSTOMER
SUPPORT
INFORMATION
Order toll-free in the U.S.: Call 877-877-BBOX (outside U.S. call 724-746-5500)
FREE technical support 24 hours a day, 7 days a week: Call 724-746-5500 or fax 724-746-0746
Mailing address: Black Box Corporation, 1000 Park Drive, Lawrence, PA 15055-1018
Web site: www.blackbox.com • E-mail: info@blackbox.com
FEBRUARY 2003
KV1510A
User Guide for the ServSwitch™ Summit
User Station Module
You can use the ServSwitch™ Summit system to manage any practical number of
computer CPUs, from just a few to thousands. This user guide describes how to
configure and operate a keyboard/video/mouse user station attached to a
ServSwitch™ Summit User Station Module (“USM,” product code KV1510A). For
USM specifications, installation instructions, system-administrator functions, etc., see
the manual for the ServSwitch™ Summit Base Units (KV1500A through KV1503A).
1. Logging In
You need to login in order to access computers and other devices connected to the
Summit system. The Login Menu (shown in Figure 1 on the next page) is
automatically displayed on every user-station monitor after the attached Summit
Base Unit is powered on; to bring up the Login Menu on a user-station monitor at
any other time, press the system’s hotkey (the factory default is [Scroll
Lock]) twice
in quick succession to bring up the On Screen User Interface (“OSUI”), then press
function key [F9].
NOTE
If a user-station monitor displays the message “…No Connection to
Summit…” instead of the Login Menu, either the USM isn’t connected
properly to the Base Unit, the Base Unit is powered off, or the Base Unit
is malfunctioning. Notify your system administrator.
Page 2

2
SERVSWITCH™ SUMMIT USER STATION MODULE
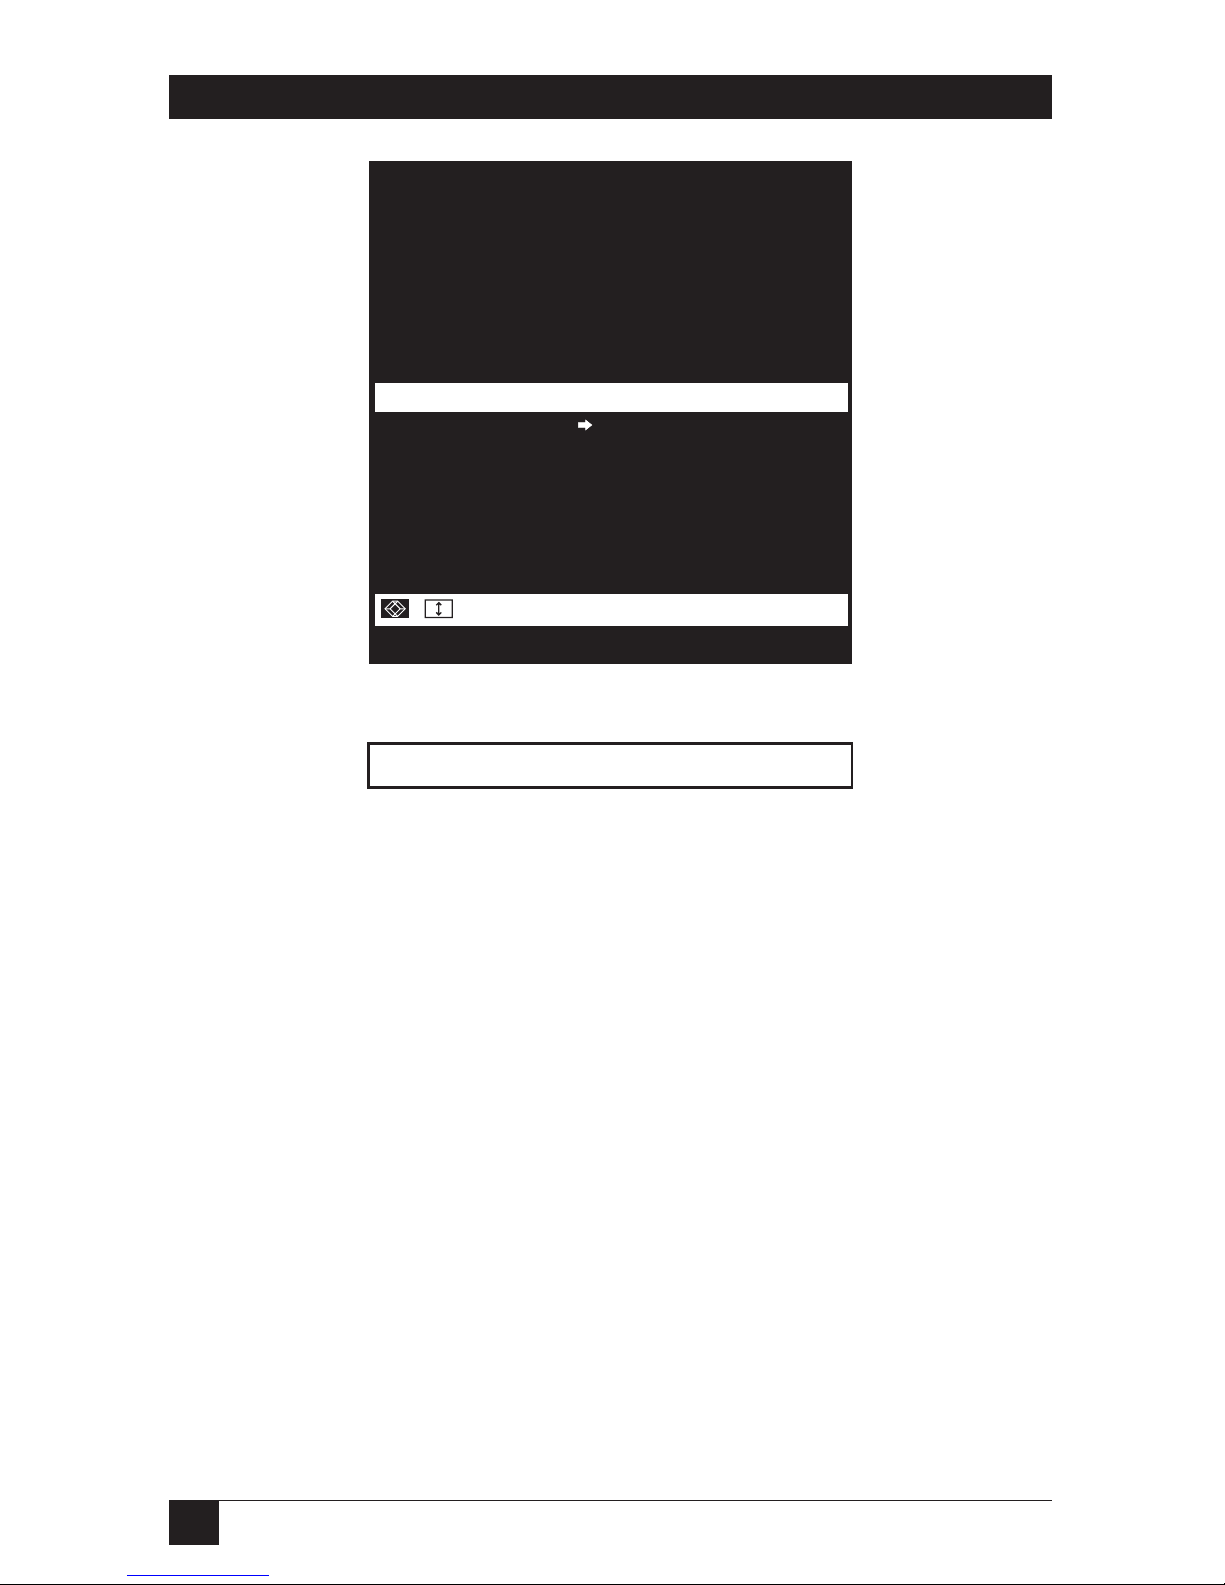
The Device ID field in the login menu will initially contain the attached Base
Unit’s default device name: “Summit” followed by “2x42” for a KV1500A, “4x42”
for a KV1501A, “8x32” for a KV1502A, or “16x64” for a KV1503A. (The
administrator can assign it a different name.) The User Port is the number of the
user port on the Base Unit—from 1 to 16 depending on the model—that this USM
and user station are attached to.
Figure 1. The Login Menu for a KV1502A.
To login at the Login Menu and start operating the system, take these steps:
1. Type in the user name that you’ve been assigned by the system administrator.
(If user names haven’t been assigned yet, the defaults are user01 through
user15—depending on the model—for regular users and admin for the
administrator. User names are not case-sensitive.) When you finish, press [Enter].
2. If a password is necessary, you’ll be prompted to enter a password as well.
Type the password you’ve been assigned by the system administrator and
press [Enter]. (Passwords are case-sensitive.)
3. The Selection Menu will be displayed, as shown in Figures 2 and 3. To go to
other menus, use the function keys as described in Section 4.
You can log out of the Summit system by pressing function key [F9] while the
OSUI is displayed.
Please Login ServSwitch Summit
Device ID: Summit 8x32
User Port: 1
User Name:
Password:
Enter Name and Password
Page 3

3
SECTION 2: Selecting a Computer
2. Selecting a Computer
Immediately after you login, the Summit’s OSUI displays the Selection Menu. If
you’re already logged in, you’ll need to bring up the Selection Menu by pressing
the hotkey (the factory default is [Scroll Lock]) twice in quick succession, then
pressing function key [F2].
The Selection Menu lists devices sorted either by channel-ID number (“Ch. ID”),
as shown in Figure 2, or alphabetically by the name of the computer or other
device on that channel (“Name”), as shown in Figure 3 on the next page. Toggle
between these two views by pressing [F12]. Default sorting is by channel-ID
number, but unless the system is re-initialized, the last selected sort order will be
shown the next time that the Selection Menu is activated. As for the other columns
in the channel-ID view, “No” is the channel’s “key number” (internally assigned by
the Summit and not changeable by the user) and “Scn” is its current individual
scan-delay time in seconds (set by the admin) unless the channel has a subsidiary
Base Unit attached to it, in which case the Scn column will show “- -”.
The Selection Menu can display eight channels per page; it will show you how
many total pages there are, and which of them you’re viewing, in its upper righthand corner (“Page 2/5” for the second of five pages, for example). Use the
[PageUp] and [PageDown] keys on your keyboard to move between the pages.
Once you’ve selected a CPU as described on the following pages, the Summit
system will switch to that channel; if you’ve enabled it (see Section 3), an “ID
Display” (shown in Figure 4) will pop up on screen to identify the chosen channel
for the number of seconds you’ve set.
Figure 2. The Selection Menu ordered by channel number.
Selection Menu
Main_16x64 Page 1/8
No Ch.ID Name Scn
-- -------- ------------ ---
1 01 03
2 02 NT40-Mail 03
3 03 Wins95_Bob 03
4 04 Wins98_Jack 03
5 05 Matrls_8x32 -6 06 NT40-Fax 03
7 07 Mrktng_8x32 -8 08 PubSrv_8x32 --
-- -------- ------------ ---
ScrlLock | Scan | Skip NCSL
3 03 Wins95_Bob 03
Page FKey Ent Esc
Page 4
4
SERVSWITCH™ SUMMIT USER STATION MODULE
Figure 3. The Selection Menu ordered by name.
Figure 4. The ID Display that appears on screen after a selection.
To choose a computer from the Selection Menu, take these steps:
1. Press [F12] to toggle the menu to your desired sort-order view (by channel-ID
number or alphabetically by device name). The entry for the channel you
currently have selected (if any) will be highlighted and will have a small red
arrow to the left of its channel name.
NOTE
In the channel-ID view only, the Selection Menu can display either all
channels or only those channels that you’re allowed to select. The latter
is the default, but if the system administrator has set the “Display All
Computers” admin option to “Yes,” you can press [F10] to toggle
between the restricted and unrestricted views. In the unrestricted “all
channels” view, the Summit displays a red “S” next to the scan rate of
any channel that you aren’t allowed to access.
2. Use the up- and down-arrow keys (and, in large systems, the [PageUp] and
[PageDown] keys) to move the highlight bar to the channel you want to
select, then press [Enter]. Note that although the highlight will move, the
small red arrow to the left of the channel name will remain where it was and
continue to indicate your currently selected channel until you choose a new
one.
Main_16x64.02 NT40-Fax
Selection Menu by Name
Main_16x64 Page 1/8
Name Ch.ID
------------ --------------Mrktng_8x32 07
Matrls_8x32 05
NT40-Fax 06
NT40-Mail 02
PubSrv_8x32 08
Wins95_Bob 03
Wins98_Jack 04
01
------------ ---------------
ScrlLock | Scan | Skip NCSL
NT40-Fax 06
Page PCName FKey Ent Esc
Page 5

5
SECTION 2: Selecting a Computer
In the channel-ID (sorted by ID) view, once your desired channel’s page is on
screen, you can also press the desired channel’s key number ([1] through
[8]) to move the highlight to that channel instantly.
In the name view, you can also type the first few characters of the desired
channel’s name to move the highlight to the first channel whose name begins
with that character sequence. If you type enough characters, the highlight
should eventually move to the precise channel you want.
3. When you press [Enter] to select a channel, and there’s a computer CPU
attached to that channel that you are allowed to access, the Summit
automatically switches you to that channel for normal computer operation
and the OSUI disappears. If there’s a cascaded Base Unit attached to that
channel, an additional dedicated OSUI Selection Menu will appear for that
Base Unit; keep moving through the Selection Menu layers until you reach
the CPU you want. (To return to the main Selection Menu from any secondor third-tier Base Unit’s Selection Menu, press the [Home] key on your
keyboard once, or press [Esc] once or twice depending which tier you’re on.)
Once you’ve switched to a different channel, you can continue switching by
pressing the hotkey (factory default is [Scroll Lock]) twice in quick succession to
bring the Selection Menu back on screen. If instead you want to go back to your
previously selected channel without seeing any OSUI menus, you can press the
“previous channel” command key (factory default is [Num Lock]) twice in quick
succession.
In the Selection Menu, each channel’s availability is visually indicated by the
following text colors. (For more information about Private Mode, Public View
Mode, and PC Share Mode, refer to the Base Unit manual.)
• Black = No device is connected or the connected device is powered down.
• Green = Computer CPU is connected and the channel is active and available.
However, if the Summit system is in PC Share Mode, another user may
currently be accessing the computer.
• Red = Channel is unavailable, currently being accessed by another user. (This
only happens when the Summit system is in Private Mode.)
• Yellow = Channel is unavailable for control (being controlled by another user),
but video can be viewed. (This only happens when the Summit system is in
Public View Mode. Also refer to the information on the next page about other
OSUI displays that appear when the system is in Public View Mode.)
• Purple = A second- or third-tier cascaded Base Unit is connected to this
channel.
• White = Channel’s current status is unknown. This should not happen if the
Summit is operating normally.
Page 6

6
SERVSWITCH™ SUMMIT USER STATION MODULE
When the Summit system is set to Public View Mode by the administrator, if one
user has already selected a computer, another user can also select it, but the
second user will only be able to view its video output; they won’t be able to control
it or input any data with the keyboard and mouse. While the system is in this mode,
if the “ID Display” parameter is enabled for your account (see Section 3), message
boxes will appear on screen as you and other users select various CPUs:
• When you select a computer that someone else is already controlling, the
message below (showing the name of the computer being viewed) will be
displayed on your monitor for the currently set “ID Display” interval. Press
[Esc] to return to the main Selection Menu.
• If another user chooses to view the video of a computer you have already
selected, you will see the messages shown below, bearing that user’s name, for
the currently set “ID Dispay” interval. You’ll see the top message when the
second user begins viewing; you’ll see the bottom message when they stop
viewing because they’ve switched to another channel or logged out.
P-View
P-View
P-View
Win95.Bob
Active - Jason
Off - Jason
Page 7

7
SECTION 3: Customizing How the USM Operates for You
3. Customizing How the USM Operates for You
When the OSUI is active, you can bring up the User Profile Menu, shown in
Figure 5, by pressing function key [F4]. This menu is for displaying the Summit’s
configuration and for setting preferred operating parameters for individual user
accounts.
Figure 5. The User Profile Menu.
To view or change your user profile, take these steps:
1. If the OSUI isn’t already active, activate it by pressing the hotkey (factory
default is [Scroll Lock]) twice in quick succession.
2. Press [F4] to access the User Profile screen. The topmost fields are identifiers
that can’t be changed by the user:
• The Connected field displays the name and channel ID of the currently
selected device or computer, if you’re currently connected to a channel.
• The User field displays the user name you entered at login.
• The User Port field shows which user port on the Base Unit your USM and
user station are attached to.
• The Admin field shows whether or not you have administrator privileges.
• The Group field displays your group ID(s) (see Appendix A of the Base
Unit manual).
User Profile
Connected: Main_16x64
User: User01 User Port: 2
Admin: No
Group: 00
Scan Mode: Global
Global Scan Rate: 03 Seconds
ID Display: On 03 Seconds
Green Mode: Off 05 Minutes
Hotkey: Scroll Lock
Display Position: Menu ID
Previous Channel Key: NumLck
Help : Single LineLocalPC:Off
ScrlLock | Scan | Skip NCSL
Edit P S Fkey Esc
Page 8

8
SERVSWITCH™ SUMMIT USER STATION MODULE
3. If you want to change the value of any of the other fields, use your keyboard
keys to select the field you want to edit: Press [Tab] to move forward through
the editable fields, [Shift]+[Tab] to move backward, the up- and down-arrow
keys to move up and down, and the left- and right-arrow keys to move left and
right.
Press [Enter] to begin editing; the highlighted area will turn green, and
the prompt in the prompt/message bar will change to “-Change Ent-Done
ESC-Cancel”. Follow the instructions below for interpreting and editing each
specific User Profile parameter.
When you’re finished, either press [Enter] to retain the changes (the
highlighted area will turn yellow) or press [Esc] (or any function key that
would cause you to leave this screen) to cancel the changes. The prompt in
the prompt/message bar will change to “Save the changes (Y/N/ESC)”. (It
will do this before you leave the screen if you pressed a function key.) Press
“S” to save the changes to long-term memory, “N” to discard your changes, or
[Esc] to discard your changes and exit the menu.
Here’s what the User Profile parameters mean and how you can change their
settings:
• Scan Mode: The method the system uses to determine how long to pause at
each channel during autoscanning (refer to the Base Unit manual). The two
possible settings are “Global” (the default), in which the system pauses at each
channel for the same length of time (which you choose—see the next
paragraph), and “Individual,” in which the system pauses at each channel for
the length of time that the administrator has set for that individual channel (as
displayed in the Selection Menu). Use any of the arrow keys to toggle between
these values.
• Global Scan Rate: If Scan Mode is set to “Global” (see the previous
paragraph), this parameter determines the length of time that the system
pauses at each channel while scanning. Using leading zeroes if necessary, type
in a two-digit number of seconds from 01 to 24, or use the up- and down-arrow
keys to increment and decrement the current value by 1 respectively. The
default setting is 03.
Page 9

9
SECTION 3: Customizing How the USM Operates for You
• ID Display: The ID Display is a small window that can pop up on screen to
show you the name and ID of each channel as you switch between them or
scan them. You can edit the two fields of this parameter to determine how the
system will show you this window:
– Possible values in the first field are “On” (ID Display is shown, the default
value) and “Off” (ID Display isn’t shown). Use any of the arrow keys to
toggle between these values.
– If the ID Display is set to “On,” the number in the second field is how many
seconds it will stay on screen. Using leading zeroes if necessary, type in a twodigit number of seconds from 01 to 24, or use the up- and down-arrow keys
to increment and decrement the current value by 1 respectively. If you type
in a number greater than 24, the second field will be filled with a “- -”,
indicating that the ID Display will be shown at all times. The default setting
is 03. If the ID Display is set to “Off,” the number in this field will have no
effect.
The setting of this parameter also controls whether and for how long the
Public View Mode message boxes are displayed on screen (see Section 2).
• Green Mode: A “power-saving mode” that blanks the monitor screen if the
user station is idle (no keyboard or mouse activity) for the specified amount of
time. You can edit the two fields of this parameter to determine how the
system handles this feature:
– Possible values in the first field are “On” (Green Mode is enabled and the
screen is blanked after a period of inactivity) and “Off” (Green Mode is
disabled and the screen displays normal video indefinitely). Use any of the
arrow keys to toggle between these values.
– If Green Mode is set to “On,” the number in the second field is how many
minutes of inactivity must elapse before it’s triggered and the screen is
blanked. Using leading zeroes if necessary, type in a two-digit number of
minutes from 01 to 99, or use the up- and down-arrow keys to increment and
decrement the current value by 1 respectively. The default setting is 05. If
Green Mode is set to “Off,” the number in this field will have no effect.
• Hotkey: The keyboard key that, when quickly pressed twice, activates the
OSUI. The five alternatives are [Scroll Lock] (the default), [Caps Lock],
[Num Lock], left [Shift], and left [Alt]; use any of the arrow keys to switch
between them. You can’t select the key that’s currently being used as the
Previous Channel Key (see the Previous Channel Key entry on the next page).
Page 10

10
SERVSWITCH™ SUMMIT USER STATION MODULE
• Display Position: Use this parameter to move the OSUI menus and ID Display
to the desired position on your monitor screen. First move the highlight to
“Menu” (for the OSUI) or “ID” (for the ID Display, which will pop up if it’s not
already on screen while the OSUI temporarily disappears) and press [Enter] to
highlight it, then use the arrow keys to move the chosen window as desired:
the left-arrow key to move the whole window to the left, for example. When
you’re finished, press [Enter] to save the change.
• Previous Channel Key: The keyboard key that, when quickly pressed twice,
causes the Summit to switch back to the previously selected channel without
going through the OSUI, provided that that channel is still available. The six
alternatives are [Scroll Lock], [Caps Lock], [Num Lock] (the default), left
[Shift], left [Alt], and “None” (no Previous Channel Key—disables this
function); use any of the arrow keys to switch between them. You can’t select
the key that’s currently being used as the hotkey (see the earlier Hotkey
entry).
• Help: This parameter determines the format of the help message at the
bottom of each OSUI menu. It’s always set to “Single Line”; it can’t be selected
or altered.
• Local PC: Use any of the arrow keys to toggle Local PC Mode on or off (the
default) for the attached USM. Only turn this on if you’ve used a KV1519A
CIM to attach a local PC between the USM and the Base Unit; see Section 6 for
more information.
You can also change your password (or delete or reinstate it if the administrator
sets “Allow Blank Password” to “yes”) while the User Profile Menu is on screen by
pressing “P” to bring up a prompt window. Type your old password at the first
prompt. At the next prompt, type a new password up to eight characters long and
press [Enter] (or just press [Enter] without typing anything in the field to delete
your password). Confirm the new password by typing it in again at the third
prompt; either press [Enter] to save the new password or [Esc] to abort the change
and continue using the old password.
NOTES
Be careful when you change your password! If you forget or lose it,
administrators have no way of recovering or erasing it for you—your
account will have to be deleted and recreated.
Page 11

11
SECTION 4: Keyboard-Controlled OSUI Functions
4. Keyboard-Controlled OSUI Functions
Use the following function keys to access the Summit’s OSUI functions:
Press… When you want to…
[F1] View the Help Menu (shown in Figure 6 on the next page).
[F2] Access the Selection Menu (see Section 2) in order to view or select
channels or view group IDs or scan rates.
[F4] Access the User Profile Menu (see Section 3) in order to view and
change user-specific operating parameters.
([F5], [F6], and [F7] are usable by administrators only.)
[F8] View the Information Menu (see Section 5) in order to see the
version numbers of the Summit’s firmware and hardware, the
number of accessible Base Units, the total number of accessible
computers, etc.
[F9] Log out of the Summit system (logs user out and causes the login
screen to be displayed).
[Shift] + [F9] If any OSUI screen is displayed: Disconnect yourself from the active
channel without logging out.
[F10] If the administrator has set “Display All Computers” to “Yes” and the
Selection Menu is sorted by channel ID: Toggle the display of all
channels (including inaccessible ones) on or off.
[F12] If you are at the Selection Menu: Toggle the Selection Menu between
sorting the channel entries by name or by channel ID.
[Esc] Exit the OSUI (returns user to the Selection Menu, or to the login
screen when no channel is selected).
NOTES
If a user does not have administrator privileges, then they will see
functions [F5], [F6], and [F7] displayed in red in the Help Menu,
indicating that these functions aren’t available to them.
If a system administrator has set Display All Computers to “No,”
then [F10] will be displayed in red in the Help Menu for all users,
indicating that this function is not available (even for administrators).
We recommend that you use a Sun keyboard if there are any Sun
CPUs in your system; if you must control Sun CPUs with a PS/2
keyboard, refer to Appendix H of the Base Unit manual for how to
produce a Sun keyboard’s special characters.
Page 12

12
SERVSWITCH™ SUMMIT USER STATION MODULE
Figure 6. The Help Menu.
5. The Information Menu
When the OSUI is active, you can bring up the Information Menu, shown in
Figure 7, by pressing function key [F8]. This menu displays the “vital statistics” of
the USM that your user station is attached to, including its firmware and hardware
revisions, its serial number, which console port (user port) on the Base Unit it’s
attached to, and the number of KVM switches and PC CPUs that can be accessed
through it.
Figure 7. The Information Menu.
Information Menu
Firmware Ver: 4L3
Hardware Ver: 0B
FPGA Ver: 0C
Serial Number: D3C80002
Console Port: 1
Accessible KVM Sws:2
Accessible PCs: 105
ScrlLock | Scan | Skip NCSL
Help
F1 Help / ESC Exit
F2 Channel Selection
-F12 Sort by Channel/Name
F4 User Profile
F5 Administrative Functions
F6 Toggle Scan On/Off
F7 Toggle Skip On/Off
F8 Information Screen
F9 Logout
-Shift+F9 Release Channel
F10 Toggle Disp All Ch. On/Off
ScrlLock | Scan | Skip NCSL
Edit P S FKey Esc
FKey Esc
Page 13

13
SECTION 6: Local PC Mode
6. Local PC Mode (Optional)
It’s possible for the system administrator to install a KV1519A Computer Interface
Module (“CIM”) between your USM and the Base Unit, as shown in Figure 8. This
would give you sole access to a local computer CPU in addition to your shared
access to the other CPUs in the system. See Appendix C in the Base Unit manual
for details.
Figure 8. A Summit system that uses a KV1519A to support a local CPU.
If this has been done at your user station, you can control the local PC by activating
Local PC Mode on your USM. Take these steps:
1. Login at the attached user station.
2. Press the hotkey ([Scroll Lock] is the default]) twice in quick succession to
bring up the OSUI.
3. Press [F4] to bring up the User Profile Menu (see Section 3).
USMs and user stations
with no access to the
local CPU
USM and
user station
with access
to the local
CPU
KV1519A
CIM
Base
Unit
Local
PC
CIMs
Other
CPUs
Page 14

14
SERVSWITCH™ SUMMIT USER STATION MODULE
4. Use [Tab] or the up- and down-arrow keys to move the highlight to the “Local
PC” field.
5. Press [Enter]. The Local PC field will turn green.
6. Use the up- or down-arrow key to toggle the value of the field to “On.”
7. Press [Enter]. The highlight will turn yellow.
8. Press “S” to save the change and return to the User Profile Menu. If you really
don’t want to do this at this time, press [Esc] to abort the change and return
to the User Profile Menu.
Once you’ve turned on Local PC Mode, you can access the dedicated local PC CPU
from this user station by pressing the [Home] key twice in quick succession while
the OSUI is on screen. The USM will immediately switch you to the local PC. (Only
you can use the local PC. Even if they log in from your user station, other users will
not be able to access the local PC unless they log in using your user name and
password.) To return to the Summit system and its switched CPUs, bring up the
OSUI by pressing the hotkey twice ([Scroll Lock] is the factory default), then press
[F2] to bring up the Selection Menu and access any of the listed computers.
7. Calling Black Box
If you determine that your ServSwitch™ Summit USM is malfunctioning, do not
attempt to alter or repair the unit. It contains no user-serviceable parts. Contact your
system administrator; if they aren’t available, contact Black Box Technical Support
at 724-746-5500.
Before you do, make a record of the history of the problem. We will be able to
provide more efficient and accurate assistance if you have a complete description,
including:
• the nature and duration of the problem;
• when the problem occurs;
• the components involved in the problem;
• any particular application that, when used, appears to create the problem or
make it worse; and
• the results of any testing you’ve already done.
Page 15

15
SECTION 8: Shipping and Packaging
8. Shipping and Packaging
If you need to transport or ship your USM:
• Package it carefully. We recommend that you use the original container.
• If you are returning it, make sure you include everything you received with it.
Before you ship for return or repair, contact Black Box to get a Return
Authorization (RA) number.
TRADEMARKS USED IN THIS MANUAL
BLACK BOX and the logo are registered trademarks, and ServSwitch and
ServSwitch Summit are trademarks, of Black Box Corporation.
Any other trademarks mentioned in this manual are acknowledged to be the property of the
trademark owners.
Page 16

1000 Park Drive • Lawrence, PA 15055-1018 • 724-746-5500 • Fax 724-746-0746
© Copyright 2003. Black Box Corporation. All rights reserved.
 Loading...