

Black Box ICOMP-ICC User Manual
V1.1.2


iCOMPEL Content Commander User Guide
Federal Communications Commission and Industry Canada Radio Frequency Interference
Statements
This equipment generates, uses, and can radiate radio-frequency energy, and if not installed and used properly, that is, in strict
accordance with the manufacturer's instructions, may cause interference to radio communication. It has been tested and
found to comply with the limits for a Class A computing device in accordance with the specifications in Subpart B of Part 15 of
FCC rules, which are designed to provide reasonable protection against such interference when the equipment is operated in a
commercial environment. Operation of this equipment in a residential area is likely to cause interference, in which case the
user at his own expense will be required to take whatever measures may be necessary to correct the interference.
Changes or modifications not expressly approved by the party responsible for compliance could void the user's authority to
operate the equipment.
This digital apparatus does not exceed the Class A limits for radio noise emission from digital apparatus set out in the Radio
Interference Regulation of Industry Canada.
Le présent appareil numérique n'émet pas de bruits radioélectriques dépassant les limites applicables aux appareils
numériques de la classe A prescrites dans Ie Règlement sur Ie brouillage radioélectrique publié par Industrie Canada.
3

NOM Statement
Instrucciones de Seguridad
(Normas Oficiales Mexicanas Electrical Safety Statement)
1. Todas las instrucciones de seguridad y operación deberán ser leidas antes de que el aparato eléctrico sea operado.
2. Las instrucciones de seguridad y operación deberán ser guardadas para referencia futura.
3. Todas las advertencias en el aparato eléctrico yen sus instrucciones de operación deben ser respetadas.
4. Todas las instrucciones de operación y uso deben ser seguidas.
5. EI aparato eléctrico no deberá ser usado cerca del agua-por ejemplo, cerca de la tina de baño, lavabo, sótano mojado o
cerca de una alberca, etc.
6. EI aparato eléctrico debe ser usado únicamente con carritos o pedestales que sean recomendados por el fabricante.
7. EI aparato eléctrico debe ser montado a la pared o al techo sólo como sea recomendado por el fabricante.
8. Servicio EI usuario no debe intentar dar servicio al equipo eléctrico más allá a lo descrito en las instrucciones de operación. Todo otro servicio deberá ser referido a personal de servicio calificado.
9. EI aparato eléctrico debe ser situado de tal manera que su posición no interfiera su uso. La colocación del aparato eléctrico
sobre una cama, sofá, alfombra o superficie similar puede bloquea la ventilación, no se debe colocar en libreros o gabinetes que impidan el flu]o de aire por los orificios de ventilación.
10. EI equipo eléctrico deber ser situado fuera del alcance de fuentes de calor como radiadores, registros de calor, estufas u
otros aparatos (incluyendo amplificadores) que producen calor.
11. EI aparato eléctrico debera ser connectado a una fuente de poder sólo del tipo descrito en el instructivo de operación, o
como se indique en el aparato.
12. Precaución debe ser tom ada de tal manera que la tierra fis ica y la polarización del equipo no sea elim inada.
13. Los cables de la fuente de poder deben ser guiados de tal manera que no sean pis ados ni pellizcados por objetos colocados sobre o contra ellos, poniendo particular atención a los contactos y receptáculos donde salen del aparato.
14. EI equipo eléctrico debe ser limpiado únicamente de acuerdo alas recomendaciones del fabricante.
15. En caso de existir, una antena externa deberá ser localizada lejos de las lineas de energia.
16. EI cable de corriente deberá ser desconectado del cuando el equipo no sea usado por un largo periodo de tiempo.
17. Cuidado debe sertomado de tal manera que objectos liquidos no sean derramados sobre la cubierta U orificios de ventilación.
18. Servicio por personal calificado deberá ser provisto cuando:
A. EI cable de poder o el contacto ha side dañado; u
B. Objectos han caído o líquido ha side derramado dentro del aparato; o
C. EI aparato ha side expuesto a la lIuvia; o
D. EI aparato parece no operar normalmente o muestra un cambio en su desempeño; o
E. EI aparato ha side tirado o su cubierta ha side dañada.
4

iCOMPEL Content Commander User Guide
Trademarks Used in this Manual
Black Box and the Double Diamond logo are registered trademarks of BB Technologies, Inc.
Any other trademarks mentioned in this manual are acknowledged to be the property of the trademark owners.
All rights reserved. No parts of this work may be reproduced in any form or by any means - graphic, electronic, or mechanical,
including photocopying, recording, taping, or information storage and retrieval systems - without the written permission of the
publisher.
Products that are referred to in this document may be either trademarks and/or registered trademarks of the respective owners. The
publisher and the author make no claim to these trademarks.
While every precaution has been taken in the preparation of this document, the publisher and the author assume no responsibility for
errors or omissions, or for damages resulting from the use of information contained in this document or from the use of programs and
source code that may accompany it. In no event shall the publisher and the author be liable for any loss of profit or any other
commercial damage caused or alleged to have been caused directly or indirectly by this document.
Printed: 07 November 2013
We're here to help! If you have any questions about your application or
our products, contact Black Box Tech Support at 724-746-5500 or go to
blackbox.com and click on "Talk to Black Box." You'll be live with one of
our technical experts in less than 30 seconds.
5

6

iCOMPEL Content Commander User Guide
Table of Contents
1. Welcome to Black Box Digital Signage 13
1.1 Overview 13
1.1.1 Standalone Display 14
1.1.2 Multiple Displays 15
1.1.3 Multiple Channels 15
1.2 Terms You Need to Know 17
1.3 Logging On 18
1.4 Using the Web Interface 19
2. Creating Digital Signage 27
2.1 Using Schedules 27
2.1.1 Creating a Schedule 28
2.1.2 Schedule Entries 28
2.1.3 Overriding the Schedule 31
2.2 Using Layouts 31
2.2.1 Manage Layout Page 32
2.2.2 Adding a New Layout 32
2.2.3 Editing a Layout 33
2.2.4 Layout Properties 33
2.2.5 Interaction Properties 33
2.3 Using Zones 34
2.3.1 The Layout Editor 34
2.3.2 Editing a Zone 36
2.3.3 Editing a Zone's Properties 37
2.4 Using Playlists 38
2.4.1 Adding Media Item Files to a Playlist 42
Changing File/Folder References 43
2.4.2 Adding Special Items to a Playlist 43
2.4.3 Adding Folders to a Playlist 44
3. Understanding Media Types 47
3.1 Media Directly Managed by the iCC 47
3.1.1 Text 47
3.1.2 Newsfeeds 48
3.1.3 Clocks 49
3.1.4 Tables 49
3.1.5 RS-232 Items 51
3.1.6 QR Codes 51
3.2 Media Run from the iCC Disk 51
3.2.1 Uploading Content Files 52
7

3.2.2 Video 54
Changing File/Folder References 55
3.2.3 Text Files 56
Changing File/Folder References 56
3.2.4 Images and Photos 56
Changing File/Folder References 57
3.2.5 Audio 57
Changing File/Folder References 58
3.2.6 Presentations 58
3.2.7 HTML Web Pages 59
Changing File/Folder References 59
3.2.8 Adobe Flash 60
3.2.9 Folder Play 60
3.3 Media from External Sources 60
3.3.1 TV 61
3.3.2 Radio 61
3.3.3 Live Video 61
3.3.4 Multicast Video 62
3.3.5 External Web Pages 62
3.4 Media Item Properties 64
3.4.1 Movie Properties 65
3.4.2 HTML Properties 66
3.4.3 Image Properties 67
3.4.4 Text Properties 68
3.4.5 Soundtrack Properties 68
3.4.6 Newsfeed Properties 69
3.4.7 Clock Properties 70
3.4.8 Folder Play Properties 71
Changing File/Folder References 71
3.4.9 Common Advanced Properties 72
3.4.10 Ad Hoc Properties 74
3.5 Playlist Commands 75
3.5.1 Rendezvous Points and the Advance To Command 75
3.5.2 Change Layout Command 76
3.6 Colors 77
3.7 Fonts 78
4. Enhancing Your Displays 81
4.1 Synchronizing Playlist Displays Between Zones 81
4.1.1 Automatic Captioning 81
4.1.2 Displaying Video-On-Demand Using a Sub-Playlist 82
4.2 Using Interactivity 83
8

iCOMPEL Content Commander User Guide
4.2.1 Designing Interactive Layouts 86
4.2.2 General Purpose Input/Output 86
4.2.3 Touch Screens 87
4.2.4 Click On Touch 87
4.3 Using the RS-232 Interface Port 87
4.4 Displaying Part of a Movie or Web Page 88
4.5 Changing the Screen Background 88
5. Ad Hoc Content 91
5.1 Enhanced Ad Hoc Access Control 92
5.2 Remote Keypad Control 94
5.3 Additional Ad Hoc 95
5.4 Ad Hoc from Center 97
5.5 Managing Ad Hoc Items 97
5.6 Creating Ad Hoc User Accounts 98
5.7 Ad Hoc Pages 99
5.7.1 Managing Ad Hoc Pages 99
5.7.2 Editing Ad Hoc Pages 99
5.8 Ad Hoc Folder Play 100
5.9 Ad Hoc Media Folder 101
5.9 Changing Ad Hoc Content 101
5.10 Ad Hoc Theming 103
6. Sharing Content Using Layout Packages 107
6.1 Layout Packages 107
6.2 Creating a Layout Package 107
6.3 Uploading and Installing a Layout Package 108
6.4 Layout Package Conflicts 108
6.5 Layout Package Information 109
7. Channels and Signage Networks 113
7.1 Publishing 114
7.1.1 Publishing Mode and Policy 114
7.1.2 Configuring the Channel 115
7.1.3 Publishing a Channel 117
7.1.4 Multichannel Publishing 118
7.1.5 Managing Channels 119
7.2 Channel Ad Hoc 121
7.3 Channel Content Servers 122
8. System Status 127
8.1 System Status 127
8.2 Conditional Play Status 128
9

9. Setup 131
9.1 Help and User Options 131
9.2 System Setup 132
9.2.1 Users 132
9.2.2 Date & Time 133
9.2.3 Network 134
9.2.4 TV & Radio 135
9.2.5 HTTP Proxy 137
9.2.6 Security – General Settings 137
9.2.7 Security – Advanced LDAP Settings 140
9.2.8 Player Local Information 144
9.2.9 Reporting 144
9.2.10 Feature Keys 145
9.3 Player Setup 145
9.3.1 RS-232 Outputs 145
9.3.2 Interactivity 147
9.4 Backing Up Your iCC 147
9.5 Software Update 148
9.6 Reboot System 150
10. Troubleshooting 153
10.1 Support Snap Shot 153
10.2 Connection Troubleshooter 153
11. Technical Reference 159
11.1 Optimizing Playback Performance 159
11.2 RS-232 Technical Reference 159
11.3 Backup Contents 161
12. Glossary 165
Index 169
10

Part I
Welcome to Black Box
Digital Signage


iCOMPEL Content Commander User Guide
1. Welcome to Black Box Digital Signage
Welcome to the iCOMPEL Content Commander (iCC) user guide. Here you will find comprehensive information about how to
create digital signage with the iCC and how to manage the iCC unit.
Find the subject you are looking for in the table of contents or in the PDF bookmarks. Track down the location of specific topics
with the index at the end of the guide or by using the Adobe®Reader®search facility.
If you are new to Black Box digital signage, you will find it helpful to read the Overview for an introduction to the fundamental
concepts and components involved. Also familiarize yourself with the Terms You Need to Know before beginning to create
digital signage content with the iCC.
Following that, you will be ready to check through the steps for Logging On to the iCC and Using the Web Interface.
However, the more experienced may wish to go straight to the information about creating and con trolling digital displays:
l Creating a Schedule – Getting started with designing and implementing your display.
l Understanding Media Types – Understanding the different types of content you can display and how the iCC manages
them.
You can also find background Information on setting up and managing the iCC:
l System Status – Keeping your iCC running smoothly.
l Setup – Performing configuration and maintenance tasks.
1.1 Overview
To understand the fundamental concepts and components of a digital signage configuration, it is useful to start by describing a
very simple arrangement with a standalone display. Building on that, further illustrations will add the extra features, including
the iCC, that become increasingly relevant as your network grows more distributed and more sophisticated.
Work through the description of these examples in turn:
l Standalone Display
l Multiple Displays
l Multiple Channels
13
1. Welcome to Black Box Digital Signage
1.1.1 Standalone Display
The following diagram illustrates the simplest situation with a single display controlled by an individual. You might conceive of
this as a screen displaying information in the foyer of a school:
Note the significance of the highlighted features in that scenario:
l User – The person controlling the screen content and its operation (that is, you).
l Browser – You exercise control through a web browser (such as Mozilla
®
Firefox®or Microsoft®Internet Explorer®). This
remains the case for even the largest digital signage network.
l Local area network, Intranet, or Internet – In principle, you do not need to be physically close to the screen's location. This
becomes more significant as the size of the network increases.
l Player – Player is the generic term for the appliance that runs the screen. Specifically, the player is the Black Box
iCOMPEL. The player has to be physically attached to the screen.
l Display Screen – The equipment that displays the content you have defined. You configure the player to display various
media on selected areas of the screen at chosen times.
As you might expect, additional features are needed to support a network that includes Multiple Displays.
14

iCOMPEL Content Commander User Guide
1.1.2 Multiple Displays
The following diagram illustrates a more fully-featured situation where a user controls several players and their screens. You
might conceive of this as a set of screens displaying sales information on the floors of a shop. In practice, the number of
players would be much higher, which is why it is desirable – and soon necessary – to add further components to the network:
You can see that certain features are the same: the user, the browser, and the network. Note now the significance of the
additional features, discussed clockwise as they appear:
l Publisher – A Publisher is a system you configure to provide content to multiple players. This enables you to display
consistent content on several screens and means you only need update it in one place. Although some player models can
perform this role, in our context the publisher is specifically the Black Box iCOMPEL Content Commander.
l Channel – A Channel refers to both the content it contains and its originating publisher. The Channel Name (in this case
'Channel 1') identifies the channel and is often just the name of the publisher.
l Subscriber – A Subscriber is a player that you configure to accept content from a publisher. In the diagram, Channel 1
provides the content for all the subscriber players and their screens. Subscriber and Publisher are referred to as Roles
(the only other role is Standalone, which is the role of the player in the first diagram).
You can build on the parts already described to create a network not only of multiple displays but also of Multiple Channels.
1.1.3 Multiple Channels
When your signage network grows to a large number of players and their screens, the quantity and variety of content you need
to manage and distribute grows accordingly.
Once again, it is useful to envision the key components in a condensed and summarized form.
15

1. Welcome to Black Box Digital Signage
The following diagram shows how the individual network features we have discussed so far combine to provide a network
infrastructure of multiple displays and multiple channels. You might conceive of this as a multisite business with sites in
different cities, maintaining a resilient network of players displaying various streams of content, and all under centralized
control:
Notice how the by-now familiar components operate in combination:
l At the center, you create and manage the flow of content for the network through your web browser.
l The iCC publishes content over multiple channels. You configure as many as you need to serve the needs of the business,
up to a maximum of 50.
l Multiple subscriber players display content from whichever channel you designate appropriate to their function. For
example, the content could be subject-based if the display is for a particular department or could be locale-based if the
display is for a particular city.
l How you group the subscriber players is up to you: you can have numerous players displaying common content.
That picture is deliberately simplified to illustrate the essential components of a large network. Therefore, it is worth
emphasising that the iCC can readily scale up to manage the content for even complex digital signage networks. For example,
the iCC allows you to set a bandwidth limit on a per-port basis, thereby prioritising quality of service for different purposes (see
the HTTP service settings description in Firewall for more details).
16
iCOMPEL Content Commander User Guide
This is not to say the iCC alone can provide everything required for more specialist configurations. You may need to add a
Channel Content Server (CCS) to assist content processing if you have specific network topology requirements (see
Channel Content Servers for more details).
Having now considered the background terms and concepts of the digital signage network, the next step is to understand how
to compose the content that you will publish through the iCC. Begin by reading the Terms You Need to Know.
1.2 Terms You Need to Know
The iCC provides powerful facilities to help you to design, structure, and control sophisticated and effective content display.
To understand how you use the iCC to manage display of content, it is important to understand how certain key features relate
to each other.
The following diagram illustrates the critical relationships between Schedules, Layouts, Zones, and Playlists:
To flesh out how those relationships work, consider each of those key features in turn.
Schedule
The player is designed to run continuously. You control which Layouts are displayed on what days and at which times by
creating a Schedule. The schedule may be something like this:
l Layout A runs from 4.00 pm to 6.00 pm, Mondays to Fridays.
l Layout B runs from 2.00 pm to 8.00 pm, Saturdays and Sundays.
l Layout C runs at all other times, throughout the week.
Layout
A Layout is the arrangement of individual display areas, known as Zones, that you use to compose your on-screen display.
Your layout might display video in one zone, scrolling text in another, a sequence of still images in a third zone, with a
17

1. Welcome to Black Box Digital Signage
full-screen zone behind the others showing a background color or image.
Zones
Zones are rectangular areas, each of which can display various forms of content (known as media items). You can design
layouts with any number of zones, of any size, in any location, either separate or overlapping. You specify which zones display
which media types (for example, one for a promotional video, one for scrolling text, another for your organization's name or
logo, and so on). You can also have zones display a mix of media types. You arrange the media items for each zone in a
Playlist.
Playlist
A Playlist contains one or several media items that you choose to display in a zone. Media items include fixed and scrolling
text, movies, images, Adobe®Flash®animations, web pages, and newsfeeds. To display a media item, you add it to the
playlist. Each zone has its own favorite playlist, which runs continuously. You can also synchronize the display between two
playlists (for example, to run a scrolling text message at the same time as a related promotional video or image.
That examination of the key features gives a flavor of how you put together your signage display content for a single player.
However, as we have seen, using the iCC you can also easily provide the same content for groups of players by publishing
through one or more channels.
You can also allow people local to the subscriber players to have a degree of control over the content the player displays. The
material and features that you allow local users to modify is called Ad Hoc content and they are called Ad Hoc Users.
That brief survey of the key terms provides the foundation to start using the iCC. Other sections introduce and describe
additional terms and concepts as needed. An extensive Glossary provides definitions of the core iCC terminology.
But now, to consider further how to use schedules, layouts, zones, and playlists to create your digital signage, refer to
Creating Digital Signage.
1.3 Logging On
During the log on process, you will need to provide the IP address of your iCC. Make a note of this before you begin. If you do
not know the IP address, restart the iCC: it displays its IP address above the progress bar towards the end of the boot
sequence.
Follow these steps to log in to your iCC:
1. Ensure that the iCC is connected to the network.
2. Open a web browser (such as Mozilla®Firefox®or Microsoft®Internet Explorer®) on a computer on the same network as
the iCC.
3. In your browser's address bar, type in the IP address of your iCC and click the 'go to' arrow or press the Enter key.
4. When prompted, enter the username and password. The factory-set defaults for these are remote and 9999 respectively.
Your iCC displays its Home page
Security: It is strongly recommended that you change the remote account password from the factory default as soon as
possible. Also change the iCC master password and check that the security services configuration matches your
requirements (see Security – General Settings for details).
That connection is secured by HTTP digest authentication, which encrypts the password. However, you should consider
adopting form-based authentication as it can be configured to give stronger security. Form-based authentication also provides
an explicit sign out when you want to end your session on the iCC.
18

iCOMPEL Content Commander User Guide
Important: If you use form-based authentication, you will need to provide a valid SSL certificate (as described below). It is
possible to access the iCC without a valid certificate, but your browser will at first block you and warn that the connection
is untrustworthy or that there is a problem with security.
To configure form-based authentication, follow these steps:
1. On the menu bar, click Setup and select System and Security.
2. Click the Firewall tab.
3. In the HTTP Service Settings panel, from the Authentication drop-down menu, select Form-based Authentication.
4. From the Supported Protocols drop-down menu, select HTTPS.
5.
Click the button (ignore the prompt to reboot the iCC).
6. Click the SSL Certificates tab.
7. Select Use Custom SSL Certificates for Web Server.
8.
Complete the certificate details and click the button.
9. Click the prompt to reboot the iCC.
When you next access the iCC, you will need to do so using the HTTPS protocol. Your username and password will be as
before. To sign out of your session, click the prompt at the top right of the iCC display.
For the future, you might want to bookmark the Home page or add it to your favorites for easier access. If your network is set
up to provide DHCP and DNS support, you can also access the iCC using its name rather than its IP address: the name is
automatically generated in the format iCCserial, where serial is the serial number of your iCC (for example, iCC123456).
The iCC comes ready-installed with a number of sample displays and you might find those useful to illustrate the kinds of
features you can implement.
If you need assistance at any time, click Help on the menu bar to access page-specific help or to navigate to any other help
page.
You can now begin to become familiar with the iCC user interface.
1.4 Using the Web Interface
You control and manage the iCC through your browser using the web-style pages of the iCC user interface.
You should familiarize yourself with the essential features of the user interface before beginning to use the iCC. Most
important is the main Home page but you should also be aware of the generic navigation and command features employed on
other pages. What follows is a tour of the Home page followed by descriptions of those generic features.
19

1. Welcome to Black Box Digital Signage
The Home Page
This is the first page you see after logging onto the iCC. At its heart is this view of the current state of the iCC, showing a
summary of its operational status:
That summary is made up of Status Bars.
Status Bars
These indicate the status of key iCC operational components. Each status bar has this general appearance:
The features to note are:
l
Open/close arrow – Click the arrow to reveal more details. Click the arrow to reduce the detail.
l Name – The subject of the status report (in the above case the subject is the Network).
l Status summary – The color of the status bar icon indicates the current status (in the above case, the network status is
good).
Here are status bars that respectively indicate attention needed and problem detected:
If you click the open arrow on an attention or problem status bar, the iCC provides a description of the problem in the
information revealed. To take corrective action, click on the appropriate button to open the relevant page in the interface.
20
iCOMPEL Content Commander User Guide
In general, opening a status bar provides you with additional information about the subject area, with a selection of buttons to
take you to the relevant pages in the user interface. For example, opening the System status bar reveals details about the iCC
system state:
Most pertinently for your use of the iCC, opening the Channels status bar reveals a summary of the channels you have
published:
As you can see, because of its importance, the iCC allocates half of the Home page display to the Channels status
summary. The iCC displays this information:
l Name – The name of the channel.
l Status – The latest publication status of the channel. When a channel starts publishing, the iCC highlights this with
and then with as the process progresses.
l Version – Indicates the minimum software version the player needs to display the channel's content.
To access detailed information on the channels, click the button to open the Manage Channels page.
Generic Features: The Menu Bar
The menu bar appears on every page of the user interface. It allows you to navigate to the page you need to perform detailed
actions. Broadly speaking, each page corresponds to a particular feature such as:
l Layout design
l Playlist creation
l Channel publishing
l Managing user accounts
21

1. Welcome to Black Box Digital Signage
The menu bar offers these top-level options (you may see fewer options depending on your configuration):
The relevant explanatory sections describe those options in detail. You can also change how you interact with the menu bar on
the Help > UI Options page. Some iCC features are only available if you enable the Detailed or Expert option on the UI
Options page. Restrictions may also apply if your iCC hardware components and capabilities do not support certain functions
or if you do not have the requisite software feature keys.
To speed your access to important pages and information, the right-hand side of the menu bar includes a selection of icons.
Click the icon to access the following:
– The Home page.
– The Manage Channels page.
– The Manage Layouts page.
– The Setup icons page.
An additional icon indicates the system status and can be one of:
– Confirms there are no known issues.
– Brief description of an attention item (only shown if one is active).
– Brief description of a problem item (only shown if one is active).
Note: The iCC does not display the quick access icons if your PC screen is too small or you have restricted the size of the
browser window.
Generic Features: Tabbed Pages
Many options in the iCC user interface are split across tabbed pages:
To access the options on the tabbed page, click the tab label (for example, Add Schedule).
Generic Features: Action Buttons
Numerous actions are common across different iCC pages. The user interface indicates these with icon action buttons. Click
the button to perform the indicated action:
– Delete
– Rename
– Copy
– Edit
– Drag to reorder
22

iCOMPEL Content Commander User Guide
Generic Features: Command Buttons
Some commands are common across different iCC pages. The user interface provides command buttons for these. To
execute the command, click the button. The label on the button describes the command, such as or .
23

24

Part II
Creating Digital Signage


iCOMPEL Content Commander User Guide
2. Creating Digital Signage
This section describes how to create your digital signs. If you are new to the iCC see Terms You Need to Know before you
begin.
Click on the links below for more information on:
Using Schedules
Using Layouts
Using Zones
Using Playlists
Understanding Media Types
Enhancing Your Displays
2.1 Using Schedules
The player units are designed to run continuously. You control which layouts are displayed on what days and at what times by
creating a Schedule for each channel. A schedule always contains at least one Schedule Entry, which defines at least one
player action (often, which layout to display). A schedule entry does not necessarily specify a layout change, it could specify
some other action (for example, switching the audio to mute).
The schedule entries define periods of time during which actions occur. The program of schedule entries is based on a oneweek cycle. The Default Schedule Entry defines the layout that appears, or the actions that occur, when no other schedule
entry is active.
The player always displays the schedule with the most recent start time. Once a schedule starts running it continues until
another schedule is set to begin. If there is only one schedule it runs indefinitely.
An example schedule might contain schedule entries taking these actions:
l Playing layout X from 4:00 pm to 6:00 pm, Mondays to Fridays.
l Playing layout Y from 2:00 pm to 8:00 pm on Saturdays and Sundays.
l The default schedule entry, playing layout Z at all other times.
You can temporarily interrupt a schedule by using a Schedule Override.
To access the schedules configured for a channel on the iCC:
1. On the menu bar, click Schedules.
2. Select the relevant channel from the drop-down list.
3. Click Manage Schedules.
There are these action buttons for each schedule:
– Delete the schedule (does not delete the associated layouts).
– Copy the schedule.
– Edit the schedule.
27

2. Creating Digital Signage
To create a new schedule, click the Add Schedule tab.
2.1.1 Creating a Schedule
To display content on your player units, you need to create at least one channel with its associated schedule. You add
schedule entries to a schedule to fine tune how the player runs it.
To create a new schedule:
1. On the menu bar, click Schedules.
2. Select the channel from the drop-down list.
3. Click Manage Schedules.
4. Click the Add Schedule tab.
To create the new schedule, complete the following details and click the button:
Schedule Name Enter a unique name for the schedule.
Valid From Select the date and time when the player starts running the schedule (the default is in 24 hours time).
Valid Until Select the option that matches your requirement:
l Superseded – The player keeps playing this schedule until a more eligible schedule becomes available.
l Date – The player keeps playing this schedule until the date and time you choose. It then plays the next
eligible schedule. If the player cannot find an eligible schedule, it continues to play this one.
Show Layout Select the layout to display.
Conditional Play This is only enabled when you have added Player Local Information (PLI) to the player (see Player Local
Information for details).
If it is enabled, you have two options:
l Play Always – Default. The player always plays the schedule.
l Play if Player Local Information Item – The player only plays the schedule if certain conditions are met.
If you select Play if Player Local Information Item, complete these steps:
1. Select the name of the relevant player local information from the first drop-down list.
2. Select the test to apply from the second drop-down list.
3.
Enter the value to test for in the final field (add further values by clicking the button or delete values
by clicking the button).
2.1.2 Schedule Entries
A schedule entry is a set of one or more actions for the player to perform at specified times. Schedule entries repeat over a
weekly cycle and a program of schedule entries make up a schedule.
Use schedule entries to specify these actions:
l Displaying a layout.
l Switching a screen on or off.
28
iCOMPEL Content Commander User Guide
l Switching audio on or off.
l Performing Advance To commands.
Whenever you create a new schedule, the iCC automatically includes a Default Schedule Entry. The default schedule entry
has no start and end time and defines the default states when no other entry is active.
Schedule entries allow you to direct your player to perform simple or highly sophisticated sequences of actions. You can have
the player display different layouts at different times of the day and different days of the week, switch the display on and off, or
repeat actions at specified intervals.
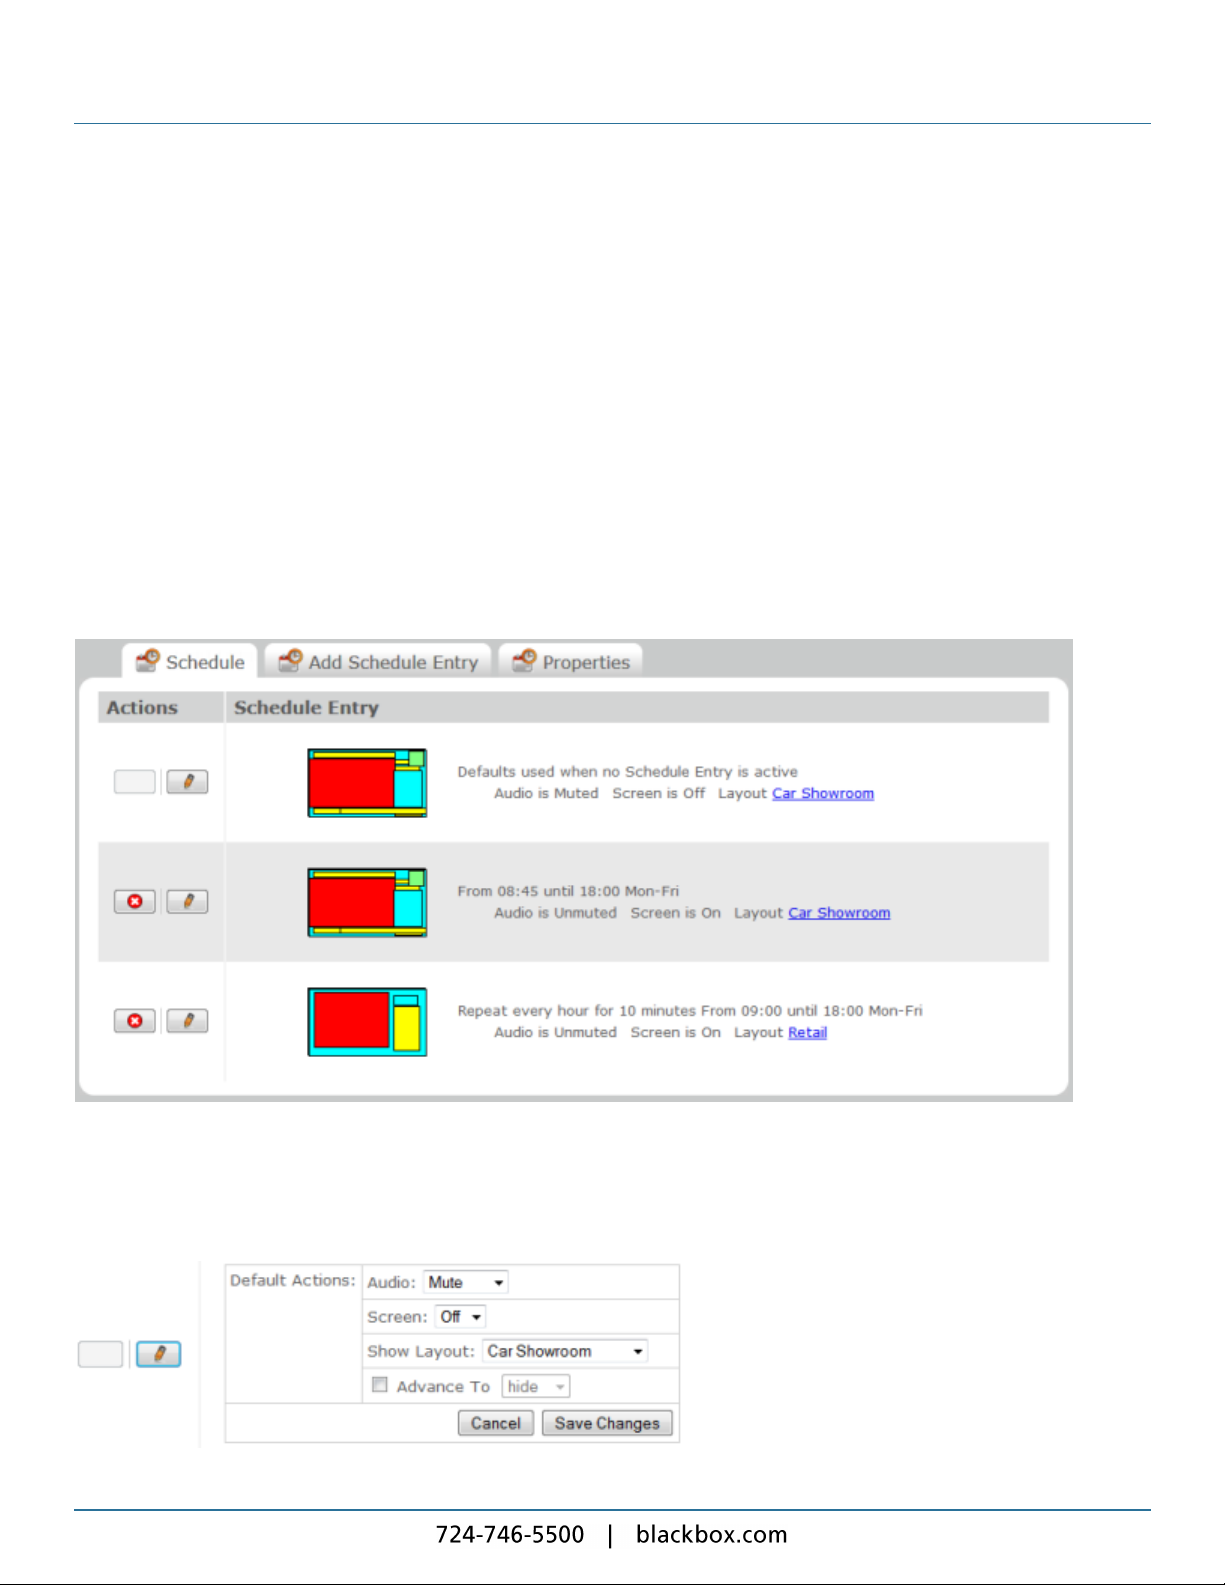
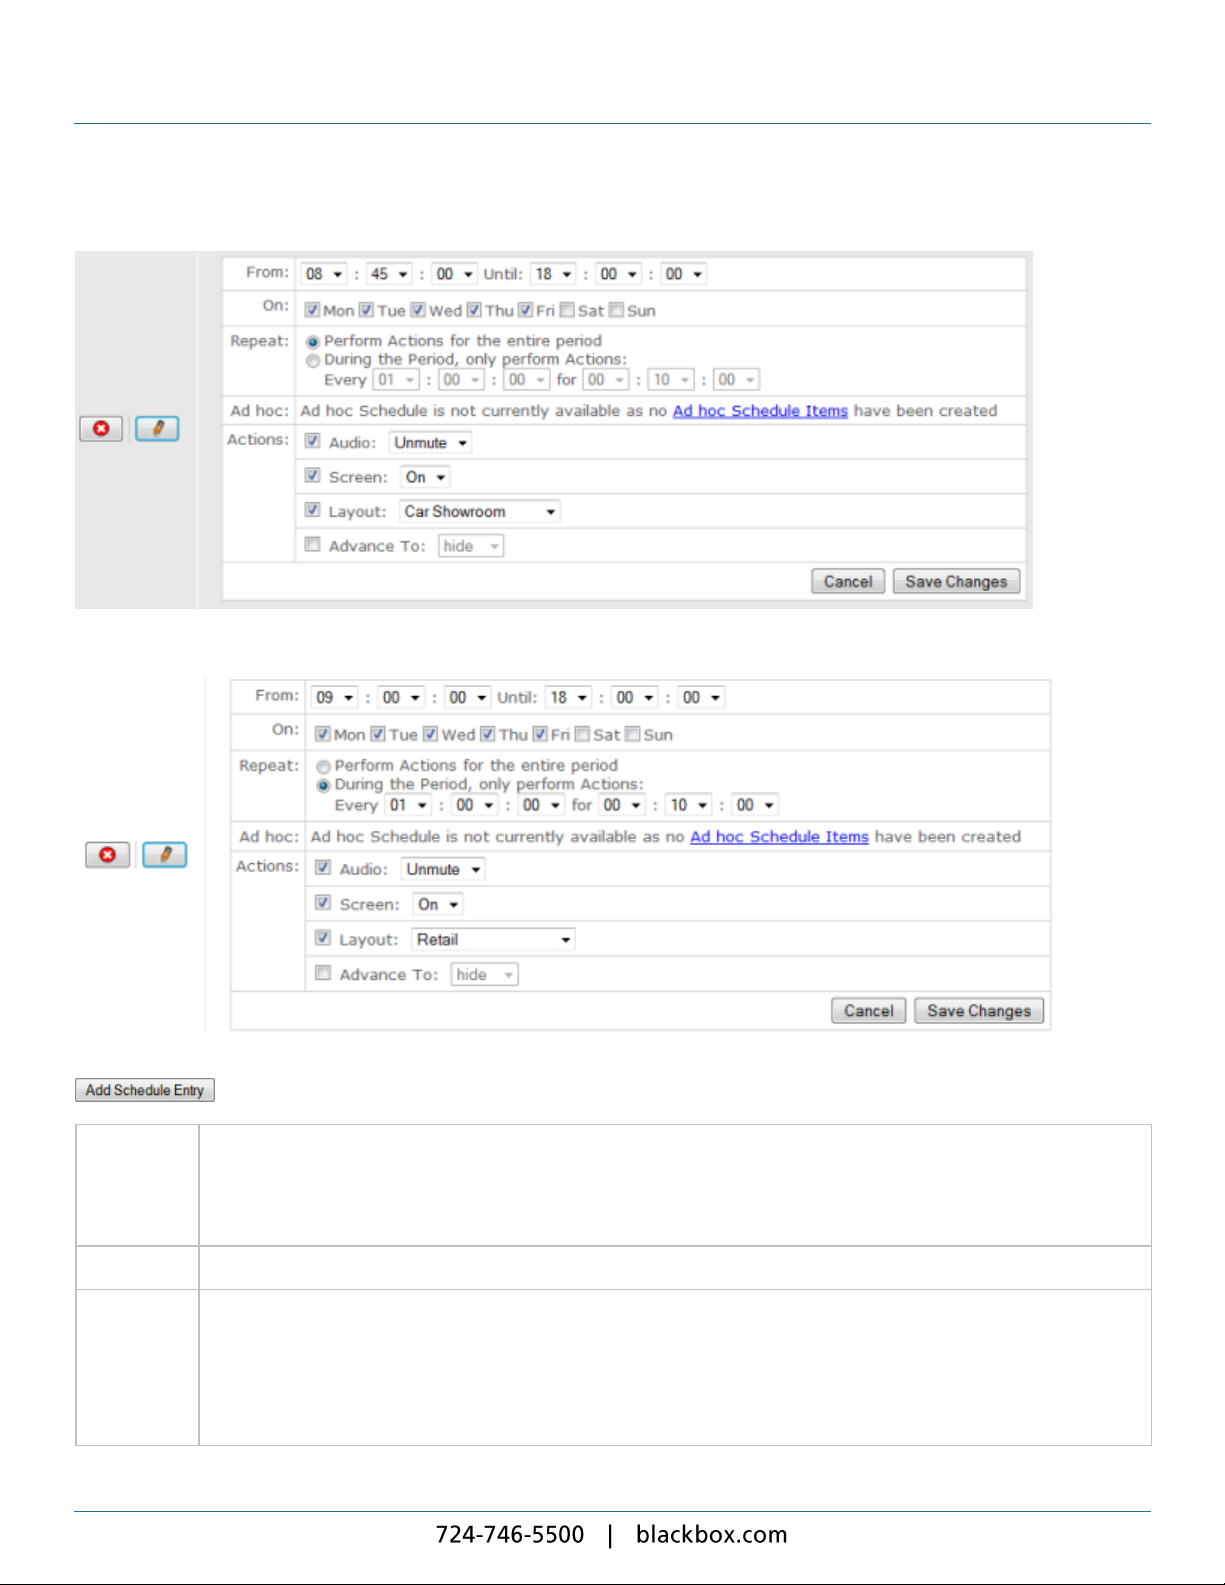
To illustrate the use of schedule entries in more detail, here is a worked example.
With the following schedule, made up of three schedule entries, the player will:
l Turn the screen on to show the Car Showroom layout from 08:45 until 18:00 on Mondays to Fridays.
l Display the Retail layout (showing other sales offerings) for 10 minutes every hour.
l Turn the screen off at all other times.
Looking at the respective settings on the Add Schedule Entry tab reveals how you would go about specifying each of those
schedule entries.
The first schedule entry causes the player to turn the screen off and mute the audio soundtrack (note that the Car Showroom
layout plays even though the screen is off):
29
2. Creating Digital Signage
The second schedule entry causes the player to turn the screen on and play the Car Showroom layout:
The third schedule entry causes the player to change to the Retail layout for 10 minutes every hour:
To create a new schedule entry, click the Add Schedule Entry tab, complete the following details, and click the
button:
From Select the time range during which you want the player to apply the schedule entry.
00:00:00 means midnight. Set both From and Until to midnight for the player to run the schedule entry all day. For a
period that runs through midnight, add separate schedule entries: one ending at midnight, one commencing from
midnight.
On Check the boxes for the days you want the player to play the schedule entry.
Repeat Choose the option that matches your requirement:
l Perform actions for the entire period – The player performs the actions all of the time.
l During the period, only perform actions – The player performs the actions only when and for as long as you
specify. Specify the regularity with the Every options and the duration with the for options. The Every setting
must be at least 30 seconds longer than the for setting. The minimum for setting is 30 seconds.
30
 Loading...