

Page 1

1000 Park Drive • Lawrence, PA 15055-1018 • 724-746-5500 • Fax 724-746-0746
© Copyright 2009. Black Box Corporation. All rights reserved.
Page 2
CUSTOMER
SUPPORT
INFORMATION
Order toll-free in the U.S.: Call 877-877-BBOX (outside U.S. call 724-746-5500)
FREE technical support 24 hours a day, 7 days a week: Call 724-746-5500 or fax 724-746-0746
Mailing address: Black Box Corporation, 1000 Park Drive, Lawrence, PA 15055-1018
Web site: www.blackbox.com • E-mail: [email protected]
FEBRUARY 2009
IC665A
Docking Station with Video
Page 3

1
FCC AND RFI STATEMENTS
FEDERAL COMMUNICATIONS COMMISSION
AND
INDUSTRY CANADA
RADIO FREQUENCY INTERFERENCE STATEMENTS
This equipment generates, uses, and can radiate radio-frequency energy, and if not
installed and used properly, that is, in strict accordance with the manufacturer’s
instructions, may cause inter ference to radio communication. It has been tested
and found to comply with the limits for a Class A computing device in accordance
with the specifications in Subpart B of Part 15 of FCC rules, which are designed to
provide reasonable protection against such interference when the equipment is
operated in a commercial environment. Operation of this equipment in a
residential area is likely to cause interference, in which case the user at his own
expense will be required to take whatever measures may be necessary to correct
the interference.
Changes or modifications not expressly approved by the party responsible
for compliance could void the user’s authority to operate the equipment.
This digital apparatus does not exceed the Class A limits for radio noise emis sion from
digital apparatus set out in the Radio Interference Regulation of Industry Canada.
Le présent appareil numérique n’émet pas de bruits radioélectriques dépassant les limites
applicables aux appareils numériques de la classe A prescrites dans le Règlement sur le
brouillage radioélectrique publié par Industrie Canada.
Page 4

2
DOCKING STATION WITH VIDEO
NORMAS OFICIALES MEXICANAS (NOM)
ELECTRICAL SAFETY STATEMENT
INSTRUCCIONES DE SEGURIDAD
1. Todas las instrucciones de seguridad y operación deberán ser leídas antes de
que el aparato eléctrico sea operado.
2. Las instrucciones de seguridad y operación deberán ser guardadas para
referencia futura.
3. Todas las advertencias en el aparato eléctrico y en sus instrucciones de
operación deben ser respetadas.
4. Todas las instrucciones de operación y uso deben ser seguidas.
5. El aparato eléctrico no deberá ser usado cerca del agua—por ejemplo, cerca
de la tina de baño, lavabo, sótano mojado o cerca de una alberca, etc..
6. El aparato eléctrico debe ser usado únicamente con carritos o pedestales que
sean recomendados por el fabricante.
7. El aparato eléctrico debe ser montado a la pared o al techo sólo como sea
recomendado por el fabricante.
8. Servicio—El usuario no debe intentar dar servicio al equipo eléctrico más allá
a lo descrito en las instrucciones de operación. Todo otro servicio deberá ser
referido a personal de servicio calificado.
9. El aparato eléctrico debe ser situado de tal manera que su posición no
interfiera su uso. La colocación del aparato eléctrico sobre una cama, sofá,
alfombra o superficie similar puede bloquea la ventilación, no se debe
colocar en libreros o gabinetes que impidan el flujo de aire por los orificios
de ventilación.
10. El equipo eléctrico deber ser situado fuera del alcance de fuentes de calor
como radiadores, registros de calor, estufas u otros aparatos (incluyendo
amplificadores) que producen calor.
11. El aparato eléctrico deberá ser connectado a una fuente de poder sólo del
tipo descrito en el instructivo de operación, o como se indique en el aparato.
Page 5

3
12. Precaución debe ser tomada de tal manera que la tierra fisica y la polarización
del equipo no sea eliminada.
13. Los cables de la fuente de poder deben ser guiados de tal manera que no
sean pisados ni pellizcados por objetos colocados sobre o contra ellos,
poniendo particular atención a los contactos y receptáculos donde salen del
aparato.
14. El equipo eléctrico debe ser limpiado únicamente de acuerdo a las
recomendaciones del fabricante.
15. En caso de existir, una antena externa deberá ser localizada lejos de las lineas
de energia.
16. El cable de corriente deberá ser desconectado del cuando el equipo no sea
usado por un largo periodo de tiempo.
17. Cuidado debe ser tomado de tal manera que objectos liquidos no sean
derramados sobre la cubierta u orificios de ventilación.
18. Servicio por personal calificado deberá ser provisto cuando:
A: El cable de poder o el contacto ha sido dañado; u
B: Objectos han caído o líquido ha sido derramado dentro del aparato; o
C: El aparato ha sido expuesto a la lluvia; o
D: El aparato parece no operar normalmente o muestra un cambio en su
desempeño; o
E: El aparato ha sido tirado o su cubierta ha sido dañada.
NOM STATEMENT
Page 6

4
DOCKING STATION WITH VIDEO
CE
This equipment complies with the requirements of regulation EN 55 022: Class B.
WEEE Information
For EU (European Union) member users: According to the WEEE (Waste
electrical and electronic equipment) Directive, do not dispose of this product as
household waste or commercial waste. Waste electrical and electronic equipment
should be appropriately collected and recycled as required by practices established
for your country. For information on recycling of this product, please contact your
local authorities, your household waste disposal service, or the shop where you
purchased the product.
Page 7

5
TRADEMARKS USED IN THIS MANUAL
TRADEMARKS USED IN THIS MANUAL
Black Box and the Double Diamond logo are registered trademarks of
BB Technologies, Inc.
Intel, Pentium, and Celeron are registered trademarks of Intel Corporation.
Kensington is a registered trademark of Kensington Corporation.
AMD K6 is a registered trademark, and AMD Athlon and AMD Duron are
trademarks, of Advanced Micro Devices, Inc.
Windows, Windows Vista, and MSN are registered trademarks of Microsoft
Corporation.
Skype is a trademark of Skype Limited.
Any other trademarks mentioned in this manual are acknowledged to be the property of the
trademark owners.
Page 8

6
DOCKING STATION WITH VIDEO
Contents
Chapter Page
1. Specifications .......................................................................................................8
2. Overview .............................................................................................................10
2.1 Introduction ...............................................................................................10
2.2 What’s Included ..........................................................................................10
2.3 System Requirements .................................................................................11
2.4 Front Panel .................................................................................................11
2.5 Rear Panel ...................................................................................................13
2.6 Assembly and Disassembly .........................................................................14
2.7 Typical Application .....................................................................................16
3. Installation .......................................................................................................17
3.1 Installing the Ethernet Devices .................................................................17
3.2 Installing the Video Drivers .......................................................................18
3.3 Connecting the Docking Station to a Computer .....................................22
3.4 Connecting Devices to the Docking Station .............................................23
3.4.1 Connecting an Ethernet Network Device ......................................23
3.4.2 Connecting a DVI Monitor .............................................................23
3.4.3 Connecting USB Devices ................................................................24
3.4.4 Connecting a Microphone and Speaker/Headphones ................24
4. Using the Docking Station with Video .............................................................25
4.1 USB 2.0 Ports ..............................................................................................25
4.2 Audio Ports .................................................................................................25
4.2.1 Configuring Windows Audio Device ..............................................26
4.2.2 Configuring Instant Messaging Software for an Audio Device ....26
4.3 Ethernet Port ..............................................................................................27
4.4 Video Port ...................................................................................................27
4.4.1 Display Modes ..................................................................................27
4.4.2 Adjusting Resolution, Color Depth, and Refresh Rate .................31
4.4.3 Disconnecting the Docking Station ...............................................34
4.5 How Standby or Hibernate Mode Affects Devices Attached
to the Docking Station ...............................................................................34
4.5.1 External Monitors ............................................................................34
4.5.2 Other Devices ...................................................................................35
Page 9

7
CONTENTS
Contents (continued)
Chapter Page
5. Uninstalling the Drivers ....................................................................................36
5.1 Uninstalling the Ethernet Driver ..............................................................36
5.2 Uninstalling the Video Driver ...................................................................37
Appendix. Troubleshooting ......................................................................................40
A.1 Calling Black Box .......................................................................................40
A.2 Shipping and Packaging ............................................................................40
Page 10

8
DOCKING STATION WITH VIDEO
1. Specifications
Audio: Output: 2-Channel Digital to Analog Converter (DAC);
Sampling Rate: 8, 16, 44.1 to 48 kHz with 16-bit resolution;
earphone buffer driving;
Input: 2-Channel Analog to Digital Converter;
Sampling rate: 8, 16, 44.1 kHz to 48 kHz with 16-bit resolution;
Digital Linear Microphone Gain Control Function: -6–33 dB
Compliance: FCC, CE, RoHS (WEEE)
Standards: IEEE 802.3 10BASE-T, IEEE 802.3u 100BASE-T
Data Transfer Rates: Ethernet: 10 Mbps/20 Mbps (half-/full-duplex);
Fast Ethernet: 100 Mbps/200 Mbps (half-/full-duplex)
Memory: RX packet buffering: Embedded 20 KB SRAM;
TX packet buffering: 20 KB SRAM
Host Interface: USB 2.0
Operating Systems Supported: Windows 2000 SP4, Windows XP SP2 and
Windows Vista (32-bit edition only for all)
Video: Supported modes: Extended desktop (default), mirrored desktop,
primary display;
Resolution: Up to 1680 x 1050 at 60 Hz 32-bit color quality refresh rate
Connectors: Upstream: (1) USB 2.0 Type B female,
Downstream:(4) USB 2.0 Type A female,
Ethernet: (1) 10/100BASE-T RJ-45,
Video: (1) DVI-I female;
Audio: (2) 3.5-mm ([1] for microphone in, [1] for headphones/speakers out,
Security Lock Slot: (1)industry-standard Kensington security slot;
Power: (1) barrel connector
Indicators: (1) Power on/off LED (blue), (1) USB hub on/off LED (green)
Temperature Tolerance: Operating: +50 to +104° F (+10 to +40 °C);
Storage: +14 to +176° F (-10 to +80° C)
Relative Humidity: Less than 85%, noncondensing
Page 11

9
CHAPTER 1: Specifications
Power: Input: 100-240 VAC, 50–60 Hz;
Output: 5 VDC, 2.5 A
Power Mode: External
Housing Material: ABS plastic
Size: Without base: 6"H x 1.4"W x 3.5"D (15.3 x 3.5 x 9 cm);
With base: 6.3"H x 3.4"W x 4.3"D (16 x 8.6 x 11 cm)
Weight: With base: 0.5 lb. (0.2 kg)
Page 12

10
DOCKING STATION WITH VIDEO
2. Overview
2.1 Introduction
The Docking Station with Video is a unique expansion unit designed for computers
that have extra connectivity demands. Use it to extend one USB port on the
computer to USB peripherals, an Ethernet network, a speaker, a microphone, and
an additional monitor. Its upright design enables you to connect peripherals to the
back and front of the Docking Station and attach audio outputs to the front of the
station. Two of the four USB connections are on the front of the unit for easy
access. And the Docking Station is plug-and-play and hot-pluggable—add or
remove devices without rebooting the system.
Use the Docking Station’s video port to connect your computer to an additional
monitor or an LCD or a projector. Configure this monitor to either mirror your
primary screen, or distribute opened windows between the two monitors so you can
see more applications at the same time.
The station also has an industry-standard security lock to prevent theft.
2.2 What‘s Included
Your package should contain the following items. If anything is missing or
damaged, please contact Black Box at 724-746-5500.
• Docking Station with Video
• Base plate
• USB 2.0 cable
• Power adapter
• CD-ROM containing software drivers and a user’s manual
• DVI to VGA adapter
• Printed quick installation guide
Page 13
11
CHAPTER 2: Overview
2.3 System Requirements
• 1.2 GHz CPU, Intel® Pentium® or Celeron®, or AMD K6®, AMD Athlon™,
AMD Duron™, or compatible processor
• 512 MB of RAM
• USB 2.0 port
• 30 MB of available disk space
• Windows® 2000 SP4, XP SP2, Windows Vista® (32-bit edition only for all)
To play DVD on the additional monitor, you will also need:
• 2.0-GHz CPU, dual core processor clock
• 800 x 600 with 16-bit color resolution
2.4 Front Panel
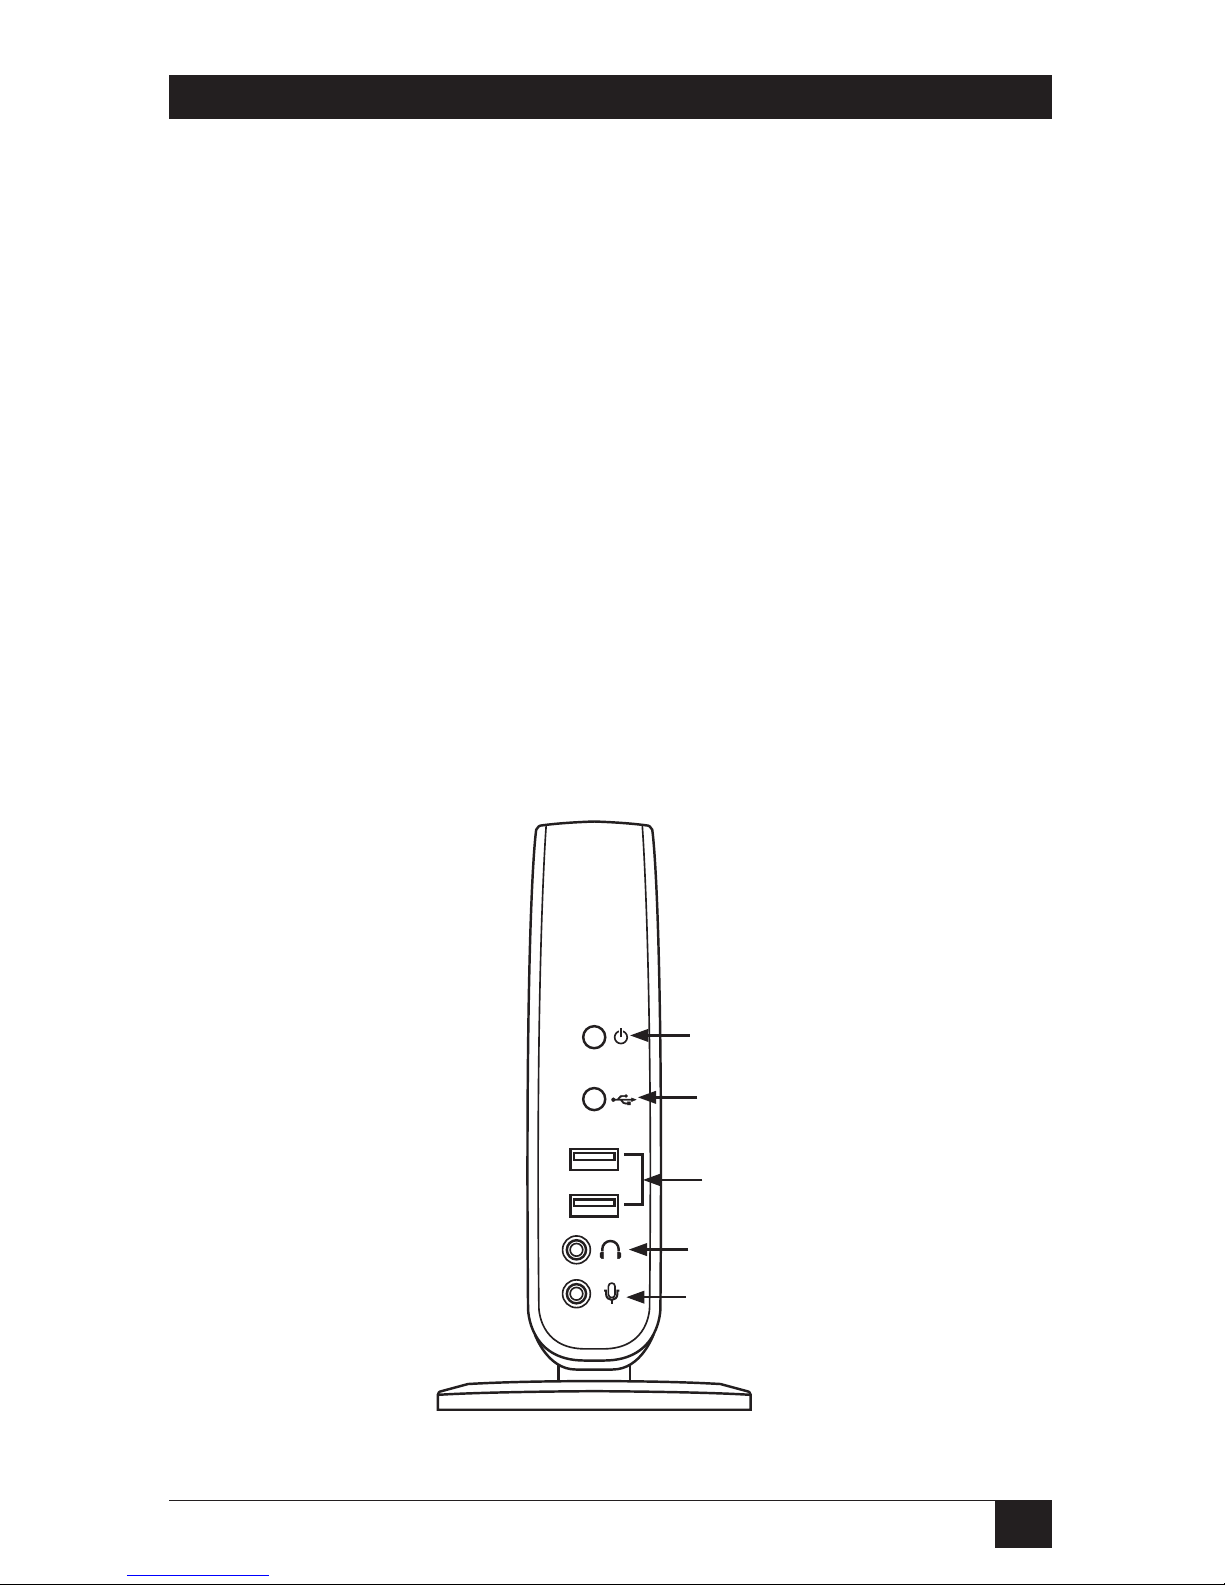
Figure 2-1 illustrates the Docking Station’s front panel. Table 2-1 describes the
components.
1
2
3
4
5
Figure 2-1. Front panel.
Page 14

12
DOCKING STATION WITH VIDEO
Table 2-1. Front-panel components.
Number Component Function
1 Power LED ON: Lights blue when the docking
station is powered on.
OFF: Power is off.
2 USB hub LED Lights when any of the four USB
downstream ports is connected to a
USB device.
3 USB Type A ports Links downstream to USB peripherals.
4 3.5-mm connector Stereo microphone input port (connects
to an external microphone for recording)
5 3.5-mm connector Stereo audio output port (connects to
stereo headphones or speakers)
Page 15
13
CHAPTER 2: Overview
2.5 Rear Panel
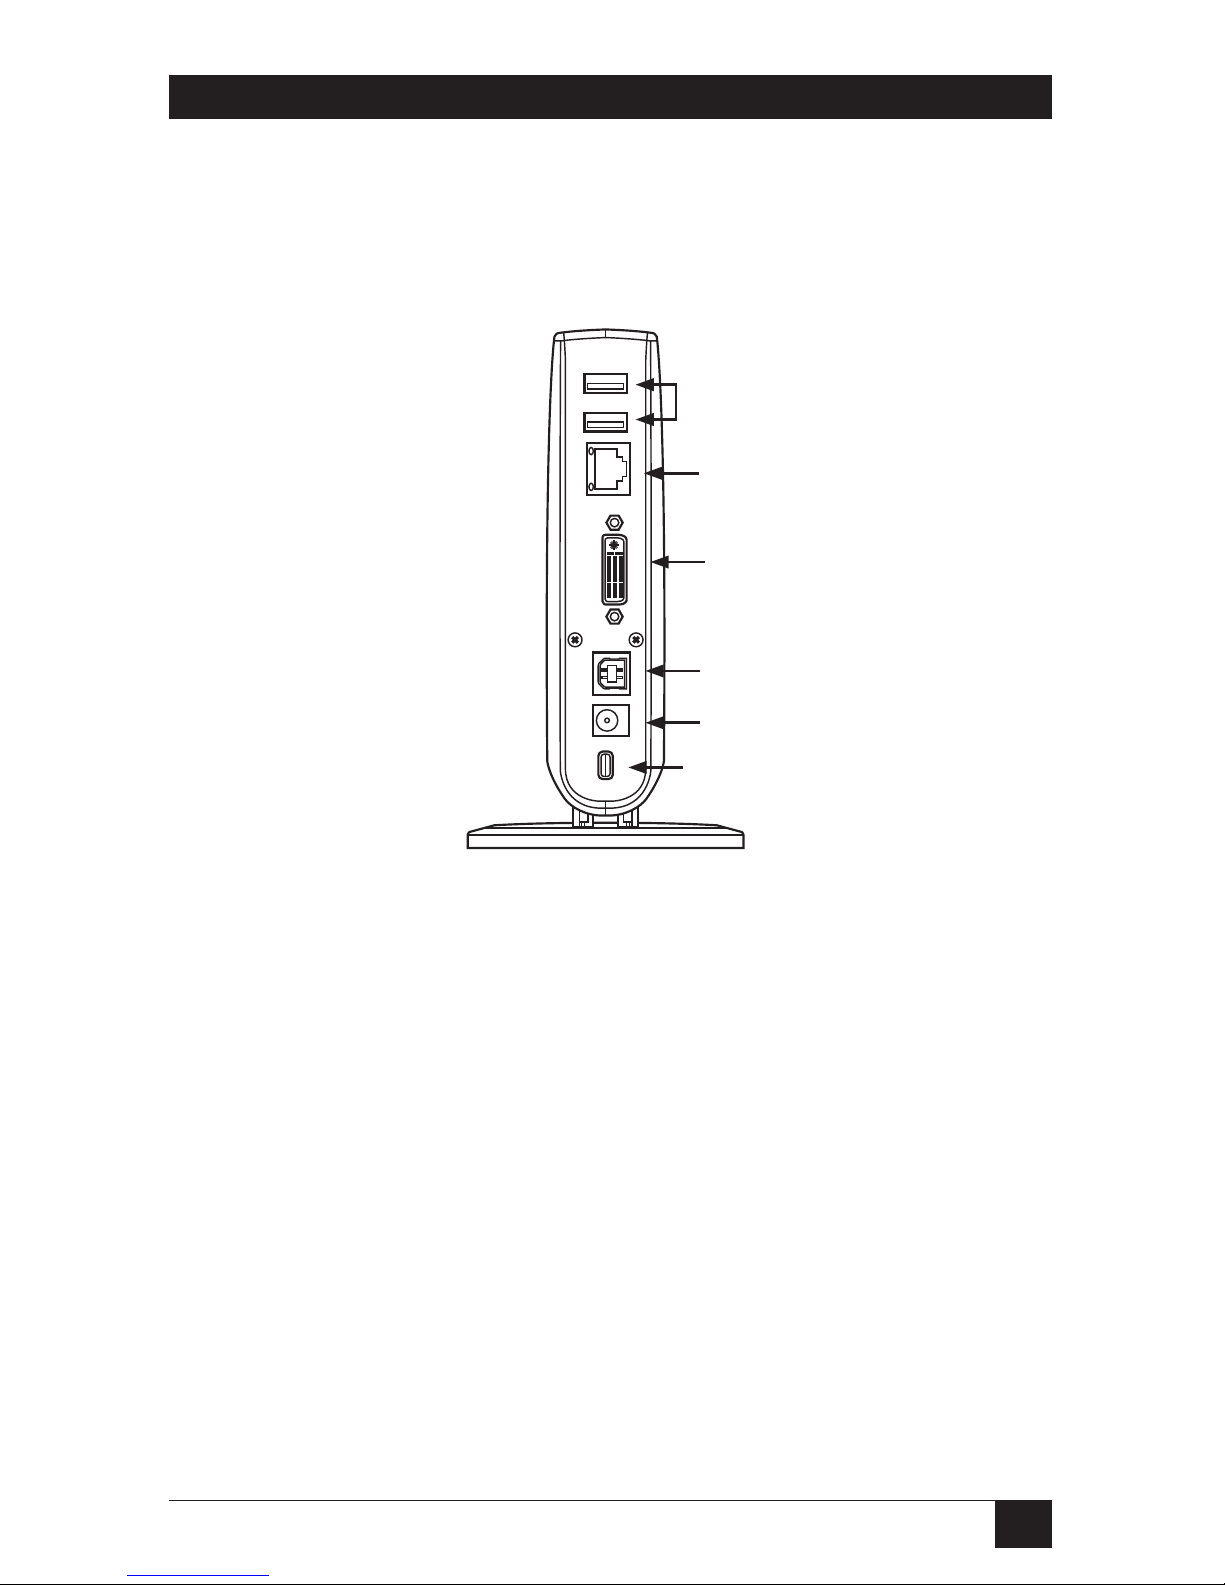
Figure 2-2 illustrates the Docking Station’s rear panel. Table 2-2 describes the
components.
6
10
9
8
7
11
Figure 2-2. Rear panel.
Page 16

14
DOCKING STATION WITH VIDEO
Table 2-2. Rear-panel components.
Number Component Function
6 (2) USB Type A ports Connect downstream to USB
peripherals.
7 10/100 Mbps Ethernet Links to an Ethernet network via a
port network cable (not included).
8 DVI output port Connects to a DVI monitor.
NOTE: To connect to a VGA monitor,
use the supplied adapter.
9 USB Type B port Connect upstream to the host
computer’s USB port.
10 Power jack Connects to the included power
adapter.
NOTE: The Docking Station always
needs external power to operate; it
does not derive power from the USB bus.
11 Security lock slot You can connect an industry-standard
Kensington® security lock (not
included) here. Insert the lock’s locking
end into the slot and turn the key to
lock the docking station.
2.6 Assembly and Disassembly
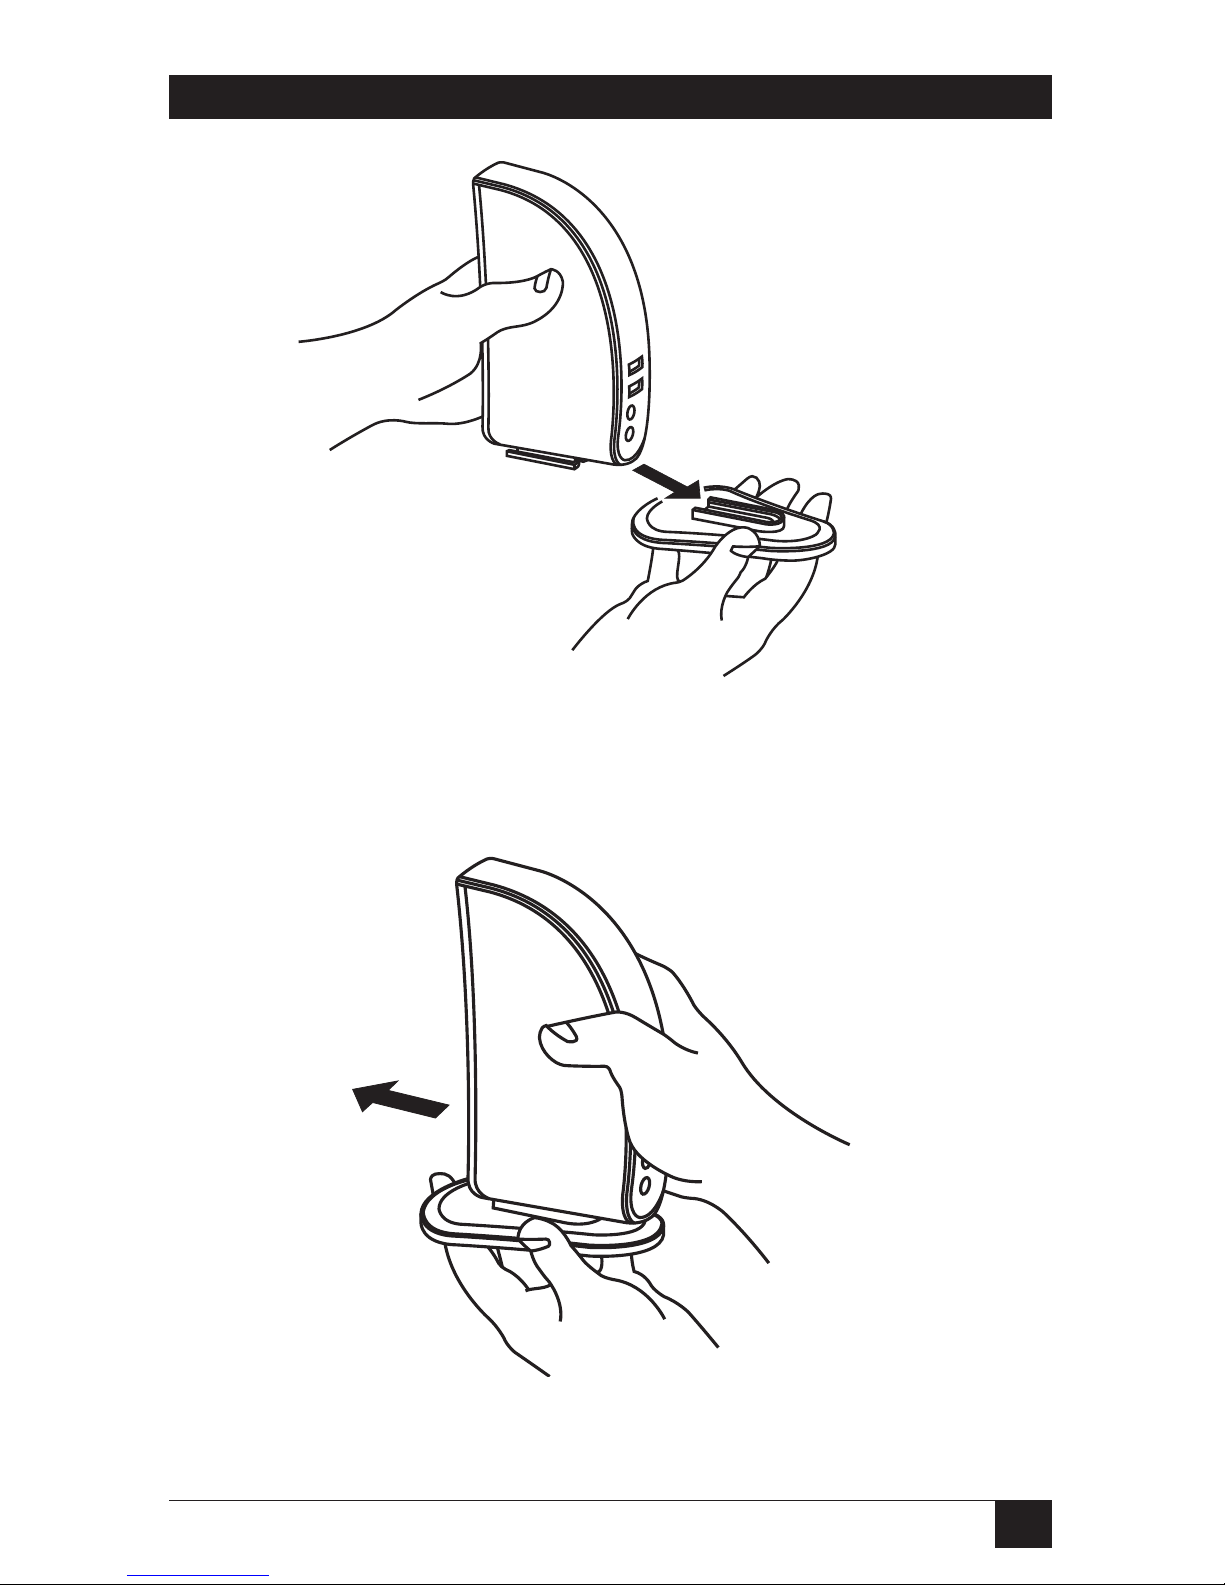
The docking station comes with a base plate to make it self-standing. To assemble
the docking station, slide the body of the docking station firmly as shown in
Figure 2-3. You will hear a click when the body snaps into place.
Page 17
15
CHAPTER 2: Overview
Figure 2-3. Assembling the docking station.
To disassemble the docking station, hold the base with one hand and then using
another hand, push the docking station firmly as shown in Figure 2-4.
Figure 2-4. Disassembling the docking station.
Page 18
16
DOCKING STATION WITH VIDEO
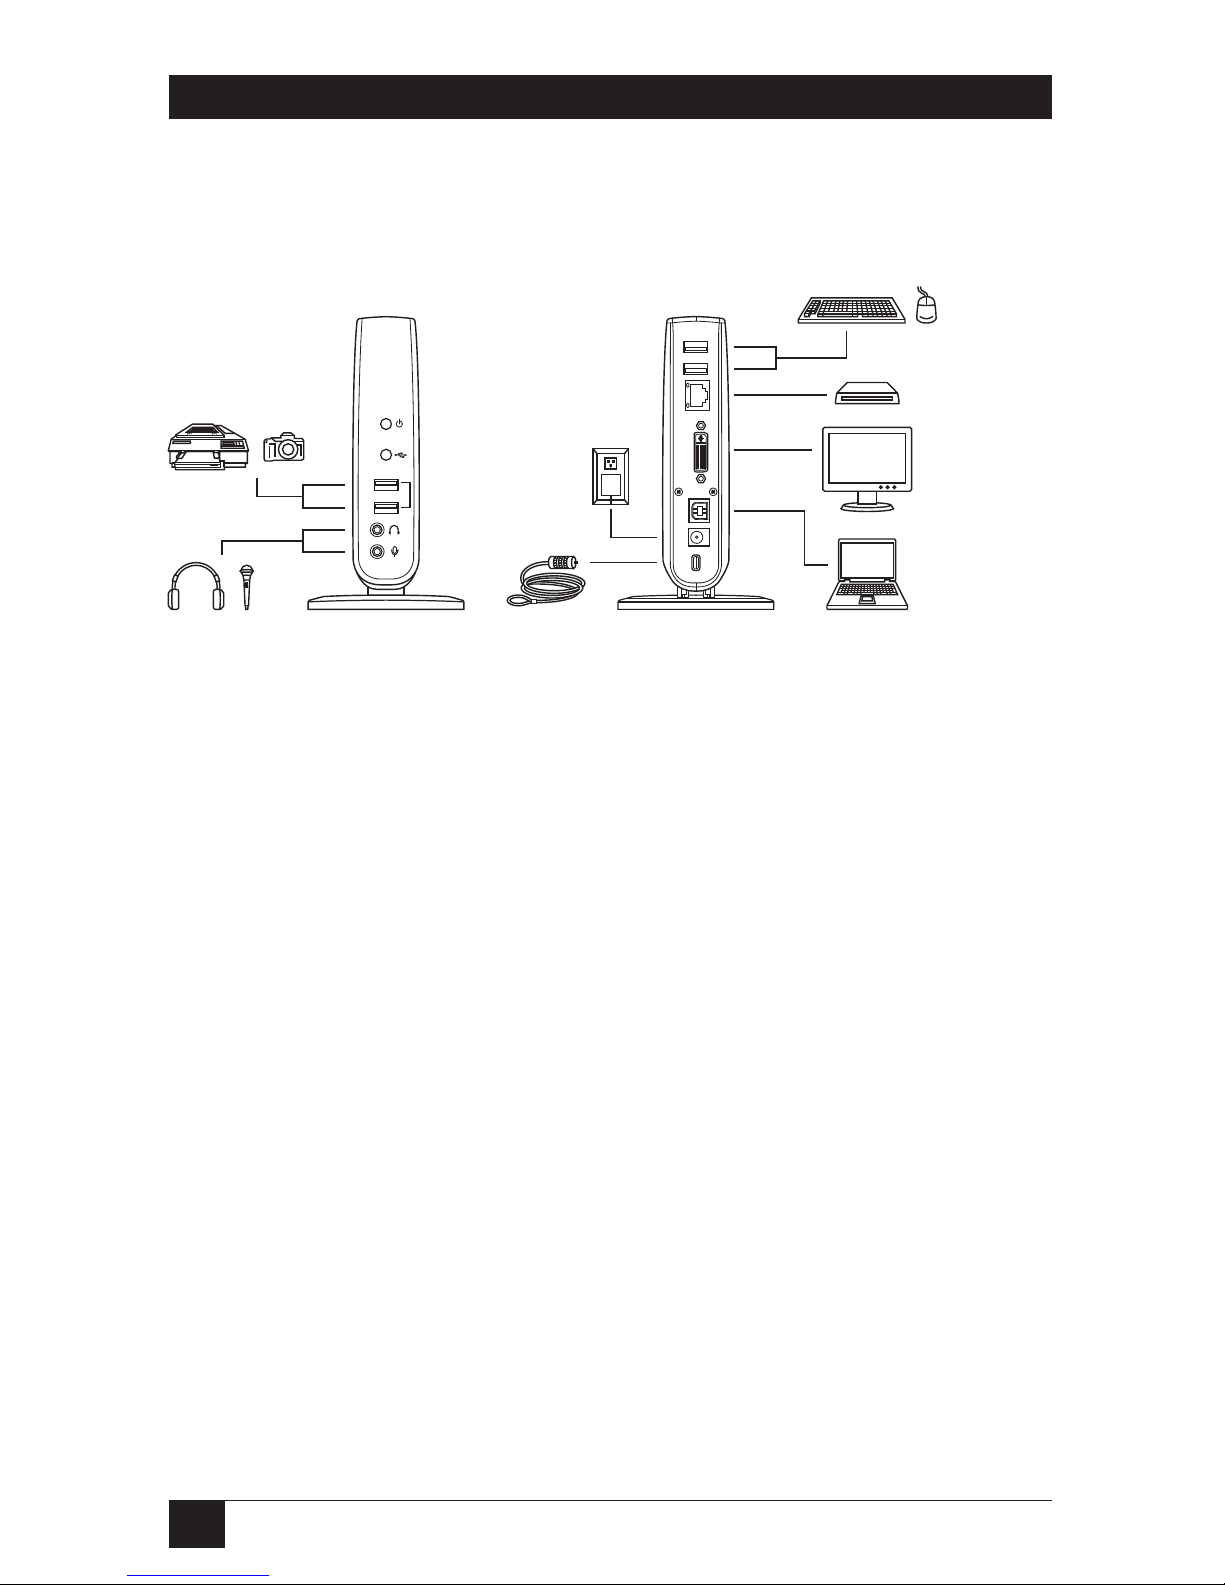
2.7 Typical Application
Figure 2-5 shows a typical application using the Docking Station.
USB
peripherals
Headphones
and
microphone
Security lock
Power
connection
USB
peripherals
Ethernet device
(aDSL modem)
DVI monitor
USB-enabled
computer
Figure 2-5. Sample application.
Page 19
17
CHAPTER 3: Installation
3. Installation
NOTE
Install the software drivers first, then connect the hardware.
This chapter explains how to install the Docking Station’s software and hardware.
Section 3.1 explains how to install the Ethernet device, Section 3.2 discusses how to
install the video drivers, Section 3.3 tells you how to connect the docking station to
your computer, and Section 3.4 describes how to connect devices to the docking
station.
3.1 Installing the Ethernet Devices
To install the Ethernet driver:
1. Insert the provided CD into your disc drive, then locate and double-click the
Setup.exe file under x:\Driver\Ethernet, where x is your disc drive letter.
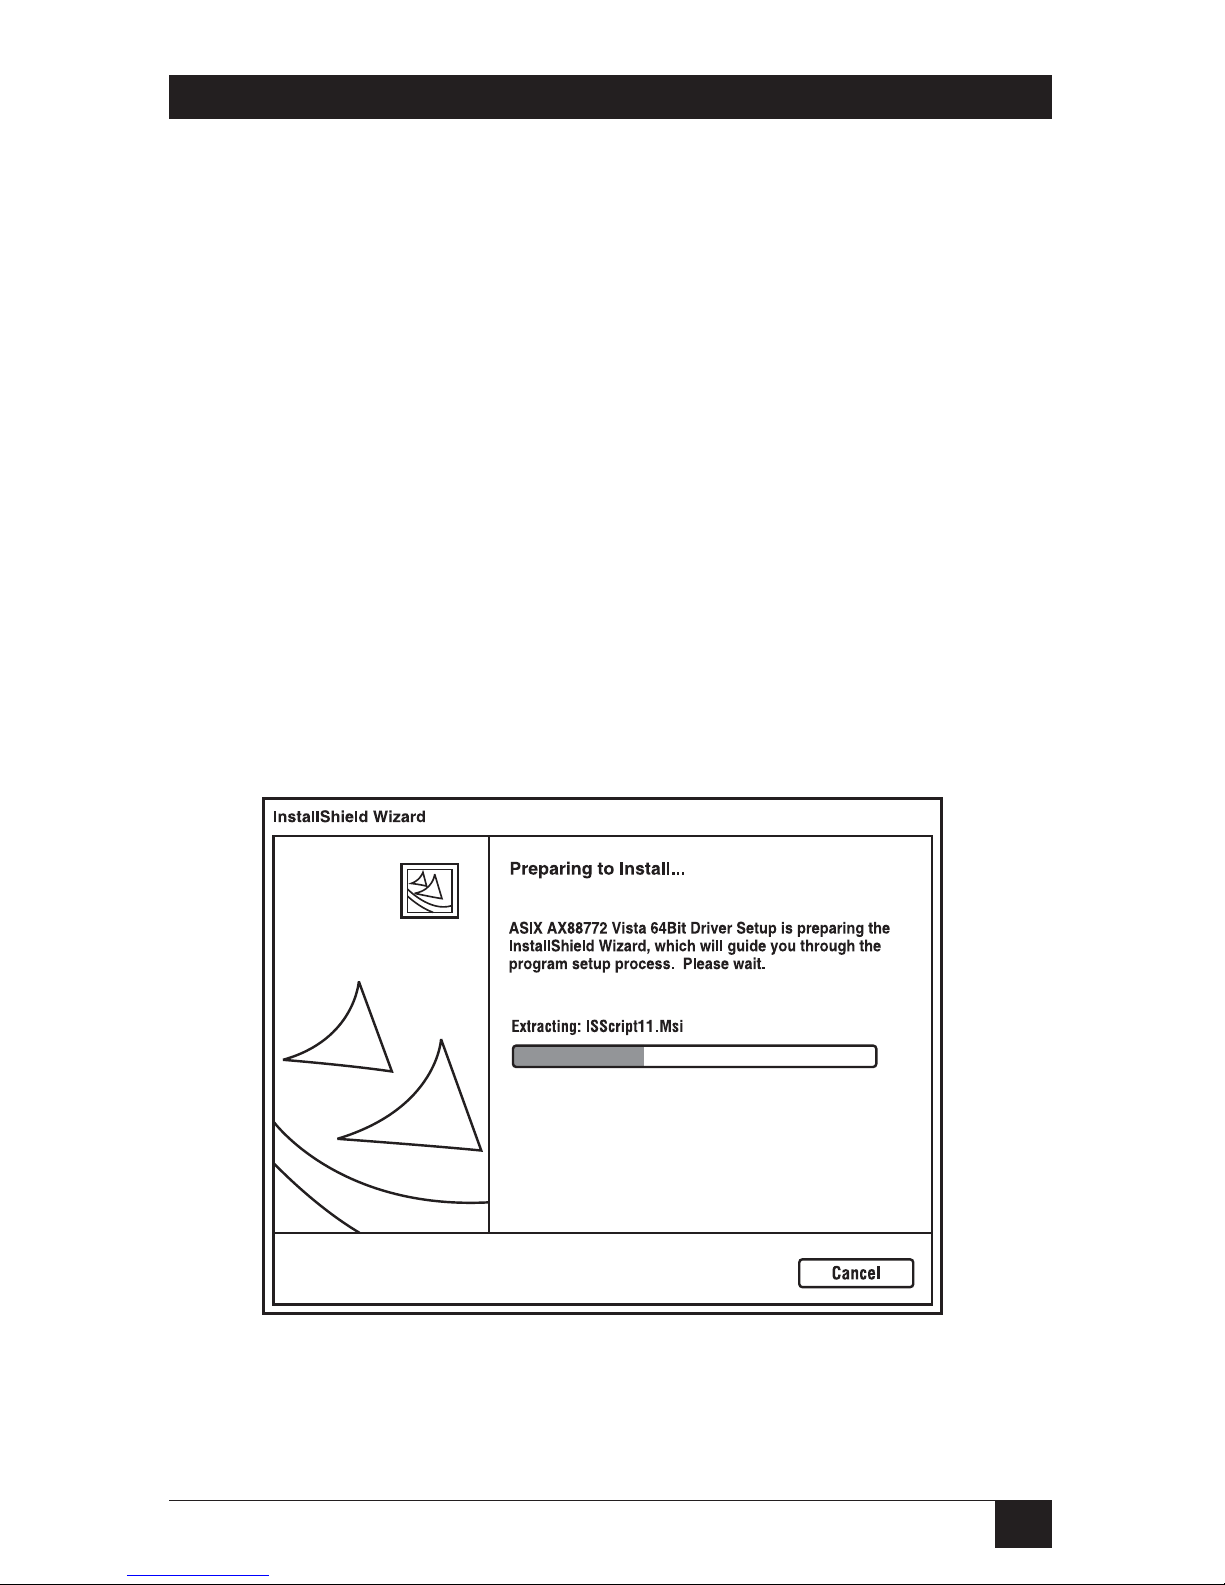
2. Wait while the programs install the driver. See Figure 3-1.
Figure 3-1. Prepare to install screen.
Page 20
18
DOCKING STATION WITH VIDEO
NOTE
Actual strings depend on your operation system. These screen shots are
from Windows Vista and might vary slightly for each operation system.
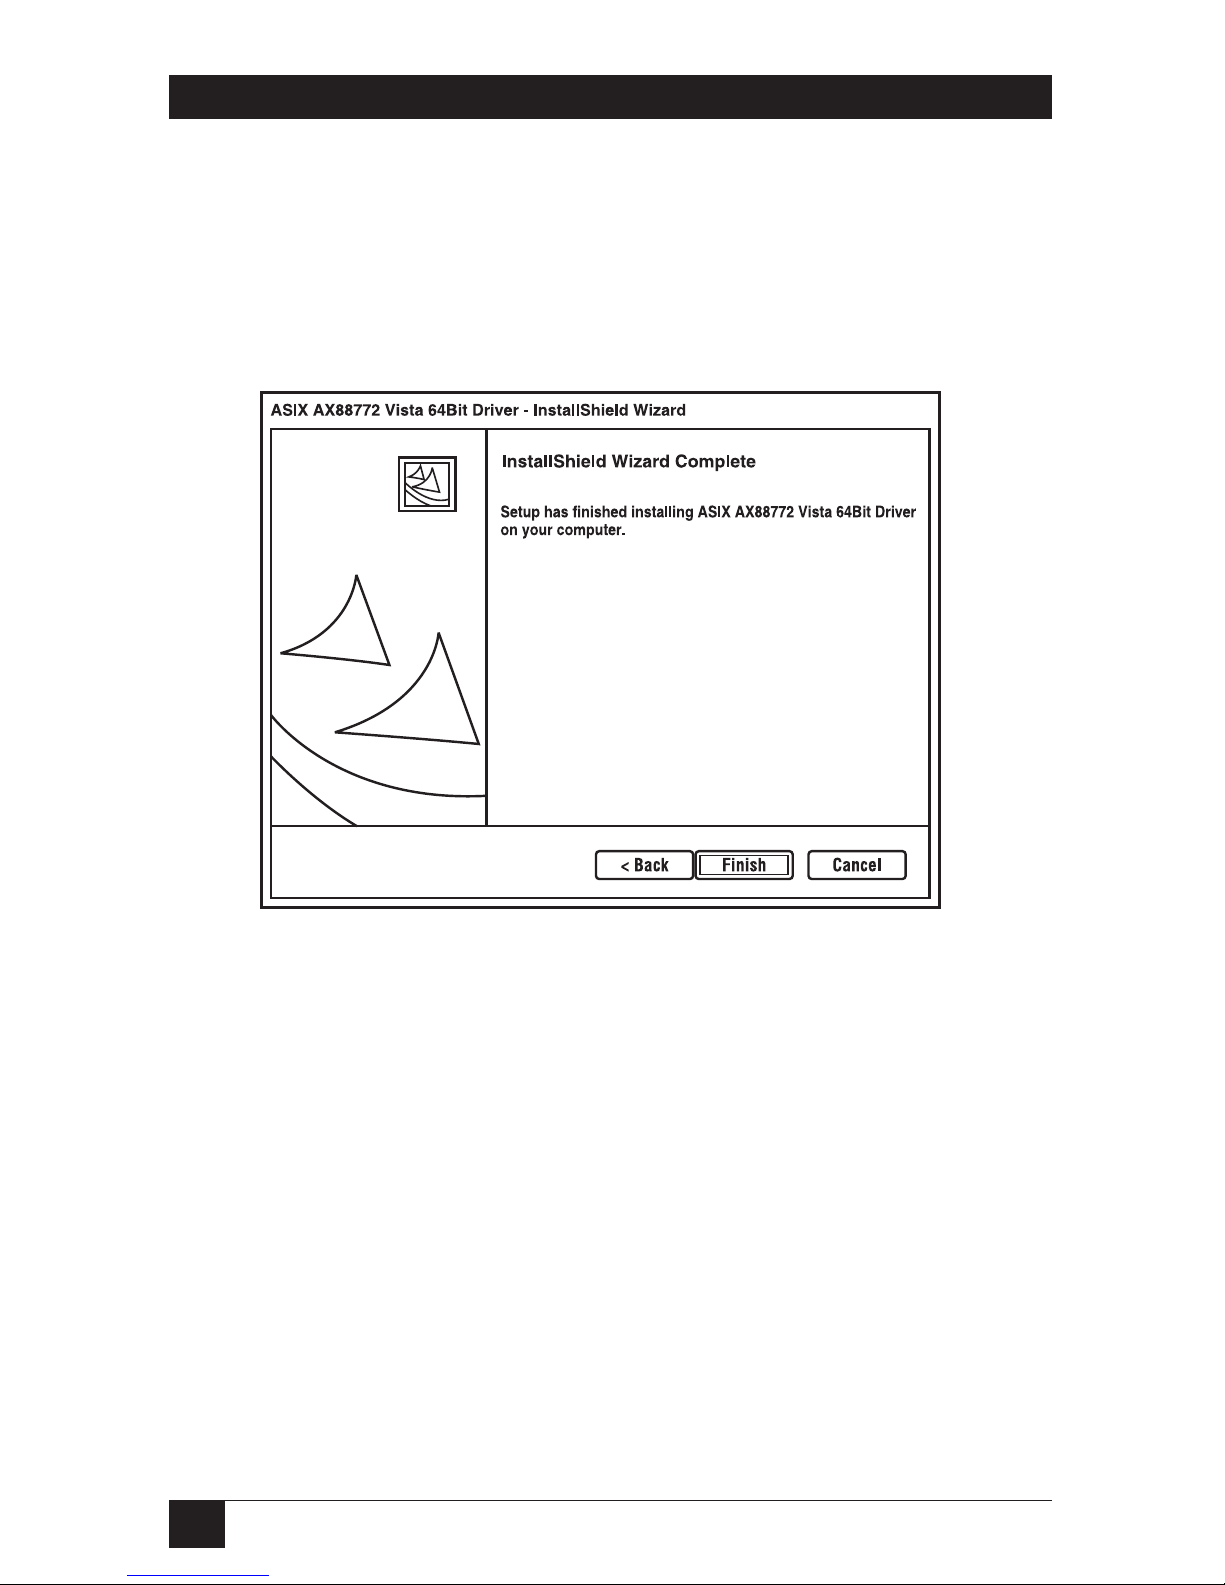
3. When the installation is done, click Finish. (If you are using Windows 2000,
you will need to restart your computer as prompted.) See Figure 3-2.
Figure 3-2. Install Wizard complete screen.
NOTE
Do not connect the docking station to your computer at this stage. Go to
Section 3.2 to continue with the video component installation.
3.2 Installing the Video Drivers
To install the video component drivers:
1. Insert the provided CD into your disc drive, locate and double-click on the
Setup.exe file under x:\Driver\Video, where x is your disc drive letter.
NOTE for Windows Vista users
Windows Vista users will encounter a User Account Control dialog box
when attempting to install a program. Enter an administrator password
or click Allow to start the installation.
Page 21
19
CHAPTER 3: Installation
2. When prompted with Windows Security dialog box, select Install this driver
software anyway.
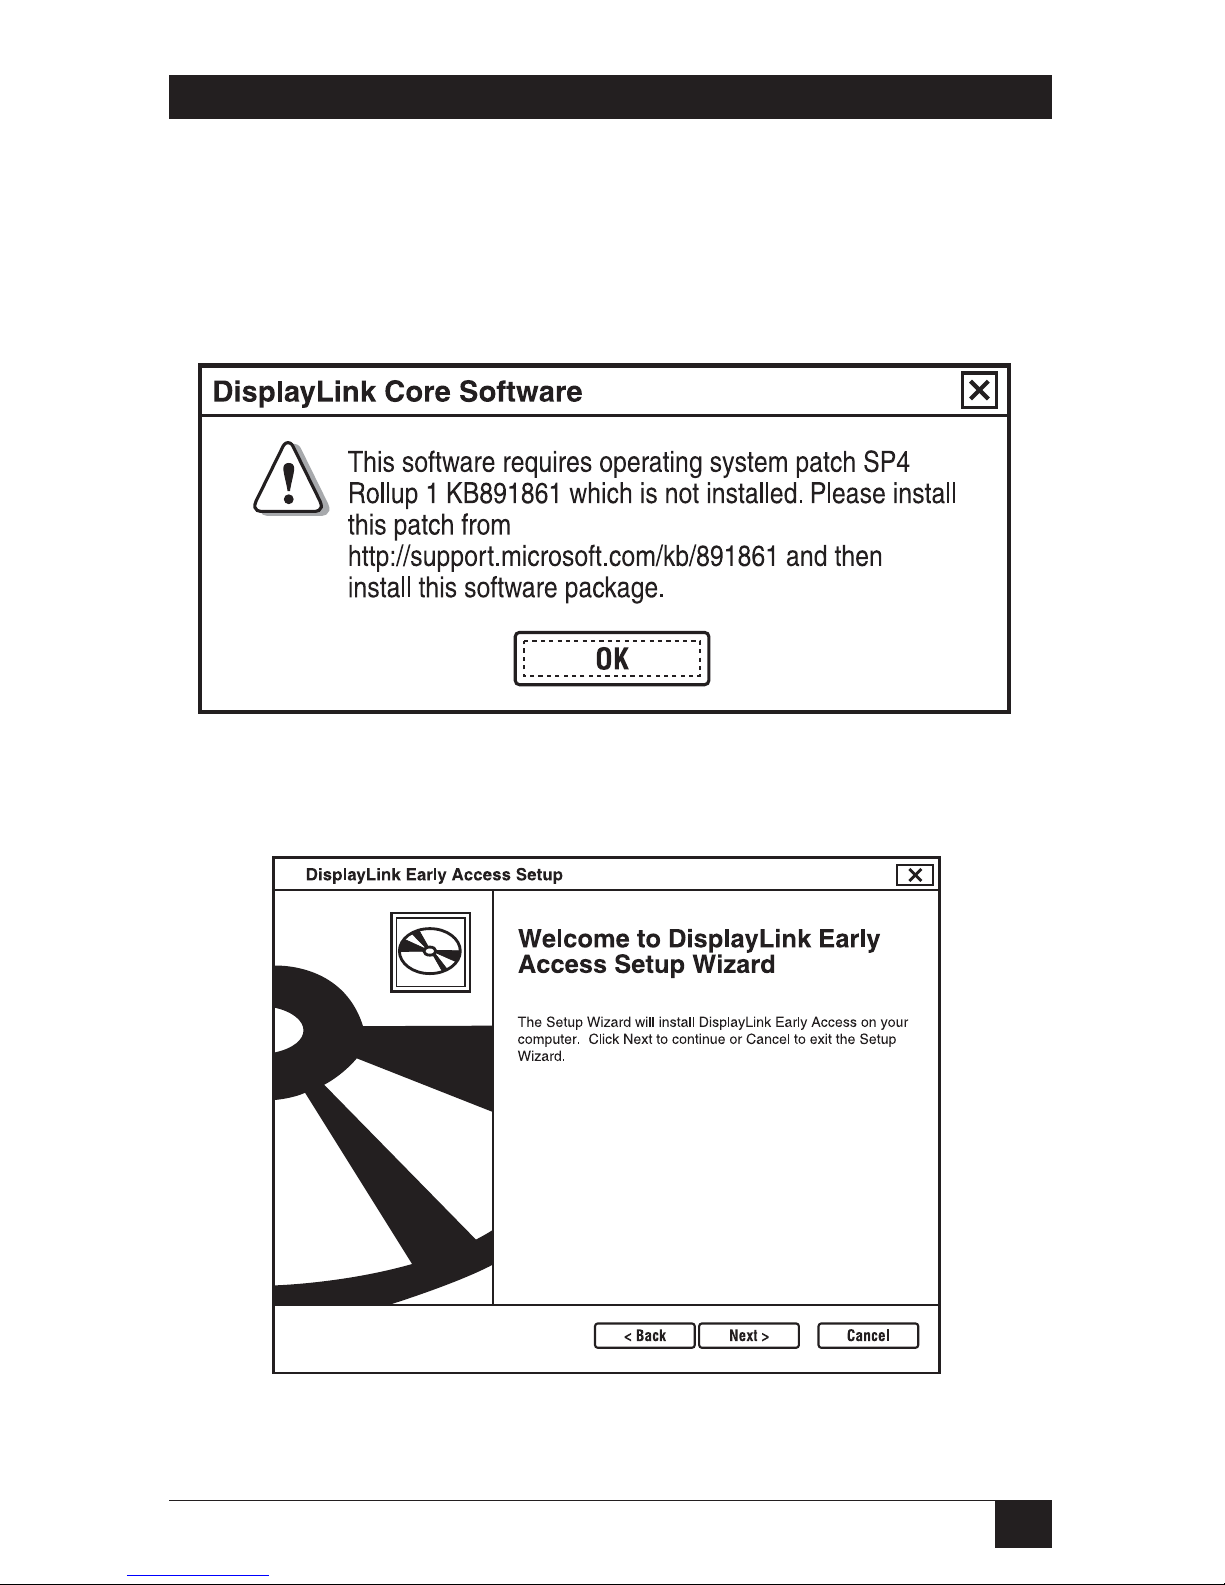
NOTE for Windows 2000 users
If the message shown in Figure 3-3 appears, download and install the
required patch first, and then run the Setup.exe file on the CD.
Figure 3-3. System patch screen.
2. When the welcome screen appears, click Next. See Figure 3-4.
Figure 3-4. Welcome screen.
CHAPTER 3: Installation
Page 22
20
DOCKING STATION WITH VIDEO
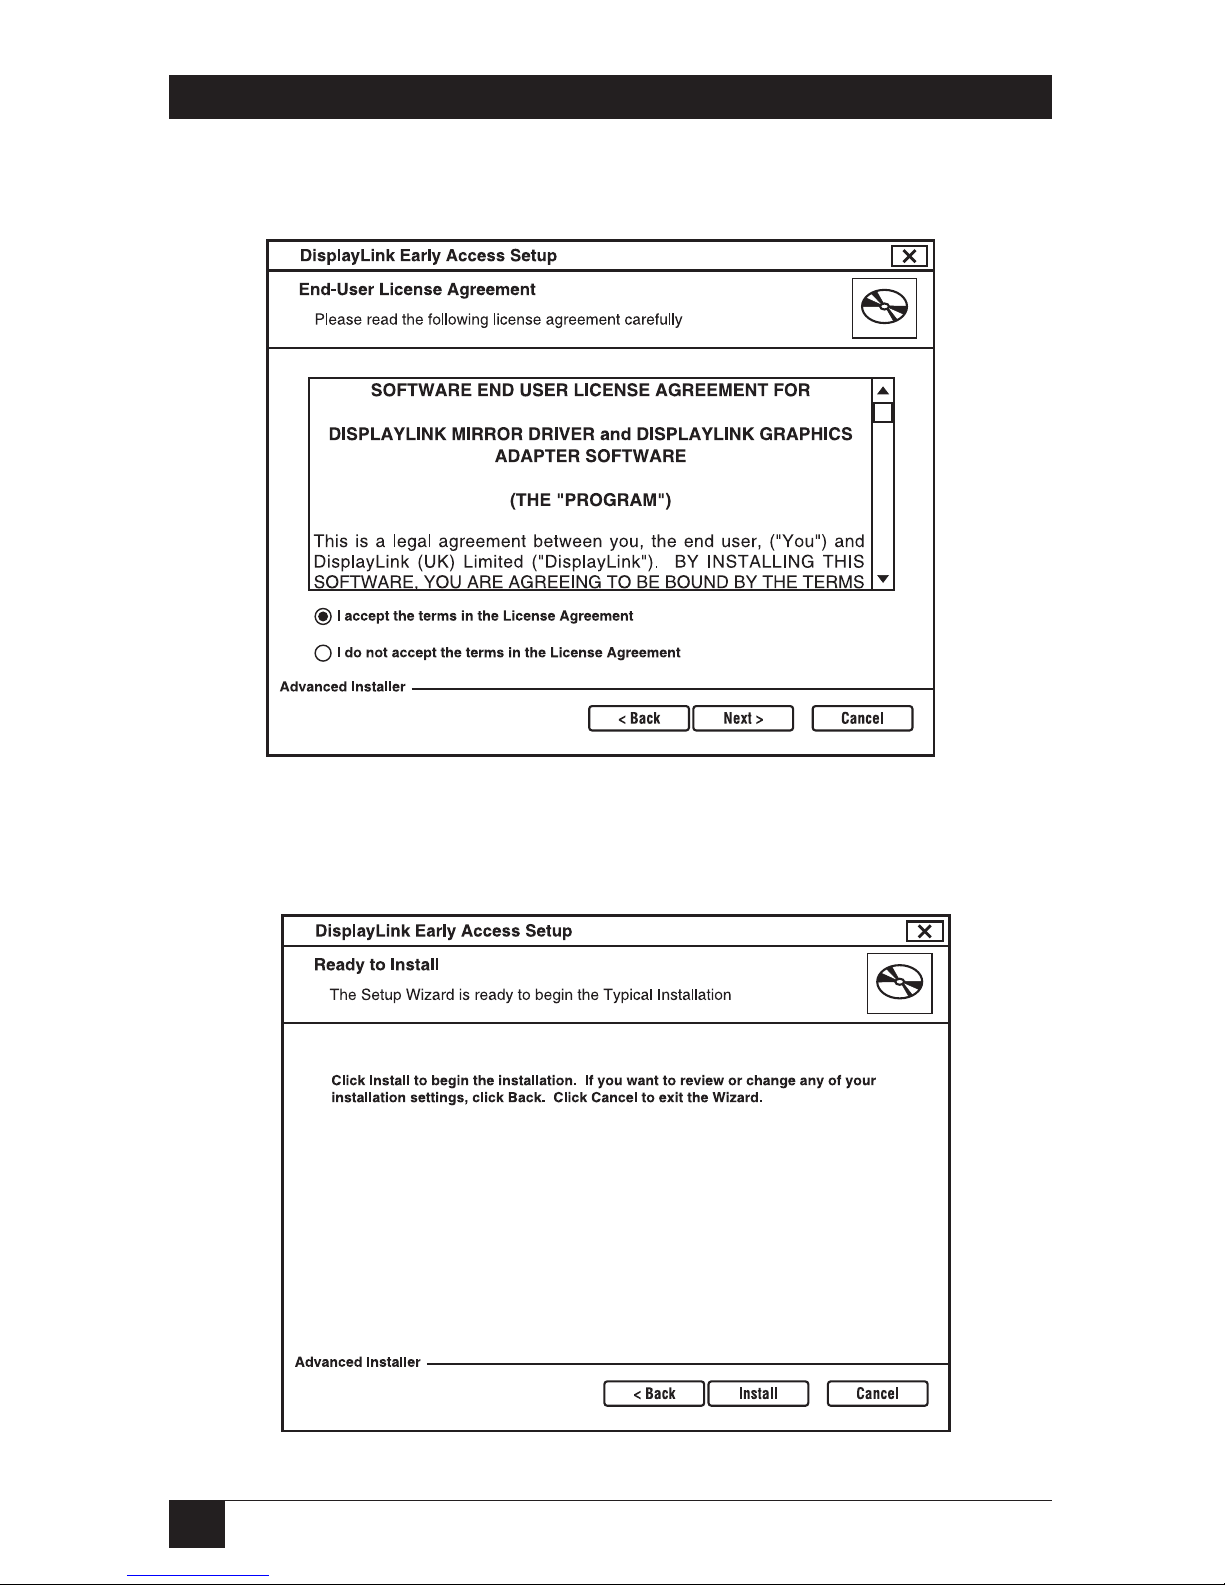
3. Select I accept the terms in the License Agreement and click Next. See
Figure 3-5.
Figure 3-5. License screen.
4. Click Install to start the installation. See Figure 3-6.
Figure 3-6. Install screen.
Page 23
21
CHAPTER 3: Installation
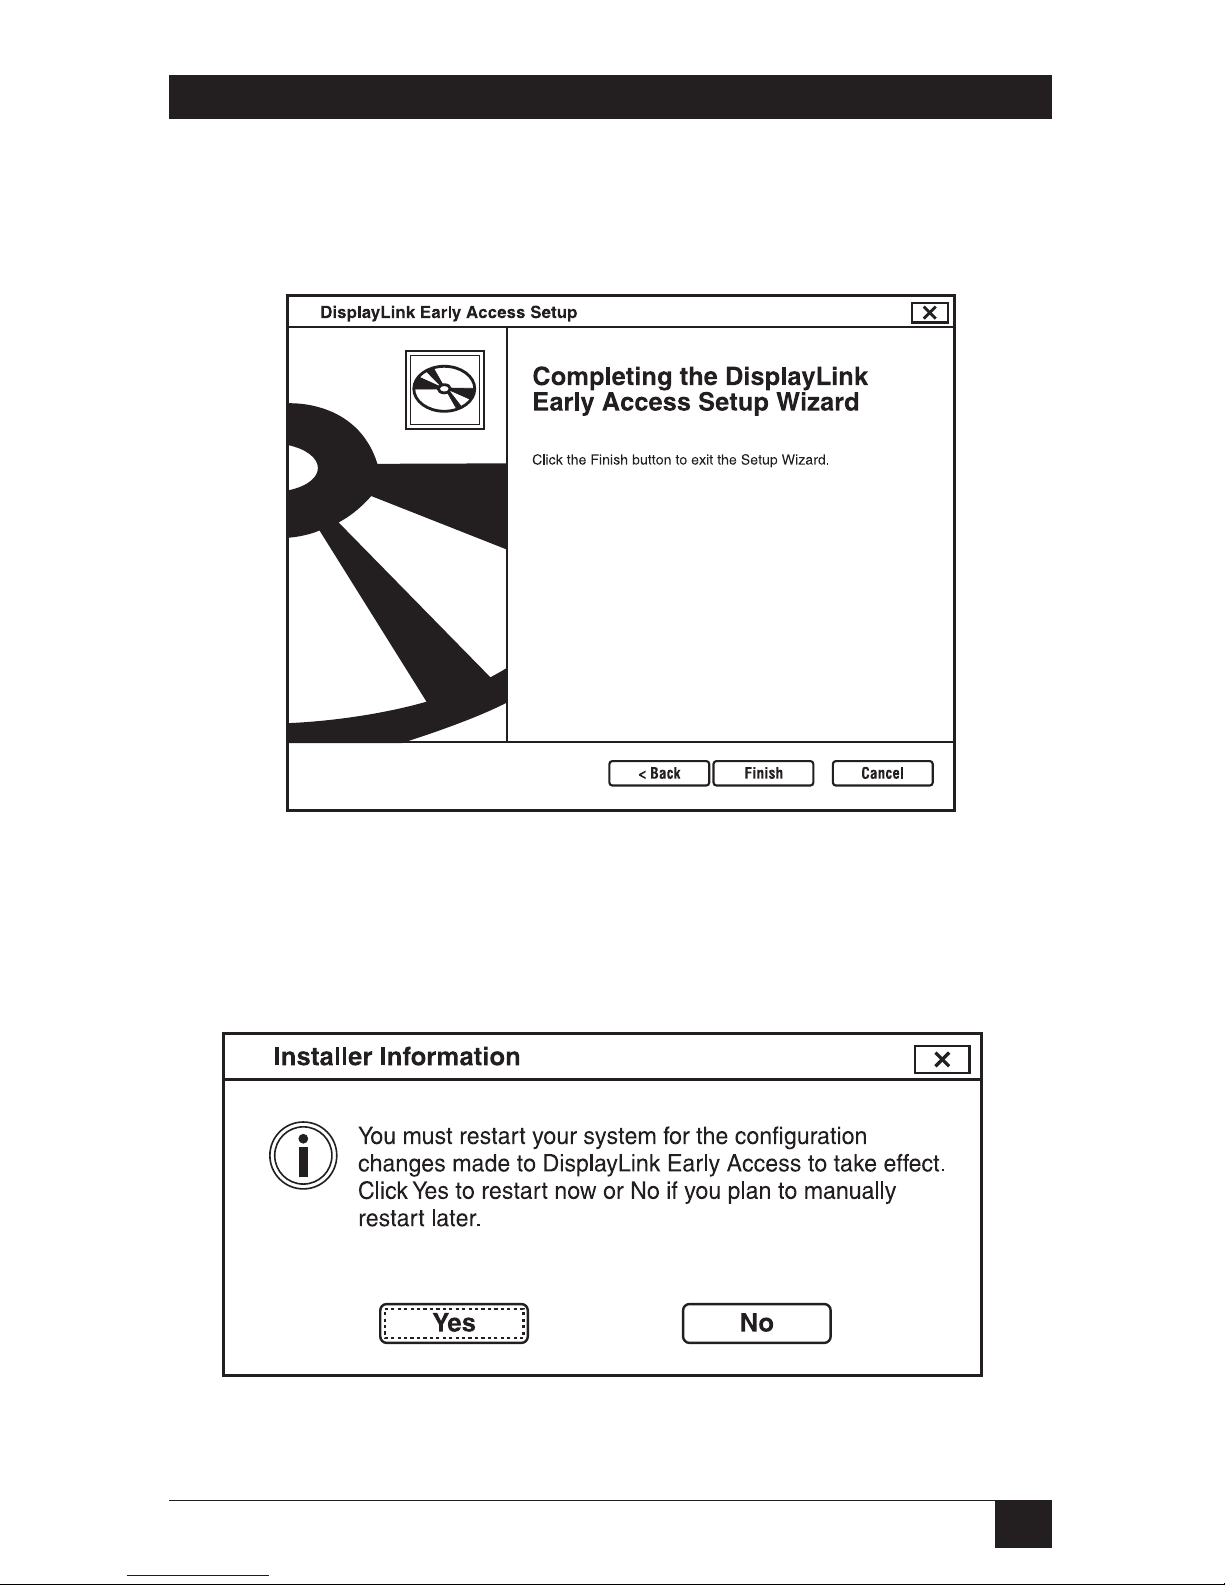
5. During the installation, the screen will go blank a couple of times. This is
normal behavior for Windows when installing new video drivers. When the
following screen (see Figure 3-7) appears, click Finish.
Figure 3-7. Completing setup wizard screen.
6. For Vista only: When prompted to restart your computer, click Yes to restart or
No to manually restart later. See Figure 3-8. After installation, you need to
reboot. If the reboot prompt doesn’t appear, manually reboot your computer.
Figure 3-8. Restart prompt screen.
Page 24
22
DOCKING STATION WITH VIDEO
3.3 Connecting the Docking Station to a Computer
1. Assemble the docking station by sliding the main body onto the base plate to
make it self-standing as described in Section 2.6.
2. Plug the power cord of the power adapter into the DC IN jack on the back of
the docking station. Then connect the power adapter to a working electrical
outlet. The Power indicator on the front panel glows when the docking
station is powered on.
3. Plug the square end of the USB cable into the USB Type B upstream
connector at the back of the docking station.
4. Plug the other end of the USB cable into an available USB 2.0 port on your
computer.
Once you connect the USB cable, your computer will automatically complete the
remaining installation, including installing Windows built-in drivers for the
docking station.
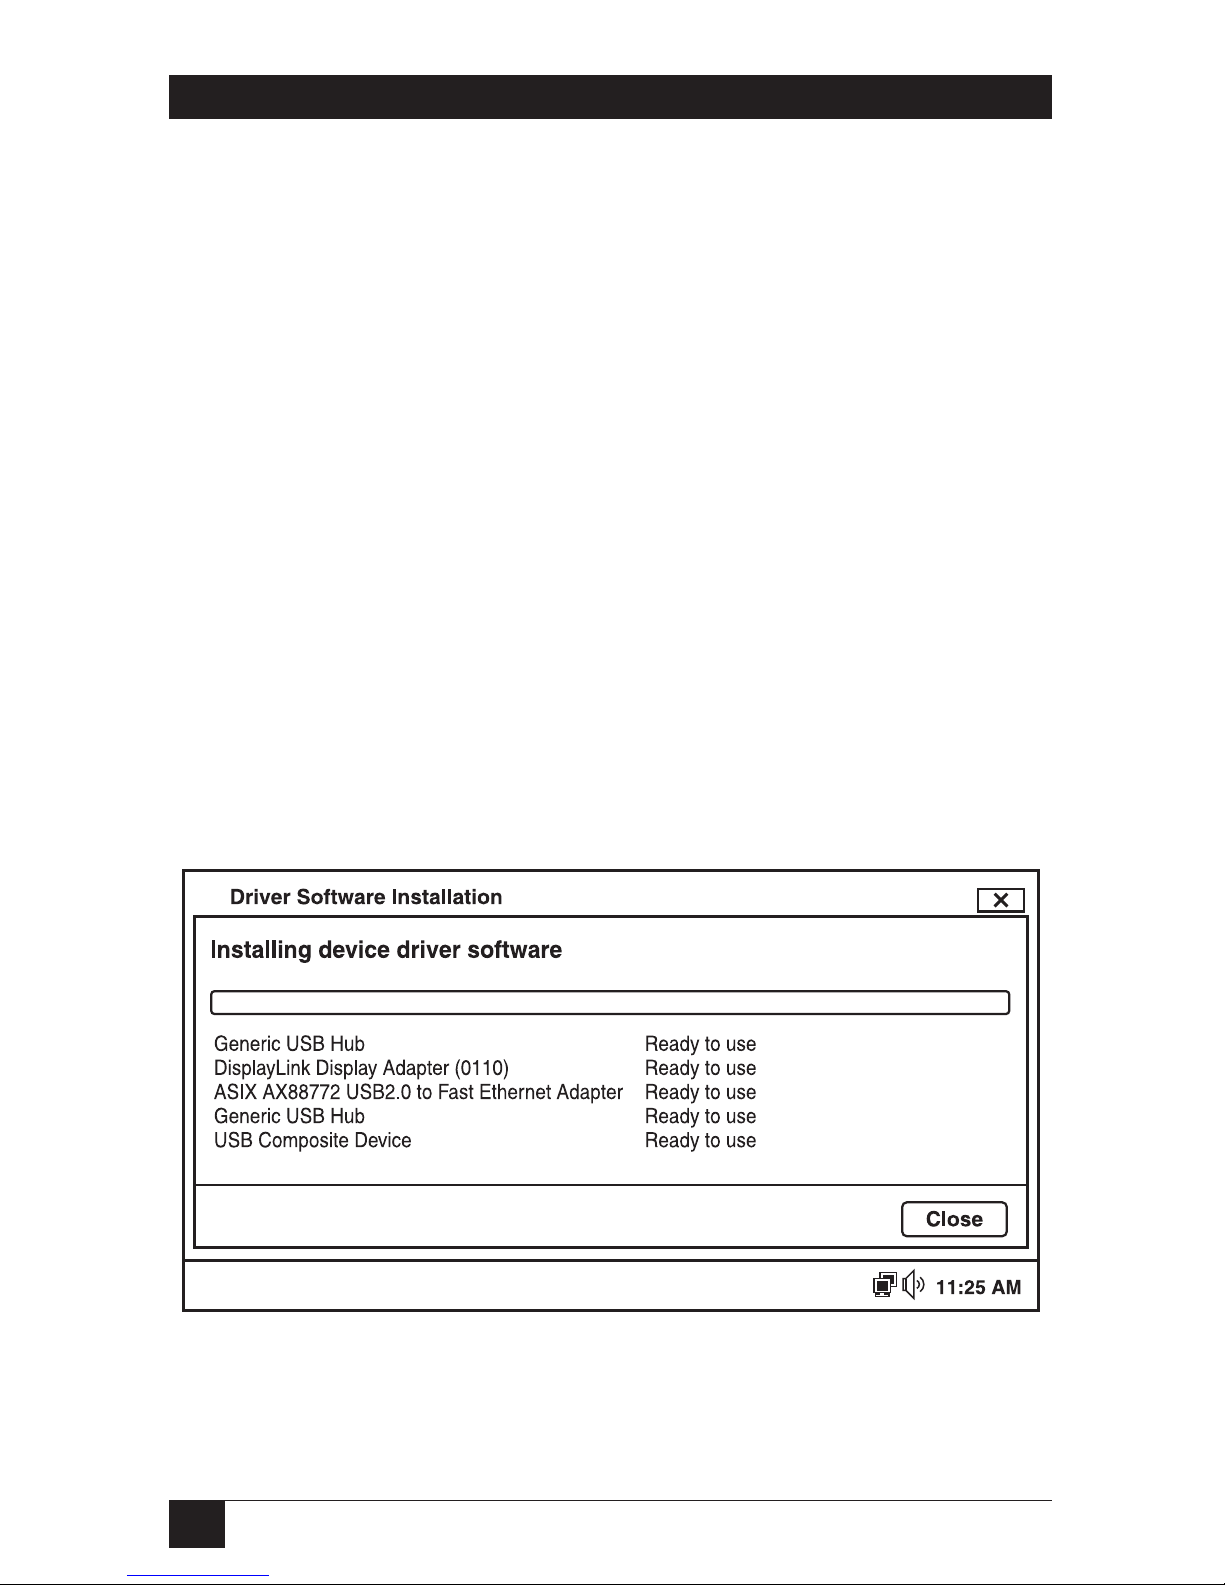
A pop-up message will appear in the notification area indicating the installation
status. Wait for the final message indicating the driver software installation is
successful. Then the docking station is ready for use. See Figure 3-9.
Figure 3-9. Installing device driver software screen.
Page 25
23
CHAPTER 3: Installation
3.4 Connecting Devices to the Docking Station
Now the installation is complete. You can connect the peripherals/monitor to
appropriate ports on the docking station as required. You can also connect and
disconnect the peripherals/monitor any time without disconnecting the docking
station from the USB port on your computer.
3.4.1 C
ONNECTING AN ETHERNET NETWORK DEVICE
1. Connect an Ethernet cable to the Ethernet port on the docking station.
2. Connect the other end of the Ethernet cable to your network hub, switch,
router, or modem.
3.4.2 C
ONNECTING A
DVI M
ONITOR
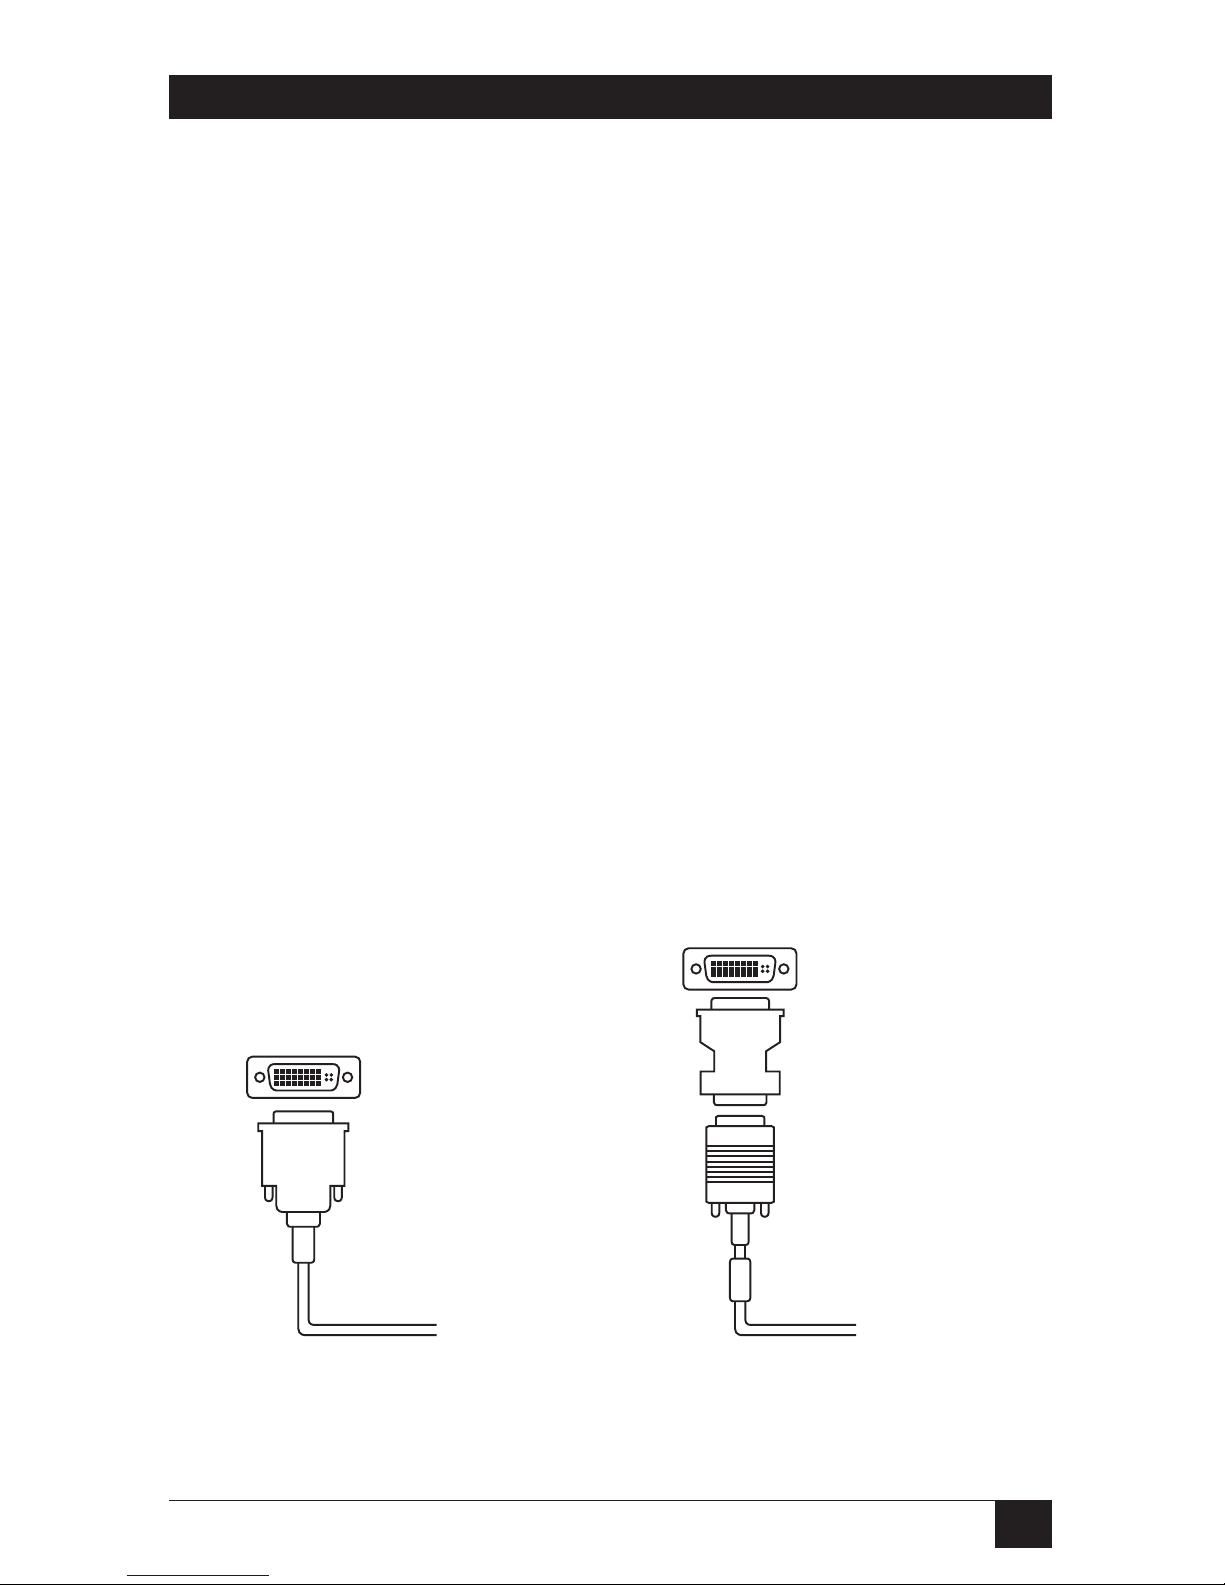
The equipped DVI-I (DVI-Integrated) connector transmits both the digital and
analog signals. This means it supports either of these two connection types (see
Figure 3-10):
• It can be connected to a DVI-D (digital) monitor using a DVI cable (not
included).
• Or, it can be connected to an analog VGA monitor using the provided DVI-I to
VGA adapter and a VGA cable (not included).
DVI cable
Connect to
DVI monitor
DVI to VGA
adapter
VGA cable
Connect to
VGA monitor
Figure 3-10. Connecting a DVI monitor or
connecting a VGA monitor using the DVI to VGA adapter.
Page 26

24
DOCKING STATION WITH VIDEO
While it is connecting, the screen flickers black a couple of times. Once the
connection is complete, an extended screen appears on the add-on monitor. Wait
until the add-on monitor shows the video.
For Windows Vista, if the add-on monitor is still blank after a while, please reboot your
system again.
To change the display mode, see Section 4.4.1.
3.4.3 C
ONNECTING
USB D
EVICES
Connect your USB devices to the USB Type A (downstream) ports on the docking
station. As long as one USB device is connected to the port and the connection
works properly, the USB LED glows green (on). When no USB device is connected
to the port, the LED light is off.
If your USB device, such as a printer or optical drive, etc., came with its own AC
adapter, make sure that it is plugged into the device and a working electrical outlet.
3.4.4 C
ONNECTING A MICROPHONE AND SPEAKER/HEADPHONES
To connect a microphone, insert the plug into the audio connector with
microphone icon on the front of the docking station.
To connect your speaker/headphones, insert the plug into the audio connector
with headset icon on the front of the docking station.
Page 27

25
CHAPTER 3: Installation
4. Using the Docking Station
with Video
4.1 USB 2.0 Ports
The four USB ports on the docking station function just like the ports on a USB
hub. Connect any USB device to the docking station’s USB ports.
• All four USB ports provide power when the computer is either off, suspended,
or hibernated. You can use the USB port for power chargers with USB plugs.
NOTE
In hibernate mode, your PC goes into a “sleep” mode to conserve power.
During this time the Docking Station will still provide power on the USB
ports. Although they will not have active USB connections, power can be
used to power equipment such as cell phones, game systems, etc.
• The USB port supports hot-plugging equipment. You may plug and unplug an
USB device from the docking station at any time.
• Some USB devices, for example, printers and optical drives, require higher
power to operate. To use these devices, plug the device into one of the docking
station’s USB ports then plug the device’s power adapter into the device and
the power outlet.
4.2 Audio Ports
Before using the speaker/microphone connected to the docking station, you must
correctly configure your application to use USB (Multimedia) Audio Device (the
audio components of the docking station).
When the docking station is connected to your computer, the audio devices named
USB (Multimedia) Audio Device are automatically installed and may override
Windows default audio settings. The most obvious effect is that your original music
playback will be re-directed to the speaker connected to the docking station.
However, users may want to use an original sound card for music playback and use
the docking station’s audio ports for chatting via instant messaging software (such
as MSN® messenger, Yahoo! messenger, or Skype®). In these cases, users have to
manually configure the required audio device for each application.
Page 28
26
DOCKING STATION WITH VIDEO
4.2.1 C
ONFIGURING A WINDOWS AUDIO DEVICE
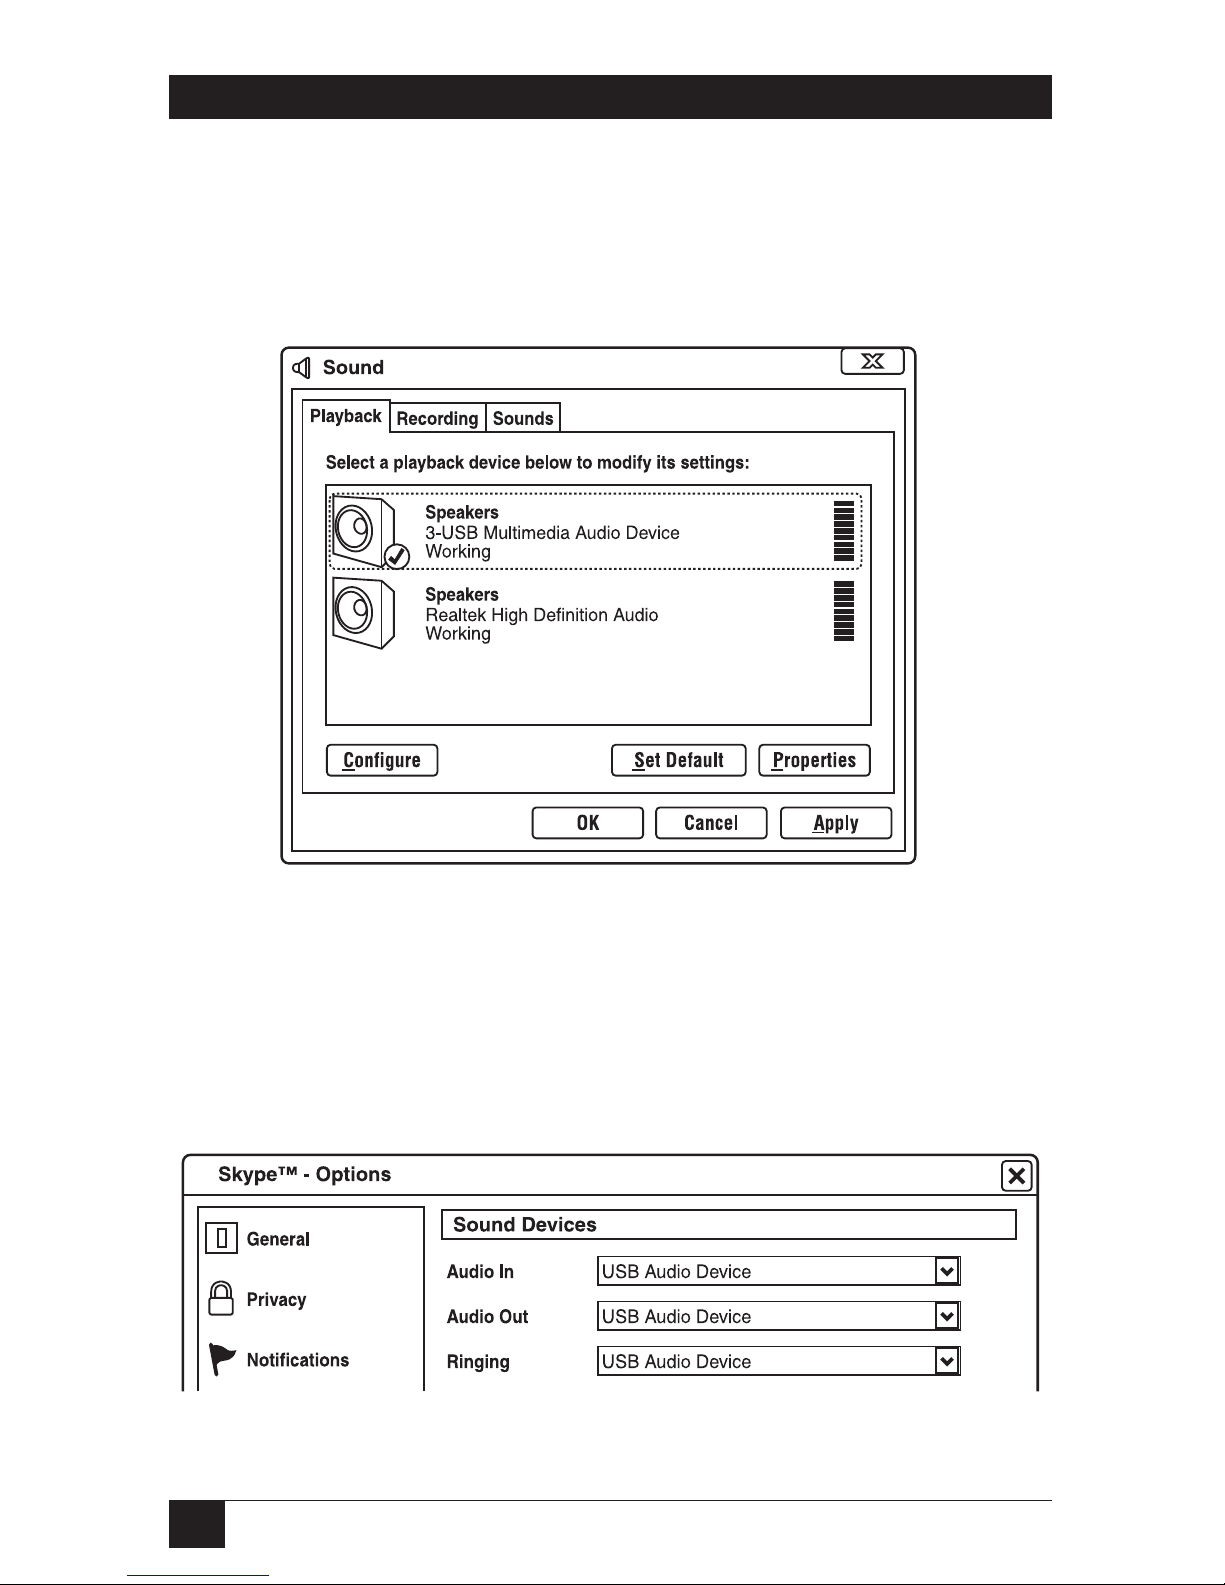
To specify a sound device for music playback in Windows, open Control Panel and
double-click the sound or audio icon. Then select a desired device in the playback
section. If you want to use your original sound card for music playback, make sure
to select it instead of USB (Multimedia) Audio Device. See Figure 4-1.
Figure 4-1. Sound screen.
4.2.2 C
ONFIGURING INSTANT MESSAGING SOFTWARE FOR AN AUDIO DEVICE
To chat via instant messaging software using the headphone and microphone
connected to the docking station, make sure the instant messaging software, such
as MSN messenger, Yahoo! messenger or Skype, is configured to use USB
(Multimedia) Audio Device as the audio in and out devices. See Figure 4-2.
Figure 4-2. Instant messaging.
Page 29
27
CHAPTER 4: Using the Docking Station with Video
4.3 Ethernet Port
The Ethernet port supports 10-/100-Mbps Ethernet. To connect your computer to
a network through the docking station, attach one end of a network cable (not
included) to the Ethernet port on the docking station. Connect the other end of
the cable to your network hub, switch, or router for network access.
Properly configure the network settings according to your network environment.
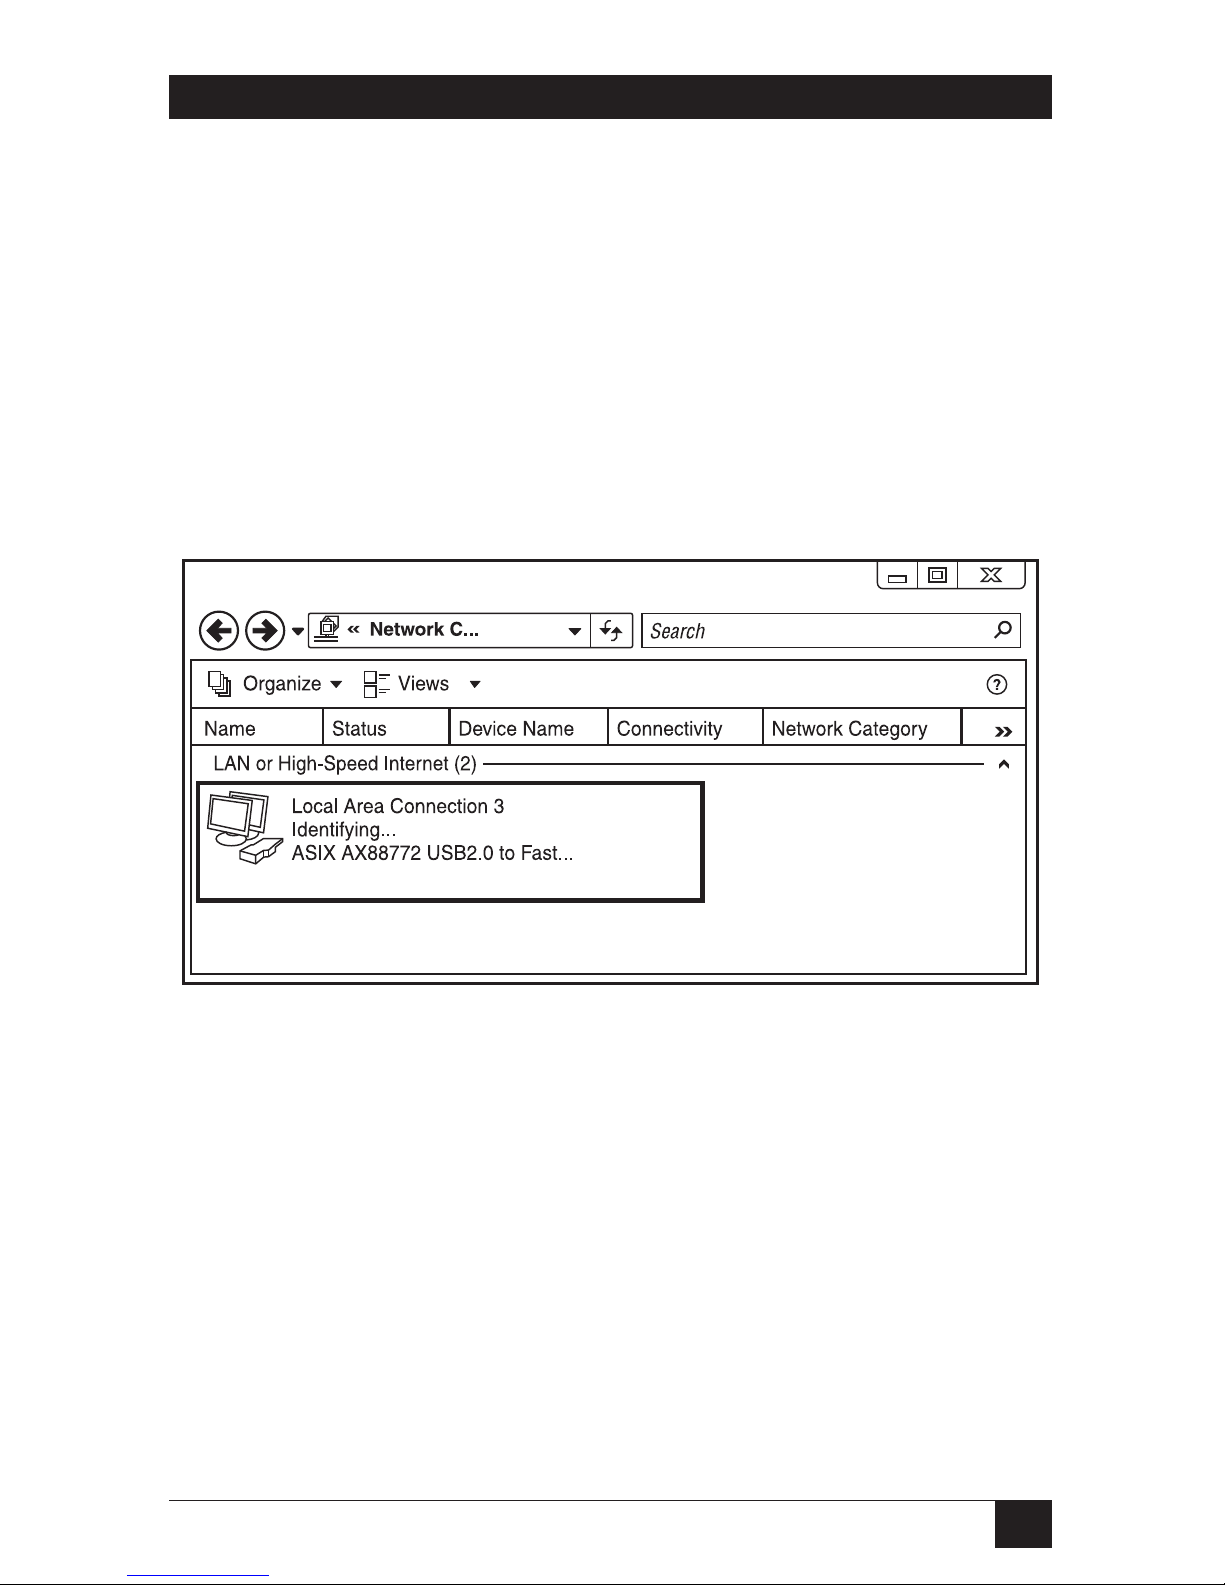
To configure the network settings, go to Control Panel > Network Connections,
then right-click the connection icon, which is indicated by ASIX AX88772 USB2.0
to Fast Ethernet Adapter and then click Properties to make the required settings.
See Figure 4-3.
Figure 4-3. Connecting to Ethernet.
4.4 Video Port
4.4.1 D
ISPLAY MODES
There are several ways you can use the monitor attached to the docking station.
Configure the additional monitor to use either “extended mode,” “mirror mode,”
or as the primary display.
Extend Your Windows Desktop to Additional Monitor (Default)
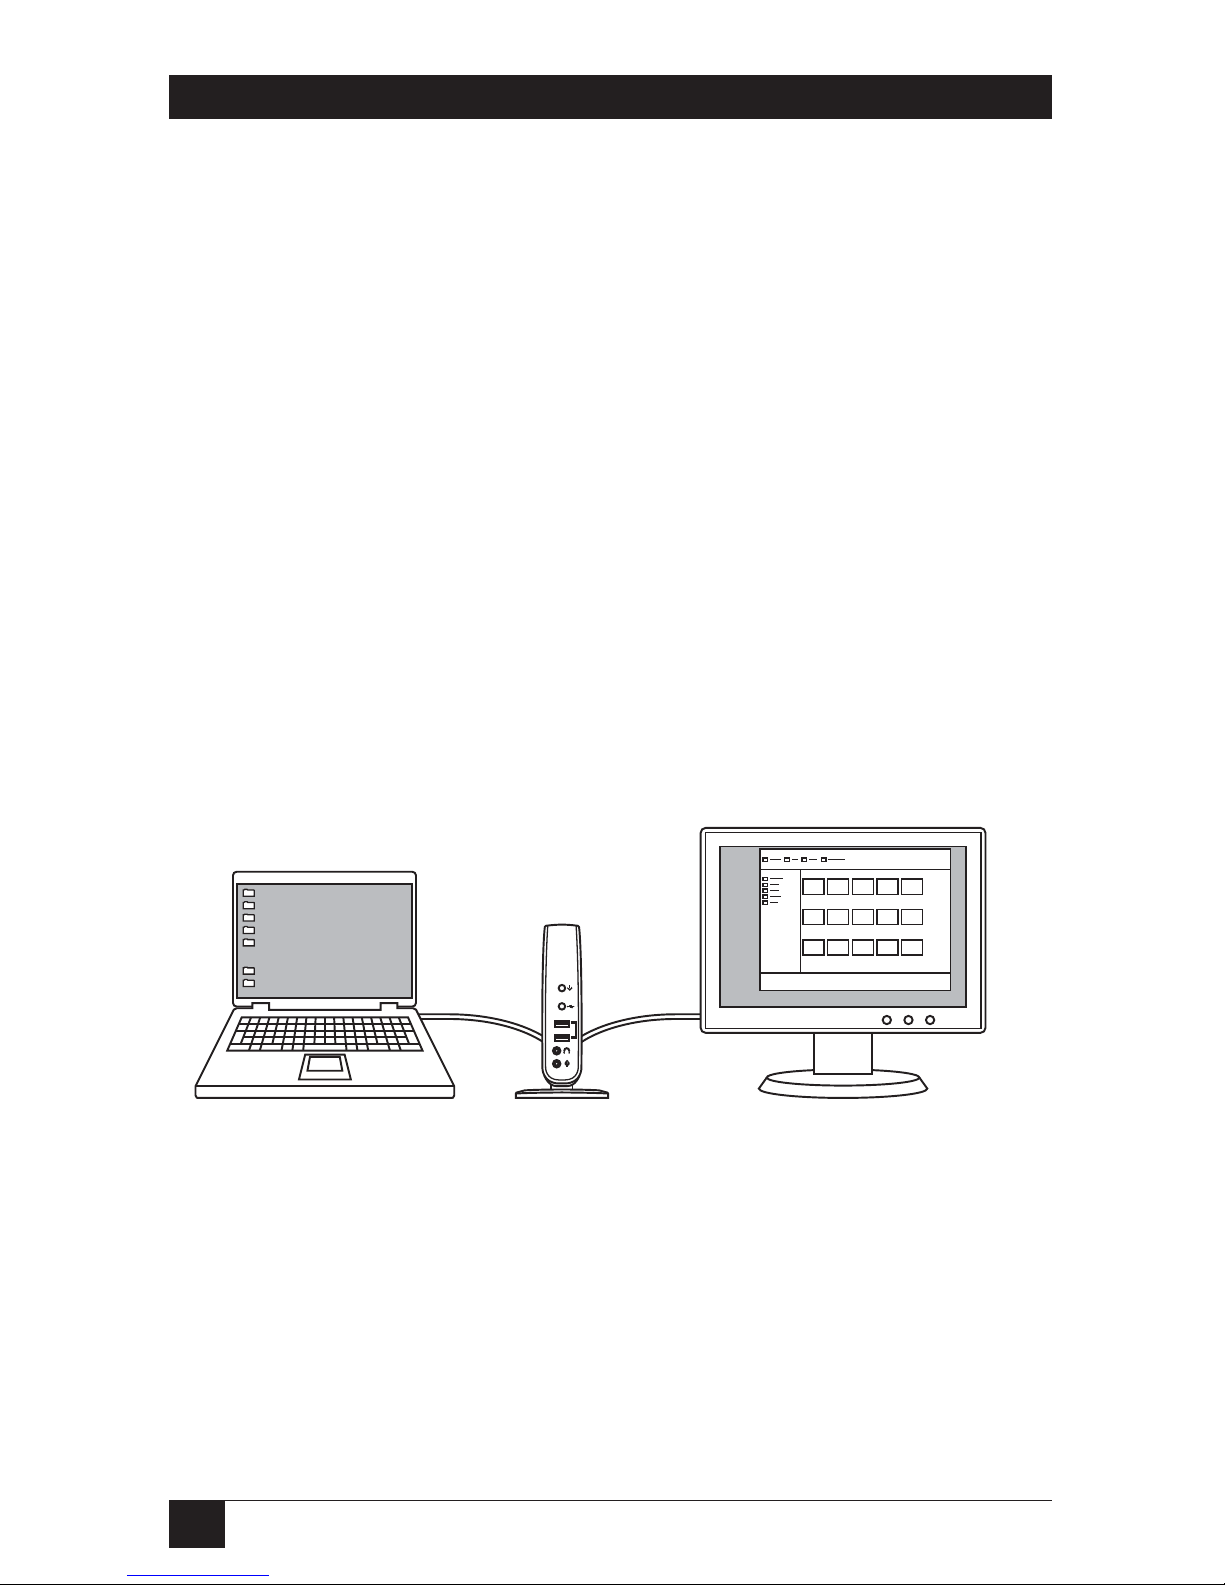
In extended mode, your display will be spread over the additional monitor(s). This
mode allows you to perform multiple tasks more effectively without overlapping
windows. See Figure 4-4.
Page 30
28
DOCKING STATION WITH VIDEO
Extended mode is the default setting. To set up the video component to use or
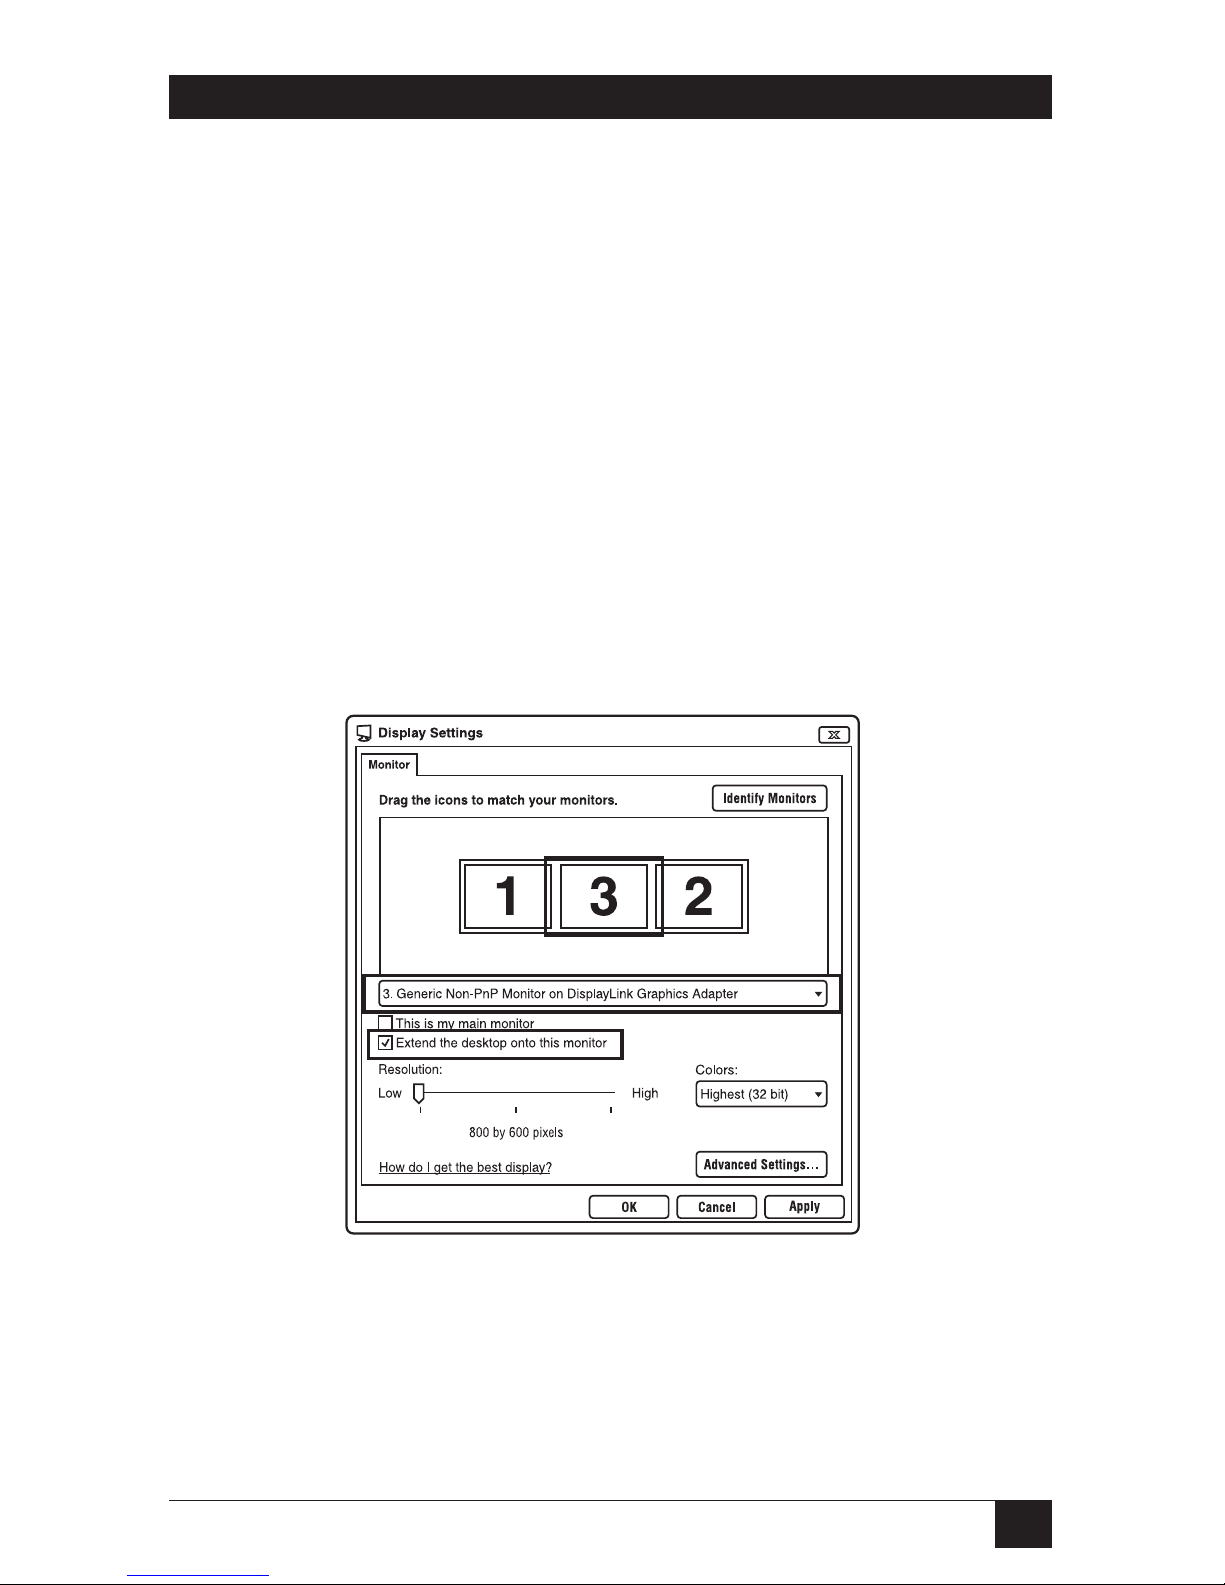
restore extended mode, follow these steps and refer to Figure 4-4:
1. Position the mouse anywhere on your computer desktop, right-click and
select Personalize > Display Settings on Vista or Properties > Settings on
XP/2000.
2. In the Display drop-down menu, select the option with the string “DisplayLink
Graphics Adapter.”
3. Check the Extend the desktop onto this monitor box on Vista or Extend my
Windows desktop monitor box on XP/2000.
4. Drag the icons in the window at the top of the screen to match the physical
arrangement of your primary monitor and add-on monitor.
The additional monitor connected to the docking station may be identified as
either "2" or “3,” depending on your computer, although there may not be a
total of three screens connected.
5. Click OK to close the settings screen.
Figure 4-4. Graphic/text display shown on additional monitor screen.
Once the setting is complete, to use your extended desktop, simply drag and drop
your open windows over to your second monitor.
NOTE
Some applications may not support display on the extended desktop.
Call Tech Support at 724-746-5500 for details.
Page 31
29
CHAPTER 4: Using the Docking Station with Video
What to do if the cursor disappears:
If you’re in extended mode but the additional monitor is not connected, the
desktop still pans to the additional monitor. Your cursor may have moved to the
extended desktop, so you cannot find it on the primary display. To restore the
cursor, connect the add-on monitor to the docking station or unplug the docking
station first.
Video and DVD Playback in Extended Mode
On Windows Vista with extended mode, run video or DVD playback programs on
your primary monitor instead of the additional monitor for proper playback.
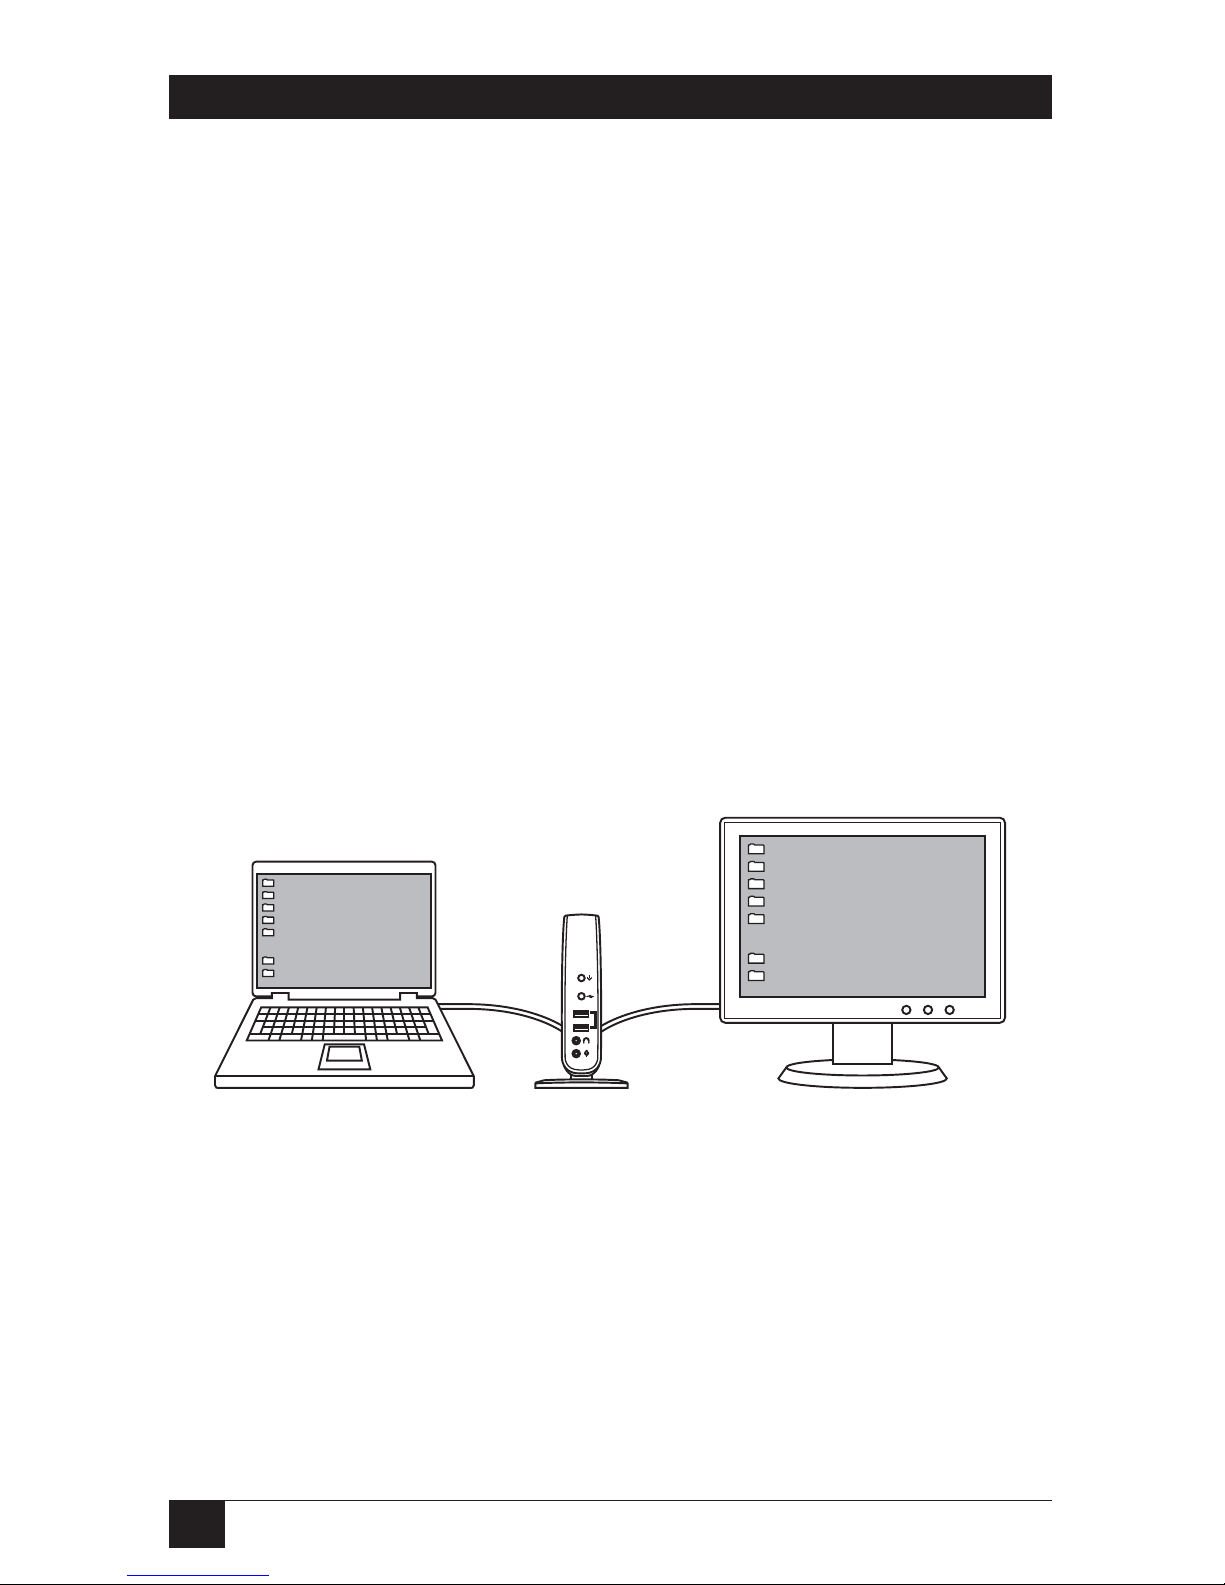
Mirror Your Windows Desktop
This mode is referred to as “mirror” or “clone” mode. In this mode, your original
screen (the primary display) will be mirrored to the additional monitor. See Figure
4-5.
Figure 4-5. Mirror mode.
Page 32
30
DOCKING STATION WITH VIDEO
In mirror mode, the video component will automatically select the settings (screen
resolution, color quality, and refresh rate) for the additional monitor. But you can
manually adjust the settings as required. The additional monitor’s settings are
limited by those of the primary monitor. For example, even though your additional
monitor supports a resolution of up to 1680 x 1050, you can only configure it to
use 1280 x 1024 since the primary monitor only supports a resolution of up to 1280
x 1024.
If you change the video output to extended mode and then want to switch back to
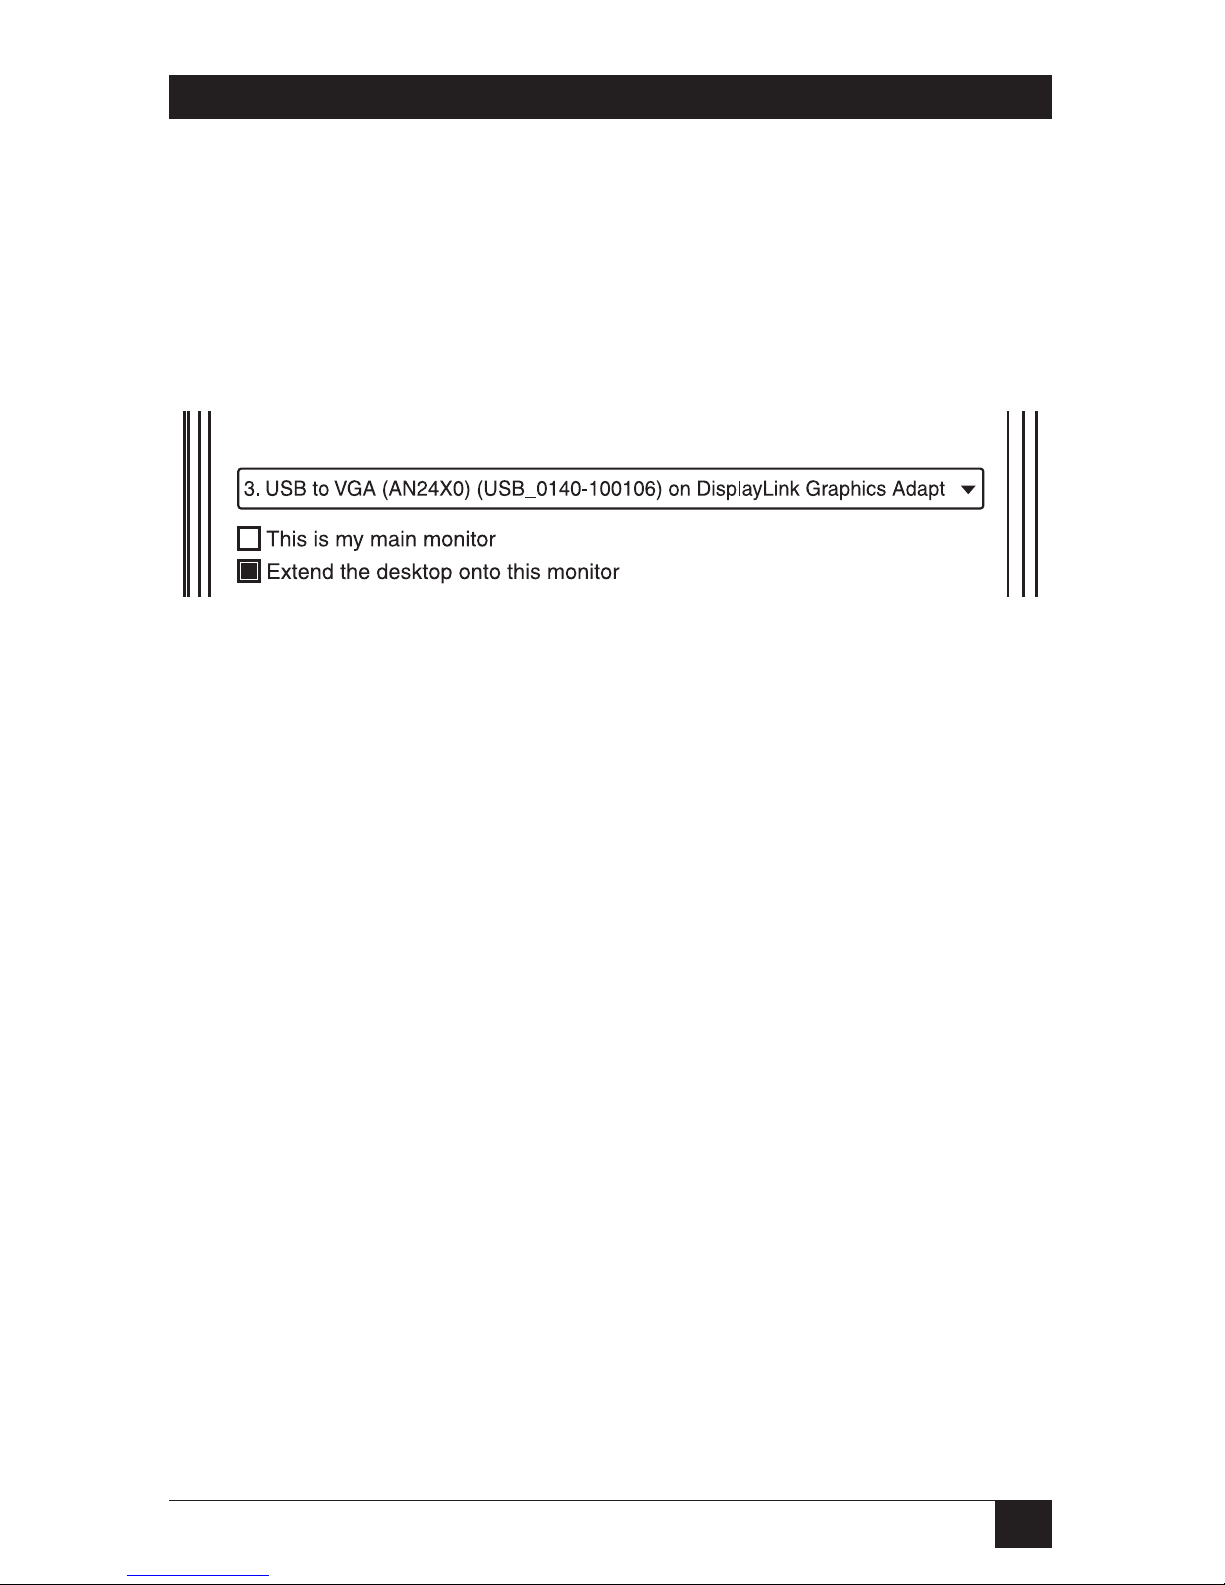
mirror mode, follow these steps and refer to Figure 4-6 on the next page:
1. Position the mouse anywhere on your computer desktop, right-click and select
Personalize > Display Settings on Vista or Properties > Settings on XP/2000.
2. In the Display drop-down menu, select the option with the string “DisplayLink
Graphics Adapter.”
3. Uncheck the Extend the desktop onto this monitor on Vista or Extend my
Windows desktop onto this monitor on XP/2000.
4. Click OK to close the settings screen.
Figure 4-6. Connections to extend the desktop onto this monitor screen.
Use the Additional Monitor as your Primary Monitor
To configure the additional monitor as the primary display:
1. Position the mouse anywhere on your computer desktop, right-click and
select Personalize > Display Settings on Vista or Properties > Settings on
XP/2000.
Page 33

31
CHAPTER 4: Using the Docking Station with Video
2. In the Display drop-down menu, select the option that ends with the
DisplayLink Graphics Adapter.
3. Check the This is my main monitor box on Vista or Use this device as the
primary monitor box on XP/2000.
On some PCs and laptops you must disable the main display (uncheck the
Extend the desktop onto this monitor or Extend my Windows desktop onto
this monitor box for the main display) as part of the same settings change.
4. Click OK to close the settings screen.
The add-on monitor stays primary if the PC enters hibernate or suspend mode or
is rebooted. If the add-on monitor is unplugged, the main display becomes primary
again.
4.4.2 A
DJUSTING RESOLUTION
, C
OLOR DEPTH, AND REFRESH RATE
There are three components that make up the screen mode:
1. Resolution: This is the number of pixels displayed on the screen horizontally
and vertically.
2. Color Depth: This defines the number of different colors that the screen can
display at the same time.
3. Refresh rate: Measures how long it takes to rescan the entire screen. Higher
frequencies reduce flicker.
Some monitors support these modes through the video connector. In this case, the
video component identifies the supported modes from the monitor. If the monitor
does not support these modes through a connector, the video software chooses a
set of common screen modes for the monitor.
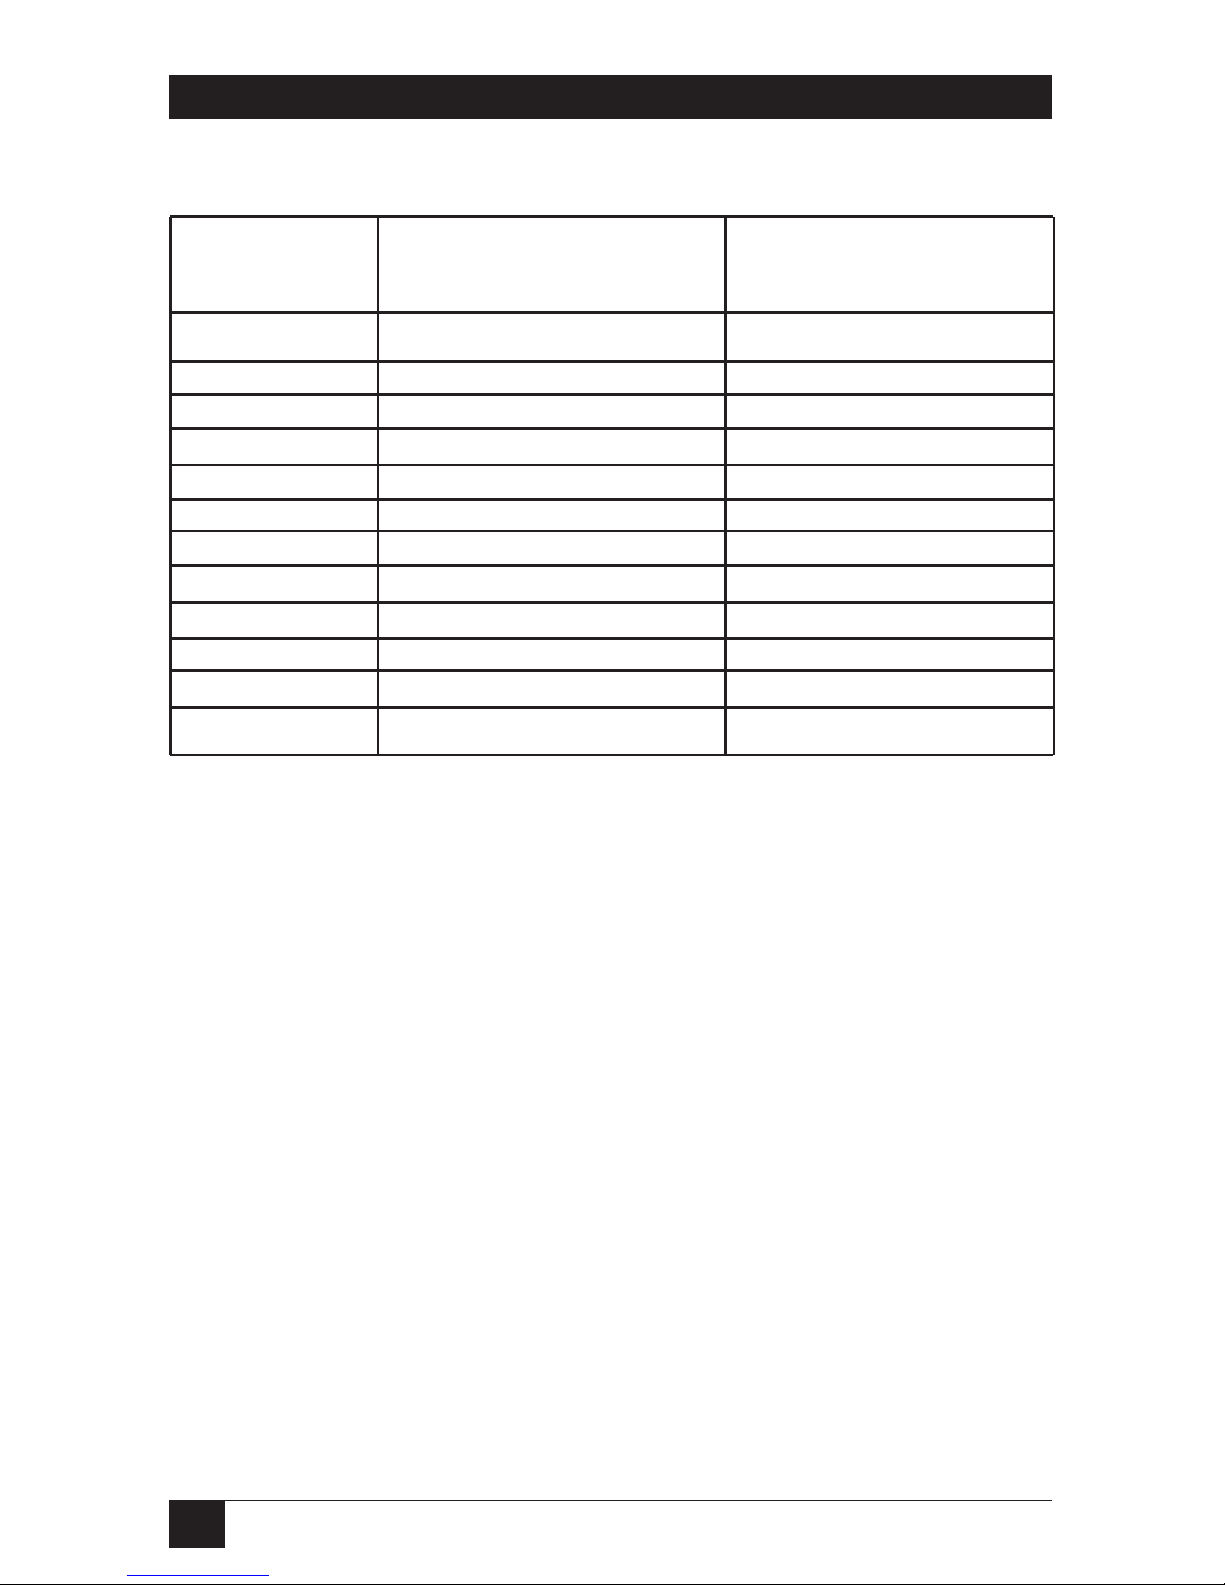
The software supports the modes listed in Table 4-1.
Page 34
32
DOCKING STATION WITH VIDEO
Table 4-1. Supported modes.
Color Depth/ Refresh rates available (Hz) Refresh rates available (Hz)
Resolution at 16-bit color quality at 32-bit color quality
640 x 480 60, 72, 75 60, 72, 75
800 x 600 56, 60, 72, 75, 85 56, 60, 72, 75, 85
1024 x 768 60, 75, 85 60, 75, 85
1280 x 960 60, 85 60, 85
1280 x 1024 60, 75, 85 60, 75
1360 x 768 60 60
1366 x 768 60 60
1368 x 768 60 60
1400 x 1050 60, 75, 85 60, 75, 85
1440 x 900 60 60
1600 x 1200 60 60
1680 x 1050 59, 60 59, 60
NOTE
The resolutions and refresh rates available to users through Windows
require support from the docking station’s video component, the primary
monitor and add-on monitor, and the primary video card on your
computer and installed drivers.
For example, if your monitor doesn’t support a resolution of 1600 x 1200, then
your system can’t attain this resolution even if the video component supports 1600
x 1200. This protects your monitor from going into an unsupported mode, which
might damage it.
If cloning the primary display, the video component will try to use the preferred
monitor mode. In some cases, this may not be the most appropriate mode for the
cloned desktop. We recommend that you change the primary display resolution to
closely match the add-on monitor’s default resolution.
To configure a screen mode’s three components (resolution, color depth, and
refresh rate), follow these steps:
1. Position the mouse anywhere on your computer desktop. Then right-click
and select Personalize > Display Settings on Vista or Properties > Settings on
XP/2000.
Page 35
33
CHAPTER 4: Using the Docking Station with Video
2. In the Display drop-down menu, select the option that ends with DisplayLink
Graphics Adapter.
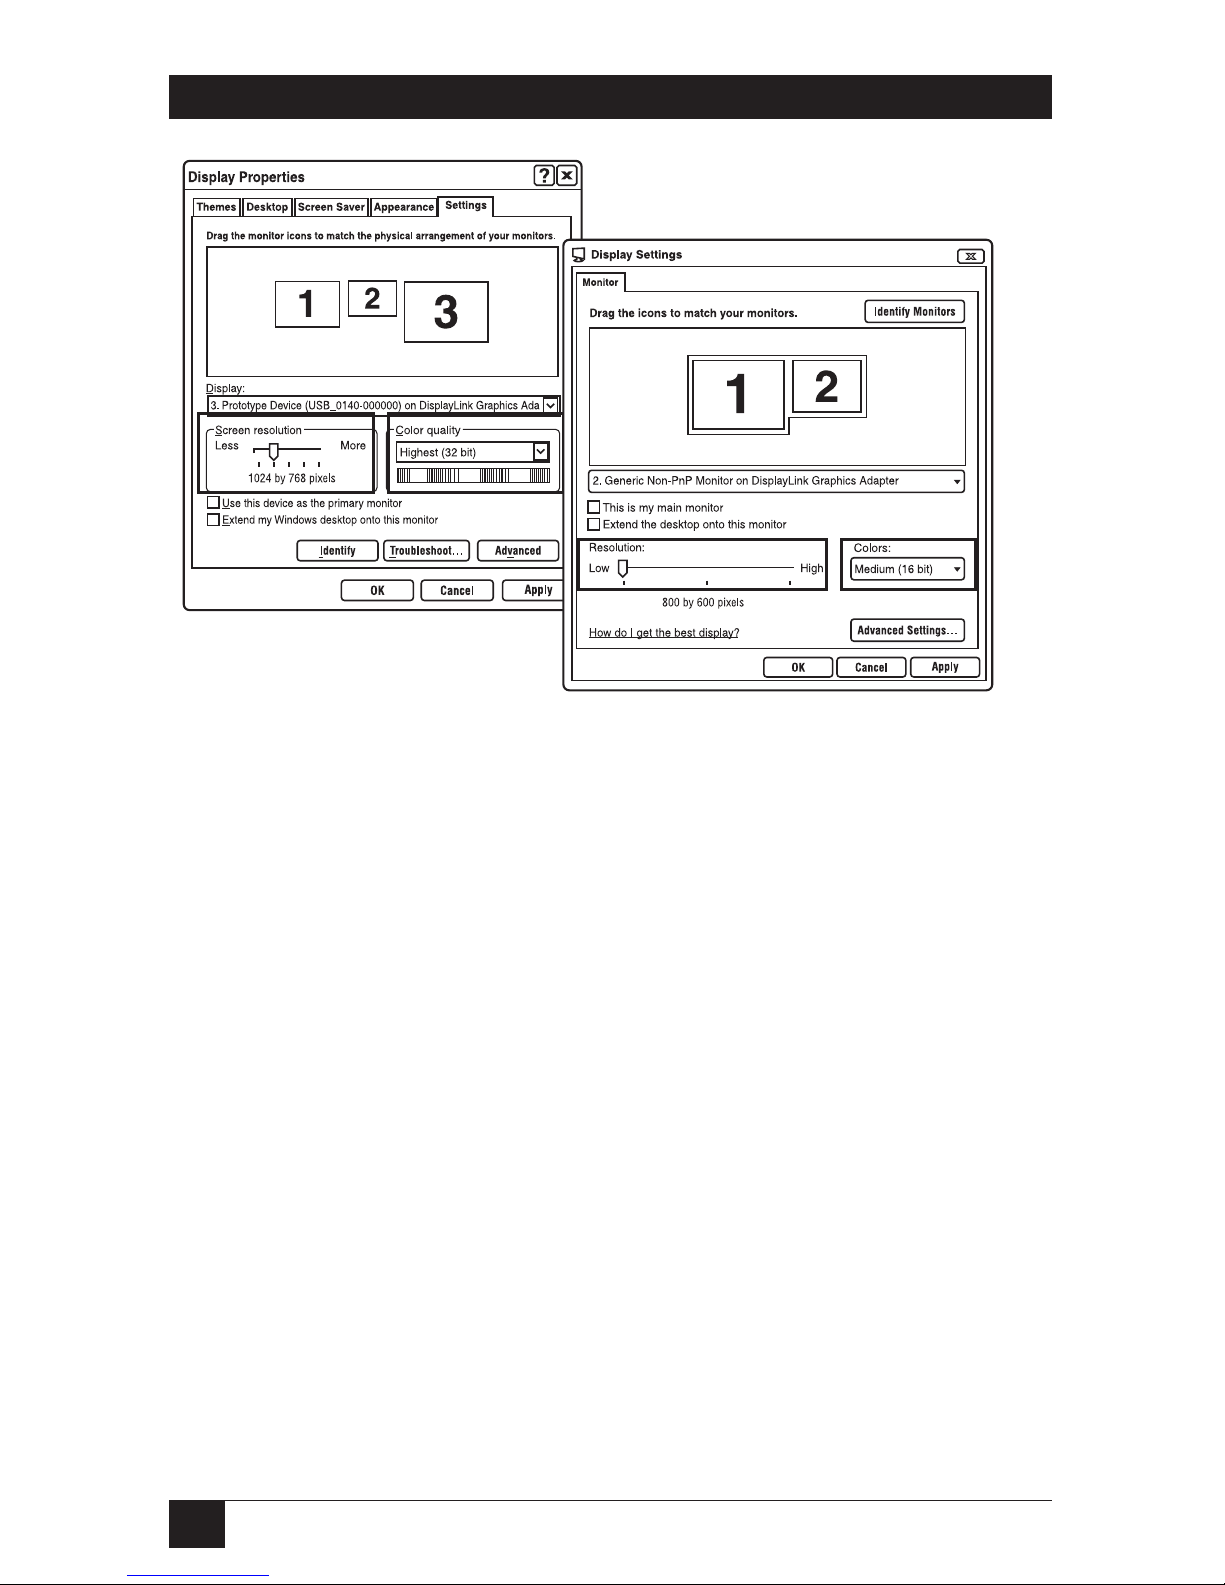
3. To change the screen resolution or color quality, select those options on the
screen (see Figure 4-7). Choose one of the supported resolution and color
quality numbers from Table 4-1. For an add-on monitor, you can also select
any resolution or color quality that the monitor supports.
Figure 4-7. Display Properties, Display Settings screens.
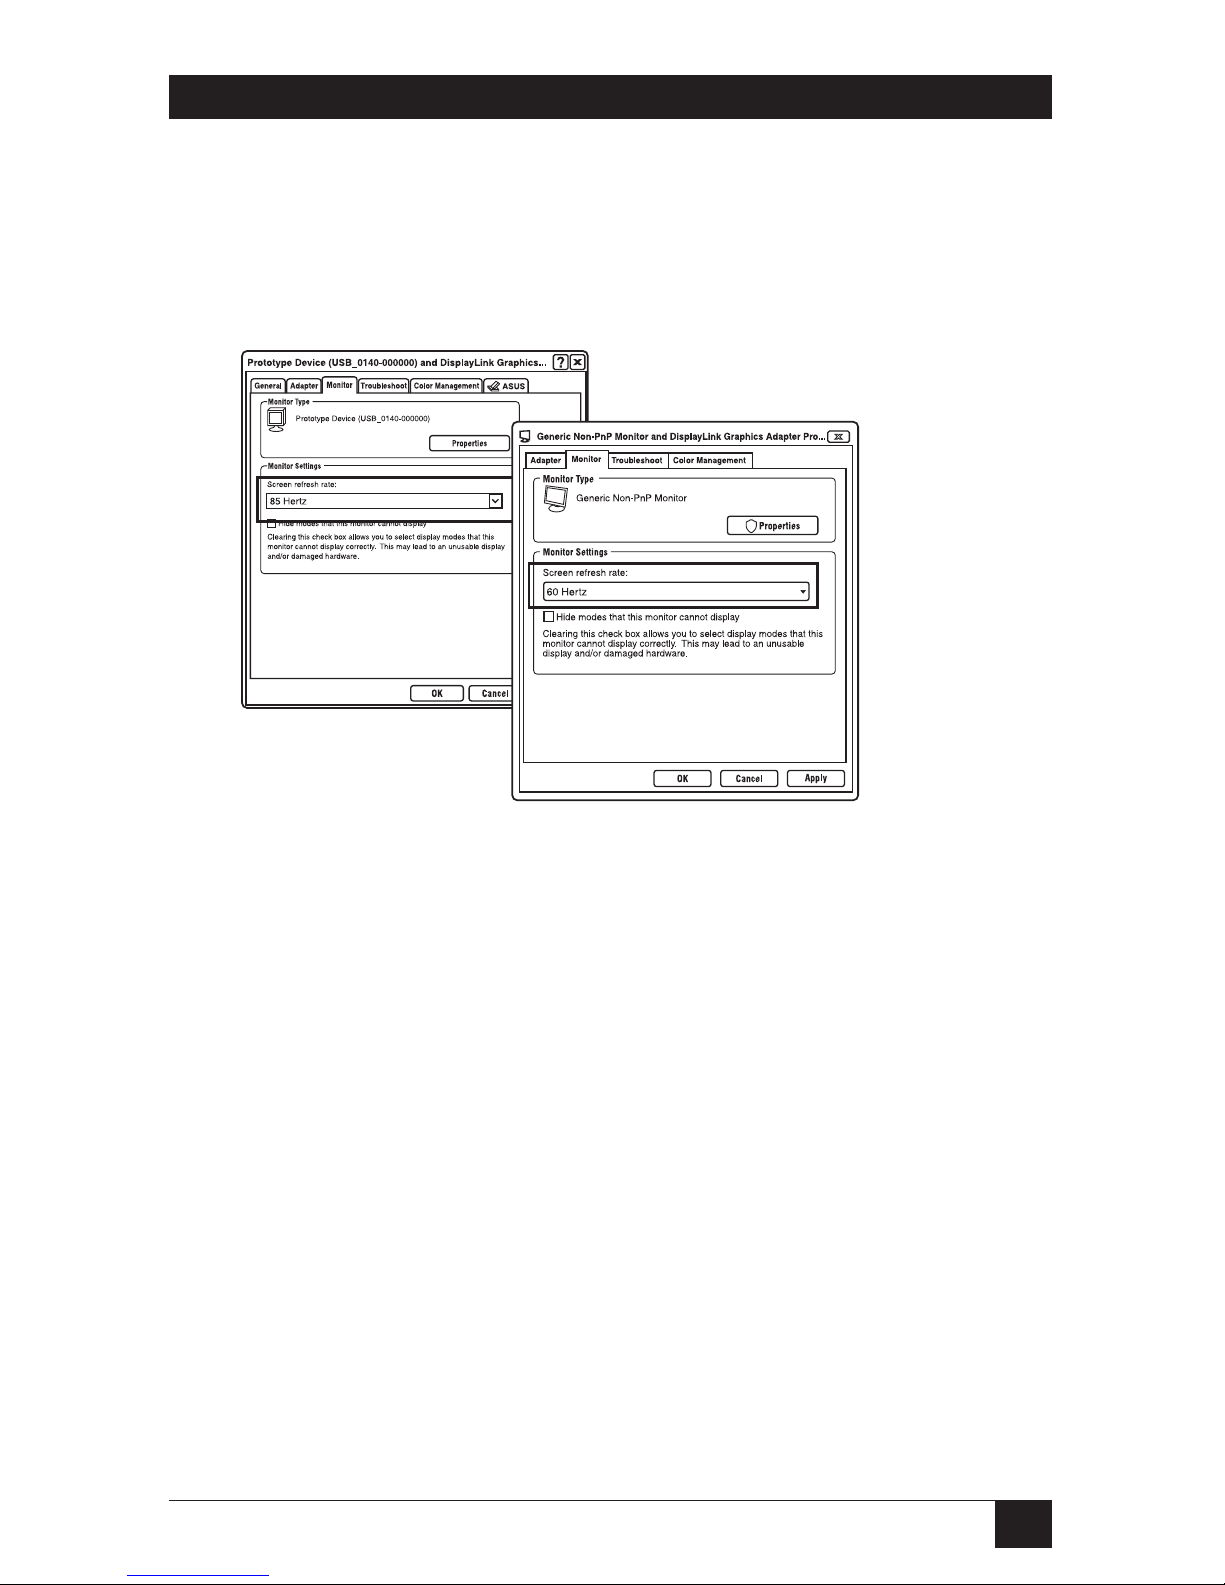
4. To change the refresh rate, click Advanced... and then click Monitor. See
Figure 4-8.
5. Select a refresh rate from the Screen refresh rate drop-down list and then
click Apply.
6. Click OK to close the Settings screen.
Page 36
34
DOCKING STATION WITH VIDEO
Figure 4-8. Monitor screens.
4.4.3 D
ISCONNECTING THE DOCKING STATION
If the docking station is unplugged from the computer, the add-on monitor goes
blank. All windows and icons move to the primary screen.
When you plug in the docking station again, it returns to the same mode that it was
in before disconnection. However, windows and icons that were previously on the
screen will not be moved back.
4.5 How Standby or Hibernate Mode Affects Devices Attached to the Docking
Station
4.5.1 E
XTERNAL MONITORS
When the docking station is connected to a computer and an additional external
monitor, if the computer goes into standby or hibernate mode, the external
monitor display goes blank.
When the computer returns to an active state, the external monitor display keeps
the same settings it had before the computer went into standby or hibernate mode.
However, if the add-on monitor was set for extended mode, windows that were
previously on the external monitor will not move back to that secondary monitor.
Page 37
35
CHAPTER 4: Using the Docking Station with Video
Also, if the add-on monitor is in extended mode and the computer requires a login
after standby or hibernate mode, the login screen appears on the primary
computer monitor, not the external monitor.
If the computer is shut down, restarted, and logged in, the add-on monitor returns
to the same mode as it was before shutdown.
Figure 4-9. External monitors screens.
4.5.2 O
THER DEVICES
If another device is connected to a port on the docking station and the computer
goes into standby or hibernate mode, that device will not function. For example, if
you are using the Ethernet port for high-speed network access, network access will
not be available until the computer returns to an active state.
Page 38
36
DOCKING STATION WITH VIDEO
5. Uninstalling the Drivers
5.1 Uninstalling the Ethernet Driver
To uninstall the Ethernet component driver, follow these steps:
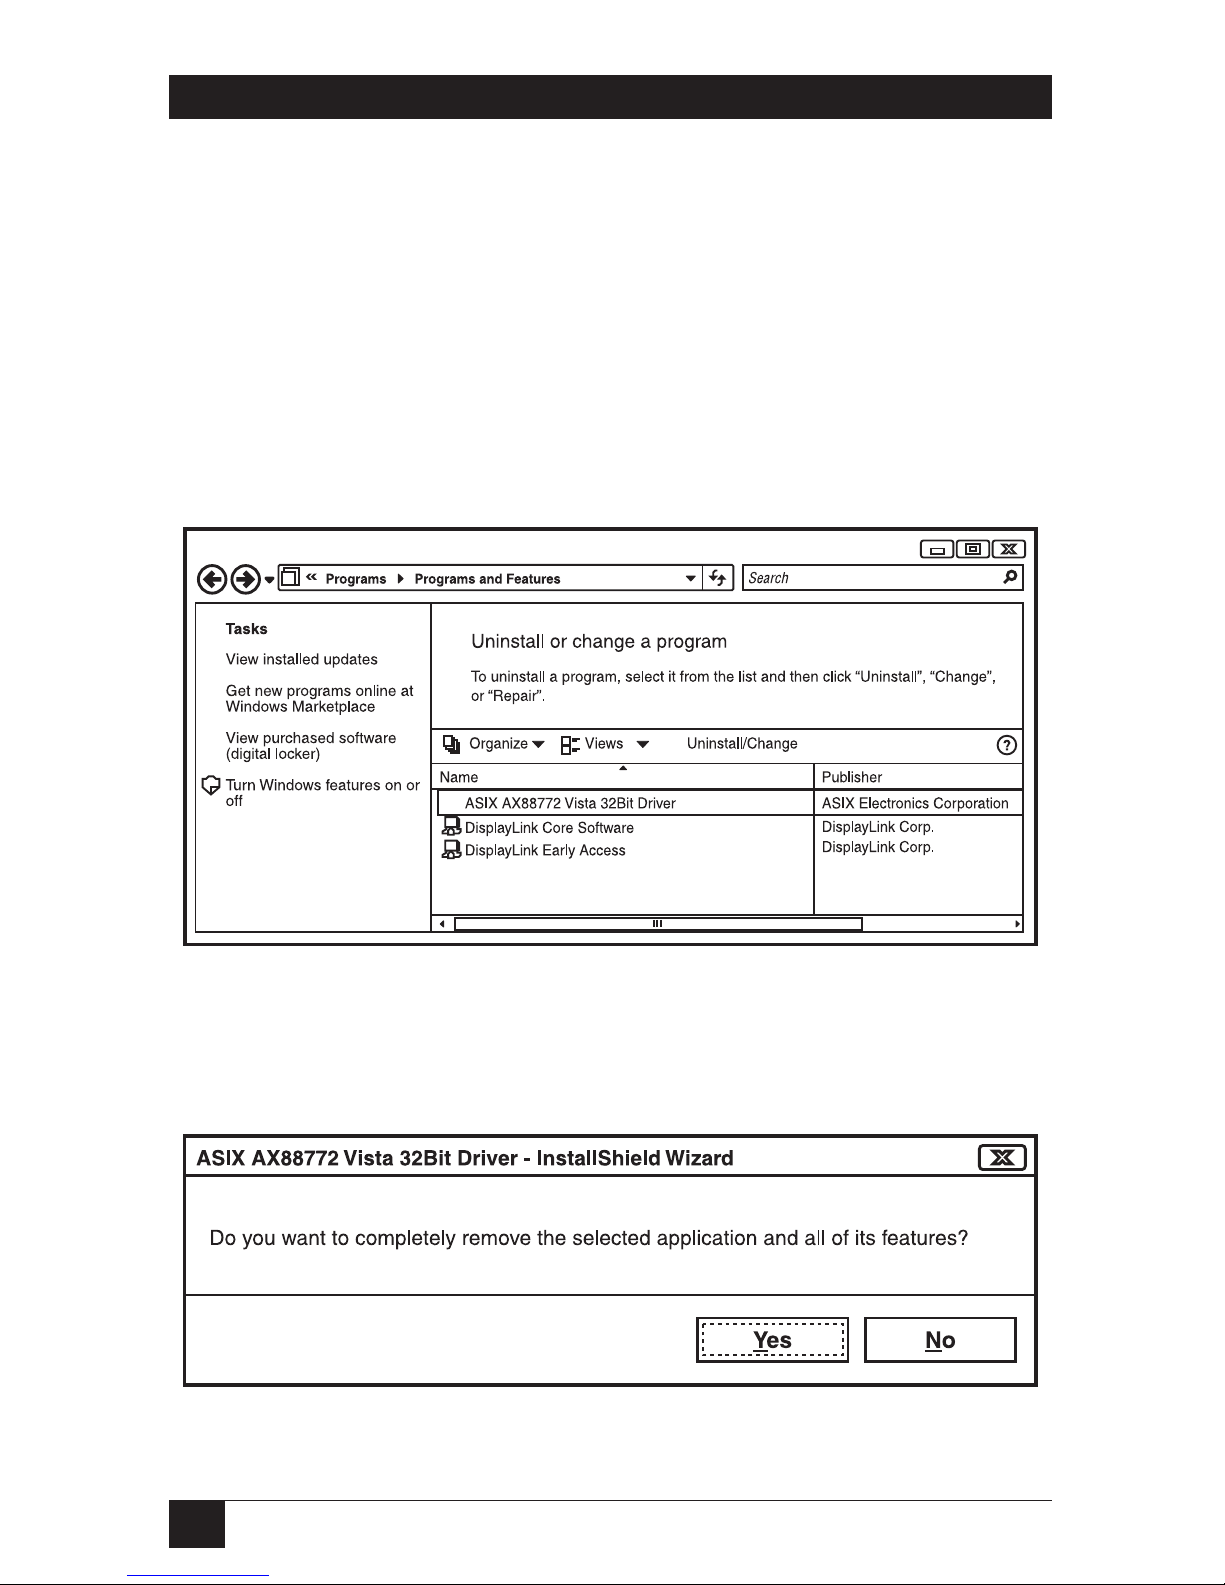
1. Open the Control Panel and double-click Programs and Features on Vista or
Add or Remove Programs on 2000/XP.
2. Select ASIX AX88772… and click Uninstall or Remove. See Figure 5-1.
Figure 5-1. Selecting Uninstall or Remove.
3. Click Yes to confirm the removal. See Figure 5-2.
Figure 5-2. Confirm the removal.
Page 39
37
CHAPTER 5: Unistalling the Drivers
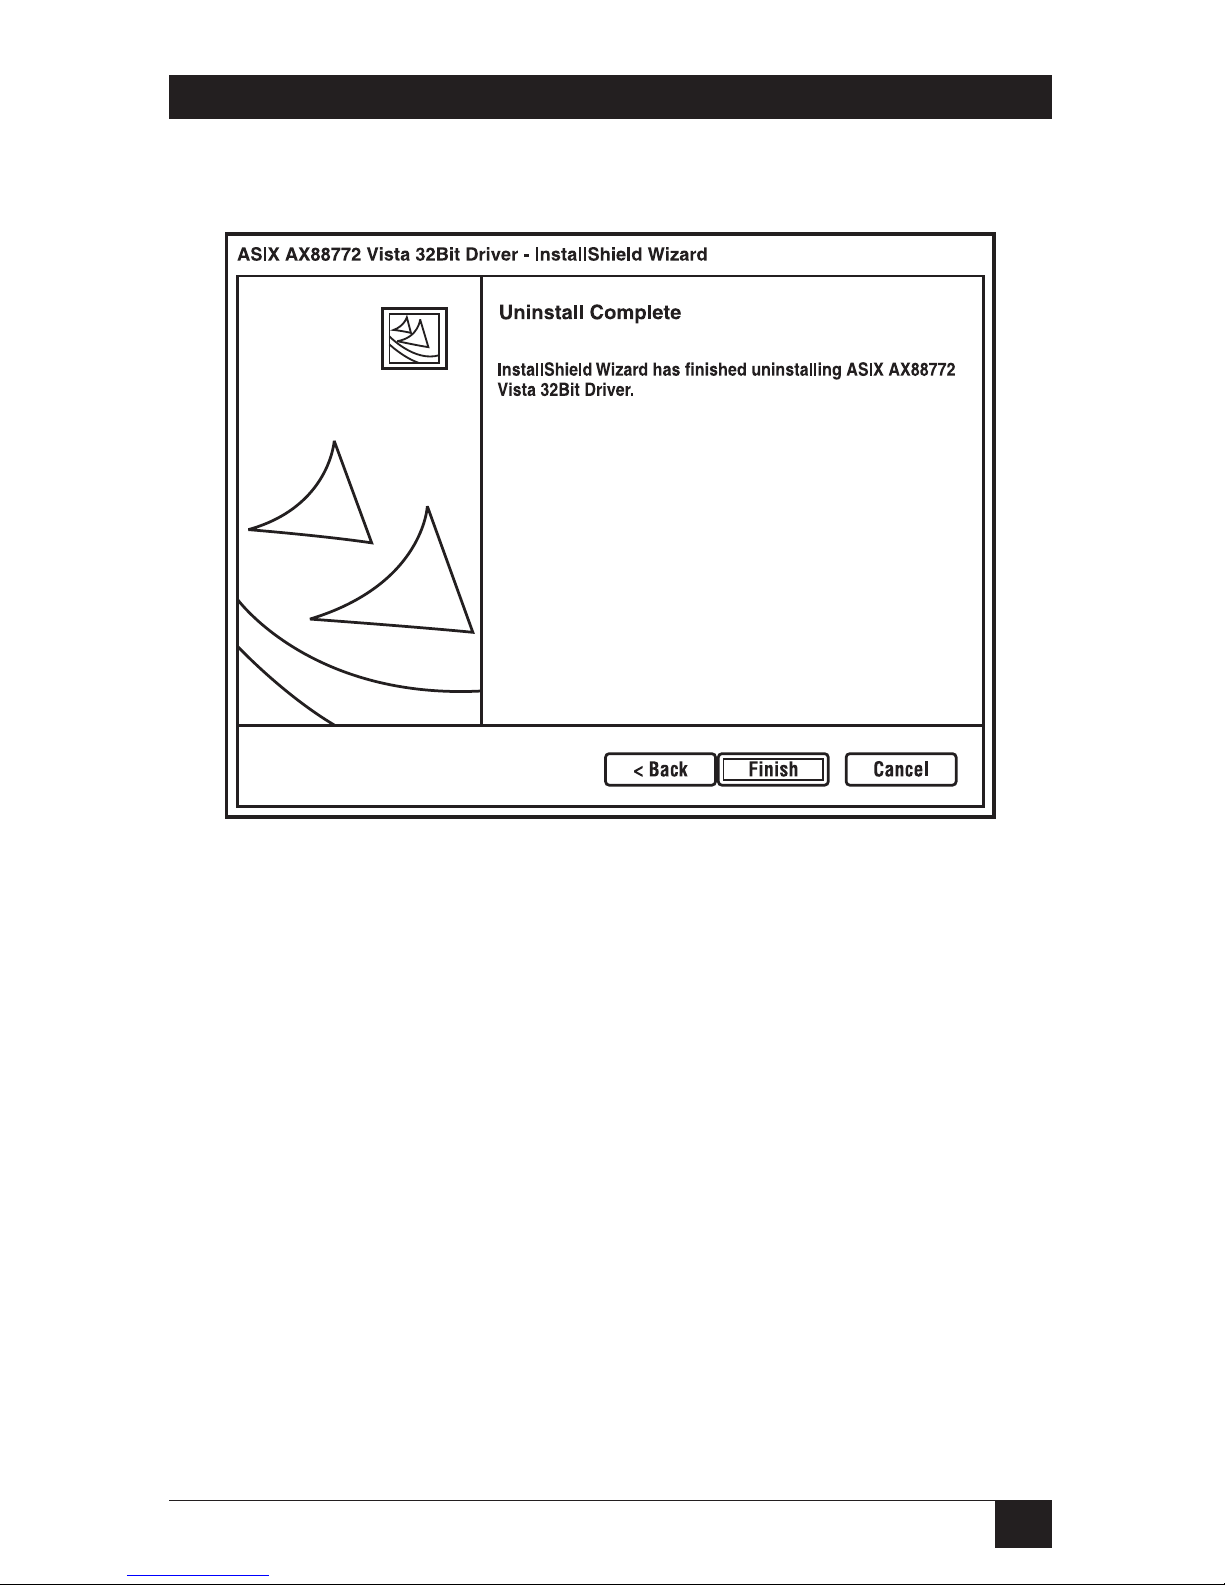
4. Click Finish when the removal is complete. See Figure 5-3.
Figure 5-3. Finish screen.
5.2 Uninstalling the Video Driver
To uninstall the video component driver, follow these steps:
1. Open the Control Panel and double-click Programs and Features on Vista or
Add or Remove Programs on 2000/XP.
Page 40
38
DOCKING STATION WITH VIDEO
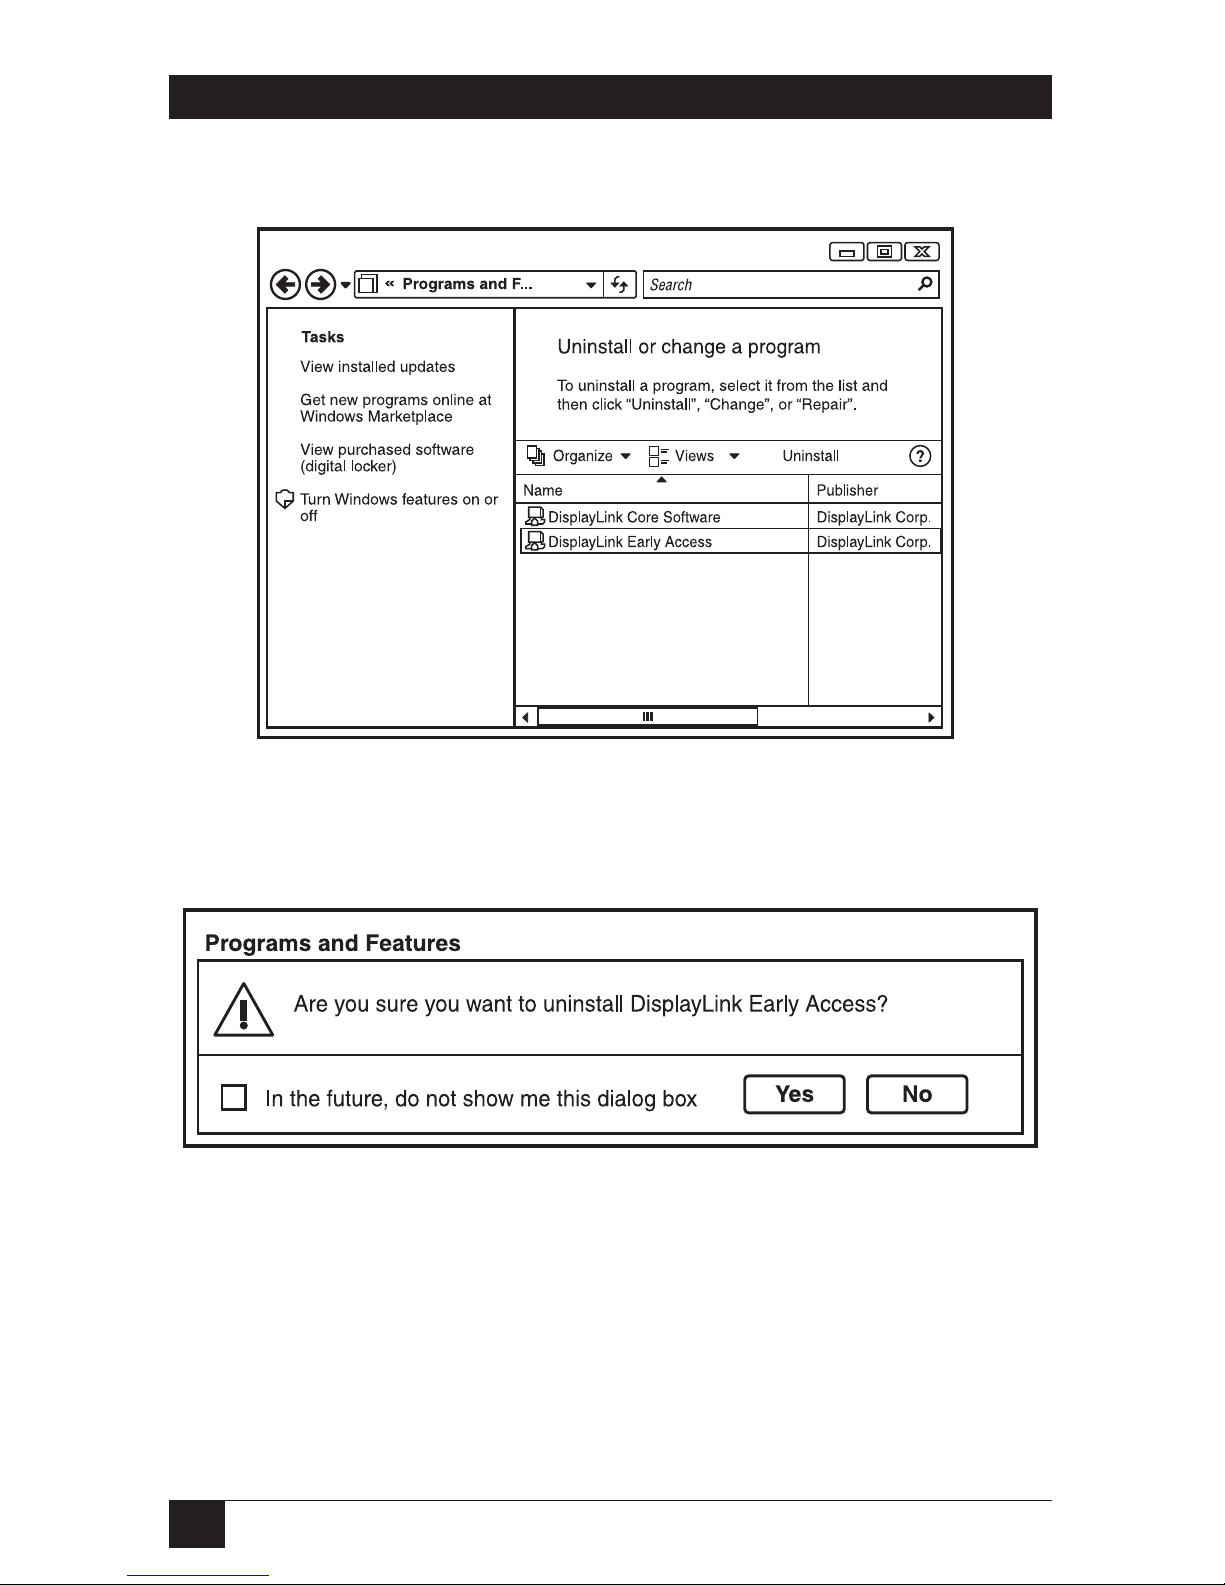
2. Select DisplayLink Early Access and click Uninstall or Remove. See Figure 5-4.
Figure 5-4. Uninstall or Remove screen.
3. Click Yes to confirm the removal. See Figure 5-5.
Figure 5-5. Yes screen.
Page 41
39
CHAPTER 5: Unistalling the Drivers
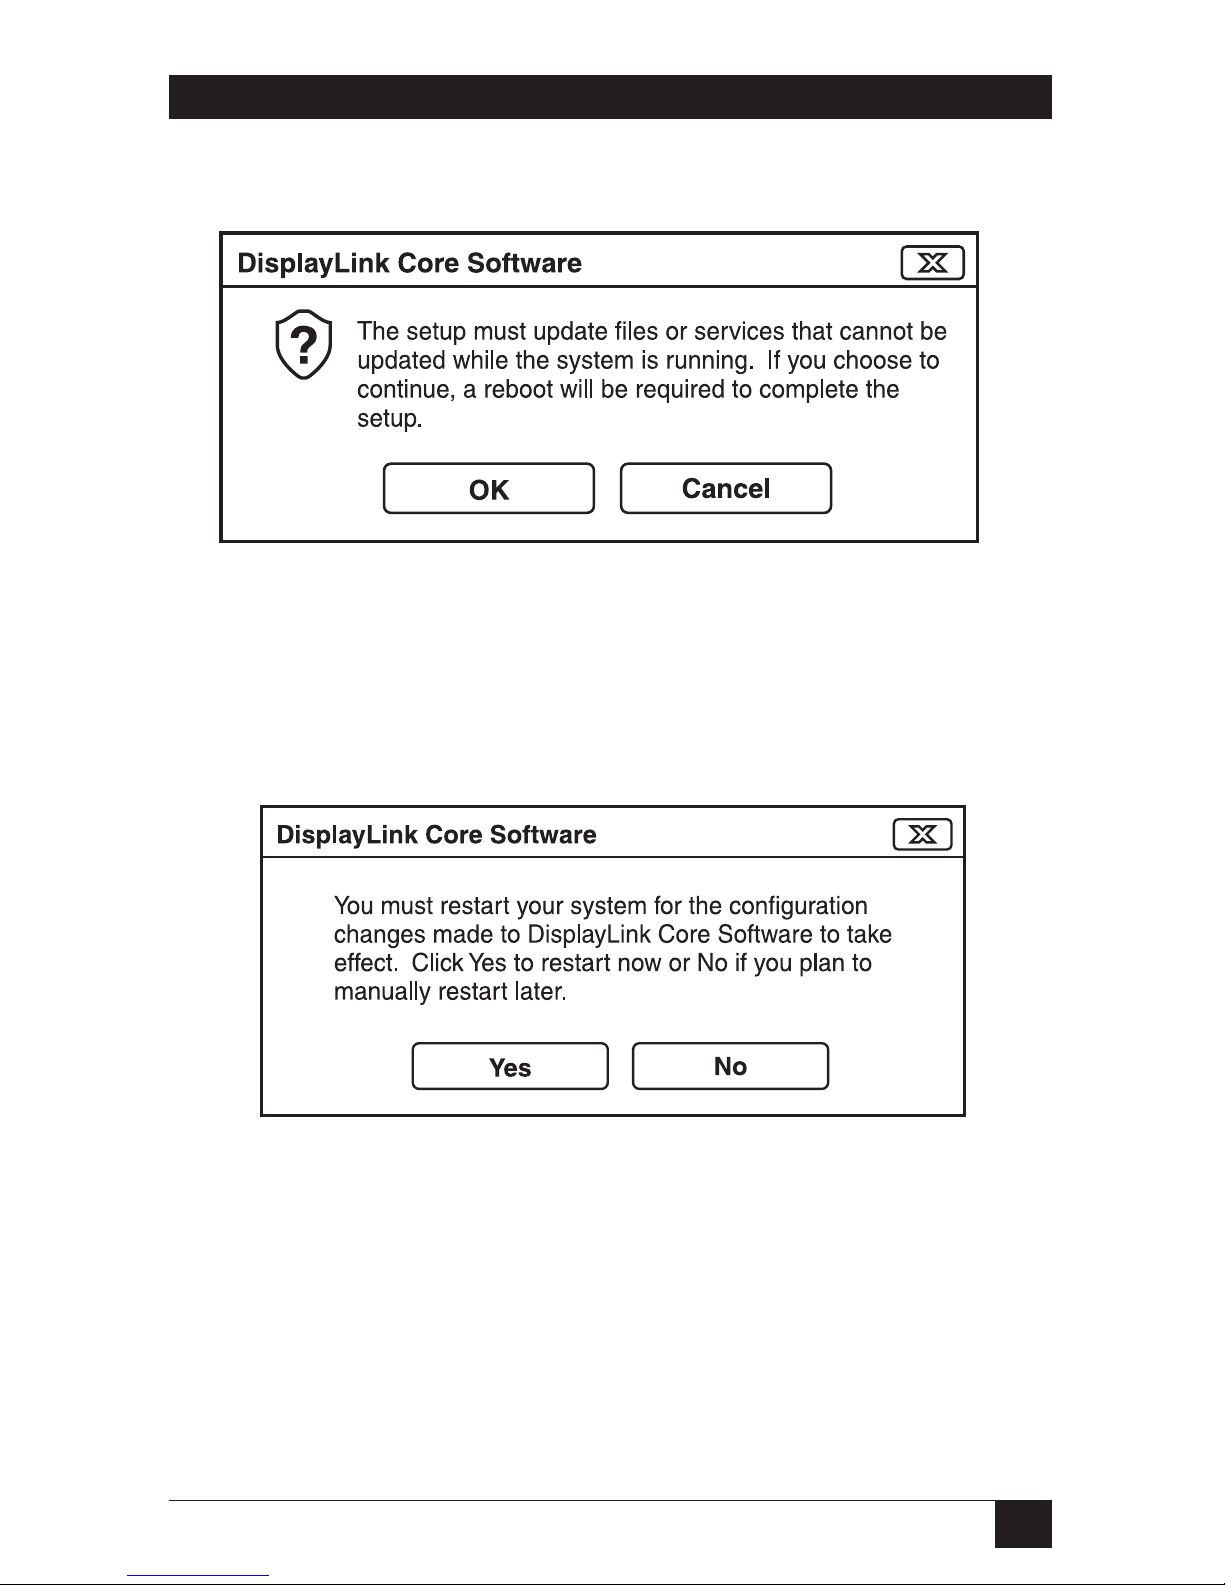
4. When prompted for system restart, click OK. See Figure 5-6.
Figure 5-6. OK screen.
5. Click Yes to restart your computer. See Figure 5-7. You can also disconnect the
video connection now.
Figure 5-7. Restart computer screen.
Page 42

40
DOCKING STATION WITH VIDEO
Appendix. Troubleshooting
A.1 Calling Black Box
If you determine that your Docking Station with Video is malfunctioning, do not
attempt to alter or repair the unit. It contains no user-serviceable parts. Contact
Black Box Technical Support at 724-746-5500.
Before you do, make a record of the history of the problem. We will be able to
provide more efficient and accurate assistance if you have a complete description,
including:
• the nature and duration of the problem.
• when the problem occurs.
• the components involved in the problem.
• any particular application that, when used, appears to create the problem or
make it worse.
A.2 Shipping and Packaging
If you need to transport or ship your Docking Station with Video:
• Package it carefully. We recommend that you use the original container.
• If you are returning the unit, make sure you include everything you received
with it. Before you ship for return or repair, contact Black Box to get a Return
Authorization (RA) number.
 Loading...