

Page 1
CUSTOMER
SUPPORT
INFORMATION
Order toll-free in the U.S. 24 hours, 7 A.M. Monday to midnight Friday: 877-877-BBOX
FREE technical support, 24 hours a day, 7 days a week: Call 724-746-5500 or fax 724-746-0746
Mail order: Black Box Corporation, 1000 Park Drive, Lawrence, PA 15055-1018
Web site: www.blackbox.com • E-mail: info@blackbox.com
JANUARY 1997
FX810A-R2
FX810AE-R2
FX801A-R2
FX802A
Campus Pager
P
0
1
4
7
2
5
8
3
6
9
GROUP
PROGRAM
CANCEL
PAGE
MESSAGE CODES
0
1
2
3
4
5
6
7
8
9
MESSAGE CODES
0
1
2
3
4
5
6
7
8
9
Page 2

1
FCC STATEMENT
FEDERAL COMMUNICATIONS COMMISSION
and INDUSTRY CANADA
RADIO FREQUENCY INTERFERENCE STATEMENT
This equipment has been tested and found to comply with the limits for a computing
device pursuant to Part 95 of the FCC Rules.
FCC Rules Part 95
Do not make adjustments that could result in a violation of the rules or that are
recommended to be performed by or under the immediate supervision and
responsibility of a person certified as technically qualified to perform transmitter
maintenance and repair duties in the private land mobile services and fixed services by
an organization or committee representative of users of those services.
WARNING
Replacement of any transmitter component (crystal, semiconductor,
etc.) could result in a violation of the rules.
This digital apparatus does not exceed the Class B limits for radio noise emission from digital
apparatus set out in the Radio Interference Regulation of Industry Canada.
Le présent appareil numérique n’émet pas de bruits radioélectriques dépassant les limites
applicables aux appareils numériques de classe B prescrites dans le Règlement sur le brouillage
radioélectrique publié par Industrie Canada.
Page 3

2
CAMPUS PAGER
NORMAS OFICIALES MEXICANAS (NOM)
ELECTRICAL SAFETY STATEMENT
INSTRUCCIONES DE SEGURIDAD
1. Todas las instrucciones de seguridad y operación deberán ser leídas antes
de que el aparato eléctrico sea operado.
2. Las instrucciones de seguridad y operación deberán ser guardadas para
referencia futura.
3. Todas las advertencias en el aparato eléctrico y en sus instrucciones de
operación deben ser respetadas.
4. Todas las instrucciones de operación y uso deben ser seguidas.
5. El aparato eléctrico no deberá ser usado cerca del agua—por ejemplo,
cerca de la tina de baño, lavabo, sótano mojado o cerca de una alberca,
etc..
6. El aparato eléctrico debe ser usado únicamente con carritos o pedestales
que sean recomendados por el fabricante.
7. El aparato eléctrico debe ser montado a la pared o al techo sólo como
sea recomendado por el fabricante.
8. Servicio—El usuario no debe intentar dar servicio al equipo eléctrico más
allá a lo descrito en las instrucciones de operación. Todo otro servicio
deberá ser referido a personal de servicio calificado.
9. El aparato eléctrico debe ser situado de tal manera que su posición no
interfiera su uso. La colocación del aparato eléctrico sobre una cama,
sofá, alfombra o superficie similar puede bloquea la ventilación, no se
debe colocar en libreros o gabinetes que impidan el flujo de aire por los
orificios de ventilación.
10. El equipo eléctrico deber ser situado fuera del alcance de fuentes de
calor como radiadores, registros de calor, estufas u otros aparatos
(incluyendo amplificadores) que producen calor.
Page 4

3
NOM STATEMENT
11. El aparato eléctrico deberá ser connectado a una fuente de poder sólo
del tipo descrito en el instructivo de operación, o como se indique en el
aparato.
12. Precaución debe ser tomada de tal manera que la tierra fisica y la
polarización del equipo no sea eliminada.
13. Los cables de la fuente de poder deben ser guiados de tal manera que no
sean pisados ni pellizcados por objetos colocados sobre o contra ellos,
poniendo particular atención a los contactos y receptáculos donde salen
del aparato.
14. El equipo eléctrico debe ser limpiado únicamente de acuerdo a las
recomendaciones del fabricante.
15. En caso de existir, una antena externa deberá ser localizada lejos de las
lineas de energia.
16. El cable de corriente deberá ser desconectado del cuando el equipo no
sea usado por un largo periodo de tiempo.
17. Cuidado debe ser tomado de tal manera que objectos liquidos no sean
derramados sobre la cubierta u orificios de ventilación.
18. Servicio por personal calificado deberá ser provisto cuando:
A: El cable de poder o el contacto ha sido dañado; u
B: Objectos han caído o líquido ha sido derramado dentro del
aparato; o
C: El aparato ha sido expuesto a la lluvia; o
D: El aparato parece no operar normalmente o muestra un cambio en
su desempeño; o
E: El aparato ha sido tirado o su cubierta ha sido dañada.
Page 5

4
CAMPUS PAGER
TRADEMARKS
All applied-for and registered trademarks are the property of their respective
owners.
Page 6

5
TABLE OF CONTENTS
CONTENTS
1. Specifications .................................................................................6
2. Important Notes.............................................................................7
3. Introduction...................................................................................8
3.1 Overview ................................................................................8
Unpacking the Campus Pager (FX810A-R2)......................8
3.2 Tone Pager (FX801A-R2)...................................................10
Unpacking the FX801A-R2 ................................................10
3.3 Vibrating/Tone Pager (FX802A) ......................................11
Unpacking the FX802A......................................................11
4. Installation ...................................................................................12
4.1 Positioning the Campus Pager...........................................12
4.2 Positioning the Antenna Ground Wire .............................14
4.3 Connecting Power to the Campus Pager ..........................14
4.4 Installing/Replacing Pager Batteries.................................15
5. Using the Campus Pager.............................................................17
5.1 Overview ..............................................................................17
5.2 Storing the System Code ....................................................17
5.3 Storing the Pager Code ......................................................19
5.4 Transmitting a Message Code to a Single Pager...............20
5.5 Transmitting a Message Code to Groups of
System Pagers......................................................................21
5.6 Receiving a Message Code with the Tone Pager...............22
5.7 Receiving a Message Code with the Vibrating/Tone
Pager....................................................................................23
5.8 Reviewing Stored Message Codes ......................................23
6. Troubleshooting ..........................................................................24
6.1 Helpful Hints ......................................................................24
6.2 Service Information ............................................................25
Page 7

6
CAMPUS PAGER
1. Specifications
Operating Voltage — 120 VAC, 60 Hz
Transmitting Frequency — 27.255 MHz
System Codes — 1000 combinations
Transmitting Range — Up to 2 miles (3.2 km)
Pagers Supported — 1000
RF Transmitting Power — 7 watts
Message Code Numbers — 10 (0-9)
Antenna Connection — UHF/RF connector
Power — FX810A-R2: 120 VAC, 60 Hz; FX810AE-R2: 230 VAC, 50 Hz;
FX801A-R2, FX802A: 2 AAA batteries (not included)
Size — FX810A-R2: 3”H x 10”W x 8.5”D (7.6 x 25.4 x 21.6 cm);
FX801A-R2, FX802A: 3.5”H x 2.5”W x 1”D (8.9 x 6.4 x 2.5 cm)
Weight — FX810A-R2: 2.5 lb. (1.1 kg);
FX801A-R2, FX802A: <0.1 lb. (<0.1 kg)
Page 8

7
CAMPUS PAGER
2. Important Notes
We recommend that you use a surge protector with all electronic devices. Use
a surge suppressor on the input power supply of the Campus Pager.
WARNING
BEWARE OF ELECTRIC SHOCK!
You might be shocked if you remove the cover or back of the Campus
Pager. THERE ARE NO USER-SERVICEABLE PARTS INSIDE! If you have
problems with your Campus Pager, call for technical support.
WARNING
You might cause a fire if you expose the Campus Pager to rain or
moisture! Keep the unit in a clean, dry environment.
To reduce the risk of fire, do not set the Campus Pager on any heating or
cooking appliance.
Page 9

8
CAMPUS PAGER
3. Introduction
3.1 Campus Pager
The Campus Pager is a wireless, in-house paging system that alerts you to
important messages through its individual system pagers. The base unit
(FX810A-R2) works with pagers that you order separately (FX801A-R2,
FX802A).
U
NPACKING THE
C
AMPUSPAGER
(FX810A-R2)
The Campus Pager (FX810A-R2) includes the following items:
• (1) Campus Pager Base Unit
• This User’s Manual
You must order the pagers separately to work with the FX810A-R2. Choose
from either the Tone Pager (FX801A-R2) or the Vibrating/Tone Pager
(FX802A). See Sections 3.2 and 3.3 for more information about these pagers.
Page 10

9
CAMPUS PAGER
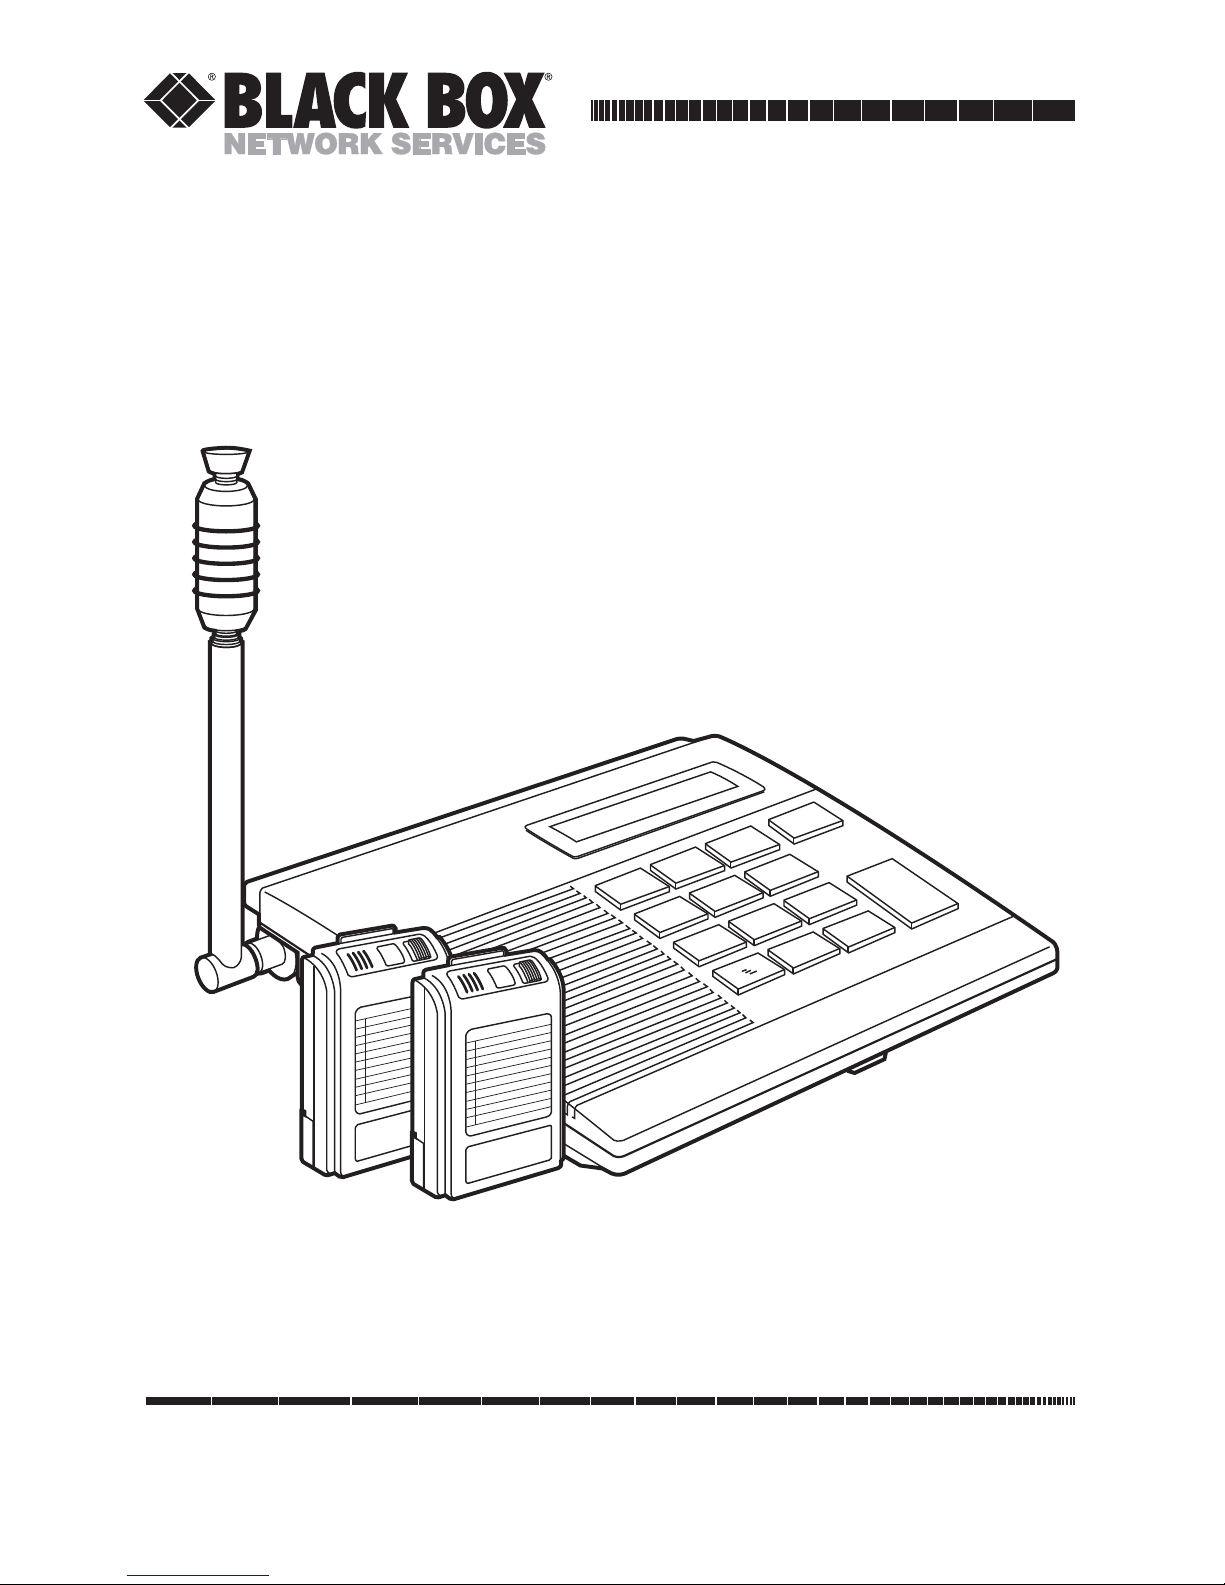
Figure 3-1. Campus Pager.
The Pager has a transmission range of up to 2 miles (3.2 km). You can use
the Campus Pager in a variety of applications, in any environment in which
you need unlimited/direct paging:
• restaurants
• hospitals
• factories
• hotels
• apartment complexes
• construction sites
• offices
• retail outlets
• residential properties
• campgrounds
NOTE
Distance is based on line-of-sight, and will vary depending on
environment.
987
654
3
2
1
P0
GROUP PROGRAM
PAGE
CANCEL
Page 11

10
CAMPUS PAGER
The Campus Pager can send ten different message codes (0-9) and address
up to 1000 individual (system) pagers.
Attractive features of the Campus Pager system include:
• Nonvolatile memory—stores system and pager codes for over one year,
even if the power fails.
• Group Page feature—sends a message to specific groups of pagers
simultaneously.
• “Page All” feature—sends a message to all pagers simultaneously.
• AC/DC Operation—allows use from a standard 120-volt AC wall outlet, or
from a standard 12-volt DC cigarette lighter. (Adapter cable not
included.)
• Center-loaded antenna—provides up to a maximum of two miles
transmitting range, depending on the conditions at the receiving site. You
can replace this antenna with an outdoor antenna for extended
transmission range. One of your local consumer electronics stores might
carry an outdoor antenna. If you cannot locate a store that sells an
antenna, call for technical support.
3.2 Tone Pager (FX801A-R2)
The Tone Pager beeps 12 times then once every 60 seconds if the signal is
unattended. Pressing the on/off button allows you to view old messages from
newest to oldest. The FX801A-R2 includes one pager; however, you can order
additional pagers to work with your unit.
U
NPACKING THE
FX801A-R2
The FX801A-R2 package includes:
• (1) Tone Pager
You can order additional pagers to work with your base unit.
Page 12

11
CAMPUS PAGER
3.3 Vibrating/Tone Pager (FX802A)
The Vibrating/Tone Pager works in a similar fashion, except that it does not
beep 12 times. Instead, it vibrates once. The process does not repeat three
times, but the unit does beep once every 60 seconds, and allows you to view
old messages from newest to oldest by pushing the on/off button. The
FX802A includes one pager; however, you can order additional pagers to
work with your base unit.
U
NPACKING THE
FX802A
The FX802A package includes:
• (1) Vibrating Pager
You can order additional pagers to work with your base unit.
For more information about how to properly install and operate the
Campus Pager, read the rest of this manual.
Page 13

12
CAMPUS PAGER
4. Installation
4.1 Positioning the Campus Pager
You can operate the Campus Pager from a flat surface such as a table,
counter, or shelf. Or you can use the supplied wall-mount brackets to mount
it on a wall. Steel and concrete walls reduce the Campus Pager’s transmitting
range. If the Campus Pager is located in a concrete or steel building, and part
of the coverage area is located outside the structure, place the unit and
antenna close to a window.
To mount the Campus Pager on a wall, follow these steps:
1. Slide the wall-mount brackets into the 2 wall-mount sockets, as shown in
Figure 4-1.
Figure 4-1. Connecting wall-mount brackets.
Page 14

13
CAMPUS PAGER
2. Insert the center-loaded antenna connector into the antenna jack on the
Campus Pager. Turn the connector clockwise until the antenna locks in
place. For maximum efficiency, extend the antenna to its full length,
orient it vertically, and keep it away from walls. See Figure 4-2.
Figure 4-2. Connecting the antenna to the Campus Pager.
3. Mark the positions for the two supplied mounting screws on the wall. The
positions should be 6” apart. Drill the two holes, then thread the two
screws into the wall. The screws should extend 3/16”. Do not over-tighten
the screws.
4. Align the keyholes on the back of the brackets with the two screws, then
push in and press down to secure the Campus Pager to the wall. See
Figure 4-3.
Back of
Campus Pager
Clockwise
Page 15

14
CAMPUS PAGER
Figure 4-3. Connecting the Campus Pager to the mounted screws.
You can use an outdoor base antenna in place of the supplied antenna to
increase the Campus Pager’s transmitting range. The PL259-type antenna jack
on the Campus Pager makes it easy to use with a variety of antennas.
WARNING
When installing or removing a base station antenna, use extreme
caution. If it starts to fall, let it go. It could contact overhead power lines.
If the antenna touches the power line, contact with the antenna, mast,
cable, or guy wires can cause electrocution and death. Call the power
company to remove the antenna. Do not attempt to do so yourself.
Antenna
ground wire
Extend
antenna
upward
6”
Page 16

15
CAMPUS PAGER
4.2 Positioning the Antenna Ground Wire
For best transmission, fully extend the black antenna ground wire. Do not coil
this wire, as this will diminish the transmission efficiency.
4.3 Connecting Power to the Campus Pager
120 VAC P
OWER(IN HOME OR OFFICE
)
Plug the power cord into a standard AC outlet.
The Campus Pager does not operate when AC power fails, but it maintains
the system code in memory. (See Section 4.6.) Because the Campus Pager
maintains its memory through power failure, there is no need to reprogram
the unit when power is restored. The Campus Pager can maintain this code
for more than one year without power.
12 VDC P
OWER(IN CAR, TRUCK, OR BOAT
)
The Campus Pager can also operate from a 12 VDC power source, such as
in a car, truck, or boat that has a cigarette lighter. Simply connect the Campus
Pager to the cigarette lighter with an adapter cable (not included). In this
application, transmission range may be reduced.
4.4 Installing/Replacing Pager Batteries
The individual pager is powered by two AAA batteries (not supplied). We
recommend that you use alkaline batteries to power the pager.
To install or replace the pager’s batteries, follow these steps:
1. Slide the battery compartment door open.
2. Insert two fresh alkaline batteries as indicated by the polarity symbols (+
and -) marked inside the compartment.
3. Slide the battery compartment door closed.
Page 17

16
CAMPUS PAGER
When the batteries are low, the FX801A-R2 will beep once every 15 seconds
and the FX802A will beep once every 5 minutes.
The pager also maintains memory during a power loss, so you do not need
to re-enter its pager code (see Section 5.3).
Page 18

17
CAMPUS PAGER
5. Using the Campus Pager
This section contains operating notes for using the Campus Pager. Read these
notes before attempting to operate the system.
5.1 Overview
Before operating the Campus Pager, be sure that you understand the
following information concerning the paging system’s capabilities.
The Campus Pager covers a maximum range of up to two miles using the
supplied center-loaded antenna.
This distance is based on average conditions over a line-of-sight path. This
range may be less, depending on surrounding conditions. The Campus Pager
sends a number (from 0-9) to one or all of the pagers. The pagers in turn
beep and display the numbered message. Each pager has a label where you
can write down the message you’ve established for each number. We
recommend that you use a pencil, so the number can be easily changed at a
later date.
Each pager has its own pager code, which allows the Campus Pager to send
a message to a single pager, or to ALL of your system’s pagers using the
TRANSMIT ALL feature. You can record each of the pager codes, and their
corresponding users on the card located under the Campus Pager. (The card
is inside the bottom of the unit and must be pulled out from the front.) You
can also write down the messages represented by each message code. Again,
we recommend that you use a pencil, so the number can be easily changed at
a later date.
5.2 Storing the System Code
Before you can use the Campus Pager, you must designate a system code. The
system code ensures proper signaling between the Campus Pager and the
pager.
To enter and store a system code, follow these steps:
1. Turn the Campus Pager power on.
Page 19

18
CAMPUS PAGER
2. Press CANCEL to clear display.
3. Press PROGRAM, then 0. The TRANSMIT display will show the stored
system code momentarily, then ___will appear (after pressing PROGRAM,
the display flashes).
1
7
4
8
5
2
0
9
6
3
P
CANCEL
GROUP
PAGE
PROGRAM
Figure 5-1. The Campus Pager Keypad.
4. Enter a 3-digit system code. After about 1 second, the display shows
----, indicating that the system code is stored.
5. If you enter a wrong code, repeat Steps 2 through 4 to reset the system
code.
NOTE
If your application requires more than 1000 system pagers, you can use
multiple Campus Pager systems. If using more than one Campus Pager,
each system should have a unique system code.
Page 20

19
CAMPUS PAGER
5.3 Storing the Pager Code
To enter and store a pager code in the Tone Pager or Vibrating/Tone Pager,
follow these steps:
1. Turn the pager OFF.
2. Press and hold the ON/OFF switch, then slide it to the ON position.
Continue holding this switch down until the display shows “=” (about 5
seconds). The display then shows an L, indicating that the pager is ready
to receive a new code.
ON OFF
Figure 5-2. Tone Pager ON/OFF Switch.
OFF
Figure 5-3. Vibrating/Tone Pager ON/OFF Switch.
Page 21

20
CAMPUS PAGER
3. Make sure that the Campus Pager is turned ON, then enter a 3-digit
pager code (000-999) and then 0.
4. Press the PAGE key on the Campus Pager, and the unit will transmit the
pager code to the pager. The pager will beep 5 times, and flash “L” on its
display, indicating that it received the message code 0.
NOTE
For example, if you would like the pager to have a new pager code such
as 38, enter 380, and press PAGE.
After you press the PAGE key, the Campus Pager LED flashes the four digits
seven times, and simultaneously transmits the pager code to the pager. The
four digits will stay lit until you perform one of the following actions:
• Turn the Campus Pager OFF
• Press A/C or CANCEL
• Transmit a message to a pager
Perform the preceding steps for each pager used with the Campus Pager.
NOTE
If the pager does not successfully store the pager code, repeat the
preceding steps.
5.4 Transmitting a Message Code to a Single Pager
1. Turn the Campus Pager power ON.
2. Press A/C or CANCEL if the display shows unwanted pager or message
codes.
3. Enter the three-digit code for the pager you want to receive the message,
then the one-digit message code that you want to send. If you enter the
wrong pager or message code, press A/C or CANCEL, then re-enter the
correct codes.
NOTE
You cannot reset either of these codes after you press the PAGE button.
Page 22

21
CAMPUS PAGER
4. Press the PAGE key. The TRANSMIT display lights during transmission,
and the pager’s display flashes the message code number seven times. The
three digits will remain lit until you perform one of the following actions:
• Turn the Campus Pager OFF
• Press A/C or CANCEL
• Transmit a message to a pager
If desired, press PAGE again to re-send the current message code to the
pager.
5. Press CANCEL, then repeat Steps 3 and 4 if you want to transmit another
message code to another pager.
5.5 Transmitting a Message Code to Groups of System Pagers
1. Turn the Campus Pager power ON.
2. Press the CANCEL key if the display shows unwanted pager or message
codes.
3. Enter the 3-digit code for the group of pagers you want to receive the
message, then the 1-digit message code that you want to send.
The GROUP key represents 0-9 and can be inserted into any position of
this 3-digit code. This designates the specific group of pagers to receive
the message code. Example:
Press 10 GROUP (then message code)—sets the message code for pagers
numbered 100, 101, 102, 103, 104, 105, 106, 107, 108, 109.
Or, press 1 GROUP 0 (then message code)—sets the message code for
pagers numbered 100, 110, 120, 130, 140, 150, 160, 170, 180, 190.
Or, press GROUP 0 0 (then message code)—sets the message code for
pagers numbered 000, 100, 200, 300, 400, 500, 600, 700, 800, 900.
Or, press 0 GROUP GROUP (then message code)—sets the message code
for all pagers numbered 000 through 099.
Or, to page all pagers, press GROUP GROUP GROUP (then message
code)—sets the message code for all pagers numbered 000 through 999.
If you enter the wrong pager or message code, press the CANCEL key,
then re-enter the correct codes.
Page 23

22
CAMPUS PAGER
NOTE
You cannot reset either of these codes after you press the PAGE key.
4. Press the PAGE key. The TRANSMIT display lights during transmission,
and the pager’s display flashes the message code number 7 times. The
four digits (GROUP is represented as “n” on the display) will remain lit
until you perform one of the following actions:
• Turn the Campus Pager OFF.
• Press the CANCEL key.
If desired, press PAGE again to re-send the current message code.
5. Press CANCEL, then repeat Steps 3 and 4 if you want to transmit another
message code.
5.6 Receiving a Message Code with the Tone Pager
When a Tone Pager is turned ON and receives a page, it sounds 12 beeps and
flashes the received message code on its display, unless you press the
ON/OFF button to silence the pager before it finishes beeping. Press
ON/OFF to silence the pager when it beeps again, or the pager beeps once
about every 60 seconds to remind you that there is a new call.
Press ON/OFF to stop the pager from beeping every 60 seconds.
If the message code is transmitted to all pagers, each pager sounds the 12
beeps.
Page 24

23
CAMPUS PAGER
5.7 Receiving a Message Code with the Vibrating/Tone Pager
The Vibrating/Tone Pager has two modes of operation:
1. In the first mode of operation (tone mode), the pager beeps when it
receives a message. The pager sounds 12 beeps and flashes the received
message code on its display, unless you press the ON/OFF switch to reset.
Press ON/OFF to silence the pager when it beeps again, or the pager
beeps once about every 60 seconds to remind you that there is a new
message.
Press ON/OFF to silence the pager from beeping every 60 seconds.
If the message code is transmitted to all pagers, each pager sounds 12
beeps. Press ON/OFF to reset the pager.
2. In the second mode of operation (vibrating mode), the pager vibrates
when it receives a message. The pager vibrates for 3-1/2 seconds and
flashes the received message code on its display, unless you press the
ON/OFF switch to reset. Press ON/OFF to reset the pager when it
vibrates again, or the pager beeps once about every 60 seconds to remind
you that there is a new message.
Press ON/OFF to silence the pager from beeping every 60 seconds.
5.8 Reviewing Stored Message Codes
The pager can store eight message codes. Repeatedly press ON/OFF to view
the stored message codes one by one, from newest to oldest. A “-” indicates
the end of the stored message codes.
When the memory is full and a new message is received, the oldest message
code is deleted from memory.
If a newly received message code is identical to the last message received, it
is not stored.
All stored message codes are erased when you turn the pager OFF.
Page 25

24
CAMPUS PAGER
6. Troubleshooting
6.1 Helpful Hints
Problem: After following all operating procedures, the Campus Pager isn’t
reaching my pagers. What can I do to increase the range of transmission?
Solution:
1. Adjust or reposition the antenna to obtain optimum transmitting range.
2. Connect a base station antenna to substantially increase the Campus
Pager’s transmitting range.
Problem: What can I do to reduce the interference on my phone when using
the Campus Pager?
Solution: Adjust or reposition the antenna and the antenna ground wire.
Problem: What can I do if my pager doesn’t display a message code?
Solution:
1. Review operating procedures and try again.
2. Check the pager’s batteries.
Problem: What do I do if my pager won’t receive a message code?
Solution:
1. Verify the Campus Pager system code and correct pager code.
2. Complete the steps to store the pager code.
Problem: How can I use two Campus Pager base units with multiple pagers?
Solution: Set both of the Campus Pager base units to the same system code.
Page 26

25
CAMPUS PAGER
6.2 Service Information
If you have problems with your Campus Pager, first call for technical support.
If technical support personnel cannot solve the problem with your Pager, you
might have to return the unit to the factory for service.
Before calling for technical support, please have the following items ready:
1. Campus Pager serial number
2. Campus Pager Operator’s Guide
3. Sales receipt
4. Campus Pager
Page 27

1000 Park Drive • Lawrence, PA 15055-1018 • 724-746-5500 • Fax 724-746-0746
© Copyright 1997. Black Box Corporation. All rights reserved.
 Loading...