

Page 1
R
e
v
a
m
s
n
a
B
t
S
m
9
E
JUNE 200
EME201A
Ser
Enviro
Syst
nment
m Ad
Mo
l Moni
inistr
x
oring
tor’s
yste
Guide
SUPPO
T
FREE
technical
upport
Page 2

ServMon xB
ServMon xB is a remote environmental monitoring system to increase the security of your facilities and
reduce unforeseen downtimes of your equipment. Its modular conception allows to monitor many sensors
and trigger emergency actions like individual control of power outlets and alert sending via SNMP traps,
Email or Syslog messages.
This product carries the CE mark to indicate compliance with the European Directive on Electromagnetic
Compatibility (89/336/EEC). It has been tested to EN55024:1998 and EN55022:1998.
Edition June 2009
Page 3

Environmental monitoring system
Contents
Safety instructions: ............................................................................................................................................... 2
1. DESCRIPTION ................................................................................................................................................. 3
1.1 Diagram ..................................................................................................................................................... 3
1.2. Package list .............................................................................................................................................. 4
1.3 Option ........................................................................................................................................................ 4
2. INSTALLATION ................................................................................................................................................ 5
3. CONFIGURATION ........................................................................................................................................... 6
3.1. Configuration through the LAN using the Finder program ....................................................................... 6
3.2. Configuration through an RS232 Terminal connection ............................................................................ 8
3.3. Configuration through the LAN using a standard Browser ....................................................................... 9
3.3.1. General / IP configuration ............................................................................................................. 10
3.3.2. General / System time ................................................................................................................... 12
3.3.3. General / SMTP ............................................................................................................................. 13
3.3.4. General / SNMP ............................................................................................................................ 14
3.3.5. General / Tools .............................................................................................................................. 15
3.3.6. Settings / Accounts ....................................................................................................................... 16
3.3.7. Settings / Groups........................................................................................................................... 18
3.3.8. Settings / Peripherals .................................................................................................................... 20
3.3.8.1. Settings / Peripherals - devices labelling ......................................................................... 22
3.3.8.2. Settings / Peripherals - ePowerSwitch settings ............................................................... 24
3.3.8.3. Settings / Peripherals - Sensors settings ......................................................................... 26
3.3.8.4. Settings / Peripherals - Digital Input settings ................................................................... 29
3.3.8.4.1. Digital Input Modules ....................................................................................... 29
3.3.8.4.2. Temperature and proximity sensors ................................................................ 32
3.3.8.4.3. Push Button settings ........................................................................................ 34
3.3.8.5. Settings / Peripherals - AC Current Probe settings ......................................................... 36
3.3.8.6. Settings / Peripherals - Energy Meter settings ................................................................ 38
3.3.9. Settings / Rules ............................................................................................................................. 40
3.3.9.1. Settings / Rules / Schedule Rule ..................................................................................... 42
3.3.9.2. Settings / Rules / Ping Monitoring Rule ........................................................................... 44
3.3.9.3. Settings / Rules / Scan Monitoring Rule .......................................................................... 46
3.3.9.4. Settings / Rules / Power Supply Monitoring Rule ............................................................ 48
3.3.9.5. Settings / Rules / Digital Input Monitoring Rule ............................................................... 51
3.3.9.6. Settings / Rules / Analog Input Monitoring Rule .............................................................. 53
3.3.10. Misc / Control Panel .................................................................................................................... 56
3.3.11. Misc / Rule Panel ........................................................................................................................ 57
3.3.12. Misc / Log .................................................................................................................................... 58
3.3.13. Misc / Log Settings ...................................................................................................................... 59
4. POWER OUTLET CONTROL AND PERIPHERALS STATUS ........................................................................ 60
5. ANNEXES ......................................................................................................................................................... 62
5.1. Ping and Scan Methods ........................................................................................................................... 62
5.2. Technical Data .......................................................................................................................................... 63
5.3. Commonly used Ports .............................................................................................................................. 63
5.4. Syslog Messages: Severity Level Definitions ........................................................................................... 64
1
Page 4

Environmental monitoring system
Safety instructions:
to read before use!
NOTE
The ServMon xB Remote Monitoring System and all its peripheral components can only be
installed by qualified people with the following installation and use instructions. The manufacturer
disclaims all responsibility in case of a bad use of the ServMon xB device and its peripheral
components and particularly any use with equipments that may cause personal injury or material
damage.
The power adapter of the ServMon xB is designed to be installed on a dedicated circuit that must
have a circuit breaker or fuse protection.
The electrical power socket used to plug the power adapter of the ServMon xB must be close to
the ServMon xB device and easily accessible.
Check that the power adapter, plug and socket are in good condition.
If power switches, Energy Meter or Current Probe devices are connected to the ServMon xB,
always plug them into properly grounded power sockets (two poles plus ground).
The ServMon xB is intended for indoor use only. Do NOT install them in an area where excessive
moisture or heat is present.
Always disconnect the power adapter of the ServMon xB if you want to intervene on the ServMon
xB or on the equipments connected to the ServMon xB.
Do NOT attempt to disassemble the ServMon xB or any of its peripheral components, they contain
potentially hazardous voltages.
The ServMon xB and its peripheral components contain no user serviceable parts and repairs are
to be performed by factory trained service personnel only.
Always use a shielded cable for the Ethernet connection.
2
Page 5
Environmental monitoring system
1. DESCRIPTION
ServMon xB is a remote environmental monitoring system to increase the security of your facilities and
reduce unforeseen downtimes of your equipment. Its modular conception allows to monitor many sensors
and trigger emergency actions like individual control of power outlets and alert sending via SNMP traps,
Email or Syslog messages
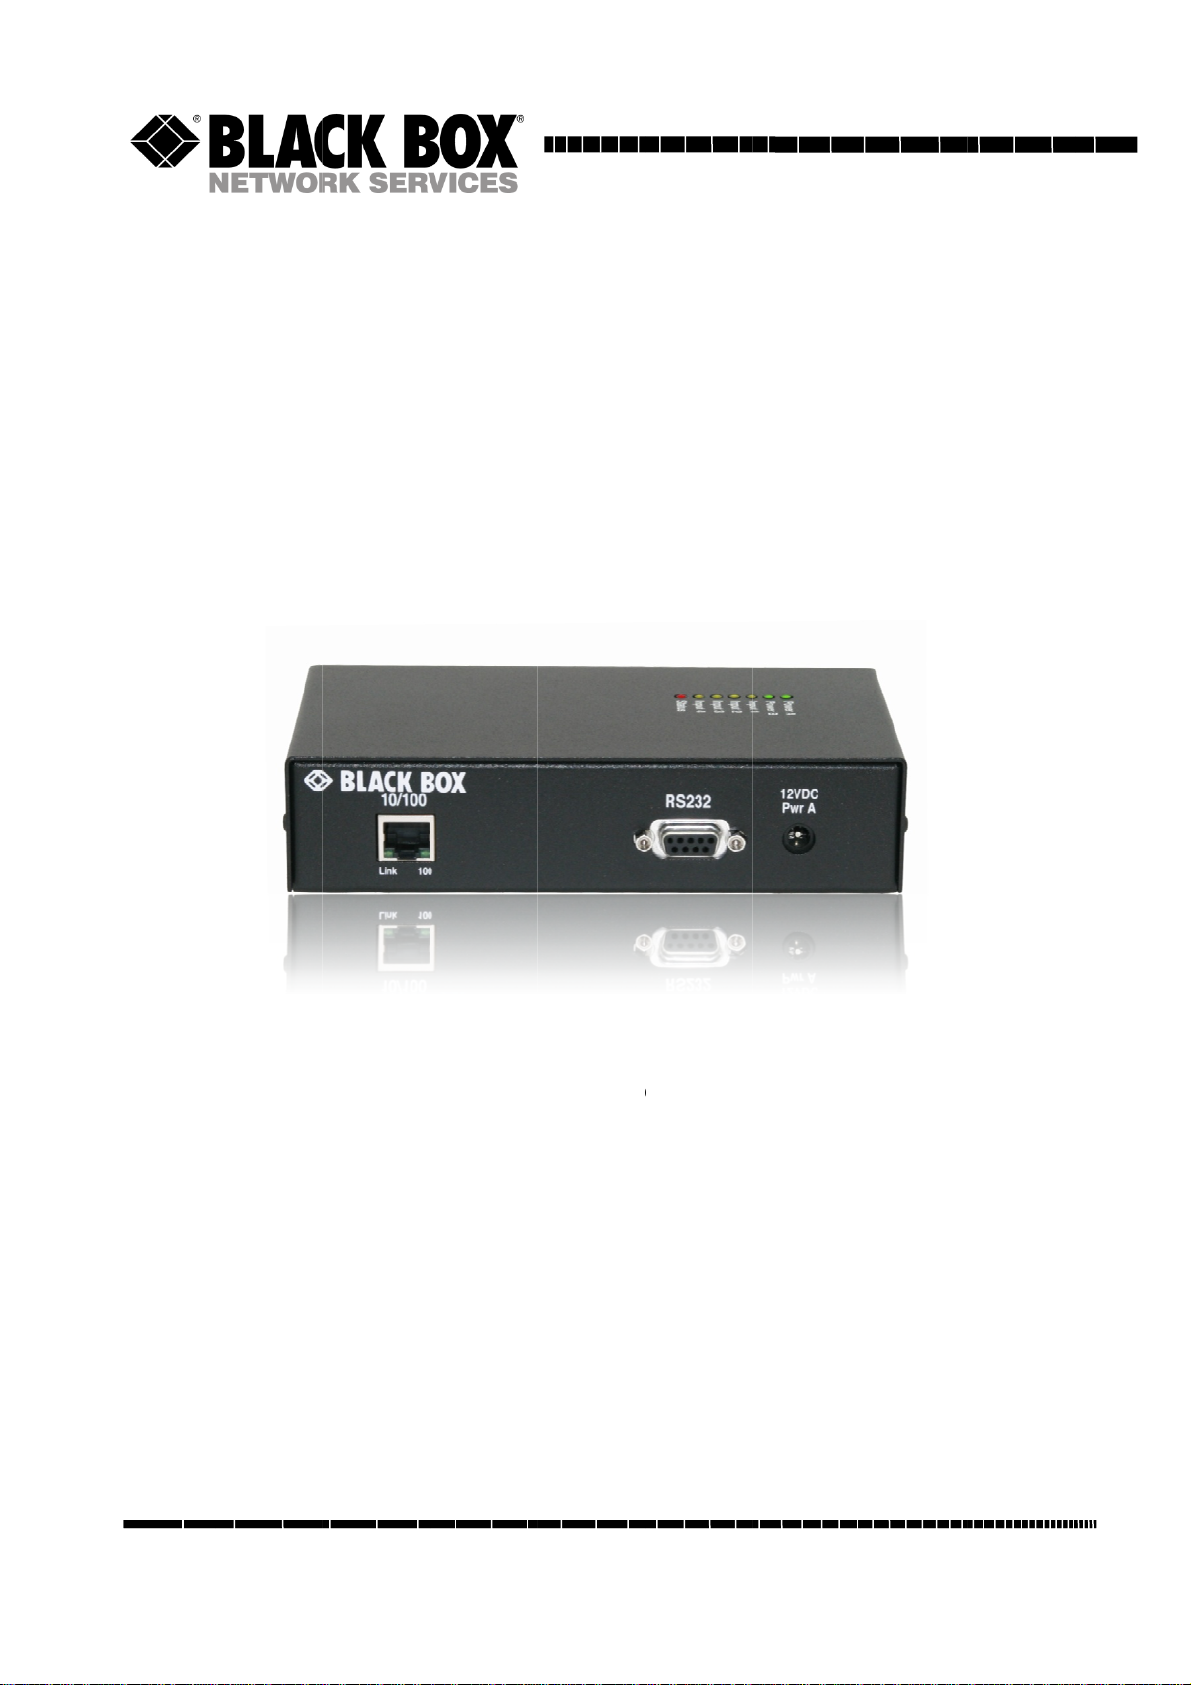
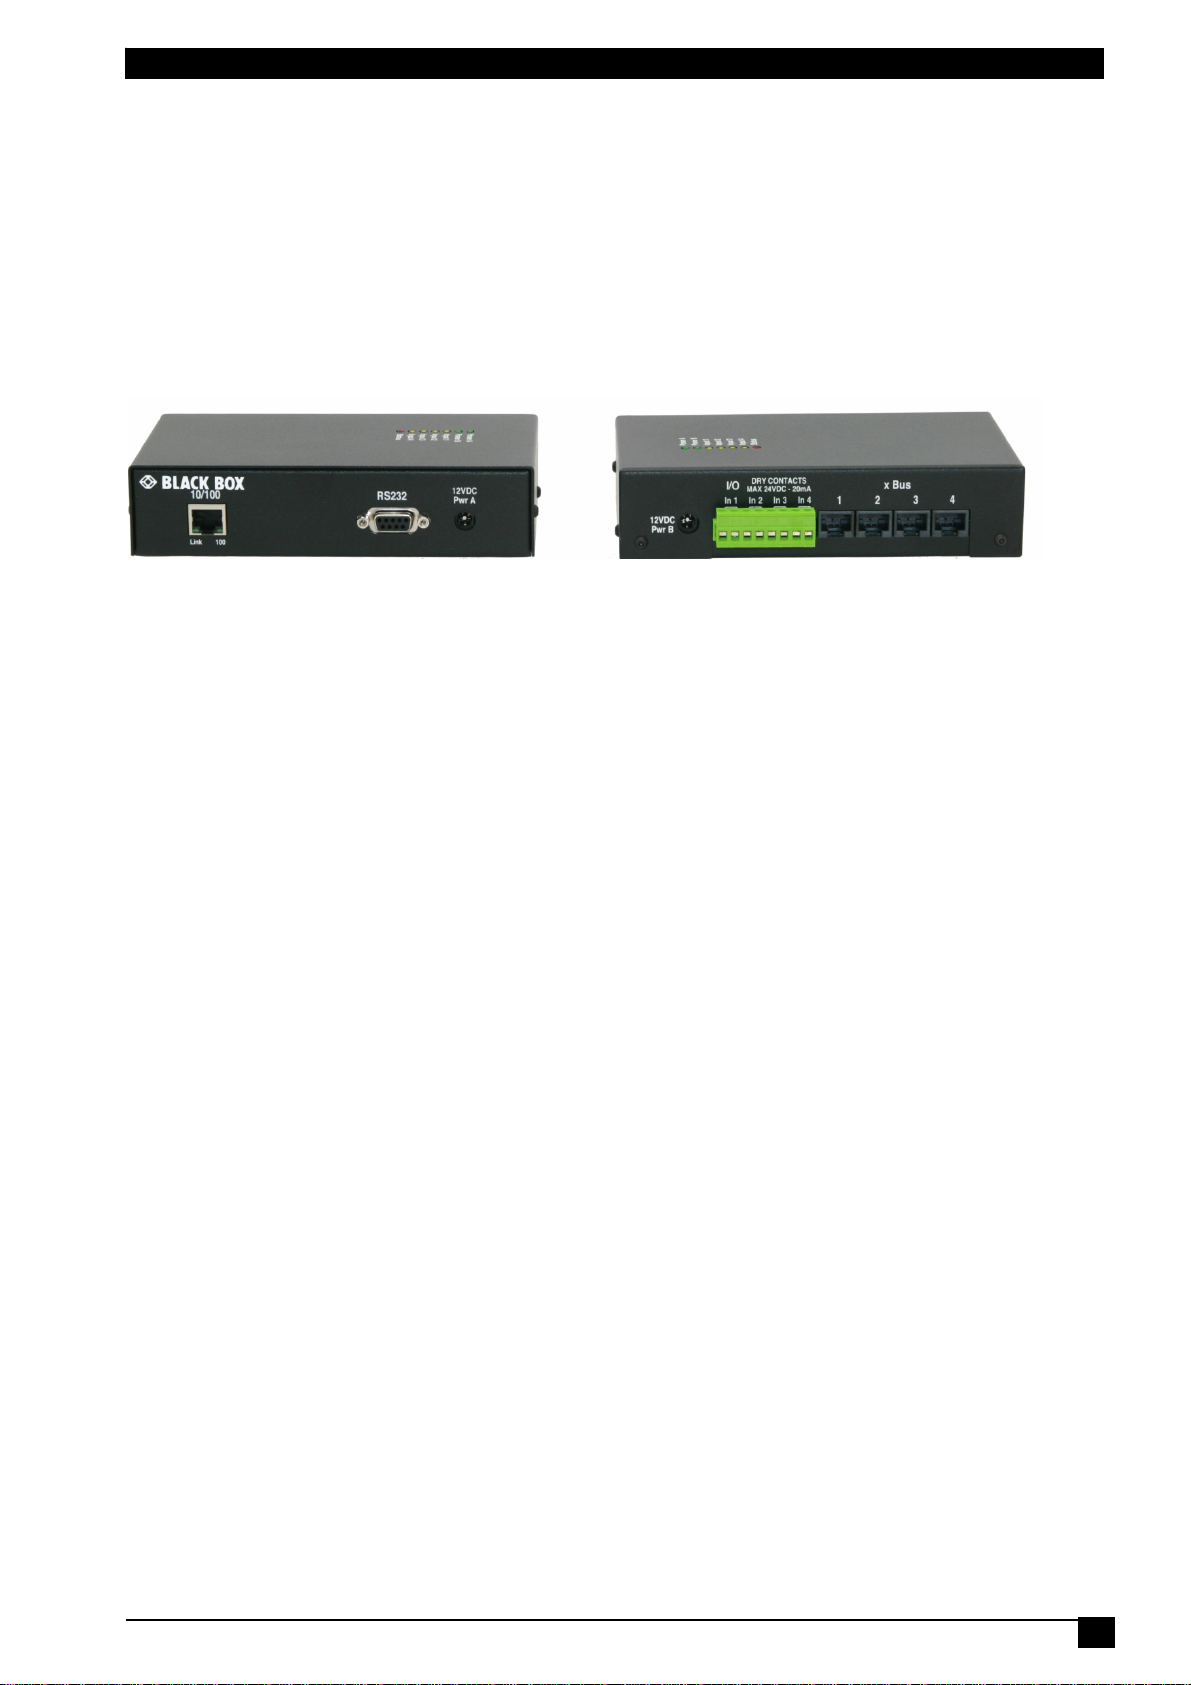
1.1 Diagram
Front side
10/100 (RJ45 Connector)
Network connection 10/100 Mbits/sec
Link (LED):
- off = network connection not detected
- on = network connection detected
- flashing = the device is sending or receiving
data over this port
100 (LED):
- off = 10 Mbits/sec connection
- on = 100 Mbits/sec connection
RS232 (SUB-D 9F Connector)
Serial port RS232 for Terminal connexion
Pinout: 2 = TxD, 3 = RxD, 5 = Gnd
12 VDC Power input A
First power supply of the ServMon xB
The Web server can be powered either by
Power Input A or Power Input B.
Top Side
LEDs
Power A: - green, lights up when power applied on power input A (on front side)
Power B: - green, lights up when power applied on power input B (on front side)
Input 1: - yellow, lights up when digital input 1 closed (on back side)
Input 2: - yellow, lights up when digital input 2 closed (on back side)
Input 3: - yellow, lights up when digital input 3 closed (on back side)
Input 4: - yellow, lights up when digital input 4 closed (on back side)
Status: - green, on, ServMon xB software is started
- green/red flashing, ServMon xB is initializing
Back
12 VDC Power input B
Optional second power supply of the ServMon xB
The Web server can be powered either by Power
Input A or Power Input B.
I/O Dry contacts In1 to In4
4 digital inputs for dry contact
xBus 1 to 4 (RJ45 Connector)
Connection for all xBus peripherals
Maximal TOTAL line length: 200 meters
3
Page 6

Environmental monitoring system
1.2. Package list
The following items are included:
• 1 x ServMon xB device with cabinet mounting kit
• 1 x 19" rack mount kit, ref. RMK-D,
• 1 x power adapter 12 VDC
• 1 x RJ45 M/M cable, 2 Meters
• 1 x serial cable SUB-D 9 points M/F, 1.80 Meters
• 1 x CD ROM
• 1 x quick installation guide
1.3 Option
The following option can be ordered separately:
• power adapter 12 VDC for redundant power supply, ref. PA 12VDC
4
Page 7

Environmental monitoring system
2. INSTALLATION
Connect the ServMon xB to your Local Area Network.
Power-up the ServMon xB using the provided power adapter (you can use either the Power Input A on the
front panel or the Power Input B on the back panel of the device).
Starting needs approximately 30 seconds. During this time, the status LED on the top of the case flashes
red/green. During all this time you cannot login.
5
Page 8

m
h
d
o
y
M
h
a
o
f
o
x
n
e
n
w
p
g
s
r
m
u
i
g
c
u
o
t
n
r
o
e
g
L
e
G
s
h
e
R
s
w
n
u
e
M
e
c
v
o
o
O
e
i
w
w
u
e
v
h
S
o
t
o
u
p
a
a
s
t
r
g
Environ
To use t
network a
There are
3.1. C
It is the si
configure
with those
1. Start t
2. Open
Serv
ental monit
e ServMon
ministrator
the three fol
nfigurat
mplest and
our ServM
of your PC.
he Finder.e
the File me
on xB conn
ring system
3
xB on you
or the para
lowing meth
ion thro
fastest conf
n xB throu
e program
u and choo
cted on yo
. CON
network, y
eters to us
ods to confi
gh the
guration m
h your local
ontained on
se SCAN (o
r LAN.
FIGU
ou must fir
.
ure the net
AN usi
thod if you
network ev
the CD-RO
r click on th
ATI
t configure
ork param
g the F
se Windo
n if its net
.
first left b
N
its network
ters of the
nder pr
s as operati
ork parame
tton in the t
parameter
ervMon xB:
gram
ng system.
ers are not
ol bar) to d
. Ask your
It allows to
compatible
iscover the
3. Open
config
This page
Firmware.
!!! To ac
program
the File me
ure the net
enables to
The HTTP
ieve the hi
fter the fir
u and cho
ork parame
define all IP
rotocol is e
hest secu
t installati
se CONFI
ers.
parameter
abled and t
ity level w
n.
URE (or cli
of the Ser
e Finder pr
suggest t
k on the s
Mon xB de
gram is aut
disable t
cond left b
ice and dis
horized at f
e configur
tton in the
lays the ve
ctory settin
tion using
ool bar) to
sion of the
s.
the Finder
6
Page 9

e
s
x
H
s
s
a
y
v
o
F
n
o
T
n
s
t
c
P
r
b
P
m
e
u
e
r
a
s
t
n
r
e
s
i
t
t
o
a
d
e
e
x
e
s
e
t
e
e
x
c
e
d
a
n
a
5
s
c
a
l
.
s
e
S
g
w
a
r
T
g
e
w
g
d
e
H
o
S
w
o
e
t
A
s
S
t
M
k
s
d
r
w
n
Environm
DHCP:
Check thi
ServMon
Use of D
network.
IP Addre
IP addres
Subnet M
Subnet M
Gateway:
Generally
DNS 1:
Primary D
DNS 2:
Secondar
Version:
Firmware
Finder au
The Netw
provided
system.
!!! The Fi
Finder pr
HTTP / H
These opt
HTTPS e
the web
indicates
based en
The HTT
HTTP Po
Port num
Standard
Standard
ntal monito
box is you
B via DHC
CP (Dyna
s:
of the Serv
ask:
sk of the S
the address
NS (Domain
DNS, defa
ersion of th
thorized:
rk paramet
inder Prog
der Progr
gram after
TPS Acce
ions enable
crypts and
erver of the
hat the con
ryption algo
protocol is
t Number:
er: default i
HTTP port
HTTPS por
ring system
want to ob
.
ic Host C
Mon xB, def
rvMon xB,
of your rout
Name Serv
lt is blank.
e ServMon
rs of the S
am. It is a
m is enabl
the first co
s:
o choose b
decrypts th
ServMon
ection is en
ithm betwe
nabled as
80 (HTTP).
s 80.
is 443.
ain the IP
nfiguratio
ult is 192.1
efault is 25
r, default is
r), default i
B
rvMon xB
imple and f
d as defau
nfiguration
tween the
page requ
B using a
rypted usin
n your bro
efault value
ddress, the
Protocol)
68.100.202.
.255.255.0.
blank.
blank.
an be confi
st configur
t value. Fo
tandard HT
sts and pa
ecure Sock
SSL. SSL
ser and the
.
subnet mas
requires a
gured throu
tion metho
security r
P and the
e informati
t Layer (S
transactions
eb server
k and the d
DHCP hos
h a Local
if you use
asons we
TTP over S
n between
L). A URL
are negotia
f your Serv
fault gatew
to be set
rea Networ
Windows a
uggest to
L protocol.
the client b
beginning
ed by mea
on xB.
ay for your
up on the
using the
operating
isable the
owser and
ith HTTPS
s of a Key-
7
Page 10

Environmental monitoring system
3.2. Configuration through an RS232 Terminal connection
1. Use the provided RS232 cable to connect the ServMon xB to an available serial port of your PC.
2. Run a Terminal program such as Windows HyperTerminal.
3. Configure the appropriate serial port @ 9.600, n, 8, 1 and no flow control.
4. On your computer, press <ENTER> until the menu appears on your screen.
5. Press the “M” on your keyboard and follow the menu to configure the network parameters of your
ServMon xB.
NETWORK INTERFACE PARAMETERS:
Should this target obtain IP settings from the network?[N]
Static IP address [192.168.1.250]?
Subnet Mask IP address [255.255.255.0]?
Gateway IP address [192.168.1.2]?
Primary DNS Server IP address [192.168.1.2]?
Secondary DNS Server IP address [0.0.0.0]?
MISCELLANEOUS:
Finder program enabled?[Y]
Configuration menu
8
Page 11

e
o
e
e
e
s
a
1
t
o
a
e
g
5
c
r
t
p
u
B
r
r
y
m
a
w
L
y
g
r
n
y
r
s
n
o
m
o
r
a
n
Environm
ntal monito
ring system
3.3. C
During th
network s
Factory n
IP Addres
Gateway:
Default f
1. Open
http://
2. Enter
3. The h
nfigurat
first install
ttings of th
twork settin
: 192.168.1
255.255.25
ctory proto
your Web b
92.168.100
he administ
me page a
ion thro
tion, chang
ServMon x
s of the Se
00.202 - Po
.0
ol is HTTP
owser and t
.202/sysad
rator name
pears, allo
gh the
e temporaril
.
vMon xB:
t: 80
!!!
pe followin
in.htm
nd passwo
ing you to c
AN usi
the netwo
IP address
d (default fo
onfigure all
g a sta
k settings
:
both = ad
ettings of y
dard B
f your PC
in)
ur ServMo
owser
ccording to
xB.
the default
9
Page 12

m
e
s
x
H
s
s
e
s
e
a
a
D
r
y
o
o
s
c
T
a
t
o
n
P
o
c
u
P
m
n
i
e
s
r
u
b
e
P
s
n
s
o
s
n
e
e
h
o
t
e
o
a
n
e
p
d
e
e
e
s
e
e
e
a
u
r
d
t
a
n
a
e
r
5
s
c
m
e
s
o
S
d
s
e
o
e
L
c
t
e
T
m
(
t
e
c
x
d
s
d
a
h
o
a
e
R
g
H
M
e
t
.
c
s
n
g
B
o
y
e
t
W
a
c
n
S
Environ
ental monit
ring system
3.3.1. Ge
This page
DHCP Cli
Check thi
ServMon
Use of D
network.
IP Addre
IP addres
If you us
keys. Thi
times rep
Subnet M
Subnet M
Default G
Generally
Primary
Primary D
Seconda
Secondar
Finder Pr
The Netw
the provid
operating
The Finde
!!!For se
HTTP / H
This optio
encrypts
server of
that the c
encryptio
The HTT
!!!To achi
neral / IP
enables yo
nt enabled
box is you
B via DHC
CP (Dyna
s:
of the Serv
the https
operatio
atedly dur
ask:
sk of the S
teway:
the address
NS Addres
NS (Domain
y DNS Add
DNS, defa
gram ena
rk paramet
ed Finder
ystem.
r Program i
urity reaso
TPS Acce
n enables t
nd decrypt
he ServMo
nnection is
algorithm b
Protocol is
eve the hig
onfigurati
to define al
:
want to ob
. Factory d
ic Host C
Mon xB, def
protocol a
takes sev
ng all the
rvMon xB,
of your rout
:
Name Serv
ess:
lt is blank
led:
rs of the S
rogram. It i
enabled as
s we sugg
s:
choose b
the page r
xB using
encrypted
tween you
nabled as
est securi
n
l the IP para
ain the IP
fault setting
nfiguratio
ult is 192.1
d change t
ral minut
rocess. Du
efault is 25
r, default is
r), default i
rvMon xB
a very si
default valu
st to disab
tween the
quests and
Secure S
sing SSL.
browser an
efault value
y level we
meters of th
ddress, the
for this opti
Protocol)
68.100.202.
he IP addr
s and the
ing all this
.255.255.0.
blank.
blank
an also be
ple and fas
.
le the Find
tandard H
page infor
cket Layer
SL transac
the web s
.
uggest to
ServMon
subnet mas
n is disable
requires a
ss, the sy
ED marke
time, you c
onfigured t
configurati
r program
TP and the
ation betw
SSL). A U
ions are ne
rver of your
hoose the
B Remote
k and the d
.
DHCP hos
tem needs
"Status"
nnot login
rough a Lo
n method i
fter the fir
HTTP over
en the clie
L beginnin
otiated by
ServMon x
TTPS prot
onitoring S
fault gatew
to be set
to comput
on the cas
al Area Ne
f you use
t configur
SSL proto
t browser a
with HTTP
means of a
.
col.
stem.
ay for your
up on the
new SSL
e blinks 3
work using
indows as
tion.
ol. HTTPS
d the web
indicates
Key-based
10
Page 13

Environmental monitoring system
HTTP Port:
Port number: default is 80 (HTTP).
Standard HTTP port is 80.
Standard HTTPS port is 443.
LOGOUT:
Click "Logout" at the bottom of the page to exit the session without saving changes.
DISCARD CHANGES:
Click "Discard Changes" at the bottom of the page to discard all the changes you have made on this page.
APPLY CHANGES:
Click "Apply Changes" at the bottom of the page to save changes.
11
Page 14
m
m
e
S
s
d
w
n
e
S
n
r
Y
e
a
e
m
e
r
S
:
o
c
H
p
o
s
e
c
e
u
s
c
m
e
e
e
r
o
D
r
e
o
o
e
"
x
a
m
e
e
m
e
t
a
d
o
v
d
t
o
e
m
u
u
y
t
a
w
v
k
a
g
s
n
B
a
h
s
v
e
y
e
m
.
y
d
r
h
n
s
a
w
e
e
y
m
s
g
a
a
w
o
e
h
h
i
u
e
a
a
a
o
e
o
a
r
e
n
Environ
ental monit
ring system
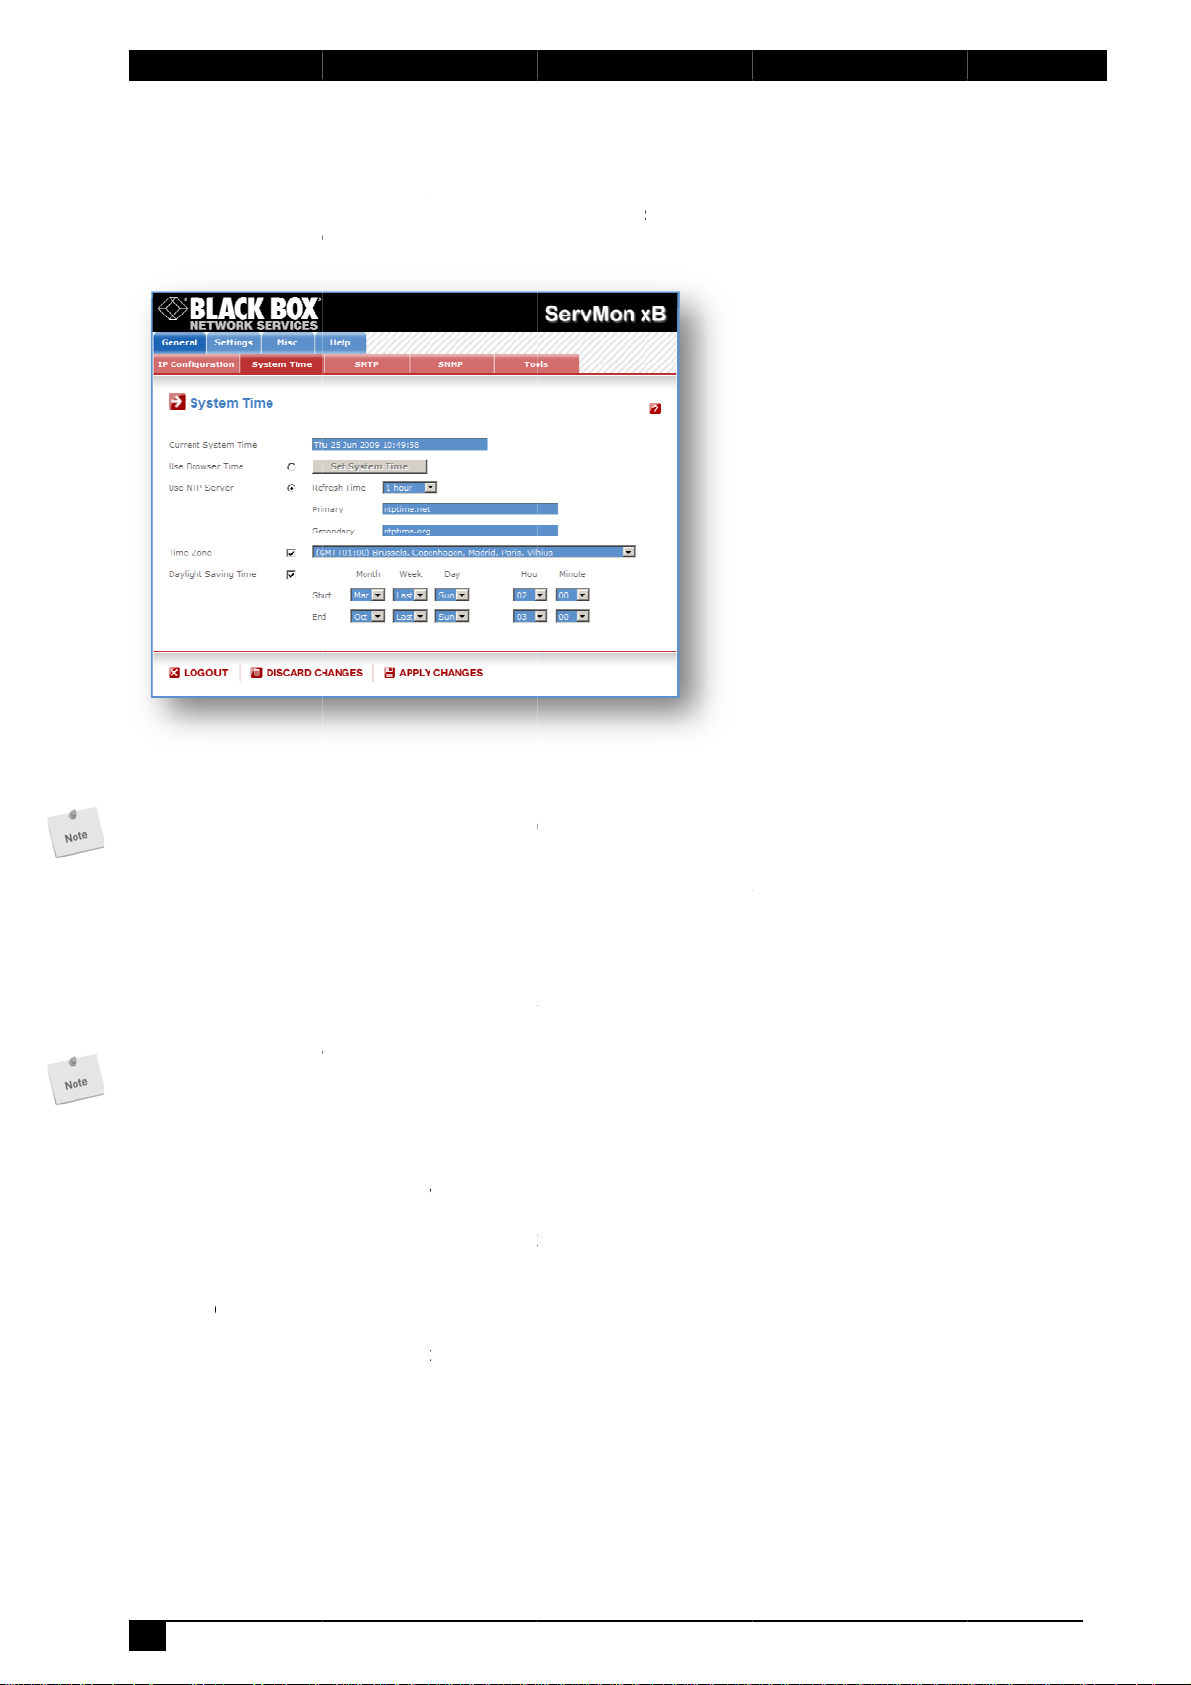
3.3.2. Ge
The syste
traps, Sys
time of th
neral / Sy
time of th
log informati
connected
tem time
ServMon
on, e-mails
omputer or
B is used fo
nd internal
can be aut
r synchroniz
logs. The sy
matically sy
ing scheduli
tem time c
chronized
g actions a
n be set m
ith one or t
nd to timest
nually with t
o NTP time
mp SNMP
he browser
servers.
Current
This field
As the sy
compare
Use Bro
If you wa
on the "S
Use NTP
If you wa
and enter
timeserve
only if the
ou can
configur
NTP uses
Time Zon
Set the ti
Without s
are synch
Daylight
If you wan
LOGOUT
Click "Log
DISCARD
Click "Dis
APPLY C
Click "Ap
ystem Tim
hows the c
stem time i
to the exa
ser Time:
t to set the
t System Ti
erver:
t to set the
the IP addr
can be sp
primary tim
nter eithe
tion page)
port 123/U
:
e zone co
tting this, th
onizing with
aving Tim
t to set Dayl
ut" at the b
CHANGES
ard Chang
ANGES:
ly Changes
:
rrent syste
displayed
t hour. Th
system time
e" button.
system tim
ss of the ti
cified in th
server is no
the hostn
r the IP ad
P.
responding
e system cl
an NTP ser
:
ight Saving
ttom of the
:
s" at the bo
at the botto
time of the
through th
system ti
using the c
using an N
eserver yo
"Secondar
available.
me (in that
ress of an
to your loc
ck will sho
er.
ates, chec
page to exit
tom of the p
m of the pa
ServMon x
browser,
e is nevert
rrent Brow
TP timeser
wish to us
" field. Th
case you
NTP server
tion. The s
UTC/GMT
this box an
the session
ge to disca
e to save c
.
small diff
eless corr
er time of
er, select th
in the "Pri
secondary
ust have
stem clock
time. Settin
specify the
without savi
d all the ch
anges.
rence (1 t
ct.
our PC, sel
is option, c
ary" field. T
timeserver
pecified a
will subseq
a time zon
date you w
ng changes.
nges you h
2 sec) can
ct this opti
oose a refr
e address
s optional
DNS serve
ently show
is only rel
nt to use.
ve made o
appear as
n and click
sh interval
f a second
nd is used
on the IP
local time.
vant if you
this page.
12
Page 15

e
s
d
e
a
s
r
d
Y
e
a
r
d
m
d
d
@
:
o
c
H
p
T
r
e
u
s
w
a
r
o
D
P
s
e
m
r
e
o
o
e
"
v
h
a
d
s
a
t
r
b
v
M
g
a
a
g
e
t
m
.
t
s
o
n
r
h
a
n
s
p
p
a
a
h
m
a
r
a
r
n
r
s
n
Environm
ntal monito
ring system
3.3.3. Ge
You can
the rules
To send
following
SMTP en
Check thi
SMTP Se
In this fiel
ou can
configur
NTP uses
SMTP Po
In this fiel
From (e-
In this fiel
The name
a valid ad
Example:
yourname
LOGOUT
Click "Log
DISCARD
Click "Dis
APPLY C
Click "Ap
neral / SM
etup the Se
efined by th
-mails, yo
parameter
bled:
box if you
ver Addres
, enter the
nter eithe
tion page)
port 123/U
t:
, enter the
ail Addres
, enter the
can be fro
ress (gene
yourmails
ut" at the b
CHANGES
ard Chang
ANGES:
ly Changes
P
vMon xB to
administra
will need
:
ant the Ser
s:
ddress of t
the hostn
r the IP ad
P.
ort Number
):
-mail addre
1 to 64 ch
ally servers
rver.net
ttom of the
:
s" at the bo
at the botto
send the lo
tor.
a SMTP se
Mon xB to
e e-mail ser
me (in that
ress of an
you want to
s that Serv
racters lon
reject mess
page to exit
tom of the p
m of the pa
gs to an em
ver on the
e able to s
er you wan
case you
NTP server
use, defaul
on xB mes
, and can c
ges that do
the session
ge to disca
e to save c
ail account
network a
nd e-mails.
to use.
ust have
and usual
ages will a
ntain alpha
't have a v
without savi
d all the ch
anges.
nd report a
d you will
pecified a
ort is 25.
pear to co
numeric ch
lid from add
ng changes.
nges you h
ll activities t
ave to co
DNS serve
e from.
racters. Thi
ess).
ve made o
iggered by
figure the
on the IP
should be
this page.
13
Page 16
m
M
a
e
u
T
a
s
s
d
c
l
s
m
d
s
m
s
r
c
m
s
f
s
t
s
t
s
:
o
c
H
p
o
M
e
y
e
w
e
a
n
a
e
a
n
a
w
y
a
w
h
a
o
o
e
"
h
a
B
u
a
a
a
g
u
a
n
t
M
s
o
P
v
c
o
s
v
c
o
c
o
W
s
r
v
c
e
P
a
g
r
e
o
S
v
C
m
o
C
u
m
N
a
s
r
h
m
e
d
.
m
a
m
i
m
u
a
e
o
m
w
p
a
l
t
e
f
e
m
f
s
m
o
n
a
a
e
e
o
o
r
h
u
o
n
Environ
ental monit
ring system
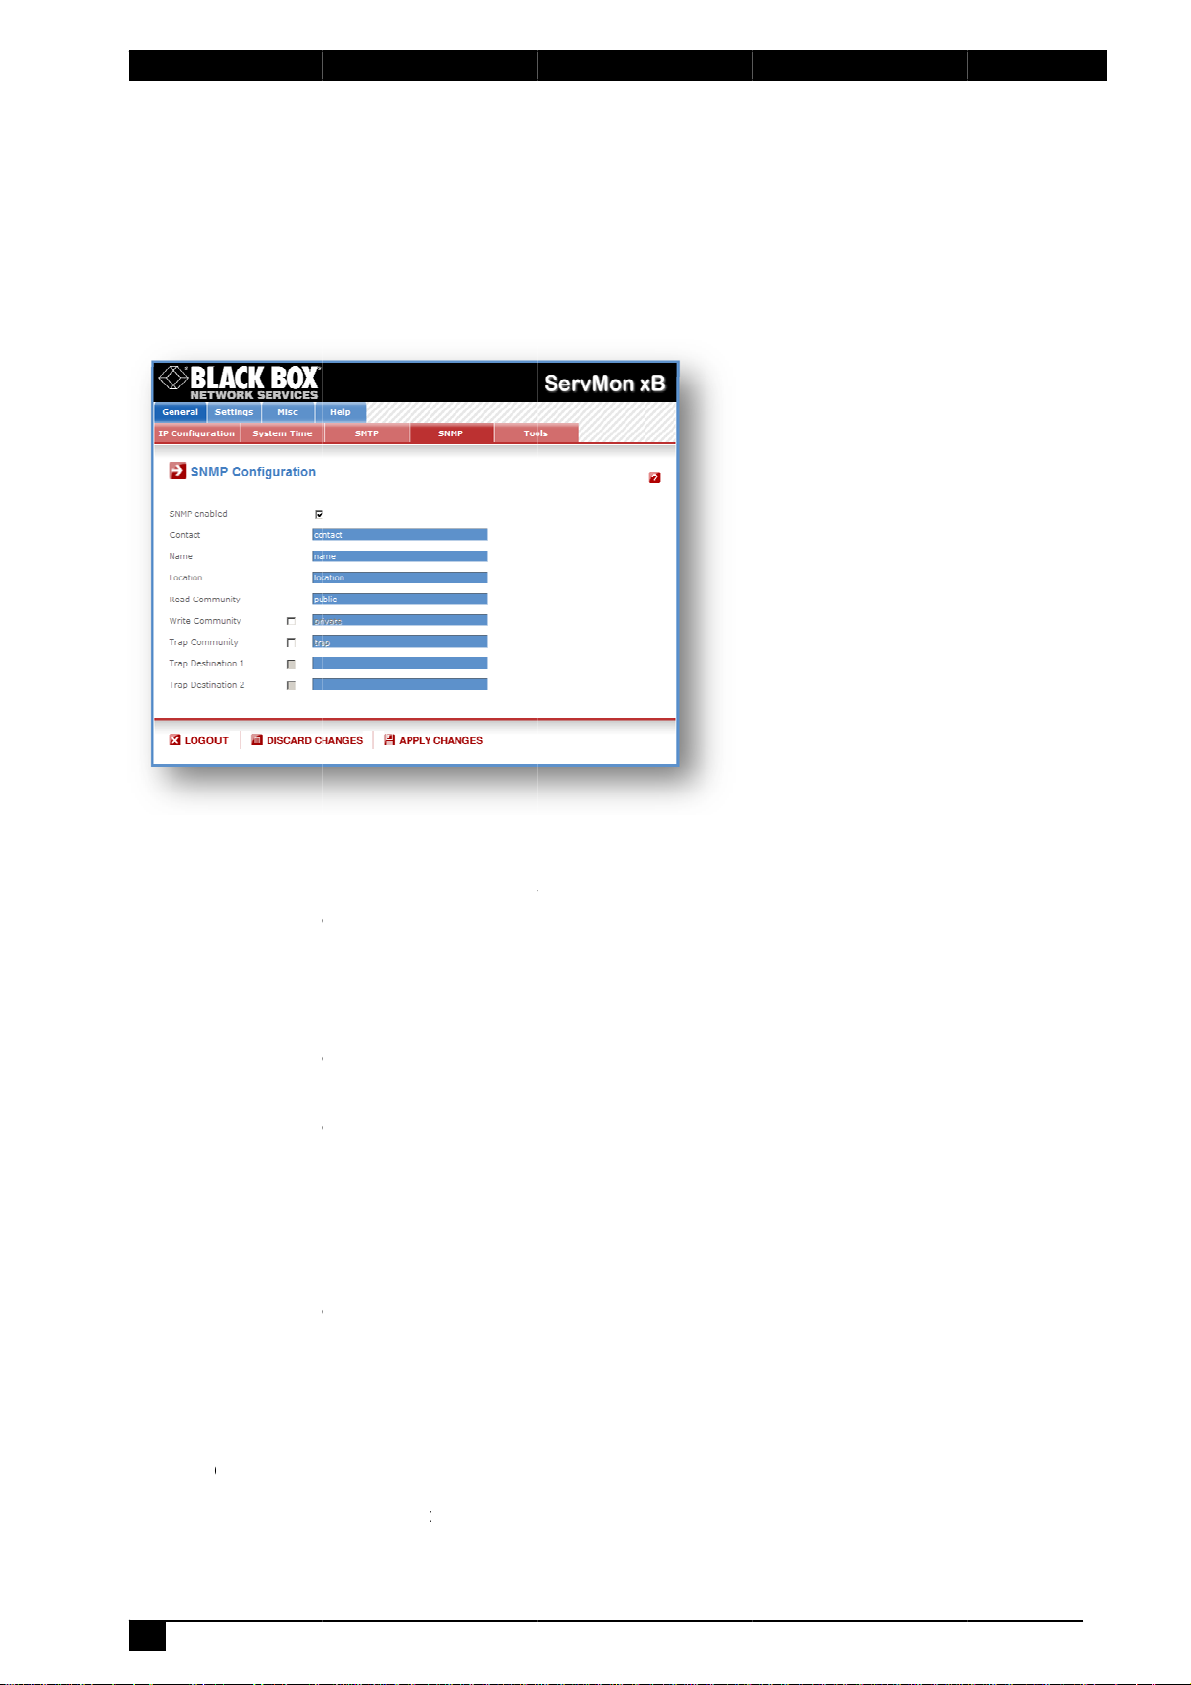
3.3.4. Ge
The Serv
you to m
MIB file
(temperat
groups of
General /
neral / SN
on xB prov
nage the S
nables to r
re, humidit
power outl
ools Page.
P
ides a built-i
rvMon xB t
emotely re
, ambient l
ts. The MI
n SNMP (Si
rough SN
d out the
ight). It als
file is stor
mple Netwo
P-based n
tatus of all
enables t
ed on the
k Manage
twork mana
power outl
control in
ervMon xB
ent Protoco
gement sys
ts and the
ividually all
and can b
) agent, whi
ems. The S
values of
power outl
download
ch enables
ervMon xB
ll sensors
ts and all
d from the
SNMP en
Check thi
Contact:
In this fie
character
Name:
In this fiel
long, and
Location:
In this fie
character
Read Co
In this fiel
character
Write Co
Check thi
field, ente
long, and
Trap Co
Check thi
following
character
Trap Des
Check thi
Trap Des
Check thi
LOGOUT
Click "Log
DISCARD
Click "Dis
APPLY C
Click "Ap
bled:
box if you
ld, enter th
long, and c
, enter the
an contain
d, enter th
long, and c
munity:
, enter the
long, and c
munity:
box if you
the name
an contain
munity:
box if you
ield, enter t
long, and c
ination 1:
box and en
ination 2:
box and en
ut" at the b
CHANGES
ard Chang
ANGES:
ly Changes
ant to enab
name yo
n contain a
ame you w
lphanumeri
name you
n contain a
ame you w
n contain a
ant to be
ou want to
lphanumeri
ant to confi
e name yo
n contain a
ter the prim
ter the seco
ttom of the
:
s" at the bo
at the botto
le the SNM
want to gi
lphanumeri
nt to give t
c character
want to gi
lphanumeri
nt to give t
lphanumeri
ble to contr
ive to the
c character
gure the Se
want to gi
lphanumeri
ry SNMP S
dary SNM
page to exit
tom of the p
m of the pa
protocol.
e to the
characters.
the Name
. Default na
e to the L
characters.
the Read
characters.
l the power
rite Comm
. Default na
vMon xB S
e to the Tr
characters.
rver addre
Server add
the session
ge to disca
e to save c
ontact field
Default na
field. The n
e is "name
cation field
Default na
ommunity f
Default na
outlets thro
nity. The n
e is "privat
MP agent t
p Commun
Default na
s the traps
ress the tra
without savi
d all the ch
anges.
The name
e is "contac
me can be
".
. The nam
e is "locatio
eld. The na
e is "public"
gh a MIB b
me can be
".
send trap
ity. The na
e is "trap".
ill be sent t
s will be se
ng changes.
nges you h
can be fr
t".
rom 1 to 64
can be fr
n".
e can be f
.
rowser. In t
rom 1 to 64
to a comm
e can be fr
.
t to.
ve made o
m 1 to 64
characters
m 1 to 64
om 1 to 64
e following
characters
nity. In the
m 1 to 64
this page.
14
Page 17
e
d
h
d
b
b
b
b
:
o
o
u
h
o
e
o
v
e
o
o
e
f
l
n
n
o
w
u
e
C
t
w
o
e
x
o
e
M
P
d
S
y
a
Environm
ntal monito
ring system
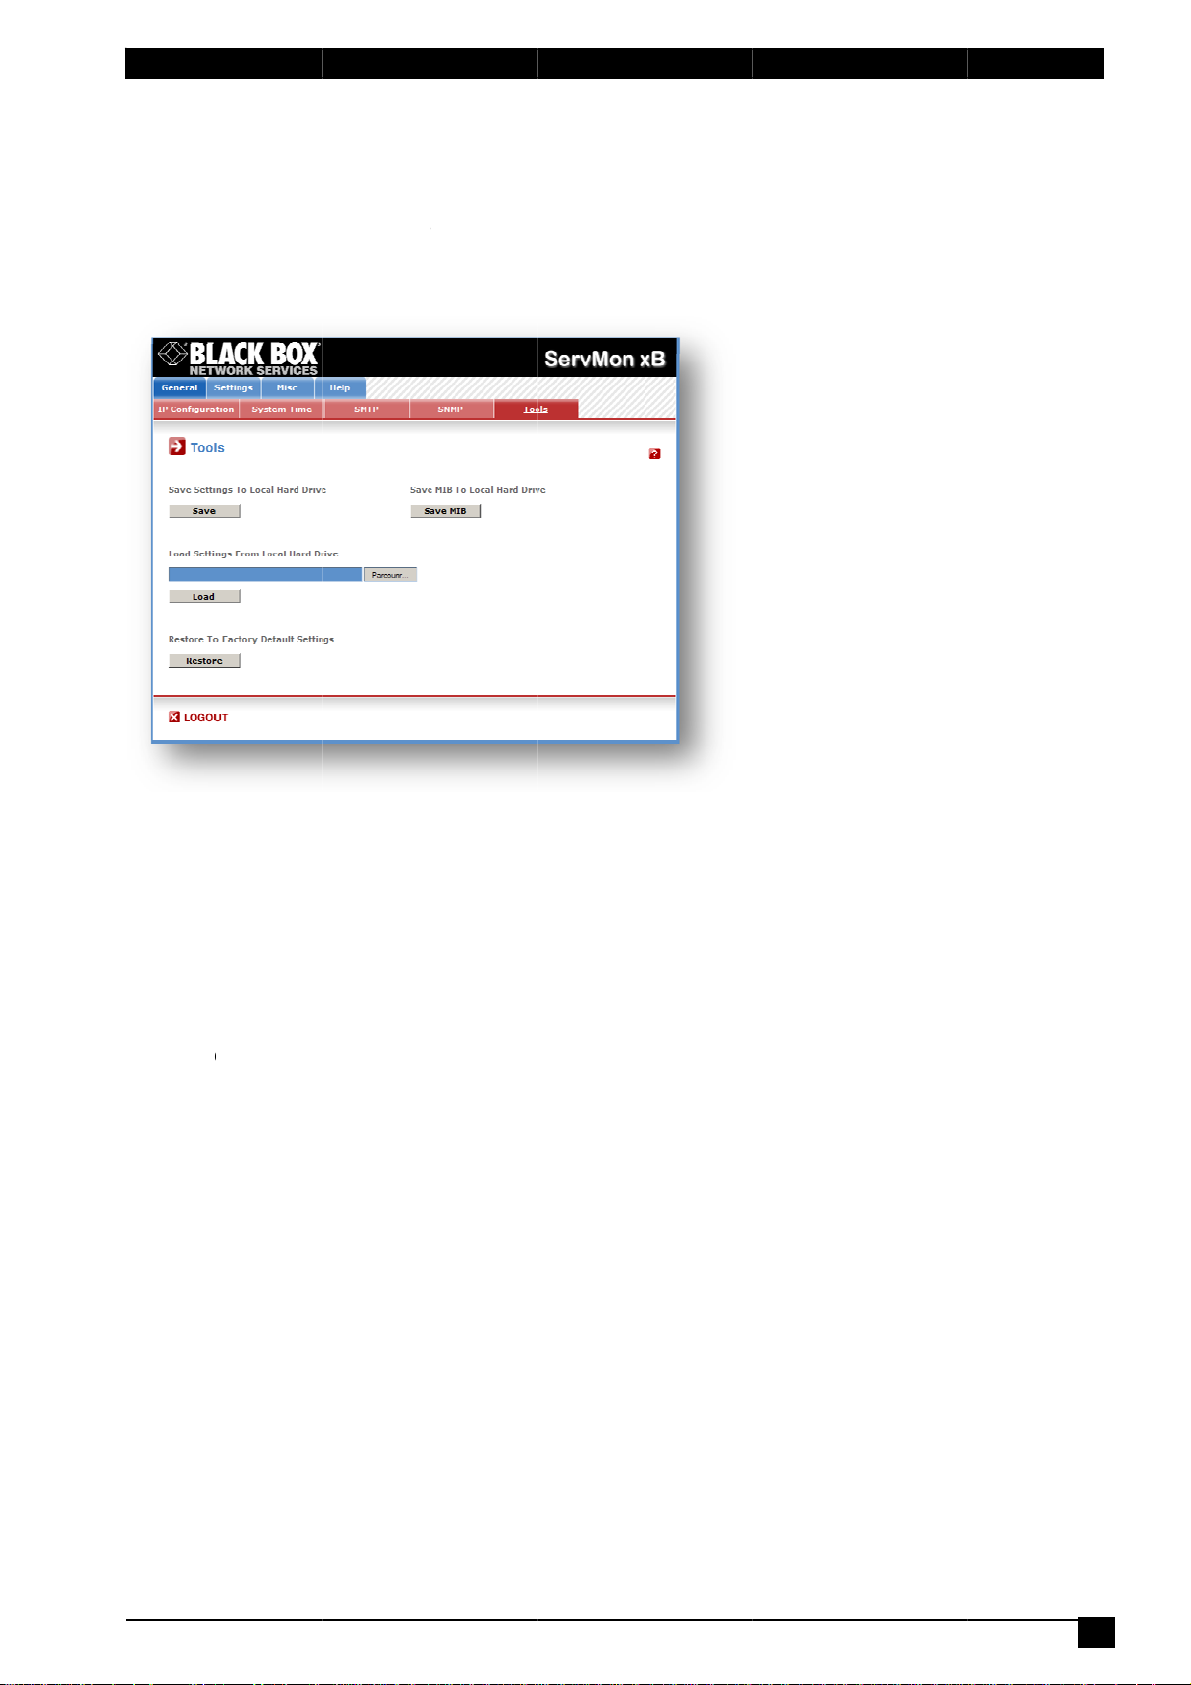
3.3.5. Ge
This page
- downloa
- upload a
- restore t
- downloa
neral / To
enables yo
and save t
n existing c
e factory s
the ServM
ls
to:
e current s
nfiguration
ttings
n xB MIB fi
ttings of yo
ile to your S
e on your P
r ServMon
rvMon xB
.
B on your
C
Save:
Click this
Load:
Click this
Restore:
Click this
Save MIB
Click this
LOGOUT
Click "Log
utton to sa
utton and s
utton if you
:
utton if you
ut" at the b
e the curre
lect a setti
want to rest
want to do
ttom of the
t system se
gs file you
re the fact
nload the S
page to exit
tings onto y
ant to down
ry default s
rvMon xB
the session
ur local har
load to the
ttings.
IB file onto
without savi
drive.
ervMon xB.
our local h
ng changes.
rd drive.
15
Page 18
m
t
a
f
e
e
a
m
d
o
d
d
c
P
d
o
c
r
v
t
s
n
p
a
p
t
E
c
d
o
w
u
e
o
e
c
v
s
h
n
e
h
e
T
t
n
d
o
c
a
w
u
o
a
Environ
ental monit
ring system
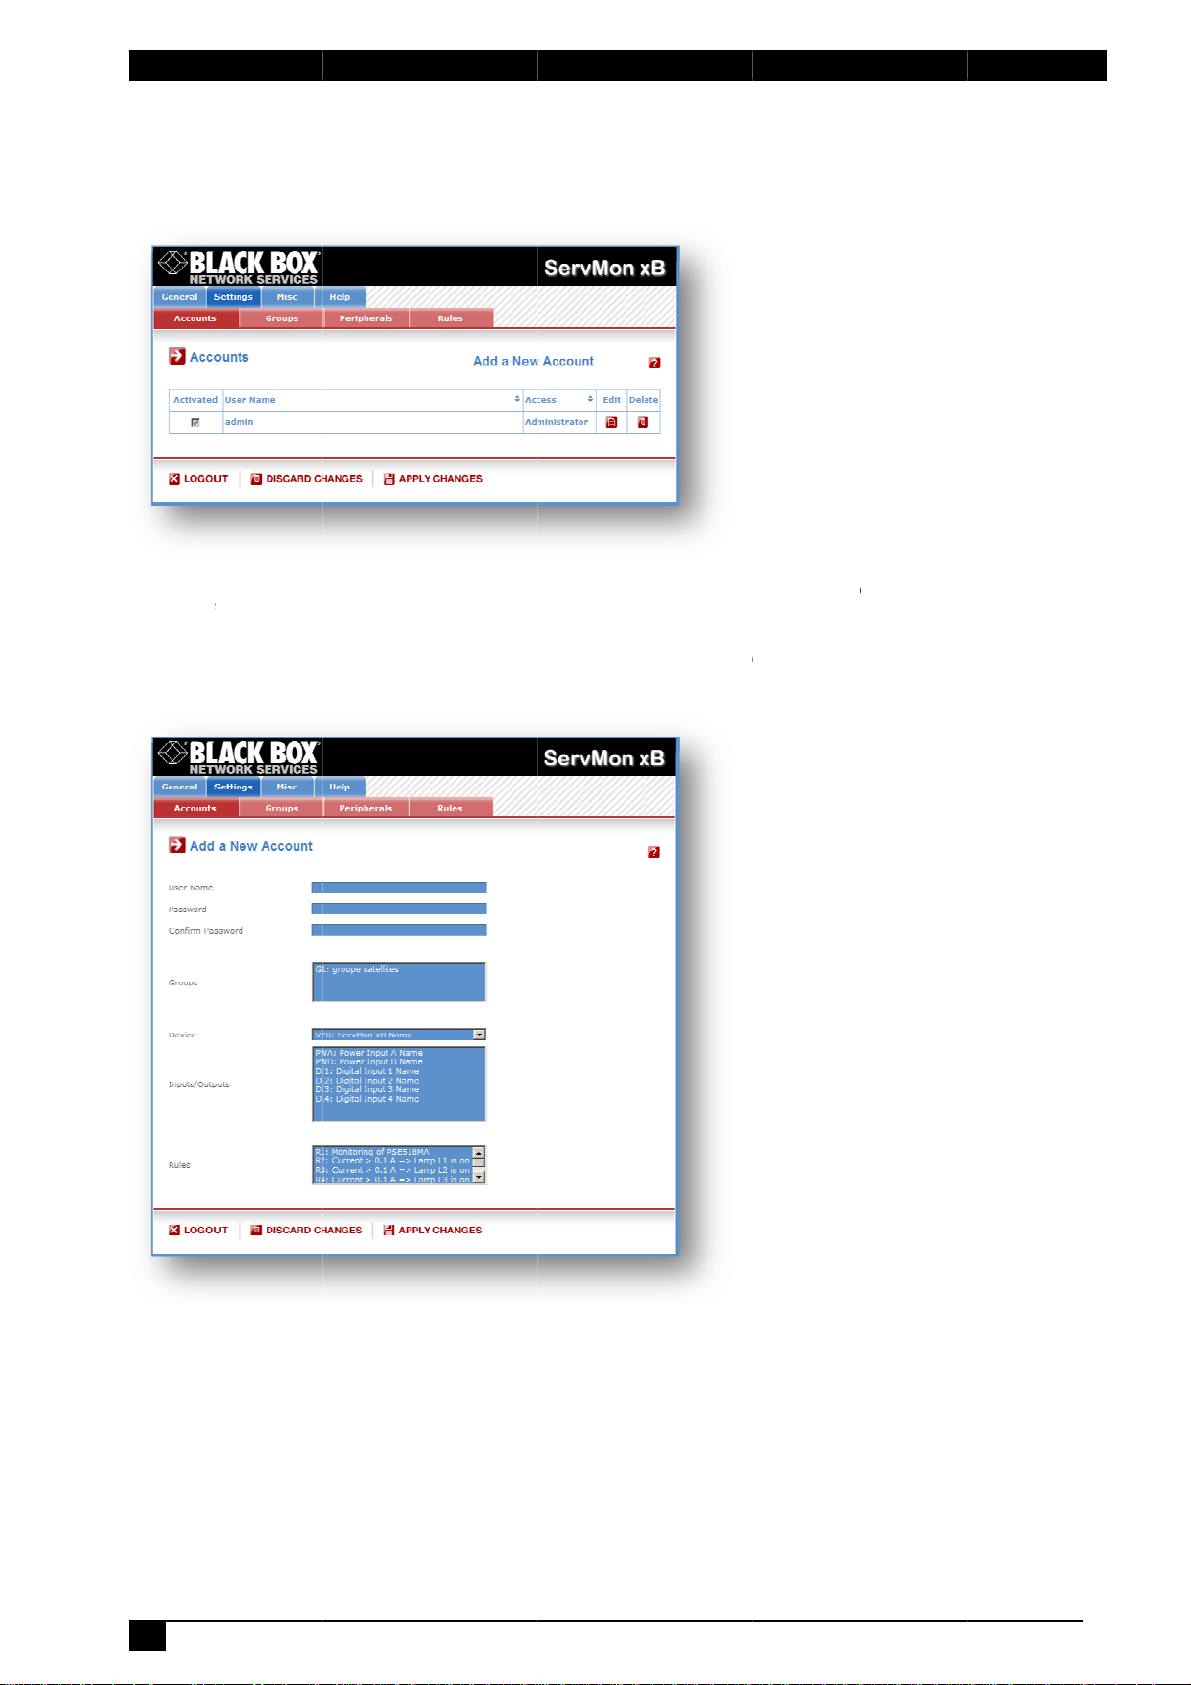
3.3.6. Se
This page
- To activ
- To modi
- To delet
- To creat
A new p
tings / Ac
is used to c
te or deacti
y an accoun
an existing
an accoun
ge appear
ounts
eate, activa
ate an acco
t, click on "
account, cli
, click on "A
, allowing y
e, deactivat
unt, check
dit" next to t
k on "Delet
d a New A
u to set all t
, modify an
r uncheck t
he correspo
" next to th
count" on t
he paramet
d delete up
e correspon
ding accou
correspon
e right side
rs of the ac
o 255 acco
ding checkb
t.
ing account
f the page.
ount.
nts.
ox.
.
User Na
In this fiel
and can c
Passwor
In this fiel
long, and
Confirm
In this fiel
16
e:
, enter the
ntain alpha
:
, enter the
an contain
assword:
, enter the
name you
umeric cha
assword yo
lphanumeri
assword ag
ant to give t
racters.
want to gi
c character
ain.
o the user.
e to the use
.
he name c
r. The pass
n be from 1
ord can be
to 32 char
from 4 to 32
cters long,
characters
Page 19

Environmental monitoring system
Groups:
This field is used to add or remove groups to the current account.
To add Groups to the current account, press the Ctrl key and click on the displayed Groups. The selected
Groups are marked dark blue and their IDs are listed at the right side of the Groups field.
Device:
In this drop-down list, choose a device from which you want to add Inputs or Outputs to the current
account.
Inputs/Outputs:
This field is used to add/remove Inputs or Outputs to/from the current account.
To add Inputs or Outputs to the current account, press the Ctrl key and click on the Inputs/Outputs of the
device selected in the previous field. The selected Inputs/Outputs are marked dark blue and their IDs are
listed at the right side of the Input/Output field.
The ServMon xB supports number of peripherals which are clearly identified by specific ID Codes.
LOGOUT:
Click "Logout" at the bottom of the page to exit the session without saving changes.
DISCARD CHANGES:
Click "Discard Changes" at the bottom of the page to discard all the changes you have made on this page.
APPLY CHANGES:
Click "Apply Changes" at the bottom of the page to save changes.
17
Page 20
m
t
x
u
P
e
o
a
y
M
a
l
s
o
o
o
c
n
e
m
e
a
s
t
t
s
e
o
t
e
x
o
p
C
v
c
o
t
f
u
s
e
l
e
o
e
v
d
d
p
o
a
o
n
f
e
o
s
p
f
o
h
Environ
ental monit
ring system
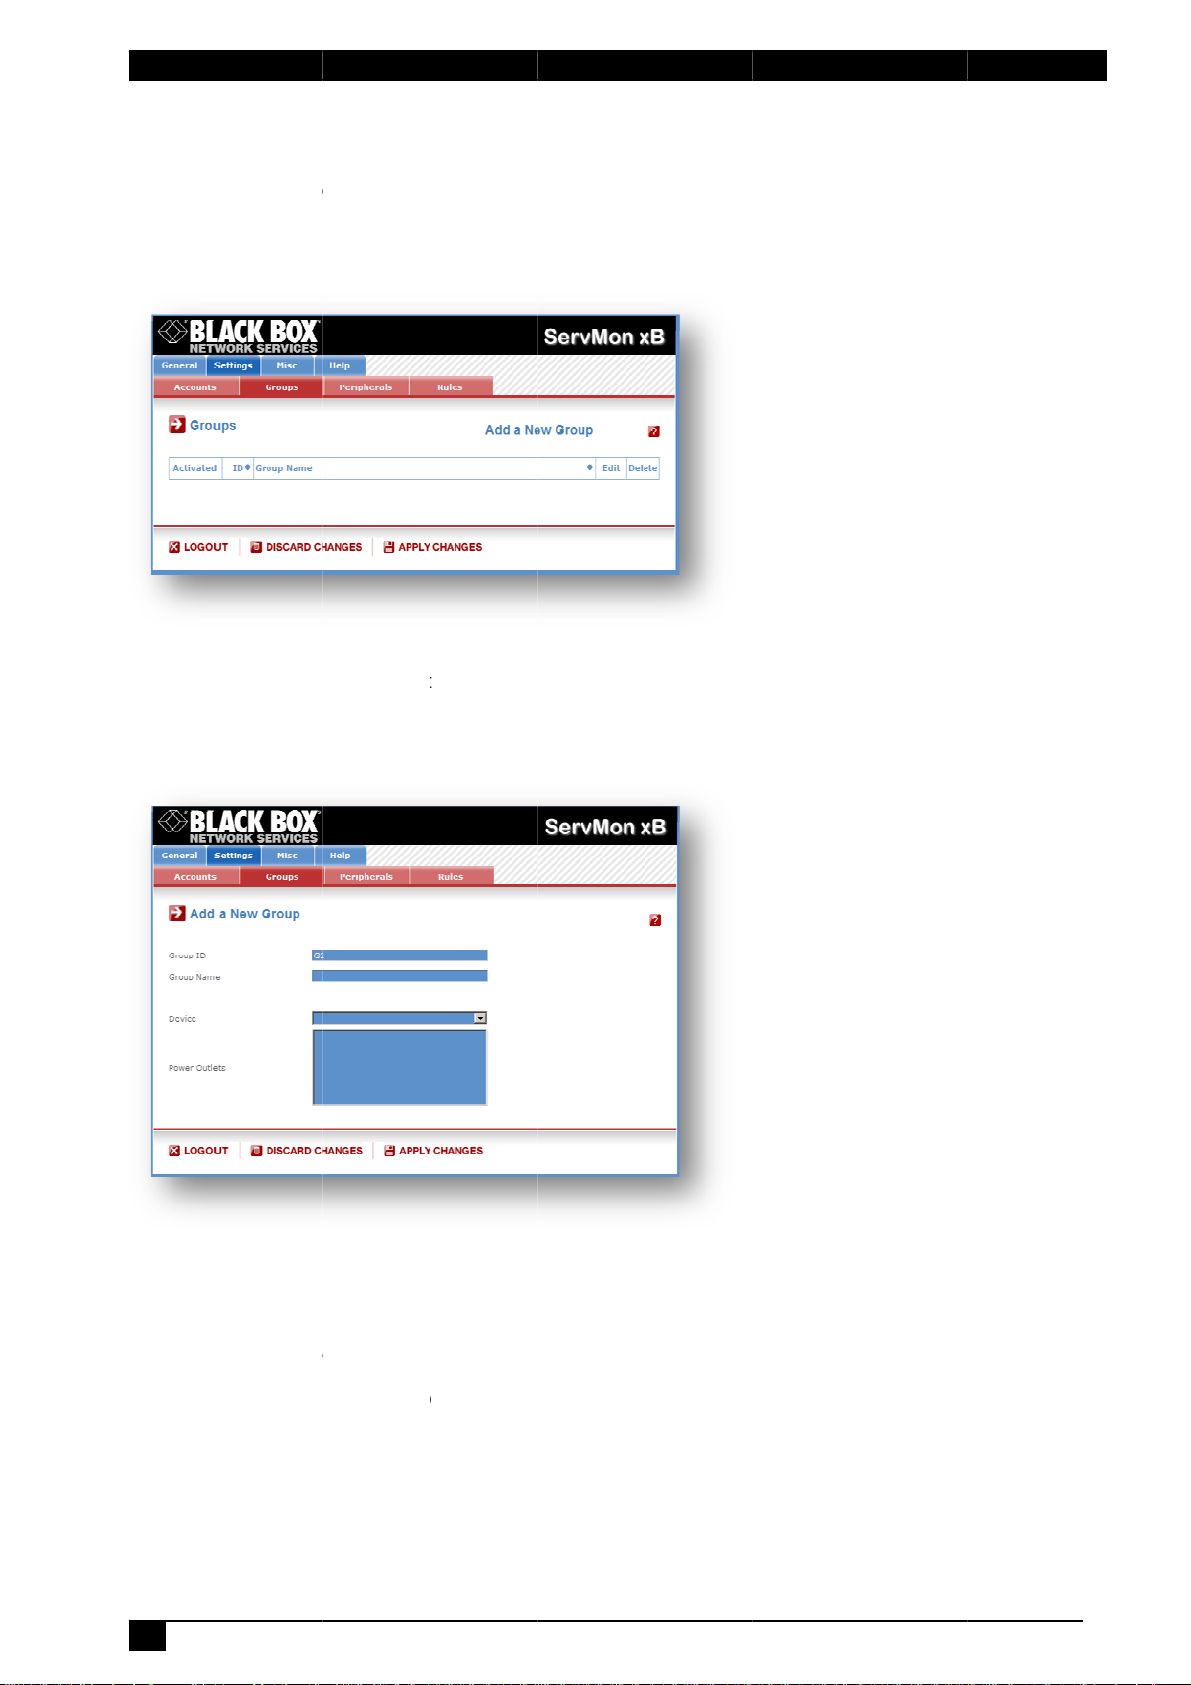
3.3.7. Se
This page
ServMon
using red
several e
- To delet
- To add
- To deact
- To add
allowing
tings / Gr
is used to
B. This fu
ndant pow
owerSwitch
an existing
r remove po
ivate a Grou
new group,
ou to set al
ups
reate, mod
ctionality is
r supplies.
8XS device
group, click
wer outlets
p, uncheck
click on "Ad
l parameter
ify and dele
particularly
You can cr
.
on "Delete"
o/from an e
he box "Acti
d a New Gr
of the grou
e groups o
useful if yo
ate groups
of the corre
isting group
vated" of th
up" on the r
.
power outl
have to c
including s
ponding de
, click on "E
correspon
ight side of t
ts which c
ntrol the p
veral powe
ice.
it" of the co
ing group.
he page. A
n be contr
wer supply
r outlets di
rresponding
ew page a
lled by the
of devices
tributed on
device.
pears,
Group Id:
The Serv
ID Codes
Group N
In this fie
character
Device:
In this dr
group.
18
on xB auto
used to iden
me:
d, enter th
long, and c
p-down list,
atically cr
tify groups s
name you
n contain a
choose a P
ates an ID
tart with the
want to gi
lphanumeri
wer Switch
ode to clea
letter "G".
e to the se
characters.
from which
rly identify e
ected grou
you want t
ach group o
. The nam
add power
Power Out
can be fr
outlets to t
lets. All the
m 1 to 32
e selected
Page 21

Environmental monitoring system
Power Outlets:
This field is used to add and remove power outlets to/from the group.
- To add power outlets to the group, press the Ctrl key and click on the power outlets of the Power Switch
selected in the field above. The selected power outlets are marked dark blue and their names are listed at
the right of the field "Power Outlets".
- To remove a power outlet from the group, press the Ctrl key and click on the power outlet you wish to
remove.
LOGOUT:
Click "Logout" at the bottom of the page to exit the session without saving changes.
DISCARD CHANGES:
Click "Discard Changes" at the bottom of the page to discard all the changes you have made on this page.
APPLY CHANGES:
Click "Apply Changes" at the bottom of the page to save changes.
19
Page 22

m
t
h
n
S
E
e
D
B
B
o
n
e
O
O
n
u
t
e
o
p
r
p
a
o
o
r
e
e
p
M
u
B
h
h
a
R
B
x
e
t
e
p
e
e
n
o
B
m
h
r
t
B
n
b
s
r
a
h
t
2
a
c
6
t
o
t
t
s
m
n
f
M
e
e
n
p
n
h
r
p
e
r
x
S
a
e
s
d
e
o
r
t
e
L
e
o
l
o
y
e
e
a
d
e
P
m
o
u
h
e
o
R
c
n
s
e
e
s
M
a
c
e
d
o
a
s
s
v
c
e
P
o
d
d
s
Environ
ental monit
ring system
3.3.8. Se
The Perip
the ServM
been con
Following
• 16 x
• 16 x
• 16 x c
• 32 x s
• 16 x
• any x
• any x
You can c
behind an
Connecti
1. Set th
- Do N
- Do N
2. Using
After con
1. Open
2. Enter
3. Click
If the peri
on this pa
symbol is
The Peri
peripher
Explorer
anoth
of the
(defa
=> Th
tings / Pe
erals page
on xB. This
ected to the
xBus periph
ecure Powe
nergyMeter
urrent probe
nsors (tem
igital Input
us Extende
us Optoco
nnect an x
xBus perip
g an xBus
e dip switc
r peripheral
T connect t
T use the s
a standard
ServMon x
ecting an
your brows
lt: http://192
he administ
home pag
n the Settin
heral is pro
ge after a d
ed.
heral pag
l TAB agai
r Mozilla F
ipherals
is used to e
page is als
ServMon x
rals can be
r Switch Sat
for real-time
s
erature, hu
odules (wit
rs
plers
us periphe
eral already
peripheral
es of the x
already co
he xBus ca
me addre
J45 Netwo
or behind
Bus perip
r and log in
.168.100.20
rator name
appears.
gs and then
erly conne
lay of 1 to
is not au
n (or push
irefox).
able and c
very useful
.
connected
ellite (8-Por
power con
idity and a
16 digital i
al to each o
connected t
o the Serv
us periphe
nected to th
le (and th
s for two di
k cable, co
n xBus peri
eral, you M
o the Admi
/sysadmin.
nd passwo
on the Peri
ted to the S
0 seconds.
omatically
[F5] or p
nfigure the
to give an o
o the ServM
) or Power
umption me
bient light)
puts) or 16
the 4 conn
o the ServM
on xB:
ral so that t
xBus (see
power cab
fferent xBu
nect the xB
heral alrea
UST enabl
istrator's C
tm)
d (default fo
herals Tab.
rvMon xB i
In this cas
refreshed,
ess <CTR
Bus periph
verview of a
on xB Envir
witch Satel
suring
x push butt
ctors locate
on xB (Dais
e selected
user's guid
le if need b
periphera
s peripher
y connecte
it in the P
nfiguration
both = ad
will be aut
, the colour
so you ne
-R> on yo
rals which
ll the periph
nmental M
ite (1-Port)
ns or 16 x I
d on the ba
Chain Con
I/O addres
of the corr
) before s
ls
l to an xBu
to the Serv
ripherals P
age
in).
matically re
of the corr
ed to refre
r keyboar
ave been c
rals which
nitoring Sy
proximity
k of the Ser
ection).
does not
sponding p
tting its DI
connector
on xB.
ge:
ognized an
sponding E
sh it by cl
if you u
nnected to
re or have
tem:
ensors
Mon xB or
onflict with
ripheral).
switches
n the back
displayed
it and Info
icking the
e Internet
20
Page 23

e
/
n
h
h
c
e
e
r
a
x
h
a
v
v
h
e
g
o
o
r
e
n
n
g
s
e
p
o
t
r
f
c
s
e
t
e
o
h
e
a
t
h
g
r
a
d
e
o
a
s
e
R
a
A
n
o
e
t
e
s
l
t
k
o
c
A
f
o
t
p
e
o
w
o
e
o
y
t
n
p
a
d
n
t
e
g
r
x
y
r
n
c
y
,
n
d
h
e
e
r
h
y
z
s
s
Environm
ntal monito
ring system
Problem
• If you
• The y
• The P
xB, a
perip
perip
confli
the P
longe
TAB
Firefo
Troublesh
choose any
address c
eral will be
eral, remov
t and recon
ripherals pa
be reached
eripheral pa
gain (or pu
llow warni
).
oting
setting that
nflict occurs
eplaced by
its power
ect the peri
ge and their
g triangle i
(for instanc
e is not au
h [F5] or pr
is already in
and the co
a yellow w
able if nee
pheral. If th
Edit and Inf
also displ
if a cable i
omatically r
ss <CTRL-
use by ano
responding
rning triangl
be, chang
conflict is
Symbol wi
yed to poin
disconnect
freshed, so
> on your
her xBus p
Edit and Inf
e. In that ca
the DIP s
olved, all c
l be red.
out that a
d).
you need t
eyboard if
ripheral co
symbol of
se, disconn
itch settin
nnected pe
connected
refresh it b
ou use Inte
nected to th
he previous
ct your last
s to solve t
ipherals will
Bus periph
clicking th
net Explore
e ServMon
connected
connected
e address
appear on
ral can no
peripheral
or Mozilla
The Perip
- To activ
- To deact
remains
- To remo
to delet
- To know
- To confi
The Ser
A perip
erals page
te a periph
ivate a peri
physically c
Mon xB ca
e a periphe
eral canno
it from the
the Firmwa
ure or modi
is used to c
ral, check t
heral, unch
nnected to
nnot be de
ral, click on
be deleted
group or t
e version of
y the settin
nfigure all p
e box "Activ
ck the box "
the ServMo
ctivated.
he corresp
if it belong
e rule.
a device, cli
s of a devic
eripherals c
ted" of the
ctivated" o
xB, it will n
nding “Dele
s to a grou
ck on the co
, click on th
nnected to
orrespondi
the corres
longer be
e” button.
or a rule. I
rresponding
e correspon
he ServMo
g device.
onding devi
ccessible b
n that case
“Info” butto
ing "Edit" b
xB.
e. Even if t
its authori
you will fir
.
utton.
e device
ed users.
t have
21
Page 24

m
e
e
e
t
o
M
f
f
f
f
f
f
f
f
f
f
f
d
s
o
r
r
t
s
m
A
1
a
a
a
a
a
a
a
a
a
n
t
d
d
S
o
a
B
A
e
e
e
e
e
e
e
e
e
e
a
e
e
p
a
s
r
C
r
a
o
e
e
e
e
u
u
n
a
o
m
h
P
g
r
T
r
u
h
M
e
s
a
a
a
s
s
e
c
a
E
/
m
n
a
f
x
y
o
e
h
o
0
m
e
n
o
s
n
b
n
d
p
u
p
p
Environ
ental monit
ring system
3.3.8.1. S
This pag
ServMon
supported
Procedur
1. Open
2. Enter
3. Click
to defi
ttings / Pe
enables to
xB and all
and appear
:
you browse
he administ
n the Settin
ne the label
ipherals -
label both
connected
in log files,
and log in t
rator name
gs Tab and
.
evices lab
power sup
evices. N
yslog mes
the Admini
nd passwo
then on the
lling
ly inputs, t
mes of up
ages, SNM
strator's Pa
d (default fo
Périphrasa
e 4 digital
to 32 alph
traps and
e, (ex. http:
both = ad
ab. Followi
inputs locat
numeric c
mails to av
/192.168.1
in). The ho
g new pag
d on the
aracters in
id confusio
0.202/sysa
e page ap
appears, a
ack of the
length are
s.
min.htm).
ears.
llowing you
ID:
The Serv
• EMS0 i
• PW
• DI
• DIM
• S
• T
• TH
• TA
• TP
• PB
• CB
• EM
Name:
In this fiel
supply or
character
on xB auto
dentifies the
ollowed by “
ollowed by
ollowed by
ollowed by
ollowed by
ollowed by
ollowed by
ollowed by
ollowed by
ollowed by
ollowed by
, enter the
Digital Inpu
.
atically cre
ServMon x
” or “B” ide
to 4 identifi
number id
number id
number id
number id
number id
number id
number id
number id
number id
ame you w
. The nam
ates an ID
ntifies powe
s the Digit
ntifies the D
ntifies the p
ntifies the t
ntifies the t
ntifies the t
ntifies the t
ntifies the p
ntifies the c
ntifies the e
nt to give t
can be fro
ode to clea
supply inp
l Inputs of t
igital Input
wer switch
mperature
mperature
mperature
mperature
sh buttons
rrent probe
ergy meter
the select
1 to 32
ly identify e
t A and B o
e ServMon
odules
s
ensors
nd humidity
nd ambient
nd proximit
d device an
haracters l
ch device a
the ServM
B
sensors
light sensor
sensors
d its analog
ng, and ca
d each inp
n xB
or digital in
contain al
t.
uts, power
hanumeric
22
Page 25

Environmental monitoring system
LOGOUT:
Click "Logout" at the bottom of the page to exit the session without saving changes.
DISCARD CHANGES:
Click "Discard Changes" at the bottom of the page to discard all the changes you have made on this page.
APPLY CHANGES:
Click "Apply Changes" at the bottom of the page to save changes.
23
Page 26

m
e
d
e
o
c
h
e
O
O
e
e
t
t
o
y
p
a
o
/
h
w
h
h
a
x
o
r
a
4
S
h
w
s
R
r
w
r
t
e
.
e
o
u
h
a
g
s
e
s
h
P
y
a
e
r
o
o
s
a
c
a
t
c
c
t
e
c
C
e
e
d
e
r
.
r
p
o
0
r
n
c
n
a
t
y
e
R
o
t
c
h
b
o
w
e
i
n
r
M
n
L
o
e
t
e
e
e
k
a
n
o
r
e
o
t
m
l
t
u
r
s
S
o
y
h
h
P
o
o
e
m
a
d
i
l
y
r
c
s
c
p
g
o
s
t
c
e
e
r
Environ
ental monit
ring system
3.3.8.2. S
ttings / Pe
Up to 16
electrical
8-port to
already c
Power Swit
evices on
ach of the
nnected to t
To conne
1. Set t
e dip switc
anoth
- Do N
- Do N
2. Using
the S
a standard
rvMon xB o
3. Conn
ct the powe
To config
ure the Po
1. Open
(ex. h
you browse
tp://192.168
2. Enter
he administ
3. Click
n the Settin
If the Po
displayed
wer Switch
on this pag
and Info s
The Peri
peripher
heral pag
l TAB agai
Explorer
Problem
Troublesh
xB, a
Switc
choose any
conflict occ
will be cha
• If you
its po
Switc
again. If
Perip
erals page
TAB
eripheral pa
gain (or pu
• The P
Firefo
t a Power
r Power S
T connect
T use the
mbol is red
r Mozilla F
er cable, c
).
ipherals - e
ches 8-Port
nd off as w
connector
he ServMon
witch to t
es of the
itch alread
the xBus c
ame addr
J45 netwo
behind an
r cable(s) to
er Switch,
and log in t
.100.202/sy
rator name
gs and then
is properly
after a del
is not au
n (or push
irefox).
oting
setting that
rs and the
nged to bla
ange the DI
the conflict
nd their Edi
e is not au
h [F5] or pr
PowerSwit
or Power S
ll as reboot
located on
xB (Daisy
e ServMon
ower Switc
installed (s
ble and th
ss for two
k cable, con
ther xBus p
your Powe
use followi
the Admini
admin.htm)
nd passwo
on the Peri
onnected t
y of up to 6
omatically
[F5] or p
is already i
orrespondi
k. In that c
P switch set
is solved,
t and Info S
omatically r
ss <CTRL-
h settings
witches 1-P
them remo
the back of
hain Conne
xB, use foll
h so that t
e user's gui
power ca
ifferent P
nect the Po
ripheral alr
Switch dev
ng Log in p
strator's Co
d (default fo
herals Tab.
the Serv
seconds. I
refreshed,
ess <CTR
use by an
g Edit and
se, disconn
ings to solv
all connect
mbol will b
freshed, so
> on your
rt can be
ely. You ca
the ServM
tion).
owing proc
e selected
de of the co
le before s
wer Switch
er Switch t
ady connec
ce.
rocedure:
figuration P
both = ad
on xB it wi
this case,
so you ne
-R> on yo
ther Powe
Info symbol
ct your last
the addre
d Power
red.
you need t
eyboard if
ttached to t
connect a
n xB or be
edure:
I/O address
responding
tting its DI
devices.
an xBus c
ed to the S
age,
in). The ho
l be autom
he colour of
ed to refre
r keyboar
Switch con
of the prev
connected
s conflict an
witches wi
refresh it b
ou use Inte
e ServMon
Power Swit
ind an xBu
does not
Power Swit
switches,
nnector on
rvMon xB.
e page ap
tically reco
the corresp
sh it by cl
if you u
nected to th
ous connec
Power Swit
d reconnect
l now app
clicking th
net Explore
xB to turn
h 1-port or
peripheral
onflict with
ch).
the back of
ears.
nized and
nding Edit
icking the
e Internet
e ServMon
ed Power
h, remove
the Power
ar on the
peripheral
or Mozilla
24
Page 27

e
u
o
M
u
f
f
e
d
s
d
t
u
d
3
o
p
o
o
a
d
o
5
f
:
o
c
H
p
f
e
o
a
A
n
a
d
n
s
e
c
c
w
p
e
h
o
o
e
"
g
a
e
t
t
A
e
a
w
n
a
a
e
n
n
l
t
w
t
o
p
r
e
o
t
e
o
o
t
t
n
t
o
n
a
g
w
a
s
u
o
e
c
f
a
o
r
h
y
S
f
w
h
o
d
d
e
u
a
k
c
r
m
w
o
r
o
o
e
w
y
a
e
r
a
f
n
f
Environm
ntal monito
ring system
To config
"Edit" butt
Power Sw
ID:
The Serv
power inp
• S
• PW
• follow
Name:
In this fiel
character
Power Su
In this fiel
32 charac
Power O
In this fiel
from 1 to
Default P
In the dro
You can c
- "On" if y
- "Off" if y
- "Last St
failure.
Power up
In this fiel
delay bef
and 6553
Function
In this fiel
function o
LOGOUT
Click "Log
DISCARD
Click "Dis
APPLY C
Click "Ap
re or modi
n in the P
itch device.
on xB aut
t(s) and its
ollowed by
ollowed by “
d by 1 to 8
, enter the
long and c
pplies:
, enter the
ers long an
tlets:
, enter the
2 character
wer-Up:
-down lists,
hoose betw
u want the
u want the
tus" if you
delay:
, enter the
re the pow
seconds, t
delay:
d, enter the
an outlet).
ut" at the b
CHANGES
ard Chang
ANGES:
ly Changes
y the settin
ripherals p
matically cr
power outle
number be
” or “B” ide
identifies th
ame you w
n contain al
name you
can contai
ame you w
long and c
choose for
en:
orrespondi
orrespondi
ant that the
ower up de
r outlet will
e value 0 m
delay you
ttom of the
:
s" at the bo
at the botto
s of the c
ge. A new
ates an ID
(s).
ween 1 and
ntifies powe
Power outl
nt to give t
phanumeric
ant to give
alphanum
nt to give t
n contain a
ach power
g power ou
g power ou
correspondi
ay you wan
ake the defi
eans that n
ant to defi
page to exit
tom of the p
m of the pa
nnected Po
age appear
Code to cle
16 identifie
supply inp
t output,
the selecte
characters.
o the two p
ric characte
each pow
lphanumeri
utlet the de
let to be alw
let to be alw
g power ou
to define fo
ned status
delay has t
e before th
the session
ge to disca
e to save c
er Switch
s, allowing
rly identify
the Power
t A and B o
d Power S
wer input 1
rs.
r outlet of t
characters.
ault status t
ays switche
ays switche
tlet takes ag
r each pow
fter power
be applied
e execution
without savi
d all the ch
anges.
device, clic
ou to set al
each conne
witch unit,
each Powe
itch. The na
and 2. The
e Power S
apply afte
On after p
Off after p
ain the stat
r outlet. Po
p. The dela
after power
of a functio
ng changes.
nges you h
on the cor
l the param
ted Power
Switch,
e can be f
name can b
itch. The n
power-up.
wer-up.
wer-up.
it was in be
er up delay
can be set
up.
n (for exam
ve made o
responding
ters of the
Switch, its
om 1 to 32
e from 1 to
me can be
ore power
means the
between 1
ple Restart
this page.
25
Page 28

m
e
t
m
c
O
O
M
t
t
o
s
r
p
a
o
/
c
v
a
x
o
r
a
o
h
t
s
h
s
r
t
l
y
e
o
y
d
e
g
s
S
e
a
e
v
e
u
a
s
o
r
l
o
s
a
d
t
t
p
,
a
e
t
e
t
y
x
v
s
a
o
s
h
.
r
p
M
r
i
t
s
e
R
r
B
t
g
t
D
e
y
r
n
r
,
L
n
y
n
o
h
k
e
t
t
e
r
s
x
t
m
a
u
o
d
o
y
n
o
c
M
m
d
d
o
s
o
y
r
e
n
w
b
p
d
s
v
n
t
e
r
Environ
ental monit
ring system
3.3.8.3. S
ttings / Pe
Up to 32
emperature,
and proxi
connect a
peripheral
sensor to e
already con
To conne
1. Set th
senso
e dip switc
r already ins
- Do N
- Do N
T connect
T use the
2. Using
Serv
a standard
on xB or be
To config
ure the sen
1. Open
(ex. h
you browse
tp://192.168
2. Enter
he administ
3. Click
n the Settin
If the sen
this page
symbol is
The Peri
peripher
or is proper
after a dela
ed.
heral pag
l TAB agai
Explorer
confli
chang
to sol
senso
Troublesh
choose an
t occurs an
ed to black.
e the addr
rs will now a
Problem
• If you
• The P
TAB
Firefo
eripheral pa
gain (or pu
).
ity sensors
t an sens
r Mozilla F
ipherals -
temperatur
can be att
ch of the 4
nected to th
r to the Ser
es of the s
talled (see
he xBus c
ame addre
RJ45 netw
ind anothe
or, use fol
and log in t
.100.202/sy
rator name
gs and then
y connecte
of up to 6
is not au
n (or push
irefox).
oting
setting tha
the corres
In that case
ss conflict
ppear on th
e is not au
h [F5] or pr
ensors set
& humidit
ched to the
connectors
ServMon
Mon xB, u
nsor so th
ser's guide
ble before
s for two d
rk cable, co
xBus perip
owing Log
the Admini
admin.htm)
nd passwo
on the Peri
to the Serv
0 seconds.
omatically
[F5] or p
is already
onding Edi
disconnect
nd reconne
Peripheral
omatically r
ss <CTRL-
ings
, temperatu
ServMon x
located on
B (Daisy Ch
e followin
t the selec
f the corres
etting its
ifferent sen
nnect the s
eral alread
in procedu
strator's Co
d (default fo
herals Tab.
on xB it wi
In this case
refreshed,
ess <CTR
n use by a
and Info s
your last co
ct the sens
page and t
freshed, so
> on your
e and ambi
to monitor
he back of
ain Connec
procedur
ed I/O add
ponding sen
IP switche
sors
nsor to an
connected
e:
figuration P
both = ad
ll be autom
the colour
so you ne
-R> on yo
other sens
mbol of the
nected sen
r again. If t
eir Edit an
you need t
eyboard if
nt light sen
environmen
he ServMo
ion).
:
ess does n
sor).
Bus conne
o the Serv
age,
in). The ho
tically recog
of the corre
ed to refre
r keyboar
r connecte
previous c
sor, change
he conflict i
Info Symb
refresh it b
ou use Inte
sors or 16 t
tal condition
xB or behi
t conflict
tor on the
on xB.
e page ap
nized and di
sponding E
sh it by cl
if you u
to the Ser
nnected se
the DIP swi
solved, all
l will be red.
clicking th
net Explore
mperature
s. You can
d an xBus
ith another
ack of the
ears.
splayed on
it and Info
icking the
e Internet
Mon xB, a
sor will be
ch settings
connected
peripheral
or Mozilla
26
Page 29

e
u
e
T
y
p
a
s
i
i
r
e
A
e
r
a
d
t
m
u
t
n
P
m
Environm
ntal monito
ring system
To config
page. A n
humidity (
re or modif
w page ap
H), temper
the setting
ears, allow
ture & amb
of a senso
ng you to s
ent light (T
, click on th
t all the pa
) or temper
correspon
ameters of
ture & proxi
ing "Edit" b
he tempera
ity (TP) se
tton in the
ure (T), te
sors.
eripherals
perature &
27
Page 30

m
D
M
f
f
f
f
M
w
a
s
d
d
s
m
d
p
d
:
o
c
H
p
o
m
a
a
a
a
e
a
a
w
e
a
o
o
e
"
t
t
t
t
o
a
a
e
e
a
t
C
t
e
c
w
s
a
g
r
s
s
s
s
o
e
n
r
h
a
e
d
e
m
y
o
a
e
o
s
e
e
a
o
o
n
Environ
ental monit
ring system
Sensor I
The Serv
• T
• TH
• TA
• TP
The Serv
sensors
Sensor N
In this fiel
character
Analog In
Name:
In this fiel
Unit:
In this fiel
Graph:
Check thi
Period (
In this fiel
Digital In
Name:
In this fiel
LOGOUT
Click "Log
DISCARD
Click "Dis
APPLY C
Click "Ap
:
on xB auto
ollowed by
ollowed by
ollowed by
ollowed by
on xB su
ith digital i
me:
d, enter th
long, and c
puts
enter the n
enter the u
box if you
inutes):
enter the p
uts
enter the n
ut" at the b
CHANGES
ard Chang
ANGES:
ly Changes
atically cre
number be
number be
number be
number be
pports a t
nput.
name you
n contain a
me you wa
nit of measu
ant a displ
riod betwe
me you wa
ttom of the
:
s" at the bo
at the botto
ates an ID
ween 1 and
ween 1 and
ween 1 and
ween 1 and
tal of up
want to giv
lphanumeri
nt to give to
rement you
y of the ana
n two mea
nt to give to
page to exit
tom of the p
m of the pa
ode to clea
32 identifie
32 identifie
32 identifie
16 identifie
o 32 sens
to the sel
characters.
the analog i
ant to be d
log inputs.
urements.
the digital in
the session
ge to disca
e to save c
ly identify e
each temp
each humi
each ambi
each proxi
rs but onl
cted sens
puts.
isplayed (°C
put.
without savi
d all the ch
anges.
ch connect
rature sens
ity sensor
nt light sen
ity sensor
16 temp
r. The nam
, %RH...).
ng changes.
nges you h
d sensor.
r
or
rature and
can be fr
ve made o
proximity
m 1 to 32
this page.
28
Page 31

e
e
x
M
n
…
c
e
e
O
O
o
e
t
t
o
t
y
p
a
o
/
M
l
c
h
a
x
r
u
o
f
e
t
I
e
t
s
i
r
t
d
e
.
e
o
y
u
m
n
a
g
s
D
P
n
o
e
l
o
l
a
s
r
h
o
o
s
a
e
a
t
a
c
w
n
t
e
s
h
x
r
c
e
n
o
.
r
p
e
0
r
b
(
l
y
e
R
a
s
y
r
u
t
r
g
h
d
o
n
r
v
n
L
a
E
a
e
k
r
c
(
n
d
o
o
M
d
m
w
t
u
o
w
t
o
y
s
a
c
n
e
s
p
t
m
m
d
o
t
r
s
y
r
a
c
c
e
p
o
s
c
c
h
p
e
r
Environm
ntal monito
ring system
3.3.8.4. S
ttings / Pe
Up to 16
the Serv
located o
xB (Daisy
Digital Inp
on xB to m
the back o
Chain Conn
3.3.8.4.1.
Digital Inpu
Up to 16
detectors
To conne
t a Digital
1. Set th
anoth
r Digital Inp
- Do N
- Do N
T connect
T use the
2. Using
back
a standard
f the ServM
3. Conn
ct the powe
To config
ure the Dig
1. Open
(ex. h
you browse
tp://192.168
2. Enter
he administ
3. Click
n the Settin
If the Digi
displayed
and Info s
al Input Mo
on this pag
mbol is red
The Peri
peripher
Explorer
heral pag
l TAB agai
r Mozilla F
Problem
Troublesh
• If you
Serv
Digita
Input
confli
Perip
choose an
on xB, a co
Input Mod
Module, re
t and recon
erals page
TAB
Firefo
eripheral pa
gain (or pu
).
• The P
Digital Inp
) can be at
dip switch
ipherals -
t Modules,
nitor enviro
the ServM
ction).
t Modules
ut Modules
ached to th
nput Modu
s on the b
ut Module a
he xBus c
ame addre
RJ45 netwo
on xB or be
r adapter(s)
tal Input M
and log in t
.100.202/sy
rator name
gs and then
ule is prop
after a del
is not au
n (or push
irefox).
oting
setting th
nflict occurs
le will be
ove its po
ect it agai
nd their Edi
e is not au
h [F5] or pr
igital Input
ush Button
mental con
n xB or be
with 16 in
ServMon
e to the Se
ttom of the
ready install
ble and th
s for two d
k cable, co
ind another
to your Digit
dule, use f
the Admini
admin.htm)
nd passwo
on the Peri
rly connect
y of up to 6
omatically
[F5] or p
t is already
and the cor
hanged to
er adapter
. If the conf
t and Info S
omatically r
ss <CTRL-
settings
or Temper
ditions. You
ind an xBu
puts for dr
B to monito
vMon xB,
ase so tha
ed (see use
Power ada
ifferent Dig
nect the Di
xBus perip
al Input Mo
llowing L
strator's Co
d (default fo
herals Tab.
d to the Ser
seconds. I
refreshed,
ess <CTR
in use by
responding
lack. In th
s), change
ict is solved
mbol will b
freshed, so
> on your
ture and P
can conne
peripheral
contacts
environme
se followin
the selecte
's guide of t
pter(s) bef
ital Input M
ital Input
eral already
ule.
g in proce
figuration P
both = ad
Mon xB it
this case,
so you ne
-R> on yo
nother Digi
dit and Inf
t case, disc
the DIP s
, all connec
red.
you need t
eyboard if
oximity sen
t them to e
already con
door conta
tal conditio
g procedur
I/O addre
he Digital In
re setting i
dules
odule to an
connected t
ure:
age,
in). The ho
ill be auto
he colour of
ed to refre
r keyboar
tal Input M
symbol of
onnect you
itch setting
ed devices
refresh it b
ou use Inte
ors can be
ch of the 4
nected to th
ts, smoke
s.
:
s does not
ut Module).
s DIP swit
xBus conn
o the ServM
e page ap
atically reco
the corresp
sh it by cl
if you u
dule conne
he previous
last conne
to solve t
will now ap
clicking th
net Explore
ttached to
connectors
e ServMon
and water
onflict with
hes
ctor on the
on xB.
ears.
gnized and
nding Edit
icking the
e Internet
ted to the
connected
ted Digital
e address
ear on the
peripheral
or Mozilla
29
Page 32

m
u
A
g
M
f
f
f
d
s
d
p
l
s
o
f
y
a
m
a
A
a
a
n
c
h
a
y
g
t
A
t
w
a
n
u
g
e
C
r
t
c
o
a
c
s
r
s
u
s
t
a
w
m
a
a
a
f
l
u
s
e
t
i
e
u
m
e
u
p
u
e
o
o
Environ
ental monit
ring system
To config
Peripheral
new pa
re or modi
s page.
e appears,
the settin
llowing you
s of the Di
to set all th
ital inputs,
parameter
click on the
of the Digit
correspond
l Inputs.
ing "Edit" b
tton in the
ID:
The Serv
• DIM
• PW
• DI
Name:
In this fiel
character
Power Su
In this fiel
be from 1
Digital In
Name:
In this fie
character
on xB auto
ollowed by
ollowed by “
ollowed by
, enter the
long, and c
pplies:
, enter the
to 32 chara
uts
ds, enter t
long, and c
atically cre
number be
” or “B” ide
number be
name you
n contain a
ame you w
ters long, a
e name yo
n contain a
ates an ID
ween 1 and
ntifies powe
ween 1 and
ant to give
lphanumeri
nt to give t
d can cont
want to gi
lphanumeri
ode to clea
16 identifie
supply inp
16 identifie
o the Digit
characters.
the two po
in alphanu
ve to each
characters.
ly identify e
each Digit
t A and B o
each digita
l Input Mod
er supplie
eric charact
Digital Inpu
ch connect
l Input Mod
each Digita
input of the
le. The na
“PWA” and
rs.
. The nam
d Digital In
le
l Input Mod
module
e can be fr
“PWB”. Th
can be fr
ut Module.
le
m 1 to 32
name can
m 1 to 32
30
Page 33

Environmental monitoring system
LOGOUT:
Click "Logout" at the bottom of the page to exit the session without saving changes.
DISCARD CHANGES:
Click "Discard Changes" at the bottom of the page to discard all the changes you have made on this page.
APPLY CHANGES:
Click "Apply Changes" at the bottom of the page to save changes.
31
Page 34

m
T
e
a
c
O
O
M
t
t
o
s
r
p
a
o
/
c
v
a
x
o
r
a
o
i
h
t
s
h
s
r
t
l
y
e
o
y
d
e
g
s
t
n
M
e
u
a
s
o
r
l
o
s
a
d
t
t
p
,
a
e
t
e
r
a
e
a
o
s
h
.
r
p
M
r
i
t
s
e
R
v
t
D
e
y
r
n
r
,
L
n
y
n
o
h
k
e
e
a
a
r
s
x
t
m
a
u
o
d
o
y
o
b
o
c
M
m
d
d
o
s
o
y
r
v
S
w
b
p
d
s
v
n
t
e
r
Environ
ental monit
ring system
3.3.8.4.2.
Up to 16 t
conditions
. You can c
or behind
To conne
1. Set th
senso
e dip switc
r already ins
- Do N
- Do N
T connect
T use the
2. Using
Serv
a standard
on xB or be
To config
ure the sen
1. Open
(ex. h
you browse
tp://192.168
2. Enter
he administ
3. Click
n the Settin
If the sen
this page
symbol is
The Peri
peripher
or is proper
after a dela
ed.
heral pag
l TAB agai
Explorer
Problem
Troublesh
confli
chang
to sol
senso
choose an
t occurs an
ed to black.
e the addr
rs will now a
• If you
• The P
TAB
Firefo
eripheral pa
gain (or pu
).
emperatu
mperature
n xBus per
t a sensor
r Mozilla F
e and proxi
nd proximi
nnect a se
pheral alrea
to the Serv
es of the s
talled (see
he xBus c
ame addre
RJ45 netw
ind anothe
or, use fol
and log in t
.100.202/sy
rator name
gs and then
y connecte
of up to 6
is not au
n (or push
irefox).
oting
setting tha
the corres
In that case
ss conflict
ppear on th
e is not au
h [F5] or pr
mity senso
y sensors c
sor to each
dy connecte
on xB, us
nsor so th
ser's guide
ble before
s for two d
rk cable, co
xBus perip
owing Log
the Admini
admin.htm)
nd passwo
on the Peri
to the Serv
0 seconds.
omatically
[F5] or p
is already
onding Edi
disconnect
nd reconne
Peripheral
omatically r
ss <CTRL-
s
n be attach
of the 4 con
d to the Ser
following
t the selec
f the corres
etting its
ifferent sen
nnect the s
eral alread
in procedu
strator's Co
d (default fo
herals Tab.
on xB it wi
In this case
refreshed,
ess <CTR
n use by a
and Info s
your last co
ct the sens
page and t
freshed, so
> on your
d to the S
nectors loc
Mon xB (D
procedure:
ed I/O add
ponding sen
IP switche
sors
nsor to an
connected
e:
figuration P
both = ad
ll be autom
the colour
so you ne
-R> on yo
other sens
mbol of the
nected sen
r again. If t
eir Edit an
you need t
eyboard if
rvMon xB t
ted on the
isy Chain C
ess does n
sor).
Bus conne
o the Serv
age,
in). The ho
tically recog
of the corre
ed to refre
r keyboar
r connecte
previous c
sor, change
he conflict i
Info Symb
refresh it b
ou use Inte
monitor en
ack of the
onnection).
t conflict
tor on the
on xB.
e page ap
nized and di
sponding E
sh it by cl
if you u
to the Ser
nnected se
the DIP swi
solved, all
l will be red.
clicking th
net Explore
ironmental
ervMon xB
ith another
ack of the
ears.
splayed on
it and Info
icking the
e Internet
Mon xB, a
sor will be
ch settings
connected
peripheral
or Mozilla
32
Page 35

e
u
D
M
M
a
s
d
d
s
m
d
p
d
:
o
c
H
p
y
p
m
b
e
a
a
w
e
a
o
o
e
"
s
w
a
a
a
e
e
a
t
r
s
C
e
6
e
c
w
s
a
g
e
a
r
e
n
r
h
d
f
a
x
o
a
u
f
r
e
o
e
a
P
o
n
Environm
ntal monito
ring system
To config
page. A n
sensors.
Sensor I
The Serv
TP followe
The Serv
Sensor N
In this fiel
character
Analog In
Name:
In this fiel
Unit:
In this fiel
Graph:
Check thi
Period (
In this fiel
Digital In
Name:
In this fiel
LOGOUT
Click "Log
DISCARD
Click "Dis
APPLY C
Click "Ap
re or modif
ew page a
:
on xB auto
d by a num
on xB sup
me:
d, enter th
long, and c
puts
enter the n
enter the u
box if you
inutes):
enter the p
uts
enter the n
ut" at the b
CHANGES
ard Chang
ANGES:
ly Changes
the setting
pears, allo
atically cre
er between
ports a tot
name you
n contain a
me you wa
nit of measu
ant a displ
riod betwe
me you wa
ttom of the
:
s" at the bo
at the botto
of a senso
ing you to
ates an ID
1 and 16 id
l of up to 1
want to giv
lphanumeri
nt to give to
rement you
y of the ana
n two mea
nt to give to
page to exit
tom of the p
m of the pa
, click on th
et all the p
ode to clea
ntifies each
temperatu
to the sel
characters.
the analog i
ant to be d
log inputs.
urements.
the digital in
the session
ge to disca
e to save c
correspon
rameters o
ly identify e
proximity se
re and pro
cted sens
puts.
isplayed (°C
put.
without savi
d all the ch
anges.
ing "Edit" b
the tempe
ch connect
nsor
imity sens
r. The nam
, %RH...).
ng changes.
nges you h
tton in the
ature & pro
d sensor.
rs.
can be fr
ve made o
eripherals
ximity (TP)
m 1 to 32
this page.
33
Page 36

m
P
c
c
e
b
O
O
e
t
t
o
s
y
p
a
o
/
n
c
a
a
x
o
n
s
u
h
u
e
o
t
s
r
s
r
t
e
.
e
o
e
a
n
i
g
s
a
o
s
a
s
r
o
s
o
s
a
o
a
t
i
B
t
e
s
t
e
e
h
e
s
n
e
g
.
r
p
r
t
E
e
R
x
t
w
e
s
D
s
u
e
o
n
r
o
n
L
o
o
k
y
w
d
d
u
s
o
t
m
l
h
u
p
e
w
v
o
y
e
k
n
n
o
o
e
m
a
d
h
t
t
s
n
y
r
v
w
o
b
t
p
g
o
s
y
h
e
e
r
Environ
ental monit
ring system
3.3.8.4.3.
Push Butto
Up to 16
You can
behind an
onnect a P
xBus perip
To conne
1. Set th
Push
- Do N
- Do N
T connect
T use the
2. Using
the S
a standard
rvMon xB o
To config
ure the Pu
1. Open
(ex. h
you browse
tp://192.168
2. Enter
he administ
3. Click
n the Settin
If the Pu
displayed
h button is
on this pag
and Info s
The Peri
peripher
heral pag
l TAB agai
Explorer
Problem
Troublesh
conne
previo
disco
confli
appe
choose any
cted to the
us connect
nect your l
t and recon
r on the Per
• If you
TAB
eripheral pa
gain (or pu
• The P
Firefo
ush button
t a Push b
dip switch
utton or an
mbol is red
r Mozilla F
).
settings
can be att
sh Button t
eral already
tton to the
s of the Pu
ther Digital
he xBus c
ame addre
RJ45 netwo
behind an
h button, u
and log in t
.100.202/sy
rator name
gs and then
properly c
after a del
is not au
n (or push
irefox).
oting
setting that
ServMon x
d Push bu
st connect
ect the Pu
pherals pag
e is not au
h [F5] or pr
ched to th
each of t
connected t
ServMon x
h button so
Input Modul
ble before
s for two d
k cable, co
ther xBus p
e followin
the Admini
admin.htm)
nd passwo
on the Peri
nnected to
y of 1 to 60
omatically
[F5] or p
s already in
, a conflict
ton or Digi
d Push but
h button ag
e and their
omatically r
ss <CTRL-
ServMon
e 4 connec
o the ServM
B, use follo
that the sel
already in
etting its
ifferent Pu
nect the P
ripheral alr
Log in pr
strator's Co
d (default fo
herals Tab.
the ServM
seconds. I
refreshed,
ess <CTR
use by anot
occurs and
al Input M
ton, change
ain. If the c
dit and Info
freshed, so
> on your
B to trigger
ors located
on xB (Dais
ing proce
cted I/O ad
talled (see
IP switche
h buttons
sh button t
ady connec
cedure:
figuration P
both = ad
n xB it wil
this case, t
so you ne
-R> on yo
her Push bu
the corres
dule will b
the DIP s
nflict is sol
Symbol will
you need t
eyboard if
manually pr
on the bac
Chain Con
ure:
ress does
ser's guide
an xBus c
ed to the S
age,
in). The ho
be autom
e colour of
ed to refre
r keyboar
tton or anot
onding Edi
changed
itch setting
ed, all con
be red.
refresh it b
ou use Inte
-programm
of the Ser
ection).
ot conflict
f the Push
nnector on
rvMon xB.
e page ap
tically reco
the corresp
sh it by cl
if you u
er Digital In
and Info s
o black. In
to solve t
ected devic
clicking th
net Explore
ed actions.
Mon xB or
ith another
utton).
he back of
ears.
nized and
nding Edit
icking the
e Internet
put Module
mbol of a
that case,
e address
s will now
peripheral
or Mozilla
34
Page 37

e
u
M
f
d
s
p
d
f
n
m
a
c
c
a
n
g
p
t
s
s
w
u
w
C
u
c
a
c
r
s
h
h
e
t
p
a
d
d
t
n
i
o
t
m
u
e
r
Environm
ntal monito
ring system
To config
Peripheral
Buttons.
ID:
The Serv
• PB
• SP1 i
• LP2 i
Name:
In this fiel
character
Digital In
Name:
In this fiel
re or modi
s page. A
on xB auto
ollowed by
dentifies ea
dentifies ea
, enter the
long, and c
uts
s enter the
y the settin
ew page a
atically cre
number be
h "Short Pu
h "Long Pu
name you
n contain a
ame of the
s of the P
pears, allo
ates an ID
ween 1 and
h" action (d
h" action (d
ant to give t
lphanumeri
two type of
sh Button,
ing you to
ode to clea
16 identifie
uring less t
ring more t
o the select
characters.
ction (Shor
lick on the
set all the
ly identify e
each Push
an 1 secon
an 3 secon
d Push but
Push or Lo
correspond
arameters
ch Push bu
button
)
s)
on. The na
g Push).
ng "Edit" b
f the conn
ton.
e can be f
tton in the
cted Push
om 1 to 32
35
Page 38

m
S
A
d
c
e
O
O
o
e
t
t
o
AC C
y
p
a
o
/
M
A
u
,
n
a
x
o
P
p
s
h
u
n
t
s
r
t
b
e
.
e
o
y
s
e
g
s
b
e
C
a
s
o
h
o
o
s
a
y
a
t
a
n
b
s
t
e
e
o
n
v
o
d
e
o
n
.
r
p
y
r
y
k
t
h
e
R
s
o
o
s
o
A
A
r
n
r
v
n
L
E
s
i
k
o
e
o
y
d
e
e
o
p
d
m
w
h
u
C
o
e
l
o
y
r
n
:
s
P
x
d
m
a
d
r
t
e
y
r
m
e
v
c
x
c
v
p
g
o
s
c
A
c
e
r
Environ
ental monit
ring system
3.3.8.5.
Up to 16
electrical
connect a
behind an
To conne
1. Set th
- Do N
- Do N
2. Using
3. Conn
To config
1. Open
2. Enter
3. Click
If the
displayed
and Info s
The Peri
peripher
Explorer
Problem
• If you
• The P
anoth
back
(ex. h
Serv
C C
probe
recon
now a
TAB
Firefo
ettings /
C Current
evice (PC,
n AC Curre
xBus perip
t an AC C
e dip switch
r AC Curre
T connect
T use the
a standard
f the ServM
ct the powe
ure the Cur
you browse
tp://192.168
he administ
n the Settin
on this pag
mbol is red
heral pag
l TAB agai
r Mozilla F
Troublesh
choose an
on xB, a co
rrent probe
remove it
ect the AC
ppear on th
eripheral pa
gain (or pu
).
urrent pro
eripherals
robes can
erver, light,
nt probe to
eral already
rrent prob
es of the A
t probe alre
he xBus c
ame addre
RJ45 netw
on xB or be
r cable to y
rent Probe,
and log in t
.100.202/sy
rator name
gs and then
e is properl
after a del
is not au
n (or push
irefox).
oting
setting th
nflict occurs
will be cha
power cab
Current pro
Peripheral
e is not au
h [F5] or pr
- AC Curr
e attached t
printer…) a
each of the
connected t
to the Ser
Current pr
ady installe
ble and th
s for two d
rk cable, c
ind another
ur device
use followi
the Admini
admin.htm)
nd passwo
on the Peri
connected
y of 1 to 60
omatically
[F5] or p
t is alread
and the cor
ged to blac
le, change
e again. If
page and t
omatically r
ss <CTRL-
nt Probe
the ServM
d trigger ac
4 connect
o the ServM
Mon xB, u
be so that
(see user's
Power cab
ifferent AC
nnect the
C Current
g Log in p
strator's Co
d (default fo
herals Tab
to the Ser
seconds. I
refreshed,
ess <CTR
in use by
responding
. In that ca
he DIP swi
the conflict
eir Edit and
freshed, so
> on your
ettings
on xB to m
tions if pred
rs located
on xB (Dais
e following
the selecte
guide of th
le before s
Current pr
C Current
probe alrea
ocedure:
figuration P
both = ad
Mon xB it
this case, t
so you ne
-R> on yo
another A
dit and Inf
e, disconn
tch settings
s solved, al
Info Symbo
you need t
eyboard if
nitor the cu
fined limits
n the back
Chain con
procedure
I/O addres
AC Current
tting its DI
bes
robe to an
y connecte
age,
in). The ho
ill be autom
e colour of
ed to refre
r keyboar
Current p
symbol of
ct your last
to solve th
connected
l will be red.
refresh it b
ou use Inte
rent consu
are exceed
of the Ser
ection).
does not
probe)
switches
Bus conne
to the Ser
e page ap
atically reco
the corresp
sh it by cl
if you u
obe conne
he previous
connected
address
AC Current
clicking th
net Explore
ption of an
d. You can
Mon xB or
onflict with
tor on the
Mon xB.
ears.
nized and
nding Edit
icking the
e Internet
ted to the
connected
C Current
onflict and
probes will
peripheral
or Mozilla
36
Page 39

e
u
r
M
f
d
s
d
c
d
s
m
d
:
o
c
H
p
y
n
m
a
n
a
n
a
w
e
o
o
e
"
s
t
a
a
a
e
e
t
C
o
c
o
s
w
s
a
g
e
o
r
s
e
r
h
e
a
n
o
a
a
d
s
P
m
f
a
u
r
n
Environm
ntal monito
ring system
To config
Peripheral
Current P
ID:
The Serv
• CP
• I1 i
Name:
In this fiel
character
Analog In
Name:
In this fiel
long, and
Unit:
In this fiel
Graph:
Check thi
Period (
In this fiel
LOGOUT
Click "Log
DISCARD
Click "Dis
APPLY C
Click "Ap
re or modif
s page. A
obe.
on xB auto
ollowed by
dentifies the
, enter the
long, and c
puts
, enter the
an contain
enter the u
box if you
inutes):
enter the p
ut" at the b
CHANGES
ard Chang
ANGES:
ly Changes
the setting
ew page a
atically cre
number be
current ana
ame you w
n contain a
ame you w
lphanumeri
nit of measu
ant a displ
riod betwe
ttom of the
:
s" at the bo
at the botto
of an AC C
ppears, allo
ates an ID
ween 1 and
log input.
nt to give t
lphanumeri
nt to give t
c character
rement you
y of the ana
n two mea
page to exit
tom of the p
m of the pa
urrent Prob
wing you t
ode to clea
16 identifie
the select
characters.
the analog
.
ant to be d
log inputs.
urements.
the session
ge to disca
e to save c
, click on th
set all the
ly identify e
each curre
d current pr
input. The n
isplayed.
without savi
d all the ch
anges.
correspon
parameter
ch Current
t probe
be. The na
me can be
ng changes.
nges you h
ing "Edit" b
of the con
robe.
e can be f
from 1 to 32
ve made o
tton in the
nected AC
om 1 to 32
characters
this page.
37
Page 40

m
e
E
n
m
e
n
c
h
e
O
O
e
e
t
t
o
e
y
p
a
o
/
f
e
a
a
x
o
r
s
x
h
e
t
s
R
r
e
r
t
e
.
e
o
a
t
e
g
s
E
a
M
c
h
E
a
s
o
u
o
s
a
o
a
t
i
e
a
c
s
y
t
e
e
r
r
e
e
n
e
y
g
.
r
p
r
d
c
t
e
e
R
B
e
t
M
a
e
e
o
n
r
o
n
L
h
s
n
k
h
e
c
o
o
t
m
l
h
u
M
n
w
o
y
c
t
t
n
D
o
e
m
a
d
c
c
M
c
p
y
r
t
a
D
c
e
t
p
g
o
s
e
n
v
A
P
e
r
Environ
ental monit
ring system
3.3.8.6. S
ttings / Pe
Up to 16
the curre
actions if
nergyMeter
t consumpti
predefined l
both 20 A
back of th
connectio
).
To conne
1. Set t
e dip switc
anoth
- Do N
- Do N
T connect
T use the
the S
a standard
rvMon xB o
2. Using
3. Conn
ct the powe
To config
ure the En
1. Open
(ex. h
you browse
tp://192.168
2. Enter
he administ
3. Click
n the Settin
If the En
displayed
rgyMeter is
on this pag
and Info s
The Peri
peripher
heral pag
l TAB agai
Explorer
Problem
Troublesh
a con
will b
cable(
probe
choose any
lict occurs
changed to
s), change
again. If th
• If you
page
• The P
TAB
eripheral pa
gain (or pu
Firefo
ps power i
ServMon
t an Energ
r EnergyM
mbol is red
r Mozilla F
nd their Edi
).
ipherals -
can be att
on (Amp R
imits are ex
nputs. You
B or behind
yMeter to t
es of the
ter already i
he xBus c
ame addre
J45 Netwo
behind an
r cable(s) to
rgyMeter,
and log in t
.100.202/sy
rator name
gs and then
properly c
after a del
is not au
n (or push
irefox).
oting
setting that
nd the corr
black. In th
he DIP swit
conflict is
t and Info S
e is not au
h [F5] or pr
nergy Mete
ched to the
S) of eight
ceeded. Th
an connect
an xBus pe
e ServMon
nergyMete
nstalled (se
ble and th
s for two d
rk cable, co
ther xBus p
your Energ
se followin
the Admini
admin.htm)
nd passwo
on the Peri
nnected to
y of 1 to 60
omatically
[F5] or p
s already in
sponding E
t case, dis
h settings
olved, all c
mbol will b
omatically r
ss <CTRL-
r settings
ServMon x
electrical d
EnergyMe
an Energy
ipheral alre
xB, use fol
so that th
user's guid
Power cab
ifferent AC
nect the En
ripheral alr
Meter.
Log in pr
strator's Co
d (default fo
herals Tab.
the ServM
seconds. I
refreshed,
ess <CTR
use by anot
it and Info
onnect your
o solve the
onnected E
red.
freshed, so
> on your
to monitor
vices (PC,
er is also a
eter to eac
dy connect
lowing pro
selected I
e of the Ene
le(s) before
Current pr
ergyMeter t
ady connec
cedure:
figuration P
both = ad
n xB it wil
this case, t
so you ne
-R> on yo
er Energy
ymbol of th
last connec
address co
ergyMeter
you need t
eyboard if
the energy
server, ligh
ble to moni
of the 4 co
d to the Se
edure:
/O address
rgyMeter)
setting its
bes
an xBus c
ed to the S
age,
in). The ho
be autom
e colour of
ed to refre
r keyboar
eter conne
e previous
ted Energy
flict and re
ill now ap
refresh it b
ou use Inte
onsumption
, printer…)
or the Inpu
nectors loc
rvMon xB (
does not
IP switch
nnector on
rvMon xB.
e page ap
tically reco
the corresp
sh it by cl
if you u
ted to the S
onnected E
eter, remo
onnect the
ear on the
clicking th
net Explore
(kWh) and
and trigger
voltage of
ted on the
aisy Chain
onflict with
s
he back of
ears.
nized and
nding Edit
icking the
e Internet
rvMon xB,
ergyMeter
e its power
C Current
eripherals
peripheral
or Mozilla
38
Page 41

e
u
A
g
M
e
d
s
d
d
s
m
d
:
o
c
H
p
f
a
o
m
r
n
a
a
w
e
o
o
e
"
g
e
a
a
a
a
e
e
t
n
e
P
C
h
o
c
w
s
a
g
c
s
s
r
e
n
r
h
a
a
e
W
a
i
M
r
m
a
u
e
r
n
Environm
ntal monito
ring system
To config
Peripheral
new pa
This page
re or modi
s page.
e appears,
is used to c
y the settin
llowing you
nfigure the
s of the E
to set all th
connected
ergyMeter,
parameter
ush Button
lick on the
of the Digit
.
correspond
l Inputs.
ng "Edit" b
tton in the
ID:
The Serv
used to id
Name:
In this fiel
character
Analog In
Name:
In this fiel
Unit:
In this fiel
Graph:
Check thi
Period (
In this fiel
LOGOUT
Click "Log
DISCARD
Click "Dis
APPLY C
Click "Ap
on xB auto
ntify a Ene
, enter the
long, and c
puts
enter the n
enter the u
box if you
inutes):
enter the p
ut" at the b
CHANGES
ard Chang
ANGES:
ly Changes
atically cr
gy Meter st
ame you w
n contain a
me you wa
nit of measu
ant a displ
riod betwe
ttom of the
:
s" at the bo
at the botto
ates an ID
rt with the c
nt to give t
lphanumeri
nt to give to
rement you
y of the ana
n two mea
page to exit
tom of the p
m of the pa
ode to clea
aracters "E
the select
characters.
the analog i
ant to be d
log inputs.
urements.
the session
ge to disca
e to save c
ly identify e
M" followed
d Energy M
puts.
isplay (A, k
without savi
d all the ch
anges.
ch Energy
by a numbe
ter. The na
h, V...).
ng changes.
nges you h
eter. All th
.
e can be f
ve made o
ID Codes
om 1 to 32
this page.
39
Page 42

m
t
o
v
f
a
A
g
A
2
o
l
n
O
h
k
r
a
n
n
m
o
f
y
a
t
m
o
o
p
"
e
r
n
s
t
m
e
p
e
o
u
e
P
a
Environ
ental monit
ring system
3.3.9. Se
Rules are
switch a p
when a te
open.
- To remo
- To modi
This page
- To add
new pa
tings / Ru
used to co
wer outlet
mperature,
e an existin
y a rule, clic
is used to c
new rule, cl
e appears,
es
trol actions
FF and se
umidity, a
g rule, click
on "Edit" o
eate, modif
ick on "Add
llowing you
according
d an alert
bient light
n "Delete"
the corres
and delete
New Rule
to set all th
o a specific
essage usi
r current ex
f the corres
onding rule.
rules.
on the right
parameter
event. For
g different
ceeds a pre
ponding rul
side of the
of the rule.
example, y
ethods like
defined val
.
age.
u can defin
email, SNM
e or when
e a rule to
or Syslog
contact is
total of
40
55 rules ca
be created
and there a
e 6 differen
types of rul
s.
Page 43

Environmental monitoring system
1. Schedule Rule:
This rule is used to control actions according to the scheduler of the Master Unit.
2. Ping Monitoring Rule:
This rule is used to control actions according to the response to a Ping command.
3. Scan Monitoring Rule:
This rule is used to control actions according to the response to a Scan command.
4. Power Supply Monitoring Rule:
This rule is used to control actions according to the state of the power supplies of the ServMon xB and its
peripherals like the ePowerSwitch 8XS and the Digital Input Module.
5. Digital Input Monitoring Rule:
This rule is used to control actions according to the state of a dry contact connected to the back panel of
the ServMon xB, to a Digital Input Module or a Push Button connected over the xBus to the ServMon xB.
6. Analog Input Monitoring Rule:
This rule is used to control actions when an analog input (temperature, humidity, ambient light, current...)
exceeds a predefined value.
LOGOUT:
Click "Logout" at the bottom of the page to exit the session without saving changes.
DISCARD CHANGES:
Click "Discard Changes" at the bottom of the page to discard all the changes you have made on this page.
APPLY CHANGES:
Click "Apply Changes" at the bottom of the page to save changes.
41
Page 44

m
e
c
M
t
m
d
o
o
d
c
e
e
p
w
o
l
t
n
e
t
u
c
n
u
e
R
w
t
H
e
e
y
C
y
w
t
e
h
o
a
f
T
o
e
e
i
e
5
a
e
a
a
l
e
e
r
e
w
d
e
a
x
s
m
s
Environ
ental monit
ring system
3.3.9.1. S
This rule
ttings / Ru
an be used
es / Sched
o execute s
le Rule
ome actions
according t
a defined t
me table.
Rule ID:
The Serv
identify rul
middle of
Rule Na
In this fiel
and can c
Rule Col
In this fiel
use own
identify th
Rule Typ
In this dro
Configuri
Schedule
Here you
and belo
on xB auto
es start with
he Rule list,
e:
, enter the
ntain alpha
r:
, select on
olours, just
triggered r
:
-down list,
ng the Eve
Action:
can define t
, check one
matically cr
the letter "
the number
name you
umeric cha
of the 48 s
ype in the
le when dis
hoose Sch
t
he time wh
or more da
ates an ID
" followed b
of this rule
ant to give
racters.
andard colo
ex value of
played in th
dule Rule t
n the rule h
boxes.
ode to cle
a number
ill only be u
o the rule.
urs you wan
the colour y
Rule Panel
en configur
as to be ex
rly identify
rom 1 to 25
sed again if
he name c
t to use to h
u want. Th
page or in
the event
cuted. In th
ach rule. A
. If you del
no other rul
n be from 1
ighlight the
Rule highli
special us
nd the actio
e Drop-Do
l the ID Co
te a rule in t
is availabl
to 32 char
ule when e
ghting allow
rs page.
ns to perfor
n lists choo
es used to
he
.
cters long,
ecuted. To
to quickly
.
e the time
42
Page 45

e
v
p
e
s
n
f
o
o
s
d
c
o
s
S
p
o
s
M
r
s
n
n
T
d
g
s
:
o
c
H
p
o
a
a
u
o
o
t
n
y
g
g
a
e
w
v
e
a
e
e
s
a
a
e
o
a
M
o
a
m
o
o
e
"
c
d
o
s
e
e
o
o
n
d
/
d
m
d
r
c
w
d
b
c
s
g
e
r
t
a
o
-
h
n
5
a
-
e
o
o
g
s
o
a
w
e
n
w
m
v
M
e
a
g
e
n
h
t
s
c
t
b
n
d
d
n
d
e
r
r
r
h
a
o
u
e
o
E
e
h
e
a
h
r
o
g
t
a
e
g
e
o
h
t
e
v
n
o
n
h
a
t
e
w
u
a
b
w
t
i
e
y
d
r
l
n
Environm
ntal monito
ring system
Configuri
For the E
Set Grou
This type
group (S
Check thi
to. In the
Each pow
able to de
- If you ch
- If you ch
Page".
Set Powe
Check thi
the next c
On/Off an
65535 se
Send Sys
This type
destinati
Check thi
the facility
the "Log
Send Tra
This type
destinati
Check thi
send SN
Mail to:
This type
SMTP Se
Check thi
to send a
network a
Syslog /
This fiel
(Misc/Lo
Up to 255
the e-mail
LOGOUT
Click "Log
DISCARD
Click "Dis
APPLY C
Click "Ap
ng the Acti
ent defined
:
of action
ttings/Gro
box and in
ext corresp
er outlet gr
ine a restar
ose 0 seco
ose a dela
r Outlet:
box and in
orrespondin
restarted.
onds.
log Messa
of action
n Syslog S
box if you
and the se
ettings Pag
Message:
of action
n SNMP S
/these box(
P message
of action
ver (Gener
/these box(
e-mail to
d you will h
rap / Mail
appears
Settings P
characters
.
ut" at the b
CHANGES
ard Chang
ANGES:
ly Changes
ns
bove, you
ppears an
ps Tab).
the corresp
nding drop-
up can be
delay betw
d for the d
different fr
the corresp
drop-dow
If you choos
e:
ppears an
rver (Misc
ant to sen
erity of the
".
ppears an
rver (Gene
s) and spe
to one or t
ppears an
l/SMTP Ta
s) and spe
ne or two
ve to confi
essage:
nly if you
ge) or a d
ay be ente
ttom of the
:
s" at the bo
at the botto
an choose
can be c
nding drop
down list, c
witched O
en 0 and 6
lay, the del
m 0, the del
nding drop
list, choos
e "restart" y
can be c
Log Settin
a message
essage to
can be c
al/SNMP T
ify one or t
o SNMP S
can be co
).
ify one or t
pecific user
ure its para
already ha
stination S
ed in this fr
page to exit
tom of the p
m of the pa
nd configur
nfigured o
down list c
oose the ac
/Off and re
535 second
y will be the
ay will repla
down list, c
the action
u will also
nfigured o
s Tab).
to a Syslog
end. The a
nfigured o
b).
o SNMP ad
rvers.
figured o
o e-mail ad
(s). To sen
eters in th
e configu
TP Serve
e text field.
the session
ge to disca
e to save c
following
ly if you a
oose the p
ion to exec
tarted. If yo
s.
delay defin
e the delay
oose the p
o execute.
e able to d
ly if you a
server. In t
dress of th
nly if you
resses in t
ly if you al
dress(es) in
e-mails, y
"SMTP Pa
ed at leas
(General/S
The text will
without savi
d all the ch
anges.
ctions:
lready hav
wer outlet
te.
u choose "r
d in the "P
defined in t
wer outlet
ach power
fine a resta
lready hav
e following
Syslog ser
lready hav
e correspo
eady have
the corresp
u will need
e".
one desti
MTP Page).
appear in t
ng changes.
nges you h
created a
roup the rul
start" you
wer Outlets
e "Power O
he rule will
outlet can
rt delay bet
created a
drop-down l
er has to b
e specified
ding field if
created a
nding field
a SMTP se
ation Sys
e Syslog, th
ve made o
least one
will apply
ill also be
Page".
tlets
pply to. In
e switched
een 0 and
least one
sts choose
defined in
at least a
ou want to
estination
if you want
ver on the
og Server
e Trap and
this page.
43
Page 46

m
e
c
a
a
M
t
m
d
o
o
d
c
e
e
p
d
e
d
e
d
o
l
o
h
n
e
t
u
c
n
P
b
q
w
o
a
o
d
e
R
w
t
H
c
n
c
o
u
o
c
n
C
y
w
t
e
R
c
d
e
o
e
p
a
f
T
o
o
w
m
m
o
y
e
5
a
e
a
e
o
t
,
l
e
e
r
e
e
v
d
e
a
x
s
p
a
o
Environ
ental monit
ring system
3.3.9.2. S
This rule
packets a
automatic
Ping & Sc
ttings / Ru
an be used
nd listens f
lly switch t
n Method).
es / Ping M
to check if
r replies fr
e powered
nitoring R
computer
m the spe
evice off a
le
r any IP d
ific host. If
d after a s
vice is conn
the host d
ecified dela
ected to the
esn't reply
, switch it a
network. It
the ServM
gain on (for
sends ping
on xB can
details see
Rule ID:
The Serv
identify rul
middle of
Rule Na
In this fiel
and can c
Rule Col
In this fiel
use own
identify th
Rule Typ
In this dro
Configuri
IP device
In this fiel
Wait Tim
In this fiel
The delay
Interval b
In this fiel
The delay
on xB auto
es start with
he Rule list,
e:
, enter the
ntain alpha
r:
, select on
olours, just
triggered r
:
-down list,
ng the Eve
to monitor:
enter the I
for Answe
, define the
can be set
tween Re
, define the
can set bet
matically cr
the letter "
the number
name you
umeric cha
of the 48 s
ype in the
le when dis
hoose Ping
t
address of
r:
delay in se
etween 1 a
uests:
delay in se
een 30 and
ates an ID
" followed b
of this rule
ant to give
racters.
andard colo
ex value of
played in th
Monitoring
the IP devi
onds for the
d 10 secon
onds betwe
65535 sec
ode to cle
a number
ill only be u
o the rule.
urs you wan
the colour y
Rule Panel
ule then c
e that you
Answer Ti
s.
n ping com
nds.
rly identify
rom 1 to 25
sed again if
he name c
t to use to h
u want. Th
page or in
nfigure the
ant to monit
eout.
ands sent
ach rule. A
. If you del
no other rul
n be from 1
ighlight the
Rule highli
special us
vent and th
r using the
o the IP de
l the ID Co
te a rule in t
is availabl
to 32 char
ule when e
ghting allow
rs page.
actions to
Ping comm
ice to monit
es used to
he
.
cters long,
ecuted. To
to quickly
erform.
nd.
r.
44
Page 47

e
o
d
o
d
v
p
G
s
n
f
o
o
s
d
c
o
s
S
p
o
s
M
r
s
n
n
T
d
g
s
:
o
c
H
p
e
e
b
o
a
p
o
o
t
n
y
g
g
a
e
w
v
e
a
e
e
s
a
a
e
o
a
M
o
a
m
o
o
e
"
s
P
o
a
c
c
o
s
e
e
o
o
n
d
/
d
m
d
r
c
w
d
b
c
s
g
e
r
t
A
n
s
r
e
a
g
-
h
n
5
a
e
-
e
o
o
g
s
o
a
w
e
n
w
m
v
M
e
a
g
n
e
e
g
h
t
s
e
t
b
n
d
d
n
d
e
r
r
r
h
a
d
o
u
e
o
E
e
h
e
a
h
r
o
g
t
a
e
a
g
e
o
e
t
e
v
n
o
n
h
a
h
e
w
g
a
b
w
t
i
e
y
d
r
l
n
Environm
ntal monito
ring system
Number
In this fiel
The numb
Delay bef
In this fiel
The delay
Configuri
For the E
Set Grou
This type
(Settings/
Check thi
to. In the
Each pow
able to de
- If you ch
- If you ch
Set Powe
Check thi
the next c
On/Off an
65535 se
Send Sys
This type
destinati
Check thi
the facility
the "Log
Send Tra
This type
destinati
Check thi
send SN
Mail to:
This type
SMTP Se
Check thi
to send a
network a
Syslog /
This fiel
(Misc/Lo
Up to 255
the e-mail
LOGOUT
Click "Log
DISCARD
Click "Dis
APPLY C
Click "Ap
f unsucces
, define the
er can be s
re First R
, define the
can be set
ng the Acti
ent defined
:
of action a
roups Tab)
box and in
ext corresp
er outlet gr
ine a restar
ose 0 seco
ose a dela
r Outlet:
box and in
orrespondin
restarted.
onds.
log Messa
of action
n Syslog S
box if you
and the se
ettings Pag
Message
of action
n SNMP S
/these box(
P message
of action
ver (Gener
/these box(
e-mail to
d you will h
rap / Mail
appears
Settings P
characters
.
ut" at the b
CHANGES
ard Chang
ANGES:
ly Changes
sful Reque
number of
t between 1
quest after
time in sec
etween 30
ns:
bove, you
pears and
.
the corresp
nding drop-
up can be
delay betw
d for the d
different fr
the corresp
drop-dow
If you choos
e:
ppears an
rver (Misc
ant to sen
erity of the
".
ppears an
rver (Gene
s) and spe
to one or t
ppears an
l/SMTP Ta
s) and spe
ne or two
ve to confi
essage
nly if you
ge) or a d
ay be ente
ttom of the
:
s" at the bo
at the botto
ts before
ing comma
and 65535
Power up:
nds before
nd 65535 s
an choose
an be confi
nding drop
down list, c
witched O
en 0 and 6
lay, the del
m 0, it will r
nding drop
list, choos
e "restart" y
can be c
Log Settin
a message
essage to
can be c
al/SNMP T
ify one or t
o SNMP S
can be co
).
ify one or t
pecific user
ure its para
already ha
stination S
ed in this fr
page to exit
tom of the p
m of the pa
ction:
ds to be se
econds.
estarting th
conds.
nd configur
ured only i
down list c
oose the ac
/Off and re
535 second
y will be the
place the d
down list, c
the action
u will also
nfigured o
s Tab).
to a Syslog
end. The a
nfigured o
b).
o SNMP ad
rvers.
figured o
o e-mail ad
(s). To sen
eters in th
e configu
TP Serve
e text field.
the session
ge to disca
e to save c
t to the IP d
monitoring
following
f you alrea
oose the p
ion to exec
tarted. If yo
s.
delay defin
lay defined
oose the p
o execute.
e able to d
ly if you a
server. In t
dress of th
nly if you
resses in t
ly if you al
dress(es) in
e-mails, y
"SMTP Pa
ed at leas
(General/S
The text will
without savi
d all the ch
anges.
evice befor
after the reb
ctions:
y have cre
wer outlet
te.
u choose "r
d in the "P
in the "Pow
wer outlet
ach power
fine a resta
lready hav
e following
Syslog ser
lready hav
e correspo
eady have
the corresp
u will need
e".
one desti
MTP Page).
appear in t
ng changes.
nges you h
executing t
oot action.
ted at least
roup the rul
start" you
wer Outlets
r outlets pa
he rule will
outlet can
rt delay bet
created a
drop-down l
er has to b
e specified
ding field if
created a
nding field
a SMTP se
ation Sys
e Syslog, th
ve made o
e actions.
one group
will apply
ill also be
Page".
e".
pply to. In
e switched
een 0 and
least one
sts choose
defined in
at least a
ou want to
estination
if you want
ver on the
og Server
e Trap and
this page.
45
Page 48

m
e
c
M
h
e
M
t
m
d
o
o
d
c
e
e
p
d
o
e
d
o
l
d
)
n
,
n
e
t
u
c
n
b
b
M
n
s
e
R
w
t
H
n
o
o
n
c
n
R
p
s
o
e
C
y
w
t
e
v
y
d
M
u
a
f
T
o
o
u
m
m
a
w
M
e
5
a
e
a
e
o
a
r
r
p
l
e
e
r
e
e
h
H
m
d
e
a
x
s
o
Environ
ental monit
ring system
3.3.9.3. S
This rule
Telnet, S
there. If t
after a sp
ttings / Ru
an be use
TP, POP...
e connectio
cified delay
es / Scan
to check if
. If the con
is not pos
switch it ag
onitoring
a specific
ection is po
ible, ServM
ain on (for d
ule
rotocol is a
sible, Serv
n xB can a
tails see Pi
vailable on
on xB kno
tomatically
ng & Scan
server (fo
s that a se
switch the
ethod).
example
ver progra
owered dev
TTP, FTP,
is running
ice off and,
Rule ID:
The Serv
identify rul
middle of
Rule Na
In this fiel
and can c
Rule Col
In this fiel
use own
identify th
Rule Typ
In this dro
Configuri
IP device
In this fiel
the "Port t
The value
Wait Tim
In this fiel
The delay
on xB auto
es start with
he Rule list,
e:
, enter the
ntain alpha
r:
, select on
olours, just
triggered r
:
-down list,
ng the Eve
to monitor:
, enter the
scan" field
can be set
for Answe
, define the
can be set
matically cr
the letter "
the number
name you
umeric cha
of the 48 s
ype in the
le when dis
hoose Sca
t
IP address
, enter the p
etween 1 a
r:
delay in se
etween 1 a
ates an ID
" followed b
of this rule
ant to give
racters.
andard colo
ex value of
played in th
Monitoring
f the IP de
rt number
d 65535.
onds for the
d 10 secon
ode to cle
a number
ill only be u
o the rule.
urs you wan
the colour y
Rule Panel
Rule then c
ice that yo
ou want to
Answer Ti
s.
rly identify
rom 1 to 25
sed again if
he name c
t to use to h
u want. Th
page or in
nfigure the
want to m
onitor.
eout.
ach rule. A
. If you del
no other rul
n be from 1
ighlight the
Rule highli
special us
vent and t
nitor using
l the ID Co
te a rule in t
is availabl
to 32 char
ule when e
ghting allow
rs page.
e actions to
the Scan c
es used to
he
.
cters long,
ecuted. To
to quickly
perform.
mmand. In
46
Page 49

e
e
d
o
d
s
o
d
v
p
e
s
n
f
o
o
s
d
c
o
s
S
p
o
s
M
r
s
n
n
T
d
g
s
:
o
c
H
p
q
b
e
e
e
b
o
a
a
u
o
o
t
n
y
g
g
a
e
w
v
e
a
e
e
s
a
a
e
o
a
M
o
a
m
o
o
e
"
e
a
C
o
a
c
d
o
s
e
e
o
o
n
d
/
d
m
d
r
c
w
d
b
c
s
g
e
r
t
e
b
n
s
r
e
a
o
-
h
n
5
a
e
-
e
o
o
g
s
o
a
w
e
n
w
m
v
M
e
a
g
s
o
d
e
e
n
h
t
s
e
t
b
n
d
d
n
d
e
r
r
r
h
P
a
o
u
e
o
E
e
h
e
a
h
r
o
g
t
a
d
e
g
e
o
e
t
e
v
n
o
n
h
a
e
t
e
w
a
a
b
w
t
i
e
y
d
r
l
n
Environm
ntal monito
ring system
Interval b
In this fiel
The delay
Number
In this fiel
the action
The numb
Delay bef
In this fiel
The delay
Configuri
For the E
Set Grou
This type
group (S
Check thi
to. In the
Each pow
able to de
- If you ch
- If you ch
Set Powe
Check thi
the next c
On/Off an
65535 se
Send Sys
This type
destinati
Check thi
the facility
the "Log
Send Tra
This type
destinati
Check thi
send SN
Mail to:
This type
SMTP Se
Check thi
to send a
network a
Syslog /
This fiel
(Misc/Lo
Up to 255
the e-mail
LOGOUT
Click "Log
DISCARD
Click "Dis
APPLY C
Click "Ap
tween Re
, define the
can be set
f unsucces
, define th
.
er can be s
re First R
, define the
can be set
ng the Acti
ent defined
of action
ttings/Gro
box and in
ext corresp
er outlet gr
ine a restar
ose 0 seco
ose a dela
r Outlet:
box and in
orrespondin
restarted.
onds.
log Messa
of action
n Syslog S
box if you
and the se
ettings Pag
Message:
of action
n SNMP S
/these box(
P message
of action
ver (Gener
/these box(
e-mail to
d you will h
rap / Mail
appears
Settings P
characters
.
ut" at the b
CHANGES
ard Chang
ANGES:
ly Changes
uests:
delay betw
etween 30
sful Scan
number of
t between 1
quest after
time in sec
etween 30
ns
bove, you
ppears an
ps Tab).
the corresp
nding drop-
up can be
delay betw
d for the d
different fr
the corresp
drop-dow
If you choos
e:
ppears an
rver (Misc
ant to sen
erity of the
".
ppears an
ver (Gene
s) and spe
to one or t
ppears an
l/SMTP Ta
s) and spe
ne or two
ve to confi
essage:
nly if you
ge) or a d
ay be ente
ttom of the
:
s" at the bo
at the botto
en the scan
nd 65535 s
ommands
Port scanni
and 65535
Power Up:
nds before
nd 65535 s
an choose
can be c
nding drop
down list, c
witched O
en 0 and 6
lay, the del
m 0, it will r
nding drop
list, choos
e "restart" y
can be c
Log Settin
a message
essage to
can be c
al/SNMP T
ify one or t
o SNMP S
can be co
).
ify one or t
pecific user
ure its para
already ha
stination S
ed in this fr
page to exit
tom of the p
m of the pa
commands
conds.
efore Acti
g comman
econds.
estarting th
conds.
nd configur
nfigured o
down list c
oose the ac
/Off and re
535 second
y will be the
place the d
down list, c
the action
u will also
nfigured o
s Tab).
to a Syslog
end. The a
nfigured o
b).
o SNMP ad
rvers.
figured o
o e-mail ad
(s). To sen
eters in th
e configu
TP Serve
e text field.
the session
ge to disca
e to save c
ent to the I
n:
s to be sen
monitoring
following
ly if you a
oose the p
ion to exec
tarted. If yo
s.
delay defin
lay defined
oose the p
o execute.
e able to d
ly if you a
server. In t
dress of th
nly if you
resses in t
ly if you al
dress(es) in
e-mails, y
"SMTP Pa
ed at leas
(General/S
The text will
without savi
d all the ch
anges.
device.
t to the IP
after the reb
ctions:
lready hav
wer outlet
te.
u choose "r
d in the "P
in the "Pow
wer outlet
ach power
fine a resta
lready hav
e following
Syslog ser
lready hav
e correspo
eady have
the corresp
u will need
e".
one desti
MTP Page).
appear in t
ng changes.
nges you h
evice befor
oot action.
created a
roup the rul
start" you
wer Outlets
r Outlets P
he rule will
outlet can
rt delay bet
created a
drop-down l
er has to b
e specified
ding field if
created a
nding field
a SMTP se
ation Sys
e Syslog, th
ve made o
executing
least one
will apply
ill also be
Page".
ge".
pply to. In
e switched
een 0 and
least one
sts choose
defined in
at least a
ou want to
estination
if you want
ver on the
og Server
e Trap and
this page.
47
Page 50

m
e
c
M
t
m
d
o
o
d
c
e
e
o
l
d
n
e
t
u
l
e
R
w
t
H
w
n
o
S
C
y
w
t
e
M
e
w
a
f
T
o
u
t
e
5
a
e
a
n
M
l
e
e
r
e
v
d
e
a
x
s
e
Environ
ental monit
ring system
3.3.9.4. S
This rule
supplies o
ttings / Ru
an be use
f connected
es / Power
to monitor
peripherals
Supply Mo
the status
ike Power
itoring Rul
f the 2 po
witches and
er supplies
Digital Inpu
of the Serv
Modules.
on xB and
the power
Rule ID:
The Serv
identify rul
middle of
Rule Na
In this fiel
and can c
Rule Col
In this fiel
use own
identify th
Rule Typ
In this dro
perform.
on xB auto
es start with
he Rule list,
e:
, enter the
ntain alpha
r:
, select on
olours, just
triggered r
:
p-down list,
matically cr
the letter "
the number
name you
umeric cha
of the 48 s
ype in the
le when dis
choose Po
ates an ID
" followed b
of this rule
ant to give
racters.
andard colo
ex value of
played in th
er Supply
ode to cle
a number
ill only be u
o the rule.
urs you wan
the colour y
Rule Panel
onitoring R
rly identify
rom 1 to 25
sed again if
he name c
t to use to h
u want. Th
page or in
le then co
ach rule. A
. If you del
no other rul
n be from 1
ighlight the
Rule highli
special us
figure the e
l the ID Co
te a rule in t
is availabl
to 32 char
ule when e
ghting allow
rs page.
ent and th
es used to
he
.
cters long,
ecuted. To
to quickly
actions to
48
Page 51

e
p
c
S
o
t
o
e
c
h
a
h
o
p
o
v
p
e
s
n
f
o
o
s
d
c
o
s
S
p
o
s
M
r
s
n
n
T
d
g
s
n
t
p
v
P
h
t
r
h
b
e
a
t
a
o
o
a
a
u
o
o
t
n
y
g
g
a
e
w
v
e
a
e
e
s
a
a
e
o
a
M
o
a
m
t
h
P
e
c
e
o
e
c
d
o
s
e
e
o
o
n
d
/
d
m
d
r
c
w
d
b
c
s
g
e
r
D
n
P
e
e
a
o
-
h
n
5
a
-
e
o
o
g
s
o
a
w
e
n
w
m
v
M
e
w
a
a
t
a
u
e
n
h
t
s
c
t
b
n
d
d
n
d
e
r
r
w
y
e
a
o
u
e
o
E
e
h
e
a
h
r
o
g
t
e
e
e
e
e
g
e
o
h
t
e
v
n
o
n
h
v
c
t
e
w
u
a
b
w
t
i
e
y
d
r
l
Environm
ntal monito
ring system
Configuri
Power In
In the first
Each devi
• EMS0
• S1 to
• TA1 t
• DIM1
• CP1 t
A charact
- The "X"
- The "!" c
If you w
- The " " c
In the sec
Action if
In this Dr
Configuri
For the E
Set Grou
This type
group (S
Check thi
to. In the
Each pow
able to de
- If you ch
- If you ch
Page".
Set Powe
Check thi
the next c
On/Off an
65535 se
Send Sys
This type
destinati
Check thi
the facility
the "Log
Send Tra
This type
destinati
Check thi
send SN
Mail to:
This type
SMTP Se
Check thi
to send a
network a
Syslog /
This fiel
(Misc/Lo
Up to 255
the e-mail
ng the Eve
ut to moni
Drop-Down
e name is
for the Ser
16 for the
TA32 for t
o DIM16 fo
CP16 for t
r between
haracter m
aracter me
nt to activa
aracter (bl
nd Drop-D
ower supp
p-Down list,
ng the Acti
ent defined
:
of action
ttings/Gro
box and in
ext corresp
er outlet gr
ine a restar
ose 0 seco
ose a dela
r Outlet:
box and in
orrespondin
restarted.
onds.
log Messa
of action
n Syslog S
box if you
and the se
ettings Pag
Message:
of action
n SNMP S
/these box(
P message
of action
ver (Gener
/these box(
e-mail to
d you will h
rap / Mail
appears
Settings P
characters
.
t
or:
list choose
receded by
Mon xB.
ower Switc
e sensors.
Digital Inpu
e Current
rackets can
ans that th
ns that the
e it, go to th
nk) means t
wn list, cho
ly...:
choose if th
ns
bove, you
ppears an
ps Tab).
the corresp
nding drop-
up can be
delay betw
d for the d
different fr
the corresp
drop-dow
If you choos
e:
ppears an
rver (Misc
ant to sen
erity of the
".
ppears an
rver (Gene
s) and spe
to one or t
ppears an
l/SMTP Ta
s) and spe
ne or two
ve to confi
essage:
nly if you
ge) or a d
ay be ente
he device fo
the ID Code
units.
t Modules.
robes.
follow this I
correspond
orrespondi
"Settings/
hat the corr
se the pow
action has
an choose
can be c
nding drop
down list, c
witched O
en 0 and 6
lay, the del
m 0, the del
nding drop
list, choos
e "restart" y
can be c
Log Settin
a message
essage to
can be c
al/SNMP T
ify one or t
o SNMP S
can be co
).
ify one or t
pecific user
ure its para
already ha
stination S
ed in this fr
r which you
of the devic
Code:
ing peripher
g peripher
ower Outle
sponding s
r input (Inp
to be execu
nd configur
nfigured o
down list c
oose the ac
/Off and re
535 second
y will be the
ay will repla
down list, c
the action
u will also
nfigured o
s Tab).
to a Syslog
end. The a
nfigured o
b).
o SNMP ad
rvers.
figured o
o e-mail ad
(s). To sen
eters in th
e configu
TP Serve
e text field.
ant to mon
e.
l is physica
l is physicall
s" tab.
tellite is ph
t A or Input
ted on pow
following
ly if you a
oose the p
ion to exec
tarted. If yo
s.
delay defin
e the delay
oose the p
o execute.
e able to d
ly if you a
server. In t
dress of th
nly if you
resses in t
ly if you al
dress(es) in
e-mails, y
"SMTP Pa
ed at leas
(General/S
The text will
itor the pow
lly not conn
y connected
sically conn
B) you wish
r on or pow
ctions:
lready hav
wer outlet
te.
u choose "r
d in the "P
defined in t
wer outlet
ach power
fine a resta
lready hav
e following
Syslog ser
lready hav
e correspo
eady have
the corresp
u will need
e".
one desti
MTP Page).
appear in t
r supplies.
cted.
but not acti
cted and a
to monitor.
r failure.
created a
roup the rul
start" you
wer Outlets
e "Power O
he rule will
outlet can
rt delay bet
created a
drop-down l
er has to b
e specified
ding field if
created a
nding field
a SMTP se
ation Sys
e Syslog, th
ated.
tivated.
least one
will apply
ill also be
Page".
tlets
pply to. In
e switched
een 0 and
least one
sts choose
defined in
at least a
ou want to
estination
if you want
ver on the
og Server
e Trap and
49
Page 52

Environmental monitoring system
LOGOUT:
Click "Logout" at the bottom of the page to exit the session without saving changes.
DISCARD CHANGES:
Click "Discard Changes" at the bottom of the page to discard all the changes you have made on this page.
APPLY CHANGES:
Click "Apply Changes" at the bottom of the page to save changes.
50
Page 53

e
e
c
s
M
t
m
d
o
o
d
c
e
e
o
p
o
w
o
w
l
d
s
n
e
t
u
n
t
x
m
m
n
e
R
w
t
H
g
D
t
o
C
y
w
t
e
o
o
s
M
c
a
f
T
o
a
o
e
5
a
e
a
f
a
l
e
e
r
e
v
e
d
e
a
x
s
e
Environm
ntal monito
ring system
3.3.9.5. S
This rule
proximity
ttings / Ru
an be use
ensor, a pu
es / Digital
to monitor
h button) a
Input Moni
the status
d to initiate
oring Rule
f an electri
different act
al contact (
ions if the c
door cont
ntact status
ct, a smok
has change
contact, a
d.
Rule ID:
The Serv
identify rul
middle of
Rule Na
In this fiel
and can c
Rule Col
In this fiel
use own
identify th
Rule Typ
In this dr
perform.
Configuri
Digital In
In the first
- EMS0 f
- TP follo
- DIM foll
- PB follo
on xB auto
es start with
he Rule list,
e:
, enter the
ntain alpha
r:
, select on
olours, just
triggered r
:
p-down list,
ng the Eve
ut to moni
drop-down l
r ServMon
ed by a nu
wed by a nu
er by a nu
matically cr
the letter "
the number
name you
umeric cha
of the 48 s
ype in the
le when dis
choose Di
t
or:
ist, choose t
B,
ber for a Pr
mber for a
ber for a Pu
ates an ID
" followed b
of this rule
ant to give
racters.
andard colo
ex value of
played in th
ital Input M
he device y
oximity Sen
igital Input
sh Button.
ode to cle
a number
ill only be u
o the rule.
urs you wan
the colour y
Rule Panel
nitoring Ru
u want to m
or,
odule,
rly identify
rom 1 to 25
sed again if
he name c
t to use to h
u want. Th
page or in
le then con
onitor:
ach rule. A
. If you del
no other rul
n be from 1
ighlight the
Rule highli
special us
igure the e
l the ID Co
te a rule in t
is availabl
to 32 char
ule when e
ghting allow
rs page.
ent and th
es used to
he
.
cters long,
ecuted. To
to quickly
actions to
51
Page 54

m
w
e
w
w
c
o
t
p
e
v
p
e
s
n
f
o
o
s
d
c
o
s
S
p
o
s
M
r
s
n
n
T
d
g
s
:
o
c
H
p
o
o
m
m
m
m
c
o
s
e
o
a
a
u
o
o
t
n
y
g
g
a
e
w
v
e
a
e
e
s
a
a
e
o
a
M
o
a
m
o
o
e
"
o
o
g
h
n
e
o
c
d
o
s
e
e
o
o
n
d
/
d
m
d
r
c
w
d
b
c
s
g
e
r
t
u
n
t
h
t
o
e
a
o
-
h
n
5
a
-
e
o
o
g
s
o
a
w
e
n
w
m
v
M
e
a
g
t
u
t
o
t
e
n
h
t
s
c
t
b
n
d
d
n
d
e
r
r
r
h
T
a
o
u
e
o
E
e
h
e
a
h
r
o
g
t
a
n
e
g
e
o
h
t
e
v
n
o
n
h
a
D
t
e
w
u
a
b
w
t
i
e
y
d
r
l
n
Environ
ental monit
ring system
In the sec
clearly ide
- DI1 to DI
- PS follo
- DI follow
- SP follo
- LP follo
Action if
In this Dr
- a contac
- when a
- when th
Configuri
For the E
Set Grou
This type
group (S
Check thi
to. In the
Each pow
able to de
- If you ch
- If you ch
Page".
Set Powe
Check thi
the next c
On/Off an
65535 se
Send Sys
This type
destinati
Check thi
the facility
the "Log
Send Tra
This type
destinati
Check thi
send SN
Mail to:
This type
SMTP Se
Check thi
to send a
network a
Syslog /
This fiel
(Misc/Lo
Up to 255
the e-mail
LOGOUT
Click "Log
DISCARD
Click "Dis
APPLY C
Click "Ap
ond drop-d
ntify each In
4 for the dig
ed by a nu
d by a nu
ed by a nu
ed by a nu
ontact...:
p-Down list
opens or cl
ush button i
proximity s
ng the Acti
ent defined
:
of action
ttings/Gro
box and in
ext corresp
er outlet gr
ine a restar
ose 0 seco
ose a dela
r Outlet:
box and in
orrespondin
restarted.
onds.
log Messa
of action
n Syslog S
box if you
and the se
ettings Pag
Message:
of action
n SNMP S
/these box(
P message
of action
ver (Gener
/these box(
e-mail to
d you will h
rap / Mail
appears
Settings P
characters
.
ut" at the b
CHANGES
ard Chang
ANGES:
ly Changes
wn list, cho
put:
ital inputs of
ber for a pr
ber for all di
ber for a s
ber for a lo
hoose if th
ses,
used (long
nsor detect
ns
bove, you
ppears an
ps Tab).
the corresp
nding drop-
up can be
delay betw
d for the d
different fr
the corresp
drop-dow
If you choos
e:
ppears an
rver (Misc
ant to sen
erity of the
".
ppears an
rver (Gene
s) and spe
to one or t
ppears an
l/SMTP Ta
s) and spe
ne or two
ve to confi
essage:
nly if you
ge) or a d
ay be ente
ttom of the
:
s" at the bo
at the botto
se the Inp
the ServMo
ximity inpu
ital input of
ort push on
g push on t
action has
push or sh
s a presenc
an choose
can be c
nding drop
down list, c
witched O
en 0 and 6
lay, the del
m 0, the del
nding drop
list, choos
e "restart" y
can be c
Log Settin
a message
essage to
can be c
al/SNMP T
ify one or t
o SNMP S
can be co
).
ify one or t
pecific user
ure its para
already ha
stination S
ed in this fr
page to exit
tom of the p
m of the pa
t you want
xB,
,
a DIM mod
the push bu
e push butt
o be execu
rt push),
.
nd configur
nfigured o
down list c
oose the ac
/Off and re
535 second
y will be the
ay will repla
down list, c
the action
u will also
nfigured o
s Tab).
to a Syslog
end. The a
nfigured o
b).
o SNMP ad
rvers.
figured o
o e-mail ad
(s). To sen
eters in th
e configu
TP Serve
e text field.
the session
ge to disca
e to save c
o monitor.
le,
ton,
n.
ed when:
following
ly if you a
oose the p
ion to exec
tarted. If yo
s.
delay defin
e the delay
oose the p
o execute.
e able to d
ly if you a
server. In t
dress of th
nly if you
resses in t
ly if you al
dress(es) in
e-mails, y
"SMTP Pa
ed at leas
(General/S
The text will
without savi
d all the ch
anges.
he ServMo
ctions:
lready hav
wer outlet
te.
u choose "r
d in the "P
defined in t
wer outlet
ach power
fine a resta
lready hav
e following
Syslog ser
lready hav
e correspo
eady have
the corresp
u will need
e".
one desti
MTP Page).
appear in t
ng changes.
nges you h
xB uses I
created a
roup the rul
start" you
wer Outlets
e "Power O
he rule will
outlet can
rt delay bet
created a
drop-down l
er has to b
e specified
ding field if
created a
nding field
a SMTP se
ation Sys
e Syslog, th
ve made o
Codes to
least one
will apply
ill also be
Page".
tlets
pply to. In
e switched
een 0 and
least one
sts choose
defined in
at least a
ou want to
estination
if you want
ver on the
og Server
e Trap and
this page.
52
Page 55

e
e
c
r
M
t
m
d
o
o
d
c
e
e
o
l
n
e
t
u
g
a
d
e
R
w
t
H
a
n
e
C
y
w
t
e
M
d
a
f
T
o
u
e
5
a
e
a
f
m
l
e
e
r
e
v
d
e
a
x
s
e
Environm
ntal monito
ring system
3.3.9.6. S
This rule
and perfo
ttings / Ru
an be used
m actions w
es / Analo
to monitor
hen the pre
Input Moni
n Analog I
efined valu
toring Rule
put value (t
is exceede
emperature,
.
humidity, a
bient light,
current....)
Rule ID:
The Serv
identify rul
middle of
Rule Na
In this fiel
and can c
Rule Col
In this fiel
use own
identify th
Rule Typ
In this dr
perform.
on xB auto
es start with
he Rule list,
e:
, enter the
ntain alpha
r:
, select on
olours, just
triggered r
:
p-down list,
matically cr
the letter "
the number
name you
umeric cha
of the 48 s
ype in the
le when dis
choose An
ates an ID
" followed b
of this rule
ant to give
racters.
andard colo
ex value of
played in th
log Input
ode to cle
a number
ill only be u
o the rule.
urs you wan
the colour y
Rule Panel
onitoring R
rly identify
rom 1 to 25
sed again if
he name c
t to use to h
u want. Th
page or in
le then con
ach rule. A
. If you del
no other rul
n be from 1
ighlight the
Rule highli
special us
igure the e
l the ID Co
te a rule in t
is availabl
to 32 char
ule when e
ghting allow
rs page.
ent and th
es used to
he
.
cters long,
ecuted. To
to quickly
actions to
53
Page 56

m
M
c
c
A
e
c
h
a
h
A
o
n
"
"
e
e
f
v
p
e
s
n
f
o
h
s
d
c
o
s
d
n
p
o
s
M
o
n
i
o
c
h
w
b
e
a
o
a
v
,
a
"
t
t
c
y
n
o
a
a
u
o
o
t
n
a
g
g
a
e
w
y
a
e
e
s
t
n
8
r
m
e
c
t
e
w
h
l
a
n
v
u
c
d
o
s
e
e
f
p
n
d
/
s
d
r
c
w
o
t
D
n
e
h
a
t
.
e
v
a
o
-
h
n
5
a
e
o
o
g
d
o
a
w
e
m
,
r
s
.
e
e
n
d
H
0
e
e
n
h
t
s
e
h
t
b
n
s
e
d
S
n
n
o
s
h
n
n
0
n
o
u
e
e
o
E
e
e
a
h
n
a
e
t
o
e
g
e
o
d
t
e
h
n
s
t
e
t
e
e
e
e
t
e
w
w
a
b
w
t
y
s
Environ
ental monit
ring system
Configuri
Analog In
Choose in
The Serv
- up to 32
- up to 16
- up to 16
- up to 16
Each devi
by the ID
the chara
charact
- The "X"
- The "!" c
want to
- The " " c
ccording
humidity, l
Action C
The optio
- Choose
defined in
- Choose
defined in
For temp
For relativ
For ambie
For the ef
Configuri
For the E
Set Grou
This type
group (S
Check thi
to. In the
Each pow
able to de
- If you ch
- If you c
Page".
Set Powe
Check thi
the next c
On/Off an
65535 se
Send Sys
This type
destinati
Check thi
facility an
"Log Setti
Send Tra
This type
destinati
Check thi
send SN
ng the Eve
put to mon
the first Dr
on xB supp
temperature
current prob
EnergyMete
Power Swit
e name, w
Code of the
ter "T" follo
r between
haracter m
aracter me
ctivate it, g
aracter (bl
to the de
ight, current
ndition:
s "higher th
higher than
the field on
lower than"
the field on
rature, you
humidity,
nt light, you
ective curre
ng the Acti
ent defined
:
of action
ttings/Gro
box and in
ext corresp
er outlet gr
ine a restar
ose 0 seco
oose a del
r Outlet:
box and in
orrespondin
restarted.
onds.
log Messa
of action
n Syslog S
box if you
the severit
gs Page".
Message:
of action
n SNMP S
/these box(
P message
t
tor:
p-Down list
orts:
, humidity a
es,
r,
h Satellite
ich can be
device. Fo
ed by a nu
rackets can
ans that th
ns that the
to the "Set
nk) means t
ice you us
energy...).
n" and "lo
if you want
he right of "
if you want
he right of "
an define v
ou can defi
can define
t (rms), yo
ns
bove, you
ppears an
ps Tab).
the corresp
nding drop-
up can be
delay betw
d for the d
y different
the corres
drop-dow
If you choos
es:
ppears an
rver (Misc
ant to send
of the mes
ppears an
rver (Gene
s) and spe
to one or t
he device y
d ambient li
-port 32 A.
defined by
example, a
ber.
follow this I
correspond
orrespondi
ings/Power
hat the corr
, choose t
er than" en
to execute
igher than"
to execute t
ower than".
lues betwe
e values be
alues betwe
can define
an choose
can be c
nding drop
down list, c
witched O
en 0 and 6
lay, the del
rom 0, the
onding drop
list, choos
e "restart" y
can be c
Log Settin
a message
age to sen
can be c
al/SNMP T
ify one or t
o SNMP S
u want to
ght sensors
he administ
ll ID Codes
Code:
ing sensor i
g sensor is
Outlets" tab
sponding s
e Analog I
ble you to d
he rule whe
he rule whe
n -25°C an
tween 20 R
en 0 and 10
alues betw
nd configur
nfigured o
down list c
oose the ac
/Off and re
535 second
y will be the
delay will r
-down list c
the action
u will also
nfigured o
s Tab).
to a Syslog
. The addr
nfigured o
b).
o SNMP ad
rvers.
onitor.
ator (go to
used to ide
physically
physically c
nsor is phy
nput in the
fine when t
n the enviro
the enviro
60°C, +/- 2
and 80 RH
0 Lux.
en 1 and 1
the followi
ly if you a
oose the p
ion to exec
tarted. If yo
s.
delay defin
place the d
oose the p
o execute.
e able to d
ly if you a
erver. In th
ss of the Sy
nly if you
resses in t
ettings/Se
tify temper
ot connect
nnected bu
ically conne
second Dr
e rule has t
ment value
ment value
°C.
, +/- 3%.
Amps.
g actions:
lready hav
wer outlet
te.
u choose "r
d in the "P
lay define
wer outlet
ach power
fine a resta
lready hav
following d
slog server
lready hav
e correspo
sors Tab), i
ture sensor
d.
not activat
cted and ac
p-Down (t
o be execut
exceeds th
is below th
created a
roup the rul
start" you
wer Outlets
in the "Po
he rule will
outlet can
rt delay bet
created a
rop-down lis
as to be de
e specified
ding field if
preceded
start with
d. If you
ivated.
mperature,
d.
value you
value you
least one
will apply
ill also be
Page".
er Outlets
pply to. In
e switched
een 0 and
least one
t chose the
fined in the
at least a
ou want to
54
Page 57

e
r
s
n
n
T
d
g
s
:
o
c
H
p
a
a
e
o
a
M
o
a
m
o
o
e
"
d
b
c
s
g
e
r
t
n
w
m
v
M
e
a
g
n
d
e
r
r
r
h
r
o
g
t
a
o
n
h
a
d
r
l
n
Environm
Mail to:
This type
SMTP Se
Check thi
to send a
network a
Syslog /
This fiel
(Misc/Lo
Up to 255
the e-mail
LOGOUT
Click "Log
DISCARD
Click "Dis
APPLY C
Click "Ap
ntal monito
of action
ver (Gener
/these box(
e-mail to
d you will h
rap / Mail
appears
Settings P
characters
.
ut" at the b
CHANGES
ard Chang
ANGES:
ly Changes
ring system
ppears an
l/SMTP Ta
s) and spe
ne or two
ve to confi
essage:
nly if you
ge) or a d
ay be ente
ttom of the
:
s" at the bo
at the botto
can be co
).
ify one or t
pecific user
ure its para
already ha
stination S
ed in this fr
page to exit
tom of the p
m of the pa
figured o
o e-mail ad
(s). To sen
eters in th
e configu
TP Serve
e text field.
the session
ge to disca
e to save c
ly if you al
dress(es) in
e-mails, y
"SMTP Pa
ed at leas
(General/S
The text will
without savi
d all the ch
anges.
eady have
the corresp
u will need
e".
one desti
MTP Page).
appear in t
ng changes.
nges you h
created a
nding field
a SMTP se
ation Sys
e Syslog, th
ve made o
estination
if you want
ver on the
og Server
e Trap and
this page.
55
Page 58

m
o
r
p
o
e
O
d
h
s
e
o
h
h
P
g
p
n
c
n
e
P
d
H
d
Environ
ental monit
ring system
3.3.10. M
This page
which are
can check
check the
control all
isc / Cont
is very hel
currently co
the status
values of th
the Power
ol Panel
ful for the a
nnected or
f the power
connected
utlets of the
ministrator
ave been c
upplies of t
sensors, c
connected
because it
nnected to
e ServMon
eck the stat
ower Switc
ives a com
the ServMo
xB and the
us of the co
h units.
lete overvi
xB. At a gl
onnected
nected dry
w of all the
ance, the a
eripherals.
contacts an
peripherals
ministrator
e can also
of course
56
Page 59

e
v
h
w
s
O
P
e
b
s
b
s
a
e
d
u
w
s
t
t
n
o
s
e
t
t
c
t
e
i
M
r
t
t
t
v
’
r
n
P
p
a
c
s
a
m
o
h
s
Environm
ntal monito
ring system
3.3.11. M
This page
executed
highlight c
For super
rules. In t
the rules
isc / Rule
shows all t
can also b
olours can
ision purpo
e example
hich have
anel
he rules th
highlighte
e customize
e, the adm
below, the
een triggere
administra
in differen
d during the
inistrator ca
ser Bill has
d.
or has crea
colours a
creation of
create sp
the possibil
ed and acti
cording to
he rule (Set
cial accoun
ty to super
vated. The
he emerge
ings/Rules
s which dis
ise 4 rules
ules which
cy of the
age).
lay only so
nd to see
have been
ction. The
e specific
n a glance
The page
Unlike a
session.
is automati
tandard se
pening m
cally refres
sion, the
ny session
hed every 1
eb server
of this aff
0 seconds.
f the Serv
cts the pe
on xB won
formances
t automati
of the web
ally close t
erver.
is kind of
57
Page 60

m
f
a
o
a
w
o
v
s
o
v
i
u
e
e
Environ
3.3.12. M
The log
automatic
ental monit
isc / Log
ile keeps
lly cleared
ring system
running l
hen the de
g of event
ice is rebo
and acti
ted. The file
ities occurr
will display
ng on the
p to 2048 r
device. Th
cent logs.
logs are
58
Page 61

e
d
c
S
A
a
a
r
d
s
d
n
n
m
s
:
o
c
H
p
S
t
f
t
e
h
e
S
e
e
M
r
e
o
o
e
"
t
q
n
W
f
e
A
o
s
s
t
e
t
t
m
o
1
w
v
a
g
u
g
o
w
S
)
r
h
s
t
e
e
e
f
a
o
t
d
a
s
e
s
e
n
Environm
ntal monito
ring system
3.3.13. M
This page
errors an
recorded
(Emergen
isc / Log
allows you
problems.
in the log
y, Alert, Cri
ettings
o configure
It is often
ile and se
ical, Error,
he logs. Th
uite useful
t as copy
arning, No
Log file is
o discover
to a Syslo
ice, Informa
sed by the
he causes
server ar
tional and D
ystem to re
of tricky pr
classified
bug).
cord action
blems. The
into 8 sev
, warnings,
messages
rity levels
Primary
If you wan
ddress"
or the IP
Seconda
In this fiel
Example:
Email Ad
If you wa
destinatio
Type of
Specify in
(for detail
LOGOUT
Click "Log
DISCARD
Click "Dis
APPLY C
Click "Ap
yslog Serv
t to enable t
nd enter th
ddress of a
y Syslog S
you can d
yslog.Serv
ress:
t to enable
e-mail add
essages to
this field th
see Syslog
ut" at the b
CHANGES
ard Chang
ANGES:
ly Changes
r:
e ServMon
address o
yslog serv
rver:
fine the IP
on xB.com
the ServM
ess to be u
send:
type of me
Messages:
ttom of the
:
s" at the bo
at the botto
xB to send
the Syslog
r. The Sysl
ddress of a
or 192.168.
n xB to sen
ed.
sages you
Severity Le
page to exit
tom of the p
m of the pa
essages t
Server you
g uses port
secondary
.252
d e-mails, c
ant to send
el definition
the session
ge to disca
e to save c
a Syslog S
ish to use.
443/UDP.
yslog Serve
heck the bo
to the speci
.
without savi
d all the ch
anges.
rver, check
You can en
r.
x "e-mail a
ied e-mail a
ng changes.
nges you h
the box "Sy
er either th
dress" and
ddress.
ve made o
log Server
hostname
specify the
this page.
59
Page 62

m
r
a
s
o
P
w
b
d
R
p
o
T
E
a
w
r
C
S
y
a
w
T
o
S
t
A
i
e
i
Environ
ental monit
ring system
Start you
authentic
Enter a u
In the dro
want to kn
4.
Web bro
tion dialog
er name an
p-down list,
ow the statu
OWE
PE
ser and ty
ox.
its corresp
choose the
s.
R OU
IPH
e the IP
nding pass
power cont
LET
RAL
ddress of
ord. The st
ol unit you
ONT
STA
our ServM
tus of the
ant to con
ROL
US
n xB. The
ervMon xB
rol or the p
ND
browser d
s displayed.
ripheral for
splays the
which you
60
Page 63

e
h
h
n
h
h
u
b
T
r
m
o
a
a
(
a
s
r
o
a
B
o
e
h
c
t
e
/
r
d
p
a
r
w
r
c
e
p
o
y
v
n
t
h
w
e
.
t
t
w
s
w
o
y
e
e
t
t
w
Environm
ntal monito
ring system
If you log i
- control a
- display t
- display t
If you log i
- control i
- display t
- display t
The ON b
The OFF
The RES
The powe
by the ad
n as system
ll the power
e instant v
e status of
n as a user
dividually al
e values of
e status of
tton allows
utton allow
ART button
outlet or g
inistrator (s
administrat
utlets and
lues of all th
ll digital inp
ServMon x
l the power
all the conn
ll the digital
you to switc
you to swit
allows you
oup of pow
ee Settings
r, you will b
ll the powe
e connecte
uts.
handles u
utlets and
cted senso
inputs for
ON the co
h OFF the
o switch OF
r outlets wil
power outl
e able to:
outlet grou
sensors (te
to 255 acc
ll the power
s for which
hich you ha
responding
orrespondi
F the corres
l then be au
ts Page).
s of the con
mperature,
unts), you
outlet group
ou have th
e the rights
power outle
g power ou
ponding po
omatically
nected Po
umidity, am
ill be able t
s for which
rights,
or group of
let or group
er outlet or
witched ON
er Switch d
bient light),
:
ou have th
power outle
of power ou
group of po
after the de
vices,
rights,
s.
lets.
er outlets.
lay defined
61
Page 64

m
n
x
P
m
C
S
n
n
n
M
S
x
p
g
w
s
e
e
d
e
b
o
e
e
o
s
k
e
n
u
)
B
m
n
f
b
s
t
n
s
r
e
q
s
:
n
o
o
h
c
f
x
t
s
a
r
s
i
S
a
g
e
t
m
g
A
h
m
e
e
o
m
p
r
c
s
e
n
s
r
e
s
r
b
X
e
s
a
t
s
a
u
f
x
o
e
s
h
s
p
o
o
C
e
t
n
t
s
c
e
c
i
u
w
u
o
h
m
a
o
n
i
L
r
e
M
e
e
w
H
o
o
o
d
m
s
r
w
Environ
ental monit
ring system
5.1. Pi
ServMon
alive:
Address
The first
The Ping
(Internet
request,
or several
it again o
Port Sca
The seco
command
Telnet, S
possible,
ServMon
function).
- The Su
- The Pin
- The net
direct a
A probl
- Execute
the IP d
- Choose
overloa
Recomm
- Interval
- Number
- Delay b
- Delay b
g and S
B has two
inging:
ethod uses
command,
ontrol Mes
ervMon xB
requests, S
(Reboot fu
ning:
d method
allows you
TP, POP...
ervMon x
B can auto
ervision fu
and Scan
ork route
possible,
m on a rou
several Pi
vice doesn
a realistic
the netwo
nded valu
etween Re
f unsucces
fore Reboot
fore restarti
can Met
methods to
the well-kn
which is an
age Protoc
nows that t
rvMon xB
ction).
ses the Po
to find out i
. ServMon
knows tha
atically swi
ction work
unctions c
etween Se
o do not u
er or the w
gs and/or
't respond
upervision
k with Pin
s:
uests: 10 s
ful Reques
10 sec or
g monitorin
5.
hods
check whet
wn Ping co
echo requ
l) if an IP d
e TCP/IP c
an automati
rt Scan co
a specific
B simply tri
a server p
tch the devi
only if th
n be used
vMon xB a
e unneces
ring could
cans befor
lthough it i
cycle. One
and Scan
c or more
s before Re
ore
after Rebo
NNE
er an IP eq
mand wh
st, enable
vice is avail
nnection is
cally switch
mand to te
rotocol is
es to conne
ogram is r
e off and a
ServMon
separately
d the IP d
ary router
eboot the I
running t
s still worki
econd is
equests.
oot: 3 or m
ot: 120 sec
ES
uipment (P
reby a requ
you to de
ble on the
established.
he device o
t a specifi
vailable on
ct to a spec
nning there
ter a specifi
B is conne
r together.
vice you w
and compl
device to
e Reboot f
ng.
ossible, ho
re
r more
, server, ro
st is sent t
ermine thro
etwork. If t
If the syste
ff and after
TCP/IP po
a server (fo
ific server p
. If the con
d delay sw
ted to the
sh to supe
ex wiring b
supervise.
nction. It c
ever it's n
ter, Webca
a specific I
ugh an IC
e system r
does not r
specified d
rt. In other
r example
rt. If the c
ection is n
tch it again
AN.
vise shoul
tween the
ould be po
ot necessa
m...) is still
P address.
P protocol
acts to this
act to one
elay switch
ords, this
TTP, FTP,
nnection is
t possible,
n (Reboot
be as
.
sible that
y to
62
Page 65

Environmental monitoring system
5.2. Technical Data
Network standards:
IEEE 802.3, 10 / 100 BASE-T
Network protocols:
TCP/IP, HTTP/HTTPS
Network connection:
RJ-45 connector for STP CAT5
Max. network cable length 100 meters
Serial connection:
RS232, SUB-D 9 female
SSL Technology:
Version 2 and 3
Operating temperature:
0°C to +40°C
Operating humidity:
10% to 80% RH (not condensing)
Dimensions (LxDxH):
170 x 110 x 42 mm
Weight:
0,63 kg
Approvals:
CE, EN55022 & EN55024
5.3. Commonly used Ports
TCP 25: This port is used to deliver e-mails over SMTP (Simple Mail Transfer Protocol).
TCP 80: This port is used for http connections.
UDP 123: This port is u sed to allo w time synchronization over NTP (Network Time Protocol).
UDP 161: This port is used for SNMP Requests.
UDP 162: This port is u sed for SNMP Traps.
TCP 443: This port is used to allow SSL support (Secure Socket Layer).
UDP 514: This port is u sed to delive r Syslog messages.
63
Page 66

Environmental monitoring system
5.4. Syslog Messages: Severity Level Definitions
The Emergency level is the most severe type of message generated by ServMon xB and the Debug
severity level is the least severe one.
Severity Level 0, Emergency:
The following messages appear at severity 0:
- Continuous error!
- An SMTP Client could not be created
Severity Level 1, Alert:
The following messages appear at severity 1:
- Settings have been reinitialized through the serial connection
- ServMon xB does not respond
- Satellite "number" does not respond
- Sensor "number" does not respond
- Failure on Power Input A of Master M0
- Failure on Power Input B of Master M0
- Failure on auxiliary Power Input of Master M0
- Failure on Power Input A of Satellite (number)
- Failure on Power Input B of Satellite (number)
- I/O Extension Module has been disconnected
- A Mail could not be sent "subject" to "name"
- SMTP Client not available: a Mail could not be sent "subject" to "name"
Severity Level 2, Critical:
The following messages appear at severity 2:
- "file" config corrupted : restoring default values
Severity Level 3, Error:
ServMon xB doesn't generate Severity Level 3.
Severity Level 4, Warning:
The following messages appear at severity 4:
- Settings have been changed through the serial connection
- Settings have been changed through the network by User "name"
Severity Level 5, Notice:
The following messages appear at severity 5:
- Master M0 has been connected
- Satellite (number) has been connected
- Sensor (number) has been connected
- SSL Key has been reinitialized through the serial connection
- System has been restarted through the serial connection
- Power Supply A of Master restored
- Power Supply B of Master restored
- Auxiliary Power Supply of Master restored
- Power Supply A of Satellite (number) restored
- Power Supply B of Satellite (number) restored
- I/O Extension Module has been connected
- Rule (number) : Outlet (number) of Master has been switched ON
- Rule (number) : Group (number) has been switched ON
- Rule (number) : Dry Contact Output (number) has been open
- Rule (number) : Mail "subject" has been sent to "name"
64
Page 67

Environmental monitoring system
Severity Level 6, Informational:
The following messages appear at severity 6:
- System has been started
- Date & Time have been synchronized to a Network Time Server
- User "name" : Outlet (number) of Master M0 has been switched ON
- User "name" : Group (number) has been switched ON
- Dry Contact Input (number) has been opened
- Dry Contact Input (number) has been closed
- Dry Contact Output (number) has been opened
- Dry Contact Output (number) has been closed
- Mail "subject" has been sent to "name"
- Session opened by user "name"
Severity Level 7, Debug:
ServMon xB doesn't generate Severity Level 7.
All modifications reserved
65
 Loading...