

Page 1

BLACK BOX Catalogue Ltd
TECHNICAL:
SALES:
ADDRESS:
The Source for Connectivity
10 CD NetMate:
CDUNM10
10 CD with 9GB HD Cache NetMate:
CDUNM10C
10CD & 1 DVD with 9GB HD Cache NetMate:
CDUNM10CDV
35 CD & 2 DVD with 23GB HD Cache NetMate:
CDUNM35CDV
70 CD & 1 DVD with 45GB HD Cache NetMate:
CDUNM70CDV
NetMate
CD/DVD Servers
FAX:
WEB:
(0118) 931 2233
(0118) 965 5100
(0118) 931 1727
15 Cradock Road, Reading, Berkshire RG2 0JT
www.blackbox.co.uk
Page 2

How To Contact your Local Black Box
Italy: Australia:
Black Box Italia S.P.A Black Box Catalog Australia PTY LTD
Tel: 0227400280 Tel: 0398797100
Fax: 0227400219 Fax: 0398702955
Web Site: www.blackbox.it
Deutschland: Brazil:
Black Box Deutschland Black Box Do Brasil.
Tel: 0811/5541-0 Tel: (011) 5515-4000
Fax: 0811/5541-499 Fax: (011) 5515-4002
Web Site: www.blackbox-deutschland.com Web Site: www.blackbox.com.br
Switzerland: Canada:
Datacom Black Box Services AG Black Box Canada Corp.
Tel: 0554517070 Tel: 0416-736-8000
Fax: 0554517075 Fax: 0416-736-7348
Web Site: www.black-box.ch Web Site: www.blackbox.com
Netherlands: Mexico:
Black Box Datacom BV Black Box De Mexico S.A. de C.V
Tel: 03032417799 Tel: 05-420-0100
Fax: 0302414746 Fax: 05-420-0123
Web Site: www.blackbox.nl/ Web Site: www.blackbox.com.mx
Page 3

Belgium: Japan:
Black Box Black Box Catalog
Tel: 027258550 Tel: 03-3820-5011
Fax: 027259212 Fax: 03-3820-5010
Web Site: www.blackbox.be Web Site: www.blackbox.co.jp/
France: U.S.A
Black Box Catalogue Black Box Corporation
Tel: 0145606700 Tel: 724-746-5500
Fax: 0145606747 Fax: 724-746-0746
Web Site: www.blackbox.fr Web Site: www.blackbox.com
Spain: Chile
Black Box Comunicaciones S.A. Black Box Chile
Tel: 34 91 663 0200 Tel: 00 562 223 8811
Fax: 34 91 661 84 35 Fax: 00 562 225 1002
Web Site: www.blackbox.es Web Site: www.Blackbox.cl
Page 4

Page 5

NetMate CD/DVD Servers
TECHNICAL: 0118 931 2233
NetMate CD/DVD Servers
CONTENTS
Communications Regulation Information ix
Limits & Liabilities x
1 Welcome and Overview 11
Welcome 11
Overview 11
How Netmate Works 11
Features & Benefits 12
Unpacking your CD-Server 15
2 Installing the CD/DVD Server 15
Connecting the Cables 15
LED and LCD Description 17
Care and handling of CD-ROM or DVD-ROM discs 18
3 Automatic Configuration and Accessing the CD’s 21
Overview 21
IP Configuration 22
Automatic IP Configuration Methods 23
DHCP (Dynamic Host Configuration Protocol) 23
BOOTP (Bootstrap Protocol) 23
RARP (Reverse Address Resolution Protocol) 23
Temporary IP Configuration Methods 24
Page 6

SALES: 0118 965 5100
NetMate CD/DVD Servers
Setting Your IP Configuration Manually 26
Apple Macintosh Networking 30
Automatic Configuration 30
Accessing the CD’s 30
Windows PC Networking 33
Automatic Configuration 33
Accessing the CD’s - Find Computer Method 33
Accessing the CD’s - Network Neighborhood Method 33
HTML Access 38
NFS Access 39
"Unconfigured" or Default IP Address 24
"Force-Pinging" an IP Address 25
Web Administration 26
Configuration Text File 28
FTP Access 39
4 Administrative Tools 41
Web Administration and Feature Description 42
Making Changes 43
Server 43
General 43
File Systems 45
Date & Time 46
Statistics 47
User’s & Groups 47
Add User 48
Configure user 49
Page 7

NetMate CD/DVD Servers
TECHNICAL: 0118 931 2233
Delete User 50
Add Group 50
Configure group 51
Delete group 52
Volumes 52
Configure Volume 52
Add Virtual Volume 56
Configure Virtual Volume 58
Delete Virtual Volume 60
Devices 60
Drive Information 59
Hard Drive Caching 61
Hard Drive Cache Options 66
Minichanger 67
NetMate CD/DVD Servers
SCSI Settings 68
Networking 69
AppleTalk 70
FTP/TFTP 71
HTTP 72
Microsoft Networking 73
NDS 75
NetWare 76
NFS 78
SNMP 79
TCP/IP 80
Maintenance 82
Log Page 82
Page 8

SALES: 0118 965 5100
NetMate CD/DVD Servers
ROM Usage 83
Restart/Shutdown 83
5 NetMate Security Overview 85
Initial Security 85
Increasing Security - Guest Access 85
Using NDS 86
Using Microsoft Domain Services 86
Users & Groups (User Level Security) 87
Remote Authentication 87
Share Level Security 87
NT Authentication 88
About Guest Access and UNIX Environments 88
APPENDIX A - Glossary 89
APPENDIX B - Updating Firmware and Factory Defaults 103
APPENDIX C - Troubleshooting and Technical Resources 107
APPENDIX D- Specifications 113
Page 9

NetMate CD/DVD Servers
TECHNICAL: 0118 931 2233
NetMate CD/DVD Servers
Communications Regulation Information (Network Board Only)
FCC statement
This device complies with Part 15 of the FCC Rules. Operation is subject to the following two conditions:
1. This device may not cause harmful interference, and
2. This device must accept any interference received, including interference that may cause undesired operation.
WARNING: This equipment has been tested and found to comply with the limits for a Class A digital
device, pursuant to Part 15 of the FCC Rules. These limits are designed to provide reasonable
protection against harmful interference in a commercial installation. This equipment generates, uses
and can radiate radio frequency energy and, if not installed and used in accordance with the instructions, may cause harmful interference to radio communications. However, there is no guarantee that
interference will not occur in a particular installation. If this equipment does cause harmful interference to radio or television reception, which can be determined by turning the equipment off and on,
the user is encouraged to try to correct the interference by one or more of the following measures:
· Reorient or relocate the receiving antenna.
· Increase the separation between the equipment and receiver.
· Connect the equipment into an outlet on a circuit different from the one which the
receiver is connected to.
· Consult the dealer or an experienced radio/TV technician for help.
The user may find the following booklet prepared by the Federal Communications Commission
helpful:
The Interference Handbook
This booklet is available from the U.S. Government Printing Office, Washington, D.C. 20402. Stock
No. 004-000-00345-4.
NOTE: In order to maintain compliance with the limits of a Class B digital device, Black Box. requires
that you use quality interface cables when connecting to this device. Changes or modifications not
expressly approved by Black Box could void the user's authority to operate this equipment. Refer to
the manual for specifications on cabling types.
Page 10

SALES: 0118 965 5100
NetMate CD/DVD Servers
CE Notice
Marking by the symbol CE indicates compliance of this equipment to the EMC directive of the
European Community. Such marking is indicative that this equipment meets or exceeds the following
technical standards:
· EN 55022-"Limits and Methods of Measurement of Radio Interference Characteristics
of Information Technology Equipment."
· EN 50082-1-"Electromagnetic compatibility -Generic immunity standard Part 1:
Residential, commercial, and light industry."
A "Declaration of Conformity" in accordance with the above standards is being made and is on file at
Black Box.
CD-ROM drive laser information
WARNING Making adjustments or performing procedures other than those specified in your
equipment’s manual may result in hazardous exposure.
WARNING Do not attempt to disassemble the cabinet containing the laser. The laser beam used in
this product is harmful to the eyes. The use of optical instruments, such as magnifying lenses, with
this product increases the potential hazard to your eyes. For your safety, have this equipment
serviced only by an authorized service provider.
Limits & Liabilities
Whereas Black Box. has tested the hardware and software described in this manual, neither Black
Box. nor their dealers make any form of warranty or representation, either expressed or implied,
concerning the manual or the hardware and software that it describes. In no event can any of these
parties be held liable for indirect or consequential damage resulting from any defect in the software,
firmware, hardware, disks, or manuals, even in the case where they have been advised of the possibility of such damages. The above mentioned can in no way be held responsible for any loss of data or
damage done to media or other systems on the network used in conjunction with this product. There
are some states that do not allow the exclusion or limitation of implied warranties or liabilities for
incidental or consequential damages. If this is the case, then the above mentioned limitations and
exclusions may not apply.
Black Box. cannot guarantee or be held responsible that you will be given notice of any revisions to
the software described in this manual, even if you have previously returned the enclosed registration
card. You should periodically check with your dealer for updates.
Page 11

NetMate CD/DVD Servers
TECHNICAL: 0118 931 2233
NetMate CD/DVD Servers
Read this chapter to
familiarize yourself with
the basic features and
functions
1
Welcome and Overview
Welcome
Congratulations on the purchase of your new Black Box powered CD/DVD Server! In this
guide we provide you with information and instructions for installing and operating your new
system.
Overview
Black Box’s Netmate CD/DVD Servers are Network Attached Storage (NAS) Servers.
They are extremely simple though powerful tools for sharing information over diverse
computer networks. Their operating systems were designed from the ground up to be a
high performance multi-protocol server for sharing CD-ROM or DVD-ROM discs, referred
to as "shared resources", to clients over the network.
Most configuration items are automatically determined and configured during system
startup. Should the Network Administrator need to modify these settings, information
provided within this document will aid this process.
How NetMate CD/DVD Servers Work
NetMate CD/DVD Servers are connected as a node in a standard speed 10BaseT or Fast
100BaseT Ethernet Network. Other then the Domain services security verifications, in a
Domain environment, all communication takes place directly between the NetMate CD/
DVD Server and the network client requesting the information. The NetMate CD/DVD
Server comes pre-installed with all the network functionality required. You do not need to
11
Page 12

SALES: 0118 965 5100
NetMate CD/DVD Servers
install any special software on any systems. NetMate CD/DVD Servers offer high performance, reliability, and independence form other equipment.
NetMate CD/DVD Servers install in minutes! In most environments, all you need is the
physical connection between the NetMate CD/DVD Server and the network to start accessing CD’s or DVD’s.
Once the system is running all you have to do is insert CD’s at the server and the volumes
become almost instantly available to the clients. It’s that simple!
When hard disk caching is enabled a newly inserted disc will automatically migrate itself
over to the hard drive and eject itself making room for additional CD’s.
IMPORTANT: If you are the network administrator, you should review
the procedures in this guide necessary for you to install, configure,
and use the NetMate CD/DVD Server in your particular networking
environment.
Features & Benefits
NetMate has many features and advantages offering its users a variety of benefits.
Ease-of-Use
NetMate CD/DVD Server is easy-to-use; it uses protocols that already exist
on today’s networks such as Netware-NCP, Microsoft-SMB and IP, AppleAFP and Unix-NFS, so there is no need to learn or install any software to
access the CD server. It is a complete plug-and-play system! Just turn it
on; it auto configures to your network and is available to use in 30 seconds
with no network downtime.
Flexibility
NetMate CD/DVD Server simultaneously supports Novell NetWare, OS/2,
12
Page 13

NetMate CD/DVD Servers
TECHNICAL: 0118 931 2233
NetMate CD/DVD Servers
Windows, UNIX, and Apple Macintosh operating systems in both Internet
and Intranet environments. This wealth of capability offers the greatest
flexibility of network access available today.
Web Server Functionality
Since your new NetMate CD/DVD Server is a Web Server, you can access
it using any Web browser, such as Netscape Navigator or Microsoft Internet
Explorer. In a Web environment NetMate offers configuration, user management, and CD access. NetMate CD/DVD Server supports total Web
browser administration and support.
CD-ROM Disc Formats
NetMate CD/DVD Server supports the various disc formats: ISO 9660
(Joliet & Romeo), RockRidge, High Sierra, Multi-session, HFS, Hybrid CDs
as well as long file names. Additionally, all formats are available to all protocols and clients allowing cross platform sharing of data.
Incredible Network Performance
NetMate CD/DVD Servers
NetMate CD/DVD Server offers network throughput close to 100 Mbits/sec.
A single read can sustain at nearly 6 Megabytes per second with overall
throughput even greater!
Network Interface
Your NetMate CD/DVD Server has an auto switching fast Ethernet interface, RJ 45 connector (Category 5 unshielded twisted pair cable) for
10BaseT or 100BaseT fast Ethernet connection.
Hard Drive Caching
NetMate CD/DVD Server offers multiple variations of hard disc caching.
Huge and highly cost effective systems can be built using today’s higher
capacity hard drives and CD-ROM, CD Changer or DVD-ROM Drive(s).
Capacity or Performance is no longer limited to the number of individual
CD-ROM or DVD-ROM installed. Upon insert a CD-ROM disc is entirely
migrated over to the hard drive then ejected from the tower.
Performance Hard Drive Caching
13
Page 14

SALES: 0118 965 5100
NetMate CD/DVD Servers
If performance is paramount such as large rack configurations, NetMate
CD/DVD Server can be configured to have the disc image both on the hard
drive and in the CD-ROM pulling the information from both sources simultaneously similar to the way RAID systems function.
Domain Services
NetMate CD/DVD Server fully supports Novell NDS and Microsoft Domain
Services. These advanced security systems are popular in today’s larger
networks since a single security strategy and user list is common to all
network servers. The Net Base becomes part of your NDS Tree or
Microsoft Domain and can be managed with the standard tools used for
Domain Management.
Security
Users and groups can be stored or managed on the NetMate CD/DVD
Server or kept remotely on your existing file servers. You can restrict
access by setting up password protection. You can also limit the number of
simultaneous users of any CD to comply with license agreements.
14
Software Updates - Automatically!
Flash memory allows you to easily download software updates over the
network using a Web Browser, FTP, or just by doing a standard file copy in
windows or from a mac. By using the “Firmware Autoupdate” feature the
NetMate can automatically search the Internet and update it’s own software!
Network Management
NetMate CD/DVD Server allows you to perform all configuration and management tasks via any standard Web browser. For non-IP networks all
management and configuration functions can be maintained via text files
stored on your local system. NetMate CD/DVD Server also supports the
SNMP administrative Protocol.
Year 2000 Compliant
The NetMate CD/DVD Server was designed with Year 2000 compliance in
mind and fully supports Year 2000 requirements.
Page 15

NetMate CD/DVD Servers
TECHNICAL: 0118 931 2233
NetMate CD/DVD Servers
NetMate CD/DVD Servers
This chapter provides
connection and general
information about the
NetMate hardware
2
Installing the CD/DVD Server
Connecting the Cables
This section contains instructions for connecting your new CD/DVD Server.
1 Carefully remove your new CD/DVD Server from the shipping con-
tainer and save all shipping materials.
2 Position your NetMate CD/DVD Server in a location where it can be
safely connected to power and the network.
Make sure you provide adequate air circulation and do not block the ventilation fans. Also, do not place your new equipment in a location subject to
unnecessary vibration, on an unstable base, near heat sources, direct
sunlight, excessive dust, or moisture.
3 Connect the Network Cable.
Your NetMate CD/DVD Server comes equipped with a RJ-45 connector.
The NetMate CD/DVD Server automatically switches between 10BaseT
and 100BaseT, full or half-duplex modes.
15
Page 16
SALES: 0118 965 5100
NetMate CD/DVD Servers
IMPORTANT: Make sure you always use a Category 5 UTP cable for 100
BaseT environments.
4 Connect the AC power cord.
Be sure to check foreign system voltage settings on the power supply(ies)
first.
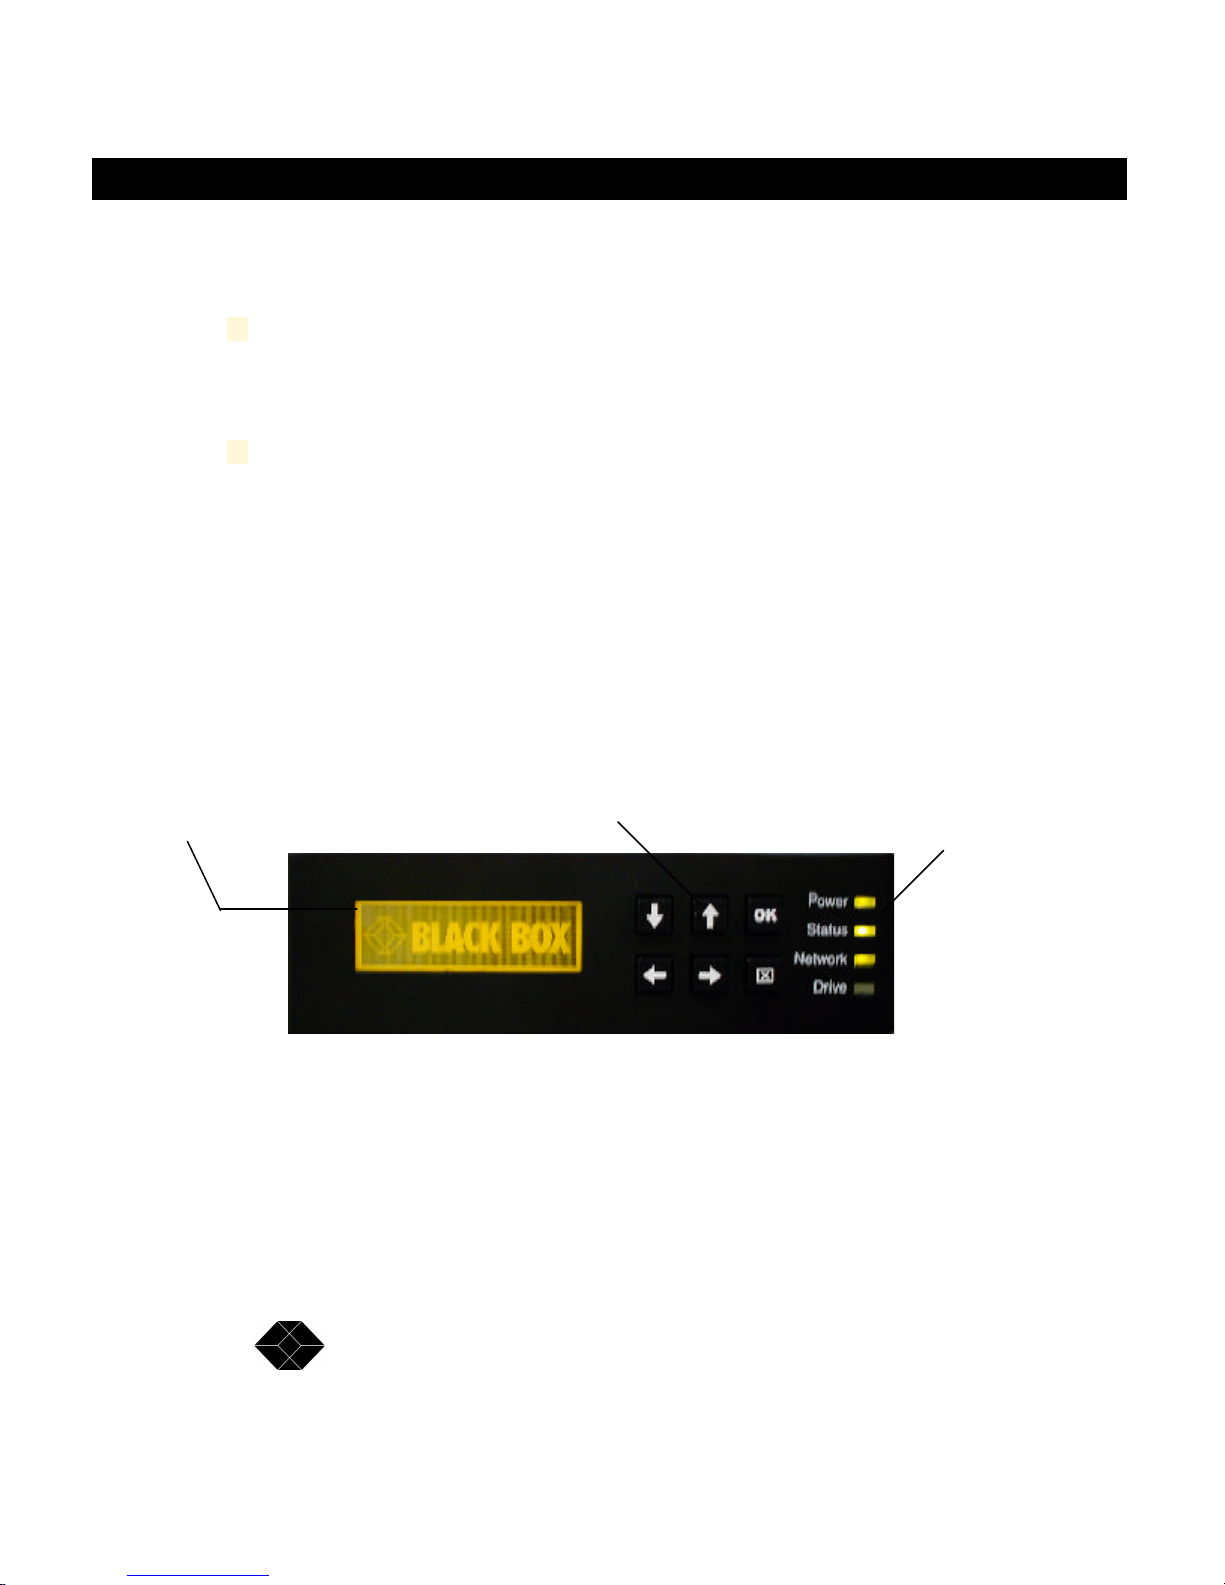
Front Panel Description
The front panel of the CD/DVD Server provides immediate configuration information to the
Network Administrator. The Display model allows the Administrator to quickly and easily
see how the Netmate configured itself to your network as well as allowing network configuration to be directly entered into the CD/DVD Server.
Graphical
display window
16
User Entry Keys
Multi-Color
LED’s
Page 17

NetMate CD/DVD Servers
TECHNICAL: 0118 931 2233
NetMate CD/DVD Servers
LED Description
The front panel LED’s provide immediate feedback for configuration and operational
information. ( In 7 and 14 drive models only)
Each display is multi-colored and capable of displaying various colors. Also, some lights
will display as solid colors while others will flash. The below chart describes how they
function under different conditions.
Note: During system start time the Power light will initially show solid Red until the board
has passed initialization and is ready for access over the network. This time period is
approximately 30 seconds.
Power Solid Green Power is currently on and the board initialized
Solid Red Your system has a power supply problem
No Light Your system has a power supply problem
Solid Amber The NetMate did not initialization properly
Status Solid Green An IP# has been acquired automatically
Solid Amber An IP# has been set manually
Off IP has been configured and is set to
10.10.10.10
Network Solid Green Represents Ethernet Link
Flashing Amber Represents Ethernet activity (Transmitting)
Drive Flashing Green Data is currently being read from Bus 0
Flashing Amber Data is currently being read from Bus 1
Flashing Yellow Data is currently being read from both Buses
17
Page 18
SALES: 0118 965 5100
NetMate CD/DVD Servers
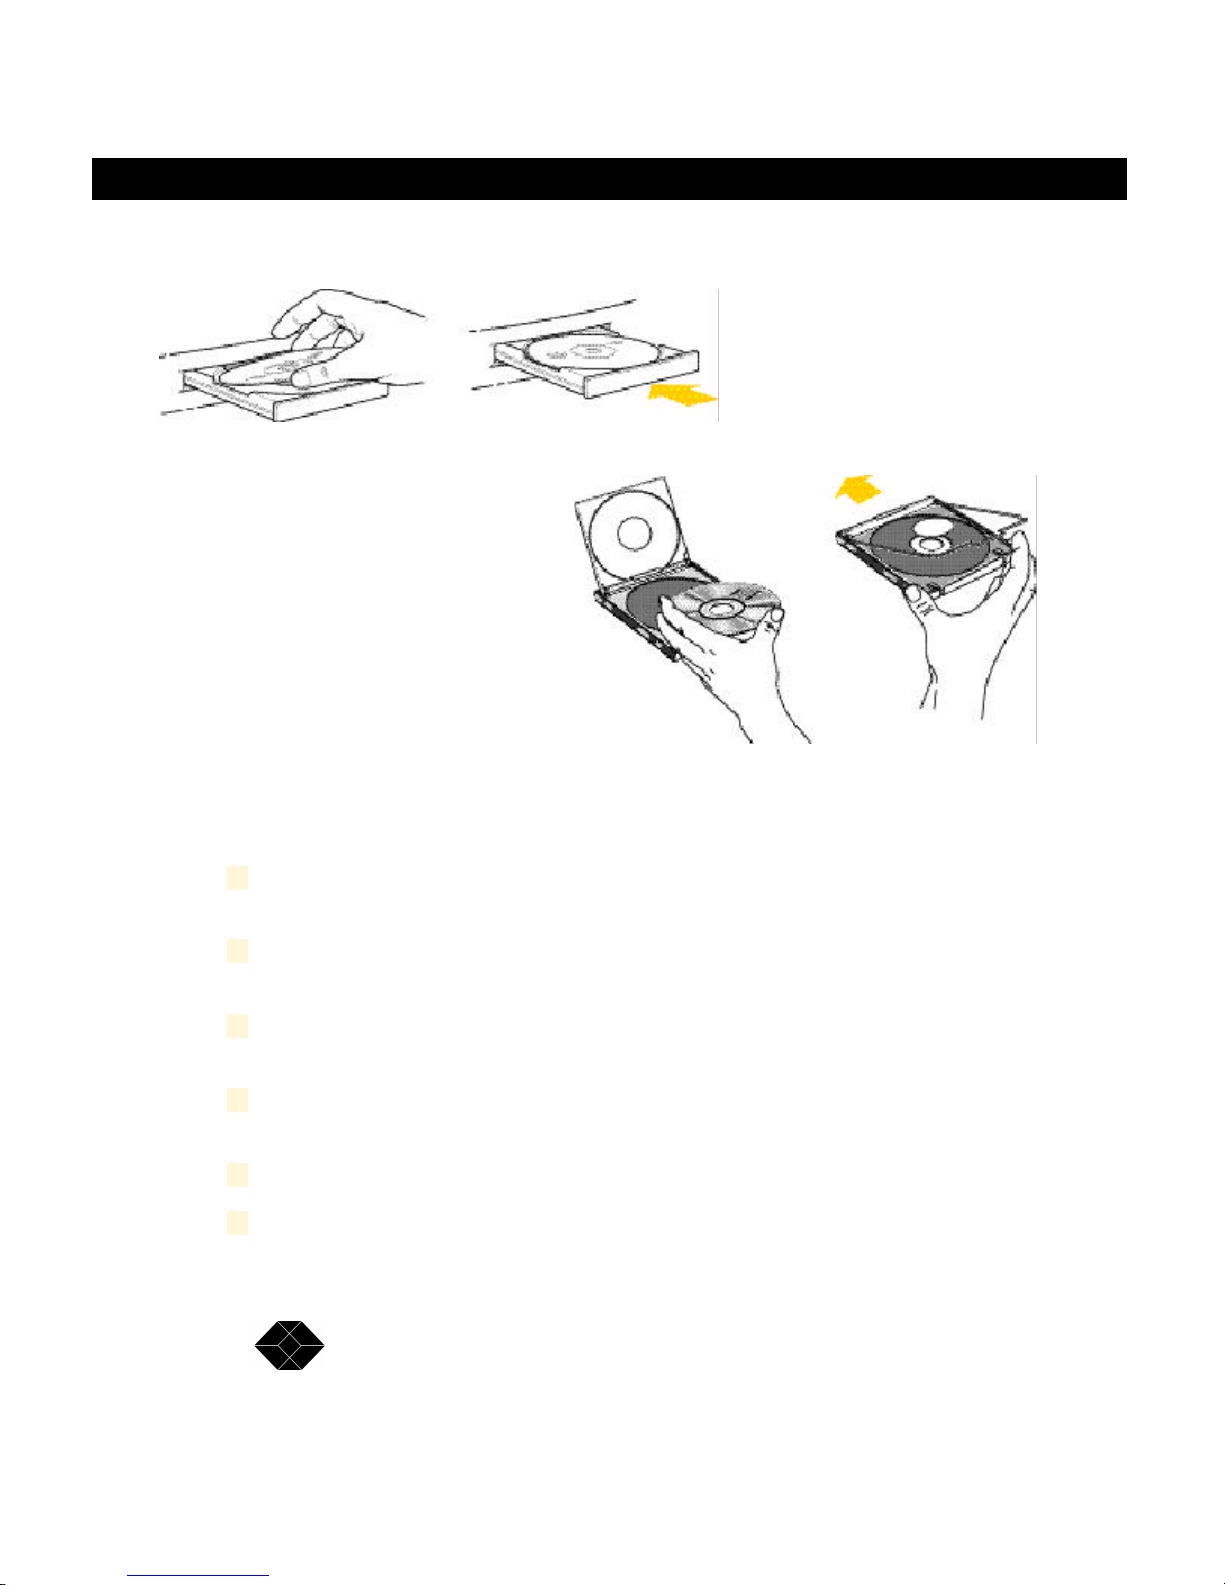
Loading and Unloading Discs
Care and handling of CD-ROM or DVD-ROM discs
Keep the important safety instructions in mind as you use your new
CD Server.
Position your CD Server so that the trays don’t bump into anything
when they open.
Do not leave the disc trays open. If dust gets on the lens of a CDROM or DVD-ROM drive, the drive may have trouble reading discs.
Do not put anything besides a CD-ROM on the disc loading tray when
it is open.
Do not force the disc loading tray open by hand.
Use only approved cleaning kits to clean the optics in the CD-ROM
or DVD-ROM drive. Do not clean the drive with anything not ex-
18
Page 19
NetMate CD/DVD Servers
TECHNICAL: 0118 931 2233
pressly made for the purpose.
Do not transport the CD/DVD Server with discs in the drives.
DO NOT touch the disc surface. The CD-ROM or DVD-ROM is made
of polycarbonate and a build-up of smudges, fingerprints, or other
contaminants can affect the readability of the disc. Deep scratches or
gouges will seriously damage the disc.
The cleanliness of the media is extremely important. If a CD-ROM or
DVD-ROM disc needs cleaning, use a soft, damp cloth, working in a
straight line from center to edge.
DO NOT smoke near computer equipment. Ashes and tobacco are a
prime source of drive contamination. Keep all tobacco and smoking
materials away from areas where media is being used and stored.
Keep your computer equipment and media away from sources of
liquids. Spilled coffee and other beverages can penetrate the equipment and CD-ROM or DVD-ROM storage containers and cause serious contamination.
NetMate CD/DVD Servers
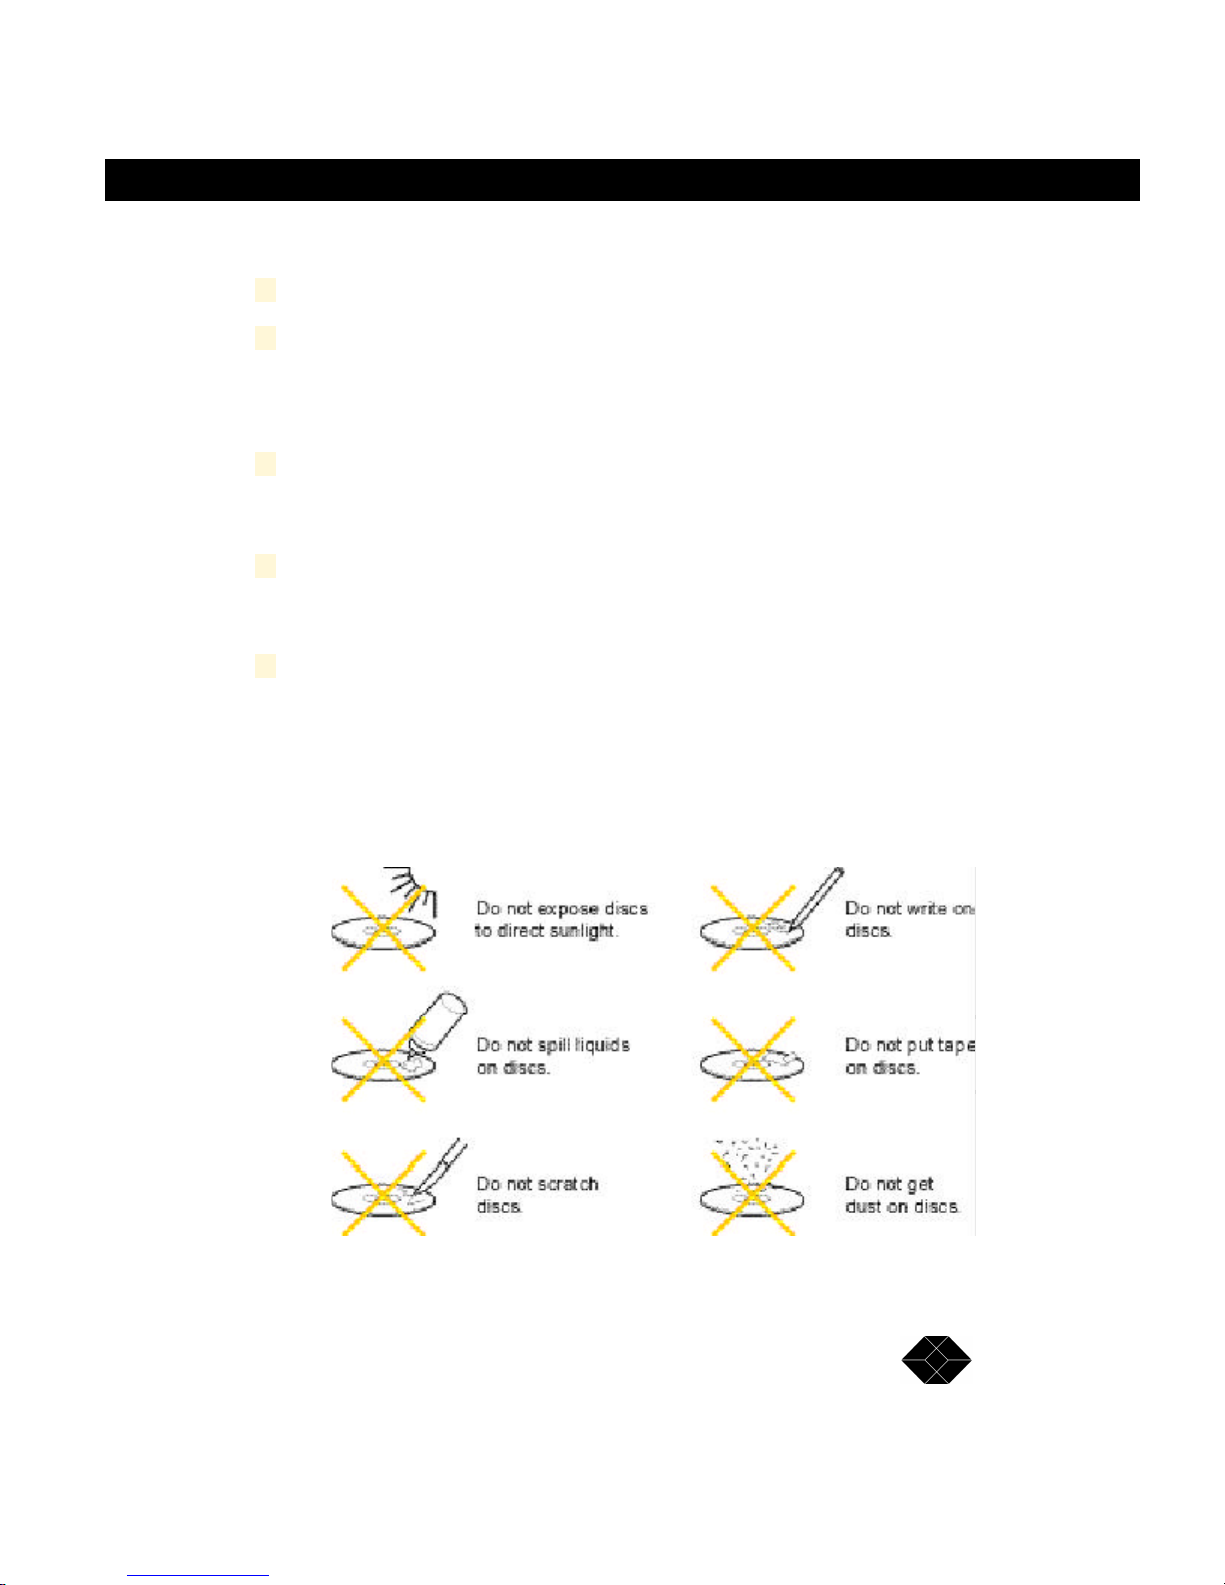
To avoid damage to your discs, follow these guidelines:
19
Page 20

SALES: 0118 965 5100
NetMate CD/DVD Servers
20
Page 21

NetMate CD/DVD Servers
TECHNICAL: 0118 931 2233
Automatic Configuration and
NetMate CD/DVD Servers
This chapter describes
how the CD/DVD Server
configures itself on your
network and how to
access the CD’s
3
Accessing the CD’s
Overview
With your CD/DVD Server now connected to the network and AC power, the next step is to
power on the CD/DVD Server. During start up, the CD/DVD Server will configure itself for
your network and begin sharing any CD/DVD’s inserted into the drives. Discs can be
added at any time into a free tray or slot.
If Hard Disk caching is installed, the CD/DVD’s will also be automatically copied over to the
hard drive. Once fully cached, except with changer model drives or if configured not too,
the CD/DVD’s will be automatically ejected making way for new discs to be installed while
the CD/DVD image is now available directly from the hard disk.
When first installed, the CD/DVD Server will have no security options enabled and be
configured for Guest Access. Any discs placed in the tower will be accessible to any user
that logs on. Microsoft networking users can access shares on the CD/DVD Server
without being prompted for a password. Netware or Apple clients can enter either Supervisor or Guest with no password. See the “CD/DVD Server Security Overview” section for
additional security options.
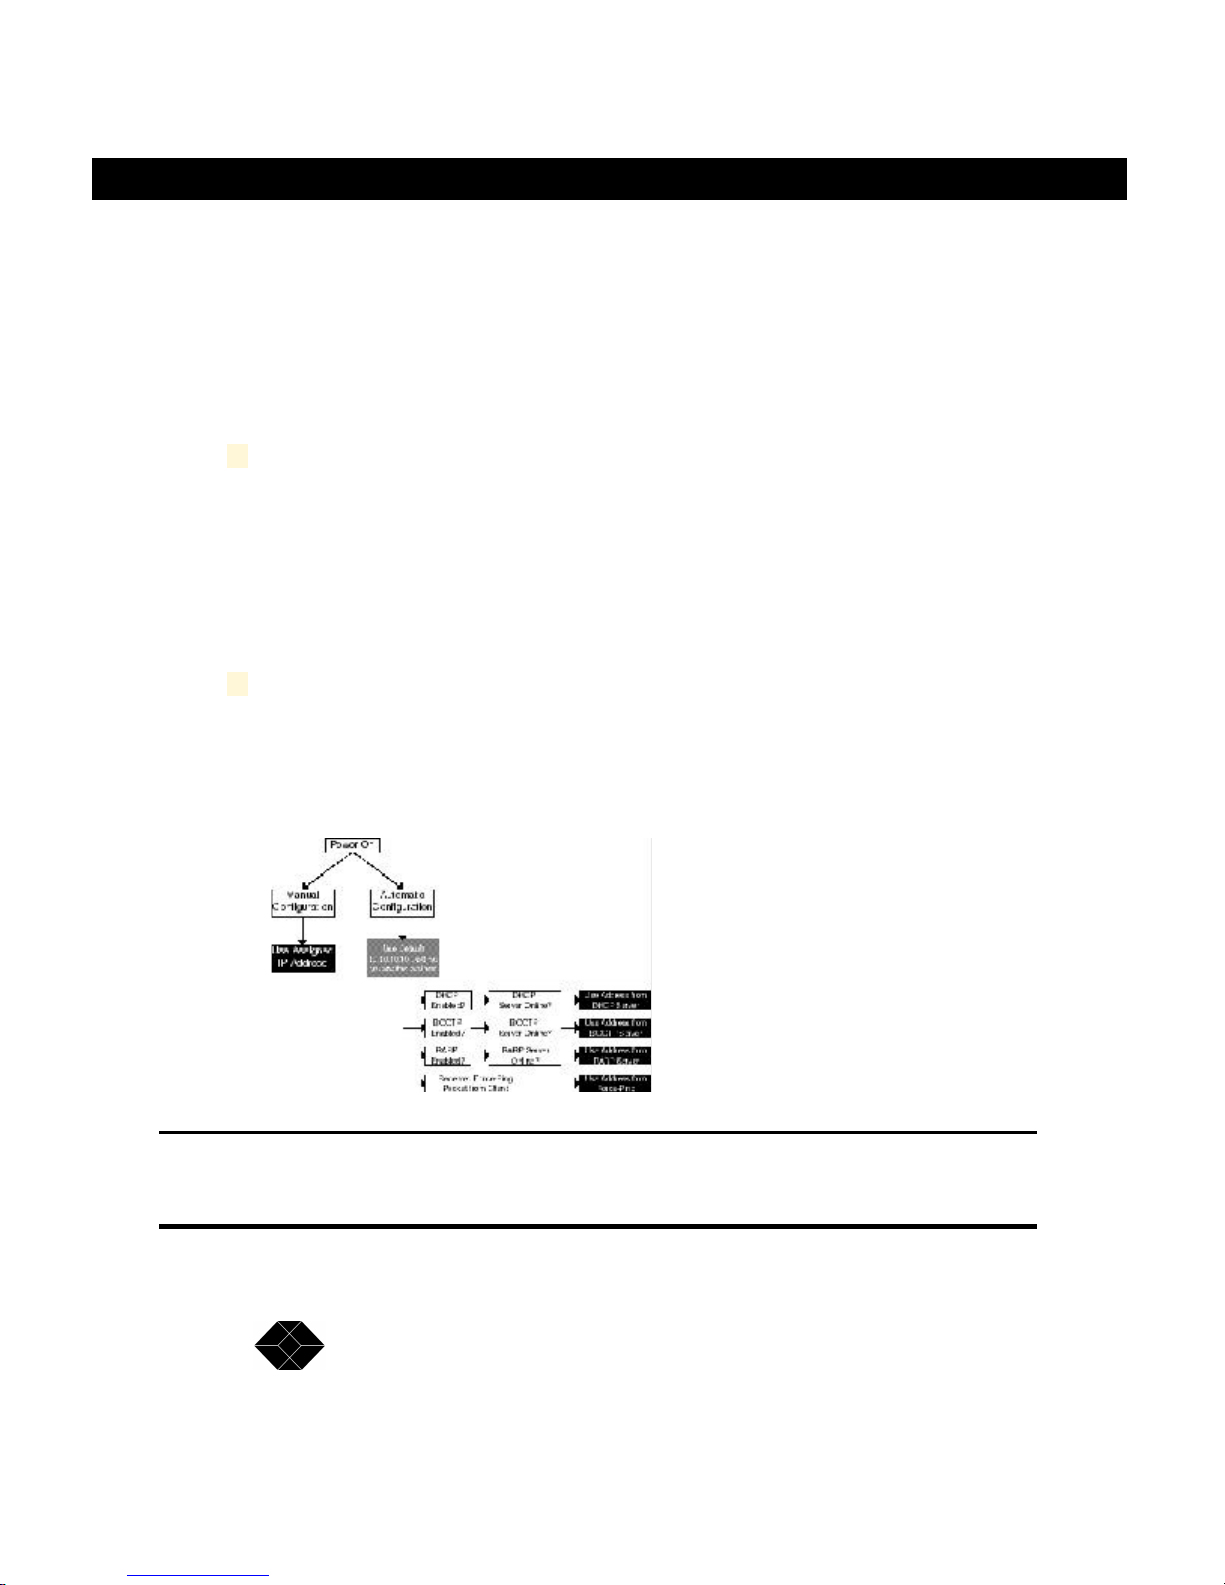
Also on each power up, the CD/DVD Server will automatically configure itself in almost all
network environments without intervention.
The only protocol which may require some manual configuration is the IP Protocol. IP is
the core protocol that runs the internet. Due to its increased popularity there are now
multiple methods where IP can autoconfigure itself for new systems.
21
Page 22
SALES: 0118 965 5100
NetMate CD/DVD Servers
IP Configuration
When you first receive your system (or it is otherwise configured to its factory default
settings), the CD/DVD Server will be set to automatically detect its IP address through all
available methods. On many networks, this automatic IP initialization may be appropriate.
If not, these settings may be configured manually.
In your network environment, if you either:
a Are sure you have an automatic IP configuration system, such as
DHCP, which will automatically configure the CD/DVD Server for IP or
you are not going to be using IP with the CD/DVD Server and will
likely use simple Microsoft Peer-to-Peer Networking or Apple Networking.
Go directly to the Accessing the CD’s Section later in this chapter. Reading
the IP configuration section is for informational purposes only.
b If you are going to use IP on your network and are unsure about how
to configure it.
Review the chart on the next page and follow the instructions for the strategy that works best in your environment.
NOTE: It is important to remember that until the CD/DVD Server
auto detects an IP address it is available on the network with it’s
default temporary value of 10.10.10.10.
22
Page 23

NetMate CD/DVD Servers
TECHNICAL: 0118 931 2233
NetMate CD/DVD Servers
Automatic IP Configuration Methods
NetMate’s CD/DVD Server has several methods for automatically obtaining IP addresses.
These methods are:
DHCP (Dynamic Host Configuration Protocol)
DHCP is one of the newer and more popular methods for automatic IP number
assignment. To use it, your network must have a DHCP server present and running
on it. Many IP networks which use Windows-NT Servers, often have a WindowsNT DHCP server running on it. If you are unsure if your network has a DHCP
server on it, check with your network administrator.
In any respect, DHCP is enabled on CD/DVD Server, upon startup, the CD/DVD
Server will attempt to find a DHCP server on the network, and if it discovers one,
obtain its IP address along with other required information such as default gateway,
netmask, DNS, etc.
The factory default settings enable DHCP discovery and configuration.
BOOTP (Bootstrap Protocol)
BOOTP is another service used to dynamically assign IP addresses to machines
on a network. BOOTP, like DHCP, requires a BOOTP server to be present on your
network to function. BOOTP servers are typically UNIX servers. You can check
with your network administrator to see if your network has a BOOTP server, or
leave this option on to check for one.
Like with DHCP, upon startup, the CD/DVD Server will attempt to find a BOOTP
server, and if found, will use it to obtain its IP settings.
The factory default settings enable BOOTP discovery and configuration.
RARP (Reverse Address Resolution Protocol)
Like the others, RARP requires that a RARP server be present on the network to
use it. RARP servers however, are a bit more complicated in that they require one
extra step in their setup. Your network administrator must enter your CD/DVD
Server's MAC (Media Access Controller) address, or Ethernet Address into the
23
Page 24

SALES: 0118 965 5100
NetMate CD/DVD Servers
RARP server, and manually assign it an IP number.
You must contact your network administrator to have this done, supplying him or
her with the Ethernet Address of your NetMate. For its complexity, RARP is rarely
used these days vs. the simpler BOOTP and DHCP protocols.
The factory default settings enable RARP discovery and configuration.
Temporary IP Configuration Methods
A temporary IP configuration method is used just to get the CD/DVD Server up on
your network enough to allow it to be configured with a permanent solution. There
are 2 primary ways to temporarily configure an IP #.
"Unconfigured" or Default IP Address
When your CD/DVD Server boots up in automatic configuration mode, it uses one
or several of the above protocols to attempt to configure its IP parameters. Often
however, for several reasons, none of these methods will work. For example, when
you turn on the CD/DVD Server for the first time, and you are running it on a network with no IP configuration servers.
24
In this case, the CD/DVD Server will be available using its "default" IP configuration.
Any time the CD/DVD Server is turned on, while it is in the process of
autoconfiguring but has not yet autoconfigured (i.e. was not able to find a server) it
will use and respond to its default IP settings. The default settings are as follows:
IP Address: 10.10.10.10
Netmask: 255.255.255.0
Gateway: None
Accessing the CD/DVD Server at this address will give you access to it - most
likely to access it and change its IP configuration (ie give it an address that is valid
for your network.)
When the CD/DVD Server comes up on this address (and with this netmask) it is
probable that your client will not be able to access it as the IP settings of your client
will be incompatible with the CD/DVD Server's settings. You will need to change
Page 25

NetMate CD/DVD Servers
TECHNICAL: 0118 931 2233
your client's own IP address to one which is suitable to communicate with the CD/
DVD Server on these settings. An example of an appropriate setting would be:
IP Address: 10.10.10.9
Netmask: 255.255.255.0
The specifics of how IP Addresses and netmasks actually work and are calculated
are beyond the scope of this document. Your network administrator should help
you if you need help with obtaining permanent IP number and netmasks which are
correct for your network. In this case, you would often set you client's IP address to
something similar to the one shown, and then connect to the CD/DVD Server with
a web browser (See Setting Your IP Configuration) set its permanent IP settings for
your network, then change your client's IP address back.
"Force-Pinging" an IP Address
A method exists to "shoot" your CD/DVD Server board an address for "one-time"
use. This works to assign an IP address to a NetMate which would otherwise be
unconfigured. Force-Pinging works only when the CD/DVD Server is attempting to
autoconfigure an address. It will not work when it has an address manually assigned to it, and it will not work if one of the autoconfiguration techniques has
already configured it. Force-Pinging autoconfiguration can work on almost any
platform which supports an "arp" and a "ping" command. It is a two-step process
which consists of the following:
NetMate CD/DVD Servers
1 Put your CD/DVD Server's Ethernet Address, and it’s desired IP
Address as a static entry in your workstation's ARP table.
The CD/DVD Server's Ethernet Address is 00:e0:65:XX:XX:XX where
XX:XX:XX is the units 6 digit serial number found on the rear of the CD/DVD
Server.
2 Send a "ping" to the IP address with a data length of 75 bytes.
On a typical Windows machine, this can be done from the "DOS Prompt"
or "Command Prompt" as follows. Let’s say for the sake of example that
our CD/DVD Server’s Serial number is 123456 and we wish to assign it an
IP address of 100.120.140.160. We would use the following two commands:
1 arp -s 100.120.140.160 00-E0-65-12-34-56
25
Page 26

SALES: 0118 965 5100
NetMate CD/DVD Servers
2 ping -l 75 100.120.140.160
If you have been successful, you will see several messages such as:
Reply from 100.120.140.160: bytes=75 time=1ms TTL=128
If not, you would receive many messages like "Command Timed Out"
For more information on these commands in Windows, type "ARP -?" and/
or "PING -?"
A "Force-Pinged" address is only active for as long as the CD/DVD Server is
running. If the CD/DVD Server is turned off or restarted, it will resolve to
autoconfiguring again. Force-Pinging is designed to allow you to give it an address,
so you can get it on your network and log-into it to set it with its "real" values to be
used. (See Setting Your IP Configuration.)
Setting Your IP Configuration Manually
There are several different techniques which can be used to change or set-up the
CD/DVD Server's permanent IP settings. As discussed before, when the CD/DVD
Server is using its factory default settings, it will attempt to autoconfigure using
several available methods. This is not always desirable. Often it is desired to
assign the CD/DVD Server an explicit IP address (Manual Configuration), or enable
certain automatic methods. There are several ways of making such changes.
Web Administration
The simplest of all consists of using a standard Web Browser to access NetMate’s
administration and maintenance pages. To do this, you must already be able to
access the CD/DVD Server via. IP. This means that one of the automatic configuration methods must have worked, or you must have force-pinged it to a valid
address, or you must be able to access it at it's "default" (10.10.10.10) address. If
none of these are true, you must use a different method.
If you can access the CD/DVD Server via. IP, do the following to get to the IP configuration page:
1 In the address bar of your web browser, enter the IP address of your
CD/DVD Server.
2 When NetMate's main page comes up, click the hyperlink to Adminis-
tration
26
Page 27

NetMate CD/DVD Servers
TECHNICAL: 0118 931 2233
3 When prompted to log in, enter the supervisor's username and
password. The factory default will be a user name of "supervisor" no
password.
4 In the frame on the left of your window, if the "Networking" menu is
not expanded, click Networking to expand it.
5 Under the Networking menu, click TCP/IP
6 The main frame on the right will display the TCP/IP Settings page.
7 IP Enable should be set to Yes unless you wish to completely disable
TCP/IP.
8 You have two primary options at this point:
1 You may specify all manual parameters for TCP/IP
2 You may set the CD/DVD Server up to autoconfigure all param-
eters
9 Click one of the two radio-buttons, for manual or automatic configura-
tion.
NetMate CD/DVD Servers
Automatic Configuration
After clicking automatic, you may then select which of the automatic con-
figuration methods you wish to enable. The recommended setting is to
enable all three. Note that these checkboxes (DHCP, BOOTP and RARP)
are only applicable when Automatic Configuration is specified.
Manual Configuration
If you have selected manual configuration, proceed to enter all the appli-
cable information shown, such as IP address, netmask, gateway, DNS
server, etc. All of these parameters should be supplied by your network
administrator. These fields are only used when Manual Configuration is
specified.
10 When you are done making your changes, click the submit button to
save them.
Saved changes will not go into effect until the CD/DVD Server is rebooted.
27
Page 28

SALES: 0118 965 5100
NetMate CD/DVD Servers
At this time, you will be prompted to optionally reboot the CD/DVD Server.
Click reboot if so desired.
Note that when you enter the TCP/IP Configuration page, the active values are
shown in the text fields (IP Address, Netmask, etc.) This means that if you are
currently set up for automatic configuration, these numbers will reflect the values
assigned to your board by the autoconfiguration server or force-ping, or
10.10.10.10 (default) if your board has not been autoconfigured.
Configuration Text File
The Configuration Text File allows access to server parameters through a different
protocol when IP is not available. The downside being that you are required to
modify a formatted text file, rather than use the easy and intuitive web interface.
To set IP parameters from the configuration file, you will need to have access to the
CD/DVD Server from either AppleTalk, Microsoft Networking or Novell Networking.
(See applicable sections.) If you are running a Windows-NT system, you will
needed to have logged in with the user name "supervisor" on system startup. If you
haven't, log-out and log into you workstation as supervisor.
To access the administrative text file:
28
1 Use the applicable technique to log-into the CD/DVD Server. (Usually
Network Neighborhood or Find Computer for Windows machines, or
Chooser for a Macintosh.)
2 When/if prompted for a username and password, use a username of
supervisor and the supervisor account password. The factory default
is no password.
3 There should be a folder, icon or directory named SYS. Enter this.
4 There should be a folder within SYS called CONFIG. Enter this.
5 There will be a file named CONFIG.INI. Using your favorite text editor
(like Wordpad, or TeachText) open CONFIG.INI
6 Scroll down to the section which starts with the text [TCP/IP]. These
are all the TCP/IP settings.
7 For each setting to be modified, modify the text immediately to the
Page 29

NetMate CD/DVD Servers
TECHNICAL: 0118 931 2233
right of the equals-sign (=). Be careful not to insert and spaces, tabs,
or other characters that do not belong here. Maintain and preserve
the current format of the text shown.
8 If you are going to configure your CD/DVD Server for manual IP
configuration:
1 Enter the IP Address, Subnet Mask, Default Gateway, Domain
Name, and Primary & Secondary DNS.
2 All entries (except Domain Name) should be dotted-decimal format
ted IP Addresses. (No host names or hexadecimal numbers.)
3 If a gateway or DNS server is not to be specified, use 0.0.0.0 for its
entry.
4 If the Domain Name is not to be specified, you may leave it blank.
9 If you are going to configure your CD/DVD Server for automatic IP
configuration:
NetMate CD/DVD Servers
1 Set the IP Address, Subnet Mask, Default Gateway, and Primary &
Secondary DNS servers all to 0.0.0.0.
2 Change DHCP_Enable, RARP_Enable and BOOTP_Enable all to
yes or no, each as desired.
10 Save the file after making your changes.
11 Changes will not go into effect until after the CD/DVD Server is
rebooted. You may do so at this time.
Note that the rightmost parameters listed in each line after the
pound-sign (#) in the CONFIG.INI file represent the currently active
settings for the CD/DVD Server. This means that if you are currently
set up for automatic configuration, these numbers will reflect the
values assigned to your board by the autoconfiguration server or
force-ping, or 10.10.10.10 (default) if your board has not been
autoconfigured.
29
Page 30
SALES: 0118 965 5100
NetMate CD/DVD Servers
Apple Macintosh Networking
Automatic Configuration
On startup the CD/DVD Server automatically configures itself as an Apple
Macintosh File Server capable of sharing volumes over standard AppleTalk or
AppleTalk over IP. If there are multiple zones then the network router will provide the
CD/DVD Server with the default zone in which the CD/DVD Server will appear.
Accessing the CD’s
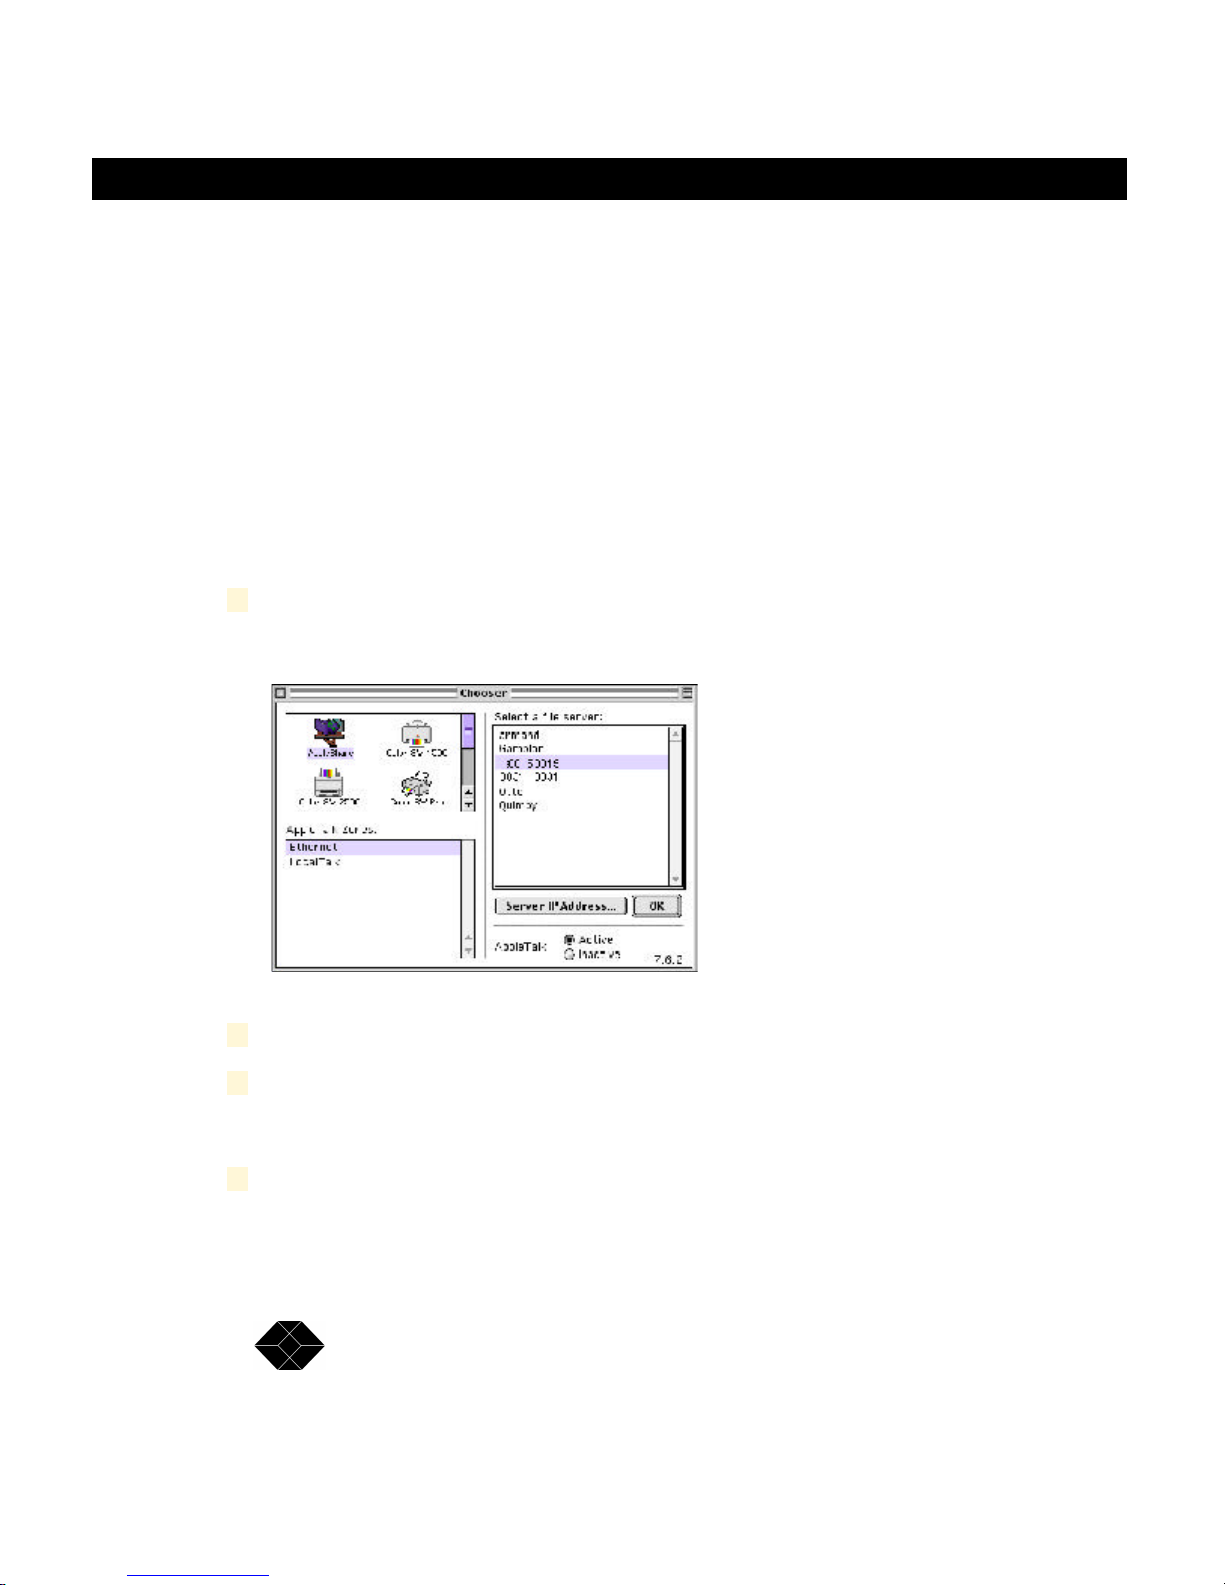
1 From the Macintosh client open the Chooser by selecting it from the
Apple menu.
2 Click on the AppleShare icon.
3 Select the zone that contains the CD/DVD Server.
If there is only one zone, no zone information will appear in the Chooser.
4 Select the name of the CD/DVD Server from the list on the right.
A new unconfigured CD/DVD Server, or one that has been set back to
30
Page 31

NetMate CD/DVD Servers
TECHNICAL: 0118 931 2233
factory defaults, will display itself with the name “Black BoxXXXX” where
XXXX are the last 4 digits of the systems serial number from the Registration Card.
5 Click “OK”.
A dialog box will display.
6 Initially select “Supervisor” and no password.
NetMate CD/DVD Servers
The factory default is no password.
7 Click “OK”.
A list of available shared volumes will appear.
8 Highlight the volumes to be accessed.
31
Page 32

SALES: 0118 965 5100
NetMate CD/DVD Servers
If the shift key is held down, multiple volumes may be selected. Optionally,
clicking the check box to the right of each name will mount these volumes
at startup without any user intervention. Also, the configuration can be set to
automatically remember the password to access the chosen volume(s).
9 Click “OK”.
10 The shared volume icon or folder will appear on the desktop under
the icons for your local disks.
The selected item is now available for use. Open the item by double-
clicking on the icon, and use the data as if it were on your local computer.
32
SYS Volume:
You will notice one additional volume besides the ones that are the physical CDROM or DVD-ROM discs. This volume seen, as “SYS”, is a special volume called
a “Virtual Volume”. A Virtual Volume is a logical volume that the CD/DVD Server
creates on it’s own. In the next chapter there are instructions on how to create
additional Virtual Volumes to assist in organization of data. The SYS volume is a
special non-configurable Virtual Volume that contains all the CD’s in one place for
easy access and a single mount point. Also, the configuration files, explained in the
“Administrative Tools” chapter are in a sub folder/directory within the sys Volume.
TIP: By having your client(s) auto-remount the SYS volume on
startup the Administrator can remove and insert new discs and have
these discs automatically mount on the clients on startup.
Page 33

NetMate CD/DVD Servers
TECHNICAL: 0118 931 2233
Windows PC Networking
Automatic Configuration
On Startup the CD/DVD Server automatically configures itself for Microsoft Networking. The CD/DVD Server searches the network for Primary Domain controllers and initially registers itself with all of them showing up in all workgroups on your
network until it configured to only be in one of them.
The NetMate CD/DVD Server will configure itself as BOTH an SMB over NetBEUI
server, commonly used in simple Microsoft peer-to-peer networks, or as an SMB
over IP server as used in more powerful NT Server environments.
In SMB over IP environments, and if DHCP is used, the CD/DVD Server will automatically configure WINS and DNS information.
NOTE: It is recommended after automatic configuration to put the
CD/DVD Server within one workgroup using the administrative tools
and not let the CD/DVD Server continuously present itself in all
workgroups.
NetMate CD/DVD Servers
Accessing the CD’s - Find Computer Method
Until the CD/DVD Server shows up in the Network Neighborhood Workgroups or
Domains, or if none exist on your network, it can be found almost immediately by
using the Find Computer method. Choose Find Computer from the Start Menu and
type Black BoxXXXX_smb for Microsoft Networking or Black BoxXXXX_nw for
Novell NetWare networking where XXXX are the last 4 digits of the CD/DVD
Server’s serial number from the Registration Card.
Accessing the CD’s - Network Neighborhood Method
To access your NetMate CD/DVD server from Windows 95, 98 or NT 4.0 or greater
system
1 Open your Network Neighborhood icon on your desktop.
33
Page 34

SALES: 0118 965 5100
NetMate CD/DVD Servers
2 Then open the “Entire Network” icon within this folder.
3 Then open the Networking method that is used on your network
Microsoft Networking
Microsoft Networking users can open the “Workgroup” of their choice. In this example it is
NetMate (Keep in mind it will take a number of minutes, sometimes longer for big networks, for the CD/DVD Server to register itself to your network and appear in a workgroup)
34
Page 35

NetMate CD/DVD Servers
TECHNICAL: 0118 931 2233
Novell Networking
Novell Networking users will see a folder similar to “NetWare Servers” or “IntraNetWare
Servers” . Open this folder to see Netware servers and locate the CD/DVD Server.
NetMate CD/DVD Servers
4 Once you have located the CD/DVD Server in your environment open
the CD/DVD Server to log in.
NetWare users will be prompted for a username and password, use a
35
Page 36

SALES: 0118 965 5100
NetMate CD/DVD Servers
username of supervisor and the supervisor account password. The factory
default is no password.
5 (If desired) Map the device to a local Drive before accessing it.
Some programs require that the CD-ROM be “mapped” to a local device in
order to operate correctly. To do this, right click on the CD-ROM in Network
Neighborhood and choose “Map Device”. You will be prompted to choose a
free drive letter to assign the device too and whether or not to automatically
re-connect and Map on each startup.
36
Page 37

NetMate CD/DVD Servers
TECHNICAL: 0118 931 2233
SYS Volume:
You will notice one additional volume besides the ones that are the physical CD-ROM or
DVD-ROM discs. This volume seen, as “SYS”, is a special volume called a “Virtual Volume”. A Virtual Volume is a logical volume that the NetMate creates on it’s own. In the next
chapter there are instructions on how to create additional Virtual Volumes to assist in
organization of data. The SYS volume is a special non-configurable Virtual Volume that
contains all the CD’s in one place for easy access and a single mount point. Also, the
configuration files, explained in the “Administrative Tools” chapter are in a sub folder/
directory within the sys Volume.
NetMate CD/DVD Servers
TIP: By having your client(s) auto-remount the SYS volume on
startup the Administrator can remove and insert new discs and have
these discs automatically mount on the clients on startup.
NOTE: These are the most simple and straight forward ways to access the CD/DVD Server in a Windows PC environment. Please note
that many other windows based methods can be used to access the
CD/DVD Server. Any utility or method that is used to access any
standard Microsoft or NetWare server can also be used to access
37
Page 38

SALES: 0118 965 5100
NetMate CD/DVD Servers
CD’s on the CD/DVD Server. These include but are not limited to:
NetUse Commands, NetX drivers, VLM Drivers, The windows explorer, OS/2, Windows for Workgroups, Find Computer, etc.
HTML Access
(Once an IP # has been established as described earlier)
The CD/DVD Server supports HTTP over TCP/IP, which simply means that you
can use your new CD/DVD Server unit as a Web server. Using the CD/DVD
Server with HTML access over the network makes your CDs available on the
Internet and your companies Intranet.
In an HTTP environment, you can access the CD/DVD Server's CD-ROM data and
images using a standard Web browser, such as Microsoft Internet Explorer or
Netscape Navigator.
38
Page 39

NetMate CD/DVD Servers
TECHNICAL: 0118 931 2233
ATTENTION: Due to the nature of NFS and TCP, the instructions
expect that a user has common knowledge of these systems in order
to utilize them and therefor provides only minimal information.
NOTE : The IP address is the IP address you assigned to the CD/DVD
Server in IP Configuration. The <host name> is the host name that
you assigned to the CD/DVD Server.
NFS Access
To access NetMate on a UNIX system:
1 Create a directory for the CD/DVD Server.
mkdir /Black Box
2 Mount the CD/DVD Server.
mount <hostname>:/Black Box or mount <IP address>:/Black Box
NetMate CD/DVD Servers
Example:
Here's an example of what you might do on a Unix server:
This creates the empty directory used as a mount point.
The CD/DVD Server’s host name may be used instead of the IP address
FTP Access
The CD/DVD Server is available as a standard FTP server. It can be accessed by
any graphical or text based FTP client
To access the CD/DVD Server on a DOS system:
1 At the DOS prompt type:
mkdir /cdroms
mount -F nfs 202.202.202.98:cdroms /cdroms
FTP open <host name> or FTP open <IP Address>
39
Page 40

SALES: 0118 965 5100
NetMate CD/DVD Servers
40
Page 41

NetMate CD/DVD Servers
TECHNICAL: 0118 931 2233
NetMate CD/DVD Servers
Read this chapter to learn
how to Administer and
Configure the CD/DVD
Server
4
Administrative Tools
Page 42

SALES: 0118 965 5100
NetMate CD/DVD Servers
Web Administration and Feature Description
Web administration is the most powerful administration tool available on the CD/
DVD Server. All configuration and Administration items can be set through the
Web Administration pages quickly and effectively.
After you set the Internet address, as described in the earlier section, you are ready
to use the CD/DVD Server from any standard Web browser, such as Microsofts
Internet Explorer or Netscape Navigator. Any Web browser that supports frames
can be used to Administer the NetMate. In the following example we are using
Netscape Navigator To access NetMate using a Web browser:
1 Start Netscape Navigator.
2 In the Open Location field, or address line, enter your system’s URL.
3 Click Open.
4 Begin by clicking on the “Administration” button
5 Enter “Supervisor” as the user name with no password.
6 You should now be in the Administrative section.
42
Page 43

NetMate CD/DVD Servers
TECHNICAL: 0118 931 2233
NetMate CD/DVD Servers
Making Changes
As configuration items are modified you will be prompted to save these changes as necessary. Also, some changes modify network information and require the system to be
rebooted for the changes to take effect. These are the possible options you will be presented with as you make changes to the CD/DVD Server.
Submit
Use this button to save changes to the system once you are satisfied with your choice(s).
Reset
Use this option to reset any entries made prior to submitting changes.
Save Changes
When available, this option writes changes made into permanent storage. Any modification
or group of modifications should be followed by clicking this button. You will be prompted
when you have made changes that need to be saved.
Server
General
The most basic aspects of the server can be set from within this screen.
43
Page 44

SALES: 0118 965 5100
NetMate CD/DVD Servers
Server Name
This is the primary name of the server. For new systems this field is by default left blank
and the server name is set to “Black Box” plus up to four digits from the end of the ethernet
address. Entering a new name in this field modifies the Server Name. The Server Name
can include upper and lower case alphanumeric characters as well as space, underscore
and apostrophe. The CD/DVD Server will present itself in the various networking environments with the name entered in this field. Under some networking environments this name
will be additionally appended with a suffix such as “_nw” for Novell NetWare clients and
“_smb” for Microsoft networking clients.
Ethernet Address
This is a unique identifier for your CD/DVD Server and is used by other products on your
network to communicate with the CD/DVD Server. All Network products have a unique
identifier regardless of manufacturer or product type. This item cannot be changed and is
provided for information purposes only.
Software Version
This field represents the currently loaded software revision of the CD/DVD Server’s Operating System.
System Uptime
This field shows the elapsed time since the CD/DVD Server was last started or rebooted.
This value is reset upon each new power up.
Enable Guest Access
On by default, this setting allows guest access privileges to be granted to all shared
resources of the NetMate. Guest access can be shut off thus requiring either remote
authentication through NetWare, NDS, Microsoft Domain Services, or that specific users
be created and given access privileges from within the Users & Groups section of the CD/
DVD Server itself.
Reset to Factory Defaults
Clicking this button will permanently erase all saved settings on the CD/DVD Server. The
server will be as it was when it was initially installed with all information, users, groups and
security rights initialized to original values. This feature is used only under extreme conditions or if the server is being relocated on a different network with different users.
44
Page 45

NetMate CD/DVD Servers
TECHNICAL: 0118 931 2233
NetMate CD/DVD Servers
File Systems
Multi-session CD
When the system attempts to mount a disc with multiple data tracks (commonly called a
Multi-session CD), this option determines which tracks are made available as shared
resources. By selecting “mount all sessions”, each track will be mounted as a separate
shared resource. If “mount last session only” is selected then only the last track (which will
be the most recently written) will be mounted and the other tracks will be ignored.
ISO9660/High Sierra Enable
Defaulting to on, this setting enables mounting of the ISO-9660 and High Sierra disc
formats including Rock Ridge, Romeo and Joliet file format extensions. These formats are
common to the Intel Windows and UNIX based systems.
HFS Enable
Defaulting to on, this setting enables mounting of the HFS disc format. The HFS disc
format is common to Macintosh based computers.
45
Page 46

SALES: 0118 965 5100
NetMate CD/DVD Servers
Date & Time
This page can be used to set the servers internal Date and Time. When adjustments to
Date and Time are made be sure to click the “Update Date/Time” box(es) prior to submitting changes to the NetMate.
Use Local Workstation Time
This button can be used to automatically enter the time of the local PC into the date and
time fields on this page. You still need to check the “Update” boxes and submit changes to
set the NetMates clock.
46
Page 47

NetMate CD/DVD Servers
TECHNICAL: 0118 931 2233
NetMate CD/DVD Servers
Statistics
The statistics page gives detailed information on the CD/DVD Server. System Capacity,
Cache Statistics, Protocol Information, and other information are available on this page.
Users & Groups
The CD/DVD Server provides flexible and powerful management tools incorporated directly into the CD/DVD Server. Security can be handled in multiple ways either through
domain services, existing servers or from within the CD/DVD Server itself. Multiple methods can also be used simultaneously. The Users & Groups section and the Volumes
Section of the CD/DVD Server administration pages allow the Supervisor to configure all of
these security options.
47
Page 48

SALES: 0118 965 5100
NetMate CD/DVD Servers
Add User
This page allows the administrator to enter new users into the CD/DVD Server. Users can
either be “Local” users where the NetMate handles all security or “Remote” users where
the user exists on another server but accesses shared resources on the CD/DVD Server.
To create a user type the new name into the “User Name:” field and click “Continue”. The
following fields then appear:
User Name
This displays the user name entered on the previous screen.
48
Page 49

NetMate CD/DVD Servers
TECHNICAL: 0118 931 2233
Local User
Click this button if the CD/DVD Server will handle all security for this user. Enter and
confirm the password for this new user here as well.
Remote User
Click this button if the user to be created is a remote user. A remote user is created for
one of two reasons. Either the user is going to be added to a local group and have access
privileges to items this local group can access, or if the user is going to be given specific
access rights to a shared resource. Also, whenever the CD/DVD Server is accessed via
NDS a remote user is automatically generated for this NDS user.
Disable Login
Click this button if the user should be denied access to the CD/DVD Server.
NFS ID
The default NFS ID of “-2” is used for all new users. An alternate ID can be entered in this
field.
NetMate CD/DVD Servers
Configure User
This feature allows you to configure existing users. The same configurable parameters
that were available in the Add User page are available on this page.
Delete User
49
Page 50

SALES: 0118 965 5100
NetMate CD/DVD Servers
Any existing users can be deleted from this page.
Add Group
This page allows the administrator to enter new groups to the NetMate. Groups can either
be “Local” groups where the NetMate handles all security or “Remote” groups where some
security aspects are handled through another server.
To create a group type the new name into the “Group Name:” field and click “Continue”.
50
Page 51

NetMate CD/DVD Servers
TECHNICAL: 0118 931 2233
The following fields then appear:
Group Name
This displays the group name entered on the previous screen.
Local Group
Click this button if the NetMate will handle security for this group.
Remote Group
Click this button if the group to be created shall be a remote group. A remote group is a
group that is stored on another server. During access to a shared resource a request is
made to the remote server to see if the user trying to log in belongs to the remote group.
NFS ID
The default NFS ID of “-2” is used for all new groups. An alternate ID can be entered in this
field.
Select users for local group
These lists are used to select users that will belong to the currently displayed group. Users
belonging to this group will have access to shared resources that are assigned to this
group. To include a user, select the desired user from the left list and click the right arrow
(Add) to move the selection to the list on the right. To remove a user, select the user in the
list on the right and click the left arrow (Remove).
NetMate CD/DVD Servers
Configure Group
This feature allows you to configure existing groups. The same configurable parameters
that were available in the Add Group page are available on this page.
51
Page 52

SALES: 0118 965 5100
NetMate CD/DVD Servers
Delete Group
Any existing groups can be deleted from this page.
Volumes
Configure Volume
The CD/DVD Server’s volume management feature is flexible and powerful. Security
options include: management down to a directory level, changing volume names and
52
Page 53

NetMate CD/DVD Servers
TECHNICAL: 0118 931 2233
restricting concurrent user access to comply with the licensing restrictions of software
publishers. These functions and others are configurable within the Configure Volume
pages.
Within this page the user is present with a list of all physical shared resources whether
actual CD/DVD volumes or Archived Volumes. A volume can be highlighted and one of the
following 3 choices made:
Properties
NetMate CD/DVD Servers
Original name
This field represents the actual volume name of the disc prior to any alias being created
(unless the volume name is a duplicate volume name that the CD/DVD Server will internally change to reduce confusion).
Alias
A name entered into this field will replace the original name of the volume as seen from the
client. This feature allows the administrator to rename sometimes confusing volume
names with ones that are easier to understand.
File System
This field displays the type of file system of this shared resource.
53
Page 54

SALES: 0118 965 5100
NetMate CD/DVD Servers
Size
This represents the size of the shared resource in megabytes.
Device
This is displayed in the format of [BUS,ID,LUN]. The CD/DVD Server can support up to
240 individual SCSI devices using all available parameters.
BUS
The bus the device is on. The CD/DVD Server has up to two busses numbered 0 and 1.
ID
The SCSI ID of the device. Narrow SCSI ranges from 0 to 6 and Wide SCSI ranges from 0
to 15 (excluding 7 which is used by the NetMate).
LUN
The Logical Unit Number of the device. In the range of 0 to 7.
Open
When a volume or directory is highlighted in the list, clicking this button will open this item
displaying the content of the next sub-directory. If the (Parent Directory) item for a given
directory is chosen and this button is clicked, then the current location displayed is moved
up one directory.
Permissions
The following permission information is available to be set for the entire shared resource
and not for a given directory.
54
Page 55

NetMate CD/DVD Servers
TECHNICAL: 0118 931 2233
Password
NetMate CD/DVD Servers
Enter a password here for the volume. This becomes the password used for AppleTalk or
Microsoft share level security.
Confirm
Confirm the share-level security password here.
Licenses
This field represents the number of concurrent users that can access a particular shared
resource. This feature allows the system administrator to conform to specific license
restriction imposed by software publishers. Either unlimited users “licenses” or a specific
number of users “licenses” can be set with this field.
The following permission information is available to be set for the entire shared resource or
for individual directories within the shared resource.
Allow all Users and Groups
Check this choice if all users and groups will have access to this shared resource or
directory.
55
Page 56

SALES: 0118 965 5100
NetMate CD/DVD Servers
Inherit Access
Check this choice for directories within a shared resource if this directory is going to have
the same security rights as the directory above it.
Allow Selected Users and Groups
These lists are used to select users and/or groups that will have access to the currently
displayed shared resource or directory. To include an item, select the appropriate user/
group from the left list and click the right arrow (Add) to move the selection to the list on the
right. To remove an item, select the user/group in the list on the right and click the left
arrow (Remove).
Add Virtual Volume
A virtual volume is a shared resource that allows other shared resources to be consolidated into a single mount point. A virtual volume can be created and have installed into it
specific directories from specific CD/DVD’s. For instance, an “installs” volume can be
created that includes all the install directories from other CD/DVD’s. Or, for instance, an
“accounting” virtual volume can be created that includes all 5 individual year-end accounting CD/DVD’s in one volume. The administrator can use a virtual volume to organize
information more effectively.
To enter a new virtual volume type the new name into the “Volume Name:” field and click
“Continue”.
56
Page 57

NetMate CD/DVD Servers
TECHNICAL: 0118 931 2233
On the next window two lists appear. The one to the left represents all online volumes,
which can be placed within a virtual volume. The list to the right represents the contents of
the virtual volume. Items to left can be added or removed from the virtual volume. When
the desired items have been added to the virtual volume clicking “done” saves all changes.
NetMate CD/DVD Servers
Open
When a volume or directory is highlighted in the left most list clicking this button will open
this item displaying the contents of the next sub-directory. If the (Parent Directory) item for
a given directory is chosen and this button is clicked, then the current location displayed is
moved up one directory.
> Add > (Add)
When a volume or directory is highlighted in the left most list clicking this button will include
this item in the virtual volume being created and move the item to the right list.
< Remove < (Remove)
When a volume or directory is highlighted in the right list clicking this button will remove
this item from the virtual volume being created.
Done
57
Page 58

SALES: 0118 965 5100
NetMate CD/DVD Servers
When all desired items have been entered into the virtual volume clicking this button saves
all changes.
Configure Virtual Volume
This feature allows you to configure an existing Virtual Volume. Selecting a Virtual Volume
from the list and clicking on the “Properties” button allows the same configurable parameters that were available in the Add Virtual Volume page to be manipulated.
Permissions
The following permission information is available to be set for the entire shared resource
and not for a given directory.
Password
Enter a password here for the volume. This becomes the password used for AppleTalk or
Microsoft share level security.
Confirm
Confirm the share-level security password here.
Licenses
This field represents the number of concurrent users that can access a particular shared
resource. This feature allows the Network Administrator to conform to specific license
restriction imposed by software publishers. Either unlimited users “licenses” or a specific
number of users “licenses” can be set with this field.
The following permission information is available to be set for the entire shared resource or
for individual directories within the shared resource.
Allow Everyone
Check this choice if all users and groups will have access to this shared resource or
directory.
Inherit Access
Check this choice for directories within a shared resource if this directory is going to have
the same security rights as the directory above it.
Available/Selected Users and Groups
58
Page 59

NetMate CD/DVD Servers
TECHNICAL: 0118 931 2233
These lists are used to select users and/or groups that will have access to the currently
displayed shared resource or directory. To include an item, select the appropriate user/
group from the left list and click the right arrow (Add) to move the selection to the list on the
right. To remove an item, select the user/group in the list on the right and click the left
arrow (Remove).
NetMate CD/DVD Servers
Delete Virtual Volume
Any existing Virtual Volumes can be deleted from this page.
Devices
Drive Information
Specific information about each drive, as well as information about the volumes mounted
within each drive is available here.
59
Page 60

SALES: 0118 965 5100
NetMate CD/DVD Servers
Device
This is displayed in the format of [BUS,ID,LUN]. The CD/DVD Server can support up to
240 individual SCSI devices using all available parameters.
BUS
The bus the device is on. NetMate has up to two busses numbered 0 and 1.
ID
The SCSI ID of the device. Narrow SCSI ranges from 0 to 6 and Wide SCSI ranges from 0
to 15 (excluding 7 which is used by the CD/DVD Server).
LUN
The Logical Unit Number of the device. In the range of 0 to 7.
Vendor
This field displays the drive mechanism’s Vendor name.
Name
This field displays the drive mechanism’s Product name.
60
Page 61

NetMate CD/DVD Servers
TECHNICAL: 0118 931 2233
Revision
This field displays the drive mechanism’s internal software revision number.
Volume
This field displays the mounted volume name(s) for multiple partition discs. If a disc is
renamed then the changed name is displayed here. If a disc has been archived by the
Hard Disk Caching process but not yet ejected this field will say “Unmounted”
File System
This field displays the type of file system(s) on the disc in this device.
Eject
This feature ejects the disc mounted within this device.
Lock/Unlock
Locking a drive disables the “Eject” button on the front of the device once the unit is powered on and a volume is mounted in the device.
NetMate CD/DVD Servers
Hard Drive Caching
Hard Drive Caching is one of the most powerful features of the NetMate Server. This page
provides information about cached disks as well as options to cache additional CD/DVD’s.
This page will appear only if a hard drive is found during startup that can be used for
caching.
There are 2 primary hard disc caching modes:
ARCHIVE CACHING: The default setting, in this mode the CD/DVD Server will automatically start caching each disc inserted into it. When the caching is completed for each disc
the CD/DVD Server will create an archive volume with the contents of each disc. After
each disc has been archived the disc will automatically be ejected, except for Changer
units which by default are set to not eject a disc after archiving so as to cache all discs
within the changer without user intervention.
61
Page 62

SALES: 0118 965 5100
NetMate CD/DVD Servers
PERFORMANCE CACHING: This mode is used for discs that will be used in the most
demanding multi-user scenarios. This mode is enabled by turning “HD Cache Auto Mode”
to off. In this mode when a new disc is inserted it is still cached but upon completion an
archive is not automatically created. As user requests come to this CD the data is accessed first from the hard drive but if user requests for information start to back-up the
information is simultaneously still accessed from the CD-ROM drive. This mode allows the
best of both world’s allowing the fast access of a hard drive but still providing a dedicated
CD-ROM device for heavy use scenarios.
Device.
This is displayed in the format of [BUS,ID,LUN]. The NetMate can support up to 240 indi-
vidual SCSI devices using all available parameters.
62
Page 63

NetMate CD/DVD Servers
TECHNICAL: 0118 931 2233
BUS
The bus the device is on. The CD/DVD Server has up to two busses numbered 0 and 1.
ID
The SCSI ID of the device. Narrow SCSI ranges from 0 to 6 and Wide SCSI ranges from 0
to 15 (excluding 7 which is used by the CD/DVD Server).
LUN
The Logical Unit Number of the device. In the range of 0 to 7.
Size (Megabytes)
This value represents the size of the CD/DVD. It also represents the amount of hard disk
space that will be taken up once the CD/DVD is fully cached.
Volume
This field displays the volume name(s) of the CD/DVD-ROM or CD/DVD-ROM partition. If
a disc has been archived but not yet ejected this field will say “Unmounted”
File System
NetMate CD/DVD Servers
This field displays the type of file system(s) on the disc in this device.
Progress
Displayed as a percentage, this value represents the amount of the CD/DVD-ROM disc
that has been cached thus far. Pressing the “Update” button on the bottom of this page
updates this value if the CD/DVD is currently being cached.
Status:
Uncached
This message is displayed if caching for this device has not started (and is not waiting to
start) or has been disabled and the administrator has not manually initiated caching for this
volume.
No Media
This message is displayed if there is no disc in this location.
Caching
This message is displayed if caching is currently processing for a disc in this location. In
63
Page 64

SALES: 0118 965 5100
NetMate CD/DVD Servers
this condition pressing the “Update” button should display an increasing number in the
“Progress” field as the CD/DVD-ROM contents are copied to the hard disk.
Waiting
This message is displayed if caching had been stopped and re-started again and the
NetMate is currently caching other devices.
Partial
This message is displayed if caching had been stopped for a disc in this location. If a client
accesses this disc, then the data already cached to the hard drive will be accessible from
the hard drive while the un-cached data will be accessed from the CD/DVD-ROM drive.
Complete
This message is displayed if the caching process has completed for a CD/DVD-ROM disc
in this location.
Archived
This message is displayed when a device has been archived but the disc was not ejected
(if ejects were disabled or the device was locked). The disc must be manually ejected
before a new volume can be mounted in this device.
Cache Action
Cache
Pressing this button causes the caching process to begin for the selected location.
Stop
Pressing this button interrupts the caching process for the selected location. The process
can be resumed later by pressing the “Continue Caching” button at the bottom of the page.
Recache
Pressing this button deletes the cached volume on the hard disk and re-caches it for the
selected location.
64
Page 65

NetMate CD/DVD Servers
TECHNICAL: 0118 931 2233
Archive
A button will appear in this column once a CD/DVD-ROM disc has been completely
cached and accesses are now done from the hard disk. Clicking this button goes one step
further and creates an “Archive” disc ejecting the physical disc from the CD/DVD Server.
This allows the drive mechanism’s slot to be available to share additional CD/DVD-ROM
discs.
Delete
When a disc has been archived, the Delete option will become available. Pressing this
button deletes the chosen “Archive” drive. The archive drive and its contents are no longer
available as a shared resource but the space it occupied is now available to be used to
cache other discs.
Enable/Disable
Enabling caching on a device (the default mode) causes caching to begin as soon as a
new volume is detected. When caching is disabled, the administrator must press the
“Cache” button in the “Cache Action” section to begin caching.
NetMate CD/DVD Servers
Function Buttons
Continue Caching
Press this button to continue a “stopped” caching process.
Cache All
When available, clicking this button will initiate caching on all uncached volumes.
Reformat
Clicking this button causes all performance and archive caches on all hard drives to be
erased. When pushed, further caching activity will be suspended until the “Cache All”
button is clicked. This button is only available when no volume is actively building a cache.
Update
Press this button to update the on-screen information.
Stop All
65
Page 66

SALES: 0118 965 5100
NetMate CD/DVD Servers
Press this button to halt the caching process.
Hard Drive Statistics
Device
This is the device location of the hard drive. It is displayed in the same format as described
earlier in this section.
Capacity (MBytes)
This is the total size of the hard drive.
Used (MBytes)
This is the amount of space occupied by active caches on the hard drive.
Available (MBytes)
This is the total amount of free space on the hard drive.
Hard Drive Cache Options
This setting allows the administrator to set system wide features of Hard Disk Caching.
66
Page 67

NetMate CD/DVD Servers
TECHNICAL: 0118 931 2233
Caching Mode
This setting controls the behavior of the Hard Drive Caching sub-system after a disc has
finished building it’s cache. When set to “archive”, discs will immediately archive and eject
(if ejecting is enabled) once the cache is built. Further access to the volume will be directed solely to the Hard Drive. When set to “performance”, the disc will remain in the CD/
DVD-ROM drive after the cache is built. In this case, if the Hard Drive is busy when information is requested from the cached resource, it will be fetched from the CD/DVD instead.
NetMate CD/DVD Servers
Eject Minichanger on Archive
This setting determines whether a disc will be ejected from a minichanger when an
archive cache is created. Since several minichanger models will suspend normal operation upon eject until a user manually removes the disc from the drive, it is recommended to
leave this option on it’s default setting of “no”.
Minichanger
This setting allows the administrator to “fine tune” performance of Minichanger devices.
67
Page 68

SALES: 0118 965 5100
NetMate CD/DVD Servers
MiniChanger Lock Time
The value entered here is the total time that is dedicated to each user request per
Minichanger device before the disc is swapped to service the next user request. This
setting can be experimented with but should not be decreased below approximately 6
seconds as drive “thrashing” can occur. Drive thrashing occurs when multiple users are
trying to access different CD’s on the same Minichanger and the discs are constantly
swapping.
SCSI Settings
Use choices on this page to customize SCSI settings for devices that do not support the
default settings.
68
Page 69

NetMate CD/DVD Servers
TECHNICAL: 0118 931 2233
Wide Enable
Normally set to on, Wide SCSI negotiation can be turned off here. When on this option also
enables recognition of SCSI ID numbers in the range of 8 to 15.
Disconnect Enabled
NetMate CD/DVD Servers
Normally set to on, SCSI Disconnect/Reconnect can be turned off here.
Synchronous Enabled
Normally set to on, Synchronous SCSI transfers can be turned off here.
Parity Enabled
Normally set to on, SCSI parity checking can be turned off here.
Bus 0 Termination
Normally set to narrow/wide, bus 0 termination can be set here to either off, narrow only,
wide only or both on.
Bus 1 Termination
Normally set to narrow/wide, bus 1 termination can be set here to either off, narrow only,
wide only or both on.
Networking
69
Page 70

SALES: 0118 965 5100
NetMate CD/DVD Servers
AppleTalk
AppleTalk Enable
“yes” by default, this feature turns on AFP the Apple File Protocol that is native to Apple
Macintosh file servers. If Macintosh access is desired then this feature should be left on.
AppleTalk/IP Enable
“yes” by default, this feature turns on AFP over IP. This is similar to the above choice but
allows the Apple File Protocol to run over the industry standard “IP” or Internet Protocol.
This feature allows Apple Macintosh computers to access shared resources from the
NetMate over the Internet. In order for AppleTalk IP to function AppleTalk Enable must also
be set to yes. If AppleTalk Enable is set to no AppleTalk IP Enable is automatically set to no
as well.
AppleTalk Network Number
This is the network number that the CD/DVD Server has selected from within the range
provided by an AppleTalk Router on your network. If no router is present, it will be zero.
This number is read-only and is provided for information and trouble-shooting purposes
only.
AppleTalk Node Number
This is the node number that the CD/DVD Server has selected from the available node
numbers on its network number. All node numbers associated with the same network
number must be unique and in the range of 1 to 254. This number is read-only and is
70
Page 71

NetMate CD/DVD Servers
TECHNICAL: 0118 931 2233
provided for information and trouble-shooting purposes only.
AppleTalk Zone
This is the zone name which the CD/DVD Server will appear in. When uninitialized, it will
be set to the default zone as specified by an AppleTalk Router on your network. If no router
is present, the zone name is ignored. Changing this field causes the CD/DVD Server to
immediately relocate to the new zone without requiring a server restart.
Login Message
Any message typed here will be displayed to all Macintosh users while logging in. This
information is displayed within a dialog box prior to mounting any volumes. You do not need
to restart the CD/DVD Server to allow changes to this field to be active.
NetMate CD/DVD Servers
FTP/TFTP
TFTP Enabled
On by default, TFTP access can be turned off here. TFTP is primarily used as a protocol
to upload firmware.
FTP Enable
On by default, FTP access can be turned off here. The NetMate functions as an FTP
server working with all standard and graphical FTP clients.
71
Page 72

SALES: 0118 965 5100
NetMate CD/DVD Servers
FTP Guest Access
On by default, FTP Guest access can be turned off here. Commonly FTP Guest Access is
shut off if the NetMate is going to act as a high security FTP Server with all users being
entered into the CD/DVD Server via the Users & Groups section. Enabling FTP Guest
access allows use of Anonymous user name during an FTP session.
HTTP
HTTP Enable
On by default, HTTP access can be turned off here. The CD/DVD Server functions as a
web server when this feature is set to on. This setting also controls access to administrative features via the web. Once disabled, this setting can be re-enabled by editing the
config.ini in the SYS/CONFIG directory.
Base URL
This is the Web Page that is initially displayed when a user accesses the CD/DVD Server
via a web browser. Providing the new Base URL here can change the initial “home page”.
It is possible to burn a custom CD/DVD with a custom web home page for the CD/DVD
Server.
Alternate index.html
72
Page 73

NetMate CD/DVD Servers
TECHNICAL: 0118 931 2233
This is a list of HTML filenames which will be automatically opened when they are encountered during the browsing of a disc. When a directory is opened that contains one or more
of these files, the list is checked in order and the first filename that matches is opened.
The special file index.htm(l) is always checked first and does not appear on the list. To add
an item to the list, type it’s name in the “Alternate index.html” box (you do not need to add
.html or .htm) and click the “Add To List” button. To remove an item, select it in the list and
click the “Remove” button. To move an item, select it in the list and click either the “Raise
Priority” or “Lower Priority” button. To remove all entries, click the “Clear All” button
(index.htm(l) is not removed). Once you are satisfied with the entries in the list, click the
“Submit” button to save your changes.
NetMate CD/DVD Servers
Microsoft Networking
Bind to NetBEUI
On by default, SMB over NetBEUI access can be turned off here. The NetMate functions
as a standard Windows NetBEUI server when this feature is enabled. This type of networking is popular in smaller workgroup environments or if IP is not configured on the
network. Accessing the server in this configuration is very simple and does not require IP
information to be entered or name servers such as DNS or WINS to exist on the network.
Drawbacks to NetBEUI servers are that the packets are not routable and thus cannot be
73
Page 74

SALES: 0118 965 5100
NetMate CD/DVD Servers
used between wide area networks. If Both NetBEUI and IP bindings are enabled on the
server and on the client it is sometimes difficult to see which protocol is being used to
access the CD/DVD Server. Whichever is used to access the CD/DVD Server depends
on how the client is configured to prioritize protocols.
Bind to IP
On by default, SMB over IP access can be turned off here. The CD/DVD Server functions
as a standard Windows IP server when this feature is enabled. This type of networking is
standard in today’s Enterprise networks. In order to utilize Microsoft IP networking your
network should additionally have a name server such as DNS or WINS in order to allow
servers to be accessed by name vs IP number. If Both NetBEUI and IP bindings are
enabled on the server and on the client it is sometimes difficult to see which protocol is
being used to access the CD/DVD Server. Whichever is used to access the CD/DVD
Server depends on how the client is configured to prioritize protocols.
Microsoft Server Name
A specific and different name can be entered here which will be used for all Microsoft
networking. A name entered here will supersede any server name entered under General
Configuration. If no name is entered here, the Microsoft server name will be set by appending “_smb” to the name entered in General Configuration.
Workgroup/Domain
This is an important and required field for Microsoft Networking. It determines where the
CD/DVD Server will appear to the client computers and in a Microsoft Domain environment it further determines what machine will be used to authenticate access rights.
NT Style Authentication
Set to Off by default, NT style Authentication allows for security to be configured such that
specific users would have access to specific shared resources. When this setting is set to
Off the CD/DVD Server prompts the client for User Name and Password rather then
relying on the current User Name of the workstation.
Share Level Access
Set to Enabled by default, Share Level Access requires that a user only supply a password
to access a shared resource.
Map Domain Users To
Users who are authenticated by a Domain Controller will have access to the CD/DVD
74
Page 75

NetMate CD/DVD Servers
TECHNICAL: 0118 931 2233
Server’s resources as the user selected here. The special entity “DOMAIN USERS” is the
default and can be used to assign permissions to volumes or directories.
NetMate CD/DVD Servers
NDS
Enable NDS
Off by default, this feature can be turned on to enable NDS access in a NetWare environment. When enabling NDS the other NDS fields also need to be properly configured. If
NDS is configured to be on and the CD/DVD Server has not been correctly configured and
installed into the NDS Tree, then some NetWare clients can have trouble accessing the
CD/DVD Server.
Install Mounted Volumes
Change this option to yes to have the volumes installed into the NDS Tree along with the
CD/DVD Server.
Tree Name
Enter the name of the NDS Tree you wish to install the CD/DVD Server into here. The tree
must already exist.
Context
Enter the Context of the NDS Tree here.
75
Page 76

SALES: 0118 965 5100
NetMate CD/DVD Servers
Administrator Name
Enter the NDS Tree Administrators user name here.
Administrator Password
Enter the Administrators password here. This is required to have the NetMate installed into
the NDS Tree. NOTE: The password is NOT saved. It is used only once to install the
NetMate into the tree and then it is discarded.
Install now to the NDS Tree
Once the above parameters have been entered click this box and then choose “submit”.
NetWare
NetWare Enable
On by default, NetWare access can be turned off here. The CD/DVD Server functions as a
NetWare Bindery or NDS server when this feature is enabled. This type of networking is
also called NCP over IPX.
NetWare/IP Enable
On by default, NetWare over IP, also known as NCP over IP, access can be turned off
here. When this feature is on the NetMate functions as a NetWare Bindery or NDS server
utilizing IP under NCP. Both NCP over IPX and NCP over IP can coexist on the CD/DVD
Server simultaneously. NetWare clients can then be configured to access the CD/DVD
76
Page 77

NetMate CD/DVD Servers
TECHNICAL: 0118 931 2233
Server using either protocol. In order for NetWare/IP to function NetWare Enable must also
be set to yes. If NetWare Enable is set to no NetWare/IP Enable is automatically set to no
as well.
NetWare Server Name
A specific and different name can be entered here which will be used for NetWare networking. A name entered here will supersede any server name entered under General
Configuration. If no name is entered here, the NetWare server will be set by appending
“_nw” to the name entered in General Configuration.
Authentication Server
The name of an existing Bindery server can be entered here. If so, NetWare requests will
be routed to this server to see if the user has proper authentication to access shared
resources.
NetWare/IP DSS Server
In a NetWare IP environment the IP DSS server must be entered here.
Network Numbers
Either automatic or manual configuration is selected here. By default automatic network
number configuration is enabled causing frame type(s) and network numbers to be detected during power on. The NetMate supports 802.2, 802.3, SNAP and Ethernet II frame
types.
NetMate CD/DVD Servers
77
Page 78

SALES: 0118 965 5100
NetMate CD/DVD Servers
NFS
NFS Enable
On by default, NFS access can be turned off here. The CD/DVD Server functions as an
NFS server when this feature is enabled.
PCNFSD Server
A PCNFSD Server name can be set here for PCNFSD client access.
NFS User License Timeout
In seconds, NFS user license timeout can be set by changing this field. By default, a blank
entry represents a timeout period of zero seconds or no timeout. In this case NFS user
access occupies a user license only during actual data reads. If this item is set to a nonzero value NFS clients will occupy a user license for each shared resource for the timeout
period following the last access.
Allow Any Host Access
On by default, all IP numbers can access the CD/DVD Server as long as they also meet
the set security features for Users, Groups, or Guest access.
Restrict Access to Certain Hosts by Mask and Address
As an additional security step, NFS access can be restricted to a specific IP mask and
address range.
78
Page 79

NetMate CD/DVD Servers
TECHNICAL: 0118 931 2233
NetMate CD/DVD Servers
SNMP
SNMP Enable
On by default, SNMP access can be turned off here. The CD/DVD Server can be seen as
an SNMP object with some of its parameters modifiable by SNMP.
Community
This field is the readCommunity SNMP object and is the community for all SNMP traps.
Contact
This is an optional field that can be used to display the Supervisor or system contact.
Location
This is an optional field that can be used to display the physical location of the CD/DVD
Server.
Trap Address
This field is the trapAddress SNMP object and is the IP address to which all SNMP traps
are sent.
79
Page 80

SALES: 0118 965 5100
NetMate CD/DVD Servers
TCP/IP
A
Assigning IP information to the NetMate server can be done in two different ways. Either
manually where the administrator types in the required information into the appropriate
fields or automatically if a dynamic configuration server is available on the network. The
Systems Administrator must make the decision as to which approach is correct for your
network. Only one method may be used at a time.
IP Enable
On by default, IP access can be turned off here. IP is a requirement for many other protocols such as HTTP (including web administration), NetWare/IP, AppleTalk/IP and SMB over
IP to function properly.
MANUAL NETWORK CONFIGURATION
IP Address
The IP address is entered and stored in this field. If Automatic Network Configuration is
turned on and a valid IP address has been obtained it will be displayed here.
Subnet Mask
80
Page 81

NetMate CD/DVD Servers
TECHNICAL: 0118 931 2233
The Subnet mask is used to determine whether network traffic will stay within the local
network or be passed through a router to other networks. The standard class C Subnet
Mask is 255.255.255.0 though other Subnet masks can also be used. If Automatic Network
Configuration is turned on and a Subnet mask has been obtained it will be displayed here.
Default Gateway
Sometimes also known as “Default Router” this is the IP address of the router where all
traffic outside your network is sent to. If Automatic Network Configuration is turned on and
a valid Default gateway address has been obtained it will be displayed here.
Primary DNS
This is the IP address of the Primary “DNS” or Domain Name Server. The DNS is used to
associate a server name with it’s IP address. If Automatic Network Configuration is turned
on and a valid Primary DNS address has been obtained it will be displayed here.
Secondary DNS
This is the IP address of the Secondary DNS. This server will be used if the primary server
is unavailable or unreachable. If Automatic Network Configuration is turned on and a valid
Secondary DNS address has been obtained it will be displayed here.
NetMate CD/DVD Servers
Domain Name
This is the name of the Domain which the CD/DVD Server is configured to. If Automatic
Network Configuration is turned on and a valid Domain name has been obtained it will be
displayed here.
WINS Server
This is the IP address of the Windows Name Server. This name server machine provides
similar functionality to a DNS Server but uses the Microsoft WINS name server protocol. If
Automatic Network Configuration is turned on and a valid WINS server address has been
obtained it will be displayed here.
NetBIOS Scope
This is the NetBIOS scope which the CD/DVD Server is configured to. If Automatic Network Configuration is turned on and a valid NetBIOS scope address has been obtained it
will be displayed here.
81
Page 82

SALES: 0118 965 5100
NetMate CD/DVD Servers
AUTOMATIC NETWORK CONFIGURATION
Automatic Network Configuration is a simple way to have the CD/DVD Server configure
itself on an IP network. This process is done automatically each time the CD/DVD Server
is started. Automatic configuration can set items such as: IP Number, Default Gateway,
DNS, Domain name, WINS information and more. The values obtained will appear above
in the Manual Configuration fields though Automatic Network Configuration will still be
checked on-screen.
DHCP
Set to On by default, this enables DHCP automatic Internet configuration. DHCP is the
preferred method of configuration and will override any values that may have been returned
by BOOTP or RARP.
BOOTP
Set to On by default, this enables BOOTP automatic Internet configuration.
RARP
Set to On by default, this enables RARP automatic Internet configuration. Only the IP
Address can be set using RARP.
Maintenance
Log Page
82
Page 83

NetMate CD/DVD Servers
TECHNICAL: 0118 931 2233
The Log page gives a time line of information about the server. Note that the log page is of
a limited size and that a server running long enough will only show the most recent log
entries.
ROM Usage
The ROM Usage page provides detailed information about the current capacity and usage
of the internal system ROM “Read Only Memory”. The ROM is where Management items
are stored. The individual Management items are summarized on this page. Clicking on an
entry in the “Record Type” column displays a list of entries where items can be deleted to
recover space on the ROM should it becomes full. It is highly unlikely that the administrator
or supervisor will ever need to remove any ROM stored items as this feature is provided
mostly for informational purposes only.
NetMate CD/DVD Servers
Restart/Shutdown
This page allows the administrator to Restart or Shutdown the CD/DVD Server.
Restart
This feature is commonly used to enable newly changed Configuration parameters to take
effect.
ShutDown
This feature completely shuts down the NetMate. Once this feature is chosen the CD/DVD
Server must have its power recycled to enable it to be accessible over the network again.
83
Page 84

SALES: 0118 965 5100
NetMate CD/DVD Servers
84
Page 85

NetMate CD/DVD Servers
TECHNICAL: 0118 931 2233
NetMate CD/DVD Servers
Read this chapter to learn
about the multiple security
options of the CD/DVD
Server.
5
In this section we discuss the security options provided by the CD/DVD Server.
Use the concepts within this chapter and the administrative tools described in
Chapter 4 to implement your chosen level of security.
CD/DVD Server Security Overview
Initial Security - Guest Access
When first installed, the CD/DVD Server will have no security options enabled. Any
discs placed in the tower will be accessible to any user that logs on. Microsoft
networking users can access shares on the CD/DVD Server without being
prompted for a password. Netware or Apple clients can enter either Supervisor or
Guest with no password.
IMPORTANT: the supervisor account (used to administer the CD/
DVD Server) will have no password. It is recommended that a minimal level of security be established by setting the supervisor password
Increasing Security
If it is necessary or desired, an increased level of security can be enabled either on
a system wide, per volume or even per directory basis. To enable system wide
security, change the "Enable Guest Access" setting on the General Configuration
Page 86

SALES: 0118 965 5100
NetMate CD/DVD Servers
page to "no". Once this is set, all users will have to authenticate (either locally or
remotely) with a valid username and password before access in granted. Enabling
security on a CD/DVD, archived volume or a specific directory, is managed from
the Configure Volume page, while security for a virtual volume is handled from the
Configure Virtual Volume page. Only users specifically granted access or users
who belong to a group which has been granted access are allowed to connected to
a volume once security has been enabled on it.
Using NDS
In order to use NDS you must first enable it and install the NetMate into the desired
tree. This can be done by filling in the tree name, context, administrator name and
password on the NDS configuration page, setting "Enable NDS" to yes, checking
the "Install now to the NDS tree" box and submitting the page. You can also set
"Install Mounted Volumes" to yes if you would like the NetMate to maintain the list of
it’s volumes on the tree.
Once NDS is enabled and properly configured, users, groups and volume rights
can be maintained through the standard NDS administrative tools.
Note: Enabling NDS without installing the server into the tree may cause
connection problems for some NetWare users.
Using Microsoft Domain Services
In order to use Microsoft Domain Services you must first enter a Microsoft Domain
in which to authenticate from. This is accomplished via one of the Administrative
methods. For example; using the Web Administration go to the page
Networking>>Microsoft Networking>>WorkGroup/Domain. Once this is done the
NetMate contacts the Primary Domain Controller for the domain entered. Further
authentication requests that cannot be verified as local users or groups are passed
on to the Primary Domain Controller for verification.
By default, users that are authenticated against a domain controller are initially
86
Page 87

NetMate CD/DVD Servers
TECHNICAL: 0118 931 2233
given access to all volumes in the server. This can be changed by creating a
different default domain user which has been assigned specific domain rights and
changing the “Map Domain Users” choice in Microsoft Networking.
Users & Groups (User Level Security)
Before setting up access rights to each volume, you need to create users and/or
groups. Each user and group can be configured as either local or remote. Using
local means that administration of this user/group is handled by the CD/DVD
Server and that authentication is done internally. Remote means that the user/
group exists on a different server and that authentication requests are sent out to a
predefined remote server to determine if access is granted.
NetMate CD/DVD Servers
By organizing users into groups access permissions become easier to setup and
manage. Once some users are defined and group memberships are established,
you can assign permissions to groups and individual users for one or more volumes, using the Configure Volume or Configure Virtual Volume page.
Remote Authentication
Each protocol that supports remote authentication has it's own remote server.
This server is either manually entered into the protocol specific configuration page
or is automatically determined during system startup. A given remote authentication server will only be used in the context in which it was defined. For example, a
user attempting to login using Novell NetWare will not be authenticated against the
Microsoft Networking Primary Domain Controller but might be authenticated
against the NetWare Authentication Server if no local user exists that matches the
supplied username.
87
Page 88

SALES: 0118 965 5100
NetMate CD/DVD Servers
Share Level Security
Some protocols, such as Microsoft Networking and AppleTalk, allow you to set
password for volumes as well as users. This is sometimes referred to as Share
Level security. Anytime a volume with a password set is connected to over one of
these protocols, the user will be prompted for the password before further access
is granted.
NT Authentication
NT servers authenticate users in a different fashion then previous version of Windows file sharing such as those included in Windows 95, 98 or Windows for
Workgroups. The CD/DVD Server supports both the previous version and the
Windows NT style of authentication. Either can be chosen depending on what the
mix is of workstations on your network.
If NT Style Authentication is turned on, a Windows-NT machine can only log into a
NetMate using the same Username which they logged into their local NT workstation as. (Usually upon startup). If the user then tries to connect to a CD/DVD Server
specifying a different username, the CD/DVD Server will fail the login. The user
name used when starting up the client must have access rights for the given
server. If the present user does not have access rights then the user user must log
out of their workstation and back in as a user that does.
About Guest Access and UNIX Environments
In addition to global control of guest access, some protocols (such as FTP) allow
individual control over guest access. In the case of FTP, enabling guest access
also allows the use of the common FTP username of anonymous as an alias to
guest. Disabling FTP guest access causes FTP to refuse guest and anonymous
logins but does not affect any other protocol.
Should you desire a more secure system but also want some level of guest access, you can configure the guest user account with a password. This will allow
users to login as guest (or in FTP as anonymous) but will require the correct
password to be entered before access is granted.
88
Page 89

NetMate CD/DVD Servers
TECHNICAL: 0118 931 2233
NetMate CD/DVD Servers
Use the Glossary of terms
for an explanation of the
items within networking
and storage systems
Appendix A
Glossary
10BaseT This is the earlier version of twisted pair Ethernet which can
operate over standard telephone wiring. This type of
Ethernet networking usually requires a network hub and is
wired in what is called a star topology.
100BaseT This new form of Ethernet is similar to 10BaseT in design but
runs at 10 times the speed of its predecessor and requires a
more stringent level of twisting and wire grade to sustain the
faster speeds.
Access Rights This is a security privilege set by the system administrator
giving a network client access to shared resources.
Access Time The amount of time it takes a storage device to locate the
desired data on the device. This time does not include the
time it takes to transfer the actual data.
AFP AppleTalk Filing Protocol is the standard protocol which
Macintosh clients and servers use to transfer data between
them.
89
Page 90

SALES: 0118 965 5100
NetMate CD/DVD Servers
Alert Dialog A box that appears on the screen to give a warning or to
report an error during use of an application. Its appearance is
usually accompanied by a beep.
Anonymous User This is a special type of user in an FTP environment that is not
a registered user.
Application This is a special type off computer file that can be “launched
or “started” to perform a specific task.
Authentication This is the process by which a users security rights are veri-
fied prior to that user being given access to resources. This
process can happen locally on the CD/DVD Server or via
remote authentication against another Novell server or
against a Microsoft or Netware Domain
Bindery This is a database that NetWare 3.x servers use to store Users
and Groups.
Bit A contraction of the words "binary digit", the smallest unit of
information that a computer can hold. The value of a bit, 0 or 1,
represents a simple two-way choice, such as on or off, true or
false, black or white, and so on. Bits are put together to represent text characters, numbers, graphic images, sounds, etc.
Block A physical or logical number containing a set quantity of bytes.
Most drives have either 512 or 1024 byte blocks. CD-ROMs
have 2048 byte blocks.
BOOTP Also known as Boot Strap Protocol, is an earlier version of
automatic IP number assignment which is similar but less
powerful then DHCP. BOOTP only sets the IP address and not
other settings that DHCP is able to automatically configure.
90
Page 91

NetMate CD/DVD Servers
TECHNICAL: 0118 931 2233
BroadCast This is a type of network transfer that is designed to go to all
computers on the local network. The CD/DVD Server
BroadCasts certain packets to initialize itself onto a new
network and later to maintain itself.
Broadcast Address This is a common address that will be received by all user
addresses on the network.
Browse List Used in Microsoft Networking, this list maintains all of the
hosts and domains available on the network. This list is what
is used to construct the “Network Neighborhood” for the
clients.
Browser This is a special type of application that is used to access
information over the World Wide Web. The most common
Browsers are Netscape Communicator and Microsofts Internet
Explorer. Browsers can access other computers, such as the
CD/DVD Server, through either their Web Address or Host
Name
NetMate CD/DVD Servers
Byte A unit of computer memory consisting of eight bits. A byte is
the amount of storage used to represent a single character.
Cache Drive This is a hard drive on the CD/DVD Server that is used to
Cache CD-ROM or DVD-ROM’s too
Changer This is a type of CD-ROM or DVD-ROM device that can hold
multiple CD discs simultaneously to provide more online
storage. The drawback is that though multiple discs are available for use only one can be accessed at a time.
CD-R This is a special type of CD-ROM or DVD-ROM disc that a user
can create on their own in a CD-ROM writer system. The CD/
DVD Server supports CD-R discs.
91
Page 92

SALES: 0118 965 5100
NetMate CD/DVD Servers
Class X Network Where “X” can be “A”, “B” or “C” this defines the type of
Internet Protocol “IP” network that your network utilizes.
Class A networks are extremely large with thousands of computers where on the other extreme Class A networks can have
only up to 255 computers or users.
Client This is a type of computer attached to a network that accesses
information from other computers or services.
Datagram This is a packet of data that is using a protocol that does not
guarantee delivery. This type of protocol streams data over
the network vs sending small amounts and waiting for
acknowledgement before sending additional packets.
Desktop Your working environment on the computer. The menu bar
and the background area on your screen.
Device See Peripheral Device.
Directory A list of the contents of a folder or a disk.
DHCP Standing for Dynamic Host Configuration Protocol, DHCP is
used in modern networks to configure IP services. A common
DHCP server keeps track of all IP configurations for all computers that it services.
Disc A flat, circular, optical surface on which data can be recorded,
as in a CD-ROM or DVD-ROM.
Disk A flat, circular, magnetic surface on which data can be re-
corded, as in a floppy disk, or hard disk.
Dismount This is the process by which a disc that is currently being
92
Page 93

NetMate CD/DVD Servers
TECHNICAL: 0118 931 2233
shared over the network is removed from the list of available
resources. This process happens each time a volume is
ejected or a cache volume deleted.
DNS Standing for Domain Name System, DNS is a database that
correlates a machines IP address to it’s host name.
DNS Server This is a common server on an IP based network that main-
tains and handles requests to and from the DNS server database.
Domain A domain is a compilation of computers into a logical and more
understandable group. Microsoft or Novell Domain services
are common access points for which to log into all available
servers and network resources. In the Internet world a Domain also is a naming convention used to access IP based
computers.
NetMate CD/DVD Servers
Domain Name Each domain must have a specific name that distinguishes it
over the Internet. A Domain name has 2 parts. First and last.
The first is usually the name of the organization and the last it
its type. For example ‘ford.com” or “nyu.edu” are two examples of domain names.
Drive Mapping This is the process by which a client can make a remote vol-
ume on a server seem to be a local storage device. This is
many times required in order to access applications on network volumes. During the mapping process a volume can be
set to automatically re-map on each subsequent startup of the
client without additional user intervention.
DVD-ROM This is a new type of Read-Only storage similar to CD-ROM
but of a much larger capacity.
93
Page 94

SALES: 0118 965 5100
NetMate CD/DVD Servers
Eject To remove a disc from its drive by unmounting it.
Ethernet This is a wiring standard used to connect computers together
over networks. There were other earlier types of networking
but Ethernet has risen to be the dominant form of networking
used today.
Ethernet Address Every device on the Ethernet network must have its own
unique identifier. The Ethernet Address of a CD/DVD Server
will always be 00:E0:65:xx:xx:xx where the last 6 “x” characters
are the systems serial number.
Factory Defaults This is the form that a new CD/DVD Server arrives in and is
installed on to a new network. No network configuration or
security information is entered at this point.
Firmware A software program on a computer chip (rom) that contains
information. Sometimes manufacturers have firmware upgrades to handle new features.
Flash Memory Flash Memory or Flash ROM’s are a type of memory chip that
can be reprogrammed with new software or firmware in the
field. The CD/DVD Server utilizes Flash ROM’s to store its
firmware
Frame Type In Ethernet Networks the data packets that carry information
must belong to a specific Frame Type. The Frame Type is used
to distinguish the type of packet. NetWare Networks utilize all
4 Frame Types, IEEE802.2, IEEE802.3, Ethernet II and Ethernet
SNAP. The CD/DVD Server utilizes all four for frame types
while sharing data to Novell networking clients, 802.2 for
Microsoft SMB Networking and Ethernet II for IP.
FTP Standing for File Transfer Protocol, FTP is the popular proto-
94
Page 95

NetMate CD/DVD Servers
TECHNICAL: 0118 931 2233
col to transfer files in a UNIX IP environment.
Gateway A Gateway is a piece of networking hardware that separates
two networks allowing data to pass between them. In IP networks a Gateway is usually assigned during configuration so
that the workstation sending data knows whether or not to
send the data directly to a local computer, in the case of a LAN,
or to the Router or GateWay in order to be passed on to other
computers outside of your local network.
HFS Standing for Hierarchical File System, this is the type of file
system that is common to Macintosh only CD-ROM’s or DVDROM’s
Host This is a server or computer from which a client can copy
information from or log into. The term Host is more commonly
used in Internet Networking though it applies to all types of
networks.
NetMate CD/DVD Servers
Host ID This is part of the IP address that determines the computer on
the individual network. Host ID+Network ID=IP Address
HTML Standing for Hypertext Markup Language, HTML is the pro-
gramming language that is used to create Web pages.
HTTP Standing for Hypertext Transfer Protocol, HTTP is the proto-
col that is used to transfer HTML information over the network.
Hyperlink These are the underlined words, or graphics, in a Web page
that are used to jump to other web pages or resources.
Internet This is the term used to define all of the computers that use
the IP protocol. The Internet is a combination of IP based
95
Page 96

SALES: 0118 965 5100
NetMate CD/DVD Servers
computers all over the world. Any computer can have access
to any other computer over the Internet if access rights have
been granted.
IP Short for Internet Protocol, IP is the underlying Protocol for all
internet transfers. IP is considered a datagram or unreliable
packet since it is sent out without any required provision for
verification of receipt.
IP Address This is the address scheme used to identify a node on an IP
network. Every node on a given network is represented by a
unique set of four numbers, each ranging from 0 to 255.
These numbers are commonly arranged with periods as separators, e.g., 204.57.59.68. The largest example of an IP based
network is the Internet. Since every address on the network
must be unique, for a node to exist on the Internet it must be
assigned an IP Address. IP numbers are typically assigned to
an organization as a group of similar numbers which are then
distributed to their machines either dynamically or on a permanent basis.
IPX Network NumberAn eight-digit hexidecimal number that uniquely identifies a
Netware network.
ISO 9660 This is the most common disc format for CD-ROM and DVD-
ROM discs. It is defined by the International Standardization
Organization (ISO).
LAN (Local Area Network) A LAN is a colletion of computers linked together that
are physically close to each other, usually in the same building.
LED (Light-Emitting Diode) An electronic component that emits light. The light
is generally used as an indicator to signify a condition or
activity.
96
Page 97

TECHNICAL: 0118 931 2233
NetMate CD/DVD Servers
Long File Name This is a format for file names used in Windows 95,98, and NT.
Unlike the earlier format of eight-dot-three where file names
could only be 8 characters long filed by a period and a 3 letter
suffix, Long File Names can be up to 255 characters, including
spaces but not the characters \/:*?"<>|.
LUN (Logical Unit Number) The SCSI specification provides a sub-identifier for each SCSI
ID called a Logical Unit Number or LUN. Every SCSI ID has
eight LUNs numbered 0 through 7 that can each be processing a command at any given time. LUNs are typically used to
communicate with distinct components of a device, such as a
jukebox which might have a mechanical arm for moving discs
on one LUN and one or more read heads on others. A LUN
consolodiation tower can connect up to eight standard devices to a single SCSI ID by mapping each device to a separate LUN.
Master Browser This is the computer on a Microsoft Network that maintains
the browse list workgroup or NT domain. When a computer
starts up in a Microsoft network it offers it’s name to the network. The Master Browser accepts this name and puts it in the
Browse List
Media The physical medium where the data is written to. The media
is protected by the cartridge housing, or in the case of CDROMs, the loading tray or caddy.
Mount The process of making a volume available to be shared. This
is generally performed at system startup.
Narrow SCSI This is a type of SCSI interface that can run up to 20 Mega-
bytes per second in Ultra SCSI mode and 10 Megabytes per
second in Fast SCSI mode.
NCP Standing for NetWare Core Protocol, NCP is a combination of
97
Page 98

SALES: 0118 965 5100
NetMate CD/DVD Servers
routines used by a Novell Server to communicate transactions
to and from a Netware server and NetWare client.
NDS Standing for Novell Directory Services, NDS is a logical
grouping of Novell servers and resources. These resources
are presented in a Network Neighborhood as one entity for
ease of access and a common method to control security for
multiple servers. A user logs into the NDS Tree vs a single
server as it was under NetWare 3.x. By logging into the NDS
Tree user can have access to all the resources of the NDS
Tree without requiring multiple log-ins.
NOS Standing for Network Operating System, an NOS is specifically
designed operating system whose sole purpose is to share
data to other computers on the network. The CD/DVD Server
features a highly optimized NOS.
NetWare Bindery This is a database that a Netware NetWare 3.x servers uses to
store Users and Groups.
Network A group of interconnected computers.
Network Neighborhood
Under Windows 95, 98 & NT this is a desktop icon that represents the network that the workstation is connected to.
Network ID This is part of the IP address that determines the network that
an individual workstation is on. Host ID+Network ID=IP Address
NFS Standing for Network File System, NFS is the file server sys-
tem used by UNIX systems. A NFS volume is mounted locally to
a NFS client computer and seen as a local device.
98
Page 99

NetMate CD/DVD Servers
TECHNICAL: 0118 931 2233
Node Any computer on a network is considered a Node on that
network.
NT Domain An NT domain is a logical grouping of servers or hosts on a
network. They are presented in a Network Neighborhood as
one entity for ease of access. NT Domains are very similar to
Microsoft Workgroups. They look identical in the Network
Neighborhood. The difference is that a domain provides for
common control of network security and access privileges. A
user logs into the domain vs a single server. By logging into
the Domain the user can have access to all the resources of
the domain without requiring multiple log-ins.
Partition A defined storage area on a disk. Each partition is treated as a
separate volume and has its own icon on the desktop.
Peripheral Device Any device that can be attached to a data port on a computer.
For example: hard disk drive, tape drive, CD-ROM drive,
printer, modem, graphics tablet, etc
NetMate CD/DVD Servers
Operating System This is the primary program a computer will run on startup.
Applications are normally run on top of Operating Systems.
Primary Domain Controller
This is the computer on an NT Domain that handles security
and maintenance functions for the domain. There can also be
a backup domain controller which will operate should the
Primary Domain Controller be unavailable.
Protocol A protocol is a specific communications method between two
computers over a network. Similar to two people speaking a
foreign language, both computers must speak the same Protocol, or language, to transfer data to and from each other.
99
Page 100

SALES: 0118 965 5100
NetMate CD/DVD Servers
RARP This is an earlier version of automatic IP number assignment
which is similar but less powerful then DHCP. RARP only sets
the IP address and not other settings that DHCP is able to
automatically configure.
Read To transfer information from a source such as a disk drive, or
main memory or to other destinations such as a client on the
network.
Reboot This is the process of safely shutting down the system, dis-
connecting all users, and restarting.
Router This is a piece of computer networking equipment that de-
cides the path that data will follow. Routers are used to separate computer networks where desired usually for security or
performance reasons.
SCSI Small Computer Systems Interface. American National Stan-
dards Institute (ANSI) defined interface, ANSI X3.131-1986. A
parallel, bi-directional communications interface used to
transfer data between at least two digital devices.
(See also Narrow SCSI and Wide SCSI)
SCSI Address A unique value from 0 to 7 that is assigned to a SCSI device.
No devices are allowed to have the same address. The SCSI
Address for most host adapters, and the CD/DVD Server is ID
# 7.
SCSI bus A group of SCSI devices linked to one another through SCSI
peripheral interface cables and linked to the SCSI port on the
computer through a SCSI system cable. Sometimes referred to
as a Daisy Chain.
100
 Loading...