

Page 1

July 2010
ASTC3000
ASTC3000POE
ASTCBK
ASTCPOEK
ASTCRCB
ASTCRCG
ASTCRCR
ASTCKEY
Auto-Sync Time Clock
The Auto-Sync Time Clock is a validated time system
with a Web interface and auto discovery.
ASTC3000 provides validated time for an accurate time stamp,
ASTC3000POEK Kit option provides Power over Ethernet with Full
Power Reserve, and the ASTCBK Kit option provides Full Power
Reserve.
Page 2

Trademarks Used in this Manual
Ethernet is a registered trademark of Xerox Corporation, Inc.
XP, VISTA, IE, Microsoft, Windows, Windows NT, are registered trademarks of
Microsoft Corporation in the United States and/or other countries.
Bonjour is a trademark of Apple Computer, Inc., registered in the U.S. and other
countries.
Safari is a registered trademark of Apple Computer, Inc., registered in the U.S. and
other countries.
Digi Connect ME is a registered trademark of Digi International, Inc.
Firefox is a registered trademark of the Mozilla Foundation.
Black Box and the Double Diamond logo are registered trademarks, and Auto-Sync
is a trademark, of BB Technologies, Inc.
Any other trademarks mentioned in this manual are acknowledged to be the
property of the trademark owners.
724-746-5500 | blackbox.com
Page 3

Table of Contents
1. Auto-Sync Time Clock ................................................................................ 1-1
1.1. How This Manual is Organized ..................................................................... 1-1
1.2. General Information .................................................................................. 1-1
1.2.1. What is OATS Compliance? ................................................................... 1-2
1.2.2. Features ............................................................................................ 1-3
1.2.3. Benefits ............................................................................................. 1-4
1.2.4 Hardware Features .............................................................................. 1-4
1.2.5 Requirements ..................................................................................... 1-4
1.3. Auto-Sync Time Clock Installation & Operation Guide ..................................... 1-5
1.4. Time Servers General Information ............................................................... 1-5
2. Installation Basics ..................................................................................... 2-1
2.1. Auto-Sync Time Clock External View ............................................................ 2-1
2.2. Components ............................................................................................. 2-1
2.3. Removing the Cover .................................................................................. 2-1
2.4. Unpacking the Clock .................................................................................. 2-2
2.5. Installing the (ASTCBK) Optional Full Power Reserve (FPR) ............................. 2-2
2.6. Installing the (ASTCPOEK) Optional PoE with FPR .......................................... 2-7
2.7. Normal Startup Sequence ........................................................................ 2-11
2.8. Wall Mounting ........................................................................................ 2-12
2.9. Printing ................................................................................................. 2-12
2.9.1. The First Printout ................................................................................. 2-12
2.9.2. Acceptable Print Media .......................................................................... 2-13
2.9.3. Adjusting the Print Margin ..................................................................... 2-14
2.9.4. Available Print Methods ......................................................................... 2-14
2.10. Front Panel Reset Button ....................................................................... 2-15
2.11. Specifications ...................................................................................... 2-16
2.12. Power over Ethernet Overview ............................................................... 2-17
3. Getting Started .......................................................................................... 3-1
3.1. Connecting to the Auto-Sync Time Clock using Zeroconf .............................. 3-1
3.2. First Time Set up of the Auto-Sync Time Clock ........................................... 3-4
4. General Information .................................................................................. 4-1
4.1. Auto-Sync Time Clock Web Interface ........................................................... 4-2
4.1.1. Auto-Sync Time Clock Web Page .............................................................. 4-2
4.1.2. Login ................................................................................................... 4-3
4.1.3. How to Create Users ............................................................................... 4-4
4.1.4. Normal Login ......................................................................................... 4-5
4.1.5. How to Custom Configure the Auto-Sync Time Clock ................................... 4-5
4.1.6. How to Set the Print Options ................................................................... 4-8
4.1.7. How to Set Time Synchronization ........................................................... 4-12
4.1.7.1. Time Sync Settings ........................................................................... 4-12
4.1.7.2. Time Server Setup ............................................................................ 4-13
4.1.7.3. DNS Server Setup ............................................................................. 4-15
4.1.8. How to Setup E-Mail and SNMP Trap Notification ...................................... 4-16
4.1.8.1. E-mail Setup .................................................................................... 4-16
4.1.8.2. SNMP Trap Setup .............................................................................. 4-19
4.1.9. How to Setup Time Synchronization Schedules ......................................... 4-20
4.1.10. How to Setup Report Schedules .......................................................... 4-22
4.1.11. How to Setup Backup Schedules ......................................................... 4-23
4.1.12. Auto-Sync Time Clock Utilities ............................................................ 4-23
4.1.12.1. Utility Settings for FTP Server .......................................................... 4-24
4.1.12.2. Performing Backup and Restore ....................................................... 4-25
4.1.12.3. Reports Utility ............................................................................... 4-28
724-746-5500 | blackbox.com i
Page 4

Auto-Sync Time Clock
5. Getting Started .......................................................................................... 5-1
5.1. Installing the Auto-Sync Utility ................................................................. 5-1
5.2. Using the Auto-Sync Utility ...................................................................... 5-2
5.2.1. How to Discover & Connect to a Auto-Sync Time Clock ............................. 5-3
5.2.2. How to Create a Centralized Transaction Report ...................................... 5-6
5.2.3. Advanced Function of Downloading to Auto-Sync Time Clocks ................... 5-8
5.2.4. Auto-Sync Time Clock Menu Selections ................................................. 5-11
6. Auto-Sync Time Clock Diagnostics ............................................................. 6-1
6.1. How to Display Clock Configuration ............................................................. 6-1
6.2. How to Manually Time Sync the Clock .......................................................... 6-2
6.3. How to Perform LCD Display Clock Diagnostics .............................................. 6-3
6.4. How to Reset the Clock .............................................................................. 6-3
6.5. How to Perform Remote Connection Test ...................................................... 6-5
6.6. Display Messages ...................................................................................... 6-6
6.6.1. Normal Startup ...................................................................................... 6-6
6.6.2. Colon Status ......................................................................................... 6-6
6.6.3. Time Synchronization Validation ............................................................... 6-7
6.6.4. Error Messages ...................................................................................... 6-7
6.7. How to Replace the Ribbon Cartridge ......................................................... 6-10
6.7.1. Ribbon Cartridge Removal ..................................................................... 6-10
6.7.2. Ribbon Cartridge Installation ................................................................. 6-10
7. Wide Area Service Discovery ...................................................................... 7-1
7.1. Wide Area Service Discovery Setup ............................................................. 7-1
7.2. Wide Area Clock Discovery ......................................................................... 7-2
8. Frequently Asked Questions (FAQs) ........................................................... 8-1
A. Appendix .................................................................................................... A-1
ii 724-746-5500 | blackbox.com
Page 5

Chapter 1: Introduction
1. Auto-Sync Time Clock
1.1. How This Manual is Organized
The installation, setup and operation procedures in this manual are provided for
user assistance.
Chapter 1 provides general information with a brief overview of features, and
benefits.
Chapter 2: provides an overview of system components with step-by-step
procedures for installing your Auto-Sync Time Clock.
Chapter 3 provides step-by-step procedures for quick startup using a Web
browser.
Chapter 4 provides detailed step-by-step procedures for operation of the AutoSync Time Clock using a Web browser.
Chapter 5 provides installation information and how to use the Auto-Sync Utility
for discovering and connecting to your clock.
Chapter 6 provides a description of how to use the clock diagnostics, basic
maintenance procedures and error code analysis.
Chapter 7 provides a description of Wide Area Network service discovery
information.
Chapter 8 provides Frequently Asked Questions (FAQs) for the Auto-Sync Time
Clock.
Appendix provides a character table for guidance in selecting print characters,
default NIST information and a glossary of used terms.
1.2. General Information
The Auto-Sync Time clock is a system with a web interface which provides users an
accurate time stamp. This clock will run on its own using elaborate scheduling time
synchronization with a backup system that can send alerts (SNMP traps & e-mail
notification) plus reports to designated recipients on time sync events for potential
audit.
The Auto-Sync Time Clock utilizes Zero Configuration Networking (Zeroconf), a
set of techniques that will automatically create a usable network IP address without
configuration or special services. This allows users to connect Auto-Sync Time
Clock’s together and expect them to work automatically. Without Zeroconf, a user
must either set up special services, like Dynamic Host Configuration Protocol
(DHCP) and Domain Name System (DNS), or set up each device’s network settings
manually. This may be challenging for non-technical or novice users.
724-746-5500 | blackbox.com 1-1
Page 6

Auto-Sync Time Clock
The Auto-Sync Time Clock can be synchronized from a National Institute of
Standards and Technology (NIST) NTP (Network Time Protocol) time server, or
internal time server via Ethernet
All communication with the Auto-Sync Time Clock is via a network TCP/IP
connection. The Auto-Sync Time Clock auto discovery and configuration can be
accomplished via simple instructions (see Chapter 3: Quick Start).
End-users may never need to change the configuration settings after the initial
configuration setup. However, it is recommended that all configuration settings
should be recorded in the event that the setup needs to be repeated in the future.
®
connection (see Figure 1-1).
Figure 1-1. Auto-Sync Clock Time Synchronization.
During the configuration process, both the event logger and scheduler use the same
supporting configuration files located in the clock. The event logger runs in the
clock with a scheduler that runs in the background as a service.
The Auto-Sync Time Clock can optionally obtain power from a Full Power Reserve
(FPR) or Power over Ethernet (PoE) (see Figure 1-1). Power over Ethernet or PoE
technology describes a system to transfer electrical power, along with data, to
remote devices over standard twisted-pair cable in an Ethernet network.
1.2.1. What is OATS Compliance?
The Auto-Sync Time Clock has been specially designed to be in compliance with the
Financial Industry Regulatory Authority (FINRA) Order Audit Trail System (OATS)
rule 7430 (formerly NASD OATS Rule 6953 & NYSE Rule 132A), Synchronization of
Member Business Clocks described as follows:
Rule 7430 requires any FINRA member firm that records order, transaction or
related data required under the By-Laws and Rules of the Association to
synchronize all business clocks used to record the date and time of any market
event. Clocks, including computer system clocks and manual time stamp machines,
1-2 724-746-5500 | blackbox.com
Page 7

Chapter 1: Introduction
must record time in hours, minutes and seconds with to-the-second granularity and
must be synchronized to a source that is synchronized to within three seconds of
the National Institute of Standards and Technology (NIST) atomic clock. Clocks
must be synchronized once a day prior to the opening of the market, and remain in
synch throughout the day. In addition, firms are to maintain a copy of their clock
synchronization procedures on-site. Clocks not used to record the date and time of
market events need not be synchronized.
1.2.2. Features
DHCP (Dynamic Host Configuration Protocol) compatibility for IP address
management and other parameters (Subnet Mask and Gateway) from the DHCP
server, which ensures each IP address, is unique.
Optional PoE (Power over Ethernet) accessory, which includes Full Power
Reserve (FPR option).
Automatic time synchronization to an official time source.
Event notification through Simple Network Management Protocol (SNMP) traps.
This feature enables network administrators to centrally manage time clock
performance, find problems and solve them in a timely manner.
NTP (Network Time Protocol) syncs clocks to a time reference over a data
network.
Direct synchronization to the time source rather than to a computer.
Log-in security for two (2) separate users.
Synchronization transaction data maintained per FINRA Rule 7430 requirements.
Full OATS compliance with stand-alone units not linked to a PC.
Complete solution without the need for individual trader computers.
Report for transaction log (time sync).
Maximum Sync of once every 2 hours for improved accuracy with up to 12 time
validations a day per schedule. The clock can store 5 years of data utilizing one
normal sync schedule of 2 syncs per day for OATS compliance.
Compatible with IE, Safari, and Firefox Web browsers.
Employs Windows Services to perform synchronization.
E-mail notification of clock failure to synchronize the time, configurable to send
e-mail notification to chosen recipients.
724-746-5500 | blackbox.com 1-3
Page 8

Auto-Sync Time Clock
1.2.3. Benefits
Assures financial institutions’ compliance with OATS Rule 7430 as per
FINRA/SEC.
The Auto-Sync Time Clock will continue to function and maintain time as a
stand-alone unit, even if it does not receive synchronization from an NTP time
server.
The Auto-Sync Time Clock is the highest quality OATS-compliant time stamp
available.
Time sync transaction files are automatically maintained in the Auto-Sync Time
Clock and can be saved to file, viewed, or printed as desired.
Visible alarms on time stamp imp rint and LCD display provide notificat ion of
time synchronization failure (see Figure 6-8).
Provides a solution for industry sectors that require strict adherence to good
time keeping practices.
No server software required, which means minimal IT staff involvement and
lower support costs due to streamlined setup.
1.2.4. Hardware Features
Maintains accurate time to within four tenths of a second over a 24-hour period
once synchronized.
Time imprint format includes seconds as per FINRA OATS 7430 requirements.
Prints through up to 6 multiple-part carbonless copies.
Capable of printing alphanumeric characters in two separate lines.
Optional Full Power Reserve permits clock operation and/or stamping in the
event of power outage.
Quick and easy ribbon cartridg e replacement.
Time validation via Ethernet connection to internal or external time servers.
Optional PoE accessory, which includes the FPR option.
1.2.5. Requirements
A Web browser and Ethernet connection is required to setup and time synchronize
the Auto-Sync Time Clock.
1-4 724-746-5500 | blackbox.com
Page 9

Chapter 1: Introduction
1.3. Auto-Sync Time Clock Installation & Operation Guide
The Auto-Sync Time Clock Installation & Operation Guide was designed to assist
you in the daily operation of your clock and to provide a comprehensive
understanding of the Auto-Sync Time Clock. This Guide can be found on the AutoSync Utility CD that came with your clock.
1.4. Time Servers General Information
A time server is a server computer that reads the actual time from a reference
clock and distributes this information to its clients using a computer network. The
time server may be a local network time server or an Internet time server.
The most important and widely-used protocol for distributing and synchronizing
time is the Network Time Protocol (NTP), though other less-popular or outdated
time protocols continue to be used.
The time reference used by a time server could be another time server on the
network or the Internet, a connected radio clock or an atomic clock. The most
common true time source is a GPS or GPS master clock. Time servers are
sometimes multi-purpose network servers, dedicated network servers, or dedicated
devices. All a dedicated time server does is provide accurate time.
An existing network server (e.g. a file server) can become a time server with
additional software. The NTP homepage provides a free and widely-used reference
implementation of the NTP server and client for many popular operating systems.
The other choice is a dedicated time server device.
The term "stratum" is used to label the closeness to a central or high quality time
server. The stratum indicates the place of a particular time server in a hierarchy of
servers. The scale is 0 to 16 where 0 is the most accurate and likely a highly
specialized physical hardware device. Some time clients will reject a time update
from a server whose stratum is too high, and most will prefer lower strata time
sources to higher ones. This can be a pitfall for administrators setting up an inhouse time server with no true time source.
724-746-5500 | blackbox.com 1-5
Page 10

Auto-Sync Time Clock
This page intentionally left blank.
1-6 724-746-5500 | blackbox.com
Page 11
2. Installation Basics
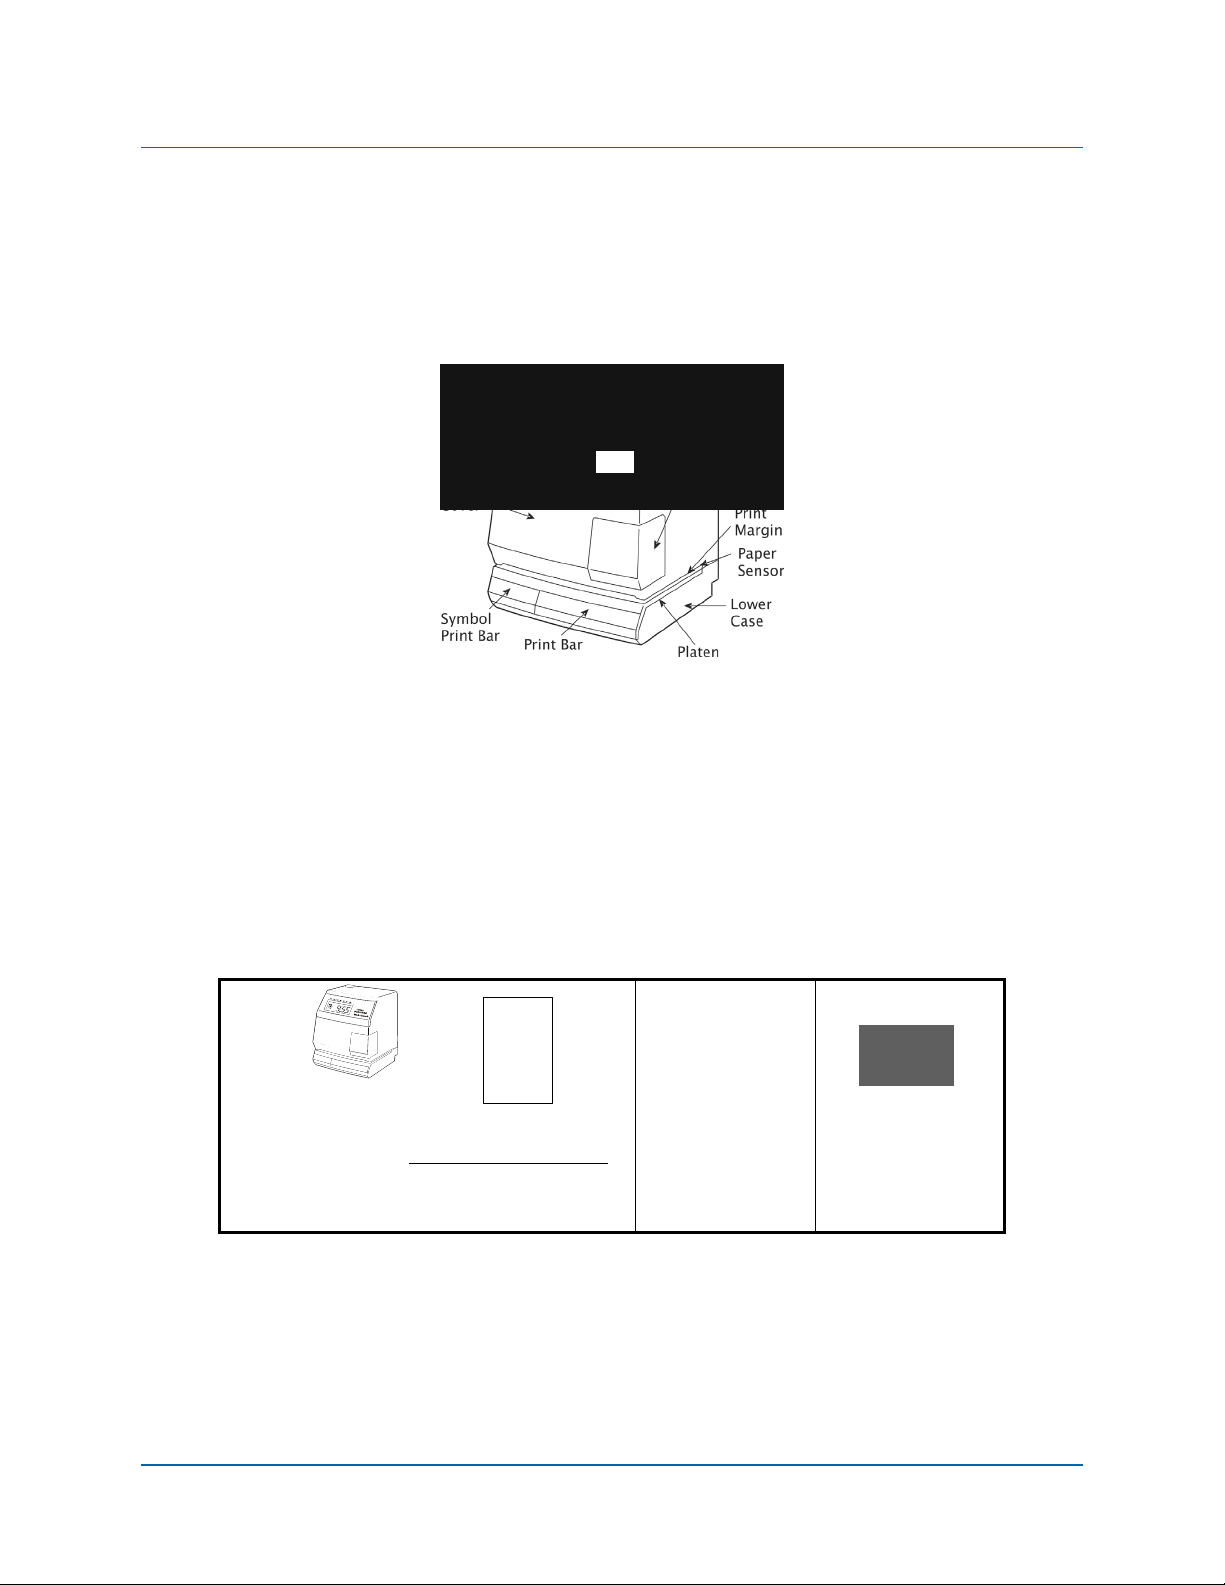
2.1. Auto-Sync Time Clock External View
Figure 2-1. Auto-Sync Time Clock External View.
Chapter 2: Installation
2.2. Components
• 2 Keys (Important!! - Please store these keys in a safe place as you will need
them to remove the cover). One unit with attached AC power adapter [not
included with PoE model] and Ethernet cable.
• An Auto-Sync Utility CD for the clock (copy configuration to clocks, auto
discovery, reports, etc.), which also contains the Installation and Operation
Guide in PDF format. Also, Quick Start Guide (printed).
Auto-Sync Time Clock (1 unit),
Power Adapter (not used with PoE
1 unit), Ethernet Cable, and Quick-
Start Guide
-
Auto-Sync
Utility CD
(1 copy)
Keys (one pair,
2 keys)
2.3. Removing the Cover
Insert and turn the key clockwise to remove the upper cover. Note – the upper
cover must be removed to change the ribbon and access the reset button (see
Chapter 6, How to Replace the Ribbon Cartridge).
724-746-5500 | blackbox.com 2-1
Page 12
Auto-Sync Time Clock
Figure 2-2. Auto-Sync Time Clock Cover Removal.
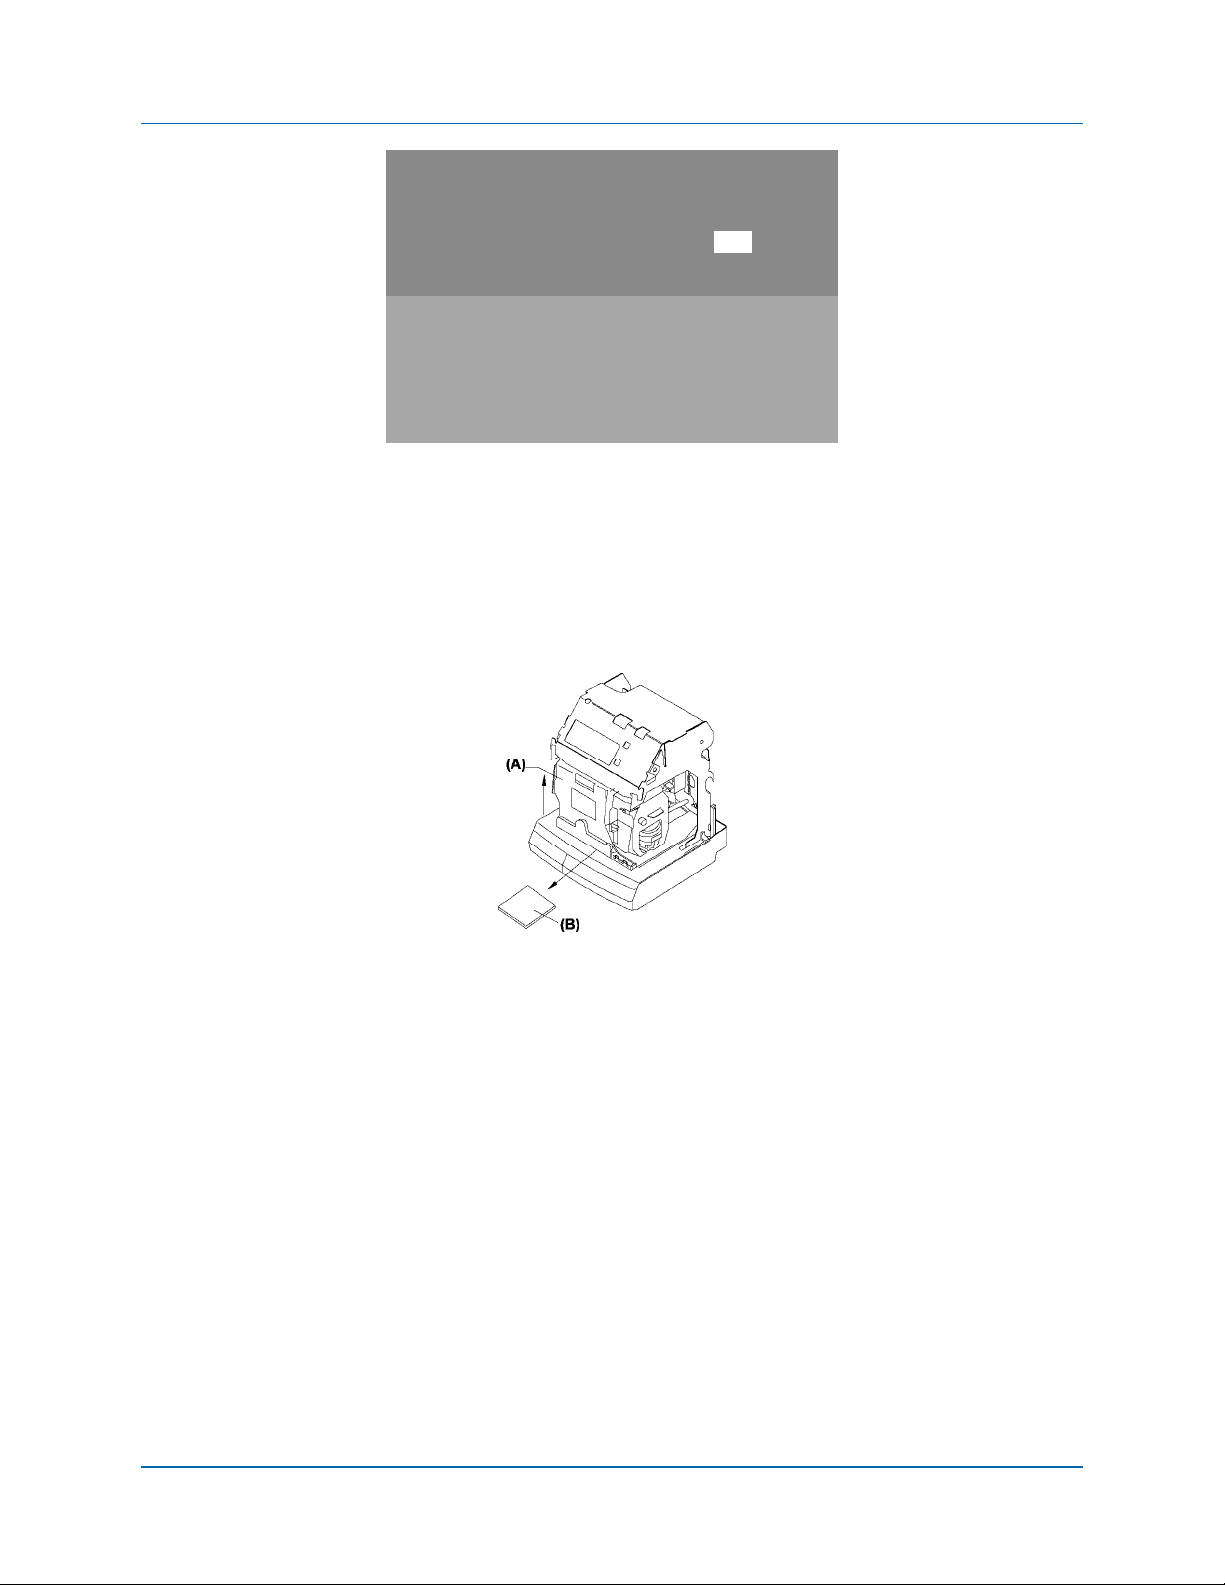
2.4. Unpacking the Clock
After removing the upper cover, lift up the Printer Block (A) and remove the
Packaging Spacer (B).
Figure 2-3. Auto-Sync Time Clock Packaging.
NOTE: The serial number can be found on the bottom of your clock.
2.5. Installing the (ASTCBK) Optional Full Power Reserve (FPR)
1. Disconnect the clock AC adapter from the power outlet.
NOTE: Failure to do so could result in a hazardous shock.
2. Insert the key, turn the key clockwise, and remove the upper cover of the AutoSync Clock (see Figure 2-2).
3. Remove one small Phillips head retaining screw from the right and left front
sides of the top plate (see Figure 2-4).
2-2 724-746-5500 | blackbox.com
Page 13

Chapter 2: Installation
Figure 2-4. Top Plate Removal.
4. Disconnect the Ethernet cable at the RJ-45 network connector (see Figure 2-4).
You DO NOT have to remove the cable from under the wall mounting plate on
the back – just disconnect it at the RJ-45 connector
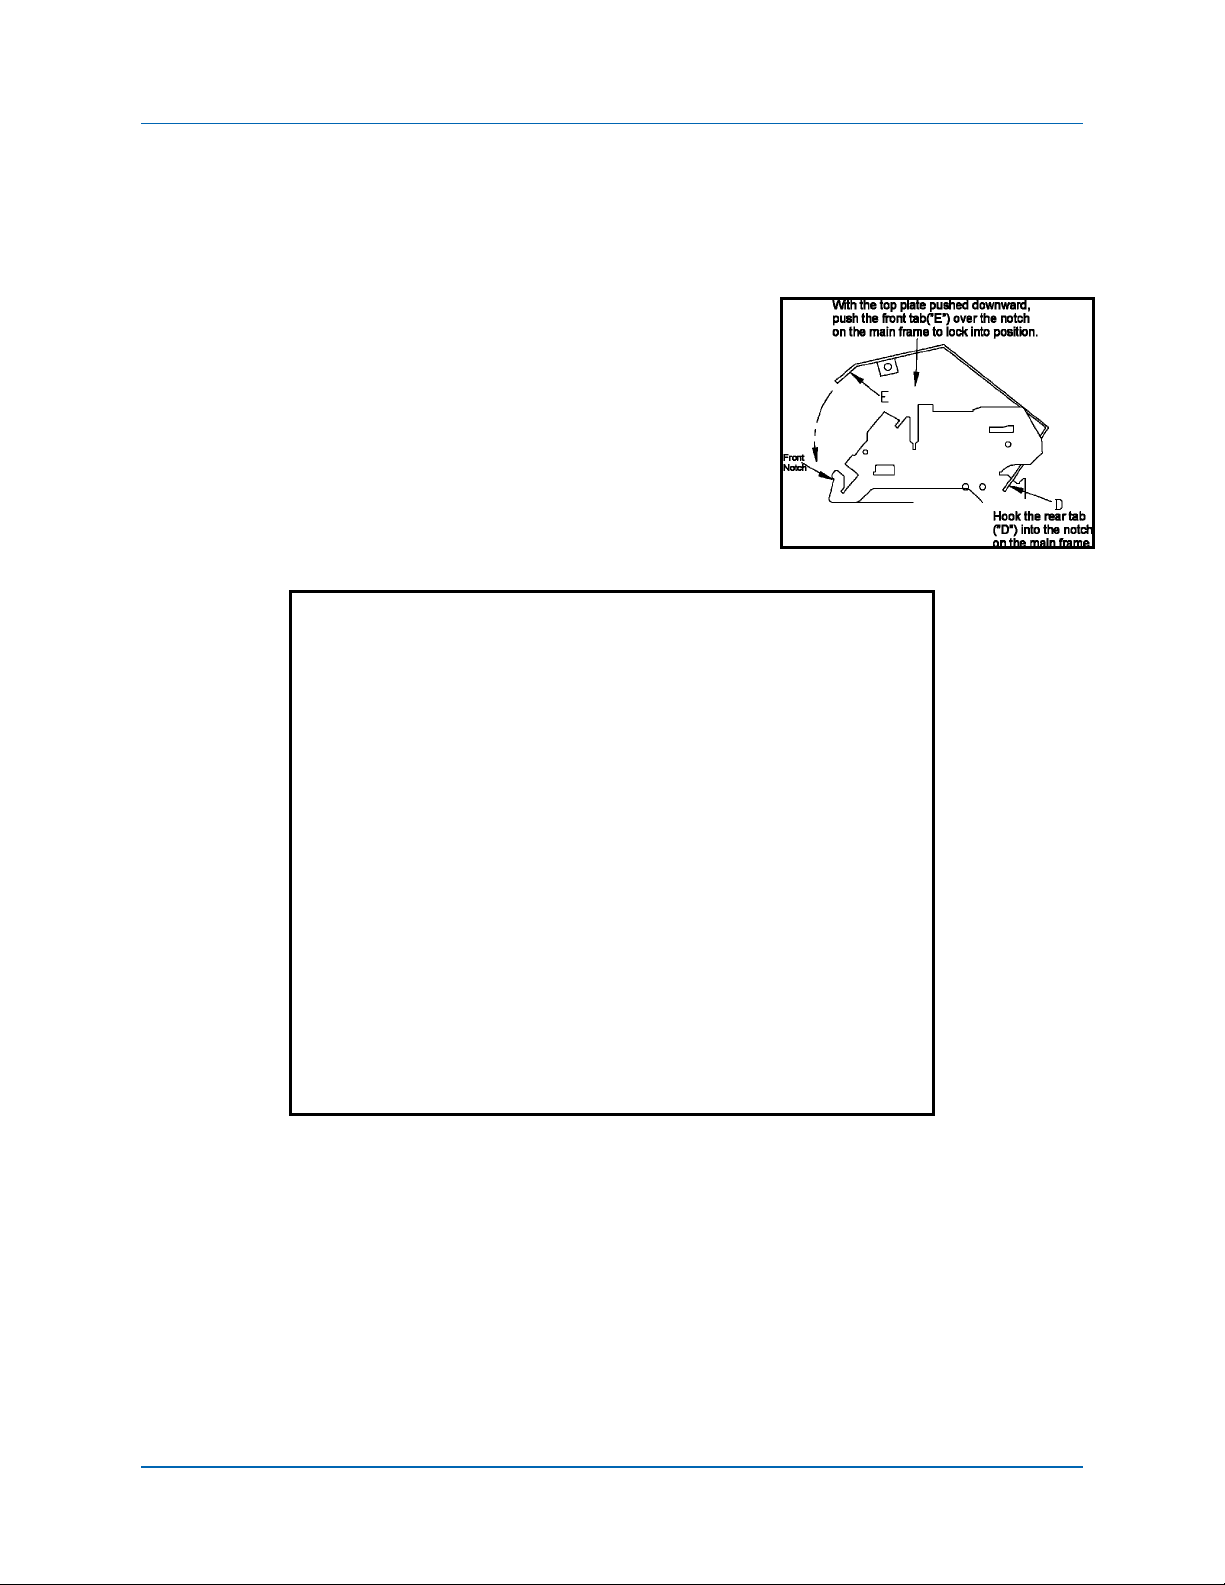
5. Lift up the top plate by pulling up wards and
towards the back of the clock to remove it.
Temporarily set aside. Note the alignment of the
top plate during removal – especially the front and
rear tabs (see figure to the right).
6. Carefully lift the front PCB up and out of its
retaining slot (see Figure 2-6). This is the PCB with
the coin battery on it. Just lift the PCB up enough
to provide adequate clearance for the FPR
mounting bracket to be inserted into its side
retaining slots on the right and left sides of the
main clock frame (see Figure 2-6).
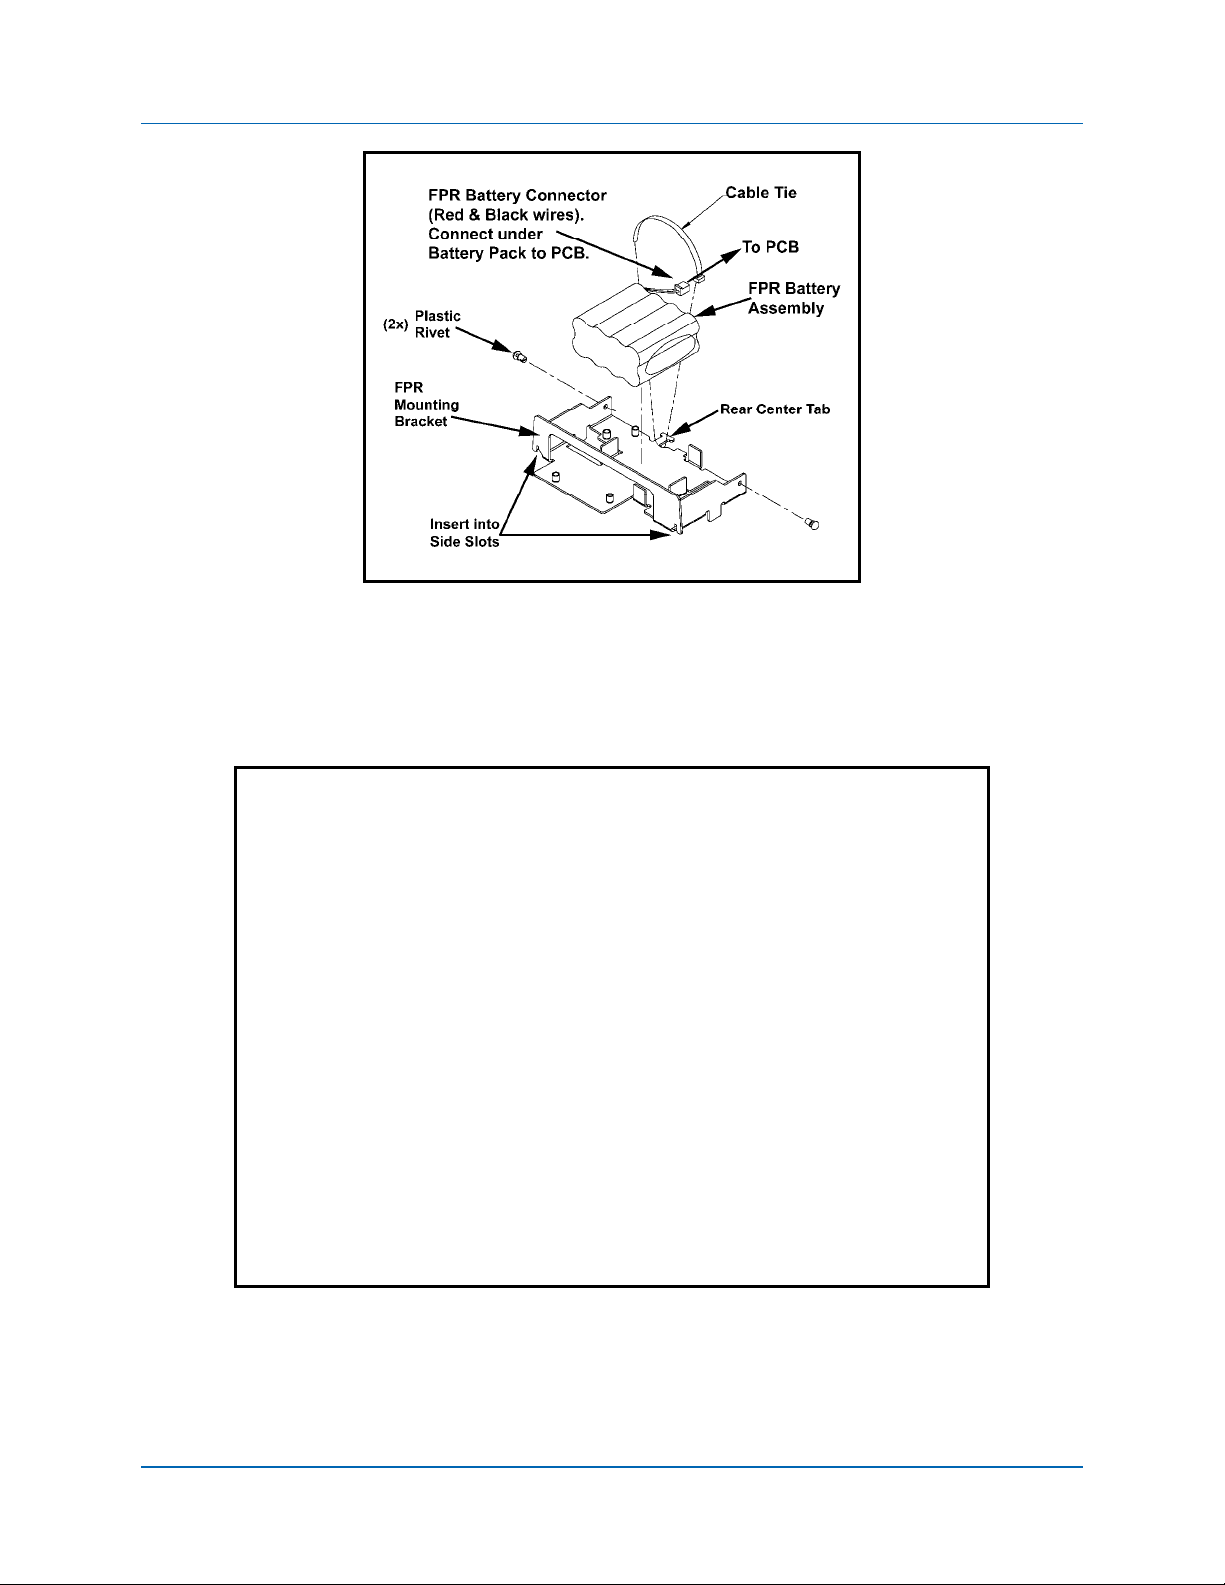
7. Carefully insert the FPR mounting bracket with the
FPR battery pack (see Figure 2-5). It will fit only
one way as it must slip over the rectangular shaped
network connector (see Figure 2-7).
.
724-746-5500 | blackbox.com 2-3
Page 14
Auto-Sync Time Clock
Figure 2-5. FPR & Mounting Bracket.
8. After the FPR mounting bracket is in its proper position, return the front PCB to
its original position seated in its retaining slot. In this position the top rear of the
PCB will fit close alongsi de the FPR mounting bracket (see Figure 2-6).
Figure 2-6. Front PCB & FPR Mounting Bracket in Position.
9. Install the two plastic rivets (1 per each side) as illustrated in Figure 2-7 through
the side of the clock frame into the proper locating hole in the FPR mounting
bracket (see Figure 2-5).
2-4 724-746-5500 | blackbox.com
Page 15
Chapter 2: Installation
Insert
Plastic
Rivet
Insert
Plastic
Rivet
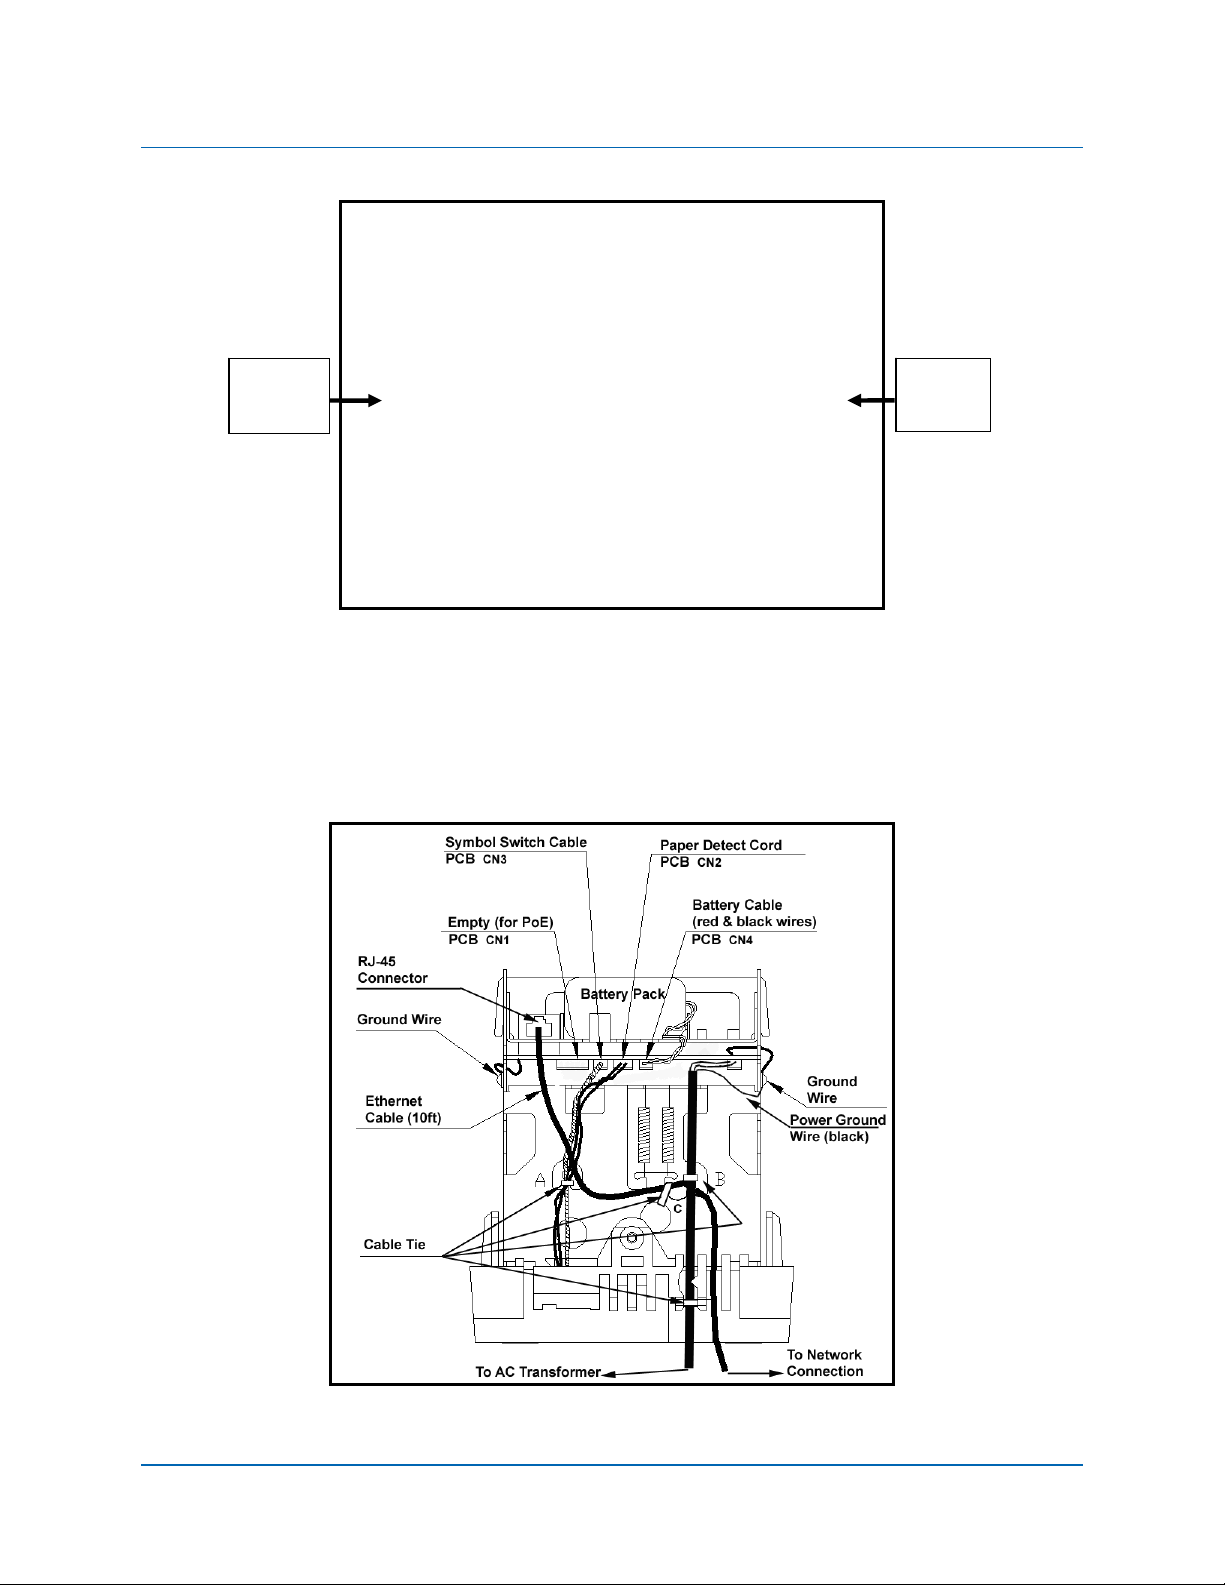
Figure 2-7. Auto-Sync Time Clock Rear View.
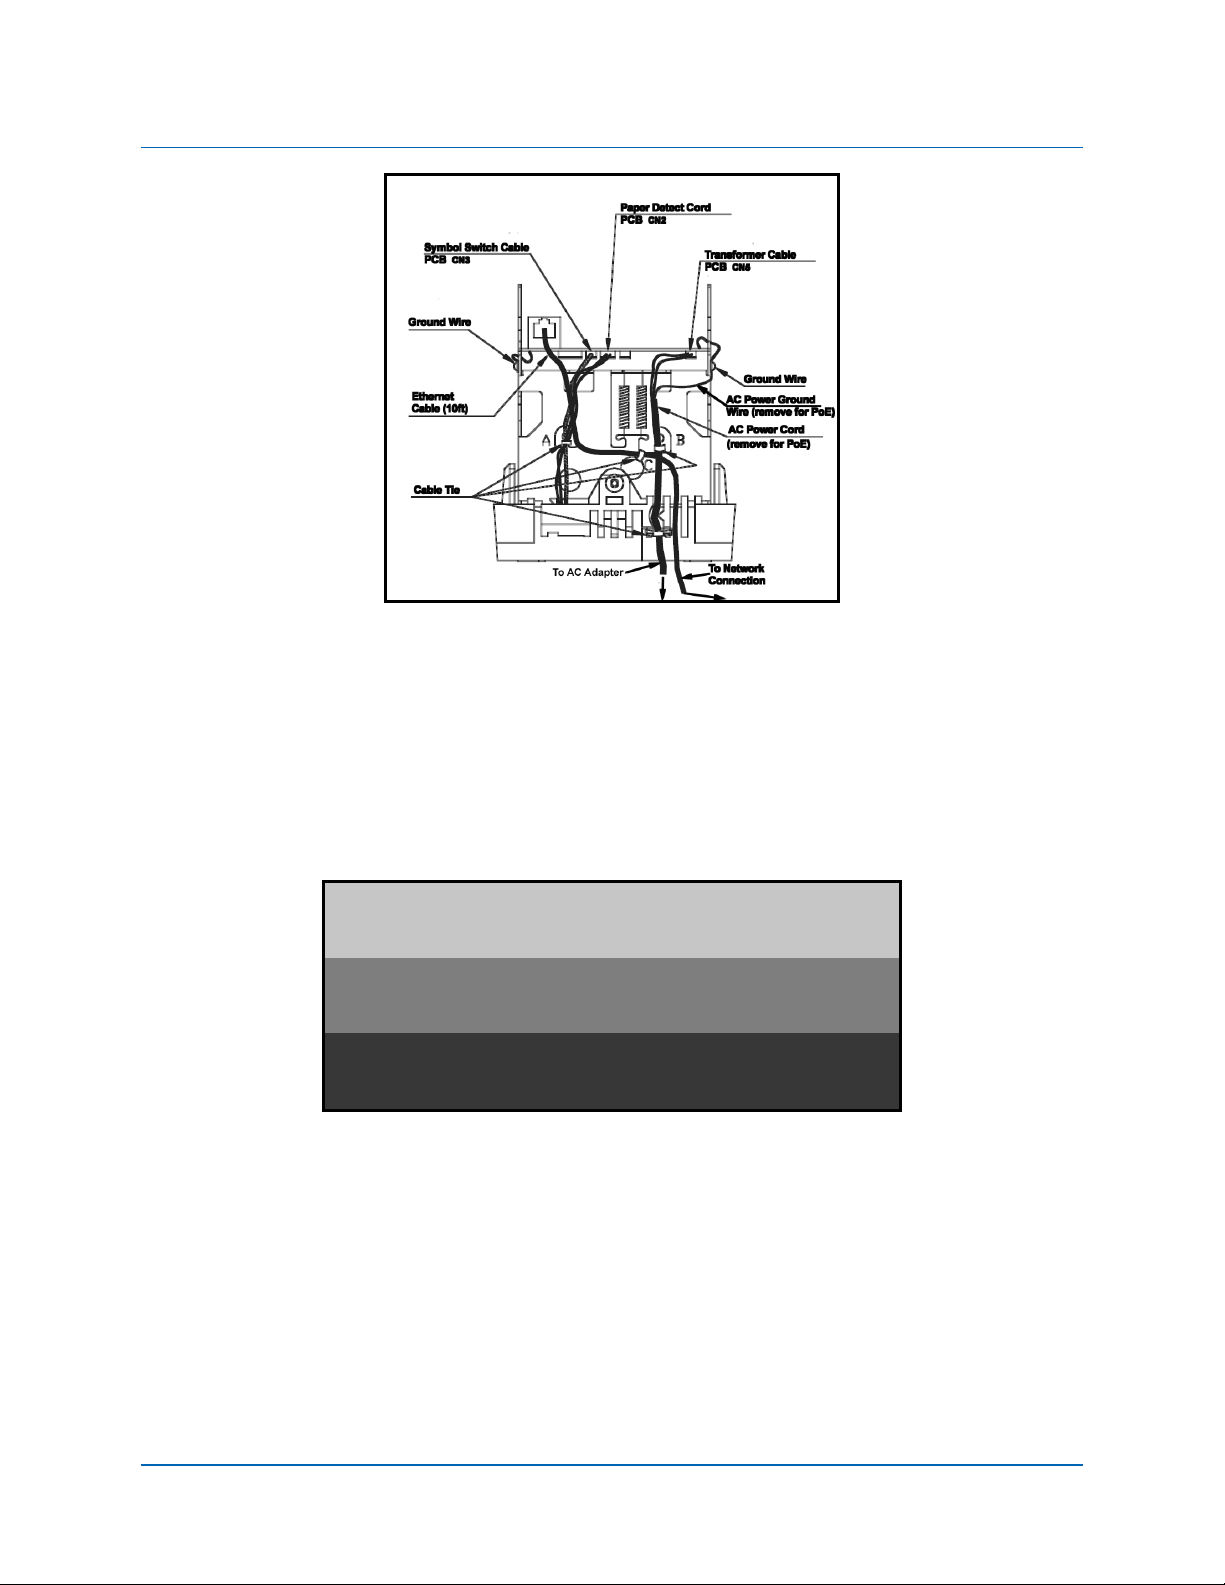
10. With the FPR battery pack in the holder alongside the network RJ-45
connector, plug in the FPR battery cable (the connector with the black and red
wires) into the open brown connector (see Figure 2-7) located just under the
battery pack on the PCB at CN4.
Figure 2-8. Rear View Showing Cable/Connector Location.
724-746-5500 | blackbox.com 2-5
Page 16
Auto-Sync Time Clock
NOTE: For units with the FPR option, disconnect the FPR battery pack cable
connector if the Auto-Sync Time Clock will not be plugged into AC power for
an extended amount of time. Leaving the battery pack connected without
charging for a long time could promote battery harm and damage to the
clock.
11. Carefully reinstall the top plate by fir st inserting
the rear tabs into the appropriate rear notches,
making sure the rear centering tab is in its notch.
Then push the plate forward (see right-hand
figure) while properly aligning the top plate sides
and front. Finally push the top plate downward to
lock it firmly into position with the front tabs (see
Figure 2-9).
Figure 2-9. Top Plate Installed.
12. Insert the Ethernet connector through the hole in the rear of the top plate into
the RJ-45 network connector (previously disconnected in Step 4).
13. Insert and tighten the two (2) side retaining screws (one on right and left front
sides) for the top plate (see Figure 2-9).
14. Replace the upper co ver of the Auto-Sync Time Clock (see Figure 2-2).
15. Connect the clock Ethernet cable to a network connection and plug the AC
power transformer into a wall socket.
2-6 724-746-5500 | blackbox.com
Page 17

Chapter 2: Installation
NOTE: After installing the FPR and connecting the unit to AC power for the first
time, allow it to charge the battery pack for 24 hours before printing.
Failure to do so may result in reduced battery life. When using the optional
FPR - keep the clock plugged into an AC power source during normal
operation to maintain an adequate charge. The power reserve battery is
designed to be used only during limited power outages, not as a power
source during normal operation. The FPR can maintain normal operation for
up to 6 hours or 400 print stamps.
2.6. Installing the (ASTCPOEK) Optional PoE with FPR
If your Auto-Sync Time Clock came equipped with the PoE option skip to Step 17.
1. Disconnect the clock AC adapter from power outlet.
NOTE: Failure to do so could result in a hazardous shock.
2. Insert the key, turn the key clockwise, and remove the upper cover of the AutoSync Time Clock (see Figure 2-2).
3. Remove one small Phillips head retaining screw from the right and left front
sides of the top plate (see Figure 2-9).
4. Disconnect the Ethernet cable at the RJ-45 network connector (see Figure 2-4).
5. Lift up the top plate by pulling upwards and towards the back of the clock to
remove it (see Figure 2-4) and temporarily set aside. Note the alignment of the
top plate during removal – especially the front and rear tabs.
6. Carefully lift the front PCB up and out of its retaining slot. This is the PCB with
the coin battery on it. Just lift the PCB up enough to provide adequate clearance
for the PoE/FPR mounting bracket (see Figure 2-11) to be inserted into its
retaining slot.
7. Carefully insert the PoE/FPR mounting bracket (see Figure 2-10). It will fit only
one way as it must slide over the rectangular shaped RJ-45 network connector
(see Figure 2-7). Also, ensure that the mounting frame fits properly in the side
slots (see Figure 2-11).
724-746-5500 | blackbox.com 2-7
Page 18

Auto-Sync Time Clock
Figure 2-10. PoE/FPR & Mounting Bracket.
8. Install the two plastic rivets (1 per each side) through the main clock frame into
the locating holes as illustrated in Figure 2-10 to help align and secure the
mounting bracket.
Figure 2-11. Front PCB & Mounting Bracket.
9. Remove the rear wall mounting plate (see Wall Mounting). Disconnect the AC
power connector from the PCB (red & white wires – see Figure 2-12).
2-8 724-746-5500 | blackbox.com
Page 19
Chapter 2: Installation
Figure 2-12. Rear View Showing AC Power Line For Removal.
10. Unscrew the Phillips head screw and remove the black ground wire for the AC
line (see Figure 2-12). Remove the AC power line from the back of the clock
with the transformer at the end. You may have to cut a couple of plastic wire
ties to do this.
11. Reinstall the wall mounting plate (see figure below) on the back of the clock
using caution to verify that the Ethernet cable is properly routed.
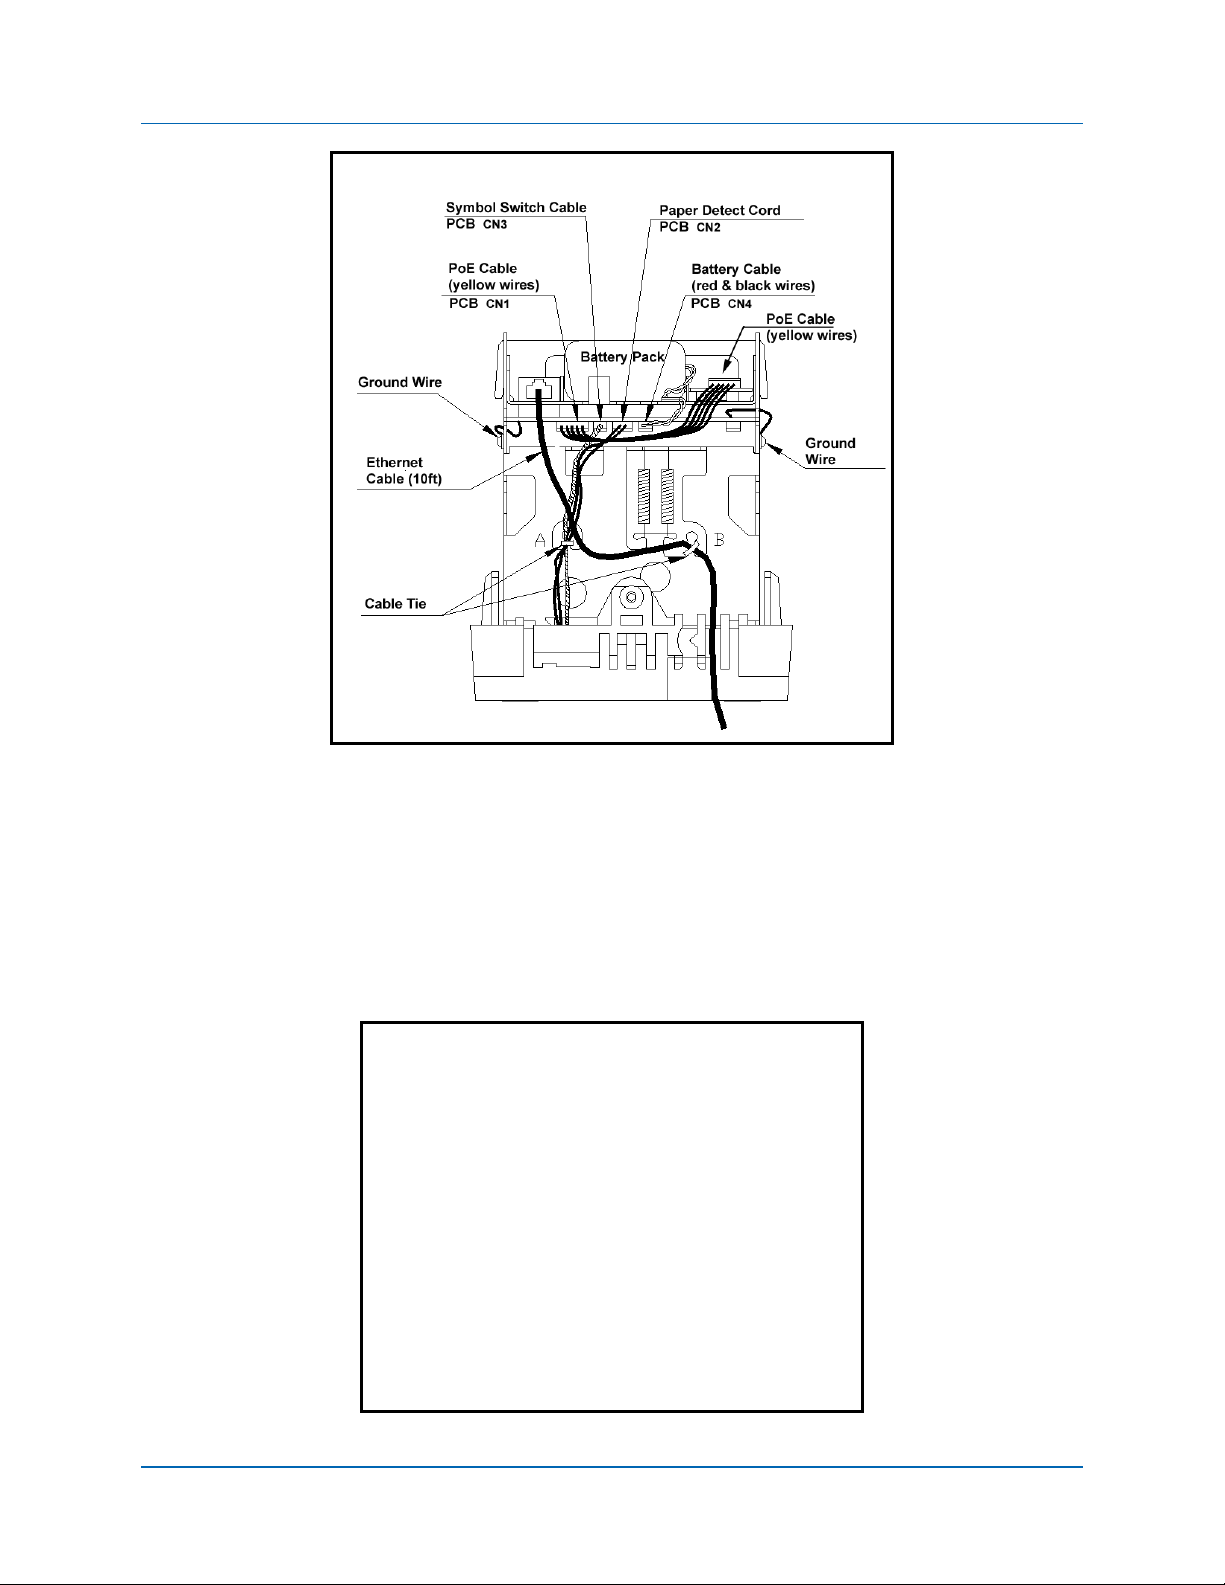
12. Plug in the FPR battery pack cable (the connector with the black and red wires)
into the small open connector (see Figure 2-13) located just under the battery
pack on the PCB. Next, plug in the PoE connector to the left of the FPR
connector for the PoE cable (yellow wires). It is keyed and can only fit into the
connector one way. The connection for the PoE cable has a 5-pin connector on
the main PCB and a 5-pin connector at the PoE PCB. Both connector ends are
keyed (can only fit in one way). You may have to temporarily remove the
connector on the PoE PCB to install the top plate.
724-746-5500 | blackbox.com 2-9
Page 20
Auto-Sync Time Clock
Figure 2-13. Rear View Showing PoE & FPR Cables/Connections.
13. Carefully reinstall the top plate by first inserting the rear tabs into the
appropriate rear notches, making sure the rear centering tab is located in its
notch. Then push the plate forward making sure to align the sides and front of
the plate in the proper position. Finally push the plate downward to lock into
position.
14. Insert the Ethernet connector through the hole in the rear of the top plate into
the RJ-45 network connector (previously disconnected in Step 4).
Figure 2-14. PoE & FPR Connectors.
2-10 724-746-5500 | blackbox.com
Page 21

Chapter 2: Installation
15. Insert and tighten the two (2) top plate side retaining screws (one on each
side).
16. Replace the upper co ver of the Auto-Sync Time Clock (see Figure 2-2).
17. Connect the clock Ethernet cable to a network connection (AC power no longer
required when equipped with the PoE option).
NOTE: After installing the PoE with FPR and connecting the unit to a network
connection for the first time, the PoE may require up to 24 hours to fully
charge the battery pack, but the unit can be immediately used. You must
keep the clock plugged into the network during normal operation to
maintain a continuous charge. The power reserve battery is designed to
provide additional power for printing during normal operation.
NOTE: For units with the PoE/FPR option, disconnect the FPR battery pack cable
connector if the Auto-Sync Time Clock will not be plugged into a PoE
terminal for an extended amount of time. Leaving the battery pack
connected without charging for a long time could promote battery harm and
damage to the clock.
NOTE: For units with the PoE/FPR option, leaving the Auto-Sync Time Clock
unplugged from a PoE terminal or without power for more than 24 hours
may create a problem with the clock starting up (you will see “low bat”
briefly appear in the display). In this instance, the clock should be started
with the battery pack cable disconnected and the clock plugged into a PoE
terminal. Wait until the clock starts up, or displays the time, then the
battery pack cable can be reconnected and it will charge. During this time,
it is recommended to wait for 24 hours before printing.
2.7. Normal Startup Sequence
During power up, the clock will flash “boot”, then sequentially display the IP
address twice, and complete the startup sequence with a display of the time
(Hours:Minutes:Seconds) with a flashing colon. IMPORTANT - if the clock cannot
make a network connection it will flash 0.0.0.0 for the IP Address. If this happens
please verify that the clock is connected to the network!
Normally, within a minute or two after the clock has been connected to a network
and plugged in, the clock will connect to a time server and perform a Startup Time
Sync. The correct time will appear in the display after a successful time sync. If the
clock CANNOT perform a successful STARTUP SYNC, six day indicators (cursors) will
flash, while the day indicator associated with the current day of the week will not
flash.
Figure 2-15. Startup Display Sequence.
724-746-5500 | blackbox.com 2-11
Page 22

Auto-Sync Time Clock
NOTE: Plugging the AC power cord into a wall socket will cause the printer carriage
to move up. When AC power is not connected properly or the PoE is not
functioning, the colon will not flash (see Error Messages in Chapter 6).
2.8. Wall Mounting
The following procedure is recommended for wall mounting:
1. With the cover removed, the wall mount plate can be
removed by using your index finger as shown to pry open the
bottom portion (see arrow 1). Slide the wall mount plate
down in the direction of arrow 2. Use caution not to disrupt
the power and Ethernet cables on the back when removing
the wall mount plate.
2. Knock out the three holes in the
mounting plate.
3. Mount the plate on the wall using three #10
screws or equivalent.
4. Align the Auto-Sync Time Clock with the hooks on the mounting plate. Press
down and toward the wall until a "CLICK" is heard. Replace the cover, lock it and
remove the key. Your Auto-Sync Time Clock is now wall mounted.
NOTE: Be sure to wall mount your Auto-Sync Time Clock within 6ft of an 110V
power source and an Ethernet connection (AC power is not required if
equipped with PoE option).
2.9. Printing
2.9.1. The First Printout
Please verify the following before attempting to print:
1. Is all the packaging material removed from inside the clock?
2. Is the FPR battery connected? (optional)
3. Is the cover securely on the clock?
2-12 724-746-5500 | blackbox.com
Page 23

Chapter 2: Installation
4. Is the Auto-Sync Time Clock connected to a network connection (Ethernet RJ-
45)? This step is not required to perform a test printout when first installing the
Auto-Sync Time Clock.
5. Is the Auto-Sync Time Clock plugged into an AC wall outlet? (skip this step if
equipped with optional PoE).
Once you have verified these items, insert a sheet of paper to make a test
print. As shipped from the factory, the Auto-Sync Time Clock will print with the
following FINRA (Financial Industry Regulatory Authority) format on line 1:
YYYY/MM/DD hh:mm ss
Four digit Year
Sample = 2008/07/08 18:30 15s
Figure 2-16. Sample of Default FINRA Print Style for Line 1.
The default for line 2 is the last 9 digits of the clock’s IP address followed by the
last 6 digits of the MAC address. If the default print format for Line 1 & 2 is
acceptable, the print style does not have to be changed! If the print style has to
be changed, please refer to How to Set the Print Options in Chapter 4.
Two digit Date
Two digit Month
24 Hour:Minutes
Seconds
s
Seconds
Indicator
NOTE: As shipped from the factory the clock will have the date and time in it.
However, until the clock performs it’s Start Up Time Sync with a Time
Server on initial power up, the date and time may not be accurate.
6. If the clock fails to sync during the Startup Sync it will print a block ( ) instead
of an “s” at the end of a print line to indicate that this failed time sync condition
has occurred (see the following example).
Print Example = 2008/07/08 18:30 15█
Seconds must be selected to be printed for this error message to be seen. Seconds
= default setting.
2.9.2. Acceptable Print Media
Print Media is defined as the type of material you will be using in the machine to
time stamp (time cards, documents, etc.). To avoid damaging the print head, it is
recommended that you do not exceed a media thickness of 0.3 mm (0.01"). The
following are general specifications for the different media dimensions.
Time Card: Time card thickness less than or equal to 0.3 mm (0.01").
Small Ticket: Tickets, slips, receipts or other validation media should be no
smaller than 100 mm (4”) long x 60 mm (2.25") wide.
Larger Paper: When using standard paper sizes, such as 8.5" x 11", make sure
the paper is heavy enough to push the Paper Sensor. If the weight of the paper
(thickness) is too light, the paper will curl up and tear off inside the Auto-Sync
Time Clock. This may result in jams or damage to the clock.
724-746-5500 | blackbox.com 2-13
Page 24

Auto-Sync Time Clock
Carbon Paper: The Auto-Sync Time Clock will print on both carbon and
carbonless paper. The imprint will print through up to six copies, depending on
the quality of the document used. Carbon and carbonless paper deteriorates
over time. Humidity, high temperatures and sunlight accelerate this process. For
maximum print performance, use only high grade, uncontaminated carbon or
carbonless paper.
2.9.3. Adjusting the Print Margin
If you wish to change the default margin adjustment, locate the Margin Selector
on the bottom of the machine and slide in the direction of the arrows to adjust the
print margin (see Figure 2-17).
This selector will move the Paper Sensor forward or backward on the Printer
Platen and determine how much of a margin there is between the imprint and the
edge of the print media. The margin can be adjusted to a maximum of 30 mm
(1.2").
Figure 2-17. Auto-Sync Time Clock Printer Adjustment.
2.9.4. Available Print Methods
There are three different Print Methods available. The default Print Method is for
Paper Detect Only (P.). If you wish to change the default Print Method, locate the
Print Method Selector on the bottom of the machine (see Figure 2-17) and move
it to the desired position.
The settings are:
2-14 724-746-5500 | blackbox.com
Page 25

Chapter 2: Installation
P. - Paper Detect Only: This setting will disable the Print Bar and
automatically print when media is inserted into the Auto-Sync Time Clock and
contacts the print margin (Paper Sensor). For this method, you must set a
desired print margin using the Margin Selector.
S.P. - Paper Detect & Print Switch: This Print Method is for manual printing
when the alignment of the imprint on your document is critical. For this method,
you must set a desired print margin using the Margin Selector. To print, insert
media into the Auto-Sync Time Clock until it contacts the print margin, and
press the Print Bar.
S. - Print Switch Only: This setting will allow you to print manually regardless
of print margin setting by inserting media into the Auto-Sync Time Clock and
pressing the Print Bar.
NOTE: Printing when no media is present may cause damage to the print head.
2.10. Front Panel Reset Button
The front panel (see Figure 2-18) reset button can be accessed by removing the
upper cover (see Figure 2-2).
Figure 2-18. Auto-Sync Time Clock Front Panel.
724-746-5500 | blackbox.com 2-15
Page 26

Auto-Sync Time Clock
2.11. Specifications
Power Requirements: 120 VAC ±10%, 60 Hz
100 and 230 VAC ±10%, 50/60 Hz
Power Consumption: Normal 4.5W, Maximum 25W.
Power Failure Memory
Protection: Built-in lithium coin battery (up to 12 months).
Communication: 10/100 BaseT (auto-sensing), RJ45 connection.
Ambient Conditions: Temperature: -10°C to 45°C (14°F to 113°F)
FPR Option: 0°C to 45°C (32°F to 113°F)
Humidity: 10% to 90% (non condensing).
Dimensions: 176 mm (6.9”) High X 150 mm (5.9”) Wide X 153
mm (6.0”) Deep.
Weight: 2.3 kg (5 lbs.).
Environment: Indoor use only, which is dust free, and not in
direct sunlight.
Standards Compliance: UL
Clock Configuration: Access through a built-in Web interface.
Print format: Print format selection through built-in Web
interface.
Factory Default Print
Style: Default print format = year/month/day
hour:minute:seconds, with the year printed as a 4-
digit number. Can be changed via the Web
interface.
Dual Auto Print
Feature: This feature provides the automatic printing of a
second programmed print style, without having to
push the auxiliary Symbol Print Bar.
Browser Requirements: Windows Internet Explorer 6 or 7, Safari® 3,
Firefox® 2 (not compatible with Bonjour).
2-16 724-746-5500 | blackbox.com
Page 27

Chapter 2: Installation
Options
Full Power Reserve (FPR): Optional, 9.6V, 700mAh NiCad rechargeable
battery. When fully charged, it will maintain normal
operations for 6 hours or 400 prints.
Power over Ethernet (PoE): Optional, and includes 9.6V, 700mAh NiCad
rechargeable battery.
48V in, 13.5V out
2.12. Power over Ethernet Overview
With the PoE Option for Auto-Sync Time Clock:
Power-over-Ethernet (PoE) is a network standard based on IEEE 802.3af that
provides a means of delivering power to devices connected to a LAN. This
technology eliminates AC electrical wiring, wall transformers, allows centralized UPS
backup, and is compatible with both powered and non-powered Ethernet devices.
In addition to providing time synchronization and control over Ethernet, a PoE
enabled Ethernet cable can provide power to the Auto-Sync Time Clock. This allows
greater flexibility for placing clocks and, in most cases, significantly decreases
installation costs. The Auto-Sync Time Clocks utilize the spare wires from the Cat 5
Ethernet cable to provide power over Ethernet. The Auto-Sync Time Clocks will
work with older non-standard and passive power sources, and newer auto-sensing
PoE switches and mid-span power injectors. Power-over-Ethernet begins with an
Ethernet power source such as a PoE compatible switch or a mid-span power
"injector". These devices insert power onto the Ethernet cable. The power source is
typically installed in the "wiring closet" near the Ethernet switch or hub.
The Auto-Sync Time Clocks may be ordered as PoE compatible, or converted at a
later time by adding the PoE option kit. PoE is able to supply a maximum of about
15 watts of power over the Ethernet cable.
724-746-5500 | blackbox.com 2-17
Page 28

Auto-Sync Time Clock
This page intentionally left blank.
2-18 724-746-5500 | blackbox.com
Page 29

Chapter 3: Quick-Start
3. Getting Started
The following prerequisites are recommended:
Ethernet connection to connect the clock to for time sync and configuration.
AC power (Auto-Sync Time Clock comes with 6 foot long cable attached to
power adapter if not equipped with the PoE option).
A web browser for configuring the Auto-Sync Time Clock.
It is recommended to install the Utility CD that was included to discover the
clock and connect to the web login.
Bonjour (formerly Rendezvous) plug-in installed in Internet Explorer browser for
discovering the clock. If not installed you can go to
http://www.apple.com/bonjour/
Windows.
3.1. Connecting to the Auto-Sync Time Clock using Zeroconf
1. Start your Web browser and from:
Internet Explorer (IE) with Bonjour plug-in:
Start IE browser and select from the View menu Explorer Bar Bonjour.
Double-click on the desired Auto-Sync Time Clock from the list of discovered
Bonjour devices on the left-hand side to connect for login (see Figure 3-1).
Located
clocks
to download and install, or Safari browser for
Figure 3-1. Using IE with Bonjour to Find Auto-Sync Time Clock.
NOTE: Bonjour may have to be downloaded and installed into IE as a plug-in.
Safari® with Bonjour:
Start Safari browser and select the Bookmarks menu Show All
Bookmarks. Double-click on the desired Auto-Sync Time Clock from the list of
discovered Bonjour devices (see Figure 3-2).
724-746-5500 | blackbox.com 3-1
Page 30

Auto-Sync Time Clock
Figure 3-2. Using Safari with Bonjour to Find Auto-Sync Time Clock.
Firefox without Bonjour:
Use the Auto-Sync Utility which is discussed in detail in Chapter 5 to discover
and connect to the clock. If Firefox is your default browser it can be used with
the utility to configure the clock. (see next paragraph).
Or it is recommended to:
Install and start the Auto-Sync Utility on the CD that came with your clock.
When the Utility opens it will automatically perform a network search
(Discovery) for Auto-Sync Time Clocks.
All of the discovered Auto-Sync Time Clocks will be displayed in a list with their
Domain, Device Name, IP Address, MAC Address, and Status (see Figure 3-3).
Go to View Clock Firmware version Show Version to see the clock
firmware version.
Figure 3-3. Auto-Sync Utility Auto Discovery.
2. Double-click on a clock from the list and your browser will open to the web login
screen for that clock. See the following Auto-Sync Time Clock Login example.
3-2 724-746-5500 | blackbox.com
Page 31

Chapter 3: Quick-Start
Figure 3-4. Auto-Sync Time Clock Login Screen.
NOTE: The Auto-Sync default Clock Name will be auto-sync_ and the clocks MAC
address (i.e., auto-sync_00:00:00:00:00:00).
In computer networking, a Media Access Control address (MAC address),
Ethernet Hardware Address (EHA), hardware address, adapter address or
physical address is a quasi-unique identifier assigned to most network
adapters or network interface cards (NICs) by the manufacturer for
identification. The MAC address usually encodes the manufacturer's
registered identification number.
3. If this is your first time logging into the clock enter
Username = Admin
Password = password
If this is not your first time logging into the clock, enter your case-sensitive
Username (maximum = 20 characters) and your Password (maximum = 15
characters), then click on the Login button and the Auto-Sync Time Clock
Information page will appear (see Figure 3-5). ONLY 1 user can be logged into
a clock.
NOTE: If you do not perform any activity with the clock via your browser for more
than 5 minutes, your web connection will timeout with the clock. You will
have to login again.
Link
Navigation
Menu
Figure 3-5. Auto-Sync Time Clock Homepage.
724-746-5500 | blackbox.com 3-3
Page 32

Auto-Sync Time Clock
NOTE: If this is not your first time connecting to this Auto-Sync Time Clock and a
“Favorites” bookmark was created in your Web browser, select it from the
Favorites/Bookmarks menu, and the Auto-Sync Time Clock Login page will
be displayed. In this instance you will NOT have to Bonjour the clock as its
location has already been discovered and saved!
3.2. First Time Set up of the Auto-Sync Time Clock
NOTE: The Auto-Sync Time Clock configuration parameters can be customized at
any time and do not have to be done in the following order. It is
recommended to set up these parameters to obtain the full potential from
you clock.
1. Log into the Auto-Sync Time Clock (see Figure 3-4) and Click on the Settings
link under Users
a new user with a unique Username and Password and store this information in
, and the Users List screen will appear (see Figure 4-2). Create
a secure place. Click on the
button to save the new username and/or
password in the clock’s flash memory.
Look – Skip Step 1 if a new User is not desired.
2. Click on the Information link under Clock
, and the Clock Information will
appear (see Figure 3-5). It is recommended to change the name to suit your
nomenclature (default name = auto-sync_MAC). See Figure 3-4 for an example
of a default clock name.
NOTE: The acceptable characters for clock name are ‘a-z’ upper & lowercase, ‘0-
9’, (-) dash, (_) underscore, and (*) asterisk. Uppercase letters will
automatically be changed to lowercase.
Enter a unique clock description that might, for example, describe where the
clock is located. All other fields on this screen are read only. Click on the
button to save your custom clock name and description.
Look – Skip Step 2 if the default clock name and no description are acceptable.
3. Click on the Settings link under Clock
, and the Clock Settings screen for
general settings will appear (see Figure 4-4). Select the appropriate Time Zone
from the dropdown menu, select 12 hour (AM/PM) or 24 hour (Military = default
setting) for the display and transaction format. Select if seconds or date will be
displayed. Check whether or not daylight savings should be applied. Enter the
Start and End DST dates/times if DST applied. Click on the
button to save
custom general clock settings.
Look – Skip Step 3 if the default clock settings are acceptable.
4. Click on the General Settings link under Print
, and the Print General
Settings screen will appear (see Figure 4-6) to setup: minute format, Dual Print
(On/Off), Dual Print Timeout (0-60 seconds), Pr int leading Zero (On/Off), Print
Direction (L/R), and Auto Numbering. Click on the
button to save general
print options settings.
3-4 724-746-5500 | blackbox.com
Page 33

Chapter 3: Quick-Start
Look – Skip Step 4 if the default general print options are acceptable.
5. To define custom print out, click on the Print Lines 1 & 2 link under Print
the Print Lines 1 & 2 screen will appear (see Figure 4-10). Click on the
and
button to save custom Print Lines 1 and/or 2 in the clock flash memory.
Look – Skip Step 6 if the default NASDAQ prin t for Line 1 and the clock
IP/MAC address for Line 2 is acceptable.
The following is an example of default print set up for line 1:
YYYY/MM/DD hh:mm ss
Four digit Year
Two digit Date
Two digit Month
24 Hour:Minutes
Seconds
s
Seconds
Indicator
Line 1 Print Sample = 2008/07/08 18:30 15s
6. To define custom Time Synchronization, click on the Settings link under Time
Sync, and the Time Sync Settings screen will appear (see Figure 4-11). Click
on the
Look – Skip Step 6 if the default time sync settings are acceptable.
button to save custom Time Sync settings.
7. To define custom Time Servers and/or order of use, click on the Time Servers
link under Time Sync
, and the Time Server List screen will appear (see Figure
4-12). The Auto-Sync Time Clock provides 18 default Stratum 1 NTP ser ver s for
the user. Click on the
or buttons to add or customize Time Server
Settings. Any added time server will appear at the top of the list.
Look – Skip Step 7 if the default time servers are acceptable.
8. From the Time Server List, highlight the desired time server in the list, and click
on the
or buttons to change the time server order for use.
Any new custom time server will appear at the top of the list ahead of the
defaults. NOTE: Click the “Test Time Sync” button to check the connection with
a Time Server. A good procedure to verify settings, etc
Look – Skip Step 8 if the default time server order is acceptable.
9. To define custom DNS Servers, click on the DNS Servers link under Time Sync
;
the DNS Server Settings screen will appear to display the four (4) default
public DNS servers (see Figure 4-14). If necessary, enter new DNS Server
information. Click on the
Look – Skip Step 9 if the default DNS server settings are acceptable.
button to save custom DNS Time Server settings.
724-746-5500 | blackbox.com 3-5
Page 34

Auto-Sync Time Clock
10. To define e-mail notification for Backup, Report, and/or Time Sync
transactions, (i.e., a clock failure to synchronize with a specific time server),
click on the E-mail link under Notification
, and the E-Mail Settings screen will
appear with the SMTP tab (see Figure 4-15). Click on the
e-mail settings.
Look – Skip Step 10 if notification of clock transactions is not required.
11. To define Simple Network Management Protocol (SNMP) Traps which notify a
network administrator of significant events via SNMP messages, click on the
SNMP Trap link under Notification
appear (see Figure 4-19). Click on the
Look – Skip Step 11 if SNMP Traps are not required. The method of
SNMP trap notification, i.e., instant messaging, is completely user
controlled and has nothing to do with the clock. See your network
administration for assistance.
12. To setup Time Sync, Report, and Backup schedules, click on the Schedules
link under Scheduling
4-20). From the Schedule List screen, click on the
to add or edit a schedule and the Schedule Settings setup screen will appear.
Define the Schedule, and click on the
clock memory.
Look – Skip Step 12 if the 2 default time sync schedules are sufficient and
no backup and report schedules are required.
NOTE: Your clock comes with two (2) default Time Sync schedules which can be
customized and/or deleted. However, the clock must have at least one
defined schedule to maintain time validation.
NOTE: At a pre-determined time of the day and day of the week, the Auto-Sync
Time Clock can be set to confirm or validate that a time/date
synchronization signal has been received. This is called time
synchronization or “Signal Validation". This time validation is controlled by
setting up schedules as described in How to Setup Time Synchronization
Schedules in Chapter 4.
, and the Schedule List screen will appear (see Figure
, and the SNMP Trap Settings screen will
button to save SNMP settings.
button to retain the schedule in the
button to save
, or buttons
Congratulations – You have finished customizing the configuration of your AutoSync Time Clock!! All of your settings have been saved in the clocks flash
memory. It is recommended to make a backup of your settings (see Figure
4-23. Backup Utility) with the Backup Utility. A backup file could be used, if
required, to reload all these settings with the Restore Utility.
NOTE: The Backup/Restore Utility can also be used to create a shared
“ATVSConfig.bin” file to replicate a copy of the setup of one clock to
another Auto-Sync Time Clock (for additional i nf o rmation, see Performing
Backup and Restore). Also, see the Auto-Sync Utility CD that is included
with your clock, which can be used to “get selected clock
configuration.”
3-6 724-746-5500 | blackbox.com
Page 35

Chapter 4: Operation
4. General Information
After the Auto-Sync Time Clock has been unpacked, wall mounted (optional),
connected to a network, and plugged into AC power, the Zeroconf capability should
allow the clock to be automatically detected with a Web browser. It is
recommended to install and use the Auto-Sync Utility that came on the CD included
with your Auto-Sync clock if:
Your browser does not support the Bonjour plug-in, or you do not want to install
Bonjour.
You want to use the features of the Utility to; find clocks, obtain clock setup,
obtain clock transactions (timesync info), monitor clocks status on the network,
and perform diagnostic functions.
It is recommended to obtain the maximum functionality from the Auto-Sync Time
Clock by:
Configure the system settings including: clock name, unique clock description,
time zone, and Daylight Saving Time (DST), etc., that are applicable to your
installation (using the browser).
Assign the NTP servers that will be used to synchronize the
Auto-Sync Time Clock (either internal or external).
Enter information to generate e-mail notification.
Enter information to generate SNMP Trap alerts for network.
Enter FTP Server information for Backup of configuration and transaction report
files.
Prepare schedules for: time synchronization, reports, and backup.
NOTE: The Auto-Sync Time Clock configuration parameters, which are retained in
the clock, usually remain unchanged after installation and setup.
About Bonjour and Zero-Configuration
Bonjour, also known as Zero-Configuration networking, enables automatic
discovery of the Auto-Sync Time Clock on IP networks. Bonjour uses industry
standard IP protocols to allow devices to automatically be discovered without the
need to enter IP addresses or configure DNS servers.
Bonjour, formerly Rendezvous, is Apple Inc.'s trade name for its implementation of
Zeroconf, a service discovery protocol. Bonjour locates devices such as the AutoSync Time Clock, printers, copiers, and other computers, with the services that
those devices offer on a local network using multicast Domain Name System service
records. The software is built into Apple's Mac OS X operating system from version
10.2 onwards, and can be installed onto computers using Microsoft Windows
operating systems.
Bonjour is a networking protocol that sends and receives network packets on User
Datagram Protocol (UDP) port 5353. If you have a "personal firewall" enabled, you
will need to ensure that UDP port 5353 is open for Bonjour to work correctly.
724-746-5500 | blackbox.com 4-1
Page 36

Auto-Sync Time Clock
Certain firewalls will only partially block Bonjour packets, so if you experience
intermittent behavior, check the firewall settings and verify that Bonjour is listed as
an exception and is allowed to receive incoming packets. Bonjour will configure the
Windows firewall appropriately during installation on Windows XP Service Pack 2
and above.
If your version of Bonjour does not include the IE plug-in mentioned above, and
you would like this feature, you can download the complete Bonjour for Windows
package from Apple's web site by visiting http://www.apple.com/bonjour/ . The
current implementation of Bonjour for Windows requires Windows 2000/2003,
Windows XP or Windows Vista. Make sure you have the latest Windows Service
Pack installed on your computer using Windows Update.
Bonjour is normally placed in a folder called "Bonjour" within the "Program Files"
folder. Bonjour modifies registry entries related to Bonjour's internal configuration
and operation. In the list of MS Windows startup services, Bonjour runs as the
name mDNSResponder.exe, consuming almost a full megabyte of memory.
Communications across the network take place over UDP port 5353; this may
require reconfiguring some personal or corporate firewalls that can block Bonjour
packets. A full installation of Bonjour for Windows will include a plug-in for Internet
Explorer, a printer wizard and the network communication services.
Some Virtual Private Network (VPN) clients are co nfigured so that local network
services are unavailable to a computer when VPN software is active and connected.
In such a case, no local Zeroconf services are available to Bonjour or any other
Zeroconf implementation. If you find that you can no longer discover network
services or print to Bonjour shared printers, try logging out of VPN.
NOTE: If Bonjour is not desired or available for your network use, it is
recommended to use the Auto-Sync Utility that came with your clock to
perform the Zeroconf function for discovery.
4.1. Auto-Sync Time Clock Web Interface
4.1.1. Auto-Sync Time Clock Web Page
After logging onto the Auto-Sync Time Clock, the clock name and assigned IP will
appear in the Web page title (see Figure 4-1).
4-2 724-746-5500 | blackbox.com
Page 37

Chapter 4: Operation
Name & Assigned IP
Enter Name
Enter Description
Figure 4-1. Auto-Sync Time Clock Web Page.
The following links appear on every Auto-Sync web page:
Home
The “Home” link will always return you to the Auto-Sync Time Clock Information
page (see Figure 4-1).
Contact
The “Contact” link displays support contact information for the Auto-Sync Time
Clock.
Help
The "Help" link selection provides online help.
Logout
Selecting the “Logout” link allows you to log off the Auto-Sync Time Clock and
return to the login screen (see Figure 3-4). You will automatically be logged off the
clock after 5 minutes of no activity.
4.1.2. Login
If this is your first time logging in to this Auto-Sync Time Clock, you will be required
to enter the Username of Admin (see Figure 3-4) and Password of password. Use
the following procedure to create a new user and/or edit a password.
724-746-5500 | blackbox.com 4-3
Page 38

Auto-Sync Time Clock
NOTE: The Auto-Sync Time Clock setup parameters can be customized at any time
and do not have to be changed in the following order. However, it is
recommended to create a user.
NOTE: After logging in, the Clock Information screen will appear. It is
recommended to customize the clock name
nomenclature. All other fields on this screen are read-only.
NOTE: The only acceptable characters for a clock name are ‘a-z’ upper and
lowercase, ‘0-9’, (-) dash, (_) underscore, and (*) asterisk. If uppercase
letters are used they will automatically be changed to lowercase.
4.1.3. How to Create Users
1. Click on the Settings link under Users, and the User List screen will appear
(see Figure 4-2).
To Add, Edit or
Delete a User
and description to your facility
Figure 4-2. User List.
2. Click on the button to create a new user, and the User Settings screen will
appear (see Figure 4-3).
Figure 4-3. User Settings.
NOTE: One (1) additional user can be created, but only one user can be logged in
at a time
per clock.
3. Enter the required user field information for Name (min. = 4 characters with
max. = 20) and Password (min. = 4 characters with a max. = 30). The
Username and Password are case sensitive. Press the button to save, or
to return to main screen with no change.
4-4 724-746-5500 | blackbox.com
Page 39

Chapter 4: Operation
NOTE: The only acceptable characters for a Username and Password are ‘a-z’
upper and lowercase, ‘0-9’, (-) dash, (_) underscore, and (*) asterisk.
Please make a note of your Username and Password and keep in a
safe place.
4. Click on the Edit button to change the name and/or password of a user. Press
the
5. Click on the Delete button and press Yes at the prompt – “Ar e you sure you
want to delete this user?” to delete the user. Press the No button to return to
the User Settings screen with no change.
NOTE: The Admin user CANNOT
button to save, or to return to main screen with no change.
be deleted or have the Username changed, but
the Password can be changed! The following red error messages may
appear when entering too many users, or trying to delete Admin user:
“Exceeded the maximum number of user(s) allowed.”
“You cannot delete the Admin user.”
4.1.4. Normal Login
Once a user login has been established, enter your case sensitive Username and
Password, then press the
an error message will be displayed.
Press the
user. The following error message will appear when entering an invalid
username/password; “Invalid username or password. Please try again.”
button to clear the current Login information and enter a different
button (see Figure 3-4). If there is any mismatch,
4.1.5. How to Custom Configure the Auto-Sync Time Clock
The Settings function under Clock is used to configure each Auto-Sync Time Clock
to your preference for: Time Zone, time format for display and transaction reports,
daylight savings, and network access.
Network access can be configured by selecting DHCP, a fixed IP address, domain
name, and/or enable Zero Configuration.
1. After you have logged in, click on the Settings link under Clock
Settings screen for general settings will appear (see Figure 4-4).
2. Select the appropriate Time Zone from the dropdown menu (see Figure 4-4).
The default = EST. The Time Zone selected controls the Time Zone adjustment
sent to the clock. If OATS compliance is necessary, the Time Zone must be set
to the default of (GMT-05:00) Eastern Time (US & Canada).
3. Click on 12 hour (AM/PM) or 24 hour (Military) (default = military) to set the
display format. This format will also be used on transaction reports.
4. Select to show either the day of the month or seconds on the clock display
(default = seconds).
, and the Clock
724-746-5500 | blackbox.com 4-5
Page 40

Auto-Sync Time Clock
5. Check whether or not daylight savings should be applied. This option should only
be un-checked in areas where DST is not used and OATS compliance is not
required. Select the week, day, and month of the Start and End dates from the
dropdown Start and End times (hour/minute). Default = DST enabled.
Default = Military
(i.e., 17:00 = 5:00pm)
Figure 4-4. General Clock Settings.
6. Click on the
NOTE: If “Apply Daylight Savings” is checked, the standard Start and End
dates/times currently observed will be automatically entered. Modification
is only necessary for special circumstances (see next paragraph).
NOTE: Daylight Saving Time is NOT observed in Hawaii, American Samoa, Guam,
Puerto Rico, and the Virgin Islands and in most of Arizona, with the
exception of the Navajo Indian Reservation in Arizona.
The Auto-Sync Time Clock will automatically advance by one hour at the
beginning of Daylight Saving Time on the second Sunday in March. It will
automatically return to Standard Time on the first Sunday in November. If
you live in an area that does not observe Daylight Saving Time, uncheck
the box “Apply Daylight Saving.”
7. Click on the Network tab and the Clock Settings screen for network will appear
(see Figure 4-5).
button to save the general clock settings.
4-6 724-746-5500 | blackbox.com
Page 41

Chapter 4: Operation
Figure 4-5. Network Clock Settings.
8. Select to Use DHCP (Dynamic Host Configuration Protocol) which is a protocol
used by networked devices (clients) to obtain the parameters necessary for
operation in an Internet Protocol network. This is the default.
Or
Select Use Fixed IP Address when desiring to use a static IP address, and
enter the following:
Fixed IP address for the Web Clock
Subnet Mask for the Web Clock
computer networks based on the Internet Protocol Suite, a subnetwork, or
subnet, is a portion of the network's computers and network devices that
have a common, designated IP address routing prefix.
Default Gateway for the Web Clock
administrator. A default gateway is a node (a router) on a computer
network that serves as an access point to another network.
9. Select Service Port (default = 7) for the Auto-Sync Time Clock’s built-in TCP
service that allows a user to initiate an operation from an external application
(i.e., the Auto-Sync Utility functions). Any unreserved port 1 thru 65535 can be
used.
10.Select Enable Zero Configuration (default) for Zero Configuration to obtain
the parameters necessary for operation in an Internet Protocol
local level. This is where you would turn Zero Configuration off if you did not
want the clock to broadcast its location. The most direct way to get to the clock
when this function is disabled is to know the IP address.
. Obtained from network administrator.
. Obtained from network administrator. In
. May have to obtain from network
network at a
11.When finished entering the network settings, click on the
network settings for the clock.
button to save
724-746-5500 | blackbox.com 4-7
Page 42

Auto-Sync Time Clock
4.1.6. How to Set the Print Options
1. Click on the General Settings link under Print, and the Print General
Settings screen will appear (see Figure 4-6).
th
2. Select the Minute Format from the dropdown menu (default = 60
example of this would be: if the actual time is 16:30 (4:30PM), 10
th
= 16.50, 60
= 16:30, and 100th = 16.50.
). An
th
= 16.5, 20th
Figure 4-6. Print General Settings.
3. Select the Dual Print, On or Off. This determines whether you print one line
(Line 1) or both lines (Line 1 & Line 2). When Dual Print is turned On (default =
Off), and the print method is set to Paper Detect Only (P) (see Figure 2-17) two
different print styles (lines) can be printed sequentially, without having to push
the auxiliary Symbol Print Bar.
The following is an example for a custom print style with the Dual Print feature
turned On to show the sequence for Line 1 & Line 2 imprints:
First imprint (Line 1) 2008/09/22 00:51 13s
Second imprint (Line 2) DESK 1234
4. Enter a value, in seconds, for the dual print to timeout (default = 10 seconds).
nd
For example, when set to 10, the 2
seconds have passed since the 1
seconds. When zero (0) is used there is NO timeout; the 2
print line will not be active if more than 10
st
line was printed. The range is 0 to 60
nd
line is always
active.
NOTE: When Dual Print On is selected, the clock will display “L2” where the
seconds/date is normally displayed. L2 will be displayed after Line 1 is
printed (see the figure) to prompt you that Line 2 (L2) will be printed with
the next print stamp. This prompt will remain displayed for the timeout
value or until Line 2 is printed. For example, a timeout of 0 seconds would
allow L2 to display until the print cycle was completed with Line 2.
4-8 724-746-5500 | blackbox.com
Page 43

Chapter 4: Operation
Print Line 2
Indicator
5. Select to Print Leading Zero, On or Off (default = On). An example of this
feature would be: if the actual date is 07/08/2008, with leading zero ON, the
display = 07/08/2008, and with OFF, the display = 7/8/2008.
6. Select to Print Direction, Left or Right (default = Left). This defines if you
want to Left or Right justify the printout. The following figures illustrate the
appearance of left and right justified printing on a typical time card. The right
print (depending on how the card is placed in the clock) may appear to be
printed upside down. The following figures illustrate the appearance of left and
right-side printing on a typical card.
Figure 4-7. Example of Left-Side Printing.
Figure 4-8. Example of Right-Side Printing.
724-746-5500 | blackbox.com 4-9
Page 44

Auto-Sync Time Clock
Figure 4-9. Example of Both Left & Right Printing.
7. For auto numbering select: Print the same number all the time
OR….select
Print number Nth times & increment by 1. You must enter the Nth number
if using this selection (default value = 1).
The Auto-Sync Time Clock will automatically add a sequential number to the
printout.
The Nth #: field selection will make the automatic number increment or remain
constant. For example, if a value of “1” is entered, the number will increment by
one after each print. If a value greater than “1” is entered, the Auto-Sync Time
Clock will print the same number that many times before incrementing to the
next number. For example, if a value of “3” is entered the same number will be
printed three (3) times consecutively, then the number will increment by one for
the next three (3) printouts, and so on.
NOTE: For OATS compliance this numbering should not be used on line 1.
8. Click on the Print Lines 1 & 2 link under Print
screen will appear (see Figure 4-10).
NOTE: For OATS compliance, custom print styles and symbols should not be used
on line 1. However, depending on the specific application, it may be
necessary to identify each location where a Auto-Sync Time Clock resides.
For example, a location code may be required to precede the date and time
stamp. Other applications may require a floor number, department number,
job number, workstation code, bank teller number, trader code, branch
name or any other unique identifier. You can create up to two custom print
lines using a similar procedure. There is a maximum number of characters
, and the Print Lines 1 & 2
4-10 724-746-5500 | blackbox.com
Page 45

Chapter 4: Operation
which can be printed on each line (total allowable length = 150 dots or
approximately 21 characters). Also, a maximum of 10 rows can be added.
See Appendix A for a character table which shows character size as a % of
dots for regular and bold characters.
NOTE: Lines cannot be edited. If a mistake is made, press the
button and
start over.
9. Enter the desired text in the text field, select Regular or Bold from the dropdown
menu, and click the
button. The new message will appear in the
“Message:” display field and the row box on the right (see Figure 4-10). If you
need to correct an error, click the
button to clear the Message display
field.
10.To enter symbols, select the desired symbol from the dropdown menu, select
Regular or Bold from the dropdown menu, and click the
button. The
new message will appear in the “Message:” display field and the row box on the
right (see Figure 4-10). If you need to correct an error, click the
button
to clear the Message display field.
NOTE: If you have added a symbol and press the
button the Symbol field
will NOT be cleared. Just the Message filed will be cleared.
11.Click the
button to retain your print style in the clock for line 1. The
default for line 1 = FINRA settings (see Figure 2-16).
12.If a print style is desired for line 2
, click on the “Line 2” tab and a similar screen
will appear to define print for line 2. Follow the same procedure to define Line 2,
and click on the
button to retain print style for line 2 in the clock.
The default for Line 2 is the clock IP/MAC address.
Enter Text
Select Symbol
Message
Field
Figure 4-10. Print Lines 1 & 2.
Rows –
each line
= 1 row.
Press
Clear All
to start
over.
724-746-5500 | blackbox.com 4-11
Page 46

Auto-Sync Time Clock
NOTE: Only uppercase characters will be printed. Every time you enter text or a
symbol, and press the Add Text or Add Symbol buttons that is considered a
“row” which appears in the row box. A maximum of 10 rows will be
accepted. Trying to save a print line with greater than 150 dots will
generate the error message; “Symbol is invalid, exceeded the
maximum length”.
If you make a mistake entering text and/or symbols you must press the
button to clear the Message and row display and re-enter your
desired print.
4.1.7. How to Set Time Synchronization
The following procedures for Time Sync Settings, Time Servers, and DNS Servers
can be used to setup custom parameters for time validation to ensure your AutoSync Time Clock is accurate and meets your requirements. For example, an internal
Time Server could be configured instead of one of the default time servers which
require Internet access.
4.1.7.1. Time Sync Settings
1. Click on the Settings link under Time Sync and the Time Sync Settings screen
will appear (see Figure 4-11).
2. Select the Sync Type: Auto Sync (default) or ATVS Software Sync from the drop
down menu. ATVS Software Sync should only be checked if you are using the
Auto-Sync Time Clock with ATVS Software. When ATVS syncs with the clock, it
will automatically reset the Sync Type to ATVS Software Sync. If you wanted to
disable the ATVS sync, you would have to change this setting back to Auto Sync.
3. Enter the Max Deviation that is acceptable to synchronize the clock. The
maximum deviation is the difference in time between the clock and the time
server. The range is 0 to 90000 milliseconds with a default = 3000 milliseconds
(3 seconds). However, it is recommended to not set below 400 milliseconds due
to normal inherent network latency.
Figure 4-11. Time Sync Settings.
4-12 724-746-5500 | blackbox.com
Page 47

Chapter 4: Operation
4. Enter the Sync Retry Attempts: (the default & maximum = 3). This is the # of
times that any time server would be tried if time synchronization fails.
5. Select “Ignore Deviation Error” option for the maximum deviation (absolute
difference between clock time and NTP time) to be ignored and the clock time
set to the NTP Time Server during time synchronization. If not checked
(default), and the previous condition occurs, the clock will not be set to that
Time Server.
And
Select “Send e-mail and/or SNMP trap notification if it completely fails to
set the time” If checked, and time synchronization fails, a message would not
be sent until all enabled time servers have been tried. If not checked, a
message will be sent every time a time synchronization failure occurs, which is
the default.
4.1.7.2. Time Server Setup
1. Click on the Time Servers link under Time Sync, and the Time Server List
screen will appear (see Figure 4-12). The Auto-Sync Time Clock provides 18
default Stratum 1 NTP servers for the user. Additionally, the user can add up to
14 additional time servers for a total of 32 time servers. The user can not delete
any of the 18 predefined time servers, but any user created time server can be
deleted. The time server order signifies the order that they will be tried for time
synchronization, i.e., number 1, then number 2, etc.
2. To change the time server priority order, highlight the desired time server in the
list, and click the
or buttons to change the time server
order. The time server order controls the order that the enabled time servers
will be used to validate the time at the clock. The first time server with a
successful time sync is the one used. The next time server in the list will only be
used upon failure to time sync within the 1-3 programmed sync attempts with
the previous time server.
To change position
for order of use.
To Add, Edit and
Delete Time Servers.
Figure 4-12. Time Server List.
724-746-5500 | blackbox.com 4-13
Page 48

Auto-Sync Time Clock
3. Highlight the desired time server in the list, and click on the , or
buttons to modify or delete an existing time server.
NOTE: The only editable field for a predefined time server is Enabled, but if the
time server was user created
Enabled fields can be changed.
The Last Successful Sync and Last Successful Attempt fields are read
only. The last successful sync represents the date/time that the clock time
was actually synced (met parameters), while the last successful attempt
represents when the actual connection attempt was successful.
, then the Name, Host Name/IP Address, and
4. Click on the
Server Settings screen will appear (see Figure 4-13). Enter the Name of the
time server (maximum length is 20 characters).
NOTE: The acceptable characters for a Time Server name are ‘a-z’ upper and
lowercase, ‘0-9’, (-) dash, (_) underscore, and (*) asterisk.
Look – This is where you can setup the parameters to use an internal Time
Server. Also, when you create a new Time Server it will automatically be placed
at the top of the list in position 1. This order is important because the first Time
Server successfully used sets the time.
button to create a user defined time server, and the Time
Figure 4-13. Time Server Settings.
5. Enter the Host Name/IP Address for the time server (maximum length is 50
characters).
6. You MUST
7. Press the “Test Time Sync” button to connect to the Time Server using the
settings. This tests whether the connection is good or bad (i.e., wrong host
name/IP address).
8. Click the
click the Enabled box for a time server to be used.
button to save the new time server information.
4-14 724-746-5500 | blackbox.com
Page 49

Chapter 4: Operation
4.1.7.3. DNS Server Setup
1. Click on the DNS Servers link under Time Sync, and the DNS Servers
Settings screen will appear displaying the four (4) default public DNS servers
(see Figure 4-14).
2. Enter Domain Name (default = local as Zero Configuration uses dot local).
3. To define your own DNS Server, highlight the desired IP Address and enter
your IP address (max. = 46 characters). It is recommended to use the DNS
Server 1 for your first DNS Server IP Address, using DNS Server 2 for your 2
DNS Server IP Address, and so forth. This is because the clock will use the DNS
Servers in appearance order. Therefore, it is recommended to leave the servers
you are not using blank.
NOTE: The Domain Name System (DNS) is a hierarchical naming system for
computers, services, or any resource participating on the Internet. It
associates information with domain names assigned to such participants.
Most importantly, it translates humanly meaningful domain names to the
numerical (binary) identifiers associated with networking equipment for the
purpose of locating and addressing these devices world-wide.
nd
An often used analogy to explain the Domain Name System is that it serves
as the "phone book" for the Internet by translating human-friendly
computer hostnames into IP addresses. For example, www.blackbox.com
translates to 38.107.149.196.
4. Click the
button to save your DNS Server information.
Only define the
DNS Servers you
are using.
Figure 4-14. DNS Server Settings.
724-746-5500 | blackbox.com 4-15
Page 50

Auto-Sync Time Clock
4.1.8. How to Setup E-Mail and SNMP Trap Notification
Simple Mail Transfer Protocol (SMTP) is an Internet standard for electronic mail
(e-mail) transmission across Internet Protocol (IP) networks. While electronic mail
server software uses SMTP to send and receive mail messages, user-level client
mail applications typically only use SMTP for sending messages to a mail server for
relaying. For receiving messages, client applications usually use either the Post
Office Protocol (POP) or the Internet Message Access Protocol (IMAP) to access
their mail box accounts on a mail server.
The E-mail settings allow you to setup SMTP, ”To” and “From” e-mail accounts, and
select Time Sync plus Report and Backup events for e-mail notification. The
parameters for E-mail and SNMP Trap notification need to be defined if you desire
e-mail notification for significant Auto-Sync time validation events. However, if you
do not setup these parameters you can still obtain a record of the Auto-Sync Ti me
Clock transactions by viewing the Reports (see Reports Utility for additional
details). These clock transactions represent a history, while e-mail and/or SNMP
Trap notification represents an alert for a current event.
4.1.8.1. E-mail Setup
1. Click on the E-Mail link under Notification, and the E-Mail Settings screen will
appear with the SMTP tab (see Figure 4-15). Enter the “Host Name: IP Address”
for the SMTP server.
2. Enter the Port number. You may need to get this information from the network
administrator. Port # represents an endpoint or “channel” for network
communication. Port #’s allow different applications on the same computer to
utilize network resources without interfering with each other. Default port
number = 25.
3. Click the Require Authentication box if authentication for e-mail is required.
When Require Authentication is checked, the Username and Password are
required.
Figure 4-15. E-Mail Settings for SMTP.
4-16 724-746-5500 | blackbox.com
Page 51

Chapter 4: Operation
4. Click the button to save the SMTP e-mail settings.
5. Click on the Account(s) tab and the E-Mail screen to define e-mail destinations
will appear (see Figure 4-16).
6. Enter E-mail From Address (maximum length is 155 characters). This is the
originator for the e-mail notification.
7. Enter E-mail To Address 1 and E-mail To Address 2 (maximum length is 155
characters each). This is the recipient(s) for e-mail notification.
8. Click on Enabled for each address to make the e-mail address active. If
unchecked, no e-mail notification will be sent to that recipient.
9. Click the
button to save the e-mail account settings.
Figure 4-16. E-Mail Settings for Accounts.
10.Click on the Time Sync Event(s) tab and the E-Mail Settings screen to select
event(s) for email notification will appear (see Figure 4-17).
11.Select the events to trigger e-mail notification from any or all of the 3 event
choices by clicking in each event box.
12.Enter the desired Message(s) to be sent to the e-mail recipient for the event
(maximum length is 100 characters). This can be any message you want sent
for that event.
13.Click the
button to save the e-mail Time Sync Events settings.
724-746-5500 | blackbox.com 4-17
Page 52

Auto-Sync Time Clock
Figure 4-17. E-Mail Settings for Time Sync Events.
14.Click on the Report & Backup Event(s) tab and the E-Mail Settings screen to
select these events for email notification will appear (see Figure 4-18).
Figure 4-18. E-Mail Settings for Report & Backup Events.
15.Select to receive e-mail notification for the status of running a scheduled backup
and/or transaction report by clicking in the box alongside the selection.
16.Enter the desired Message(s) (maximum length is 100 characters for each
message) to be sent to the e-mail recipient(s). This can be any message you
want sent for that event.
17.Click the
button to save the e-mail Report & Backup events settings.
4-18 724-746-5500 | blackbox.com
Page 53

Chapter 4: Operation
4.1.8.2. SNMP Trap Setup
Simple Network Management Protocol (SNMP) is used in network
management systems to monitor network-attached devices for conditions that
warrant administrative attention either on-site or remotely. A network administrator
can use SNMP to monitor the availability-performance-error rates either on-site or
remotely over a network, which facilitates central clo ck manage ment.
NOTE: The following SNMP-related Request for Comments (RFCs) and
Management Information Bases (MIBs) are supported:
RFC 1213 – Management information Base (MIB) II
RFC 1215 – Generic Traps (coldStart, linkUp, authenticationFailure only)
RFC 1316 – Character MIB
RFC 1317 – RS-232 MIB
DIGI-DEVICE-INFO.mib – A Digi enterprise MIB for the Digi Connect Family
DIGI-SERIAL-ALARM-TRAPS.mib – A Digi enterprise MIB for sending alarms
as SNMP traps
For additional information, please consult the above RFCs on the Web.
1. Click on the SNMP Trap link under Notification, and the SNMP Trap Settings
screen will appear (see Figure 4-19).
Figure 4-19. SNMP Trap Settings for E-mail Notification.
2. Enter the Host Name/IP Address for the SNMP trap server (maximum length
is 50 characters). You may need to get this information from the network
administrator.
3. Enter the Port number (default port = 162). You may need to get this
information from the network administrator.
4. Enter the Community Name (maximum length is 10 characters). The
Community Name (“Identifier”, i.e., Time Clocks”) is used to group the SNMP
managed Web clocks under that name.
724-746-5500 | blackbox.com 4-19
Page 54

Auto-Sync Time Clock
5. Click on Enabled to make the SNMP trap server active for alerts. If unchecked,
no SNMP trap alerts will be used.
6. Click the
button to save the SMTP trap settings.
4.1.9. How to Setup Time Synchronization Schedules
At a pre-determined time of the day and day of the week, the Auto-Sync Time
Clock can be set to confirm or validate that a time/date synchronization signal has
been received. This is called time synchronization or “Signal Validation". The clock
has two default Time Sync schedules called “Before Trading” and “After Trading”
to ensure that time validation automatically occurs using default settings with no
user intervention. The Before Trading schedule is predefined to sync at 06:13
(6:13am) each day, while the After Trading Schedule is set to sync at 18:13
(6:13pm). Time Sync schedules as described in the following procedure can be
created, edited and deleted:
1. Click on the Schedules link under Scheduling, and the Schedule List screen
will appear (see Figure 4-20).
Figure 4-20. Schedule List.
2. Highlight the desired time sync schedule to modify and click on the
button to edit an existing schedule, or click on the
Add
button to create a
new schedule and the Schedule Settings setup screen will appear
(see Figure 4-21).
NOTE: Select a schedule and click on the
button to delete. When deleting
a schedule, the prompt, “Are you sure you want to delete this
Schedule?” will appear. Click Yes to confirm and delete.
4-20 724-746-5500 | blackbox.com
Page 55

Chapter 4: Operation
NOTE: Care must be exercised when setting up Time Sync schedules because a
maximum of 8 separate Time Sync schedules can be set up. Each of these
8 schedules could be enabled and have up to a maximum of 12 scheduled
time syncs per day. The flash memory in the clock is capable of retaining
up to 5 years worth of data created as per OATS Rule 7430 which requires
2 Time Syncs per day. Therefore, if multiple schedules are created and
enabled, the length of time that data could be retained might be severely
reduced. This should not discourage setting up multiple schedules. Perhaps
all of them do not have to be active. At any time, you can simply activate
or deactivate a schedule by clicking on the enable box. However, you
should be aware that the more time syncs per day that the clock is
scheduled to perform, the more data that is going to be stored in the clock,
thus filling up flash memory faster.
3. Enter the schedule Name (maximum length is 20 characters).
NOTE: The acceptable characters for a Schedule name are ‘a-z’ upper and
lowercase, ‘0-9’, (-) dash, (_) underscore, (*) asterisk, and a space. For
example, “Before Trading” is a valid format.
4. Select Time Sync for the Type of schedule template from the drop down menu.
The choices for type are; Time Sync, Report, and Backup.
NOTE: A maximum of eight (8) time sync schedules, two (2) Report schedules,
and two (2) Backup schedules for a total of 12 separate schedules that can
be user created. Report and Backup schedules do not consume any of the
on-board clock flash memory.
5. Select the schedule start date from the drop down menus.
6. Select the schedule start time from the drop down menus.
7. Select the schedule recurrence. The choices are: Daily, or Weekly.
If Daily is selected, then define Run Every “X” day(s), and check Run Every:
“X” min(s) to enter the number of minutes.
If Weekly is selected, then define Run Every: “X” week(s) and check the days
to sync (check box for each day or check box for All).
The default for days = 1, Minimum = 1, and Maximum = 365.
The default for minutes = 120, Minimum = 120, and
Maximum = 1439
The default for weeks = 1, Minimum = 1, and Maximum = 52.
724-746-5500 | blackbox.com 4-21
Page 56

Auto-Sync Time Clock
Figure 4-21. Schedule Settings.
Frequency Settings used
to define contents of a
scheduled Report file and
the scheduled Backup
Transaction file.
8. Click on the
button to save the schedule information, or click on the
button to return to the Home page without saving.
4.1.10. How to Setup Report Schedules
At a pre-determined time of the day and day of the week, the Auto-Sync Time
Clock can be set to send a transaction report file to a designated FTP site (path).
These transaction report files are controlled by setting up schedules as previously
described in the Schedules procedure.
NOTE: You must define an FTP server for the Backup and Restore Utility to
properly function.
NOTE: When a Report schedule occurs, a transaction report text file with the date
it was run will be created from the clock database. The contents of a
scheduled Report will depend upon the schedule frequency settings. The
Report text file created will have a name starting with the last 6 digits of
the “MAC address_ATVSrpt_date.txt”. This file never gets appended
because every time a new Report schedule is run, a new file is created with
the date that it was run. If more than one report schedule from the same
clock is run per day, each subsequent file will have the same name, but
with a _01 (for the 2
the end of the file name, and so on.
nd
one), _02 (for the 3rd one), _03 (for the 4th one) at
4-22 724-746-5500 | blackbox.com
Page 57

Chapter 4: Operation
The following would be created for Daily when:
Run every 1 day(s) = a Report file just for the previous day,
Run every 2 day(s) = a Report file with the previous 2 days of transactions,
Run every 3 day(s) = a Report file with previous 3 days of transactions,
And so on with a maximum of 365 days.
The following would be created for Weekly when:
Run every 1 week(s) = a Report file with 1 previous week of transactions,
Run every 2 week(s) = a Report file with 2 previous weeks of transactions,
Run every 3 week(s) = a Report file with 3 previous weeks of transactions,
And so on with a maximum of 52 weeks.
Both the binary and text files created during a scheduled Backup will have the
last 6 digits of the clocks unique MAC Address in the filename.
4.1.11. How to Setup Backup Schedules
At a pre-determined time of the day and day of the week, the Auto-Sync Time
Clock can be set to send a Backup file of the entire transaction database to a
designated FTP site (path). This Backup of the entire transaction database up until
the date that the schedule is run is controlled by setting up schedules as previously
described in the Schedules procedure.
When a Backup schedule occurs, 3 files are created. A scheduled clock Backup
always includes the clock’s unique MAC address. Each clock’s 3 Backup files always
st
get appended with new data when the latest Backup schedule is run. The 1
Backup
file created is a binary file with the name MAC address_ATVSConfig.bin for a
configuration file. This ensures you always have a backup copy of this clock’s
nd
configuration. Note – this file cannot be shared with other clocks. The 2
file, also a
binary, has the file name MAC address_ATVSTrans.bin because it is a backup of
the clock’s transaction database. This ensures that you always have the most
complete copy of the entire clock database. Thus, it is important to schedule
backups to maintain an up to date copy of the transaction database and
rd
configuration setup. The 3
file is a text file generated from the database based
upon what was defined for either “Daily” or “Weekly” and this file is named MAC
address_ATVSTrans.txt
4.1.12. Auto-Sync Time Clock Utilities
The Auto-Sync Time Clock utilizes an FTP server for the Backup/Restore utility
functions. The File Transfer Protocol (FTP) is a network protocol used to transfer
data from one computer to another through a network such as the Internet. FTP is
a file transfer protocol for exchanging and manipulating files over a TCP computer
network. An FTP client may connect to an FTP server to manipulate files on that
server.
724-746-5500 | blackbox.com 4-23
Page 58

Auto-Sync Time Clock
Also, use the Auto-Sync Utility CD to get clock configuration and/or transaction files
with the built-in FTP capability provided by the utility (see Chapter 5).
4.1.12.1. Utility Settings for FTP Server
The Auto-Sync Time Clock can backup and/or restore the configuration and time
sync transaction database. The clock utilities can also be used to view transaction
report files for a user defined period of time. It is important to set up an FTP server
as described in the following procedure so these files can be saved.
1. Click on the Settings link under Utilities
will appear (see Figure 4-22).
2. Enter FTP Server address (URL).
3. Enter your Username for the FTP Server.
4. Enter your Password for the FTP Server.
5. Enter the actual Directory Path where you want the transaction and/or
configuration files stored on the FTP Server.
6. Press the
address and directory path you have entered is correct and that the clock is
communicating with the FTP Server. If everything is Ok you will see
“Successful” in the Status field. However, if the connection fails you will see
“Failed: Check Server Name/Username/Password” or Failed: Check
Directory Path.
and the Utility Settings screen for FTP
button to verify that the FTP Server
Figure 4-22. Utility Settings (FTP Server).
7. If the FTP connection is OK, press the
button to store the FTP settings.
4-24 724-746-5500 | blackbox.com
Page 59

Chapter 4: Operation
4.1.12.2. Performing Backup and Restore
The Auto-Sync Time Clock has a built in utility that can be used to Backup and/or
Restore the clock configuration and transaction files. Please consult Chapter 5 for
details on how to use the Auto-Sync Utility to simultaneously update the
configuration of multiple clocks using a shared configuration config.bin file which
was created from a shared backup procedure.
To backup the Configuration & Transaction files stored in the clock:
1. Click on the Backup/Restore link under Utilities
will appear (see Figure 4-23).
2. Click on the drop down menu to select the type of Backup. The choices are;
Configuration, Transaction, or Both.
3. Click on the radio button Specific or Shared to define this backup file. Click
Shared if you want to make a shared file for this clock’s configuration to
be possibly used by other clocks.
NOTE: A transaction file CANNOT actually be shared by multiple clocks even
though you might have selected Shared. You CANNOT restore a shared
transaction file. This is prevented to maintain each clocks transaction
record for OATS compliance.
, and the Backup tab screen
Figure 4-23. Backup Utility.
4. Click on the
appear once the operation has been completed. The transaction file will be
stored at the same location (path) previously entered for the FTP Server (see
Figure 4-22). The configuration file will also be stored in the same location but in
a binary format with a filename which correlates to the clock and ending in
“_ATVSConfig.bin”.
button to perform the Backup and the status will
724-746-5500 | blackbox.com 4-25
Page 60

Auto-Sync Time Clock
NOTE: It is recommended to open the text version of the transaction file using MS
Word® or Excel rather than Notepad. The filename for the clock transaction
file will begin with the last 3 character pairs of the unique clock MAC
address (see Figure 6-1) and end in “_ATVSTrans.txt”. The following is an
example of a typical text transaction file:
Clock Name, Date, Sender, Message Type, Message
auto-sync_00-40-9d-36-b2-84, 01/01/2008 00:01:21, STARTUP TIME SYNC, Info, Trying to connect to time server < Univ.
of Washington >
auto-sync_00-40-9d-36-b2-84, 01/01/2008 00:01:21, STARTUP TIME SYNC, Info, Connected to time server < Univ. of
Washington >
auto-sync_00-40-9d-36-b2-84, 03/24/2009 06:55:26, STARTUP TIME SYNC, Info, Time from time server < Univ. of
Washington > is 03/24/2009 06:55:26
auto-sync_00-40-9d-36-b2-84, 03/24/2009 06:55:26, STARTUP TIME SYNC, Info, Current time zone is : (GMT-05:00)
Eastern Time (US & Canada) DLS ON
auto-sync_00-40-9d-36-b2-84, 03/24/2009 06:55:27, STARTUP TIME SYNC, Success, Successfully sync time to the
clock : auto-sync_00-40-9d-36-b2-84 00:40:9D:36:B2:84(192.168.0.216) with deviation of 0 ms
auto-sync_00-40-9d-36-b2-84, 03/24/2009 06:55:27, STARTUP TIME SYNC, Info, Time sent to the clock = 03/24/2009
06:55:27
auto-sync_00-40-9d-36-b2-84, 01/00/1900 00:00:48, STARTUP TIME SYNC, Info, Connected to time server < Univ. of
Washington >
Figure 4-24. Example of a Transaction File.
At the same time a Backup transaction text file is created, a Backup transaction
binary file is also created. This binary file can be used by the Restore utility to
restore the transaction database in a clock. This should only be necessary if the
clock’s flash memory was reset. The following figure shows a Backup configuration
and transaction file for the same clock on an FTP Server. In the illustration, the first
file labeled “36-b0-4d_ATVSConfig.bin” is the configuration file for that clock. The
highlighted file (see Figure 4-25) called “ATVSConfig.bin” is the shared
configuration file for multiple clocks. This file can be used by the Auto-Sync Utility
to copy this configuration to multiple clocks.
Figure 4-25. FTP Server Configuration & Transaction Files.
4-26 724-746-5500 | blackbox.com
Page 61

Chapter 4: Operation
To restore a Configuration & Transaction file in the clock:
1. From the Backup/Restore link under Utilities,
perform a restore for the Auto-Sync Time Clock (see Figure 4-26).
2. Click on the drop down menu to select the type of data you want to restore. The
choices are: Configuration, Transaction, or Both.
3. Select the radio button for “Are you restoring this clock based on shared
settings or is it specific to this clock only? The choices are: Specific, or
Shared. Select Specific if you are restoring only the clock you are connected to.
Select Shared if you are using the shared settings file (possibly a different clock)
to transfer to this clock. See Figure 4-25 for an example of a shared
configuration file. The shared file does NOT have the MAC address. It is
important to note, that when restoring a clock all the information will be
changed except for the clock name. The current name in the clock will remain
unchanged so that clock retains this unique identifier.
NOTE: The transaction file CANNOT actually be shared by multiple clocks even
though you might have selected Yes to share. You CANNOT restore a
shared transaction file. This is prevented to maintain each clocks
transaction record for OATS compliant record maintenance.
click on the Restore tab to
Figure 4-26. Restore Utility.
4. Click on the
the restoration status will be displayed once the operation has been completed,
i.e., “Successfully restored configuration from file 36-b0-4d_ATVSConfig.bin.”
button to perform the file restoration in the clock and
724-746-5500 | blackbox.com 4-27
Page 62

Auto-Sync Time Clock
NOTE: The restore utility is recommended to be used when the clock has been
reset to factory default settings. It can also be used to copy the
configuration settings from one clock to a single clock. It is recommended
to use the Auto-Sync Utility for Updating the configuration of multiple
clocks. The error message “Can’t open FTP connection” will appear if an
FTP Server cannot be detected, i.e., has not been setup in the Utility
Settings.
4.1.12.3. Reports Utility
The Auto-Sync Time Clock has a built in flash memory, which stores time
synchronization transactions. The transaction report settings can be used to view
and/or save a report file based on the filter criteria defined on the Settings screen
to a text file on an FTP Server. The key function occurring here is the creation of
filter criteria for transaction reports that can be viewed and/or saved to a text
formatted file. For example, to create a transaction report for successful sync
attempts between 8:00am on Nov 17, 2008 and 9:00am on April 29, 2009, select a
Transaction Type = Successful, and Date Selection = Date Range, with a Start
Date = Nov 17, 2008 and Start Time = 08:00, and End Date = Apr 29, 2009 with
End Time = 09:00.
1. Click on the Reports link under Utilities
show the Settings tab (see Figure 4-27).
2. Select the Order you want the report data to appear in.
3. Select the Transaction Type you want from the dropdown menu. The choices
are: All, Failure, or Successful (default = All).
Figure 4-27. Reports Settings.
, and the Reports screen will appear to
4. Select the Date Selection for the transaction report data from the dropdown
menu. If Date Range is selected you must enter the Start & End Date and Time
for the range by using the drop down menus. The date choices are; Today,
Current Week, Current Month, and Date Range (default = Today).
4-28 724-746-5500 | blackbox.com
Page 63

Chapter 4: Operation
5. Click on the button to save the report settings.
6. Click on the View Transactions tab to view the transactions based upon the
previously defined and saved settings (see Figure 4-28). All failed
synchronizations will appear in red when viewed in the browser. See the
following for a transaction view examples:
01/08/2009 09:44:14 : - USER TIME SYNC - Trying to connect to time server
< Internal Time >
01/08/2009 09:45:17 : - USER TIME SYNC - Invalid time server or time
server not responding.
01/08/2009 09:45:17 : - USER TIME SYNC - Trying to connect to time server
< Univ. of Washington >
01/08/2009 09:45:17 : - USER TIME SYNC - Connected to time server <
Univ. of Washington >
All manually forced time syncs will appear in orange in the transaction
report when viewed with the browser. See the following example:
01/12/2009 15:36:27 : - USER - Clock has been reset
01/12/2009 15:37:46 : - STARTUP TIME SYNC - Time from time server < Univ.
of Washington > is 01/12/2009 15:37:46
All sync retries will appear in blue when viewed with the Reports –
“View Transactions”. See the following example which indicates a failure on
the first sync retry and then a connection.
01/14/2009 07:49:00 : - USER TIME SYNC - Attempting to sync to time server
: Retry # 1 time(s)
01/14/2009 07:49:00 : - USER TIME SYNC - Connected to time server < Univ.
of Washington >
The following types of time sync descriptions can appear in the transaction reports:
“STARTUP TIME SYNC” - Used to designate that the clock has just been powered
up. Upon power up, the Auto-Sync Time Clock will automatically attempt to sync
with the first enabled and available time server. The Auto-Sync Time Clock contains
an internal perpetual calendar which includes the date, time, and DST.
“SCHEDULED TIME SYNC” – Used to designate that a scheduled time sync has
been performed (see How to Setup Time Synchronization Schedules in Chapter 4).
724-746-5500 | blackbox.com 4-29
Page 64

Auto-Sync Time Clock
“USER TIME SYNC” – Used to designate that a manual time sync has been
performed using the Reset function from Diagnostics (see How to Reset the Clock in
Chapter 6).
Figure 4-28. View Transactions Example.
NOTE: The display will only show 25 transactions. Click the or
buttons to move backward or forward 25 transactions in the display. When
the transaction file is saved as a file, the filename will end in “_rpt” (see
Figure 4-24 for an example of a transaction file). If a transaction file has to
be restored, the only file used will be the Backup transaction file.
7. Press the
FTP Server. These settings will be used to select the transaction data when
viewing and/or saving a transaction report to a text file . The transaction report
created here will be very similar in structure to the transaction report created by
using the Backup Utility. However, the name of the file will end with the date
that it was saved to a file. See the following figure for an example of a saved-tofile report (highlighted) versus the other transaction report where the file name
ends in “36-b0-4d_ATVStrans”.
button to save the Transaction Report as a text file on a
Figure 4-29. FTP Files For Reports.
4-30 724-746-5500 | blackbox.com
Page 65

Chapter 5: Utility
5. Getting Started
It is recommended to install the Auto-Sync Utility for ease-of-use to discover and
connect to your Auto-Sync Time Clock(s). This utility eliminates the need of having
to use Bonjour with your browser, which for Internet Explorer might require that
you download and/or install the Bonjour plug-in. The utility also provides the easyto-use function of getting clock configuration and/or transaction files plus the ability
to download firmware, configuration, and IP address from files.
5.1. Installing the Auto-Sync Utility
1. Close any open Windows application, and insert the Auto-Sync Utility CD that
came with your clock into the disk drive. The installation should start
automatically. If the installation stalls: click on Start, select Run, and type
D:\setup.exe (where D is the computer CD drive letter).
2. When “Welcome to the InstallShield Wizard for Auto-Sync Utility” appears, click
on the Next button to continue and follow the on screen prompts to perform the
Utility installation.
Figure 5-1. Auto-Sync Utility InstallShield Wizard.
NOTE: The following Setup Maintenance screen (see Figure 5-2) only appears if
you already have the Auto-Sync Utility installed on your PC. The Setup
Maintenance program allows you to Modify, Repair, and Remove the
program. In most instances you probably will not see this screen.
724-746-5500 | blackbox.com 5-1
Page 66

Auto-Sync Time Clock
Figure 5-2. Setup Maintenance.
3. When the “InstallShield Wizard Complete” screen appears, click on the Finish
button to end installation and launch the utility, if checked (see Figure 5-3).
Figure 5-3. Finish Install of Auto-Sync Utility.
5.2. Using the Auto-Sync Utility
The following procedures discuss how to use the Auto-Sync Utility. The main
function of this utility is simple location (discovery) and connection to a Auto-Sync
Time Clock (see Chapter 4 of this Guide for more details on clock configuration
utilizing a browser).
However, this utility can also be used to:
Create a centralized transaction report for multiple Auto-Sync Time Clocks using
all the transaction data or a selected data range. For example, create an HTML
formatted report of transactions for August 10, 2010 through August 25, 2010
(see Figure 5-10).
Besides initial discovery, this utility could be used at any time to connect to a
clock for configuration edits (i.e., edit a Time Server). Use of this function
requires knowledge of the clock operation concepts described in Chapter 4 of
this Guide.
5-2 724-746-5500 | blackbox.com
Page 67

Chapter 5: Utility
Replicate a previously created clock configuration to multiple clocks with the
feature. Using this function requires knowledge of the
operation concepts described in Chapter 4 of this Guide.
Update the clock firmware, download configuration, and load IP file.
Monitor clock status by showing on-line/off-line clocks.
Use Settings feature to:
- Change and/or select Domain names
- Define email server settings and enable/disable
- Define service port (default = 7).
5.2.1. How to Discover & Connect to a Auto-Sync Time Clock
1. Startup the Auto-Sync Utility to automatically search for Auto-Sync Time Clocks.
When the desired clock appears on the list, double-click on it to open to the
clock login with your browser.
Skip to Step 3 if clock is discovered.
All of the discovered Auto-Sync Time Clocks should be displayed in a list with
the Domain, Device Name, IP Address, MAC Address, and Status (see
Figure 5-4).
If the Utility fails to discover the clock(s), or you need to change
settings, proceed to Step 2.
NOTE: The Auto-Sync Time Clock default domain = local and the default Device
Name = auto-sync_ plus the clocks MAC address
(i.e., auto-sync_00:00:00:00:00:00). In computer networking, a Media
Access Control address (MAC address), is a quasi-unique identifier assigned
to most network adapters or network interface cards (NICs) by the
manufacturer for identification.
Figure 5-4. Auto-Sync Utility Auto Discovery.
724-746-5500 | blackbox.com 5-3
Page 68

Auto-Sync Time Clock
2. From the main menu, click on the View menu and select the submenu
Settings. The Settings and Auto discovery tabs will appear on top. If necessary,
from the Settings screen, click on the Discovery Settings tab to change the
discovery settings.
This step is optional and should usually be skipped. Only perform this step if you
are having discovery problems and need to change the Domain Name, and
timeout value.
Enter a new Domain Name if a different one other than the default of local is
desired. You can change the clock discovery timeout if greater than the 1 minute
default is desired.
The default factory setting on the Auto-Sync Time Clock is “Local Area Service
Discovery’ so that clocks on network1 can only be discovered and managed from
a PC connected to network1. See Chapter 7 of this Guide for Wide Area clock
discovery information.
After entering Discovery
Settings, click on red arrow
to include the domain,
select domains, and then
click Auto discovery tab to
search.
Figure 5-5. Utility Settings.
Once these changes have been made, click on the Auto Discovery tab to return
to that screen, and click the Start Discovery
button to begin the search
again with the new discovery settings to generate a list of located clocks.
3. When the clock(s) appears in the list, follow the tool tip and double-click on the
desired Auto-Sync Time Clock to launch your browser and open to the clock’s
web login (see Figure 5-6).
5-4 724-746-5500 | blackbox.com
Page 69

Chapter 5: Utility
Default clock name with
MAC address at the end.
Figure 5-6. Auto-Sync Time Clock Login.
If this is your first time logging into the clock, enter the default
Username = Admin
Password = password
If this is not your first time logging into the clock, enter your case-sensitive
Username (max = 20 characters) and your Password (max = 15 characters),
then click on the Login button and the Auto-Sync Time Clock Information
page will appear (see Figure 5-7). ONLY 1 user can be logged into a clock.
Link Selections
Navigation
Menu Selections
Figure 5-7. Auto-Sync Time Clock Homepage.
NOTE: If no activity between the user and the clock occurs using the browser
within 5 minutes, your web connection with the clock will timeout. Please
log back in.
NOTE: See Chapter 4 for operational details on how to configure your Auto-Sync
Time Clock.
724-746-5500 | blackbox.com 5-5
Page 70

Auto-Sync Time Clock
5.2.2. How to Create a Centralized Transaction Report
NOTE: Before using this function of the Auto-Sync Utility you MUST have
performed a Backup of each clock to have created a text transaction report
file. Also, all the desired report files must be in the same folder.
1. Startup the Auto-Sync Utility. All of the discovered Auto-Sync Time Clocks will
automatically appear in a list with the Domain, Device Name, IP Address,
MAC Address, and Status.
2. From the main menu, click on View and select Advanced options Report
submenus.
3. From the Utility Report screen, select the desired file format from the dropdown
choices of HTML or text.
4. Enter the desired Start/End dates and time for the transaction report date
range, or click on the box for “All time sync data” and a report will be
generated utilizing all the data from the appropriate “ATVSTrans.txt” files.
Figure 5-8. Auto-Sync Utility Report Tab.
5. Click on the Browse button to use the Windows Select Directory dialog (see
Figure 5-8) to navigate to the folder where the “MAC address_ATVSTrans.txt”
backup
NOTE: The “MAC address_ATVSTrans.txt” backup
files are to use for the report.
file for each Auto-Sync Time
Clock that is being used to create the transaction report for the Auto-Sync
Time Clocks can be found at the same FTP location (directory path) where
they were saved. You may want to copy these files to another
location/folder to create the transaction report.
6. You should see the files you want to use in the “Files *.*” listing on the Select
Directory screen (see Figure 5-9). Click the OK button to close the Select
Directory screen. The default location path will be: C:\Program Files\Auto-Sync
Utility\Transactions\Temp.
5-6 724-746-5500 | blackbox.com
Page 71

Chapter 5: Utility
Figure 5-9. Select Report Directory.
7. Press the “Generate Report from File(s)” button and the utility will create the
report and automatically open when complete. The report will be created and
saved in the same folder with the transaction files that were used to create it.
Date Range Selected.
Clock name.
Transaction Info with
example of successful
sync shown in blue.
Figure 5-10. Example of Transaction Report Created with Auto-Sync Utility.
724-746-5500 | blackbox.com 5-7
Page 72

Auto-Sync Time Clock
NOTE: The transaction file will automatically be named auto-
sync_time_sync_report.html or .txt (see Figure 5-9). The transaction report
file created in either html or text format can be easily edited. Every time
you create a report file the previous report file will be overwritten. It is
recommended to move the report file to a different location if you do not
want that to happen.
5.2.3. Advanced Function of Downloading to Auto-Sync Time Clocks
The downloading procedures assume you have read and understand the concepts
described in Chapter 4: Auto-Sync Time Clock Operation. These procedures also
assume that you have previously configured a clock and created a shared
“config.bin” for that clock. This must have been done first for you to have this file
to transfer to other clocks. A key feature of the Auto-Sync Utility is that it allows
you to perform the Update Configuration function on multiple clocks.
NOTE: Using the Restore function, from the clock Utilities (see Chapter 4) web
page will only allow you to download to the one clock that you are
connected to.
Connecting to Auto-Sync Time Clock(s) and downloading the configuration
information from a “ATVSConfig.bin” file can be accomplished via two methods;
“Auto Discovery” and “Manual Discovery”. Auto Discovery is used if you do not
know the clock(s) IP Address, while Manual Discovery would be used if you did
know the clock(s) IP address. If you should forget a clocks IP address, simply
reboot the clock by pressing the Reset button and the clock will flash its IP address
as it starts up.
Auto Discovery Procedure for download:
1. Startup the Auto-Sync Utility. All of the discovered Auto-Sync Time Clocks will
automatically appear in a list with the Domain, Device Name, IP Address,
MAC Address, and Status. Select the desired Auto-Sync Time Clock(s) from
the list by clicking in the “Select” column (see Figure 5-11). Click “Select All
Clocks” to select/deselect all discovered clocks (this is the default).
2. From the main menu click on View and select the Advanced options
Download submenus.
5-8 724-746-5500 | blackbox.com
Page 73

Chapter 5: Utility
Browse to
Click on desired clock(s)
Operation status will be displayed here
ATVSConfig
(.bin) file
stored on FTP
server
Figure 5-11. Auto Discovery Download.
3. Browse to select the shared clock file using the Windows Open dialog
(see Figure 5-12). For example, this file could be a configuration file labeled
“ATVSConfig.bin” and in this example, this file was previously created as a
shared configuration file using the clock Backup Utility (see Chapter 4: Utility
Settings for FTP Server). This “ATVSConfig.bin” file was created from an AutoSync Time Clock that was already configured via the web interface. In effect,
what this utility is allowing you to do is to replicate the configuration of a
previously configured clock to multiple clocks through the Update Configuration
function.
Look – This file should be stored on the FTP Server which was configured
in the Utilities Settings for the Auto-Sync Time Cock (see Chapter 4:
Utility Settings for FTP Server ).
Figure 5-12. Windows Open Dialog.
724-746-5500 | blackbox.com 5-9
Page 74

Auto-Sync Time Clock
4. Once you have located the original configuration file, click on the now active
button to download the clock configuration file to the selected
clock(s).
NOTE: It is recommended to perform a Backup
Utility before performing any clock firmware updates. FAILURE to do this
could result in loss of clock configuration and/or the transaction database!
NOTE: If updating clock firmware, click on the
to and selecting a clock firmware file. ONLY PERFORM this function if Black
Box recommended. When performing a firmware update, the file would
have an “image.bin” name and probably be stored in a different location.
Otherwise, this function is not normally used.
Manual Discovery Procedure for download:
1. With the Advanced options Download open, click on View Advanced
options Manual discovery to enter the IP Address for the desired clock, and
press the
(see Figure 5-13). Use this same procedure to manually add other Auto-Sync
Time Clocks to the list.
button to add the clock to the list of Auto-Sync Time Clocks
from the built-in clock Backup
button after browsing
Operation status displayed here
Figure 5-13. Manual Discovery Download.
2. Browse to select the clock “ATVSConfig.bin”” file using the Windows Open dialog
(see Figure 5-12).
3. Click on the
the selected clock(s) in the list that was manually created. Click “Select All
Clocks” (the default) to select/deselect all discovered clocks, or click on each
desired clock.
button to download the clock configuration file to
5-10 724-746-5500 | blackbox.com
Page 75

Chapter 5: Utility
NOTE: It is recommended to perform a Backup from the built-in clock Backup
Utility before performing any clock firmware updates. FAILURE to do this
could result in loss of clock configuration and/or the transaction database!
NOTE: If updating clock firmware, click on the
to and selecting a clock firmware file. ONLY PERFORM this function if Black
Box recommended. When performing a firmware update, the file would
have an “image.bin” name and probably be stored in a different location.
Otherwise, this function is not normally used.
button after browsing
5.2.4. Auto-Sync Time Clock Menu Selections
With the Auto-Sync Utility open, from the main menu use the buttons, and/or
perform the following functions, if necessary.
Menu Buttons
Start Auto-Sync Time Clock discovery – Use this
restart (rerun) the auto discovery, and generate a new list.
End Auto-Sync Time Clock discovery – Use this
the auto discovery.
Save Settings – Use this
the Settings tab for Domain Name and Clock Discovery Timeout. This
information will be saved in auto-sync_config.INI file.
button to save the settings you have defined on
button (if active) to
button (if active) to stop
Print clock information – Use this
all discovered Auto-Sync Ti me Clocks with the IP address, MAC address and
name.
File Menu Functions
Refresh – Use this function for quick start/stop restart (rerun) the auto
discovery, and generate a new list.
Reset Status – Use this function to reset (refresh) the displayed status column
after performing an update. This command always resets the status to Ready,
Updated (configuration or firmware updated), and Failed (configuration or
firmware update failed).
Exit – Use this function to close the Auto-Sync Utility.
to print to your default printer a list of
724-746-5500 | blackbox.com 5-11
Page 76

Auto-Sync Time Clock
View Menu Functions
Settings – Use this function to enter discovery settings for Domain name to
allow discovery in multiple domains. Also, set clock discovery timeout of
Auto-Sync Utility function. Domains can be deleted from the list to browse
(see Figure 5-14).
NOTE: Each domain will be searched for the amount of time set in the “Clock
discovery timeout” field before searching the next domain in the “List of
domains to browse” list on the right (see Figure 5-14 for an example).
Figure 5-14. View Utility Settings – Discovery Settings.
Click on the Monitoring Settings tab to enter Mail Server Settings (see
Figure 5-15) to;
- Enable/disable email notification; enter the monitoring refresh frequency
for email notification (default = 60 mins.);
- Enter SMTP Server host name/IP address,
- Enter port used (default = 25),
- Enable/disable authentication.
NOTE: Enter the amount of time in minutes in the “Monitoring Refresh Frequency”
field (see Figure 5-15 for an example with 60 minutes selected) that you
want the clock status screen updated (see Figure 5-19). In this example, if
the Auto-Sync Utility is running the clock monitoring screen will be
refreshed every 60 minutes.
5-12 724-746-5500 | blackbox.com
Page 77

Chapter 5: Utility
Figure 5-15. View Utility Settings – Monitoring Settings.
From the Monitoring Settings tab click on the Mail Account Settings
(see Figure 5-16) to;
- Enter email from and To address used for email notification;
Figure 5-16. View Utility Settings – Monitoring Account Settings.
Click on the Other Settings tab (see Figure 5-17) to;
- Enter the service port number (the default = 7). Enter any unused port
number from 1 thru 65535. The service port allows the user to initiate an
operation from an external application using the built-in TCP service from
the clock that is running and listening to a specific port to execute the
task.
Figure 5-17. View Utility Settings – Other Settings.
724-746-5500 | blackbox.com 5-13
Page 78

Auto-Sync Time Clock
Log – Use this function to view a continuous log of Auto-Sync Utility functions
(see Figure 5-18) from the auto-sync_Util.log file. The log is arranged in
ascending order by date.
Figure 5-18. View Utility Log Information.
Advanced options – Use this menu to perform the advanced Auto-Sync Utility
functions, which include the previously discussed Manual discovery, Download
and Report functions.
From Advanced options you can elect to monitor the status for all discovered
clocks and the following type of screen will appear:
Figure 5-19. Clock Status Monitoring with Utility.
NOTE: All on-line clocks will be green while all off-line clocks are red.
From Advanced options you can elect to get Clock Config/Transaction file
from selected or all discovered clocks and the following type of screen will
appear:
5-14 724-746-5500 | blackbox.com
Page 79

Chapter 5: Utility
Figure 5-20. Auto-Sync Utility Get Configuration File.
NOTE: Operation status will appear below. Press the clear button to clear status.
From Advanced options Clock Config/Transaction file to;
Get selected clock configuration: copy the configuration file from the
selected clock to a binary file with the name “ATVSConfig.bin”. This file will be
located in a folder called Configuration at the following path Program
Files/Auto-Sync Utility/Configuration. If multiple clocks are selected, the
first clock downloaded will be the one copied to this file. If another clock is
copied to that file at a later date then the configuration will be updated with that
information. See the status window in Figure 5-20 for an example of
configuration file download.
Get Transactions: copy the transaction file from the selected cloc k to a text file
with the name of the clock [for example “3c-0d-e8_Trans.txt”].” This file will be
located in a folder called Configuration at the following path Program
Files/Auto-Sync Utility/Transaction. If multiple clocks are selected, all the
selected clocks downloaded will be the one copied to this folder. If a report is
created from these files using the utility, any transaction file in the folder will be
included in the report (see Figure 5-21). See the status window in Figure 5-21
for an example of configuration file download.
Clear Transactions: clear all sync transactions stored in the clock.
Reset Config: Reset the clock configuration to factory default settings. This
command could be used to reset the configuration if the Username/password
was lost.
Factory Reset: Clear all transactions and reset clock configuration to factory
default.
724-746-5500 | blackbox.com 5-15
Page 80

Auto-Sync Time Clock
Figure 5-21. Auto-Sync Utility Get Transaction File.
Sort By – Use this function to resort the list of discovered Auto-Sync Time
Clocks by; Device Name, MAC Address, IP Address, Status, and Version
(firmware). The list will automatically be generated in the order that the clocks
are discovered.
Clock Firmware version – Use this function (see Figure 5-22) to show the
clock firmware version in the list of discovered Auto-Sync Time Clocks. If left on
Hide, the list will be generated without listing the version for the discovered
clocks.
Figure 5-22. Show Firmware Version.
5-16 724-746-5500 | blackbox.com
Page 81

Chapter 5: Utility
Help Menu Functions
About – Use this function to display the About screen (see Figure 5-23). Click
on the OK button to close.
Figure 5-23. Auto-Sync Utility About Screen.
User Guide – Use this function to open the PDF version of the Auto-Sync Time
Clock User Guide from the Auto-Sync Utility CD.
724-746-5500 | blackbox.com 5-17
Page 82

Auto-Sync Time Clock
This page intentionally left blank.
5-18 724-746-5500 | blackbox.com
Page 83

Chapter 6: Maintenance
To prevent damage to the Auto-Sync Time Clock, it is recommended to use only
paper type media. Special care should be taken to avoid inserting paper with
staples, paper clips, or other fastening devices directly under the print frame as
damage can occur. Care should also be taken when inserting and removing paper
from the clock. Upon inserting, make sure the paper does not bend or crumple,
because it may jam the machine. Before attempting to remove the paper you
should wait until the unit has completed its print cycle. The clock secures the paper
by clamping down on it, so if you attempt to remove the paper too soon it may tear
inside the machine. It is recommended to periodically clean the inside of the
machine. This is accomplished by using a can of pressurized air to blow out paper
dust. A good time to perform this preventative maintenance is when you are
changing the print ribbon cartridge.
6. Auto-Sync Time Clock Diagnostics
The Web Clock diagnostics can be used to determine the version of the clock
firmware, reset the clock configuration and/or transactions, check the LCD display
on the clock, reset the print number, display the print settings, display the actual
clock configuration, and display the status of the clock.
6.1. How to Display Clock Configuration
1. Click on the Diagnostics link under Clock
will appear.
2. Click on the
configuration information (see Figure 6-1).
NOTE: This information is read only
the current status of the clock. Any clock errors such as E4 Prt printing
plus
error would appear in red on this screen (see Figure 6-1).
(non-editable) and displays the clock settings,
, and the Clock Diagnostics screen
button to display the Web clock
Figure 6-1. Show Clock Configuration.
724-746-5500 | blackbox.com 6-1
Page 84

Auto-Sync Time Clock
6.2. How to Manually Time Sync the Clock
Use this function to ensure the clock is able to sync with the desired time server,
and/or force a time sync to set the time.
1. Click on the Diagnostics link under Clock
, and the Clock Diagnostics screen
will appear. Then click on the Time Sync tab and the Time Sync screen will
appear (see Figure 6-2).
Figure 6-2. Manual Time Sync Clock.
2. Select Yes and press the
button to manually Time Sync the clock.
The status of the synchronization will be displayed. If everything is performed
within the configured deviation you will see “Successful” in the Status field.
NOTE: This operation does not change time sync schedules. A manual time sync
will be designated in the transactions report as a “USER TIME SYNC”. See
the following example, which was obtained by using “View Transactions” in
the Reports Utility.
01/06/2010 09:40:13 : - USER TIME SYNC - Successfully sync
time to the clock : Auto-Sync (Marketing)
00:40:9D:36:B0:4D(192.168.0.225) with deviation of 954 ms
01/06/2010 09:40:13 : - USER TIME SYNC - Time sent to the
clock = 01/06/2010 09:40:13
6-2 724-746-5500 | blackbox.com
Page 85

Chapter 6: Maintenance
6.3. How to Perform LCD Display Clock Diagnostics
1. Click on the Diagnostics link under Clock, and the Clock Diagnostics screen
will appear. Then click on the LCD Display tab and the LCD Display screen will
appear (see Figure 6-3).
Figure 6-3. LCD Display Clock Diagnostics.
2. Press the
segments/symbols on the clock LCD (see Figure 6-4). This allows the user to
verify that all segments and symbols work. After the LCD test is invoked, if
desired, press the
automatically terminate after 15 seconds.
button to test the clock LCD display by lighting all the
to manually terminate the test. The test will
Figure 6-4. LCD Test Display.
6.4. How to Reset the Clock
1. Click on the Diagnostics link under Clock
will appear. Then click on the Reset tab and the Reset screen will appear
(see Figure 6-5).
, and the Clock Diagnostics screen
724-746-5500 | blackbox.com 6-3
Page 86

Auto-Sync Time Clock
Status Area
Information
Figure 6-5. Clock Reset.
NOTE: If any of the clock reset commands fail, you will see a red “Failed” in the
status area. All of the reset commands will appear in the transaction report
highlighted in orange. See the following for an example of reset commands
when using View Transactions from the Reports Utility
:
01/06/2009 08:46:26 : - USER - All
transaction(s) have been deleted
01/06/2009 08:47:13 : - USER - Clock
print counter has been reset to : 1
2. Select Yes for, “Do you want to clear transactions?” and clear the clock
transactions by pressing the Clear Transactions button. The status will be
displayed after the operation. If everything is Ok, you will see “Successful” in
the Status field. This only clears the clock transactions from the flash memory,
i.e., sync information.
3. Select Yes for, “Do you want to do a complete clock reset?” to clear the
clock transactions and reset the clock configuration to factory default settings by
pressing the
button. The status will be displayed af ter the operation.
If everything is Ok, you will see “Successful” in the Status field. This clears the
clock transactions and all user configurations from the flash memory, i.e., sync
information, schedules, users, etc.
NOTE: This operation will reboot the clock, which means that you will
automatically be logged off the clock and the Login screen will appear. The
clock name will be reset to the default name (see Figure 3-4), and the clock
will temporarily disappear from the list of Bonjour devices and then
reappear with the default name. However, it is recommended to use the
“Reset” button to clear an error message (see Figure 6-9).
6-4 724-746-5500 | blackbox.com
Page 87

Chapter 6: Maintenance
4. Select Yes for, “Do you want to reset the print number?” by pressing the
button. The status will be displayed after the operation. If
everything is Ok, you will see “Successful” in the Status field. This will reset
the Print Number to 1 or to any value specified.
6.5. How to Perform Remote Connection Test
1. Click on the Diagnostics link under Clock
will appear. Then click on the Remote Connection Test tab and the Remote
Connection Test screen will appear (see Figure 6-6).
, and the Clock Diagnostics screen
Status Area
Information
Figure 6-6. Clock Reset.
NOTE: If any of the clock’s single or multiple connection (i.e., connection to an
enabled time server) commands fail, you will see a red error in the status
area. Also, if FTP, E-Mail, and SNMP Traps are configured, they will be
checked.
2. Enter the remote host name/IP address and press the Test Single Connection
button. The status will be displayed after the operation. If everything is Ok, you
will see “Successful” in the Status field. This checks the connection between
this clock and a remote host.
3. Press the Test Multiple Connection button to check the connection of the clock
with enabled Time Servers and DNS Servers using some of the clock’s
configuration. The status will be displayed after the operation. If everything is
Ok, you will see “Successful” in the Status fields.
724-746-5500 | blackbox.com 6-5
Page 88

Auto-Sync Time Clock
6.6. Display Messages
6.6.1. Normal Startup
When the AC power is connected to the clock, the display on the clock will flash
“boot”, then sequentially display the complete IP address twice, and finally show
the normal display of date and time. See the following figure for an example.
For example, an
IP =
192.168.57.106
would display
st
192
1
nd
2
168
rd
3
57
For Auto-Sync Time Clock with no network connection
During the clock power up sequence, if the clock cannot make a network
connection, it will flash 0.0.0.0 for the IP Address. If this happens, please verify
that the clock is connected.
6.6.2. Colon Status
For Auto-Sync Time Clock equipped with FPR Option Only
If the AC power is connected to the clock, the display colon will “flash.” Upon loss of
AC power, the display colon will remain constant to indicate that the clock with
printing capability is currently running from the battery which has a 6 hour or 400
print cycle capacity.
For Auto-Sync Time Clock equipped with PoE and FPR Option
When the PoE is operating corre ctly and charging the FPR battery plus helping to
power the clock, the display colon will “flash.” Upon loss of PoE power, the display
colon will remain constant to indicate PoE failure and that the clock with printing
capability is currently running from the battery which has a 6 hour or 400 print
cycle capacity.
6-6 724-746-5500 | blackbox.com
Page 89

Chapter 6: Maintenance
6-7. Colon Status.
6.6.3. Time Synchronization Validation
At a pre-determined time of the day and day of the week (see How to Setup Time
Synchronization Schedules), the Auto-Sync Time Clock can be set to confirm or
validate that a time/date synchronization signal has been received. This is called
time synchronization or “Signal Validation".
The factory default time validation is set for 00:00 or (12:00 AM midnight), Sunday
through Saturday. Time Signal Validation sync schedules 2 thru 8 are set via the
web interface. Each schedule template can be set to run a minimum of every 120
minutes, with a maximum of once every 1439 minutes (see Figure 4-21).
These schedules can be used to alert the user that a date/time synchronization
signal has not been received. If a successful time validation does not occur within a
24 hour period, the Auto-Sync Time Clock will flash six day indicators (cursors),
while the day indicator associated with the current day of the week will not flash
(see Figure 6-8).
Figure 6-8. Failed Time Synchronization Display.
In addition to the flashing day indicators, during the print cycle, the clock will print
a block (█) instead of an “s” at the end of a print line to indicate that this failed
time sync condition has occurred (see the following example).
Print Example = 2008/07/08 18:30 15█
Seconds must be selected to be printed for this error message to be seen.
6.6.4. Error Messages
In the event of an error, a message will appear in the display. The possible error
messages are listed in the following Table along with their probable causes and
solutions.
724-746-5500 | blackbox.com 6-7
Page 90

Auto-Sync Time Clock
NOTE: An error message can be cleared by removing the cover and pressing the
“Reset” button (see Figure 6-9). The Reset button will NOT clear the
configuration and/or transaction information (i.e., DST & print line styles)
stored in the clock flash memory. Conversely, it is not recommended to
clear an error by using the Reset command from the clock web interface as
this could reset the clock configuration.
Figure 6-9. Reset Button Location.
Error
Message
Discharged FPR
L0 bA
E r Pr General Print Error.
E I Pr
FPR battery cable
No AC power.
Home Sensor
Motor, Carriage
Stuck.
Cause Solution
battery.
not connected.
Table 6-1. Error Messages.
Verify that the battery cable for the FPR is
connected and connect the power cord to AC
source. Allow FPR battery to recharge for 24
to 48 hours.
Unlock cover and remove. Press the Reset
button (see Figure 6-9). If the error clears,
try to stamp a card. If the unit stamps
without having the error message come up
again replace the cover and lock. The
configuration is still programmed in the
clock.
Unlock cover and remove. Set Auto-Sync
Time Clock on side with the ribbon side up.
Press the Reset button to reset the printer
carriage and blow air into the printer platen
to remove or dislodge jammed objects
(i.e., staples).
6-8 724-746-5500 | blackbox.com
Page 91

Chapter 6: Maintenance
Error
Message
E 2 Pr
E 3 Pr
and
E 4 Pr
Timing Sensor,
Carriage Stuck.
Home Sensor,
Carriage Stuck.
Cause Solution
Unlock cover and remove. Set Auto-Sync
Time Clock on side with the ribbon side up.
Press the Reset button to reset the printer
carriage and blow air into the printer platen
to remove or dislodge jammed objects. If
the error reoccurs, check the wires and
cables to verify all are connected properly.
Unlock cover and remove. Press the Reset
button to reset the printer carriage and the
time should reappear on the display. Try to
stamp a card again so you can hear the
machine attempting to stamp. If you hear
that the assembly sounds sluggish or drags,
it is recommended that the frame be relubricated with either silicone or white
lithium grease. See the following figure for
location. (DO NOT use WD-40 as it will
damage the plastic components.
NOTE: Print errors can be caused by the absence of grease on the printing carriage
mechanism. If this occurs, the carriage mechanism may not slide smoothly.
This movement restriction may cause the printer to display a print error
and stop working. If this occurs, apply white silicone grease to the
horizontal metal plate that the carriage mechanism slides against
(see Figure 6-10).
Figure 6-10. Ribbon Carriage Grease.
724-746-5500 | blackbox.com 6-9
Page 92

Auto-Sync Time Clock
Should you need further assistance in clearing an error message:
1. Visit our website at: http://www.blackbox.com
2. Call us 24/7 at: 1 (724) 746-5500 or fax (724)-746-0746
3. E-mail us at: info@blackbox.com
NOTE: There is no ribbon life counter which shows the remaining ribbon life.
However, the ribbon cartridge generally has a life span of approximately
6,000 print cycles.
The Black Box Part numbers for the Auto-Sync Time Clock Ribbon Cartridges are:
Black ink ASTCRCB
Green ink ASTCRCG
Red ink ASTCRCR
When ordering parts and/or accessories, be sure to include your Auto-Sync Time
Clock model number and the serial number which is located on the bottom of the
clock.
6.7. How to Replace the Ribbon Cartridge
6.7.1. Ribbon Cartridge Removal
1. Remove the cover.
2. Looking at the right hand side of the machine, pull the
two catches (B) upward. While holding the catches up,
use your other hand to remove the ribbon cartridge.
6.7.2. Ribbon Cartridge Installation
1. Insert the top of the ribbon cartridge first.
2. Then swing the lower portion of the ribbon cartridge into
position.
3. Turn the knob on the ribbon cartridge two or three times
to reduce any slack in the ribbon.
4. Replace the cover and lock.
6-10 724-746-5500 | blackbox.com
Page 93

Chapter 7: WAN Service Discovery
This chapter discusses special issues that might be related to configuring the AutoSync Time Clock for Wide Area Network (WAN) service discovery.
7. Wide Area Service Discovery
“Wide Area Service Discovery” is the expansion of mDNS protocol, which allows the
devices to register their services in the companywide DNS server so they can be
discovered across the subnets. The Auto-Sync Time Clock comes with a built-in
feature of “Wide Area Service Discovery” so the clocks connected to one network
can be remotely discovered and managed from a PC connected to another network
(see Figure 7-1).
Figure 7-1. WAN Service Discovery.
7.1. Wide Area Service Discovery Setup
The default factory setting on the Auto-Sync Time Clock is “Local Area Service
Discovery” so that clocks on network1 can only be discovered and managed from
the PC connected to network1.
To configure the clock for Wide Area Service Discovery:
1. Setup your DNS server to update non-secure dynamic updates. Make sure the
firewall is not blocking UDP port 53 on the DNS server.
2. Click on the DNS Servers link under Time Sync
Settings screen will appear displaying the four (4) default public DNS servers
(see Figure 7-2).
, and the DNS Servers
724-746-5500 | blackbox.com 7-1
Page 94

Auto-Sync Time Clock
Figure 7-2. Configure DNS Server Settings.
3. Change the domain name from “local” to the domain name of your network. For
example, you companywide domain name might be “apple.com” or “dnssd.org”.
4. Enter the IP address of your companywide DNS server as one of the four DNS
servers in the list.
5. Click the
could take 1-2 minutes to complete. The clock should now be ready for Wide
Area Service Discovery.
button to save the new DNS Server configuration. This process
7.2. Wide Area Clock Discovery
If the Auto-Sync Time Clocks are configured for Wide Area Service Discovery, they
can be discovered and managed remotely from any PC connected to the Wide Area
Network.
To discover and manage the clocks, use the following procedure:
1. Install and open the Auto-Sync Utility that came on the CD included with the
clock. The default factory setting on the utility is to discover the clocks in a Local
Area Network.
2. From the main menu, click on the View menu and select the submenu
Settings. The Discovery Settings, Monitoring Settings, and Other Settings tabs
will appear on the top of the list.
7-2 724-746-5500 | blackbox.com
Page 95

Chapter 7: WAN Service Discovery
3. In the Domain Name field, enter the domain name of your network and press
the Red Arrow
discovery of all clocks in your companywide domain (see Figure 7-3). For
example, the domain name of your companywide network might be “abc.net”.
button to load the Domain Name in the list on the right for
Figure 7-3. Discovery Settings.
4. Select the desired domains in the “List of domains to browse” or click on “Select
All domain(s).
5. Click on the Auto Discovery tab to return to that screen, and click on the Start
Discovery
generate a new list of discovered clocks. To stop auto discovery, simply click on
the End Discovery
timeout.
6. From the list of discovered clocks, double click on the clock that you want to
manage and your web browser will open to the clock’s login page.
NOTE: Make sure your DNS server is setup to allow the non-secured dynamic
updates. Please visit www.dns-sd.org to get more information about how to
setup DNS severs for Wide Area Service Discovery.
button to begin the search again with the new settings to
button. Searching for the clocks will automatically
724-746-5500 | blackbox.com 7-3
Page 96

Auto-Sync Time Clock
This page intentionally left blank.
7-4 724-746-5500 | blackbox.com
Page 97

Chapter 8: Frequently Asked Questions (FAQs)
FAQ-1. How do I find and connect to my Auto-Sync Time Clock using the auto
discovery Zero Configuration Protocol?
Please install and run the Auto-Sync Utility that came on the CD with
your clock. See Chapter 5 of this Guide.
Consult the Quick-Start Guide that came with your clock.
Consult the Installation and Operation Guide, see Chapter 3 - Quick-
Start for how to use Internet Explorer with Bonjour plug-in installed,
Safari browser with built-in Bonjour, and Firefox browser with the AutoSync Utility.
Visit www.blackbox.com
FAQ-2. How do I find my Auto-Sync Time Clock if my browser does not support the
Bonjour plug-in, or I do not want to use the auto discovery Zero
Configuration Protocol?
Install and open the Auto-Sync Utility provided on the CD that came
with your clock.
Consult the Quick-Start Guide that came with your clock.
Visit www.blackbox.com
FAQ-3. Can I print individual Auto-Sync Time Clock time sync transaction reports
from my PC? Yes. This does not require any additional software as
transaction reporting is web based directly from each clock and can be
saved as a text file on an FTP Server.
Consult the Installation and Operation Guide, see Chapter 4.
Visit www.blackbox.com
FAQ-4. Where are all my report and/or configuration files from my Auto-Sync Time
Clock stored? What is the file format of the report and configuration files?
All of your report (transaction) and configuration files can be stored on the
FTP server configured in the Utility Settings. The transaction files are text
files and can be imported into Excel and combined with other clocks to be
viewed as a clock/site report. Note – a transaction file for a specific clock
CANNOT be restored to multiple clocks. However, the configuration files are
binary and can be used to clone the configuration of a single clock to
multiple clocks using the Auto-Sync Utility.
for additional support.
for additional support.
for additional support.
NOTE: You must have the FTP server configured in order to backup the reports
and configuration files.
FAQ-5. Do I require any special cables to connect the Auto-Sync Time Clock? No –
The Auto-Sync Time Clock utilizes a CAT5 cable which has a RJ-45
connector on the end for network connection (see the following figure). It is
recommended to use a space gain cable and RJ45 female-to-female coupler
for cable extension.
724-746-5500 | blackbox.com Page 8-1
Page 98

Auto-Sync Time Clock
FAQ-6. If I do not require centralized reporting, do I still need to install ATVS
software to use the Auto-Sync Time Clock? No. No software-No server-No
central management = Minimal IT staff involvement. However, it is
recommended to install the Utility that came on the CD with your clock for
auto discovery and advanced functions.
FAQ-7. Can the time on the Auto-Sync Time Clock be manipulated? No. The Auto-
Sync Time Clock has no external programming buttons. All clock functions
are browser accessed with a Login Username and Password, thus the AutoSync Time Clock is completely secured from any type of manipulation.
FAQ-8. How many times can I sync the clock per day? Per week? A maximum of 12
times per day or 84 times per week per Time Sync schedule, and you can
have a maximum of 8 separate Time Sync schedules.
FAQ-9. How many years can the clock internally store time sync transaction
records? Up to 5 years of transaction records can be stored in each clocks
flash memory when using one normal Time Sync schedule with 2 syncs per
day.
NOTE: Each clocks transaction records can be backed up automatically utilizing the
clocks built-in Backup Utility
.
FAQ-10. How many NTP time servers can I choose from to perform a time sync?
18 default NTP servers are provided. You can also create an additional 14
time servers (including internal ones) for a total of 32, to enhance the
ability for a successful sync.
FAQ-11. Can I upgrade my standard Auto-Sync Time Clock which utilizes AC to
Power over Ethernet (PoE) which does not require AC power? Yes. You
would need the PoE option with FPR included. Contact 1-724-746-5500 for
further details.
Page 8-2 724-746-5500 | blackbox.com
Page 99

Chapter 8: Frequently Asked Questions (FAQs)
FAQ-12. How do I setup my clock for custom print lines? You can create 2 custom
print lines and save them in the clock’s flash memory.
Consult the Installation and Operation Guide, see How to Set the Print
Options in Chapter 4 of this Guide.
Visit www.blackbox.com
FAQ-13. How can I use the Restore Utility to copy my clock settings to other clocks
for additional support information.
for quick setup? You can quickly copy a clock’s setup to any other AutoSync Time Clock using the built-in Backup/Restore Utility for shared
configuration to create the shared “ATVSConfig.bin” file. It is
recommended to use the advanced functions of the Auto-Sync Utility that
came on the CD with your clock. Note – when restoring a clocks
configuration everything, but the name will be updated. This maintains the
clocks original name as a unique identifier.
Consult this Installation and Operation Guide, see Chapter 4.
Consult this Installation and Operation Guide, Chapter 5, for directions
how to use the Auto-Sync Utility included on the CD that came with the
clock for updating a clock configuration to multiple clocks.
FAQ-14. How do I change a ribbon? You must use the key that came with your
clock to unlock and remove the cover to replace the ribbon cartridge.
Consult Chapter 6 of the Installation and Operation Guide.
FAQ-15. How do I clear the E4 Prt error message that is displayed on my clock?
Unlock and remove the clock cover. Next, correct the reason for the E4 Prt
error, i.e., re-lubricate the printer carriage, and press the “Reset” button.
If the error message comes back, the problem must be rectified. If the
error message does not come back, replace the cover.
Consult Chapter 6 of the Installation and Operation Guide.
NOTE: Pressing the Reset button will NOT
reset the clock configuration to the
default settings or delete the transaction records.
NOTE: Each clocks transaction records can be backed up automatically utilizing the
clocks built-in Backup Utility
FAQ-16. How do I Backup a configuration file for a single clock? Select the
.
Backup/Restore Utility from the browser and select “Configuration” from
the dropdown menu. Next, click Specific for the question, “Is this backup
file going to be shared to multiple clocks?” Press the “
” button,
and the status box will display the active status, “Backup is running”
followed by “Successful”.
Consult the Installation and Operation Guide, Chapter 4.
Use the Scheduling function to setup a Backup schedule to create
regular backups.
724-746-5500 | blackbox.com Page 8-3
Page 100

Auto-Sync Time Clock
FAQ-17. How do I Backup a configuration file for multipl e clocks? Select the
Backup/Restore Utility from the browser and select “Configuration” from
the dropdown menu. Next, click Shared for the question, “Is this bac kup
file going to be shared to multiple clocks?” Press the
and the status box will display the active status, “Backup is running”
followed by “Successful”.
Consult this Installation and Operation Guide, see Chapter 4 for details
on how to create the “ATVSConfig” file.
Consult the Installation and Operation Guide, see Chapter 5 for
directions on how to use the Auto-Sync Utility with a shared Backup file
for Update Configuration function.
FAQ-18. How do I Restore a configuration file on a single clock? Select the
Backup/Restore Utility from the browser and select “Configuration” from
the dropdown menu. Next, click Specific for the question, “Are you
restoring this clock based on shared settings or is it specific to th is clo ck
only?” Press the
active status, “Restore is running” followed by “Successful”. Also, it is
recommended that you can use the Auto-Sync Utility with the shared
“ATVSConfig” file was created, by using the download function in the AutoSync Utility that came with your clock to download this configuration to
another clock.
Consult the Installation and Operation Guide, Chapter 4.
FAQ-19. How do I Restore a configuration file for multiple clocks? Open the Auto-
Sync Utility and use the Auto Discovery or Manual Discovery to generate a
list of clocks. Select the desired clocks to update on the clock list.
Next, click on the View menu and select Advanced settings. Browse to
the previously created shared “ATVSConfig.bin” file and press the
button, and the status box will display the
button,
button. The Auto-Sync Utility can be used to replicate a
clocks configuration to multiple clocks, thus ensuring that each clock has
the exact same setup.
Consult the Installation and Operation Guide, see Chapter 4 for how to
create a shared configuration file.
Consult the Installation and Operation Guide, see Chapter 5 for
directions on how to use the Auto-Sync Utility with a shared Backup
file for Update Configuration function.
FAQ-20. How do I Backup a Transaction file on a single clock? Select the
Backup/Restore Utility from the browser and select “Transaction” from
the dropdown menu. Next, click Specific for the question, “Is this backup
file going to be shared to multiple clocks?” Press the “
and the status box will display the active status, “Backup is running”
followed by “Successful”.
Consult the Installation and Operation Guide, Chapter 4.
Page 8-4 724-746-5500 | blackbox.com
” button,
 Loading...