

Page 1

ACX0 48 ACXIO8-C ACXSFPC ACX288 -PS
ACX080 ACXIO8-SM ACXSFPS ACXC16
ACX160 ACXIO8-SPF ACX080 -PS ACXC32
ACX288 ACX288 -C TL AC X160- PS ACXC4 8
ServSwitch™ DKM FX and DKM FX Compact
Provides flexible and super-fast crosspoint
switching of Full HD video in KVM enterprises.
Customer
Support
Information
Order toll-free in the U.S.: Call 877-877-BBOX (out side U.S. call 724-746-5500)
FREE technical support 24 hours a day, 7 days a week: Call 724-746-5500 or fax
724-746-0746 • Mailing address: Black Box Corp oration, 1000 Park Drive, Lawrence,
PA 15055-1018 • Web site: ww w.blackbox.com • E-mail: info @blackbox.com
Page 2

Trademarks Used in this Manual
Trademarks Used in this Manual
Black Box and the Double Diamond logo are registered trademarks, and
ServSwitch is a trademark, of BB Technologies, Inc.
Mac is a registered trademark of Apple Computer, Inc.
IBM is a registered trademark of International Business Machines Corporation.
Java is a registered trademark of Oracle Corporation.
TOSLINK is a registered trademark of Toshiba Corporation.
Any other trademarks mentioned in this manual are acknowledged to be
the property of the trademark owners.
NOTE: The ServSwitch DKM FX and the ServSwitch DKM FX Compact function in
similar ways. The difference between them is described in the table below.
Table 1. ServSwitch DKM FX and DKM FX Compact comparison.
Serv Switch DKM FX Compact ServSwitch DKM FX
Number of Ports 16-, 32-, 48 -por t options 48-, 80-, 160-, 288-port options
Type of Ports CATx I/O ports only CATx/fiber I/O ports dependent on I/O card
Form Factor Small form factor (1U) Large form factor (4U+)
Modular or Not Not modular Modular
Page 2
724-746-5500 | blackbox.com
Page 3

FCC and IC RFI Statements/NOM Statement
FEDERAL COMMUNICATIONS COMMISSION AND
INDUSTRY CANADA RADIO FREQUENCY INTERFERENCE STATEMENTS
This equipment generates, uses, and can radiate radio-frequency energy,
and if not installed and used properly, that is, in strict accordance with the
manufacturer’s instructions, may cause inter ference to radio communication.
It has been tested and found to comply with the limits for a Class A computing
device in accordance with the specifications in Subpart B of Part 15 of FCC rules,
which are designed to provide reasonable protection against such interference
when the equipment is operated in a commercial environment. Operation of
this equipment in a residential area is likely to cause interference, in which case
the user at his own expense will be required to take whatever measures may be
necessary to correct the interference.
Changes or modifications not expressly approved by the party responsible
for compliance could void the user’s authority to operate the equipment.
This digital apparatus does not exceed the Class A limits for radio noise
emis sion from digital apparatus set out in the Radio Interference Regulation
of Industry Canada.
Le présent appareil numérique n’émet pas de bruits radioélectriques dépassant les
limites applicables aux appareils numériques de la classe A prescrites dans le
Règlement sur le brouillage radioélectrique publié par Industrie Canada.
Normas Oficiales Mexicanas (NOM)
Electrical Safety Statement
INSTRUCCIONES DE SEGURIDAD
1. Todas las instrucciones de seguridad y operación deberán ser leídas antes
de que el aparato eléctrico sea operado.
2. Las instrucciones de seguridad y operación deberán ser guardadas para
referencia futura.
3. Todas las advertencias en el aparato eléctrico y en sus instrucciones de
operación deben ser respetadas.
724-746-5500 | blackbox.com
Page 3
Page 4

NOM Statement
4. Todas las instrucciones de operación y uso deben ser seguidas.
5. El aparato eléctrico no deberá ser usado cerca del agua—por ejemplo,
cerca de la tina de baño, lavabo, sótano mojado o cerca de una alberca,
etc.
6. El aparato eléctrico debe ser usado únicamente con carritos o pedestales
que sean recomendados por el fabricante.
7. El aparato eléctrico debe ser montado a la pared o al techo sólo como sea
recomendado por el fabricante.
8. Servicio—El usuario no debe intentar dar servicio al equipo eléctrico más allá
lo descrito en las instrucciones de operación. Todo otro servicio deberá ser
referido a personal de servicio calificado.
9. El aparato eléctrico debe ser situado de tal manera que su posición no
interfiera su uso. La colocación del aparato eléctrico sobre una cama, sofá,
alfombra o superficie similar puede bloquea la ventilación, no se debe
colocar en libreros o gabinetes que impidan el flujo de aire por los orificios
de ventilación.
10. El equipo eléctrico deber ser situado fuera del alcance de fuentes de calor
como radiadores, registros de calor, estufas u otros aparatos (incluyendo
amplificadores) que producen calor.
11. El aparato eléctrico deberá ser connectado a una fuente de poder sólo del
tipo descrito en el instructivo de operación, o como se indique en el
aparato.
12. Precaución debe ser tomada de tal manera que la tierra fisica y la
polarización del equipo no sea eliminada.
13. Los cables de la fuente de poder deben ser guiados de tal manera que no
sean pisados ni pellizcados por objetos colocados sobre o contra ellos,
poniendo particular atención a los contactos y receptáculos donde salen
del aparato.
14. El equipo eléctrico debe ser limpiado únicamente de acuerdo a las
recomendaciones del fabricante.
15. En caso de existir, una antena externa deberá ser localizada lejos de las
lineas de energia.
16. El cable de corriente deberá ser desconectado del cuando el equipo no sea
usado por un largo periodo de tiempo.
Page 4
724-746-5500 | blackbox.com
Page 5

NOM Statement
17. Cuidado debe ser tomado de tal manera que objectos liquidos no sean
derramados sobre la cubierta u orificios de ventilación.
18. Servicio por personal calificado deberá ser provisto cuando:
A: El cable de poder o el contacto ha sido dañado; u
B: Objectos han caído o líquido ha sido derramado dentro del aparato; o
C: El aparato ha sido expuesto a la lluvia; o
D: El aparato parece no operar normalmente o muestra un cambio en su
desempeño; o
E: El aparato ha sido tirado o su cubierta ha sido dañada.
724-746-5500 | blackbox.com
Page 5
Page 6

Safety Instructions
Safety Instructions
For reliable and safe long-term operation of your ServSwitch DKM FX, follow these
guidelines:
Installation
• Only use in dry, indoor environments.
• The ServSwitch DKM FX and the power supply units can get warm. Don’t put them
in an enclosed space without any airflow.
• Do not obscure ventilation holes.
• Only use power supplies originally supplied with the product or manufacturer-
approved replacements. Do not use a power supply if it appears to be defective or
has a damaged case.
• Connect all power supplies to grounded outlets. In each case, make sure that the
ground connection is maintained from the outlet socket to the power supply’s AC
power input.
• Do not connect the link interface to any other equipment, particularly network or
telecommunications equipment.
• Only connect devices to the serial interface that are sufficiently secured against
short circuits and false voltages at the serial interface.
• To disconnect the switch from the power supply, remove the power cords of all
power supply units that are in use or set the power switch (if available) to the OFF
position.
• Take any required ESD precautions.
Repair
• Do not attempt to open or repair a power supply unit.
• Do not attempt to open or repair the ServSwitch DKM FX. There are no
user-serviceable parts inside.
• Contact Black Box Technical Support at 724-746-5500 or info@blackbox.com
if there is a fault.
Page 6
724-746-5500 | blackbox.com
Page 7

Table of Contents
Chapter Page
1. Specifications .........................................................................................11
1.1 I nte rf ac es .........................................................................................11
1.1.1 DVI-D Single Link ..................................................................11
1.1.2 USB HID ................................................................................11
1.1.3 RJ-45 (Network) ....................................................................12
1.1.4 RS -232 (Serial ) .......................................................................12
1.1.5 RJ-45 (Interconnect) ..............................................................12
1.1.6 Fiber SFP Type LC (Interconnect) ...........................................12
1.1.7 SDI (Interconnect) ..................................................................12
1.2 Interconnect Cable ..........................................................................12
1.2.1 CATx......................................................................................12
1.2.2 Fiber ......................................................................................13
1.2.3 Coaxial ..................................................................................14
1.3 Supported Peripherals .....................................................................15
1.4 Connector Pinouts ...........................................................................15
1.4.1 CPU Board .............................................................................15
1.4.2 I/O Board CATx .....................................................................17
1.4.3 I/O Board SFP ........................................................................17
1.4.4 I/O Board SDI ........................................................................17
1.5 Power Supply...................................................................................18
1.6 Environmental Conditions ................................................................18
1.7 Size......... . ........................................................................................18
1.8 Shipping Weight ..............................................................................18
2. Overview............ ......................................................................................19
2.1 Description ......................................................................................19
2.1.1 A ppl ic at io n ............................................................................19
2.1.2 Access Options ......................................................................19
2.2 System Overview ............................................................................ 20
2.3 Available Products ...........................................................................21
2.4 What’s Included ..............................................................................21
2.5 Device Views .................................................................................. 23
2.5.1 ServSwitch DKM FX 288-Port .............................................. 23
2.5.2 ServSwitch DKM FX 160-Port ...............................................24
2.5.3 ServSwitch DKM FX 80-Port .................................................25
2.5.4 ServSwitch DKM FX 48-Port .................................................26
2.5.5 ServSwitch DKM FX Compact 48-Port ..................................26
724-746-5500 | blackbox.com
Page 7
Page 8

Table of Contents
Chapter Page
2.5.6 ServSwitch DKM FX Compact 32-Port ................................. 28
2.5.7 ServSwitch DKM FX Compact 16-Port ................................. 29
2.6 Diagnostics and Status ................................................................... 30
2.6.1 Status LEDs ........................................................................... 30
2.6.2 Port Status ............................................................................ 38
2.6.3 Extender OSD ....................................................................... 42
2.6.4 Network Status .................................................................... 43
2.6.5 Firmware Status .................................................................... 45
2.6.6 Firmware Status Extender ......................................................47
2.7 Trace Function ................................................................................ 48
2.8 Syslog Monitoring ........................................................................... 49
2.9 SNMP .........................................................................................51
3. Installation ............................................................................................. 53
3.1 System Setup .................................................................................. 53
3.2 Example Applications ..................................................................... 54
3.2.1 KVM Matrix ..........................................................................55
3.2.2 Video Matrix ........................................................................ 56
3.2.3 Parallel Operation (Stacking)................................................. 56
3.2.4 Cascading ............................................................................ 58
4. Configuration .........................................................................................59
4.1 Command Mode .............................................................................59
4.2 Control Options .............................................................................. 60
4.2.1 Control via OSD ....................................................................61
4.2.2 Control via Java Tool ............................................................ 65
4.2.3 Control via Serial Interface ................................................... 73
4.3 Assignment .....................................................................................74
4.3.1 Virtual CPU ............................................................................74
4.3.2 Virtual Console ..................................................................... 77
4.4 System Settings .............................................................................. 80
4.4.1 System Data ......................................................................... 80
4.4.2 Automatic ID ........................................................................ 83
4.4.3 Access .................................................................................. 85
4.4.4 Switch .................................................................................. 88
4.4.5 Network ................................................................................91
4.4.6 Date and Time ...................................................................... 94
Page 8
724-746-5500 | blackbox.com
Page 9

Table of Contents
Chapter Page
4.5 User Settings ................................................................................... 96
4.5.1 User Data ............................................................................. 96
4.5.2 Favorites List Users ............................................................. 100
4.5.3 User Macros ........................................................................103
4.6 Extender Settings ......................................................................... 106
4.6.1 Creating Flex-Port Extender Units ....................................... 109
4.6.2 Creating Fixed-Port Extender Units .................................... 109
4.6.3 Deleting Flex-Port Extender Units ....................................... 109
4.6.4 Deleting Fixed-Port Extender Units ..................................... 109
4.7 CPU Settings .................................................................................. 110
4.8 Console Settings ............................................................................114
4.8.1 CON Devices .......................................................................11 4
4.8.2 Mouse and Keyboard ..........................................................118
4.8.3 Extender OSD ......................................................................121
4.8.4 Favorite List Consoles ..........................................................123
4.8.5 Console Macros ..................................................................125
4.9 Saving and Loading of Configurations ...........................................129
4.9.1 Active Configuration ...........................................................129
4.9.2 Saving of Configurations (Internal) ......................................129
4.9.3 Loading of Configurations (Internal) ....................................131
4.9.4 Saving of Configurations (External) .....................................133
4.9.5 Loading of Configurations (External) ...................................134
4.10 Export and Import Options .........................................................135
4.10.1 Export Options ....................................................................135
4.10.2 Import Options ...................................................................136
4.11 Firmware Update ..........................................................................137
4.11.1 Matrix Update .....................................................................137
4.11.2 Extender Update .................................................................139
4.12 License Management ...................................................................143
5. Operation ........................................................................................145
5.1 Operation via Hotkeys .................................................................145
5.1.1 Direct Switching ...............................................................145
5.1.2 Scan Mode ......................................................................14 6
5.1.3 Function Keys <F1>–<F12> .............................................147
5.1.4 Addressing of Main and Sub Matrices .............................147
5.2 KVM Switching ........................................................................... 148
724-746-5500 | blackbox.com
Page 9
Page 10

Table of Contents
5.3 Extended Switching ..................................................................... 151
5.4 USB 2.0 Switching .......................................................................157
5.5 Presets ........................................................................................157
5.6 Serial Interface .............................................................................159
5.7 Power On and Power Down Functions ........................................159
5.7.1 Restart .............................................................................159
5 .7. 2 Re se t ................................................................................160
5.7.3 Power Down ....................................................................160
6. Serial Control ........................................................................................161
7. Troubleshooting ...................................................................................173
7.1 External Failure ..............................................................................173
7.2 Video Interference .........................................................................173
7.3 Fans Malfunction ...........................................................................173
7.4 Power Supply Units Malfunction ...................................................174
7.5 Network Error ................................................................................174
7.6 ServSwitch DKM FX Failure ........................................................... 174
7.7 Blank Screen ..................................................................................175
7.8 Contacting Black Box.....................................................................175
7.9 Shipping and Packaging ................................................................176
Appendix. Glossary .....................................................................................177
Page 10
724-746-5500 | blackbox.com
Page 11

Chapter 1: Specifications
1. Specifications
1.1 Interfaces
1.1.1 DVI-D Single Link
The video interface supports the DVI-D protocol. All signals that comply with
DVI-D single-link standard can be transmitted. This includes, for example, monitor
resolutions such as 1920 x 1200 @ 60 Hz, Full HD (1080p), or 2K HD (up to 2048
x 1152). Data rate is limited to 165 MPixel/s.
1.1.2 USB HID
Devices with USB HID interface support a maximum of two devices with
USB HID protocol. Each USB HID port provides a maximum current of 100 mA.
Keyboard
Compatible with most USB keyboards. Certain keyboards with additional
functions may require custom firmware to operate. Keyboards with an integral
USB Hub (Mac® keyboards, for example) are also supported.
Mouse
Compatible with most 2-button, 3-button, and scroll mice.
Other USB HID devices
The proprietary USB emulation also supports certain other USB HID devices, such
as specific touchscreens, graphics tablets, bar-code scanners, or special keyboards.
Support cannot be guaranteed, however, for every USB HID device.
NOTE: Only two USB HID devices are supported concurrently, such as keyboard
and mouse or keyboard and touchscreen. A hub is allowed, but it does not
increase the number of HID devices allowed.
To support other USB “non-HID” devices, such as scanners, Web cams or memory
devices, choose our devices with transparent USB support.
1.1.3 RJ-45 (Network)
CATx device communication requires a 1000BASE-T connection. Pin the cable
according to EIA/TIA-568-B (1000BASE-T) standard with RJ-45 connectors at both
ends. All four wire pairs are used in both directions. The cabling is suitable for
full-duplex operation. For the cable connection to a source (computer, CPU), use a
cross-pinned network cable.
724-746-5500 | blackbox.com
Page 11
Page 12

Chapter 1: Specifications
1.1.4 RS-232 (Serial)
The communication takes place with a transmission speed of up to 115.2 kbps,
regardless of the file format, eight data bits and a stop bit, but without a parity
bit. Limited hardware handshake (DSR) is possible.
1.1.5 RJ-45 (Interconnect)
CATx device communication requires a 1000BASE-T connection.
Connector wiring must comply with EIA/TIA-568-B (1000BASE-T), with RJ-45
connectors at both ends. All four wire pairs are used.
1.1.6 Fiber SFP Type LC (Interconnect)
Fiber device communication is performed via Gigabit SFPs connected to suitable
fibers fitted with LC connectors (see Section 1.2.2).
NOTE: The correct function of the device can only be guaranteed with SFPs
provided by Black Box.
CAUTION: SFP modules can be damaged by electrostatic discharge (ESD). Follow
ESD handling precautions.
1.1.7 SDI (Interconnect)
SDI device communication requires a mini coax connection with mini BNC
connectors or 3G SFPs with transmission speeds of 0.360 Gbps (SD-SDI, SMPTE
259M), 1.485 Gbps (HD-SDI, SMPTE 292M), and 2.70 Gbps (3G SDI).
1.2 Interconnect Cable
1.2.1 CATx
NOTE: A point-to-point connection is required. Operation with several patch fields
is possible. Routing over an active network component, such as an Ethernet
hub, router, or ServSwitch DKM FX, is not allowed.
• Avoid routing CATx cables along power cables.
• If the site has three-phase AC power, make sure that the CPU Unit and
CON Unit are on the same phase.
NOTE: To maintain regulatory EMC compliance, use correctly installed shielded
CATx cable throughout the interconnection link.
NOTE: To maintain regulatory EMC compliance, all CATx cables need to carry
ferrites on both cable ends close to the device.
Type of Interconnect Cable
The ServSwitch DKM FX requires interconnect cabling specified for Gigabit
Ethernet (1000BASE-T). Use solid-core (24 AWG), shielded, CAT5e (or better)
cable.
Page 12
724-746-5500 | blackbox.com
Page 13

Table 1-1. CATx interconnect cable.
Cable Type Description
CATx solid-core 24 AWG cable
This S/UTP (CAT5e) cable confoms to EIA/TIA-568-B.
Uses four pairs of 24 AWG wires. Connects according
to EIA/TIA-568-B (1000BASE-T).
Chapter 1: Specifications
CATx solid-core 26/8 AWG cable
This S/UTP (CAT5e) cable confoms to EIA/TIA-568-B.
Uses four pairs of 26/8 AWG wires. Connects according
to EIA/TIA-568-B (1000BASE-T).
NOTE: You can use use type 26/8 AWG flexible cables (patch cables), but the
maximum possible extension distance is cut in half.
Table 1-2. Maximum acceptable cable length.
Cable Type Distance
CATx 24 AWG installation cable 400 ft. (140 m)
CATx 26/8 AWG patch cable 200 ft. (70 m)
1.2.2 Fiber
NOTE: A point-to-point connection is necessary. Operation with multiple patch
panels is allowed. Routing over active network components, such as
Ethernet hubs, ServSwitch DKM FXes, or routers, is not allowed.
Type of Interconnect Cable
Table 1-3. Fiber interconnect cable.
Cable Type Description
Single-mode, 9-µm
Multimode 50-µm
Multimode 62.5-µm
• Two fibers, 9-µm
• In-house patch cable (EFN092)
• Two fibers, 50-µm
• In-house patch cable (EFN6020)
• Two fibers, 62.5- µm
• In-house patch cable (EFN116 -LCLC)
NOTE: Only use single-mode cables for fiber connections that are based on 3G
SFPs.
724-746-5500 | blackbox.com
Page 13
Page 14

Chapter 1: Specifications
Table 1-4. Maximum acceptable fiber cable length.
Cable Type Distance
Single-mode 9-µm 32,800 ft. (10,00 0 m)
Multimode 50-µm ( OM3) 3280 ft. (1000 m)
Multimode 50-µm 1300 ft. (400 m)
Multimode 62.5µm 650 ft. (200 m)
NOTE: If you use single-mode SFPs with multimode fiber optic cable, you can
double the maximum acceptable cable length.
Type of Connector
The fiber cable uses LC connectors.
1.2.3 Coaxial
NOTE: A point-to-point connection is necessary.
Table 1-5. Coaxial interconnect cable.
Cable Type Description
Mini coaxial cable, 18 AWG
RG-6
Impedance: 75 ohms
Table 1-6. Maximum acceptable coaxial cable length.
Bandwidth Distance
0.270 Gbps 1312 ft. (400 m)
1.4 85 Gbp s 459 ft. (140 m)
2.970 Gbps 394 ft. (120 m)
Type of Connector
The coaxial cable uses mini BNC connectors.
Page 14
724-746-5500 | blackbox.com
Page 15
Chapter 1: Specifications
1.3 Supported Peripherals
You can use the KVM extenders described in Tables 1-7 and 1-8 with the
ServSwitch DKM FX:
Table 1-7. KVM extender with CATx connection.
Produc t Code Description
AC X1 T-11 -C KVM CPU unit, single-head, 2x USB HID
ACX1R -11-C KVM CON unit, single -head, 2x USB HID
AC X1 T-11V - C KVM CPU unit, single-head, DVI-I input (VGA), 2x USB HID
ACX1R -11V-C KVM CON unit, single-head, IR receiver, 2x USB HID
Table 1-8. KVM extender with fiber (single-mode) connection.
Produc t Code Description
AC X1 T-11 -SM KVM CPU unit, single -head, 2x USB HID
ACX1R -11-SM KVM CON unit, single-head, 2x USB HID
AC X1 T-11V -S M KVM CPU unit, single-head, DVI-I input (VGA), 2x USB HID
ACX1R -11V-SM KVM CON unit, single-head, IR receiver, 2x USB HID
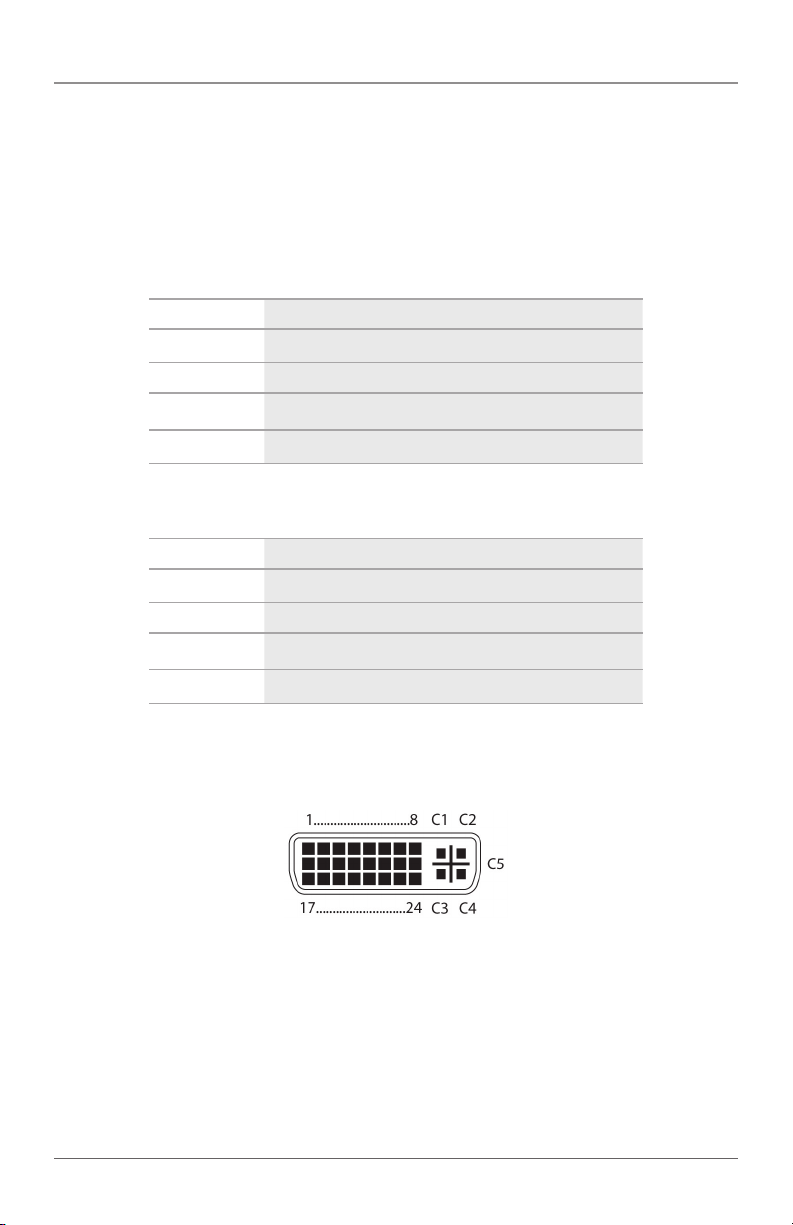
1.4 Connector Pinouts
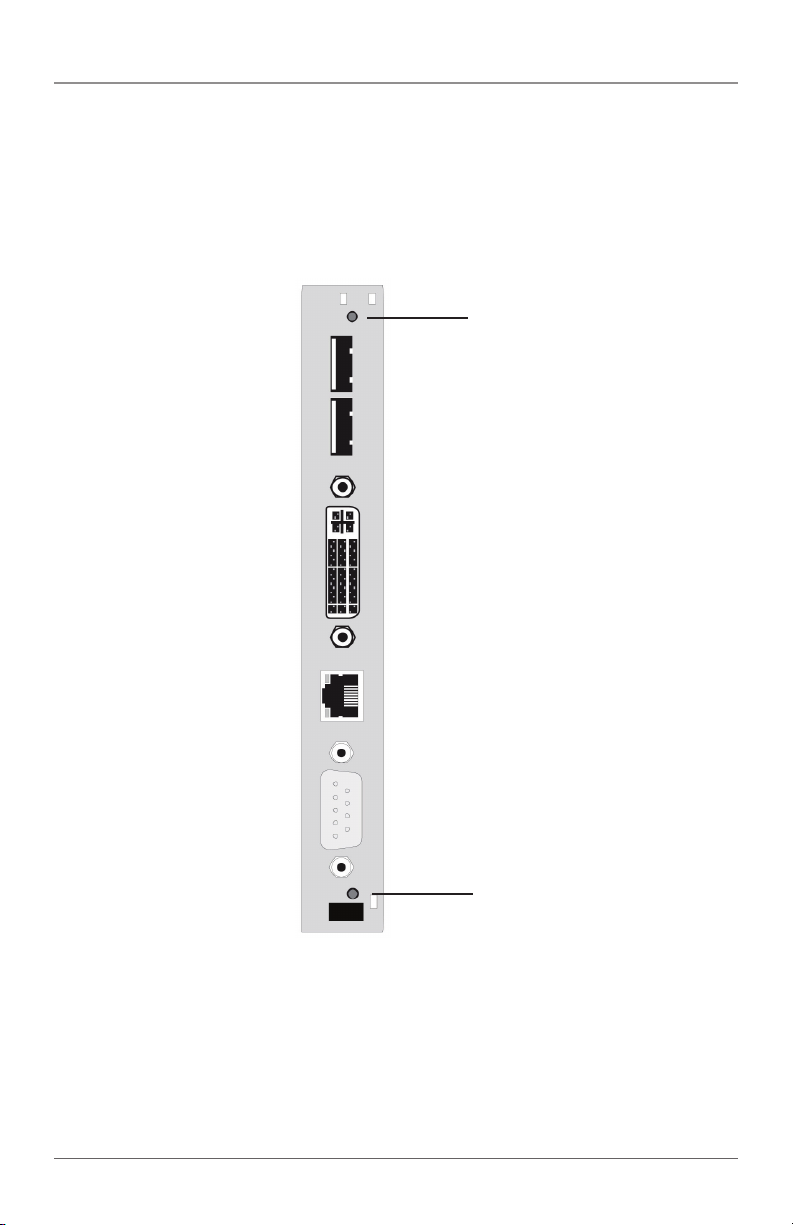
1.4.1 CPU Board
Figure 1-1. DVI-D single-link connector.
724-746-5500 | blackbox.com
Page 15
Page 16
Chapter 1: Specifications
Table 1-9. DVI-D single-link connector pinout.
Pin Signal Pin Signal Pin Signal
1 T.M.D.S. data 2- 9 T.M.D.S. data 1- 17 T.M.D.S. data 0-
2 T.M.D.S. data 2+ 10 T.M.D.S. data 1+ 18 T.M.D.S. data 0+
3 T.M.D.S. data 2 GND 11 T.M.D.S. data 1 GND 19 T.M.D.S. data 0 GND
4 Not connnected 12 Not connected 20 Not connected
5 Not connected 13 Not connected 21 Not connected
6 DDC input ( SCL) 14 +5 VDC high impedance 22 T.M.D.S. GND
7 DDC output (SDA) 15 GND 23 T.M.D.S. clock+
8 Internal use 16 Hot plug recognition 24 T.M.D.S. clock-
C1 Internal use — — C3 Internal use
C2 Not connected C5 GND C4 Internal use
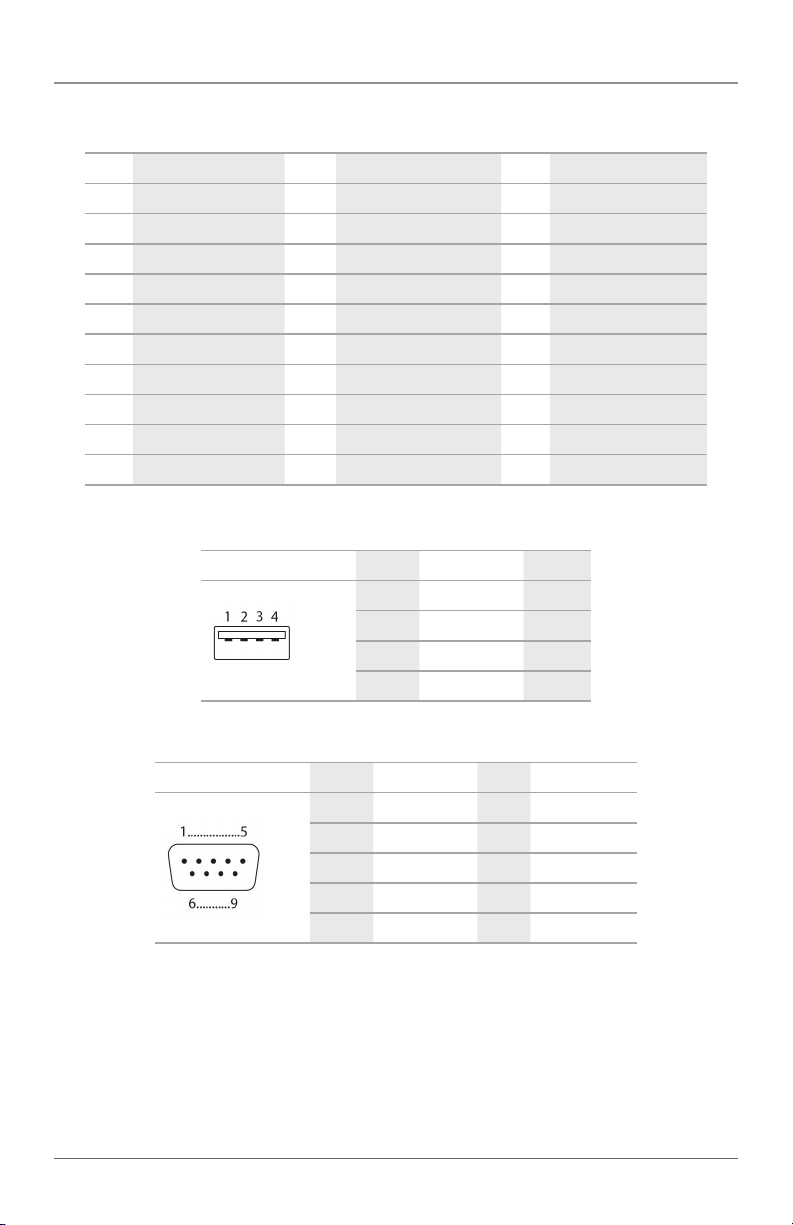
Table 1-10. USB Type A connector.
Picture Pin Signal Color
1 VCC (+5 VDC) Red
2 Data - White
3 Data + Green
4 GND Black
Page 16
Table 1-11. DB9 connector.
Picture Pin Signal Color Signal
1 Not connected 6 DTR
2 CTS 7 TxD
3 RTS 8 RxD
4 DSR 9 Not connected
5 GND — —
724-746-5500 | blackbox.com
Page 17
Picture Pin Signal Color Signal
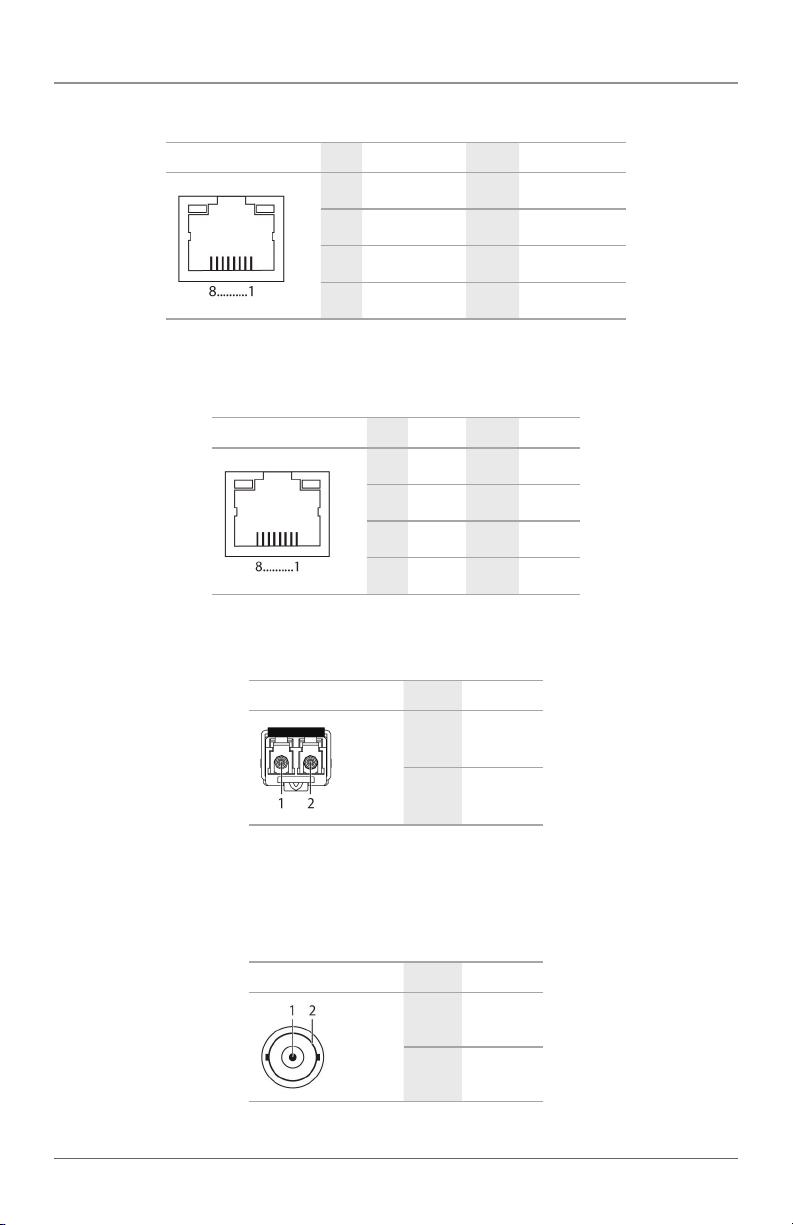
1.4.2 I/O Board CATx
Picture Pin Signal Color Signal
1.4.3 I/O Board SFP
Chapter 1: Specifications
Table 1-12. RJ-45 connector.
1 D1+ 5 Not connected
2 D1- 6 D2-
3 D2+ 7 Not connected
4 Not connected 8 Not connected
Table 1-13. RJ-45 CATx connector.
1 D1+ 5 D3-
2 D1- 6 D2-
3 D2+ 7 D4+
4 D3 + 8 D4-
Table 1-14. RJ-45 connector.
Picture Diode Signal
1.4.4 I/O Board SDI
724-746-5500 | blackbox.com
1 Data OUT
2 Data IN
Table 1-15. RJ-45 connector.
Picture Pin Signal
1 Data In
2 GND
Page 17
Page 18

Chapter 1: Specifications
1.5 Power Supply
Power — ACXC48, ACXC32, ACXC16: 90–240 VAC, 50–60 Hz internal power
supply;
All other models: Voltage: 100–240 VAC, 50–60 Hz;
ACX288, ACX288-PS: 202 W max. without I/O boards;
ACX160, ACX160-PS: 188 W max. without I/O boards;
ACX080, ACX080-PS: 99 W max. without I/O boards;
ACX048: 94 W max. without I/O boards;
I/O boards (ACXI08-C, ACXI08-SM, ACXI08-SPF): 13 W max.
1.6 Environmental Conditions
Temperature Tolerance — +41 to +113° F (+5 to +45° C)
Storage Temperature — -13 to +140° F (-25 to +60° C)
Relative Humidity — Max. 80%, non-condensing
1.7 Size
Size — ACX288: 19"H x 22.8"W x 12"D (48.3 x 57.8 x 33 cm),
Shipping box: 25.6"H x 26.8"W x 29.9"D (65 x 68 x 76 cm);
ACX160: 19"H x 15.8"W x 12"D (48.3 x 40 x 33 cm),
Shipping box: 25.6"H x 26.8"W x 12"D (65 x 68 x 54 cm);
ACX080: 19"H x 7"W x 9.1"D (64 x 57 x 36 cm),
Shipping box: 25.2"H x 22.4"W x 21.3"D (64 x 57 x 36 cm);
ACX048: 19"H x 5.3"W x 9.1"D,
Shipping box: 25.2" x 22.4"W x 12.4"D (64 x 57 x 23.1 cm);
ACXC48, ACXC32, ACXC16: 1.7"H x 17.4"W x 16.9"D (4.4 x 44.4 x 42.9 cm)
1.8 Shipping Weight
Weight — ACX288: 76.2 lb (34.6 kg) fully equipped,
Shipping box: 90.6 lb. (41.1 kg);
ACX160: 60 lb. (26.3 kg) fully equipped,
Shipping box: 69.9 lb. (31.7 kg);
ACX080: 24.5 lb. (11.1 kg) fully equipped,
Shipping box: 34.4 lb. (15.6 kg);
ACX048: 19.6 lb. (8.9 kg),
Shipping box: 26.7 lb. (12.1 kg)
ACXC48: 9 lb. (4.1 kg);
ACXC32: 8.8 lb. (4 kg);
ACXC16: 8.6 lb. (3.9 kg)
Page 18
724-746-5500 | blackbox.com
Page 19

Chapter 2: Overview
2. Overview
2.1 Description
2.1.1 Ap plic ation
The ServSwitch DKM FX is used to establish connections from consoles (monitor,
keyboard, mouse, and other peripheral devices) to various sources (computer,
CPU). In a maximum configuration, up to 288 independent ports can be defined
and switched either as a console or a CPU.
The ServSwitch DKM FX Compact is used to establish connections from consoles
(monitor, keyboard, mouse, and other peripheral devices) to various sources
(computer, CPU). In a maximum configuration, up to 16 (using the ACXC16), 32
(using the ACXC32), or 48 (using the ACXC48) independent ports can be defined
and switched either as a console or a CPU.
The ServSwitch DKM FX is mainly specified for the use with extenders that are
able to transmit video, KVM, and USB 2.0 signals. You can also use it as a video
matrix.
For the connection between the ServSwitch DKM FX and the peripheral devices,
such as KVM extenders or video sources, you can use CATx, fiber, or coaxial
cables.
The ServSwitch DKM FX serves as a repeater. You can place it up to 6.2 miles
(10 km) from the consoles and 6.2 miles (10 km) from the sources.
2.1.2 Access Options
You have the following options to access the ServSwitch DKM FX for
configuration and operation:
Table 2-1. Access options.
Access option Symbol
OSD
Java tool
Serial interface
724-746-5500 | blackbox.com
Page 19
Page 20
Chapter 2: Overview
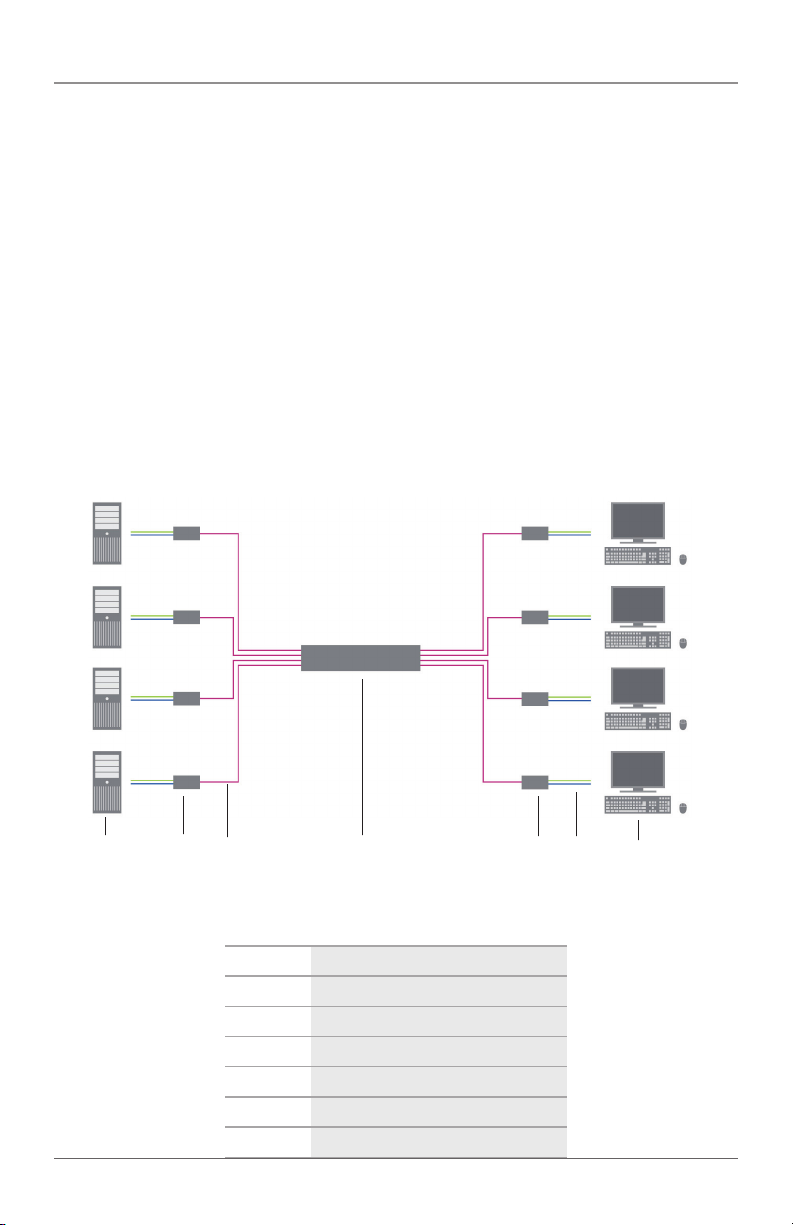
2.2 System Overview
A ServSwitch DKM FX system consists of a ServSwitch DKM FX or DKM FX
Compact and, for KVM applications, one or more CPU units/CON units. The
ServSwitch connects to the CPU units/CON units by interconnect cables or is connected directly to the video devices when used as a video matrix.
The CPU units connect directly to the sources (computer, CPU), using the included
cables.
Monitor(s), keyboard, and mouse connect to the CON units.
The ServSwitch DKM FX and the CPU units/CON units communicate over CATx,
fiber, or coaxial interconnect cables. The ServSwitch DKM FX Compact and the
CPU units/CON units communicate over CATx cable.
Figure 2-1 shows the system overview. Table 2-2 describes its components.
1 2 3 4 3 5 6
Figure 2-1. System overview.
Table 2-2. System components.
Number Component
1 Source (computer, CPU)
2 CPU units
3 Interconnect cable
4 ServSwitch DKM FX
5 CON units
6 Console (monitor, keyboard, mouse)
Page 20
724-746-5500 | blackbox.com
Page 21

See Section 3.2 for installation examples.
2.3 Available Products
Table 2-3. Available products.
Number Description
Serv Switch DKM FX
ACX04 8 ServSwitch DKM FX 48-port with control card and power supply
ACX080 ServSwitch DKM FX 80-port with control card and power supply
ACX16 0 ServSwitch DKM F X 160-port with control card and power supply
ACX288 ServSwitch DKM FX 288-port with control card and power supply
Serv Switch DKM FX Compact
ACXC16 ServSwitch DKM FX Compact 16-port
ACXC32 ServSwitch DKM FX Compact 32-port
ACXC4 8 ServSwitch DKM FX Compact 48-port
Accessories
ACXIO8- C 8-port CATx input/output (I /O) module
ACXI O8-SM 8-port single-mode fiber input/output (I /O ) module
ACXI O8-SFP 8-por t single-mode fiber SFP input/output (I / O) module
ACX288-CTL ServSwitch DKM F X controller card
ACXSFPC CATx SFP module
ACXSFPS Single-mode fiber SFP module
ACX080-PS Power supply for ACX04 8 and ACX080
ACX16 0-P S Power supply for ACX160
ACX288-PS Power supply for ACX288
ACX080-FAN Tray for 48 /80 port console
ACX288-FAN Tray for 160/288 port console
ACX-JAV DKM F X Java Switch and Preset License
ACX-SYS DKM FX SNMP Switch and Syslog License
ACX-CAS DKM FX Cascade License
ACX-API DKM FX API License
Chapter 2: Overview
2.4 What’s Included
Your package should contain the following items. If anything is missing
or damaged, contact Black Box Technical Support at 724-746-5500
or info@blackbox.com.
724-746-5500 | blackbox.com
Page 21
Page 22

Chapter 2: Overview
ACX048, ACX80 ACX160, ACX288:
• (1) ServSwitch DKM FX (ACX048, ACX080, ACX160, or ACX288)
• (1) power cord per built-in power supply unit
• (1) DKM FX controller card
• (1) serial control cable
• (1) set of mounting accessories
• This users’ manual in PDF format and Java tool on CD-ROM
• (1) cross-wired CATx network cable
ACXC16, ACXC32, ACXC48:
• (1) ServSwitch DKM FX Compact (ACXC16, ACXC32, or ACXC48)
• (2) U.S. power cords (one per built-in power supply unit)
• (2) mounting brackets
• (1) RJ-45/DB9 adapter
• (4) rubber feet
• This users’ manual in PDF format and Java tool on CD-ROM
Page 22
724-746-5500 | blackbox.com
Page 23

Chapter 2: Overview
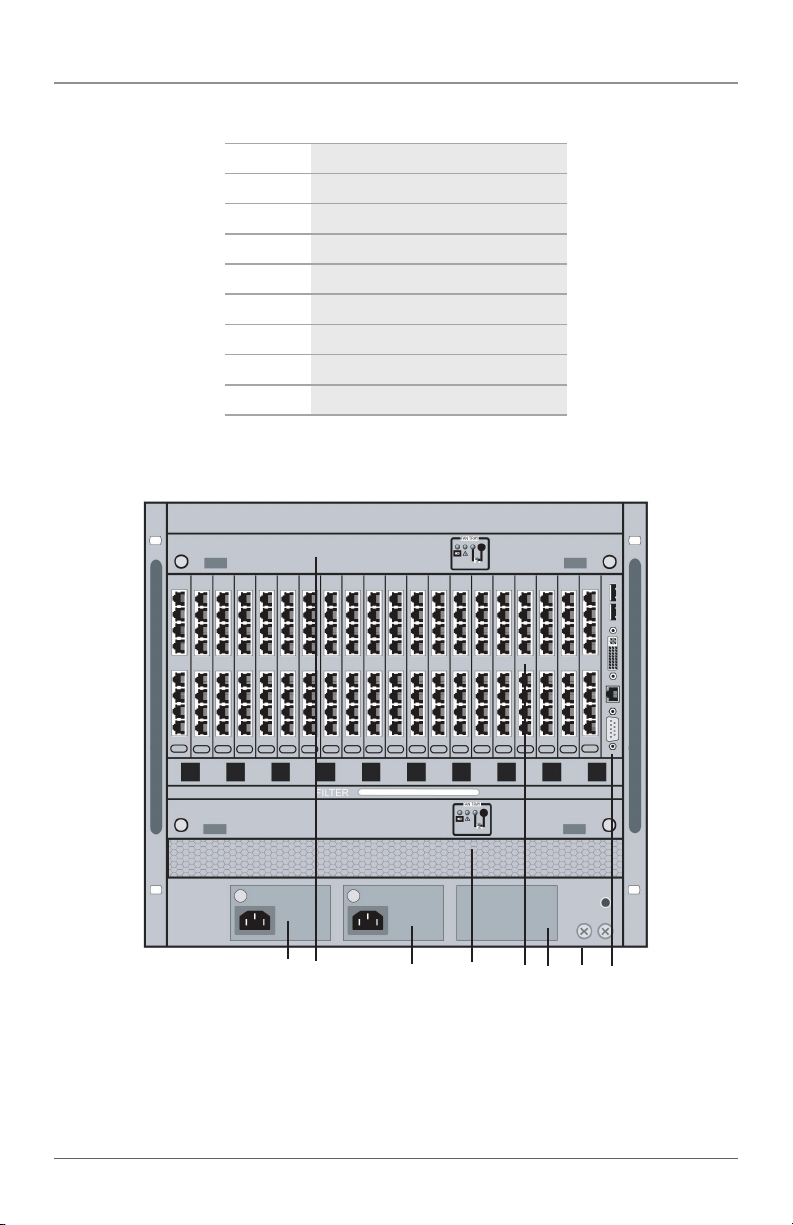
2.5 Device Views
In Sections 2.5.1 through 2.5.4, Figures 2-2 through 2-5 illustrate the ServSwitch
DKM FX chassis models. Tables 2-4 through 2-7 describe their components.
2.5.1 ServSwitch DKM FX 288-Port
1 2 3 4 5 6 7 8
Figure 2-2. Front view, ACX288.
724-746-5500 | blackbox.com
Page 23
Page 24
Chapter 2: Overview
Table 2-4. ACX288 components.
Number Component
1 Slot for Power Supply Unit 1
2 Slot for Fan Tray 1
3 Slot for Power Supply Unit 2
4 Slot for Fan Tray 2
5 Slot for I/ O Boards 1–36
6 Slot for Power Supply Unit 3
7 Slot for CPU board
8 Grounding
2.5.2 ServSwitch DKM FX 160-Port
Page 24
1 2 3 4 5 6 7 8
Figure 2-3. Front view, ACX160.
724-746-5500 | blackbox.com
Page 25
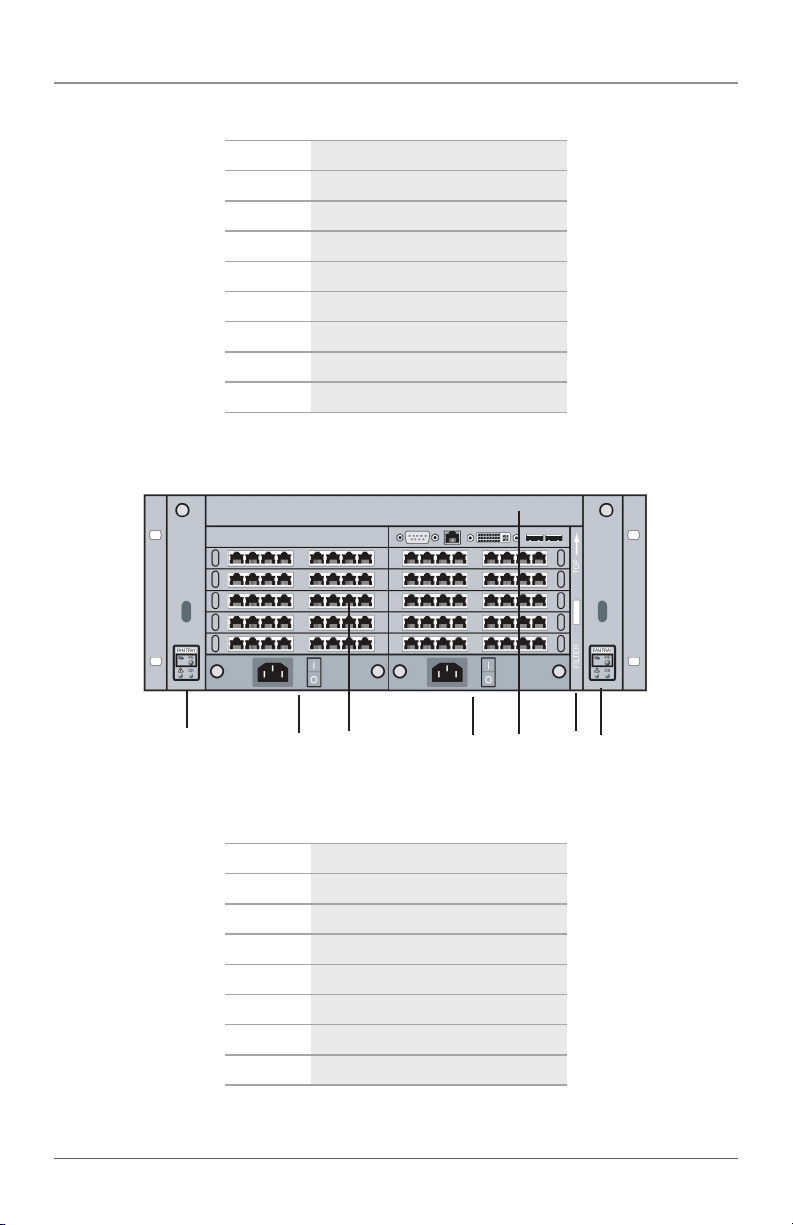
Table 2-5. ACX160 components.
Number Component
1 Slot for Power Supply Unit 1
2 Slot for Fan Tray 1
3 Slot for Power Supply Unit 2
4 Slot for Fan Tray 2
5 Slot for I/ O Boards 1–36
6 Slot for Power Supply Unit 3
7 Slot for CPU board
8 Grounding
2.5.3 ServSwitch DKM FX 80-Port
Chapter 2: Overview
1 2 3 4 5 6 7
Figure 2-4. Front view, ACX080.
Table 2-6. ACX080 components.
Number Component
1 Slot for fan tray
2 Slot for Power Supply Unit 1
3 Slot for I/ O Boards 1–10
4 Slot for Power Supply Unit 2
5 Slot for CPU board
6 Slot for air filter
7 Slot for Fan Tray 2
724-746-5500 | blackbox.com
Page 25
Page 26
Chapter 2: Overview
2.5.4 ServSwitch DKM FX 48-Port
1 2 3 4 5 6 7
Figure 2-5. Front view, ACX048.
Table 2-7. ACX048 components.
Number Component
1 Slot for fan tray
2 Slot for Power Supply Unit 1
3 Slot for I/ O Boards 1–10
4 Slot for Power Supply Unit 2
5 Slot for CPU board
6 Slot for air filter
7 Slot for Fan Tray 2
In Sections 2.5.5 through 2.5.7, Figures 2-6 through 2-11 illustrate the ServSwitch
DKM FX Compact models. Tables 2-8 through 2-13 describe their components.
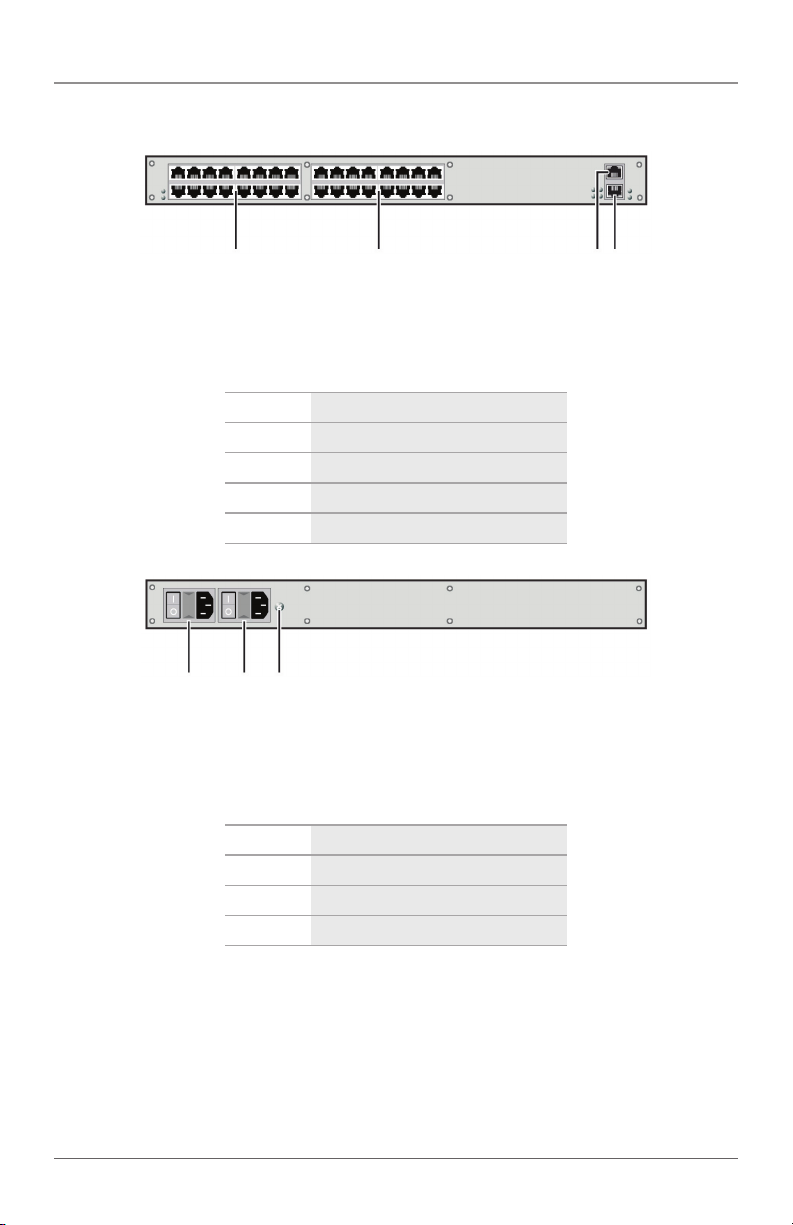
2.5.5 ServSwitch DKM FX Compact 48-Port
1 2 3 4 5
Figure 2-6. Front view, ACXC48.
Page 26
724-746-5500 | blackbox.com
Page 27
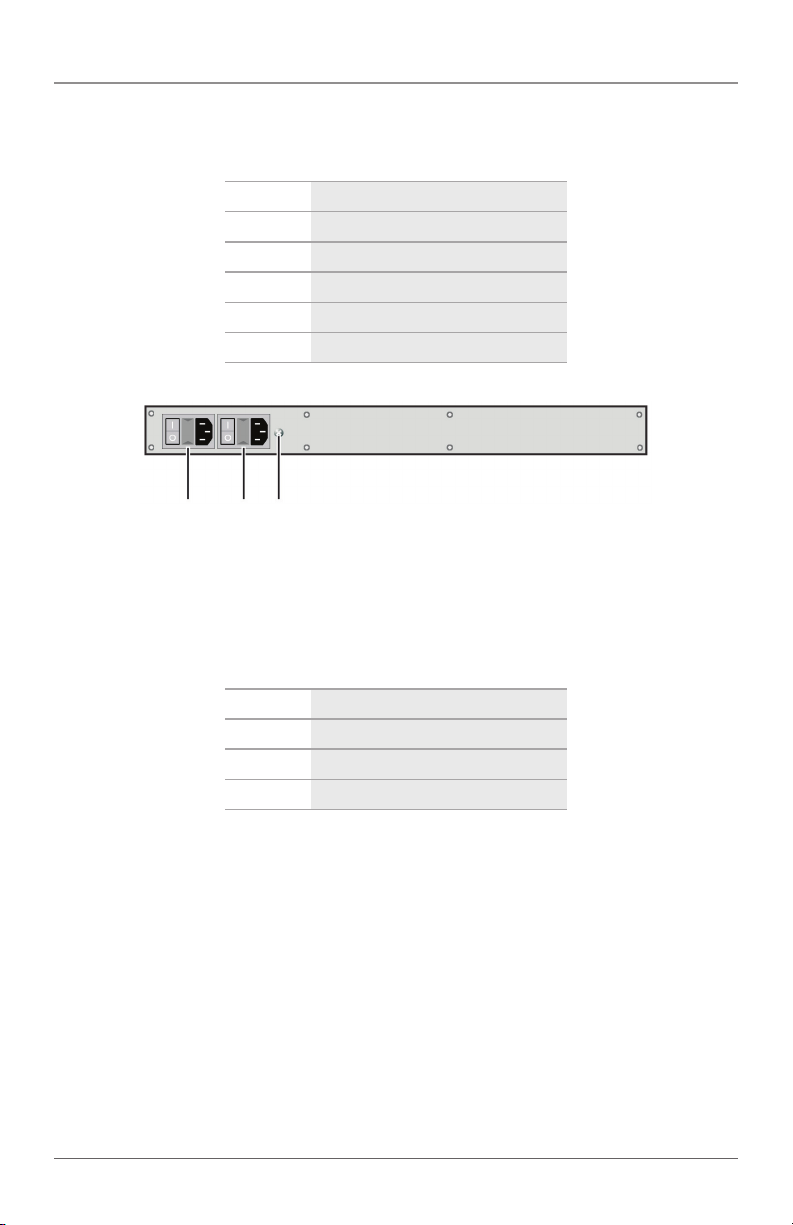
Table 2-8. ACXC48 front-panel
components.
Number Component
1 I/ O ports 1–16
2 I/ O ports 17–32
3 I/ O ports 33–48
4 Serial connection (RJ-45)
5 Network connection (RJ-45)
1 2 3
Figure 2-7. Back view, ACXC48.
Chapter 2: Overview
Table 2-9. ACXC48 back-panel
components.
Number Component
1 Power supply unit 1
2 Power supply unit 2
3 Grounding
724-746-5500 | blackbox.com
Page 27
Page 28
Chapter 2: Overview
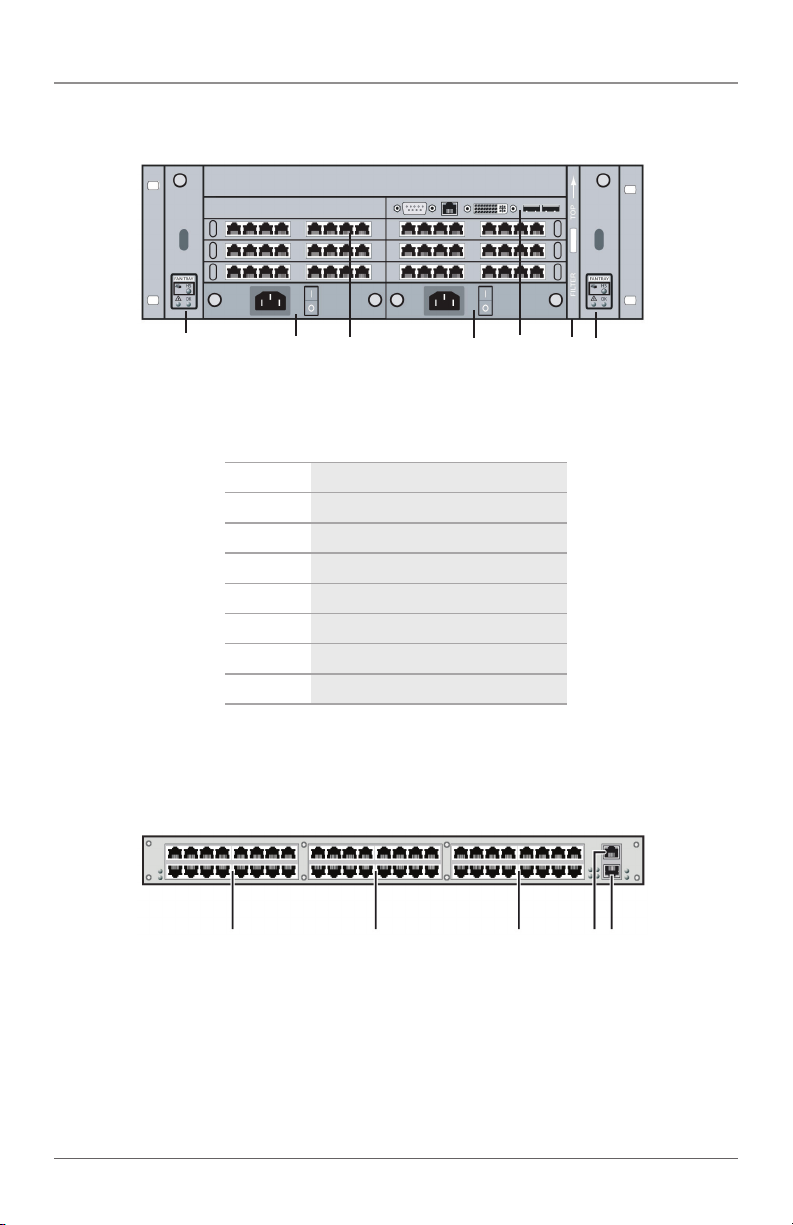
2.5.6 ServSwitch DKM FX Compact 32-Port
1 2 3 4
Figure 2-8. Front view, ACXC32.
Table 2-10. ACXC32 components.
Number Component
1 I/ O ports 1–16
2 I/ O ports 17–32
3 Serial connection (RJ-45)
4 Network connection (RJ-45)
Page 28
1 2 3
Figure 2-9. Back view, ACXC32.
Table 2-11. ACXC32 back-panel components.
Number Component
1 Power supply unit 1
2 Power supply unit 2
3 Grounding
724-746-5500 | blackbox.com
Page 29

2.5.7 ServSwitch DKM FX Compact 16-Port
1 2 3
Figure 2-10. Front view, ACXC16.
Table 2-12. ACXC16 components.
Number Component
1 I/ O ports 1–16
2 Serial connection (RJ-45)
3 Network connection (RJ-45)
Chapter 2: Overview
1 2 3
Figure 2-11. Back view, ACXC16.
Table 2-13. ACXC16 back-panel components.
Number Component
1 Power supply unit 1
2 Power supply unit 2
3 Grounding
724-746-5500 | blackbox.com
Page 29
Page 30
Chapter 2: Overview
2.6 Diagnostics and Status
2.6.1 Status LEDs
The ServSwitch DKM FX and DKM FX Compact LED indicators are shown in
Figures 2-12 through 2-22, and described in Tables 2-14 through 2-25.
1
Page 30
2
Figure 2-12. CPU board, front view.
724-746-5500 | blackbox.com
Page 31

Chapter 2: Overview
Table 2-14. Status LEDs on the CPU board.
Number LED Status Description
White CPU board is in registration process
Blue flashing Registration at the matrix is started
1 Status 1
2 Status 2
NOTE: Because of variations in the LED type, “white” may also appear as light
purple or light blue.
Red flashing Registration is in progess
Green flashing Operating condition
Green CPU board de-registered
White CPU board is in registration process
Red flashing Registration at the matrix is started
Off Operating condition
1
2
1
2
CATx SFP fiber SFP coax
Figure 2-13. LEDs on the I/O boards.
1
2
724-746-5500 | blackbox.com
Page 31
Page 32

Chapter 2: Overview
Table 2-15. Status LEDs on the I/O boards.
Number LED Status Description
Light blue I/O board in boot process
1 Status 1
2 Status 2
Red flashing I/ O board in registration process
Green flashing Operating condition, I/O board registered at the matrix
Green I/O board de-registered (locking pin pulled out)
White I /O board in boot process
Blue I /O board in registration process
Blue flashing
Red flashing I/O board de-registered (locking pin pulled out)
Operating condition, communication active with CPU board
active
1
2
1
2
CATx SFP fiber SFP coax
Figure 2-14. Ports status LEDs on the I/O boards.
Table 2-16. Port status LEDs on the I/O boards.
Number LED Status Description
Off Port not activated
1 Link status (green)
2 Link status (orange)
Flashing Port activated, no connection via interconnect cable
On Connection via interconnect cable OK, data traffic active
Off Port not activated
Flashing Port activated, no connection via interconnect cable
On Connection via interconnect cable OK, data traffic active
1
2
Page 32
724-746-5500 | blackbox.com
Page 33

1 2 3
Figure 2-15. Status LEDs on the fan tray.
Table 2-17. Status LEDs on the fan tray.
Number LED Status Description
1 Status 1 (green) On Operating condition
2 Status 2 (blue)
3 Hot swap (blue)
Off Operating condition
On Error indication
Off Hot swap option deactivated
On Hot swap option activated
Chapter 2: Overview
1 2 3
Figure 2-16. Status LEDs on the power supply unit (ACX288-PS or ACX160-PS).
724-746-5500 | blackbox.com
Page 33
Page 34

Chapter 2: Overview
Table 2-18. Status LEDs on the power supply unit
Number LED Status Description
1 AC input OK (green) On Operating condition
2 DC output OK (green) On Operating condition
3 O/T (yellow)
Figure 2-17. Status LEDs on the power supply unit (ACX080-PS).
(ACX288-PS or ACX160-PS).
Off Normal temperature
On High temperature
1
Table 2-19. Status LEDs on the power supply unit
(ACX080-PS).
Number LED Status Description
1
DC input OK (green) On Operating condition
DC output OK (green) Off No power supply
Status LEDs on ACXC16, ACXC32, and ACXC48
1 2
Figure 2-18. Status LEDs on ACXC16, ACXC32, and ACXC48.
Page 34
724-746-5500 | blackbox.com
Page 35

Chapter 2: Overview
Table 2-20. Status LEDs on the ACXC16, ACXC32, and ACXC48.
Number LED Status Description
White CPU board is in registration process
1 Status 2
Red flashing Registration at the matrix is started
Off Operating condition
White CPU boad is in registration process
Blue flashing Registration at the matrix is started
2 Status 1
Red flashing Registration is in process
Green flashing Operating condition
Green CPU board de-registered
NOTE: Because LED type varies, “white” might also appear as light purple or light
blue.
LAN Port LEDs on the ACXC16, ACXC32, and ACXC48
1 2
Figure 2-19. LAN port LEDs on ACXC16, ACXC32, and ACXC48.
Table 2-21. LAN port LEDs on
ACXC16, ACXC32, and ACXC48.
Number LED Status Description
1
2
Status LED 1
(orange)
Status LED 2
(green)
On Connection to network is available
Off No connection to net work
Flashing Data traf fic is active
Off Data traf fic is not active
724-746-5500 | blackbox.com
Page 35
Page 36

Chapter 2: Overview
I/O Port LEDs on the ACXC16, ACXC32, and ACXC48
1 2
Figure 2-20. I/O port LEDs on ACXC16, ACXC32, and ACXC48.
Table 2-22. I/O port LEDs on
ACXC16, ACXC32, and ACXC48.
Number LED
1 Link status port 1
2 Link status port 2
Table 2-23. Status LEDs at the ports of the
ACXC16, ACXC32, and ACXC48 I/O boards.
Number LED Status Description
Off Initialization
1 Link status
Green Connection via interconnect cable is OK, data traffic is active
Orange Extender is not recognized
Power Supply Unit LEDs on the ACXC16, ACXC32, and ACXC48
1 2
Figure 2-21. Power supply LEDs on ACXC16, ACXC32, and ACXC48.
Page 36
724-746-5500 | blackbox.com
Page 37

Chapter 2: Overview
Table 2-24. Power supply unit LEDs of the
ACXC16, ACXC32, and ACXC48 I/O boards.
Number LED Status Description
1
2
Status PSU
1 (green)
Status PSU
2 (green)
Fan Tray Status LEDs on ACXC16, ACXC32, and ACXC48
On Operating condition
Off Power supply unit off
On Operating condition
Off Power supply unit off
1 2
1 2
Figure 2-22. Fan Tray Status LEDs on ACXC16, ACXC32, and ACXC48.
Table 2-25. Fan Tray Status LEDs on the ACXC16, ACXC32, and ACXC48.
Number LED Status Description
1
2
3
4
Left Fan Status 1
(red)
Left Fan Status 2
(green)
Right Fan Status 2
(green)
Right Fan Status 1
(red)
724-746-5500 | blackbox.com
On Error indication
Off Operating condition
On Operating condition
Off Fan off
On Operating condition
Off Fan off
On Error indication
Off Operating condition
Page 37
Page 38

Chapter 2: Overview
2.6.2 Port Status
The connections and the switching status between the various consoles and CPUs
are shown in this menu.
You can access the menu in two ways: OSD or Java.
Figure 2-23. OSD and Java icons.
OSD
An on-screen display (abbreviated OSD) is an image superimposed on a screen
picture, commonly used by modern television sets, VCRs, and DVD players to
display information such as volume, channel, and time.
Java® Tool
The current port configuration of the ServSwitch DKM FX is illustrated in this
menu.
Select “Status > Matrix View” in the task area in on-line mode.
Figure 2-24. Menu Status—Matrix View screen, Example #1.
Page 38
724-746-5500 | blackbox.com
Page 39

Chapter 2: Overview
Figure 2-25. Menu Status—Matrix View screen, Example #1.
Table 2-26. Connection status.
Color Description
Gray Port not connected
Yel low Video connection
Green K VM connection
Red Fault y Port
The symbol in Table 2-27 indicates the extender that is recognized and defined at
a certain port.
724-746-5500 | blackbox.com
Page 39
Page 40

Chapter 2: Overview
Symbol Description
Port connected to a CPU unit
Port connected to a CON unit
Port connected to a USB 2.0 CPU unit
Port connected t a USB 2.0 CON unit
Port is configured as a CON port for customer-specific applications.
Port is configured as a CPU por t for customer-specific applications.
Table 2-27. Extender recognized.
• Red framed ports are defined as “fixed” (for example, for USB 2.0 connections).
• The port with four static blue squares is currently selected.
• If a port is selected, all the other ports will be shown transparently, except for
those ports that are connected to the currently selected port. To clear a selected
port, press the “Clear Selection” button.
• If there is a red cross shown on a port when switching by the matrix view, the
console chosen to be connected does not have access rights to the respective
CPU at this port.
NOTE: To show the extender information of the currently selected port in the right
part of the working area, press the left mouse button.
The information in Table 2-28 is available:
Page 40
724-746-5500 | blackbox.com
Page 41

Chapter 2: Overview
Table 2-28. Extender information.
Symbol Description
Extender name Name of the selected extenders
Extender type Type of the selected extender
Port I D Number of the selected port
Device name Name of the connected console or CPU
Connections Listing of assigned connections to the marked port (full access or video access)
NOTE: To open the context menu for the currently selected port with further
functions, press the right mouse button.
The context functions in Table 2-29 are available:
Table 2-29. Context functions.
Function Description
Open extender The menu for definition of the currently selected extender is opened
Open device The menu for definition of the currently selected console or CPU is opened
Switch The menu for execution of switching applications is opened
To reload the Matrix View:
• Press the “F5” key of a connected keyboard.
• Execute “Edit > Reload” in the menu bar.
• Press the “Reload ” button in the tool bar.
724-746-5500 | blackbox.com
Page 41
Page 42

Chapter 2: Overview
2.6.3 Extender OSD
All extenders used with the matrix switch have an individual OSD to display the
connection status of the console.
Figure 2-26. Example view of extender OSD.
Table 2-30. Extender OSD information.
Field Description
CON Name of the extender’s individual console
CPU Name of the currently connected CPU
Full Access: The extender’s indivdual console has a KVM connection to the displayed CPU.
Video Access: The extender’s individual console has a video only connection to the displayed CPU.
Access
Private Mode: The extender’s individual console has a Private Mode connection to the displayed
CPU.
Not connected: The individual console is not connec ted to a CPU.
Page 42
724-746-5500 | blackbox.com
Page 43
Chapter 2: Overview
NOTE: If the Mouse Connect or Keyboard Connect options are used, the name of
the console with keyboard/mouse control will be displayed at those
consoles that do not have K/M control at the moment. The console is
displayed in yellow under “Access.”
2.6.4 Network Status
The current network configuration is shown in this menu.
You can access the menu via OSD or Java:
Figure 2-27. OSD and Java icons.
OSD
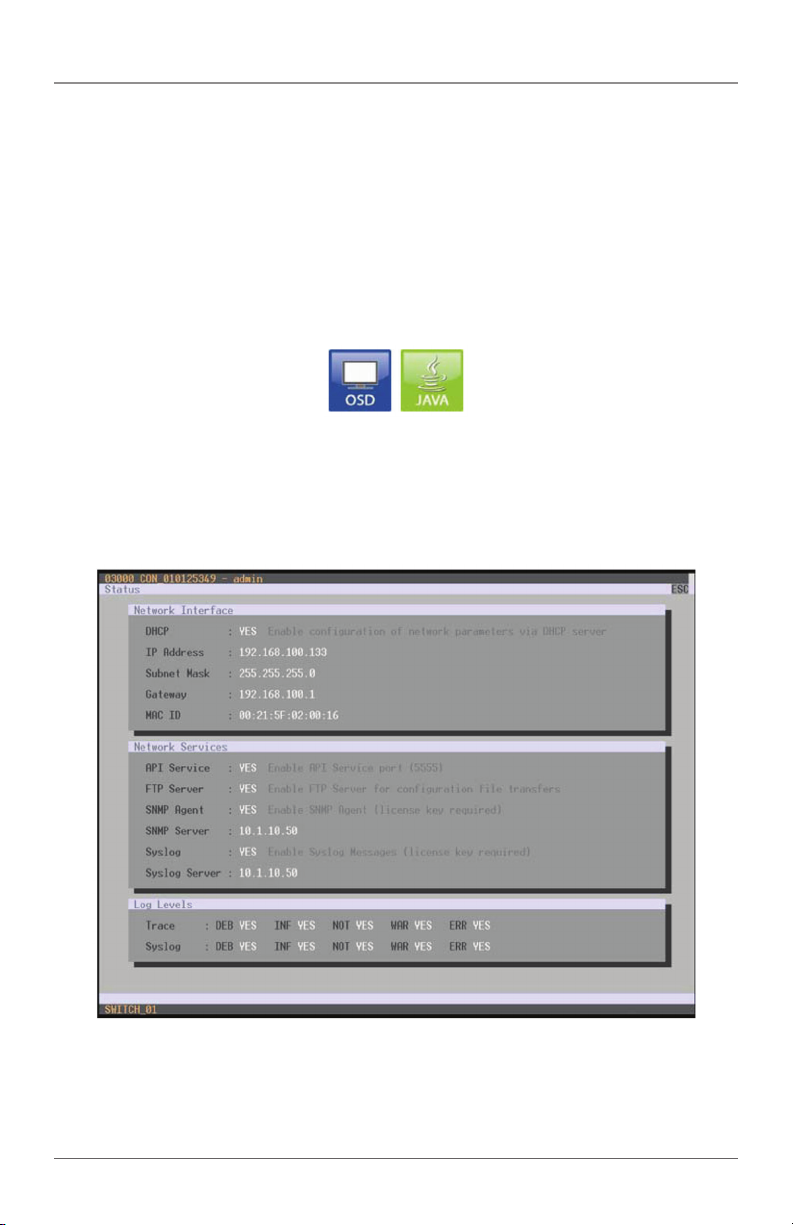
Select “Status > Network” in the main menu.
Figure 2-28. Status—Network screen.
724-746-5500 | blackbox.com
Page 43
Page 44

Chapter 2: Overview
The following information is shown in the Network Status menu:
Table 2-31. Network status.
Field Description
DHCP Information if the network settings are applied dynamically. Display Y (Yes) or N (No)
IP address Information about the IP address as provided manually or via DHCP
Subnet mask Information about the subnet mask as provided manually or via DHCP
Gateway Information about the gateway address as provided manually or via DHCP
MAC ID Information about the MAC address in the matrix
Java Tool
1. Select “Status > Matrix View” in the task area.
Page 44
Figure 2-29. Menu status—matrix view.
724-746-5500 | blackbox.com
Page 45

Chapter 2: Overview
2. Use the left-mouse button to click on the network port of the CPU board.
The corresponding network status will be shown in the right part of the
working area.
2.6.5 Firmware Status
The current firmware status of the installed boards is shown in this menu.
You can access the menu via OSD or Java:
Figure 2-30. OSD and Java icons.
Figure 2-31. Menu status—firmware.
724-746-5500 | blackbox.com
Page 45
Page 46

Chapter 2: Overview
Table 2-32. Menu status—firmware.
Field Description
Name Description of the modules
Type Type number
Ports Number of ports
Version Complete description of the firmware version
Date Date of the firmware version
Status Module status
Java Tool
1. Select Status > Slot Table in the task area.
Figure 2-32. Menu Status—Slot Table.
2. To read the firmware status and store it locally (file extension .dtf), select
“Switch > Save Firmware Status to File....”
3. To read the overall status of the ServSwitch DKM FX and store it locally (file
extension .zip), select “Switch > Save Status to File...”.
The various modules can expanded and retracted in the “Name” column by
clicking the left-mouse button on the plus or minus symbols to get a better
over view.
Page 46
724-746-5500 | blackbox.com
Page 47

Chapter 2: Overview
Click on the plus resp. minus symbol in the upper right corner of the
working area to expand and retract all module information with one click
of the left-mouse button.
2.6.6 Firmware Status Extender
The current firmware status of the connected extenders is shown in this menu.
To access the menu, use the Java tool.
Figure 2-33. Java Tool icon.
The following information is shown in this menu:
Table 2-33. Menu status—firmware status extender.
Field Description
Name Description of the firmware
Type Type number
Ports Number of por ts
Cur. Ver sio n Complete description of the current firmware version
Cur. Date Date of the current firmware version
724-746-5500 | blackbox.com
Page 47
Page 48

Chapter 2: Overview
Select “Status >EXT Firmware” in the task area.
Figure 2-34. Menu status—EXT firmware.
2.7 Trace Function
All events—for example, activities and switching operations of the ServSwitch
DKM FX—are logged and displayed in this menu.
This function is used for diagnostic purposes.
You can request various trace views in the menu:
Figure 2-35. OSD icon.
The following information is shown in this menu:
Table 2-34. Trace menu function.
Field Description
Time Timestamp
Message Detailed description of the event
Page 48
724-746-5500 | blackbox.com
Page 49

Chapter 2: Overview
Trace possibilities
• Select “Status > Trace IO Board” in the main menu to check the events on your
current I/O boards.
• Select “Status > Trace Matrix” to check the ServSwitch DKM FX events.
2.8 Syslog Monitoring
This menu logs matrix activities, switching operations, and the surveillance of
function-critical components (such as fans or power supply units).
Click on the Java icon to access the menu:
Figure 2-36. Java icon.
To start Syslog Monitoring, proceed as follows:
Select the Monitoring symbol in the symbol bar.
Figure 2-37. Monitoring Menu—Syslog.
724-746-5500 | blackbox.com
Page 49
Page 50

Chapter 2: Overview
Logging system activities start when opening the Monitoring menu, and remain
active until the appropriate tab is closed.
During logging, the activities are written continuously into logging files and stored
locally. This process can be set with various options.
Options
Select Extras > Options in the menu bar and open the Syslog tab.
The following options are available:
Table 2-35. Syslog options.
Option Description
Log File Directory Default director y to store the log files.
Log File Name Default name of the log file to be saved.
Log File Extension Default ex tension for the log file.
Maximum Log File Size (KB) Allowed maximum size of a log file.
Maximum Number of Log Files Allowd maximum number of log files.
NOTE: When the maximum log file size is reached, a new log file will be created.
When the maximum number of log files is reached, the oldest one will be
overwritten with the new information.
Filter Function
To filter relevant messages out of a number of logged activities of the matrix
switch, the Syslog Monitoring offers various filter options.
To set and activate a filter, follow these steps:
1. Set the desired filter option(s) by activating the respective checkbox(es).
2. Activate the filter settings by pressing the “Filter” button.
3. To deactivate an activated filter setting, press the “Clear” button.
Page 50
724-746-5500 | blackbox.com
Page 51

Chapter 2: Overview
The following filter options are available:
Table 2-36. Filter options.
Option Description
Date Messages of a defined range will be filtered.
Facility Messages of a defined facility will be filtered.
Severity Messages of a defined severity will be filtered.
Host Messages of a defined host will be filtered.
Message Messages with defined text parts will be filtered.
NOTE: Filter options are not valid within the locally stored log files.
Recording Function
All messages shown in the Syslog are equipped with various recording functions.
• To store the messages shown in the Syslog (filtered or unfiltered), press the
“Save trace” button. The messages will be stored in a .txt file.
• To remove the messages shown in the Syslog, press the “Clear trace” button.
• To stop recording the messages, press the “Pause” button. To continue
recording, press the button again.
2.9 SNMP
Use SNMP to monitor all function-critical and safety-critical parts of the matrix
and to query their status. This function complies with the RFC 1157 standard.
NOTE: During SNMP monitoring, we strongly recommend that you use a
dedicated network to ensure access security.
You can access the menu via OSD or Java:
Figure 2-38. OSD and Java icons.
OSD
To activate SNMP via OSD, follow these steps:
1. Select “Configuration > Network” in the main menu.
724-746-5500 | blackbox.com
Page 51
Page 52

Chapter 2: Overview
2. Set the option SNMP Agent to “Y” (Yes) under Network Services. Activating
this option grants permission to run an active query of the SNMP agent.
3. Set the IP address of the SNMP server under Network Services. This enables
active sending of trap messages from the SNMP agent to the SNMP manager.
Java Tool
To activate SNMP via Java tool, follow these steps:
1. Select “System > Network” in the task area.
2. Activate the option SNMP Agent under SNMP. Activating this option grants
permission for an active query of the SNMP agent.
3. Set the IP address of the SNMP server under SNMP Server. This enables active
sending of trap messages from the SNMP agent to the SNMP manager.
Page 52
724-746-5500 | blackbox.com
Page 53

Chapter 3: Installation
3. Installation
3.1 System Setup
NOTE: If you are a first-time user, we recommend that you set up the system
in the same room as a test setup. This will allow you to identify and solve
any cabling problems, and experiment with your system more conveniently.
Setup of the ServSwitch DKM FX
1. Install the CPU and I/O boards.
2. Connect the keyboard, mouse, and monitor to the CPU board of the
ServSwitch DKM FX.
3. Connect the ServSwitch DKM FX to the power supply.
4. Open OSD via hotkey and log in with administrator rights in the main menu
under configuration (see Section 4.2.1).
5. Configure initially as requested.
NOTE: After configuring the system, we recommend that you save the
configuration by selecting Configuration > Save and restart the ServSwitch
DKM FX by selecting Restart Matrix.
6. Optional: Establish a network connection between the ServSwitch DKM FX and
the Java tool to set an extended configuration (see Section 4.2.2).
Setup of Extender
1. Connect the CON units to the ServSwitch DKM FX by using the interconnect
cables (CATx or fiber).
2. Connect the CON units to the input devices to be used (for example, keyboard
and mouse).
3. Connect the 5-VDC power supply units to the CON units.
4. Check the basic function of the CON unit by opening the OSD via hotkey.
5. Connect the source (computer, CPU) to the CPU unit of the extender by using
the provided connection cables.
6. Connect the CPU unit to the ServSwitch DKM FX by using the provided
interconnect cables (CATx or fiber).
724-746-5500 | blackbox.com
Page 53
Page 54

Chapter 3: Installation
7. If you have a video matrix, connect the video source directly to the ServSwitch
DKM FX by using the interconnect cables (coax, fiber).
8. Connect the 5-VDC power supply units to the CPU units.
9. Start the system.
3.2 Example Applications
The ServSwitch DKM FX supports a flexible configuration of your system
environment:
For example, part of the ServSwitch DKM FX can be configured as a single-head
workstation, part as dual-head, or quad-head, or even as a video ServSwitch DKM
FX. You can also configure KVM and USB 2.0.
In addition to the access via OSD by the keyboard connected to the CPU board or
an extender CON unit, you have the following access options:
• via Java Tool
• via serial interface
A connection to common media controls is possible, too.
Sections 3.2.1 through 3.2.4 describe typical installations of the ServSwitch DKM
FX.
Page 54
724-746-5500 | blackbox.com
Page 55

Chapter 3: Installation
3.2.1 KVM Matrix
In single-head mode, up to 288 ports can be used either as an input or as an
output port, depending on components and equipment. At the same time, all
users have non-blocking access (user access is not limited by the activities of
another user).
1 2 3 4 3 5 6
Figure 3-1. KVM using ServSwitch DKM FX application.
Table 3-1. Single-head KVM matrix components.
Number Description
1 Source (computers, CPU)
2 CPU units
3 Interconnect cable
4 ServSwitch DKM F X
5 CON units
6 Consoles (monitor, keyboard, mouse)
If you have a single-head console, you can also access a dual-head or quad-head
console. However, you can control the system only at Monitor 1.
Any signal source can be switched to any number of monitors that will show the
video signal at the same time. Even (optional) audio can be switched.
724-746-5500 | blackbox.com
Page 55
Page 56

Chapter 3: Installation
3.2.2 Video Matrix
If you use the ServSwitch DKM FX as a video matrix, it can switch up to 288 input
ports to up to 288 output ports, depending on components and equipment.
1 2 3 2 4
Figure 3-2. Video using ServSwitch DKM FX application.
Table 3-2. Video matrix components.
Number Description
1 Video sources, for example, an SDI camera
2 Interconnect cable
3 ServSwitch DKM F X
4 Video sinks, for example, a monitor
3.2.3 Parallel Operation (Stacking)
If you have special configurations, especially at installations with several monitors
per workstation, or you need additional support for USB 2.0 transmission paths,
you can increase the number of CPUs and consoles connected using a parallel
operation (stacking) of several ServSwitch DKM FX devices.
One of the ServSwitch DKM FX matrices has to be defined as the master
ServSwitch DKM FX, and all the others have to be configured as slaves and must
be connected to the master ServSwitch DKM FX via a network.
Page 56
724-746-5500 | blackbox.com
Page 57

Chapter 3: Installation
If you send a switching command via the OSD, the slave matrices will also switch.
NOTE: Switching of stacked devices might be delayed by several seconds.
1 2 3 4 6 3 7 8
Figure 3-3. Parallel operation (stacking) application.
Table 3-3. Parallel operation
(stacking) components.
Number Description
1 Dual-head source computer, CPU
2 CPU units
3 Interconnect cable
4 Ser vSwitch DKM F X (master)
5 Ser vSwitch DKM F X (slave)
6 Network connection master/slave(s)
7 CON units
8 Console (two monitors, keyboards, and mice
724-746-5500 | blackbox.com
Page 57
Page 58

Chapter 3: Installation
3.2.4 Cascading
For applications that exceed the number of available ports, you can extend the
system by cascading.
In this case, the ServSwitch DKM FX devices are connected by “tie lines.” The tie
lines are dynamically configured to support connections in both directions.
Page 58
1 2 3 4 3 5 3 6 7
Figure 3-4. Cascading application.
Table 3-4. Cascading components.
Number Description
1 Source (computer, CPU)
2 CPU units
3 Interconnect cable
4 Ser vSwitch DKM F X (slave)
5 Ser vSwitch DKM F X (master)
6 CON unit
7 Console (monitor, keyboard, mouse)
724-746-5500 | blackbox.com
Page 59

Chapter 4: Configuration
4. Configuration
4.1 Command Mode
The ServSwitch DKM FX has a Command Mode that enables several functions via
keyboard command during normal use.
To enter Command Mode, use a hotkey sequence, and to exit Command Mode,
press <Esc>. While in Command Mode, the Shift and Scroll LEDs on the console
keyboard will flash.
NOTE: In Command Mode, normal keyboard and mouse operation will cease.
Only selected keyboard commands are available.
NOTE: If there is no keyboard command executed within 30 seconds after
activating Command Mode, it willl be automatically deactivated.
The following table lists the keyboard commands to enter and to exit Command
Mode and to change the hotkey sequence:
Table 4-1. Command mode components.
Function Keyboard command
Enter Command Mode (default) 2x <Right-Shif t> (or hotkey)
Exit Command Mode <Esc>
Change hotkey sequence
<Lef t-Ctrl> + <Left-Shif t> + <c>, <hotkey code>, <Enter>
Since 8 /10/ 2011:
<current hotkey> + <c>, <new hotkey code>, < Enter>
NOTE: <Key> + <Key> = Press keys simultaneously; <Key>, <Key> = Press keys
successively, 2x <Key> = Press key quickly, twice in a row (similar to a
mouse double-click).
724-746-5500 | blackbox.com
Page 59
Page 60

Chapter 4: Configuration
You can change the hotkey sequence to enter Command Mode. The following
table lists the hotkey codes for the available key sequences:
Table 4-2. Command mode components.
Hotkey code Hotkey
1 <Lef t-Ctrl> + <Left-Shif t> + <i>
2 2x <Scroll>
3 2x <Left-Shift>
4 2x <Left-Ctrl>
5 2x <Left-Alt>
6 2x <Right-Shift>
7 2x <Right-Ct rl >
8 2x <Right-Alt>
NOTE: In a combined KVM matrix/U-Switch configuration, choose different
hotkeys for the KVM matrix and the U-Switch.
Set freely selectable “Hotkey” (exemplary)
To set a freely selectable Hotkey (for example, 2x <space>), use the following
keyboard sequence:
<current “Hotkey”>, <c>, <0>, <Space>, <Enter>
Reset “Hotkey”
To set a Hotkey back to the default settings of the extender, press the key
combination <Right-Shift> + <Del> within 5 seconds after switching on the CON
unit or plugging in a keyboard.
4.2 Control Options
The ServSwitch DKM FX contains an internal CPU that enables you to control all
functions from any console without the need for an external CPU or media
control.
You can access the ServSwitch DKM FX for configuration and operation in three
ways:
• via OSD
• via Java Tool
• via serial interface
Page 60
724-746-5500 | blackbox.com
Page 61

Chapter 4: Configuration
4.2.1 Control via OSD
Figure 4-1. OSD icon.
Via OSD (on-screen display), you set the configuration of the ServSwitch DKM FX
operating system. The settings of the Configuration menu are described in this
chapter. All other menus are described in later chapters.
You can enter the OSD of the ServSwitch DKM FX:
• via keyboard connected to the CPU board
• via keyboard connected to a CON unit of an extender
Entering OSD
1. Start Command Mode with the hotkey.
2. Press <o> to open OSD. You will see a list of all available CPUs as a start menu.
3. Press <Esc> to enter the main menu.
Leaving OSD
• Press <Shift> + <Esc> simultaneously. The OSD will close without any further
changes and the currently active CPU connection will display.
724-746-5500 | blackbox.com
Page 61
Page 62

Chapter 4: Configuration
Menu Structure
Figure 4-2. Menu structure.
The general layout of the OSD is structured into three areas:
• Upper status area (top-most two text lines)
• Working area
• Lower status area (lowest two text lines)
Page 62
724-746-5500 | blackbox.com
Page 63

Chapter 4: Configuration
Keyboard control
You can select between the following keyboard commands:
Table 4-3. Keyboard commands.
Function
Left cursor—only within an input field or a switching screen <Cursor-Left>
Right cursor—only within an input field or a switching screen < Cursor-Right>
• In input fields: Line up (with wrap-around)
• In menus: Line up (without wrap-around)
• In input fields: Line down (with wrap-around)
• In menus: Line down (without wrap-around)
Previous page in menus with more than one page <Page-Up>
Next page in menus with more than one page <Page-Down>
Next input field <Tab>
Previous input field <Left-Shift> + <Tab>
Next option in selection fields <+>
Previous option in selection fields <->
Switching in selection fields between two conditions,
for example, between ON/OFF or Y(Yes)/N(No)
• In menus with input fields: Save data
• In menus: Select menu item
• In menus with input fields: Cancel data
• In menus with selection fields: Go back to the superior menu
Keyboard
command
<Cursor-Up>
<Cursor-Dow n>
<Space>
<Enter>
<Esc>
724-746-5500 | blackbox.com
Page 63
Page 64

Chapter 4: Configuration
Sorting Function
You can sort lists and tables in the Java Tool.
Table 4-4. Sorting functions.
Function
Sort ID numbers in a descending order or in an ascending order by
pressing the keyboard command twice (ID)
Sort ID names in a descending order or in an ascending order by pressing
the keyboard command twice (Name)
Go to the next result in the list of results for the search field (Next) <F3>
Go to the previous result in the list of results for the search field ( Previous) <F3>
Refresh the currently shown list (Previous) <F4>
Refresh the currently shown field (Refresh) <F5>
Jump bet ween the search field and the list of results (Find) <F6>
Keyboard
command
<F1>
<F2>
Password request
You have to log in with administrator rights to be able to set configurations.
Page 64
Figure 4-3. Login Menu screen.
724-746-5500 | blackbox.com
Page 65

Chapter 4: Configuration
Access to the configuration menu requires administrator rights. User login is
mandatory.
Table 4-5. Menu login parameters.
Field Input
User admin
Password admin
NOTE: For security reasons, change the administrator password as soon as
possible.
4.2.2 Control via Java Tool
Figure 4-4. Java icon.
Requirements
If you want to use the Java tool, you need these items:
• Computer with an executable Java tool and an installed Java Runtime
Environment (JRE, version 1.6 or higher)
• Java Tool software
• Available network connection between the Java tool and the ServSwitch DKM
FX
NOTE: Contact your system administrator concerning JRE and network
connection.
Installation of the Java Tool
The Java tool is available as a single executable program file that does not require
a separate installation.
Copy the tool after receiving the file to a directory on your computer.
NOTE: If you do not have a Java tool, contact Black Box Technical Support
at 724-746-5500 or info@blackbox.com.
724-746-5500 | blackbox.com
Page 65
Page 66

Chapter 4: Configuration
Computer Connection to the ServSwitch DKM FX
NOTE: For a direct connection between the computer and ServSwitch DKM FX,
use a cross-wired network cable.
For a connection between the computer and ServSwitch DKM FX via
switch or hub, use a straight-pinned network cable.
Connect the network cable to the RJ-45 ports of the computer and CPU board of
the ServSwitch DKM FX.
Start of the Java Tool
Open the Java tool by a double click on the program icon or use the <Enter> key
on the keyboard.
Connection to the Matrix
NOTE: Administrator rights are required.
1. Open the Java tool.
2. Select Matrix > Connect in the menu bar.
3. Enter the IP address in the popup input field according to the network
configuration of the ServSwitch DKM FX.
4. Enter the user name and password for the ServSwitch DKM FX.
5. Confirm your inputs with the button “OK” or reject with “Cancel.”
Figure 4-5. Menu Connection screen.
Page 66
724-746-5500 | blackbox.com
Page 67

Chapter 4: Configuration
NOTE: Up to 12 connections between the matrix and the Java tool can be
established at the same time because available sockets are limited.
Menu structure
Figure 4-6. Example menu view (system-switch).
The menu structure of the Java tools is subdivided into various sections:
• Menu bar (top line)
• Toolbar (second line)
• Tab bar (third line)
• Task area (left menu section)
• Working area (right menu section)
• Status bar (bottom line section)
Operating Instructions
The operation of the Java tool is intuitive and corresponds to the user interface of
common operating systems.
724-746-5500 | blackbox.com
Page 67
Page 68

Chapter 4: Configuration
The Java tool contains its own support function.
You can activate or deactivate the integrated help texts in the working area of the
Java tool by checking the box in the upper right corner.
Mouse Control
You can select between the following mouse commands:
Table 4-6. Mouse commands.
Function Mouse command
Menu selection, marking Left mouse button
Open function-specific selection menus Double-click the left mouse button
Open content-specific selection menus Right mouse button
Keyboard Control
You can select between the following keyboard commands:
Table 4-7. Keyboard commands.
Function Keyboard command
Cursor to the left <Cursor Left>
Cursor to the right <Cursor Rig ht>
Line up <Cursor Up>
Line down <Cursor Down>
Previous page in input or status menus with more than one page <Page Up>
Next page in input or status menus with more than one page <Page Down>
Next field in input menus <Tab>
Previous field in input menus <Left-Shift> + <Tab>
• Switching in selection fields between t wo conditions (checkmark or not)
• Open already marked fields with editing or selecting capablility
• In menus: data saving
• Menu item selection
• Leave tables
• Jump from tables into the next field
Page 68
724-746-5500 | blackbox.com
<Space>
<Enter>
<Ctrl> + <Tab>
Page 69

Chapter 4: Configuration
Table 4-7 (Continued). Keyboard commands.
Function Keyboard command
• Leave tables
• Jump from tables into the previous filed
NOTE: Various functions within the menus in the menu bar can be executed with
the provided keyboard commands that are listed to the right of the
respective menu item :(for example, press <Ctrl> + <S> to execute “Save”).
Reload Options
The information shown in the Java tool can be reloaded in different ways.
• Via <F5> key on the used keyboard
• Via Edit > Reload in the menu bar
• Via “Reload” Symbol in the symbol bar
Context Function
The Java tool offers several context functions that support a user-friendly and
effective operation of the tool. The context functions are described in the
respective chapters.
<Ctrl> + <Left-Shift> +
<Tab>
To execute a context function, use the right mouse button on the corresponding
field and select the desired function.
Sorting Function
Lists and tables in the Java tool offer a sorting function for fast and smooth
search.
1. For ascending sort status, use the left mouse button once to click into the
header of the column you want to sort.
The sort status is indicated by an arrow that points upwards.
2. For descending sort, use the left mouse button twice to click on the header of
the column that you want to sort. The sort is displayed by an arrow that points
downwards.
3. To cancel the sort, use the left mouse button once or twice to click on the
header of the column that is sorted until the displayed arrow disappears.
724-746-5500 | blackbox.com
Page 69
Page 70

Chapter 4: Configuration
Filter Function
Lists and tables in the Java tool offer a filter function that enables a fast and
smooth search.
1. To activate a filter, use the right-mouse button to click on the header of the
column you want to filter and select Set Filter.
2. Write the word or part of a word you want to filter directly into the header.
The filter results are shown immediately.
3. To delete a filter, use the right mouse button to click on the header of the
column you want to filter and select “Clear Filter.”
NOTE: An asterix in the header indicates an active filter.
The filter function is based on the functional principle of common Web
search engines.
Configuration in the Java Tool (Off-line Configuration)
You can only change configuration and system settings via Java tool in off-line
mode without a direct connection between ServSwitch DKM FX and Java tool.
To activate a configuration in the ServSwitch DKM FX:
1. Select “File > Upload to” in the menu bar.
2. Enter the IP address of the ServSwitch DKM FX (see Section 4.2.3) and the
name and password of the user authorization and select the storage location
of the new configuration (default or config01-08) in the menu “Select
Configuration.”
3. Select “Matrix > Connect” in the menu bar and enter the IP address of the
matrix and the name and password for user authorization.
4. Select “Administration > Activate Configuration” in the task area and select the
storage location that you selected above.
5. Use the “Activate” button to open the selected configuration within the matrix.
The connection and the open tab will close, and the matrix will restart.
NOTE: During the activation of a configuration, the matrix is temporarily not
available.
Page 70
724-746-5500 | blackbox.com
Page 71

Chapter 4: Configuration
On-line Configuration
Configurations and system settings can be also edited via the Java tool in On-line
mode with an active connection between matrix and Java tool.
Figure 4-7. Menu System—System Data.
To edit a configuration in online mode, proceed as follows:
1. Select the menu item “Matrix > Activate Online Configuration Mode.” This
setting will also be shown in the lower part of the working area.
2. Make any edits at the configuration and system settings and confirm by
pressing the “Apply” button. The changes will be applied immediately.
3. To deactivate the On-line mode, select the menu item “Matrix > Deactivate
Online Configuration Mode” in the menu bar.
Options menu
You can adapt and customize the Java tool by editing various default settings.
To activate or change the default settings, proceed as follows:
Select “Extras > Options” in the menu bar. The tab Default Settings will open.
724-746-5500 | blackbox.com
Page 71
Page 72

Chapter 4: Configuration
The default settings parameters are:
Table 4-8. Default settings.
Option Description
IP/Hostname Default IP address of the matrix required for connection.
User Default user name used for connection.
Configuration Directory Default directory for configuration files.
Firmware Directory Default directory for update files.
Status Directory Default direc tory for the firmware status.
Import/ Export Directory Default directory for import and export files.
Presets Directory Default directory for macro files.
To set various font sizes for the Java tool, proceed as follows:
1. Select “Extras > Options” in the menu bar.
2. Open the tab Font.
3. Select the desired font size (normal or large).
Report
The Java tool is equipped with a report function that shows the current switching
status and all relevant parts of the matrix configuration in a PDF file.
To create a report, proceed as follows:
1. Select “File > Report...” in the menu bar. A selection assistant will be opened.
2. Select those contents that should be included in the report (Matrix View,
EXT Units, CPU Devices, CON Devices, and Users) and confirm with the
“Next >” button.
3. Select the preferred location for storage of the report and confirm with the
“Finish” button.
The report will be created as a PDF file.
Page 72
724-746-5500 | blackbox.com
Page 73

Chapter 4: Configuration
Figure 4-8. Menu File > Report.
NOTE: The report function can be used in both On-line or Off-line mode of the
Java tool.
4.2.3 Control via Serial Interface
Figure 4-9. RS-232 icon.
The ServSwitch DKM FX operating system offers various functions for operation
via serial interface. There are telegrams for switching single or all connections
available, both unidirectional and bidirectional. There are also telegrams for an
overall definition of the total switching status and for saving and loading such
switching states.
724-746-5500 | blackbox.com
Page 73
Page 74

Chapter 4: Configuration
The ServSwitch DKM FX has an option that provides an echo of all affected
switching operations via serial interface or network interface. It enables you to
track the current configurations of the matrix at any time so you can update your
own applications.
You can also switch ServSwitch DKM FX clones as slaves (stacking) in parallel via a
serial network interface.
4.3 Assignment
The ServSwitch DKM FX enables you to create a console-specific or a CPU-specific
assignment.
• You can assign virtual CPUs to real CPUs.
• You can assign real consoles to virtual consoles.
4.3.1 Virtual CPU
Switch several consoles to the same CPU. If there are several consoles connected
to a virtual CPU that is assigned to a real CPU, you will only have to change the
real CPU once and all the consoles will receive the video signal of the new CPU.
You can access the menu via OSD or Java.
Page 74
Figure 4-10. OSD and Java icons.
724-746-5500 | blackbox.com
Page 75

Chapter 4: Configuration
OSD
Select “Assignments > Virtual CPU Devices” in the main menu.
Figure 4-11. Menu Assignments – Virtual CPU Devices.
For an assignment, proceed as follows:
1. Select the virtual CPU in the list Virtual Devices that has to be assigned to a real
CPU.
2. Press the “Edit” button.
3. Select the CPU in the list Real Devices that has to be assigned to the selected
virtual CPU.
4. Press the “OK” button to confirm the assignment.
The assignment will be done.
NOTE: Only one virtual CPU can be assigned to a real CPU.
724-746-5500 | blackbox.com
Page 75
Page 76

Chapter 4: Configuration
Java Tool
Select “Assignment > Virtual CPU Devices” in the task area.
Figure 4-12. Menu assignment—Virtual CPU devices screen.
For an assignment, proceed as follows:
1. Select a virtual CPU in the “Virtual CPU” list.
2. Double-click in the “Real CPU” column to get a list of all available real CPUs.
3. Select a real CPU.
You can select between the following buttons:
Table 4-9. Selection buttons.
Button Function
Send Send assignments to the matrix
Reload Reload changes
NOTE: By activating the “Auto Send” function in the left lower corner of the
working area, switching operations will occur immediately without
pressing the “Send” button to confirm.
Page 76
724-746-5500 | blackbox.com
Page 77

Chapter 4: Configuration
The selection boxes in the Real CPU column contain a filter function for an easy
selection of single consoles from a larger pool of consoles.
The Java tool also offers the possibility to go directly from the Assignment menu
to the Definition menu to check specific settings for the respective console or
CPU.
Use the right-mouse button to select the respective console or CPU and select
“Open CON Device” or “Open CPU Device.”
4.3.2 Virtual Console
You can assign real consoles to virtual consoles in this menu.
Using this function, you can change access permissions of the virtual console and
apply them to all assigned real consoles, too.
You can access the menu via OSD or Java.
Figure 4-13. OSD and Java icons.
724-746-5500 | blackbox.com
Page 77
Page 78

Chapter 4: Configuration
OSD
Select “Assignments > Virtual CON Devices” in the main menu.
Figure 4-14. Menu Assignments – Virtual CON Devices.
For an assignment, proceed as follows:
1. From the “Virtual Devices” list, select the real console that has to be assigned
to a virtual CPU.
2. Press the “Edit” button.
3. Select the virtual console in the list Virtual Devices that has to be assigned to
the selected real console.
4. Press the “OK” button to confirm the assignment.
NOTE: A virtual console can be assigned to more than one real console.
Page 78
724-746-5500 | blackbox.com
Page 79

Chapter 4: Configuration
Java Tool
Select “Assignment > Real to Virtual Console” in the task area.
Figure 4-15. Menu Assignment—Virtual Console Devices screen.
To place an assignment, proceed as follows:
1. Select the required real console in the “Real Console” table.
2. Double-click in the “Virtual Console” column to get a list of all available virtual
consoles.
3. Select the required virtual console.
You can select between the following buttons:
Table 4-10. Send and Cancel
selection buttons.
Button Function
Send Send assignments to the matrix
Cancel Reject changes
NOTE: If you activate the Auto Send function in the left lower corner of the
working area, switching operations will occur automatically without
pressing the Send button to confirm.
724-746-5500 | blackbox.com
Page 79
Page 80

Chapter 4: Configuration
The selection boxes in the Virtual Console column contain a filter function so you
can easily select a single CPU from a larger pool of CPUs (see Section 4.2.2).
4.4 System Settings
You can configure the following system settings at the ServSwitch DKM FX.
NOTE: Only users with administrator rights can configure the system settings.
4.4.1 System Data
The system configuration is set in this menu.
You can access the menu via OSD and Java:
Figure 4-16. OSD and Java icons.
Page 80
724-746-5500 | blackbox.com
Page 81

Chapter 4: Configuration
Select from the following settings:
Table 4-11. System data settings.
Field Selection Description
Device Tex t Enter the device name of the matrix (default: SWITCH 01)
Name Te xt
Info Text
Activated
Sub matrix
Deactivated Function not active (default)
Auto Save
Enable COM
echo
Enable LAN
echo
Activated
Deactivated Function not active (default)
Activated
Deactivated Function not active (default)
Activated
Deactivated Function not active (default)
Enter the name of the configuration that is used to save the current
settings (default: Standard)
Additional text field to describe the configuration (default: Factory
settings)
If the matrix is defined as a slave in the OSD, the user will lose control
automatically. Use the keyboard command <Shift><Shift><s><o>to
recover control. The OSD will open again in the matrix defined as
slave.
Save the current configuration of the matrix in the flash memory
periodically.
Send all performed switching commands in the matrix as an echo via
serial interface.
NOTE: Enable this function when using media control via the serial
interface.
Send all performed switching commands in the matrix as an echo via
LAN connection.
NOTE: Enable this function when using media control via the serial
interface.
Slave matrix
Master IP
address
Ho r. M ouse
Speed 1/x
Ver. Mouse
Speed 1/x
Activated
Deactivated Function not active (default)
Numerical value
1–9 Adjust the horizontal mouse speed, 1= slow, 9 = fast (default value: 5)
1–9 Adjust the vertical mouse speed, 1= slow, 9 = fast (default value: 5)
724-746-5500 | blackbox.com
Synchronize the slave matrix according to the switch status of the
master matrix.
Set the network address of the master matrix (default value:
000.000.000.000)
Page 81
Page 82

Chapter 4: Configuration
Table 4-11 (continued). System data settings.
Field Selection Description
Double click
time
100–800 ms Adjusts the time slot for a double click (default value: 200 ms)
Keyboard
layout
Info Text
Sub matrix
Auto Save
Region
Activated
Deactivated Function not active (default)
Activated
Deactivated Function not active (default)
Set the OSD keyboard layout according to the used keyboard;
Default: English (US)
Additional text field to describe the configuration (default: Factory
settings)
If the matrix is defined as a slave in the OSD, the user will lose control
automatically. Use the keyboard command <Shift><Shift><s><o>to
recover control. The OSD will open again in the matrix defined as
slave.
Save the current configuration of the matrix in the flash memory
periodically.
OSD
Select Configuration > System in the main menu.
Page 82
Figure 4-17. Menu Configuration—System screen.
724-746-5500 | blackbox.com
Page 83

Java Tool
Chapter 4: Configuration
Table 4-12. Cancel and Save
selection buttons.
Button Function
Cancel Reject changes
Save Save changes
Figure 4-18. Menu System—System Data.
4.4.2 Automatic ID
From this menu, you can automatically create CPU and CON devices‘ settings by
connecting a new extender unit.
You can access the menu via OSD or Java:
Figure 4-19. OSD and Java icons.
724-746-5500 | blackbox.com
Page 83
Page 84

Chapter 4: Configuration
You can select between the following settings:
Table 4-13. Automatic ID settings.
Field Selection Description
Enable Auto
Config
Activated
Deactivated Function not active
Automatically creates a new CPU or CON device if new extender unit s
are connected (default)
ID Real CPU
Device
ID Virtual
CPU Device
ID Real CON
Device
ID Virtual
CON Dev ice
Numerical value Initial value of the automatic ID for real CPUs (default value: 1000)
Numerical value Initial value of the automatic ID for virtual CPUs (default value : 200 0)
Numerical value Initial value of the automatic ID for real CONs (default value: 3000 )
Numerical value Initial value of the automatic ID for virtual CONs (default value: 4000)
OSD
Select Configuration > System in the main menu.
Page 84
Figure 4-20. Menu Configuration—System screen.
724-746-5500 | blackbox.com
Page 85

Table 4-14. Cancel and Save
selection buttons.
Button Function
Cancel Reject changes
Save Save changes
Java Tool
Select “System > Automatic ID” in the task area.
Chapter 4: Configuration
Figure 4-21. Menu System—Automatic ID screen.
4.4.3 Access
The access configuration is set in this menu.
You have the following possibilities to access the menu:
Figure 4-22. OSD and Java icons.
724-746-5500 | blackbox.com
Page 85
Page 86

Chapter 4: Configuration
Table 4-15. Access settings.
Field Selection Description
Force User
Login
Enable User
ACL
Enable
Console ACL
Enable new
user
Enable new
CON
Auto
Disconnect
OSD
Timeout
Activated
Deactivated Function not active (default)
Activated
Deactivated Function not active (default)
activated
deactivated Function not active (default)
activated Newly-created users automatically receive access to all CPUs
deactivated Function not active (default)
activated Newly-created CON devices automatically receive access to all CPUs
deactivated Function not active (default)
activated
deactivated Function not active (default)
0–999 seconds
The user has to log in with a user name and a password code to enter
OSD. Thereafter, the user remains logged in until he explicitly logs out
or an auto logout is effected.
CPU access is restricted according to the permissions in the ACL
(Access Control List).
• User login is required.
• Switching by keyboard hotkeys requires a prior login.
CPU access is restricted according to the permissions of the respective
Access Control List (ACL). No login is required.
Upon opening the OSD, the console will automatically disconnect from
the current CPU.
Period of inactivity after which OSD will close automatically.
• Select 0 seconds, for no timeout (default: 0 seconds)
Auto Logout 0–999 seconds
Page 86
Period of inactivity of a logged-in user after which he will be
automatically logged out at the console.
There might be a disconnect because of the logout, depending on the
defined rights in each CON and user ACL.
• Select 0 minutes, for an automatic use logout when leaving OSD.
• Using the setting -1 allows the user to be logged in permanently,
until a manual logout is executed.
• The timer is not active as long as the OSD is open.
(default: 0 minutes)
724-746-5500 | blackbox.com
Page 87

OSD
Select “Configuration > Access” in the main menu.
Chapter 4: Configuration
Figure 4-23. Menu Configuration Access screen.
You can select between the following buttons:
Table 4-16. Cancel and Save
selection buttons.
Button Function
Cancel Reject changes
Save Save changes
724-746-5500 | blackbox.com
Page 87
Page 88

Chapter 4: Configuration
Java Tool
Select “System > Access” in the task area.
Figure 4-24. Menu System—Access screen.
4.4.4 Switch
The configuration of the switching parameters is set in this menu.
You have the following possibilities to access the menu:
Figure 4-25. OSD and Java icons.
Page 88
724-746-5500 | blackbox.com
Page 89

You can select between the following settings:
Table 4-17. Switch settings.
Field Selection Description
The user can switch to any CPU as an observer, even to ones that are
already assigned to another user (observer without keyboard/mouse
access).
Video
Sharing
Force
Conne ct
Force
Disconnect
Activated
Deactivated Function not active (default)
Activated
Deactivated Function not active (default)
Activated
• NOTE: Switch with the <Space> key , not the <Enter> key.
• The operator will not be informed if further users connect as an
observer to the CPU that is connected to his console.
The user can connect to every single CPU as an operator, even to ones
that are related to another user.
• NOTE: The previous user is set to video-only status.
• To share K /M control, Force Connect must be activated.
Extension of Force Connect: If the user connects to a CPU as an
operator that is already related to another user, the connection to the
previous user will be completely disconnected.
NOTE: To share K/M control, Force Connect must be deactivated.
Chapter 4: Configuration
CPU Auto
Conne ct
CPU
Timeout
Keyboard
Conne ct
Mouse
Conne ct
Deactivated Function not active (default)
Activated
Deactivated Function not active (default)
0–999
minutes
Activated Activate request of K/ M control by keyboard event (key will be lost)
Deactivated Function not active (default)
Activated Activate request of K/ M control by mouse event
Deactivated Function not active (default)
724-746-5500 | blackbox.com
If a console is not connected to a CPU, you can establish an automatic
connection to the next available CPU by pressing any key or mouse
button.
Period of inactivity after which a console will automatically disconnect
from its current CPU. (default value = 0 minutes)
Page 89
Page 90

Chapter 4: Configuration
Table 4-17 (continued). Switch settings.
Field Selection Description
Period of inactivity of a connected console after which K/ M control
can be requested by other consoles connected to the CPU.
Release Time
0–999
seconds
NOTE: If the “Keyboard Connect” and/or “Mouse Connect” options are activated,
the Release Time condition must be met until a new user gains control.
OSD
Select “Configuration > Switch” in the main menu.
• NOTE: Set “0” for an immediate transfer in real time.
• Only one console can have keyboard and mouse control at the same
time. The other consoles that are connected to the same CPU have a
video-only status (default value: 10 seconds)
Page 90
Figure 4-26. Menu configuration–System.
724-746-5500 | blackbox.com
Page 91

Table 4-18. Cancel and Save
selection buttons.
Button Function
Cancel Reject changes
Save Save changes
Java Tool
Select “System > Switch” in the task area.
Chapter 4: Configuration
Figure 4-27. Menu system—switch.
4.4.5 Network
The network configuration is set in this menu.
You have the following possibilities to access the menu:
Figure 4-28. OSD and Java icons.
724-746-5500 | blackbox.com
Page 91
Page 92

Chapter 4: Configuration
Table 4-19. Network settings.
Field Selection Description
DHCP
IP address Byte Input of the IP address in the form “192.168.1.1,” if DHCP is not active
Subnet mask Byte
Gateway Byte
API service
FTP server
HTTP ser ver
Telnet server
SNMP agent
Syslog
Syslog server Byte Input of the OP address of the Syslog servers in the form “192.168.1.1”
Activated
Deactivated Function not active
Activated
Deactivated Function not active
Activated FTP server for tranmission of configuration files activated.
Deactivated Function not active
Activated HTTP server activated (not yet implemented)
Deactivated Function not active
Activated Telnet server activated (not yet implemented)
Deactivated Function not active
Activated SNMP agent for matrix monitoring active (not yet implemented)
Deactivated Function not active
Activated Syslog server for status request is active
Deactivated Function not active
The net work settings are automatically supplied by a DNS server
(default)
Input of the subnet mask in the form “255.255.255.0,” if DHCP is not
active (default 255.255.255.0)
Input of the subnet mask in the form “192.168.1.1,” if DHCP is not
active
LAN interface at the switch activated for access via Java tool
(API service port 5555)
Trace
5
Page 92
DEB Activate debug messages in Trace (default: Yes)
INF Activate information messages in Trace (default: Yes)
NOT Activate notification messages in Trace (default: Yes)
WAR Activate warning messages in Trace (default: Yes)
ERR Activate error messages in Trace (default: Yes)
DEB Activate debug messages in Syslog (default: Yes)
INF Activate information messages in Syslog (default: Yes)
NOT Activate notification messages in Syslog (default: Yes)
WAR Activate warning messages in Syslog (default: Yes)
ERR Activate error messages in Syslog (default: Yes)
724-746-5500 | blackbox.com
Page 93

Chapter 4: Configuration
NOTE: To activate the modified network parameters, restart the ServSwitch DKM.
CAUTION: Consult your system administrator before modifying the network
parameters. Otherwise, unexpected results and failures can occur in
combination with the network.
OSD
Select “Configuration > Network” in the main menu.
Figure 4-29. Menu Configuration—Network screen.
Table 4-20. Cancel and Save
selection buttons.
Button Function
Cancel Reject changes
Save Save changes
724-746-5500 | blackbox.com
Page 93
Page 94

Chapter 4: Configuration
Java Tool
Select “System > Network” in the task area.
Figure 4-30. Menu system—network.
4.4.6 Date and Time
Date and Time are set in this menu.
You can access the menu via OSD:
Figure 4-31. OSD icon.
Page 94
724-746-5500 | blackbox.com
Page 95

Chapter 4: Configuration
Table 4-21. Date and time settings.
Field Selection Description
Month 1 –12 Enter month
Date 1–31 Enter date
Yea r 1–99 Enter year
Day 1–7
Hours 0–23 Enter hour
Minutes 0–59 Enter minute
Seconds 0 –59 Enter second
OSD
Select “Configuration > Date+Time” in the main menu.
Enter day of the
week
Figure 4-32. Menu Configuration—Date and Time screen.
724-746-5500 | blackbox.com
Page 95
Page 96

Chapter 4: Configuration
You can select between the following buttons:
Table 4-22. Cancel and Save
selection buttons.
Button Function
Cancel Reject changes
Save Save changes
4.5 User Settings
You have the possibility to configure the following user settings:
4.5.1 User Data
New users and their user settings and permissions are set in this menu.
You have the following possibilities to access the menu:
Figure 4-33. OSD and Java icons.
Page 96
724-746-5500 | blackbox.com
Page 97

You can select between the following settings:
Table 4-23. User data settings.
Field Selection Description
Name Te xt User name (case-sensitive)
Password Tex t User password (case-sensitive)
Repeat
Password
HTTP
FTP
Telnet access
Tex t Repeat user password (case-sensitive)
Activated Access permission via HTTP
Deactivated Function not active (default)
Activated
Deactivated Function not active (default)
Activated Access permission via Telnet
Deactivated Function not active (default)
Access permission via FTP. This setting is necessary for file access from
the Java tool or any Web browser.
Chapter 4: Configuration
Power User
Super User
Administrator
activated
deactivated Function not active (default)
activated
deactivated Function not active (default)
activated
deactivated Function not active (default)
• User has rights
• Permission for crosspoint operations
• Permission for system configuration and all switching operations
• User has administrator rights
• This setting is required for an online connection with the Java tool
• Permission for system configuration and all switching operations
• User has administrator rights
• This setting is required for an online connection to the Java tool
724-746-5500 | blackbox.com
Page 97
Page 98

Chapter 4: Configuration
OSD
Select “Configuration > User” in the main menu.
Page 98
Figure 4-34. Menu Configuration—User screen.
Table 4-24. OSD settings.
Button Function
New Create a new user
Edit Edit an existing user
Delete Delete an existing user
Cancel Reject changes
Save Save changes
724-746-5500 | blackbox.com
Page 99

Java Tool
Select “User > User Data” in the task area.
Figure 4-35. Menu User—User Data screen.
Chapter 4: Configuration
Table 4-25. OSD settings.
Button Function
New Create a new user
Delete Delete an existing user
Apply Create a new user account
Cancel Reject changes
To configure user access rights for CPUs, proceed as follows:
1. Select a user in the User Data list.
2. By using the right mouse button once on a CPU in one of the respective access
lists (Full Access, Video Access, and No Access), two lists for selection will
appear in which the respective CPU can be moved and the access rights can be
changed.
3. Confirm the configuration by pressing the “Apply” button.
724-746-5500 | blackbox.com
Page 99
Page 100

Chapter 4: Configuration
To create a new user, proceed as follows:
1. Press the “New” button.
2. Select a template of an existing user if applicable (choose template).
3. Press the “OK” button.
4. Set a user name.
5. Set password.
6. Set general access permissions.
7. Set user permissions for CPU access (paste function).
8. Set user favorites for OSD access.
9. Press the “Apply” button to save the new user settings.
You can select between the following keyboard commands:
Table 4-26. Keyboard commands.
Function Keyboard Command
Add CPU to Full Access list < F>
Add CPU to Video Access list <V>
Add CPU to No Access list <N>
4.5.2 Favorites List Users
Individual favorites lists of CPUs that have to be switched frequently can be
created for different users in this menu. A Favorites list can contain up to eight
sdifferent CPUs.
The switching of the favorites is done via hotkeys using the keyboard.
You can access the menu in two ways: via OSD or Java.
Figure 4-36. OSD and Java tool icons.
OSD
Select “Assignments > User Favorites” in the main menu.
Page 100
724-746-5500 | blackbox.com
 Loading...