

Page 1
CUSTOMER
SUPPORT
INFORMATION
Order toll-free in the U.S. 24 hours, 7 A.M. Monday to midnight Friday: 877-877-BBOX
FREE technical support, 24 hours a day, 7 days a week: Call 724-746-5500 or fax 724-746-0746
Mail order: Black Box Corporation, 1000 Park Drive, Lawrence, PA 15055-1018
Web site: www.blackbox.com • E-mail: info@blackbox.com
JANUARY 2001
AC455A-TX-R2
AC456A-RX-R2
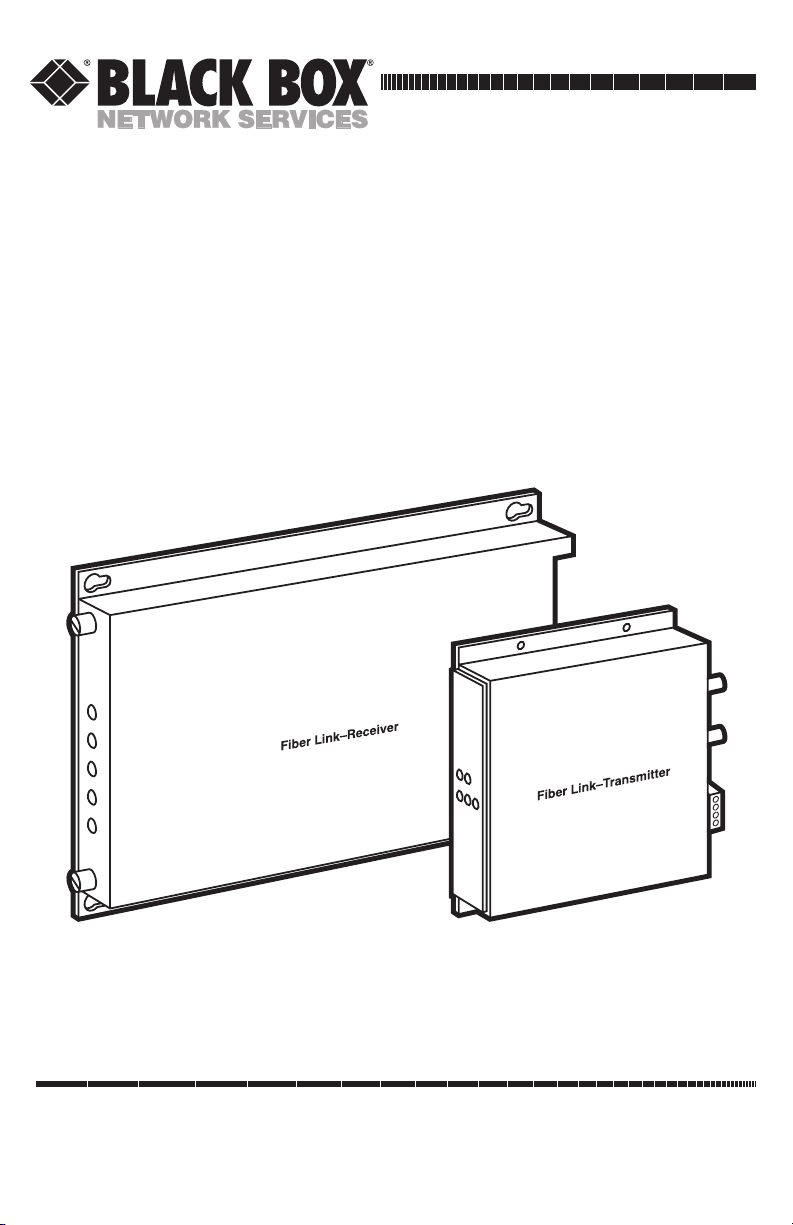
Fiber Link—Transmitter
Fiber Link—Receiver
POWER
+12~16VDC
ALARM/+5VDC
GROUND
3
2
1
AC/DC+
GROUND/DC-
AC
3
2
1
FIBER
VIDEO IN
Page 2

1
FIBER LINK
FEDERAL COMMUNICATIONS COMMISSION
AND
INDUSTRY CANADA
RADIO FREQUENCY INTERFERENCE STATEMENTS
This equipment generates, uses, and can radiate radio frequency energy and if not
installed and used properly, that is, in strict accordance with the manufacturer’s
instructions, may cause interference to radio communication. It has been tested
and found to comply with the limits for a Class A computing device in accordance
with the specifications in Subpart J of Part 15 of FCC rules, which are designed to
provide reasonable protection against such interference when the equipment is
operated in a commercial environment. Operation of this equipment in a
residential area is likely to cause interference, in which case the user at his own
expense will be required to take whatever measures may be necessary to correct the
interference.
Changes or modifications not expressly approved by the party responsible for
compliance could void the user’s authority to operate the equipment.
This digital apparatus does not exceed the Class A limits for radio noise emission from digital
apparatus set out in the Radio Interference Regulation of Industry Canada.
Le présent appareil numérique n’émet pas de bruits radioélectriques dépassant les limites
applicables aux appareils numériques de la classe A prescrites dans le Règlement sur le
brouillage radioélectrique publié par Industrie Canada.
The Fiber Link complies with CE EN55022 and EN50082-1 requirements.
Page 3

2
FIBER LINK
NORMAS OFICIALES MEXICANAS (NOM)
ELECTRICAL SAFETY STATEMENT
INSTRUCCIONES DE SEGURIDAD
1. Todas las instrucciones de seguridad y operación deberán ser leídas antes de
que el aparato eléctrico sea operado.
2. Las instrucciones de seguridad y operación deberán ser guardadas para
referencia futura.
3. Todas las advertencias en el aparato eléctrico y en sus instrucciones de
operación deben ser respetadas.
4. Todas las instrucciones de operación y uso deben ser seguidas.
5. El aparato eléctrico no deberá ser usado cerca del agua—por ejemplo, cerca
de la tina de baño, lavabo, sótano mojado o cerca de una alberca, etc..
6. El aparato eléctrico debe ser usado únicamente con carritos o pedestales que
sean recomendados por el fabricante.
7. El aparato eléctrico debe ser montado a la pared o al techo sólo como sea
recomendado por el fabricante.
8. Servicio—El usuario no debe intentar dar servicio al equipo eléctrico más allá
a lo descrito en las instrucciones de operación. Todo otro servicio deberá ser
referido a personal de servicio calificado.
9. El aparato eléctrico debe ser situado de tal manera que su posición no
interfiera su uso. La colocación del aparato eléctrico sobre una cama, sofá,
alfombra o superficie similar puede bloquea la ventilación, no se debe colocar
en libreros o gabinetes que impidan el flujo de aire por los orificios de
ventilación.
10. El equipo eléctrico deber ser situado fuera del alcance de fuentes de calor
como radiadores, registros de calor, estufas u otros aparatos (incluyendo
amplificadores) que producen calor.
11. El aparato eléctrico deberá ser connectado a una fuente de poder sólo del
tipo descrito en el instructivo de operación, o como se indique en el aparato.
Page 4

3
FIBER LINK
12. Precaución debe ser tomada de tal manera que la tierra fisica y la polarización
del equipo no sea eliminada.
13. Los cables de la fuente de poder deben ser guiados de tal manera que no
sean pisados ni pellizcados por objetos colocados sobre o contra ellos,
poniendo particular atención a los contactos y receptáculos donde salen del
aparato.
14. El equipo eléctrico debe ser limpiado únicamente de acuerdo a las
recomendaciones del fabricante.
15. En caso de existir, una antena externa deberá ser localizada lejos de las lineas
de energia.
16. El cable de corriente deberá ser desconectado del cuando el equipo no sea
usado por un largo periodo de tiempo.
17. Cuidado debe ser tomado de tal manera que objectos liquidos no sean
derramados sobre la cubierta u orificios de ventilación.
18. Servicio por personal calificado deberá ser provisto cuando:
A: El cable de poder o el contacto ha sido dañado; u
B: Objectos han caído o líquido ha sido derramado dentro del aparato; o
C: El aparato ha sido expuesto a la lluvia; o
D: El aparato parece no operar normalmente o muestra un cambio en su
desempeño; o
E: El aparato ha sido tirado o su cubierta ha sido dañada.
Page 5

4
FIBER LINK
TRADEMARKS USED IN THIS MANUAL
Any trademarks mentioned in this manual are acknowledged to be the property of
the trademark owners.
Page 6

5
FIBER LINK
Contents
1. Specifications . . . . . . . . . . . . . . . . . . . . . . . . . . . . . . . . . . . . . . . . . . . . 6
2. Introduction . . . . . . . . . . . . . . . . . . . . . . . . . . . . . . . . . . . . . . . . . . . . 10
2.1 Description . . . . . . . . . . . . . . . . . . . . . . . . . . . . . . . . . . . . . . . . . . 10
2.2 Additional Features. . . . . . . . . . . . . . . . . . . . . . . . . . . . . . . . . . . . 10
3. Installation . . . . . . . . . . . . . . . . . . . . . . . . . . . . . . . . . . . . . . . . . . . . . 12
3.1 Physical Installation . . . . . . . . . . . . . . . . . . . . . . . . . . . . . . . . . . . 12
3.2 Signal Connections. . . . . . . . . . . . . . . . . . . . . . . . . . . . . . . . . . . . 13
3.3 Optical Connections. . . . . . . . . . . . . . . . . . . . . . . . . . . . . . . . . . . 14
3.4 Power Connections. . . . . . . . . . . . . . . . . . . . . . . . . . . . . . . . . . . . 14
3.5 System Power. . . . . . . . . . . . . . . . . . . . . . . . . . . . . . . . . . . . . . . . . 15
4. Transmitter and Receiver Optical Indicators. . . . . . . . . . . . . . . . . . 16
5. Troubleshooting. . . . . . . . . . . . . . . . . . . . . . . . . . . . . . . . . . . . . . . . . 19
5.1 Try This First . . . . . . . . . . . . . . . . . . . . . . . . . . . . . . . . . . . . . . . . . 19
5.2 Calling Black Box . . . . . . . . . . . . . . . . . . . . . . . . . . . . . . . . . . . . . 19
5.3 Shipping and Packaging. . . . . . . . . . . . . . . . . . . . . . . . . . . . . . . . 20
Page 7

6
FIBER LINK
1. Specifications
Video Signal
Video Direction—TX→RX
Number of Video Channels—One
Standards Supported—Monochrome: EIA and CCIR; Color: NTSC, PAL,
SECAM
Video Input Signal—1.0 V p-p nominal composite video
Input Impedance—75 Ω
Video Output Signal—1.0 V p-p nominal composite video, unity gain, ±2%
Output Impedance—75 Ω
Signal-to-Noise Ratio—>54 dB at maximum optical attenuation
Video Bandwidth—10 Hz to 10 MHz
Video Resolution—800 TV lines
Differential Phase—<3°
Differential Gain—<3%
Tilt—0°
Input Coupling—Capacitative
Output Coupling—Sync tip clamped
Video Interconnection
Recommended Maximum Distance—Video Equipment to AC455A-TX-R2:
<100 ft. (30 m); AC456A-RX-R2 to Video Equipment: <100 ft. (30 m)
Recommended Cable Type—RG59 “U” cable (part number ETN59-BNC)
Video Termination—The last video component in the video line must be
terminated with 75 Ω.
Page 8

7
FIBER LINK
Control Data Signal
Data Directions—Control: RX→TX; Response: TX→RX
Data Formats—All major up-the-coax formats, including American Dynamics,
Baxall, Burle, Elbex (sync and control), Panasonic
®
(PTZ and VD2), Pelco™,
Robot, Sensormatic, VCS format, Vicon™, Videoalarm™, and others.
Detection Area—In even fields, the control signal is imposed on lines 8 through
19. In odd fields, the control signal is imposed on lines 9 through 20.
Pulse Amplitude—50 mV to 2 V
Genlock Sync Signal
Sync Direction—RX→TX
Detection Area—Can be imposed on all lines outside the control area
Sync Amplitude—Up to 6 V
Optical
Wavelength—850 and/or 1300 nm
Optical Mode—Multimode
Optical Budget—13 dB minimum
Operating Distance at 850 nm—Operating distance is approximate, and will be
affected by the type and number of splices in the fiber and by the exact type of
fiber used. Maximum: 10,000 ft. (3048 m)
Emitter Type—LED
Fiber Size—62.5 µ
Modulation Type—Frequency modulation
Gain Control—Fully automatic (AGC)
Transmitter Launch Power—> -17 dBm (1300 nm)
Transmitter Sensitivity—< -27 dBm (850 nm)
Receiver Sensitivity—< -26 dBm (1300 nm)
Page 9

8
FIBER LINK
Receiver Launch Power—> -14 dBm (850 nm)
Agency Compliance
Emissions—FCC Part 15; ICES-003 (Canada); AS/NZS 3548 (Australia/NZ); CE
EN55022; CE EN50082-1, including EN61000-4-2 ESD, EN61000-4-3 Radiated
Immunity, EN61000-4-4 Electrical Fast, Transient Burst (EFT) Immunity,
EN61000-4-5 Power Surge Immunity, EN61000-4-6 Conducted Disturbances
Immunity, EN61000-4-11 Voltage Dips, Short Interruptions and Voltage
Variations
Immunity—ENV50204 Radiated, Pulsed Magnetic Field Immunity
Product Safety—No standards required, since the Fiber Link is DC-powered by
SELV (Safety Extra-Low Voltage)
Controls
Alarm Disable—Removable jumper on receiver cards
LEDs
Video In (bicolor)—Shows presence of good video signal
Level/Loss (bicolor)—Shows presence of good optical signal
COMMAND—Shows activity on PTZ control channel
RESPONSE—Shows activity on response channel
SYNC—Shows activity on genlock channel
Connectors
Signal Input—Optical: ST®; Video: BNC
Signal Output—Optical: ST; Video: BNC
Power Input—Standalone units: 3-pin detachable screw terminal connector;
Rack units: Direct rack connection
Page 10

9
FIBER LINK
Electrical
Input Voltage—AC455A-TX-R2: 12 to 16 VAC, 12 to 14 VDC; AC456A-RX-R2:
13.5 to 16 VDC
Input Power Frequency—50 to 60 Hz
Current Requirement—AC455A-TX-R2: 300 mA; AC456A-RX-R2: 380 mA
Power Consumption—6 W
Heat Equivalent—0.3 BTU/min., 0.09 cal/min.
NOTE
The heat equivalent represents the conversion of all input power to heat.
The actual heat generated will be less.
Environmental
Temperature—Operating: 32 to 122°F (0 to 50°C); Storage: -40 to +185°F (-40 to
+85°C)
Mechanical
Enclosure—Transmitter: 4 x 4 (10 x 10 cm); Receiver: 501R
Construction—Aluminum enclosure with black semigloss paint finish
Mounting Method—(4) No. 6 (3-mm) screws
Size—AC455A-TX-R2: 1.2"H x 4.6"W x 4.7"D (3 x 11.7 x 11.9 cm), including
connectors; AC456A-RX-R2: 1.2"H x 6.3"W x 9.8"D (3.2 x 16.2 x 24.9 cm),
including connectors
Weight—AC455A-TX-R2: 0.7 lb. (0.3 kg); AC456A-RX-R2: 1.6 lb. (0.7 kg)
Page 11

10
FIBER LINK
2. Introduction
2.1 Description
The Fiber Link supports the transmission of video from a camera to a monitoring
station and a data signal back to the camera over one multimode fiber. A single
coaxial cable at each end of the link is used to connect the appropriate equipment
to the system. In up-the-coax systems, video signals travel in one direction and
control signals travel in the other direction for full-duplex operation. Video is
transmitted from the camera back to the control center over coaxial cable. In
conventional coax systems, signals travel in only one direction at a time. Control
signals to operate the pan-tilt-zoom (PTZ) functions are transmitted from the
control station out to the receiver/driver at the camera station. The Fiber Link is a
single-fiber link that uses two different wavelengths (850 and 1300 nm) for two-way
transmission.
The control signals are transmitted during the vertical blanking period of the
video signal. In addition to video and control, the Fiber Link provides for the
transmission of response signals from the camera station to the control station. It
also provides for transmission of embedded genlock sync if genlocking is a feature
of the particular control system used. It works with all major brands of up-the-coax
systems.
The Fiber Link features extensive LED diagnostics, with input/output indicators
for video, command, response, genlock sync, and optical signal strength.
Table 2-1. Available Models
Model Enclosure Fiber Number Maximum Wavelength
Type Size of Fibers Attenuation
Transmitter 4 x 4 (10 x 10 cm) 62.5µ 1 13 dB 850/1300 nm
Receiver 501R 62.5µ 1 13 dB 850/1300 nm
2.2 Additional Features
• Operating distances of 10,000 feet (3048 m) make possible expanded, simpler
systems.
• Built-in automatic gain control compensates for optical loss within a system.
Page 12

11
FIBER LINK
Figure 2-1. Typical Application.
One coaxial
cable
One coaxial
cable
One fiber
Transmitter
Receiver
Video and
response
Video and
response
Page 13

12
FIBER LINK
3. Installation
To install the Fiber Link, you will physically install the modules, connect the
optical fiber, connect the input and output electrical signals, and connect power to
the fiberoptic modules. Then you’ll verify correct system operation.
3.1 Physical Installation
The Fiber Link is a standalone module. Install Fiber Links in dry locations
protected from extremes of temperature and humidity.
1. Determine where you want to install the module, and make sure that there’s
adequate space at both ends for making various cable connections and
reading the diagnostic LEDs.
2. The Fiber Link has mounting holes for four No. 6 screws (3-mm screws).
Standalone Enclosures:
CAUTION
Make sure that the enclosure is not connected to any power source.
Look inside the enclosure to determine the location of the socket for the edge
connector on the card. Orient the card so that it will seat in the socket, and slide it
into the card guides in the enclosure until the edge connector at the back of the
card seats in the socket. Seating may require gently pressing on the ends of the
card’s front panel.
Page 14

13
FIBER LINK
Figure 3-1. Standalone Transmitter.
3.2 Signal Connections
All fiberoptic links convert electrical signals into a light signal at the transmitter
and convert the light back to electrical signals for output at the receiver. The
electrical signal connections to the Fiber Link consist of a single BNC connector
on the transmitter and receiver.
CAUTION
Make sure all the peripheral equipment that is to be connected to the
fiber unit is turned off.
BNC
Fiber
Video In, Level/Loss LEDs
Command Out, Response In,
Sync Out LEDs
Power
connection (see
Figure 3-2)
Page 15

14
FIBER LINK
NOTE
Use RG59/U coaxial cable (part number ETN59-BNC) between the video
equipment and the fiber units. The video equipment and the fiber unit
should be no more than 100 ft. (30.5 m) apart.
Terminate the coaxial cable with a female BNC and connect it to the fiber unit.
Repeat for both ends of the link.
3.3 Optical Connections
The standard optical connector on the Fiber Link is ST. Connect the
preterminated fiber to the two fiber units.
3.4 Power Connections
All standalone modules are equipped with removable screw-terminal connectors
for power input.
1. Identify the power connector and remove it from the module.
2. Make sure the power supply is not connected to any power source, and strip
approximately
1
⁄4 inch (0.6 cm) of insulation from the ends of the cable.
3. While observing correct polarization of the cable (see Table 3-1), insert one
lead into one of the screw sockets and tighten the screw. Repeat for the other
conductor. Confirm the security of the connection with a light pull on the
cable.
Table 3-1. Pin and Connector Functions
Pin No. Function Connector Function
3 +12 to 16 VDC BNC Video, Data, and Genlock Sync
2 Alarm/+5 VDC
1 Ground
Page 16

15
FIBER LINK
Figure 3-2. Electrical Connection.
4. Seat the connector in its position in the fiber unit.
5. Plug the power supply into a suitable outlet.
3.5 System Power
Power up the peripheral equipment. You’ll need to verify system operation. You
can do this by observing video on the monitor at the receiver end, or by operating
all of the pan-tilt-zoom functions controlled by the up-the-coax data signal. If any
feature of the system does not perform as expected, refer to Table 4-1 for a
explanation of how to diagnose system faults using the built-in LEDs.
POWER
+12~16VDC
ALARM/+5VDC
GROUND
3
2
1
Page 17

16
FIBER LINK
4. Transmitter and Receiver Optical
Indicators
All transmitters and receivers have five active LEDs. See Figure 4-1.
Level/Loss indicators are used in determining received optical power. The LED
will glow in varying intensities of green depending upon the amount of optical
power received. Any amount of green illumination, from barely visible to bright,
indicates that sufficient light is a the receiver or transmitter. Red indicates
insufficient optical power is being received, suggesting that the fiber is open or that
the transmitting link is inoperative.
The VIDEO indicators are used to monitor the presence of valid video signals.
When a valid signal is being transmitted or received, the VIDEO LED will glow
green; if no signal is present, the LED will glow red.
A Red VIDEO LED suggests that the camera is either off or inoperative. It could
also mean that the coaxial cable from the camera to the module is defective, or
that the fiber link from the transmitter to the receiver is not functional.
The COMMAND indicator monitors outgoing PTZ Control Data Pulses, while
the RESPONSE LED shows return signals from the camera, when applicable.
The SYNC LED indicates Genlock Synchronization Pulses, when applicable.
Table 4-1. Diagnostic LED Indicators
Indicator Display What It Means
LEVEL/LOSS Green (varying) Sufficient light is at the receiver.
Red Optical power not being received. Fiber
open, or transmitter or receiver inoperative.
Check fiber loss, connectors, and splices (if
any).
Page 18

17
FIBER LINK
Table 4-1 (continued). Diagnostic LED Indicators
Indicator Display What It Means
VIDEO (TX) Green Video coax input to link is good. Note that
even a totally black screen is a valid video
signal.
Red Video coax input to link is not good. Check
the camera and the coax into the link.
VIDEO (RX) Green Valid video signal received. Note that even a
totally black screen is a valid video signal.
Red No video signal received. Check the camera
and coax. Check the LEVEL/LOSS
indicator. If the LEVEL/LOSS indicator is
green, check the video indicator on the TX
unit.
COMMAND Green Indicates PTZ command transmission
(>250 mV).
Dark No activity, or command being transmitted is
<250 mV.
RESPONSE Green Indicates response from camera >250 mV.
Dark No response from camera or signal is
<250 mV, may indicate a problem with the
camera. This function is not commonly
available in all systems.
SYNC Green Indicates transmission of Genlock
Synchronization signals (>2V), where
applicable.
Dark No Genlock signal being sent, or signal is
<2V.
Page 19

18
FIBER LINK
Figure 4-1. End View of Standalone Module.
COMMAND OUT
VIDEO IN
LEVEL/LOSS
RESPONSE IN
SYNC OUT
Page 20

19
FIBER LINK
5. Troubleshooting
5.1 Try This First
If you encounter problems using the Fiber Link:
1. Check to make sure the power is properly connected to the modules.
2. Then verify that the fiber is good.
3. Check the video status indicators. If they’re lit, power and video are present.
NOTE
Even a totally black picture is a valid input.
4. If you still cannot find the source of the problem, call Black Box Technical
Support at 724-746-5500. Before calling, have the following information
available:
• Product code (AC455A-TX-R2, AC456A-RX-R2) of the Fiber Link.
• A listing of the diagnostic indicators and their respective color/condition.
5.2 Calling Black Box
If you determine that your Fiber Link is malfunctioning, do not attempt to alter or
repair the unit. It contains no user-serviceable parts. Contact Black Box at
724-746-5500.
Before you do, make a record of the history of the problem. Black Box
Technical Support will be able to provide more efficient and accurate assistance if
you have a complete description, including:
• the nature and duration of the problem.
• when the problem occurs.
• the components involved in the problem.
• any particular application that, when used, appears to create the problem or
make it worse.
Page 21

20
FIBER LINK
5.3 Shipping and Packaging
If you need to transport or ship your Fiber Link:
• Package it carefully. We recommend that you use the original container.
• If you are shipping the Fiber Link for repair, make sure you include its power
supply. If you are returning the Fiber Link, make sure you include this manual
as well. Before you ship, contact Black Box at 724-746-5500 to get a Return
Materials Authorization (RMA) number.
Page 22

1000 Park Drive • Lawrence, PA 15055-1018 • 724-746-5500 • Fax 724-746-0746
© Copyright 2001. Black Box Corporation. All rights reserved.
 Loading...