

Page 1
CUSTOMER
SUPPORT
INFORMATION
FEBRUARY 1998
AC331A
AC331AE
VGA to Video Portable Pro
VGA IN
ZOOM
↔
UNZOOM
VGA to Video Portable Pro
V
ID
E
O
O
U
T
RGB VIDEO OUT
DC 9V IN
BRIGHT
S
-O
U
T
VGA OUT
V
G
A
↔
M
A
C
Order toll-free in the U.S. 24 hours, 7 A.M. Monday to midnight Friday: 877-877-BBOX
FREE technical support, 24 hours a day, 7 days a week: Call 724-746-5500 or fax 724-746-0746
Mail order: Black Box Corporation, 1000 Park Drive, Lawrence, PA 15055-1018
Web site: www.blackbox.com • E-mail: info@blackbox.com
VGA/Video Portable Pro
Page 2

FEDERAL COMMUNICATIONS COMMISSION
AND
INDUSTRY CANADA
RADIO FREQUENCY INTERFERENCE STATEMENT
Class B Digital Device. This equipment has been tested and found to comply with the
limits for a Class B computing device pursuant to Part 15 of the FCC Rules. These
limits are designed to provide reasonable protection against harmful interference
in a residential installation. However, there is no guarantee that interference will
not occur in a particular installation. This equipment generates, uses, and can
radiate radio frequency energy, and, if not installed and used in accordance with
the instructions, may cause harmful interference to radio communications. If this
equipment does cause harmful interference to radio or telephone reception,which
can be determined by turning the equipment off and on, the user is encouraged to
try to correct the interference by one of the following measures:
• Reorient or relocate the receiving antenna.
• Increase the separation between the equipment and receiver.
• Connect the equipment into an outlet on a circuit different from
that to which the receiver is connected.
• Consult an experienced radio/TV technician for help.
Caution:
Changes or modifications not expressly approved by the party
responsible for compliance could void the user’s authority to operate the
equipment.
To meet FCC requirements, shielded cables and power cords are required to
connect this device to a personal computer or other Class B certified device.
This digital apparatus does not exceed the Class B limits for radio noise emission from
digital apparatus set out in the Radio Interference Regulation of Industry Canada.
Le présent appareil numérique n’émet pas de bruits radioélectriques dépassant les limites
applicables aux appareils numériques de classe B prescrites dans le Règlement sur le brouillage
radioélectrique publié par Industrie Canada.
FCC AND IC STATEMENTS
3
Page 3

VGA/VIDEO PORTABLE PRO
NORMAS OFICIALES MEXICANAS (NOM)
ELECTRICAL SAFETY STATEMENT
INSTRUCCIONES DE SEGURIDAD
1. Todas las instrucciones de seguridad y operación deberán ser leídas antes
de que el aparato eléctrico sea operado.
2. Las instrucciones de seguridad y operación deberán ser guardadas para
referencia futura.
3. Todas las advertencias en el aparato eléctrico y en sus instrucciones de
operación deben ser respetadas.
4. Todas las instrucciones de operación y uso deben ser seguidas.
5. El aparato eléctrico no deberá ser usado cerca del agua—por ejemplo,
cerca de la tina de baño, lavabo, sótano mojado o cerca de una alberca,
etc.
6. El aparato eléctrico debe ser usado únicamente con carritos o pedestales
que sean recomendados por el fabricante.
7. El aparato eléctrico debe ser montado a la pared o al techo sólo como
sea recomendado por el fabricante.
8. Servicio—El usuario no debe intentar dar servicio al equipo eléctrico más
allá a lo descrito en las instrucciones de operación. Todo otro servicio
deberá ser referido a personal de servicio calificado.
9. El aparato eléctrico debe ser situado de tal manera que su posición no
interfiera su uso. La colocación del aparato eléctrico sobre una cama,
sofá, alfombra o superficie similar puede bloquea la ventilación, no se
debe colocar en libreros o gabinetes que impidan el flujo de aire por los
orificios de ventilación.
10. El equipo eléctrico deber ser situado fuera del alcance de fuentes de
calor como radiadores, registros de calor, estufas u otros aparatos
(incluyendo amplificadores) que producen calor.
11. El aparato eléctrico deberá ser connectado a una fuente de poder sólo
del tipo descrito en el instructivo de operación, o como se indique en
el aparato.
4
Page 4

NOM STATEMENT
12. Precaución debe ser tomada de tal manera que la tierra fisica y la
polarización del equipo no sea eliminada.
13. Los cables de la fuente de poder deben ser guiados de tal manera que
no sean pisados ni pellizcados por objetos colocados sobre o contra ellos,
poniendo particular atención a los contactos y receptáculos donde salen
del aparato.
14. El equipo eléctrico debe ser limpiado únicamente de acuerdo a las
recomendaciones del fabricante.
15. En caso de existir, una antena externa deberá ser localizada lejos
de las lineas de energia.
16. El cable de corriente deberá ser desconectado del cuando el equipo
no sea usado por un largo periodo de tiempo.
17. Cuidado debe ser tomado de tal manera que objectos liquidos
no sean derramados sobre la cubierta u orificios de ventilación.
18. Servicio por personal calificado deberá ser provisto cuando:
A: El cable de poder o el contacto ha sido dañado; u
B: Objectos han caído o líquido ha sido derramado dentro del
aparato; o
C: El aparato ha sido expuesto a la lluvia; o
D: El aparato parece no operar normalmente o muestra un cambio
en su desempeño; o
E: El aparato ha sido tirado o su cubierta ha sido dañada.
5
Page 5

VGA/VIDEO PORTABLE PRO
Contents
Chapter Page
1. Specifications ............................................................................................. 7
2. Introduction ............................................................................................... 9
2.1 General Overview ................................................................................ 9
2.2 Features ............................................................................................... 9
2.3 The VGA/Video Portable Pro Illustrated ......................................... 10
3. Installation ................................................................................................ 12
3.1 System Requirements ........................................................................ 12
3.2 Unpacking: The Complete VGA/Video Portable Pro Package ..... 12
3.3 Installation Procedures ..................................................................... 13
4. Operation ................................................................................................. 18
4.1 The VGA↔MAC Switch .................................................................... 18
4.2 The BRIGHT (Brightness) Dial ....................................................... 18
4.3 The Horizontal Positioning Dial ...................................................... 18
4.4 The ZOOM x UNZOOM Switch ...................................................... 19
5. Troubleshooting ...................................................................................... 20
5.1 Common Questions and Concerns .................................................. 20
5.2 Contacting Black Box ....................................................................... 23
5.3 Shipping and Packaging ................................................................... 23
Appendix: Port Pinouts .................................................................................. 24
A.1 VGA IN Port ...................................................................................... 24
A.2 VGA OUT Port .................................................................................. 24
A.3 VIDEO OUT Port ............................................................................. 25
A.4 S-VIDEO OUT Port ........................................................................... 25
A.5 RGB OUT Port .................................................................................. 26
Trademarks and Legal Information .............................................................. 27
6
Page 6

7
CHAPTER 1: Specifications
System Hardware
Required — Computer of one of these types:
• IBM AT, PS/2, or compatible with VGA output, or
•
Apple Macintosh or compatible supporting standard
Macintosh display mode (640 x 480, 31.5 or 35 KHz)
or SVGA-compatible 800 x 600 video (as described
below in Resolutions Supported);
TV set with one of these inputs: composite video,
S-Video, analog RGBS video, or (with modulator) RF
System Software
Required — None
Compliance — FCC Class B, IC Class/classe B
Standards — Computer-video input/output:
VGA or Macintosh (user-selectable);
TV-video output:
AC331A: NTSC (60 Hz);
AC331AE: PAL (56 Hz)
Interfaces — Input: VGA or Macintosh video;
Output: Composite video, S-Video, RGBS video,
and VGA or Macintosh video
Color — Full color support, including 24-bit (true color) input
Resolutions
Supported — VGA: 800 x 600 (at 35.2 KHz hsync/56 Hz vsync only)
or 640 x 480 (at up to 37.9 KHz hsync/72 Hz vsync);
Mac: 800 x 600 (at 35.2 KHz hsync/56 Hz vsync only)
or 640 x 480 (at 35 KHz hsync/66 Hz vsync or
31.5 KHz/60 Hz)
1. Specifications
Page 7

8
VGA/VIDEO PORTABLE PRO
Horizontal Sync.
Supported — 24 to 38 KHz (autosensing)
Vertical Sync.
(Refresh Rates)
Supported — 56 to 72 Hz (autosensing)
Maximum
Distance — 50 ft. (15.2 m) to any input or output device
User Controls — (2) Side-mounted slide switches: (1) for VGA or Mac
input/output, (1) for ZOOM/UNZOOM
(underscan);
(2) Side-mounted screwdials: (1) for brightness,
(1) for horizontal positioning
Indicator — (1) Top-mounted Power LED
Connectors — (6) Side-mounted:
(2) DE15 (“DB15HD,” “HD15”) female for
computer video: (1) input, (1) output;
(1) RCA jack for composite video output;
(1) 4-pin mini-DIN for S-Video output;
(1) DE9 (“DB9”) female for RGBS video output;
(1) Barrel jack for power input;
(2) Macintosh adapter cables included:
(1) DE15 (“DB15HD,” “HD15”) male to DA15
(“DB15”) male,
(1) DE15 male to DA15 female
Power — AC331A: From wallmount power supply:
Input: 120-VAC, 60 Hz;
Output: 9 VDC at 650 mA;
AC331AE: From desktop power supply:
Input: 100 to 240-VAC, 50 to 60 Hz (autosensing);
Output: 9 VDC at 600 mA;
Consumption: 5.4 watts maximum
Page 8

9
CHAPTER 1: Specifications
Temperature
Tolerance — Operating: 0 to 95˚F (–17.8 to 35˚C)
Storage: 0 to 110˚F (–17.8 to 43.3˚C)
Humidity
Tolerance — Up to 95% noncondensing
Size — 5.5"H x 4"W x 1"D (14 x 10.2 x 2.5 cm)
Weight — 1 lb. (0.5 kg)
Page 9

10
VGA/VIDEO PORTABLE PRO
2.1 General Overview
The VGA/Video Portable Pro is a super-compact computer-to-TV video
converter. It transfers graphic images from your computer for display on
a TV or video projector of any size or for recording on a VCR. The Portable
Pro is completely hardware-based—you don’t have to run any computer
software to make it work. It can support both IBM®PC based and Apple
®
Macintosh®based systems. In short, it’s perfect for presentations, training,
advertising, education, and a host of other applications.
2.2 Features
• Latest-generation filter technology brings you 100% flicker-free video.
• Pure hardware design—no software necessary, just “plug-and-display.”
• With “automatic mode detection,” the Portable Pro supports horizontal
synchronization rates from 24 KHz to 38 KHz and vertical synchronization
(refresh) rates from 56 Hz to 72 Hz for all colors. This means that it is
compatible with PC systems outputting VGA video at 800 x 600 resolution
(at 35.2 KHz/56 Hz) or 640 x 480 resolution (at up to37.9 KHz/72 Hz).
It is also compatible with computer systems outputting Mac®video at
800 x 600 resolution (“SVGA mode”) at 35.2 KHz/56 Hz or 640 x 480
resolution (at either 35 KHz/66 Hz or 31.5 KHz/60 Hz).
• Supports NTSC (AC331A) or PAL (AC331AE) video for the TV output.
• You can select ZOOM (regular magnification) or UNZOOM
(underscan—640 x 480 is 100% visible edge-to-edge) display; there is no
flickering or reduced resolution in either mode.
• You can adjust the brightness and horizontal position of your images.
• Since it has a computer-video output port, images can be viewed on a
monitor and a TV simultaneously.
• It has a variety of TV-video output ports, so it can be connected to almost
any type of TV, even those with special high-quality video interfaces.
2. Introduction
Page 10

11
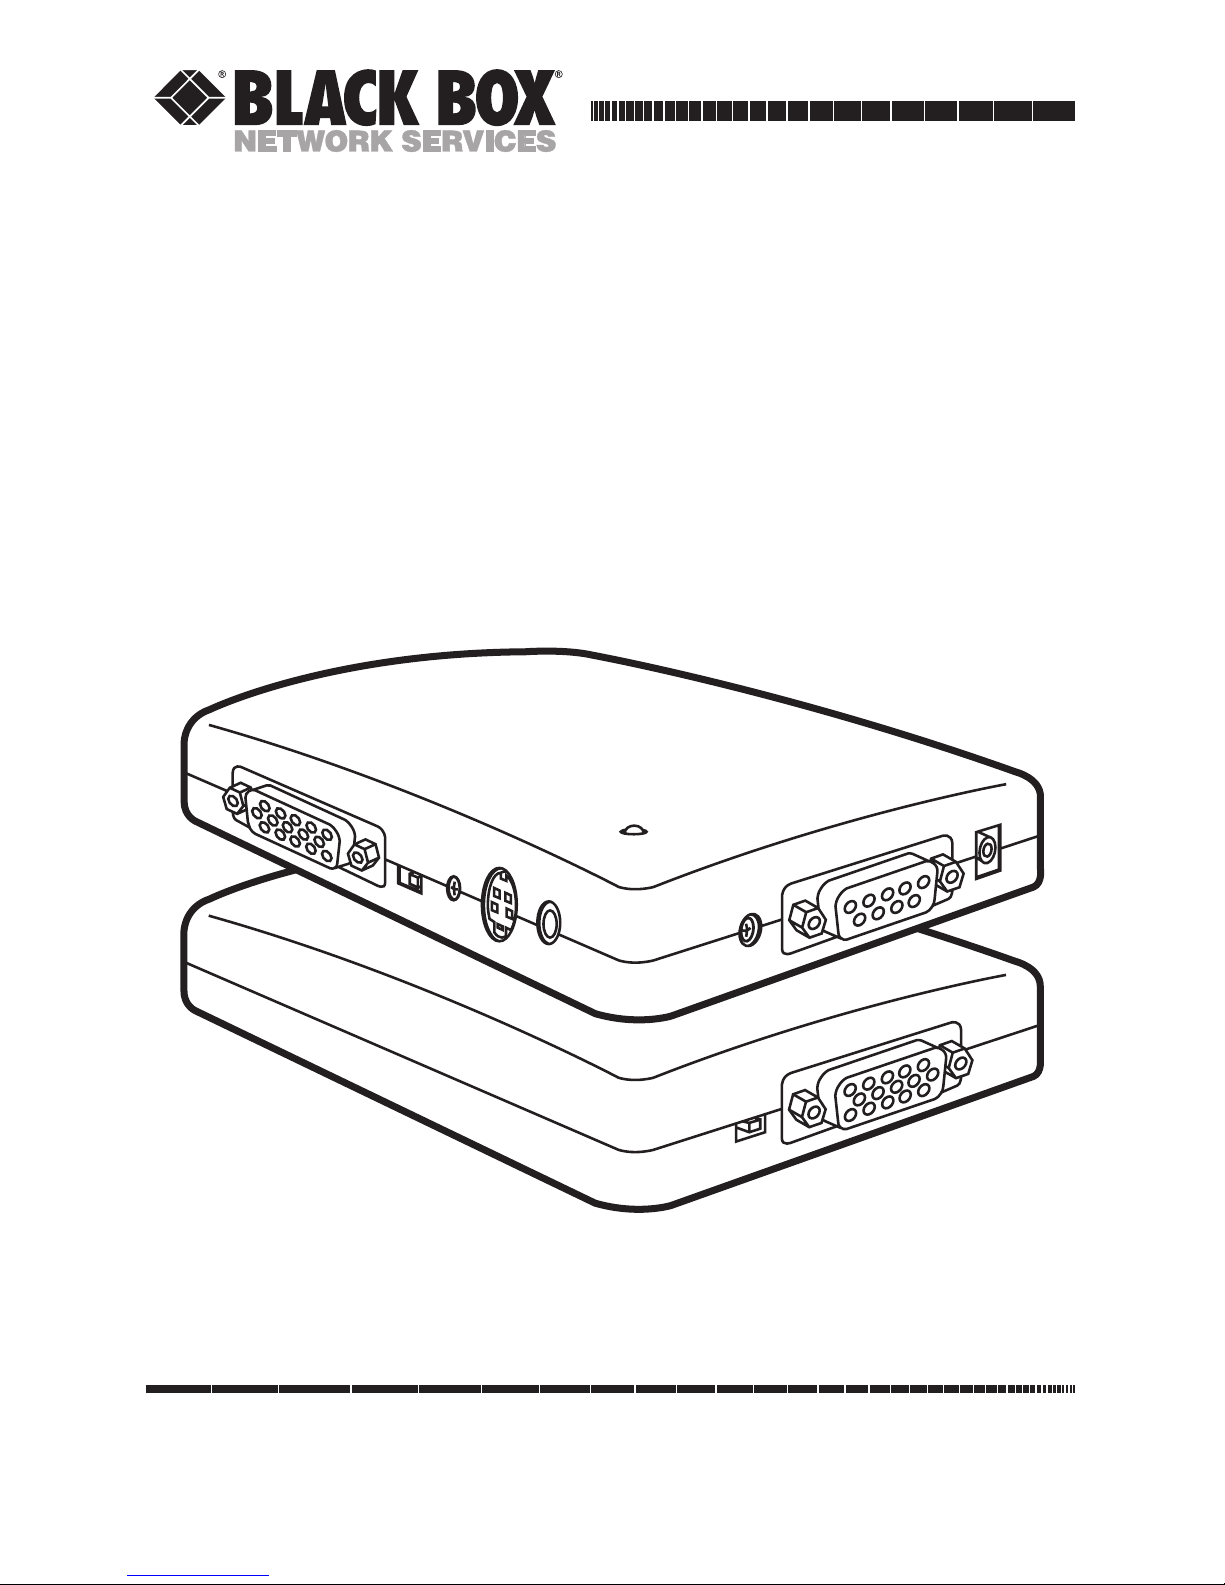
2.3 The VGA/Video Portable Pro Illustrated
Figure 2-1 below shows the top of the VGA/Video Portable Pro and the three
sides of the unit that have connectors or controls on them. The numbers
refer to the component descriptions on the next page.
Figure 2-1. The VGA/Video Portable Pro’s surface components.
11 10 9
2
7
6
4
3
1
5
8
BRIGHT RGB VIDEO OUT DC 9V IN
ZOOM x UNZOOM VGA IN
VGA OUT
S-VIDEO OUT
VIDEO
OUT
VGA↔MAC
CHAPTER 2: Introduction
Page 11

12
VGA/VIDEO PORTABLE PRO
1. ZOOM/UNZOOM Switch: A slide switch you can use to get your
computer images to fit on the TV screen. See Chapter 4 for more details.
2. VGA IN Port: You’ll run cable from the computer’s video-output port to
this DE15 connector.
3. VGA OUT Port: You can run cable from this DE15 connector to a local
monitor, or plug the included terminator into this port if you aren’t
using a monitor.
4. VGA↔MAC Switch: A slide switch you can use to tell the VGA/Video
Portable Pro whether its input is coming from a VGA card or a
Macintosh.
5. Horizontal Positioning Dial: A screw dial you can use to move your image
right or left on the screen.
6. S-VIDEO OUT Port: You can run cable from this 8-pin mini-DIN
connector to a TV or VCR that can accept S-Video input.
7. VIDEO OUT Port: You can run cable from this RCA
®
jack to a TV
or VCR that can accept standard composite video input.
8. Power LED: This indicator lights when the unit is receiving electric
power.
9. BRIGHT Dial: A screw dial you can use to increase or decrease the
brightness of the output image.
10. RGB VIDEO OUT Port: You can run cable from this DB9 connector
to a TV or VCR that can accept RGBS video.
11. DC 9V IN Port: You’ll plug the power supply’s output cord into this
barrel jack.
Page 12

13
CHAPTER 3: Installation
3.1 System Requirements
Before beginning to install the VGA/Video Portable Pro, please take a
moment to make sure your equipment can support it. This is what you need:
• The computer must be either an IBM AT®, PS/2®, or compatible
PC/notebook/laptop with a video-output port that supports standard
VGA, or an Apple Macintosh or compatible PC/notebook/laptop with
a video-output port that supports the standard Macintosh display mode
(640x480 resolution, 35 or 31.5 KHz horizontal synchronization) or fully
SVGA-compatible 800 x 600 mode (35.2 KHz horizontal sync, 56 Hz
vertical sync).
• The TV or VCR must have one of these inputs: Standard composite/
baseband video (RCA jack), S-Video/Y-C (4-pin mini-DIN), analog RGBS
(four BNC connectors or one SCART connector), or an RF (antenna)
input (this would require an RF modulator, which is not included with
your unit). If your Portable Pro is an AC331A, the TV or VCR must be
able to accept NTSC video signals at 60 Hz; if the Portable Pro is an
AC331AE, the TV or VCR must be able to accept PAL video signals
at 56 Hz.
NOTE
The VGA/Video Portable Pro should in theory support any VGA or
Macintosh computer that has a vertical display frequency between 56 Hz
and 72 Hz and a horizontal display frequency between 24 KHz and 38
KHz. However, because video circuitry and connectors differ widely
among manufacturers and devices, we cannot guarantee that the
Portable Pro will function correctly in any nonstandard application.
3. Installation
Page 13

14
VGA/VIDEO PORTABLE PRO
3.2 Unpacking: The Complete VGA/Video Portable Pro Package
Before you assemble your system, please make sure you received all of the
following items:
1. (1) VGA/Video Portable Pro unit
2. (1) Power supply
3. (1) Carry case
4. (1) Composite-video cable (has RCA connectors)
5. (1) S-Video cable (has 4-pin mini-DIN connectors)
6. (1)
VGA passthrough cable (has DE15 [“DB15HD,” “HD15”] connectors)
7. (1) Macintosh computer-adapter cable (long, DE15 male to DA15
[“DB15”] male, marked MAC)
8. (1) Macintosh monitor-adapter cable (short, DE15 male to DA15 female,
marked MAC)
9. (1) Dummy terminator (DE15 male connector, emulates an
Apple 14-inch monitor)
10. (1) Small screwdriver
11. (1) Copy of this manual
12. AC331AE only: (1) SCART (RGBS) cable (DE9 [“DB9”] male
to SCART male)
Page 14

15
CHAPTER 3: Installation
3.3 Installation Procedures
3.3.1 VGA S
YSTEMS
To install the VGA/Video Portable Pro in a VGA system, take these steps
(referring to Fig. 2-1 on page 11 and Fig. 3-1 on page 16):
1. Make sure your computer (laptop, notebook, or desktop PC) is turned
OFF.
2. Slide the VGA↔MAC switch (component 4 in Fig. 2-1) to the left side
(marked “VGA”).
3. Plug one end of the included VGA passthrough cable into your
computer’s video-output port. Plug the other end into the Portable Pro’s
VGA IN port (component 2 in Fig. 2-1).
4. If you are using a local monitor with the Portable Pro, plug one end of
the monitor’s video cable into the monitor’s video-input port. Plug the
other end into the Portable Pro’s VGA OUT port (component 3 in
Fig. 2-1).
5A. If you’re going to use the Portable Pro’s composite-video output, plug
one end of the included composite-video cable into the Portable Pro’s
VIDEO OUT port (component 7 in Fig. 2-1). Plug the other end into
the VIDEO IN port on your TV, VCR, or video projector.
5B. If you’re going to use the Portable Pro’s higher-quality S-Video output,
plug one end of the included S-Video cable into the Portable Pro’s
S-VIDEO OUT port (component 6 in Fig. 2-1). Plug the other end
into the S-VIDEO IN port on your TV, VCR, or video projector.
5C. If you’re going to use the Portable Pro’s highest-quality RGBS video
output, plug the DB9 end of an RGBS cable (included with the AC331AE
only) into the Portable Pro’s RGB VIDEO OUT port (component 10 in
Fig. 2-1). If this cable is the one included with the AC331AE, plug its
male SCART connector into the female SCART connector on your TV,
VCR, or video projector. If this cable is a BNC-type RGBS cable with four
male BNC connectors (not included), plug them into the RED, GREEN,
BLUE, and SYNC connectors of the RGBS VIDEO IN port on your TV,
VCR, or video projector. (The ends of the cable should be color-coded—
red, green, blue, and black, for example—to help you determine which
connectors should go together.) If you need an RGBS cable, call Black
Box for a special quote.
Page 15

16
VGA/VIDEO PORTABLE PRO
Figure 3-1. A VGA/Video Portable Pro system (VGA environment).
VIDEO
OUT
S-VIDEO
OUT
S-VIDEO IN
VIDEO IN
VGA
OUT
VGA IN
VGA
OUT
DC IN
RGB
OUT
or
Power Supply
(9 VDC,
600 mA)
VGA Passthrough
Cable
S-Video Cable
Monitor Cable
Composite
Video Cable
VGA
Monitor
TV
Notebook PC
Desktop PC
VGA/Video
Portable Pro
or
RGBS
Monitor
Page 16

17
6. Plug the output cord of the Portable Pro’s power supply into the DC 9V
IN jack on the Portable Pro (component 11 in Fig. 2-1). Plug the power
supply into a working electrical outlet. The Portable Pro should power
up automatically (it has no ON/OFF switch); the red LED on its top
panel should be lit.
7. If you are using a local monitor with the Portable Pro, plug it into a
working electrical outlet and turn it on.
8. Turn on your computer.
9. Turn on your TV, VCR, or video projector. If necessary, select VIDEO IN
(or S-VIDEO IN or RGBS VIDEO IN) as the device’s video-input source
(consult the device’s manual if you don’t know how to do this).
Your installation is now complete. Your VGA/Video Portable Pro system
should be ready for continuous operation.
3.3.2 M
ACINTOSHSYSTEMS
To install the VGA/Video Portable Pro in a Macintosh system, take these steps
(referring to Fig. 2-1 on page 10, Fig. 3-1 on page 16, and Fig. 3-2 on page 18):
1. Make sure your computer (laptop, notebook, or desktop PC) is turned
OFF.
2. Slide the VGA↔MAC switch (component 4 in Fig. 2-1) to the right side
(marked “MAC”), unless you are actually using a VGA monitor with your
Mac, in which case you should slide this switch to the left side.
3. Plug the DA15 (“DB15”) male end of the included Macintosh computeradapter cable (the long cable marked “MAC”) into your
computer’s DA15
female video-output port. Plug the DE15 (“DB15HD,”
“HD15”) male end
into the Portable Pro’s VGA IN port (component 2 in Fig. 2-1).
CHAPTER 3: Installation
Page 17

18
VGA/VIDEO PORTABLE PRO
Figure 3-2. Special cabling for VGA/Video Portable Pro system (Mac environment).
VGA/Video
Portable Pro
VGA
OUT
Macintosh
monitor-
adapter cable
(included)
Dummy terminator (included,
use if local monitor not attached)
Macintosh computer-
adapter cable (included)
Monitor cable
(not included)
VGA
IN
or
Macintosh CPU
Apple
14-Inch
Monitor
Page 18

19
CHAPTER 3: Installation
4A. If you are using a local Macintosh monitor with the Portable Pro, plug one
end of the monitor’s video cable into the monitor’s video-input port.
Plug the other end into the DA15 female end of the included Macintosh
monitor-adapter cable (the short cable marked “MAC”). Plug the DE15
male end of the monitor-adapter cable into the Portable Pro’s VGA OUT
port (component 3 in Fig. 2-1).
NOTE
For a local Macintosh monitor, the Portable Pro supports Apple 14-inch
monitors only. It does not support Apple 12-inch or 16-inch monitors.
4B. If you are using a local VGA monitor with the Portable Pro, do not use the
monitor-adapter cable mentioned in step 4A; plug the monitor’s video
cable directly into the Portable Pro’s VGA OUT port. (As stated in Step
2, the VGA↔MAC switch must be in the VGA position.)
4C. If you aren’t using a local monitor with the Portable Pro, you must plug
the included DE15 male dummy terminator into the Portable Pro’s VGA
OUT connector. This terminator emulates an Apple 14-inch monitor
and enables the computer to operate properly.
The rest of the installation procedure (steps 5 through 9) is the same as that
for VGA systems; see pages 15 and 17.
Page 19

20
VGA/VIDEO PORTABLE PRO
As long as it is plugged in and is securely connected to the proper equipment,
the VGA/Video Portable Pro performs signal conversion more or less
automatically. Because of this, operating the unit mainly consists of using
its controls to fine-tune your presentation.
4.1 The VGA↔MAC Switch
You should have moved this switch to the setting appropriate for your
environment during installation. If you didn’t, do so now (see Step 2 in
Section 3.3.1 or 3.3.2).
4.2 The BRIGHT (Brightness) Dial
The brightness of the Portable Pro’s TV image has been adjusted to the
setting that is best for most TVs at the factory. If the image you get on your TV
is too bright or too dark, or has vertical strips or horizontal interference in it,
use the included screwdriver to turn this dial until the brightness is correct
and the noise disappears.
4.3 The Horizontal Positioning Dial
If the image on your TV screen isn’t centered correctly (if it’s too far to the
left or right), reposition it with this unlabeled dial, located between the
VGA↔MAC switch and the S-VIDEO OUT port. Use the included screwdriver
to move the image to the center by turning the dial. This problem happens
with TVs that have atypical voltage levels.
4. Operation
Page 20

21
CHAPTER 4: Operation
4.4 The ZOOM x UNZOOM Switch
When this switch is in the ZOOM position, the Portable Pro converts your
computer graphics directly to TV-video format without compressing them in
size. The centers of the images will appear in the center of the TV screen, but
because of the normal tendency of TVs to “overscan” (display the picture in
such a way that parts of it are lost beyond the boundaries of the screen), the
edges of the images might not be visible.
If you find that parts of your images cannot be seen, you can move this
switch to the UNZOOM (“underscan”) position. When the switch is in this
position, the Portable Pro compresses images as it converts them, so that as
much of the images as possible appears on the TV screen:
•In 720 x 400 resolution, images are compressed in the horizontal
dimension only.
•In 640 x 480 resolution, images are compressed both horizontally and
vertically.
•In 800 x 600 resolution, images are compressed both horizontally and
vertically, but the vertical component of the image will probably still be
too large to fit entirely on the TV screen.
The portions of the TV screen that are outside any image will contain a dark
border.
Page 21

22
VGA/VIDEO PORTABLE PRO
This chapter tries to answer questions and concerns that can arise when you
install and use the VGA/Video Portable Pro. It also describes what to do when
you have problems with the unit that you can’t solve yourself.
5.1 Common Questions and Concerns
5.1.1 I
NSTALLATION-RELATED
Q: My TV doesn’t have an RCA jack (composite-video connector). How can I
connect the Portable Pro to the TV?
A1: Check the TV—if it has a 4-pin mini-DIN connector for S-Video input or
a SCART connector or 4 BNC connectors for RGBS input, use one of these
types of video instead (the quality of the picture will be better anyway).
A2: If your TV is hooked to a VCR, connect through the VCR as follows:
1. Install and interconnect the Portable Pro as shown in Fig. 3-1 and (if
applicable) Fig. 3-2, but connect the composite-video cable to the VCR’s
VIDEO IN jack instead of to the TV.
2. Turn on the VCR and the TV. Switch the TV to the channel that takes
VCR input. Play a tape for a moment on the VCR to make sure that you
can see the program on the TV screen, then remove the tape from the
VCR.
3. Consult your VCR’s manual to find out how to set its “input source”
mode. (VCRs generally have two or three input sources: one called TV,
CABLE, or TUNER; one called VIDEO IN or AUX; and occasionally
one called TAPE.) Set the input source to VIDEO IN or AUX. Your TV
should now display the images from the Portable Pro.
A3: Another option is the RF-modulator method: You can use an RF
modulator (not included) to convert the Portable Pro’s composite-video
signal to an RF signal and send that signal into the TV’s antenna (VHF/UHF)
input.
5. Troubleshooting
Page 22

23
5.1.2 O
PERATION-RELATED
I’m not getting a picture on my TV.
Take these steps:
1. Check all the cable connections again, as shown in Figure 3-1
and (where applicable) Figure 3-2.
2. Make sure the POWER and CHANNEL settings of your TV are correct.
If the TV has a remote control, make sure it is not being triggered
accidentally.
3. Make sure that the correct type of input (VIDEO, S-VIDEO, or RGBS
VIDEO) is selected on your TV. If possible, connect a VCR, a camcorder,
or other output device to the TV’s video input and make sure that the
TV is accepting input through the selected connector.
4. If you are using a notebook PC, you might have to enable “External
VGA” or “CRT Output.” Consult your notebook’s manual.
5. If you are using the Portable Pro with a Macintosh computer, but
without a local Macintosh monitor, you must either connect either a
monitor or the included dummy terminator to the Portable Pro’s VGA
OUT port.
6. A few VGA systems require a local monitor to be connected through
the Portable Pro when the system is powered up. Consult your system
manual to find out whether this is the case for your system. If it is, and
attaching a local monitor is not convenient, try connecting the included
dummy terminator to the Portable Pro’s VGA OUT port. If this doesn’t
help, we might be able to provide a dummy terminator that will emulate
your monitor as a special quote; call Black Box for technical support.
I have a notebook PC connected to the Portable Pro, but I’m not getting any
output displayed on my TV.
Try Step 4 above. If this is not the problem, try the other steps listed above.
CHAPTER 5: Troubleshooting
Page 23

24
VGA/VIDEO PORTABLE PRO
When I connect my TV to the Portable Pro through a VCR, I get no picture on
the TV.
Take these steps:
1. Make sure your TV is tuned to the channel that the VCR is using for
output. (In North America, this is most often channel 3, but might be
channel 2, 4, or 6 instead.) You might need to change the VCR’s output
channel rather than the TV channel; consult the VCR’s manual if
necessary.
2. Make sure that the VCR is set to receive input from the VIDEO IN
or AUX source.
The picture on my TV is really messed up.
Take these steps:
1. Make sure the VGA↔MAC switch is set to the right position.
2. If you’re using a VGA system, make sure you aren’t trying to use a higher
resolution than the Portable Pro can support (800 x 600 max.).
3. If you’re using a Macintosh system, make sure you are using an
Apple 14-inch monitor or (if you have set your Mac for this) a VGA
monitor. Other monitors, such as Apple 12-inch or 16-inch models, are
not supported by the Portable Pro.
4. If you are using the VGA/Video Portable Pro in a foreign country, make
sure the TV can accept the Portable Pro’s TV-video output. The AC331A
outputs NTSC (the video standard for North America and Japan) only;
the AC331AE outputs PAL (the video standard for most of Europe and
Asia) only.
Page 24

25
Q: Why is the TV not displaying portions of my images?
A: Your images might be running afoul of the TV’s “overscanning” (placing
parts of the picture beyond the boundaries of the screen). This typically
occurs because VGA graphics have more display lines than the TV can handle.
In general, a TV can display only 420 lines, whereas VGA in 640 x 480
resolution has 480 lines. You might get the complete picture if you slide the
ZOOM x UNZOOM switch to the UNZOOM position. For more information,
see Section 4.4.
NOTE
If you are using 800 x 600 resolution, there is probably no way to fit an
entire image on the TV screen—you might have to reposition or redesign
your graphics so that their information content is away from the edges
that are geting clipped.
Q: There are noise lines on the TV picture. How do I get rid of them?
A: Adjust the Portable Pro’s BRIGHT (brightness) dial to eliminate them.
See Section 4.2.
Q: How can I enhance the quality of the TV’s display?
A1: If the TV has S-Video or RGBS video-input connectors, the best
improvement you can make is to use one of these inputs (preferably RGBS)
instead of the composite-video input.
A2: You can usually get a better picture by using the controls on the TV to
lower the contrast and sharpness (consult your TV’s manual if necessary).
In particular, lowering the contrast will help reduce flickering.
CHAPTER 5: Troubleshooting
Page 25

26
VGA/VIDEO PORTABLE PRO
5.2 Contacting Black Box
If you determine that your VGA/Video Portable Pro is malfunctioning, do not
attempt to alter or repair it. It contains no user-serviceable parts. Contact Black
Box Technical Support at 724-746-5500. The problem might be solvable over
the phone.
Before you do, make a record of the history of the problem. We will be
able to provide more efficient and accurate assistance if you have a complete
description, including:
• The nature and duration of the problem.
• When the problem occurs.
• The components involved in the problem.
• Any particular application that, when used, appears to create the problem
or make it worse.
5.3 Shipping and Packaging
If you need to transport or ship your VGA/Video Portable Pro:
• Package it carefully. We recommend that you use the original container.
• Before you ship a unit for repair or return, contact Black Box to get a
Return Materials Authorization (RMA) number, and make sure you
include everything you received with the unit when you ship it.
Page 26

27
A.1 VGA IN Port
This port is a DE15 (often called “DB15HD” or “HD15”) female connector.
On this port, the VGA/Video Portable Pro receives analog RGB signals from
the computer’s DE15 (VGA) or DA15 (Macintosh, often called “DB15”)
female video-output port.
Pin No. Signal Description
1 Red, 0.7 Vpp, 75 ohms
2 Green, 0.7 Vpp, 75 ohms
3 Blue, 0.7 Vpp, 75 ohms
4 Monitor ID2, TTL level
5 (Passed through)
6 Ground
7 Ground
8 Ground
9 (Passed through)
10 Ground
11 Ground
12 Monitor ID1, TTL level
13 Horizontal Sync (HSYNC), TTL level
14 Vertical Sync (VSYNC), TTL level
15 (Passed through)
A.2 VGA OUT Port
This port is a DE15 female connector. From this port, the Portable Pro sends
analog RGB signals to a local monitor’s DE15 (VGA) or DA15 (Macintosh)
female video-input port. The pinout of this port is the same as that of the
VGA IN port (see above).
Appendix: Port Pinouts
5
10
15 11
6
1
APPENDIX: Port Pinouts
Page 27

28
VGA/VIDEO PORTABLE PRO
A.3 VIDEO OUT Port
This port is an RCA jack (female connector). From this port, the Portable Pro
sends composite-video signals (1.0 ±0.2 Vpp, 75 ohms, negative sync) to the
composite-video input port (RCA jack) of a TV, VCR, or video projector.
A.4 S-VIDEO OUT Port
This port is a 4-pin mini-DIN female connector. From this port, the Portable
Pro sends S-Video signals to the 4-pin mini-DIN female S-Video input port of
a TV, VCR, or video projector.
Pin No. Signal Description
1 Ground
2 Ground
3 Y (Luminance), 0.7 ±0.2 Vpp,
75 ohms, negative sync
4 C (Chrominance), 0.3 ±0.1 V
pp
43
21
Page 28

29
A.5 RGB OUT Port
This port is a DB9 female connector. From this port, the Portable Pro sends
analog RGBS signals to the (1) SCART or (4) BNC RGBS-input port(s) of a
TV, VCR, or video projector.
Pin No. Signal Description
1 Ground
2 VCC
3 Red, 0.7 ±0.2 Vpp, 75 ohms,
negative sync
4 Green, 0.7 ±0.2 Vpp, 75 ohms,
negative sync
5 Blue, 0.7 ±0.2 Vpp, 75 ohms,
negative sync
6 (No connection)
7 Video Output, 1 V, 75 ohms
8 TV Composite Sync (CSYNC),
TTL level, negative sync
9 (No connection)
5
96
1
APPENDIX: Port Pinouts
Page 29

30
VGA/VIDEO PORTABLE PRO
TRADEMARKS USED IN THIS MANUAL
AT, IBM, and PS/2 are registered tradmarks of IBM Corporation.
Apple, Mac, and Macintosh are registered trademarks of Apple Computer,
Inc.
RCA is a registered trademark of GE Co.
Any other trademarks mentioned in this manual are acknowledged to be the property
of the trademark owners.
OTHER LEGAL INFORMATION
The information in this document is subject to change without notice
and does not represent a commitment on the part of the developer.
This document contains materials protected by copyright. All rights are
reserved. No part of this manual may be reproduced or transmitted in any
form, by any means or for any purpose, without express written consent.
Page 30

1000 Park Drive • Lawrence, PA 15055-1018 • 724-746-5500 • Fax 724-746-0746
© Copyright 1998. Black Box Corporation. All rights reserved.
 Loading...