

Page 1
SEPTEMBER 2008
AC1130A
Wireless A/V System
© Copyright 2008. Black Box Corporation. All rights reserved.
1000 Park Drive • Lawrence, PA 15055-1018 • 724-746-5500 • Fax 724-746-0746
CUSTOMER SUPPORT INFORMATION Order toll-free in the U.S.: Call 877-877-BBOX (outside U.S. call 724-746-
5500) • FREE technical support 24 hours a day, 7 days a week: Call 724-746-5500 or fax 724-746-0746 • Mailing address:
Black Box Corporation, 1000 Park Drive, Lawrence, PA 15055-1018 • Web site: www.blackbox.com • E-mail:
info@blackbox.com
A
C1130A_manual.indd 900
Page 2
O
VERVIEW & FEATURES
Use the Wireless A/V System to make any projector
work without wires. This plug-and-play solution
works with any desktop or notebook PC—and no cable
swapping is required.
Ideal for conference rooms and classrooms, the
Wireless A/V System includes login protection to
prevent authorized access to the projector. Use it
for PowerPoint
®
and real-time video presentations.
The Wireless A/V System also works with an HDTV
VGA/PC port, and it has built-in, proprietary
technology for smooth streaming of audio and video
in MPEG formats.
Features:
• Enables you to share a projector through a
wireless connection.
• Supports streaming video including MPEG1, 2, and
4 formats.
-• Supports 1024 x 768 or 1280 x 768 screen
resolutions.
• Built-in DHCP server provides greater
installation flexibility.
• Web-based user interface for easy configuration.
• Conference control function is perfect for
training sessions.
• Includes session security login and Wi-Fi
®
WEP
protection.
• Works with Windows Vista
®
/Windows® XP/Windows 2000
systems.
• Supports IEEE 802.3 RJ-45 LAN and IEEE 802.11b/g
Wi-Fi.
• Features Wi-Fi WEP 64- and 128-bit encryption for
wireless protection.
• Supports a range of up to 200 feet (60.9 m) and
works with internal or external wireless cards.
• Acts as a DHCP server or works with the existing
local area network server.
• Supports static IP configuration and custom SSID
wireless ID.
• Provides Internet connection through its built-in
RJ-45 port.
INSTALLATION
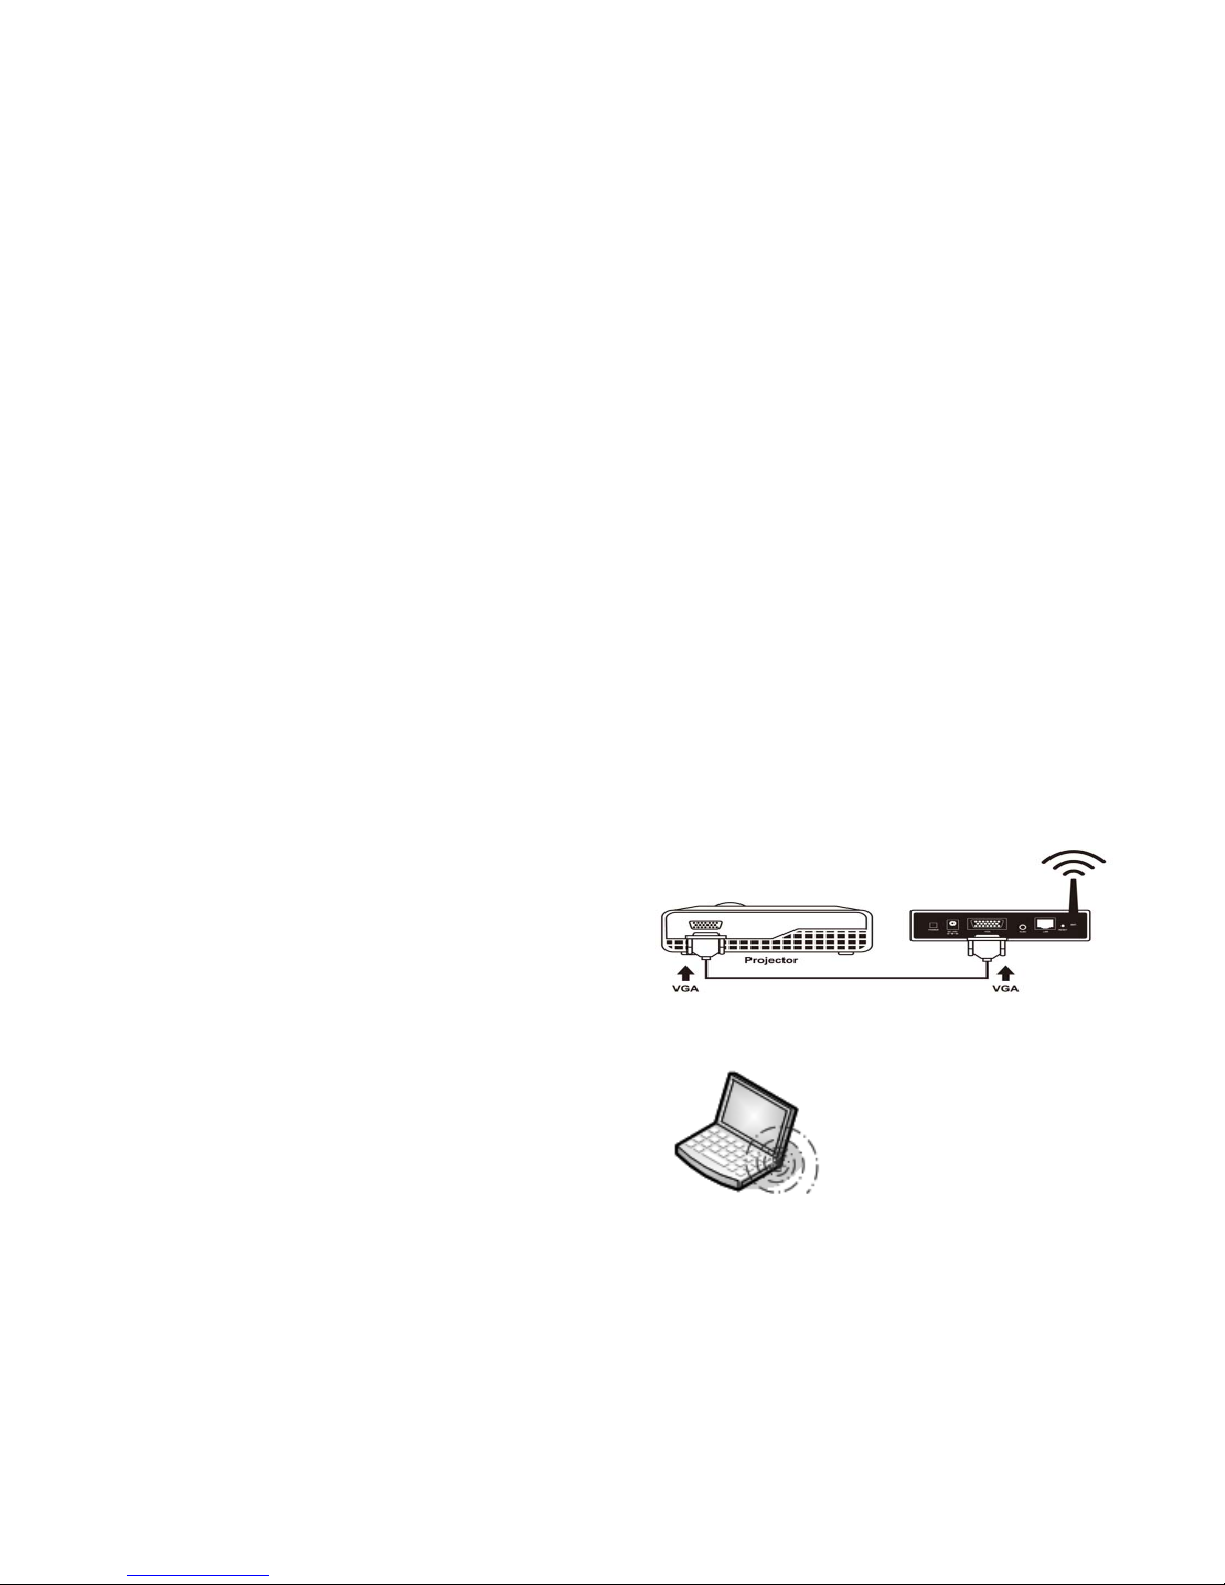
1. Assemble the AC1130A by connecting its wireless
antenna to the base unit and its power adapter to a
power outlet. Then connect the AC1130A to the
projector’s VGA port.
2. Make sure your computer’s wireless connection is
active.
Page 3
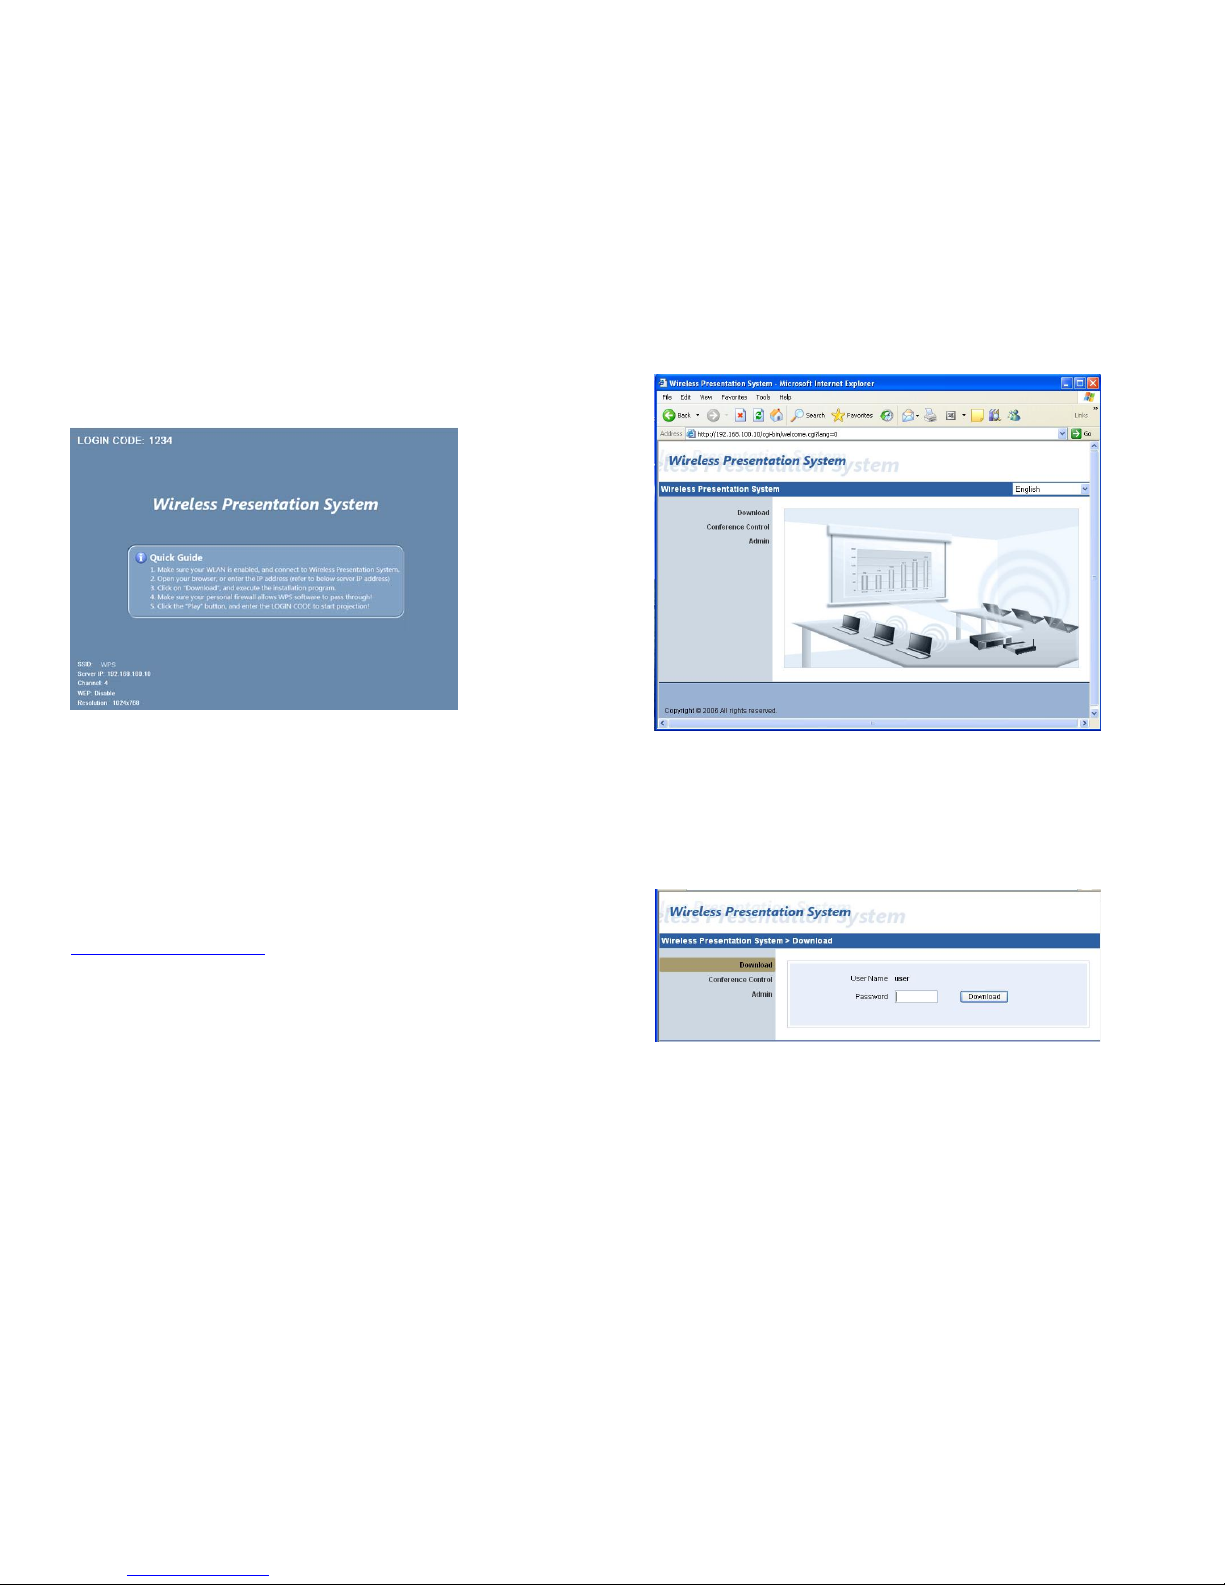
3. Turn on the projector; then turn on the AC1130A.
Wait until you see the screen below on your projector:
From the projector’s screen, note the 4-digit login
code, SSID, and Server IP address. You will need this
to install the player software.
4. Connect your computer to AC1130A wireless network
(SSID: WPS). Most computers will automatically connect
to the available wireless access point. Otherwise,
click on your computer’s wireless utility to select WPS
to connect.
5. Opening Internet Explorer and type the Server IP
address shown on the screen (default is
http://192.168.100.10
) in the address bar. You should
see the screen below:
6. Click on “Download.” At the prompt, enter the
default password, which is “user.” Then click on the
“Download” button located on the right side of the
screen. Click on “Run” and follow the instructions to
install the player software. It will create a desktop
icon called “WPS.”
Page 4
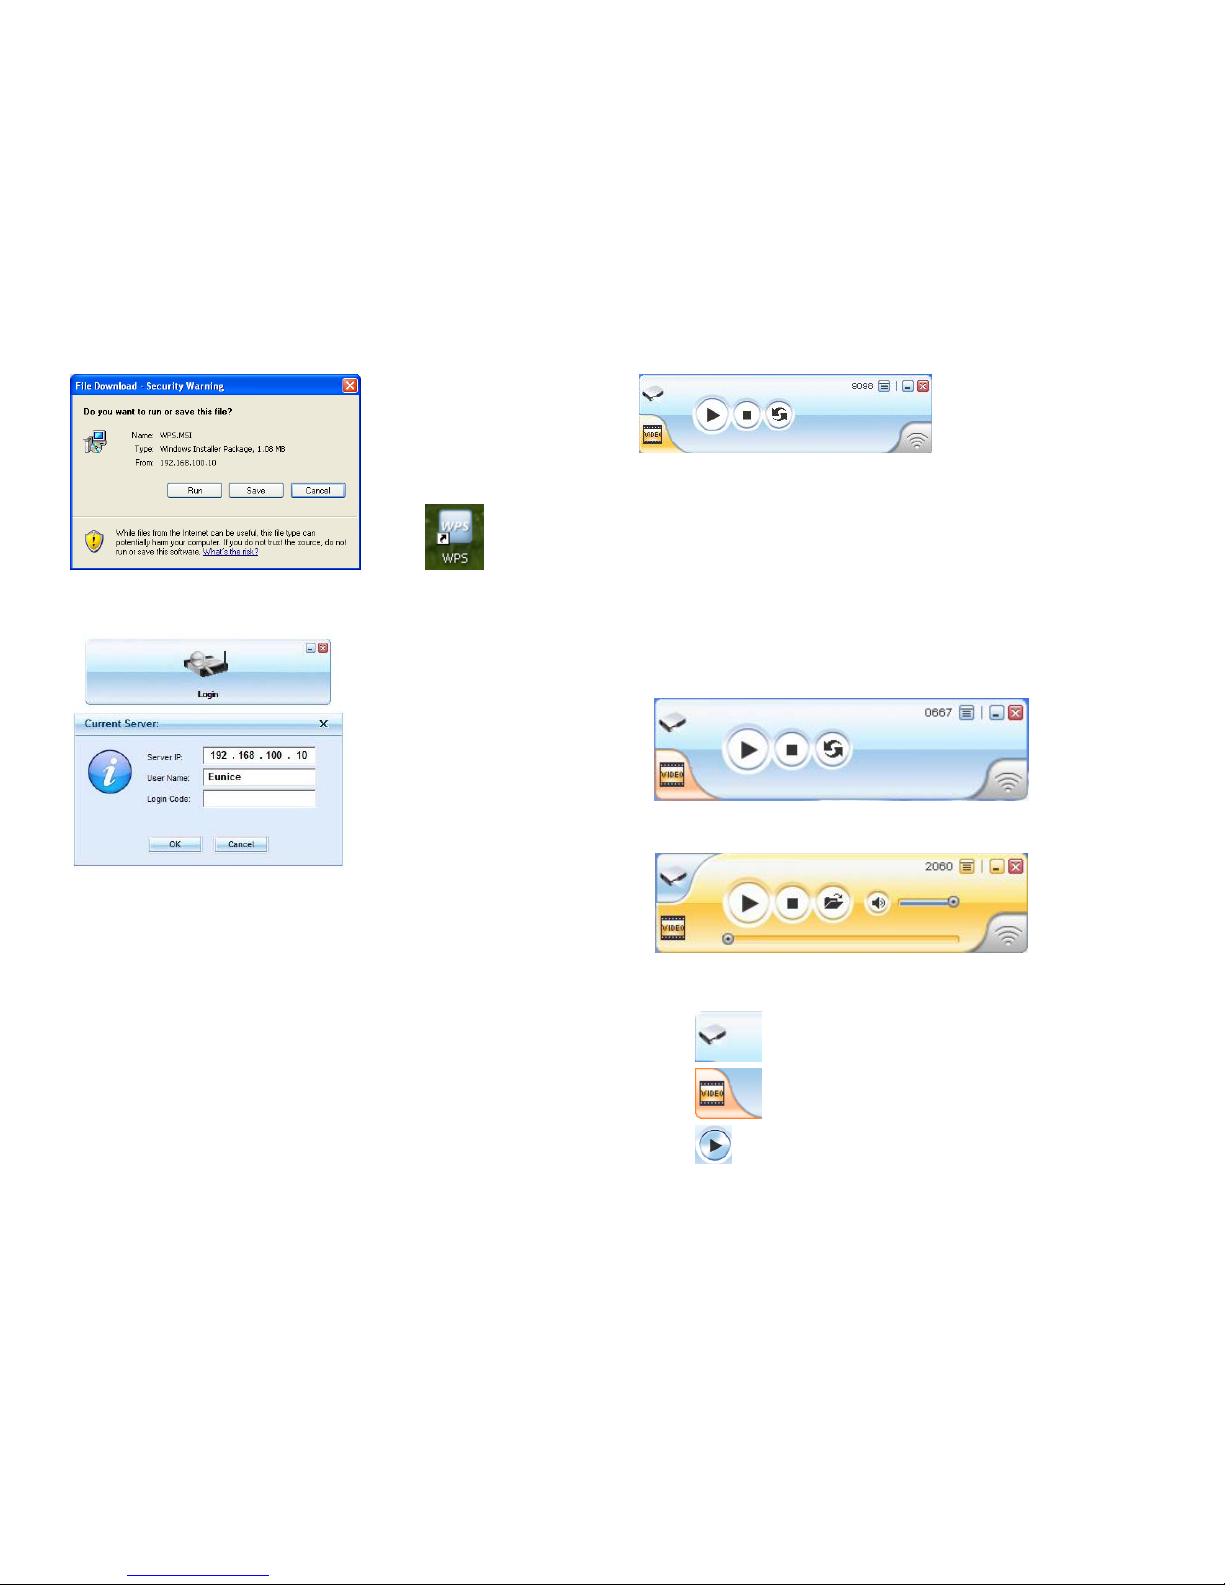
7. Click on “WPS.” The program will search the
network. At the prompt, enter the 4-digit login code.
NOTE: If WPS fails to connect, make sure you have the
correct login code and that your wireless card
connection is properly configured.
After a successful login, click OK on the next prompt.
This might change your screen resolution. Once you exit
the application, your computer screen will go back to
its original settings.
8. Click “Play” to start sending your computer
screen’s contents to the projector.
NOTE: For video streaming, see “Playing Streaming Video”
in the WPS Application Software section.
WPS
APPLICATION SOFTWARE
1. WPS application software is built into the module
and accessible through Internet Explorer. Its default
IP address is 192.168.100.10. You can change it in the
WPS Admin section.
2. After you log in successfully, these are two main
user interfaces:
Standard Mode (Screen Mirroring):
Video Streaming Mode:
(appears when you click on “Video” from Standard Mode)
The following are the buttons and their functions:
Presentation Mode
Video Mode
Start Projecting
Page 5

Pause Projecting
Stop Projecting
Refresh Projecting Screen
Server Login Code
Projecting in Progress (When Blinking)
Start Playing Video
Stop Playing Video
Pause Playing Video
Open Video File
Audio Volume ON
Audio Volume OFF
Audio Volume Strength Bar
Video Time Bar
Video Playing (When Blinking)
Function Menu
Minimize the Program
Exit the Program
3. Playing Streaming Video
Click
to switch to Video Streaming Mode.
Click
to open the video file; then click
start to play it.
Page 6

NOTE: Only MPEG formats, including MPEG1 (MPG, MPEG,
DAT), MPEG2 (MPG, MPEG, VOB), MPEG4 (ASF, WMW9, WMW,
AVI, are supported. It does not support QuickTime video
files (MOV).
The audio port on the AC1130A is only for streaming
video with audio and requires a IEEE 802.11g connection.
C
ONFERENCE CONTROL
The Conference Control Administrator screen enables the
host or presenter to maintain order in presentations
especially when there are many users who are logged in
at the same time.
1. Open Internet Explorer and type the server IP
address shown on the screen (default is
http://192.168.100.10
) in the address bar and you’ll
see the screen on the next page:
2. Click “Conference Control”, enter the default
password “trainer”; then click login. On this screen,
you will see all users who are currently logged in.
3. “Play Control” shows the status of users who are
currently logged in
These are toggle icons that enable the host to play or
stop a presentation.
W
EB ADMIN
Web Admin enables you to customize WPS default settings
and monitor system status, including setup changes for
network, projection, passwords, and firmware upgrades.
Page 7

You can also reset the AC1130A to its default settings
or restart it remotely.
WARNING: BE CAREFUL WHEN MAKING CHANGES.
ANY MODIFICATION TO DEFAULT SETTINGS MAY REQUIRE
CORRESPONDING CHANGES TO COMPUTERS CONNECTED TO THE
AC1130A.
1. Open Internet Explorer and type the AC1130A server
IP address (default is http://192.168.100.10
) at the
address bar. Click “Admin” and enter the password
(default password is admin).
2. Here is the information that can be found under
“System Status”:
3. “Network Setup”
Network configuration, including changes to IP, DHCP
Server, Wireless, and GateKeeper, is under “Network
Setup.”
Please consult your network administrator for changes
needed for IP, DHCP Server, and Wireless Setup when
integrating the AC1130A into an existing local network.
The GateKeeper feature has three options; All Block, All
Pass, and Internet Only. All Block will not allow
Internet or office network access; All Pass allows
office network access and Internet access; and Internet
Only doesn’t allow office network access but still
allows Internet access. This feature is only active when
the AC1130A is connected to a local area network, the
Internet, or both.
Page 8

4. “Projection Setup”
Under Projection Setup, you can change the resolution,
color depths, and screen refresh rates to suit different
types of projectors. Resolution options are 1024 x 768
and 1280 x 768, color depth options are 16 bit and 32
bit, and screen refresh rate options are 60 Hz and 75
Hz.
5. “Changing Passwords”
After entering the password, click on “Apply”.
When setting customized passwords, remember to keep a
copy. If you forget or lose the password, the only
option is Reset to Default.
6. “Reset to Factory Default”
This will restore the AC1130A to factory defaults.
You can also reset the AC1130A by powering it off, then
pressing the RESET button on the rear panel and holding
it for 10 seconds while turning on the AC1130A.
Page 9

7. “Firmware Upgrade”
Do this only when instructed by the factory technician
because it can render your AC1130A unusable if not done
correctly.
8. “Reboot”
Reboot enables you to do a soft restart. It also gives
your network administrator the capability to remotely
restart the AC1130A.
N
ETWORK APPLICATION DIAGRAMS
Page 10

W
ALLMOUNT INSTRUCTIONS (OPTIONAL)
T
ECHNICAL SPECIFICATIONS
Screen Resolutions: 1024 x 768 (XGA), 1280 x 768
(WXGA)
Video Streaming: Up to 30 fps with audio
Video Formats: MPEG1, MPEG2, MPEG4, WMV, AVI
Network Connections: Wi-Fi: IEEE 802.11b, IEEE
802.11g;
Fast Ethernet: IEEE 802.3 10/100 Mbps
Wireless Speed: 11 Mbps, 54 Mbps
Wireless Frequency: 2.4 GHz
Wireless Channels: 11
Wireless Encryption: WEP 64 or 128 bit
Wireless Antenna: Detachable SMA (-3 dBi)
Wireless Range: Up to 200 ft. (0.9 m)
LAN Protocol: TCP/IP
LAN Type: AP Mode, Hybrid (AP + LAN)
IP Configuration: Automatic or manual (static)
Operating System Compatibility: Windows Vista,
Windows 2000, and
Windows XP
Connectors: RJ-45 LAN, HD15 VGA, 3.5-mm audio, SMA
Power Supply: AC power adapter (included)
Certification: FCC, CE
Warranty: 1 year
TRADEMARKS USED IN THIS MANUAL
BLACK BOX and the Double Diamond logo are registered
trademarks of BB Technologies, Inc.
PowerPoint, Windows Vista, and Windows are registered
trademarks of Microsoft Corporation.
Wi-Fi is a registered trademark of the Wi-Fi Alliance.
Any other trademarks mentioned in this manual are
acknowledged to be the property of the trademark owners.
Page 11

 Loading...