

Page 1
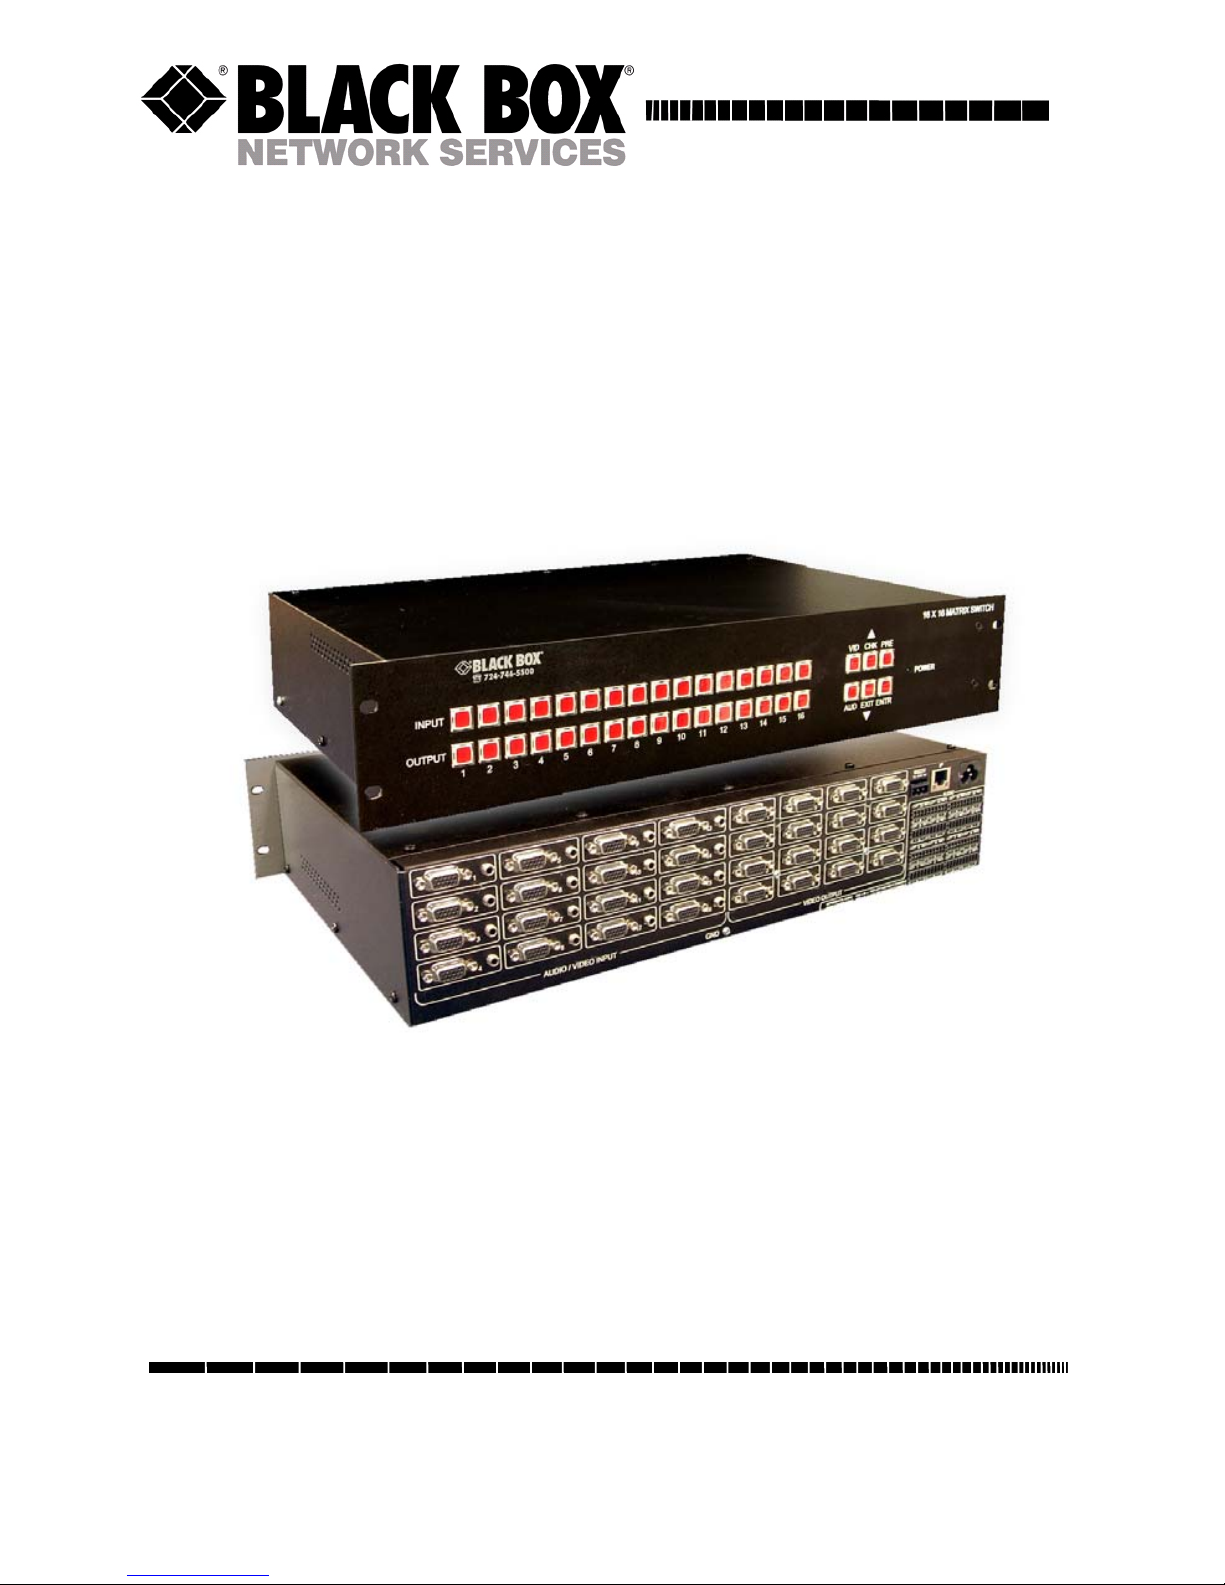
Models AC1120A 1121A 1122A 1123A *
16x16 and 8x8 VGA/HDTV Video Matrix Switch with
Front Panel, RS232, and Optional Audio & IP Control
* This user’s manual pertains to a number of Black Box 16x16 and
8x8 video matrix switches. Some models have audio switching
and IP control port, and some models do not.
UMA1149 Rev. A
Order toll-free in the U.S. 24 hours, 7 A.M. Monday to midnight Friday: 877-877-BBOX
FREE technical support, 24 hours a day, 7 days a week: Call 724-746-5500 or fax 724-746-0746
Mail order: Black Box Corporation, 1000 Park Drive, Lawrence, PA 15055-1018
Web site: www.blackbox.com • E-mail: info@blackbox.com
CUSTOMER
SUPPORT
INFORMATION
Page 2

Page 3

8x8 and 16x16 VGA / HDTV Matrix Switch with Audio, RS232 & IP Control
1
TRADEMARKS USED IN THIS MANUAL
BLACK BOX and its logo are registered trademarks of Black Box Corporation.
Any other trademarks mentioned in this manual are acknowledged to be the property
of the trademark owners.
FCC and Canadian Dept of Communications Radio Frequency
interference statements
This equipment generates, uses, and can radiate radio frequency energy and if not
installed and used properly, that is, in strict accordance with the manufacturer’s
instructions, may cause interference to radio communication. It has been
designed to comply with the limits for a Class A computing device in accordance
with the specifications in Subpart B of Part 15 of FCC rules. Operation of this
equipment in a residential area is likely to cause interference, in which case the
user at his own expense will be required to take whatever measures may be
necessary to correct the interference. Changes or modifications not expressly
approved by the party responsible for compliance could void the user’s authority
to operate the equipment.
This digital apparatus does not exceed the Class A limits for radio noise emission
from digital apparatus set out in the Radio Interference Regulation of the
Canadian Department of Communications.
Le présent appareil numérique n’émet pas de bruits radioélectriques dépassant
les limites applicables aux appareils numériques de la classe A prescrites dans le
Règlement sur le brouillage radioélectrique publié par le ministère des
Communications du Canada.
European Union Declaration of Conformity
This product complies with the requirements of the European EMC directive
89/336/EEC
Normas Oficiales Mexicanas (NOM)
Page 4

Model AC1120A, AC1121A, AC1122A, AC1123A
2
Table of Contents
1.0 GENERAL..................................................................................................... 4
1.1 FEATURES.................................................................................................... 4
2.0 INSTALLATION.......................................................................................... 5
2.1 INPUT AUDIO & VIDEO CONNECTIONS ........................................................5
2.2 OUTPUT AUDIO & VIDEO CONNECTIONS..................................................... 6
2.3 POWER INPUT CONNECTION ......................................................................... 7
2.4 CONTROL INPUTS......................................................................................... 7
2.4.1 Matrix with RS-232 Control (no IP) .................................................... 7
2.4.1.1 Primary RS-232 Control Port .................................................................... 8
2.4.1.2 Auxiliary RS-232 Control Port.................................................................. 8
2.4.2 Units with IP control............................................................................ 9
3.0 OPERATION ................................................................................................ 9
3.1 FRONT-PANEL BUTTONS AND INDICATORS.................................................. 9
3.1.1 Viewing Audio and Video Routings or “Ties”................................... 10
3.1.1.1 Viewing ties by Video and Audio ........................................................... 10
3.1.1.2 Viewing ties by Video only..................................................................... 11
3.1.1.3 Viewing ties by Audio only..................................................................... 12
3.1.2 Making Audio and Video Routings or “Ties”.................................... 12
3.1.2.1 Making a tie by Input .............................................................................. 12
Video and Audio to follow each other................................................................. 12
Video only or Audio only.................................................................................... 13
3.1.2.2 Making a tie by Output............................................................................ 13
Video and Audio to follow each other................................................................. 13
Video only or Audio only.................................................................................... 13
3.1.3 Recalling Presets (routing patterns).................................................. 14
3.1.4 Saving Presets (routing patterns) ...................................................... 14
3.1.5 Disconnecting all AV outputs (blank preset) ..................................... 14
3.1.6 To reset system to factory defaults..................................................... 14
3.1.7 Using the Front Panel VU meter ....................................................... 14
3.2 CONTROL COMMANDS (RS-232 AND IP)................................................... 16
3.2.1 Naming Functions.............................................................................. 17
Page 5

8x8 and 16x16 VGA / HDTV Matrix Switch with Audio, RS232 & IP Control
3
3.2.2 Routing Functions.............................................................................. 17
3.2.2.1 To make a video tie: ................................................................................ 17
3.2.2.2 To make an audio tie: .............................................................................. 17
3.2.2.3 To make a synchronized audio/video tie: ................................................ 17
3.2.3 Preset Pattern Saving and Routing Functions................................... 18
3.2.3.1 To recall a saved preset Video routing pattern: ....................................... 18
3.2.3.2 To save the current Video routing pattern to a preset:............................. 18
3.2.4 Restoring Factory Defaults................................................................ 18
3.2.5 Rebooting the System ......................................................................... 18
3.2.6 To Read Audio Volume Units (VU) of output #1 ............................... 19
3.2.7 To Read Temperature inside the Matrix ............................................ 19
3.2.8 To Read the Firmware Version.......................................................... 19
3.2.9 To Read Supply Voltages ................................................................... 19
3.2.10 Real Time Clock Functions.............................................................. 19
3.2.10.1 To set date & time: ................................................................................ 19
3.2.11 Scheduling Auto recall of Preset Patterns ....................................... 20
3.2.11.1 To set a schedule ................................................................................... 20
3.2.12 IP Control Basics............................................................................. 22
3.2.12.1 IP Setup Commands using the RS-232 Serial Port................................ 22
3.2.12.2 IP Configuration through port 23 .......................................................... 25
4.0 MAINTENANCE AND TROUBLESHOOTING .................................... 28
4.1 MAINTENANCE .......................................................................................... 28
4.2 TROUBLESHOOTING ................................................................................... 28
4.2.1 Calling Black Box .............................................................................. 28
4.2.2 Shipping and Packaging .................................................................... 29
5.0 SPECIFICATIONS ....................................................................................29
APPENDIX 1 – FRONT PANEL QUICK REFERENCE GUIDE .............. 30
APPENDIX 2 – COMMAND SUMMARY .................................................... 31
Page 6

Model AC1120A, AC1121A, AC1122A, AC1123A
4
About This Manual
This user’s manual covers several variations of Black Box’s 8x8 and 16x16
VGA/HD matrix switches. Four configurations of the matrix are discussed in this
user’ manual per the table below. Since this is an all-encompassing user’s manual,
portions of this guide may not pertain to any specific unit.
AC1120A 8x8 VGA Matrix Switch With Serial Control
AC1121A 8x8 VGA & Audio Matrix Switch with IP and Serial Control
AC1122A 16x16 VGA Matrix Switch with Serial Control
AC1123A 16x16 VGA & Audio Matrix Switch with IP and Serial Control
*** Upon power-up the switches output a string on their RS-232 port that
identifies the unit’s capabilities such as: BBox-I-A-8-8 (I=IP port, A= Audio,
8-8 = number of inputs and outputs respectively)
1.0 General
The AC1120A through AC1123A are compact high-end matrix switches for
video and audio. The matrices are used for cross-point switching of video and
audio signals. The switch provides 8 or 16 video (and audio) outputs, each
capable of independently displaying any of 8 or 16 inputs in any combination.
Additionally, the outputs can be blanked out and/or muted. The Matrices can be
used in TV broadcasting environments, multi-media conference halls, public
facilities, large display projects, schools, courtrooms, and command & control
centers.
The units are compatible with PC video from 640x480 to 1920x1600 or analog
SD/HDTV Component Video (YPbPr) from 480i to 1080p. The Matrix can be
controlled in 3 ways: manually using the buttons on the front panel, through one
or two serial RS232 control ports, or remotely via IP port.
1.1 Features
Allows cross-point switching of PC or HD video and audio signals
Multiple control methods including front panel, serial and IP ports
Switched output can be blanked or muted
Wide bandwidth to support PC resolutions to 1920x1200 or HD to 1080p
Balanced stereo audio outputs allow interference free connections
VU meter (sound level) bar graph display on the front panel
Battery-backed Real-time clock on all models with scheduling capability
Monitors system voltage levels and temperature
Alerts user with a blinking CHECK light if system faults are detected
Built-in universal power supply
Compact, Rugged, Reliable, and Economical
Page 7
8x8 and 16x16 VGA / HDTV Matrix Switch with Audio, RS232 & IP Control
5
2.0 Installation
The matrix is housed in a 2RU 19” wide rack mountable enclosure. All of I/O,
control, and the power connections are on the rear of the unit.
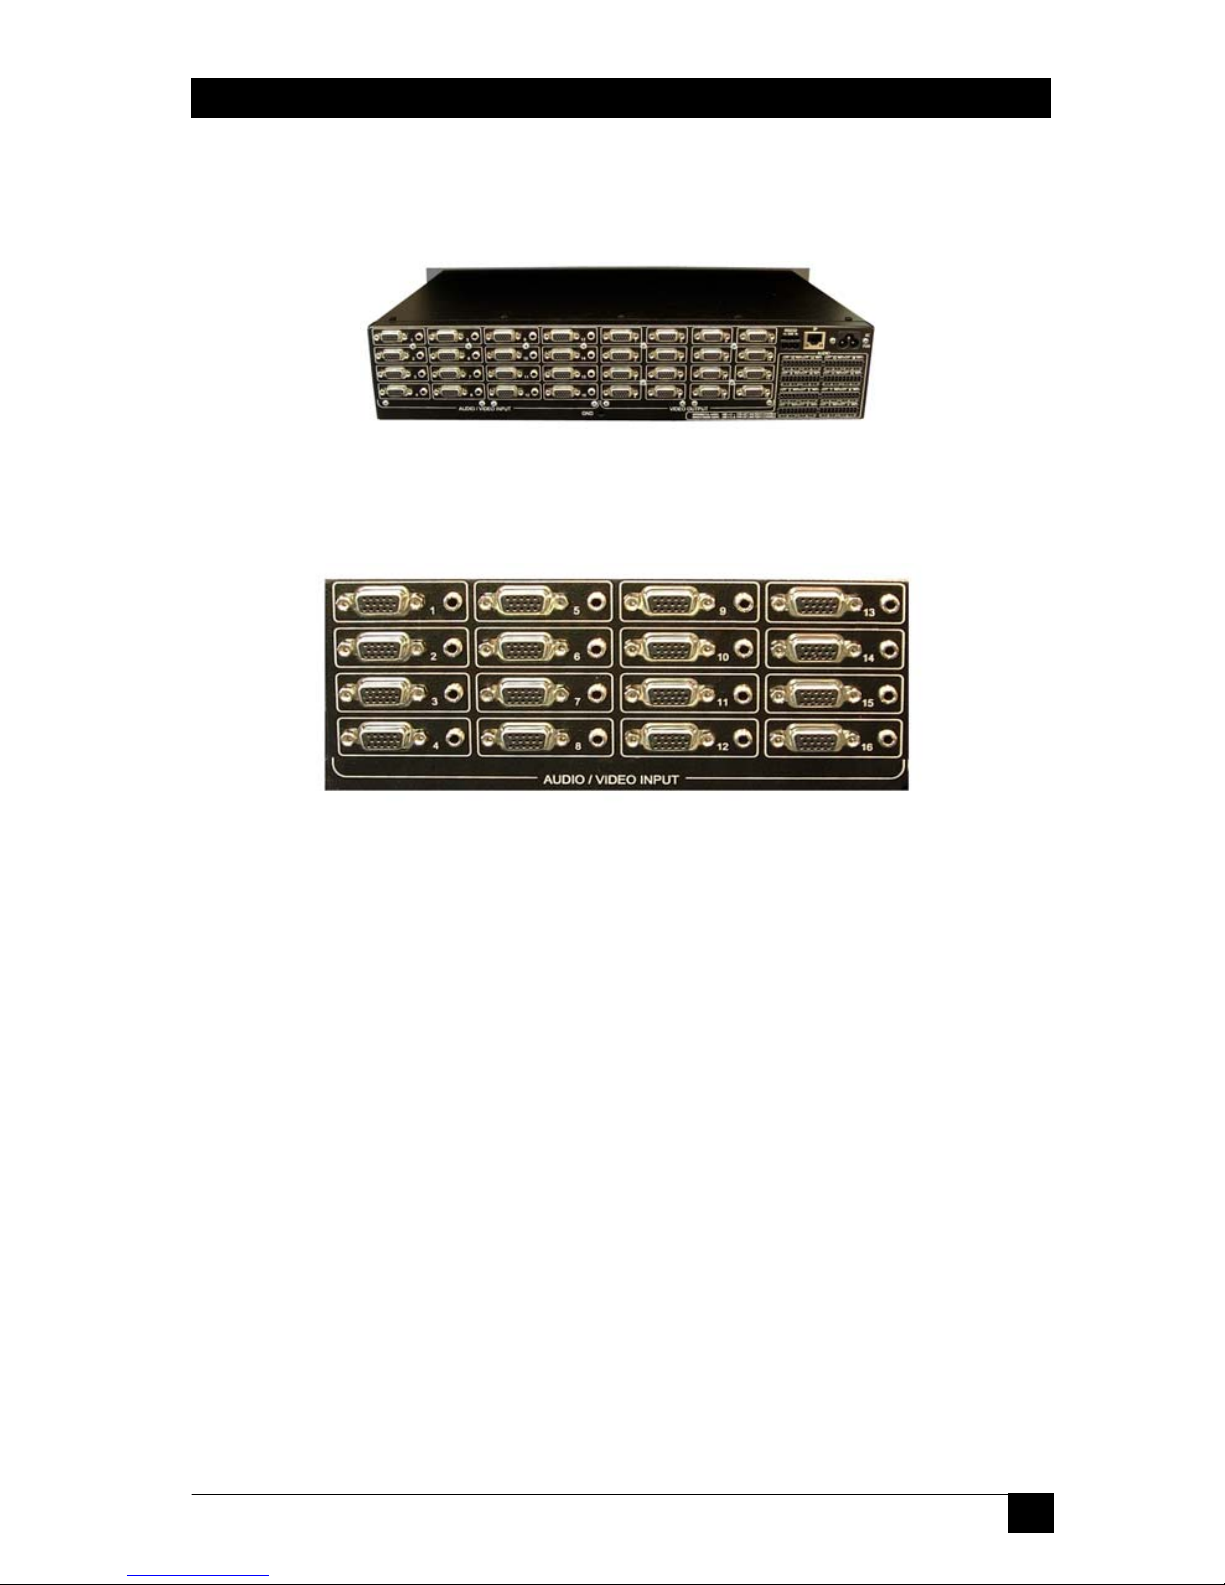
Figure 1 – Rear panel of AC1123A showing all the connections
2.1 Input Audio & Video Connections
Figure 2 - Audio and video inputs on AC1123A
The video connectors are HD15 female. These are compatible with PC’s VGA
video signal (RGBHV). The Matrix is also compatible with analog SD or HDTV
signals (YPbPr) with resolutions from 480i to 1080p. To connect these types of
signals to the Matrix, HD15 to 3-RCA cables may be required.
Technical Note about the Video Inputs
The HD15 inputs of the matrix handle only the color and sync signals. EDID
(extended display identification data) is absent. EDID is normally used by the
source PC to read pertinent information from the connected display. This
information includes a list of the resolutions that are supported by the LCD. If
EDID is not implemented, the source PC is unaware of the specific LCD
connected to it. Generally this is not a problem since in the absence of EDID,
most PC’s allow the user to select from a set of default resolutions for output.
Some PC’s may not output any video signal, or only allow limited resolution
settings with the absence of EDID . One way to resolve this is to change the
display settings of the PC to show all modes and not detect Plug and Play
LCD. The procedure for doing this varies depending on the operating system
and the video card in the PC. It is generally found under: Control Panel >
Display Settings > Advanced > Monitor tab. Alternatively a pass-through EDID
emulator can be used. This a piece of hardware that is sold separately.
Page 8
Model AC1120A, AC1121A, AC1122A, AC1123A
6
The audio input on the basic unit uses standard 3.5mm mini-stereo connectors. To
use these with PC audio, standard male-to-male audio extension cables would be
required. To connect from typical TV sources with separate right and left
connectors, 3.5mm male to 2 RCA cables would be needed.
Technical Note about the Audio Inputs
Since the audio inputs are unbalanced (single ended), the ground reference of
the source has to be the same as the matrix. Of course the cable connecting
the two is tying the grounds across but if there are currents flowing in the
ground it can create potential differences that would manifest as noise. The
quality of grounding at the audio source and the matrix are important. For
example if the input source is a desktop PC, as long as the PC is properly
grounded and the audio cable length is not excessive, you can expect good
results. On the other hand if the input is a notebook PC running on battery,
there is no ground reference at the source so it gets its reference through the
audio (and video) cable connection to the matrix. This should also be okay.
However if it is plugged in through its external power brick, noise can be
induced. This is because most notebook power supplies do not properly
provide an AC ground path to the system ground (some only have only 2 prong
AC cords). The switching power supply circuit will inject noise into the audio
lines. In this case the solution may be to attach a low resistance ground strap
to the notebook. The other option for eliminating the noise is to use a stereo
audio Balun (or isolator). The Balun essentially couples the audio through a
transformer so the audio grounds are isolated. Baluns can also cure noise
pickup in long cable runs.
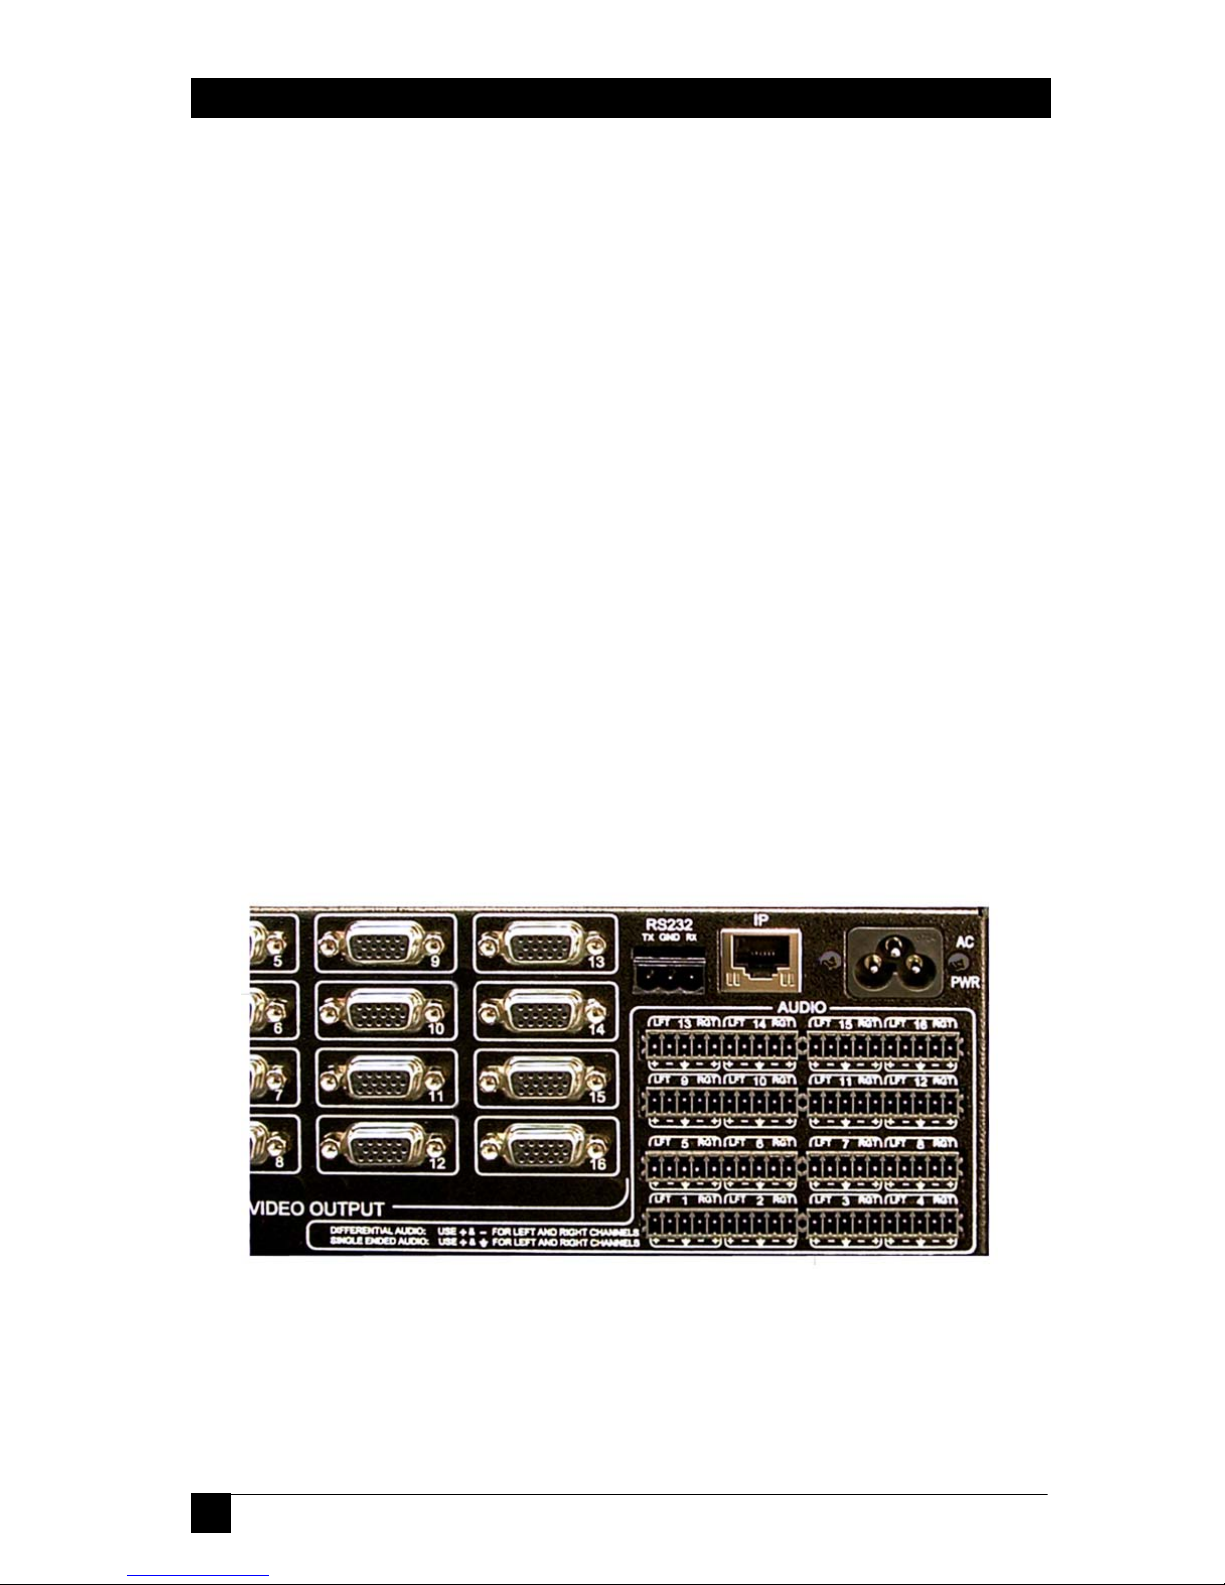
2.2 Output Audio & Video Connections
Figure 3 – Standard matrix audio and video outputs
The video output connectors are HD15 female. These are compatible with PC’s
VGA video signal (RGBHV). The Matrix is also compatible with YPbPr HDTV
signals with the use of HD15 to 3 RCA adapter cables.
Page 9

8x8 and 16x16 VGA / HDTV Matrix Switch with Audio, RS232 & IP Control
7
The audio outputs of the matrix are balanced. So a + and a – are provided for each
side. There is also a ground connection available. If you are going to connect the
matrix output to a single-ended audio device (one with RCA or phono
connectors), then use the + of the left, + of the right, and ground. On the other
hand, if you will be connecting the output to professional audio gear it is best to
use the differential + and – (balanced) outputs of each side that offer immunity to
noise.
Figure 4 – Typical balanced audio output connector
The balanced audio outputs are provided on detachable screw-terminals. Mating
connectors for all outputs are also provided.
2.3 Power input connection
The matrix has a built-in universal power supply. The AC input connector on the
rear of the matrix is an IEC320 / C6 and is always shipped with a North American
power cord (shown below). If you want to use the matrix in a country with
different plug type, you should purchase your own cable or adapter. The Matrix
supports both 110 V, 60 Hz and 220 V, 50 Hz power systems. There is a power
on indicator light on the front panel
Figure 5 – End of IEC320 / C6 power cord
2.4 Control Inputs
The matrix can be controlled from either RS-232 or through IP.
2.4.1 Matrix with RS-232 Control (no IP)
The AC1120A and AC1122A (without IP feature) actually have 2 separate and
independent RS-232 control ports.
Page 10

Model AC1120A, AC1121A, AC1122A, AC1123A
8
The main RS-232 port is on a screw terminal and the auxiliary port is on an RJ45.
Caution on RJ45 Control Input
Since the matrices with the IP control and those without both have an
RJ45 connector next to the RS-232 screw terminal, it is easy to
confuse their function. The function of the connector should be labeled
above it. A sure way to tell if the RJ45 control input is LAN or Serial is
by the existence of little LED indicators to the sides of the connector. If
the connector has these lights, then it is a LAN connection, otherwise it
is an RS-232 serial connection.
Figure 6 – IP input versus Auxiliary RS-232
2.4.1.1 Primary RS-232 Control Port
This is a 3-terminal captive screw input. A detachable mating connector is
provided. The function of each pin is designated on the panel above the
connector. Below is a diagram for connection this port to a PC’s DB9 serial port.
Figure 7 – Primary RS-232 to PC cable
2.4.1.2 Auxiliary RS-232 Control Port
The matrix switches without IP control have a secondary serial port that can work
independently of the primary port. The user can control the matrix from either or
both ports.
The auxiliary RS-232 is on an RJ45. Make sure to not connect this to any LAN
devices. The pinout for the auxiliary RS-232 follows the basic EIA-561 for TX
RX and Ground. Optional current limited 12v DC may also be provided (max
rated output current of 50ma) that can be used to power external keypads or
control devices.
Caution High-Voltage
Never open the unit’s cover. Lethal voltages exists inside the unit
Opening the unit also voids the warranty on the unit.
The pinout is shown below.
Page 11

8x8 and 16x16 VGA / HDTV Matrix Switch with Audio, RS232 & IP Control
9
Figure 8 – Aux RS-232 port pinout
2.4.2 Units with IP control
Models AC1121A and AC1123A are equipped with 10/100 base-T Ethernet
connection and can be controlled via IP. They also have the primary RS-232 serial
control port on the screw terminal input. The command set for controlling the
matrix via the IP port is exactly the same as the RS-232 port. The basic method of
control is via Telnet. Please see section 3.2.12 IP Control Basics for details.
3.0 Operation
The Matrices can be operated using the front panel buttons, by serial commands
via RS232, or through the IP port.
3.1 Front-Panel Buttons and Indicators
An image of the front panel for the 8x8 matrix is shown below. The 16x16 units
have more INPUT and OUTPUT buttons than shown in this picture.
Figure 9 –AC1120A front panel controls & indicators
The front panel can be used for the following purposes:
• Monitor Power On/Off status
• View current routings (ties) either from input or from output
• Make new ties either from input or from output
• Blank or mute a particular or all outputs
• Recall preset patterns
• Save preset patterns
• Disconnect all ties
• Display current sound level as a digital light bar VU meter
• Recall factory presets
Page 12

Model AC1120A, AC1121A, AC1122A, AC1123A
10
All of the front panel switches have built-in LEDs that help in the operation. The
functions of front panel are carefully designed for intuitiveness. With just a little
practice, one can learn to quickly monitor and control the matrix.
3.1.1 Viewing Audio and Video Routings or “Ties”
There are three different ways to view a tie: Video & Audio, Video only, or
Audio only. The point of view can also be either from input side (where the
selected input is routed to), or from the output side (see which input is feeding the
selected output). You can also use the ▲ and ▼ buttons to quickly go through
and check status of all channels. Furthermore, during viewing of ties you can
make new ties.
3.1.1.1 Viewing ties by Video and Audio
Press and release both VID and AUD buttons so that the LEDs of the VID and
AUD buttons are lit, which indicates that you are going to view both together.
At this point you have to decide if you want to view from the point of view of the
input or the output side.
… To View from input side
Press and release any Input button, the backlit LED of that button will light, and
all the backlit LEDs for the outputs whose video and audio are both
currently tied
to this input will also light up solid.
Note
If there is audio breakaway, the output LED will not be lit. An example may be
that output #2 video is tied to input #7 while output #2 audio is tied to input 12.
In this case if you start the viewing from input #7, output #2 will not be lit even
though input 7 video is routed to it. To see video ties independently from audio
ties, only the Video or the Audio LED on the front panel should be lit, not both.
You can now use the ▲ and ▼ buttons to quickly go through all inputs.
You can also make new ties by hitting output buttons. New ties will not take
effect unless ENTER is hit (see next section).
When you are done viewing ties, to exit you can hit ENTER. If you don’t hit any
buttons, then after 8 sec the view function times out and all the input and output
LEDs will go out.
… To View from output side
Page 13

8x8 and 16x16 VGA / HDTV Matrix Switch with Audio, RS232 & IP Control
11
Press and release any output button, the backlit LED of that button will light, and
if that output’s video and audio are tied to one particular input, that input LED
will also light.
Note: If there is audio breakaway, the input LED will not be lit
You can now use the ▲ and ▼ buttons to quickly go through all outputs.
You can also make new ties by hitting another input button. New ties will not take
effect unless ENTER is hit (see next section).
When you are done viewing ties, to exit you can hit ENTER. If you don’t hit any
buttons, then after 8 sec the view function times out and all the input and output
LEDs will go out.
3.1.1.2 Viewing ties by Video only
Press and release the AUD and/or VID buttons so that the backlit LED of the VID
button is lit and the AUD button is off
At this point you have to decide if you want to view from the point of view of the
input side or the output side.
… To View from input side
Press and release any Input button, the backlit LED of that button will light, and
all the backlit LEDs for the outputs whose video is currently tied to this input will
also light up solid.
You can now use the ▲ and ▼ buttons to quickly go through all inputs.
You can also make new ties by hitting output buttons. New ties will not take
effect unless ENTER is hit (see next section).
When you are done viewing ties, to exit you can hit ENTER. If you don’t hit any
buttons, then after 8 sec the view function times out and all the input and output
LEDs will go out.
… To View from output side
Press and release any output button, the backlit LED of that button will light, and
if that output’s video is tied to any input, that input LED will also light.
You can now use the ▲ and ▼ buttons to quickly go through all outputs.
You can also make new ties by hitting another input button. New ties will not take
effect unless ENTER is hit (see next section).
Page 14

Model AC1120A, AC1121A, AC1122A, AC1123A
12
When you are done viewing ties, to exit you can hit ENTER. If you don’t hit any
buttons, then after 8 sec the view function times out and all the input and output
LEDs will go out.
3.1.1.3 Viewing ties by Audio only
Press and release the AUD and/or VID buttons so that the backlit LED of the
AUD button is lit and the VID button is off
At this point you have to decide if you want to view from the point of view of the
input side or the output side.
… To View from input side
Press and release any Input button, the backlit LED of that button will light, and
all the backlit LEDs for the outputs whose audio is currently tied to this input will
also light up solid.
You can now use the ▲ and ▼ buttons to quickly go through all inputs.
You can also make new ties by hitting output buttons. New ties will not take
effect unless ENTER is hit (see next section).
When you are done viewing ties, to exit you can hit ENTER. If you don’t hit any
buttons, then after 8 sec the view function times out and all the input and output
LEDs will go out.
… To View from output side
Press and release any output button, the backlit LED of that button will light, and
if that output’s audio is tied to any input, that input LED will also light.
You can now use the ▲ and ▼ buttons to quickly go through all outputs.
You can also make new ties by hitting another input button. New ties will not take
effect unless ENTER is hit (see next section).
When you are done viewing ties, to exit you can hit ENTER. If you don’t hit any
buttons, then after 8 sec the view function times out and all the input and output
LEDs will go out.
3.1.2 Making Audio and Video Routings or “Ties”
This procedure is an extension of “Viewing Ties” described in above paragraphs.
3.1.2.1 Making a tie by Input
Video and Audio to follow each other
Make sure both VID and AUD LEDs are lit, indicating that your changes will be
synchronized (audio and video are together). Video and audio will be routed to
the same input channel.
Page 15

8x8 and 16x16 VGA / HDTV Matrix Switch with Audio, RS232 & IP Control
13
Press and release any Input button, the backlit LED of that button will light, and
all the backlit LEDs for the outputs tied to it will light up solid. At this point,
pressing any output buttons will be breaking or making connections.
To disconnect a tie, press the lit output button once. To make new ties, press any
of the unlit output buttons. The output LED will be blinking to indicate a pending
change of state. If you change your mind simply press the blinking output LED
again and it will go back to its previous state.
When you are done, press ENTER to save new changes. If you wait too long (8
seconds of inactivity) your changes will be lost and all the input and output LEDs
will go out.
Video only or Audio only
Press and release the AUD and/or VID buttons so that the backlit LED of the
desired button is lit and the other one is off.
Follow the same procedure as described above
3.1.2.2 Making a tie by Output
Video and Audio to follow each other
Make sure both VID and AUD LEDs are lit, indicating that your changes will be
synchronized (i.e. audio and video are from the same input).
Press and release any Output button, the backlit LED of that button will light,
and all the backlit LEDs for the input tied to it will light up solid. At this point,
pressing any output buttons will be breaking or making connections.
To disconnect a tie, press the lit input button once. To make a new tie, press any
of the unlit input buttons. The new input LED will be blinking to indicate a
pending change of state. If you change your mind simply press the blinking input
LED again and it will go back to its previous state.
When you are done, press ENTER to execute and save the changed route. If you
wait too long (8 seconds of inactivity) your changes will be lost and all the input
and output LEDs will go out.
Video only or Audio only
Press and release the AUD and/or VID buttons so that the backlit LED of the
desired button is lit and the other one is off. Follow the same procedure as
described above.
Page 16

Model AC1120A, AC1121A, AC1122A, AC1123A
14
3.1.3 Recalling Presets (routing patterns)
The number of presets accessible from front panel is the same as # of inputs
(however through the IP or Serial port, the unit can store and recall up to 16
presets even for an 8 input Model)
Press and release the Preset button. The button will light up solid. Then press and
release the input button (it will light up) and hit ENTER. You have 8 seconds to
hit ENTER or the action will be cancelled. This will recall the desired preset tie
pattern.
Note that a recalled preset replaces the current tie configuration, which will be
lost unless it has been stored as another preset.
3.1.4 Saving Presets (routing patterns)
The current tie configuration can be saved as a preset to be called up later on.
To save the current AV routing pattern, press and hold the PRESET button for 3
sec, the backlit LED will start flashing (this means that save preset function has
been activated). Press the desired input button to save the preset (the button with
light up). Then hit the ENTER button to complete the operation. Again, you have
8 seconds to complete this sequence.
3.1.5 Disconnecting all AV outputs (blank preset)
There is a hidden blank preset (think of it as Preset #0) in the system that can be
very useful in clearing all ties. A blank preset is a preset without any ties selected
in it. To Recall a blank preset, press and release the Preset button, press and hold
the ARROW UP (▲) button, and simultaneously press the ARROW DOWN (▼)
button. This will clear all ties. From here, the user can make new ties or save the
blank tie over a preset that had ties in it which effectively erases that preset.
3.1.6 To reset system to factory defaults
Disconnect the AC power from the unit. Press and hold the ENTER button on the
front panel while plugging in AC power. Continue to hold the ENTER button
until all LEDs on the front panel flash on. System reset clears all ties, presets,
schedule settings, and unit name.
3.1.7 Using the Front Panel VU meter
This function is useful for ensuring no noticeable volume difference among the
audio sources for models AC1121A and AC1123A.
Press and hold the AUD button for approximately 3 seconds until the backlit LED
starts to blink. Press and release an input button whose audio you want to adjust.
Page 17
8x8 and 16x16 VGA / HDTV Matrix Switch with Audio, RS232 & IP Control
15
The associated input LED lights up, the matrix will temporarily route the audio
input from the selected channel to audio output #1 and monitor its level on the
front panel. Any other outputs tied to this selected input channel stay connected
during this adjustment procedure.
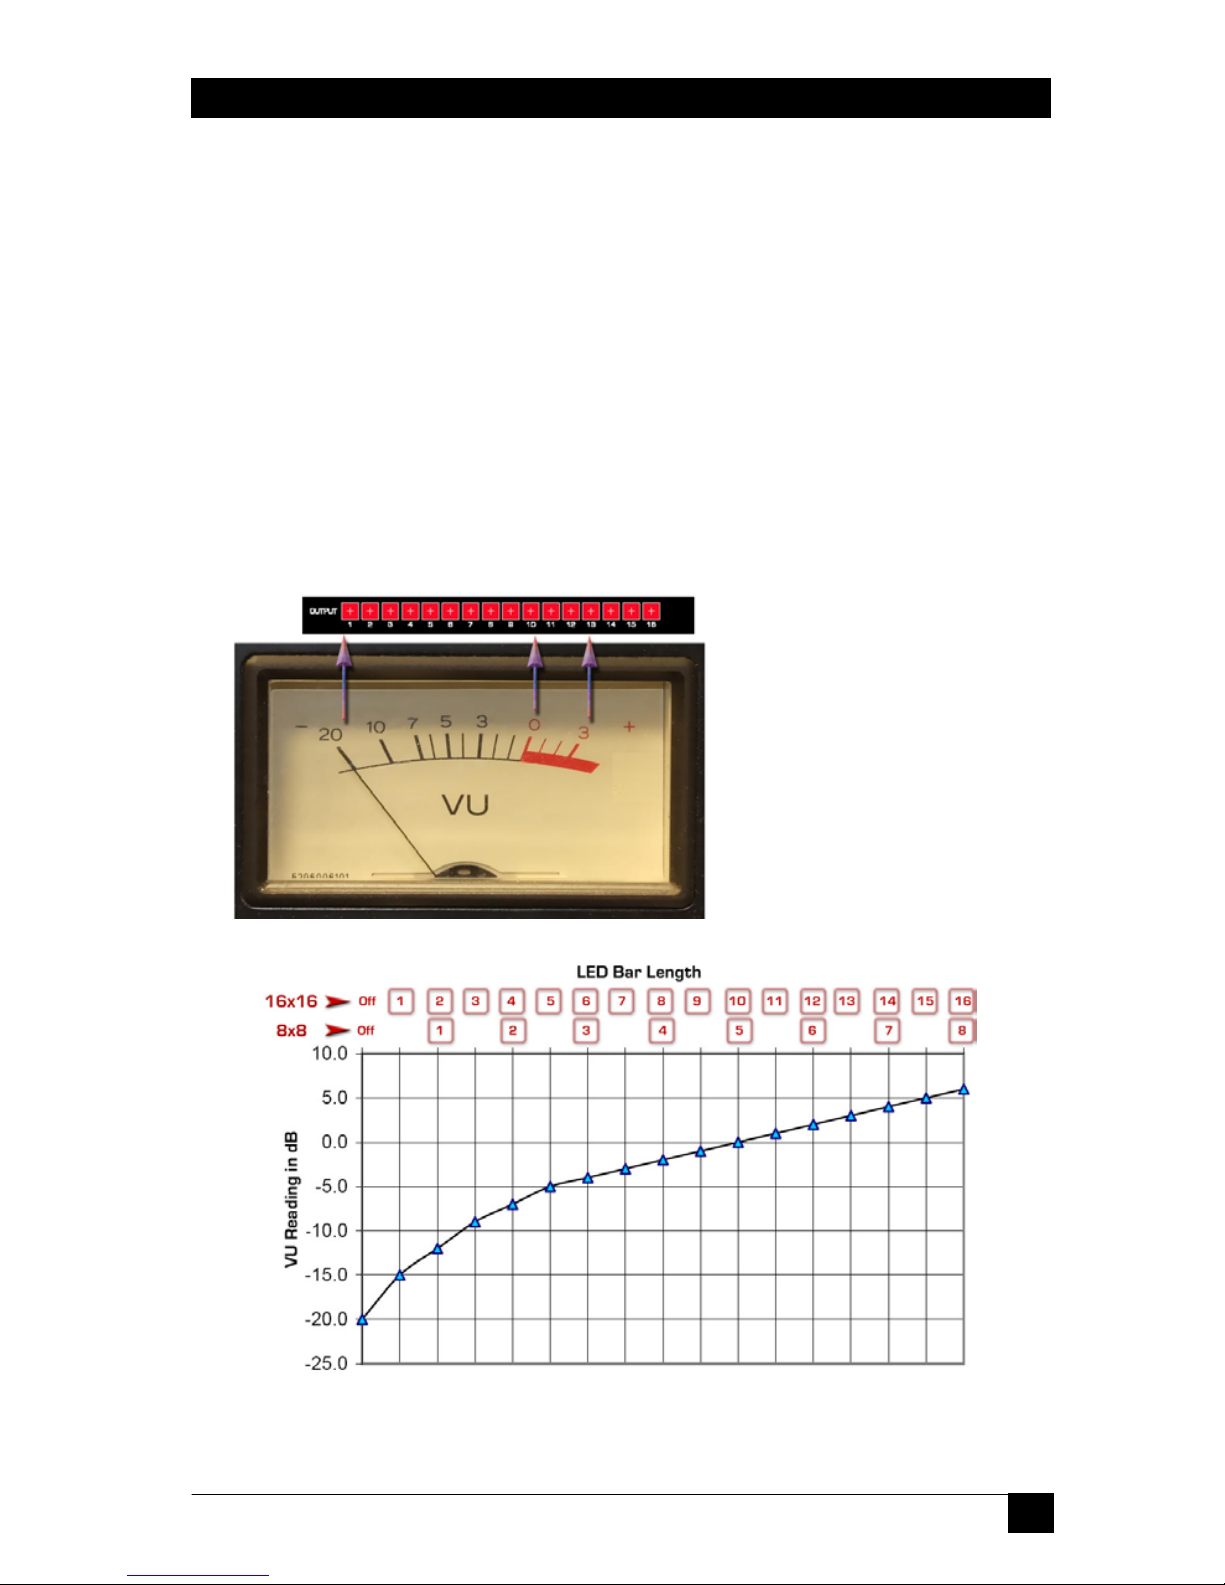
The installer can connect an external VU meter to output #1 or rely on the front
panel (bottom row of lights) that act as a digital VU meter.
Notes about VU Meter Function
The front panel VU meter function is available on both the 16x16 and the 8x8
units with audio. However, the matrices do not change the volume level. The
user can do that at the source and use the matrix to monitor the level. The bar
indicator is for the left input (tip on mini-phono input) channel only. So when
adjusting a stereo level make sure the left and right audio inputs are balanced
The bottom row of 8 or 16 LEDs indicate the sound level. Position 10 (or 5 for
8x8 matrix) is used to correspond to 0 VU (desired peak level).
Figure 11 – Graph of VU dB level versus LED bar length
Figure 10 –Comparison
with Analog VU meter on
16x16 Matrix
Page 18

Model AC1120A, AC1121A, AC1122A, AC1123A
16
3.2 Control Commands (RS-232 and IP)
The matrices can be controlled via an external control system by using RS-232.
Additionally, Models AC1121A and AC1123A can be controlled through an IP
port. Any program capable of standard serial communication in ASCII format is
capable of working with the matrices. Most PCs with Microsoft Windows
operating systems have HyperTerminal™ pre installed with this capability. There
are also many free Terminal Emulator and Telnet software programs available for
download on the internet.
Note on RS-232 port availability on your PC
Most PCs and notebooks do not have a serial port. So to program the
Matrix Switch you may need a USB to RS-232 Serial converter. These
are available from Black Box (Model IC199A-R3).
Figure 12 – USB to RS-232 Adapter
Use Figure 8 to connect the unit to the PC’s serial port. Use 9600 Baud, 8 bits, No
Parity, 1 Stop bit, No flow control.
Upon power up, the matrix will output a screen similar to the figure below
through its serial port(s).
Unit's name:
Version 2.3
Build # 7
BBox-I-A-8-8
Figure 13 – Power on screen
Note on RS-232 commands
When the front panel is in use (for example to make new ties or recall presets,
etc), only status request commands are accepted. Any other command will be
prompted with the following response:
Front panel is in use<cr>
Fortunately, all front panel operations have a timeout function so even if a user
started to use the panel but forgot to finish the process, it will time out in a few
seconds and full serial port functionality will be restored.
Page 19

8x8 and 16x16 VGA / HDTV Matrix Switch with Audio, RS232 & IP Control
17
3.2.1 Naming Functions
The matrix unit can be named. Its name can be up to 10 characters long.
To assign or retrieve a unit name:
Command: NU<cr> stands for Name Unit
Response:
xxxxxxxxxx (current name)
Rename unit: ___________
No change<cr>
If you hit <cr> or wait 5 seconds (command times out) the unit will respond with:
Cancelled<cr>
Otherwise you have 5 seconds to change the name by entering up to 10 ASCII
characters followed by <cr>. If you just send a <cr> then the stored name will not
be changed. If you enter more than 10 characters, then the 1
st
10 characters will
be saved as the name and the rest discarded.
3.2.2 Routing Functions
Video routing commands are specified from the point of view of the output. The
wildcard character ‘*’ is acceptable for output (but not input).
In addition, these commands can be used to monitor or query the status of system
ties. Omitting the input channel will result in a response of the current routing for
that output. In entering channel numbers leading zeros are acceptable hence you
can specify channel 7 as 07 or just 7.
3.2.2.1 To make a video tie:
Command: CVn,m<cr> stands for Connect Video n = output, m= input (unit
accepts leading zeros and spaces are ignored)
Response: CVn,m<cr>
If you enter CVn<cr> then you will get the response as above for the n output
3.2.2.2 To make an audio tie:
Command: CAn,m<cr> stands for Connect Audio n = output, m= input (unit
accepts leading zeros and spaces are ignored)
Response: CAn,m<cr>
3.2.2.3 To make a synchronized audio/video tie:
Command: COn,m<cr> stands for Connect Output n = output, m= input (unit
accepts leading zeros and spaces are ignored)
Page 20

Model AC1120A, AC1121A, AC1122A, AC1123A
18
Response:
CAn,m<cr>
CVn,m<cr>
Note: If the system does not have audio, it will still accept this command but
response will be missing audio tie line.
3.2.3 Preset Pattern Saving and Routing Functions
3.2.3.1 To recall a saved preset Video routing pattern:
Command: PRx<cr> stands for Preset Recall
x = preset # can be 1 to 16
Response:
PRx<cr>
CVn
1,m1
<cr>
CVn
2,m2
<cr>
3.2.3.2 To save the current Video routing pattern to a preset:
Command: PSx<cr> stands for Preset Save
x = preset # can be 1 to 16 (unit should accept leading zero)
Response:
PSx<cr>
3.2.4 Restoring Factory Defaults
To restore factory defaults:
Command: FR<cr> stands for Factory Restore
Response: Are you sure (Y,N)?<cr>
Note: You have 5 seconds to press Y, or the command is cancelled.
Factory defaults restored<cr> if the “Y” was entered.
Cancelled<cr> if other key was entered or command times out.
Note: Restore Factory command will clear all ties, presets, schedule settings, and
unit name. All LEDs on the front panel should flash when units executes factory
defaults command.
3.2.5 Rebooting the System
To perform a system reset/reboot (same effect as cycling AC power):
Command: FB<cr> stands for Firmware Boot
Response:
Are you sure (Y,N)?<cr>
Note: You have 5 seconds to press Y, or the command is cancelled.
Page 21

8x8 and 16x16 VGA / HDTV Matrix Switch with Audio, RS232 & IP Control
19
3.2.6 To Read Audio Volume Units (VU) of output #1
This command returns the height of hypothetical bar LED indicator having a
height of 16 segments. It will return a number from 0 to 16 with 10 being 0 db
level. So if the output #1 is at 0 dB (900 mv p-p sinewave) it returns 10. See
figure 11 for 16x16 row. This value is 0-16 regardless of the type of matrix.
Command: RB<cr> stands for Read Bar
Response: 0 ~ 16<cr>
3.2.7 To Read Temperature inside the Matrix
Command: RT<cr> stands for Read Temperature
Response:
Temperature in degrees C = 32.500000<cr>
Temperature in degrees F = 90.500000<cr>
3.2.8 To Read the Firmware Version
Command: RI<cr> stands for Read Identity
Response:
Unit's name: ← User defined name of the unit
Version 2.3 ← Firmware Version
Build # 7 ← Build number (for mfg purposes only)
BBox-I-A-8-8 ← Characteristics of the unit
3.2.9 To Read Supply Voltages
The supply voltages consist of clock battery voltage, 5V supply, and 12V supply.
Command: RV<cr> stands for Read Voltages
Response:
RTC Battery Voltage = 2.9876704
+5V Supply = 4.9473252
+12V Supply = 12.4646893
3.2.10 Real Time Clock Functions
3.2.10.1 To set date & time:
Command: DS<cr> stands for Date Set
Response:
Friday 04/18/08 12:27:15pm
Enter the year (00-99):
Hit Enter if you want to keep previous value; hit Esc to exit
Enter the month (01-12):
Enter the date (01-31):
Enter the day of the week (1=Sun – 7=Sat):
Enter the hour (1-12):
Enter the minute (00-59):
Page 22
Model AC1120A, AC1121A, AC1122A, AC1123A
20
Enter the second (00-59):
Enter AM/PM (0-1):
Notes: You have 16 seconds to make your selection, or the command is cancelled. To skip
the current prompt without making a change, press ENTER.
Invalid entry<cr>
Cancelled <cr> if invalid value was entered.
Cancelled <cr> if ESC was entered.
3.2.11 Scheduling Auto recall of Preset Patterns
The matrix provides up to 4 specific times throughout the day where any preset
patterns (0 to 16) can be recalled. You can set a schedule that is the same every
day (daily) or is different for weekdays and weekends. Presets 1 to 16 are those
saved by the user, and preset 0 disconnects all video and audio outputs
Notes on Scheduling Presets
When defining a schedule, to skip the current prompt without making a change,
press ENTER. Press ESC to exit the schedule setting at any time. Timer values
should be entered in the proper order meaning that Timer1 should occur prior to
Timer2, Timer2 should occur prior to Timer3, and etc. Timers will be disabled if
hour, minute, and AM/PM are set to 0. So if for example, your schedule only has
to set the pattern once in the morning, leave the data for timers 2 through 4 at
zero and only enter values for timer 1. If Timer values are not set properly (in
ascending order), an error message will be prompted
3.2.11.1 To set a schedule
Command: SS<cr> stands for Schedule Set (current schedule is displayed)
Response:
------------------ Weekday ------------------ (on/off)
Timer1 = 06:00am Preset Pattern = 1
Timer2 = 12:05pm Preset Pattern = 3
Timer3 = 05:30pm Preset Pattern = 7
Timer4 = 09:00pm Preset Pattern = 12
------------------ Weekend ------------------ (on/off).
Timer1 = 02:00am Preset Pattern = 1
Timer2 = 06:00am Preset Pattern = 5
Timer3 = 12:00pm Preset Pattern = 13
Timer4 = 06:00pm Preset Pattern = 16
Select Schedule Setting
1 = Weekday
2 = Weekend
3 = Daily
(on/off) indicates if
the Schedule is ineffect or not.
Weekday and
weekend are both
on or both off.
If the 4 timers are
not in ascending
order, the unit
does not let you
turn the schedule
on; fix any
inconsistencies
before turning on.
00:00am is not a
valid time setting
and is used to turn
off a timer
Page 23

8x8 and 16x16 VGA / HDTV Matrix Switch with Audio, RS232 & IP Control
21
4 = Schedule On
5 = Schedule Off
ESC = Quit
Note: You have 16 seconds to make your selection, or the command is cancelled.
Response: if “1”, “2” or “3” was entered
Enter weekday Timer1 hour (00-12): Hit Enter if you want to keep previous value
Enter weekday Timer1 minute (00-59):
Enter weekday Timer1 AM/PM (0-1):
Enter weekday Timer1 preset pattern (0-16):
Remember Preset 0 disconnects outputs
.
…… (data for timers 2 & 3, hit Esc if you are done at any time)
.
Enter weekday Timer4 hour (00-12):
Enter weekday Timer4 minute (00-59):
Enter weekday Timer4 AM/PM (0-1):
Enter weekday Timer4 preset pattern (0-16):
Response: if “4” was entered (schedule on).
Schedule setting is ON<cr>
- - - - - Alternate Response: In case of an inconsistency or error in entry
Schedule setting cannot be ON because weekday (weekend) TimerX is less than
or equal to TimerY<cr>
Response: if “5” was entered (schedule off).
Schedule setting is OFF<cr>.
Response:
if “ESC” was entered (Quit).
Quit schedule setting<cr>.
Page 24
Model AC1120A, AC1121A, AC1122A, AC1123A
22
Matrix
Command
Processing
Port 23
IP Setup
Serial
Control
IP
Control
RS-232
Port
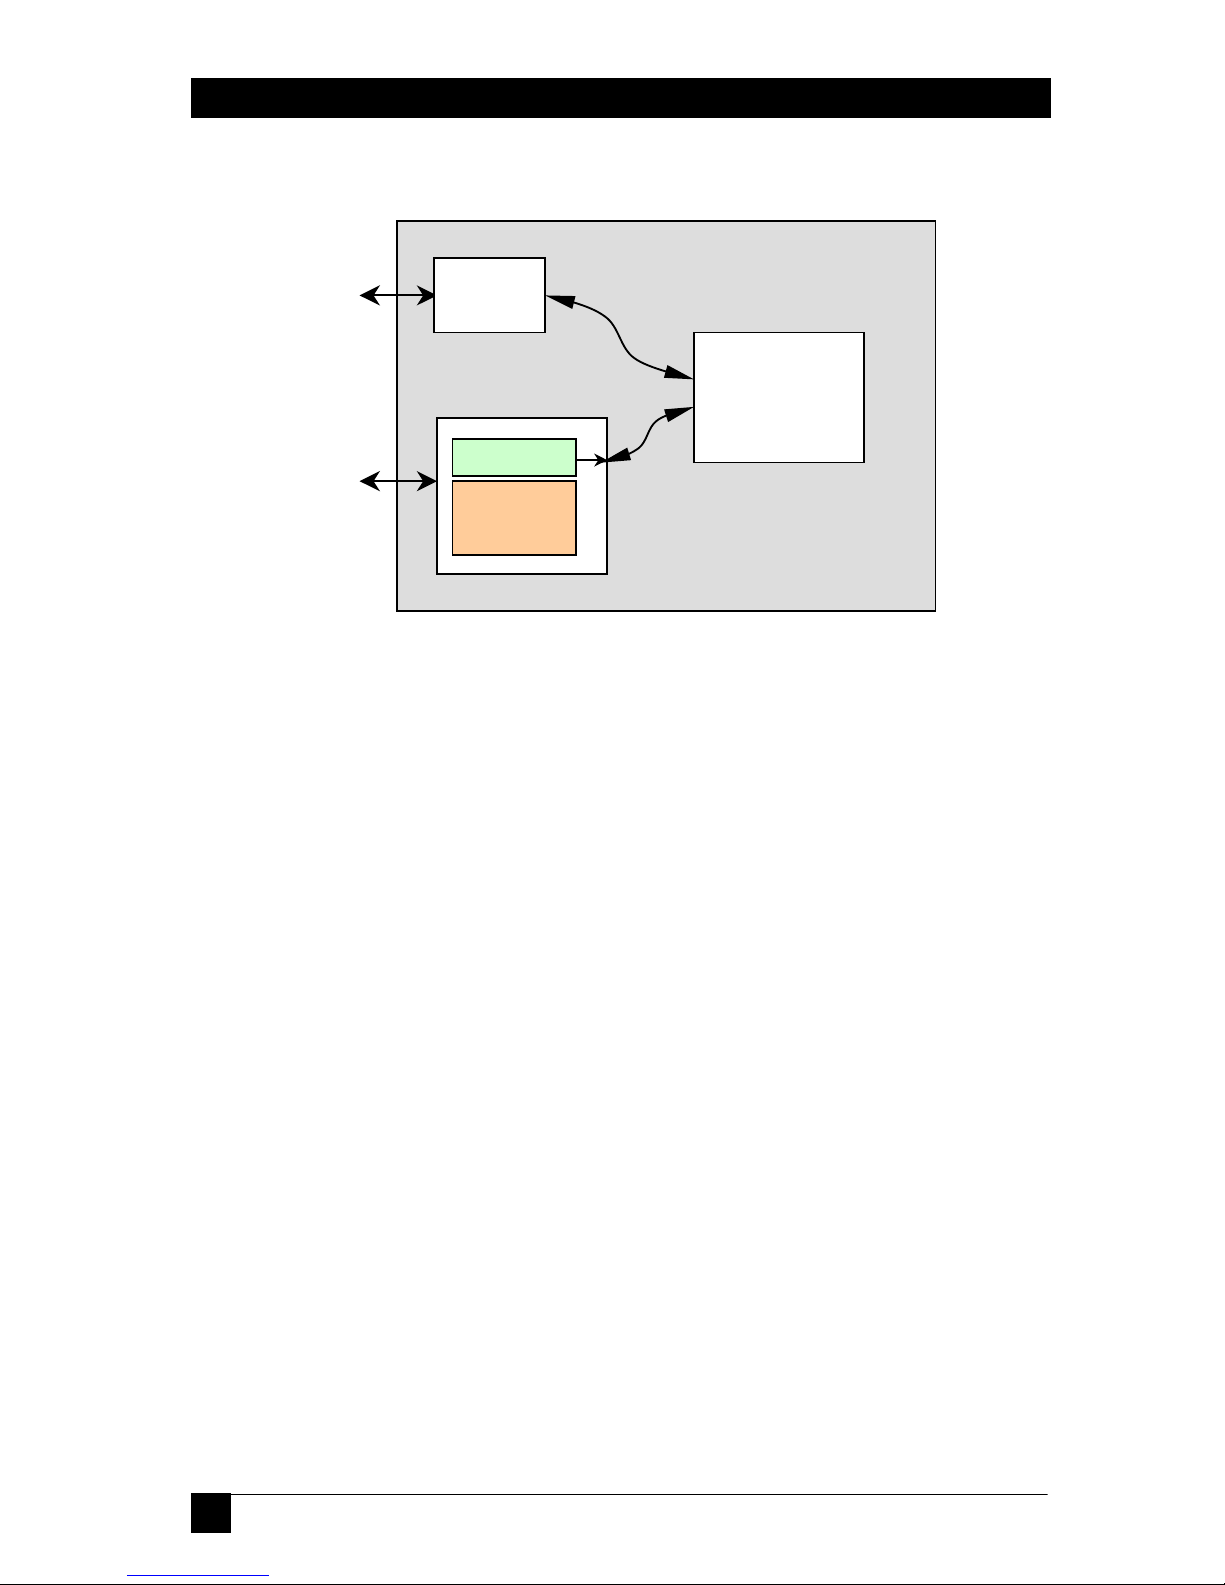
3.2.12 IP Control Basics
Figure 14 – Control Block Diagram
As shown in the figure above, the matrix can be controlled via RS232 Serial port
or through an IP (Ethernet) port if equipped. If the unit is missing the IP port, then
in its place, there is an auxiliary 2
nd
serial control port (see section 2.4.1).
The IP port of the matrix can be accessed via Telnet (interactive TCP connection).
Two ports are available, one for controlling the matrix and the other to configure
the IP parameters.
Though not recommended, using port 23 you can change the Ethernet interface’s
IP parameters such as IP address, gateway, port number, etc. The IP settings can
also be accessed through the unit’s RS232 serial port (recommended).
Port 1001 by default is used to control the matrix (this port number can be
changed as part of the IP Settings). The commands used to control the matrix are
the same as those through the RS-232 Serial port.
3.2.12.1 IP Setup Commands using the RS-232 Serial Port
IP interface on the matrix has a unique MAC-address, and it must be assigned a
valid IP-address to function properly on the network. As shipped from factory this
IP is 192.168.123.180
1. To get into the IP setting mode:
Note: Inactivity period of 16 seconds causes the system to exit this mode. You can also hit
ESC to end the IP setting mode.
Command: IP <cr> stands for IP setting mode
Response:
Enter IP commands:
Page 25

8x8 and 16x16 VGA / HDTV Matrix Switch with Audio, RS232 & IP Control
23
This is the normal response meaning that IP setting through the RS-232 port is
allowed
- - - - - Alternate Response - - - - -
IP commands not enabled. Please refer to the manual
This message indicates that IP setting through the RS-232 port is disabled on
your unit for some reason. Please refer to section 3.2.12.2 below to enable this
mode
2. To get the current IP address of the matrix box:
Command: GIP <cr> stands for Get IP address.
Response:
192.168.123.180
3. To set a new IP address:
Command: SIP192.168.123.179 <cr> stands for Set IP address.
Response:
OK .................................................. if command completed successfully.
Error........................................................................... if command failed.
4. To get the current gateway IP address:
Command: GGI <cr> stands for Get Gateway IP address.
Response:
192.168.123.122
5. To set a new gateway IP address:
Command: SGI192.168.123.125 <cr> stands for Set Gateway IP address.
Response:
OK .................................................. if command completed successfully.
Error........................................................................... if command failed.
6. To get the current subnet mask:
Command: GNM <cr> stands for Get Net Mask.
Response:
255.255.255.0
7. To set a subnet mask:
Command: SNM255.255.255.0 <cr> stands for Set Net Mask.
Response:
OK .................................................. if command completed successfully.
Error........................................................................... if command failed.
8. To get the current port number (this is the port to access the matrix):
Command: GPN <cr> stands for Get Port Number.
Response:
1001
Page 26

Model AC1120A, AC1121A, AC1122A, AC1123A
24
9. To set a port number (IP port that controls the Matrix):
Command: SPN1000 <cr> stands for Set Port Number.
Response:
OK .................................................. if command completed successfully.
Error........................................................................... if command failed.
10. To get a device/host name:
Command: GDN <cr> stands for Get Device Name.
Response:
BB1123-A
Note on Device Name
This is the host name assigned to the IP port; it is independent of the
name assigned to the matrix (NU command), though you can use the
same name if you wish!
11. To set a device name:
Command: SDNnew_name <cr> stands for Set Device Name.
Response:
OK .................................................. if command completed successfully.
Error........................................................................... if command failed.
12. To reboot the system for the changes to take effect:
If you change the IP address, Subnet mask, etc., the changes do not take effect
unless you reboot the unit. You can do this by unplugging the AC from the unit
and reconnecting it in a few seconds, or by using the FB command discussed
earlier. However you must first exit the IP setup mode by hitting Esc,
Page 27

8x8 and 16x16 VGA / HDTV Matrix Switch with Audio, RS232 & IP Control
25
3.2.12.2 IP Configuration through port 23
If you were unable to enter the IP setting mode through the serial command, a
Telnet TCP programming method can be used to turn on RS-232 serial mode
programming, or even to configure the network settings directly through port 23.
To open a Telnet section, a command prompt (Run: CMD) or a HyperTerminal
window can be used:
For example, to run a HyperTerminal window, set it up for TCP/IP connection on
PORT 23 along with the Matrix’s default IP address as the host address.
Telnet commands and replies have the following format:
STX Command/reply CR
• STX character (ASCII code 2 or CTRL-B from the keyboard)
The unit will respond with <CTRL-B> A for most valid commands.
1. To use the IP configuration Telnet commands, you must first log in using the
(L) command.
Command: <CTRL-B> L <CR> stands for Log in
2. To enable a serial IP setting (serial programming) mode, type the following
commands:
Command: <CTRL-B> SSE2 <CR> Stands for Set Serial Enable
Command: <CTRL-B> SEC6 <CR> Stands for Serial Enable Char
Command: <CTRL-B> O <CR> stands for log out
Reboot the system by cycling power. Now you should be able to configure IP
parameters through the IP port.
Alternatively instead of rebooting the system you could use <CTRL-B> <E>
<CR> to reboot the IP port, this may cause a momentary loss of Telnet
connection.
3. To get the current IP address:
Command: <CTRL-B> GIP <CR>
Response: <CTRL-B> A 192.168.123.180 <CR>
4. To set a new IP address:
Command: <CTRL-B> SIP192.168.123.179 <CR>
5. To get the current gateway IP address:
Command: <CTRL-B> GGI <CR>
Response: <CTRL-B> A 192.168.123.122 <CR>
6. To set a new gateway IP address:
Command: <CTRL-B> GGI192.168.123.125 <CR>
Page 28

Model AC1120A, AC1121A, AC1122A, AC1123A
26
7. To get the current subnet mask:
Command: <CTRL-B> GNM <CR>
Response: <CTRL-B> A 255.255.255.0 <CR>
8. To set a subnet mask:
Command: <CTRL-B> SNM255.255.255.0 <CR>
9. To get a port number:
Command: <CTRL-B> GPN <CR>
Response: <CTRL-B> A 1001 <CR>
10. To set a port number:
Command: <CTRL-B> SPN1000 <CR>
11. To get the current device name:
Command: <CTRL-B> GDN <CR>
Response: <CTRL-B> A BB1123-A <CR>
12. To set a new device name:
Command: <CTRL-B> SDNconcert_hall <CR>
13. To Reboot device for the new parameters to take effect:
Command: <CTRL-B> E <CR>
Response: none! May lose connection
14. To log out :
Command: <CTRL-B> O <CR>
Response: <CTRL-B> <CR>
Page 29

8x8 and 16x16 VGA / HDTV Matrix Switch with Audio, RS232 & IP Control
27
Note on IP Settings through port 23
If you are unable to access the unit’s
port 23 from your PC using the
matrix’s default or last known IP
address, it could be that the IP
address of the matrix is not
compatible on your LAN. One way
around this is to connect your PC
directly to the Matrix’s IP port using a
cross over cable, or use a switch or
router not connected to anything else
but your PC and the Matrix, Then
configure your PC for a static IP
compatible with the current address
of the matrix. If the matrix has the
factory default of 192.168.123.180, a
PC address of 192.168.123.nnn may
be entered where nnn is any number
except 180.
Note on Accessing the Matrix via the Internet
It is best to contact your IT or network administrator for assistance. As
mentioned earlier you can control the matrix through its IP via port
1001 (default). Most likely the unit will be on a local network connected
to an Ethernet Switch or Router with a WAN connection. To access the
matrix from outside your local network, you should configure the
Ethernet Switch or Router to treat the IP and port assigned to the
matrix as a virtual server this is a setting of your switch or router. Then
you can access the matrix from anywhere on the internet via your WAN
address and assigned port. It is advised to set the matrix’s Gateway
address the same as your Ethernet switch or router’s Gateway IP
address. In case of trouble please contact your IP administrator for
assistance.
Page 30

Model AC1120A, AC1121A, AC1122A, AC1123A
28
4.0 Maintenance and Troubleshooting
4.1 Maintenance
The front panel CHECK button LED starts flashing if one of the following
conditions occurs:
• RTC Battery Voltage is below 2.4V
• +5V Supply is outside of normal operating range 4.5V – 5.5V
• +12V Supply is outside of normal operating range 10.8V – 13.2V
• System temperature is exceeding 122° F (50° C)
If the battery needs changing, please contact Black Box (during the warranty
period).
Caution High-Voltage
Never open the unit’s cover. Lethal voltages exists inside the unit
Opening the unit also voids your warranty.
If there is a problem with the 12 or 5v supplies, you need to return the unit for
repair. Please see next section. If the temperature is excessive in the unit, you
must make sure that there is adequate air flow around the unit.
4.2 Troubleshooting
Make sure that all your connections are solid, and check the state of the LED’s on
the front of the unit. Do not open or try to repair the unit yourself. There is no
customer repairable item in the unit and you will void your warranty.
4.2.1 Calling Black Box
If you determine that your unit is malfunctioning, do not attempt to repair the unit.
Contact Black Box Tech. Support at 724-746-5500.
Before you do, make a record of the history of the problem. We will be able to
provide more efficient and accurate assistance if you have a complete description,
including:
• The nature and duration of the problem;
• The components involved in the problem
• The results of any testing you’ve already done.
Page 31

8x8 and 16x16 VGA / HDTV Matrix Switch with Audio, RS232 & IP Control
29
4.2.2 Shipping and Packaging
If you need to transport or ship your matrix:
• Package it carefully. We recommend that you use the original container.
• Before you ship the unit back to Black Box for repair or return, contact us to
get a Return Authorization (RA) number.
5.0 Specifications
Video Inputs 8 or 16 HD15 female connectors
Video Outputs 8 or 16 HD15 female connectors
Resolutions Supported PC resolutions up to 1900x1200 @ 60 Hz & HDTV to
1080p
Video Levels -0.3v to 0.7v (1 V p-p) on RGB, 0 to 5v DC on Sync
Audio Inputs Unbalanced Stereo.
Audio Input Levels 0 to +4dBu (0.78 to 1.23Vrms) line level
Audio outputs Balanced Stereo on screw terminals.
Audio Bandwidth 10 Hz to > 10 MHz (could pass through analog or
digital S/PDIF audio sources)
Temperature Operating: 32 to 122°F (0 to 50°C);
Storage: –40 to +185°F (–40 to +85°C)
Enclosure Steel with Aluminum front panel
Battery Type CR2032 (3v Lithium)
MTBF 90,000 hours (calculated estimate)
Power 100VAC-240VAC 50/60Hz.
Size 3.5" High x 19" Wide 12.78” Deep
Weight 9.4 pounds
Page 32
Model AC1120A, AC1121A, AC1122A, AC1123A
30
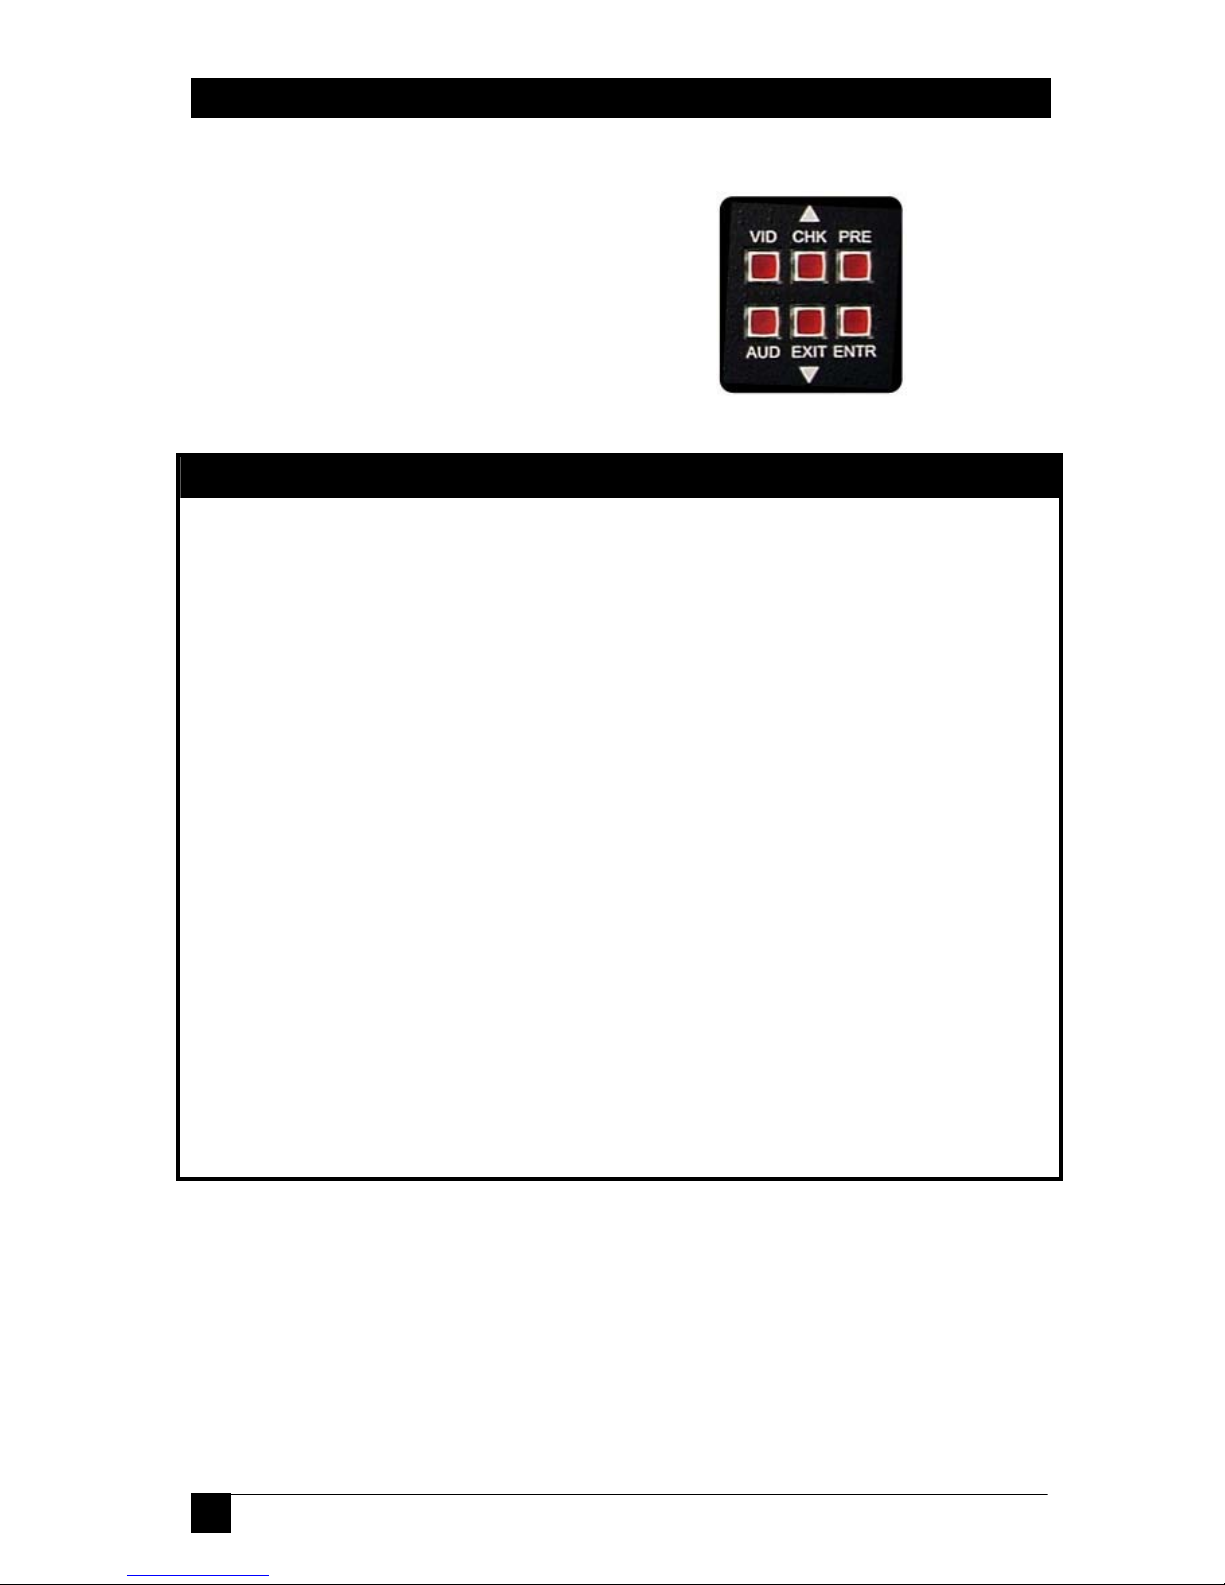
Appendix 1 – Front Panel Quick Reference Guide
Figure 15 – Control buttons on the front panel
Function Procedure
View ties or Make ties Hit VID and/or AUD buttons to light desired
Hit any of the INPUT or OUTPUT Buttons
To change ties, hit any INPUT or OUTPUT then
hit ENTR
Use ▲ and ▼ buttons to quickly scroll
Recall Presets Hit PRE (button lights up)
Hit any of the 16 INPUT buttons
Hit ENTR
Save Presets Hold PRE until it starts blinking
Hit any of the 16 INPUT buttons
Hit ENTR
Disconnect all outputs Hit PRE (button lights up)
Hold ▲
While holding the ▲, hit ▼ button
Reset to Factory Defaults Disconnect power
Hold ENTR
While holding ENTR, plug power
Page 33

8x8 and 16x16 VGA / HDTV Matrix Switch with Audio, RS232 & IP Control
31
Appendix 2 – Command Summary
Command Function
COn,m Connect Output (both A&V). n = output, m= input
Omitting ,m will show current connections
Substitute * for n to tie all outputs
CVn,m Connect Video output. n = output, m= input
Omitting ,m will show current connection
Substitute * for n to tie all outputs
CAn,m Connect Audio output. n = output, m= input
Omitting ,m will show current connection
Substitute * for n to tie all outputs
PRx Preset Recall... x = preset # can be 1 to 16
PSx Preset Save ... x = preset # can be 1 to 16
NU Name Unit
FR Factory Restore (back to default settings)
FB Firmware Boot (Resets the entire system)
RT Read Temperature
RI Read Identity (firmware version, & characteristics)
RV Read Voltage levels (battery, power supply)
RB Read Bar (reads VU level of output #1 Left Chan)
DS Date and Time Set
SS Schedule Set
IP Access or change IP settings of Matrix
GIP (get IP) SIP (set IP)
GGI (get Gateway) SGI (set Gateway)
GNM (get Net Mask) SNM (set Net Mask)
GPN (get Port No.) SPN (get Port No.)
GDN (get Dev Name) SPN (set Dev Name)
Page 34

Model AC1120A, AC1121A, AC1122A, AC1123A
32
Page 35

Page 36

© Co
pyrig
ht 2008. Black Box Corporation. All rights reserved.
1000 Park Drive Lawrence, PA 15055-1018 724-746-5500 Fax 724-746-0746
 Loading...