

Page 1
AC1003A-R2
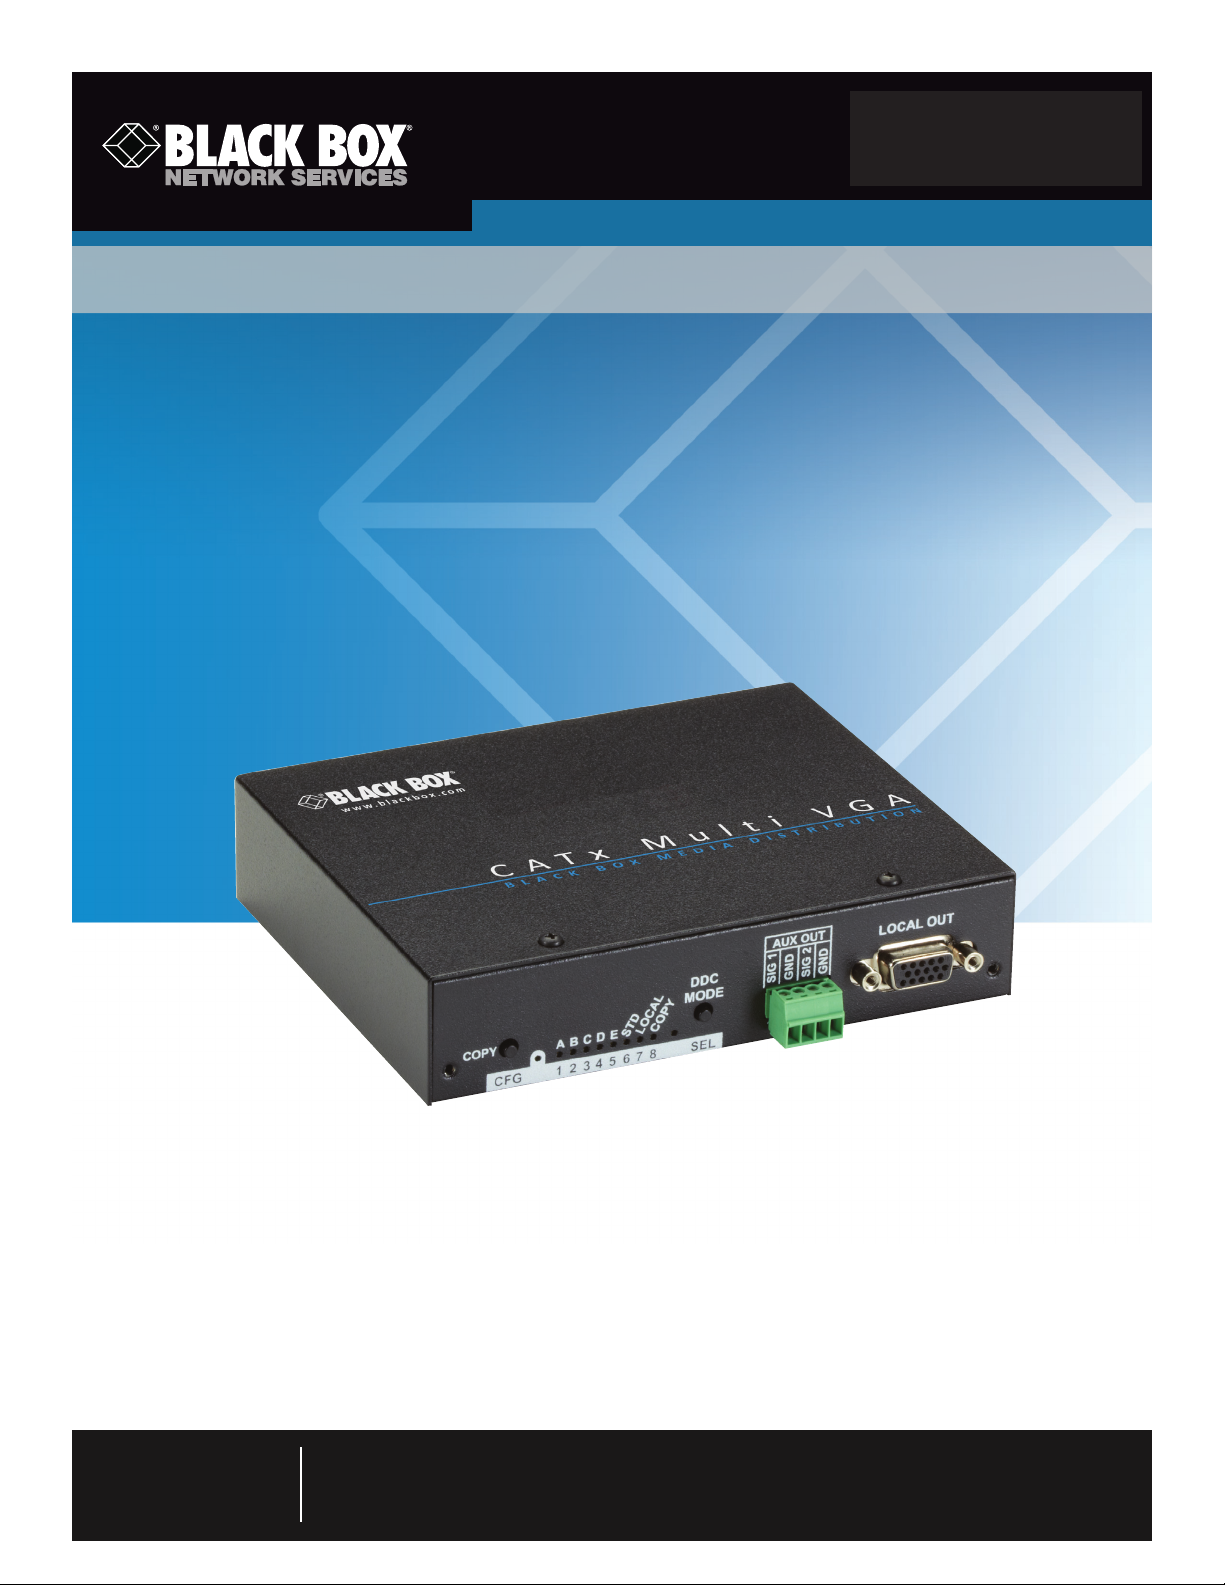
CAT5 Multi VGA + Mono Audio Quad Transmitter
Extend hi-res VGA video with audio or serial data
as far as 2000 feet over ordinary CAT5 cable.
Customer
Support
Information
Order toll-free in the U.S.: Call 877-877-BBOX (outside U.S. call 724-746-5500)
FREE technical support 24 hours a day, 7 days a week: Call 724-746-5500 or fax 724-746-0746
Mailing address: Black Box Corporation, 1000 Park Drive, Lawrence, PA 15055-1018
Web site: w ww.blackbox.com • E-mail: info @blackbox.com
Page 2

724-746-5500 | blackbox.com
Trademarks Used in this Manual
Trademarks Used in this Manual
Black Box and the Double Diamond logo are registered trademarks, and iCOMPEL is a trademark, of BB Technologies, Inc.
Windows is a registered trademark of Microsoft Corporation.
UL is a registered trademark of Underwriters Laboratories.
Any other trademarks mentioned in this manual are acknowledged to be the property of the trademark owners.
Page 2
We‘re here to help! If you have any questions about your application
or our products, contact Black Box Tech Support at 724-746-5500
or go to blackbox.com and click on “Talk to Black Box.”
You’ll be live with one of our technical experts in less than 30 seconds.
724-746-5500 | blackbox.com
Page 3

FCC RFI Statements
Federal Communications Commission and Industry Canada Radio Frequency Interference
Statements
This equipment generates, uses, and can radiate radio-frequency energy, and if not installed and used properly, that is, in strict
accordance with the manufacturer’s instructions, may cause inter ference to radio communication. It has been tested and found to
comply with the limits for a Class A computing device in accordance with the specifications in Subpart B of Part 15 of FCC rules,
which are designed to provide reasonable protection against such interference when the equipment is operated in a commercial
environment. Operation of this equipment in a residential area is likely to cause interference, in which case the user at his own
expense will be required to take whatever measures may be necessary to correct the interference.
Changes or modifications not expressly approved by the party responsible for compliance could void the user’s authority to
operate the equipment.
This digital apparatus does not exceed the Class A limits for radio noise emis sion from digital apparatus set out in the Radio
Interference Regulation of Industry Canada.
Le présent appareil numérique n’émet pas de bruits radioélectriques dépassant les limites applicables aux appareils numériques de
la classe A prescrites dans le Règlement sur le brouillage radioélectrique publié par Industrie Canada.
724-746-5500 | blackbox.com
Page 3
Page 4

724-746-5500 | blackbox.com
NOM Statement
Instrucciones de Seguridad
(Normas Oficiales Mexicanas Electrical Safety Statement)
1. Todas las instrucciones de seguridad y operación deberán ser leídas antes de que el aparato eléctrico sea operado.
2. Las instrucciones de seguridad y operación deberán ser guardadas para referencia futura.
3. Todas las advertencias en el aparato eléctrico y en sus instrucciones de operación deben ser respetadas.
4. Todas las instrucciones de operación y uso deben ser seguidas.
5. El aparato eléctrico no deberá ser usado cerca del agua—por ejemplo, cerca de la tina de baño, lavabo, sótano mojado o cerca
de una alberca, etc.
6. El aparato eléctrico debe ser usado únicamente con carritos o pedestales que sean recomendados por el fabricante.
7. El aparato eléctrico debe ser montado a la pared o al techo sólo como sea recomendado por el fabricante.
8. Servicio—El usuario no debe intentar dar servicio al equipo eléctrico más allá a lo descrito en las instrucciones de operación.
Todo otro servicio deberá ser referido a personal de servicio calificado.
9. El aparato eléctrico debe ser situado de tal manera que su posición no interfiera su uso. La colocación del aparato eléctrico
sobre una cama, sofá, alfombra o superficie similar puede bloquea la ventilación, no se debe colocar en libreros o gabinetes
que impidan el flujo de aire por los orificios de ventilación.
10. El equipo eléctrico deber ser situado fuera del alcance de fuentes de calor como radiadores, registros de calor, estufas u otros
aparatos (incluyendo amplificadores) que producen calor.
11. El aparato eléctrico deberá ser connectado a una fuente de poder sólo del tipo descrito en el instructivo de operación, o como
se indique en el aparato.
12. Precaución debe ser tomada de tal manera que la tierra fisica y la polarización del equipo no sea eliminada.
13. Los cables de la fuente de poder deben ser guiados de tal manera que no sean pisados ni pellizcados por objetos colocados
sobre o contra ellos, poniendo particular atención a los contactos y receptáculos donde salen del aparato.
14. El equipo eléctrico debe ser limpiado únicamente de acuerdo a las recomendaciones del fabricante.
15. En caso de existir, una antena externa deberá ser localizada lejos de las lineas de energia.
16. El cable de corriente deberá ser desconectado del cuando el equipo no sea usado por un largo periodo de tiempo.
17. Cuidado debe ser tomado de tal manera que objectos liquidos no sean derramados sobre la cubierta u orificios de ventilación.
18. Servicio por personal calificado deberá ser provisto cuando:
A: El cable de poder o el contacto ha sido dañado; u
B: Objectos han caído o líquido ha sido derramado dentro del aparato; o
C: El aparato ha sido expuesto a la lluvia; o
D: El aparato parece no operar normalmente o muestra un cambio en su desempeño; o
E: El aparato ha sido tirado o su cubierta ha sido dañada.
CAUTION:
READ INSTRUCTIONS. Read and understand all operating, installation, and safety instructions before using this equipment.
AVOID ATTACHMENTS: Do not use accessories, attachments, tools, or materials that are not recommended by the equipment manufacturer.
Doing so may compromise operating performance, create an unsafe condition, damage equipment, or violate the terms of usage or warranty.
FOLLOW WARNINGS: Always follow all instructions and warnings marked on the equipment or as detailed in the related user documentation.
724-746-5500 | blackbox.com
Page 4
Page 5

Table of Contents
Table of Contents
1. Specifications ......................................................................................................................................................................... 6
1.1 General .......................................................................................................................................................................... 6
1.2 DCE/EDID Support ........................................................................................................................................................6
1.3 Auxiliary System Support ...............................................................................................................................................7
1.4 CAT5 Cable Compatibility .............................................................................................................................................7
2. Overview .......................................................................................................................................................................... 9
2.1 Introduction ...................................................................................................................................................................9
2.2 What’s Included ............................................................................................................................................................9
2.3 Hardware Description .................................................................................................................................................... 9
3. Installation ........................................................................................................................................................................ 11
3.1 Prerequisites ................................................................................................................................................................ 11
3.2 Installation Procedure .................................................................................................................................................. 11
3.3 Configuration .............................................................................................................................................................. 13
3.3.1 DDC Mode Selection ...................................................................................................................................... 13
3.3.2 General Configuration Settings .......................................................................................................................13
3.3.3 Setting Factory Defaults ..................................................................................................................................13
3.3.4 Config Mode 1: Sync Mode Options ............................................................................................................... 14
3.3.5 Config Mode 1: 4th-Pair Modes ..................................................................................................................... 15
3.3.6 Config Mode 2: Video Coupling ..................................................................................................................... 16
3.3.7 Config Mode 2: Video Termination ................................................................................................................. 16
4. Troubleshooting ................................................................................................................................................................... 17
4.1 Problems/Solutions ...................................................................................................................................................... 17
4.2 Contacting Black Box...................................................................................................................................................18
4.3 Shipping and Packaging ..............................................................................................................................................18
Appendix. Connector Pinouts ................................................................................................................................................... 19
A.1 HD15 Connector Pinout (SOURCE IN, LOCAL OUT) ....................................................................................................19
A.2 Auxiliary I/O (AUX-IN/AUX-OUT) .................................................................................................................................20
A.3 RJ-45 Wiring Standard ................................................................................................................................................ 21
A.4 DC Power Connector ..................................................................................................................................................22
724-746-5500 | blackbox.com
Page 5
Page 6

724-746-5500 | blackbox.com
Chapter 1: Specifications
1. Specifications
1.1 General
Audio Characteristics — Left + right summed audio
Auxiliary Signals (Only One at a Time) — L+R summed audio input: 47 k-ohms input impedance (a source device
with 600 ohms maximum output impedance is recommended [analog input mode]);
Simplex RS-232 Input: 4.75 k-ohms input impedance (simplex RS-232 mode)
Cable Required — Category 5, 5e, 6, cable, shielded or unshielded twisted pair
Compliance — CE, FCC Class A, IC Class/Class A, UL® listed ITE Device
Interface Signal Details — Video Input: Standard VGA (HD15) video connection;
RGB Signals Input Impedance: 75 ohm;
DDC: Supported
Local Output Port Drive Impedance — Video output: Standard VGA (HD15);
RGB Signal Impedance: 75 ohm, supports DDC;
Auxiliary Signals (only one type at a time): L&R summed audio output impedance: 600 ohm or greater load impedance
(analog output mode);
Simplex RS-232 Output Impedance: 600 ohm or greater load impedance (simplex RS-232 mode)
Maximum Distance — Up to 2000 ft. (625 m), depends on receiver
Resolution and Refresh Rate — Up to 1920 x 1200 @ 70 Hz
Serial Characteristics — Simplex serial, any speed up to 115.2 kbps, transparent to format and protocol
Video Support — RGBHV, RGB, Composite, S-Video, and Component Video modes
Connectors — Video In/Out: (2) HD15 VGA;
CAT5 Link Output: (1) RJ-45;
Auxiliary Signal Input/Output: (1) 4-position Phoenix;
DC Power Input: (1) coaxial jack (5.5 mm OD, 2.5 ID, 11 mm L)
Temperature Tolerance — Operating: 32 to 104° F (0 to 40° C);
Storage: -4 to +140° F (-20 to +60° C)
Humidity Tolerance — Up to 80% noncondensing
Enclosure — Steel, black powder-coat finish
MTBF — 100,000 hours
Power — Input voltage: +5 VDC, 1 A maximum;
Consumption: 5 watts maximum
Size — 1.2"H x 5.6"W x 4.5"D (3.1 x 14.2 x 11.4 cm)
Weight — 1.1 lb. (0.5 kg)
1.2 DDC/EDID Support
For best compatibility with source devices (for example, a PC), an extension device (CAT5 Multi VGA and Analog Audio
Transmitter in this case) should provide an appropriate DDC/EDID profile with the proper resolution and timing information. This
helps ensure best compatibility with display devices connected at the remote end.
The transmitter supports a simple, yet very flexible, DDC/EDID management scheme:
• The built-in factory-default DDC/EDID profile supports a number of standard resolutions and timing information that is widely
compatible with many displays.
724-746-5500 | blackbox.com
Page 6
Page 7

Chapter 1: Specifications
• A specific DDC/EDID profile can be copied from a particular display and stored inside the transmitter’s internal non-volatile
memory. This method enables the best possible compatibility with a specific display that would otherwise not work properly if
simply using the factory-default DDC/EDID profile.
• Finally, the transmitter supports a “pass-through” mode, where the DDC/EDID profile of a locally attached display is passed
directly to the video source. This can be very helpful in diagnosing certain resolution or timing related display issues, but
generally is not used on a permanent basis (though it is safe to do so).
Table 1-1. DDC/EDID.
DDC/EDID Parameter: Presented to the source whn using the transmitter:
Manufacturer name string MRI
Monitor name string Magic display
Established timings
Detailed timings 1920 x 1080 @ 60 Hz, 1280 x 720 @ 60 Hz, 720 x 480 @ 60 Hz
CEA video formats
Specific timings 1280 x 720 @ 60 Hz, 720 x 4 80 @ 59.94 Hz, 1920 x 1200 @ 59.94 Hz
640 x 480 @ 60 Hz, 800 x 600 @ 60 Hz, 1024 x 768 @ 60 Hz, 1280 x 1024 @ 60 Hz, 1360 x 768 @ 60 Hz,
1600 x 1200 @ 60 Hz, 1920 x 1080 @ 60 Hz, 1920 x 1200 @ 60 Hz
720 x 480p @ 59.94, 60 Hz, 4:3, 720 x 576p @ 50 Hz: 3
1280 x 720p @ 50 Hz @ 16: 9
1280 x 720p @ 59.4, 60 Hz @ 16:9
1920 x 1080p @ 50 Hz @ 16: 9
1920 x 1080p @ 59.94, 60 Hz @ 16:9
1.3 Auxiliary Signal Support
The transmitter design supports two types of auxiliary signals, preconfigured from the factory.
NOTE: Only one type of signal is supported at a time.
The CAT5 Multi VGA and Analog Audio Transmitter supports L+R summed audio.
It also supports the following serial signals:
• Provides simplex (TX-only) serial data, even with daisychained receivers.
• Data is transmitted to all attached receivers. No data can ever be received.
• Receivers are not individually addressable.
• RS-232 interface supports a 2-wire interface: TX/GND.
• Baud rates up to 115.2K are supported. No settings required.
• Transparent to format and protocol.
NOTE: For each transmitter configuration above, the accompanying receiver device must be similarly configured.
For more specific information on CAT5 Multi VGA and Analog Audio receivers, please refer to the user guide provided with your
re cei ver.
1.4 CAT5 Cable Compatibility
The CAT5 Multi VGA and Analog Audio Transmitter enables the highest quality video extension over common Category 5 (CAT5)
cable. In some applications, system design or environmental factors can require the use of CAT5e and CAT6 cabling (with and
without optional shielding). Each installation may have special requirements, and it is up to the system designer to determine the
most appropriate type of cable to deploy with CAT5 Multi VGA and Analog Audio Transmitter products.
724-746-5500 | blackbox.com
Page 7
Page 8

724-746-5500 | blackbox.com
Chapter 1: Specifications
CAUTION: In any case, if there is any doubt with regards to a specific type of cable, it is strongly advised that actual testing be
performed using an appropriate length of the desired cable—BEFORE that cable is specified and installed.
The transmitter provides four UTP output ports. Each port in turn supports a daisychained CAT5 connection to multiple receivers.
This allows one video source to be sent to many displays at the same time—with the absolute minimum amount of signal
degradation possible.
The transmitter is compatible with standard CAT5/5e/6 data cabling as well as specialized “low skew” cabling manufactured
primarily for video applications.
CAUTION:
Some “low skew” cabling is specific to a particular equipment vendor or application and may not be compatible with CAT5 Multi
VGA and Analog Audio Transmitter products. Make sure that any “low-skew” CAT5 cable is non-proprietary prior to purchase/
installation.
Standard CAT6 cable can exhibit much greater skew than standard CAT5/5e and may require skew compensation beyond what
the standard product offers. Contact Black Box Technical Support at 724-746-5500 or info@blackbox.com for details.
The CAT5/5e/6 cable should be suitably rated listed (DUZX) communications cables, TYPE CMP, CMR, CMG, or CM as
designated in the NEC. Cables are to be installed in accordance with the NEC and local building and electrical codes. This is the
responsibility of the end user/installer of this product.
Page 8
724-746-5500 | blackbox.com
Page 9

Chapter 2: Overview
2. Overview
2.1 Introduction
The CAT5 Multi VGA and Analog Audio Transmitter supports L+R summed audio and simplex serial.
CAUTION: This equipment is not intended for, nor does it support, distribution through an Ethernet network. Do not connect
these devices to any sort of networking or telecommunications equipment.
CAUTION: Use only Black Box approved CAT5 Multi VGA and Analog Audio Transmitter power adapters. Failure to do so may
damage this device and will void the warranty.
The CAT5 Multi VGA and Analog Audio Transmitter extends an analog video signal over standard CAT5 cable (also CAT5e and
CAT6). It accepts analog video (VGA, RGB and other analog formats), audio (analog) or serial (RS-232 simplex) signals. These are
converted to CAT5 Multi VGA and Analog Audio Transmitter-compatible signals, provided over four UTP output ports.
The transmitter also features an enhanced front-panel interface for user-configuration and DDC/EDID management. There are no
internal configuration settings or jumpers. Everything can be set from the front-panel buttons. The transmitter is compatible with
the CAT5 Multi VGA and Analog Audio receivers.
2.2 What’s Included
Your package should contain the following items. If anything is missing or damaged, contact Black Box Technical Support
at 724-746-5500 or info@blackbox.com.
• (1) Transmitter
• (1) External Power Supply
• (1) U.S. Power Cord
• This user’s manual
2.3 Hardware Description
Figures 2-1 and 2-2 show the front and back panels of the transmitter. Table 2-1 describes its components.
1 2 3 4 5 6 7 8 9
Figure 2-1. Front panel.
10 11 12 13 14
Figure 2-2. Back panel.
724-746-5500 | blackbox.com
Page 9
Page 10

724-746-5500 | blackbox.com
Chapter 2: Overview
Number Component Description
1 (1) COPY/CFG L ED In normal mode, the CFG indicator is off. In configuration mode, the CFG indicator is on or flashing.
2 (1) COPY/CFG button In operating mode, Off = Normal.
3 (5) LEDs A, B, C, D, E
4 (1) STD LED Video status
5 (1) Local LED Video status
6 (1) Copy LED DDC copy
7 (1) DDC Mode/Sel button Selec ts DDC mode.
Table 2-1. Front and back panel components.
8
9 (1) HD15 VGA connector Local video output port (to display)
10 (1) HD15 VGA connector Video input port (from source)
11
12 (4) RJ- 45 connectors (4) UTP (link) output ports
13 (1) Power LED Lights on when power to the unit is on.
14 (1) barrel connector 5-VDC power input
(1) 4-position Phoenix
connector
(1) 4-position Phoenix
connector
Auxiliary signal out
Auxiliary signal in
Page 10
724-746-5500 | blackbox.com
Page 11

Chapter 3: Installation
3. Installation
CAT5/5e/6 cabling for the CAT5 Multi VGA and Analog Audio Transmitter must be pinned to the TIA-EIA T568B wiring
specification.
Figure 3-1. T568B CAT5 Specification.
CAUTION: We also highly recommend that all CAT5 cables be preterminated and tested. Cables terminated on-site or in an
existing infrastructure should be tested before use to ensure compliance with the TIA-EIA T568B specification. Using
incorrectly terminated CAT5 cables can damage the transmitter.
CAUTION: This equipment is not intended for, nor does it support, distribution through an Ethernet network. Do not connect
these devices to any sort of networking or telecommunications equipment.
NOTE: Do not connect DC power until instructed to do so.
3.1 Prerequisites
Depending on the specific installation requirements, some common tools (screwdrivers, nutdrivers) and related hardware (mounting screws) may be required. These are not included with the transmitter.
You might need the following items. For details, contact Black Box Technical Support at 724-746-5500 or info@blackbox.com.
• Appropriate audio cabling.
• Appropriate video cables and adapters (if needed).
• Auxiliary signal cables.
Of course, you will need appropriate CAT5 cable, as previously described, to connect the transmitter to receivers.
3.2 Installation Procedure
NOTE: All units must be configured alike for all supported features to function correctly. For example, a serial transmitter must be
connected to a CAT5 Multi VGA and Analog Audio serial type receiver for the serial interface to function properly. You
cannot mix one version of a transmitter with a different version of a receiver.
724-746-5500 | blackbox.com
Page 11
Page 12

724-746-5500 | blackbox.com
Chapter 3: Installation
NOTE: Make sure that all connectors are clean and free of contaminants before making the connections. Use appropriate
connector locking hardware (screws/latches) to prevent cables from disconnecting or causing intermittent operation.
At the transmitter end:
1. Connect the source video to the CAT5 Multi VGA and Analog Audio Transmitter’s video input port, which is a standard HD15
female (VGA) connector labeled SOURCE IN.
2. If desired, attach a local monitor to the VGA connector labeled LOCAL OUT (optional).
3. Connect up to four CAT5 cables to the transmitter LINK OUT ports. All link-out ports have the same signals—it does not
matter what order they are used in.
4. Make your audio or serial connections via the Phoenix AUX IN and AUX OUT connectors (optional).
5. Apply power to the transmitter.
a. The power-on LED should turn on. All other LEDs should execute a power-up test sequence.
b. If the video source is providing a valid RGBHV video signal, the Video Status indicator should turn on.
NOTE: It will remain off for YUV, S-Video, and any other analog formats that do not use separate H/V sync signals.
c. If there’s a local monitor attached, a video image should appear on the monitor’s screen.
6. Remember to make any required transmitter configuration changes via the LED/button user interface.
Speakers
iCOMPEL™ Digital
Signage Player
TV
VGA
AC10 03A -R 2
Transmitter
TV
CATx
AC10 03A -R 2
Receiver
Figure 3-2. Transmitter connections.
At the receiver end (these steps are generic—refer to the appropriate receiver manual):
1. Connect the VIDEO OUTPUT connector to the display, and attach any audio (AUX I/O) and/or serial connections, depending on
the configuration of the receiver and option module installed.
2. Connect the CAT5 cable to the LINK IN connector. If you are daisychaining multiple receivers, also connect the downstream
CAT5 cable to the LINK OUT port on the receiver.
3. Apply power to the receiver.
a. The power-on LED should turn on.
b. The status-LED should turn on (Green).
724-746-5500 | blackbox.com
Page 12
Page 13

Chapter 3: Installation
4. Make any required configuration changes via the LED/button user interface, if the receiver is equipped with this capability. This
is for skew compensation.
5. Adjust the receiver’s EQ and/or SKEW (optional) settings.
NOTE: If this adjustment is not made, it can result in a poor or no image on the display.
3.3 Configuration
The transmitter has a number of configurable operating parameters, and the factory-default settings will work in most
applications. However, some applications may require configuration changes. Nearly all settings are available from the front-panel
buttons/LEDs. The enclosure does not need to be opened; there are no user-configuration settings or jumpers inside.
3.3.1 DDC Mode Selection
The CAT5 Multi VGA and Analog Audio Transmitter features the ability to send DDC/EDID display identifiers to the video source
to determine display capabilities. The DDC/EDID interface is a data communications channel used between plug-and-play devices
to accurately report a display's capabilities and identify the manufacturer. If this data is not available, the video source may revert
to a low resolution or not display at all. The transmitter has three DDC/EDID modes of operation. When the T4 is operating in
“normal mode” (CFG indicator is off), you can quickly select between the three operating modes simply by using the DDC MODE
button at any time:
• STD: Selects the default DDC profile (a default set of common video resolutions). Press the DDC MODE button until the STD
indicator (LED 6) is on. This is the factory default setting.
• LOCAL: Selects the DDC profile from a locally connected display. Press the DDC MODE button until the LOCAL indicator (LED 7)
is on. The LOCAL mode allows the video source device to directly read the DDC profile from the locally connected display (if
present).
NOTE: LOCAL mode does not store any DDC profile information inside the transmitter.
• COPY: Selects a previously stored copy of a DDC profile. Press the DDC MODE button until the COPY indicator (LED 8) is on. To
use the COPY mode, a DDC profile must have already been read and stored into the transmitter.
• To perform a DDC-copy operation, make sure the COPY mode is selected (LED 8=on), then:
1. Connect a display to the LOCAL OUT port.
2. Push and hold the COPY button until the copy-status indicator flashes three times, indicating a successful operation. If it only
flashes once, the operation failed, and the previously stored DDC profile (if any) will remain unchanged.
3. If desired, disconnect the display from the LOCAL OUT port.
3.3.2 General Configuration Settings
For all other configuration settings, the transmitter must be in CONFIG mode (CFG indicator is on). Once in CONFIG mode, any
changes are effective immediately and are saved in non-volatile memory.
• To enter configuration mode1: Press the CFG button once. The CFG indicator will light, confirming that you are in configuration-
mode 1. Once in this mode, the LED indicators 1–8 will display the current settings as described in Tables 3-1 through 3-4.
• To enter configuration mode2: Press CFG button twice. The CFG indicator will flash, confirming you are in configuration-mode
2. Once in this mode, the LED indicators 1–8 will display the current settings as described in Tables 3-1 through 3-4.
• To exit configuration mode: Leave the buttons untouched for 10 seconds. The CFG indicator will turn off (normal mode).
3.3.3 Setting Factory Defaults
To quickly reset all user-configurable options back to factory default settings:
1. Disconnect the DC power cable (or AC power).
2. Press and hold the CFG button.
724-746-5500 | blackbox.com
Page 13
Page 14

724-746-5500 | blackbox.com
Chapter 3: Installation
3. Connect the DC power cable (or AC power). All LEDs blink three times, indicating all settings are now changed back to factory
defaults.
4. Release the CFG button.
NOTE: The factory default settings represent the analog version. You can easily reconfigure this device to be a serial by using “con-
figuration mode 1” and “4th-pair settings.” See below.
3.3.4 Config Mode 1: Sync Mode Options
The transmitter is factory-configured for autodetecting the proper sync mode (RepliSync-I normal/stretched). This mode is
generally compatible with all existing receiver products that support sync (if they are also using their factory-default settings).
However, some video sources may require a custom sync mode setting (especially at 1080p and 1920 x 1200 video resolutions).
For these cases, you can select one of the other available sync modes.
NOTE: Any connected receiver should generally be set to the same sync mode and may require other configuration adjustments
(such as sync polarity). Otherwise, you may not get a proper video display output at that receiver.
Table 3-1. Config mode 1, sync-mode options.
Step
Number* LED 1 LED 2 LED 3 Front-Panel View Sync Mode Setting
1 dim dim dim
2 dim dim ON
3 dim ON dim
4 dim ON ON
5 ON dim dim
The transmitter will auto-detect the required sync mode (normal or stretched). This is the
factor y default setting.
Force sync “normal,” Horizontal sync, pulse encoding.
Force sync “stretched,” Horizontal sync, pulse encoding.
Force sync.
Force fixed-sync mode.
NOTE: A compatible connected receiver must also be in fixed-sync mode and with H/V
polarities selected at the receiver.
Follow these steps*:
1. Starting in normal mode, press and release the CFG button once to access configuration mode 1. CFG indicator is ON.
2. Press and release the SEL button once. You will now be able to change sync mode settings.
3. LED indicators 1–3 should be lit (either dim or ON); all other indicators (LEDs 4–8) should be OFF.
4. Press the CFG button repeatedly to step through the availabel sync mode settings.
5. To leave configuration mode, step through all the options OR leave the buttons untouched for 10 seconds.
Page 14
724-746-5500 | blackbox.com
Page 15

3.3.5 Config Mode 1: 4th-Pair Modes
Table 3-2. Config mode 1, 4th-pair operating mode options.
Step
Number* LED 4 LED 5 LED 6 Front-Panel View 4th-Pair Operating Mode
Chapter 3: Installation
1 dim dim dim
2 dim dim ON
3 dim ON dim
4 dim ON ON
5 ON dim dim
4th-pair signals are disabled. This effectively “mutes” anything sent on the 4th pair.
Use this for diagnostics.
Direct pass-through of 4th-pair wires. Use this for custom applications.
External analog ( L + R summed) audio. This is the factory default mode.
External S/PDIF digital audio. Input impedance = 75 ohms.
Simplex serial.
Follow these steps*:
1. (starting in normal-mode) Press and release the CFG button once to access configuration mode-1. CFG indicator = on.
2. Press and release the SEL button twice. You will now be able to change 4th-pair option settings.
3. LED indicators 4–6 should be illuminated (either DIM or ON); all others (indicators 1–3, 7, and 8) should be off.
4. Press the CFG button repeatedly to step through the available 4th-pair option settings.
5. To leave configuration mode, step through all the options OR leave the buttons untouched for 10 seconds.
724-746-5500 | blackbox.com
Page 15
Page 16

724-746-5500 | blackbox.com
Chapter 3: Installation
3.3.6 Config Mode 2: Video Coupling
Select AC or DC coupling, and DC-restore functions, to be applied to the input video.
Table 3-3. Config mode 2, video coupling options.
Step
Number* LED 1 LED 2 Front-Panel View Video Options Mode
1 dim dim
3 dim ON
4 dim ON
5 ON ON
Auto-detect AC/DC coupling mode based on input signal. This is the factory
default mode.
Video input is DC coupled.
Video input is AC coupled. DC restore function is disabled.
Video input is AC coupled. DC restore function is enabled.
Follow these steps*:
1. (starting in normal-mode) Press and release the CFG button twice to access configuration mode-2. CFG indicator = flashing.
2. Press and release the SEL button once. You will now be able to change video coupling settings.
3. LED indicators 1–2 should be illuminated (either DIM or ON); all others (Indicators 3–8) should be off.
4. Press the CFG button repeatedly to step through the available video option settings.
5. To leave configuration mode, step through all the options OR leave the buttons untouched for 10 seconds.
3.3.7 Config Mode 2: Video Termination
Select input video termination to be 75 ohms or high-impedance (Hi-Z).
Table 3-4. Config mode-2, 75 ohms or high-impedance (Hi-Z) options.
Step
Number* LED 3 Front-Panel View Video Options Mode
1 dim
2 ON
Video input impedance is Hi-Z.
Video input impedance is 75 ohms. This is the factory default setting.
1. (starting in normal-mode) Press and release the CFG button twice to access configuration mode 2. CFG indicator = flashing.
2. Press and release the SEL button twice. You will now be able to change video termination settings.
3. LED indicator 3 should be lit (either DIM or ON); all others (Indicators 1, 2, 4–8) should be off.
4. Press the CFG button repeatedly to toggle video termination on/off.
5. To leave configuration mode, step through all the options OR leave the buttons untouched for 10 seconds.
724-746-5500 | blackbox.com
Page 16
Page 17

Chapter 4: Troubleshooting
Chapter 4. Troubleshooting
4.1 Problems/Solutions
In most cases, nearly every issue with the CAT5 Multi VGA and Analog Audio CAT5 Video System can be resolved by checking
the CAT5 termination and making sure that it’s pinned to the TIA/EIA 568B wiring specification. However, there may be other
problems that cause the system not to perform as it’s designed. Table 4-1 explains the most common installation errors and their
solutions.
Table 4-1. Common installation errors and solutions.
Problem Solution
1. Check that both units are powered.
2. Make sure the receiver EQ and SKEW adjustments are set correctly.
3. Change EQ settings slowly to allow the display to re-acquire a valid signal and display the image.
4. Make sure the CAT5 cable is terminated correctly per the TIA/EIA 568B wiring application.
No video signal at the transmitter local port or at
the receiver.
5. Is the display device powered on and functioning?
6. Check to make sure display settings (resolution, refresh rate, etc.) are compatible with the input signal.
7. In some cases, the video termination may be mismatched.
8. Generally, transmitters and receivers ship with 75-ohm termination as the default. Refer to applicable user guides to
change the termination settings.
9. There may be a DDC/EDID compatibility problem. Try changing the DDC mode setting or copying the DDC/EDID
profile directly from the display.
1. Make sure the receiver EQ and SKEW adjustments are set correctly.
2. Change EQ settings slowly to allow the display to re-acquire a valid signal and display the image.
3. Check all cable connections.
Poor video quality at the receiver.
Poor audio quality.
4. The video signal’s refresh rate may be set too high. Reset to a lower refresh rate in your display configuration menu
(for example, under Windows
5. There may be a video-skew delay issue. See the section on skew adjustment s in the applicable receiver manual.
6. There may be a DDC/EDID compatibility problem. Try changing the DDC mode setting, or copying the DDC/ EDID
profile directly from the display.
1. The audio output at the receiver is line-level only. An amplifier or powered speakers are required. Make sure the
amplifier or speaker power is on.
2. Check input source levels from the source device. Make sure the audio source level does not exceed the audio input
ratings for the transmitter. Clipping or distortion can result.
3. Audio is summed left and right for “A” versions. If using a single channel, both audio inputs must be connected at the
transmitter end to obtain proper audio gain through the link (1:1, input to output).
4. If daisychaining, audio termination should be removed in DP rceivers. Only the last receiver requires termination.
NOTE: The transmitter is NOT compatible with equipped receivers.
NOTE: Table 4-1 is continued on the next page.
®
on a PC).
724-746-5500 | blackbox.com
Page 17
Page 18

724-746-5500 | blackbox.com
Chapter 4: Troubleshooting
Table 4-1 (Continued). Common installation errors and solutions.
Problem Solution
1. Are the serial devices connected properly?
2. Are the serial parameters correct for source/destination devices?
Serial communications do not work correctly
NOTES on Daisychaining: When using a receiver’s RJ-45 daisychain port, the following rules apply:
• If using L/R summed audio, simplex serial, or SPDIF units, a maximum of 12 units may be daisychained within the rated cable
length of the receiver.
3. Are the serial cables terminated correctly?
4. Is a null-modem cable required at the TX or R X end?
5. When using RS -232 (CAT5 Multi VGA and Analog Audio Transmitter S type) capable receivers with video switches, distribution amps, or multi-output transmitters, the serial data is sent transmit-only. Consider this when trying to
control displays or other devices. For help, contact Black Box Technical Support at 724-746 -5500 or info@blackbox.com.
• When daisychaining, the maximum cable distance is not increased beyond the rated distance of the receiver used. For example,
a receiver can only daisychain up to the allowed distance of the transmitter. It is possible to daisychain out of a short-range
receiver into a longer-range receiver to increase the range. For example, a receiver can be daisychained into a receiver that
allows longer daisychaining distance.
4.2 Contacting Black Box
If you determine that your CAT5 Multi VGA + Mono Audio Quad Transmitter is malfunctioning, do not attempt to alter or repair
the unit. It contains no user-serviceable parts. Contact Black Box Technical Support at 724-746-5500 or info@blackbox.com.
Before you do, make a record of the history of the problem. We will be able to provide more efficient and accurate assistance if
you have a complete description, including:
• the nature and duration of the problem.
• when the problem occurs.
• the components involved in the problem.
• any particular application that, when used, appears to create the problem or make it worse.
4.3 Shipping and Packaging
If you need to transport or ship your CAT5 Multi VGA + Mono Audio Quad Transmitter:
• Package it carefully. We recommend that you use the original container.
• If you are returning the unit, make sure you include everything you received with it. Before you ship for return or repair, contact
Black Box to get a Return Authorization (RA) number.
Page 18
724-746-5500 | blackbox.com
Page 19

Appendix. Connector Pinouts
A.1 HD15 Connector Pinout (SOURCE IN, LOCAL OUT)
Figure A-1. HD15 connector.
Table A-1. HD15 connector signal assignments
Appendix: Connector Pinouts
RGBHV
Pin
(VGA) RGBS RGsB Composite
1 Red + Red + Red + — C+ V+ Audio Left
2 Green + Green + Green + C+ Y+ Y+ C+
3 Blue + Blue + Blue + — — U+ Audio Left
4 — — — — — — —
5 Gnd Gnd Gnd — — — —
6 Red - Red - Red - — C- Y- Shield
7 Green - Green - Green - C- Y- Y- C-
8 Blue - Blue - Blue - — — U- Shield
9 — — — — — — —
10 Gnd Gnd — — — — —
11 Gnd Gnd — — — — —
12 — — — — — — —
13 H Sync C Sync — — — — —
14 V Sync — — — — — —
SVHS
(Y/C) YUV
Composite Video and
Stereo Audio
15 Gnd Gnd — — — — —
724-746-5500 | blackbox.com
Page 19
Page 20

724-746-5500 | blackbox.com
Appendix: Connector Pinouts
A.2 Auxiliary I/O (AUX-IN/AUX-OUT)
Figure A-2. 4-pin Phoenix AUX I/O connector.
Table A-2. 4-pin Phoenix connector signal assignments.
Pin # (A) Audio (S ) Simplex serial SPDIF Audio
1 (SIG 1) Left channel Tx Signal + Signal +
2 (GND) Ground Ground Signal - Signal -
3 (SIG 2) Right channel — — —
4 (GND) — Shell — —
Composite Video (use S/PDIF
configuration settings)
Page 20
724-746-5500 | blackbox.com
Page 21

A.3 RJ-45 Wiring Standard
Appendix: Connector Pinouts
Figure A-3. T568B CAT5 specifications.
Figure A-4. Typical RJ-45 plug.
Table A-3. RJ-45 connector pinout.
Pin # Color Pair
1 White/Orange 2
2 Orange solid 2
3 White/Green 3
4 Blue solid 1
5 White/Blue 1
6 Green solid 3
7 White/ Brown 4
8 Brown solid 4
724-746-5500 | blackbox.com
Page 21
Page 22

724-746-5500 | blackbox.com
Appendix: Connector Pinouts
A.4 DC Power Connector
You should use the power supply that’s included with the transmitter. However, if there is a reason a substitute power supply
must be used, then the following information is important for maintaining product reliability and performance:
Power supply output rating: Regulated +5-VDC @ 3-Amps.
Power-input rating for CAT5 Multi VGA and Analog Audio Transmitter: 5-VDC, 1-Amps max.
The transmitter’s DC power input connector accepts an industry-standard coaxial-DC plug with the following specifications:
• Coaxial power connector
• Outside diameter (OD) = 5.5 mm
• Inside diameter (ID) = 2.5 mm (accepted center-pin diameter)
• Length = 11 mm (overall length of insertable plug end)
• Inner contact (pin-socket) = +5VDC
• Outer contact (sleeve) = Ground
We recommend that the inner contact (center-pin contact) of any mating DC plug use a “tuning-fork” shaped design, rather than
a plain barrel shape. The tuning-fork design greatly increases the reliability of the power connection. The plain barrel style connector can cause intermittent operation, often resulting in “mysterious” system problems that are difficult to identify.
The provided power supply already comes with the correct output ratings and DC-plug configuration.
Figure A-5. Plain barrel center contact.
Figure A-6. Tuning-fork center contact (PREFERRED).
The power supply included with your transmitter already has the correct output ratings and DC-plug configuration.
Page 22
724-746-5500 | blackbox.com
Page 23

NOTES
724-746-5500 | blackbox.com
Page 23
Page 24

Black Box Tech Support: FREE! Live. 24/7.
Tech support the
way it should be.
Great tech support is just 30 seconds away at 724-746-5500 or blackbox.com.
About Black Box
Black Box provides an extensive range of networking and infrastructure products. You’ll find everything from cabinets and racks
and power and surge protection products to media converters and Ethernet switches all supported by free, live 24/7 Tech Support
available in 30 seconds or less.
© Copyright 2012. Black Box Corporation. All rights reserved.
AC1003A- R2, version 1
724-746-5500 | blackbox.com
 Loading...